
www.klarstein.com
QUICKSTICK FREE
Sous-vide-Stick
Sous-vide Stick
Varilla Sous-vide
Variglia sous-vide
Stick sous-vide
10033286


3
DE
Sehr geehrter Kunde,
wir gratulieren Ihnen zum Erwerb Ihres Gerätes. Lesen Sie
die folgenden Hinweise sorgfältig durch und befolgen Sie
diese, um möglichen Schäden vorzubeugen. Für Schäden,
die durch Missachtung der Hinweise und unsachgemäßen
Gebrauch entstehen, übernehmen wir keine Haftung. Scannen
Sie den folgenden QR-Code, um Zugriff auf die aktuellste
Bedienungsanleitung und weitere Informationen rund um das
Produkt zu erhalten:
INHALTSVERZEICHNIS
Sicherheitshinweise4
Bedienfeld und Bedienung5
Entkalkung6
Fehlersuche und Fehlerbehebung7
Hinweise zur Entsorgung8
TECHNISCHE DATEN
Artikelnummer 10033286
Stromversorgung 220-240 V ~ 50/60 Hz
HERSTELLER & IMPORTEUR (UK)
Hersteller:
Chal-Tec GmbH, Wallstraße 16, 10179 Berlin, Deutschland.
Importeur für Großbritannien:
Chal-Tec UK limited
Unit 6 Riverside Business Centre
Brighton Road
Shoreham-by-Sea
BN43 6RE
United Kingdom
English 9
Español 15
Français 21
Italiano 27
4
DE
SICHERHEITSHINWEISE
• Kinder ab 8 Jahren, physisch und körperlich eingeschränkte Menschen dürfen
das Gerät nur benutzen, wenn sie vorher von einer für Sie verantwortlichen
Aufsichtsperson ausführlich mit den Funktionen und den Sicherheitsvorkehrungen
vertraut gemacht wurden.
• Benutzen Sie das Gerät nur unter Aufsicht. Halten Sie Kinder vom Gerät fern.
Achten Sie darauf, dass Kinder nicht mit dem Gerät spielen.
• Für Schäden, die durch Missachtung der Hinweise und unsachgemäßen Gebrauch
entstehen, übernehmen wir keine Haftung. Benutzen Sie das Gerät nur wie in der
Anleitung angegeben.
• Das Gerät ist nicht für den kommerziellen Gebrauch, sondern nur für Gebrauch im
Haushalt und in ähnlichen Umgebungen vorgesehen.
• Entfernen Sie vor der Benutzung das komplette Verpackungsmaterial innen und
außen.
• Überprüfen Sie das Gerät vor der Benutzung auf sichtbare Schäden.
• Benutzen Sie nur die mitgelieferten Teile.
• Stellen Sie das Gerät so auf, dass es nicht herunterfallen kann und lassen Sie das
netzkabel nicht von der Arbeits äche hängen.
• Schalten Sie das Gerät aus und ziehen Sie den Stecker, bevor Sie es reinigen oder
wenn Sie es länger nicht benutzen.
• Ziehen sie den Stecker nicht am Kabel aus der Steckdose, sondern halten Sie ihn
beim Abziehen mit der Hand fest.
• Halten Sie das Gerät von anderen Wärmequellen, heißen Gegenständen und
offenem Feuer fern.
• Wickeln Sie das Kabel immer komplett ab.
• Wickeln Sie das Kabel nicht um das Gerät.
• Reparaturen dürfen nur von Fachpersonal ausgeführt werden und sind erforderlich,
wenn das Gerät beschädigt wurde, Netzkabel oder Stecker beschädigt sind,
Flüssigkeiten darauf ausgelaufen oder Objekte darauf gefallen sind, wenn das
Gerät Nässe oder Feuchtigkeit ausgesetzt oder fallen gelassen wurde oder nicht
ordnungsgemäß funktioniert.
• Prüfen Sie vor der Benutzung die Spannung auf der Geräteplakette. Schließen Sie
das Gerät nur an Steckdosen an, die der Spannung des Geräts entsprechen.
• Modi zieren Sie das Gerät nicht.
• Garen Sie im Gerät nur vakuumierte Lebensmittel. Garen sie keine unverpackten
Lebensmittel.
VORSICHT
Verbrennungsgefahr! Die Geräteteile können während des Betriebes
sehr heiß werden. Fassen Sie sie nicht an, damit Sie sich nicht
verbrennen.

5
DE
BEDIENFELD UND BEDIENUNG
(1) Füllen Sie den Tank mit Wasser. Der Wasserstand sollte sich oberhalb der MIN-
Markierung der Anzeige vorne am Tank benden.
Hinweis: Wenn sich das Wasser erhitzt, verdampft es teilweise. Das Gerät ist mit
einem Kontrollmechanismus ausgestattet, der den Wasserstand erkennt. Wenn
der Wasserstand zu niedrig (unterhalb der MIN-Markierung), geht das Gerät
automatisch aus.
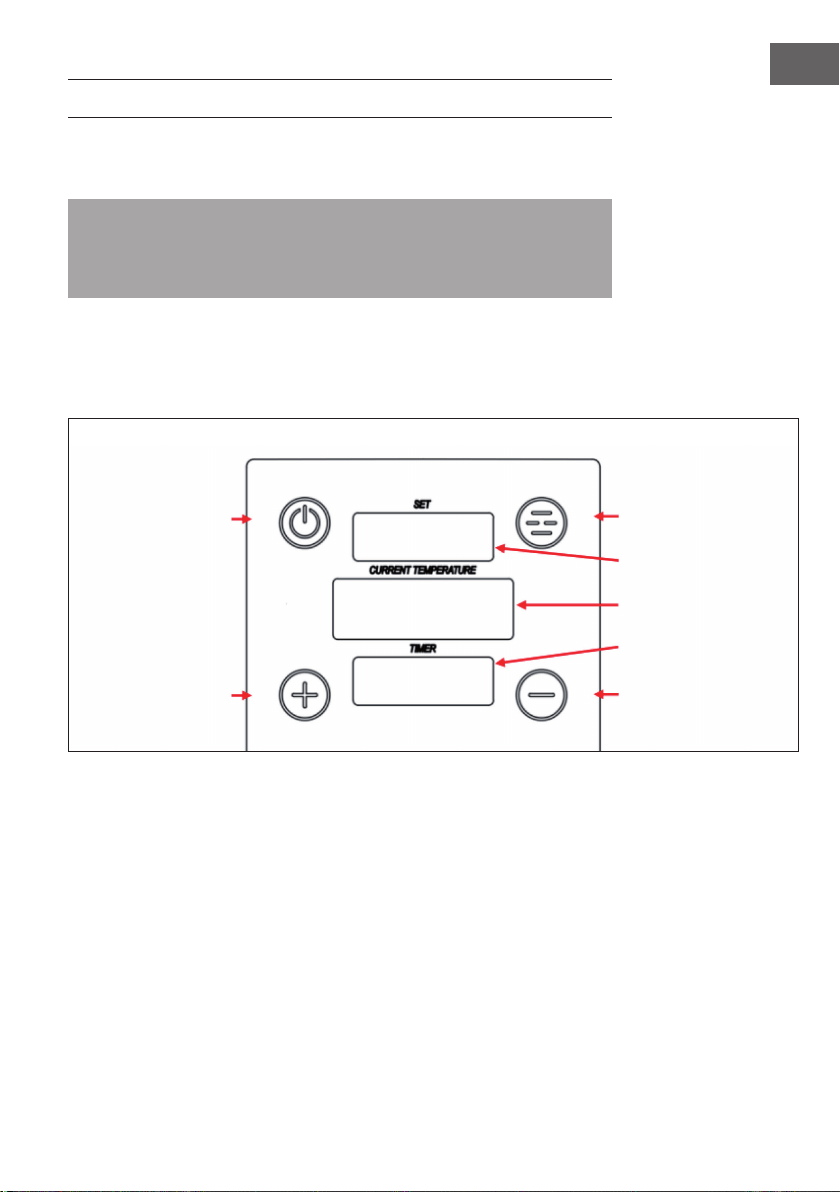
(2) Drücken Sie mindestens 2 Sekunden lang auf die POWER-Taste am Bedienfeld. Das
obere Display zeigt die eingestellte Wassertemperatur an. Das untere Display zeigt
die aktuelle Wassertemperatur an. Die Temperatur lässt sich zwischen 0-85°C
(32-185°F) einstellen.
(3) Drücken Sie mehrmals auf die SET-Taste, um SET TEMP (Temperatur einstellen) und
SET TIME (Zeit einstellen) zu wählen. Die Anzeige blinkt. Benutzen Sie dann die
Taste [+] oder [-], um die gewünschte Temperatur oder Zeit einzustellen. Warten Sie
dann einen Moment, bis der eingestellte Wert übernommen wurde und das Display
aufhört zu blinken.
(4) Halten Sie die SET-Taste gedrückt, um zwischen °C und °F zu wechseln. Ein
Signalton signalisiert, dass die Einstellung übernommen wurde.
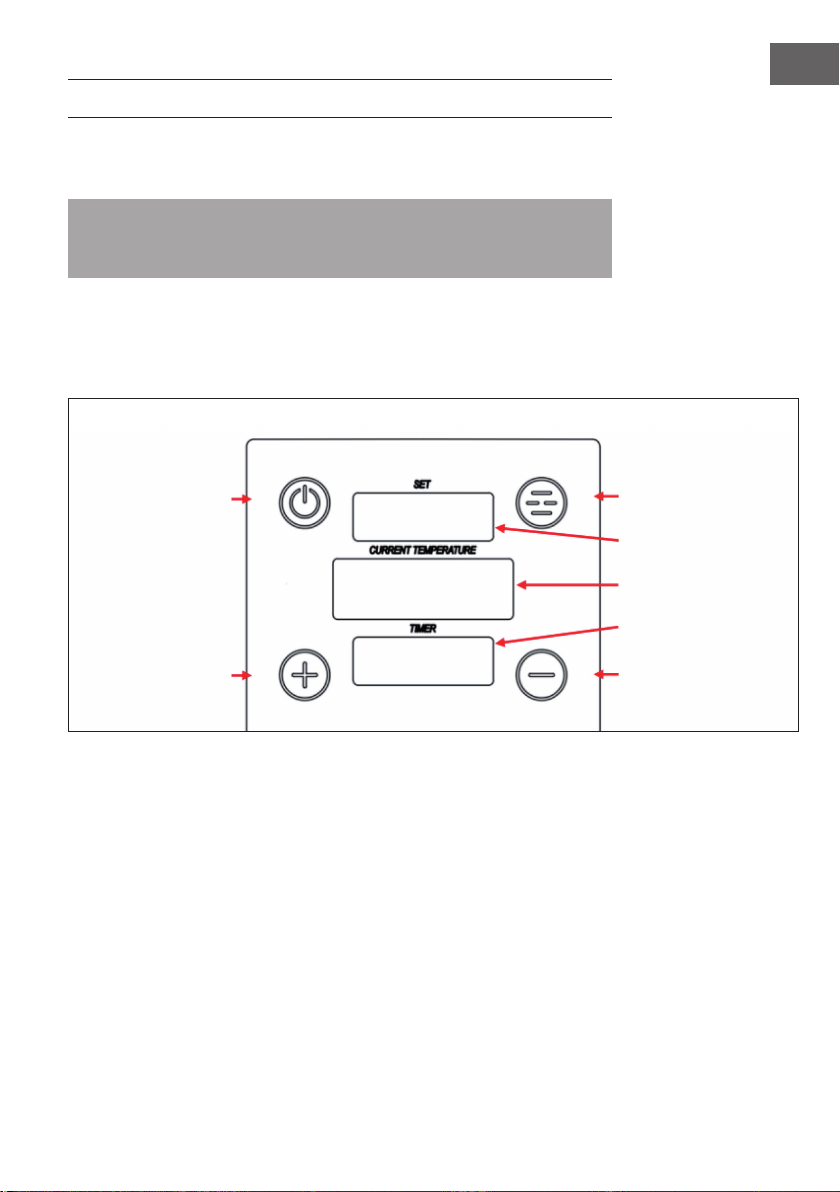
POWER-Taste
PLUS-Taste
SET-Taste
Zeigt die eingestellte
Temperatur an
Zeigt die aktuelle
Temperatur an
Zeigt die Timer-Zeit an
MINUS-Taste

6
DE
(5) Timer einstellen: Der Timer zählt die eingestellte Zeit hoch. Drücken Sie kurz auf die
Taste [+] oder [-], um den Timer zwischen 0-60 Minuten einzustellen. Drücken Sie
die Tasten länger, um den Timer schneller einzustellen.
Hinweis: Wenn die aktuelle Wassertemperatur die eingestellte Temperatur erreicht
hat, drücken Sie doppelt auf MINUS, um den Alarm zu stoppen und den Timer zu
starten. Das Display zeigt die aktuell abgelaufenen Zeit an.
• Wenn Sie die eingestellte zeit überprüfen möchten, klicken Sie soppelt auf SET.
Drücken Sie erneut auf SET, um den aktuellen Timer wieder anzuzeigen.
• Drücken Sie während der Timer läuft doppelt auf MINUS, um den Timer
zurückzusetzen oder zu ändern.
• Wenn der Timer abgelaufen ist, drücken Sie doppelt auf MINUS, um den Alarm zu
beenden.
(6) Lebensmittel zubereiten: Drücken Sie einmal auf POWER, um mit dem Heizen und
Umwälzen des Wassers zu beginnen. Geben Sie das verpackte Essen in den Tank,
sobald die eingestellte Temperatur erreicht ist.
(7) Wenn die Lebensmittel gar sind, schalten Sie das Gerät aus, indem Sie 5 Sekunden
lang auf POWER drücken.
ENTKALKUNG
Bei häuger Benutzung empfehlen wir Ihnen das Gerät monatlich oder öfter zu
entkalken, besonders in Regionen mit hartem Wasser.
1 Befestigen Sie das Gerät in einen Topf. Füllen Sie den Topf bis zur Max-Markierung
mit Wasser auf.
2 Stellen Sie die Temperatur auf 70 °C.
3 Geben Sie 5 g Zitronensäurepulver (Lebensmittelqualität) pro Liter Wasser zu.
4 Lassen Sie das Wasser 20 Minuten lang zirkulieren, nachdem die
Wassertemperatur 70°C erreicht hat.
5 Schalten Sie das Gerät aus und ziehen Sie den Netzstecker.
6 Wenn das Gerät abgekühlt ist, spülen Sie das Unterteil mit kaltem Wasser ab und
trocknen Sie den Stick vor der Lagerung.

7
DE
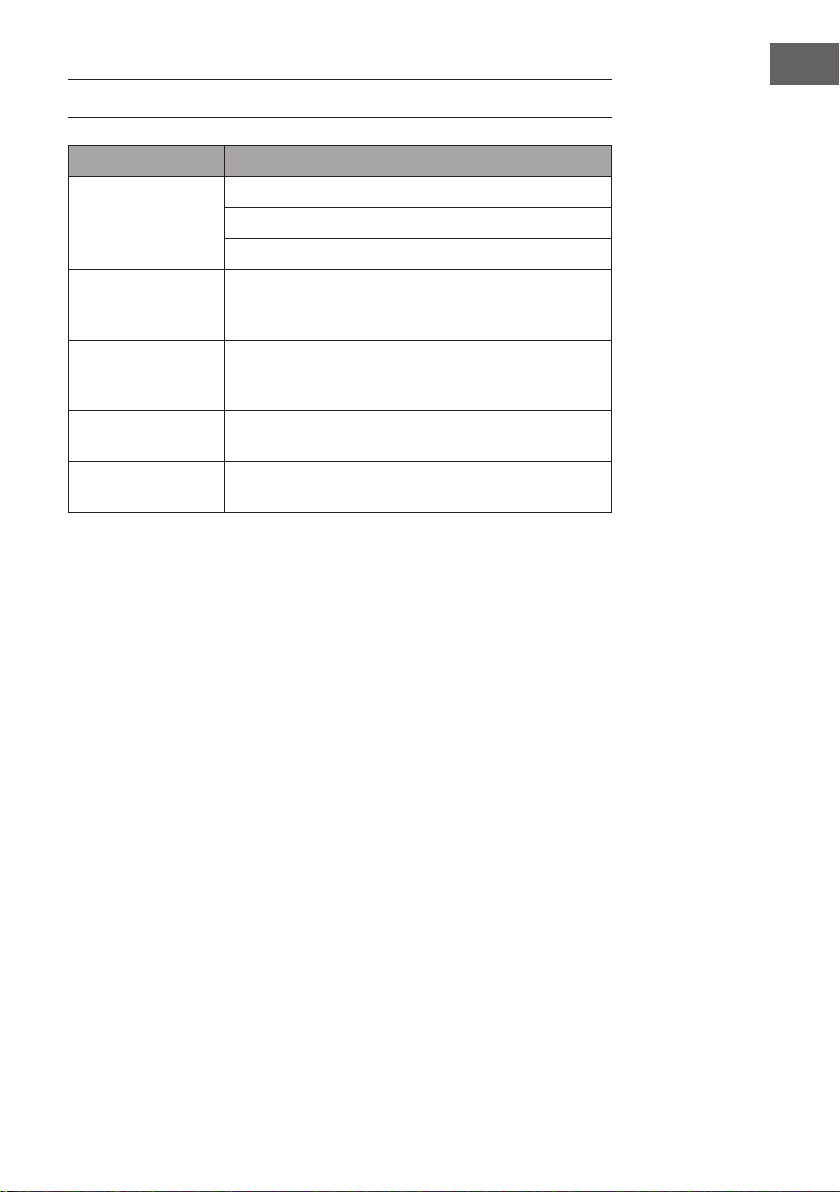
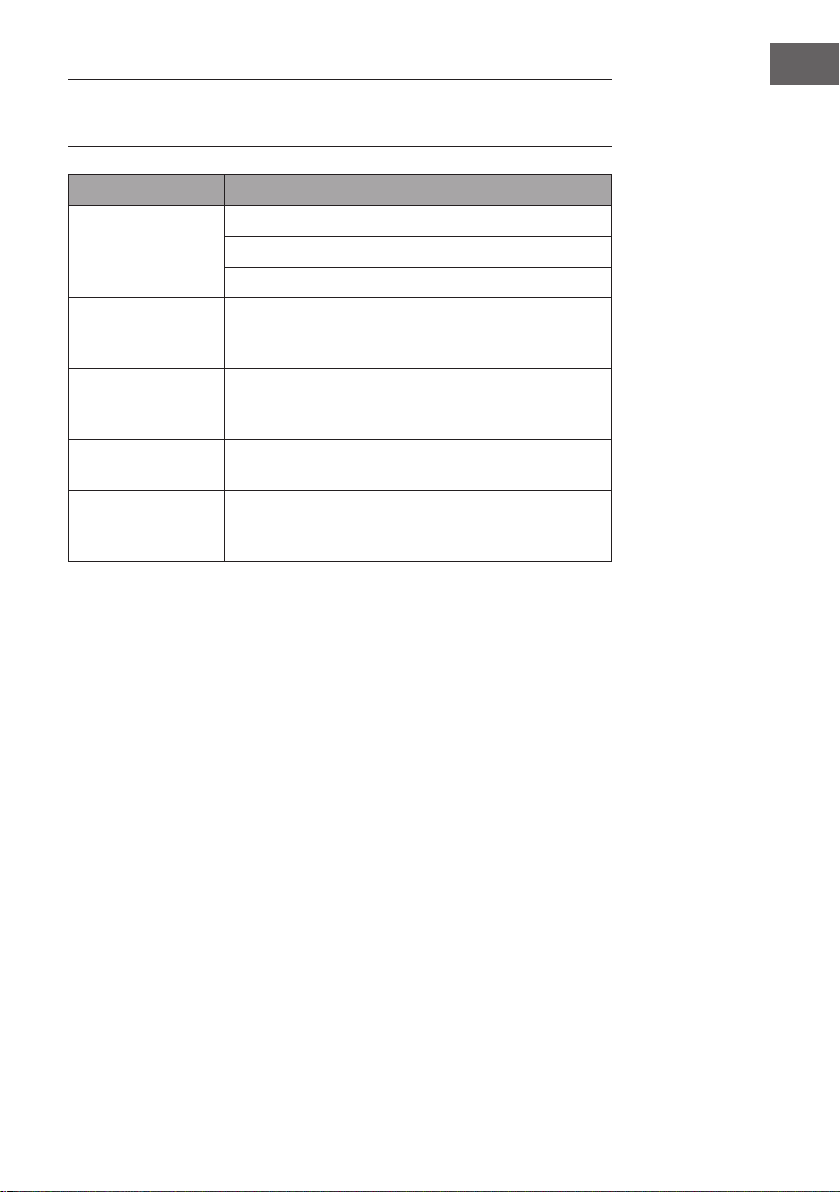
FEHLERSUCHE UND FEHLERBEHEBUNG
Problem Mögliche Ursache und Lösungsansatz
Das Gerät geht nicht
an.
Prüfen Sie, ob der Stecker in der Steckdose steckt.
Prüfen Sie, ob das Netzkabel beschädigt ist.
Prüfen Sie, ob das Gerät eingeschaltet wurde und das
Display an ist.
Das Display zeigt den
Fehlercode E01 an.
Ein Alarm ertönt und das Gerät geht aus, sobald der
Wasserstand unterhalb der MIN-Markierung ist. Schalten
Sie das Gerät aus, füllen Sie Wasser nach und starten Sie
das Gerät erneut.
Das Display zeigt den
Fehlercode E02 an.
Es bendet sich zu wenig Wasser im Tank. Ein Alarm ertönt
und das Gerät geht aus. Schalten Sie das Gerät aus, füllen
Sie Wasser nach und starten Sie das Gerät erneut.
Das Display zeigt den
Fehlercode E03 an.
Der digitale Thermostat ist kaputt. Wenden Sie sich zur
Kontrolle und Reparatur an einen Fachbetrieb.
Das Display zeigt den
Fehlercode E04 an.
Der zweite digitale Thermostat ist kaputt. Wenden Sie sich
zur Kontrolle und Reparatur an einen Fachbetrieb.
8
DE
HINWEISE ZUR ENTSORGUNG
Wenn es in Ihrem Land eine gesetzliche Regelung zur
Entsorgung von elektrischen und elektronischen Geräten
gibt, weist dieses Symbol auf dem Produkt oder auf der
Verpackung darauf hin, dass dieses Produkt nicht im
Hausmüll entsorgt werden darf. Stattdessen muss es zu
einer Sammelstelle für das Recycling von elektrischen
und elektronischen Geräten gebracht werden. Durch
regelkonforme Entsorgung schützen Sie die Umwelt und die
Gesundheit Ihrer Mitmenschen vor negativen Konsequenzen.
Informationen zum Recycling und zur Entsorgung dieses
Produkts, erhalten Sie von Ihrer örtlichen Verwaltung oder
Ihrem Hausmüllentsorgungsdienst.

9
EN
Dear Customer,
Congratulations on purchasing this equipment. Please read
this manual carefully and take care of the following hints to
avoid damages. Any failure caused by ignoring the items and
cautions mentioned in the instruction manual is not covered
by our warranty and any liability. Scan the QR code to get
access to the latest user mannual and other information about
the product
CONTENT
Safety Instructions10
Control Panel and Operation11
Descaling12
Troubleshooting13
Hints on Disposal14
TECHNICAL DATA
Item number 10033286
Power supply 220-240 V ~ 50/60 Hz
MANUFACTURER & IMPORTER (UK)
Manufacturer:
Chal-Tec GmbH, Wallstrasse 16, 10179 Berlin, Germany.
Importer for Great Britain:
Chal-Tec UK limited
Unit 6 Riverside Business Centre
Brighton Road
Shoreham-by-Sea
BN43 6RE
United Kingdom
10
EN
SAFETY INSTRUCTIONS
• This appliance may only be used by children aged from 8 years and above and
persons with reduced physical, sensory or mental capabilities or lack of experience
and knowledge if they are supervised or have been given instructions concerning
use of the appliance in a safe way and understand the hazards involved. Children
must not play with the appliance. Cleaning and user maintenance must not be
performed by children without supervision.
• Keep the appliance under constant supervision while in use. Keep an eye on any
children in the vicinity of the appliance when it is in use. The appliance is not a toy.
• Incorrect use of this appliance may cause personal injury and damage the
appliance.
• Use for its intended purpose only. The manufacturer is not responsible for any injury
or damage resulting from incorrect use or handling (see also Warranty Terms).
• For domestic use only. Not for outdoor or commercial use.
• Remove all packaging and transport materials from the inside and outside of the
appliance.
• Check that the appliance has no visible damage and that no parts are missing.
• Do not use with any cords other than that supplied.
• Check that it is not possible to pull or trip over the cord or any extension cord.
• The appliance must not be used together with a timer switch or a separate remote
control system.
• Turn off the appliance and remove the plug from the socket before cleaning, or
when the appliance is not in use.
• Avoid pulling the cord when removing the plug from the socket. Instead, hold the
plug.
• Keep the cord and appliance away from heat sources, hot objects and naked
ames.
• Ensure that the cord is fully extended.
• The cord must not be twisted or wound around the appliance.
• Check regularly that neither the cord nor plug is damaged and do not use the
appliance if there is any damage, or if it has been dropped on the oor, dropped in
water or damaged in any other way.
• If the appliance, cord or plug has been damaged, have the appliance inspected
and if necessary repaired by an authorised repairer.
• Connect to 230V, 50 Hz only. The warranty is not valid if the appliance is
connected to incorrect voltage.
• Unauthorised repairs or modi cations will invalidate the warranty.
• Only place vacuum-packed foods in the appliance. Do not try to cook unwrapped
food.
CAUTION
Risk of burns! Some parts of this product can become very hot and
cause burns. Particular attention should be paid where children and
vulnerable people are present.
11
EN
CONTROL PANEL AND OPERATION
(1) Fill the tank with water. The water level should be above the MIN mark on the
display at the front of the tank.
Note: When the water heats up, it evaporates partially. The appliance is equipped
with a control mechanism that detects the water level. If the water level is too low
(below the MIN mark), the appliance will automatically switch off.
(2) Press and hold the POWER button on the control panel for at least 2 seconds. The
upper display shows the set water temperature. The lower display shows the current
water temperature. The temperature can be set between 0-85 °C (32-185 °F) to
adjust the temperature.
(3) Press the SET button repeatedly to select SET TEMP and SET TIME. The display will
ash. Then use the [+] or [-] button to set the desired temperature or time. Wait a
moment until the set value is accepted and the display stops ashing.
(4) Press and hold the SET button to switch between °C and °F. A beep indicates that
the setting has been accepted.
POWER button
PLUS button
SET button
Displays the set
temperature
Displays the current
temperature
Shows the timer
MINUS button

12
EN
(5) Set timer: The timer counts up the set time. Briey press the [+] or [-] button to set the
timer between 0-60 minutes. Press and hold the buttons to set the timer faster.
Note: When the current water temperature has reached the set temperature, press
MINUS twice to stop the alarm and start the timer. The display shows the current
elapsed time.
• If you want to check the set time, click SET twice. Press SET again to display the
current timer again.
• While the timer is running, press MINUS twice to reset or change the timer.
• When the timer has expired, double press MINUS to stop the alarm.
(6) Prepare food: Press POWER once to start heating and circulating the water. Place
the packaged food in the tank as soon as the set temperature is reached.
(7) When the food is cooked, turn off the appliance by pressing POWER for 5 seconds.
DESCALING
With frequent use, descaling should be done every month or more often in regions with
hard water.
1 Put the appliance in a pot and ll the pot with water to the „Max“ level indicated on
appliance.
2 Set the appliance temperature to 70℃°C.
3 Add 5 g of citric acid powder (Food grade) per liter of water used.
4 Allow the water to circulate for 20 minutes after 70℃°C is reached.
5 Turn off and unplug the appliance.
6 When appliance is cool, rinse the bottom in the cold water and dry before storage.
13
EN
TROUBLESHOOTING
Problem Possible Cause and Solution
The device does not
turn on.
Check whether the plug is plugged into the socket.
Check if the power cord is damaged.
Check that the unit has been turned on and the display is on.
The display shows
error code E01.
An alarm sounds and the appliance goes off as soon as
the water level is below the MIN mark. Switch off the
appliance, top up with water and restart the appliance.
The display shows
error code E02.
There is too little water in the tank. An alarm sounds and
the appliance goes off. Switch off the appliance, rell with
water and restart the appliance.
The display shows
error code E03.
The digital thermostat is broken. Contact a specialist
company for inspection and repair.
The display shows
error code E04.
The second digital thermostat is broken. Contact a specialist
company for inspection and repair.

14
EN
HINTS ON DISPOSAL
If there is a legal regulation for the disposal of electrical
and electronic devices in your country, this symbol on the
product or on the packaging indicates that this product must
not be disposed of with household waste. Instead, it must be
taken to a collection point for the recycling of electrical and
electronic equipment. By disposing of it in accordance with
the rules, you are protecting the environment and the health of
your fellow human beings from negative consequences. For
information about the recycling and disposal of this product,
please contact your local authority or your household waste
disposal service.

15
ES
Estimado cliente,
Le felicitamos por la adquisición de este producto. Lea
atentamente el siguiente manual y siga cuidadosamente las
instrucciones de uso con el n de evitar posibles daños. La
empresa no se responsabiliza de los daños ocasionados por
un uso indebido del producto o por haber desatendido las
indicaciones de seguridad. Escanee el código QR para obtener
acceso al manual de usuario más reciente y otra información
sobre el producto:
ÍNDICE
Indicaciones de seguridad16
Panel de control y funcionamiento17
Descalcicación18
Búsqueda de problemas y solución de problemas19
Retirada del aparato20
DATOS TÉCNICOS
Número de artículo 10033286
Fuente de alimentación 220-240 V ~ 50/60 Hz
FABRICANTE E IMPORTADOR (REINO UNIDO)
Fabricante:
Chal-Tec GmbH, Wallstraße 16, 10179 Berlín, Alemania.
Importador para Gran Bretaña:
Chal-Tec UK limited
Unit 6 Riverside Business Centre
Brighton Road
Shoreham-by-Sea
BN43 6RE
United Kingdom
16
ES
INDICACIONES DE SEGURIDAD
• Los niños mayores de 8 años y las personas con discapacidad física o psíquica
pueden utilizar el aparato si han sido previamente instruidos por su tutor o
supervisor sobre el funcionamiento del mismo y conocen las funciones, así como
las indicaciones de seguridad.
• Utilice el aparato solamente bajo supervisión. Mantenga a los niños lejos del
aparato.
• No permita que los niños jueguen con el aparato.
• La empresa no se responsabiliza de los daños ocasionados por un uso indebido
del producto o por haber desatendido las indicaciones de seguridad. Utilice el
aparato de acuerdo con lo descrito en estas instrucciones de uso.
• Este aparato no está indicado para un uso comercial, sino doméstico o para
entornos similares.
• Antes de utilizar el aparato, retire por completo el material de embalaje tanto
interior como exterior.
• Antes de utilizar el aparato, compruebe que no presenta daños visibles.
• Utilice solamente los componentes suministrados.
• Coloque el aparato de manera que no pueda caerse y asegúrese de que el cable
de alimentación no quede colgando del borde de la encimera.
• Apague el aparato y desconecte el enchufe de la toma de corriente antes de
limpiarlo o si no lo va a utilizar durante un largo periodo de tiempo.
• Para desconectar el aparato no tire del cable, sino del cuerpo del enchufe.
• Mantenga el aparato lejos de las fuentes de calor, objetos calientes y llamas
abiertas.
• Desenrolle el cable completamente.
• No enrolle el cable alrededor del aparato.
• Las reparaciones deberán llevarse a cabo por personal autorizado y serán
necesarias si el aparato se ha visto dañado, si el cable de alimentación o el
enchufe están averiados, si se han vertido líquidos o se han dejado caer objetos
sobre el aparato, si el aparato se ha visto expuesto al agua o a la humedad o si el
propio aparato se ha dejado caer o no funciona correctamente.
• Antes de utilizar el aparato, compruebe la tensión en la placa técnica del mismo.
Conecte el aparato a tomas de corriente que se adecuen a la tensión del mismo.
• No modi que el aparato.
• Cocine con el aparato únicamente los alimentos envasados al vacío. Nunca cocine
alimentos no envasados.
¡ATENCIÓN!
¡Riesgo de quemaduras! La super cie del aparato alcanza
temperaturas muy elevadas durante el funcionamiento. No la toque
para evitar quemarse.
17
ES
PANEL DE CONTROL Y FUNCIONAMIENTO
1. Llene el tanque con agua. El nivel del agua debe estar por encima de la marca
MIN en la pantalla de la parte delantera del tanque.
Nota: Cuando el agua se calienta, se evapora parcialmente. El dispositivo está
equipado con un mecanismo de control que detecta el nivel de agua. Si el nivel
del agua es demasiado bajo (por debajo de la marca MIN), el aparato se apaga
automáticamente.
2. Pulse y mantenga pulsado el botón POWER del panel de control durante al menos
2 segundos. La pantalla superior muestra la temperatura del agua ajustada. La
pantalla inferior muestra la temperatura actual del agua. La temperatura puede ser
ajustada entre 0-85 °C (32-185 °F).
3. Pulse el botón SET repetidamente para seleccionar SET TEMP y SET TIME.
El display parpadea. A continuación, utilice el botón[+] o[-] para ajustar la
temperatura o la hora deseada. A continuación, espere un momento hasta que se
haya aceptado el valor ajustado y la pantalla deje de parpadear.
4. Pulse y mantenga pulsado el botón SET para cambiar entre °C y °F. Una señal
acústica indica que el ajuste ha sido aceptado.
Botón POWER
Botón PLUS
Botón SET
Indicación de la
temperatura ajustada
Muestra la
temperatura actual
Muestra la hora del
temporizador
Botón MINUS

18
ES
5. Ajuste del temporizador: El temporizador cuenta la hora ajustada. Pulse
brevemente el botón[+] o[-] para ajustar el temporizador entre 0 y 60 minutos.
Mantenga pulsados los botones para ajustar el temporizador más rápidamente.
Nota: Cuando la temperatura actual del agua haya alcanzado la temperatura
establecida, pulse dos veces la tecla MINUS para detener la alarma y poner en
marcha el temporizador. La pantalla muestra el tiempo transcurrido actualmente.
℃ Si desea comprobar la hora ajustada, haga clic en SET dos veces. Pulse SET de
nuevo para volver a mostrar el temporizador actual.
℃ Mientras el temporizador está en marcha, pulse MINUS dos veces para
restablecer o cambiar el temporizador.
℃ Cuando el temporizador haya expirado, pulse dos veces MINUS para detener la
alarma.
6. Preparar la comida: Pulse POWER una vez para comenzar a calentar y hacer
circular el agua. Coloque los alimentos envasados en el tanque tan pronto como se
alcance la temperatura establecida.
7. Cuando los alimentos estén cocidos, apague el aparato pulsando POWER durante
5 segundos.
DESCALCIFICACIÓN
En caso de uso frecuente, recomendamos descalcicar la máquina mensualmente o con
más frecuencia, especialmente en regiones con agua dura.
1 Fije el aparato en una olla. Llene la olla con agua hasta llegar a la marca MAX.
2 Congure la temperatura a 70 °C.
3 Añada 5 g de ácido cítrico en polvo (calidad alimentaria) por litro de agua.
4 Deje que el agua circule durante 20 minutos después de que el agua haya
alcanzado 70 °C.
5 Apague el aparato y desconecte el cable de alimentación.
6 Cuando el aparato se haya enfriado, enjuague la parte inferior con agua fría y
séquelo antes de guardarlo.

19
ES
BÚSQUEDA DE PROBLEMAS Y SOLUCIÓN DE
PROBLEMAS
Problema Posible causa y solución del problema
El dispositivo no
funciona.
Compruebe si el enchufe está conectado a la toma de
corriente.
Compruebe si el cable de alimentación está dañado.
Compruebe que la unidad ha sido encendida y que la
pantalla está encendida.
La pantalla muestra el
código de error E01.
Suena una alarma y la unidad se apaga cuando el nivel
del agua está por debajo de la marca MIN. Apague el
aparato, rellénelo con agua y vuelva a ponerlo en marcha.
La pantalla muestra el
código de error E02.
Hay muy poca agua en el tanque. Suena una alarma y el
dispositivo se apaga. Apague el aparato, rellénelo con
agua y vuelva a ponerlo en marcha.
La pantalla muestra el
código de error E03.
El termostato digital está roto. Póngase en contacto con una
empresa especializada para la inspección y reparación.
La pantalla muestra el
código de error E04.
El segundo termostato digital está roto. Póngase en
contacto con una empresa especializada para la
inspección y reparación.

20
ES
RETIRADA DEL APARATO
Si en su país existe una disposición legal relativa a la
eliminación de aparatos eléctricos y electrónicos, este
símbolo estampado en el producto o en el embalaje
advierte que no debe eliminarse como residuo doméstico.
En lugar de ello, debe depositarse en un punto de recogida
de reciclaje de aparatos eléctricos y electrónicos. Una
gestión adecuada de estos residuos previene consecuencias
potencialmente negativas para el medio ambiente y la salud
de las personas. Puede consultar más información sobre el
reciclaje y la eliminación de este producto contactando con
su administración local o con su servicio de recogida de
residuos.
21
FR
Chère cliente, cher client,
Toutes nos félicitations pour l’acquisition de ce nouvel appareil.
Veuillez lire attentivement et respecter les instructions de ce mode
d’emploi an d’éviter d’éventuels dommages. Nous ne saurions
être tenus pour responsables des dommages dus au non-respect
des consignes et à la mauvaise utilisation de l’appareil. Scannez
le QR-Code pour accéder à la dernière version du mode
d‘emploi et à d‘autres informations concernant le produit
SOMMAIRE
Consignes de sécurité22
Panneau de commande23
Détartrage24
Identication et résolution des problèmes25
Informations sur le recyclage26
FICHE TECHNIQUE
Numéro d'article 10033286
Alimentation 220-240 V ~ 50/60 Hz
FABRICANT ET IMPORTATEUR (UK)
Fabricant :
Chal-Tec GmbH, Wallstraße 16, 10179 Berlin, Allemagne.
Importateur pour la Grande Bretagne :
Chal-Tec UK limited
Unit 6 Riverside Business Centre
Brighton Road
Shoreham-by-Sea
BN43 6RE
United Kingdom
22
FR
CONSIGNES DE SÉCURITÉ
• Les enfants de 8 ans et plus, les personnes handicapées physiques et mentales ne
sont autorisés à utiliser l‘appareil que s‘ils ont été préalablement familiarisés avec
les fonctions et les précautions de sécurité par une personne responsable de leur
sécurité.
• N‘utilisez l‘appareil que sous surveillance. Tenez les enfants éloignés de l‘appareil.
Assurez-vous que les enfants ne jouent pas avec l‘appareil.
• Nous déclinons toute responsabilité pour les dommages causés par le non-respect
des instructions et une mauvaise utilisation. Utilisez l‘appareil uniquement tel que
spéci é dans les instructions.
• L‘appareil n‘est pas destiné à un usage commercial, mais uniquement pour un
usage domestique et similaire.
• Avant utilisation, retirez tous les matériaux d‘emballage à l‘intérieur et à l‘extérieur.
• Véri ez que l‘appareil n‘est pas endommagé avant de l‘utiliser.
• Utilisez uniquement les pièces fournies.
• Placez l‘appareil de façon à ce qu‘il ne puisse pas tomber et ne laissez pas le
câble d‘alimentation pendre sur le bord du plan de travail.
• Éteignez et débranchez l‘appareil avant de le nettoyer ou lorsque vous ne l‘utilisez
pas pendant une longue période.
• Ne débranchez pas la che de la prise en tirant sur le câble, mais tenez-la toujours
en main pour la retirer.
• Tenez l‘appareil à l‘écart des autres sources de chaleur, des objets chauds et des
ammes libres.
• Déroulez toujours le câble complètement.
• N‘enroulez pas le câble autour de l‘appareil.
• Les réparations doivent être effectuées par du personnel quali é et sont nécessaires
lorsque l‘appareil a été endommagé, que le câble secteur ou la prise sont
endommagés, lorsque du liquide a été renversé ou que des objets sont tombés sur
l‘appareil, s‘il a été exposé à l‘humidité ou a fait une chute, ou s‘il ne fonctionne
pas correctement.
• Véri ez la tension sur la plaque signalétique de l‘appareil avant de l‘utiliser. Ne
branchez l‘appareil qu‘à des prises correspondant à sa tension indiquée.
• Ne modi ez pas l‘appareil.
• Ne faites cuire dans l‘appareil que des aliments sous vide. Ne cuisez pas d‘aliments
non emballés.
ATTENTION
Risque de brûlures ! Certaines parties de l‘appareil peuvent devenir
très chaudes pendant le fonctionnement. Ne le touchez pas pour ne
pas vous brûler.

23
FR
PANNEAU DE COMMANDE
(1) Remplissez le réservoir d‘eau. Le niveau d‘eau doit se trouver au-dessus du repère
MIN de l‘indicateur à l‘avant du réservoir.
Remarque : Lorsque l‘eau chauffe, une partie s‘évapore. L‘appareil est équipé d‘un
mécanisme de contrôle qui détecte le niveau d‘eau. Si le niveau d‘eau est trop bas
(en dessous du repère MIN), l‘appareil s‘éteint automatiquement.
(2) Appuyez sur le bouton POWER du panneau de commande pendant au moins
2 secondes. L‘écran supérieur indique la température de l‘eau réglée. L‘écran
inférieur indique la température actuelle de l‘eau. La température peut être réglée
entre 0-85 ° C (32-185 ° F).
(3) Appuyez plusieurs fois sur le bouton SET pour choisir SET TEMP (réglage de la
température) et SET TIME (réglage de la durée). L‘afchage clignote. Ensuite,
utilisez la touche [+] ou [-] pour régler la température ou la durée souhaitée.
Attendez un moment que la valeur dénie soit acceptée et que l‘afchage cesse de
clignoter.
(4) Maintenez le bouton SET enfoncé pour basculer entre °C et °F. Un bip indique que
le réglage a été accepté.
Bouton
d‘alimentation
Bouton plus
Bouton de réglage
Indique la température
réglée
Afche la température
actuelle
Afche l‘heure de la
minuterie
Bouton moins

24
FR
(5) Réglage de la minuterie : La minuterie compte la durée réglée. Appuyez brièvement
sur la touche [+] ou [-] pour régler la minuterie entre 0 et 60 minutes. Appuyez plus
longtemps sur les boutons pour régler la minuterie plus rapidement.
Remarque : Lorsque la température actuelle de l‘eau a atteint la température dénie,
appuyez deux fois sur MOINS pour arrêter l‘alarme et démarrer le chronomètre.
L’écran afche la durée écoulée au fur et à mesure.
• Si vous voulez vérier l‘heure réglée, double-cliquez sur SET. Appuyez de nouveau
sur SET pour afcher à nouveau la minuterie en cours.
• Pendant que la minuterie est en marche, appuyez deux fois sur MOINS pour la
réinitialiser ou la modier.
• Lorsque la durée est écoulée, appuyez deux fois sur MOINS pour arrêter l‘alarme.
(6) Préparation des aliments : appuyez une fois sur POWER pour commencer à
chauffer et à faire circuler l‘eau. Placez les aliments emballés dans le réservoir dès
que la température dénie est atteinte.
(7) Lorsque les aliments sont cuits, éteignez l‘appareil en appuyant sur POWER
pendant 5 secondes.
DÉTARTRAGE
En cas d‘utilisation fréquente, nous vous recommandons de détartrer l‘appareil une fois
par mois voire plus souvent, en particulier dans les régions à eau dure.
1 Fixez l‘appareil sur une casserole. Remplissez la casserole avec de l‘eau jusqu‘à la
marque max.
2 Réglez la température à 70°C
3 Ajouter 5 g d‘acide citrique en poudre par litre d‘eau (acide alimentaire).
4 Laisser l‘eau circuler pendant 20 minutes après que la température de l‘eau ait
atteint 70°C.
5 Éteignez l‘appareil et débranchez le câble d‘alimentation.
6 Lorsque l‘appareil a refroidi, rincez la base avec de l‘eau froide et séchez le stick
avant de le ranger.
25
FR
IDENTIFICATION ET RÉSOLUTION DES
PROBLÈMES
Problème Cause possible et solution
L'appareil ne s'allume
pas.
Vériez que la che est bien branchée dans la prise.
Vériez que le cordon d'alimentation n'est pas endommagé.
Vériez si l'appareil a été allumé et si l'écran est allumé.
L'écran afche le code
d'erreur E01.
Une alarme retentit et l'appareil s'éteint dès que le niveau
d'eau est inférieur au repère MIN. Éteignez l'appareil,
remplissez le réservoir d'eau et redémarrez l'appareil.
L'écran afche le code
d'erreur E02.
Il n'y a pas assez d'eau dans le réservoir. Une alarme
retentit et l'appareil s'éteint. Éteignez l'appareil, remplissez
le réservoir d'eau et redémarrez l'appareil.
L'écran afche le code
d'erreur E03.
Le thermostat numérique est hors service. Contactez une
entreprise spécialisée pour inspection et réparation.
L'écran afche le code
d'erreur E04.
Le deuxième thermostat numérique est hors service.
Contactez une entreprise spécialisée pour inspection et
réparation.
26
FR
INFORMATIONS SUR LE RECYCLAGE
S‘il existe une réglementation pour l‘élimination ou le
recyclage des appareils électriques et électroniques dans
votre pays, ce symbole sur le produit ou sur l‘emballage
indique que cet appareil ne doit pas être jeté avec les
ordures ménagères. Vous devez le déposer dans un point
de collecte pour le recyclage des équipements électriques
et électroniques. La mise au rebut conforme aux règles
protège l‘environnement et la santé de vos semblables des
conséquences négatives. Pour plus d‘informations sur le
recyclage et l‘élimination de ce produit, veuillez contacter
votre autorité locale ou votre service de recyclage des
déchets ménagers.
27
IT
Gentile Cliente,
La ringraziamo per aver acquistato il dispositivo. La preghiamo
di leggere attentamente le seguenti istruzioni per l’uso e di
seguirle per evitare possibili danni tecnici. Non ci assumiamo
alcuna responsabilità per danni scaturiti da una mancata
osservazione delle avvertenze di sicurezza e da un uso
improprio del dispositivo. Scansionare il codice QR seguente,
per accedere al manuale d’uso più attuale e per ricevere
informazioni sul prodotto.
INDICE
Avvertenze di sicurezza28
Pannello di controllo e utilizzo29
Decalcicazione30
Ricerca e correzione degli errori31
Smaltimento32
DATI TECNICI
Numero articolo 10033286
Alimentazione 220-240 V ~ 50/60 Hz
PRODUTTORE E IMPORTATORE (UK)
Produttore:
Chal-Tec GmbH, Wallstraße 16, 10179 Berlino, Germania.
Importatore per la Gran Bretagna:
Chal-Tec UK limited
Unit 6 Riverside Business Centre
Brighton Road
Shoreham-by-Sea
BN43 6RE
United Kingdom
28
IT
AVVERTENZE DI SICUREZZA
• I bambini a partire da 8 anni e persone con limitate capacità siche e psichiche
possono utilizzare il dispositivo solo se sono stati istruiti in modo esaustivo da una
persona responsabile del loro controllo riguardo alle funzioni e alle procedure di
sicurezza.
• Tenere il dispositivo sotto controllo quando è in funzione. Tenere i bambini lontano
dal dispositivo. Assicurarsi che i bambini non giochino con il dispositivo.
• Non ci assumiamo alcuna responsabilità per danni scaturiti da una mancata
osservazione delle avvertenze di sicurezza e da un uso improprio del dispositivo.
Utilizzare il dispositivo solo secondo le modalità descritte nel manuale.
• Il dispositivo non è adatto all’uso commerciale, ma solo casalingo e in ambienti
simili.
• Rimuovere tutto il materiale d’imballaggio interno ed esterno prima dell’utilizzo.
• Controllare che non ci siano danni visibili sul dispositivo.
• Utilizzare solo i componenti inclusi in consegna.
• Posizionare il dispositivo in modo che non possa cadere e non far penzolare il cavo
di alimentazione dal piano di lavoro.
• Spegnere il dispositivo e staccare la spina prima di pulirlo o se non viene utilizzato
per lunghi periodi di tempo.
• Non staccare la spina tirando dal cavo, ma tenere saldamente la spina stessa.
• Tenere il dispositivo lontano da fonti di calore, oggetti bollenti e amme libere.
• Srotolare sempre completamente il cavo.
• Non avvolgere il cavo intorno al dispositivo.
• Eventuali riparazioni devono essere realizzate da personale tecnico specializzato
e sono necessarie se il dispositivo, il cavo o la spina sono danneggiati, se sono
stati versati liquidi o se sono caduti oggetti sopra al dispositivo, se il dispositivo
è stato esposto a umidità o bagnato, se è stato fatto cadere o se non funziona
normalmente.
• Controllare la tensione sulla targhetta del dispositivo prima dell’utilizzo. Collegare il
dispositivo solo a prese elettriche con tensione equivalente a quella del dispositivo.
• Cuocere solo alimenti sottovuoto. Non cuocere alimenti fuori dagli appositi
sacchetti.
ATTENZIONE
Pericolo di ustione! I componenti del dispositivo possono diventare
estremamente caldi durante il funzionamento. Non toccarli per evitare
ustioni.

29
IT
PANNELLO DI CONTROLLO E UTILIZZO
(1) Riempire il serbatoio d’acqua. Il livello dell’acqua deve trovarsi sopra
all’indicazione MIN sul lato frontale del serbatoio.
Avvertenza: quando l’acqua si scalda, evapora parzialmente. Il dispositivo è
dotato di un meccanismo di controllo, che rileva il livello dell’acqua. Quando il
livello dell’acqua è troppo basso (sotto al segno MIN), il dispositivo si spegne
automaticamente.
(2) Premere POWER sul pannello di controllo per almeno 2 secondi. Il display
superiore mostra la temperatura dell’acqua impostata. Il display inferiore mostra
l’attuale temperatura dell’acqua. La temperatura può essere impostata tra 0 e 85
°C (32-185 °F).
(3) Premere più volte SET per selezionare SET TEMP (impostare temperatura) e
SET TIME (impostare tempo). Lo schermo lampeggia. Utilizzare + o – per
impostare temperatura e tempo desiderati. Attendere un momento, in modo che
l’impostazione venga registrata e che il display smetta di lampeggiare.
(4) Tenere premuto SET per passare da °C a °F e viceversa. Viene emesso un segnale
acustico per indicare che l’impostazione è stata registrata.
POWER
Più
SET
Indica la temperatura
impostata
Indica la temperatura
attuale
Indica il tempo del
timer
Meno

30
IT
(5) Impostare il timer: il timer conta il tempo impostato verso l’alto. Premere brevemente
+ o – per impostare il timer tra 0 e 60 minuti. Premerli più a lungo per impostare il
timer più velocemente.
Avvertenza: quando la temperatura dell’acqua ha raggiunto quella impostata,
premere due volte Meno per fermare l’allarme e avviare il timer. Il display mostra il
tempo passato no a quel momento.
• Se si desidera controllare il tempo impostato, premere due volte SET. Premere di
nuovo SET per mostrare di nuovo il timer attuale.
• Premere due volte Meno a timer in funzione per resettare o modicare il timer.
• Quando il timer è scaduto, premere due volte Meno per fermare l’allarme.
(6) Preparazione degli alimenti: premere POWER una volta per iniziare a scaldare e
a far circolare l’acqua. Mettere gli alimenti confezionati nel serbatoio, appena è
stata raggiunta la temperatura impostata.
(7) Quando gli alimenti sono cotti, spegnere il dispositivo premendo POWER per 5
secondi.
DECALCIFICAZIONE
Se il dispositivo viene utilizzato spesso, consigliamo di decalcicarlo mensilmente o con
maggiore frequenza, in particolare in regioni con acqua dalla durezza elevata.
1 Fissare il dispositivo in una pentola. Riempire la pentola d’acqua no al segno
Max.
2 Impostare la temperatura su 70 °C.
3 Mettere 5 g di acido citrico in polvere (qualità alimentare) per ogni litro d’acqua.
4 Fare circolare l’acqua per 20 minuti dopo che ha raggiunto la temperatura di 70
°C.
5 Spegnere il dispositivo e staccare la spina.
6 Quando il dispositivo si è raffreddato, sciacquare la parte inferiore con acqua
fredda e asciugare il circolatore prima di riporlo.

31
IT
RICERCA E CORREZIONE DEGLI ERRORI
Problema Possibile causa e soluzioni
Il dispositivo non si
accende.
Controllare che la spina sia inserita nella presa elettrica.
Controllare se il cavo di alimentazione è danneggiato.
Controllare che il dispositivo sia stato acceso e che il
display sia acceso.
Il display mostra il
codice di errore E01.
Viene emesso un allarme acustico e il dispositivo si spegne,
appena il livello dell’acqua si trova sotto al segno MIN.
Spegnere il dispositivo, aggiungere acqua e riaccenderlo.
Il display mostra il
codice di errore E02.
La quantità d’acqua nel serbatoio è insufciente. Viene
emesso un allarme acustico e il dispositivo si spegne.
Aggiungere acqua e riaccenderlo.
Il display mostra il
codice di errore E03.
Il termostato digitale è guasto. Rivolgersi a un’azienda
tecnica per controllo e riparazione.
Il display mostra il
codice di errore E04.
Il secondo termostato digitale è guasto. Rivolgersi a
un’azienda tecnica per controllo e riparazione.

32
IT
SMALTIMENTO
Se nel proprio paese si applicano le regolamentazioni
inerenti lo smaltimento di dispositivi elettrici ed elettronici,
questo simbolo sul prodotto o sulla confezione segnala che
questi prodotti non possono essere smaltiti con i riuti normali
e devono essere portati a un punto di raccolta di dispositivi
elettrici ed elettronici. Grazie al corretto smaltimento dei
vecchi dispositivi si tutela il pianeta e la salute delle persone
da possibili conseguenze negative. Informazioni riguardanti il
riciclo e lo smaltimento di questi prodotti si ottengono presso
l’amministrazione locale oppure il servizio di gestione dei
riuti domestici.