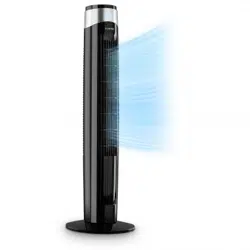

HIGHWIND
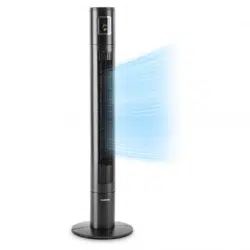
Turmventilator
Tower Fan
Ventilador de torre
Ventilateur tour
Ventilatore a torre
www.klarstein.com
10029428


3
DE
Sehr geehrter Kunde,
wir gratulieren Ihnen zum Erwerb Ihres Gerätes. Lesen Sie
die folgenden Hinweise sorgfältig durch und befolgen Sie
diese, um möglichen Schäden vorzubeugen. Für Schäden,
die durch Missachtung der Hinweise und unsachgemäßen
Gebrauch entstehen, übernehmen wir keine Haftung.
Scannen Sie den folgenden QR-Code, um Zugri auf die
aktuellste Bedienungsanleitung und weitere Informationen
rund um das Produkt zu erhalten.
INHALTSVERZEICHNIS
Technische Daten 3
Sicherheitshinweise 4
Geräteübersicht 5
Aufstellung 6
Bedienung 7
Fernbedienung 8
Reinigung und Wartung 9
Hinweise zur Entsorgung 10
Hersteller & Importeur (UK) 10
TECHNISCHE DATEN
Artikelnummer 10029428
Stromversorgung 220-240 V~ 50/60 Hz
Leistungsaufnahme 45 W
Gewicht (Netto) 4,2 kg
Schwenkgrad 90 Grad
English 11
Français 19
Italiano 27
Español 35

4
DE
SICHERHEITSHINWEISE
• Entfernen Sie die Verpackung und versichern Sie sich, dass kein Teil während
des Transports beschädigt wurde. Falls Teile beschädigt wurden wenden Sie
sich umgehend an den Kundendienst.
• Kinder könnten sich an den Verpackungsmaterialien und Altgeräten verletzen.
Entsorgen Sie das Verpackungsmaterial daher umgehend.
• Kinder ab 8 Jahren, psychisch, sensorisch und körperlich eingeschränkte
Menschen dürfen das Gerät nur benutzen, wenn sie vorher von einer für
sie verantwortlichen Aufsichtsperson ausführlich mit den Funktionen und
den Sicherheitsvorkehrungen vertraut gemacht wurden und die damit
verbundenen Risiken verstehen.
• Prüfen Sie vor der Benutzung die Spannung auf der Geräteplakette.
Schließen Sie das Gerät nur an Steckdosen an, die der Spannung des Geräts
entsprechen.
• Benutzen Sie das Gerät nur für den vorgesehenen Verwendungszweck
entsprechend der Beschreibung in der Bedienungsanleitung.
• Halten Sie sich beim Zusammenbau genau an die Anleitung. Eine falsche
Vorgehensweise kann zu irreparablen Schäden am Gerät führen.
• Schalten Sie das Gerät aus und ziehen Sie den Stecker aus der Steckdose,
bevor Sie das Gerät reinigen oder wenn Sie es nicht mehr benutzen.
• Falls das Gerät nicht ordnungsgemäß funktioniert, schalten Sie es umgehend
aus und wenden Sie sich an einen Fachbetrieb in Ihrer Nähe.
• Falls das Netzkabel oder der Stecker beschädigt sind, müssen sie vom
Hersteller, einem autorisierten Fachbetrieb oder einer ähnlich qualizierten
Person ersetzt werden.
• Schließen Sie das Gerät nicht an Mehrfachsteckdosen an.
• Benutzen Sie kein Verlängerungskabel.
• Schließen Sie das Gerät nicht an Zeitschaltuhren oder ferngesteuerte
Steckdosen an.
• Benutzen oder verstauen Sie das Gerät nicht in der Nähe von Wärmequellen,
wie Heizungen.
• Tauchen Sie das Gerät und den Stecker niemals in Wasser oder andere
Flüssigkeiten. Falls Wasser darauf ausläuft, ziehen Sie umgehend den
Stecker aus der Steckdose und lassen Sie das Gerät von einem Fachbetrieb
überprüfen.
• Wenn Sie das Gerät erstmals benutzen, entfernen die alle Folien und das
komplette Verpackungsmaterial.
• Ziehen sie den Stecker nicht am Kabel aus der Steckdose, sondern halten Sie
ihn beim Abziehen mit der Hand fest.
• Bevor Sie den Stecker in die Steckdose stecken, versichern Sie sich, dass das
Gerät ausgeschaltet ist.
• Ziehen Sie das Netzkabel nicht in die Länge.
• Achten Sie das darauf, dass alle Luftein- und Luftauslässe frei und nicht
zugedeckt sind, damit sich das Gerät nicht überhitzt.
• Achten Sie darauf, dass das Netzkabel nicht über scharfe Kanten oder
Oberächen verläuft.
5
DE
• Hängen Sie das Gerät nicht an der Decke oder Wand auf, außer es ist für
diesen Betrieb ausgelegt.
• Lassen Sie um das Gerät herum genug Platz zu Wänden, Möbeln oder
anderen Geräten, um eine bestmögliche Leistung zu erzielen.
• Benutzen Sie das Gerät nicht in der Nähe von Gasöfen oder Gasheizungen.
• Stellen Sie das Gerät nicht in die Nähe oder direkt unter Vorhänge.
• Decken Sie das Gerät nicht ab.
• Setzen Sie sich und andere Personen nicht dem direkten Luftstrom aus, damit
Sie sich nicht erkälten.
• Wenn Sie das Gerät nicht mehr benutzen, verstauen Sie es in der
Originalverpackung an einem trockenen Ort.
• Ziehen Sie immer den Stecker aus der Steckdose, bevor Sie das Gerät reinigen,
warten, verstauen oder wenn Sie es nicht mehr benutzen.
• Benutzen Sie das Gerät nicht in der Nähe explosiver oder entammbarer
Stoe oder Flüssigkeiten.
• Das Gerät ist nicht für den kommerziellen Gebrauch, sondern nur für
Gebrauch im Haushalt und in ähnlichen Umgebungen vorgesehen. Dazu
zählen Küchen in Büros, Bauernhöfen, Hotels, Motels und Einrichtungen, die
Bed & Breakfast anbieten.
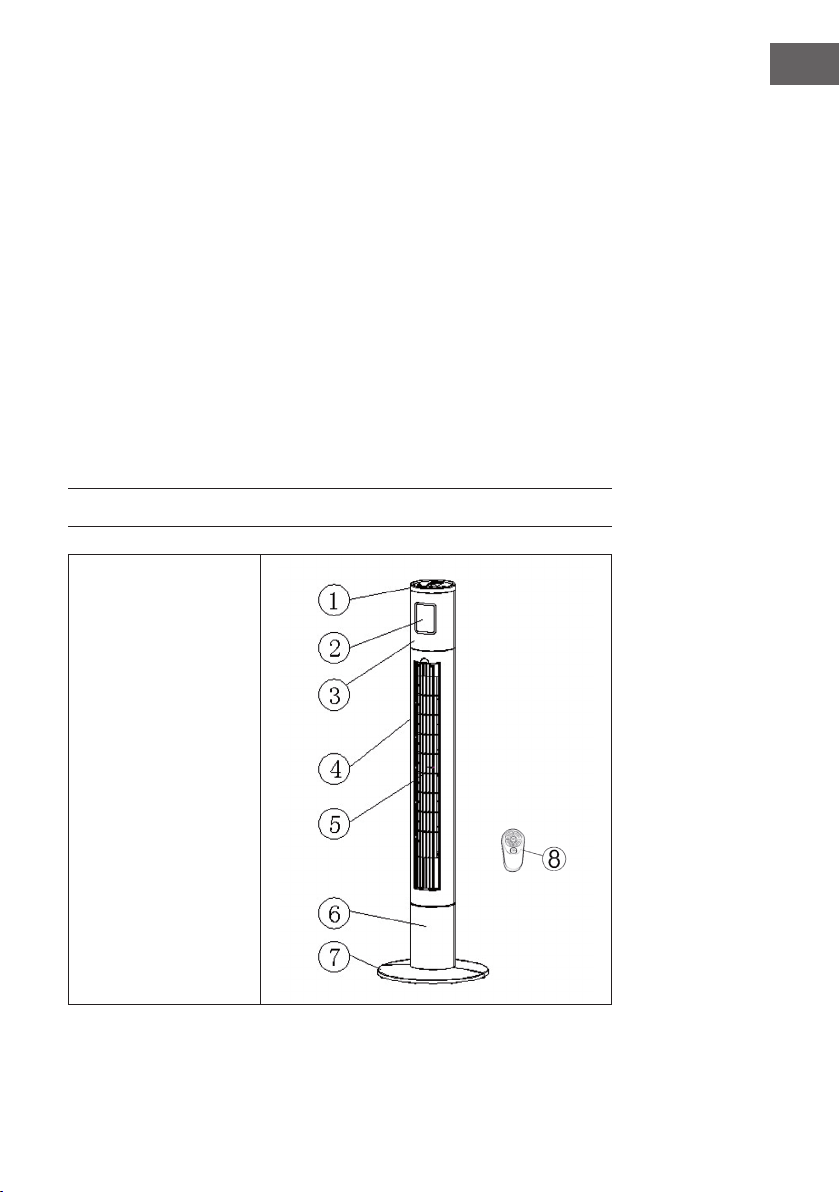
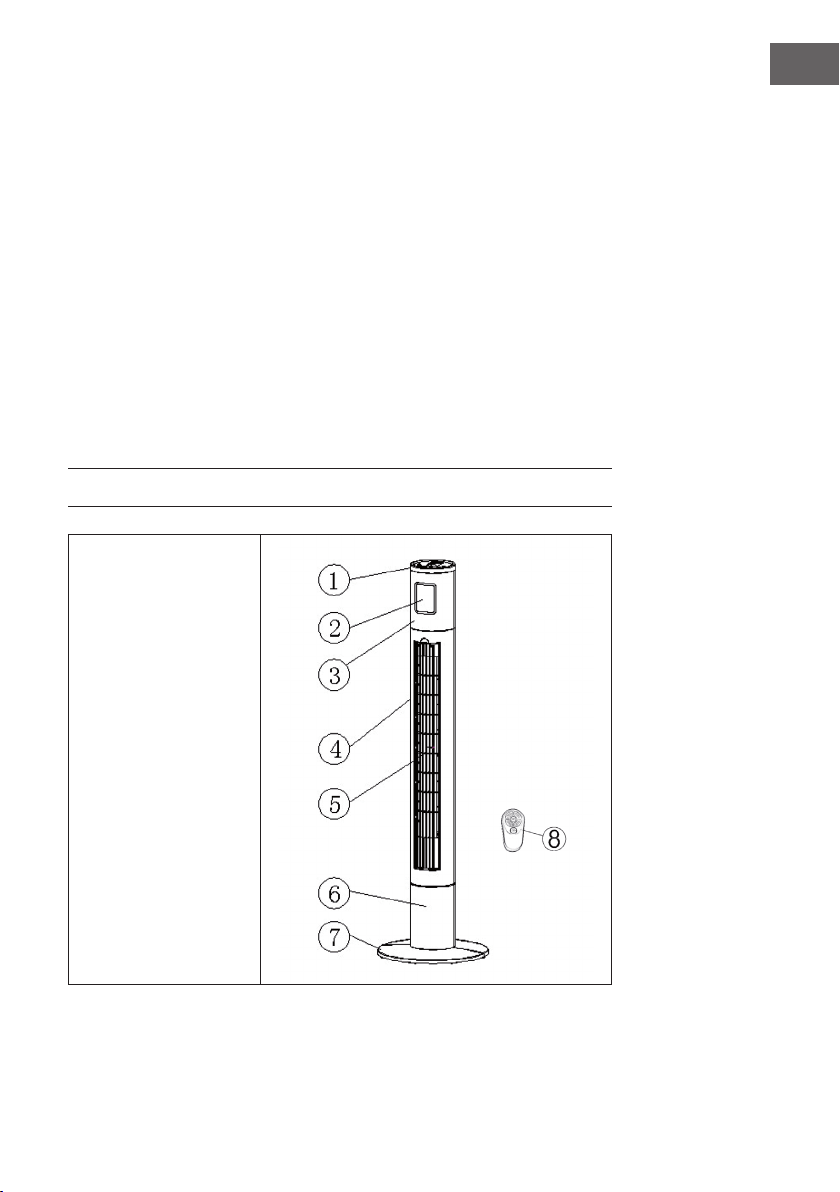
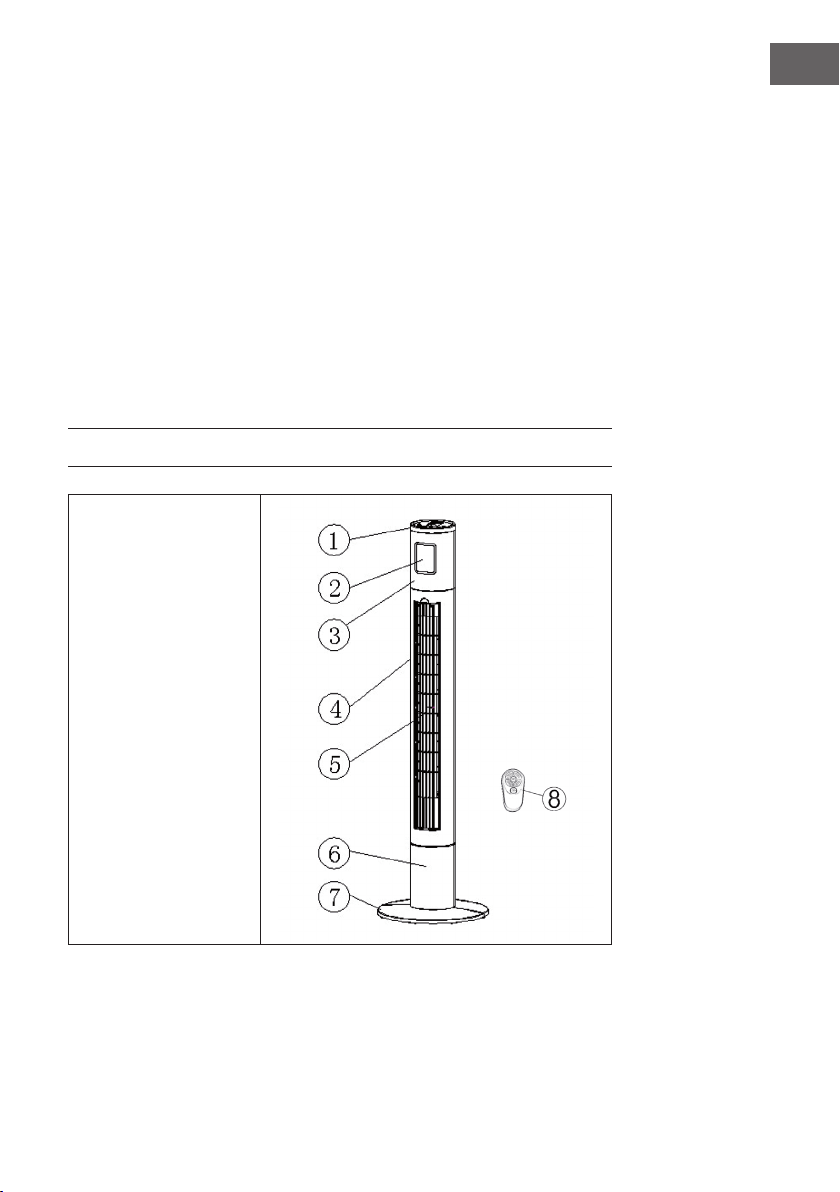
GERÄTEÜBERSICHT
1 Bedienfeld
2 Anzeige
3 Vordere Abdeckung
4 Hintere Abdeckung
5 Schutzgitter
6 Säule
7 Standfuß
8 Fernbedienung

6
DE
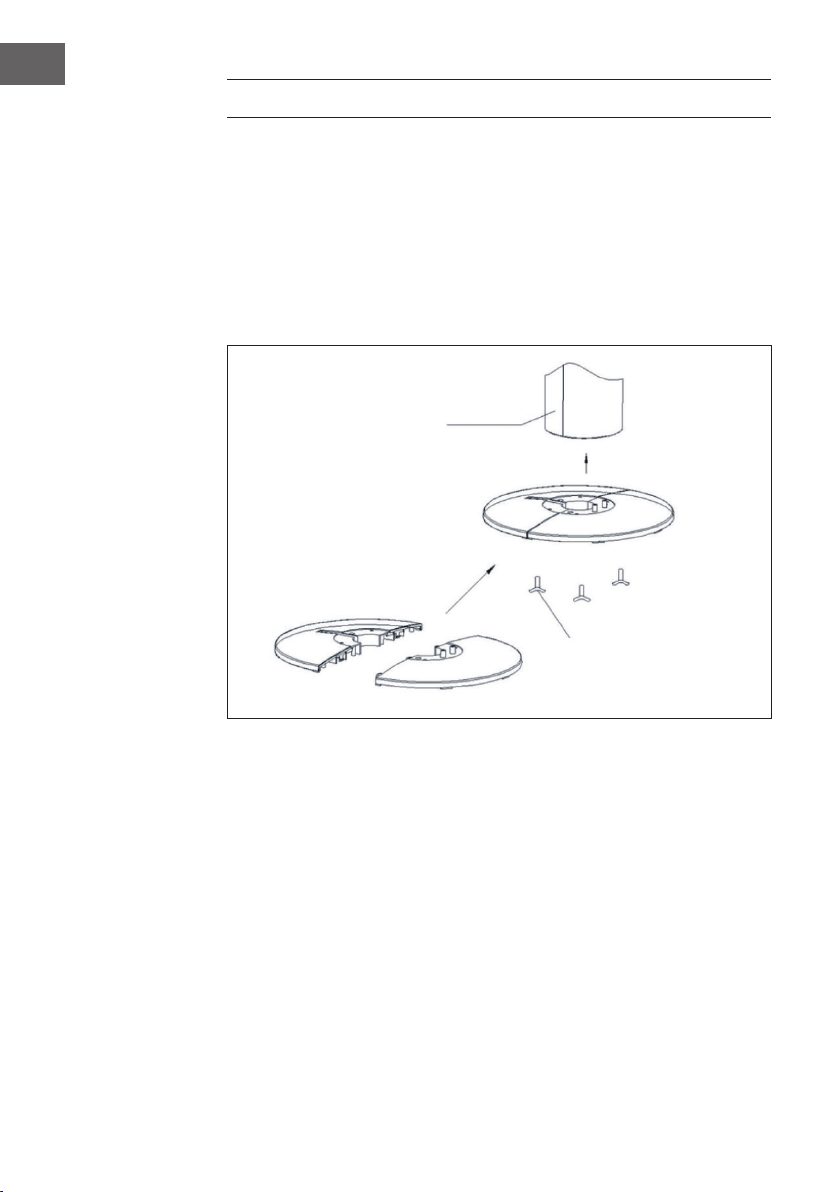
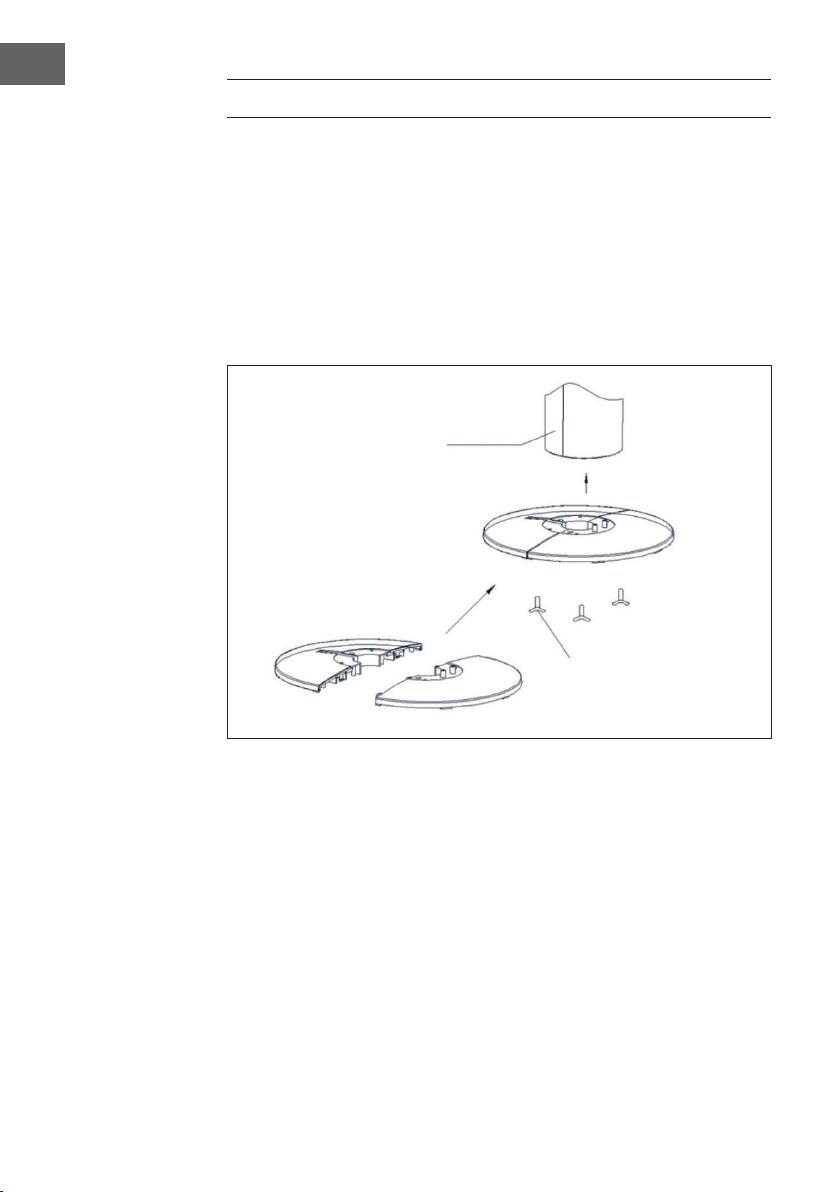
AUFSTELLUNG
1. Nehmen Sie alle Teile des Gerätes aus der Verpackung.
2. Verlegen Sie das Netzkabel durch die Mitte der beiden Standfußteile.
3. Setzen Sie den Standfuß zusammen. Haken Sie dazu den einen Teil des
Standfußes in die Halterungen des anderen Teils ein.
4. Stellen Sie den Körper des Turmventilators auf den Kopf. Setzen Sie den
Standfuß auf den Körper. Achten Sie darauf, dass die Säule fest im Standfuß
sitzt.
5. Verschrauben Sie den Standfuß mit den mitgelieferten Schrauben auf die
Säule.
6. Verlegen Sie das Netzkabel durch die Führung der Gehäusrückseite.
7. Richten Sie den Turm wieder auf. Das Gerät ist zur Verwendung bereit.
Säule
Schrauben

7
DE
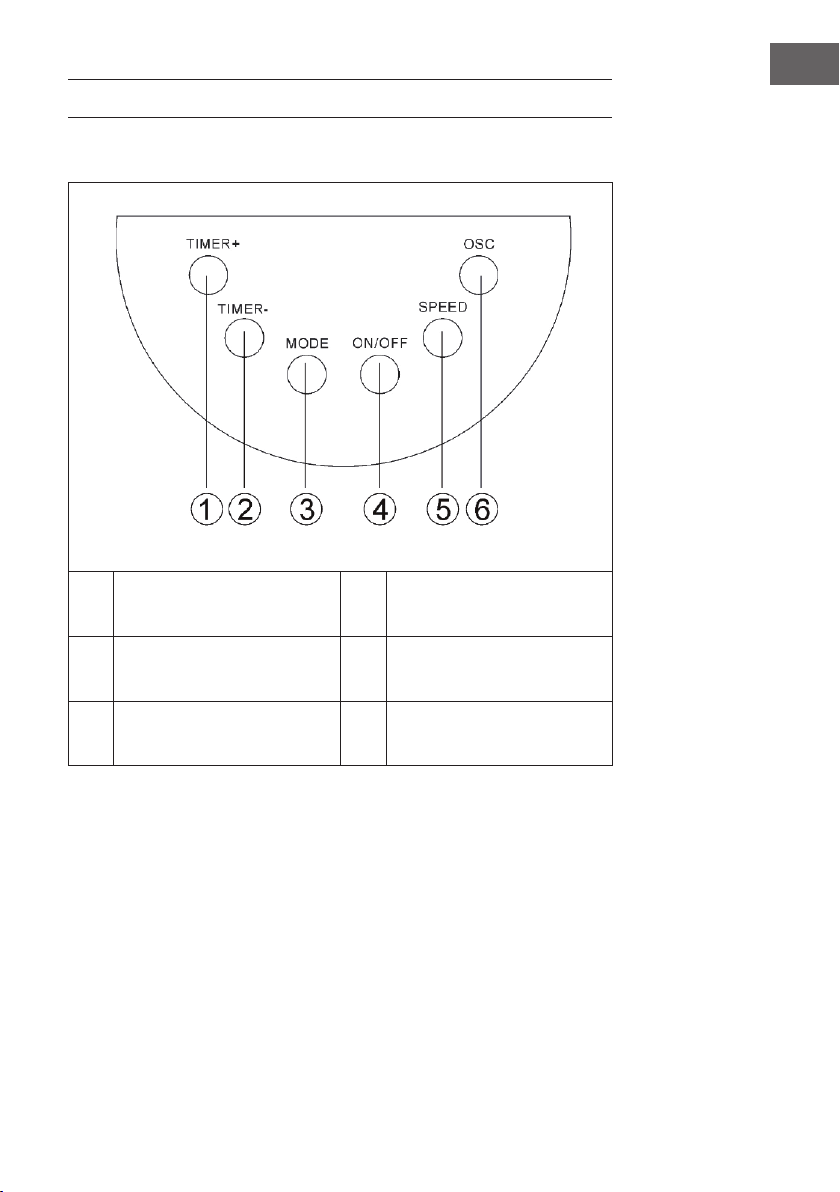
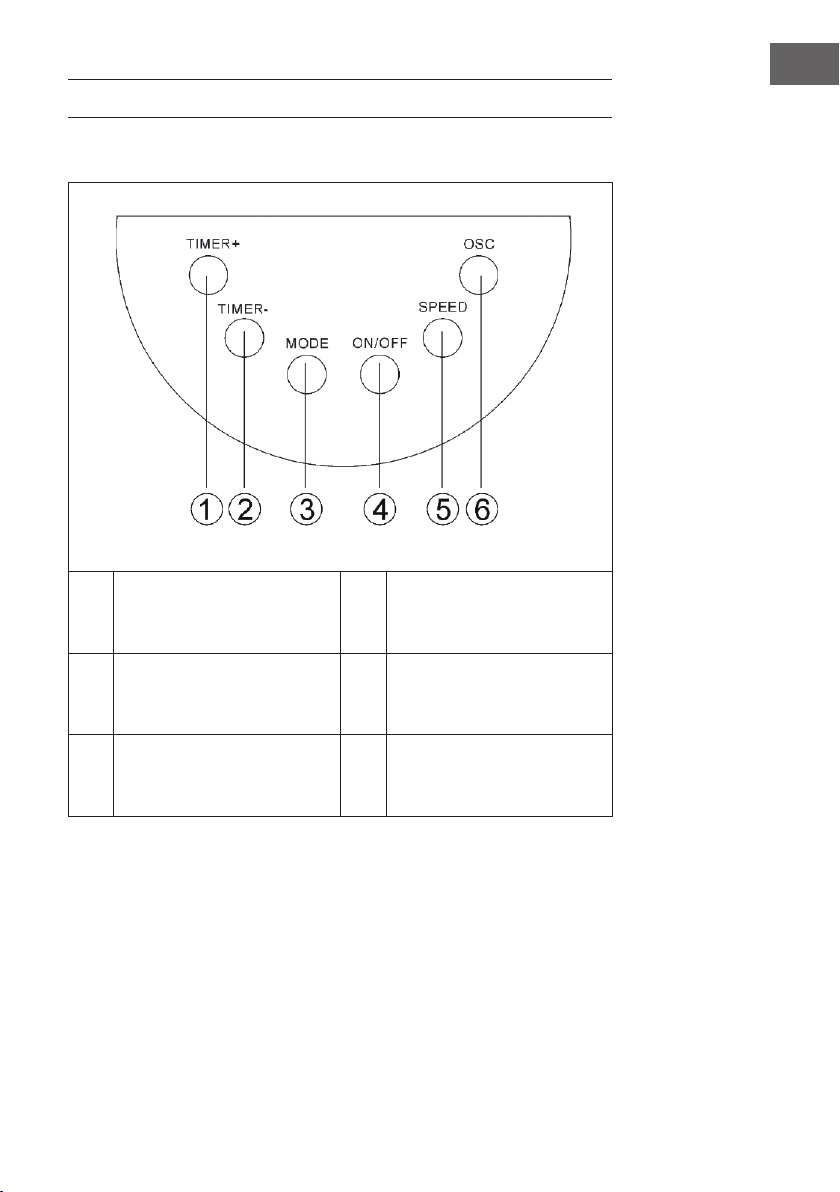
BEDIENUNG
Bedienung über das Bedienfeld am Gerät
1
Aktivieren des Timers. Bei
jedem Tastendruck wird die Zeit
um eine Stunde erhöht.
4 Ein/Aus-Schalter
2 Deaktivieren des Timers. 5
Wahl von drei Stufen (niedrig,
mittel, hoch). Die gewählte
Stufe erscheint in der Anzeige.
3
Wahl von drei Modi (Schlaf,
Natur, Normal). Der gewählte
Modus erscheint in der Anzeige.
6
Ein- und Ausschalten der
Schwenkbewegung
8
DE
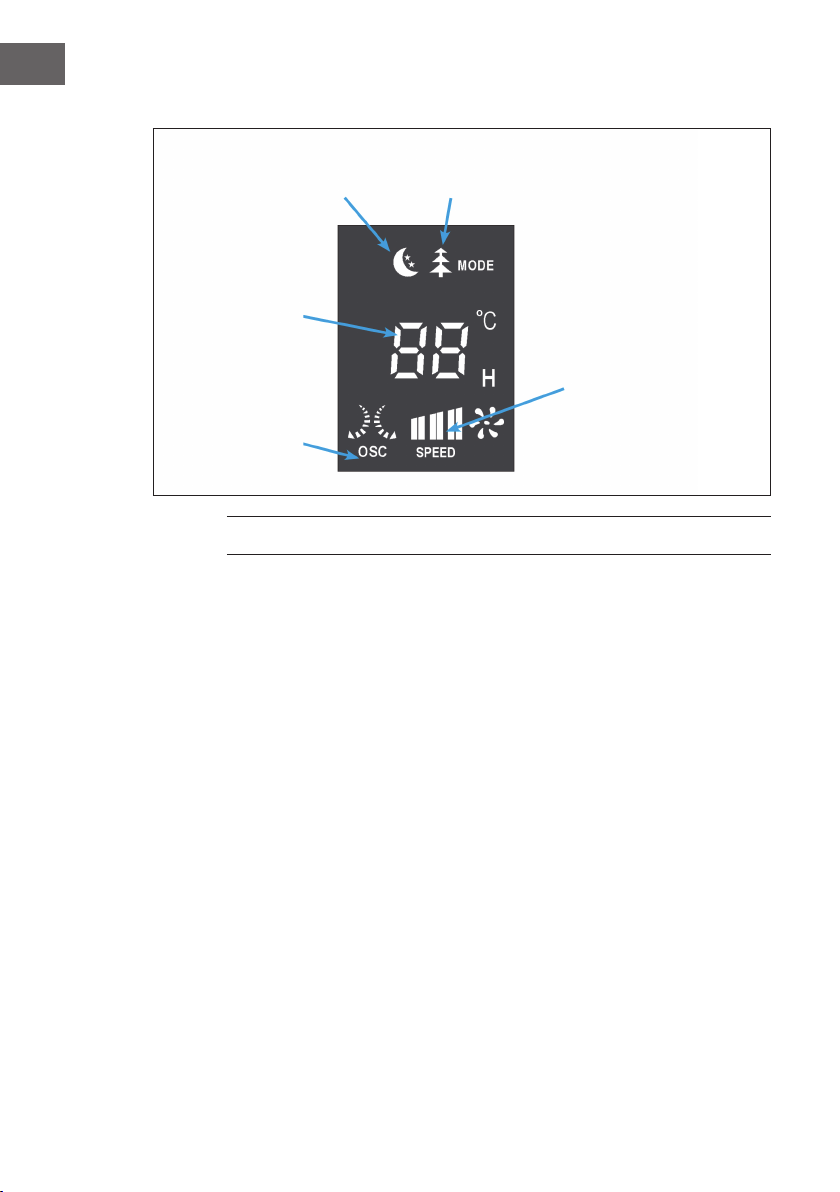
Anzeigefeld
FERNBEDIENUNG
Hinweise zur Fernbedienung
• Halten Sie die Fernbedienung in Richtung des Infrarot-Empfängers am Gerät.
• Blockieren Sie nicht die Sichtlinie zwischen der Fernbedienung und dem
Empfänger.
• Die Fernbedienung darf nicht in einem Raum benutzt werden, in dem schwere
Maschinen laufen.
• Behandeln Sie die Fernbedienung mit Sorgfalt. Lassen Sie die Fernbedienung
nicht auf den Boden fallen. Schlagen Sie damit nicht gegen harte
Gegenstände.
Hinweise zu den Batterien
• Nehmen Sie die Batterien aus dem Batteriefach, wenn Sie die Fernbedienung
über einen längeren Zeitraum nicht verwenden.
• Die Fernbedienung benötigt drei Micro-Batterien (LR03). Sie sollten neu sein
und gleichzeitig ersetzt wer- den, wenn sie leer sind.
• Reinigen Sie vor dem Einlegen die Kontakte an den Batterien und im
Batteriefach.
• Achten Sie beim Einlegen auf die richtige Polung. Plus und Minus müssen mit
den Zeichnungen am Batteriefach übereinstimmen.
Geschwindigkeitsstufe
Natürlicher WindSchlafwind
Anzeige der
Raumtemperatur
oder des Timers
Schwenkmodus
9
DE
REINIGUNG UND WARTUNG
Hinweis: Lassen Sie kein Wasser ins Innere des Gerätes laufen.
Reinigung
1. Ziehen Sie vor der Reinigung immer den
Netzstecker.
2. Entfernen Sie den Staub, indem Sie entlang der
Vorderseite des Ventilators saugen und auf der
Rückseite, wo die Kunststogitter die Luftzufuhr
abdecken. Rohrputzer oder Staubwedel eignen sich
ebenso.
3. Wischen Sie die Oberäche des Ventilators
gelegentlich mit einem feuchten Tuch (nicht
triefend) und trocknen Sie die Oberäche gründlich
mit einem weichen, trockenen Tuch, bevor Sie das
Gerät in Betrieb nehmen.
4. Verwenden Sie beim Reinigen keine scharfen
Reiniger oder Stoe. Dies führt zu einer
Beschädigung.
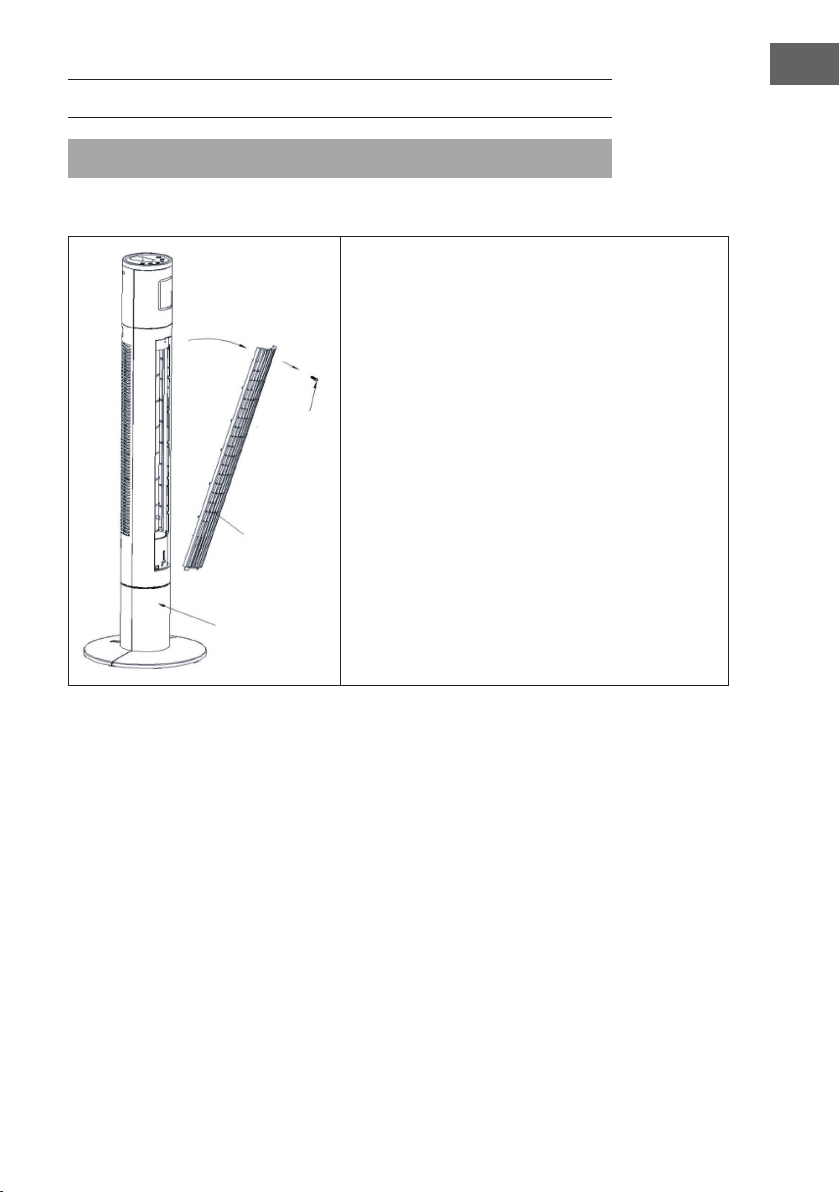
5. Lösen Sie die Schraube am Frontgitter. Önen
Sie das Gitter, um das Ventilatorrad vorsichtig zu
reinigen (Siehe Bild).
Aufbewahrung
• Reinigen Sie den Ventilator sorgfältig wie oben beschrieben.
• Legen Sie das Gerät zur Aufbewahrung vorsichtig in den Originalkarton oder
decken Sie es ab, um es vor Staub zu schützen.
• Lagern Sie es an einem trockenen Ort.
• Lassen Sie den Netzstecker während der Aufbewahrung nie ein- gesteckt.
• Wickeln Sie das Netzkabel nicht fest um das Gerät und setzen das Netzkabel
an der Eintrittsstelle zum Gerät keinen Belastungen aus, da es sonst fasert
oder bricht.
Schraube
Gitter
Säule

10
DE
HINWEISE ZUR ENTSORGUNG
Wenn es in Ihrem Land eine gesetzliche Regelung
zur Entsorgung von elektrischen und elektronischen
Geräten gibt, weist dieses Symbol auf dem Produkt oder
auf der Verpackung darauf hin, dass dieses Produkt
nicht im Hausmüll entsorgt werden darf. Stattdessen
muss es zu einer Sammelstelle für das Recycling von
elektrischen und elektronischen Geräten gebracht
werden. Durch regelkonforme Entsorgung schützen
Sie die Umwelt und die Gesundheit Ihrer Mitmenschen
vor negativen Konsequenzen. Informationen zum
Recycling und zur Entsorgung dieses Produkts,
erhalten Sie von Ihrer örtlichen Verwaltung oder Ihrem
Hausmüllentsorgungsdienst.
Dieses Produkt enthält Batterien. Wenn es in Ihrem
Land eine gesetzliche Regelung zur Entsorgung von
Batterien gibt, dürfen die Batterien nicht im Hausmüll
entsorgt werden. Informieren Sie sich über die örtlichen
Bestimmungen zur Entsorgung von Batterien. Durch
regelkonforme Entsorgung schützen Sie die Umwelt
und die Gesundheit Ihrer Mitmenschen vor negativen
Konsequenzen.
HERSTELLER & IMPORTEUR (UK)
Hersteller:
Chal-Tec GmbH, Wallstraße 16, 10179 Berlin, Deutschland.
Importeur für Großbritannien:
Chal-Tec UK limited
Unit 6 Riverside Business Centre
Brighton Road
Shoreham-by-Sea
BN43 6RE
United Kingdom
11
EN
Dear Customer,
Congratulations on purchasing this device. Please read the
following instructions carefully and follow them to prevent
possible damages. We assume no liability for damage
caused by disregard of the instructions and improper use.
Scan the QR code to get access to the latest user manual and
more product information.
CONTENT
Safety Instructions 12
Device Overview 13
Installation 14
Operation 15
Remote Control 16
Cleaning and Maintenance 17
Disposal Considerations 18
Manufacturer & Importer (UK) 18
TECHNICAL DATA
Item number 10029428
Power supply 220-240 V~ 50/60 Hz
Wattage 45 W
Weight 4.2 kg
Oscillation 90 degrees

12
EN
SAFETY INSTRUCTIONS
• Remove the packaging and make sure that the appliance is intact. If in doubt,
do not use it and contact qualied personnel only.
• Packaging materials (plastic bags, polystyrene, staples etc.) Must be kept out
of the reach of children as they could be hazardous.
• This device may be only used by children 8 years old or older and persons with
limited physical, sensory and mental capabilities and / or lack of experience
and knowledge, provided that they have been instructed in use of the device
by a responsible person who understands the associated risks.
• Before connecting the appliance, check that the appliance rating corresponds
to the mains rating.
• This appliance must only be used for the purpose for which it has been
manufactured. As a stand fan. The manufacturer is not responsible for any
damage caused by improper or incorrect use.
• The installation/assembly of the device will be made according to the
indications of the manufacturer. A wrong procedure may cause damages to
persons, animals or objects, for which the manufacturer cannot be considered
responsible
• Before cleaning or carrying out maintenance on the appliance, disconnect it
from the electrical mains by removing the plug from the electrical outlet or by
switching o the system switch.
• If the appliance is faulty and/or operating incorrectly, switch it o without
tampering with it. If the above is disregarded, the safety of the appliance may
be compromised.
• If the supply cord is damaged, it must be replaced by the manufacturer, its
service agent or similarly qualied persons in order to avoid a hazard.
• Do not power the device using multiple sockets.
• Do not use adapters and/or extension cable
• The device must not be switched on using external timers and/or other
remote control devices which are not specied in this manual.
• Do not use or store the device near heat sources (heaters, stoves).
• Do not dip the device in water or other liquids; in case the accidental fall in the
water do not try to take it out, but rst of all unplug immediately the power
cable from the socket.
• If you use the device for the rst time, make sure to remove any label or
protective sheet which blocks its proper functioning.
• Plug and unplug the power cable with dry hands and hold it rmly.
• Before plugging the plug into a wall outlet, make sure that the unit is switched
o.
• Always unplug the power cable to avoid the overheating and avoid stretching
it.
• Make sure that all air intakes and outlets are free and not covered so that the
unit does not overheat.
• Avoid placing the power cable on abrasive or sharp surfaces or in positions
where it can be damaged easily.
13
EN
• Do not hang the fan on the wall or ceiling unless this type of installation is
provided and explained in this manual.
• Place the device at a proper distance from the objects or surrounding walls
making sure that its functioning will not cause accidental damages.
• Do not use the device near gas stoves or open ames in general.
• Do not use the device near curtains or textiles.
• Do not cover the device during functioning.
• Do not expose yourself for a long period to the air ow generated by the
device because it can cause damage to the health
• If the fan must be stored for a long period and is not used regularly, place the
fan in its original packaging in a dry place.
• Always remember to unplug the power cable of the device if it is not used
for a long period, before storing, cleaning or performing any maintenance
operation.
• Do not use the appliance in the presence of potentially ammable or explosive
liquids or gases.
• This product is intended for household use only and not for commercial /
industrial or outdoor use.
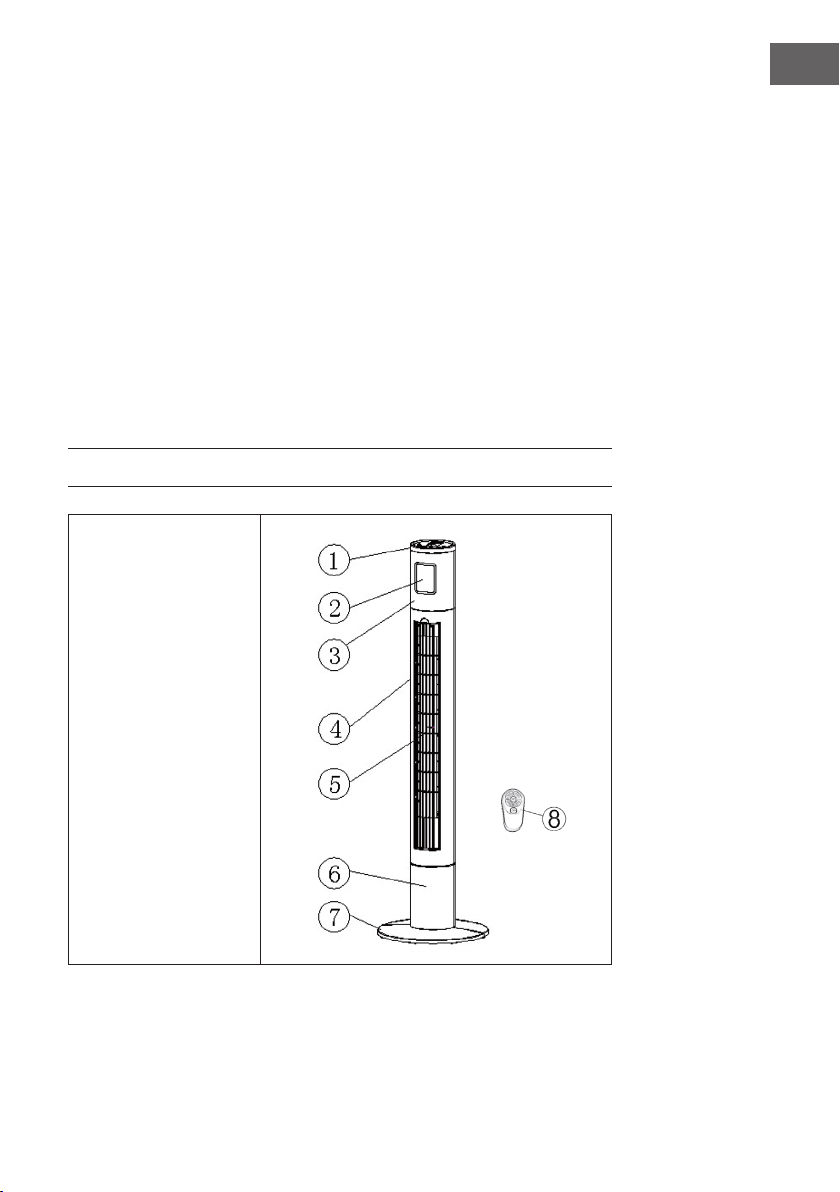
DEVICE OVERVIEW
1 Control panel
2 Display
3 Front cover
4 Rear cover
5 Protective grille
6 Column
7 Stand
8 Remote control
14
EN
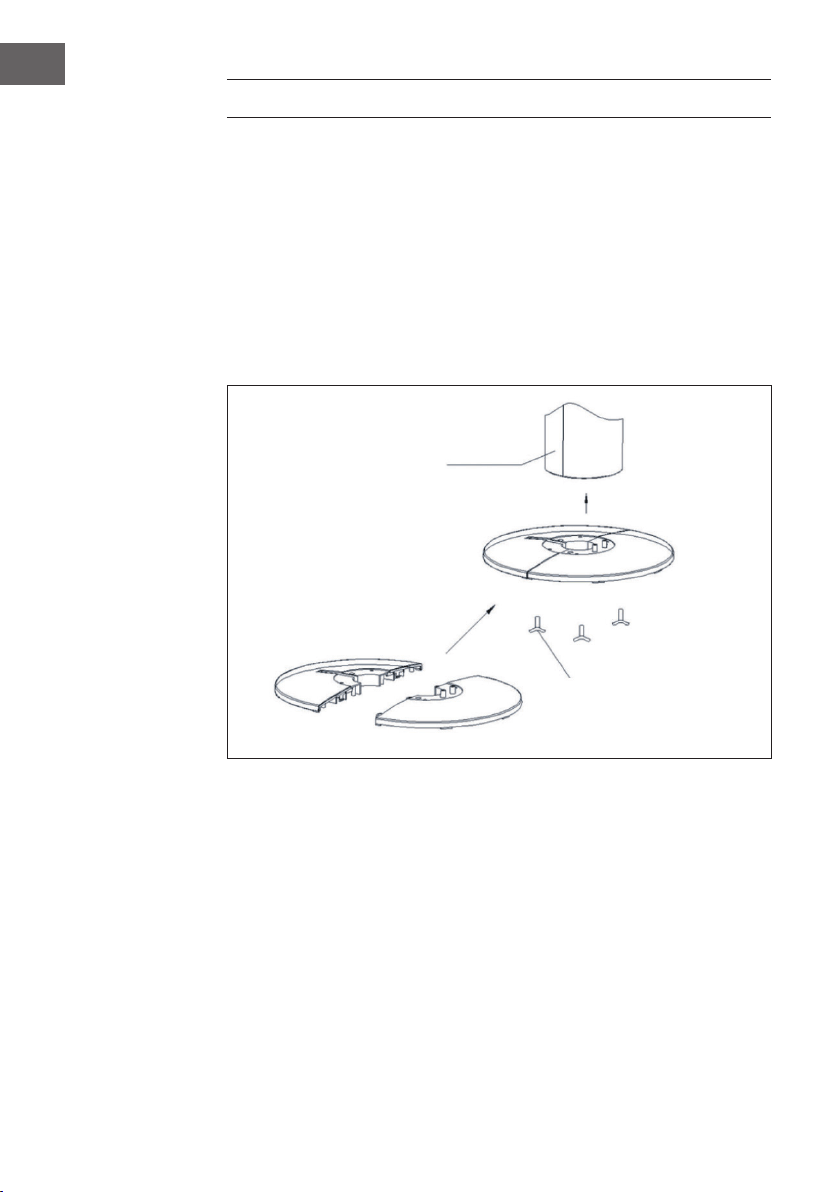
INSTALLATION
1. Remove all parts of the device from the packaging.
2. Lay the power cable through the middle of the two stand parts.
3. Assemble the stand. To do this, hook one part of the stand into the brackets of
the other part.
4. Turn the body of the tower fan upside down. Place the stand on the body.
Make sure that the column is rmly seated in the stand.
5. Screw the stand onto the column using the screws provided.
6. Route the power cable through the guide on the back of the body.
7. Put the tower back in place. The unit is ready for use.
Column
Screws
15
EN
OPERATION
Operation via the control panel on the device
1
Activate the timer. Each time
the key is pressed, the time is
increased by one hour.
4 On/O switch
2 Deactivating the timer. 5
Selection of three levels (low,
medium, high). The selected
level appears in the display.
3
Selection of three modes (Sleep,
Nature, Normal). The selected
mode appears in the display.
6
On/O switch for swivel
movement

16
EN
Display eld
REMOTE CONTROL
Notes on the remote control
• Hold the remote control in the direction of the infrared receiver on the unit.
• Do not block the line of sight between the remote control and the receiver.
• Do not use the remote control in a room where heavy machinery is running.
• Handle the remote control with care. Do not drop the remote control on the
oor. Do not strike it against hard objects.
Notes on the batteries
• Remove the batteries from the battery compartment if you will not be using
the remote control for an extended period of time.
• The remote control requires three micro batteries (LR03). They should be new
and replaced at the same time when they are empty.
• Before inserting them, clean the contacts on the batteries and in the battery
compartment.
• Pay attention to the correct polarity when inserting them. Plus and minus
must match the drawings on the battery compartment.
Speed level
Natural windSleep wind
Display of the room
temperature or
timer
Oscillation

17
EN
CLEANING AND MAINTENANCE
Note: Do not allow water to run inside the unit.
Cleaning
1. Always unplug the power cord before cleaning.
2. Remove dust by vacuuming along the front of the
fan and at the back where the plastic grilles cover
the air intake. Pipe cleaners or feather dusters are
also suitable.
3. Wipe the surface of the fan occasionally with a
damp cloth (not dripping) and dry the surface
thoroughly with a soft, dry cloth before operating
the unit.
4. Do not use harsh cleaners or substances when
cleaning. This will cause damage.
5. Loosen the screw on the front grille. Open the grille
to carefully clean the fan wheel (see picture).
Storage
• Clean the fan carefully as described above.
• For storage, carefully place the unit in the original carton or cover it to protect
it from dust.
• Store it in a dry place.
• Never leave the power plug plugged in during storage.
• Do not wrap the power cord tightly around the device and do not subject the
power cord to stress at the entry point to the device, as it will ber or break.
Screw
Grid
Column

18
EN
DISPOSAL CONSIDERATIONS
If there is a legal regulation for the disposal of electrical
and electronic devices in your country, this symbol on the
product or on the packaging indicates that this product
must not be disposed of with household waste. Instead,
it must be taken to a collection point for the recycling
of electrical and electronic equipment. By disposing of
it in accordance with the rules, you are protecting the
environment and the health of your fellow human beings
from negative consequences. For information about the
recycling and disposal of this product, please contact your
local authority or your household waste disposal service.
This product contains batteries. If there is a legal
regulation for the disposal of batteries in your country,
the batteries must not be disposed of with household
waste. Find out about local regulations for disposing
of batteries. By disposing of them in accordance with
the rules, you are protecting the environment and the
health of your fellow human beings from negative
consequences.
MANUFACTURER & IMPORTER (UK)
Manufacturer:
Chal-Tec GmbH, Wallstrasse 16, 10179 Berlin, Germany.
Importer for Great Britain:
Chal-Tec UK limited
Unit 6 Riverside Business Centre
Brighton Road
Shoreham-by-Sea
BN43 6RE
United Kingdom

19
FR
Chère cliente, cher client,
Toutes nos félicitations pour l’acquisition de ce nouvel
appareil. Veuillez lire attentivement et respecter les
instructions de ce mode d’emploi an d’éviter d’éventuels
dommages. Le fabricant ne saurait être tenu pour
responsable des dommages dus au non-respect des
consignes de sécurité et à la mauvaise utilisation de
l’appareil. Scannez le QR-Code pour accéder à la dernière
version du mode d‘emploi et à d‘autres informations
concernant le produit.
SOMMAIRE
Consignes de sécurité 20
Aperçu de l’appareil 21
Installation 22
Utilisation 23
Télécommande 24
Nettoyage et entretien 25
Informations sur le recyclage 26
Fabricant et importateur (UK) 26
FICHE TECHNIQUE
Numéro d’article
10029428
Alimentation électrique
220-240 V~ 50/60 Hz
Puissance
45 W
Poids (net)
4,2 kg
Degré d’oscillation
90 degrés

20
FR
CONSIGNES DE SÉCURITÉ
• Retirez l‘emballage et assurez-vous qu‘aucun élément n‘a été endommagé
pendant le transport. Si des pièces ont été endommagées, adressez-vous sans
attendre au service client.
• Les matériaux d‘emballage et les vieux appareils représentent un danger
pour les enfants qui peuvent se blesser avec. Pour cette raison, éliminez
immédiatement les matériaux d‘emballage.
• Cet appareil peut être utilisé par des enfants de 8 ans ou plus et des
personnes ayant des capacités physiques, sensorielles et mentales limitées
et / ou dénuées d‘expérience et de connaissances, à condition d‘avoir été
instruits au fonctionnement de l‘appareil par une personne responsable et
d‘en comprendre les risques associés.
• Avant l‘utilisation, vériez la tension sur la plaque signalétique de l‘appareil.
Branchez l’appareil uniquement sur des prises fournissant la tension prévue.
• Utilisez l‘appareil uniquement aux ns prévues et décrites dans ce mode
d‘emploi.
• Lors de l‘assemblage, tenez-vous en strictement aux indications fournies. Un
mauvais assemblage peut causer des dégâts irrémédiables à l‘appareil.
• Eteignez l‘appareil et débranchez-le de la prise avant de le nettoyer ou lorsque
vous ne l‘utilisez plus.
• Si l‘appareil ne fonctionne pas normalement, éteignez-le immédiatement et
adressez-vous à un spécialiste près de chez vous.
• Si le câble secteur ou la che sont endommagés, faites-les remplacer par le
fabricant un service professionnel agréé ou une personne de qualication
équivalente.
• Ne branchez pas l‘appareil sur une prise multiple.
• N‘utilisez pas de rallonge.
• Ne branchez pas l‘appareil sur une prise à minuterie ou commandée à
distance.
• N‘utilisez pas et ne rangez pas l‘appareil à proximité de sources de chaleur
telles que des radiateurs.
• Ne plongez jamais l‘appareil ni la che dans l‘eau ou dans d‘autres liquides. Si
vous renversez de l‘eau dessus, débranchez immédiatement la che de la prise
et faites contrôler l‘appareil par un spécialiste.
• Lorsque vous utilisez l‘appareil pour la première fois, retirez tous les lms de
protection et les matériaux d‘emballage.
• Ne tirez pas sur le câble pour débrancher l‘appareil mais tenez la che bien
fermement.
• Avant de brancher la che dans une prise murale, assurez-vous que l‘appareil
est éteint.
• Ne tendez pas le câble secteur.
• Veillez à ce que toutes les entrées et sorties d‘air soient libres et non
recouvertes pour que l‘appareil ne surchaue pas.
• Veillez à ce que le câble secteur ne passe pas sur des arêtes vives ou des
surfaces coupantes.

21
FR
• N‘accrochez pas l‘appareil au plafond ou au mur, sauf s‘il est prévu pour cette
utilisation.
• Laissez susamment d‘espace tout autour de l‘appareil entre lui et les murs,
meubles et autres objets, pour obtenir une puissance idéale.
• N‘utilisez pas l‘appareil à proximité de fours à gaz ou de radiateurs à gaz.
• Ne placez pas l‘appareil sous un rideau ni à proximité.
• Ne recouvrez pas l‘appareil.
• Ne vous asseyez pas, vous ou d‘autres personnes, directement face au ux
d‘air pour ne pas vous enrhumer.
• Lorsque vous n‘utilisez plus l‘appareil, remettez-le dans son emballage
d‘origine et conservez-le dans un endroit sec.
• Débranchez toujours la che de la prise avant de nettoyer l‘appareil, de
l‘entretenir, de le ranger, ou lorsque vous ne l‘utilisez plus.
• N‘utilisez pas l‘appareil à proximité de substances ou liquides inammables ou
explosifs.
• L’appareil n’est pas destiné à une utilisation commerciale mais au cadre
domestique et dans des conditions similaires. Cela comprend les cuisines de
bureaux, les auberges, hôtels, motels et installations proposant des services
de type bed & breakfast.
APERÇU DE L’APPAREIL
1 Panneau de
commande
2 Achage
3 Protection avant
4 Protection arrière
5 Grille de protection
6 Colonne
7 Pied
8 Télécommande
22
FR
INSTALLATION
1. Sortir toutes les pièces de l’appareil de leur emballage.
2. Faire passer le cordon d’alimentation au milieu des deux parties du pied.
3. Assembler les deux parties du pied. Pour ce faire, encastrer les deux parties
au niveau des points d’attache.
4. Retourner verticalement la colonne du ventilateur. Installer le pied sur la
colonne. Veiller à ce que la colonne soit bien xée au pied.
5. Visser le pied à la colonne au moyen des vis fournies.
6. Faire passer le cordon d’alimentation par la rainure située à l’arrière de
l’appareil.
7. Redresser la colonne. L’appareil est prêt à l’emploi.
Colonne
Vis

23
FR
UTILISATION
Utilisation du panneau de commande de l’appareil
1
Activation du minuteur.
Chaque pression sur la touche
augmente le temps d’une
heure.
4 Bouton marche/arrêt
2 Désactivation du minuteur. 5
Sélection de trois niveaux (bas,
intermédiaire, haut). Le niveau
sélectionné apparaît sur l’af-
chage.
3
Sélection de trois modes
(sommeil, nature, normal). Le
mode sélectionné apparaît sur
l’achage.
6
Activation et désactivation de la
fonction d’oscillation.

24
FR
Écran d’achage
TÉLÉCOMMANDE
Remarques sur la télécommande
• Pointer la télécommande en direction du capteur infrarouge de l’appareil.
• Ne pas placer d’obstacle entre la télécommande et le capteur.
• La télécommande ne doit pas être utilisée dans une pièce où fonctionnent des
machines lourdes.
• Utiliser la télécommande avec précaution. Ne pas laisser la télécommande
tomber au sol. Ne pas la frapper contre des objets durs.
Remarques sur les piles
• Sortir les piles du compartiment des piles en cas d’inutilisation prolongée de la
télécommande.
• La télécommande nécessite des micropiles (LR03). Elles doivent être neuves et
remplacées en même temps une fois vides.
• Nettoyer les bornes électriques des piles et du compartiment avant de les y
introduire.
• Respecter les polarités au moment de les introduire. Les bornes plus et moins
doivent correspondre avec celles du compartiment des piles.
Niveaux de vitesse
Vent naturelVent nocturne
Achage de la
température
ambiante et du
minuteur
Mode d’oscillation

25
FR
NETTOYAGE ET ENTRETIEN
Note: Ne pas laisser de l’eau s’inltrer à l’intérieur de l’appareil..
Nettoyage
1. Toujours débrancher l’appareil avant de le nettoyer.
2. Aspirer la poussière accumulée à l’avant du
ventilateur et à l’arrière, à l’endroit où la grille en
plastique recouvre l’entrée d’air. Il est également
possible d’utiliser une brosse de nettoyage ou un
plumeau.
3. Essuyer régulièrement la surface du ventilateur
à l’aide d’un chion humide (non trempé) puis la
sécher soigneusement avec un chion doux et sec
avant de remettre l’appareil en marche.
4. Ne pas utiliser de produit d’entretien ou de
substance agressifs pour nettoyer l’appareil. Cela
pourrait l’endommager.
5. Enlever les vis de la grille avant. Ouvrir la grille pour
nettoyer avec précaution la roue du ventilateur (cf.
image).
Rangement
• Nettoyer le ventilateur comme indiqué ci-dessus.
• Mettre l’appareil dans son carton d’origine an de l’entreposer ou le recouvrir
pour le protéger de la poussière.
• Le ranger dans un endroit sec.
• Ne jamais laisser l’appareil branché une fois rangé.
• Ne pas serrer le cordon d’alimentation en l’enroulant autour de l’appareil et
ne pas poser de poids sur le câble, surtout à l’endroit de son raccord avec le
ventilateur pour éviter qu’il ne s’eloche ou ne se détériore.
Vis
Grille
Colonne

26
FR
INFORMATIONS SUR LE RECYCLAGE
S‘il existe une réglementation pour l‘élimination ou le
recyclage des appareils électriques et électroniques dans
votre pays, ce symbole sur le produit ou sur l‘emballage
indique que cet appareil ne doit pas être jeté avec les
ordures ménagères. Vous devez le déposer dans un point
de collecte pour le recyclage des équipements électriques
et électroniques. La mise au rebut conforme aux règles
protège l‘environnement et la santé de vos semblables
des conséquences négatives. Pour plus d‘informations
sur le recyclage et l‘élimination de ce produit, veuillez
contacter votre autorité locale ou votre service de
recyclage des déchets ménagers.
Ce produit contient des piles. S‘il existe une
réglementation pour l‘élimination ou le recyclage des
piles dans votre pays, vous ne devez pas les jeter avec les
ordures ménagères. Renseignez-vous sur les dispositions
locales relatives à la collecte des piles usagées. La mise au
rebut conforme aux règles protège l‘environnement et la
santé de vos semblables des conséquences négatives.
FABRICANT ET IMPORTATEUR (UK)
Fabricant :
Chal-Tec GmbH, Wallstraße 16, 10179 Berlin, Allemagne.
Importateur pour la Grande Bretagne :
Chal-Tec UK limited
Unit 6 Riverside Business Centre
Brighton Road
Shoreham-by-Sea
BN43 6RE
United Kingdom

27
IT
Gentile cliente,
La ringraziamo per aver acquistato il dispositivo. La
preghiamo di leggere attentamente le seguenti istruzioni
per l’uso e di seguirle per evitare possibili danni tecnici. Non
ci assumiamo alcuna responsabilità per danni scaturiti da
una mancata osservazione delle avvertenze di sicurezza e
da un uso improprio del dispositivo. Scansionare il codice
QR seguente, per accedere al manuale d’uso più attuale e
per ricevere informazioni sul prodotto.
INDICE
Norme di sicurezza 28
Descrizione del prodotto 29
Installazione 30
Utilizzo 31
Telecomando 32
Pulizia e manutenzione 33
Avviso di smaltimento 34
Produttore e importatore (UK) 34
DATI TECNICI
Numero articolo
10029428
Alimentazione
220-240 V~ 50/60 Hz
Potenza
45 W
Peso (netto)
4,2 kg
Oscillazione
90 gradi

28
IT
NORME DI SICUREZZA
• Rimuovere il materiale di imballaggio e assicurarsi che nessun componente si
sia danneggiato durante il trasporto. Se ci sono dei componenti danneggiati,
contattare immediatamente il servizio clienti.
• I bambini possono farsi male con il materiale di imballaggio e con i vecchi
apparecchi. Smaltire immediatamente il materiale di imballaggio.
• Questo dispositivo può essere utilizzato da bambini a partire da 8 anni
e da persone con limitate capacità siche e psichiche o con conoscenza
ed esperienza limitate, solo se sono stati istruiti sulle modalità d’uso e
comprendono i rischi e i pericoli connessi.
• Prima dell‘uso controllare la tensione sulla targhetta del dispositivo. Collegare
il dispositivo solo ad una presa che corrisponde alla tensione indicata.
• Utilizzare il dispositivo solo per lo scopo previsto come descritto nel manuale
di istruzioni.
• Attenersi alle istruzioni per il montaggio. Una procedura errata può causare
danni irreparabili al dispositivo.
• Spegnere il dispositivo e staccare la spina dalla presa prima della pulizia o in
caso di inutilizzo.
• Se il dispositivo non funziona correttamente, spegnerlo immediatamente e
contattare un centro assistenza nelle vicinanze.
• Se il cavo di alimentazione o la spina sono danneggiati, devono essere
sostituiti dal produttore, da un centro assistenza autorizzato o da un tecnico
qualicato.
• Non collegare il dispositivo a prese multiple.
• Non utilizzare una prolunga.
• Non collegare il dispositivo a timer o a prese con telecomando.
• Non utilizzare o conservare il dispositivo vicino a fonti di calore come
termosifoni.
• Non immergere mai il dispositivo e la spina in acqua o in altri liquidi. Nel
caso in cui venga versata accidentalmente acqua sul dispositivo, staccare
immediatamente la spina dalla presa e far controllare il dispositivo da un
tecnico qualicato.
• Prima di utilizzare il dispositivo per la prima volta, rimuovere completamente il
materiale di imballaggio.
• Non staccare la spina tirando il cavo di alimentazione, bensì aerrare la spina
alla base.
• Prima di inserire la spina nella presa, assicurarsi che il dispositivo sia spento.
• Non tirare il cavo di alimentazione.
• Accertarsi che tutte le prese d‘aria non siano ostruite, per evitare che il
dispositivo si surriscaldi.
• Accertarsi che il cavo di alimentazione non scorra su spigoli o superci
taglienti.
29
IT
• Non appendere il dispositivo al sotto o alla parete a meno che il dispositivo
non sia progettato per questo utilizzo.
• Lasciare abbastanza spazio intorno al dispositivo con le pareti, i mobili o con
altri apparecchi per ottenere le migliori prestazioni possibili.
• Non utilizzare il dispositivo vicino a stufe a gas o a riscaldatori a gas.
• Non posizionare il dispositivo vicino o direttamente sotto le tende.
• Non coprire il dispositivo.
• Non esporre se stessi o gli altri al usso d‘aria diretto per evitare di
rareddarsi.
• In caso di inutilizzo del dispositivo, conservarlo nella confezione originale in
un luogo asciutto.
• Staccare sempre la spina dalla presa prima di eseguire la pulizia e la
manutenzione del dispositivo, prima di conservarlo o in caso di inutilizzo.
• Non utilizzare il dispositivo vicino a sostanze o liquidi esplosivi o inammabili.
• Il dispositivo non è per un uso commerciale, bensì domestico e in ambienti
simili come cucine di uci, agriturismi, hotel, motel e bed & breakfast.
DESCRIZIONE DEL PRODOTTO
1 Pannello dei comandi
2 Display
3 Parte frontale
4 Retro
5 Griglia
6 Colonna
7 Base di appoggio
8 Telecomando

30
IT
INSTALLAZIONE
1. Togliere dalla confezione tutti i componenti.
2. Far passare il cavo di alimentazione attraverso le due parti della base di
appoggio.
3. Assemblare le due parti della base di appoggio. Per fare ciò, incastrare una
parte con l’altra tramite le apposite scanalature.
4. Mettere l’unità in posizione verticale. Collocare l’unità sulla base di appoggio
prestando attenzione che la colonna sia ben ssata sulla base.
5. Avvitare la base d’appoggio sulla colonna utilizzando le viti incluse nella
consegna.
6. Dislocare il cavo di alimentazione nell’apposito alloggiamento sul retro.
7. Mettere il ventilatore in posizione verticale. Il dispositivo è pronto per l’uso.
Colonna
Viti

31
IT
UTILIZZO
Utilizzo tramite il pannello dei comandi sul dispositivo
1
Attivare il timer. Ad ogni
pressione di tasto, il tempo
aumenta di un’ora.
4 Interruttore on/o
2 Disattivare il timer. 5
Selezionare uno dei tre livelli
(basso, medio, alto). Il livello
selezionato appare sul display.
3
Selezionare una delle tre
modalità (Sleep, Na- ture,
Normal)
6
Attivare/disattivare
l’oscillazione.

32
IT
Display
TELECOMANDO
Istruzioni per il telecomando
• Dirigere il telecomando verso il ricevitore a infrarossi del dispositivo.
• Non collocare oggetti tra il telecomando e il ricevitore.
• Non utilizzare il telecomando in una stanza dove sono in funzione macchinari
pesanti.
• Maneggiare il telecomando con cura. Non farlo cadere a terra e non sbatterlo
contro oggetti duri.
Note sulle pile
• Rimuovere le pile dall’apposito vano in caso di inutilizzo prolungato del
telecomando.
• Il telecomando necessita di tre micro pile AAA (LR03). Le pile devono essere
nuove e devono essere sosti- tuite quando sono scariche.
• Prima di inserire le pile, pulire i contatti sulle pile e all‘interno del vano.
• Quando si inseriscono le pile, prestare attenzione alla corretta polarità. Più e
meno devono coincidere con i segni più e meno sul vano pile.
Livello di velocità
Vento naturaleModalità notturna
Indicazione della
temperatura della
stanza o del timer
Oscillazione

33
IT
PULIZIA E MANUTENZIONE
Nota: Non far penetrare acqua all’interno del dispositivo.
Pulizia
1. Disinserire la spina dalla presa prima di ogni
operazione di pulizia.
2. Rimuovere la polvere aspirandola lungo la parte
frontale del ventilatore e sul retro. Si può utilizzare
anche uno spolverino.
3. Pulire la supercie del ventilatore con un panno
umido (non gocciolante). Prima di mettere in
funzione il dispositivo, asciugare con cura le
superci con un panno morbido e asciutto.
4. Non utilizzare detergenti o sostanze aggressive per
la pulizia. Questo può comportare danni.
5. Allentare la vite sulla griglia anteriore. Aprire la
griglia per pulire la pala (vedere la gura).
Conservazione
• Pulire il ventilatore con cura come descritto sopra.
• Riporre il dispositivo nella confezione originale oppure coprirlo per
proteggerlo dalla polvere.
• Conservarlo in un luogo asciutto.
• Disinserire la spina prima di conservare il dispositivo.
• Non avvolgere troppo stretto il cavo intorno al dispositivo e non sovraccaricare
il cavo per evitare di danneggiarlo.
Viti
Griglia
Colonna

34
IT
AVVISO DI SMALTIMENTO
Se nel proprio paese si applicano le regolamentazioni
inerenti lo smaltimento di dispositivi elettrici ed
elettronici, questo simbolo sul prodotto o sulla confezione
segnala che questi prodotti non possono essere
smaltiti con i riuti normali e devono essere portati a
un punto di raccolta di dispositivi elettrici ed elettronici.
Grazie al corretto smaltimento dei vecchi dispositivi si
tutela il pianeta e la salute delle persone da possibili
conseguenze negative. Informazioni riguardanti il riciclo
e lo smaltimento di questi prodotti si ottengono presso
l’amministrazione locale oppure il servizio di gestione dei
riuti domestici.
Il prodotto contiene batterie. Se nel proprio paese si
applicano le regolamentazioni inerenti lo smaltimento
di batterie, non possono essere smaltite con i normali
riuti domestici. Preghiamo di informarvi sulle
regolamentazioni vigenti sullo smaltimento delle batterie.
Grazie al corretto smaltimento dei vecchi dispositivi si
tutela l’ambiente e la salute delle persone da conseguenze
negative.
PRODUTTORE E IMPORTATORE (UK)
Produttore:
Chal-Tec GmbH, Wallstraße 16, 10179 Berlino, Germania.
Importatore per la Gran Bretagna:
Chal-Tec UK limited
Unit 6 Riverside Business Centre
Brighton Road
Shoreham-by-Sea
BN43 6RE
United Kingdom

35
ES
Estimado cliente:
Le felicitamos por la adquisición de este producto. Lea
atentamente el siguiente manual y siga cuidadosamente
las instrucciones de uso con el n de evitar posibles daños.
La empresa no se responsabiliza de los daños ocasionados
por un uso indebido del producto o por haber desatendido
las indicaciones de seguridad. Escanee el siguiente código
QR para obtener acceso al manual de usuario más reciente
y otra información sobre el producto.
ÍNDICE
Indicaciones de seguridad 36
Descripción del aparato 37
Instalación 38
Funcionamiento 39
Mando a distancia 40
Limpieza y mantenimiento 41
Indicaciones sobre la retirada del aparato 42
Fabricante e importador (RU) 42
DATOS TÉCNICOS
Número de artículo 10029428
Alimentación 220-240 V~ 50/60 Hz
Consumo de energía 45 W
Peso (neto) 4,2 kg
Grado de inclinación 90 grados

36
ES
INDICACIONES DE SEGURIDAD
• Retire el embalaje y asegúrese de que ninguna pieza se ha dañado durante el
transporte. Si alguna pieza está dañada, póngase en contacto con el servicio
de atención al cliente inmediatamente.
• Los niños podrían resultar heridos por los materiales de embalaje y
los equipos antiguos. Por lo tanto, elimine los materiales de embalaje
inmediatamente.
• Los niños mayores de 8 años y las personas con discapacidad física, sensorial
o psíquica pueden utilizar el aparato si han sido previamente instruidos por
una persona responsable sobre el funcionamiento del mismo y conocen las
funciones, las indicaciones de seguridad y los riesgos asociados.
• Compruebe el voltaje en la etiqueta del aparato antes de utilizarlo. Conecte el
aparato a tomas de corriente que se adecuen a su tensión.
• Utilice el aparato únicamente para el n previsto, tal y como se describe en el
manual de instrucciones.
• Siga cuidadosamente las instrucciones de montaje del aparato. Un
procedimiento incorrecto puede provocar daños irreparables en el aparato.
• Antes de limpiar el aparato o si no lo utiliza, apáguelo y desconecte el enchufe
de la toma de corriente.
• Si el aparato no funciona correctamente, apáguelo inmediatamente y póngase
en contacto con un servicio técnico especializado de su zona.
• Si el cable de alimentación o el enchufe están dañados, deberán ser
sustituidos por el fabricante, una empresa autorizada o una persona
cualicada.
• No conecte el dispositivo a varias tomas de corriente.
• No utilice cables alargadores.
• No conecte nunca el aparato a tomas de corriente manejadas por control
remoto ni con temporizador.
• No utilice ni almacene la unidad cerca de fuentes de calor, como radiadores.
• No sumerja ni el aparato ni el enchufe en agua ni en ningún otro líquido. Si
hay una fuga de agua en el aparato, desenchúfel inmediatamente y haga que
lo revise una empresa especializada.
• Cuando utilice el aparato por primera vez, retire todas los plásticos y el
material de embalaje.
• No desconecte el enchufe tirando del cable; en su lugar, tire del cuerpo del
enchufe.
• Asegúrese de que el aparato esté apagado antes de introducir el enchufe en
la toma.
• No tire del cable de alimentación.
• Asegúrese de que todas las entradas y salidas de aire estén libres y
descubiertas para evitar que la unidad se sobrecaliente.
• Asegúrese de que el cable de alimentación no pase por bordes o supercies
aladas.
37
ES
• No cuelgue el aparato del techo o de la pared a menos que esté diseñado para
ello.
• Deje suciente espacio alrededor de la unidad con respecto a las paredes, los
muebles u otros equipos para obtener el mejor rendimiento.
• No utilice la unidad cerca de fuentes de calor, como radiadores.
• No coloque el aparato cerca o directamente debajo de las cortinas.
• No cubra el aparato.
• No se exponga a sí mismo ni a los demás a la corriente de aire directa para
evitar contagiarse de un resfriado.
• Cuando termine de utilizar el aparato, guárdelo en el embalaje original en un
lugar seco.
• Desenchufe siempre el aparato de la toma de corriente antes de limpiarlo o
cuando ya no lo utilice.
• No utilice el aparato cerca de sustancias o líquidos explosivos o inamables.
• Este aparato no está indicado para uso comercial, sino para uso doméstico o
entornos similares. Se trata de cocinas de ocinas, granjas, hoteles, moteles y
establecimientos que ofrecen alojamiento y desayuno.
DESCRIPCIÓN DEL APARATO
1 Panel de control
2 Indicador
3 Cubierta frontal
4 Tapa trasera
5 Rejilla de protección
6 Torre
7 Pie
8 Mando a distancia
38
ES
INSTALACIÓN
1. Saque todas las piezas del aparato del embalaje.
2. Pase el cable de alimentación por el centro de las dos secciones del soporte.
3. Monte el soporte. Para ello, enganche una parte del soporte en los soportes
de la otra parte.
4. Coloque el cuerpo del ventilador de la torre boca abajo. Coloque el soporte
en el cuerpo. Asegúrese de que la columna está rmemente asentada en el
soporte.
5. Atornille el soporte a la columna con los tornillos suministrados.
6. Pase el cable de alimentación por la guía situada en la parte posterior de la
carcasa.
7. Vuelve a colocar la torre en su sitio. El dispositivo está listo para su uso.
Torre
Tornillos
39
ES
FUNCIONAMIENTO
Manejo a través del panel de control del aparato
1
Activación del temporizador.
Cada vez que se pulsa el botón,
el tiempo se incrementa en una
hora.
4 Encender/apagar
2 Desactivación del temporizador. 5
Elección de tres niveles
(bajo, medio, alto). El nivel
seleccionado aparece en la
pantalla.
3
Posibilidad de elegir entre tres
modos (Sleep, Natural, Normal).
El modo seleccionado aparece
en la pantalla.
6
Activación y desactivación del
movimiento de giro

40
ES
Campo de visualización
MANDO A DISTANCIA
Notas sobre el mando a distancia
• Sostenga el mando a distancia hacia el receptor de infrarrojos de la unidad.
• No bloquee la línea de visión entre el mando a distancia y el receptor.
• No utilice el mando a distancia en una sala donde haya maquinaria pesada en
funcionamiento.
• Manipule el mando a distancia con cuidado. No deje caer el mando a distancia
al suelo. No lo golpee contra objetos duros.
Indicaciones sobre las baterías
• Extraiga las pilas cuando no vaya a utilizar el mando a distancia durante un
periodo prolongado de tiempo.
• El mando a distancia necesita tres micro-pilas (LR03). Deben ser nuevos y
sustituirse al mismo tiempo cuando estén vacíos.
• Limpie los contactos de las pilas y del compartimento de las pilas antes de
introducirlas.
• Asegúrese de que la polaridad es correcta al insertarlo. El más y el menos
deben coincidir con los dibujos del compartimento de las pilas.
Velocidad de la
ventilación
Viento naturalVentilación para dormir
Visualización de
la temperatura
ambiente o del
temporizador
Modo de giro

41
ES
LIMPIEZA Y MANTENIMIENTO
Nota: No permita que entre agua en la unidad.
Limpieza
1. Desconecte siempre el enchufe antes de la limpieza.
2. Elimine el polvo aspirando a lo largo de la parte
delantera del ventilador y en la parte trasera,
donde las rejillas de plástico cubren la entrada de
aire. También son adecuados las escobillas o los
plumeros.
3. Limpie de vez en cuando la supercie del ventilador
con un paño húmedo (que no gotee) y séquelo bien
con un paño suave y seco antes de hacer funcionar
la unidad.
4. No utilice limpiadores o sustancias agresivas para la
limpieza. Esto causará daños.
5. Aoje el tornillo de la rejilla frontal. Abra la rejilla
para limpiar con cuidado la rueda del ventilador
(Ver imagen).
Almacenamiento
• Limpie el ventilador cuidadosamente como se ha descrito anteriormente.
• Para el almacenamiento, coloque cuidadosamente la unidad en la caja original
o cúbrala para protegerla del polvo.
• Guarde el dispositivo en un lugar seco.
• No deje nunca el enchufe enchufado durante el almacenamiento.
• No enrolle el cable de alimentación con fuerza alrededor de la unidad y no
someta el cable de alimentación a tensión en el punto de entrada a la unidad,
ya que se brilará o romperá.
Tornillos
Rejilla
Torre
42
ES
INDICACIONES SOBRE LA RETIRADA DEL APARATO
Si en su país existe una disposición legal relativa a la
eliminación de aparatos eléctricos y electrónicos, este
símbolo estampado en el producto o en el embalaje
advierte que no debe eliminarse como residuo doméstico.
Debe depositarse en un punto de recogida de reciclaje
de aparatos eléctricos y electrónicos. Una retirada de
aparatos conforme a las leyes contribuye a proteger el
medio ambiente y a las personas a su alrededor frente a
posibles consecuencias perjudiciales para la salud. Para
obtener información más detallada sobre el reciclaje de
este producto, póngase en contacto con su ayuntamiento
o con el servicio de eliminación de residuos domésticos.
Este producto contiene baterías. Si en su país existe una
normativa para la eliminación de baterías, estas no deben
ser arrojadas al cubo de la basura común. Infórmese
sobre la legislación de su país que regula la retirada
y eliminación de las pilas y baterías. Una retirada de
aparatos conforme a las leyes contribuye a proteger el
medio ambiente y a las personas a su alrededor frente a
posibles consecuencias perjudiciales para la salud.
FABRICANTE E IMPORTADOR (RU)
Fabricante:
Chal-Tec GmbH, Wallstraße 16, 10179 Berlín, Alemania.
Importador para el Reino Unido:
Chal-Tec UK limited.
Unit 6 Riverside Business Centre
Brighton Road
Shoreham-by-Sea
BN43 6RE
Reino Unido