Loading ...
Loading ...
Loading ...
WARNING: FAILURE TO FOLLOW THESE OPERATING INSTRUCTIONS MAY RESULT IN INJURY
AND/OR DAMAGE.
Operating The Product
Operating Instructions (Remote Control)- See Figure 8
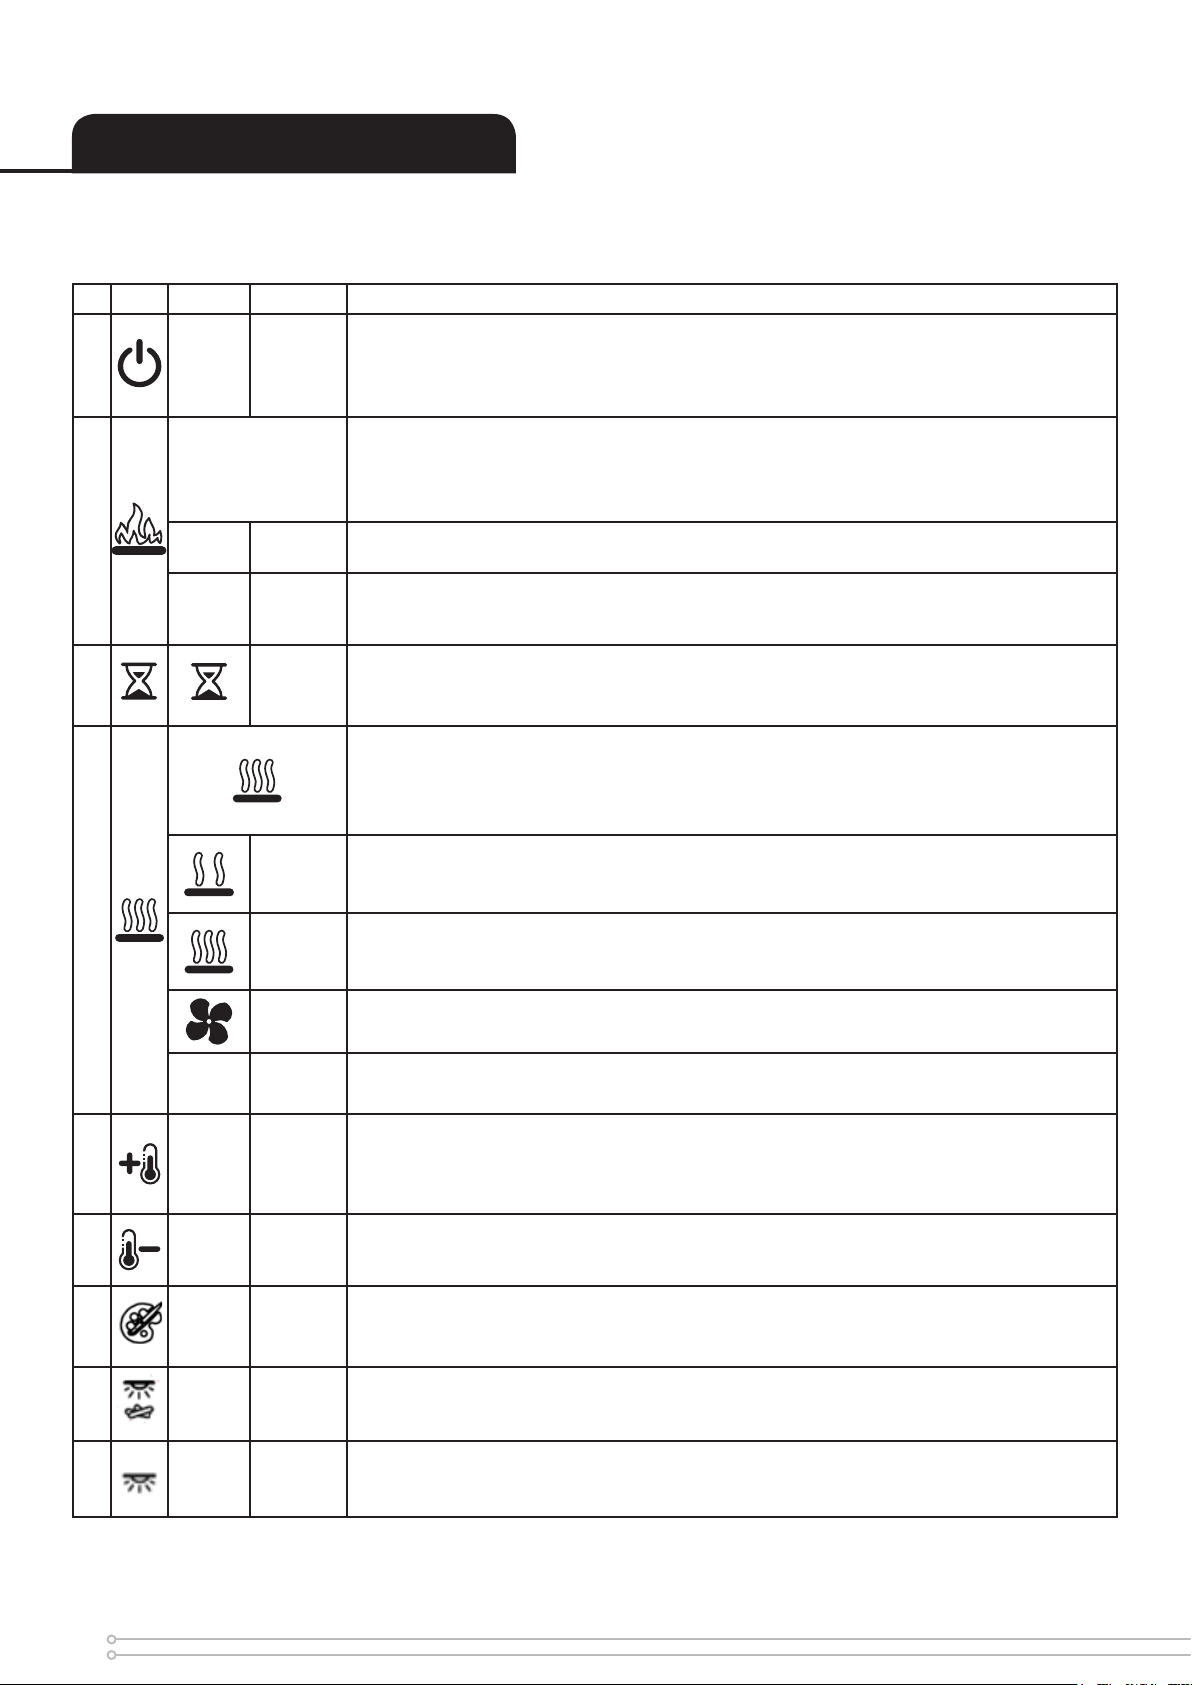
Icon Display Funtion Description
A -
Power /
Standby
Press Once to turn the product ‘ON’.
Press a second time to put the product into ‘STANDBY’
(When returning from ‘STANDBY’ mode the product will return to previous settings unless
the product has been unplugged, in which case it will reset to factory settings)
B
F1 / F2 /
F3
‘FLAME EFFECT’ button this turns the ame effect ON or OFF independently of the
products other features.
This Button will change the brightness of the ame effect. There are 3 brightness
settings shown as F1, F2, F3.
P
Flame
Pulsing
This setting is set by pressing the Flame Up button once more after F3. This will cause the
brightness of the ame effect to cycle randomly, creating a ickering effect.
-
Off
If the ame effect is turned off, but the heater is ON, the display will activate and remain
active to read the set temperature and indicate if the product is on LOW HEAT/ HIGH
HEAT/ COOL BLOW.
C
Sleep
Timer
Press multiple times to change the ‘SLEEP TIMER’ in 0.5 hr increments from 0.5
hr to 8.0 hr before turning off. The remaining time on the ‘SLEEP TIMER’ displays.
(This icon is Green in colour)
D
‘HEAT’ button cycles the unit sequentially through the 4 settings: LOW HEAT, HIGH HEAT,
COOL BLOW and OFF. The heat setting will be indicated by an icon in the display.
When the ame effect is ‘ON’ the display will turn off after 5 seconds, however if the
heater is being used independently of the ame effect. The low heat or high heat icon
will appear continuously in the display.
Low
Heat
This setting will run the heater at ‘LOW HEAT’ this setting will be indicated by the ‘LOW
HEAT’ icon and the letters ‘LO’ appearing in the display. To adjust the temperature
setting the Temp Down or Temp Up buttons described below must be used.
(This icon is Orange in Colour)
High
Heat
This icon in the display indicates ‘HIGH HEAT’ this setting will be indicated by the ‘HIGH
HEAT’ icon and the letters ‘HI’ appearing in the display. To Adjust the temperature setting
the Temp Down or Temp Up buttons described below must be used.
(This icon is Red in Colour)
Cool
Blow
This icon in the oating display indicates ‘COOL BLOW’ this setting will be indicated by
the ‘COOL BLOW’ icon and the letters ‘CB’ appearing in the display.
(This icon is Blue in Colour)
- Off
This switches the heater and blower ‘OFF’, no icon will be displayed in the display. Note
the blower will run for 5-10 seconds after being turned off, this is to ensure the product
cools down safely.
E 30 Temp Up
Press multiple times to increase the heater temperature in 2
0
C increments. The highest
temperature that can be set 30
0
C.
When High Heat is selected, the letters ‘HH’ appear in the display, this means the heat
will remain ON continusously and is not controlled by the thermostat.
F 18
Temp
Down
Press multiple times to lower the heater temperature in 2
0
C increments. The lowest
temperature that can be set is18
0
C.
G
-
Flame
Colour
Press to turn ON/OFF the coloured accents within the flame effect.
H -
Top-light
Fuel Bed
Press to turn ON/OFF the Top light illuminating the fuel bed.
J -
Top-light
Back-
ground
Press to turn ON/OFF the Top-light illuminating the product background.
6
Loading ...
Loading ...
Loading ...