Loading ...
Loading ...
Digital Timer (403TSFTie) - see Fig. 9
IMPORTANT: Remember to observe all safety warnings when operating
the heater on auto setting, either attended or unattended.
The timer allows you to select ‘AUTO’ or ‘MAN ON’ by pressing the ‘MODE’
button until the required MODE appears at the bottom of the timer display.
‘AUTO’ MODE allows the heater to switch ON and OFF according to a set
24 Hour program period (see ‘Setting Programs’ section below).
‘MAN ON’ MODE allows power to the heater uninterrupted by the program
settings.
Key Lock:
If ‘ENTER’ and ‘MODE’ are pressed within 1 second, the keys will be
locked. The user will know the keys are locked as the lock symbol ‘ ’ will
be displayed on the top left hand corner of the screen. To unlock the keypad,
press ‘ENTER’ and then ‘MODE’ within 1 second.
Initial Operation
For initial use, plug the heater into a regular household power point and
turn the power on. The timer is now ready to be set up for use.
13 : 17
ON
OFF
ADVANCE
AUTO
P1
MANUAL ON
Setting Current Time
1. Hold the ‘PROGRAM’ button until the clock symbol appears on the
top left hand side of the screen. The user can now set the clock.
2. The hour digit will ash. To adjust the hour use the ‘-‘ & ‘+’ buttons.
Conrm the hour digit by pressing ‘ENTER’.
3. Once ‘ENTER’ has been pressed the minutes will ash. To adjust
the minutes use the ‘-‘&‘+’ buttons. Conrm the minute digit by pressing
‘ENTER’.
4. The timer now returns to the default display.
5. To reset incorrect time, repeat previous steps.
Once the correct time is set, a total of four ON/OFF time programs can be
set for operation. There are two program options.
Setting Programmes
Press the ‘PROGRAM’ key to set the programs.
You are now setting the programs starting with P1 ‘ON’.
SETTING P1 ON TIME:
1. To set the hour use the ‘-‘ & ‘+’ buttons. Conrm the hour digit by pressing
‘ENTER’.
2. To set the minutes use the ‘-‘ & ‘+’ buttons. Conrm the minute digit by
pressing ‘ENTER’.
Note: The minutes can only be set in 10 minute blocks in programme
‘MODE’.
SETTING P1 OFF TIME:
3. To set the hour use the ‘-‘ & ‘+’ buttons. Conrm the hour digit by pressing
‘ENTER’.
4. To set the minutes use the ‘-‘ & ‘+’ buttons. Conrm the minute digit by
pressing ‘ENTER’.
Repeat steps 1 to 4 to programme P2, P3 & P4. After programming P4
‘OFF’ you automatically exit to the default display.
At any time while programming the timer you can press the ‘PROGRAM’
button to exit to the default display.
The Advance Function
When in ‘AUTO’ MODE, if the ‘+’ button is pressed for longer than 2
seconds the programme will ADVANCE to the next setting programmed
and will only revert back to the program when the subsequent programme
time is reached. When the ‘ADVANCE’ function is running the ‘ADVANCE’
segment will be displayed on the LCD screen. If the ‘-‘ button is pressed
when the ‘ADVANCE’ programme is running the ‘ADVANCE’ feature will
be automatically cancelled and the programme will run as normal.
Note - Timer Memory Back Up Batteries - Once the heater has been
left plugged in with the socket switched on for at least 72 hours the timer’s
memory back up batteries will be fully charged.
Once the timer batteries are fully charged, if there is a power cut or if the
heater is disconnected from the mains for less than six months, then the
timer will continue to keep time & the settings in the memory will remain
intact.
Setting the ‘Auto’ ON and OFF times
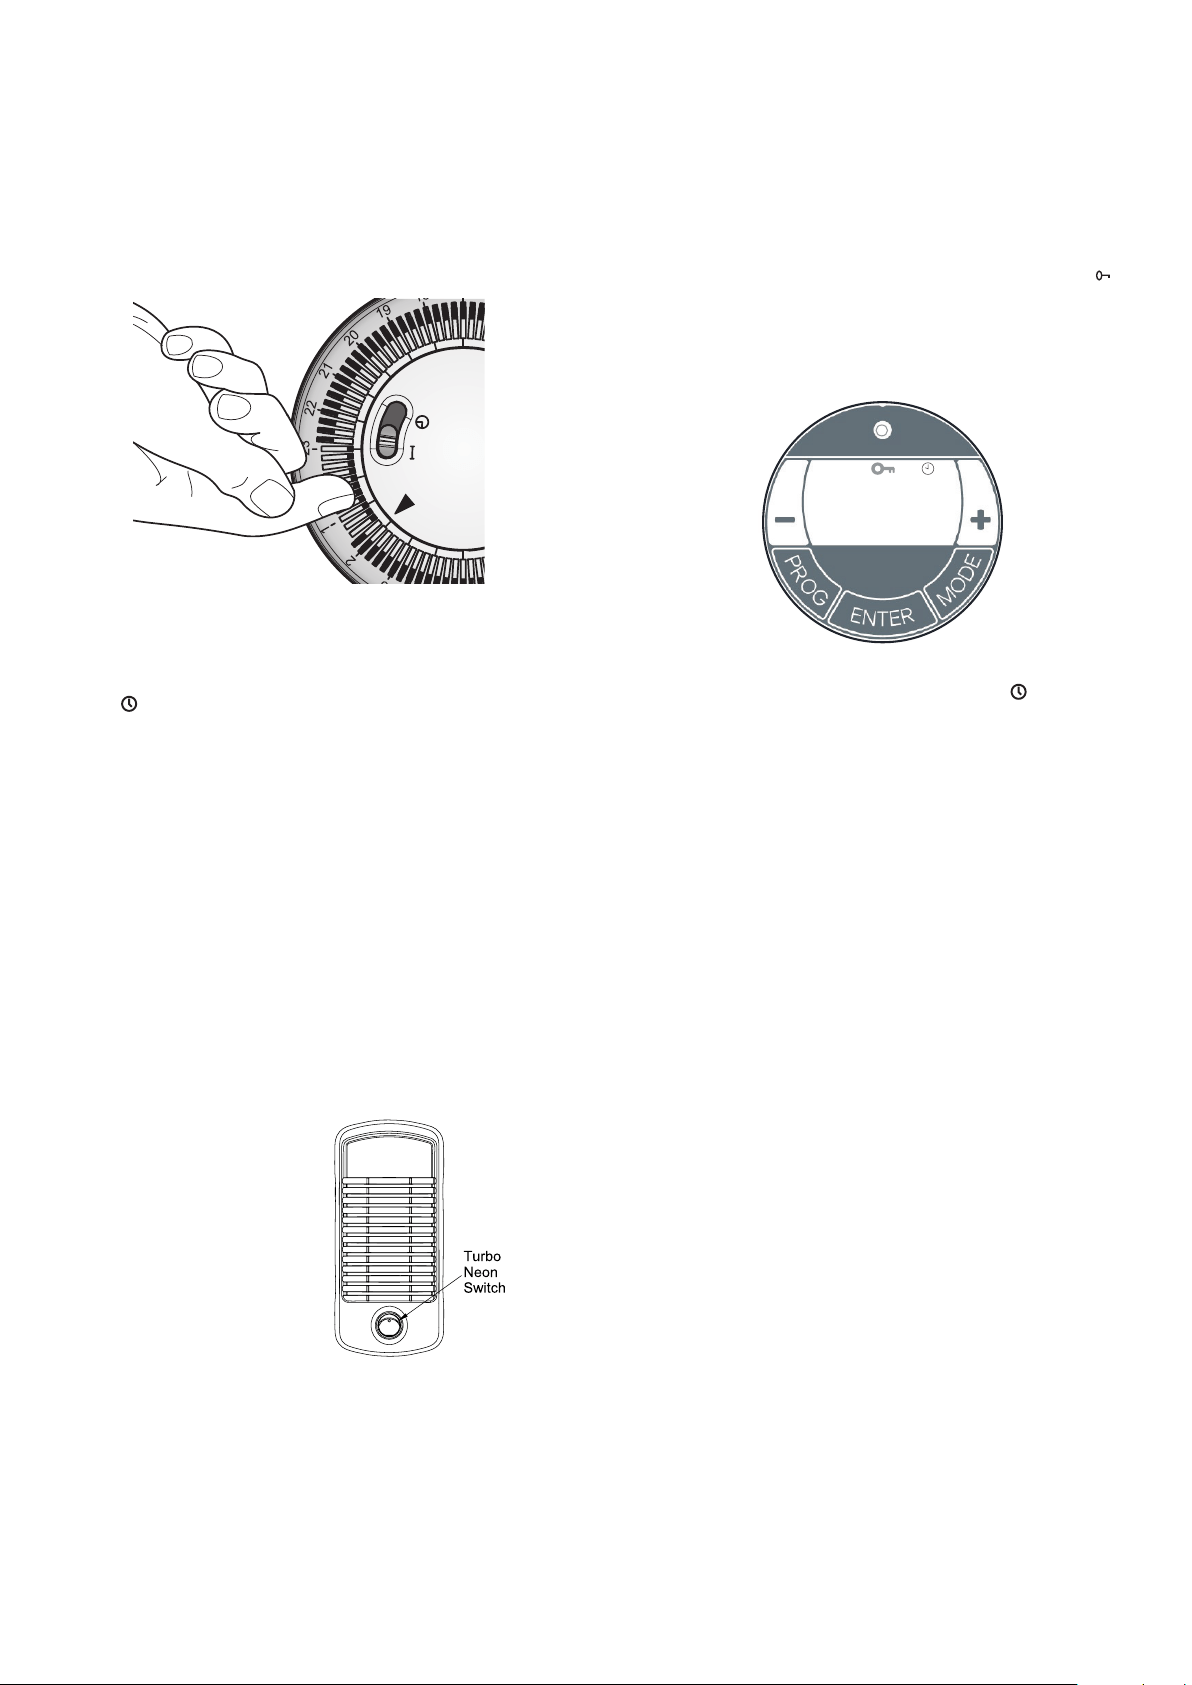
To set the timer :
1. Using your nger tip or the tip of a pencil, push in as many
segments as necessary around the dial, according to the times you
don’t require heat – see Fig. 7. Each segment pushed in switches
the heater OFF for that part of the hour. All other segments will be
ON. For example, Fig. 7 shows the timer set to switch the heater
OFF between 11pm and 1.45am.
2. You can select as many ON periods as you like, within the 24-hour
day. The settings will repeat every day until changed.
3. To change ON and OFF times, simply push in any ‘ON’ segments
you wish to cancel and pull out new ‘ON’ segments as required.
Fig. 7
Switching to auto
Ensure the thermostat and/or the heat selector are set for the desired
heat output.
Check that the clock shows the correct time of day. Set the mode slide
switch to , the heater will switch ON and OFF according to the timer
settings (see Fig. 7).
Important notes
Remember to observe all safety warnings when operating the heater on
auto setting unattended or attended .
If the mains supply to the heater is interrupted, the timer clock will stop until
power is restored ; reset the time of day to ensure correct ON and OFF times.
403TSF Operation
This model contains an On/Off switch and operates as follows.
When O/I switch is in position O the product is off regardless of any other
setting. When O/I switch is in position I and the turbo switch is Off there is
a low heat output from the product. The turbo fan will be off.
When O/I switch is in position I and the turbo switch is On the heater goes
into high heat fan boost mode. There is a high heat output from the product.
The turbo fan will be running. The indicator neon is always on when the
product is connected to the mains supply.
Note: there is no cold blow operation on this model and all heat settings
and the turbo fan operate under the control of the thermostat
Turbo fan (Boost mode)
The turbo fan is used to boost
the airow around the room. This
circulates the heat better and
results in a reduced heat up time
and a more even heat distribution.
The turbo fan is controlled by the
neon switch on the front of the
product.
403TSFTie Operation
This model contains an On/Off switch and operates as follows.
When O/I switch is in position O the product is off regardless of any other
setting. The timer will continue to operate but cannot turn on the product
When O/I switch is in position I and the turbo switch is Off there is a low
heat output from the product. The turbo fan will be off.
When O/I switch is in position I and the turbo switch is On the heater goes
into high heat fan boost mode. There is a high heat output from the product.
The turbo fan will be running. The neon indicator on the timer will only be
on when the timer is on an ‘On’ cycle.
Note: there is no cold blow operation on this model and all heat settings
and the turbo fan operate under the control of the thermostat
Fig. 8
Fig. 9
Loading ...