
USER MANUAL
BOTTLE WARMER
Model # JBW-250

2
Read this manual thoroughly
before using and save it for
future reference
FOR CUSTOMER SERVICE
QUESTIONS OR COMMENTS
VISIT US @ GOURMIA.COM
OR CALL 888.552.0033
Visit GourmiaJr.com for important product information and
regularly updated manuals
Model: JBW-250
© 2018 Gourmia
www.gourmia.com
The Steelstone Group
Brooklyn, NY
All rights reserved. No portion of this manual may be reproduced by any means
whatsoever without written permission from The Steelstone Group, except for
the inclusion of quotations in a media review.
Although every precaution has been taken in the preparation of this manual, The
Steelstone Group assumes no responsibility for errors or omissions. Nor is any
liability assumed for damages resulting from the use of the information
contained herein. Although every effort has been made to ensure that the
information contained in this manual is complete and accurate, The Steelstone
Group is not engaged in rendering professional advice or services to the
individual consumer; further, The Steelstone Group shall not be held responsible
for any loss or damage allegedly arising from any information or suggestion in
this manual.
3
Welcome to the Convenient World of
Bottle Warming from Gourmia
Thank you for
purchasing a Gourmia Bottle Warmer!
through the functions and features of the Gourmia Double Bottle Warmer.
complete step-by-step instructions for the operation, assembly, cleaning,
and maintenance of your appliance.
Please read all safety instructions thoroughly to ensure safe usage at all times.
Thank you for your purchase. We sincerely hope you will enjoy this as well as
all the many innovative products brought to you by Gourmia.

4
IMPORTANT SAFEGUARDS
Before using this product please read this manual carefully,
and save for future reference.
ALWAYS TEST THE MILK TEMPERATURE BEFORE FEEDING YOUR BABY.
SAFETY INSTRUCTIONS
When using any electric appliance, basic precautions should
always be followed to reduce the risk of re, electric shock and
injury, including the following:
1. Never use the appliance with a damaged cord or plug or after the appliance
has been damaged in any way. Contact customer service for any damages on
the appliance.
2. This appliance is for adult use only. Persons under the age of 13 should not
use this product.
3. Close supervision is required when any appliance is used near children.
4. Do not exceed the maximum level of water- spilling may occur while the
water is hot.
5. Always place the bottle warmer on a dry, flat surface- out of reach of
children.
6. Do not move the appliance during use.
7. Do not touch the appliance while it is in use, the appliance gets very hot!
8. Beware of the hot steam which escapes from the cover.
9. Never immerse the base of the appliance in water or any other liquid.
10. Always unplug the appliance before cleaning. Make sure the appliance is
cleaned and dry before each use.
11. Do not use the appliance for anything other than its intended use.
12. This appliance is intended for household use only.
13. Keep the power cord away from children.
Electromagnetic eld (EMF)
This appliance complies with all standards relating to electromagnetic
elds (EMFs). It meets the safety rules established on the basis of current
scientic knowledge provided it is handled correctly and in compliance
with these instructions.
IMPORTANT SAFEGUARDS

TABLE OF CONTENTS
TABLE OF CONTENTS
5
Know Your Bottle Warmer ..............6
Using Your Bottle Warmer
..............7
Settings Chart
..............................13
Cleaning & Maintenance...............15
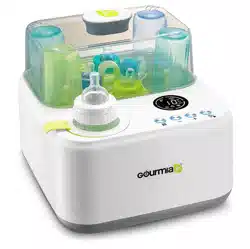
F
QUICK SLOW DEFROST
STERILIZE STEAM PRE SET
F
QUICK SLOW DEFROST
STERILIZE STEAM PRE SET
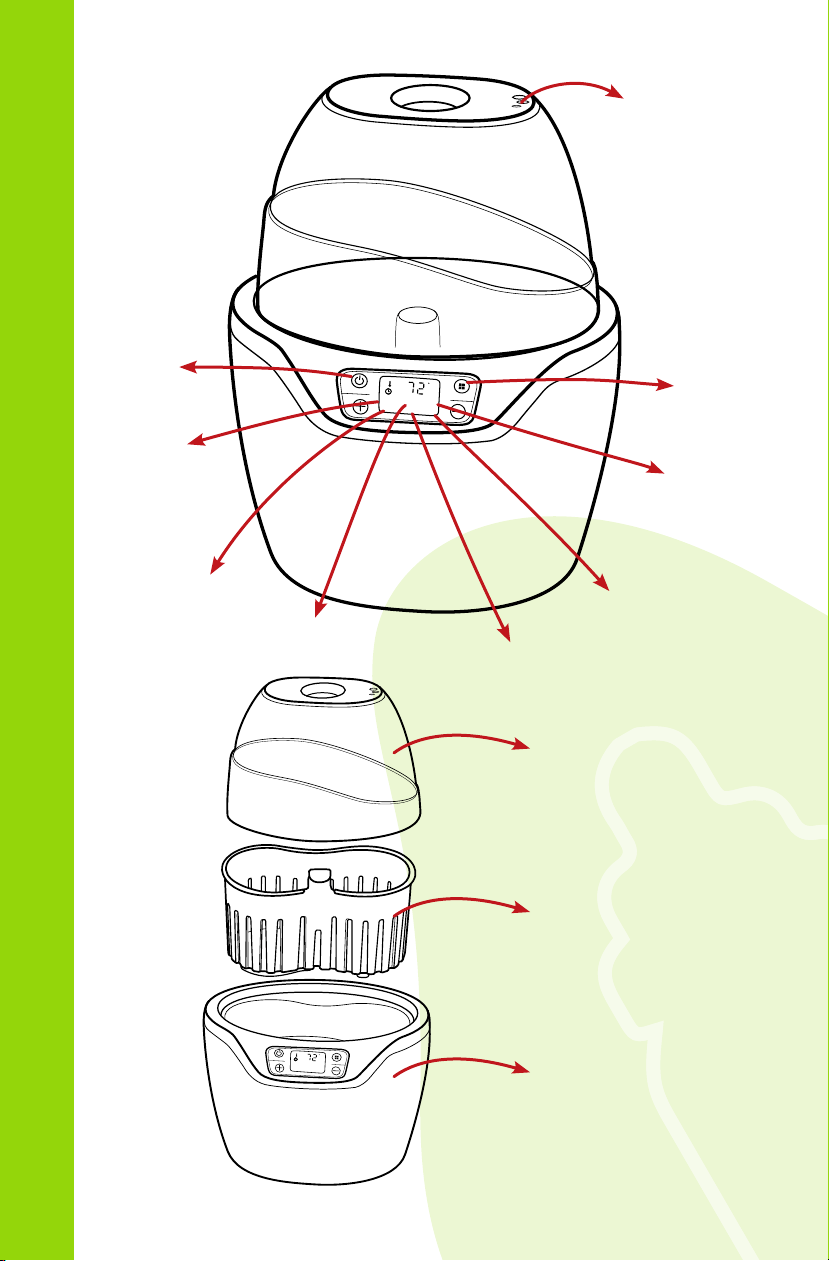
Preset
Function
Defrost
Function
Menu
Button
Air Vent
Steaming
Function
Slow Warm
Function
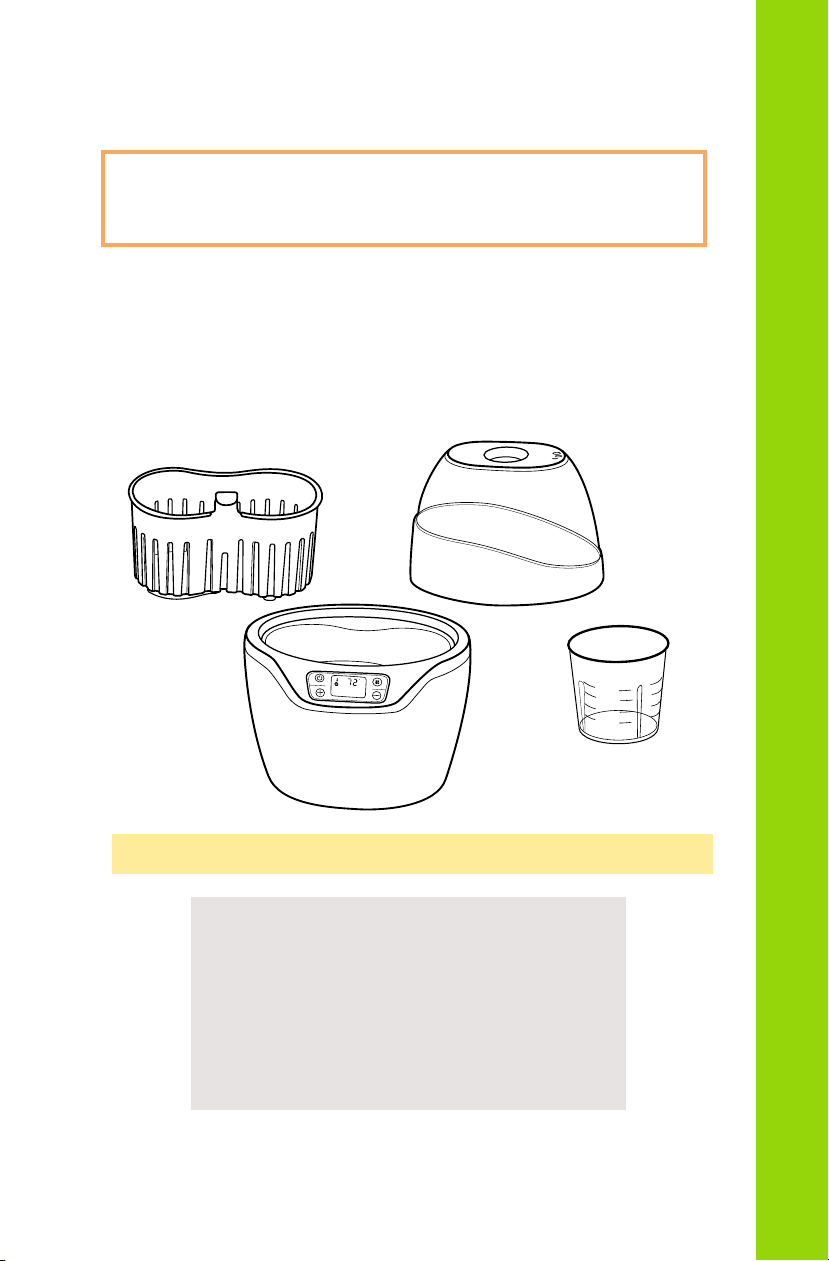
Cover
Bottle Holder
Warmer Base
Sterilize
Function
Quick
Warm
Function
Power
Button
KNOW YOUR BOTTLE WARMER
6
USING YOUR AIR FRYER
F
QUICK SLOW DEFROST
STERILIZE STEAM PRE SET
F
QUICK SLOW DEFROST
STERILIZE STEAM PRE SET
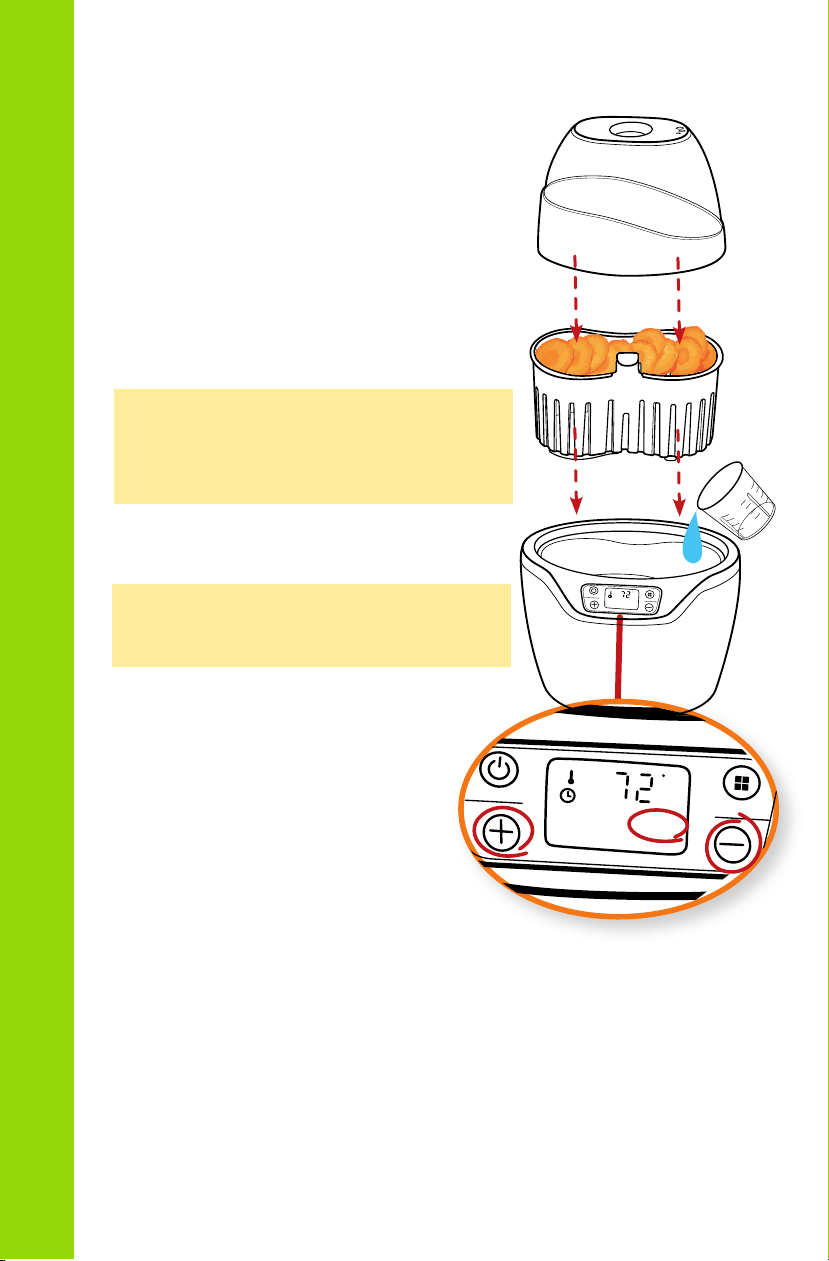
QUICK WARM FUNCTION:
The function uses steam to warm the bottle as fast as possible.
1. Put 100 ml (3.5 oz) of water inside the warmer
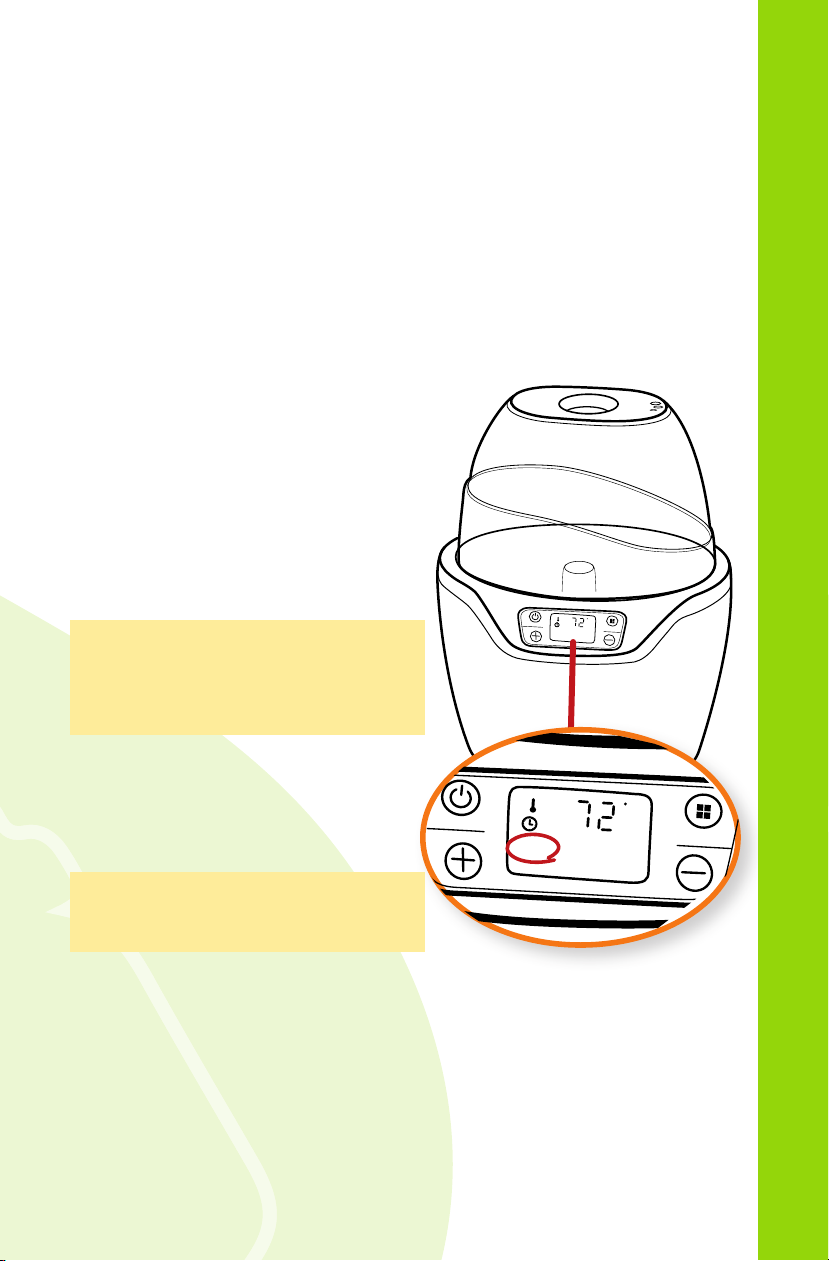
2. Tap the power button.
All options will appear on the screen.
3. Tap the menu button until the “quick” function is selected.
The 3 minute default time will appear on the display screen.
To adjust the time use the +/-
to add or decrease the time.
4. After a few seconds the quick
warm function will begin. The
display screen will show the
remaining time.
6. When the timer bell rings the
quick warm function is complete.
Warning: While the appliance is in
use hot steam will escape from
the cover vent - be careful!
7. Tap the power button to shut
down the appliance. Use the
tongs provided to remove the
hot utensils.
Warning: When lifting the cover
hot steam will escape- be careful!
USING YOUR BOTTLE WARMER
7
QUICK WARM TIME TABLE
Warm Milk
Milk in the bottle ml
2 oz - 3 oz
3 oz - 4 oz
2 oz - 3 oz
3 oz - 4 oz 2 - 3 mins 3 - 4 mins
Room Temp. 73 º F
Room Temp. 73º F
2 mins 3 mins
Refrigerated 39 º F 4 - 5 mins 5 - 6 mins
Refrigerated 39
º F 3 - 4 mins 4 - 5 mins
Milk temperature Needed time Needed time
Glass bottle
Plastic Bottle
Note: Every bottle is dierent, If your bottle is too cold after use, try one setting higher.
If your bottle is too hot, try a lower setting.
Caution: Always check the bottle temperature before feeding your baby!
F
QUICK SLOW DEFROST
STERILIZE STEAM PRE SET
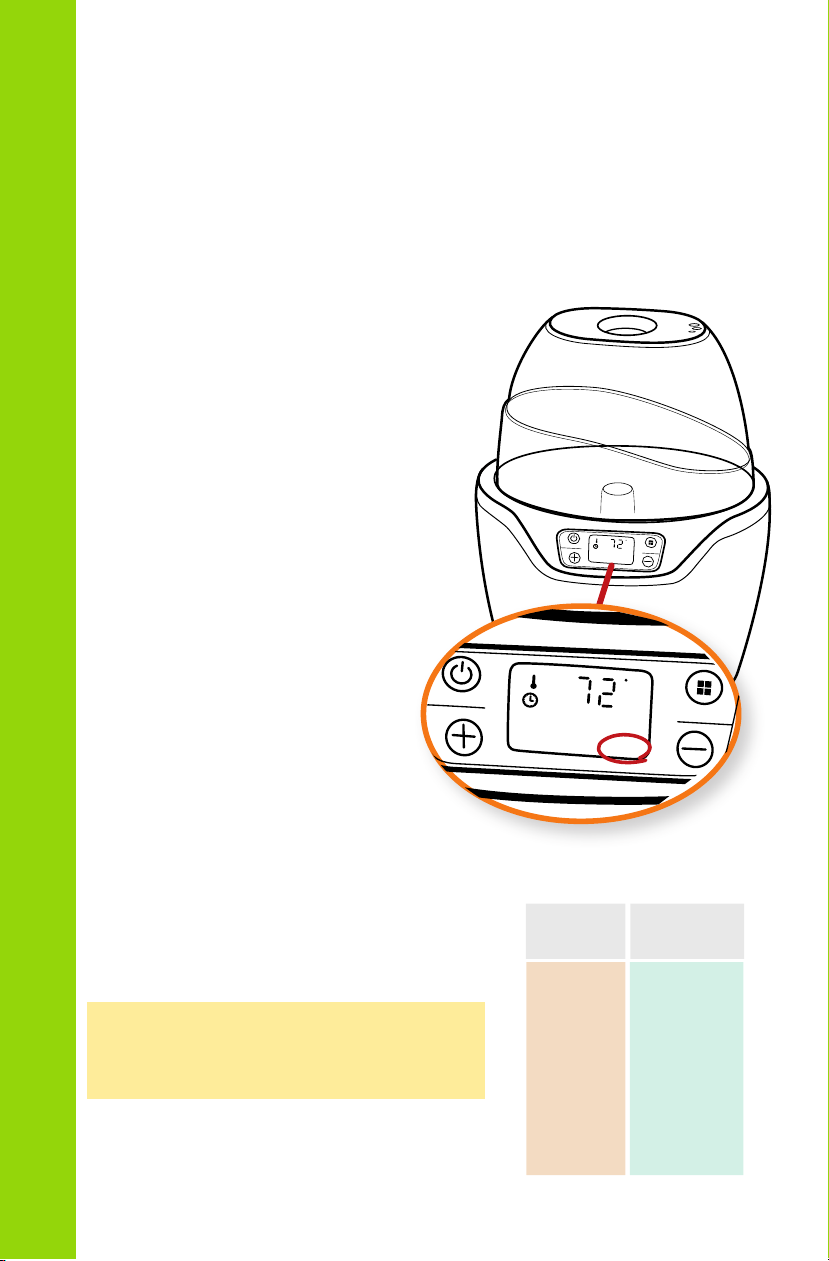
SLOW WARM FUNCTION
This function slowly and carefully warms
the water to preserve nutrients and proteins
in the bottle.
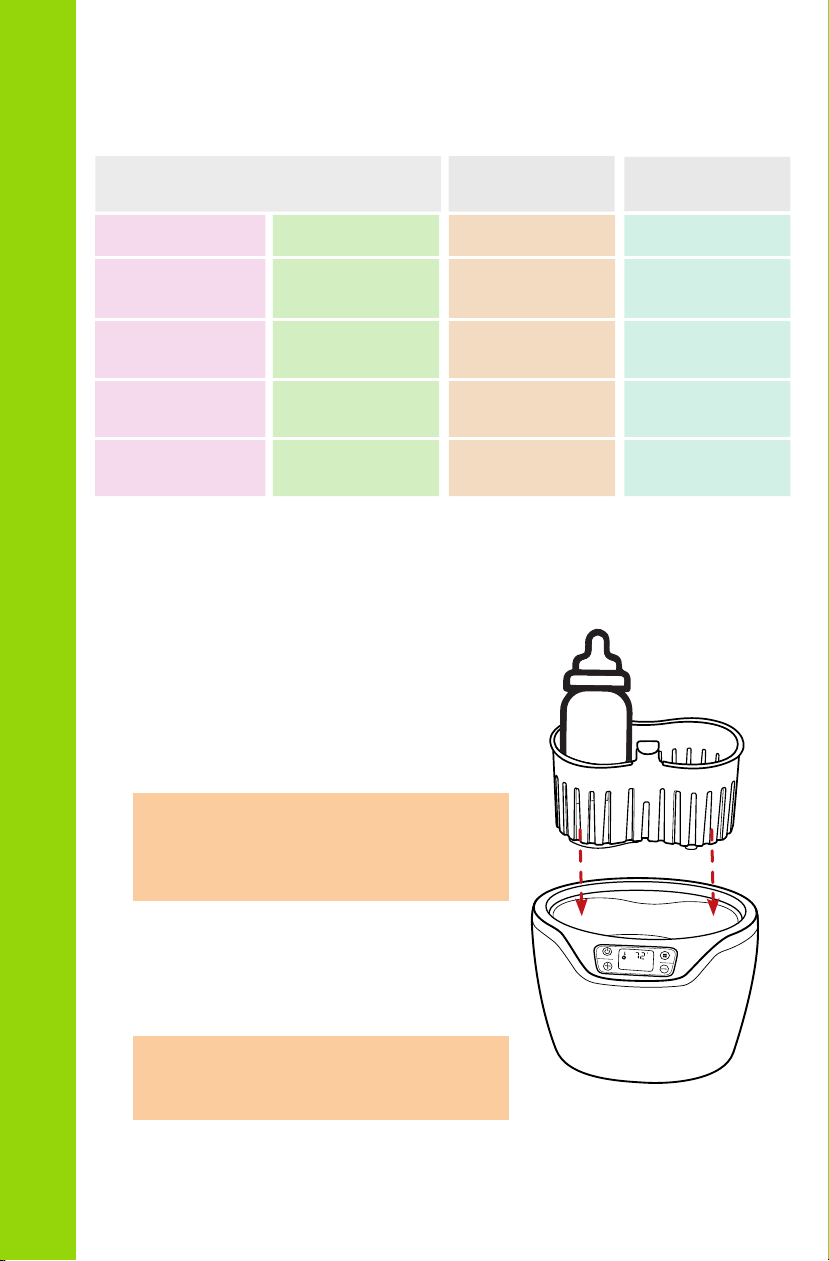
1. Place the milk bottle into the bottle
holder and into the warmer base.
Note: Do not place the bottle
directly into the warmer without
the bottle holder.
2. Pour water into the warmer.
The amount of water poured in should
reach the amount of liquid that is
inside the bottle.
Note: Never ll the container to the
point of overow.
USING YOUR BOTTLE WARMER
8
9
Note: Every bottle is dierent, If your bottle is too cold after use, try one setting higher.
If your bottle is too hot, try a lower setting.
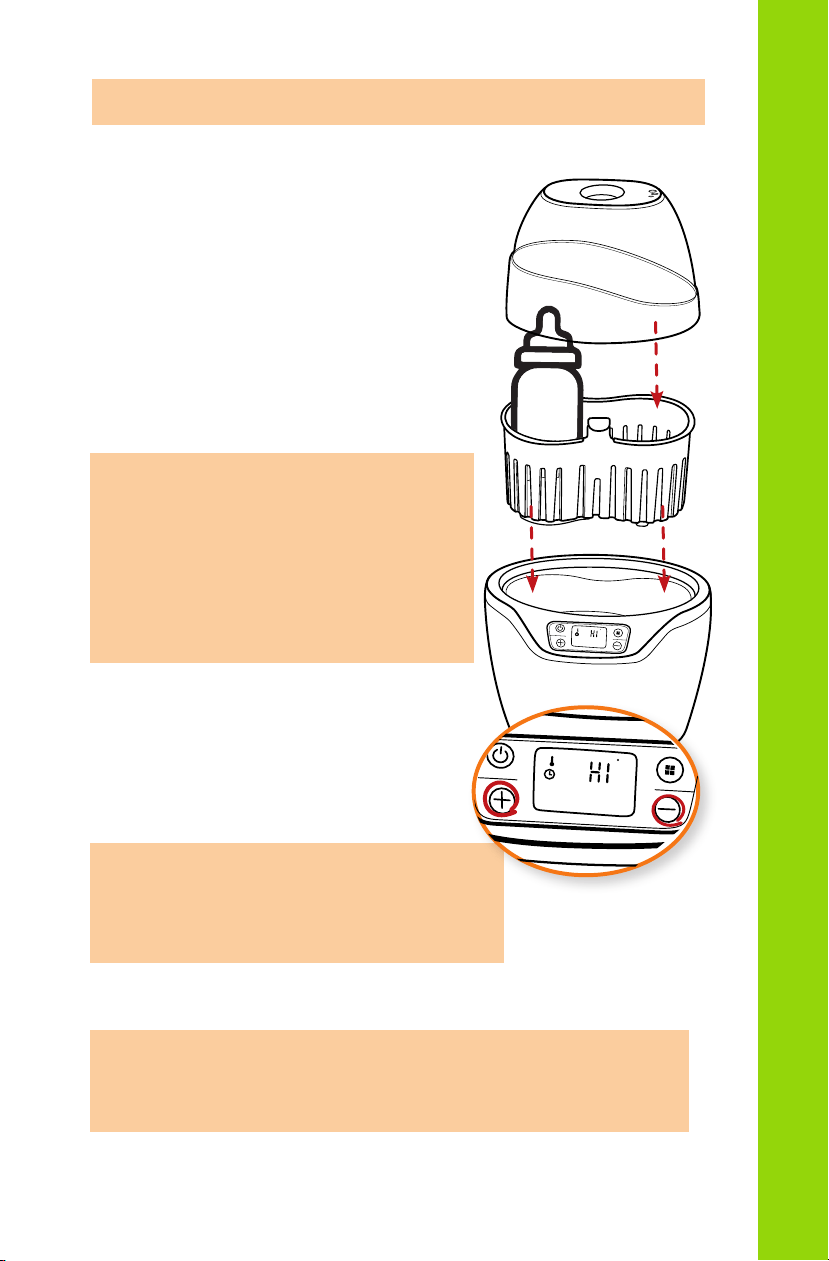
3. Place the warmer lid over the holder
and warmer base.
5. Tap the power button to turn on the
machine.
6. If any of the bottles have 7 oz of
milk or more (even if you are using
a single bottle), use the +/- keys to
select the HI setting.
7. For any other volume of milk,
use the LO setting.
Note: If you use the LO setting and
your milk isn’t warm enough, feel
free to try the HI setting.
Note: DO NOT use the HI setting to
heat bottles faster, as it can over-
heat the milk if it isnt needed.
8. The unit will beep when the
warming process is complete.
9. Once the bottles are warm, the
unit will keep them warm for three
hours.
Note: It is always recommended that
formula be used no more than one hour
after making it.
10. Tap the power button to shut down the appliance.
Note: Use the tongs provided to remove the hot bottles.
When lifting the cover, hot steam will eascape- be careful!
F
QUICK SLOW DEFROST
STERILIZE STEAM PRE SET
F
QUICK SLOW DEFROST
STERILIZE STEAM PRE SET
USING YOUR BOTTLE WARMER
9
For best results, remove bottles as soon as the heating cycle is over.
F
QUICK SLOW DEFROST
STERILIZE STEAM PRE SET
DEFROST FUNCTION:
The function is used for thawing frozen
items such as frozen breast milk or other
items.
1. Place the items into the basket, and
then the basket into the warmer
base.
Note: Do not place the food directly
into the warmer without the bottle
holder.
2. Fill the warmer with water until the
water barely covers the item.
Note: Never fill the container to the
point of overflow.
3. Place the warmer lid over the
holder.
5. Tap the power button. All options
will appear on the screen.
6. Tap the menu button- until the
defrost function appears.
Using the +/- adjust a time
needed for defrosting.
The larger or colder the item is- the longer
length of time is needed for defrosting.
7. When the defrost time is set- the machine will start defrosting.
8. When the timer bell rings the defrosting process is complete.
9. Tap the power button to shut down the appliance.
Use the tongs provided to remove your items.
F
QUICK SLOW DEFROST
STERILIZE STEAM PRE SET
USING YOUR BOTTLE WARMER
10
11
9
DEFROST FUNCTION:
The function is used for thawing frozen
items such as frozen breast milk or other
items.
1. Place the items into the basket, and
then the basket into the warmer
base.
Note: Do not place the food directly
into the warmer without the bottle
holder.
2. Fill the warmer with water until the
water covers the item.
Note: Never ll the container to the
point of overow.
3. Place the warmer lid over the holder.
5. Tap the power button. All options
will appear on the screen.
6. Tap the menu button- until the
defrost function appears.
Using the +/- adjust a time
needed for defrosting.
The larger or colder the item is- the longer
length of time is needed for defrosting.
7. When the defrost time is set- the machine will start defrosting.
8. When the timer bell rings the defrosting process is complete.
9. Tap the power button to shut down the appliance.
Use the tongs provided to remove your items.
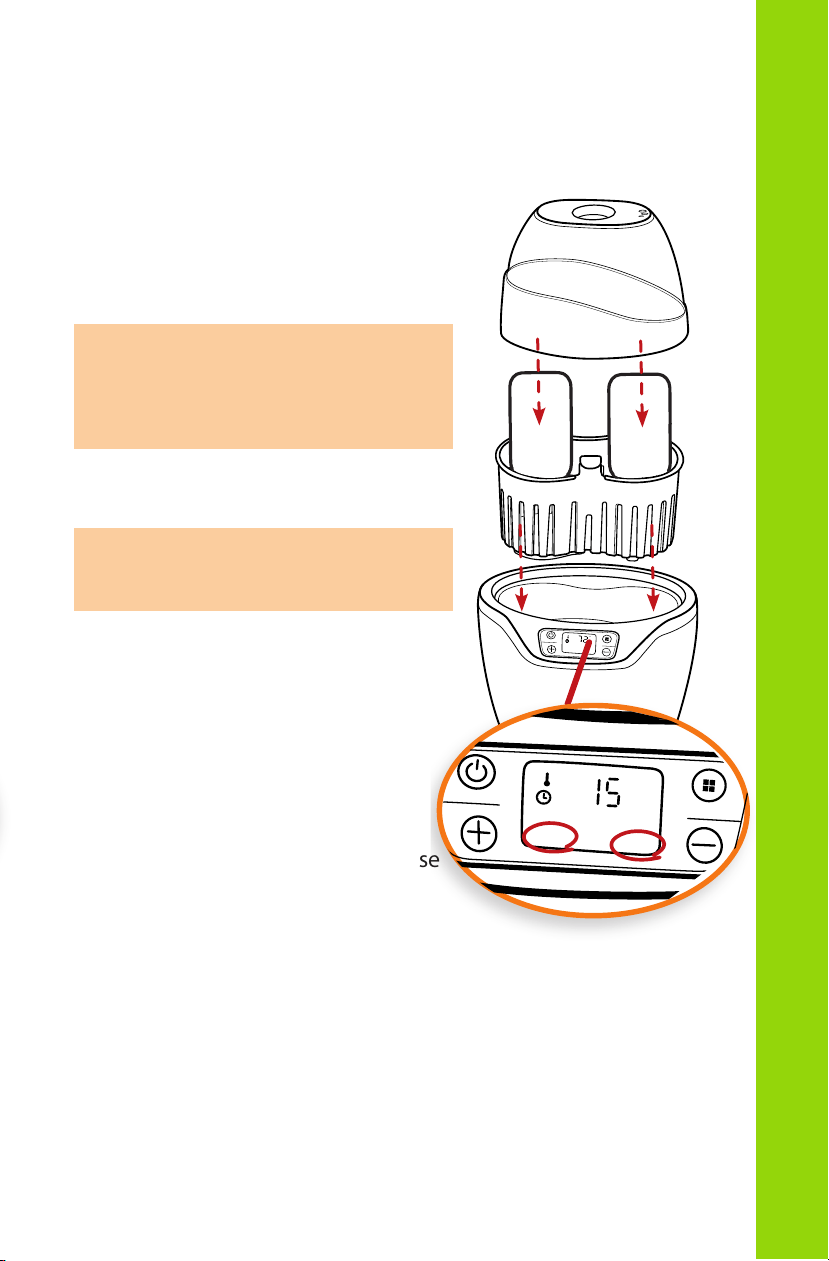
STERILIZE FUNCTION
1. For 10 and 15-minute cycles, use
100 ml (3.4 oz) of water. For 20-
minute cycles, use 130 ml (4.4 oz).
2. Place the bottle holder into the
warmer.
Note: Do not place the bottle
directly into the warmer without
the bottle holder.
3. Put the empty bottle upside down
into the bottle holder.
Note: Pacifiers and small baby
utensils can also be sterilized.
4. Place the warmer lid over the
holder and warming base.
5. Tap the power button then tap the
menu button- until the sterilizer
option appears.
The default time is 15 minutes.
The sterilizer function has three
settings 10,15, and 20 minutes. Use
+/- to adjust the time.
6. When the timer bell rings the
sterilizing process is complete.
7. Tap the power button to shut down the appliance.
Use the tongs provided to remove the hot utensils.
F
QUICK SLOW DEFROST
STERILIZE STEAM PRE SET
QUICK SLOW DEFROST
MIN
STERILIZE STEAM PRE SET
USING YOUR BOTTLE WARMER
11
SETTINGS CHART
12
SETTING’S CHART
10
8
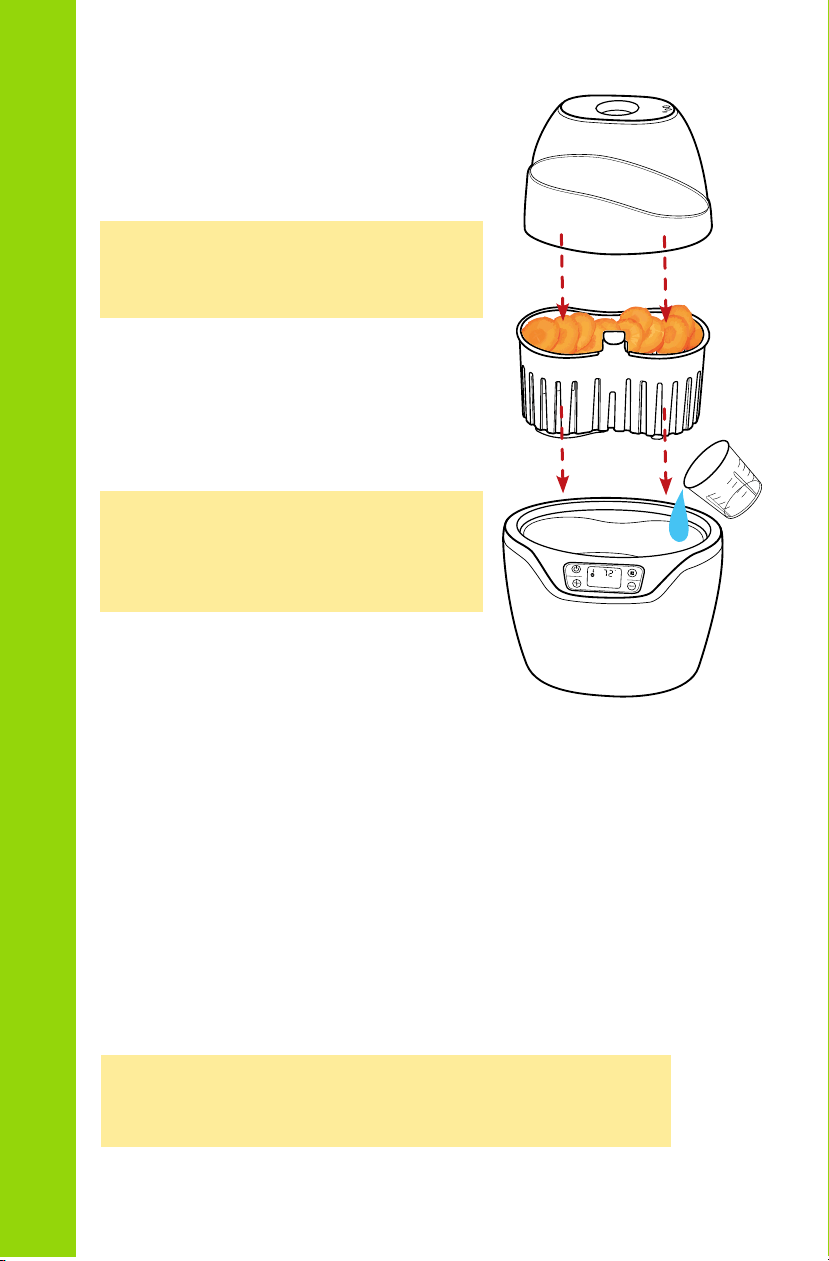
STEAM COOKING FUNCTION:
1. Fill the warmer with 170ml (6 oz) of
water.
Note: Never fill the container to the
point of overflow.
2. Place the food into the basket, and
then the basket into the warmer
base backwards.
(It will rest higher
above the water than normal)
Note: Do not place the food directly
into the warmer without the bottle
holder.
3. Place the warmer lid over the
holder.
5. Tap the power button. All options
will appear on the screen.
6. Tap the menu button- until the
steam function appears.
The default time is 12 minutes.
Warning: During the steaming process hot steam will
escape from the cover - be careful!
7. When the timer bell rings the steaming process is complete.
8. Tap the power button to shut down the appliance.
Use the tongs provided to remove the hot utensils.
Warning: When lifting the cover hot steam will escape
from the base- be careful!
F
QUICK SLOW DEFROST
STERILIZE STEAM PRE SET
12
USING YOUR BOTTLE WARMER

13
11
AIR FRYING TIPS
9
Type of food Ingredients Steam time
Fruit
Vegetable
Meat
Fish Salmon,
tongue
sole, cod
and trout
Chicken,
beef,
lamb
and pork
25 mins
12 mins
Apple
Pear
Orange
Peach
Plum
Pineapple
potato
asparagus
Broccoli
Onion
Cauliower
Spinach
Tomato
Carrot
Celery
Courgette
Pumpkin
Peas
12 mins
12 mins
12 mins
12 mins
12 mins
12 mins
12 mins
18 mins
18 mins
18 mins
18 mins
25 mins
7 mins
7 mins
12mins
12 mins
12 mins
18 mins
FOOD CHART
13
SETTINGS CHART
Note: Don't be afraid to experiment for the best results!
Always make sure your foods are fully cooked before serving. These
times are merely suggestions.
F
QUICK SLOW DEFROST
STERILIZE STEAM PRE SET
F
QUICK SLOW DEFROST
STERILIZE STEAM PRE SET
TIMER PRESET FUNCTION:
The preset function can let you start any function at the set
time you prefer.
1. Follow the steps for the option you prefer.
2. Tap the power button.
All options will appear on the screen.
3. Tap the menu button until the timer preset option appears.
The 10 minute default time will appear
on the display screen. To adjust the
time use the +/- to add or decrease
time from the default time.
4. After 3 seconds the preset option
will start. The display screen will
show the remaining time.
Note: When the appliance enters into
the preset mode, the screen will enter
into power saving mode- press any
button to see the screen again.
5. The timer preset option can be
set to 15 hours in advance to
begin the set function.
6. When the timer bell rings the
preset option is complete.
Warning: While the appliance is in use
hot steam will escape from the cover vent - be careful!
7. Tap the power button to shut down
the appliance. Use the tongs provided
to remove the hot utensils.
Warning: When lifting the cover
hot steam will escape- be careful!
4 hours 240 min
15 hours 900 min
3 hours 180 min
10 hours 600 min
2 hours 120 min
5 hours 300 min
1 hour 60 min
Hours
Minutes
12
USING YOUR BOTTLE WARMER
14
Before cleaning the appliance make sure the appliance
is completely cooled o and unplugged.
1. Clean the appliance after each use.
2. Never immerse the appliance in water.
3. Do not use bleach or any chemical disinfecting solutions
to clean the appliance.
4. Do not use steel wool or any abrasive sponge to clean
the appliance.
CLEANING AND MAINTENANCE
F
QUICK SLOW DEFROST
STERILIZE STEAM PRE SET
Storage
• Before storing the appliance empty all
the water.
• Before storing the appliance, make sure
that all parts are clean and dried.
Note: To prevent discoloration, do not use this warmer in direct sunlight.
13
11
AIR FRYING TIPS
9
CLEANING & MAINTENANCE
15

FOR CUSTOMER SERVICE
QUESTIONS OR COMMENTS
VISIT US @ GOURMIA.COM
OR CALL 888.552.0033