Loading ...
5
appliance emits a beep and a dot ashes on
the display. The appliance resumes operation
a few seconds after being placed in an
upright position again. See troubleshooting
session. See the following paragraph:
"troubleshooting".
- The appliance is tted with a safety device
which will switch the appliance o in case of
accidental overheating. To reset, disconnect
the plug from the power socket for a few
minutes, remove the cause of overheating
then plug the appliance in again. If this
abnormal situation happens several times,
please contact the customer service.
SAVE THESE
INSTRUCTIONS
THIS PRODUCT IS FOR HOUSEHOLD USE
ONLY
DESCRIPTION
A Power indicator light
B ON/STAND-BY button
C +/- adjustment buttons
D MODE button (selects the operating mode)
E “ECO plus” button
F Timer button
General instructions
Remove the heater from the packaging. Check that neither
the heater nor the power cable has been damaged during
transport. Do not operate the heater if damaged. Remove all
publicity material present on the appliance. The appliance
is suitable for free-standing or wall-mounted usage. Do not
assemble the feet if wall-mounted.
Electrical connection
- Before connecting the appliance to the current outlet,
check that the voltage indicated on the appliance rating
plate is the same as your electric plant and that it can
stand the power consumption (Watt) indicated by the
labelling.
- If more than one appliance is used at once, it is
important to ensure that the electric plant is able to
support the power required.
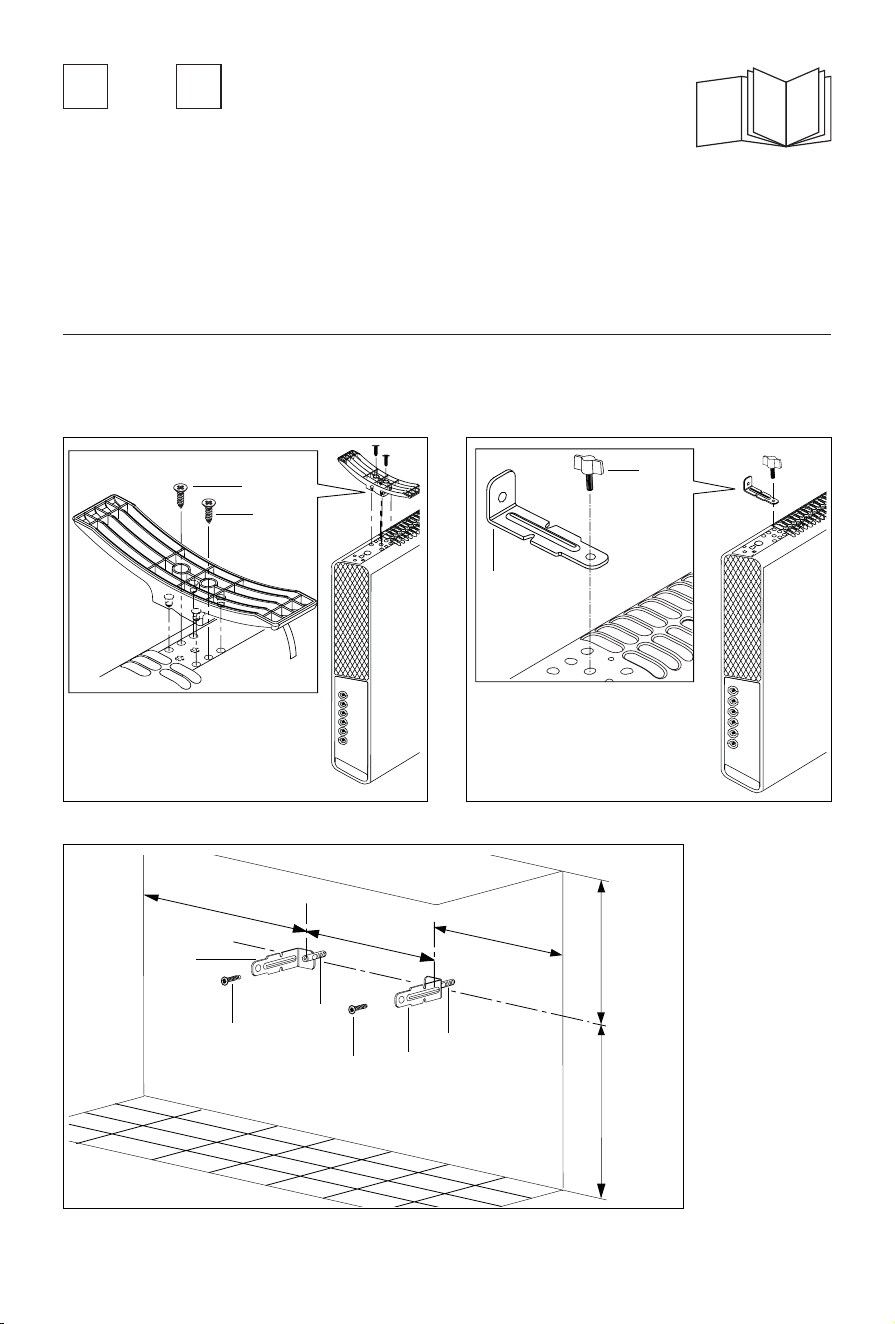
Mounting the feet
Turn the appliance upside down on a rug or soft surface in
order to prevent damaging the paint nish.
Fix the feet to the appliance with the nr. 4 screws 4.8x13 PH
G supplied (see g. 1), 2 screws for each foot.
Wall-Mounting Installation
The wall mounting kit contains:
4 metal brackets (H)
4 screws 4.5x25PH (I)
2 buttery screws M5 (J)
4 plastic anchors 6x30 (K)
Required tools for assembly and estimated assembly
time
Drill
Screwdriver PH 2 x 100 (Phillips type)
Estimated assembly time: 30 minutes
Before installing the unit , make sure of the following:
a. The appliance must not be located directly
beneath a current outlet.
b. The plug and outlet must be easy to reach after
installation.
c. No electric cables or other pipes could be
damaged during the installation.
d. Keep away from curtains or ammable materials.
To wall-mount, proceed as follows:
Turn the appliance upside down on a at stable surface.
Fix the 2 brackets H with the 2 buttery screws J as shown
in Fig. 2. For brick walls use a 6 mm concrete drill bit. For
plaster board or false/hollow walls, it is recommended to use
appropriate screws and anchors (not supplied).
1. Before drilling the wall, mark the exact points,
respecting the minimum distances as shown in g. 3.
2. Drill the wall where previously marked, and insert the
plastic anchors K.
3. Fix the 2 metal brackets H using the two screws I
provided.
4. Hang the appliance on the bracket.
5. Mark out the 2 lower xing points. Remove the
appliance, drill the lower holes and insert the wall
anchors K.
6. Now, you can hang back the heater on the bracket and
x the lower part of the appliance with the 2 remaining
screws I.
Loading ...
Loading ...