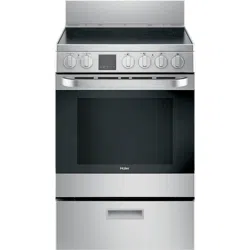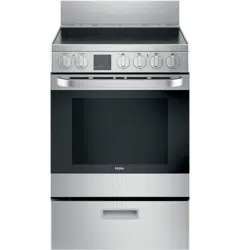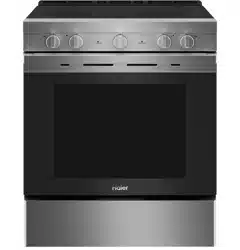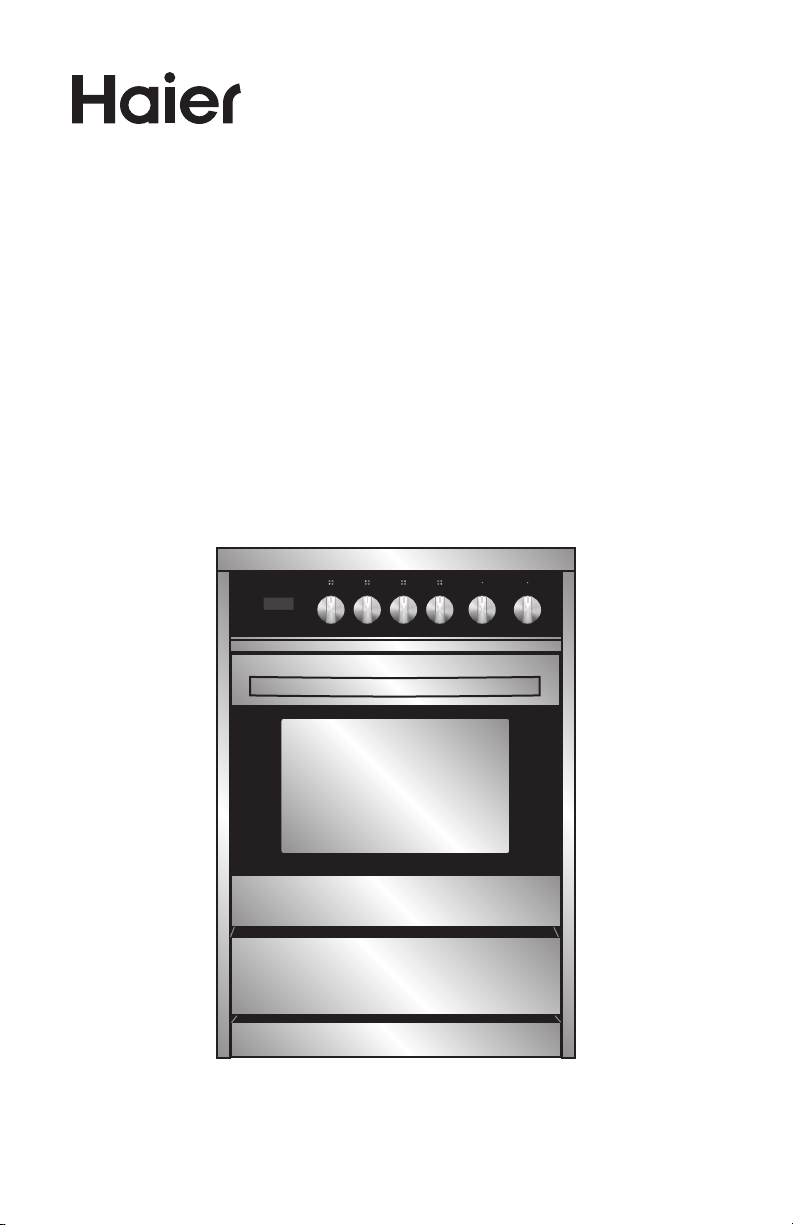
24" Electric Free-Standing Range
Cuisinière électrique autoportante de 24"
Estufa independiente para eléctrica de 24"
User Manual
Guide de l’utilisateur
Manual del usuario
HCR2250AES
HCR2250ACS
F
o
Part # 0570000767 REV B


1
TABLE OF CONTENTS
RANGE SAFETY ...................................................................................................2
The Anti-tip Bracket ...................................................................................................... 3
PARTS AND FEATURES .......................................................................................7
ELECTRONIC CONTROL .....................................................................................8
Setting the Clock and Timer ......................................................................................... 8
Timed Cooking ............................................................................................................... 9
ELEMENT AND CONTROL SETTING ..................................................................10
Heating Elements ........................................................................................................10
Control Knobs .............................................................................................................11
COOKTOP USE .................................................................................................. 12
Before Using the Cooktop ...........................................................................................12
Cookware .....................................................................................................................12
Observe the Following Points in Canning...................................................................14
OVEN USE ......................................................................................................... 15
Before Using the Oven ................................................................................................15
General .........................................................................................................................15
Oven Modes ................................................................................................................. 16
Bake Tips and Techniques ...........................................................................................17
Convection Bake Tips and Techniques ....................................................................... 18
Convection Roast Tips and Techniques .....................................................................20
Convection Broil Tips and Techniques ........................................................................22
RANGE CARE .................................................................................................... 23
Cleaning .......................................................................................................................23
OVEN DOOR REMOVAL .................................................................................... 25
Replacing an Oven Light ..............................................................................................27
TROUBLESHOOTING ........................................................................................ 28
Baking and Roasting Problems .................................................................................... 28
Cooktop .......................................................................................................................29
Oven ............................................................................................................................. 30
LIMITED WARRANTY ........................................................................................ 31
RECORD KEEPING
Thank you for purchasing this Haier
product. This user manual will help you
get the best performance from your
new range.
For future reference, record the model
and serial number located on the inside
frame of the range, and the date of
purchase.
Staple your proof of purchase to this
manual to aid in obtaining warranty
service if needed.
___________________________________
Model number
___________________________________
Serial number
___________________________________
Date of purchase
2
RANGE SAFETY
Your safety and the safety of others are very important.
We have provided many important safety messages in this manual and
on your appliance. Always read and obey all safety messages.
DANGER
WARNING
CAUTION
This is the safety alert symbol.
This symbol alerts you to potential hazards that can
kill or hurt you and others. All safety messages will
follow the safety alert symbol and either the word
“DANGER,” “WARNING” or “CAUTION.”
These words mean:
An imminently hazardous situation. You
could be killed or seriously injured if you
don’t immediately follow instructions.
A potentially hazardous situation
which, if not avoided, could result in
death or serious bodily injury.
A potentially hazardous situation
which, if not avoided, may result in
moderate or minor injury.
All safety messages will tell you what the potential hazard is, tell you
how to reduce the chance of injury, and tell you what can happen if the
instructions are not followed.
3
THE ANTI-TIP BRACKET
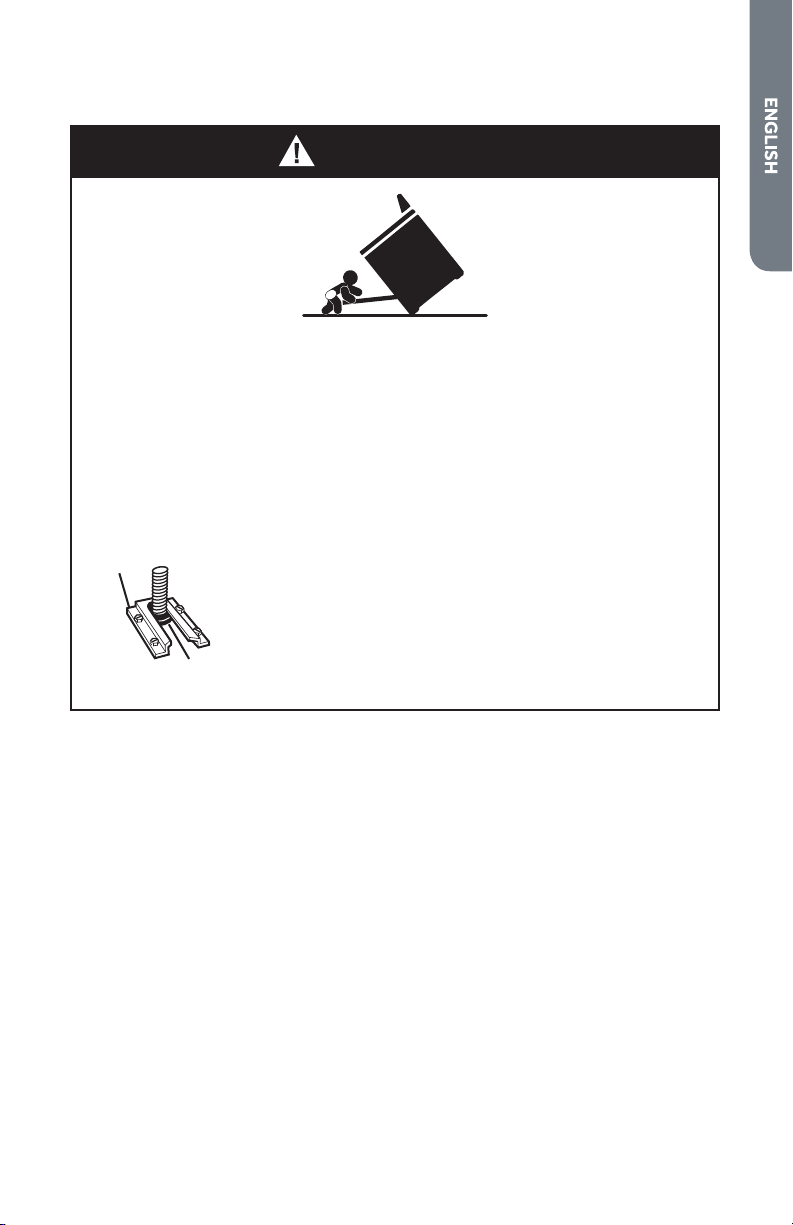
WARNING
Tip Over Hazard
A child or adult can tip the range and be killed.
Connect anti-tip bracket to rear range foot.
Reconnect the anti-tip bracket, if the range is moved.
See the installation instructions for details.
Failure to follow these instructions can result in death or serious burns
to children and adults.
Making sure the anti-tip bracket is installed:
• Slide range forward.
• Look for the anti-tip bracket securely attached to
floor.
• Slide range back so rear range foot is under anti-tip
bracket.
Anti-Tip
Bracket
Range
Foot

4
IMPORTANT SAFETY
INSTRUCTIONS
WARNING: To reduce the risk of re, electrical shock, injury to persons,
or damage when using the range, follow basic precautions, including
the following:
•
WARNING: TO REDUCE
THE RISK OF TIPPING OF
THE RANGE, THE RANGE
MUST BE SECURED BY
PROPERLY INSTALLED
ANTI-TIP DEVICES. TO
CHECK IF THE DEVICES
ARE INSTALLED PROPERLY,
SLIDE RANGE COMPLETELY
FORWARD, LOOK FOR ANTI-
TIP BRACKET SECURELY
ATTACHED TO THE FLOOR
BEHIND THE RANGE AND
SLIDE RANGE COMPLETELY
BACK UNTIL THE REAR
RANGE FOOT IS UNDER
ANTI-TIP BRACKET.
•
WARNING: NEVER use this
appliance as a space heater
to heat or warm the room.
Doing so may result in carbon
monoxide poisoning and
overheating of the oven.
•
WARNING: NEVER cover
any slots, holes or passages
in the oven bottom or cover
an entire rack with materials
such as aluminum foil. Doing
so blocks airow through
the oven and may cause
carbon monoxide poisoning.
Aluminum foil linings may
also trap heat, causing a re
hazard.
•
CAUTION: Do not store
items of interest to children
in cabinets above a range or
on the back guard of a range
– children climbing on the
range to reach items could be
seriously injured.
•
Do Not Leave Children Alone
– Children should not be left
alone or unattended in area
where the range is in use.
They should never be allowed
to sit or stand on any part of
the range.
•
Wear Proper Apparel – Loose-
tting or hanging garments
should never be worn while
using the range.
•
User Servicing – Do not
repair or replace any part of
the range unless specically
recommended in the manual.
All other servicing should
be referred to a qualied
technician.
•
Storage in or on the Range –
Flammable materials should
not be stored in an oven or
near surface units.
•
Do Not Use Water on Grease
Fires – Smother re or ame
or use dry chemical or foam-
type extinguisher.
•
Use Only Dry Potholders –
Moist or damp potholders
on hot surfaces may result in
burns from steam. Do not let
potholder touch hot heating
elements. Do not use a towel
or other bulky cloth.

5
IMPORTANT SAFETY
INSTRUCTIONS
•
DO NOT TOUCH SURFACE
UNITS OR AREAS NEAR
UNITS – Surface units may
be hot even though they
are dark in color. Areas near
surface units may become
hot enough to cause burns.
During and after use, do not
touch, or let clothing or other
ammable materials contact
surface units or areas near
units until they have had
sucient time to cool. Among
those areas are the cooktop
and surfaces facing the
cooktop.
•
Never Leave Surface Units
Unattended at High Heat
Settings – Boil over causes
smoking and greasy spillovers
that may ignite.
•
Glazed Cooking Utensils –
Only certain types of glass,
glass/ceramic, ceramic,
earthenware, or other glazed
utensils are suitable for
range-top service without
breaking due to the sudden
change in temperature.
•
Utensil Handles Should Be
Turned Inward and Not Extend
Over Adjacent Surface
Units – To reduce the risk of
burns, ignition of ammable
materials, and spillage due to
unintentional contact with the
utensil, the handle of a utensil
should be positioned so that
it is turned inward, and does
not extend over adjacent
surface units.
•
Clean Cooktop With Caution –
If a wet sponge or cloth is used
to wipe spills on a hot cooking
area, be careful to avoid
steam burn. Some cleaners
can produce noxious fumes if
applied to a hot surface.
•
Use Care When Opening Door
– Let hot air or steam escape
before removing or replacing
food.
•
Do Not Heat Unopened Food
Containers – Build-up of
pressure may cause container
to burst and result in injury.
•
Keep Oven Vent Ducts
Unobstructed.
•
Placement of Oven Racks –
Always place oven racks in
desired location while oven is
cool. If rack must be moved
while oven is hot, do not let
potholder contact hot heating
element in oven.
•
DO NOT TOUCH HEATING
ELEMENTS OR INTERIOR
SURFACES OF OVEN –
Heating elements may be hot
even though they are dark
in color. Interior surfaces of
an oven become hot enough
to cause burns. During and
after use, do not touch, or let
clothing or other ammable
materials contact heating
elements or interior surfaces
of oven until they have had
sucient time to cool. Other
surfaces of the appliance may
become hot enough to cause
burns – among these surfaces
are oven vent openings and
surfaces near these openings,
oven doors, and windows of
oven doors.

6
IMPORTANT SAFETY
INSTRUCTIONS
•
Proper Installation – The
range, when installed, must
be electrically grounded in
accordance with local codes
or, in the absence of local
codes, with the National
Electrical Code, ANSI/NFPA
70. In Canada, the range must
be electrically grounded in
accordance with Canadian
Electrical Code. Be sure the
range is properly installed
and grounded by a qualied
technician.
•
Disconnect the electrical
supply before servicing the
appliance.
•
Injuries may result from the
misuse of appliance doors
or drawers such as stepping,
leaning, or sitting on the
doors or drawers.
•
Maintenance – Keep range
area clear and free from
combustible materials,
gasoline, and other ammable
vapors and liquids.
For units with ventilating hood –
•
Clean Ventilating Hoods
Frequently – Grease should
not be allowed to accumulate
on hood or lter.
•
When ambé cooking under
the vent hood, turn the fan
on.
READ AND SAVE THESE
INSTRUCTIONS
State of California Proposition 65 Warnings:
WARNING: This product contains one or more chemicals known to the
State of California to cause cancer.
WARNING: This product contains one or more chemicals known to the
State of California to cause birth defects or other reproductive harm.
7
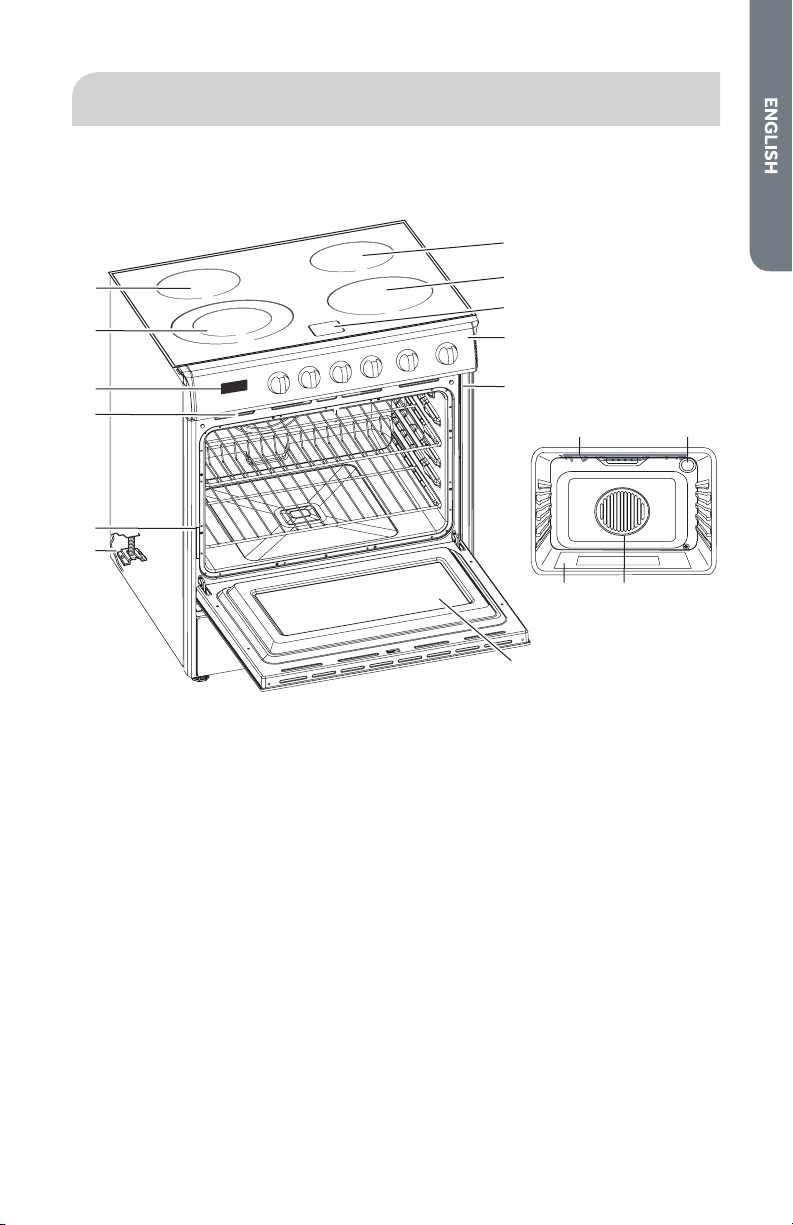
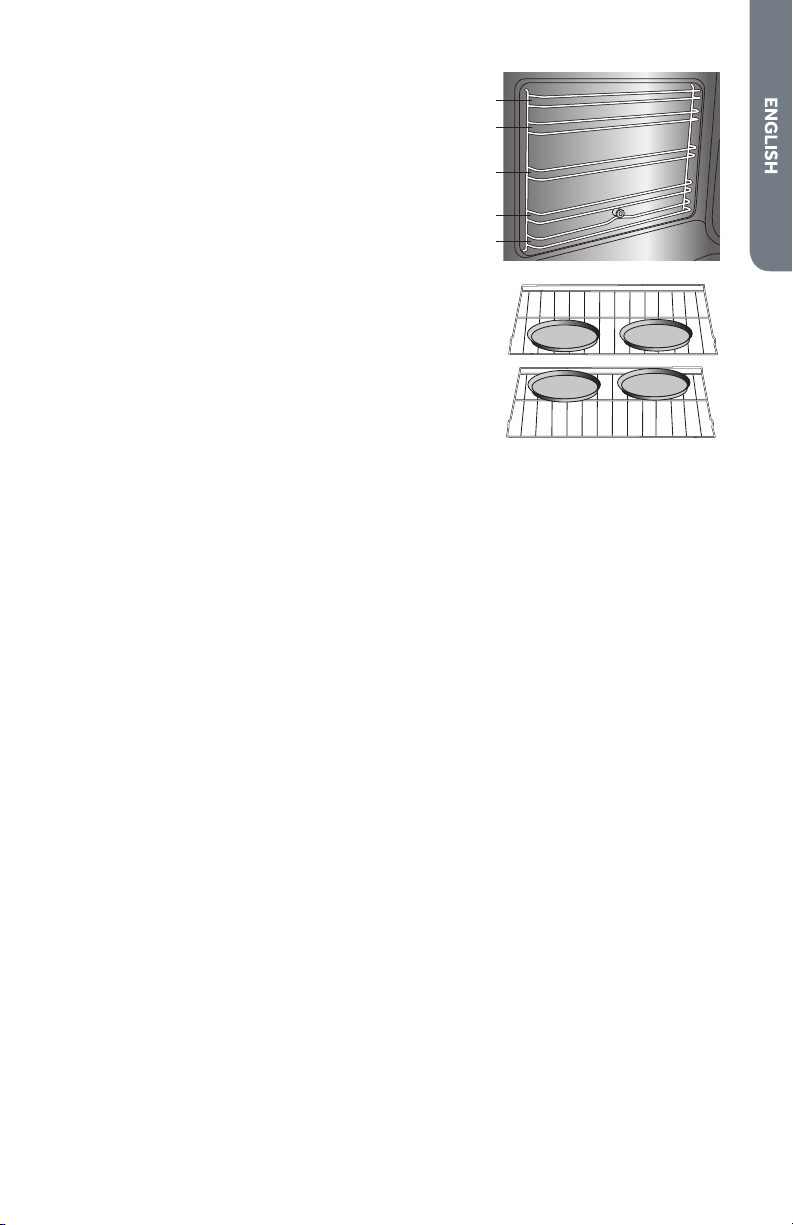
PARTS AND FEATURES
This manual covers several dierent models. The range you have purchased may
have some or all of the items listed. The locations and appearances of the features
shown here may not match those of your model.
d
f
e
j
k
p
o
ml
n
H
OT SUR
FAC
ES
a
b
c
g
h
i
a Left Rear Surface Element
b Left Front Surface Element
(Dual-element)
c Clock/Timer
d Oven Vent
e Model and Serial Number Plate
f Anti-tip Bracket
g Right Rear Surface Element
h Right Front Surface Element
i Hot Surface Indicator Lights
j Control Panel
k Door Gasket
l Broil Element
m Oven Light
n Convection Fan and Element
o Bottom Element (not visible)
p Oven Door Window
8
ELECTRONIC CONTROL
Timer
Set
Cook
Time
End
Time
Set
Clock
OFF OFF OFF OFF OFF
°
F
Broil
450
400
350
300
250
200
150
Defrost
Conv
Bake
Conv
Broil
High
Broil
Low
Broil
Pizza
Bake
Light
HI LO HI LO HI LO
MED MED MED
OFF
HI HI
SINGLE DUAL
LO LO
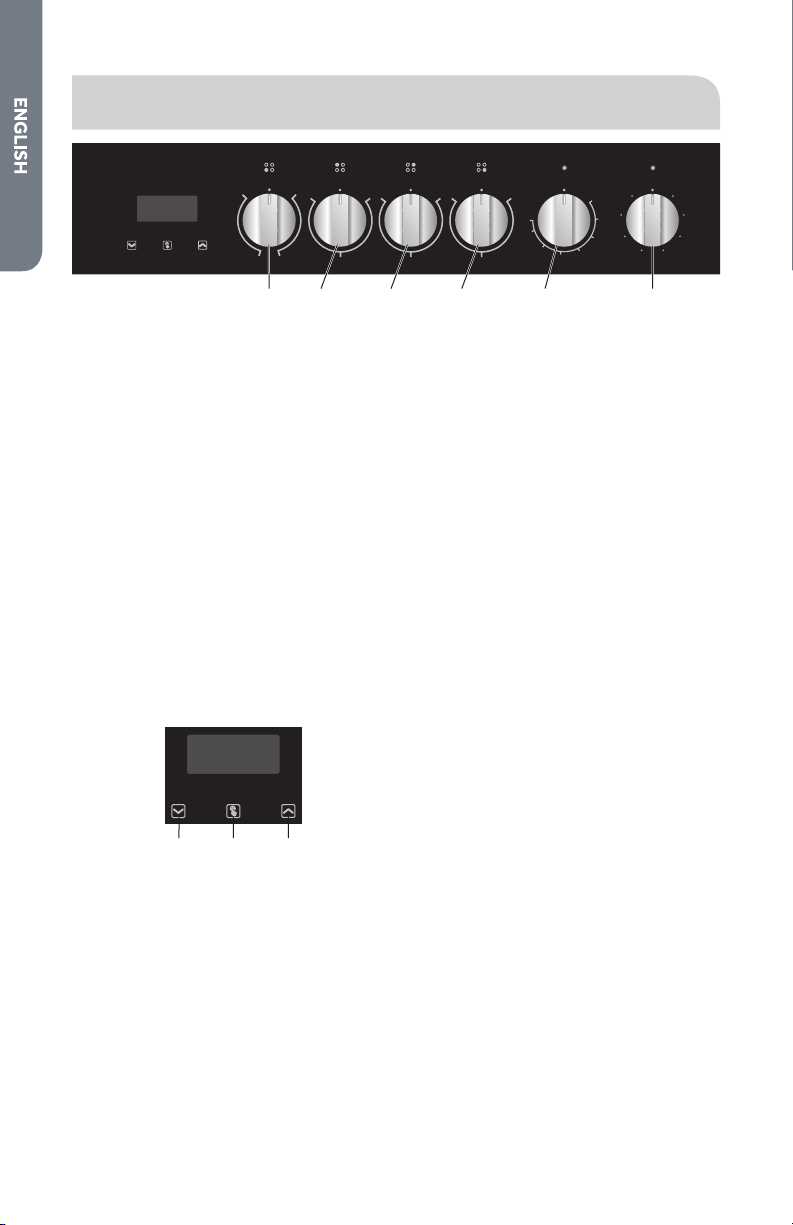
a b c d e f
a Front Left Element
b Rear Left Element
c Rear Right Element
d Front Right Element
e Electric Oven Temperature Knob
f Electric Oven Control Knob
SETTING THE CLOCK AND TIMER
Your model has a digital display, 12-hour clock with 3 Control buttons.
IMPORTANT: In the event of a power failure, all settings including the time display
will be lost. When the power is returned, the bar above Timer Set and 12:00 will be
displayed.
TO SET THE TIME OF DAY
When the power is connected, the screen displays 12:00 and the bar above “Set
Clock.”
To set the correct time, press the up arrow or down arrow until the correct time is
displayed. After 5 seconds, the clock will start automatically, or you can press the
function button to select manual operation.
Timer
Set
Cook
Time
End
Time
Set
Clock
a b c
a Decrease Time
b Function
c Increase Time
TO SET THE TIMER
The digital countdown timer can be set up to 11 hours and 59 minutes maximum.
To set the timer, press the function button repeatedly until the bar above Timer Set
is displayed. Once the function button is released, the current time is displayed and
the bar above Timer Set ashes. When the function button is pressed the remaining
time is displayed. When the set time is reached, Timer Set disappears and the alarm
will ring. To stop the alarm, press any button.
NOTE: After pressing the function button, you must set the timer within 5 seconds.

9
TIMED COOKING
Food Poisoning Hazard
Do not let food sit in oven more than one hour before or after cooking.
Doing so can result in food poisoning or sickness.
WARNING
Timed Cooking allows the oven to be set to turn on at a certain time of day, cook for
a set length of time, and/or shut o automatically. Delay start should not be used
for food such as breads and cakes because they may not bake properly.
NOTE: Before setting, make sure the clock is set to the correct time of day. See “To
Set the Time of Day” earlier in this section.
1. Press the function button repeatedly until the bar above Cook Time ashes and
then press the up arrow or down arrow to set the time frame for baking.
2. Press the function button repeatedly until the bar above End Time ashes and
then press the up arrow or down arrow to set the time to turn o the oven.
3. Set the cooking temperature and cooking mode by turning the Thermostat knob
and the Selector knob.
4. After following these steps, the bars above Cook Time and End Time will ash,
indicating that the automatic cooking feature of the oven is set.
For example: If cooking time takes 45 minutes and you want to nish cooking at
6:00.
1. Press the function button repeatedly until the bar above Cook Time ashes and
set the cooking time 45 minutes.
2. Press the function button repeatedly until the bar above End Time ashes and
set the nish time to 6:00.
After the above setting, the current time is displayed and the bars above Cook Time
and End Time will ash indicating that the automatic cooking feature is set. When
the clock displays 5:15, the oven will start cooking automatically, and the Cook Time
bar will ash.

10
ELEMENT AND CONTROL SETTING
WARNING
Fire Hazard
Turn off all controls when done cooking.
Failure to do so can result in death or fire.
The control knobs turn in either direction and from any position to the desired
temperature setting or to OFF.
HEATING ELEMENTS
TEMPERATURE LIMITERS
Each radiant element has its own temperature limiter (sensor) to protect the glass
cooking surface from extreme high temperatures. The temperature limiter operates
automatically by cycling the element to match the heat to the Temperature setting
of the element (HI to LO).
SINGLE RADIANT ELEMENT
This type of electric element uses a wire ribbon located under the glass surface to
provide the heat for cooking. The temperature limiter will cycle the element on and
o.
•
Turn the knob from LO to HI temperature (or any temperature in between).
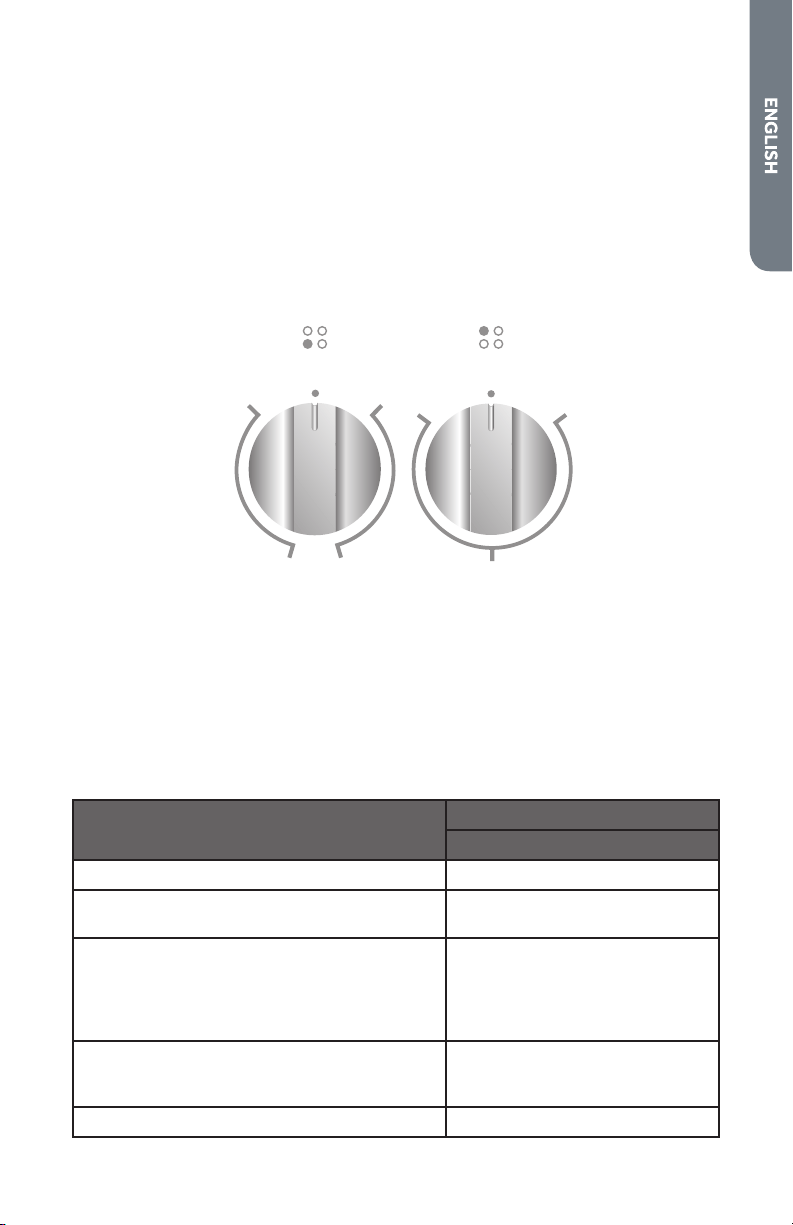
DUAL RADIANT ELEMENT
The dual element consists of two radiant ribbon elements within the same element.
Either the small (inner element) or both (inner and outer) elements may be selected
for use. There are an innite number of heat settings between the LO and HI position.
Fixed positions are found at LO and HI to dene minimum and maximum heat setting.
To turn ON the inner element, push down on the control knob and turn it
counterclockwise following the single line graphics.
To turn ON both inner and outer elements together, push down on the control
knob and turn clockwise following the double graphics line.
HOT SURFACE INDICATOR LIGHT
Each element features a hot surface indicator light to show when the cooking area is
ON or hot. The signal light will turn on automatically in the area marked with a circle.
The light remains on as long as the surface cooking area is too hot to touch even
after the surface cooking area is turned o.
11
CONTROL KNOBS
The Control knobs turn in either direction and from any position to the desired
temperature setting or to OFF.
NOTE: Once the element is turned O, the Hot Surface indicator light will remain
illuminated until the surface temperature of the element has cooled.
The placement of each knob corresponds to the placement of the heating element
that it controls.
To Turn On Any Heating Element:
•
PUSH DOWN on the knob and TURN in either direction to desired heat setting.
OFF
HI LO
MED
OFF
HI HI
SINGLE
DUAL
LO LO
RECOMMENDED HEATING ELEMENT SETTINGS
Heating elements do not require preheating.
A range of heating settings is listed in the following chart because the required
temperature depends on:
•
Type and quality of pan
•
Type, quantity and temperature of the food
•
Element used and cook’s preferences
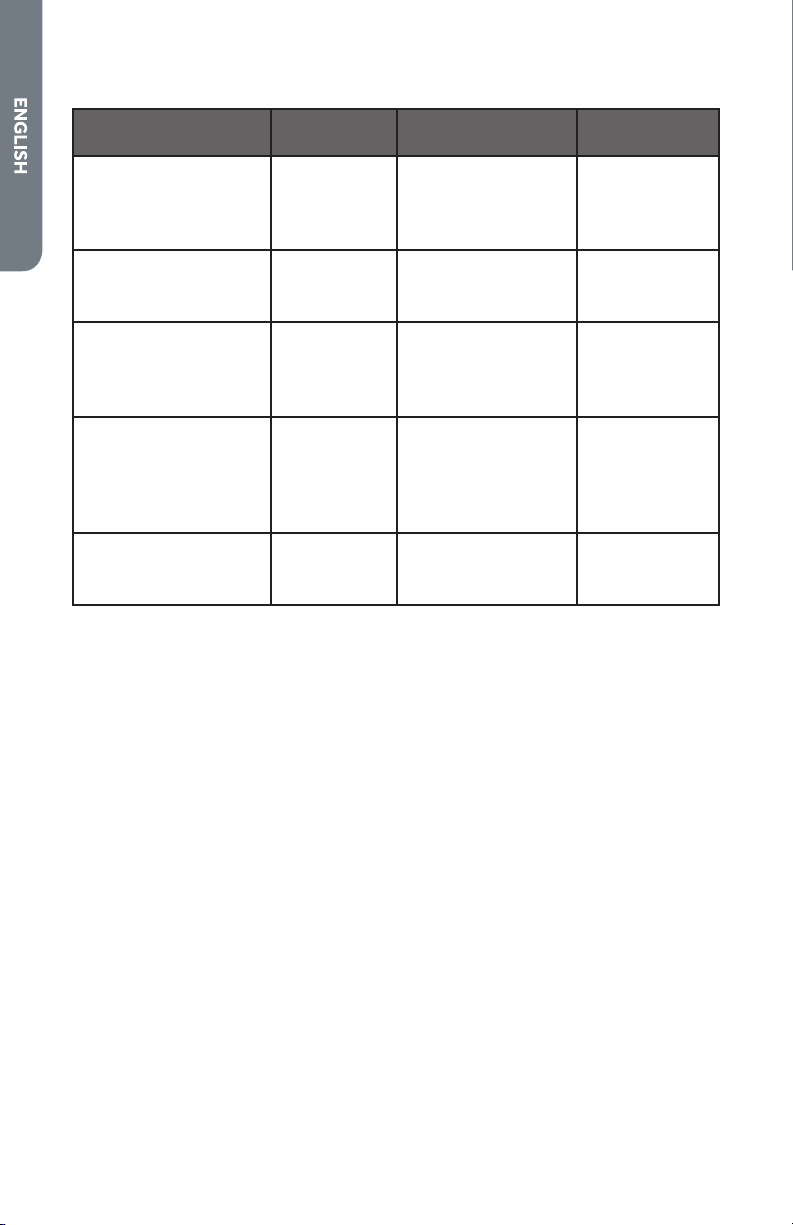
TYPE OF FOOD
HEAT SETTINGS RADIANT ELEMENTS
Energy regulator
Melting butter, chocolate Low
Delicate sauce, rice, simmering sauces with
butter and egg yolk
Low to Medium
Cooking vegetables, sh broths, eggs -fried
or scrambled-, nishing cereals, pasta, milk,
pancakes, pudding, simmering meats, steaming
vegetables, pop corn, bacon, stewing meet
soup, sauteed vegetables, spaghetti sauces
Medium
Braising meet, pan frying meet, sh, eggs, stir
frying, quickly brown or sear meats, hold rapid
boil
Medium to High
Boiling water for vegetables, pasta High

12
COOKTOP USE
BEFORE USING THE COOKTOP
1. If present, remove all packing and literature from the cooktop surface.
2. Clean your glass top. A thorough cleaning with a glass top cleaner is
recommended. It only takes a minute and puts a clean, shiny coating on the glass
top before its initial use.
3. Place a saucepan of water on each of the front elements and turn them on HI
heat for at least 30 minutes. Turn o the front elements.
4. Place a saucepan of water on each of the rear elements and turn them on HI heat
for at least 30 minutes. Turn o the rear elements.
NOTES:
•
This procedure evaporates any protective oils and humidity collected during
the manufacturing process, and enables the electronic control circuits to
operate properly.
•
There may be a slight odor during the rst several uses: this is normal and
will dissipate.
•
The cooking surface will hold the heat and remain hot over 20 minutes after
the elements have been turned o.
COOKWARE
The choice of pan directly aects the cooking performance (speed and uniformity).
For best results, select pans with the following features.
GENERAL
•
The glass ceramic cooking surface is a durable material resistant to impact, but
not unbreakable if a pan or other object is dropped on it.
•
Do not allow pans to boil dry. This can damage the pan, element and /or cooktop.
•
Never cook food directly on the glass.
•
Do not slide cookware across cooking surface it may scratch the glass
•
Using cast iron cookware on the glass cooktop Is not recommended. Cast iron
retains heat and may result in cooktop damage.
•
Food packaged in aluminum foil should not be placed directly on the glass
ceramic surface for cooking; aluminum foil will melt and cause permanent
damage to the glass surface.
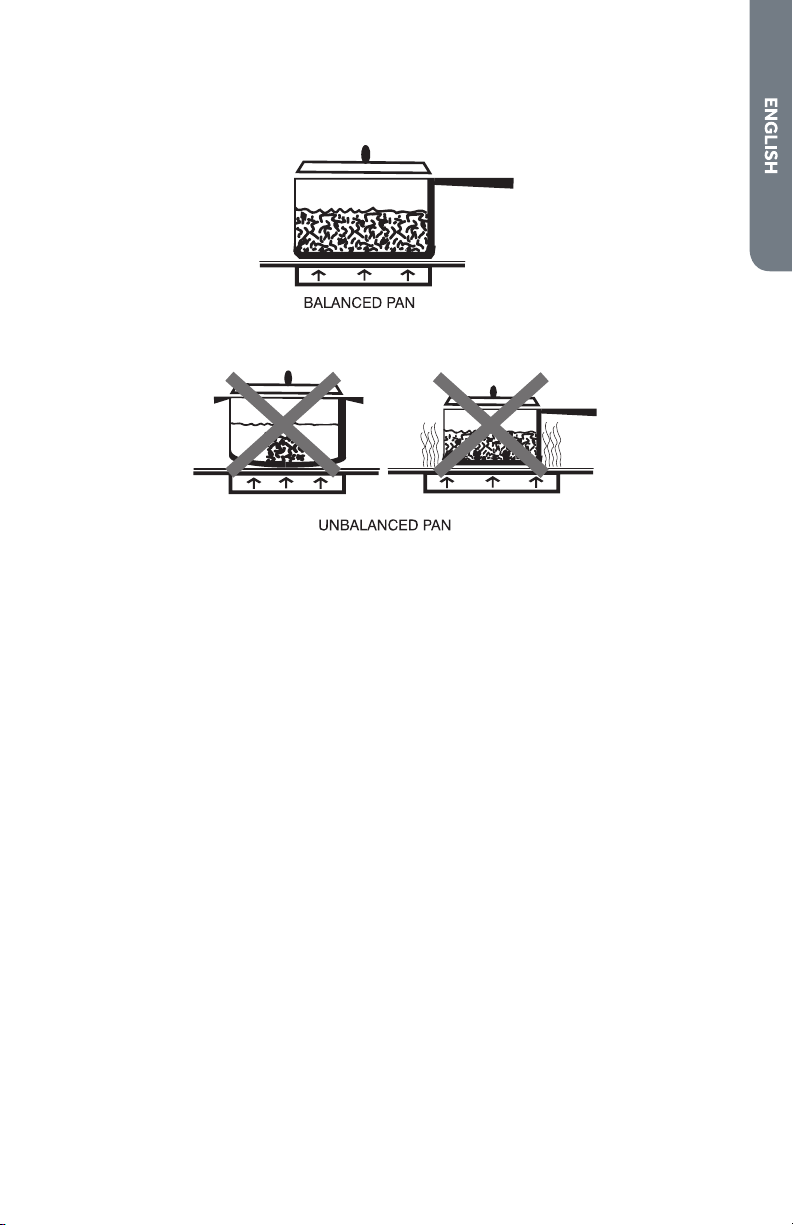
Flat Base
When a pan is hot, the base (pan bottom)should rest evenly on the surface without
wobbling (rocking). Ideal cookware should have a at bottom, straight sides, a well
tting lid and the material should be of medium to heavy thickness.
Rough nishes may scratch the cooktop.
13
Match Pan Diameter to Element
The base of the pan should cover or match the diameter of the element being used.
COOKWARE CHARACTERISTICS
•
Aluminum: heats and cools quickly. Frying, braising, roasting. May leave metal
markings on glass.
•
Cast Iron: on a glass cooktop heats and cools slowly, but retains heat and cooks
evenly.
•
Copper: tin heats and cools quickly. Gourmet cooking, wine sauces, egg dishes.
•
Enamel ware: response depends on base metal. Not recommended.
Imperfections in enamel may scratch cooktop.
•
Glass Ceramic: heats and cools slowly. Not recommended. Heats too slowly.
Imperfections in enamel may scratch cooktop.
•
Stainless Steel: heats and cools moderately. Soups, sauces, vegetables, and
general cooking.
14
OBSERVE THE FOLLOWING POINTS IN CANNING
CAUTION
Food Poisoning Hazard
Safe canning requires that harmful micro organisms are destroyed and
that the jars are sealed completely. When canning foods in a water-bath
canner, a gentle but steady boil must be maintained for the required
time. When canning foods in a pressure canner, the pressure must be
maintained for the required time.
After you have adjusted the controls, it is very important to make sure
the prescribed boil or pressure levels are maintained for the required
time.
Failure to do so can result in food poisoning or sickness.
Pots that extend beyond one of the surface unit’s circle are not recommended for
most surface cooking. However, when canning with water-bath or pressure canner,
larger-diameter pots may be used.
This is because boiling water temperatures (even under pressure) are not harmful to
the cooktop surfaces surrounding the surface units.
However, do not use large diameter canners or other large-diameter pots for
frying or boiling foods other than water.
Most syrup or sauce mixtures, and all types of frying, cook at temperatures much
higher than boiling water. Such temperatures could eventually harm the glass
cooktop surfaces.
•
Be sure the canner ts over the center of the surface unit. If your cooktop or
its location does not allow the canner to be centered on the surface unit, use
smaller diameter pots for good canning results.
•
Flat-bottomed canners must be used. Do not use canners with anged or rippled
bottoms (often found in enamelware) because they don’t make enough contact
with the surface units and take a long time to boil water.
•
When canning, use recipes and procedures from reputable sources. Reliable
recipes and procedures are available from the manufacturer of your canner;
manufacturers of glass jars for canning, such as Ball and Kerr brand; and the
United States Department of Agriculture Extension Service.
•
Remember that canning is a process that generates large amounts of steam. To
avoid burns from steam or heat, be careful when canning.
Since you must make sure to process the canning jars for the prescribed time, with
no interruption in processing time, do not can on any cooktop surface unit if your
canner is not at.

15
OVEN USE
This multi-function oven combines the functions of traditional oven modes with
the functions of modern, fan-assisted convection modes in a single oven. Use the
Cooking Mode control, located on the control panel, to select the oven mode.
ADVANTAGES OF CONVECTION COOKING
•
Saves time and energy.
•
Even baking, browning and crisping are achieved.
•
During roasting, juices and avors are sealed in while the exterior is crisp.
•
Yeast breads are lighter, more evenly textured, more golden and crustier.
•
Air-leavened foods such as cream pus, soués and meringues are higher and
lighter.
•
Baking on multiple racks at the same time with even results is possible.
•
Prepare whole meals at once with no avor transfer.
•
Dehydrates herbs, fruits and vegetables.
•
Requires no specialized bake ware.
•
Convection broiling allows for extraordinary grilling with thicker cuts of food.
BEFORE USING THE OVEN
1. Turn the Temperature Control to the highest setting.
2. Turn the Cooking Mode Selection control to a cooking mode.
3. Allow the oven to operate for 30 minutes with the door closed and no food in the
cavity.
4. Turn o the oven, and then open the oven door to allow the oven to cool.
NOTE: Any odor that may be detected during this initial use is due to the
evaporation of substances used to protect the oven during storage.
GENERAL
IMPORTANT: Do not place anything, including dishes, foil and oven trays, on the
bottom of the oven when it is in operation to avoid damaging the enamel.
1. Place bake ware with food on one or both of the shelves provided with the oven.
2. Turn Cooking Mode knob to desired oven function.
3. Turn the Temperature knob to the desired temperature or Broil if broiling.
OVEN SHELVES
The oven shelves can be placed in any of the ve height positions with the oven.
Make sure each shelf is inserted between two wire supports that are the closest
together.
Oven shelves have a stop to keep them from being unintentionally withdrawn fully.

16
To Remove the Oven Shelf Support:
•
Push down on the wire below the locking pin, and pull the support away from the
oven wall until the top of the support is released from the holes in the oven wall.
a
a Locking Pin
OVEN MODES
The Thermostat knob and Control knob are used together to select Oven Modes.
THERMOSTAT KNOB
Select the cooking temperature by turning the knob clockwise to the required
temperature, between 150°F and Broil. The light will come on when the oven is
preheating. The light will turn o when the desired temperature has been reached.
Regular ashing means that oven temperature is being constantly maintained at the
set temperature.
COOKING MODE SELECTION KNOB
Selects the oven function. Each of the functions listed below can be used only with
the correct temperature.
Light
The oven light is o, with no cooking mode selected. During oven operation the light
will remain on.
Bake
Set temperature: from 150°F to 450°F
Is cooking with heated air. Both the upper and lower elements cycle to maintain the
oven temperature.
Pizza
Set temperature: from 150 °F to 450 °F
Is a special cooking mode with heated air and the lower hidden bake element. The
lower elements cycle to cook Pizza.
Low Broil
Set temperature: Broil
There are two broil elements. In low broil the inner and outer elements are on at a
low intensity.

17
High Broil
Set temperature: Broil
There are two broil elements. In high broil only the inner element is on at a high
intensity.
Conv Broil (Convection Broil)
Set temperature: Broil
Convection Broil combines the intense heat from the upper element with the heat
circulated by the convection fan.
Conv Bake (Convection Bake)
Set temperature: from 150 °F to 450 °F
Convection Bake cooks with heat from a ring element behind the back wall of the
oven. The heat is circulated throughout the oven by the convection fan.
Defrost
Set temperature: Not applicable.
Does not use any heating element, only the convection fan is used to defrost foods.
By using Defrost mode, the defrosting time is decreased by half.
BAKE TIPS AND TECHNIQUES
Baking is cooking with heated air. Both upper and lower elements in the oven are
used to heat the air but no fan is used to circulate the heat.
Follow the recipe or convenience food directions for baking temperature, time and
rack position. Baking time will vary with the temperature of ingredients and the size,
shape and nish of the baking utensil.
General Guidelines
•
For best results, bake food on a single rack with at least 1" - 1½" (2,5 - 3 cm)
space between utensils and oven walls.
•
Use one rack when selecting the bake mode.
•
Check for doneness at the minimum time.
•
Use metal bake ware (with or without a non stick nish), heatproof glass, glass-
ceramic, pottery or other utensils suitable for the oven.
•
When using heatproof glass, reduce temperature by 25°F (15°C) from
recommended temperature.
•
Use baking sheets with or without sides or jelly roll pans.
•
Dark metal pans or nonstick coatings will cook faster with more browning.
Insulated bake ware will slightly lengthen the cooking time for most foods.
•
Do not use aluminum foil or disposable aluminum trays to line any part of the
oven. Foil is an excellent heat insulator and heat will be trapped beneath it. This
will alter the cooking performance and can damage the nish of the oven.
•
Avoid using the opened door as a shelf to place pans.
•
See Troubleshooting for tips to Solving Baking and Roasting Problems.
18
BAKE CHART
FOOD ITEM
RACK
POSITION
TEMP. °F (°C)
(PREHEATED OVEN)
TIME (MIN)
Cake
Cupcakes
Bundt Cake
Angel Food
2
1
1
350 (175)
350 (175)
350 (175)
19-22
40-45
35-39
Pie
2 crust, fresh, 9”
2 crust, frozen fruit, 9”
2
2
375-400 (190-205)
375 (190)
45-50
68-78
Cookies
Sugar
Chocolate Chip
Brownies
2
2
2
350-375 (175-190)
350-375 (175-190)
350 (175)
8-10
8-13
29-36
Breads
Yeast bread loaf, 9x5
Yeast rolls
Biscuits
Muns
2
2
2
2
375 (190)
375-400 (190-205)
375-400 (190-205)
425 (220)
18-22
12-15
7-9
15-19
Pizza
Frozen
Fresh
2
2
400-450 (205-235)
475 (246)
23-26
15-18
CONVECTION BAKE TIPS AND TECHNIQUES
Reduce recipe baking temperatures by 25°F (15°C).
•
For best results, foods should be cooked uncovered, in low-sided pans to take
advantage of the forced air circulation. Use shiny aluminum pans for best results
unless otherwise specied.
•
Heatproof glass or ceramic can be used. Reduce temperature by another 25°F
(15°C) when using heatproof glass dishes for a total reduction of 50°F (30°C).
•
Dark metal pans may be used. Note that food may brown faster when using dark
metal bake ware.
•
The number of racks used is determined by the height of the food to be cooked.
•
Baked items, for the most part, cook extremely well in convection. Don’t try to
convert recipes such as custards, quiches, pumpkin pie , or cheesecakes, which
do not benet from the convection-heating process. Use the regular Bake mode
for these foods.
19
•
Multiple rack cooking for oven meals is done
on rack positions 1, 2, 3 , 4 and 5. All ve rack
positions can be used for cookies, biscuits and
appetizers.
- 2 Rack baking: Use positions 1 and 3.
- When baking four cake layers at the same
time, stagger pans so that one pan is not
directly above another. For best results, place
cakes on front of upper rack and back of lower
rack (See graphic at right). Allow 1" - 1 ½"
(2,5cm- 3 cm) air space around pans.
•
Converting your own recipe can be easy.
Choose a recipe that will work well in
convection.
•
Reduce the temperature and cooking time if
necessary. It may take some trial and error
to achieve a perfect result. Keep track of
your technique for the next time you want to
prepare the recipe using convection.
1
2
3
4
5
Rack 3
Rack 1
•
See Troubleshooting for “Baking and Roasting Problems.”
FOODS RECOMMENDED FOR CONVECTION BAKE MODE:
Appetizers Biscuits Coee Cakes
Cookies (2 to 4 racks) Yeast Breads
Cream Pus
Popovers
Casseroles and One-Dish Entreés
Oven Meals (rack positions 1, 2, 3)
Air Leavened Foods (Soués, Meringue, Meringue-Topped Desserts, Angel Food
Cakes, Chion Cakes)

20
CONVECTION BAKE CHART
Reduce standard recipe temperature by 25 ºF (15 °C) for Convection Bake.
Temperatures have been reduced in this chart.
CONVECTION CAVITY
FOOD ITEM
RACK
POSITION
TEMP. °F (°C)
(PREHEATED OVEN)
TIME (MIN)
Cake
Cupcakes
Bundt Cake
Angel Food
2
1
1
325 (160)
325 (160)
325 (160)
20-22
43-50
43-47
Pie
2 crust, fresh, 9”
2 crust, frozen fruit, 9”
2
2
350-400 (175-205)
350 (175)
40-52
68-78
Cookies
Sugar
Chocolate Chip
Brownies
2
2
2
325-350 (160-175)
325-350 (160-175)
325 (160)
9-12
8-13
29-36
Breads
Yeast bread loaf, 9x5
Yeast rolls
Biscuits
Muns
2
2
2
2
350 (175)
350-375 (175-190)
375 (190)
400 (205)
18-22
12-15
8-10
17-21
Pizza
Frozen
Fresh
2
2
375-425 (190-220)
450 (232)
23-26
15-18
CONVECTION ROAST TIPS AND TECHNIQUES
•
Do not preheat for Convection Roast.
•
Roast in a low-sided, uncovered pan.
•
When roasting whole chickens or turkey, tuck wings behind back and loosely tie
legs with kitchen string.
•
Use the 2-piece broil pan for roasting uncovered.
•
Use the probe or a meat thermometer to determine the internal doneness on
“END” temperature (see cooking chart).
•
Double-check the internal temperature of meat or poultry by inserting meat
thermometer into another position.
•
Large poultry may need to be covered with foil (and pan roasted) during a portion
of the roasting time to prevent over-browning.
•
The minimum safe temperature for stung in poultry is 165ºF (74°C).
•
After removing the food from the oven, cover loosely with foil for 10 to
15 minutes before carving, if necessary, to increase the nal foodstu
temperature by 5° to 10°F (3° to 6° C).

21
QUICK AND EASY RECIPE TIPS
Converting from standard BAKE to CONVECTION ROAST:
•
Temperature does not have to be lowered.
•
Roasts, large cuts of meat and poultry generally take 10-20% less cooking time.
Check doneness early.
•
Casseroles or pot roasts that are baked covered in CONVECTION ROAST will
cook in about the same amount of time.
CONVECTION ROAST CHART
CONVECTION CAVITY
MEATS
WEIGHT
(lb)
OVEN TEMP.
°F (°C)
RACK
POSITION
TIME
(min. per
lb)
INTERNAL
TEMP. °F (°C)
Beef
Rib Roast 4-6 325 (160) 2 16-20
18-22
145 (63)
medium rare
160 (71)
medium
Rib Eye Roast,
(boneless)
4-6 325 (160) 2 16-20
18-22
145 (63)
medium rare
160 (71)
medium
Rump, Eye, Tip,
Sirloin (boneless)
3-6 325 (160) 2 16-20
18-22
145 (63)
medium rare
160 (71)
medium
Tenderloin Roast 2-3 400 (205) 2 15-20 145 (63)
medium rare
Pork
Loin Roast
(boneless or bone-
in)
5-8 350 (175) 2 16-20 160 (71)
medium
Shoulder 3-6 350 (175) 2 20-25 160 (71)
medium
Poultry
Chicken whole 3-4 375 (190) 2 18-21 180 (82)
Turkey, not stued 12-15 325 (160) 1 10-14 180 (82)
Turkey, not stued 16-20 325 (160) 1 9-11 180 (82)
Turkey, not stued 21-25 325 (160) 1 6-10 180 (82)
Turkey Breast 3-8 325 (160) 1 15-20 170 (77)
Comish Hen 1-1 ½ 350 (175) 2 45-75
total
180 (82)
22
MEATS
WEIGHT
(lb)
OVEN TEMP.
°F (°C)
RACK
POSITION
TIME
(min. per
lb)
INTERNAL
TEMP. °F (°C)
Lamb
Half Leg 3-4 325 (160) 2 22-27
28-33
160 (71)
medium
170 (77) well
Whole Leg 6-8 325 (160) 1 22-27
28-33
160 (71)
medium
170 (77) well
CONVECTION BROIL TIPS AND TECHNIQUES
•
Place rack in the required position needed before turning on the oven.
•
Use Convection Broil mode with the oven door closed.
•
Do not preheat oven.
•
Use the 2-piece broil pan.
•
Turn meats once halfway through the cooking time (see convection broil chart).
•
Thicker cuts and unevenly shaped pieces of meat, sh and poultry may cook
better at lower broiling temperatures.
CONVECTION BROIL CHART
CONVECTION CAVITY
FOOD AND THICKNESS
RACK
POSITION
BROIL
SETTING
INTERNAL
TEMP. °F
(°C)
TIME
SIDE 1
(MIN.)*
TIME
SIDE 2
(MIN.)*
Beef
Steak (1-½” or more)
Medium rare 4 Low 145 (65) 9-12 8-10
Medium 4 Low 160 (71) 11-13 10-12
Well 4 Low 170 (77) 18-20 16-17
Hamburgers (more than 1”)
Medium 4 High 160 (71) 8-11 5-7
Well 4 High 170 (77) 11-13 8-10
Poultry
Chicken Quarters 4 Low 180 (82) 16-18 10-13
Chicken Halves 3 Low 180 (82) 25-27 15-18
Chicken Breasts 4 Low 170 (77) 13-15 9-13
Pork
Pork Chops (1¼” or more) 4 Low 160 (71) 12-14 11-13
Sausage - fresh 4 Low 160 (71) 4-6 3-5

23
RANGE CARE
CLEANING
IMPORTANT: Before cleaning, make sure all controls are o and the oven and
cooktop are cool. Always follow label instructions on cleaning products. Soap, water
and a soft cloth or sponge are suggested rst unless otherwise noted. Do not use
abrasive cleaning products.
EXTERIOR PORCELAIN ENAMEL SURFACES
Food spills containing acids, such as vinegar and tomato, should be cleaned as soon
as the entire appliance is cool. These spills may aect the nish.
Cleaning Method:
Glass cleaner, mild liquid cleaner or nonabrasive scrubbing pad: Gently clean around
the model and serial number plate because scrubbing may remove numbers.
EXTERIOR STAINLESS STEEL
NOTE: Do not use soap-lled scouring pads, abrasive cleaners, Cooktop Polishing
Cream, steel-wool pads, gritty washcloths or some paper towels. Damage may
occur, even with one-time or limited use.
Rub in direction of grain to avoid damaging.
Cleaning Methods:
Liquid detergent or all-purpose cleaner: Rinse well with clean water and dry with
soft, lint-free cloth.
Stainless Steel Cleaner and Polish
Vinegar for hard water spots
OVEN DOOR EXTERIOR
Cleaning Method:
Glass cleaner and paper towels or nonabrasive plastic scrubbing pad: Apply glass
cleaner to soft cloth or sponge, not directly on panel.
RADIANT COOKTOP
The ceramic glass should be cleaned regularly, preferably after each use, a soon as
the Hot Surface warnings have turned o.
Remove any burned residues immediately after cooking.
Cleaning Method:
Rinse with water and dry with a clean, soft cloth. Apply a glass cooktop cleaner. Use
a damp cloth and dry with a paper towel.
NOTE: Do not use abrasive or corrosive detergents, cleansers, oven sprays, spot
removers, or steel-wool scouring pads.

24
SMUDGES FROM PANS WITH AN ALUMINUM BOTTOM
Cleaning Method:
A cloth dampened in vinegar.
COOKTOP CONTROL KNOBS
•
Pull knobs straight away from control panel to remove.
•
When replacing knobs, make sure knobs are in the O position.
Cleaning Method:
Soap and water or dishwasher:
NOTE: Do not use steel wool, abrasive cleansers or oven cleaner. Do not soak
knobs.
CONTROL PANEL
Cleaning Method:
Glass cleaner and soft cloth or sponge: Apply glass cleaner to soft cloth or sponge,
not directly on panel.
NOTE: Do not use abrasive cleaners, steel-wool pads, gritty washcloths or some
paper towels. Damage may occur.
OVEN CAVITY
Food spills should be cleaned when oven cools. At high temperatures, foods react
with porcelain, so staining, etching, pitting or faint white spots can result.
Cleaning Method:
Mild detergent and warm water.
NOTE: Do not use oven cleaners.
OVEN RACKS AND ROASTING RACKS
Cleaning Method:
Steel-wool pad
2-PIECE BROILER PAN
Cleaning Method:
Mildly abrasive cleanser: Scrub with wet scouring pad.
Solution of ½ cup (125 mL) ammonia to 1 gal. (3.75 L) water: Soak for 20 minutes,
and then scrub with scouring or steel-wool pad.
Oven cleaner: Follow product label instructions. Porcelain enamel only, not chrome.
Dishwasher: Place broiler pan in dishwasher.
25
OVEN DOOR REMOVAL
The oven door weighs 30 lbs (14kg). For ease of installation and more thorough
cleaning, some oven doors may be removed.
IMPORTANT:
•
There are two styles of oven door, so rst identify the style of your oven door.
•
Make sure oven is cool and power to the oven has been turned o before
removing the door.
•
The oven door is heavy and fragile, and the door front is glass. To avoid oven
door glass breakage, use both hands, and grasp only the sides of the oven door
to remove.
•
Be sure that both levers are securely in place before removing the door.
•
Do not force door open or closed.
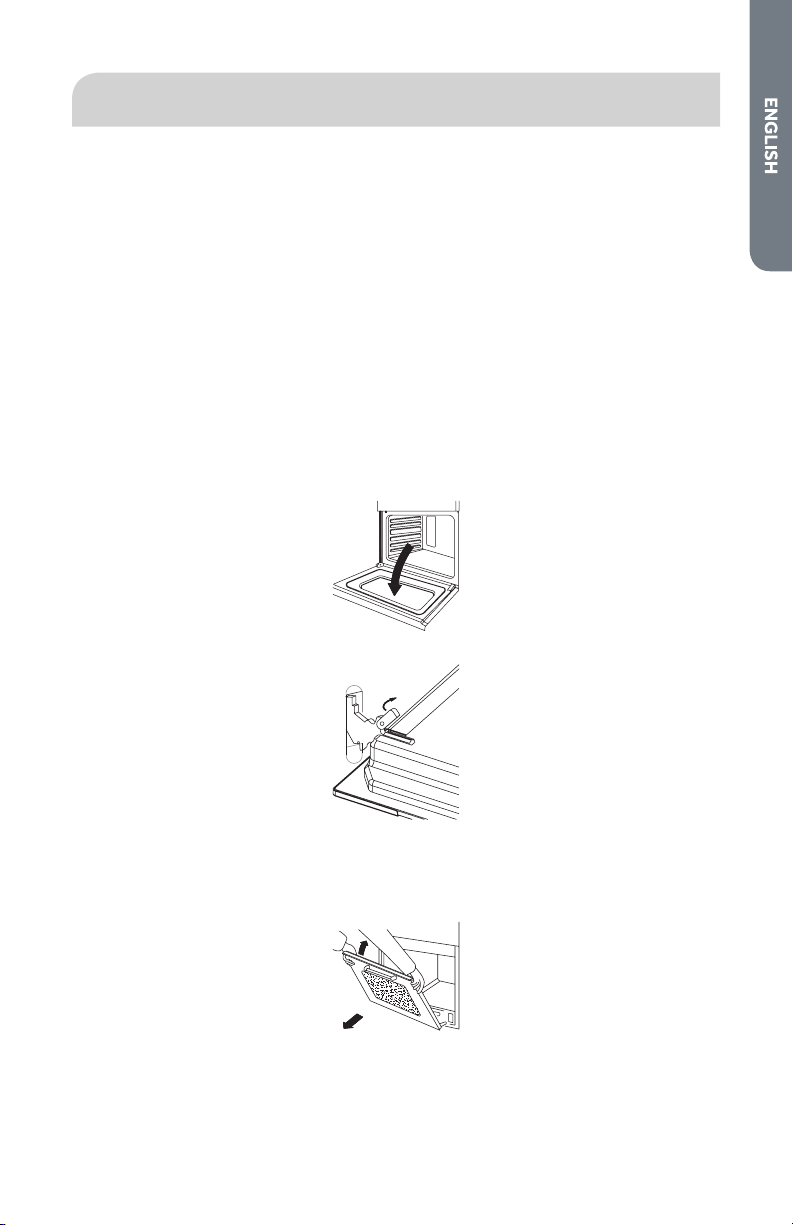
Style 1 -
To remove the oven door:
1. Open the door fully.
2. Lift up and turn the small levers situated on the two hinges.
3. Grasp the door by its two outer edges, and then close it slowly but not
completely.
4. Pull the door toward you, pulling it out of the hinge receivers located in the
frame.
5. Replace the door by reversing the previous steps.
26
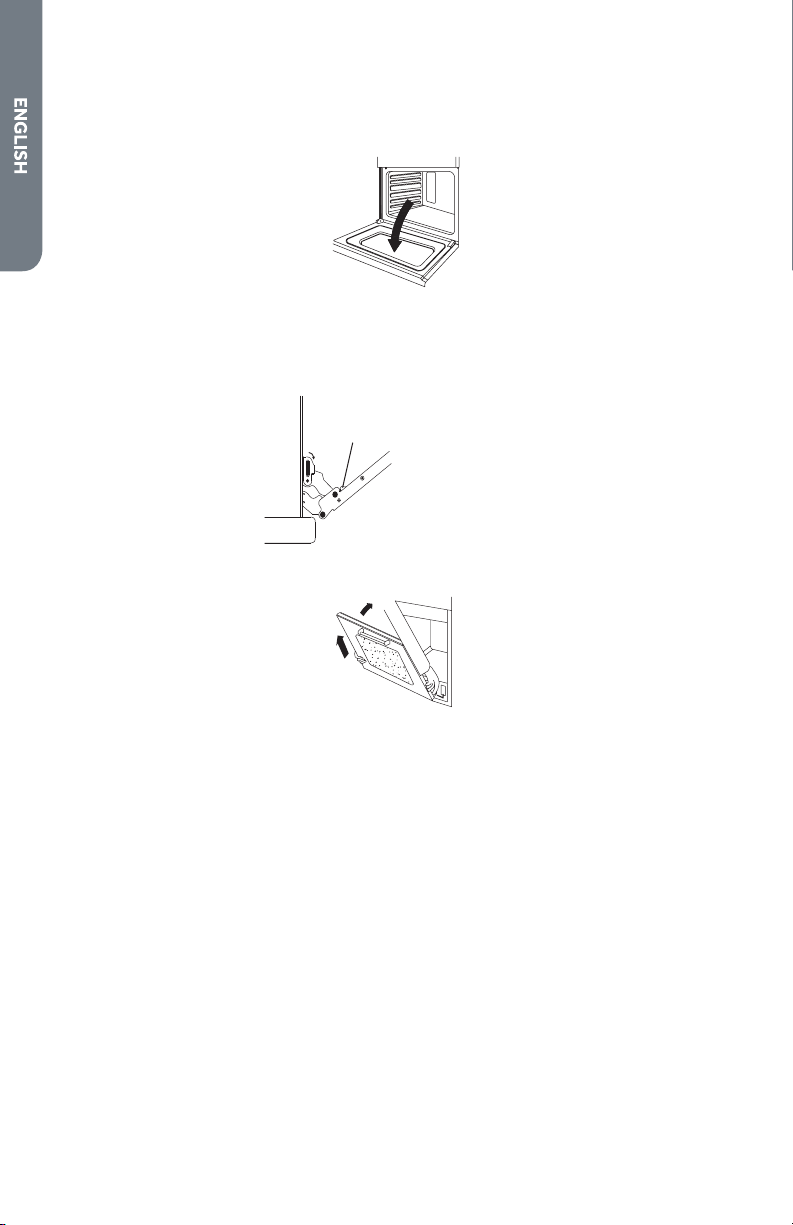
Style 2 -
To remove the oven door:
1. Open the door fully.
2. Push down and turn the small levers situated on the two hinges.
3. Grasp the door by its two outer edges, and then close it slowly but not
completely.
4. Unlock the door by pressing on the clamps.
a
a Clamps
5. Pull the door toward you, pulling it out of the hinge receivers located in the
frame. .
6. Replace the door by reversing the previous steps.
27
REPLACING AN OVEN LIGHT
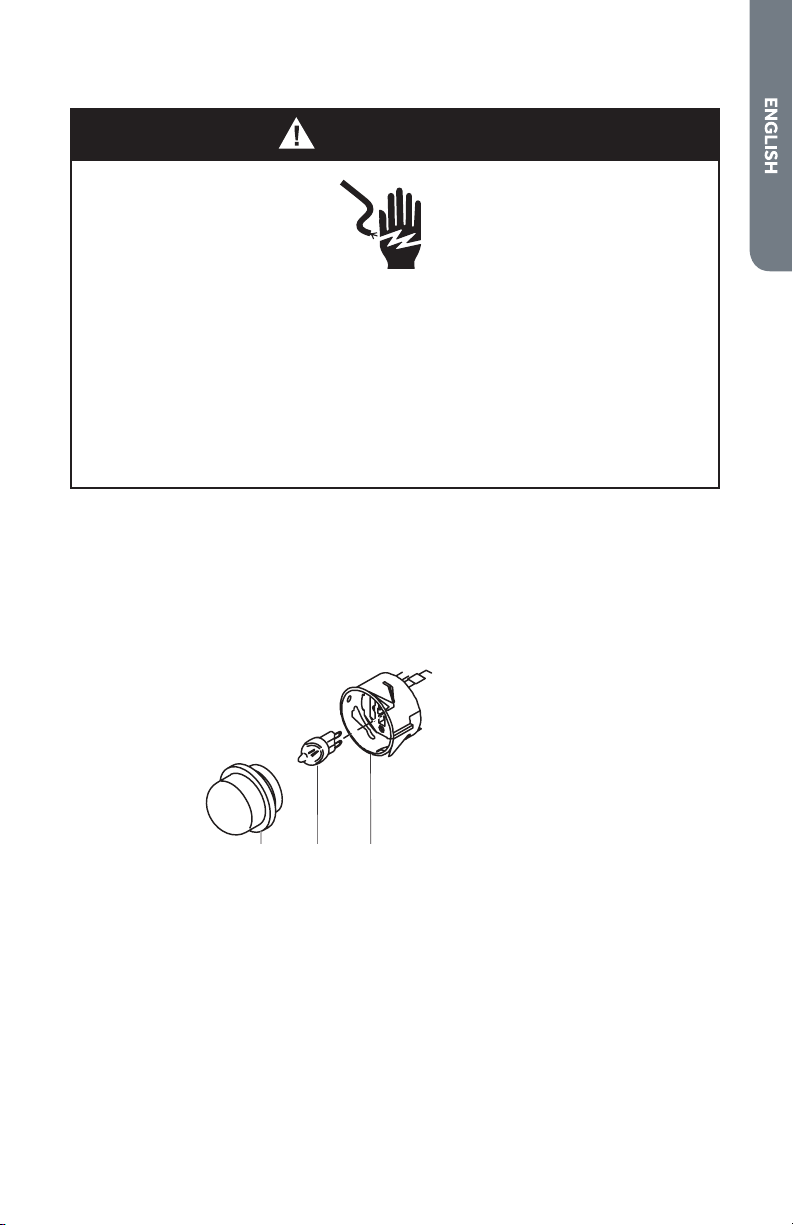
WARNING
Electrical Shock Hazard
Make sure the oven and lights are cool and power to the oven has been
turned off before replacing the light bulb(s).
The lenses must be in place when using the oven. The lenses serve to
protect the light bulb from breaking.
The lenses are made of glass. Handle carefully to avoid breakage.
Failure to do so could result in death, electric shock, cuts or burns.
IMPORTANT: The light bulb in your oven is Type: E 14, 220-240V and 25W. You must
replace this bulb with an appliance bulb of the same type, voltage and wattage.
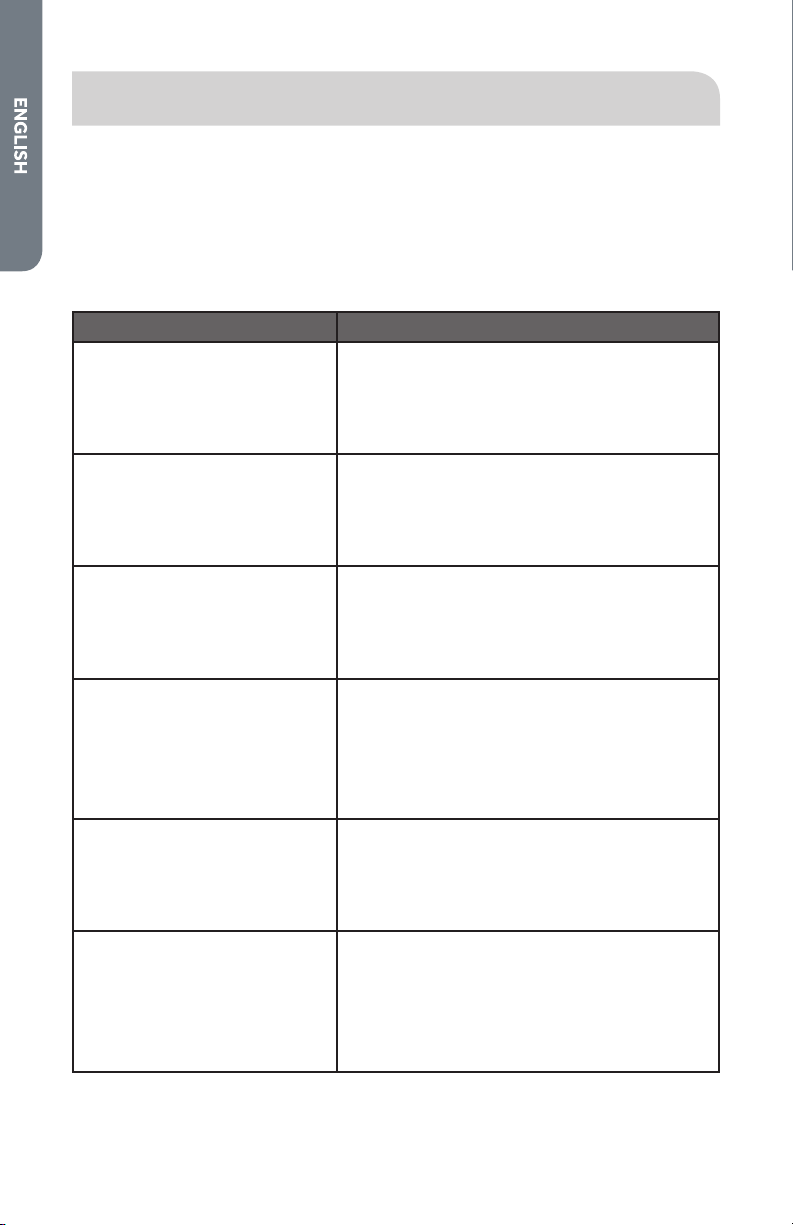
To Replace the Light Bulb:
1. Make sure oven is turned O and cool.
2. Disconnect power at the main power supply (fuse or breaker box).
3. Unscrew the lens and remove.
abc
a Lens
b Bulb
c Socket
4. Pull the burned-out bulb from the socket, and then replace it with an appliance
bulb of the same type, voltage and wattage.
5. Replace the lens.
6. Turn on power at the main power supply (fuse or breaker box).
28
TROUBLESHOOTING
BAKING AND ROASTING PROBLEMS
With any oven setting poor results can occur for many reasons other than a
malfunction of the oven. Check the chart below for causes of the most common
problems. Since the size, shape and material of baking utensils directly aect the
baking results, the best solution may be to replace old baking utensils that have
darkened and warped with age and use.
BAKING PROBLEM CAUSE
Food browns unevenly
•
Oven not preheated
•
Aluminum foil on oven rack or oven bottom
•
Baking utensil too large for recipe
•
Pans touching each other or oven walls
Food too brown on bottom
•
Oven not preheated
•
Using glass, dull or darkened metal pans
•
Incorrect rack position
•
Pans touching each other or oven walls
Food is dry or has shrunk
excessively
•
Oven temperature too high
•
Baking time too long
•
Oven door opened frequently
•
Pan size too large
Food is baking or roasting too
slowly
•
Oven temperature too low
•
Oven not preheated
•
Oven door opened frequently
•
Tightly sealed with aluminum foil
•
Pan size too small
Piecrusts do not brown on
bottom or crust is soggy
•
Baking time not long enough
•
Using shiny steel pans
•
Incorrect rack position
•
Oven temperature is too low
Cakes pale, at and may not be
done inside
•
Oven temperature too low
•
Incorrect baking time
•
Cake tested too soon
•
Oven door opened too often
•
Pan size may be too large
29
Cakes high in middle with crack
on top
•
Oven temperature too high
•
Baking time too long
•
Pans touching each other or oven walls
•
Incorrect rack position
•
Pan size too small
Piecrust edges too brown
•
Oven temperature too high
•
Edges of crust too thin
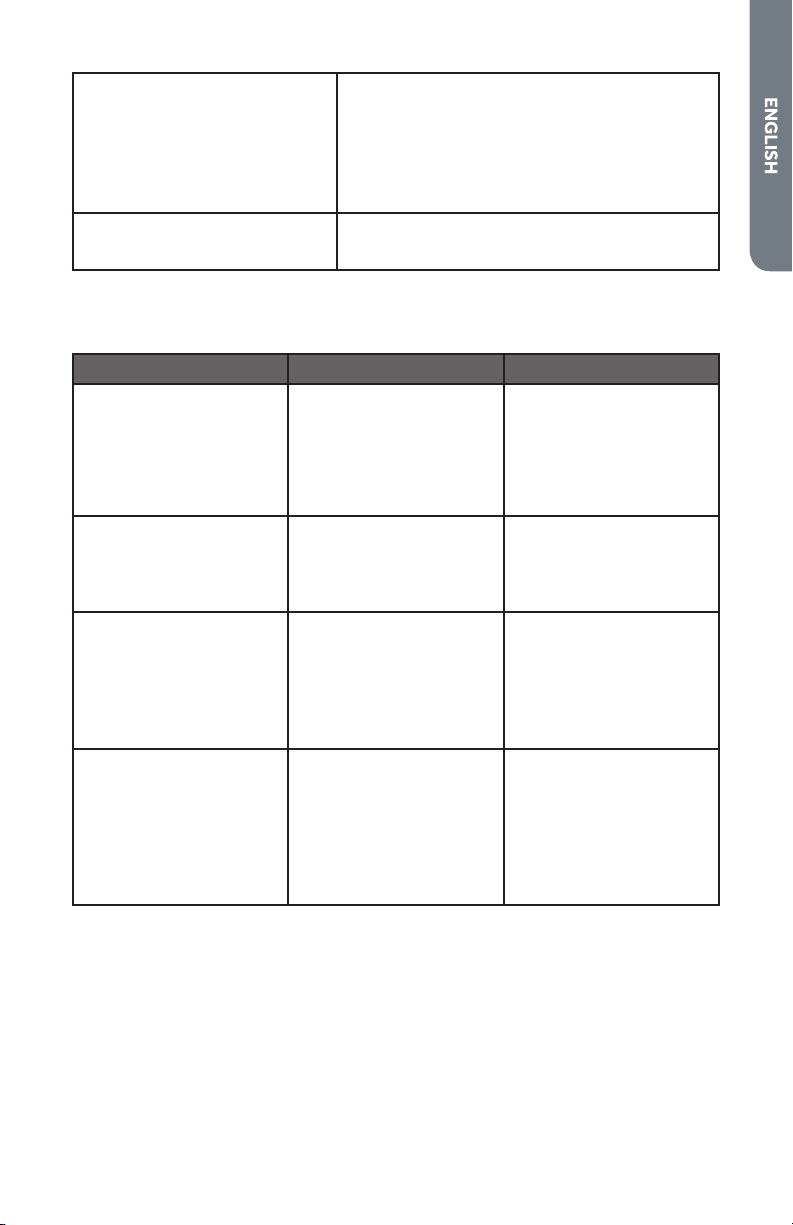
COOKTOP
PROBLEM POSSIBLE CAUSE SOLUTION
Heating elements and
controls do not work.
Fuse is blown or circuit
breaker is tripped.
No electricity to the
cooktop.
Replace the fuse or reset
the circuit breaker. If the
problem continues, call
an electrician.
Have electrician check
your power supply.
Heating elements do not
heat properly.
Improper cookware is
being used.
Select proper cookware.
See “Cookware.”
If the problem continues,
call for service.
Heating elements cycle
o even when elements
are turned to their
highest settings.
Heating element
temperature limiters
are temporarily shutting
o the elements due to
exceeding the maximum
allowable temperature.
This is a normal operating
condition, especially
during rapid heat-up
operations. The element
will cycle back on
automatically after it has
cooled suciently.
Glass ceramic surface is
see through or appears
to be red in color.
Under direct or bright
lighting, you will
sometimes be able to see
through the glass and
into the chassis due to its
transparent quality. You
may also notice a red tint
under these conditions
These are normal
properties of black
ceramic glass panels.
30
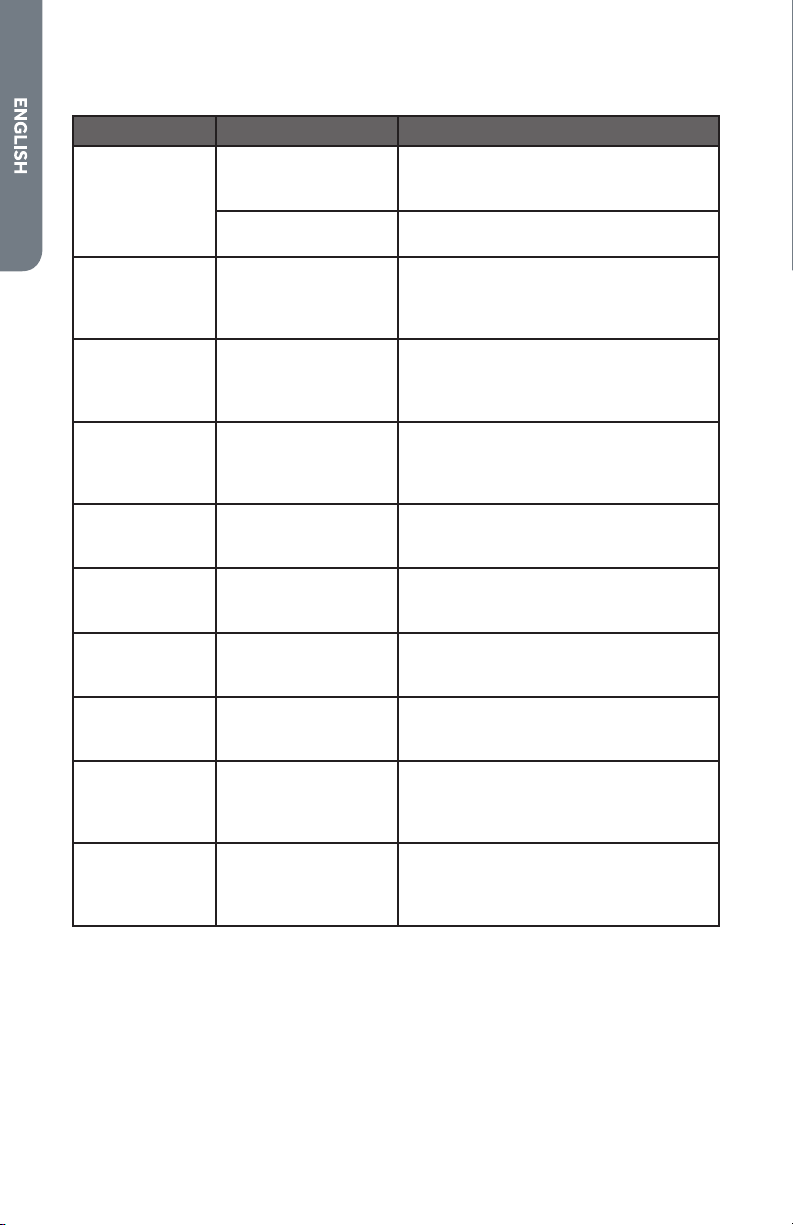
OVEN
PROBLEM POSSIBLE CAUSE SOLUTION
Oven is not
heating
No power to the
oven
Replace the fuse or reset the circuit
breaker. If the problem continues, call
an electrician.
Oven control not
turned on
Make sure the oven temperature has
been selected.
Oven is not
cooking evenly
Not using the correct
bake ware or oven
rack position
Refer to cook charts for recommended
rack position. Always reduce recipe
temperature by 25 °F (15 °C) when
baking with Convention Bake mode.
Oven display
stays O.
Power interruption Turn o power at the main power
supply (fuse or breaker box). Turn
breaker back on. If condition persists,
call for service.
Cooling fan
continues to
run after oven
is turned o
The electronic
components have
not yet cooled
suciently
The fan will turn o automatically
when the electronic components have
cooled suciently.
Oven light is
not working
properly
Light bulb loose or
burned-out.
Reinsert or replace the light bulb.
Touching the bulb with ngers may
cause the bulb to burn out.
Oven light
stays on
Door is not closing
completely
Check for obstruction in oven door.
Check to see if hinge is bent or door
switch broken.
Cannot remove
lens cover
Soil build-up around
the lens cover.
Wipe lens cover area with a clean, dry
towel prior to attempting to remove
the lens cover.
Clock and timer
are not working
properly
No power to the
oven
Check the circuit breaker or fuse box to
your house. Make sure there is proper
electrical power to the oven.
Excessive
Moisture
When using bake mode, preheat
the oven rst. Convection Bake and
Convection Roast will eliminate any
moisture in the oven.
Porcelain Chips
Porcelain interior
is bumped by oven
racks
When removing and replacing oven
racks, always tilt racks upward and do
not force them to avoid chipping the
porcelain.
FOR MORE HELP, VISIT HAIERAMERICA.COM OR CALL THE
CONSUMER HELP LINE AT 1-877-337-3639.

31
LIMITED WARRANTY
IN-HOME SERVICE
FULL TWO YEAR WARRANTY
For 24 months from the date of original retail
purchase, Haier will repair or replace any part
free of charge including labor that fails due to
a defect in materials or workmanship.
Haier may replace or repair at their sole
discretion any part, sub system including the
entire product.
Product must be accessible, without
encumbrance and installed properly to
receive for warranty repair service.
LIMITED WARRANTY
NOTE: This warranty commences on the
date the item was purchased, and the original
purchase receipt must be presented to the
authorized service representative before
warranty repairs are rendered.
Exceptions: Commercial Use Warranty
90 days labor from date of original purchase
90 days parts from date of original
purchase
No other warranty applies.
FOR WARRANTY SERVICE
All service must be performed by a Haier
authorized service center. For the name and
telephone number of the nearest authorized
service center, please call 1-877-337-3639.
Before calling please have available the
following information:
Model number and serial number of your
appliance. The name and address of the
dealer you purchased the unit from and the
date of purchase.
A clear description of the problem.
A proof of purchase (sales receipt).
This warranty covers home appliance
services within the contiguous United
States and Canada and where available in
Alaska, Hawaii and Puerto Rico.
What is not covered by this warranty:
Replacement or repair of household fuses,
circuit breakers, wiring or plumbing.
A product whose original serial number has
been removed or altered.
Any service charges not specically identied
as normal such as normal service area or
hours.
Replacement of light bulbs.
Damage to clothing.
Damage incurred in shipping.
Damage caused by improper installation or
maintenance.
Damage from misuse, abuse accident, re,
ood, or acts of nature.
Damage from service other than an
authorized Haier dealer or service center.
Damage from incorrect electrical current,
voltage or supply.
Damage resulting from any product
modication, alteration or adjustment not
authorized by Haier.
Adjustment of consumer operated controls
as identied in the owner’s manual.
Hoses, knobs, lint trays and all attachments,
accessories and disposable parts.
Labor, service transportation, and shipping
charges for the removal and replacement of
defective parts beyond the initial 24-month
period.
Damage from other than normal household
use.
Any transportation and shipping charges.
THIS LIMITED WARRANTY IS GIVEN
IN LIEU OF ALL OTHER WARRANTIES,
EXPRESS ED OR IMPLIED, INCLUDING BUT
NOT LIMITED TO, THE WARRANTIES OF
MERCHANTABILITY AND FITNESS FOR A
PARTICULAR PURPOSE
The remedy provided in this warranty is
exclusive and is granted in lieu of all other
remedies.
This warranty does not cover incidental
or consequential damages, so the above
limitations may not apply to you. Some
states do not allow limitations on how long
an implied warranty lasts, so the above
limitations may not apply to you.
This warranty gives you specic legal rights,
and you may have other rights, which vary
from state to state.
Haier America
Wayne, NJ 07470

32
TABLE DES MATIÈRES
SÉCURITÉ DE LA CUISINIÈRE ............................................................................ 33
La bride antibasculement ............................................................................................35
PIÈCES ET CARACTÉRISTIQUES .......................................................................40
MODULE DE COMMANDE ÉLECTRONIQUE ....................................................... 41
Réglage de l’horloge et de la minuterie ......................................................................41
Cuisson minutée .........................................................................................................42
RÉGLAGE DES ÉLÉMENTS ET DES COMMANDES .............................................. 43
Éléments chauants ....................................................................................................43
Boutons rotatifs de commande ..................................................................................44
UTILISATION DE LA TABLE DE CUISSON ........................................................... 45
Avant d’utiliser la table de cuisson..............................................................................45
Ustensile de cuisson ....................................................................................................46
Observer les points suivants lors de la préparation de conserves ...........................47
UTILISATION DU FOUR ..................................................................................... 48
Avant d’utiliser le four ..................................................................................................49
Renseignements généraux .........................................................................................49
Modes du four ..............................................................................................................50
Conseils et technique de cuisson ...............................................................................51
Conseils et techniques de convection européenne ..................................................52
Conseils et techniques de rôtissage à convection ....................................................54
Conseils et techniques pour le gril á convection .......................................................56
ENTRETIEN DU FOUR ........................................................................................ 57
Nettoyage ....................................................................................................................57
RETRAIT DE LA PORTE DU FOUR ......................................................................60
Remplacement de la lampe du four ............................................................................62
DÉPANNAGE ..................................................................................................... 63
Résolution de problèmes concernant la cuisson et le rôtissage ............................... 63
Table de cuisson ........................................................................................................... 64
Four ..............................................................................................................................64
GARANTIE LIMITÉE ...........................................................................................66
DOCUMENTS À CONSERVER
Merci d’avoir acheté ce produit Haier.
Ce manuel d’utilisation vous aidera
à obtenir la meilleure performance
possible de votre nouvelle cuisinière.
Pour référence ultérieure, inscrire le
numéro de plaque signalétique situé
sur le cadre à l’intérieur du la cuisinière,
et la date d’achat.
Pour faciliter l’obtention d’un service
sous garantie, agrafer la preuve de la
date d’achat à ce manuel.
___________________________________
Numéro de modèle
___________________________________
Numéro de série
___________________________________
Date d’achat

33
SÉCURITÉ DE LA CUISINIÈRE
Votre sécurité et celle des autres est très importante.
DANGER
AVERTISSEMENT
ATTENTION
Voici le symbole d’alerte de sécurité.
Ce symbole d’alerte de sécurité vous signale les
dangers potentiels de décès et de blessures graves à
vous et à d’autres. Tous les messages de sécurité
suivront le symbole d’alerte de sécurité et le mot
“DANGER”, “AVERTISSEMENT” ou “ATTENTION”.
Ces mots signifient :
Une situation de danger
imminent. Vous courez le risque
d’un décès ou de blessures
graves si vous ne suivez pas
immédiatement les instructions.
Une situation potentiellement
dangereuse qui, si vous ne
l’évitez pas, peut provoquer la
mort ou des blessures graves.
Une situation potentiellement
dangereuse qui, si vous ne
l’évitez pas, peut entraîner des
blessures légères à modérées.
Tous les messages de sécurité vous diront quel est le danger potentiel
et comment réduire le risque de blessure et ce qui peut se produire en
cas de non-respect des instructions.
Nous donnons de nombreux messages de sécurité importants dans ce
manuel et sur votre appareil ménager. Assurez-vous de toujours lire
tous les messages de sécurité et de vous y conformer.
34
Risque d'incendie
Si les informations figurant dans ce manuel ne sont pas suivies à la
lettre, il peut en résulter un incendie ou une explosion pouvant causer
des dégâts matériels, des blessures, voire un décès.
- Ne pas ranger et utiliser d’essence ou d’autres vapeurs et liquides
inflammables à proximité de cet appareil ou d’un autre appareil.
- QUE FAIRE SI VOUS SENTEZ UNE ODEUR DE GAZ
• Ne pas essayer d’allumer un appareil.
• Ne pas toucher d’interrupteur électrique.
• Ne pas utiliser de téléphone dans votre bâtiment.
• Faire évacuer tous les occupants de la pièce, du bâtiment ou de la
zone concernée.
• Appeler immédiatement votre fournisseur de gaz depuis chez un
voisin. Suivre les instructions de votre fournisseur de gaz.
• Si le fournisseur de gaz ne peut être rejoint, appeler les pompiers.
- L’installation et la maintenance doivent être confiées à un installateur
qualifié, à un réparateur agréé ou au fournisseur de gaz.
AVERTISSEMENT
35
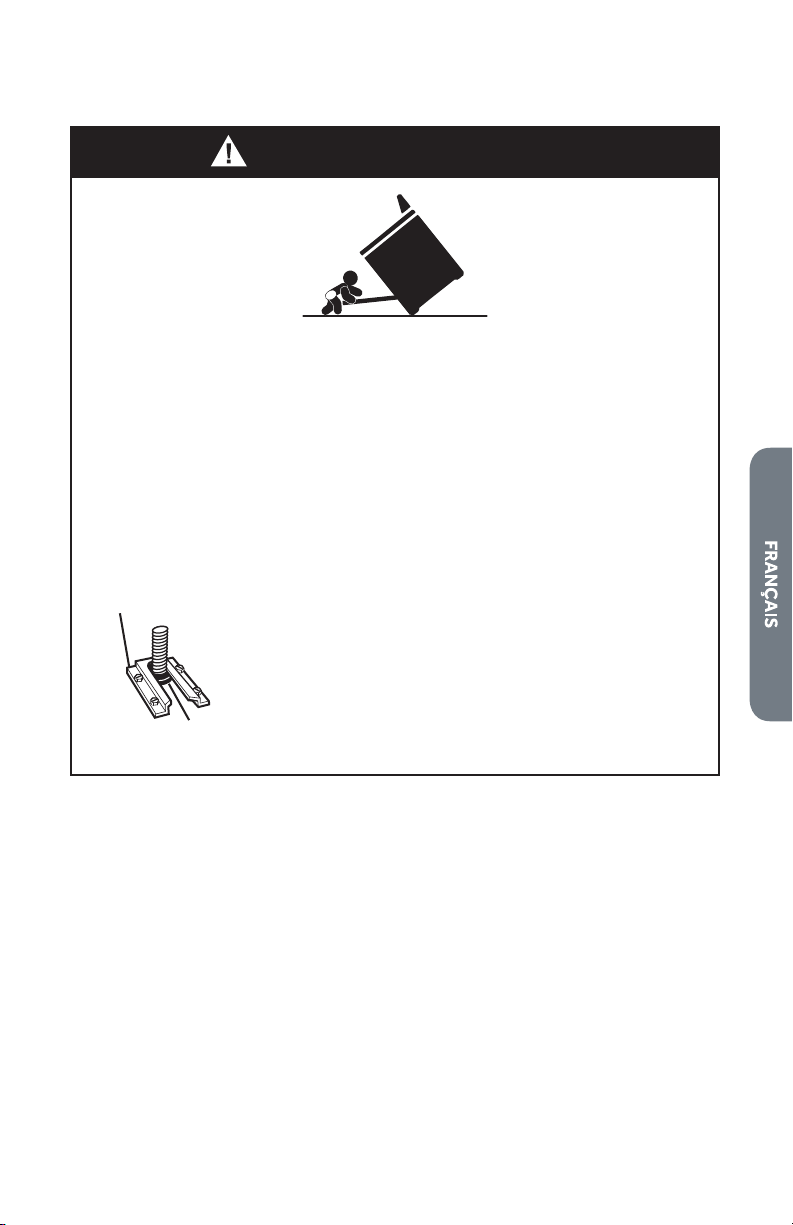
LA BRIDE ANTIBASCULEMENT
Risque de basculement
Un enfant ou une personne adulte peut faire basculer la cuisinière ce qui
peut causer un décès.
Joindre la bride antibasculement au pied arrière de la cuisinière.
Joindre de nouveau la bride antibasculement si la cuisinière est
déplacée.
Voir détails dans les instructions d'installation.
Le non-respect de ces instructions peut causer un décès ou des
brûlures graves aux enfants et aux adultes.
Assurez-vous qu'une bride antibasculement est
installée :
• Glisser la cuisinière vers l'avant.
• Vérifier que la bride antibasculement est bien fixée
au plancher.
• Glisser de nouveau la cuisinière vers l'arrière de
sorte que le pied est sous la bride antibasculement.
La bride
antibasculement
Le pied de
la cuisinière
AVERTISSEMENT
36
IMPORTANTES INSTRUCTIONS
DE SÉCURITÉ
AVERTISSEMENT : An de réduire le risque d’incendie, de choc
électrique, de blessures corporelles ou de dommage lors de l’utilisation
de la cuisinière, il convient d’observer certaines précautions
fondamentales, notamment :
•
AVERTISSEMENT : POUR
MINIMISER LE RISQUE DE
BASCULEMENT DE LA
CUISINIÈRE, ELLE DOIT
ÊTRE BIEN IMMOBILISÉE
PAR DES DISPOSITIFS
ANTIBASCULEMENT
CORRECTEMENT
INSTALLÉS. POUR VÉRIFIER
SI LES DISPOSITIFS
SONT CORRECTEMENT
INSTALLÉS, FAIRE
GLISSER LA CUISINIÈRE
COMPLÈTEMENT VERS
L’AVANT, VÉRIFIER SI LA
BRIDE ANTIBASCULEMENT
EST BIEN FIXÉE AU MUR
SITUÉ DERRIÈRE LA
CUISINIÈRE, ET FAIRE
GLISSER LA CUISINIÈRE
COMPLÈTEMENT VERS
L’ARRIÈRE JUSQU’À CE QUE
L’ENTRETOISE ARRIÈRE
DE LA CUISINIÈRE SE
TROUVE SOUS LA BRIDE
ANTIBASCULEMENT.
•
AVERTISSEMENT :
NE JAMAIS utiliser cet
appareil comme dispositif
de chauage de la pièce.
Le nonrespect de cette
instruction peut entraîner une
intoxication au monoxyde de
carbone et une surchaue du
four.
•
AVERTISSEMENT : NE
JAMAIS couvrir les fentes,
trous ou passages d’air
au fond du four ou couvrir
entièrement une grille avec
des matériaux tels que du
papier d’aluminium. Le non-
respect de cette instruction
empêche la circulation de l’air
dans le four et peut entraîner
une intoxication au monoxyde
de carbone. Les feuilles de
papier d’aluminium peuvent
également retenir la chaleur
et créer un risque d’incendie.
•
MISE EN GARDE : Ne pas
remiser dans des armoires
au-dessus de la cuisinière
ou sur le dosseret d’une
cuisinière, des objets que
des enfants pourraient
vouloir atteindre. Les enfants
pourraient se brûler ou se
blesser en grimpant sur la
cuisinière.
•
Ne pas laisser les enfants
seuls – Les enfants ne doivent
pas être laissés seuls ou sans
surveillance dans la pièce où
la cuisinière est en service.
Ne jamais laisser les enfants
s’asseoir ou se tenir sur
une partie quelconque de la
cuisinière.
•
Porter des vêtements
appropriés – Des vêtements
amples ou détachés ne
doivent jamais être portés
pendant l’utilisation de la
cuisinière.
37
IMPORTANTES INSTRUCTIONS
DE SÉCURITÉ
•
Entretien par l’utilisateur –
Ne pas réparer ni remplacer
toute pièce de la cuisinière si
ce n’est pas spéciquement
recommandé dans le manuel.
Toute autre opération
d’entretien ou de réparation
doit être conée à un
technicien qualié.
•
Remisage dans ou sur la
cuisinière – Des matériaux
inammables ne doivent pas
être remisés dans un four ou
près des éléments de surface.
•
Ne pas utiliser d’eau pour
éteindre un feu de graisse –
Étouer le feu ou les ammes
ou utiliser un extincteur à
produits chimiques secs, ou
un extincteur à mousse.
•
N’utiliser que des mitaines de
four sèches – Des mitaines
de four mouillées ou humides
sur des surfaces chaudes
peuvent provoquer des
brûlures provenant de la
vapeur. Ne pas laisser les
mitaines de four toucher les
éléments chauants. Ne pas
utiliser une serviette ou un
tissu épais.
•
NE PAS TOUCHER LES
ÉLÉMENTS DE SURFACE
OU L’ESPACE PRÈS DES
ÉLÉMENTS – Les éléments de
surface peuvent être chauds
même lorsqu’ils ont une
teinte foncée. Les endroits
près des éléments de surface
peuvent devenir assez chauds
pour causer des brûlures.
Pendant et après l’utilisation,
ne pas toucher les éléments
chauants et ne pas laisser
les vêtements ou autres
matériaux inammables
entrer en contact avec
ces éléments de surface
ou les endroits près des
éléments, avant qu’ils aient
susamment refroidi. Ces
endroits comprennent la table
de cuisson et les surfaces
près de la table de la cuisson.
•
Ne jamais laisser les éléments
de la table de cuisson sans
surveillance alors qu’ils
chauent à la puissance
maximale. Il pourrait en
résulter une ébullition qui
cause de la fumée et des
renversements de corps gras
qui peuvent s’enammer.
•
Ustensiles de cuisson
vitriés – Seulement certains
types d’ustensiles de verre,
vitrocéramique, céramique,
faïence ou autres surfaces
vitriées conviennent pour
le service sur une table de
cuisson, sans bris attribuables
aux changements soudains
de température.

38
IMPORTANTES INSTRUCTIONS
DE SÉCURITÉ
•
Les poignées des
ustensiles doivent être
tournées vers l’intérieur
et non vers le dessus des
éléments adjacents –
Pour réduire le risque de
brûlures, d’inammation
de produits inammables
et de renversements dus
à l’entrechoquement non
intentionnel des ustensiles,
la poignée d’un ustensile doit
être positionnée de sorte
qu’elle soit tournée vers
l’intérieur et non au-dessus
des éléments de surface
adjacents.
•
Nettoyer la table de cuisson
avec prudence – Si une
éponge ou un chion mouillé
est utilisé pour essuyer les
renversements sur une
surface de cuisson chaude,
éviter les brûlures causées
par la vapeur chaude. Certains
nettoyants peuvent produire
des émanations nocives
lorsqu’ils sont utilisés sur une
surface chaude.
•
Exercer une grande prudence
lors de l’ouverture de la
porte – Laisser l’air chaud ou
la vapeur s’échapper avant
d’enlever ou de replacer un
plat.
•
Ne pas faire chauer des
contenants fermés –
L’accumulation de pression
peut causer une explosion du
contenant et des blessures.
•
Ne jamais obstruer les
ouvertures des évents.
•
Positionnement des grilles
du four – Toujours placer les
grilles du four à la position
désirée pendant que le four
est froid. Si la grille doit être
déplacée pendant que le four
est chaud, ne pas laisser les
mitaines de four toucher
l’élément chaud du four.
•
NE PAS TOUCHER LES
ÉLÉMENTS CHAUFFANTS
OU LES SURFACES
INTÉRIEURES DU FOUR – Les
éléments chauants peuvent
être chauds même s’ils
ont une teinte foncée. Les
surfaces intérieures d’un four
deviennent assez chaudes
pour causer des brûlures.
Pendant et après l’utilisation,
ne pas toucher ou laisser
des vêtements ou autres
matériaux inammables venir
en contact avec les éléments
chauds ou les surfaces
intérieures chaudes du four
avant qu’ils aient eu assez de
temps pour refroidir. D’autres
surfaces de l’appareil peuvent
devenir assez chaudes pour
causer des brûlures. Ces
surfaces comprennent les
ouvertures de l’évent du four
et les surfaces près de ces
ouvertures, les portes du four,
et les hublots des portes du
four.
39
IMPORTANTES INSTRUCTIONS
DE SÉCURITÉ
•
Installation correcte – Une
fois installée, la cuisinière
doit être reliée à la terre
conformément aux codes
locaux, ou en l’absence de
codes locaux, au National
Electrical Code ANSI/NFPA
70. Au Canada, la cuisinière
doit être reliée à la terre
conformément au Code
canadien des installations
électriques. Be sure the
range is properly installed
and grounded by a qualied
technician.
•
Déconnecter la source de
courant électrique avant
d’intervenir sur l’appareil.
•
Des blessures peuvent
résulter d’un mauvais usage
des portes ou tiroirs de
l’appareil – par exemple
marcher, s’appuyer ou
s’asseoir sur les portes ou
tiroirs.
•
Entretien – Maintenir la zone
de la cuisinière à l’abri des
matériaux combustibles,
essence ou autres vapeurs ou
liquides inammables.
Pour les appareils avec hotte de
ventilation –
•
Nettoyer les hottes de
ventilation fréquemment
– La graisse ne doit pas
s’accumuler sur la hotte ou le
ltre.
•
Lorsque vous ambez des
aliments sous la hotte, mettre
le ventilateur en marche.
LIRE ET CONSERVER CES
INSTRUCTIONS
40
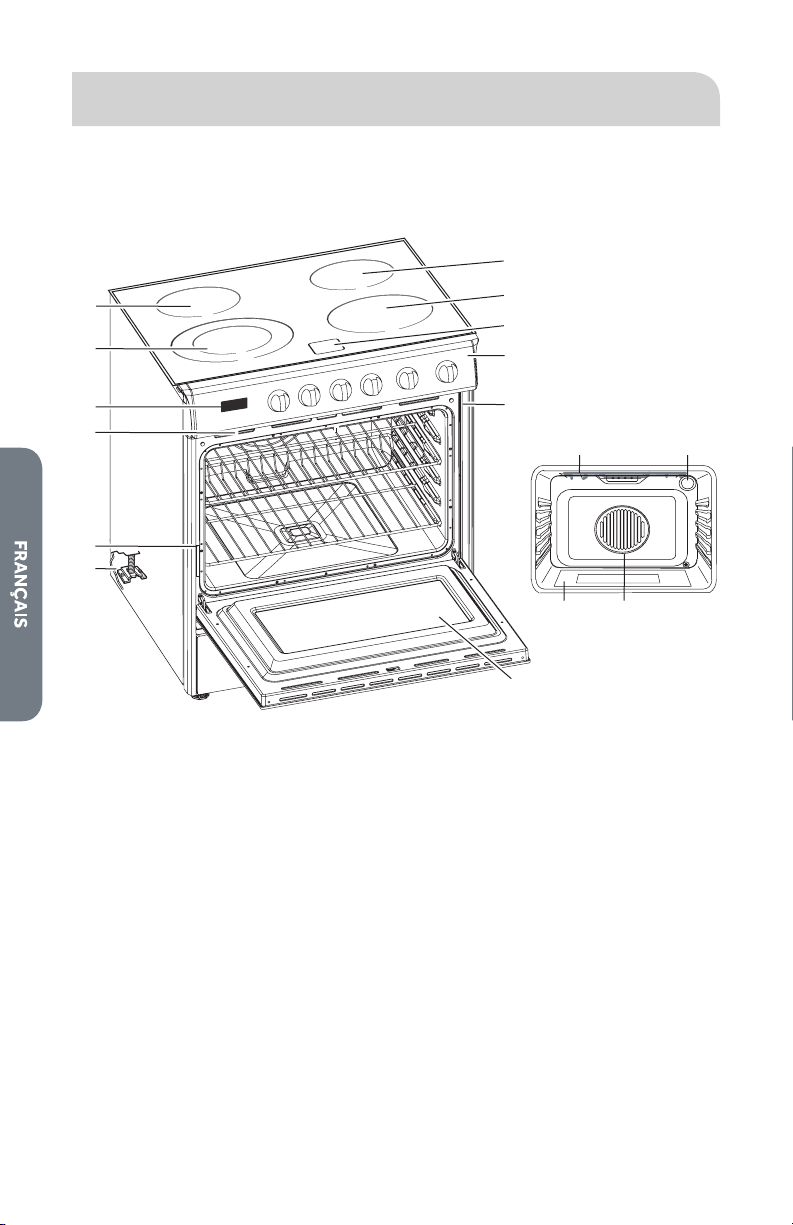
PIÈCES ET CARACTÉRISTIQUES
Ce manuel couvre plusieurs modèles diérents. La cuisinière que vous avez achetée
peut comporter l’ensemble des articles énumérés ou seulement certains d’entre
eux. L’emplacement et l’apparence des caractéristiques illustrées peuvent ne pas
correspondre à ceux de votre modèle.
d
f
e
j
k
p
o
ml
n
H
OT SUR
FAC
ES
a
b
c
g
h
i
a Élément de surface arrière
gauche
b Élément de surface avant
gauche (élément double)
c Horloge/minuterie
d Conduit d’évacuation du four
e Plaque signalétique des
numéros de modèle et de série
f Bride antibasculement
g Élément de surface arrière droit
h Élément de surface avant droit
i Témoins lumineux de surface
chaude
j Tableau de commande
k Joint d’étanchéité de la porte
l Élément de cuisson au gril
m Lampe du four
n Ventilateur et élément de
convection
o Élément inférieur (non visible)
p Hublot de la porte du four
41
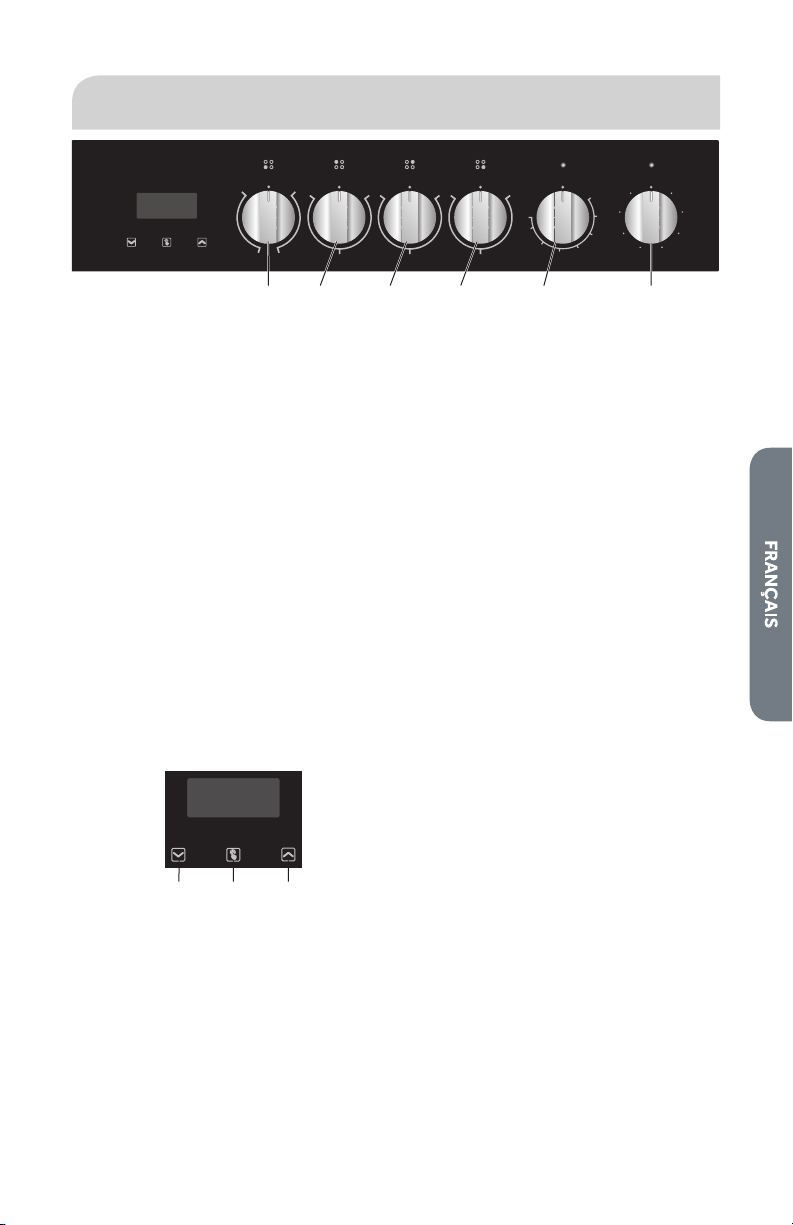
MODULE DE COMMANDE ÉLECTRONIQUE
Timer
Set
Cook
Time
End
Time
Set
Clock
OFF OFF OFF OFF OFF
°
F
Broil
450
400
350
300
250
200
150
Defrost
Conv
Bake
Conv
Broil
High
Broil
Low
Broil
Pizza
Bake
Light
HI LO HI LO HI LO
MED MED MED
OFF
HI HI
SINGLE DUAL
LO LO
a b c d e f
a L’élément avant gauche
b L’élément arrière gauche
c L’élément arrière droit
d L’élément avant droit
e Bouton de commande de la
température du four électrique
f Bouton de commande du four
électrique
RÉGLAGE DE L’HORLOGE ET DE LA MINUTERIE
Votre modèle est équipé d’un achage numérique, d’une horloge au format
12heures et de 3 boutons de commande.
IMPORTANT : Dans le cas d’une panne de courant, tous les réglages seront
réinitialisés, y compris l’achage de l’heure. Une fois le courant rétabli, la barre au-
dessus de Timer Set (minuterie réglée) ache 12:00.
RÉGLAGE DE L’HORLOGE
Lorsque l’appareil est mis sous tension, l’écran ache 12:00 dans la barre au-dessus
de “Set Clock” (régler l’horloge).
Pour régler l’heure exacte, appuyer sur la èche vers le haut ou la èche vers le bas
jusqu’à ce que l’heure exacte s’ache. Au bout de 5 secondes, l’horloge démarre
automatiquement, il est également possible d’appuyer sur le bouton de fonction
pour choisir le fonctionnement manuel.
Timer
Set
Cook
Time
End
Time
Set
Clock
a b c
a Diminuer la durée
b Fonction
c Augmenter la durée
RÉGLAGE DE LA MINUTERIE
La minuterie numérique peut être réglée jusqu’à 11 heures et 59 minutes.
Pour régler la minuterie, appuyer plusieurs fois sur le bouton de fonction jusqu’à ce
que la barre au-dessus de Timer Set (minuterie réglée) s’ache. Une fois le bouton
de fonction relâché, l’heure actuelle s’ache et la barre au-dessus de Timer Set
(minuterie réglée) clignote. Lorsque l’on appuie sur le bouton de fonction, la durée
restante s’ache. Une fois la durée réglée atteinte, Timer Set (minuterie réglée)
disparaît et une alarme retentit. Pour arrêter l’alarme, appuyer sur n’importe quel
bouton.
REMARQUE : Après avoir appuyé sur le bouton de fonction, la minuterie doit être
réglée dans les cinq secondes suivantes.

42
CUISSON MINUTÉE
Risque d’intoxication alimentaire
Ne pas laisser d’aliments dans un four plus d’une heure avant ou après
la cuisson.
Le non-respect de cette instruction peut causer une intoxication
alimentaire ou une maladie.
AVERTISSEMENT
La cuisson minutée permet d’allumer le four à une certaine heure de la journée,
d’eectuer une cuisson pendant une durée déterminée et/ou d’éteindre le four
automatiquement. La mise en marche diérée ne doit pas être utilisée pour les
aliments tels que pains et gâteaux car ils risquent de ne pas bien cuire.
REMARQUE : Avant le réglage, s’assurer que l’horloge est réglée à l’heure exacte.
Voir “Réglage de l’horloge” plus haut dans cette section.
1. Appuyer plusieurs fois sur le bouton de fonction jusqu’à ce que la barre au-
dessus de Cook Time (durée de cuisson) clignote et appuyer sur la èche vers le
haut ou vers le bas pour régler la durée de cuisson au four.
2. Appuyer plusieurs fois sur le bouton de fonction jusqu’à ce que la barre au-
dessus de End Time (heure de n) clignote puis appuyer sur la èche vers le haut
ou vers la bas pour régler l’heure d’arrêt du four.
3. Pour régler la température de cuisson et le mode de cuisson, tourner le bouton
de thermostat et le bouton de sélection.
4. Après avoir suivi ces étapes, la barre au-dessus de Cook Time (durée de cuisson)
et de End Time (heure de n) clignote, ce qui indique que la caractéristique de
cuisson automatique du four est réglée.
Par exemple : Si la durée de cuisson est de 45 minutes et que vous souhaitez arrêter
la cuisson à 6:00.
1. Appuyer plusieurs fois sur le bouton de fonction jusqu’à ce que la barre au-
dessus de Cook Time (durée de cuisson) clignote et régler la durée de cuisson
sur 45 minutes.
2. Appuyer plusieurs fois sur le bouton de fonctions jusqu’à ce que la barre au-
dessus de End Time (heure de n) clignote et régler l’heure de n à 6:00.
Une fois ce réglage eectué, l’heure actuelle s’ache et barre au-dessus de Cook
Time (durée de cuisson) et End Time (heure de n) clignote, ce qui indique que la
caractéristique de cuisson automatique du four est réglée. Lorsque l’horloge ache
5:15, le four commence automatiquement la cuisson et la barre de Cook Time
(durée de cuisson) clignote.
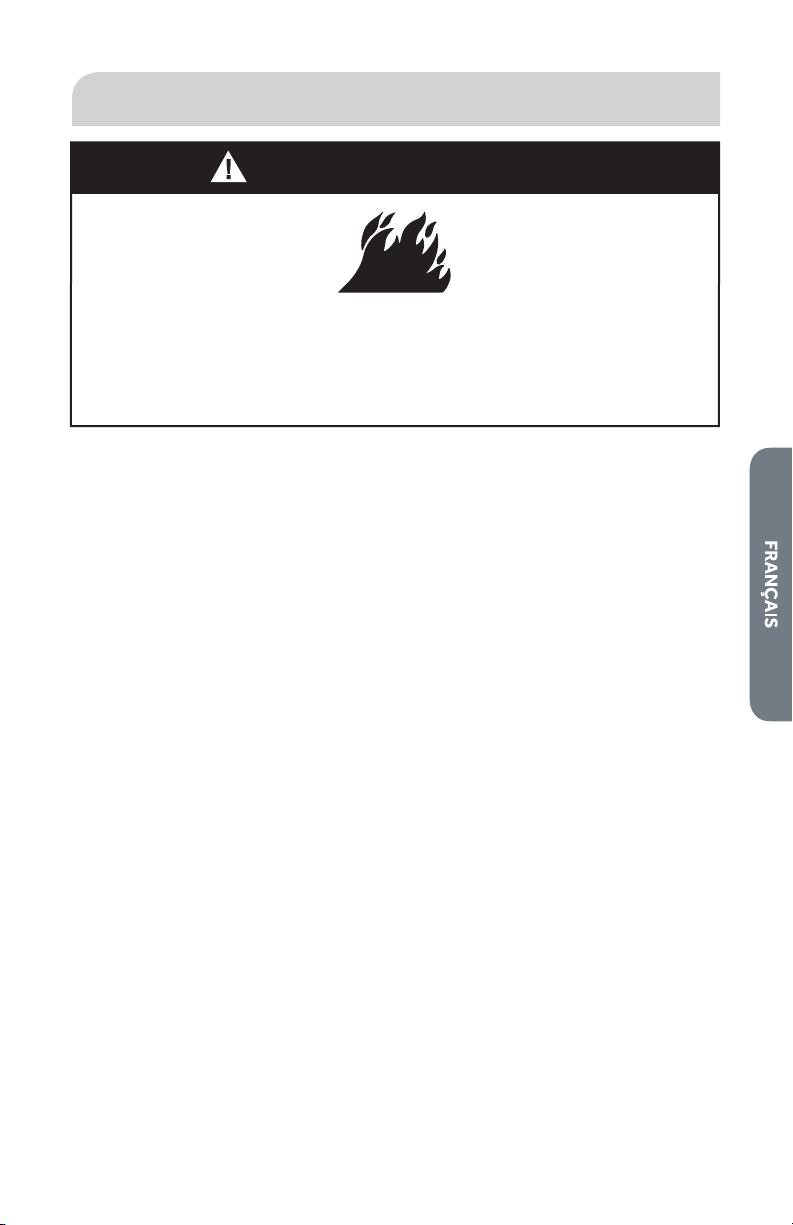
43
RÉGLAGE DES ÉLÉMENTS ET DES COMMANDES
Risque d’incendie
Éteindre toutes les commandes une fois la cuisson terminée.
Le non-respect de cette instruction peut causer un décès ou un
incendie.
AVERTISSEMENT
Les boutons rotatifs de commande peuvent se tourner dans les deux sens et sur
n’importe quel réglage de température souhaité ou sur OFF (arrêt).
ÉLÉMENTS CHAUFFANTS
LIMITEURS DE TEMPÉRATURE
Chaque l’élément radiant est équipé de son propre limiteur (capteur) de
température pour protéger la surface de cuisson en verre des températures
extrêmement élevées. Le limiteur de température fonctionne automatiquement en
faisant fonctionner l’élément par intermittence pour que sa chaleur corresponde au
réglage de température du l’élément sélectionné (de HI [élevée] à LO [basse]).
ÉLÉMENT SIMPLE RADIANT
Ce type d’élément électrique est équipé d’un ruban métallique situé sous la surface
en verre qui fournit la chaleur nécessaire à la cuisson. Le limiteur de température
allume et éteint l’élément par intermittence.
•
Tourner le bouton rotatif de la position de température LO (basse) à HI (élevée)
(ou sur n’importe quelle position de température intermédiaire).
ÉLÉMENT DOUBLE RADIANT
L’élément double est composé de deux éléments radiants en ruban dans le même
l’élément. Il est possible de sélectionner le petit élément (intérieur) uniquement
ou les deux éléments (intérieur et extérieur). Il existe un choix inni de réglages de
chaleur entre les positions LO (basse) et HI (élevée). Les positions xes délimitées
par LO (basse) et HI (élevée) servent à dénir les réglages de chaleur minimum et
maximum.
Pour ALLUMER l’élément intérieur, enfoncer le bouton rotatif et le tourner dans le
sens antihoraire en suivant la ligne portant la mention Single (simple).
Pour ALLUMER l’élément intérieur et l’élément extérieur en même temps,
enfoncer le bouton rotatif et le tourner dans le sens horaire en suivant la ligne
portant la mention Dual (double).

44
TÉMOIN LUMINEUX DE SURFACE CHAUDE
Chaque élément est équipé d’un témoin lumineux de surface chaude pour indiquer
lorsque la surface de cuisson est ALLUMÉE ou chaude. Le témoin s’allume
automatiquement dans la zone marquée d’un cercle.
Le témoin reste allumé tant que la surface de cuisson est trop chaude pour être
touchée, même après que la surface de cuisson ait été éteinte.
BOUTONS ROTATIFS DE COMMANDE
Les boutons rotatifs de commande peuvent se tourner dans les deux sens et sur
n’importe quel réglage de température souhaité ou sur OFF (arrêt).
REMARQUE : Une fois que l’élément est éteint, le témoin de surface chaude reste
allumé tant que la température de surface de l’élément n’a pas refroidi.
L’emplacement de chaque bouton correspond à l’emplacement de l’élément
chauant qu’il commande.
Pour allumer n’importe quel élément chauant :
•
ENFONCER le bouton et le TOURNER dans n’importe quel sens au réglage de
chaleur souhaité.
OFF
HI LO
MED
OFF
HI HI
SINGLE
DUAL
LO LO
RÉGLAGE RECOMMANDÉ DES ÉLÉMENTS CHAUFFANTS
Il n’est pas nécessaire de préchauer les éléments chauants.
Une fourchette de réglages de chaleur est énumérée dans le tableau suivant, la
chaleur nécessaire dépendant des éléments suivants :
•
Le type et la qualité de l’ustensile
•
Le type, la quantité et la température des aliments
•
L’élément utilisé et les préférences du cuisinier
TYPE D’ALIMENT
RÉGLAGES DE CHALEUR DES
ÉLÉMENTS CHAUFFANTS
Régulateur d’énergie
Pour faire fondre du beurre ou du chocolat Low (basse)
Sauce délicate, riz, sauces à faire mijoter avec
du beurre et des jaunes d’œuf
Low (basse) à Medium (moyenne)
45
TYPE D’ALIMENT
RÉGLAGES DE CHALEUR DES
ÉLÉMENTS CHAUFFANTS
Régulateur d’énergie
Cuisson des légumes, bouillons de poisson,
œufs (sur le plat ou brouillés), cuisson nale
des céréales, pâtes, lait, crêpes, pouding,
mijotage des viandes, légumes à la vapeur,
maïs éclaté, bacon, ragoût de viande, légumes
sautés, sauces pour spaghettis
Medium (moyenne)
Viandes braisées, viandes revenues à la poêle,
poisson, œufs, sautés, viandes à brunir ou à
saisir rapidement, maintient d’une ébullition
rapide
Medium (moyenne) à High
(élevée)
Eau à faire bouillir pour les légumes ou les pâtes High (élevée)
UTILISATION DE LA TABLE DE CUISSON
AVANT D’UTILISER LA TABLE DE CUISSON
1. Le cas échéant, retirer tous les emballages et la documentation de la surface de
la table de cuisson.
2. Nettoyer la surface en verre. Il est recommandé de nettoyer soigneusement
avec un nettoyant pour surface en verre. Cela ne prend qu’une minute et donne
un ni net et brillant à la surface en verre avant sa première utilisation.
3. Placer une casserole d’eau sur chaque l’élément avant et régler la chaleur sur HI
(élevée) pendant au moins 30 minutes. Éteindre les l’éléments avant.
4. Placer une casserole d’eau sur chaque l’élément arrière et régler la chaleur sur HI
(élevée) pendant au moins 30 minutes. Éteindre les l’éléments arrière.
REMARQUES :
•
Cette procédure fait s’évaporer toutes les huiles de protection et l’humidité
accumulées durant la fabrication et permet aux circuits des commandes
électroniques de fonctionner correctement.
•
Une faible odeur peut se dégager durant les premières utilisations : ceci est
normal et l’odeur va se dissiper.
•
La surface de cuisson retient la chaleur et reste chaude plus de 20 minutes
après que les éléments ont été éteints.
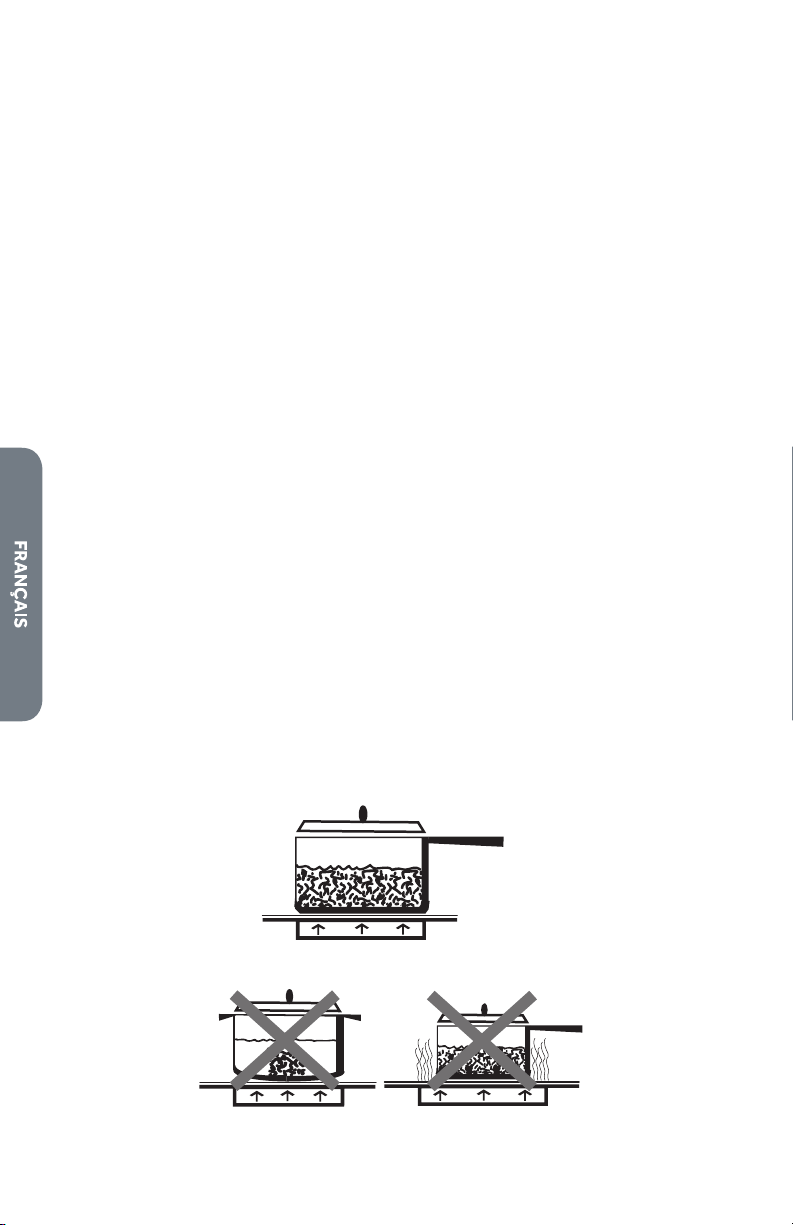
46
USTENSILE DE CUISSON
Le choix de l’ustensile aecte directement les résultats de cuisson (vitesse et
uniformité). Pour de meilleurs résultats, choisir des ustensiles aux caractéristiques
suivantes.
RENSEIGNEMENTS GÉNÉRAUX
•
La surface de cuisson en vitrocéramique est faite d’un matériau robuste et
résistant aux chocs, mais non incassable en cas de chute d’un ustensile ou d’un
autre objet.
•
Ne pas laisser les ustensiles sur le feu jusqu’à ce que le liquide qu’ils contiennent
s’évapore. Cela peut endommager l’ustensile, l’élément et/ou la table de
cuisson.
•
Ne jamais faire cuire des aliments directement sur le verre.
•
Ne pas faire glisser les ustensiles sur la surface de cuisson, cela pourrait éraer
le verre.
•
L’usage d’ustensiles de cuisson en fonte sur la table de cuisson en verre n’est
pas recommandé. La fonte retient la chaleur et pourrait occasionner des
dommages à la table de cuisson.
•
Les aliments emballés dans de l’aluminium ne doivent pas être placés
directement sur la surface en vitrocéramique pour la cuisson; l’aluminium va
fondre et occasionner des dommages permanents à la surface en verre.
Base plate
Lorsqu’un ustensile est chaud, la base (le fond de l’ustensile) doit être posée à plat
sur la surface sans osciller ni se balancer. Les ustensiles de cuisson idéals doivent
avoir un fond plat, des parois droites, un couvercle qui ferme bien et le matériau doit
être d’épaisseur moyenne à forte.
Les nis rugueux peuvent égratigner la table de cuisson.
Le diamètre de l’ustensile et l’élément doivent correspondre
La base de l’ustensile doit recouvrir ou correspondre au diamètre de l’élément
utilisé.
Ustensile équilibré
Ustensile déséquilibré
47
CARACTÉRISTIQUES DES USTENSILES DE CUISSON
•
Aluminium : chaue et refroidit rapidement. Pour faire frire, braiser, rôtir. Peut
laisser des marques métalliques sur le verre.
•
Fonte : chaue et refroidit lentement sur une table de cuisson en verre, mais
retient la chaleur et assure une cuisson uniforme.
•
Cuivre : l’étain chaue et refroidit rapidement. Pour la cuisine gastronomique,
les sauces au vin, les plats à base d’œufs.
•
Ustensiles en émail : la réaction dépend du métal de la base. Non recommandé.
Les imperfections de l’émail peuvent éraer la table de cuisson.
•
Vitrocéramique : chaue et refroidit lentement. Non recommandé. Chaue trop
lentement. Les imperfections de l’émail peuvent éraer la table de cuisson.
•
Acier inoxydable : chaue et refroidit modérément. Soupes, sauces, légumes et
tout autre type de cuisson.
OBSERVER LES POINTS SUIVANTS LORS DE LA
PRÉPARATION DE CONSERVES
ATTENTION
Risque d’empoisonnement alimentaire
Une préparation de conserves sécuritaire exige la destruction des
micro-organismes nocifs ainsi qu’une fermeture totalement hermétique
des bocaux. Lors de la préparation de conserves au bain-marie, il
convient de maintenir une ébullition douce et régulière pendant la durée
requise. Lors de la préparation de conserves dans un cuiseur sous
pression, la pression doit être maintenue pendant la durée requise.
Après avoir réglé les commandes, il est très important de veiller à ce que
l’ébullition et les niveaux de pression nécessaires soient maintenus
pendant la durée requise.
Le non-respect de ces instructions peut causer un empoisonnement
alimentaire ou une maladie.
L’utilisation de casseroles d’un diamètre supérieure au cerclage des éléments de
surface n’est pas recommandée pour la plupart des surfaces de cuisson. Toutefois,
des casseroles de diamètre supérieur peuvent être utilisées dans le cas de la
préparation de conserves au bain-marie ou dans un cuiseur sous pression.
Cela s’explique par le fait que les températures d’ébullition de l’eau (même sous
pression) ne risquent pas d’endommager les surfaces de la table de cuisson
entourant les éléments de surface.
Toutefois, ne pas utiliser d’autoclaves ou toute autre casserole d’un diamètre
supérieur pour faire frire ou bouillir autre chose que de l’eau.
48
La plupart des sirops et des sauces, ainsi que tous les types de fritures, cuisent à
des températures largement supérieures à celle de l’ébullition de l’eau. De telles
températures pourraient au nal endommager les surfaces de la table de cuisson en
verre.
•
S’assurer que l’autoclave est placé au centre de l’élément de surface. Si votre
table de cuisson ou son emplacement ne permet pas de centrer l’autoclave sur
l’élément de surface, utiliser des casseroles de diamètre plus petit pour obtenir
de meilleures conserves.
•
Des autoclaves à fond plat doivent être utilisés. Ne pas utiliser d’autoclaves à
fond ondulé ou à collerette (ce qui est souvent le cas des ustensiles en émail)
car ils n’entrent pas susamment en contact avec les éléments de cuisson et
nécessitent beaucoup de temps pour faire bouillir l’eau.
•
Lors de la mise en conserve, utiliser des recettes et des procédés obtenus
de sources ables. Des recettes et procédés ables sont disponibles auprès
du fabricant de votre autoclave, auprès des fabricants de bocaux de mise en
conserve en verre tels que Ball and Kerr, et auprès du service d’extension du
ministère de l’Agriculture des États-Unis.
•
Ne pas oublier que la mise en conserve est un procédé occasionnant de grandes
quantités de vapeur. Pour éviter les brûlures dues à la vapeur ou à la chaleur,
procéder à la mise en conserve avec précautions.
Comme il est impératif de chauer les bocaux de mise en conserve durant la durée
requise sans interruption, ne pas procéder à la mise en conserve sur n’importe quel
élément de cuisson si l’autoclave n’a pas un fond plat.
UTILISATION DU FOUR
Ce four multifonctions ore en un seul appareil les modes d’un four traditionnels et
les modes de convection modernes avec ventilateur. Utiliser la commande de mode
de cuisson située sur le tableau de commande pour sélectionner le mode de four.
AVANTAGES DE LA CUISSON PAR CONVECTION
•
Gains de temps et d’énergie.
•
Permet de cuire, brunir et faire croustiller de façon homogène.
•
Durant le rôtissage, les jus et les saveurs sont retenus à l’intérieur tandis que
l’extérieur est croustillant.
•
Les pains à la levure sont plus légers, leur texture est plus homogène, ils sont
plus dorés et plus croustillants.
•
Les aliments soués tels que les choux à la crème, les soués et les meringues
sont plus hauts et plus légers.
•
Il est possible de cuire au four sur plusieurs grilles en même temps d’une manière
homogène.
•
Préparez des pièces de viande entières sans transfert de saveur.
•
Déshydrate les herbes, les fruits et les légumes.
•
Ne nécessite aucun ustensile de cuisson au four particulier.
•
La cuisson au gril par convection ore une excellente cuisson au gril pour les
morceaux d’aliments plus épais.
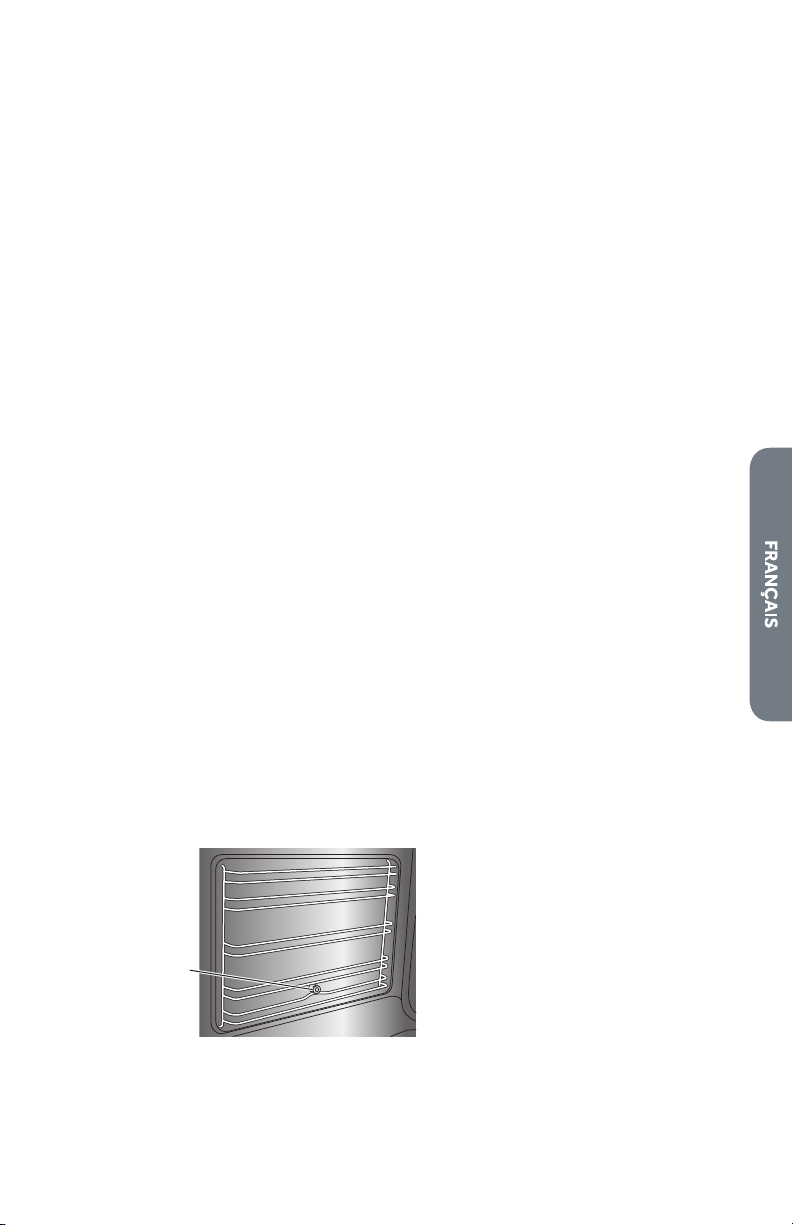
49
AVANT D’UTILISER LE FOUR
1. Tourner le bouton de réglage de la température au réglage le plus élevé.
2. Tourner le bouton de sélection du mode de cuisson sur un mode de cuisson.
3. Laisser le four fonctionner pendant 30 minutes, cavité vide et porte fermée.
4. Éteindre le four, puis ouvrir la porte du four pour permettre au four de refroidir.
REMARQUE : Toute odeur pouvant être décelée durant la première utilisation
est due à l’évaporation des substances utilisées pour protéger le four pendant
l’entreposage.
RENSEIGNEMENTS GÉNÉRAUX
IMPORTANT : Ne placer aucun objet (notamment des plats, de l’aluminium et des
plaques de cuisson) dans le fond du four lorsque celui-ci fonctionne pour éviter
d’endommager l’émail.
1. Placer le ou les ustensile(s) de cuisson contenant les aliments sur l’une ou les
deux grilles fournies avec le four.
2. Tourner le bouton rotatif de mode de cuisson pour sélectionner la fonction du
four désirée.
3. Tourner le bouton rotatif de réglage de température à la température désirée, ou
sur Broil (grillage) pour la cuisson au gril.
GRILLES DE FOUR
Les grilles de four peuvent être positionnées à n’importe laquelle des cinq hauteurs
du four.
S’assurer que chaque grille est insérée entre deux des supports métalliques les plus
rapprochés.
Les grilles de four sont équipées d’une butée pour empêcher leur retrait complet
accidentel.
Pour retirer les supports des grilles de four :
•
Appuyer sur le l métallique sous la tige de blocage et dégager le support du four
jusqu’à ce que le sommet du support soit détaché des orices dans la paroi du
four.
a
a Tige de
blocage

50
MODES DU FOUR
Le bouton de thermostat et le bouton de commande sont utilisés ensemble pour
sélectionner les modes du four.
BOUTON DE THERMOSTAT
Sélectionner la température de cuisson en tournant le bouton dans le sens horaire
vers la température désirée, entre 150 °F et Broil (cuisson au gril). Le témoin
s’allume lorsque le four préchaue. Le témoin s’éteint une fois que la température
désirée est atteinte. Un clignotement régulier signie que la température du four est
constamment maintenue à la température réglée.
BOUTON DE SÉLECTION DU MODE DE CUISSON
Il choisit la fonction du four. Chacune des fonctions énumérées ci-dessous ne peut
être uniquement utilisée avec la température correcte.
Light (éclairage)
La lampe du four est allumée, mais aucun mode de cuisson n’est sélectionné.
Durant le fonctionnement du four, la lampe du four reste allumée.
Bake (Cuisson au Four)
Réglage de température: from de 50 °C (120 °F) à 250 °C (485 °F) (position préréglée
210 °C [410 °F])
Permet de cuire au four avec de l’air chaud. Les éléments supérieur et inférieur
travaillent en cycle pour maintenir la température du four.
Pizza
Réglage température: de 150 °F à 450 °F
C’est un mode de cuisson spécial avec de l’air chaué. L’élément inférieur passe au
mode cuisson pizza.
Low Broil (cuisson au gril à basse température)
Réglage de la température : Broil (cuisson au gril)
Il y a 2 éléments de cuisson au gril. Durant la cuisson au gril à basse température,
seul l’élément interne est allumé.
High Broil (cuisson au gril à température élevée)
Réglage de la température : Broil (cuisson au gril)
Le four est équipé de deux éléments de cuisson au gril. En mode de cuisson au gril à
température élevée, seul l’élément interne fonctionne à puissance élevée.
Conv Broil (Gril à Convection)
Réglage de la température : Broil (cuisson au gril)
Le gril à convection combine la chaleur intense de l’élément supérieur avec une
chaleur qui circule grâce au ventilateur.

51
Conv Bake (Cuisson à Convection)
Réglage de température: de 150 °F à 450 °F
La cuisson au four à convection cuit avec la chaleur d’un élément circulaire derrière
la paroi arrière du four. La chaleur circule à travers le four par un ventilateur à
convection.
Conv (Décongélation)
Réglage de température: Ne s’applique pas
La décongélation n’utilise aucun élément chauant, mais uniquement le ventilateur
de convection pour décongeler les aliments.
CONSEILS ET TECHNIQUE DE CUISSON
La cuisson est une sorte de cuisson à air chaud. Les éléments supérieur et inférieur
sont utilisés pour chauer l’air mais le ventilateur n’est pas utilisé pour faire circuler
la chaleur.
Suivez la recette ou les instructions pour la température de cuisson et la position de
la grille. Le temps de cuisson varie avec la température des ingrédients et leur taille,
leur forme et la nition du plat de cuisson.
Guides Générales
•
Pour de meilleurs résultats, cuisiner les aliments, cuisinez sur une simple grille
avec au moins 1”-1½” (2,5 - 3 cm) d’espace entre les plats et les parois de four.
•
N’utilisez qu’une grille lorsque vous choisissez le mode cuisson.
•
Vériez la cuisson au temps minimum.
•
Utilisez des plats en métal (avec une nition antiadhésive ou non), en verre
résistant à la chaleur, en verre céramique, en poterie ou d’autres plats appropriés
au four.
•
Lorsque vous utilisez un plat en verre résistant à la chaleur, réduisez la
température de 25°F (15°C) par rapport à la température recommandée.
•
Utilisez des plats avec ou sans bord.
•
Des plats en métal foncé ou avec des nitions non adhésives cuiront plus vite
en brunissant plus le met. Des plats isolés ralentiront légèrement le temps de
cuisson dans la plupart des cas.
•
N’utilisez pas de feuille en aluminium ou de plateaux en aluminium. Une feuille
est un excellent insolant de chaleur et donc la chaleur sera attrapée dessous.
Cela altère la performance de cuisson et cela endommage la nition de four.
•
Evitez de placer sur la porte ouverte des plats.
•
Veuillez Dépannage pour obtenir des conseils à Solution des problèmes de
cuisson.
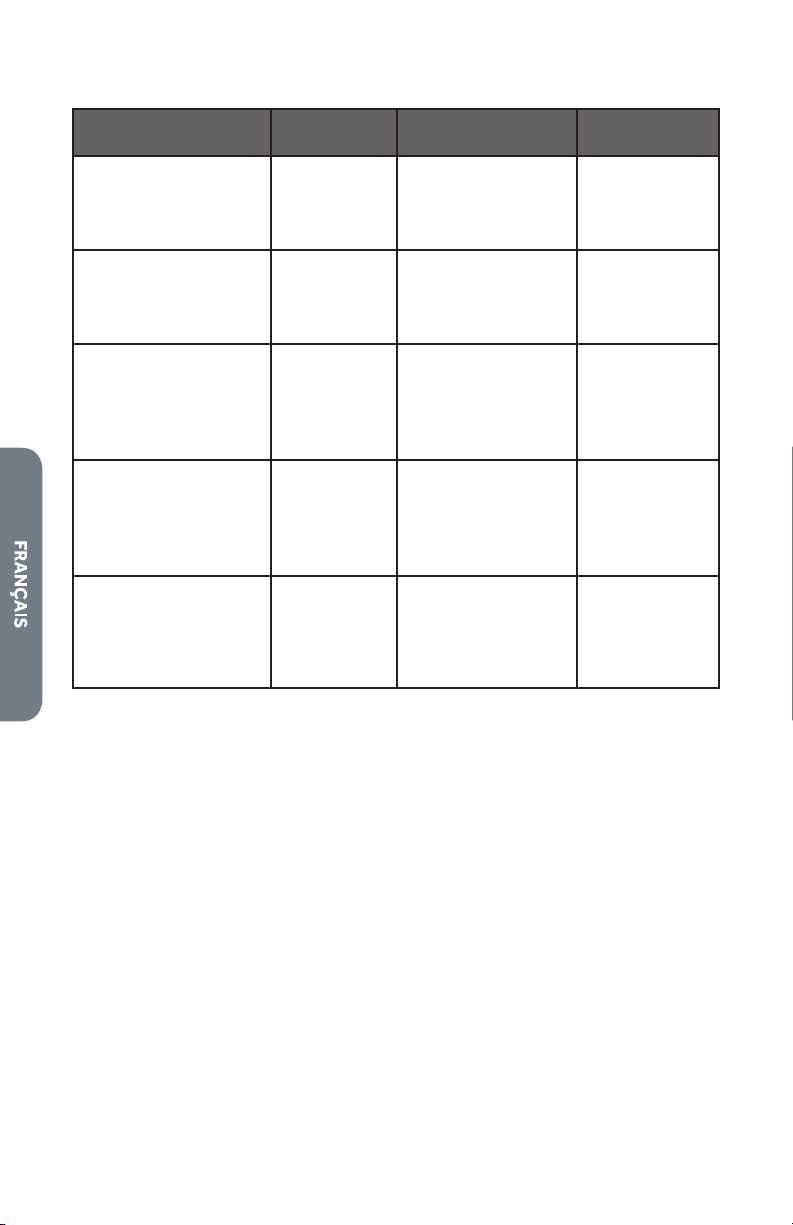
52
TABLEAU DE CUISSON
ALIMENTS
POSITION DE
GRILLE
TEMP. °F ( °C) (FOUR
PRÉCHAUFFE)
TEMPS
(MIN)
Gâteau
Petits gâteaux
Gâteau bundt
Gâteau des anges
2
1
1
350 (175)
350 (175)
350 (175)
19-22
40-45
35-39
Tarte
2 croûtes, fraiches, 9po
2 croûtes, fruits
surgelés, 9po
2
2
375-400 (190-205)
375 (190)
45-50
68-78
Biscuit
Sucre
Brisures de chocolat
Carrés au chocolat
(brownies)
2
2
2
350-375 (175-190)
350-375 (175-190)
350 (175)
8-10
8-13
29-36
Pains
Pain à levure, 9x5
Petits pains à levure
Biscuits
Muns
2
2
2
2
375 (190)
375-400 (190-205)
375-400 (190-205)
425 (220)
18-22
12-15
7-9
15-19
Pizza (Cuisson à
plusieurs grilles)
Surgelée
Fraîche
2
2
400-450 (205-235)
475 (246)
23-26
15-18
CONSEILS ET TECHNIQUES DE CONVECTION EUROPÉENNE
Réduisez les températures de recette de cuisson de 25°F (15°C).
•
Pour de meilleurs résultats, il faut cuire les aliments non couverts, dans des plats
à bord bas pour mieux proter de la circulation d’air forcé. Utilisez des plats
en aluminium brillant pour de meilleurs résultats à moins que cela soit spécié
autrement.
•
Le verre résistant à la chaleur et la céramique peuvent être utilisés. Réduisez
encore la température de 25°F (15°C) si vous utilisez un verre résistant à la
chaleur, donc une réduction totale de 50°F (30°C).
•
Les plats en métal foncé peuvent être utilisés. Notez que la nourriture peut
brunir plus vite lorsquw vous utilisez un plat en métal foncé.
•
Le nombre de grilles utilisées est déterminé par la hauteur des aliments à cuire.
•
Les aliments cuits, en général, cuisent extrêmement bien avec la convection.
N’essayez pas de convertir des recettes comme les crèmes anglaises, les
quiches, les tartes à la citrouille, les tartes au fromage, qui ne tirent pas de
bénéce de la convection. Utilisez le mode de cuisson normal pour ces recettes.

53
•
La cuisson sur plusieurs grilles pour repas
à cuire au four se fait aux positions de grille
1, 2, 3, 4 et 5. Les cinq positions de grille
peuvent être utilisées pour la cuisson des
biscuits, des petits gâteaux et des hors-
d’œuvre.
- 2 grille de cuisson : Utilisez positions 1
et 3
- Lors de la cuisson de quatre couches
de gâteau en même temps, décaler
la position des plats de cuisson de
manière à ce qu’un plat ne se trouve
pas directement au-dessus d’un autre.
Pour de meilleurs résultats, placer les
gâteaux à l’avant de la grille supérieure
et à l’arrière de la grille inférieure (voir
l’illustration sur la droite). Prévoir un
espace d’aération de 1” - 1 ½” (2,5 cm - 3
cm) autour des plats.
•
Convertir vos propres recettes peut être
facile. Choisissez une recette qui marche
bien en convection.
1
2
3
4
5
Grille 1
Grille 3
•
Réduisez la température et le temps de cuisson si nécessaire. Il peut parfois y
avoir des essais et des erreurs avant d’arriver au résultat parfait. Gardez des
traces de votre technique pour la prochaine préparation à convection.
•
Veuillez Dépannage pour obtenir des conseils à Solution des problèmes de
cuisson.
ALIMENTS RECOMMANDÉS POUR LE MODE CONVECTION
EUROPÉENNE:
Biscuits apéritifs Biscuits pour café Gâteaux,
Biscuits (2 à 4 grilles) levure pains
Choux à la crème
Popovers
Casseroles et Entrées un plat,
Plats à four (grille positions 1, 2, 3),
Aliments levés à la levure (Soués, Merinque, Desserts garnis de meringue,
Gâteaux ange, Gâteaux mousseline)
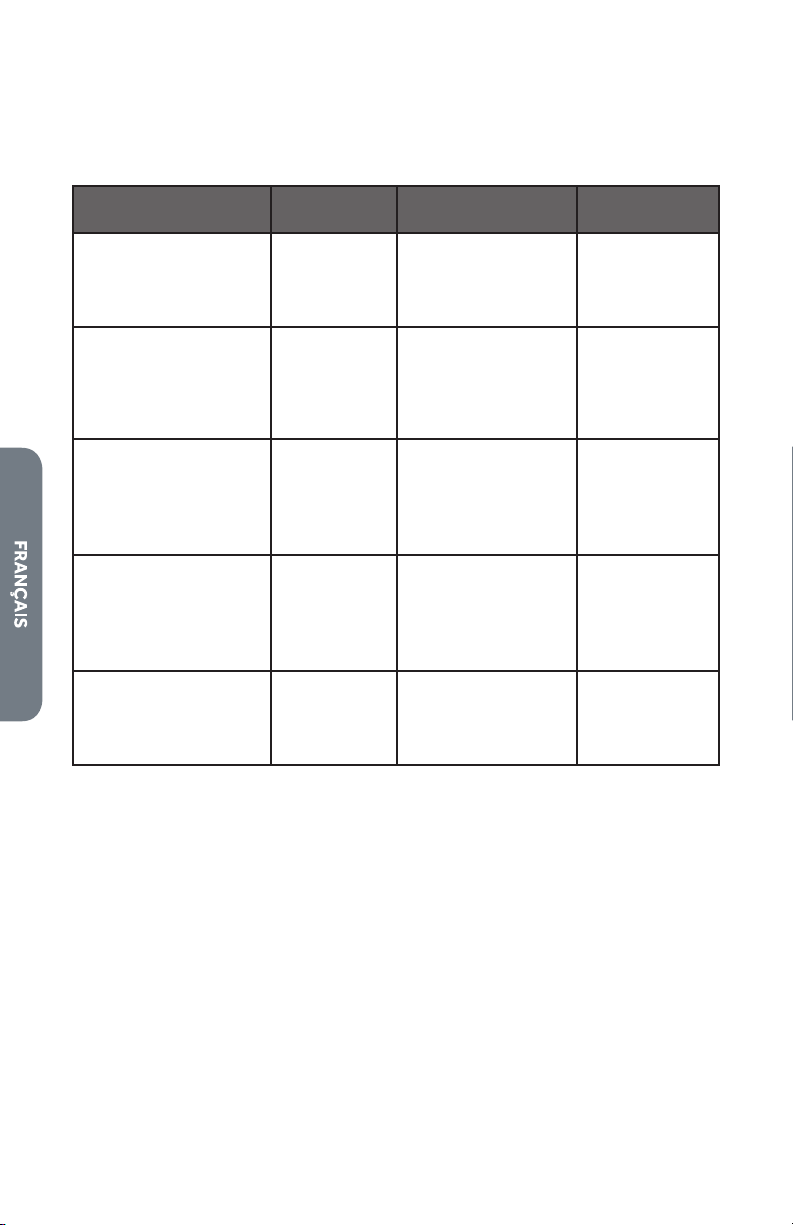
54
TABLEAU DE CONVECTION EUROPÉENNE
Réduisez la température standard des recettes de 25 °F (15 °C) pour la convection
européenne. Les températures ont été réduites dans ce tableau.
CAVITÉ DE CONVECTION
ALIMENTS
POSITION DE
GRILLE
TEMP. °F ( °C) (FOUR
PRÉCHAUFFE)
TEMPS (MIN)
Gâteau
Petits gâteaux
Gâteau bundt
Gâteau des anges
2
1
1
325 (160)
325 (160)
325 (160)
20-22
43-50
43-47
Tarte
2 croûtes, fraiches, 9
po
2 croûtes, fruits
surgelés, 9 po
2
2
350-400 (175-205)
350 (175)
40-52
68-78
Biscuit
Sucre
Brisures de chocolat
Carrés au chocolat
(brownies)
2
2
2
325-350 (160-175)
325-350 (160-175)
325 (160)
9-12
8-13
29-36
Pains
Pain à levure, 9x5
Petits pains à levure
Biscuits
Muns
2
2
2
2
350 (175)
350-375 (175-190)
375 (190)
400 (205)
18-22
12-15
8-10
17-21
Pizza (Cuisson à
plusieurs grilles)
Surgelée
Fraîche
2
2
375-425 (190-220)
450 (232)
23-26
15-18
CONSEILS ET TECHNIQUES DE RÔTISSAGE À CONVECTION
•
Ne préchauez pas lors du rôtissage à convection.
•
Eectuez le rôtissage dans un plat peu profond et non couvert.
•
Lorsque vous eectuez le rôtissage de poulets entiers ou de dindes, repliez les
ailes et attachez sans serrer les pattes avec une celle de cuisine
•
Utilisez lèche-frite à 2 pièces pour les rôtissages non couverts.
•
Utilisez la sonde thermique ou un thermomètre à viande pour déterminer la
cuisson en vériant la température interne (consultez le tableau de rôtissage à
convection).
•
Vériez de nouveau la température de la viande/volaille en insérant le
thermomètre à viande dans une autre position.
•
Les grosses volailles peuvent avoir besoin d’être recouvertes d’une feuille
durant une portion de la cuisson pour empêcher la surcuisson.
•
La température interne sécuritaire minimale pour la farce de la volaille est de
165°F (74°C).
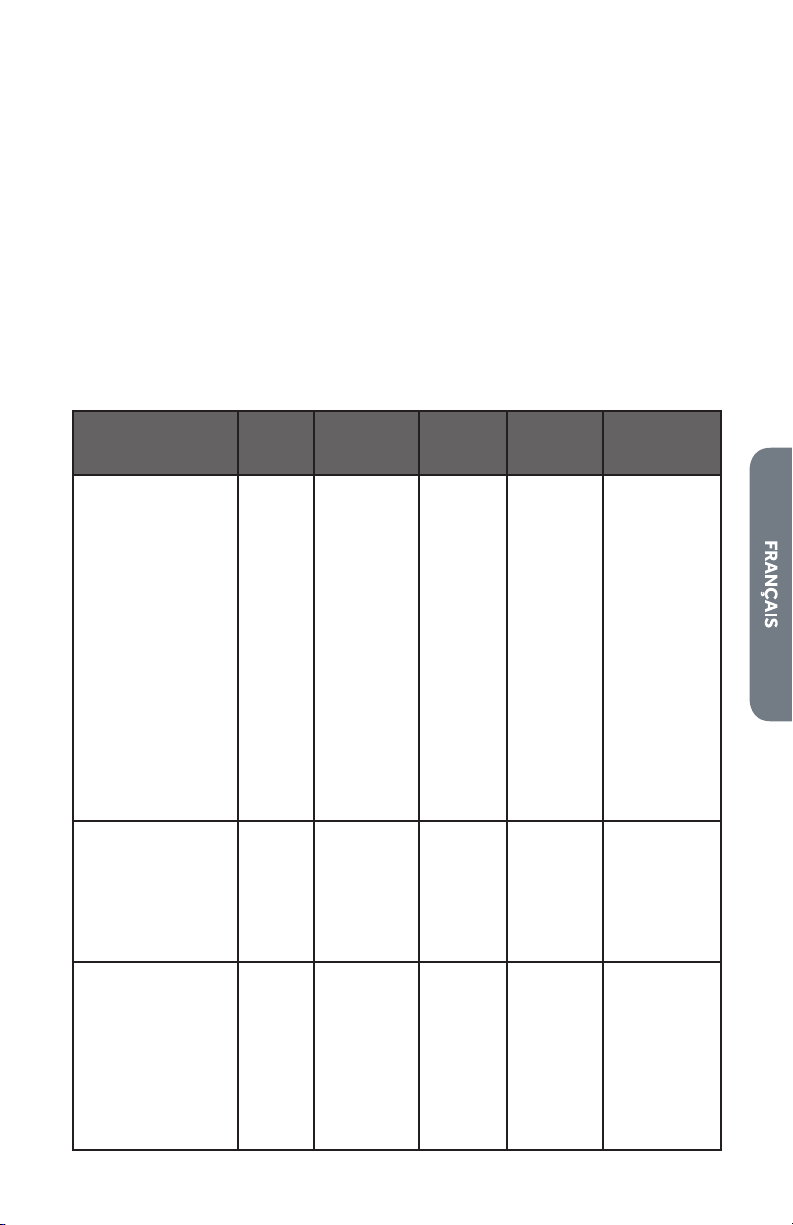
55
•
Après avoir retiré l’aliment du four, courvrez sans serrer avec une feuille
d’aluminum pendant 10 à 15 minutes avant le découpage si nécessaire an
d’augmenter la température de l’aliment de 5° à 10° F (3° à 6° C).
CONSEILS DE RECETTES FACILES ET RAPIDES
Conversion de la CUISSON standard au RÔTISSAGE À CONVECTION:
•
Les températures ne doivent pas être diminuées.
•
Les rôtis, les gros morceaux de viande et de volaille prennent généralement de
10 à 20% moins de temps. Vériez la cuisson interne plus tôt.
•
Les casseroles ou le boeuf braisé qui sont cuits couverts cuiront dans environ le
même temps lors du RÔTISSAGE À CONVECTION.
TABLEAU DE RÔTISSAGE À CONVECTION
CAVITÉ DE CONVECTION
VIANDES
POIDS
lb (kg)
TEMP. FOUR
°C (°F)
POSITION
DE LA
GRILLE
TEMPS DE
RÔTISSAGE
(Min/
TEMP.
INTERNE
°C (°F)
Boeuf
Côte de boeuf 4-6 325 (160) 2 16-20
18-22
145 (63)
misaignant
160 (71)
médium
Rosbif de faux-let
(sans os)
4-6 325 (160) 2 16-20
18-22
145 (63)
misaignant
160 (71)
médium
Croupe, let,
pointe de surlonge
(sans os)
3-6 325 (160) 2 16-20
18-22
145 (63)
misaignant
160 (71)
médium
Rôti de let 2-3 400 (205) 2 15-20 145 (63)
misaignant
Porc
Longe de porc
(sans os ou avec
os)
5-8 350 (175) 2 16-20 160 (71)
médium
Épaule 3-6 350 (175) 2 20-25 160 (71)
médium
Volaille
Poulet entier,
non farci
3-4 375 (190) 2 18-21 180 (82)
Dinde non farcie 12-15 325 (160) 1 10-14 180 (82)
Dinde non farcie 16-20 325 (160) 1 9-11 180 (82)
Dinde non farcie 21-25 325 (160) 1 6-10 180 (82)
Poitrine 3-8 325 (160) 1 15-20 170 (77)
56
VIANDES
POIDS
lb (kg)
TEMP. FOUR
°C (°F)
POSITION
DE LA
GRILLE
TEMPS DE
RÔTISSAGE
(Min/
TEMP.
INTERNE
°C (°F)
Poulet de
Cournouailles
1-1 ½ 350 (175) 2 45-75
total
180 (82)
Agneau
Demi-gigot 3-4 325 (160) 2 22-27
28-33
160 (71)
médium
170 (77) bien
cuit
Gigot entier 6-8 325 (160) 1 22-27
28-33
160 (71)
médium
170 (77) bien
cuit
CONSEILS ET TECHNIQUES POUR LE GRIL Á CONVECTION
•
Placez la grille dans la position appropriée avant de mettre votre four en marche.
•
Utilisez le mode gril à convection avec la porte formée.
•
Ne préchauez pour le four.
•
Utilisez le plat de rôtissage à 2 piéces.
•
Tourner les viandes une fois à mi-cuisson du temps de cuisson recommandé
(voir le tableau de gril à convection).
•
Les morceaux épais et de forme irrégulière de viande, de poisson et de volaille
cuisent mieux à des températures de cuisson au gril plus basses.
TABLEAU DE GRIL À CONVECTION
CAVITÉ DE CONVECTION
ALIMENTS ET ÉPAISSEUR
POSITION
DE LA
GRILLE
BROIL
SETTING
TEMPÉRA-
TURE
DU FOUR
°C(°F)
TEMPS
CÔTÉ 1
(MIN.)*
TEMPS
CÔTÉ 2
(MIN.)
Boeuf
Steak (2,5 cm [1 po] ou
plus)
Médium saignant 4 Faible 145 (65) 9-12 8-10
Médium 4 Faible 160 (71) 11-13 10-12
Bien cuit 4 Faible 170 (77) 18-20 16-17
Hamburgers (2,5 cm [1po]
ou plus)
Médium 4 Élevé 160 (71) 8-11 5-7
Bien cuit 4 Élevé 170 (77) 11-13 8-10

57
ALIMENTS ET ÉPAISSEUR
POSITION
DE LA
GRILLE
BROIL
SETTING
TEMPÉRA-
TURE
DU FOUR
°C(°F)
TEMPS
CÔTÉ 1
(MIN.)*
TEMPS
CÔTÉ 2
(MIN.)
Volaille
Quart de poulet 4 Faible 180 (82) 16-18 10-13
Deux demi-poulets 3 Faible 180 (82) 25-27 15-18
Poitrines de poulet 4 Faible 170 (77) 13-15 9-13
Porc
Côtelettes de porc (4 cm
[1¼ po] ou plus)
4 Faible 160 (71) 12-14 11-13
Saucisses fraîches 4 Faible 160 (71) 4-6 3-5
ENTRETIEN DU FOUR
NETTOYAGE
IMPORTANT : Avant le nettoyage, s’assurer que toutes les commandes sont éteintes
et que le four et la table de cuisson sont froids. Toujours suivre les instructions
gurant sur les étiquettes des produits de nettoyage. L’usage de savon, d’eau et d’un
chion doux ou d’une éponge est suggéré en priorité, sauf indication contraire. Ne
pas utiliser de produits de nettoyage abrasifs.
SURFACES EXTÉRIEURES ÉMAILLÉES
Les renversements d’aliments contenant des produits acides, tels que vinaigre et
tomates, doivent être nettoyés dès que l’appareil a refroidi. Ces salissures peuvent
endommager le ni.
Méthode de nettoyage :
Nettoyant à vitre, nettoyant doux liquide ou tampon à récurer non abrasif : Nettoyer
délicatement autour des numéros de modèle et de série car le frottement pourrait en
eacer les chires.
EXTÉRIEUR ACIER INOXYDABLE
REMARQUE : Ne pas utiliser de tampons à récurer savonneux, de nettoyants abrasifs,
de crème à polir pour table de cuisson, de tampons en laine d’acier, de chions de
lavage rugueux ou certains essuie-tout en papier. Des dommages peuvent survenir,
même en cas d’utilisation limitée ou non renouvelée.
Frotter dans la direction du grain pour éviter les dommages.
Méthodes de nettoyage :
Détergent liquide ou nettoyant tout-usage : Rincer à l’eau propre et sécher avec un
chion doux sans charpie.
Nettoyant pour acier inoxydable et poli.
Vinaigre pour les taches d’eau dure.

58
EXTÉRIEUR DE LA PORTE DU FOUR
Méthode de nettoyage :
Nettoyant à vitre et essuie-tout ou tampon à récurer en plastique non abrasif :
Appliquer le nettoyant à vitre sur un chion doux ou une éponge, et non directement
sur le tableau.
TABLE DE CUISSON RADIANTE
La vitrocéramique doit être nettoyée régulièrement, de préférence après chaque
utilisation, dès que les témoins lumineux de surface chaude se sont éteints.
Éliminer tout résidu brûlé immédiatement après la cuisson.
Méthode de nettoyage :
Rincer à l’eau tiède propre et sécher avec un chion doux et propre. Appliquer un
nettoyant pour tables de cuisson en verre. Utiliser un chion humide et sécher à
l’essuie-tout.
REMARQUE : Ne pas utiliser de détergent ou de nettoyant abrasif ou corrosif, de
vaporisateur pour four, de détachant ou de tampon à récurer en laine d’acier.
TRACES LAISSÉES PAR DES USTENSILES DE CUISSON À FOND
EN ALUMINIUM
Méthode de nettoyage :
Chion imprégné de vinaigre.
BOUTONS DE COMMANDE DE LA TABLE DE CUISSON
•
Tirer les boutons en ligne droite hors du tableau de commande pour les enlever.
•
Lors de la réinstallation des boutons, s’assurer que chacun d’entre eux est en
position O (arrêt).
Méthode de nettoyage :
Savon et eau ou lave-vaisselle :
REMARQUE : Ne pas utiliser de laine d’acier, de produits de nettoyage abrasifs ou de
nettoyant pour four. Ne pas immerger les boutons de commande.
TABLEAU DE COMMANDE
Méthode de nettoyage :
Nettoyant à vitre et chion doux ou éponge : Appliquer le nettoyant à vitre sur un
chion doux ou une éponge, et non directement sur le tableau.
REMARQUE : Ne pas utiliser de produits de nettoyage abrasifs, tampons en
laine d’acier, chions de lavage rugueux ou certains essuie-tout en papier. Des
dommages peuvent survenir.
59
CAVITÉ DU FOUR
Les éclaboussures alimentaires doivent être nettoyées lorsque le four a refroidi. À
haute température, les aliments réagissent avec l’émail et peuvent ainsi provoquer
la formation de taches, une attaque acide, des piqûres ou des décolorations
blanchâtres.
Méthode de nettoyage :
Détergent doux et eau tiède.
REMARQUE : Ne pas utiliser de nettoyants à four.
GRILLES DE FOUR ET DE RÔTISSAGE
Méthode de nettoyage :
Tampon en laine d’acier
LÈCHEFRITE 2 PIÈCES
Méthode de nettoyage :
Produit de nettoyage légèrement abrasif : Frotter avec un tampon à récurer mouillé.
Solution de 1 tasse (125 mL) d’ammoniaque par gallon (3,75 L) d’eau : Laisser
tremper pendant 20 minutes, puis frotter avec un tampon à récurer ou en laine
d’acier.
Nettoyant à four : Suivre les instructions gurant sur l’étiquette du produit. Si la
lèchefrite et sa grille sont émaillées et non chromées, elles peuvent être nettoyées
au lave-vaisselle.
Lave-vaisselle: Placez la lèchefrite dans un lave-vaisselle.
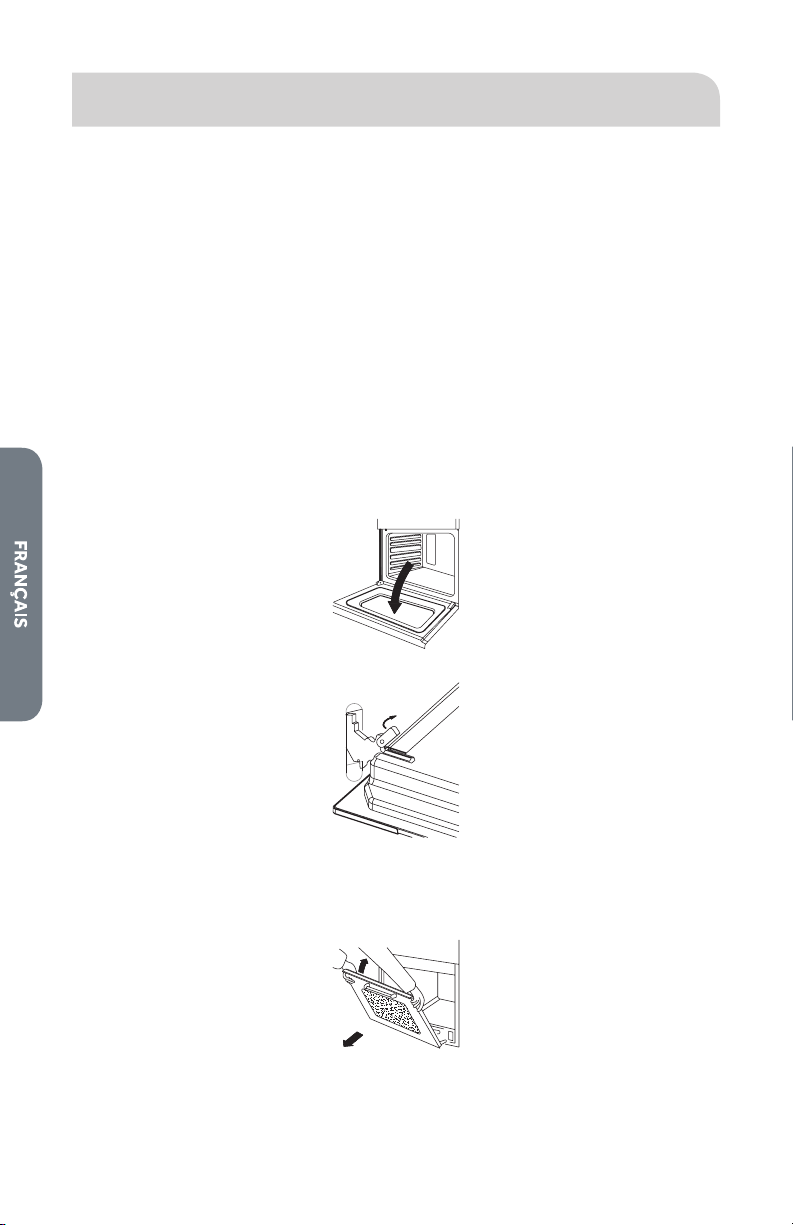
60
Dishwasher: Place broiler pan in dishwasher.
RETRAIT DE LA PORTE DU FOUR
La porte du four pèse 30 lb (14 kg). Pour faciliter l’installation et pour un nettoyage
plus méticuleux, la porte de certains fours peut être retirée.
IMPORTANT :
•
La porte du four existe en deux styles. Il est donc nécessaire d’identier au
préalable le style de la porte de votre four.
•
S’assurer que le four est froid et que l’alimentation du four a été coupée avant de
retirer la porte.
•
La porte du four est lourde et fragile, et l’avant de la porte est en verre. Pour
éviter de briser le verre de la porte, utiliser les deux mains et agripper la porte du
four uniquement par les côtés pour la retirer.
•
S’assurer que les deux leviers sont en place avant de retirer la porte.
•
Ne pas forcer l’ouverture ou la fermeture de la porte.
Style 1 -
Pour retirer la porte du four :
1. Ouvrir la porte en entier.
2. Soulever et tourner les petits leviers situés sur les deux charnières.
3. Agripper la porte par ses deux rebords extérieurs, puis la fermer lentement mais
pas complètement.
4. Tirer la porte vers soi en la dégageant des supports de charnière situés dans le
cadre.
5. Remettre la porte en place en inversant les étapes précédentes.
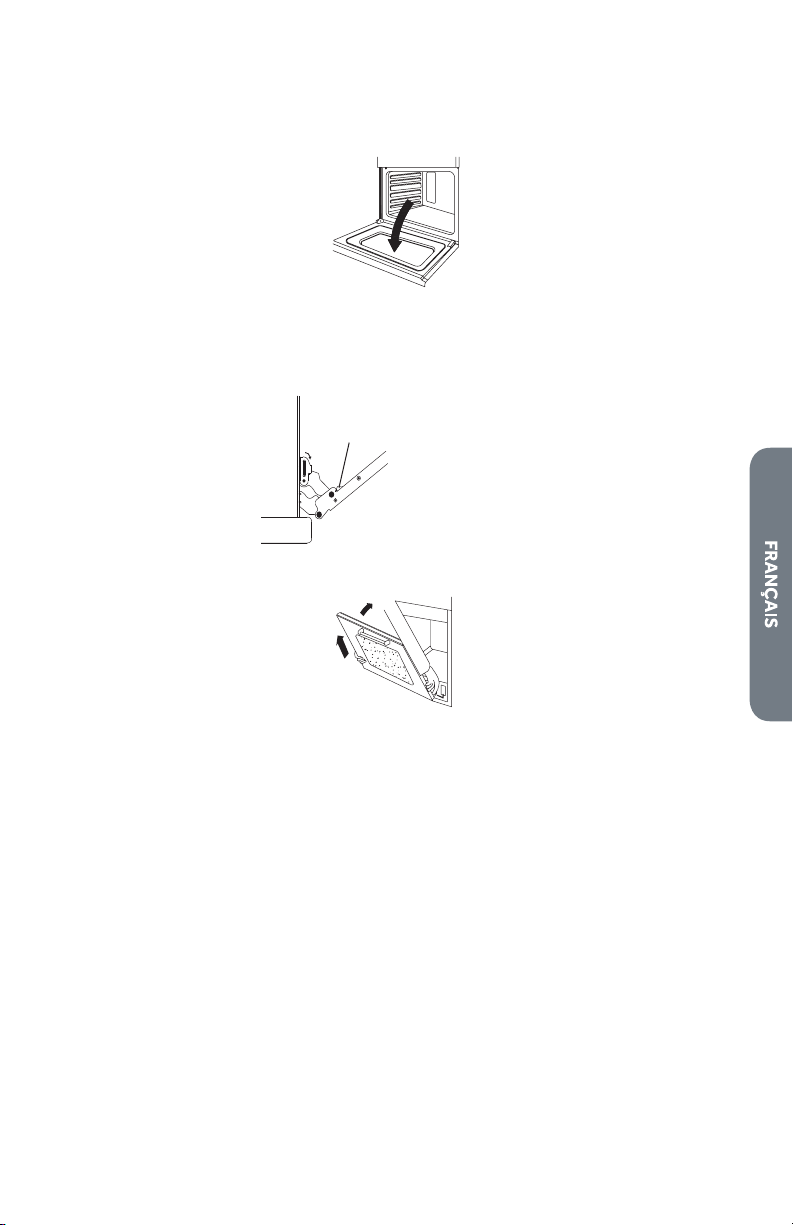
61
Style 2 -
Pour retirer la porte du four :
1. Ouvrir la porte en entier.
2. Enfoncer et tourner les petits leviers situés sur les deux charnières.
3. Agripper la porte par ses deux rebords extérieurs, puis la fermer lentement mais
pas complètement.
4. Déverrouiller la porte en appuyant sur les attaches.
a
a Attaches
5. Tirer la porte vers soi en la dégageant des supports de charnière situés dans le
cadre.
6. Remettre la porte en place en inversant les étapes précédentes.
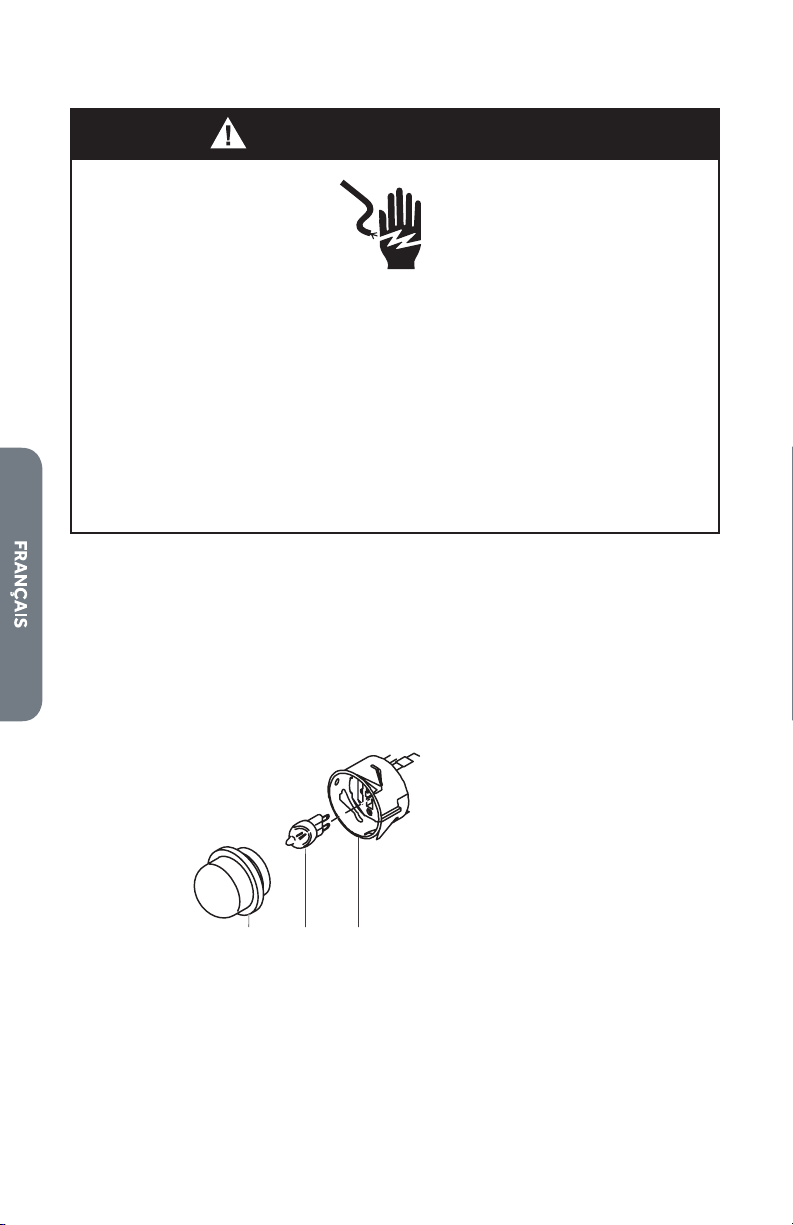
62
REMPLACEMENT DE LA LAMPE DU FOUR
Risque de choc électrique
Assurez-vous que le four et que les lumières sont froides et que le four
est bien éteint avant de remplacer les ampoules.
Les lentilles doivent être remises en place lorsque vous utilisez le four.
Les lentilles servent à protéger l'ampoule pour qu'elle ne se casse pas.
Les lentilles sont en verre. Manipulez-les avec précaution pour éviter
de les casser.
Le non-respect de cette instruction pourrait causer un décès, un choc
électrique, des coupures ou des brûlures.
AVERTISSEMENT
IMPORTANT : L’ampoule de votre four est de type E 14, 220-240 V et 25 W.
S’assurer de faire le remplacement par une ampoule de type, de voltage et de
puissance semblables.
Pour remplacer l’ampoule :
1. S’assurer que le four est éteint et froid.
2. Déconnecter l’alimentation au niveau de la source de courant électrique
principale (fusible ou boîtier de disjoncteurs).
3. Dévisser la lentille et retirer.
abc
a Lentille
b Ampoule
c Douille
4. Retirer l’ampoule grillée de la douille, puis la remplacer par une ampoule de type,
de voltage et de puissance semblables.
5. Remettre la lentille en place.
6. Rétablir l’alimentation au niveau de la source de courant électrique principale
(fusible ou boîtier de disjoncteurs).
63
DÉPANNAGE
RÉSOLUTION DE PROBLÈMES CONCERNANT LA
CUISSON ET LE RÔTISSAGE
Avec la cuisson au four ou la cuisson à convection et le rôtissage à convection,
plusieurs raisons autres que le mauvais fonctionnement du four peuvent être à
l’origine de résultats mitigés. Reportez-vous aux tableaux de cuisson.
Problème concernant la
cuisson et le rôtissage
Cause
Aliment brunissant de facon
inégale
•
Four non préchaué
•
Papier aluminium sur la grille ou au fond du
four
•
Plat de cuisson trop grand pour la recette
•
Plat touchant aux autres plats ou à la paroi
du four
Aliment trop brun au fond
•
Four non préchaué
•
Utilisation de plat en verre, mat ou foncé
•
Position de grille incorrecte
•
Plat touchant aux autres plats ou à la paroi
du four
Aliment sec ou ayant
excessivement rétréci
•
Température du four trop élevée
•
Temps de cuisson trop long
•
Porte du four trop souvent ouverte
•
Plat trop grand
Aliment cuisant ou
rôtissant trop lentement
•
Température du four trop basse
•
Four non préchaué
•
Porte du four trop souvent ouverte
•
Plat scellé hermétiquement avec du papier
aluminum
•
Plat trop petit
Croûte à tarte non brunie au
fond ou croûte non cuite
•
Temps de cuisson pas assez long
•
Utilisation de plat en acier brillant
•
Position de grille incorrecte
•
Température du four trop basse
Gâteau pâle, plat, ou non cuit à
l’intérieur
•
Température du four trop basse
•
Temps de cuisson incorrect
•
Cuisson vériée trop tôt
•
Porte du four trop souvent ouverte
•
Plat trop grand
Gâteau élevé au centre avec
craquelure sur les dessus.
•
Température du four trop élevée
•
Temps de cuisson trop long
•
Plat touchant aux autres plats ou à la paroi
du four
•
Position de grille incorrecte
•
Plat trop petit
64
Bords de croûte de tarte trop
bruns
•
Température du four trop élevée
•
Bords de croûte trop minces
TABLE DE CUISSON
PROBLÈME CAUSE POSSIBLE SOLUTION
Les éléments chauants
et les commandes ne
fonctionnent pas.
Un fusible est grillé ou le
disjoncteur est ouvert.
La table de cuisson
n’est pas alimentée en
électricité.
Remplacer le fusible
ou réenclencher le
disjoncteur. Si le
problème persiste,
appeler un électricien.
Faire vérier
l’alimentation par un
électricien.
Les éléments chauants
ne chauent pas
correctement.
Ustensiles de cuisson
inappropriés.
Sélectionner un ustensile
de cuisson approprié.
Voir “Ustensiles de
cuisson”.
Si le problème persiste,
faire un appel de service.
Les éléments
chauants s’allument
et s’éteignent par
intermittence lorsque
les éléments sont au
réglage le plus élevé.
Les limiteurs
de température
des éléments
chauants éteignent
temporairement les
éléments lorsque
ceux-ci dépassent la
température maximale
autorisée.
Ceci est une condition de
fonctionnement normale,
en particulier lors d'un
réchauement rapide.
L'élément se rallume
automatiquement
lorsqu'il a susamment
refroidi.
La surface en
vitrocéramique est
transparente ou
rougeoyante.
Sous un éclairage direct
ou vif, il est parfois
possible d'apercevoir
le châssis à travers le
verre en raison de son
caractère transparent.
Un rougeoiement est
également perceptible
dans ces conditions.
Ce sont les propriétés
normales des panneaux
en vitrocéramique noire.
FOUR
PROBLÈME CAUSE POSSIBLE SOLUTION
Le four ne
chaue pas
Le four n'est pas
alimenté.
Remplacer le fusible ou réenclencher
le disjoncteur. Si le problème persiste,
appeler un électricien.
Le module de
commande n'a pas
été allumé
S'assurer que la température du four a
été sélectionnée.
65
Le four ne
chaue pas
d'une manière
homogène.
Utilisation d'un
ustensile de cuisson
au four ou d'une
position de grille de
four incorrects
Consulter les tableaux de cuisson
pour connaître la position de grille
recommandée. Pour une cuisson en
mode Cuisson au four par convection,
toujours baisser la température de la
recette de 25 °F (15 °C).
L'achage
du four reste
éteint.
Panne de courant Déconnecter la source de courant
électrique principale (fusible ou
boîtier de disjoncteurs). Remettre en
marche le boîtier de disjoncteurs. Si le
problème persiste, faire un appel de
service.
Le ventilateur
de refroidiss-
ement continue
à fonctionner
après que le
four ait été
éteint
Les composants
électroniques du
four n'ont pas encore
susamment
refroidi.
Le ventilateur s'éteint
automatiquement lorsque les
composants électroniques ont
susamment refroidi.
La lampe
du four ne
fonctionne pas
correctement
Une ampoule est
desserrée dans la
douille ou grillée.
Réinsérer ou remplacer l'ampoule.
L'ampoule peut griller si on la touche
avec les doigts.
La lampe du
four reste
allumée
La porte ne se ferme
pas complètement
Vérier si la porte du four est obstruée.
Vérier si la charnière est tordue ou si
le contacteur de la porte est cassé.
Le protège-
ampoule ne
peut pas être
retiré
Accumulation de
saletés autour du
protège-ampoule.
Essuyer la surface du protège-ampoule
avec un torchon propre et sec avant
d'essayer de retirer le protège-
ampoule.
Clock and timer
are not working
properly
Le four n'est pas
alimenté.
Vérier le coupe-circuit ou la boîte
à fusibles du domicile. S'assurer que
le four est correctement relié à une
source d'alimentation électrique.
Humidité
excessive
Lorsque le mode Cuisson au four est
utilisé, préchauer le four au préalable.
La cuisson au four par convection et le
rôtissage par convection vont éliminer
toute l’humidité dans le four.
Éclats de
porcelaine
L'intérieur en
porcelaine a été
heurté par les grilles
de four
Lorsque les grilles du four sont
retirées et remises en place, toujours
incliner les grilles vers le haut et ne
pas les forcer pour éviter d'écailler la
porcelaine.
POUR OBTENIR DE L’AIDE SUPPLÉMENTAIRE, VISITER
HAIERAMERICA.COM OU CONTACTER LA LIGNE D’ASSISTANCE
À LA CLIENTÈLE AU 1-877-337-3639.

66
GARANTIE LIMITÉE
SERVICE À DOMICILE
GARANTIE COMPLÈTE DE DEUX ANS
Pendant 24 mois à compter de la date d’achat
d’origine, Haier réparera ou remplacera
gratuitement n’importe quelle pièce (main-
d’œuvre comprise) comportant un défaut de
matériau ou de fabrication.
Haier peut choisir à sa seule discrétion de
remplacer ou réparer des pièces, des sous-
systèmes ou le produit tout entier.
Le produit doit être accessible, dégagé et
installé correctement pour bénécier du
service de réparation sous garantie.
GARANTIE LIMITÉE
REMARQUE : Cette garantie prend eet à
la date à laquelle l’article a été acheté et le
reçu de l’achat d’origine doit être présenté au
représentant de dépannage autorisé avant
qu’une quelconque réparation sous garantie ne
soit eectuée.
Exceptions : Garantie à usage commercial
90 jours sur la main-d’œuvre à compter de la
date d’achat d’origine
90 jours sur les pièces à compter de la date
d’achat d’origine
Aucune autre garantie ne s’applique.
SERVICE AU TITRE DE LA GARANTIE
Contacter le centre de dépannage autorisé le
plus proche. Tout dépannage doit être eectué
par un centre de dépannage autorisé Haier.
Pour le nom et le numéro de téléphone du
centre de dépannage autorisé le plus proche
de votre domicile, composer le
1-877-337-3639.
Avant d’appeler le centre, veuillez garder à
disposition les renseignements suivants :
Numéros de plaque signalétique de l’appareil.
Le nom et l’adresse du revendeur auprès
duquel vous avez acheté l’appareil, ainsi que la
date d’achat.
Une description claire du problème rencontré.
Une preuve d’achat (reçu de vente).
Cette garantie est valable pour le service
des appareils domestiques aux États-Unis
contigus et au Canada et lorsque le service
est disponible, en Alaska, à Hawaï et Porto
Rico.
Cette garantie ne couvre pas :
Le remplacement ou la réparation des fusibles,
disjoncteurs, du câblage ou du circuit de
plomberie du domicile.
Un produit dont le numéro de série d’origine a
été enlevé ou modié.
Tous frais de dépannage non identiés comme
étant normaux tel un dépannage dans une
zone ou une tranche horaire normale.
Vêtements endommagés.
Les dommages liés à l’expédition.
Les dommages liés à une installation ou un
entretien inadapté.
Les dommages causés par l’un des éléments
suivants : Mauvaise utilisation, utilisation
abusive, accident, incendie ou catastrophe
naturelle.
Les dommages résultant d’un dépannage
fourni par une entité autre qu’un revendeur ou
centre de dépannage autorisé Haier.
Les dommages causés par un courant, une
tension ou une alimentation électrique
incorrects.
Les dommages résultant d’une quelconque
modication ou altération du produit ou d’un
ajustement non autorisé par Haier.
Un ajustement des commandes utilisées par le
consommateur tel qu’identié dans le manuel
de l’utilisateur.
Les tuyaux, boutons, plateaux à charpie et tout
accessoire ou pièce jetable.
Les frais de main-d’œuvre, transport pour
dépannage et d’expédition pour le retrait et
le remplacement de pièces défectueuses au-
delà de la période de 24 mois.
Les dommages liés à une utilisation autre
qu’une utilisation domestique normale.
Tout frais de transport et d’expédition.
CETTE GARANTIE LIMITÉE REMPLACE TOUTE
AUTRE GARANTIE EXPRESSE OU IMPLICITE,
Y COMPRIS, MAIS PAS SEULEMENT, LES
GARANTIES IMPLICITES, Y COMPRIS LES
GARANTIES DE QUALITÉ MARCHANDE OU
D’APTITUDE À UN USAGE PARTICULIER
Le recours oert dans cette garantie est
exclusif et se substitue à toute autre garantie.
Cette garantie ne couvre pas les dommages
fortuits ou indirects; aussi les limitations
décrites ci-dessus peuvent ne pas s’appliquer
à votre cas. Certains États ne permettent
pas de limitation sur la durée d’une garantie
implicite, aussi les limitations décrites ci-
dessus peuvent ne pas s’appliquer à votre cas.
Cette garantie vous confère des droits
juridiques spéciques. Vous pouvez
également jouir d’autres droits qui peuvent
varier d’un État à l’autre.
Haier America
Wayne, NJ 07470

67
ÍNDICE
SEGURIDAD DE LA ESTUFA............................................................................... 68
El soporte anti-vuelco ................................................................................................. 70
PIEZAS Y CARACTERÍSTICAS ........................................................................... 75
CONTROL ELECTRÓNICO .................................................................................76
Cómo Fijar el Reloj y el Temporizador ......................................................................... 76
Cocción Programada ...................................................................................................77
AJUSTE DE ELEMENTOS Y DE CONTROL ......................................................... 78
Elementos calefactores ...............................................................................................78
Perillas de control .......................................................................................................79
USO DE LA SUPERFICIE DE COCCIÓN ...............................................................80
Antes de usar la supercie de cocción........................................................................80
Utensilios de cocina .....................................................................................................81
Considerar los siguientes puntos en el envasado ......................................................83
USO DEL HORNO .............................................................................................. 84
Antes de usar el horno .................................................................................................84
General .........................................................................................................................84
Modos del Horno .........................................................................................................85
Consejos y Técnicas de Horneado ..............................................................................71
Consejos y Técnicas de Horneado por Convección...................................................72
Consejos y Técnicas del Asado por Convección ........................................................ 74
Consejos y Técnicas del Asado por Convección ........................................................ 92
CUIDADO DEL HORNO ..................................................................................... 93
Limpieza .......................................................................................................................93
CÓMO QUITAR LA PUERTA DEL HORNO ........................................................... 95
Cómo reemplazar la luz del horno ...............................................................................97
SOLUCIÓN DE PROBLEMAS ..............................................................................98
Resolución de los Problemas de Horneado ................................................................ 98
Supercie de cocción ..................................................................................................99
Horno .........................................................................................................................100
GARANTÍA LIMITADA ...................................................................................... 102
INFORMACIÓN A TENER EN CUENTA
Le agradecemos la compra de este
producto de marca Haier. Este manual
para el usuario le ayudará a obtener
el mejor funcionamiento de su nueva
estufa.
Para referencia futura, anote el número
de modelo y de serie en el cuadro
interior de la estufa, y la fecha de
compra.
Engrape la prueba de compra a este
manual para asistirle cuando necesite
obtener servicio bajo la garantía.
___________________________________
Número de modelo
___________________________________
Número de serie
___________________________________
Fecha de compra
68
SEGURIDAD DE LA ESTUFA
Su seguridad y la seguridad de los demás es muy importante.
PELIGRO
ADVERTENCIA
PRECAUCIÓN
Este es el símbolo de advertencia de seguridad.
Este símbolo le llama la atención sobre peligros
potenciales que pueden ocasionar la muerte o una
lesión a usted y a los demás. Todos los mensajes de
seguridad irán a continuación del símbolo de
advertencia de seguridad y de la palabra “PELIGRO”,
“ADVERTENCIA” o “PRECAUCIÓN”.
Estas palabras significan:
Se trata de una situación de
peligro inminente. Si no sigue las
instrucciones de inmediato,
usted puede morir o sufrir una
lesión grave.
Se trata de una situación
posiblemente peligrosa que, de
no evitarse, podría causar la
muerte o una lesión grave.
Se trata de una situación
posiblemente peligrosa que, de
no evitarse, podría causar
lesiones moderadas o leves.
Todos los mensajes de seguridad le dirán el peligro potencial, le dirán
cómo reducir las posibilidades de sufrir una lesión y lo que puede
suceder si no se siguen las instrucciones.
Hemos incluido muchos mensajes importantes de seguridad en este
manual y en su electrodoméstico. Lea y obedezca siempre todos los
mensajes de seguridad.
69
Peligro de Incendio
Si no se siguen exactamente las instrucciones de esta guía, se puede
ocasionar un incendio o explosión que dé como resultado daños
materiales, lesiones personales o la muerte.
- No almacene ni use gasolina u otros vapores y líquidos inflamables
cerca de esta unidad o de cualquier otro electrodoméstico.
- QUÉ HACER SI PERCIBE OLOR A GAS
• No intente encender ningún electrodoméstico.
• No toque ningún interruptor eléctrico.
• No use ningún teléfono dentro del edificio.
• Desaloje a todos los ocupantes del cuarto, edificio o área.
• Llame inmediatamente al proveedor de gas desde el teléfono de su
vecino. Siga las instrucciones del proveedor de gas.
• Si no se puede comunicar con el proveedor de gas, llame al
departamento de bomberos.
- Un instalador calificado, una agencia de servicio o el proveedor de gas
debe realizar la instalación y el servicio.
ADVERTENCIA
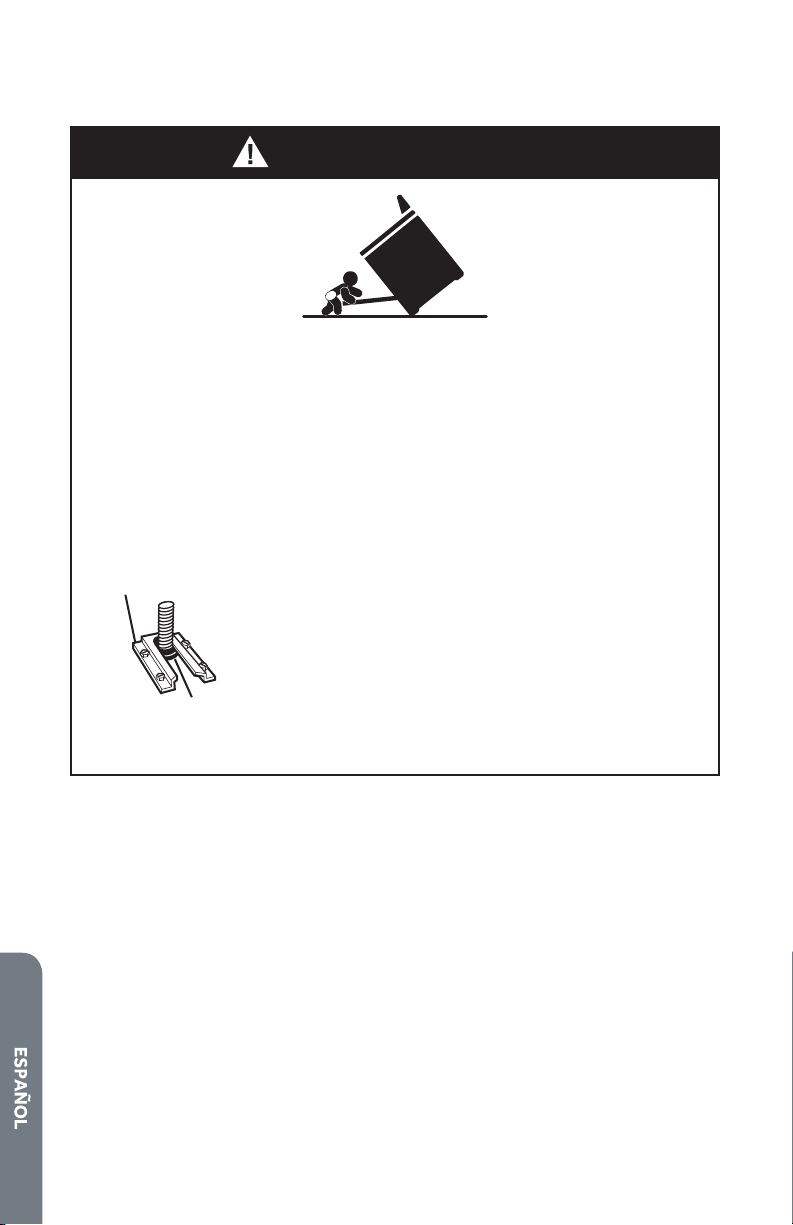
70
EL SOPORTE ANTI-VUELCO
ADVERTENCIA
Peligro de Vuelco
Un niño o un adulto puede volcar accidentalmente la estufa y resultar
muerto.
Conecte el soporte anti-vuelco a la pata trasera de la estufa.
Si traslada de lugar la estufa, vuelva a conectar el soporte anti-vuelco.
Consulte las instrucciones de instalación para más detalles.
No seguir estas instrucciones puede ocasionar la muerte o
quemaduras graves en niños y adultos.
Asegúrese de que el soporte anti-vuelco haya sido
instalado:
• Deslice la estufa hacia adelante.
• Verifique que el soporte anti-vuelco esté bien
asegurado al piso.
• Deslice la estufa para colocarla de nuevo en su lugar
asegurándose de que la pata trasera quede debajo
del soporte anti-vuelco.
El soporte
anti-vuelco
La pata
trasera
71
INSTRUCCIONES IMPORTANTES
DE SEGURIDAD
ADVERTENCIA: Para reducir el riesgo de incendio, choque eléctrico,
lesiones a personas o daños al utilizar la estufa, siga precauciones
básicas, incluyendo las siguientes:
•
ADVERTENCIA: PARA
REDUCIR EL RIESGO DE
VUELCO DE LA ESTUFA,
ESTA DEBE FIJARSE CON LA
INSTALACIÓN ADECUADA
DE DISPOSITIVOS
ANTIVUELCO. PARA
COMPROBAR SI LOS
DISPOSITIVOS ESTÁN
INSTALADOS DE FORMA
ADECUADA, DESLICE LA
ESTUFA COMPLETAMENTE
HACIA ADELANTE, BUSQUE
EL SOPORTE ANTIVUELCO
SUJETO FIRMEMENTE A
LA PARED DETRÁS DE LA
ESTUFA Y DESLICE LA
ESTUFA POR COMPLETO
HACIA ATRÁS DE MODO QUE
EL SOPORTE ANTIVUELCO
QUEDE ENCIMA DEL
REFUERZO TRASERO DE LA
ESTUFA.
•
ADVERTENCIA: Nunca use
este aparato como calefactor
de ambientes para calentar
o entibiar la habitación. Si
lo hace, puede provocar
intoxicación por monóxido de
carbono.
•
ADVERTENCIA: NUNCA
cubra las ranuras, oricios o
pasajes en la parte inferior
del horno ni cubra toda una
rejilla con materiales tales
como papel de aluminio. Si lo
hace, bloqueará el ujo de aire
en el horno y puede causar
intoxicación por monóxido de
carbono. Los forros de papel
de aluminio también pueden
atrapar el calor y provocar un
riesgo de incendio.
•
PRECAUCIÓN: No almacene
artículos que interesen a los
niños sobre el horno. Si los
niños se trepan al aparato
para alcanzar algún objeto,
podrían sufrir una lesión
grave.
•
No se debe dejar a los niños
solos o sin supervisión en el
área donde el aparato está
en uso. Jamás se les debe
permitir que se sienten o se
paren en alguna parte del
aparato.
•
Use la ropa apropiada - Nunca
debe usar prendas holgadas
o que cuelguen mientras esté
usando la estufa.
•
Servicio para el usuario – No
repare ni reemplace ninguna
pieza del horno, salvo que se
recomiende especícamente.
Hágalo reparar por un técnico
de servicio autorizado.
•
Almacenaje dentro o sobre
el aparato - No se debe
almacenar materiales
inamables cerca de las
unidades de supercie.
•
No use agua en incendios
provocados por grasa -
Extinga el incendio o la llama
o use un extinguidor de tipo
espuma o químico seco.
72
INSTRUCCIONES IMPORTANTES
DE SEGURIDAD
•
Use solo agarraderas de
ollas secas - Las agarraderas
de ollas húmedas o
mojadas en las supercies
calientes pueden ocasionar
quemaduras por vapor. No
deje que la agarradera de
ollas toque los elementos
calefactores calientes. No
use una toalla ni otros paños
voluminosos.
•
NO TOQUE LAS UNIDADES
EXTERIORES O ÁREAS
CERCA DE LAS UNIDADES
- Las unidades exteriores
podrían estar calientes aún
si están de color oscuro. Las
áreas cercanas a las unidades
exteriores se pueden calentar
lo suciente para ocasionar
quemaduras. Durante y
después del uso, no toque
ni deje que la ropa u otros
materiales inamables toquen
las unidades exteriores o las
áreas cercanas a las unidades
hasta que haya transcurrido
tiempo suciente para que se
enfríen. Entre esas áreas, se
encuentran la supercie de
cocción y las supercies que
están frente a la supercie de
cocción.
•
Nunca deje sin supervisión la
supercie de cocción cuando
está en uso. Los derrames por
hervor causan salpicaduras
grasosas y humeantes, las
cuales pueden encenderse.
Si derrama líquido sobre un
elemento podría encenderse
todo o parte de la llama o
afectar el encendido de
chispa.
•
Utensilios de cocina vidriados
– Solo algunos tipos de
utensilios de vidrio, cerámica
vitricada, cerámica, loza
de barro u otros utensilios
vidriados son adecuados para
usarse sobre la estufa sin que
se rompan debido a cambios
repentinos de temperatura.
•
Los mangos deben colocarse
hacia adentro y no deben
sobrepasar las unidades
de supercie adyacentes
- Para reducir riesgos de
quemaduras, incendio de
materiales inamables
y salpicaduras debido a
contacto accidental con
el utensilio, el mango del
utensilio debe colocarse hacia
adentro y no debe sobrepasar
las unidades de supercie
adyacentes.
•
Las agarraderas para ollas
húmedas o mojadas en las
supercies calientes pueden
ocasionar quemaduras
por vapor. No deje que la
agarradera para ollas toque
los elementos calefactores
calientes. No use una toalla
ni otros paños voluminosos.
Algunos productos de
limpieza pueden producir
gases nocivos cuando se
aplican en una supercie
caliente.
•
Tenga cuidado al abrir
la puerta - Debe abrirla
suavemente para dejar que
salga el aire caliente o el vapor
antes de quitar o volver a
colocar alimentos.

73
INSTRUCCIONES IMPORTANTES
DE SEGURIDAD
•
No ponga a calentar
recipientes de alimentos
cerrados - La acumulación de
presión puede hacer que el
recipiente explote y ocasione
lesiones.
•
No obstruya el ujo de aire
para la combustión y la
ventilación.
•
Colocación de bastidores
horno – Siempre coloque las
parrillas del horno en el lugar
deseado mientras el horno
esté frío. Si se debe mover
la parrilla mientras el horno
está caliente, no permita que
la agarradera de ollas entre
en contacto con el elemento
calefactor caliente.
•
NO TOQUE LOS ELEMENTOS
CALEFACTORES NI LAS
SUPERFICIES INTERIORES
DEL HORNO – Los elementos
calefactores podrían estar
calientes, aún si están de
color oscuro. Las supercies
interiores de un horno se
calientan lo suciente como
para causar quemaduras.
Durante y después del uso,
no toque ni deje que la ropa u
otros materiales inamables
toquen los elementos
calefactores ni las supercies
interiores del horno hasta
que haya transcurrido
tiempo suciente para que
se enfríen. Otras supercies
del electrodoméstico pueden
calentarse lo suciente como
para causar quemaduras,
entre esas supercies están
los oricios de ventilación
del horno y las supercies
cercanas a esos oricios,
las puertas del horno y las
ventanas de las puertas del
horno.
•
Instalación adecuada –
Cuando se instale la estufa,
deberá conectarse a tierra
de acuerdo con los códigos
locales, o en la ausencia
de estos, con el Código
Nacional Eléctrico (National
Electrical Code), ANSI/NFPA
70. En Canadá, la estufa
deberá conectarse a tierra
de acuerdo con el Código
canadiense de electricidad
(Canadian Electrical Code).
Cerciórese de que la
instalación y puesta a tierra
de la estufa sean efectuadas
adecuadamente por un
técnico competente.
•
Desconecte el suministro
eléctrico antes de dar servicio
al electrodoméstico.
•
Pueden producirse lesiones
por el uso indebido de
las puertas o cajones del
electrodoméstico, como
puede ser pisar, apoyarse o
sentarse sobre las puertas o
cajones.
•
Mantenimiento – Mantenga el
área de la estufa limpia y libre
de materiales combustibles,
gasolina y otros vapores y
líquidos inamables.

74
INSTRUCCIONES IMPORTANTES
DE SEGURIDAD
Para unidades con campanas de
ventilación -
•
Limpie las campanas de
ventilación con frecuencia
- No se debe permiter que
la grasa se acumule en la
campana o en el ltro.
•
Al amear alimentos debajo
de la campana, encienda el
ventilador.
LEA Y GUARDE ESTAS
INSTRUCCIONES
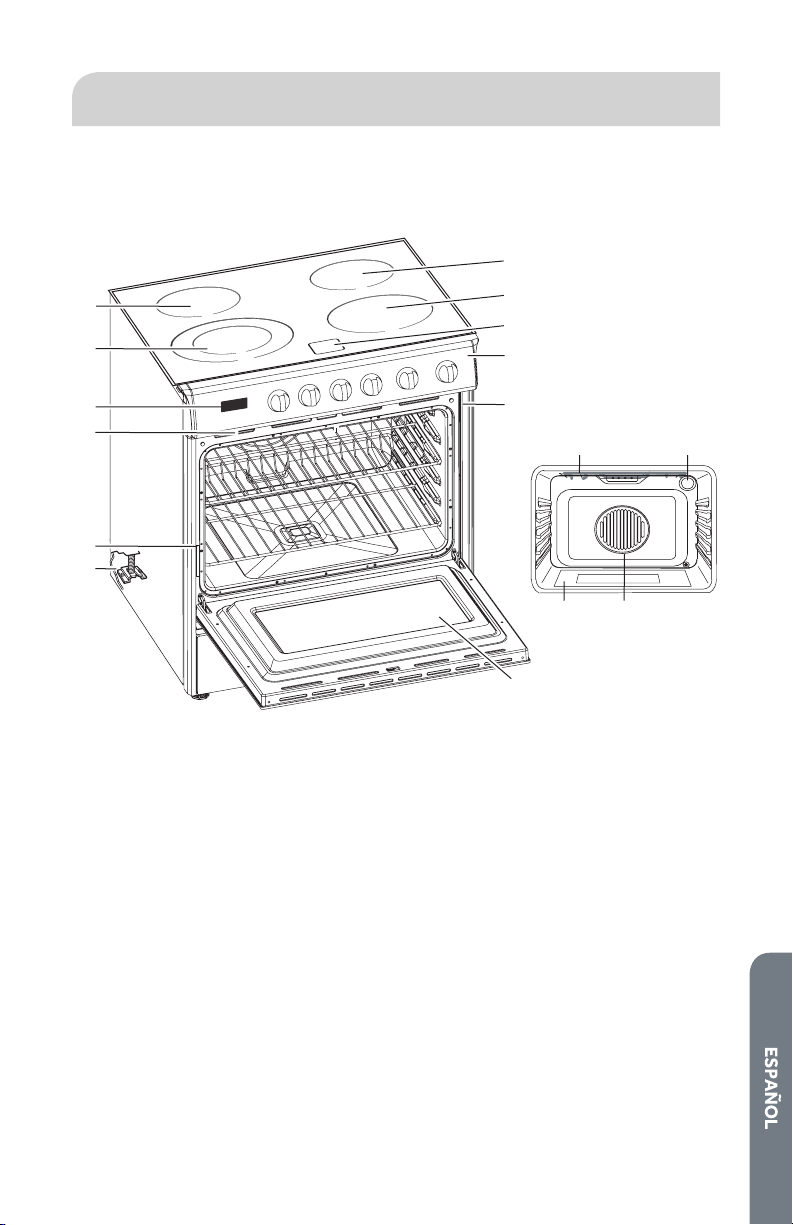
75
PIEZAS Y CARACTERÍSTICAS
Este manual abarca varios modelos diferentes. La estufa que usted adquirió puede
tener algunos o todos los artículos que aparecen a continuación. Es posible que la
ubicación y la apariencia de las características que se muestran aquí no coincidan
con las de su modelo.
d
f
e
j
k
p
o
ml
n
H
OT SUR
FAC
ES
a
b
c
g
h
i
a Elemento de supercie trasero
izquierdo
b Elemento de supercie
delantero izquierdo (Elemento
dual)
c Reloj/Temporizador
d Ducto de escape del horno
e Placa con el número de modelo
y de serie
f Soporte antivuelco
g Elemento de supercie trasero
derecho
h Elemento de supercie
delantero derecho
i Luces indicadoras de la supercie
caliente
j Panel de control
k Junta de la puerta
l Elemento para asar a la parrilla
m Luz del horno
n Elemento de convección y
ventilador
o Elemento inferior (no visible)
p Ventana de la puerta del horno
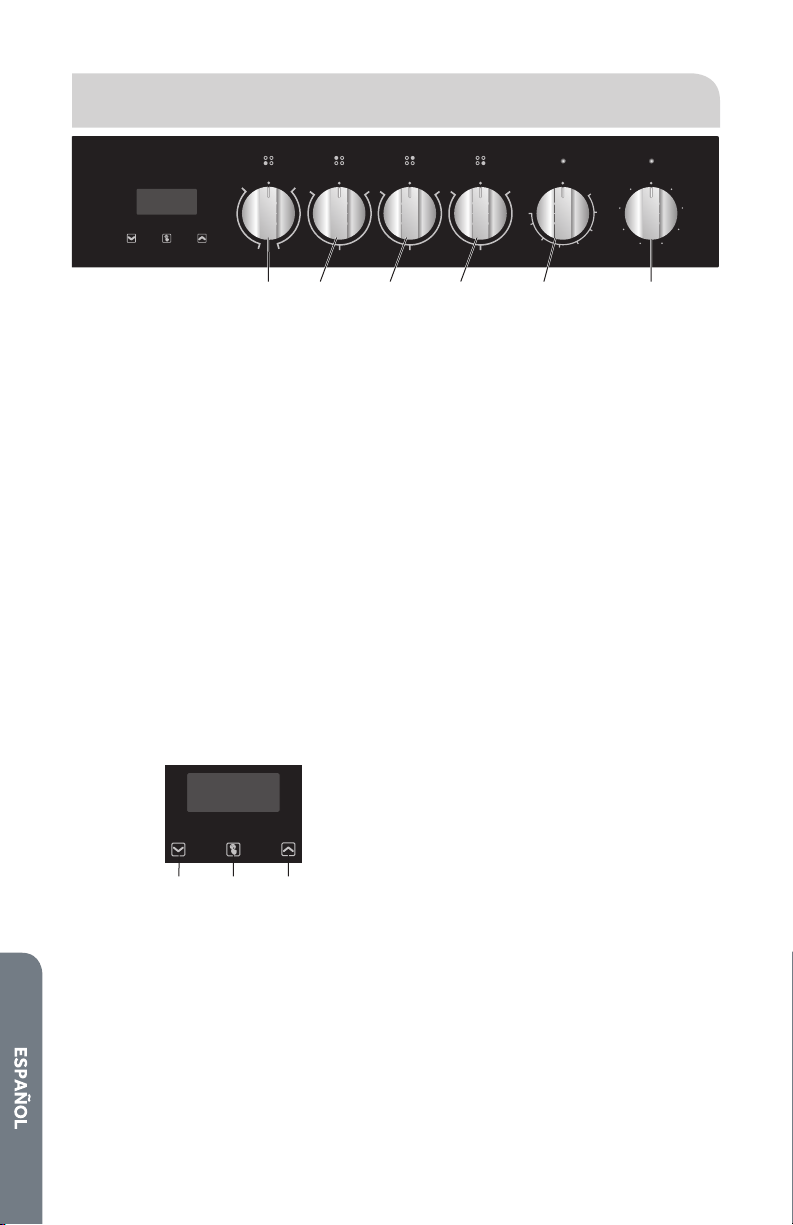
76
CONTROL ELECTRÓNICO
Timer
Set
Cook
Time
End
Time
Set
Clock
OFF OFF OFF OFF OFF
°
F
Broil
450
400
350
300
250
200
150
Defrost
Conv
Bake
Conv
Broil
High
Broil
Low
Broil
Pizza
Bake
Light
HI LO HI LO HI LO
MED MED MED
OFF
HI HI
SINGLE DUAL
LO LO
a b c d e f
a Elemento delantero izquierdo
b Elemento trasero izquierdo
c Elemento trasero derecho
d Elemento delantero derecho
e Perilla de temperatura del horno
eléctrico
f Perilla de control del horno
eléctrico
CÓMO FIJAR EL RELOJ Y EL TEMPORIZADOR
Su modelo tiene una pantalla digital, reloj de 12 horas con 3 botones de control.
IMPORTANTE: En caso de un corte de electricidad, se perderán todos los ajustes,
incluido el indicador de tiempo. Cuando vuelva la electricidad, aparecerán la barra
por encima de Timer Set (Ajuste del temporizador) y 12:00.
PARA FIJAR LA HORA DEL DÍA
Cuando se conecta la corriente, la pantalla muestra 12:00 y la barra por encima de
“Set Clock” (Fijar el reloj).
Para jar la hora correcta, presione la echa hacia arriba o la echa hacia abajo
hasta que aparezca la hora correcta. Después de 5 segundos, el reloj se iniciará
automáticamente, o puede presionar el botón de función para seleccionar la
operación manual.
Timer
Set
Cook
Time
End
Time
Set
Clock
a b c
a Disminuir tiempo
b Función
c Aumentar tiempo
PARA FIJAR EL TEMPORIZADOR
La cuenta regresiva del temporizador digital se puede jar hasta las 11 horas y
59 minutos como máximo.
Para jar el temporizador, presione el botón de función varias veces hasta que
aparezca la barra por encima de Timer Set (Ajuste del temporizador). Una vez que
suelta el botón de función, aparece la hora actual y la barra por encima de Timer Set
(Ajuste del temporizador) destella. Cuando se presiona el botón de función, aparece
el tiempo restante. Cuando se alcanza el tiempo de ajuste, desaparece Timer Set
(Ajuste del temporizador) y la alarma sonará. Para detener la alarma, presione
cualquier botón.
NOTA: Después de presionar el botón de función, debe ajustar el temporizador
dentro de los 5 segundos.
77
COCCIÓN PROGRAMADA
Peligro de intoxicación por alimentos
No deje sus alimentos en el horno por más de una hora antes o después
de su cocción.
No seguir esta instrucción puede ocasionar intoxicación alimentaria o
enfermedad.
ADVERTENCIA
La cocción programada permite que el horno se pueda jar para que se encienda a
una hora determinada del día, cocine durante un período de tiempo determinado,
y/o se apague automáticamente. El inicio diferido no debe usarse para alimentos
como panes y tortas porque quizás no se horneen como es debido.
NOTA: Antes de jar el reloj, asegúrese de que esté en la hora correcta del día. Vea
“Para jar la hora del día” anteriormente en esta sección.
1. Presione el botón de función varias veces hasta que la barra por encima de Cook
Time (Tiempo de cocción) destelle y, a continuación, presione la echa hacia
arriba o hacia abajo para jar el tiempo previsto para el horneado.
2. Presione el botón de función varias veces hasta que la barra por encima de End
Time (Hora de nalización) destelle y, a continuación, presione el botón con la
echa hacia arriba o hacia abajo para jar la hora en la que se deberá apagar el
horno.
3. Fije la temperatura de cocción y el modo de cocción girando la perilla del
termostato y la perilla del selector.
4. Después de seguir estos pasos, las barras por encima de Cook Time (Tiempo
de cocción) y de End Time (Hora de nalización) destellarán, lo que indica que la
función de cocción automática del horno está jada.
Por ejemplo: Si el tiempo de cocción es de 45 minutos y desea terminar la cocción a
las 6:00.
1. Presione el botón de función varias veces hasta que la barra por encima de Cook
Time (Tiempo de cocción) destelle y, je el tiempo de cocción en 45 minutos.
2. Presione el botón de función varias veces hasta que la barra por encima de End
Time (Hora de nalización) destelle y, se je la hora de nalización a las 6:00.
Después del ajuste anterior, aparece la hora actual y las barras por encima de Cook
Time (Tiempo de cocción) y End Time (Hora de nalización) destellarán, lo que indica
que se ja la función de cocción automática. Cuando el reloj muestra 5:15, el horno
comenzará a cocinar automáticamente, y la barra Cook Time (Tiempo de cocción)
destellará.
78
AJUSTE DE ELEMENTOS Y DE CONTROL
Peligro de incendio
Apague todos los controles cuando haya terminado de cocinar.
No seguir esta instrucción puede ocasionar la muerte o incendio.
ADVERTENCIA
Las perillas de control giran en cualquier dirección y desde cualquier posición al
ajuste de temperatura deseado o a la posición OFF (Apagado).
ELEMENTOS CALEFACTORES
LIMITADORES DE TEMPERATURA
Cada el elemento radiante tiene su propio limitador de temperatura (sensor) para
proteger la supercie de cocción de vidrio de temperaturas extremadamente altas.
El limitador de temperatura funciona automáticamente por ciclos del elemento para
que coincida con el calor del ajuste de la temperatura del elemento (HI [Alto] a LO
[Bajo]).
ELEMENTO RADIANTE SINGLE (SIMPLE)
Este tipo de elemento eléctrico utiliza una cinta metálica situada bajo la supercie
de vidrio para proporcionar el calor para cocinar. El limitador de temperatura
alternará el encendido y el apagado del elemento.
•
Gire la perilla desde la temperatura LO (Bajo) a la HI (Alto) (o cualquier
temperatura intermedia).
ELEMENTO RADIANTE DUAL
El elemento dual consta de dos elementos radiantes de cinta dentro del mismo
elemento. Tanto el elemento pequeño (elemento interior) como ambos elementos
(interior y exterior) pueden seleccionarse para su uso. Hay un número innito
de ajustes de temperatura entre la posición LO (Bajo) y HI (Alto). Las posiciones
jas se encuentran en la temperatura LO (Bajo) y HI (Alto) para denir ajustes de
calentamiento mínimo y máximo.
Para encender el elemento interior, empuje hacia abajo la perilla de control y gire en
sentido contrario a las agujas del reloj siguiendo los grácos de línea única.
Para encender ambos elementos interiores y exteriores juntos, empuje hacia
abajo la perilla de control y gire en el sentido de las agujas del reloj siguiendo la línea
gráca doble.

79
LUZ INDICADORA DE SUPERFICIE CALIENTE
Cada elemento cuenta con una luz indicadora de supercie caliente para mostrar
cuando el área de la supercie de cocción está en la posición ON (Encendida) o
caliente. La señal de luz se encenderá automáticamente en el área marcada con un
círculo.
La luz indicadora de supercie caliente permanecerá encendida mientras el área de
la supercie de cocción esté muy caliente para tocarla, aun después de que se haya
apagado el área de la supercie de cocción.
PERILLAS DE CONTROL
Las perillas de control giran en cualquier dirección y desde cualquier posición al
ajuste de temperatura deseado o a la posición OFF (Apagado).
NOTA: Una vez que el elemento esté apagado, la luz indicadora de supercie
caliente permanecerá iluminada hasta que la temperatura de la supercie del
elemento se haya enfriado.
La ubicación de cada perilla corresponde a la ubicación del elemento calefactor que
controla.
Para encender cualquier elemento calefactor:
•
PRESIONE la perilla y GIRE en cualquier dirección al ajuste de temperatura
deseado.
OFF
HI LO
MED
OFF
HI HI
SINGLE
DUAL
LO LO
AJUSTES RECOMENDADOS DEL ELEMENTO CALEFACTOR
Los elementos calefactores no requieren precalentamiento.
Un rango de ajustes de calefacción aparece en el siguiente cuadro debido a que la
temperatura requerida depende de lo siguiente:
•
Tipo y calidad de la cacerola
•
Tipo, cantidad y temperatura de la comida
•
Elemento utilizado y preferencias del cocinero
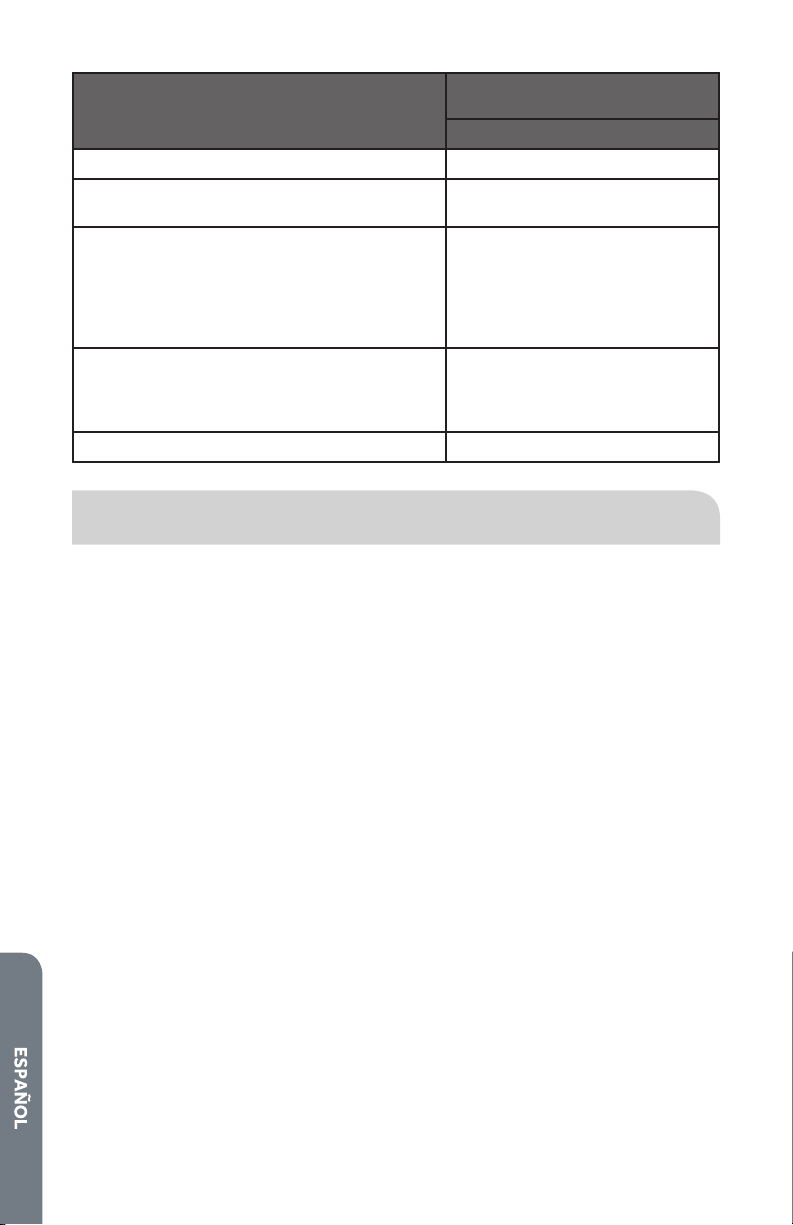
80
TIPO DE ALIMENTO
ELEMENTOS RADIANTES CON
AJUSTES DE TEMPERATURA
Regulador de energía
Derretir manteca, chocolate Low (Bajo)
Salsa suave, arroz, salsas a fuego lento con
mantequilla y yema de huevo
Low (Bajo) a Medium (Media)
Cocinar verduras, caldos de pescado, huevos
fritos o revueltos, cereales, pastas, leche,
panqueques, budines, carnes cocidas a fuego
lento, verduras al vapor, palomitas de maíz,
tocino, guiso de carne, verduras salteadas,
salsas para espaguetis
Medium (Media)
Carne a la plancha, carne frita a la sartén,
pescado, huevos, salteados, revueltos, carne
sellada o ligeramente dorada, mantener un
hervor rápido
Medium (Media) a High (Alto)
Hervir agua para verduras, pastas High (Alto)
USO DE LA SUPERFICIE DE COCCIÓN
ANTES DE USAR LA SUPERFICIE DE COCCIÓN
1. Si está presente, quite todo el embalaje y el material impreso de la supercie de
cocción.
2. Limpie la parte superior de vidrio. Se recomienda una limpieza a fondo con un
limpiador para la parte superior de vidrio. Solo lleva un minuto y deja una capa
limpia y brillante en la parte superior de vidrio antes del primer uso.
3. Coloque una olla con agua en cada uno de los elementos delanteros y colóquelos
en la posición de calentamiento HI (Alto) durante al menos 30 minutos. Apague
los elementos delanteros.
4. Coloque una olla con agua en cada uno de los elementos traseros y colóquelos
en la posición de calentamiento HI (Alto) durante al menos 30 minutos. Apague
los elementos traseros.
NOTAS:
•
Este procedimiento evapora cualquier aceite protector y humedad
acumulados durante el proceso de fabricación, y permite a los circuitos de
control electrónicos funcionar correctamente.
•
Puede haber un ligero olor durante los primeros usos: esto es normal y
desaparece.
•
La supercie de cocción mantendrá el calor y permanecerá caliente más de
20 minutos después de que los elementos se hayan apagado.

81
UTENSILIOS DE COCINA
La elección de la cacerola afecta directamente al rendimiento de cocción (velocidad
y uniformidad). Para obtener mejores resultados, seleccione cacerolas con las
siguientes características.
GENERAL
•
La supercie de cocción de vidrio de cerámica es un material durable resistente
al impacto, pero no es irrompible si una cacerola u otro objeto cae sobre ella.
•
No permita que las cacerolas hiervan estando vacías. Esto puede dañar la
cacerola, el elemento y/o la supercie de cocción.
•
Nunca cocine alimentos directamente sobre el vidrio.
•
No deslice utensilios de cocina a través de la supercie de cocción, ya que esto
puede rayar el vidrio.
•
No se recomienda el uso de utensilios de cocina de hierro fundido sobre la
supercie de cocción de vidrio. El hierro fundido retiene el calor y puede causar
daños a la supercie de cocción.
•
Los alimentos envasados en papel de aluminio no deben colocarse directamente
sobre la supercie de vidrio de cerámica para cocinar; el papel de aluminio se
derretirá y causará daños permanentes en la supercie de vidrio.
Base plana
Cuando una cacerola está caliente, la base (parte inferior de la cacerola) debe
colocarse de manera uniforme sobre la supercie, sin bamboleo (balanceo). Los
utensilios de cocina ideales deberán tener un fondo plano, lados rectos, una tapa
que encaje bien, y el material debe ser de un grosor mediano a grueso.
Los acabados ásperos pueden rayar la supercie de cocción.
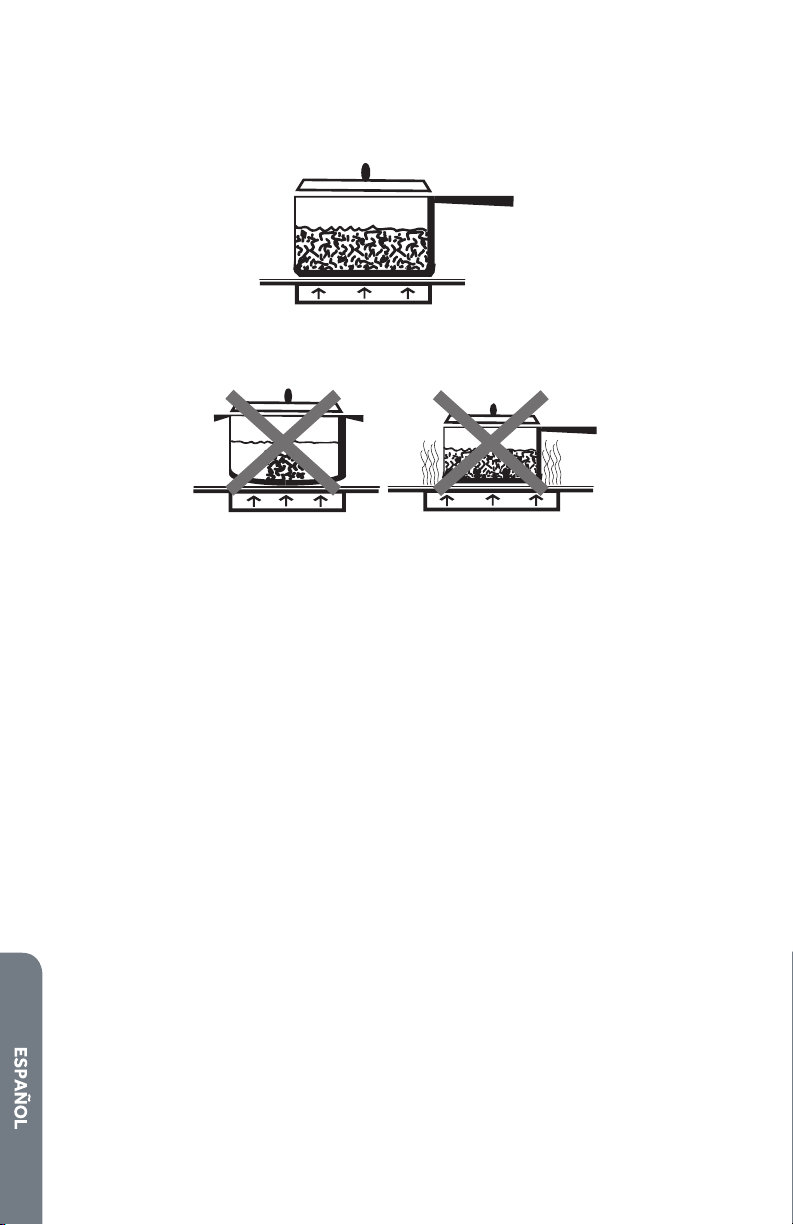
82
Debe coincidir el diámetro de la cacerola con el elemento
La base de la cacerola debe cubrir o coincidir con el diámetro del elemento que se
utiliza.
Cacerola equilibrada
Cacerola desequilibrada
CARACTERÍSTICAS DE LOS UTENSILIOS DE COCINA
•
Aluminio: calienta y enfría rápidamente. Ideal para freír, estofar, asar. Puede
dejar marcas metálicas en el vidrio.
•
Hierro fundido: en una supercie de cocción de vidrio, calienta y enfría
lentamente, pero conserva el calor y cocina de forma uniforme.
•
Cobre: la hojalata calienta y enfría rápidamente. Cocina tipo Gourmet, salsas de
vino, platos con huevos.
•
Utensilios esmaltados: La respuesta depende del metal de base. No se
recomienda. Las imperfecciones en el esmalte pueden rayar la supercie de
cocción.
•
Vidrio de cerámica: calienta y enfría rápidamente. No se recomienda. Calienta
demasiado lento. Las imperfecciones en el esmalte pueden rayar la supercie de
cocción.
•
Acero inoxidable: calienta y enfría de forma moderada. Sopas, salsas, verduras y
cocción general.
83
CONSIDERAR LOS SIGUIENTES PUNTOS EN EL
ENVASADO
PRECAUCIÓN
Peligro de intoxicación por alimentos
En un envase seguro, se destruyen microorganismos dañinos y los
frascos se sellan completamente. Cuando los alimentos envasados se
encuentran en un recipiente a baño maría, se debe mantener el hervor
moderado, pero continuo durante el tiempo necesario. Cuando los
alimentos envasados se encuentran en un recipiente para envasado a
presión, dicha presión se debe mantener durante el tiempo necesario.
Después de ajustar los controles, es muy importante asegurarse de
mantener los niveles de presión o el hervor indicado durante el tiempo
necesario.
No seguir esta instrucción puede ocasionar intoxicación por alimentos o
enfermedad.
Para la mayoría de la supercie de cocción, no se recomienda colocar ollas cuyo
tamaño sobrepase uno de los círculos de la unidad de la supercie. Sin embargo,
para envasar en un recipiente a baño maría o en un recipiente para envasado a
presión, se pueden utilizar ollas con un mayor diámetro.
Esto se debe a que la temperatura del agua hirviendo (incluso bajo presión) no daña
las supercies de cocción que rodean las unidades de la supercie.
Sin embargo, no use recipientes para envasado de gran diámetro u otras ollas de
gran diámetro para freír o hervir alimentos con otra cosa que no sea agua.
Para la mayoría de las mezclas de salsas o de almíbares, y todo tipo de frituras,
cocine a temperaturas mucho más altas que el agua hirviendo. Tales temperaturas
podrían eventualmente dañar las supercies de cocción de vidrio.
•
Asegúrese de que el recipiente para envasado se coloque sobre el centro de la
unidad de la supercie. Si la supercie de cocción o su ubicación no permite que
el recipiente para envasado se coloque en el centro de la unidad de la supercie,
utilice ollas de menor diámetro para lograr buenos resultados en el envasado.
•
Se deben utilizar recipientes para envasado de base plana. No utilice recipientes
para envasado con bases onduladas o con rebordes (a menudo se encuentran en
utensilios esmaltados), ya que no hacen suciente contacto con las unidades de
la supercie y toman mucho tiempo para hervir agua.
•
Cuando envase alimentos, use recetas y procedimientos de fuentes conables.
Las recetas y procedimientos conables pueden obtenerse del fabricante del
recipiente para envasado; los fabricantes de frascos de vidrio para conservas,
como las marcas Ball y Kerr; y el Departamento del Servicio de Extensión
Agrícola de los Estados Unidos.
•
Recuerde que el envasado es un proceso que genera grandes cantidades de
vapor. Para evitar quemaduras por el vapor o calor, tenga cuidado cuando
envase alimentos.
Puesto que debe asegurarse de procesar las botellas para conservas durante
el tiempo prescrito, sin interrupción en el tiempo de procesamiento, no envase
alimentos en cualquier unidad de la supercie de cocción si el recipiente para
envasado no es plano.

84
USO DEL HORNO
Este horno multifuncional combina las funciones de los modos de hornos
tradicionales con las funciones de los modos modernos de cocción por convección
ventilados en un solo horno. Utilice el control de modo de cocción, que se encuentra
en el panel de control, para seleccionar el modo de horno.
VENTAJAS DE LA COCCIÓN POR CONVECCIÓN
•
Ahorra tiempo y energía.
•
Se logra un horneado parejo, dorado y crocante.
•
Durante el asado, los jugos y sabores se sellan mientras que el exterior es
crocante.
•
Los panes de levadura son más ligeros, con una textura más uniforme, más
dorados y con cortezas más crujientes.
•
Los alimentos fermentados, como los bollos de crema, sués y merengues son
más altos y más livianos.
•
Es posible hornear en parrillas múltiples al mismo tiempo, con resultados
uniformes.
•
Preparar comidas con alimentos integrales a la vez sin transferencia de sabor.
•
Deshidrata hierbas, frutas y verduras.
•
No requiere utensilios para hornear especializados.
•
Asar a la parrilla por convección permite un asado extraordinario con cortes más
gruesos de alimentos.
ANTES DE USAR EL HORNO
1. Gire el control de temperatura al ajuste más alto.
2. Gire el control de selección de modo de cocción a un modo de cocción.
3. Deje que el horno funcione durante 30 minutos con la puerta cerrada y sin
alimento en la cavidad.
4. Apague el horno y abra la puerta de este para permitir que el horno se enfríe.
NOTA: Cualquier olor que se pueda detectar durante este primer uso, se debe
a la evaporación de las sustancias utilizadas para proteger el horno durante el
almacenamiento.
GENERAL
IMPORTANTE: No coloque ningún objeto, incluidos platos, papel y bandejas de
horno, en la parte inferior del horno cuando esté en funcionamiento para evitar
dañar el esmalte.
1. Coloque los utensilios para hornear con el alimento en una o ambas parrillas
provistas con el horno.
2. Gire la perilla de modo de cocción hacia la función del horno deseada.
3. Gire la perilla de la temperatura a la temperatura deseada o a Broil (Asar) si asará
alimentos.

85
PARRILLAS DEL HORNO
Las parrillas del horno se pueden colocar en cualquiera de las cinco posiciones de
altura del horno.
Asegúrese de que cada parrilla se inserte entre los dos soportes de alambre lo más
cerca posible entre sí.
Las parrillas del horno tienen un tope para evitar que sean retiradas
involuntariamente por completo.
Para quitar el soporte de la parrilla del horno:
•
Empuje hacia abajo el alambre por debajo del pasador de bloqueo y jale del
soporte de la pared del horno hasta que la parte superior del soporte se libere de
los oricios en la pared del horno.
a
a Pasador de
bloqueo
MODOS DEL HORNO
La perilla del termostato y la perilla de control se utilizan juntas para seleccionar los
Modos del horno.
PERILLA DEL TERMOSTATO
Seleccione la temperatura de cocción girando la perilla en el sentido de las agujas del
reloj hasta la temperatura requerida, entre 150 °F (66 °C) y Broil (Asar a la parrilla).
La luz se encenderá cuando el horno esté precalentado. La luz se apagará cuando
se haya alcanzado la temperatura deseada. La intermitencia regular señala que la
temperatura del horno se mantiene constante a la temperatura jada.
PERILLA DE SELECCIÓN DE MODO DE COCCIÓN
Selecciona la función del horno. Cada una de las funciones enumeradas a
continuación solo pueden utilizarse con la temperatura correcta.
Light (Ligera)
La luz del horno está encendida, sin modo de cocción seleccionado. Durante el
funcionamiento del horno, la luz permanecerá encendida.
Bake (Horneado)
Temperatura establecida: de 120 °F (50 °C) a 485 °F (250 °C) (posición preestablecida
en 410 °F (210 °C)
En el horneado se cocinar con aire caliente. Tanto el elemento superior como el
inferior se encienden en ciclos para mantener la temperatura del horno.

86
Pizza
Temperatura establecida: de 150 °F a 450 °F
Es un modo de cocción especial con aire caliente. Los elementos inferiores se
encienden para cocinar pizza.
Low Broil (Asar a la parrilla, ajuste bajo)
Fije la temperatura: Broil (Asar a la parrilla)
Hay dos elementos para asar a la parrilla. En Low Broil (Asar a la parrilla, ajuste bajo),
solamente el elemento interior está encendido.
High Broil (Asar a la parrilla, ajuste alto)
Fije la temperatura: Broil (Asar a la parrilla)
Hay dos elementos para asar a la parrilla. En High Broil (Asar a la parrilla superior)
solo el elemento interior está encendido a una intensidad alta.
Conv Broil (Asado por convección)
Temperatura establecida: de 120 °F (50 °C) a 485 °F (250 °C) (posición preestablecida
en 445 °F (230 °C)
El Asado por convección combina el calor intenso del elemento superior con el aire
que circula por medio del ventilador de convección.
Conv Bake (Horneado por convección)
Temperatura establecida: de 120 °F (50 °C) a 480 °F (250 °C (posición preestablecida
en 375 °F (190 °C)
El horneado por convección cocina con aire que proviene de tercer elementos que
se encuentra detrás de la pared trasera del homo. Este calo circula a través del homo
por medio de un ventilador de convección.
Descongelado (Conv)
Temperatura establecida: No aplicable.
En Defrost no se utiliza ningún elemento de calentamiento, sino que para
descongelar los alimentos se emplea únicamente el Ventilador de convección.
CONSEJOS Y TÉCNICAS DE HORNEADO
Hornear es cocinar con aire caliente. Tanto el elemento superior como el inferior del
horno se encienden para calentar el aire pero no se utiliza el ventilador para hacer
circular el horneado.
Siga la receta o las orientaciones de los alimentos convenientes para la temperatura
de horneado, el tiempo y la posición de las rejillas. El tiempo de horneado cambiará
con la temperatura de los ingredientes y con las dimensiones, la forma y el acabado
del molde de horneado.
Directrices Generales
•
Para obtener los mejores resultados hornee los alimentos en una única rejilla con
al menos 1” - 1½” (2,5 – 3 cm) espacio entre los moldes y las paredes del horno.
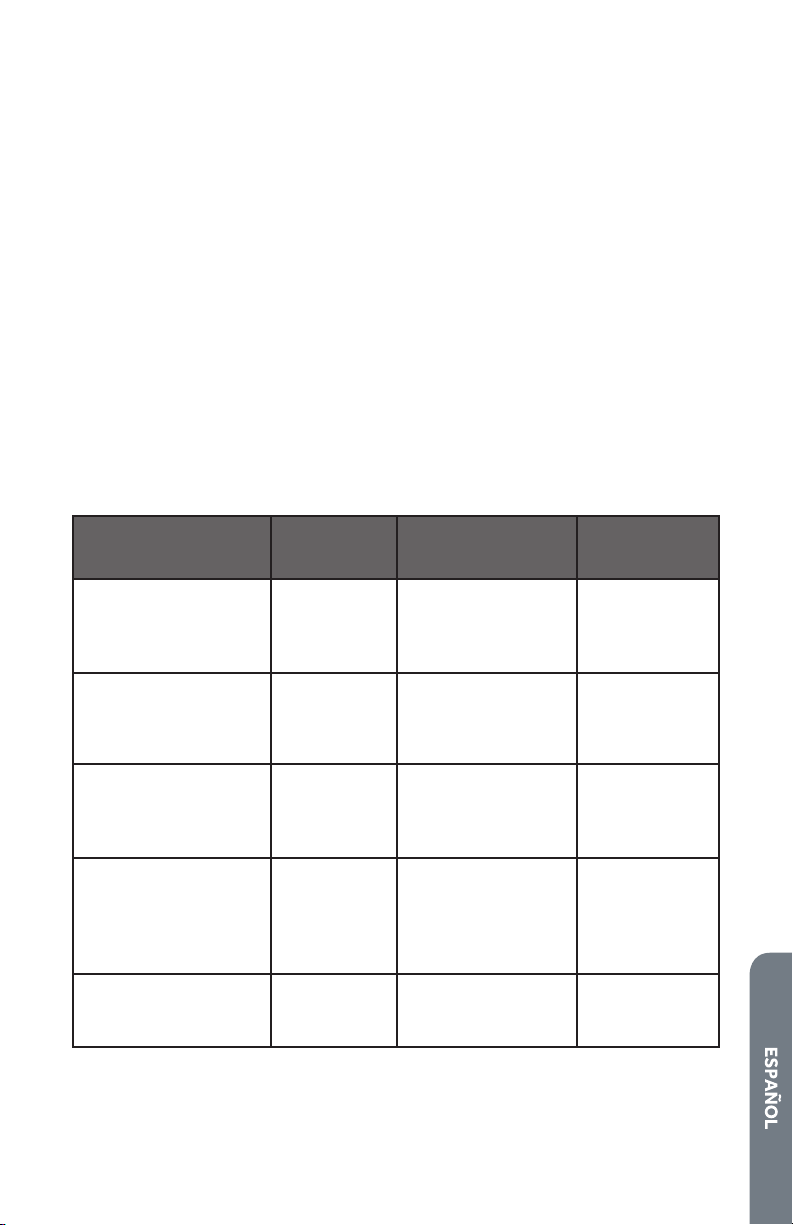
87
•
Use una rejilla cuando selecciona el modo de horneado.
•
Controle para que estén cocidos en el menor tiempo.
•
Use moldes del metal (con o sin acabado antiadherente), vidrio refractario,
vitrocerámica, cerámica u otros utensilios adecuados para el horno.
•
Cuando use vidrio refractario, reduzca la temperatura en 25 °F (15 °C) con
respecto a la temperatura recomendada.
•
Use bandejas de horneado con o sin lados o moldes de charlotas.
•
Las cazuelas de metal oscuro o con recubrimiento antiadherente cuecen más
rápidamente y los alimentos se doran más. Los moldes aislantes alargarán
ligeramente el tiempo de cocción para la mayoría de los alimentos.
•
No utilice hojas de aluminio o bandejas de aluminio desechables para cubrir
cualquier parte del horno. Las hojas son un excelente aislante de calor y el calor
quedará atrapado por debajo. Esto alterará el rendimiento de la cocción y podrá
dañar el acabado del horno.
•
Evite el uso de la puerta se abrió como un estante para colocar sartenes.
•
Consulte Solución de problemas para obtener sugerencias para la resolución de
hornear y asar problemas.
TABLA DE COCCIÓN POR HORNEADO
ALIMENTO
POSICIÓN DE
REJILLA
TEMP. °F (°C)
(HORNO
PRECALENTADO)
TIEMPO (MIN)
Pastel
Glaseado
Pastel
Bizcochos
2
1
1
350 (175)
350 (175)
350 (175)
19-22
40-45
35-39
Pay
2 cortezas, fresco 9”
2 cortezas. fruta
congel. 9”
2
2
375-400 (190-205)
375 (190)
45-50
68-78
Galletas
Azúcar
Colócate chip
Brownies
2
2
2
350-375 (175-190)
350-375 (175-190)
350 (175)
8-10
8-13
29-36
Panes
Pan de levadura, 9x5
Rollos de levadura
Bollo
Panecillo Molletes
2
2
2
2
375 (190)
375-400 (190-205)
375-400 (190-205)
425 (220)
18-22
12-15
7-9
15-19
Pizza
Congelada
Fresca
2
2
400-450 (205-235)
475 (246)
23-26
15-18
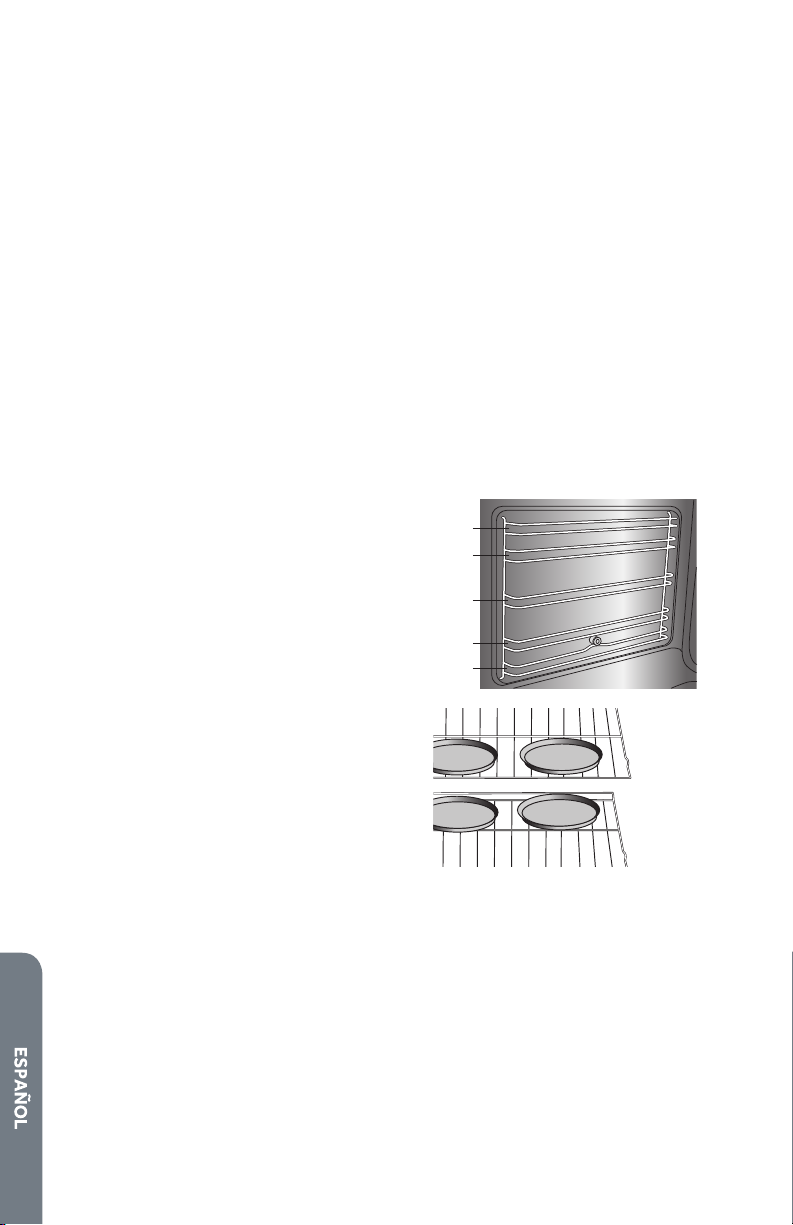
88
CONSEJOS Y TÉNICAS DE HORNEADO POR CONVECCIÓN
Reduzca las temperaturas del horneado de las recetas en 25 °F (15 °C).
•
Para obtener mejores resultados, se recomienda poner los alimentos en
bandejas planas, no tapadas para beneciarse de la circulación del aire forzado.
Utilice moldes de aluminio brillante para obtener los mejores resultados si no se
especica nada más.
•
Se puede utilice vidrio refractario o cerámica. Reduzca la temperatura en otros
25 °F (15 °C) cuando utiliza platos de vidrio refractario, con una reducción total de
50 °F (30 °C).
•
Se pueden usar moldes de metales oscuros. Tenga presente que los alimentos
se dorarán más rápidamente si usa recipientes de metal oscuro.
•
El número de rejillas utilizadas lo determina la altura del alimento que tienen que
cocinar.
•
La mayoría de los elementos horneados, se cocinan fantásticamente bien
por convección. No intente convertir recetas como natillas, quiches, tartas
de calabaza ni pasteles de queso, donde el proceso de calentamiento por
convección no es el adecuado. Con estos alimentos, utilice el modo de horneado
normal.
•
La cocción con múltiples parrillas para
comidas al horno se hace en las posiciones
de parrilla 1, 2, 3, 4 y 5. Las cinco
posiciones de parrilla se pueden utilizar
para galletas, panecillos y aperitivos.
- Con 2 rejillas de horneado. Use las
posiciones 1 y 3.
- Al hornear un pastel con cuatro capas
al mismo tiempo, alterne las cacerolas
de modo que una cacerola no esté
directamente encima de la otra. Para
obtener mejores resultados, coloque
los pasteles en la parte delantera de la
parrilla superior y en la parte posterior
de la parrilla inferior (Vea el gráco a la
derecha). Deje 1” a 1 ½” (2,5 cm a 3 cm)
de espacio alrededor de las cacerolas.
•
Transformar su propia receta puede ser
fácil. Elija una receta que funcione bien en
el modo de convección.
1
2
3
4
5
Rejilla
1
Rejilla 3
•
Reduzca la temperatura y el tiempo de cocción si fuera necesario. Puede ser
necesario algún juicio y cometer algún error para obtener un resultado perfecto.
Conserve los resultados de su técnica para la próxima vez que quiera preparar la
misma receta utilizando el sistema por convección.
•
Consulte Solución de problemas para obtener sugerencias para la resolución de
hornear y asar problemas.
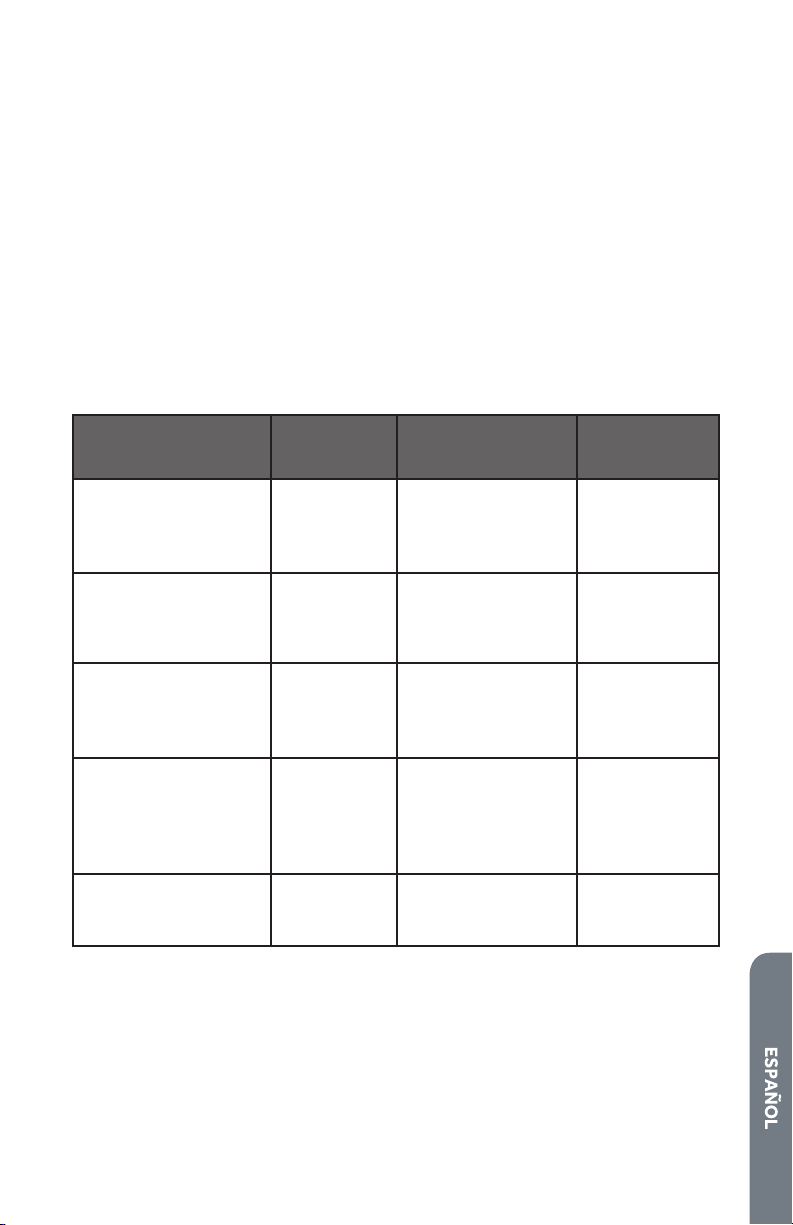
89
ALIMENTOS RECOMENDADOS PARA MODO DE HORNEADO
PORCONVECCIÓN:
Galletitas saladas y hojaldres, tortas para el café
Pasteles (de 2 a 4 rejillas) Masa de levadura
Bollos de crema
Popovers
Guisos y entrantes
Comidas preparadas al horno (posición de las rejillas 1, 2, 3)
Alimentos que se elevan con aire (Sués, Merengues, Postres recubiertos con
merengues, Bizcocho Angel, Bizcochos)
TABLA DE HORNEADO POR CONVECCIÓN
Reduzca la temperatura de la receta estándar en 25° F (15° C) para el horneado por
convección. La temperaturas se han reducido en esta tabla.
CAVIDAD DE CONVECCIÓN
ALIMENTO
POSICIÓN DE
REJILLA
TEMP. °F (°C)
(HORNO
PRECALENTADO)
TIEMPO (Min.)
Pastel
Glaseado
Pastel
Bizcochos
2
1
1
325 (160)
325 (160)
325 (160)
20-22
43-50
43-47
Pay
2 cortezas, fresco 9”
2 cortezas. fruta
congel. 9”
2
2
350-400 (175-205)
350 (175)
40-52
68-78
Galletas
Azúcar
Colócate chip
Brownies
2
2
2
325-350 (160-175)
325-350 (160-175)
325 (160)
9-12
8-13
29-36
Panes
Pan de levadura, 9x5
Rollos de levadura
Bollo
Panecillo Molletes
2
2
2
2
350 (175)
350-375 (175-190)
375 (190)
400 (205)
18-22
12-15
8-10
17-21
Pizza
Congelada
Fresca
2
2
375-425 (190-220)
450 (232)
23-26
15-18
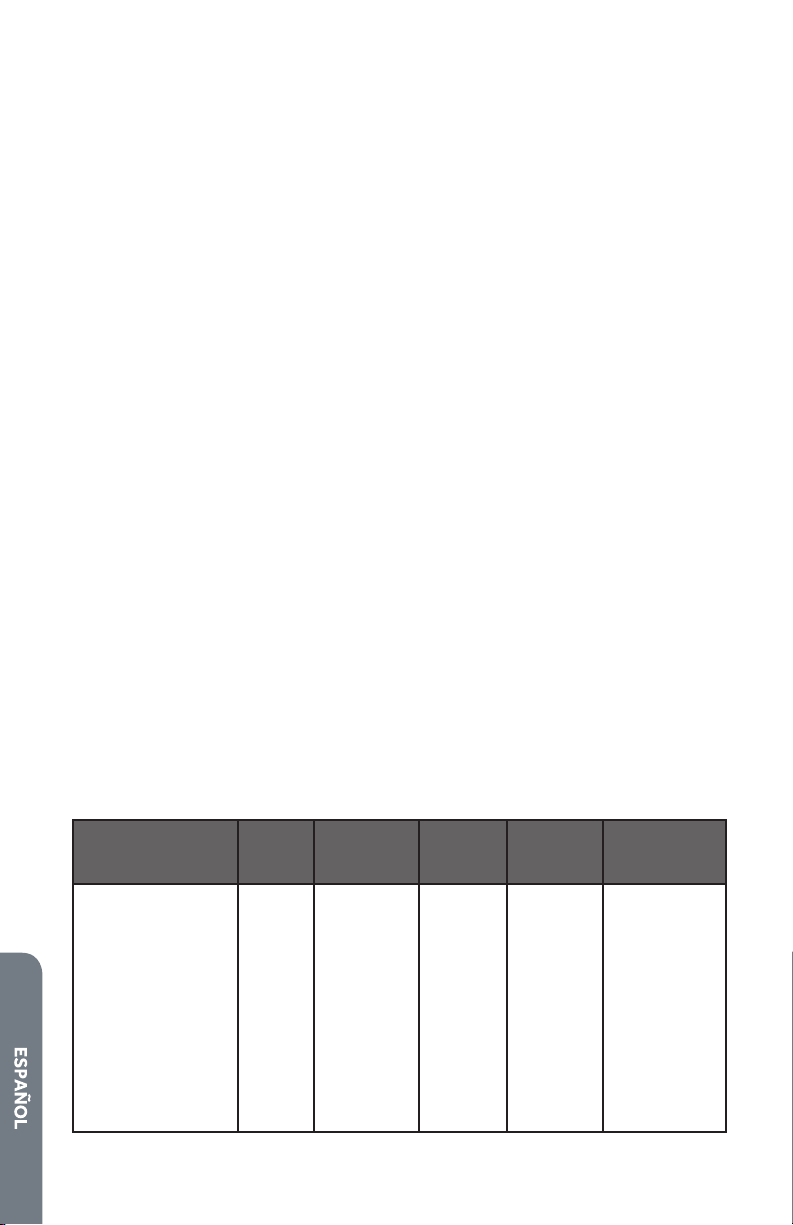
90
CONSEJOS Y TÉCNICAS DEL ASADO POR CONVECCIÓN
•
No precalentar para el asado por convección.
•
Cocine con grill en una bandeja baja y sin tapar.
•
Cuando se gratinan pollos y pavos enteros, suba las alas hacia atrás y ate fuerte
las patas con cuerda de cocina.
•
Use el recipiente para asar a la parrilla de 2 piezas para gratinar descubierto.
•
Use una sonda o un termómetro de carne para determinar la cocción del interior
cuando en la temperatura “END” (véase la tabla de cocción).
•
Controle dos veces el interior de la temperatura de la carne/de la ave
introduciendo un termómetro de carne.
•
También podría ser necesario cubrir las grandes aves con papel de aluminio (y la
fuente de asar) durante una porción del tiempo de asado para evitar que se dore
excesivamente.
•
La temperatura de seguridad mínima para el relleno de las aves es de 165 °F
(75°C).
•
Después de extraer el artículo del horno, cubrir sin demasiada fuerza con papel
de aluminio durante 10 o 15 minutos antes de cortar en el caso de que fuera
necesario aumentar la temperatura nal de los alimentos de 5° a 10 °F (3° to
6°C).
CONSEJOS PARA RECETAS RÁPIDAS Y FÁCILES
Convierta el HORNEADO estándar en GRILL POR CONVECCIÓN:
•
No hay que reucir la temperatura.
•
Los asados, los grandes cortes de carne y de ave en general requieren un 10-
20% menos de tiempo de cocción. Controle si los alimentos están cocidos
antes.
•
Los guisos y los asados a la cazuela se hornean cubiertos en el modo de GRILL
POR CONVECCIÓN y cuecen aproximadamente en el mismo tiempo.
TABLA DE ASADO POR CONVECCIÓN
CAVIDAD DE CONVECCIÓN
CARNES
PESO
lb (kg)
TEMP.
HORNO
°F ( °C)
POSICIÓN
DE
REJILLA
TIEMPO
(min per lb)
TEMPERATURA
INTERNA °F
(°C)
Carne
Costillas 4-6 325 (160) 2 16-20
18-22
145 (63)
vuelta y
vuelta
160 (71)
medio
Ojo de bife
(sin hueso)
4-6 325 (160) 2 16-20
18-22
145 (63)
vuelta y
vuelta
160 (71)
medio
91
CARNES
PESO
lb (kg)
TEMP.
HORNO
°F ( °C)
POSICIÓN
DE
REJILLA
TIEMPO
(min per lb)
TEMPERATURA
INTERNA °F
(°C)
Churrasco, lomo
(sin hueso)
3-6 325 (160) 2 16-20
18-22
145 (63)
vuelta y
vuelta
160 (71)
medio
Lomo de ternera
asado
2-3 400 (205) 2 15-20 145 (63)
vuelta y
vuelta
Puerco
Lomo asado
(con o sin hueso)
5-8 350 (175) 2 16-20 160 (71)
medio
Hombro 3-6 350 (175) 2 20-25 160 (71)
medio
Aves
Pollo Entero sin
relleno
3-4 375 (190) 2 18-21 180 (82)
Pavo sin ralleno 12-15 325 (160) 1 10-14 180 (82)
Pavo sin ralleno 16-20 325 (160) 1 9-11 180 (82)
Pavo sin ralleno 21-25 325 (160) 1 6-10 180 (82)
Pechuga Pavo 3-8 325 (160) 1 15-20 170 (77)
Codorniz 1-1 ½ 350 (175) 2 45-75
total
180 (82)
Cordero
Media Pierna 3-4 325 (160) 2 22-27
28-33
160 (71)
medio
170 (77) bien
cocido
Toda la Pierna 6-8 325 (160) 1 22-27
28-33
160 (71)
medio
170 (77) bien
cocido
92
CONSEJOS Y TÉCNICAS DEL ASADO POR CONVECCIÓN
•
Coloque la rejilla en la posición requerida antes de encender el horno.
•
Use el modo de Asado por Convección con la puerta del horno cerrada.
•
No precaliente el horno.
•
Use un recipiente de 2 piezas.
•
Voltee la carne una vez a mitad del tiempo de cocción recomendado (vea la tabla
de asado por convección).
•
Los cortes más gruesos y los pedazos de carne, pescado y aves con forma
irregular se pueden cocinar mejor a temperaturas más bajas para asar a la
parrilla.
TABLA DE ASADO POR CONVECCIÓN
CAVIDAD DE CONVECCIÓN
ALIMIENTO Y GROSOR
POSICIÓN
DE
REJILLA
CONFIG-
URACIÓN
DE ASADO
POSICIÓN
DE
ASADO
°F ( °C)
TIEMPO
LADO 1
(MIN.)*
TIEMPO
LADO 2
(MIN.)*
Carne de res
Filete (1” o más)
Vuelta y Vuelta 4 Bajo 145 (65) 9-12 8-10
Medio 4 Bajo 160 (71) 11-13 10-12
Bien Cocido 4 Bajo 170 (77) 18-20 16-17
Hamburguesas (1” o más)
Medio 4 Alto 160 (71) 8-11 5-7
Bien Cocido 4 Alto 170 (77) 11-13 8-10
Aves
Cuartod de Pollo 4 Bajo 180 (82) 16-18 10-13
Pollo en dos mitades 3 Bajo 180 (82) 25-27 15-18
Pechuga de Pollo 4 Bajo 170 (77) 13-15 9-13
Puerco
Chuletas (1¼” o más) 4 Bajo 160 (71) 12-14 11-13
Salchicha - fresca 4 Bajo 160 (71) 4-6 3-5

93
CUIDADO DEL HORNO
LIMPIEZA
IMPORTANTE: Antes de iniciar la limpieza, asegúrese de que todos los controles
estén apagados y que el horno y la supercie de cocción estén fríos. Siempre siga
las instrucciones que vienen en las etiquetas de los productos de limpieza. En primer
lugar, se sugiere el empleo de jabón, agua y una esponja o paño suave, salvo que se
indique lo contrario. No use productos de limpieza abrasivos.
SUPERFICIES EXTERIORES DE ESMALTE DE PORCELANA
Los derrames de alimentos que contienen ácidos, tales como vinagre y tomate,
deben limpiarse apenas esté frío el electrodoméstico. Es posible que estos
derrames dañen el acabado.
Método de limpieza:
Producto para limpiar vidrios, producto de limpieza líquido suave o estropajo no
abrasivo: limpie cuidadosamente alrededor de la placa con el número de modelo y
de serie, ya que al refregar, puede borrar los números.
ACERO INOXIDABLE DE LA PARTE EXTERIOR
NOTA: No utilice estropajos que vienen con jabón, productos de limpieza abrasivos,
crema para pulir la supercie de cocción, estropajos de lana de acero, paños ásperos
o toallas de papel abrasivas. Podrían ocasionar daños, aun si solo se usan una vez o
en forma limitada.
Frote en la dirección de la veta para evitar que se dañe.
Métodos de limpieza:
Detergente líquido o limpiador multiuso: enjuague bien con agua limpia y seque con
un paño suave y sin pelusa.
Limpiador de acero inoxidable
Vinagre para manchas de agua dura
PARTE EXTERIOR DE LA PUERTA DEL HORNO
Método de limpieza:
Producto para limpiar vidrios y toallas de papel o un estropajo de plástico no
abrasivo: aplique el producto para limpiar vidrios en una esponja o paño suave; no lo
haga directamente sobre el panel.
SUPERFICIE DE COCCIÓN DE VIDRIO RADIANTE
El vidrio de cerámica debe limpiarse de forma regular, preferiblemente después de
cada uso, tan pronto como las advertencias de supercie caliente se hayan apagado.
Quite los residuos quemados inmediatamente después de la cocción.
Método de limpieza:
Enjuague con agua y seque con un paño suave y limpio. Aplique un limpiador para
supercie de cocción de vidrio. Utilice un paño húmedo y seque con una toalla de
papel.
NOTA: No use detergentes abrasivos o corrosivos, productos de limpieza, aerosoles
para hornos, quitamanchas o estropajos de metal para fregar.

94
MANCHAS DE CACEROLAS CON BASE DE ALUMINIO
Método de limpieza:
Un paño humedecido en vinagre.
PERILLAS DE CONTROL DE LA SUPERFICIE DE COCCIÓN
•
Jale las perillas en sentido recto para quitarlas del panel de control.
•
Cuando vuelva a colocar las perillas, asegúrese de que estas estén en la posición
OFF (Apagado).
Método de limpieza:
Agua y jabón o lavavajillas:
NOTA: No use productos de limpieza abrasivos, estropajos de lana de acero, paños
ásperos o ciertas toallas de papel. Pueden ocasionar daños.
PANEL DE CONTROL
Método de limpieza:
Producto para limpiar vidrios y un paño suave o esponja: aplique el producto para
limpiar vidrios en un paño suave o esponja, no lo haga directamente sobre el panel.
NOTA: Do not use abrasive cleaners, steel-wool pads, gritty washcloths or some
paper towels. Damage may occur.
CAVIDAD DEL HORNO
Los derrames de alimentos deberán limpiarse cuando el horno se enfríe. A altas
temperaturas, la reacción química de los alimentos con la porcelana puede dar lugar
a manchas, corrosión, picaduras o tenues puntos blancos.
Método de limpieza:
Detergente suave y agua tibia.
NOTA: No use limpiadores para horno.
PARRILLAS DEL HORNO Y PARRILLAS PARA ASAR
Método de limpieza:
Estropajo de lana de acero
CHAROLA PARA ASAR DE DOS PIEZAS
Método de limpieza:
Limpiador abrasivo suave: refriegue con un estropajo húmedo.
Solución de ½ taza (125 mL) de amoníaco en 1 galón (3,75 L) de agua: remoje
durante 20 minutos, y luego refriegue con un estropajo o una esponja de lana de
acero.
Limpiador para horno: siga las instrucciones de la etiqueta del producto. Solo para el
esmalte de porcelana, no apto para cromo ni lavavajillas.
Lavavajillas: Coloque la asadera en el lavavajillas.
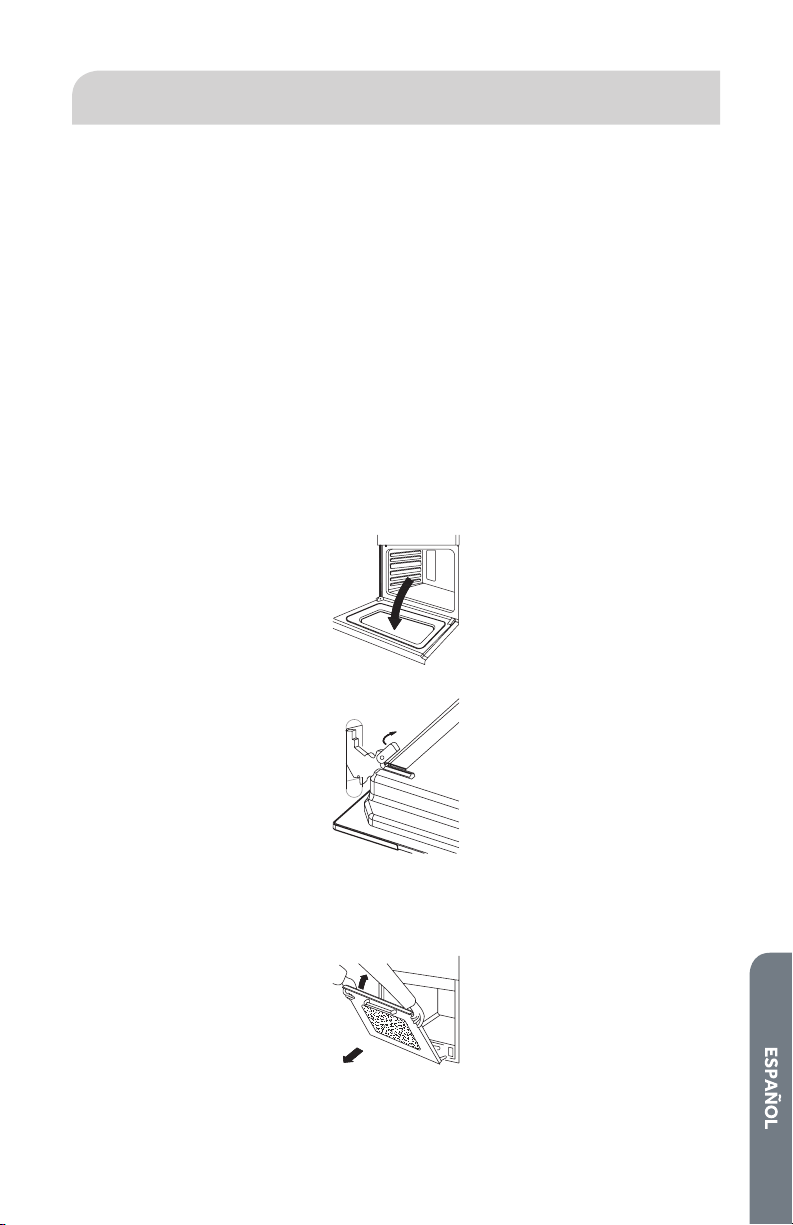
95
CÓMO QUITAR LA PUERTA DEL HORNO
La puerta del horno pesa 30 libras (14 kg). A n de facilitar la instalación y realizar una
limpieza más profunda, es posible quitar algunas puertas de los hornos.
IMPORTANTE:
•
Hay dos estilos de puerta de horno, así que primero identique el estilo de la
puerta de su horno.
•
Asegúrese de que el horno esté frío y de que se haya desconectado el suministro
de energía en el horno antes de quitar la puerta.
•
La puerta del horno es pesada y frágil y el frente de la puerta es de vidrio. Para
evitar la rotura del vidrio de la puerta del horno, utilice ambas manos y tome solo
los lados de la puerta del horno para quitarla.
•
Asegúrese de que ambas palancas estén rmes en su lugar antes de quitar la
puerta.
•
No haga fuerza para abrir o cerrar la puerta.
Estilo 1:
Para quitar la puerta del horno:
1. Abra la puerta completamente.
2. Levante y gire las palancas pequeñas situadas en las dos bisagras.
3. Tome la puerta de los dos lados externos y, luego, ciérrela lentamente, pero no
completamente.
4. Tire la puerta hacia usted, jalándola del receptor de la bisagra ubicado en el
marco.
5. Siga los pasos anteriores en orden inverso para volver a colocar la puerta.
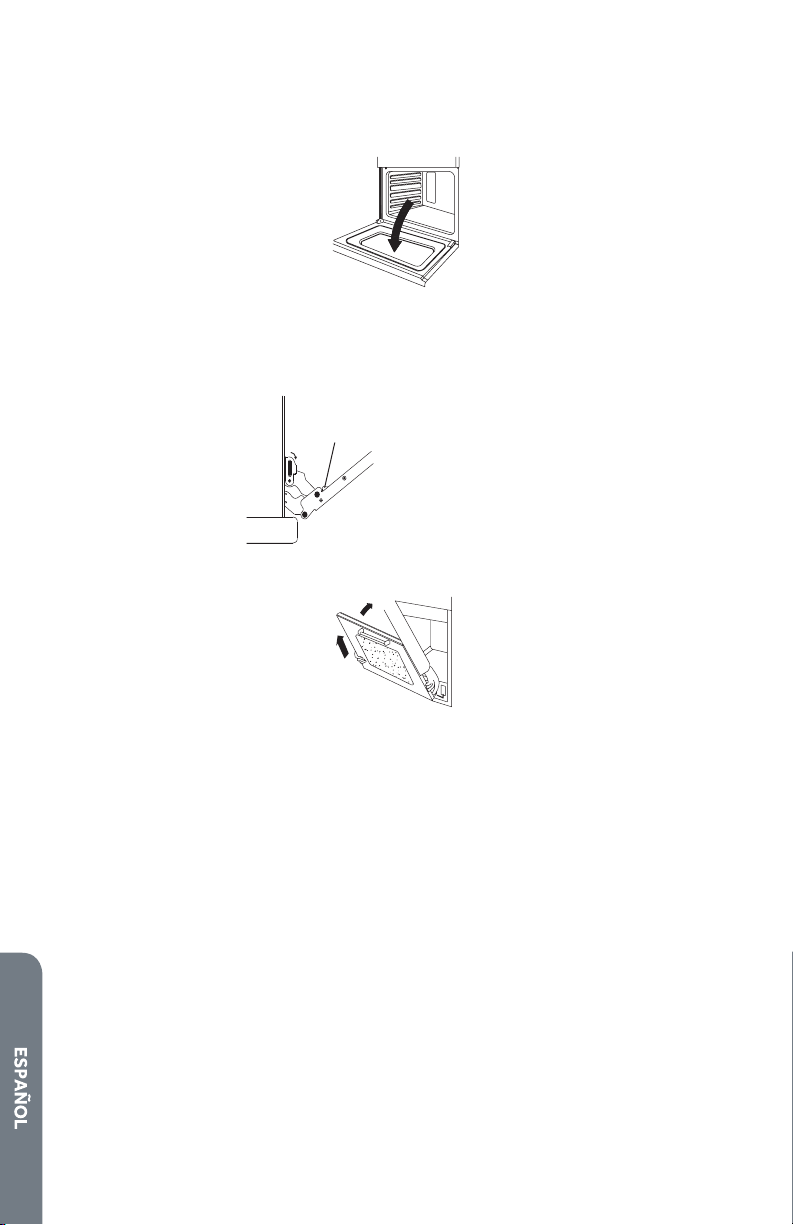
96
Estilo 2:
Para quitar la puerta del horno:
1. Abra la puerta completamente.
2. Empuje hacia abajo y gire las palancas pequeñas situadas en las dos bisagras.
3. Tome la puerta de los dos lados externos y, luego, ciérrela lentamente, pero no
completamente.
4. Destrabe la puerta presionando las abrazaderas.
a
a Abrazaderas
5. Tire la puerta hacia usted, jalándola del receptor de la bisagra ubicado en el
marco.
6. Siga los pasos anteriores en orden inverso para volver a colocar la puerta.
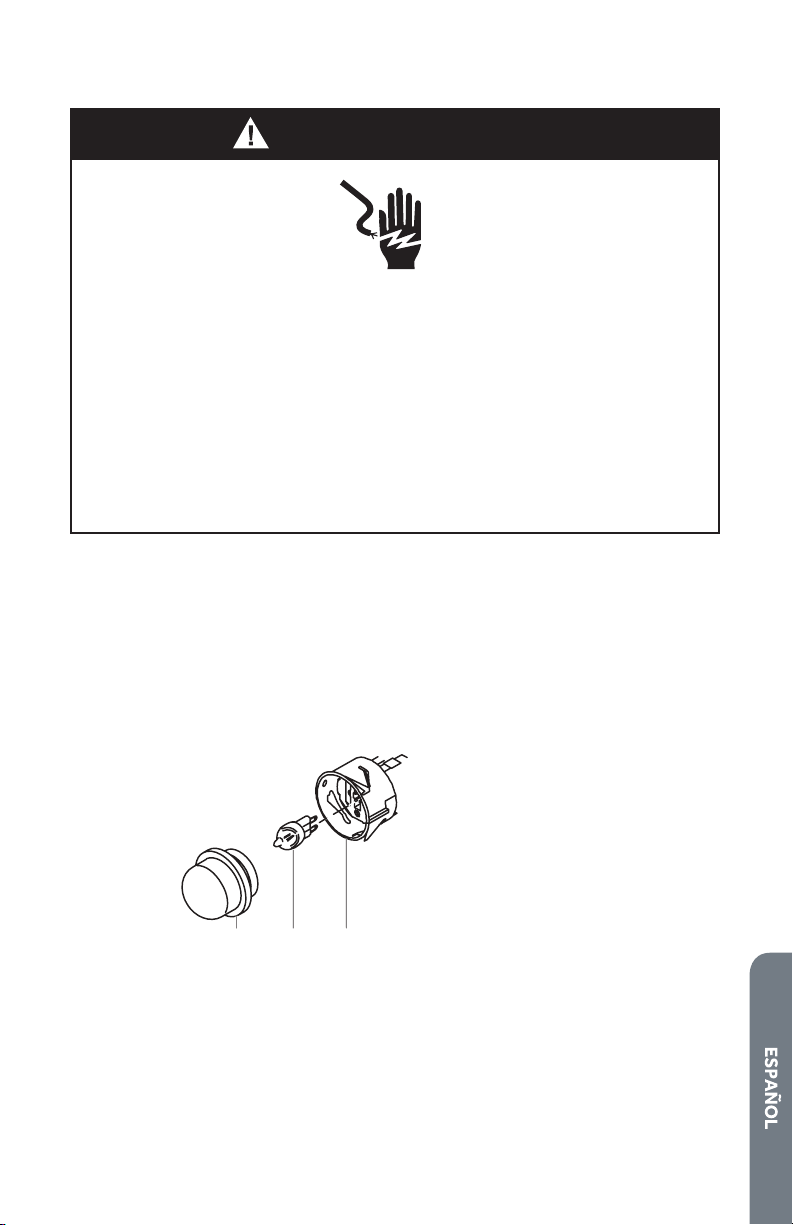
97
CÓMO REEMPLAZAR LA LUZ DEL HORNO
Peligro de choque eléctrico
Asegúrese de que el horno y las lámparas estén frías y la corriente está
apagada antes de remplazar la(s) bombilla(s).
Las lentes tienen que estar montadas cuando se usa el horno. Las
lentes sirven para evitar que se rompan las bombillas.
Las lentes son de vidrio. Manéjelas con cuidado para evitar que se
rompan.
No seguir esta instrucción puede resultar en choques eléctricos,
cortaduras, quemaduras o la muerte.
ADVERTENCIA
IMPORTANTE: El foco en su horno es Tipo: E 14, 220-240 V y 25 W. Debe
reemplazar este foco con uno para electrodomésticos del mismo tipo, voltaje y
vataje.
Para reemplazar el foco:
1. Asegúrese de que el horno esté apagado y frío.
2. Desconecte la electricidad desde el suministro principal de energía (caja de
fusibles o el cortacircuitos).
3. Desatornille el lente y quítelo.
abc
a Lente
b Foco
c Portalámparas
4. Jale el foco quemado del portalámparas y, luego, reemplácelo con uno para
electrodomésticos del mismo tipo, voltaje y vataje.
5. Vuelva a colocar el lente.
6. Conecte la electricidad desde el suministro principal de energía (caja de fusibles
o el cortacircuitos).
98
SOLUCIÓN DE PROBLEMAS
RESOLUCIÓN DE LOS PROBLEMAS DE HORNEADO
Tanto con el Horneado como con el Horneado de convección, los resultados
escasos pueden ocurrir por muchas razones además de por un mal funcionamiento
del horno. Controle la tabla para las causas de los problemas más comunes. Debido
a que el tamaño, la forma y el material de los utensilios de hornear tienen un efecto
directo sobre los resultados del horneado, la mejor solución podría ser remplazar
los viejos utensilios de hornear que se han oscurecido y deformado con el tiempo y
el uso. Revise también la tabla de Horneado de la posición de la rejilla y el tiempo de
hornear.
Problema de horneado Causa
Los alimentos se doran poco
uniformes
•
El horno no está precalentado
•
Papel de aluminio en la rejilla o fondo del
horno
•
Utensilios de hornear son demasiado
grandes
•
Los moldes tienen contacto o tocan la
pared
Alimentos demasiado marrón
en la parte inferior
•
El horno no está precalentado
•
Se usa un molde de vidrio, mate o de metal
oscuro
•
Posición incorrecta de la rejilla
•
Los moldes tienen contacto o tocan la
pared
Los alimentos quedan muy
secos o muy encogidos
•
Temperatura del horno muy alta
•
Tiempo de hornear muy largo
•
Se abrió la puerta del horno
frecuentemente
•
El molde es demasiado grande
Los alimentos se hornean o
asan muy lentamente
•
Temperatura del horno muy baja
•
El horno no está precalentado
•
Se abrió la puerta del horno
frecuentemente
•
Muy sellado con papel de aluminio
•
El molde es demasiado pequeño
Las costras de pays no se doran
en el fondo o quedan muy
empapadas.
•
Tiempo de hornear insuciente
•
Se usan moldes de acero brillosos
•
Posición incorrecta de la rejilla
•
Temperatura del horno muy baja
99
Los pasteles no se doran y
quedan planos, tal vez sin
terminar por adentro
•
Temperatura del horno muy baja
•
Tiempo de hornear incorrecto
•
Se probó el pastel antes de tiempo
•
Se abrió la puerta del horno
frecuentemente
•
El molde es demasiado grande
Los pasteles quedan elevados
en el centro con grietas en la
parte superior
•
Temperatura del horno muy alta
•
Tiempo de hornear muy largo
•
Los moldes tienen contacto o tocan la
pared
•
Posición incorrecta de la rejilla
•
El molde es demasiado pequeño
Los bordes de la costra de pays
quedan muy dorados
•
Temperatura del horno muy alta
•
Los bordes de la costra son muy delgados
SUPERFICIE DE COCCIÓN
PROBLEMA POSIBLE CAUSA SOLUCIÓN
Los elementos
calefactores y los
controles no funcionan.
Hay un fusible fundido
o se disparó el
cortacircuitos.
No hay electricidad en la
supercie de cocción.
Reemplace el fusible
o reposicione el
cortacircuitos. Si el
problema continúa, llame
a un electricista.
Haga que un electricista
revise el suministro
eléctrico.
Los elementos
calefactores no calientan
de modo apropiado.
Se está usando el
utensilio de cocina
inadecuado.
Seleccione los utensilios
de cocina correctos. Vea
la sección “Utensilios de
cocina”.
Si el problema persiste,
llame al servicio técnico.
Los elementos
calefactores alternan el
apagado, incluso cuando
los elementos se llevan a
sus ajustes más altos.
Los limitadores de
temperatura de los
elementos calefactores
cierran temporalmente
los elementos al
excederse la temperatura
máxima permitida.
Esta es una condición de
funcionamiento normal,
especialmente durante
las operaciones de
calentamiento rápido.
El elemento volverá
a funcionar en ciclos
en forma automática
después de que se haya
enfriado lo suciente.
100
PROBLEMA POSIBLE CAUSA SOLUCIÓN
Se puede ver a través de
la supercie de cerámica
de vidrio o parece ser de
color rojo.
Con iluminación directa
o brillante, a veces podrá
ver a través del vidrio e
incluso el armazón por su
calidad transparente. Es
posible que también note
un tinte rojo en estas
condiciones
Estas son propiedades
normales de los paneles
de vidrio de cerámica
negra.
HORNO
PROBLEMA POSIBLE CAUSA SOLUCIÓN
El horno no
calienta
El horno no recibe
suministro eléctrico
Reemplace el fusible o reposicione el
cortacircuitos. Si el problema continúa,
llame a un electricista.
El control del horno
no está encendido
Asegúrese de haber seleccionado la
temperatura del horno.
El horno no
cocina de forma
pareja
No está utilizando
el utensilio para
hornear o la posición
de las parrillas del
horno correctos
Consulte los cuadros de cocción para
conocer la posición recomendada
de las parrillas. Siempre reduzca la
temperatura de la receta en 25 °F
(15 °C) cuando hornee en el modo
Convection Bake (Hornear por
convección).
La pantalla
del horno
permanece
apagada.
Corte de energía Apague la electricidad desde el
suministro principal de energía
(caja de fusibles o el cortacircuitos).
Vuelva a encender el cortacircuitos.
Si el inconveniente continúa, llame al
servicio técnico.
El ventilador de
enfriamiento
continúa
encendido
después de
que se apaga el
horno
Los componentes
electrónicos no
se han enfriado lo
suciente
El ventilador se apagará
automáticamente cuando los
componentes electrónicos se hayan
enfriado lo suciente.
La luz del horno
no funciona
correctamente
El foco está ojo o
quemado.
Vuelva a insertar el foco o reemplácelo.
Si toca el foco con los dedos, puede
hacer que se queme.
La luz del
horno queda
encendida
La puerta no se cierra
completamente
Verique si la puerta del horno está
obstruida. Verique si la bisagra está
doblada o el interruptor de la puerta
está roto.
No puede quitar
la cubierta del
lente
Acumulación de
suciedad alrededor
de la cubierta del
lente.
Limpie el área de la cubierta del lente
con una toalla seca y limpia antes de
intentar quitarla.

101
El reloj y el
temporizador
no funcionan
correctamente
El horno no recibe
suministro eléctrico
Verique el cortacircuitos o la caja de
fusibles de su hogar. Asegúrese de
que el horno reciba corriente eléctrica
adecuada.
Humedad
excesiva
Cuando utilice el modo Bake (Hornear),
primero precaliente el horno. Los
modos Convection Bake (Hornear por
convección) y Convection Roast (Asar
por convección) eliminarán la humedad
en el horno.
Desporti-
lladuras en la
porcelana
El interior de
porcelana se golpea
con las parrillas del
horno
Al quitar y volver a colocar las parrillas
del horno, siempre inclínelas hacia
arriba y no las fuerce para evitar
desportilladuras en la porcelana.
SI NECESITA MÁS AYUDA, VISITE HAIERAMERICA.COM O
COMUNÍQUESE CON LA LÍNEA DE AYUDA AL CONSUMIDOR
LLAMANDO AL 1-877-337-3639.

102
GARANTÍA LIMITADA
SERVICIO EN EL HOGAR
GARANTÍA COMPLETA POR DOS
AÑOS
Durante 24 meses a partir de la fecha de
compra original en la tienda, Haier reparará o
reemplazará cualquier pieza del aparato sin
costo, incluyendo la mano de obra, si la misma
falla debido a defectos en los materiales o en
la mano de obra.
Haier puede reemplazar o reparar, a su sola
discreción, cualquier pieza, subsistema,
incluso el producto entero.
El producto debe ser accesible, sin
inconvenientes, e instalarse de forma
adecuada para recibir el servicio técnico de
reparación por parte de la garantía.
GARANTÍA LIMITADA
NOTA: Esta garantía comienza en la fecha
de compra de este producto, y el recibo
original deberá presentarse al representante
autorizado de servicio antes de hacerse las
reparaciones bajo la garantía.
Excepciones: Garantía uso comercial
90 días en la mano de obra a partir de la
fecha de compra original
90 días en las piezas a partir de la fecha de
compra original
No es aplicable ninguna otra garantía.
PARA OBTENER SERVICIO BAJO
LA GARANTÍA
Póngase en contacto con el centro de
servicio autorizado más cercano a su
localidad. Todo servicio deberá ser realizado
por un centro de servicio autorizado por
Haier. Para obtener el nombre y el número
de teléfono del centro de servicio autorizado
más cercano, llame al 1-877-337-3639.
Antes de llamar, tenga a mano la siguiente
información:
Número de modelo y de serie del aparato.
El nombre y la dirección del distribuidor en
donde compró la unidad y la fecha de compra.
Una descripción clara del problema.
Un comprobante de compra (recibo de
compra).
Esta garantía cubre servicios para
electrodomésticos dentro de los Estados
Unidos continental y Canadá y donde esté
disponible en Alaska, Hawaii y Puerto Rico.
Lo que no está cubierto bajo esta garantía:
Reemplazo o reparación de fusibles
domésticos, cortacircuitos, cableado o
plomería.
Un producto cuyo número de serie original
haya sido removido o alterado.
Cualquier cargo por servicio que no haya sido
identicado especícamente como servicio
normal, como puede ser el área o las horas de
servicio.
Reemplazo de los focos.
Daños a la ropa.
Daños ocurridos durante el transporte.
Daños ocasionados por la instalación o el
mantenimiento inadecuados.
Daños por el uso incorrecto, abuso,
accidente, incendio, inundación o fenómenos
de la naturaleza.
Daños debidos al servicio efectuado por
un distribuidor o centro de servicio que sea
diferente del autorizado por Haier.
Daños ocasionados por la corriente, el voltaje
o el suministro eléctrico incorrectos.
Daños que resulten de cualquier modicación
hecha en el producto, alteración o ajustes no
autorizados por Haier.
Ajuste de los controles manejados por el
cliente según han sido identicados en el
manual del propietario.
Mangueras, perillas, bandejas de pelusa y
todos los otros aditamentos, accesorios y
piezas desechables.
Cargos por mano de obra, transporte para
el servicio y envío para la remoción y el
reemplazo de las piezas defectuosas que se
efectúen después del período inicial de 24
meses.
Daños ocasionados por un uso diferente al
doméstico normal.
Cualquier gasto de transporte y de envío.
ESTA GARANTÍA LIMITADA REEMPLAZA
TODAS LAS OTRAS GARANTÍAS,
EXPRESAS O IMPLÍCITAS QUE INCLUYAN,
ENTRE OTRAS, LAS GARANTÍAS DE
COMERCIABILIDAD O DE CAPACIDAD
PARA UN PROPÓSITO EN PARTICULAR
El recurso provisto en esta garantía es
exclusivo y está otorgado en lugar de
cualquier otro recurso.
Esta garantía no cubre daños incidentales o
consecuentes, de modo que las limitaciones
indicadas anteriormente pueden no aplicarse
en su caso. Algunos estados no permiten
las limitaciones acerca de cuánto tiempo
dura una garantía implícita, de modo que
las limitaciones arriba indicadas quizás no le
correspondan.
Esta garantía le otorga derechos legales
especícos, y es posible que usted tenga
otros derechos, los cuales varían de un
estado a otro.
Haier America
Wayne, NJ 07470

103


IMPORTANT
Do Not Return This Product To The Store
If you have a problem with this product, please contact the
“Haier Customer Satisfaction Center” at
1-877-337-3639.
DATED PROOF OF PURCHASE, MODEL #, AND SERIAL #
REQUIRED FOR WARRANTY SERVICE
IMPORTANT
Ne pas Réexpédier ce Produit au Magasin
Pour tout problème concernant ce produit, veuillez contacter
le service des consommateurs “Haier Customer Satisfaction Center” au
1-877-337-3639.
PREUVE D'ACHAT DÁTÉE, NUMÉRO DE MODÈLE ET LE NUMÉRO DE SÉRIE
REQUIS POUR LE SERVICE DE GARANTIE
IMPORTANTE
No regrese este producto a la tienda
Si tiene algún problema con este producto, por favor contacte el
“Centro de Servicio al Consumidor de Haier” al
1-877-337-3639 (Válido solo en E.U.A).
NECESITA UNA PRUEBA DE COMPRA FECHADA, NÚMERO DE MODELO
Y DE SERIE PARA EL SERVICIO DE LA GARANTÍA
Made in China
Fabriqué en Chine
Hecho en China
Haier America
Wayne, NJ 07470
HCR2250AES,
HCR2250ACS
Issued: March 2016 Printed in China Part # 0570000767 REV B