
OWNER'S
MANUAL
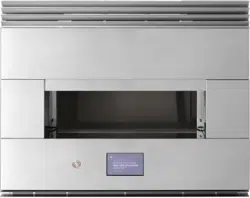
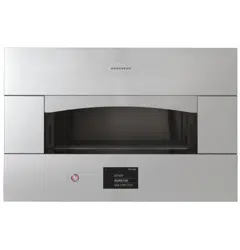
Indoor Hearth Oven
MONOGRAM.COM
ENGLISH / ESPAÑOL

MODEL INFORMATION
WRITE DOWN THE MODEL AND SERIAL NUMBERS
You’ll see them on a label on the left hand side of the
bottom panel, below the power button.
Use these numbers in any correspondence or service calls
concerning your appliance.
Please write these numbers here:
Model Number
Serial Number
MODEL NUMBERS
ZEP30FLSS, ZEP30SKSS
TABLE OF CONTENTS
MODEL INFORMATION .....................................................................................2
CONSUMER SUPPORT .....................................................................................3
SAFETY INFORMATION ....................................................................................4
OVEN SETUP .............................................................................................6
WIFI CONNECT ...........................................................................................7
COOKING INSTRUCTIONS ..................................................................................8
Before You Cook .......................................................................................8
While You are Cooking ...................................................................................8
After Cooking ..........................................................................................8
Pizza Cooking Procedure .................................................................................9
Pizza Baking Tips .......................................................................................9
Preparing to Cook Foods Other than Pizza ..................................................................10
Cooking Procedures for Foods Other than Pizza. . . . . . . . . . . . . . . . . . . . . . . . . . . . . . . . . . . . . . . . . . . . . . . . . . . . . . . . . . . . . .11
Creating a Custom Profile or Modifying Existing Profile ........................................................12
Settings ..............................................................................................13
Oven Air Vents ........................................................................................13
Cookware ............................................................................................13
CARE AND CLEANING ....................................................................................14
Cleaning Outside ......................................................................................14
Cleaning Inside ........................................................................................14
TROUBLESHOOTING .....................................................................................18
LIMITED WARRANTY .....................................................................................19
2 49-80785 Rev. 2

CONSUMER SUPPORT
MONOGRAM WEBSITE
Have a question or need assistance with your appliance? Try the Monogram website 24 hours a day, any day of the year! You can
also shop for more great Monogram products and take advantage of all our on-line support services designed for your convenience. In
the US: monogram.com.
REGISTER YOUR APPLIANCE
Register your new appliance on-line at your convenience! Timely product registration will allow for enhanced communication and
prompt service under the terms of your warranty, should the need arise. You may also mail in the pre-printed registration card included
in the packing material. In the US: monogram.com/register.
SCHEDULE SERVICE
Expert Monogram repair service is only one step away from your door.
To request service in the US, visit our website at monogram.com/contact or call 800.444.1845.
REMOTE CONNECTIVITY
For assistance with wireless network connectivity (for models with remote enable),
visit our website at monogram.com/connect or call 800.444.1845.
PARTS AND ACCESSORIES
Individuals qualified to service their own appliances can have parts or accessories sent directly to their homes
(VISA, MasterCard and Discover cards are accepted). Order on-line today 24 hours every day.
In the US: monogram.com/use-and-care/parts or call 800.444.1845.
Instructions contained in this manual cover procedures to be performed by any user. Other servicing generally should be
referred to qualified service personnel. Caution must be exercised, since improper servicing may cause unsafe operation.
CONTACT US
If you are not satisfied with the service you receive from Monogram, contact us on our website with all the details including your phone
number, or write to:
In the US: General Manager, Customer Relations | Monogram Appliances, Appliance Park | Louisville, KY 40225
monogram.com/contact or call 800.444.1845.
49-80785 Rev. 2 3
WARNING
Read all safety instructions before using the product. Failure to follow these instructions may result
in fire, electrical shock, serious injury or death.
Use this appliance for its intended purpose as described in this owner’s manual.
Be sure your appliance is properly installed and grounded by a qualified installer in accordance with the provided
installation instructions.
WARNING
Follow these instructions to
prevent risk of fire.
Ŷ '2127OHDYHRYHQXQDWWHQGHGGXULQJXVH
Ŷ '2127DGGRLOWRWKHSL]]DVWRQHEHIRUHXVHZKLFK
can ignite. DO NOT attempt to fry or cook foods in oil.
Ŷ '2127OHWFRRNLQJJUHDVHDFFXPXODWHLQRUQHDU
oven. Before use, remove grease and food soils from
the oven.
Ŷ '2127OHDYHSDSHUSURGXFWVRURWKHUFRPEXVWLEOH
materials in or near oven.
Ŷ ,ILWHPVLQVLGHWKHRYHQFDYLW\LJQLWHOHDYHWKH
materials in the oven and turn the oven off. DO NOT
disconnect the power cord. DO NOT shut off power at
the fuse or circuit breaker panel.
Ŷ $ILUHPD\RFFXULIWKHRYHQLVFRYHUHGRUFRQWDFWLQJ
flammable materials including pot holders, linens,
wall coverings, curtains, drapes and gasoline or other
flammable vapors and liquids.
Ŷ 1HYHUZHDUORRVHILWWLQJRUKDQJLQJJDUPHQWVZKLOH
using the appliance. These garments may ignite if
they contact hot surfaces.
Ŷ 7RSUHYHQWDULVNRIVHULRXVEXUQDQGSURSHUW\
damage, DO NOT use water on grease fires. Never
pick up a flaming pan. DO NOT attempt to remove
flaming foods from the oven.
Ŷ '2127DWWHPSWWRH[WLQJXLVKDILUHLQWKHRYHQ7KH
flame containment door will activate to extinguish any
fire. DO NOT touch the flame containment door or any
oven surfaces following a fire. These surfaces can be
very hot. Follow all instructions on the display panel.
Ŷ '2127UHDFKLQWRWKHRYHQXQOHVVZHDULQJKHDW
resistant oven gloves or mitts.
Ŷ 8VHRQO\VXSSOLHGSL]]DSHHOWRUHPRYHSL]]DIURPWKH
oven cavity.
Ŷ 1HYHUXVH\RXUDSSOLDQFHIRUZDUPLQJRUKHDWLQJWKH
room.
Ŷ '2127WRXFKWKHKHDWLQJHOHPHQWVRUWKHLQWHULRU
surface of the oven. These surfaces may be hot
enough to burn even though they are dark in color.
During and after use, DO NOT touch or let clothing or
other flammable materials contact any interior area of
the oven; allow sufficient time for cooling first.
Ŷ '2127KHDWXQRSHQHGIRRGFRQWDLQHUV3UHVVXUH
could build up and the container could burst, causing
injury.
Ŷ '2127XVHDQ\W\SHRIIRLORUOLQHUWRFRYHUWKHRYHQ
bottom or anywhere in the oven. Oven liners can trap
heat or melt, resulting in damage to the product and
risk of shock, smoke or fire.
Ŷ '2127XVHRYHQFOHDQHUV1RFRPPHUFLDORYHQ
cleaner or oven liner protective coating of any kind
should be used in or around any part of the oven.
Ŷ %HVXUHDOOFRQWUROVDUHWXUQHGRIIDQGWKHDSSOLDQFH
is cool before using any type of aerosol cleaner
or cooking spray on or around the appliance. The
chemical that produces the spraying action could, in
the presence of heat, ignite or cause metal parts to
corrode.
Ŷ .HHSWKHRYHQYHQWXQREVWUXFWHG'2127SODFH
items on top of the oven.
Ŷ 7KLVDSSOLDQFHLVQRWIRUXVHE\FKLOGUHQFKLOGUHQ
should not be left alone or unattended in an area
where an appliance is in use. They should never
be allowed to climb, sit or stand on any part of the
appliance.
Ŷ '2127EORFNRYHQPDLQRSHQLQJGXULQJZDUPXSRU
while cooking.
IMPORTANT SAFETY INFORMATION
READ ALL INSTRUCTIONS BEFORE USING THE APPLIANCE
READ AND SAVE THESE INSTRUCTIONS
4 49-80785 Rev. 2

Ŷ
CAUTION
Do not store items of interest to
children in cabinets above the oven - children climbing
on the oven to reach items could be seriously injured.
Ŷ 'RQRWDWWHPSWWRUHSDLURUUHSODFHDQ\SDUWRI\RXU
oven. All servicing must be performed by a qualified
technician.
Ŷ %HIRUHSHUIRUPLQJDQ\VHUYLFHGLVFRQQHFWWKHSRZHU
supply at the household distribution panel by removing
the fuse or switching off the circuit breaker.
IMPORTANT SAFETY INFORMATION
READ ALL INSTRUCTIONS BEFORE USING THE APPLIANCE
READ AND SAVE THESE INSTRUCTIONS
49-80785 Rev. 2 5

Connect to Wi-Fi (recommended)
To keep your Monogram Indoor Hearth Oven up to date with the latest cooking options and diagnostics information,
connect your local Wi-Fi using the following procedure:
1. Download the Monogram Kitchen App from the App
Store on your mobile device. If you don’t already have
one, create a new account.
2. Turn the oven ON by pressing the Power Switch.
3. Enter settings by touching the gear icon in the upper
left corner of the home screen.
4. Scroll to select Preferences.
5. Enable WiFi by touching the slider.
6. Finish by touching the Done pad.
7. Open the Monogram Kitchen App and select “Add new
appliance”. Follow the in-app instructions to complete
the setup process.
NOTE: Wi-Fi functionality is used only to update menus
and provide diagnostic information. It does not enable
remote operation of the oven.
Touch Screen
Display
Power
Switch
OVEN SETUP
6 49-80785 Rev. 2

Monogram WiFi Connect:
Monogram WiFi Connect Enabled
Your hearth oven is Monogram WiFi Connect Enabled. A WiFi communication card is built into the product allowing it to
communicate with your Smart Phone for remote monitoring and notifications. Please visit www.monogram.com/connect
to learn more about connected appliance features, and to learn what connected appliance Apps will work with your Smart
Phone.
WiFi Connectivity: For assistance with the appliance or the network connectivity (for models that are WiFi enabled),
please call 800.220.6899.
REGULATORY INFORMATION
FCC/IC Compliance Statement:
This device complies with Part 15 of the FCC Rules. Operation is subject to the following two conditions:
1. This device may not cause harmful interference.
2. This device must accept any interference received, including interference that may cause undesired operation.
This equipment has been tested and found to comply with the limits for a Class B digital device, pursuant to Part 15 of
the FCC Rules. These limits are designed to provide reasonable protection against harmful interference in a residential
installation. This equipment generates uses and can radiate radio frequency energy and, if not installed and used
in accordance with the instructions, may cause harmful interference to radio communications. However, there is no
guarantee that interference will not occur in a particular installation. If this equipment does cause harmful interference to
radio or television reception, which can be determined by turning the equipment off and on, the user is encouraged to try
to correct the interference by one or more of the following measures:
Ŷ Reorient or relocate the receiving antenna.
Ŷ Increase the separation between the equipment and receiver.
Ŷ Connect the equipment into an outlet on a circuit different from that to which the receiver is connected.
Ŷ Consult the dealer or an experienced radio/television technician for help.
Labeling: Changes or modifications to this unit not expressly approved by the manufacturer could void the user’s
authority to operate the equipment.
WiFi CONNECT
49-80785 Rev. 2 7
BEFORE YOU COOK
Before you begin cooking with the Monogram Indoor
Hearth Oven:
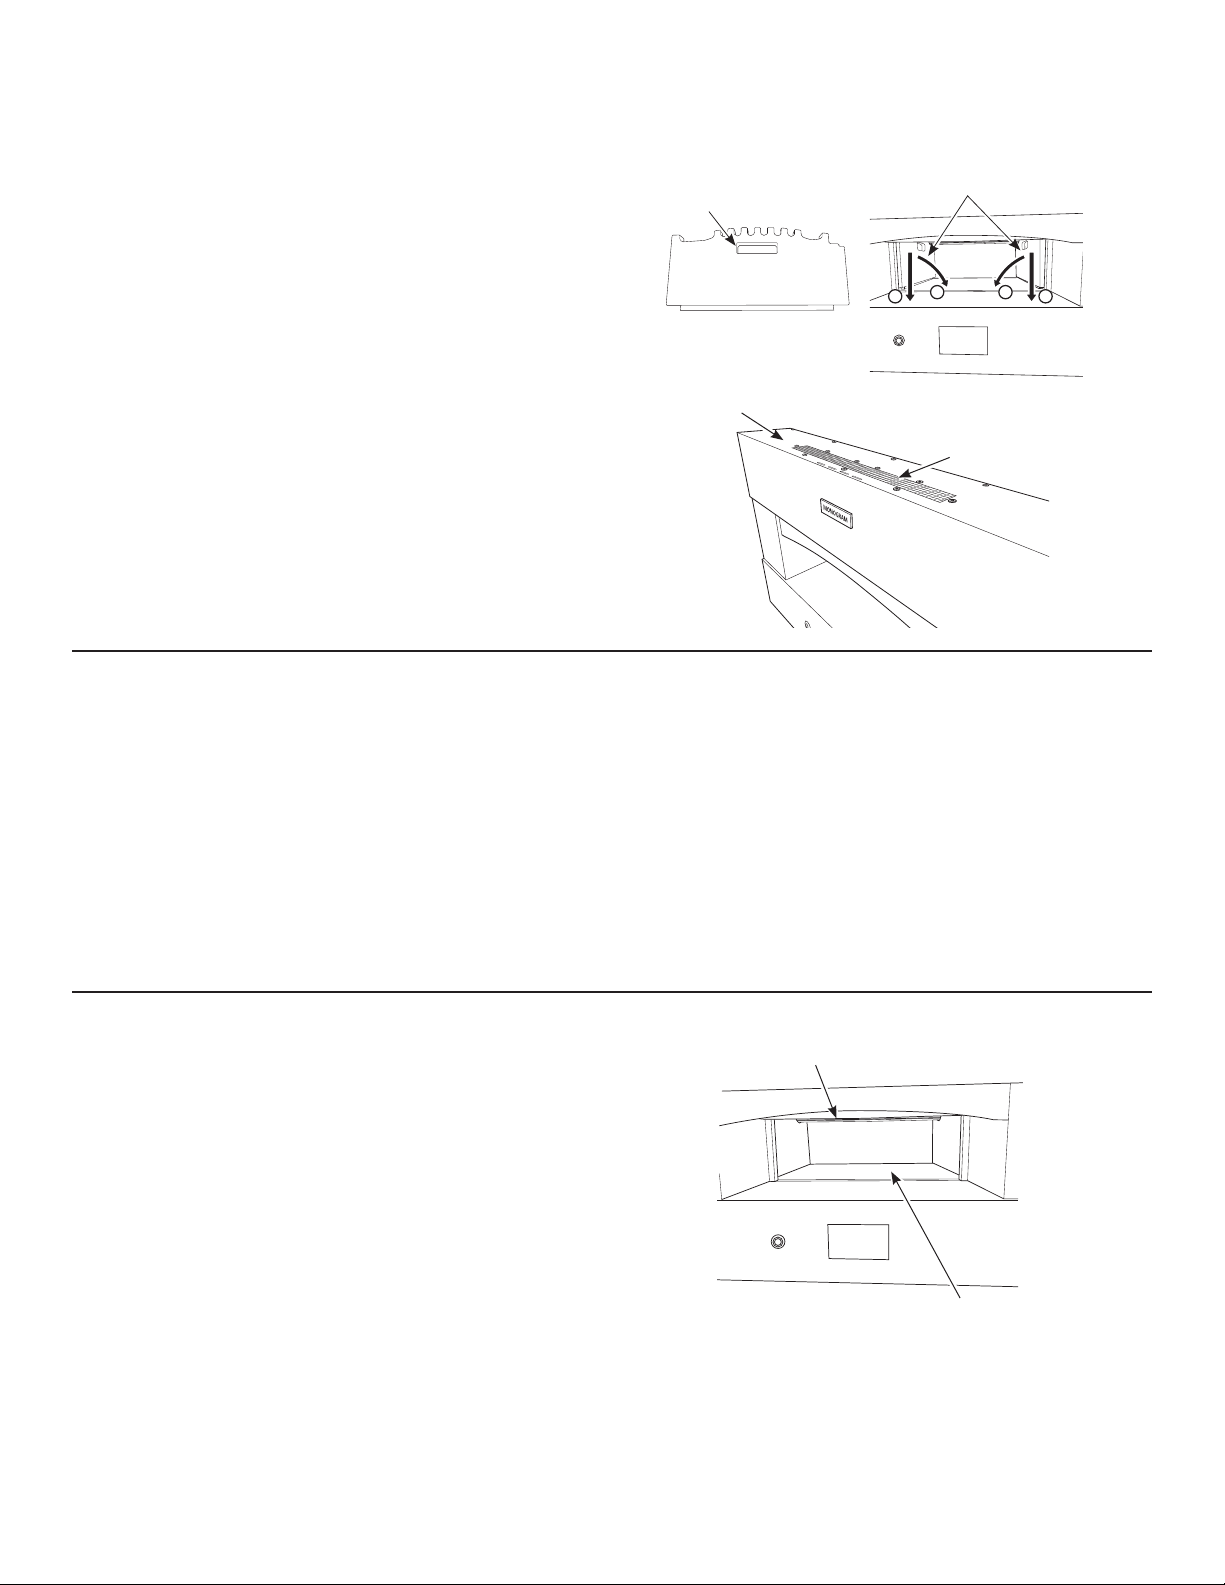
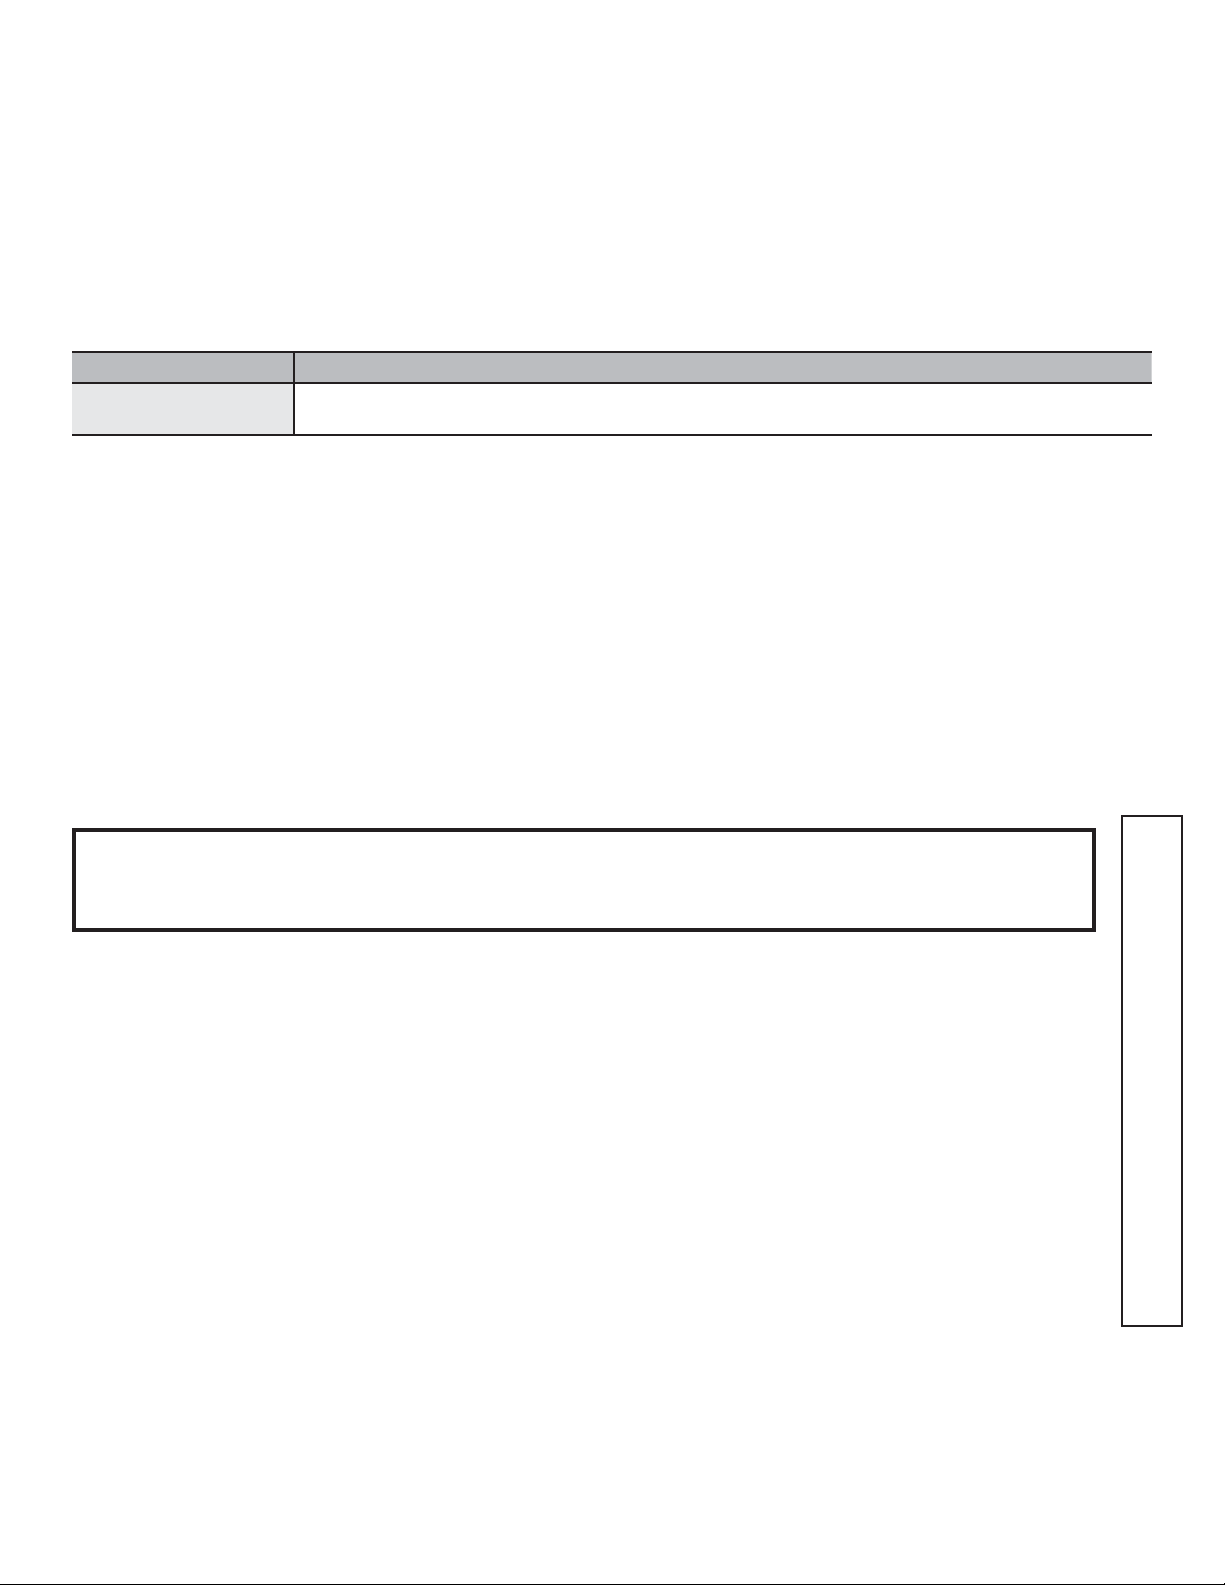
Ŷ ,QVSHFWWKHRYHQFDYLW\WRHQVXUHLWLVIUHHRI
objects or debris. Verify that the installer has
removed the wooden shipping supports.
Ŷ 9HULI\WKHH[KDXVWYHQWLVRQWRSRIWKHRYHQLV
unobstructed. Never place items on top of the oven.
Ŷ 9HULI\WKDWDOOSURWHFWLYHILOPKDVEHHQUHPRYHG
Ŷ 9HULI\WKHUHDUHQRWULSSLQJKD]DUGVLQIURQWRIWKH
oven. The hearth oven requires at least four (4) feet of
clearance in front of the oven.
Ŷ 'RQRWZHDUORRVHILWWLQJFORWKLQJHVSHFLDOO\ORRVH
sleeves, while operating the oven.
Exhaust Vent
Top of Oven
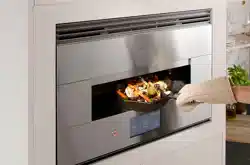
WHILE YOU ARE COOKING
Ŷ $OZD\VNHHSDQH\HRQLWHPVFRRNLQJLQWKHRYHQ
Never leave the room while the oven is in use.
Ŷ 1HYHUUHDFKLQWRWKHRYHQZLWKEDUHKDQGV$OZD\V
use long-handled pizza peels and cleaning tools.
While cooking foods other than pizza, always wear
heat resistant oven gloves or mitts that fully cover your
wrists.
Ŷ 8VHFDXWLRQZKLOHWUDQVSRUWLQJKRWIRRG+RWIRRGLWHPV
and utensils can cause serious burns to yourself or
those around you.
Ŷ .HHSWKHFRRNLQJGHFNFOHDQ8VHWKHEUDVVEULVWOHG
cleaning brush while wearing insulated gloves to
remove debris. Failure to clean the cooking deck may
result in excess smoke.
Ŷ 'RQRWXVHEUDVVEULVWOHGFOHDQLQJEUXVKRQ
stainless steel surfaces. The brush will scratch
these surfaces.
Ŷ 5HPRYHIRRGLWHPVLPPHGLDWHO\DIWHUWKH\KDYH
completed cooking. The oven will remain hot even after
the timer reaches zero or power is turned off.
AFTER COOKING
Ŷ 7XUQRIIRYHQ(YHQWKRXJKWKHRYHQLVQRWRQWKH
cooling fan will remain on for some time and the cooking
deck may remain hot for several hours after the oven is
turned off.
Ŷ &OHDQWKHFRRNLQJGHFNZLWKWKHLQFOXGHGFOHDQLQJ
brush by gently scraping the top surface of the stone to
loosen any baked-on residue. Brush any crumbs to the
front edge of the deck where they can be wiped off with
a damp cloth when cool. NOTE: Do not attempt to clean
any of the heating elements. All heating elements are
self-cleaning. Never use any liquids to clean the inside
of the oven, including the cooking deck.
Ŷ 'RQRWXVHEUDVVEULVWOHGFOHDQLQJEUXVKRQVWDLQOHVV
steel surfaces. The brush will scratch these surfaces.
Ŷ 1HYHUUHDFKLQWRWKHRYHQZLWKEDUHKDQGV$OZD\VXVH
long-handled cooking or cleaning tools and wear heat
resistant gloves or mitts that fully cover your wrists.
Shipping Supports
Remove both shipping supports
Handle
2
11
2
Heating Elements
Cooking Deck
COOKING INSTRUCTIONS
8 49-80785 Rev. 2

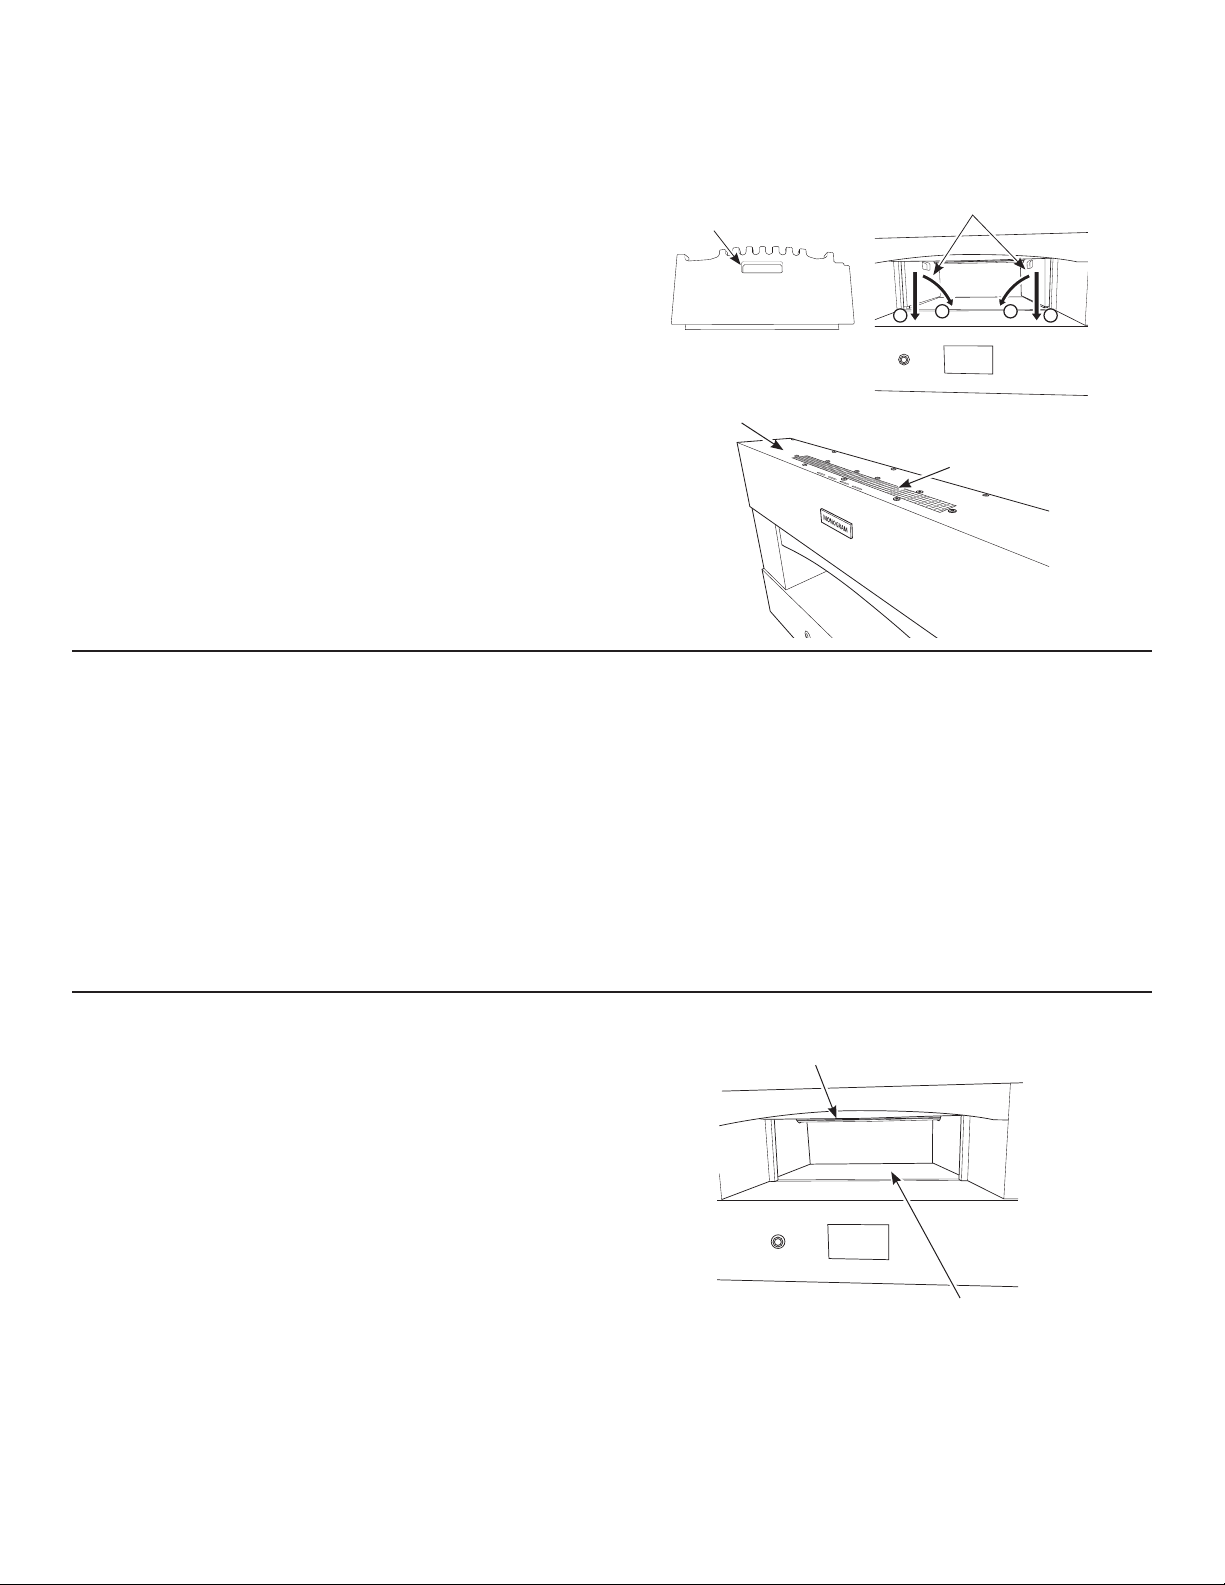
PIZZA COOKING PROCEDURE
1. Turn power ON by pressing the Power Switch.
2. Select a pre-set cooking profile. Some pre-set cooking
profiles include Detroit, Flatbread, Neapolitan, New
York, and Custom. For instructions explaining how
to setup a custom profile, please see the Creating a
Custom Profile section.
3. Touch Preheat to begin heating the oven. Pre-heating
varies by profile, but typically lasts about 30 minutes.
The progress indicator on the display will allow you to
monitor pre-heating status and a chime will sound when
pre-heating is complete.
4. Insert pizza using the wooden pizza peel and touch
Start to begin cooking timer. Halfway through the
cooking cycle, a reminder chime will sound indicating it is
time to rotate the pizza using the metal pizza peel. When
the pizza is almost done cooking, a second reminder
chime will sound. At this time, pizza is almost ready for
removal. When timer is complete remove the pizza from
oven using the metal pizza peel.
NOTE: Cooking timer and reminders may be modified
based on personal preference. For instructions on
customizing cooking profiles, see the Creating a Custom
Profile section.
5. When you are done with your cooking session, turn the
power OFF using the Power Switch.
NOTE: The oven may remain hot for several hours
after the power has been turned off. The fan will
switch to a lower speed and may run for up to 50
minutes.
PIZZA BAKING TIPS
Ŷ $GGDGXVWLQJRIIORXURUFRUQPHDOWRWKHSHHOWRKHOS
the pizza slide off.
Ŷ 'RQRWDGGH[FHVVDPRXQWVRIIORXUWRWKHSHHO'RLQJ
so may create smoke.
Ŷ 'RQRWRYHUORDGWRSSLQJV7KLVFDQUHVXOWLQVRJJ\
crust.
Ŷ 'RQRWSODFHDIUR]HQSL]]DLQWRWKHRYHQ3L]]DPXVW
be room temperature in order to cook properly.
Ŷ 8VHWKHZRRGHQSHHOWRLQVHUWDQXQFRRNHGSL]]D
Ŷ 8VHWKHPHWDOSHHOIRUURWDWLQJDQGUHPRYLQJSL]]DV
Ŷ $YRLGOHWWLQJWKHSL]]DFRQWDFWWKHEDFNRUVLGHVRIWKH
oven.
Ŷ 5RWDWHWKHSL]]DKDOIZD\WKURXJKWKHF\FOH
Ŷ (QVXUHFRRNLQJGHFNLVIUHHRIIRRGGHEULVEHIRUH
inserting a pizza.
Ŷ 2QO\FRRNRQHSL]]DDWDWLPH
COOKING INSTRUCTIONS
49-80785 Rev. 2 9
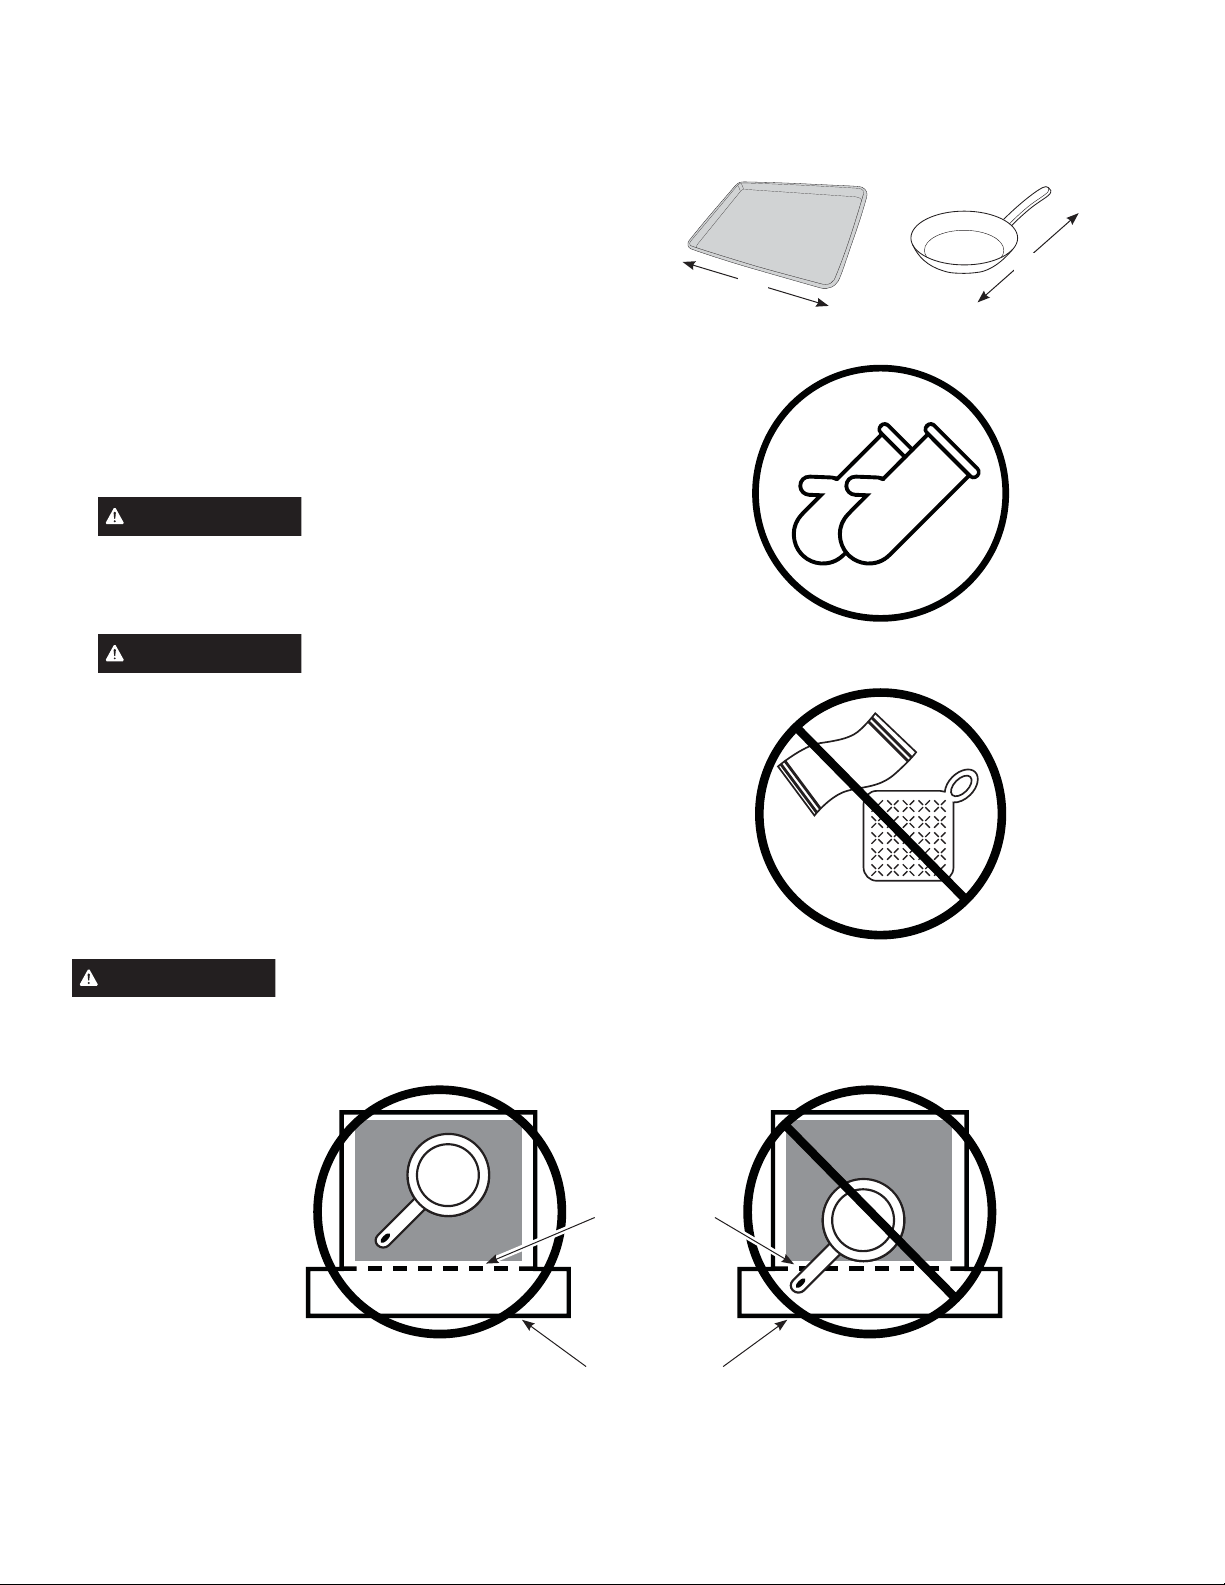
PREPARING TO COOK FOODS OTHER THAN PIZZA
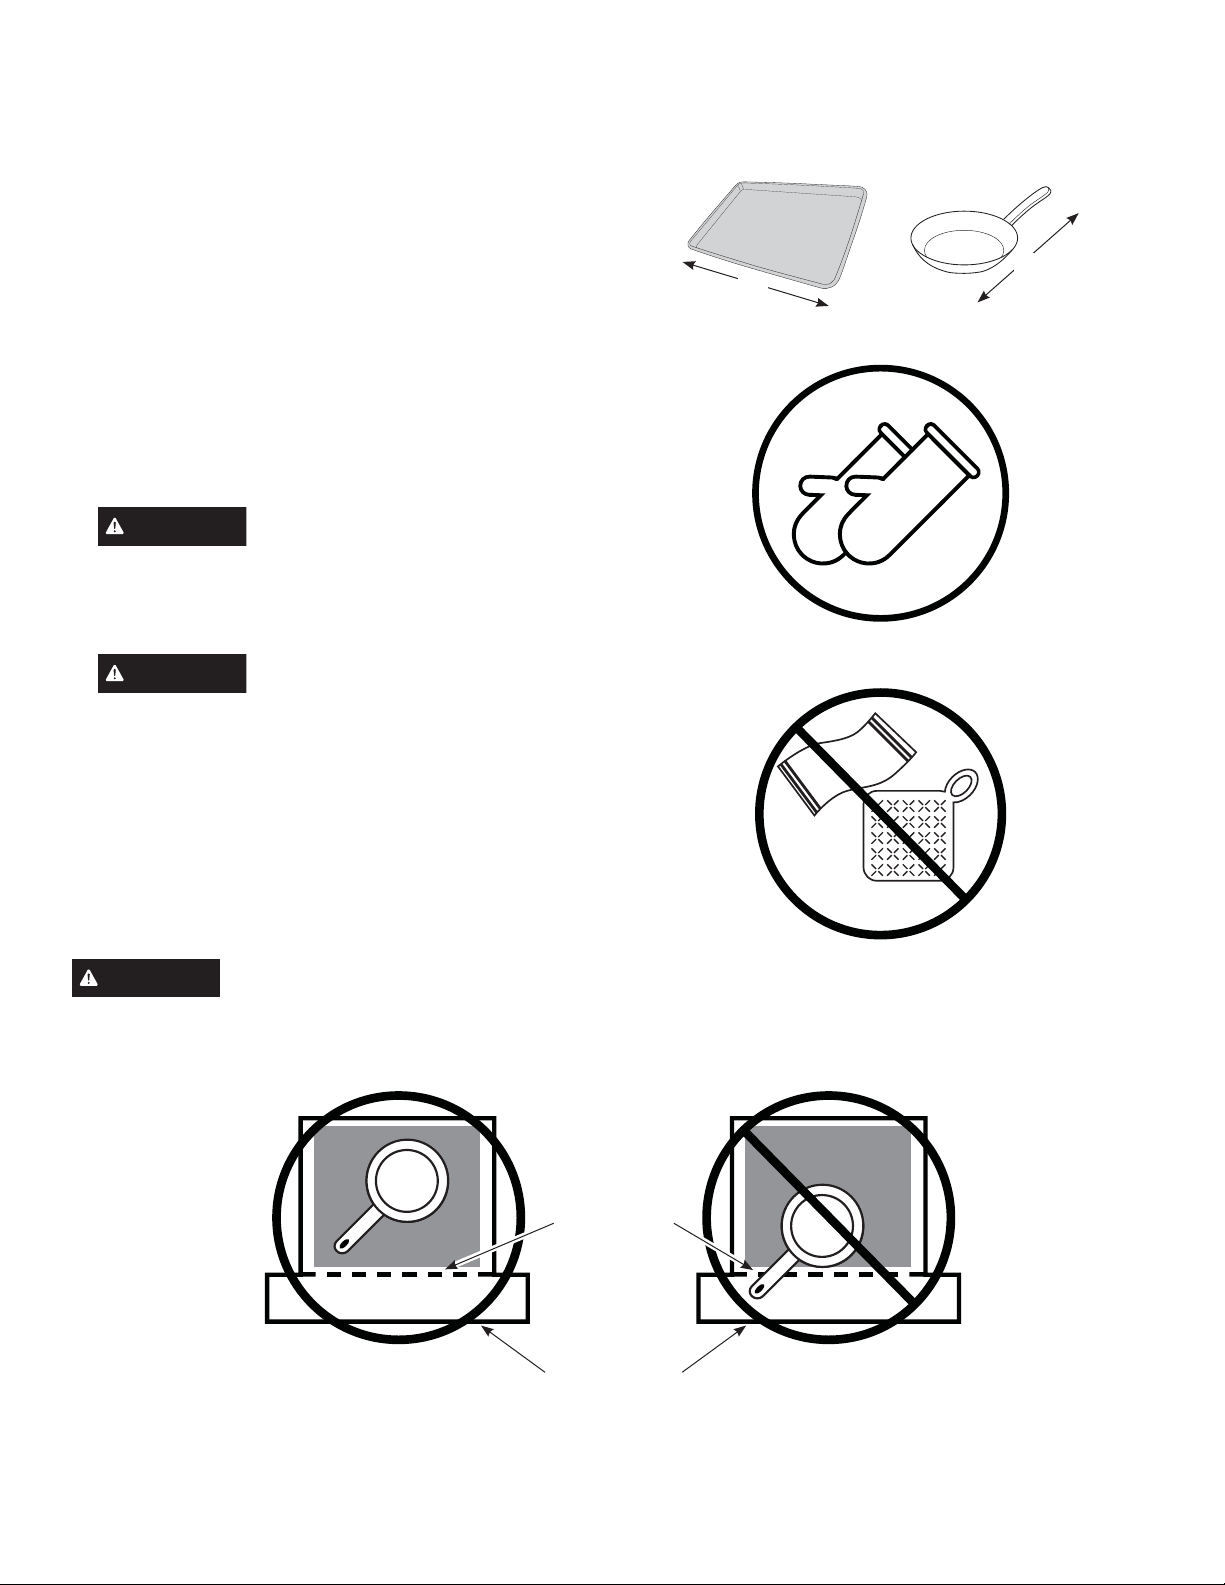
1. Prior to cooking, determine which cookware will be
used. The cookware, including the handle, must be
oven and broiler safe. Cookware with a non-stick
coating should not be used. Make sure the cookware
completely fits within the oven cavity. The maximum
length for a rectangular piece of cookware should
not exceed 18 inches. The length of a skillet with an
extended handle should not exceed 21 inches.
2. Locate the oven gloves or mitts that will be used.
Always use two hands to place food into and remove
from the oven, making sure protection is worn on both
hands. Oven gloves or mitts must be heat resistant and
should fully cover your wrists.
CAUTION
Oven mitts or gloves made exclusively
of cotton do not offer the same protection as those
made from synthetic materials, such as silicone. Cotton
may also get scorched from coming in contact with a
piece of hot cookware.
CAUTION
Do not use towels or pot holders when
reaching into the oven. Hands and wrists should be fully
covered with oven gloves or mitts to prevent burns from
the heating elements or oven surfaces.
3. Prior to cooking, determine where the cookware will be
placed after it is removed from the oven. The cookware
will be very hot and must be placed on a heat resistant
surface.
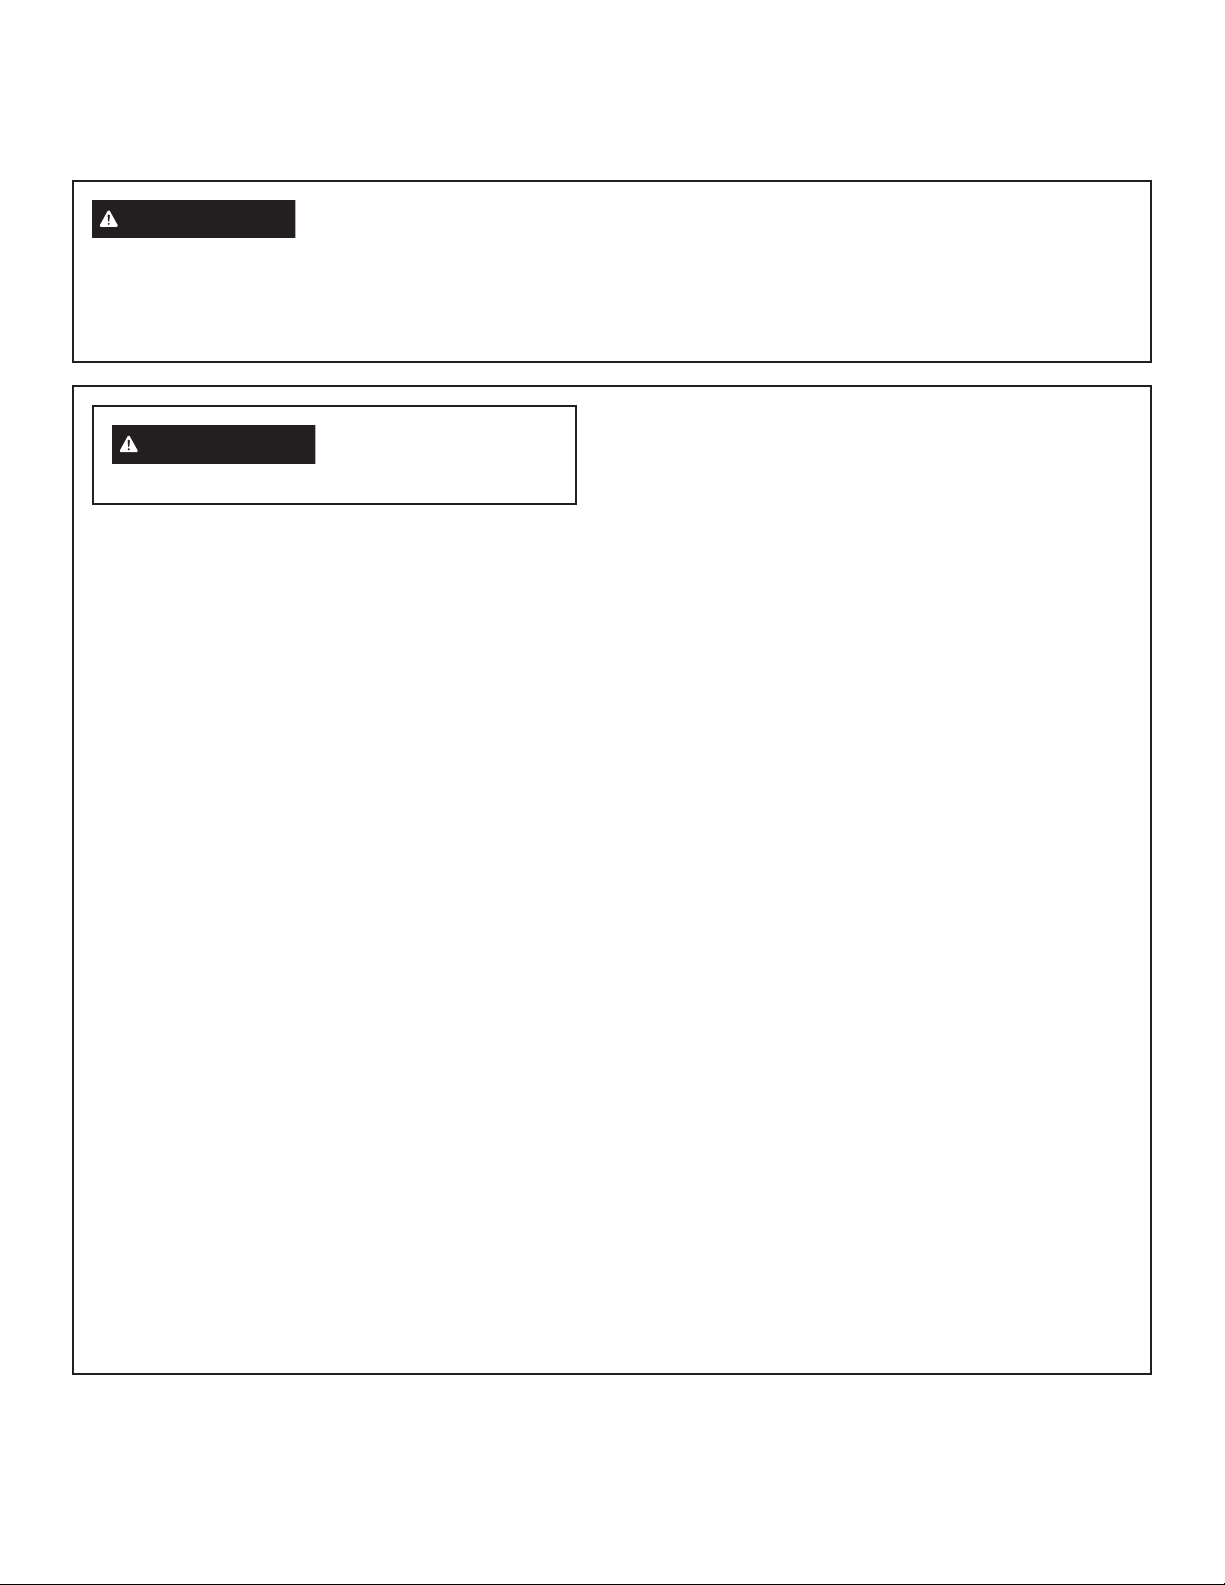
WARNING
DO NOT let any cooking utensil extend past the front edge of the cooking deck. Doing so will interfere
with the proper operation of the fire containment door.
18"
21"
Hearth Oven Top View
Cooking Deck
Hearth Oven
Front Opening
COOKING INSTRUCTIONS
10 49-80785 Rev. 2

COOKING PROCEDURE FOR FOODS OTHER THAN PIZZA
1. Turn power ON by pressing the Power Switch.
2. Select a pre-set cooking profile. Some pre-set cooking
profiles include Roasted Vegetables, Roasted Fruit,
Salmon, White Fish and Custom. For instructions
explaining how to set up a custom profile, please see the
Creating a Custom Profile section.
3. Touch Preheat to begin heating the oven. Preheating
varies by profile, but typically lasts about 30 minutes.
The progress indicator on the display will allow you
to monitor pre-heating status, and a chime will sound
when pre-heating is complete.
4. Insert the food to be cooked with the proper cookware
and touch Start to begin the cooking timer. See the
Preparing to Cook Foods Other Than Pizza section for
details on cookware approved for usage and proper
placement. Halfway through the cooking cycle, a
reminder chime will sound indicating that it is time to
rotate your food. When the food is almost done cooking,
a second reminder chime will sound. At this time,
your food is almost ready for removal. When timer is
complete, remove the food from the oven using oven
gloves or mitts. See Preparing to Cook Foods Other
Than Pizza section for details on oven gloves and mitts
approved for usage.
NOTE: Cooking timer and reminders may be modified
based on personal preference. For instructions on
customizing cooking profiles, see the Creating a Custom
Profile section.
5. When you are done with your cooking session, turn the
power OFF using the Power Switch.
NOTE: The oven may remain hot for several hours after
the power has been turned off. The fan will switch to a
lower speed and may run for up to 50 minutes.
COOKING INSTRUCTIONS
49-80785 Rev. 2 11
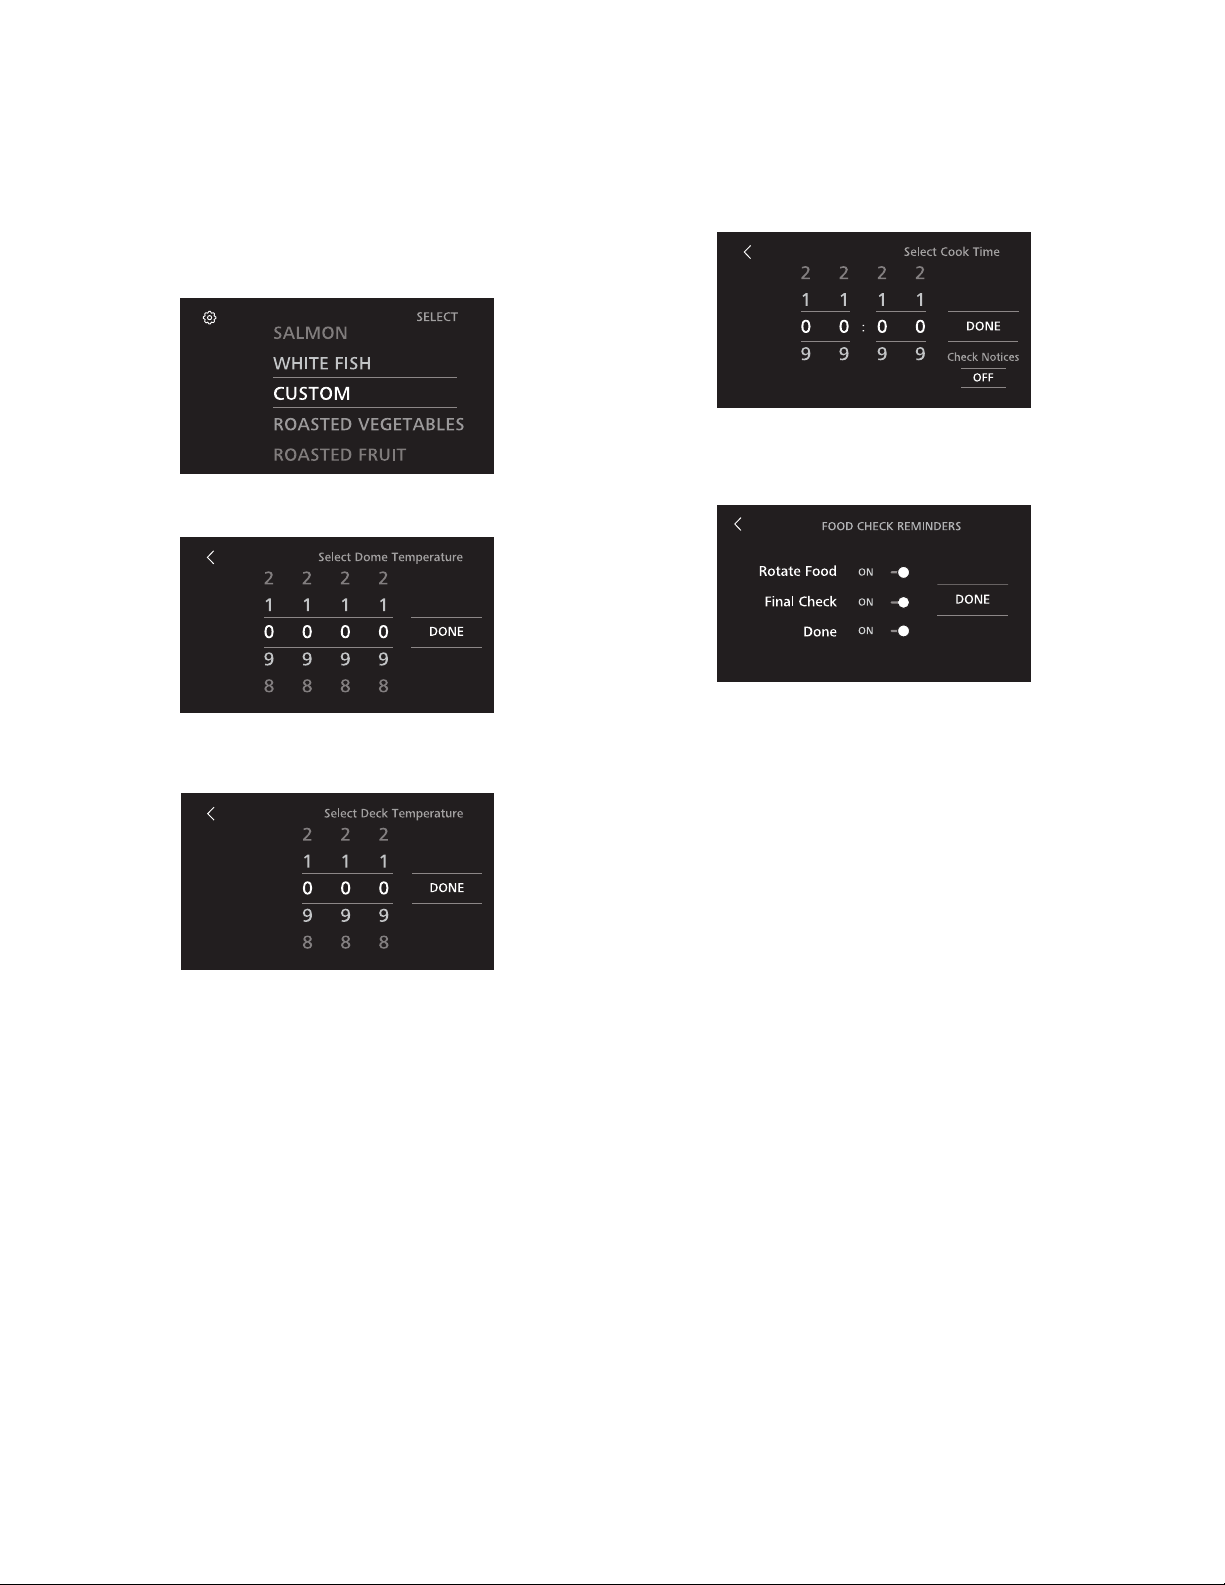
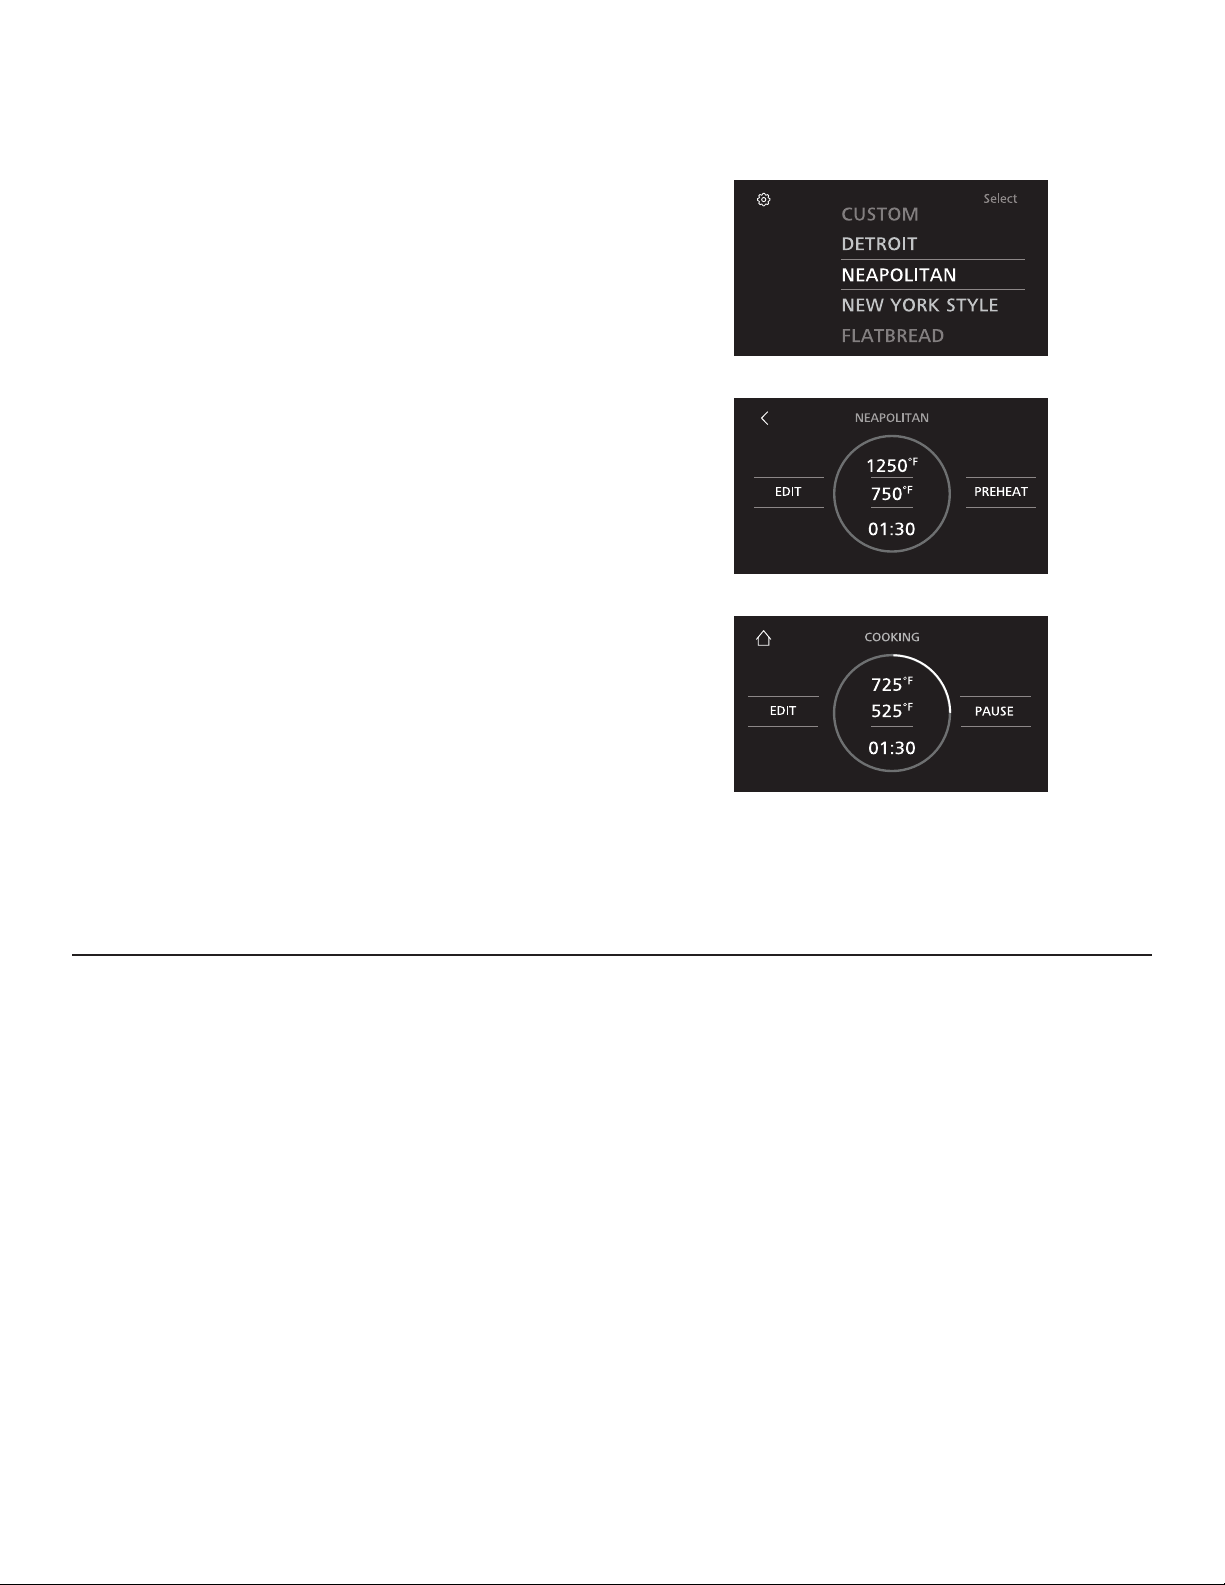
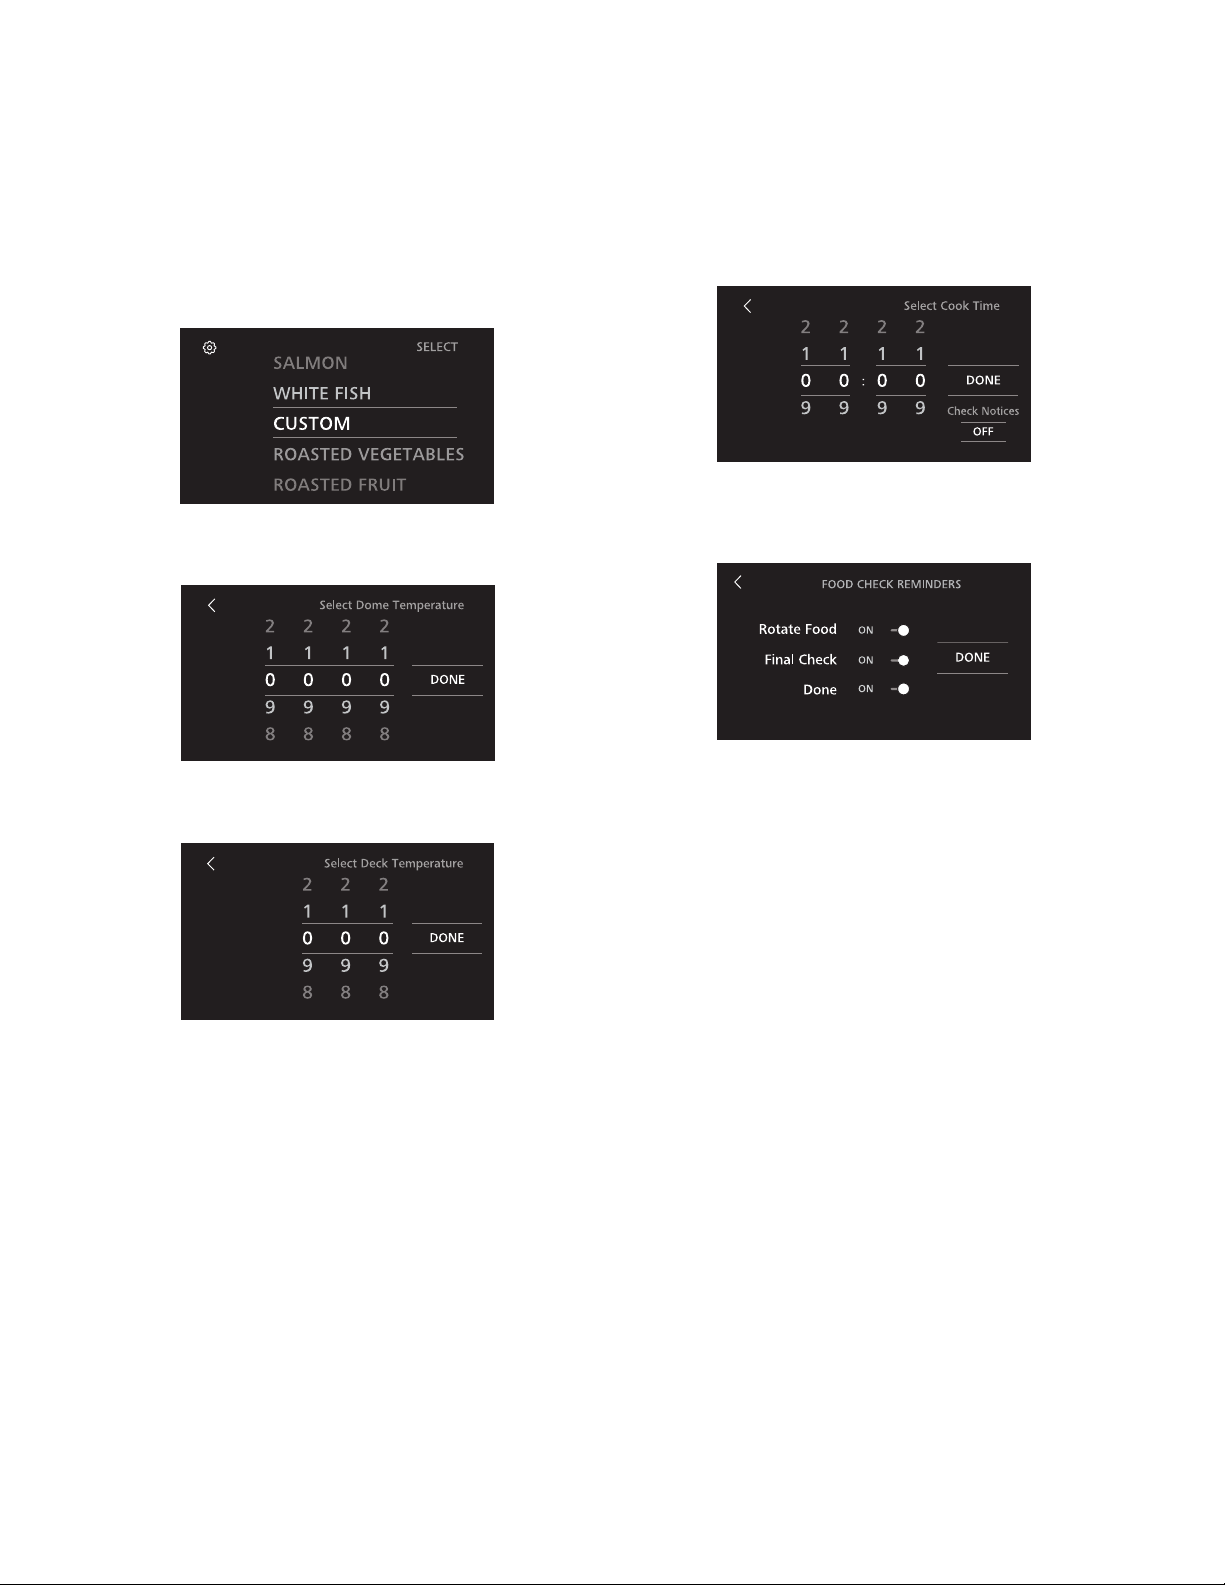
CREATING A CUSTOM PROFILE OR MODIFYING EXISTING PROFILE
1. Select Custom cooking profile to create a NEW custom
profile. To modify an existing profile, select the profile
you wish to modify.
2. Touch Edit to begin the customization sequence.
3. Adjust Dome Temperature using the scroll wheels, then
select Done.
4. Adjust Deck Temperature using the scroll wheels, then
select Done.
5. Set desired Cook Time using the scroll wheels, then
select Done.
6. Toggle reminders by touching the slider, then select
Done. You are ready to use your custom settings!
COOKING INSTRUCTIONS
12 49-80785 Rev. 2

SETTINGS
Hearth oven settings can be adjusted by selecting the gear icon in the upper left corner of the home screen.
Temperature Units
The oven control is set to display Fahrenheit temperatures
(F), but you can change it to display Celsius temperatures
(C).
Sound Volume
Sound volume can be adjusted higher or lower as desired.
Display Brightness
Brightness can be adjusted higher or lower as desired.
Control Lockout
Oven control can be locked. A passcode is required to lock
and unlock the control.
OVEN AIR VENTS
Never block the vents (air openings) of the hearth oven. They provide the air inlet and outlet that are necessary for the oven
to keep cool and operate properly. Air openings are located at the top and bottom. Blocking the oven opening will deploy
the flame containment system and disable the oven. A service professional will then need to reset the oven.
COOKWARE
The material, finish, and size of cookware affect baking performance.
For best results, use the following guidelines:
Ŷ 7KLQRUPHGLXPFUXVWSL]]DLQFOXGLQJ1HDSROLWDQDQG
New York: Cook directly on cooking deck.
Ŷ 'HWURLWVW\OHGHHSGLVK&RRNLQD'HWURLWVW\OH
rectangular pan.
Ŷ )ODWEUHDG&RRNGLUHFWO\RQFRRNLQJGHFN
Ŷ 'DUNFRDWHGDQGGXOOFRRNZDUHDEVRUEVKHDWPRUH
readily than light, shiny cookware. Pans that absorb
heat more readily can result in a darker, crispier, and
thicker crust.
Ŷ .HHSFRRNZDUHFOHDQWRSURPRWHHYHQKHDWLQJ
COOKING INSTRUCTIONS
49-80785 Rev. 2 13

CLEANING OUTSIDE
Be sure electrical power is off and all surfaces are cool before cleaning any part of the oven.
Control Panel
Wipe the control panel after each use of the oven with a
damp cloth. For cleaning, use a soft cloth dampened with
mild soap and water or a 50/50 solution of vinegar and
water. Polish dry with a soft cloth.
Do not use abrasive cleansers, strong liquid cleansers,
plastic scouring pads or oven pads on the control panel –
they will damage the finish. Avoid spraying cleaners onto
the control panel.
Aluminum Vents
(ZEP30F models only)
Wipe the aluminum vents (if installed) after each use of
the oven with a damp cloth. For cleaning, use a soft cloth
dampened with mild soap and water. Polish dry with a soft
cloth.
Do not use abrasive cleansers, strong liquid cleansers,
plastic scouring pads or oven pads on the vents – they will
damage the finish. Avoid spraying cleaners into the vent.
Stainless Steel Surfaces
Do not use a steel wool pad; it will scratch
the surface.
Do not use the brass bristled brush; it will scratch the
surface.
To clean the stainless steel surface, use warm sudsy water
or a stainless steel cleaner or polish. Always wipe the
surface in the direction of the brush lines. Follow the cleaner
instructions for cleaning the stainless steel surface.
Cleaners with oxalic acid such as Bar Keepers Friend Soft
Cleanser™ will remove surface rust, tarnish and small
blemishes. Use only a liquid cleanser free of grit and rub in
the direction of the brush lines with a damp, soft sponge.
CARE AND CLEANING
CLEANING INSIDE
Be sure electrical power is off and all surfaces are cool before cleaning any part of the oven.
Cooking Deck
Never reach into the oven with bare hands. Always use
long-handled cooking and cleaning tools, always wear heat
resistant oven gloves or mitts that fully cover your wrists.
Do not use cleaning brush on stainless steel surfaces; the
brush will scratch these surfaces.
To clean the cooking deck, use the included cleaning brush
to gently scrape the top surface of the stone to loosen any
baked-on residue. Brush any crumbs to the front edge of
the deck where they can be wiped off with a damp cloth.
NOTE: The cooking deck and interior walls will typically
change color with use. This is normal.
Never use spray cleaners inside the oven.
14 49-80785 Rev. 2

NOTES
49-80785 Rev. 2 15

NOTES
16 49-80785 Rev. 2

NOTES
49-80785 Rev. 2 17
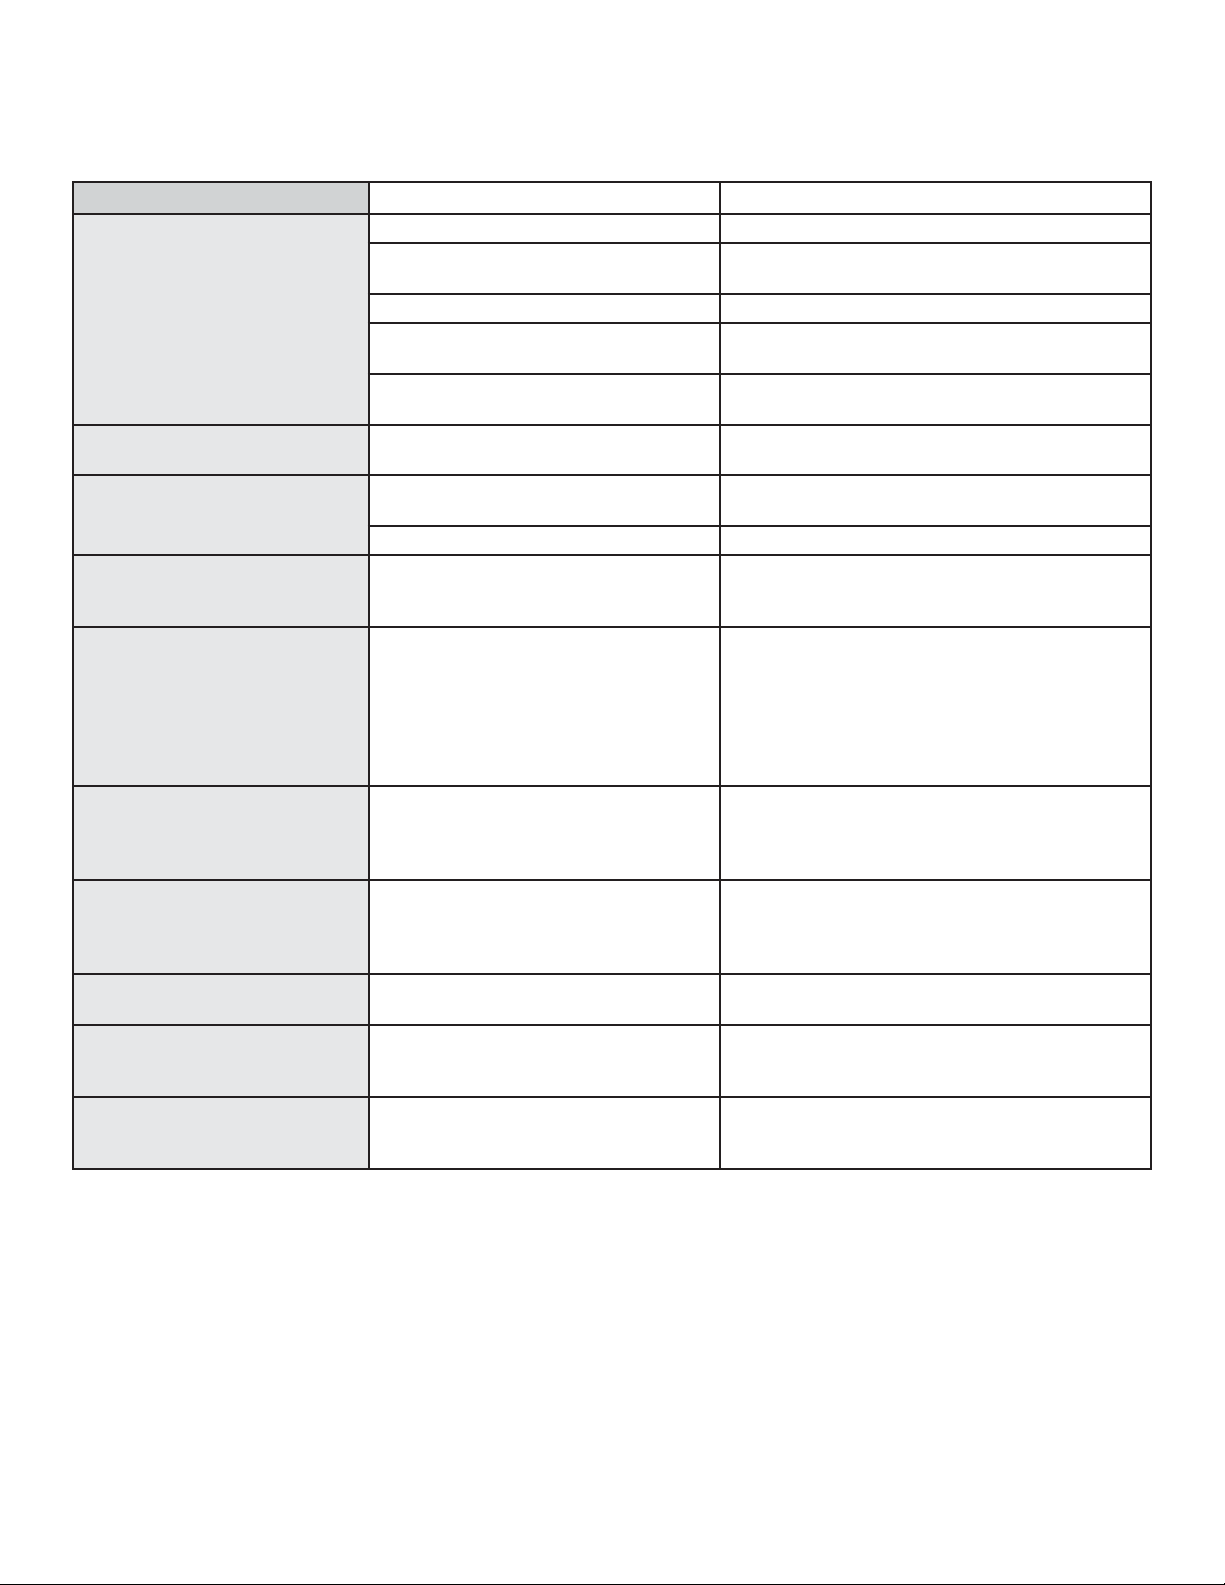
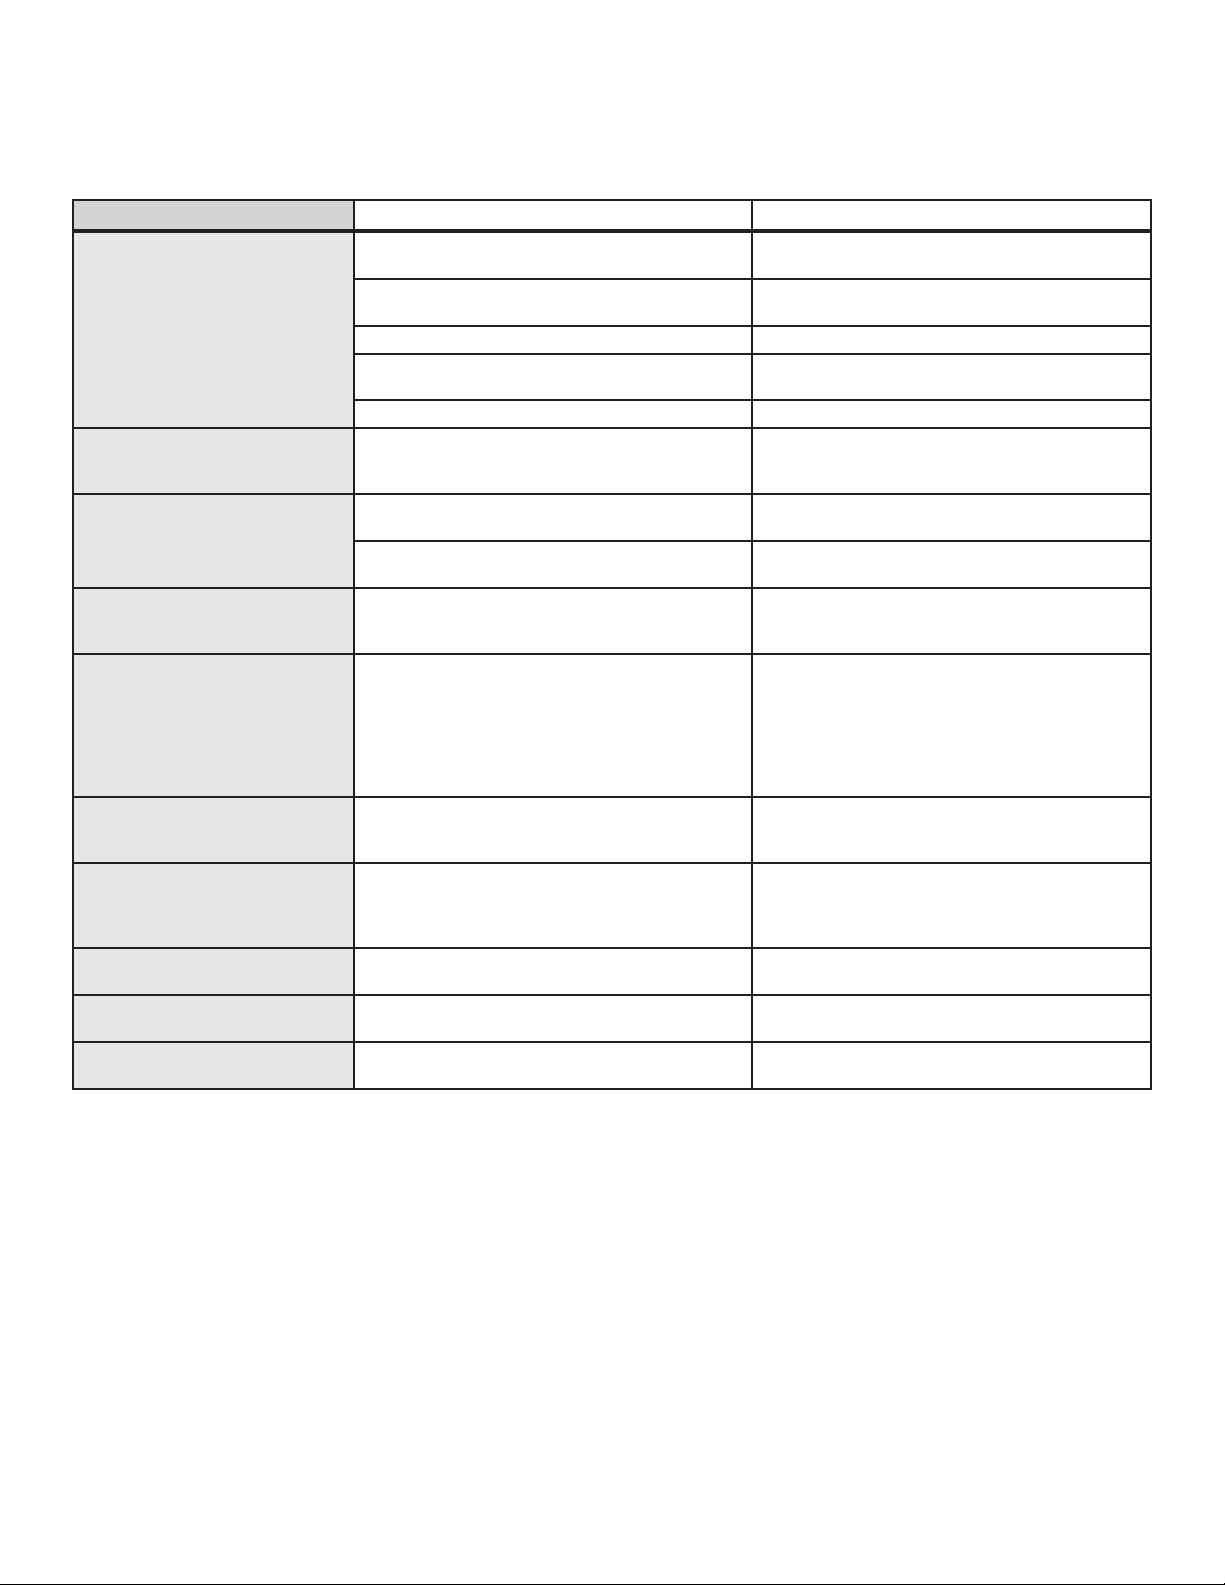
Problem Possible Cause What To Do
Food does not cook properly Oven controls improperly set. See the Cooking Instructions section.
Incorrect cookware or cookware of
improper size being used.
See the Cookware section.
Oven temperature needs adjustment. See the Special Features section.
Ingredient substitution Substituting ingredients can change the recipe
outcome.
Room temperature should be
over 60°F
Increase room temperature.
Oven temperature too hot or too
cold
Oven temperature needs adjustment. See the Special Features section.
Oven does not work or appears
not to work
A fuse in your home may be blown or the
circuit breaker tripped.
Replace the fuse or reset the circuit breaker.
Oven controls improperly set. See the Using the Oven section.
“Crackling” or “popping” sound This is the sound of the metal heating
and cooling during both the cooking and
cleaning functions.
This is normal.
Why is my range making a
"clicking" noise when using my
oven?
Your hearth oven has been designed
to maintain a tighter control over your
oven's temperature. You may hear your
oven's heating elements "click" on and off
more frequently than in standard ovens
to achieve better results during cooking
cycles.
This is normal.
Sometimes the oven takes
longer to preheat to the same
temperature
Cookware or food in oven. The cookware or food in the oven will cause the
oven to take longer to preheat. Remove items to
reduce preheat time.
Excessive smoking during
cooking cycle
Excessive food debris or flour. Touch the Cancel/Off pad. Open the windows to
rid the room of smoke. Once the oven has cooled,
wipe up the excess soil.
Display goes blank
A fuse in your home may be blown or the
circuit breaker tripped.
Replace the fuse or reset the circuit breaker.
“Burning” or “oily” odor
emitting from the vent
This is normal in a new oven and will
disappear in time.
This is normal.
Strong odor An odor from the oven insulation is
normal for the first few times the oven is
used.
This is temporary and will go away after several
uses.
Save time and money! Review the chart below first and you may not need to call for service.
TROUBLESHOOTING
18 49-80785 Rev. 2
LIMITED WARRANTY
Ŷ6HUYLFHWULSVWR\RXUKRPHWRWHDFK\RXKRZWRXVHWKH
product.
Ŷ,PSURSHULQVWDOODWLRQGHOLYHU\RUPDLQWHQDQFH
Ŷ)DLOXUHRIWKHSURGXFWLILWLVDEXVHGPLVXVHGPRGLILHG
or used for other than the intended purpose or used
commercially.
Ŷ5HSODFHPHQWRIKRXVHIXVHVRUUHVHWWLQJRIFLUFXLW
breakers.
Ŷ'DPDJHWRWKHSURGXFWFDXVHGE\DFFLGHQWILUHIORRGV
or acts of God.
Ŷ'DPDJHWRILQLVKVXFKDVVXUIDFHUXVWWDUQLVKRUVPDOO
blemishes not reported within 48 hours of delivery.
Ŷ,QFLGHQWDORUFRQVHTXHQWLDOGDPDJHFDXVHGE\SRVVLEOH
defects with this appliance.
Ŷ'DPDJHFDXVHGDIWHUGHOLYHU\
Ŷ3URGXFWQRWDFFHVVLEOHWRSURYLGHUHTXLUHGVHUYLFH
Ŷ6HUYLFHWRUHSDLURUUHSODFHOLJKWEXOEVH[FHSWIRU/('
lamps.
Ŷ5HVHWWLQJRIWKHILUHFRQWDLQPHQWGRRUGHSOR\HGGXHWR
misuse.
Monogram.com
All warranty service is provided by our Factory Service Centers, or an authorized Customer Care
®
technician. To schedule
service, call 800.444.1845 or visit us online at monogram.com/contact. In Canada, call 800.561.3344 or visit monogram.ca.
EXCLUSION OF IMPLIED WARRANTIES
Your sole and exclusive remedy is product repair as provided in this Limited Warranty. Any implied warranties, including the
implied warranties of merchantability or fitness for a particular purpose, are limited to one year or the shortest period allowed
by law.
This limited warranty is extended to the original purchaser and any succeeding owner for products purchased
for home use within the USA. If the product is located in an area where service by an Authorized Servicer is not
available, you may be responsible for a trip charge or you may be required to bring the product to an Authorized
Service location. In Alaska, the limited warranty excludes the cost of shipping or service calls to your home.
Some states do not allow the exclusion or limitation of incidental or consequential damages. This limited warranty
gives you specific legal rights, and you may also have other rights which vary from state to state. To know what
your legal rights are, consult your local or state consumer affairs office or your state’s Attorney General.
Warrantor: GE Appliances, a Haier company
Louisville KY,40225
For the period of Monogram Appliances will replace
Limited two-year
warranty
For two years from date of original purchase, we will provide, free of charge, parts and service labor in your
home to repair or replace any part of the oven that fails because of a manufacturing defect.
What Monogram will not cover:
Staple your receipt here. Proof of the original purchase
date is needed to obtain service under the warranty.
Servicing your appliance may require the use of the onboard data port for diagnostics. This gives the factory
service technician the ability to quickly diagnose any issues with your appliance and helps Monogram improve
its products by providing Monogram with information on your appliance. If you do not want your appliance
data to be sent to Monogram, please advise your technician not to submit the data to Monogram at the time of
service.
49-80785 Rev. 2 19

49-80785-2
04-19 GEA
Printed in the United States

MANUAL DEL
PROPIETARIO
Horno de Hogar Para Interiores
MONOGRAM.COM

INFORMACIÓN DEL MODELO
ESCRIBA LOS NÚMEROS DE MODELO Y SERIE
Los encontrará en una etiqueta del lado izquierdo del
panel inferior, debajo del botón de encendido.
Use estos números en cualquier correspondencia o
llamadas al servicio técnico relacionadas con su horno de
pared.
Por favor escriba estos números aquí:
Número de Modelo
Número de Serie
NÚMEROS DE MODELO
ZEP30FLSS, ZEP30SKSS
CONTENIDOS
INFORMACIÓN AL CONSUMIDOR ............................................................................2
SOPORTE PARA EL CONSUMIDOR ..........................................................................3
INFORMACIÓN DE SEGURIDAD .............................................................................4
CONFIGURACIÓN DEL HORNO ..............................................................................6
WIFI CONNECT ...........................................................................................7
INSTRUCCIONES PARA LA COCCIÓN ........................................................................8
Antes de Cocinar .......................................................................................8
Mientras Está Cocinando .................................................................................8
Luego de la Cocción .....................................................................................8
Procedimiento de Cocción de Pizza. . . . . . . . . . . . . . . . . . . . . . . . . . . . . . . . . . . . . . . . . . . . . . . . . . . . . . . . . . . . . . . . . . . . . . . . .9
Consejos para Hornear Pizza .............................................................................9
Preparación para Cocinar Comidas
que no Sean Pizza .....................................................................................10
Procedimiento de Cocción de Comidas
que no Sean Pizza .....................................................................................11
Creación de un Perfil Personalizado
o Modificación de un Perfil Existente .......................................................................12
Configuraciones .......................................................................................13
Ventilaciones de Aire del Horno ...........................................................................13
Utensilio .............................................................................................13
CUIDADO Y LIMPIEZA ....................................................................................14
Limpieza Externa ......................................................................................14
Limpieza Interna .......................................................................................14
SOLUCIÓN DE PROBLEMAS ...............................................................................18
GARANTÍA LIMITADA .....................................................................................19
2 49-80785 Rev. 2

SOPORTE AL CLIENTE
SITIO WEB DE MONOGRAM
¿Desea realizar una consulta o necesita ayuda con su electrodoméstico? ¡Intente a través del sitio Web de Mongram las 24 horas
del día, cualquier día del año! También puede comprar más grandiosos productos de Monogram y sacar ventaja de todos nuestros
servicios de soporte a través de Internet, diseñados para su conveniencia. En EE.UU.: monogram.com
REGISTRE SU ELECTRODOMÉSTICO
¡Registre su electrodoméstico nuevo a través de Internet, según su conveniencia! Un registro puntual de su producto permitirá una
mejor comunicación y un servicio más puntual de acuerdo con los términos de su garantía, en caso de surgir la necesidad. También
puede enviar una carta en la tarjeta de inscripción pre impresa que se incluye con el material embalado.
En EE.UU.: monogram.com
SERVICIO PROGRAMADO
El servicio de reparación de expertos de Monogram está a sólo un paso de su puerta. Conéctese a través de Internet y programe el
servicio a su conveniencia cualquier día del año.
En EE.UU.: Monogram.com o 800.444.1845
CONECTIVIDAD REMOTA
Para recibir asistencia en relación a la conectividad de su red inalámbrica (para modelos con activación remota), visite nuestro sitio
web en monogram.com/connect o 800.444.1845
PIEZAS Y ACCESORIOS
Individuos calificados para realizar el servicio técnico de sus propios electrodomésticos podrán solicitar el envío de piezas o
accesorios directamente a sus hogares (se aceptan las tarjetas VISA, MasterCard y Discover). Ordene a través de Internet durante
las 24 horas del día.
En EE.UU.: monogram.com/use-and-care/parts o 800.444.1845
Las instrucciones que figuran en este manual cubren los procedimientos que serán realizados por cualquier usuario. Otros
servicios técnicos generalmente deberán ser derivados a personal calificado del servicio técnico. Se deberá tener cuidado,
ya que una reparación indebida podrá hacer que el funcionamiento no sea seguro.
CONTÁCTENOS
Si no se encuentra satisfecho con el servicio que recibió de Monogram, comuníquese con nosotros a través de nuestro sitio Web con
todos los detalles, incluyendo su número telefónico, o escriba a:
En EE.UU.: General Manager, Customer Relations | Monogram Appliances, Appliance Park | Louisville, KY 40225
monogram.com/contact o 800.444.1845
49-80785 Rev. 2 3
INFORMACIÓN IMPORTANTE DE SEGURIDAD
LEA TODAS LAS INSTRUCCIONES ANTES DE USAR ESTE ELECTRODOMÉSTICO
LEA Y GUARDE ESTAS INSTRUCCIONES
ADVERTENCIA
Lea todas las instrucciones antes de usar el producto. Si no se siguen estas instrucciones se podrán
producir incendios, descargas eléctricas, lesiones graves o la muerte.
Use este electrodoméstico sólo para su propósito original, como se describe en el manual del propietario.
Solicite que un instalador calificado instale su electrodoméstico y que esté adecuadamente conectado a tierra, de acuerdo con
las instrucciones de instalación provistas.
ADVERTENCIA
Siga estas instrucciones a
fin de evitar riesgos de incendio.
Ŷ 12GHMHHOKRUQRGHVDWHQGLGRGXUDQWHVXXVR
Ŷ 12DJUHJXHDFHLWHDODSLHGUDSDUDSL]]DDQWHVGHOXVROD
cual podrá incendiarse. NO intente freír ni cocinar comidas
en aceite.
Ŷ 12SHUPLWDTXHODJUDVDGHODFRFFLyQVHDFXPXOHHQR
cerca del horno. Antes del uso, retire la grasa y restos de
comida del horno.
Ŷ 12GHMHSURGXFWRVGHSDSHOXRWURVPDWHULDOHV
combustibles en o cerca del horno.
Ŷ 6LORVSURGXFWRVGHQWURGHODFDYLGDGGHOKRUQRVH
incendian, deje los materiales en el horno y apague el
mismo. NO desconecte el cable de corriente. NO apague la
corriente desde el fusible o el panel del disyuntor.
Ŷ 6HSRGUiSURGXFLUXQLQFHQGLRVLHOKRUQRHVFXELHUWRR
entra en contacto con materiales inflamables, incluyendo
manijas de asaderas, prendas blancas, cobertores de
pared, cortinas, paños y gasolina y otros vapores y líquidos
inflamables.
Ŷ 1XQFDXVHSUHQGDVKROJDGDVRTXHFXHOJXHQPLHQWUDVXVD
el electrodoméstico. Estas prendas se podrán incendiar si
entran en contacto con superficies calientes.
Ŷ $ILQGHHYLWDUHOULHVJRGHTXHPDGXUDVJUDYHV\GDxRVVREUH
la propiedad, NO use agua sobre incendios de grasa. Nunca
tome una asadera que se esté incendiando. NO intente retirar
comidas que se están incendiando del horno.
Ŷ 12LQWHQWHH[WLQJXLUXQLQFHQGLRHQHOKRUQR/DSXHUWDGH
contención de llamas se activará para extinguir cualquier
incendio. NO toque la puerta de contención de incendios
u otras superficies del horno luego de un incendio. Estas
superficies podrán estar demasiado calientes. Siga todas las
instrucciones en el panel de la pantalla.
Ŷ 12LQWURGX]FDODVPDQRVHQHOKRUQRDPHQRVTXHFXHQWH
con guantes o mitones para horno resistentes al calor.
Ŷ 8VHVyORODSDOHWDSDUDSL]]DVXPLQLVWUDGDSDUDUHWLUDU
pizzas de la cavidad del horno.
Ŷ 1XQFDXVHHOHOHFWURGRPpVWLFRSDUDFDOHQWDUR
calefaccionar la habitación.
Ŷ 12WRTXHHOHOHPHQWRFDOHQWDGRUQLODVXSHUILFLHLQWHUQDGHO
horno. Es posible que estas superficies estén demasiado
calientes como para quemar, aunque su color sea oscuro.
Durante y después del uso, NO toque ni permita que telas
u otros materiales inflamables toquen cualquier área interna
del horno; espere a que haya pasado un tiempo suficiente
para que se enfríen.
Ŷ 12FDOLHQWHHQYDVHVGHFRPLGDTXHQRKD\DQVLGR
abiertos. Se podría acumular presión y el envase podría
explotar, ocasionando una lesión.
Ŷ 12XVHQLQJ~QWLSRGHSDSHOGHDOXPLQLRRUHYHVWLPLHQWR
para cubrir la parte inferior del horno o cualquier parte del
horno. Los revestimientos para horno pueden atrapar el
calor o derretirse, ocasionando daños sobre el producto y el
riesgo de descarga, humo o incendio.
Ŷ 12XVHOLPSLDGRUHVSDUDKRUQR1RVHGHEHUiXVDU
limpiador para hornos comerciales ni revestimientos de
protección para hornos de ningún tipo en o alrededor de
cualquier parte del horno.
Ŷ $VHJ~UHVHGHTXHWRGRVORVFRQWUROHVVHHQFXHQWUHQ
apagados y que el electrodoméstico esté frío antes de
usar cualquier tipo de limpiador en aerosol o rociador en o
alrededor del electrodoméstico. El químico que produce la
acción de rociar podría, en presencia del calor, encenderse
o hacer que las piezas metálicas queden corroídas.
Ŷ 0DQWHQJDGHVREVWUXLGDODYHQWLODFLyQGHOKRUQR12
coloque objetos en la parte superior del horno.
Ŷ (VWHHOHFWURGRPpVWLFRQRGHEHUiVHUXVDGRSRUQLxRV±QR
se deberá dejar a los niños solos o sin atención en el área
donde el electrodoméstico se encuentre en uso. Nunca se
les deberá permitir trepar, sentarse o pararse sobre ninguna
parte del electrodoméstico.
Ŷ 12EORTXHHODDEHUWXUDSULQFLSDOGHOKRUQRGXUDQWHHO
calentamiento o mientras se realiza la cocción.
4 49-80785 Rev. 2

INFORMACIÓN IMPORTANTE DE SEGURIDAD
LEA TODAS LAS INSTRUCCIONES ANTES DE USAR ESTE ELECTRODOMÉSTICO
LEA Y GUARDE ESTAS INSTRUCCIONES
Ŷ
PRECAUCIÓN
No coloque artículos de interés
para los niños sobre los gabinetes que están encima del
KRUQR±VLORVQLxRVWUHSDQVREUHHOKRUQRSDUDOOHJDUD
estos artículos podrán sufrir lesiones graves.
Ŷ 1RLQWHQWHUHSDUDUQLUHHPSOD]DUFXDOTXLHUSLH]DGHOKRUQR
Todo el servicio técnico deberá ser realizado por un técnico
calificado.
Ŷ $QWHVGHUHDOL]DUFXDOTXLHUVHUYLFLRWpFQLFRGHVFRQHFWHHO
suministro de corriente desde el panel de distribución del
hogar, retirando el fusible o desconectando el disyuntor.
49-80785 Rev. 2 5

Conéctese a Wi-Fi (recomendado)
A fin de mantener su Horno de Hogar para Interior de Monogram actualizado con las opciones de cocción más recientes
e información de diagnóstico, conecte su Wi-Fi local utilizando el siguiente procedimiento:
1. Descargue la Aplicación Monogran Kitchen a través de
la Descarga de Aplicaciones de su teléfono móvil. Si
aún no cuenta con una, cree una nueva cuenta.
2. ENCIENDA el horno presionando el Interruptor de
Corriente.
3. Ingrese las configuraciones presionando el ícono del
equipo en la esquina superior izquierda de la pantalla
inicial.
4. Desplácese para seleccionar Preferences
(Preferencias).
5. Active el WiFi presionando el deslizador.
6. Finalice presionando la tecla Done (Hecho).
7. Abra la Aplicación Monogram Kitchen y seleccione
“Agregar Nuevo electrodoméstico”. Siga las
instrucciones de la aplicación para completar el proceso
de configuración.
NOTA: El Wi-Fi sólo cumple la función de actualizar los
menús y brindar información de diagnóstico. No permite el
funcionamiento remoto del horno.
Touch Screen
Display
Power
Switch
CONFIGURACIÓN DEL HORNO
6 49-80785 Rev. 2

WiFi Connect de Monogram:
WiFi Connect de Monogram Activado
Su horno de hogar está Activado con WiFi Connect de Monogram. Una tarjeta de comunicación WiFi está incorporada en el
producto, permitiendo que se comunique con su teléfono inteligente para un monitoreo remoto y notificaciones. Para conocer más
sobre las funciones del electrodoméstico conectado, y para saber qué aplicaciones de electrodomésticos conectados funcionarán con
su teléfono inteligente, visite
www.monogram.com/connect.
Conectividad WiFi: para solicitar asistencia para el electrodoméstico o la conectividad de red (para modelos que poseen WiFi), por
favor comuníquese al 800.220.6899.
INFORMACIÓN REGULATORIA
Declaración de Cumplimiento de la FCC/IC
Este dispositivo cumple con la Parte 15 de la Normativa de la FCC. Su funcionamiento está sujeto a las dos condiciones siguientes:
1. Este dispositivo no causa interferencias perjudiciales.
2. Este dispositivo tolera cualquier interferencia recibida, incluidas las interferencias que puedan provocar un funcionamiento no
deseado.
Este equipo ha sido probado y cumple con los límites establecidos para un dispositivo digital de clase B, según la parte 15 de la
Normativa de la FCC. Estos límites han sido diseñados para ofrecer una protección razonable contra interferencias perjudiciales en la
instalación residencial. Este equipo genera, usa y puede emitir energía de radiofrecuencia y, si no se instala y utiliza de acuerdo con
las instrucciones, puede ocasionar interferencias perjudiciales para las comunicaciones de radio. Sin embargo, no se garantiza que no
se presenten interferencias en una instalación en particular. Si el equipo provoca interferencias perjudiciales para la recepción de radio
o televisión, lo que puede comprobar encendiendo y apagando el equipo, se aconseja al usuario que intente corregir la interferencia
con una de las siguientes medidas:
Ŷ Reoriente o reubique la antena receptora.
Ŷ Aumente la separación entre el equipo y el receptor.
Ŷ Conecte el equipo a un tomacorriente de un circuito diferente del tomacorriente al que se encuentra conectado el receptor.
Ŷ Consulte a el proveedor minorista o a un técnico experimentado de radio/ TV.
Etiqueta de Clasificación: Los cambios o modificaciones sobre esta unidad no aprobadas expresamente por el fabricante podrían
anular la autoridad del usuario para utilizar el equipo.
WiFi CONNECT
49-80785 Rev. 2 7
ANTES DE COCINAR
Antes de comenzar a cocinar con el Horno de Hogar para Interior de Monogram:
Ŷ ,QVSHFFLRQHODFDYLGDGGHOKRUQRSDUDDVHJXUDUVHGH
que esté libre de objectos o residuos: verifique que el
instalador haya retirado los soportes de embalaje de
madera.
Ŷ 9HULILTXHTXHODVDOLGDGHODYHQWLODFLyQHQODSDUWHVXSHULRUGHO
horno esté desobstruída. Nunca coloque objetos en la parte
superior del horno.
Ŷ 9HULILTXHTXHWRGDODSHOtFXODSURWHFWRUDKD\DVLGRUHWLUDGD
Ŷ 9HULILTXHTXHQRKD\DULHVJRVGHWURSLH]RVIUHQWHDOKRUQR(O
horno de hogar requiere por lo menos de cuatro (4) pies de
espacio libre frente al horno.
Ŷ 1RXVHSUHQGDVVXHOWDVHVSHFLDOPHQWHFRQPDQJDVVXHOWDV
mientras utiliza el horno.
MIENTRAS ESTÁ COCINANDO
Ŷ 6LHPSUHHVWpDOHUWDVREUHORVtWHPVTXHVHHVWiQ
cocinando en el horno. Nunca deje la sala mientras el
horno esté en uso.
Ŷ 1XQFDXVHHOKRUQRVLQSURWHFFLyQHQODVPDQRV6LHPSUH
use paletas para pizza con mango largo y herramientas de
limpieza. Al cocinar comidas que no sean pizza, siempre use
guantes o mitones para horno resistentes al calor que cubran
sus muñecas completamente.
Ŷ 7HQJDFXLGDGRDOWUDQVSRUWDUFRPLGDFDOLHQWH/DVFRPLGDV\
utensilios calientes pueden ocasionar lesiones graves sobre
su persona o aquellos a su alrededor.
Ŷ 0DQWHQJDOLPSLDODVXSHUILFLHGHFRFFLyQ8VHHOFHSLOORGH
limpieza con cerdas de latón mientras usa guantes aislantes
para eliminar residuos. Si la superficie de cocción no es
limpiada, se podrá producir un exceso de humo.
Ŷ 1RXVHHOFHSLOORGHOLPSLH]DFRQFHUGDVGHODWyQVREUH
superficies de acero inoxidable. El cepillo rayará estas
superficies.
Ŷ 5HWLUHODVFRPLGDVLQPHGLDWDPHQWHOXHJRGHKDEHU
completado la cocción. El horno permanecerá caliente incluso
luego de que el temporizador llegue a cero o que la corriente
sea apagada.
LUEGO DELA COCCIÓN
Ŷ $SDJXHHOKRUQR$XQTXHHOKRUQRQRHVWpHQFHQGLGRHO
ventilador para enfriar permanecerá encendido durante
algún tiempo y la superficie de cocción permanecerá caliente
durante varias horas una vez apagado el horno.
Ŷ /LPSLHODVXSHUILFLHGHFRFFLyQFRQHOFHSLOORGHOLPSLH]D
incluido, pasando el mismo de forma suave sobre la superficie
superior de la piedra para aflojar cualquier residuo luego de
hornear. Cepille cualquier sobra del extremo frontal de la
superficie, donde puedan ser retiradas con una tela húmeda
una vez frías. NOTA: No intente limpiar ninguno de los
elementos para calentar. Todos los elementos para calentar
son de limpieza automática. Nunca use líquidos para limpiar
la parte interna del horno, incluyendo la superficie de cocción.
Ŷ 1RXVHHOFHSLOORGHOLPSLH]DFRQFHUGDVGHODWyQVREUH
superficies de acero inoxidable. El cepillo rayará estas
superficies.
Ŷ 1XQFDXVHHOKRUQRVLQSURWHFFLyQHQODVPDQRV6LHPSUH
use herramientas de cocción o limpieza manuales con manija
larga y use guantes o mitones resistentes al calor que cubran
sus muñecas completamente.
Elementos de Calefacción
6XSHU¿FLHGH&RFFLyQ
INSTRUCCIONES PARA LA COCCIÓN
Ventilaciones
de la Salida
Parte Superior del Horno
Soportes de Embalaje
Retire ambos soportes de embalaje
Manija
2
11
2
8 49-80785 Rev. 2
PROCEDIMIENTO DE COCCIÓN DE PIZZA
1. ENCIENDA el electrodoméstico presionando el Interruptor de
Corriente.
2. Seleccione un perfil de cocción preconfigurado. Algunos
perfiles de cocción preconfigurados incluyen Detroit, Sin
Levadura, Napolitana, Nueva York, y Personalizada. Para
acceder a instrucciones donde se explique cómo configurar
un perfil personalizado, consulte la sección de Creación de un
Perfil Personalizado.
3. Presione Preheat (Precalentar) para iniciar el calentamiento
del horno. El precalentamiento varía según el perfil, pero
típicamente dura aproximadamente 30 minutos. El indicador
de progreso en la pantalla le permitirá monitorear el estado
de precalentamiento y sonará una campanilla una vez
completado el precalentamiento.
4. Inserte la pizza usando una paleta de madera para pizza y
presione Start (Iniciar) para activar el temporizador de cocción.
En la mitad del ciclo de cocción, la campanilla de recordatorio
sonará indicando que es hora de rotar la pizza usando la paleta
metálica para pizza. Cuando la cocción de la pizza esté casi
finalizada, una segunda campanilla de recordatorio sonará. En
este momento, la pizza está casi lista para su retiro. Una vez
completado el temporizador, retire la pizza del horno usando
la paleta metálica para pizza. NOTA: El temporizador de
cocción y los recordatorios podrán ser modificados en base a
su preferencia personal. Para acceder a instrucciones sobre la
personalización de perfiles de cocción, consulte la sección de
Creación de un Perfil Personalizado.
5. Una vez finalizada la sesión de cocción, APAGUE el interruptor
usando el Interruptor de Corriente.
NOTA: El horno permanecerá caliente durante varias
horas luego de que el interruptor haya sido apagado.
El ventilador pasará a una velocidad más baja y podrá
funcionar hasta durante 50 minutos.
CONSEJOS PARA HORNEAR PIZZA
Ŷ $JUHJXHSROYRGHKDULQDGHPDt]DODSDOHWDSDUDIDFLOLWDUHO
corte de la pizza.
Ŷ 1RDJUHJXHFDQWLGDGHVH[FHVLYDVGHKDULQDDODSDOHWD+DFHU
esto podrá generar humo.
Ŷ 1RVREUHFDUJXHODVFREHUWXUDV(VWRSRGUiJHQHUDUFDSDV
pastosas.
Ŷ 1RFRORTXHXQDSL]]DFRQJHODGDHQHOKRUQR/DSL]]DGHEHUi
estar a temperatura ambiente para que se pueda cocinar
apropiadamente.
Ŷ 8VHXQDSDOHWDGHPDGHUDSDUDLQVHUWDUXQDSL]]DQR
cocinada.
Ŷ 8VHODSDOHWDPHWiOLFDSDUDURWDU\UHWLUDU
las pizzas.
Ŷ (YLWHTXHODSL]]DHQWUHHQFRQWDFWRFRQODSDUWHWUDVHUDRORV
costados del horno.
Ŷ *LUHODSL]]DDOOOHJDUDODPLWDGGHOFLFORGHFRFFLyQ
Ŷ $VHJ~UHVHGHTXHODVXSHUILFLHGHFRFFLyQ
esté libre de restos de comida antes de insertar la pizza.
Ŷ &RFLQHVyORXQDSL]]DDODYH]
INSTRUCCIONES PARA LA COCCIÓN
49-80785 Rev. 2 9
PREPARACIÓN PARA COCINAR COMIDAS QUE NO SEAN PIZZA
1. Antes de cocinar, determine que utensilio será usado. El
utensilio, incluyendo la manija, deberán ser de uso seguro
en hornos y parrillas. No se deberán usar utensilios con
revestimiento no adherente. Asegúrese de que el utensilio
pueda ingresar completamente dentro de la cavidad del
horno. La longitud máxima para un utensilio rectangular no
deberá superar las 18 pulgadas. La longitud de la sartén con
una manija extendida no deberá superar las 21 pulgadas.
2. Ubique los guantes o mitones para horno que serán usados.
Siempre use las dos manos para introducir y retirar la
comida del horno, asegurándose de contar con protección en
ambas manos. Los guantes o mitones para horno deberán
ser resistentes al calor y deberán cubrir sus muñecas
completamente.
PRECAUCIÓN
Los guantes o mitones para horno
hechos exclusivamente de algodón no ofrecen la misma
protección que aquellos hechos de materiales sintéticos,
tales como la silicona. El algodón también se podrá quemar
al entrar en contacto con una parte de un utensilio caliente.
PRECAUCIÓN
No use toallas ni las manijas de las
ollas al introducir el utensilio en el horno. Las manos y las
muñecas deberán estar completamente cubiertas con guantes
o mitones para horno, a fin de prevenir quemaduras por
contacto con elementos calientes o superficies del horno.
3. Antes de realizar la cocción, determine dónde será ubicado
el utensilio luego de retirar el mismo del horno. El utensilio
estará demasiado caliente y deberá ser ubicado en una
superficie resistente al calor.
ADVERTENCIA
NO permita que la posición de cualquier utensilio de cocción supere el extremo frontal de la superficie de
cocción. Hacer esto interferirá con el funcionamiento correcto de la puerta de contención de incendios.
18"
21"
INSTRUCCIONES PARA LA COCCIÓN
Vista Superior del Horno de Hogar
6XSHU¿FLHGH
Cocción
Abertura Frontal
del Horno de
Hogar
10 49-80785 Rev. 2

PROCEDIMIENTO DE COCCIÓN DE COMIDAS QUE NO SEAN PIZZA
1. ENCIENDA el electrodoméstico presionando el Interruptor de
Corriente.
2. Seleccione un perfil de cocción preconfigurado. Algunos
perfiles de cocción preconfigurados incluyen Roasted
Vegetables (Vegetales Asados), Roasted Fruit (Fruta Asada),
Salmon (Salmón), White Fish (Pescado Blanco) y Custom
(Personalizado). Para acceder a instrucciones donde se
explique cómo configurar un perfil personalizado, por favor
consulte la sección de Creación de un Perfil Personalizado.
3. Presione Preheat (Precalentar) para iniciar el calentamiento
del horno. El precalentamiento variará según el perfil, pero
típicamente dura aproximadamente 30 minutos. El indicador
de progreso en la pantalla le permitirá monitorear el estado
de precalentamiento y sonará una campanilla una vez
completado el precalentamiento.
4. Inserte la comida que desea cocinar con el utensilio adecuado
y presione Start (Iniciar) para iniciar el temporizador de
cocción. Para acceder a más detalles sobre utensilios
aprobados para uso y ubicación adecuados, consulte la
sección de Preparación para Cocinar Comidas que no Sean
Pizza. A mitad del ciclo de cocción, una campanilla sonará
para recordarle que es hora de rotar la comida. Cuando
la cocción de la comida esté casi finalizada, sonará una
segunda campanilla. En este momento, la comida estará casi
lista para su retiro. Cuando el temporizador finalice, retire la
comida del horno usando guantes o mitones para horno. Para
acceder a más detalles sobre guantes o mitones para horno
aprobados para dicho uso, consulte la sección de Preparación
para Cocinar Comidas que no Sean Pizza.
NOTA: El temporizador de cocción y los recordatorios podrán
ser modificados en base a su preferencia personal. Para
acceder a instrucciones sobre la personalización de perfiles
de cocción, consulte la sección de Creación de un Perfil
Personalizado.
5. Una vez finalizada la sesión de cocción, APAGUE el interruptor
usando el Interruptor de Corriente.
NOTA: El horno permanecerá caliente durante varias horas
luego de que el interruptor haya sido apagado. El ventilador
pasará a una velocidad más baja y podrá funcionar hasta
durante 50 minutos.
INSTRUCCIONES PARA LA COCCIÓN
49-80785 Rev. 2 11
CREACIÓN DE UN PERFIL PERSONALIZADO O MODIFICACIÓN DE UN PERFIL
EXISTENTE
1. Seleccione el perfil de cocción Custom (Personalizado) para
crear un NUEVO perfil personalizado. Para modificar un perfil
existente, seleccione el perfil que desee modificar.
2. Presione Edit (Editar) para iniciar la secuencia de
personalización.
3. Ajuste Dome Temperature (Temperatura de la Bóveda)
usando las ruedas de desplazamiento, y luego seleccione
Done (Hecho).
4. Ajuste Deck Temperature (Temperatura de la Superficie)
usando las ruedas de desplazamiento, y luego seleccione Done
(Hecho).
5. Configure Cook Time (Tiempo de Cocción) según desee,
usando las ruedas de desplazamiento, y luego seleccione
Done (Hecho).
6. Alterne los recordatorios presionando el deslizador, y luego
seleccione Done (Hecho). ¡Ya está listo para usar sus
configuraciones personalizadas!
INSTRUCCIONES PARA LA COCCIÓN
12 49-80785 Rev. 2

CONFIGURACIONES
Las configuraciones del horno de hogar se podrán ajustar seleccionando el ícono del equipo en la esquina superior izquierda de la
pantalla inicial.
Unidades de Temperatura
El control del horno está configurado para mostrar temperaturas
Fahrenheit (F), pero lo puede modificar para que muestre
temperaturas Celsius (C).
Volumen del Sonido
El volumen del sonido puede ser ajustado más alto o más bajo,
según lo desee.
Brillo de la Pantalla
El brillo puede ser ajustado más alto o más bajo, según lo desee.
Bloqueo del Control
El control del horno puede ser bloqueado. Se requiere una
contraseña para bloquear o desbloquear el control.
VENTILACIONES DE AIRE DEL HORNO
Nunca bloquee las ventilaciones (aberturas de aire) del horno de hogar. Las mismas brindan las entradas y salidas de aire que
son necesarias para que la cocina se mantenga fresca y funcione de forma correcta. Las aberturas de aire están ubicadas en la
parte superior e inferior. Bloquear la abertura del horno desplegará el sistema de contención de llamas y desactivará el horno. Un
profesional del servicio técnico deberá luego reiniciar el horno.
UTENSILIO
El material, el acabado y el tamaño de los utensilios afectan el horneado.
Para obtener mejores resultados, siga las siguientes pautas:
Ŷ 3L]]DFRQPDVDILQDRPHGLDLQFOX\HQGR1DSROLWDQD\1XHYD
York: cocine directamente en la superficie de cocción.
Ŷ 3ODWRSURIXQGRHVWLOR'HWURLWFRFLQHHQXQDDVDGHUD
rectangular estilo Detroit.
Ŷ 6LQOHYDGXUDFRFLQHGLUHFWDPHQWHHQODVXSHUILFLHGHFRFFLyQ
Ŷ /RVXWHQVLOLRVRVFXURVUHYHVWLGRV\RSDFRVDEVRUEHQHOFDORU
más rápidamente que las asaderas claras y brillantes. Las
asaderas que absorben el calor más rápidamente podrán
producir capas más oscuras, crocantes y gruesas.
Ŷ 0DQWHQJDORVXWHQVLOLRVOLPSLRVSDUDXQDFRFFLyQPiVSDUHMD
INSTRUCCIONES PARA LA COCCIÓN
49-80785 Rev. 2 13

LIMPIEZA EXTERNA
Asegúrese de que la corriente eléctrica esté apagada y que todas las superficies estén frías antes de limpiar cualquier parte
del horno.
Panel de Control
Limpie el panel de control luego de cada uso del horno con una
tela húmeda. Para limpiar, use una tela húmeda con agua tibia y
jabón o una solución que sea mitad de vinagre y mitad de agua.
Pula en seco con una tela suave.
No use limpiadores abrasivos, limpiadores líquidos fuertes,
almohadillas para fregar de plástico ni almohadillas de horno en
el panel de control; dañarán el acabado. Evite rociar con espráis
sobre el panel de control.
Ventilaciones de Aluminio
(modelos ZEP30F únicamente)
Limpie las ventilaciones de aluminio (si fueron instaladas) luego
de cada uso del horno con una tela húmeda. Para limpiar, use
una tela húmeda con agua tibia y jabón. Pula en seco con una
tela suave.
No use limpiadores abrasivos, limpiadores líquidos fuertes,
almohadillas para fregar de plástico ni almohadillas de horno
en las ventilaciones; dañarán el acabado. Evite el uso de
limpiadores con rociador sobre el horno.
Superficies de Acero Inoxidable
No use una viruta de acero; ésta dañara la superficie.
No use un cepillo con cerdas de latón; éste rayará la superficie.
Para limpiar la superficie de acero inoxidable, use agua tibia con
jabón o un limpiador o pulidor para acero inoxidable. Siempre
limpie la superficie en la dirección de las líneas del cepillo. Siga
las instrucciones del limpiador para limpiar la superficie de acero
inoxidable.
Los limpiadores con ácido oxálico tales como Bar Keepers Friend
Soft Cleanser
™ eliminarán el óxido, deslustres y pequeñas
manchas. Use sólo un limpiador líquido libre de material abrasivo y
frote en la dirección de las líneas del cepillo con una esponja suave
y húmeda.
CUIDADO Y LIMPIEZA
LIMPIEZA INTERNA
Asegúrese de que la corriente eléctrica esté apagada y que todas las superficies estén frías antes de limpiar cualquier parte
del horno.
Superficie de Cocción
Nunca use el horno sin protección en las manos. Siempre use
herramientas de cocción o de limpieza con mango largo, siempre
use guantes para horno resistentes al calor que cubran sus
muñecas completamente.
No use un cepillo de limpieza sobre superficies de acero
inoxidable; el cepillo rayará estas superficies.
Para limpiar la superficie de cocción, use el cepillo de limpieza
incluido, pasando el mismo de forma suave sobre la superficie
superior de la piedra para aflojar cualquier residuo luego de
hornear. Cepille cualquier sobra del extremo frontal de la
superficie, donde puedan ser retiradas con una tela húmeda.
NOTA: La superficie de cocción y las paredes internas
típicamente cambiarán de color con el uso. Esto es normal.
Nunca use limpiadores con rociador dentro
del horno.
14 49-80785 Rev. 2

NOTAS
49-80785 Rev. 2 15

NOTAS
16 49-80785 Rev. 2

NOTAS
49-80785 Rev. 2 17
¡Ahorre tiempo y dinero! Primero revise los cuadros que aparecen en las siguientes páginas y es posible que no
necesite solicitar reparaciones.
CONSEJOS PARA LA SOLUCIÓN DE PROBLEMAS
Problema Causa Posible Qué Hacer
La comida no se cocina de forma
apropiada
Los controles del horno están configurados de forma
incorrecta.
Consulte la sección de Instrucciones de Cocción.
Uso de una cacerola incorrecta o de una cacerola de
tamaño incorrecto.
Consulte la sección de Utensilios.
La temperatura del horno debe ser ajustada. Consulte la sección de Funciones Especiales.
Sustitución de ingredientes Sustituir ingredientes puede modificar el resultado de
la receta.
La temperatura ambiente deberá ser superior a 60°F Incremente la temperatura ambiente.
La temperatura del horno es
demasiado caliente o demasiado
fría
La temperatura del horno debe ser ajustada. Consulte la sección de Funciones Especiales.
El horno no funciona o parece no
funcionar
Es posible que se haya quemado un fusible en su
hogar o que se haya desconectado el disyuntor.
Reemplace el fusible o reinicie el disyuntor.
Los controles del horno están configurados de forma
incorrecta.
Consulte la sección de Uso del Horno.
Sonido de “chasquido” o
“traqueo”
Éste es el sonido del metal calentándose o
enfriándose durante las funciones de cocción y
limpieza.
Esto es normal.
¿Por qué la cocina hace un
sonido de “clic” cuando uso el
horno?
Su horno de hogar fue diseñado para mantener
un control más ajustado sobre la temperatura del
horno. Es posible que escuche que los elementos
de calentamiento del horno hacen y dejan de hacer
sonidos de “clic” con mayor frecuencia que con
hornos de tipo más estándar para lograr mejores
resultados durante los ciclos de cocción.
Esto es normal.
A veces el horno tarda más
en precalentarse a la misma
temperatura
Utensilio o comida en el horno. El utensilio o la comida en el horno hará que éste
tarde más en precalentarse. Retire estos artículos
para reducir el tiempo de precalentamiento.
Exceso de humo durante un ciclo
de cocción
Restos de comida o harina en exceso. Presione la tecla Cancel/ Off (Cancelar/ Apagar).
Abra las ventanas para liberar el humo en la
habitación. Una vez que el horno se haya enfriado,
limpie el exceso de suciedad.
La pantalla queda en blanco Es posible que se haya quemado un fusible en su
hogar o que se haya desconectado el disyuntor.
Reemplace el fusible o reinicie el disyuntor.
Olor a “quemado” o “aceite”
desde la ventilación
Esto es normal en un horno nuevo y desaparecerá
con el tiempo.
Esto es normal.
Olor fuerte Un olor en la aislación del horno es normal durante
las primeras veces en que el horno es usado.
Esto es temporario y desaparecerá luego de varios
usos.
18 49-80785 Rev. 2
Grape aquí su recibo. Se requiere facilitar prueba de la fecha
de compra original para obtener un servicio bajo la garantía.
Garante: GE Appliances, a Haier company, Louisville KY, 40225
Garante en Canadá: MC COMMERCIAL INC, Burlington, ON, L7R 5B6
Qué no cubrirá Monogram:
Ŷ9LDMHVGHOWpFQLFRGHOVHUYLFLRDVXKRJDUSDUDHQVHxDUOHVREUH
cómo usar el producto.
Ŷ,QVWDODFLyQHQWUHJDRPDQWHQLPLHQWRLQDGHFXDGRV
Ŷ)DOODVGHOSURGXFWRHQFDVRGHDEXVRPDOXVRPRGLILFDFLyQR
uso para propósitos diferentes al original o uso comercial.
Ŷ5HHPSOD]RGHIXVLEOHVGHODFDVDRUHLQLFLRGHGLV\XQWRUHV
Ŷ'DxRVRFDVLRQDGRVVREUHHOSURGXFWRSRUDFFLGHQWHLQFHQGLR
inundaciones o catástrofes naturales.
Ŷ'DxRVVREUHHODFDEDGRWDOHVFRPRy[LGRVREUHODVXSHUILFLH
deslustres o manchas pequeñas no informadas dentro de las 48
horas luego de la entrega.
Ŷ'DxRVLQFLGHQWDOHVRFRQVHFXHQWHVFDXVDGRVSRUSRVLEOHV
defectos sobre este producto.
Ŷ'DxRFDXVDGRGHVSXpVGHODHQWUHJD
Ŷ3URGXFWRQRDFFHVLEOHSDUDEULQGDUHOVHUYLFLRUHTXHULGR
Ŷ6ROLFLWHHOVHUYLFLRWpFQLFRSDUDUHSDUDURUHHPSOD]DUODV
lámparas, excepto las lámparas LED.
Ŷ5HLQLFLRGHODSXHUWDGHFRQWHQFLyQGHLQFHQGLRVGHVSOHJDGD
debido a un mal uso.
GARANTÍA LIMITADA
Monogram.com
Todo el servicio de garantía es provisto por nuestros Centros de Servicio de Fábrica, o por un técnico autorizado de Customer Care
®
(Servicio al Cliente).Para programar el servicio a través de Internet, visítenos en monogram.com/contact. o 800.444.1845
En Canadá, visite monogram.ca o 800.561.3344
EXCLUSIÓN DE GARANTÍAS IMPLÍCITAS — Su única y exclusiva alternativa es la reparación del producto, como se indica
en esta Garantía Limitada. Las garantías implícitas, incluyendo garantías implícitas de comerciabilidad o conveniencia
sobre un propósito particular, se limitan a un año o al período más corto permitido por la ley.
Esta garantía limitada se extiende al comprador original y a cualquier dueño subsiguiente de productos comprados para uso
hogareño dentro de EE.UU. Si el producto se encuentra en un área donde no se encuentra disponible un proveedor autorizado
del servicio técnico, usted será responsable por el costo de un viaje o se le podrá requerir que traiga el producto a una ubicación
Autorizada del Servicio Técnico. En Alaska, la garantía limitada excluye el costo de envío o llamadas del servicio a su hogar.
Algunos estados no permiten la exclusión o limitación de daños fortuitos o consecuentes. Esta garantía limitada le da derechos
legales específicos y es posible que tenga otros derechos legales que varían entre un estado y otro. Para conocer cuáles son sus
derechos legales, consulte a la oficina de asuntos del consumidor local o estatal o al Fiscal de su estado.
Por el Período de Monogram Appliances reemplazará
Garantía limitada por
dos años
Por dos años desde la fecha original de compra, le brindaremos, sin costo, piezas y trabajos del servicio
técnico en su hogar para la reparación o reemplazo de cualquier parte del horno que presente fallas
debido a defectos de fabricación.
Para realizar el servicio técnico de su electrodoméstico se podrá requerir el uso de datos del puerto de abordaje para
su diagnóstico. Esto da al técnico del Servicio de Fábrica de Monogram la habilidad de diagnosticar de forma rápida
cualquier problema con su electrodoméstico, y de ayudar a Monogram a mejorar sus productos al brindarle a Monogram
la información sobre su electrodoméstico. Si no desea que los datos de su electrodoméstico sean enviados a Monogram,
solicitamos que le indique a su técnico NO entregar los datos a Monogram en el momento del servicio.
49-80785 Rev. 2 19

49-80785-2
04-19 GEA
Impreso en los Estados Unidos