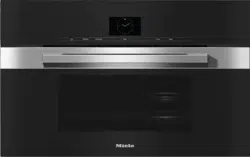
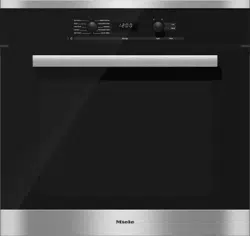
Door with contact switch* and lock for Self Clean program
Browning/Broiling element
Oven interior lighting
Twin Power convection fans with heating element
Shelf runners with 6 levels
Data plate
Clean Glass door
* This switch ensures that the heating elements and the convection fans turn off when the door is opened during use.
Oven controls
1. On / Off button
Turns the oven on and off
2. Mode selector
To select oven modes
3. Display
Displays the time of day and settings
4. Rotary selector < >
To select values
5. OK sensor button
Confirms settings and instructions
6. "Back" sensor button
To go back one step at a time
7. "Timer" sensor button
To set the timer
8. "Light" sensor button
To turn the oven cavity lighting on and off
9. "Settings" sensor button
To access settings
10. Optical interface
(for service technician use only)
Mode selector
To select an oven mode.
It can be turned clockwise or counterclockwise.
Oven modes
Surround
Bake
Maxi Broil
Defrost
Self Clean
Rapid PreHeat
Convection Bake
Intensive
Convection Broil
Gentle Bake
Display
The display shows the time of day or your settings.
Symbols in the display
Depending on the position of the mode selector and/or which button is pressed, the following symbols will appear:
A function can only be set or changed if the mode selector is in the correct position.
Rotary selector
Use the rotary selector < > to enter temperatures and durations.
Turning it clockwise will increase the values, and turning it counter-clockwise will decrease them.
It can also be used to highlight a mode by moving the in the display.
It can be turned clockwise or counterclockwise.
Settings
Changing the time of day
The time of day can only be changed when the oven is turned on and the mode selector is at the position.
Turn on the oven.
Select "Settings".
Use the rotary selector to move the until it appears under .
Confirm with OK.
The symbol will flash under .
Use the rotary selector to enter the time of day.
Confirm with OK.
The time of day is now saved.
During a power failure, the time of day will be saved for approx. 200 hours. When the power returns within this period of time the current time is displayed again.
After an extended power failure, the time of day will need to be reset.
Changing factory default settings
The appliance is supplied with a number of default settings (see the "Settings overview" chart).
A setting can be changed by altering its status.
The settings can only be changed when the oven is turned on and the mode selector is at the position.
Select "Settings".
If necessary, use the rotary selector to move the symbol until it appears under Settings.
Confirm with OK.
appears:
If you would like to change another setting, use the rotary selector to select the appropriate number.
Confirm with OK.
The setting is selected and the current status appears, e.g. .
To change the status:
Use the rotary selector to select the desired status.
Confirm with OK.
The status is saved and the setting appears again.
If you would like to change additional settings, repeat the process.
If you do not wish to change the setting shown and would like to move to another setting select Back.
If you have completed changing settings, select Settings.
The settings will remain in memory even in the event of a power failure.
System lock
The system lock prevents the oven from being used unintentionally.
The system lock is set of off by default. This can be changed by setting the status 5:
– 5 0 = Off
– 5 1 = On
The status of the system lock can only be altered when the oven is turned on and the mode selector is at .
To activate the system lock
Select "Settings".
Use the rotary selector to move the until it appears under .
The currently set Status 5 0 appears:
Confirm with OK.
Use the rotary selector to set Status 5 1.
Confirm with OK.
Select "Settings".
The current time of day appears.
Turn the oven off.
The system lock is On.
When the appliance is turned on again, the symbol will appear in the display to remind you that the system lock has been activated.
The system lock will remain activated even after a power failure.
Deactivating the system lock for a cooking process
Turn on the oven.
The and symbols will appear along with the current time of day
Press and hold OK until goes out.
The oven can now be used.
Deactivating the system lock
Turn on the oven.
Press and hold OK until goes out.
Select "Settings".
Use the rotary selector to move the until it appears under .
Confirm with OK.
The currently set status 5 1 appears.
Use the rotary selector to set Status 5 0.
Confirm with OK.
Select "Settings".
The system lock is Off.
The symbol disappears.
Timer
The timer can be used to time any activity in the kitchen, e.g. boiling eggs.
The timer can also be used at the same time as a cooking program if a start and finish time have been set, e.g. a reminder to stir the dish or add seasoning.
A maximum time of 99 minutes and 55 seconds can be set for the timer.
Setting the timer
Example: Boiling eggs and setting the timer for 6 minutes and 20 seconds.
If you have selected the "P 1 - 5 0" setting for the time of day display, you will need to turn the oven on before you can set a kitchen timer time.
Select "Timer".
00:00 will appear in the display with flashing under :
Use the rotary selector to set the kitchen timer time desired.
Confirm with OK.
The timer settings are saved and will count down in seconds:
The symbol indicates that the timer has been set.
At the end of the timer
– flashes.
– The time starts counting upwards.
– A buzzer will sound if turned on (see "Settings - P 2").
Select "Timer".
The buzzer will turn off and the symbols in the display will go out.
Resetting the timer
Select "Timer".
The time previously set appears
Use the rotary selector to change the kitchen timer time.
Confirm with OK.
The changed time is saved and will count down in seconds.
Canceling the timer
Select "Timer".
Use the rotary selector to reduce the kitchen timer time to 00:00.
Confirm with OK.
The timer has been canceled
Operating the oven
Changing the temperature
Example: You have selected Convection Bake and 350°F (175°C) and you can see the temperature rising in this display.
You would like to reduce the set temperature to 310°F (155 °C).
Use the rotary selector to reduce the temperature.
The symbol will flash under and the temperature is altered in 5°F (5°C) increments.
The altered target temperature is saved. The actual temperature is displayed.
Select "Settings" to toggle between displaying the actual temperature and the set temperature.
Temperature indicator
The temperature indicator light turns on whenever the oven heating is turned on.
Once the set temperature has been reached:
– a buzzer will sound if turned on (see "Settings - P 2"),
– the temperature indicator light will go out, and
– the oven heating will turn off.
The temperature regulator ensures that the oven heating and temperature indicator light turn back on when the oven temperature falls below the level set.
Rapid PreHeat
With Rapid PreHeat the preheating phase can be shortened.
Do not use Rapid PreHeat when baking pizza or delicate mixtures.
The tops of these items will brown too quickly.
Select Rapid PreHeat .
Select a temperature.
Set the desired oven mode when the temperature indicator light goes out for the first time.
Place the food in the oven.
Turning a cooking program On / Off automatically
You can set a cooking program to turn on or off automatically. First the mode and cooking temperature must be selected.
The maximum duration that can be set for a cooking program is 12 hours.
It It is recommended to use the automatic On/Off feature when roasting. Do not delay the start of the program for too long when baking. Cake mixtures and doughs will dry out, and the leavening agents will lose their effectiveness
Setting the duration
Example: Baking a cake for 1 hour 5 minutes
Place the food in the oven.
Select the required oven mode and temperature.
The oven heating, lighting and cooling fan will turn on.
Select "Settings".
If necessary, use the rotary selector to move the symbol until it appears under .
Confirm with OK.
00:00 will appear in the display along with a flashing under .
Use the rotary selector to select the cooking duration (01:05).
Confirm with OK.
The cooking duration is saved and then counts down in minutes, with the last minute counting down in seconds.
The symbol indicates that a cooking duration has been set.
Setting a cooking duration and a finish time
Example: the current time of day is 11:15; a roast with a cooking duration of 90 minutes needs to be ready at 13:30.
Place the food in the oven.
Select the required oven function and the temperature.
The oven heating, lighting and cooling fan will switch on.
First set the cooking duration:
Select .
If necessary, use the rotary selector < > to move the triangle until it appears under .
Confirm with OK.
00:00 will appear in the display with flashing under .
Use the rotary selector < > to set the cooking duration (01:30).
Confirm with OK.
The cooking duration is saved and then counts down in minutes:
Roast
Always observe the USDA guidelines for food safety.
Oven modes
Depending on how you would like the food prepared, you can use Convection Bake or Surround .
Cookware
Any heat-resistant cookware can be used:
Wire oven rack, grilling and roasting insert (if available) on the universal tray, roasting pans, heat-resistant glass/ earthen/cast iron dishes, roasting bags
Temperature
As a general rule, select a lower temperature.
If higher temperatures are used, the meat will brown on the outside, but will not be properly cooked through.
When cooking with Convection Bake , select a temperature 25°F (20°C) lower than when using Surround .
Shelf levels
In most cases level 3 should be used. With large items, such as a turkey, use level 1 or 2.
Tips
– Resting time: At the end of the program, take the roast out of the oven, cover with aluminum foil and let stand for about 10 minutes. This helps retain the juices when the meat is sliced.
– The larger the cut of meat, the lower the temperature setting should be.
– Use a roast probe for accurate cooking temperatures and best results.
Broil
Oven modes
Maxi Broil
For broiling thin cuts of meat and browning.
The entire Browning / Broiling element will get hot and glow red.
Convection Broil
For broiling thicker items, e.g. poultry or London broil.
The Browning/Broiling element and the fan switch on in alternating phases.
Cookware
Use the universal tray with the grilling and roasting insert (if available), and place the tray in the oven. The insert prevents any collected meat juices from burning, allowing them to be used for gravy and sauces.
Temperature
As a general rule, select the default temperature.
If higher temperatures are used, the meat will brown on the outside, but will not be properly cooked through.
Preheating
Always preheat the oven for about 5 minutes with the door closed before Broiling.
Cleaning and care
Unsuitable cleaning agents
To avoid damaging surfaces when cleaning, do not use:
Cleaners containing soda, ammonia, acids or chlorides
Lime removers on the front of the ovens
Abrasive cleaning agents, such as scouring powder, scouring cream, pumice stones
Solvent-based cleaners
Stainless steel cleaners
Dishwasher cleaners
Glass cleaners
Ceramic cooktop cleaners
Hard, abrasive sponges and brushes, such as pot scrubbers or used sponges that still contain traces of abrasive cleaner
Eraser sponges
Sharp metal scrapers
Steel wool
Spot cleaners
Oven cleaners
Stainless steel scouring pads
Tips
– Soiling caused by spilt juices and cake mixtures is best removed while the oven is still warm. Use caution and make sure the oven is not too hot - Danger of burns.
– To make cleaning easier you can dismantle the oven door, remove the side runners and lower the Browning/ Broiling element.
Normal soiling
Remove normal soiling immediately using a clean sponge with warm water and liquid dish soap applied with a clean, damp microfiber cloth.
After cleaning, ensure that any detergent residue is removed with clean water.
This is particularly important when cleaning surfaces treated with PerfectClean enamel as detergent residue can impair the non-stick properties.
Soiling on shelf runners and wire oven rack can also be removed using a non-abrasive stainless steel cleaner.
After cleaning, dry the surfaces with a soft cloth.
Stubborn soiling
Spilled fruit and roasting juices may cause lasting discoloration or matte patches on enameled surfaces. This does not affect the functional characteristics of the finish. Do not attempt to remove these marks. Clean them following the instructions given here.
Baked on deposits can be removed with a glass scraper or with a nonabrasive steel wool pad (e.g. Spontex Spirinett), warm water and liquid dish soap.
Very stubborn soiling on PerfectClean surfaces can be cleaned using Miele Oven Cleaner. This cleaner must only be applied to cold surfaces. Follow the instructions on the packaging.
Non-Miele oven cleaner must only be used in a cold oven and not left on for longer than a maximum of 10 minutes.
If necessary, the scouring pad on the back of a non-scratching washing-up sponge can be used to remove the soiling after the holding time.
After cleaning, remove all oven cleaning agent residues thoroughly with clean water, and then dry the surfaces.
Cleaning the oven interior with Self Clean
Instead of cleaning the oven by hand, you can use the Self Clean program.
Any grime that has accumulated will be broken down and burnt to ash as a result of the high temperatures.
This oven has three Self Clean levels, each with a different duration:
– Level 1 for light soiling
– Level 2 for heavier soiling
– Level 3 for very heavy soiling
Once the Self Clean program has started, the door will lock automatically. It cannot be opened again until the program has ended.
You can also set a delayed start time for the Self Clean program, in order to take advantage of off-peak electricity rates, for example.
At the end of the Self Clean program, any remaining residues (e.g., ash) can be easily wiped away
Preparing for the Self Clean program
Remove all accessories that are not suitable for the Self Clean program from the oven.
Remove the shelf runners for cleaning (see "Cleaning and care – Removing the shelf runners").
Heavy soiling in the oven can cause thick smoke to develop and can result in the Self Clean program being switched off.
Burnt-on residues can cause lasting discoloration or dull spots on enameled surfaces.
Before starting the Self Clean program, remove coarse soiling from the oven and scrape any burnt-on residues off enameled surfaces with a glass scraper.
Door removal
The door weighs approx. 42 lbs (19 kg.
The oven door is connected to the hinges by retainers.
Before removing the door from the retainers, the locking clamps on both hinges have to be released.
Open the door fully.
Release the locking clamps by turning them as far as they will go.
Raise the door up till it rests partially open.
Hold the door on either side and pull it diagonally upwards from the hinge guides. Make sure that you lift the door off straight.
Reinstalling the door
Hold both sides of the door securely and carefully fit it onto the brackets of the hinges.
Make sure that the door goes on straight.
Open the door fully.
To relock the locking clamps, turn them back up to the horizontal position as far as they will go.
Removing the shelf runners
Loosen the screw (1.).
Pull the runners out of the holder (2.) at the front of the oven, and then pull them out of the oven (3.).
Be sure that all parts are installed correctly.
Frequently asked questions
The following faults can be corrected without contacting the Miele Service Department. If in doubt, please contact Miele.
Danger of injury! Repairs should only be carried out by a qualified and trained professional in accordance with local and national safety regulations. Unauthorized repairs could cause personal injury or machine damage.
Problem
Possible cause and solution
This display is dark.
The time of day display is deactivated, so when the appliance is turned off, the time of day display is turned off.
As soon as the oven is turned on, the time of day will appear. If you want it to be displayed continuously, the setting to turn the time of day display back on must be changed (see "Settings – P 1").
There is no power to the appliance.
Check if the circuit breaker has tripped.
An oven mode has been selected and the time of day and the symbol still appear in the display.
The system lock is On.
Turn off the system lock (see "System lock ").
The oven does not heat up.
Demo mode has been activated. appears in the display.
The oven can be operated but does not heat up.
Deactivate Demo mode (see "Settings – P 10").
An oven mode has been selected but the oven is not working.
There has been a power failure which has caused the current cooking process to stop.
Turn the mode selector to the • position and turn the oven off. Start the cooking process again.
12:00 will appear in the display with flashing under :
The power supply was interrupted for longer than 200 hours.
Reset the time of day (see "Before using for the first time").
0:00 appears unexpectedly in this display and the symbol flashes at the same time. The buzzer may also be sounding.
The oven has been operating for an unusually long period of time, this has activated the "Safety cut-out feature".
Turn the mode selector to •. The oven is now ready to use again immediately.
appears in the display
The Self Clean program door lock is not locking.
Turn the mode selector to the Self Clean program • again.
If the problem persists, contact Miele Technical Service.
appears in the display.
The door lock for the Self Clean program will not deactivate.
Turn the mode selector to the • position and turn the oven off. If the problem persists, contact Miele Technical Service.
appears in the display.
A fault has occurred that you cannot resolve.
Contact Miele Technical Service.
A noise is heard after the cooking process is complete.
After the cooking process the cooling fan will continue to run for a while after a program is complete to prevent moisture from building up in the oven, on the control panel or surrounding cabinetry. The cooling fan will turn off automatically.
The oven has turned itself off.
The oven turns off automatically if a button is not pressed after a certain amount of time or after a cooking program has ended to save power.
Turn the oven back on.
Baked goods are not cooked properly after following the times given in the chart.
A different temperature than that given in the recipe was used.
Select the temperature required for the recipe.
The ingredient quantities are different from those given in the recipe.
Double check the recipe. The addition of more liquid or more eggs will make a wetter mixture which will take longer to cook.
The browning is uneven.
The wrong temperature or shelf level was selected.
There will always be a slight unevenness. If the unevenness is great, check whether the correct temperature and shelf level were selected.
The material or color of the bakeware is not suitable for the oven mode selected.
When using Surround use matte, dark colored pans. Light colored, shiny pans will not produce as desirable results.
The oven lighting turns off after a short time.
The oven is facotry set to turn off automatically after 15 seconds. This setting can be changed (see "Settings").
The oven lighting does not turn on.
The halogen bulb needs to be replaced.
Danger of burns! Make sure the heating elements are turned off and allowed to cool completely.
The lamp cover may be damaged if it falls.
When removing the cover hold it firmly so that it does not fall. Place a towel on the oven floor and open door to avoid damage.
Disconnect the appliance from the power supply.
Loosen the bulb cover with the tool supplied at the back of the frame.
Do not touch the halogen bulb with bare fingers.
Observe the manufacturer's instructions.
Remove the halogen bulb.
Replace it with a new halogen bulb (Sylvania 66740, 120 V, 40 W, G9, FS1).
Press the bulb cover back into place.
Reconnect the oven to the electrical supply.
There is soiling in the over after the Self Clean program.
The Self Clean program burns off soiling in the oven and leaves it as ash.
Using a soft sponge, warm water and liquid dish soap remove the ashes.
If coarse soiling remains, start the Self Clean program again with a longer duration.
The oven door cannot be closed.
As soon as the inner pane is damaged, a safety mechanism blocks the oven door. The oven door cannot be closed and the oven functions (oven modes, special modes and self clean) cannot be used.


 Surround
 Bake
Bake Maxi Broil
 Defrost
 Self Clean
 Rapid PreHeat
 Convection Bake
 Intensive
 Convection Broil
 Gentle Bake
 and/or which button is pressed, the following symbols will appear:
 in the display.
 position.
 .
.
 appears:

 .
.


 :
:


 and 350°F (175°C) and you can see the temperature rising in this display.
 and the temperature is altered in 5°F (5°C) increments.
 turns on whenever the oven heating is turned on.
 the preheating phase can be shortened.
 .
.
 .
.
 or Surround
  .
.


 symbol still appear in the display.
 appears in the display.
 appears in the display
 appears in the display.
 appears in the display.
 use matte, dark colored pans. Light colored, shiny pans will not produce as desirable results.