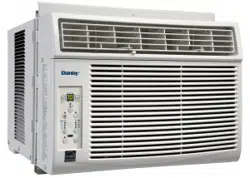
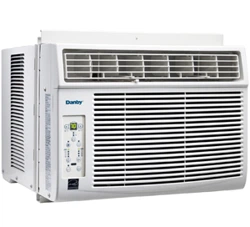
This air conditioner is designed for single or double hung windows. Since window designs vary, it may be necessary to make some modifications for safe installation.
This air conditioner is not designed for vertical, slider type windows or “through the wall” installation.
Ensure that the window and frame are structurally sound and free from dry or rotted wood.
Install the air conditioner in a window on a side of the building which favors more shade than sunlight. If the appliance must be in direct sunlight, it is advisable to provide a shade awning over the appliance to ensure efficient functioning.
Do not install the appliance where leakage of combustible gas is suspected.
This appliance is designed to evaporate condensation under normal conditions. Under extremely hot or humid conditions, excess condensation may overflow to the outside. The appliance should be installed where condensation cannot drip on pedestrians or neighboring properties.
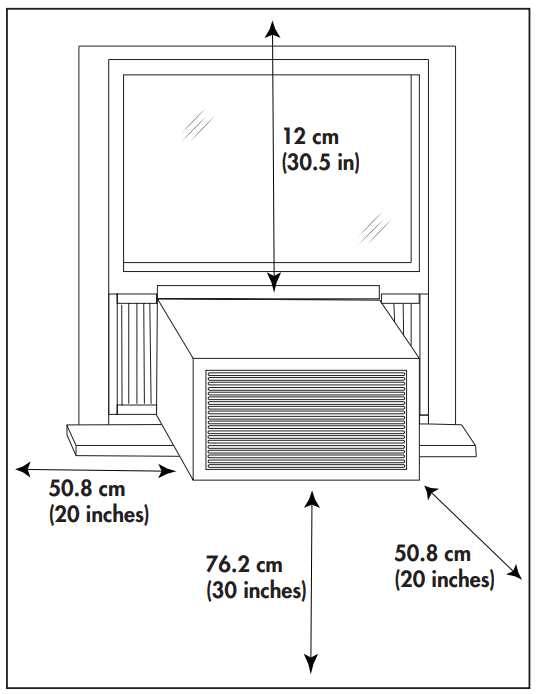
Provide sufficient clearance around the appliance to allow ample air circulation. The rear of the appliance should be outdoors, it should not be in a garage or another room. Keep the appliance away from obstacles and at least 76 cm (30 inches) above the ground. Ensure that curtains and other obstructions do not block air flow to the appliance.
REQUIRED TOOLS
Screwdrivers: Phillips and flat head.
Power Drill: 3.2mm (1/8”) diameter drill bit
Pencil
Measuring Tape
Scissors
Carpenter’s Leve
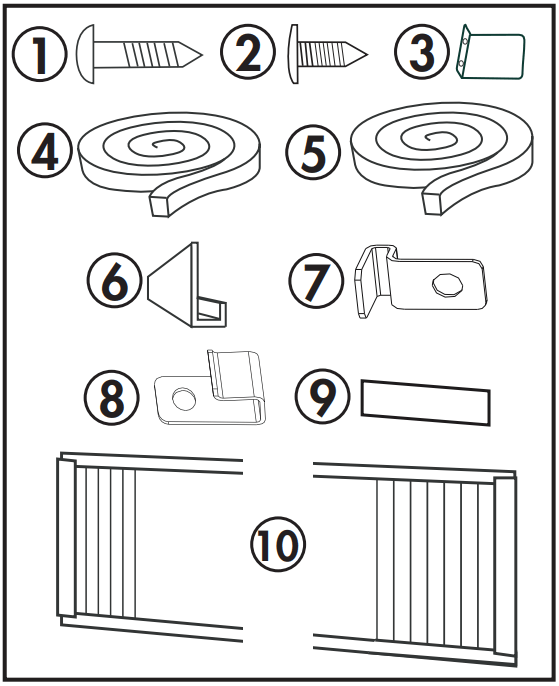
ACCESSORIES
The following accessories are included with the appliance and should be used during the installation.
13 mm (1/2 inch) screws (x7)
9.5 mm (3/8 inch) screws (x4) (Factory installed on some models.)
Safety Lock
Adhesive foam seal
Regular foam seal
“L” shaped mounting bracket (Factory installed on some models.)
Bracket for wood windows (x2)
Bracket for vinyl windows (x2)
Weather stripping (x5)
Side curtains (x2)
INSTALLATION
Attach the side curtains to the appliance by sliding the curtain frame into the side channel of the cabinet. The curtains are labeled “left” and “right on the frames. This refers to the left and right sides of the appliance when facing the front of the appliance.
Cut the regular foam seal to fit the area of the window sill that the air conditioner will rest on.
Place the air conditioner into the window with the “L” shaped mounting bracket positioned in front of the upper sash. The bottom of the cabinet should be positioned on the recessed portion of the window frame. Pull the upper window sash down until it rests just behind the front flange of the “L” shaped mounting bracket.
Expand the side curtains on each side and secure the top of the frames to the window sash using one 13 mm (1/2”) screw on each side of the “L” shaped mounting bracket.
Attach the clamps on the lower part of each curtain to the window sill using one 13 mm (1/2”) screw on each side of the cabinet.
Place the adhesive foam seal into the opening between the inside and outside windows and attached the safety lock to the outside window frame using two 13 mm (1/2”) screws.
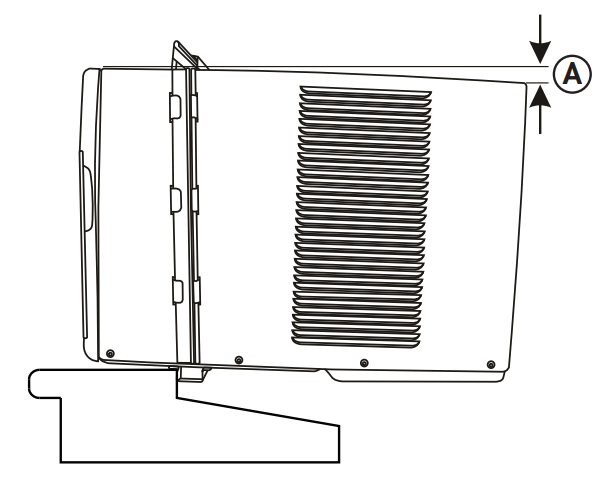
Check the Tilt Angle
The air conditioner should be tilted downward towards the outside approximately 3° to 4°. This tilt will encourage any condensed water to drain to the outside. If any condensed water leaks to the inside of the house, check the tilt angle and adjust as necessary.
Measure the tilt angle from the front of the cabinet’s edge. The difference in height between the front and the back of the appliance, labeled “A” on the image below, should be approximately:
19 mm - 2.5 cm (3/4” - 1”) for 8K
2.5 cm - 3.5 cm (1” - 1 3/8”) for 10K & 12K
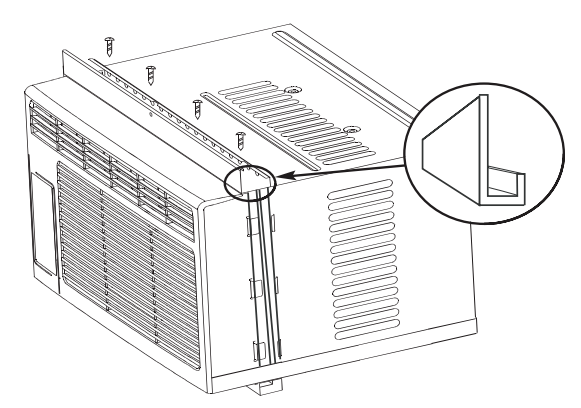
L BRACKET
The “L” shaped bracket may come factory installed on some models.
If the “L” shaped bracket is not pre-installed, attach it to the top of the cabinet as shown below using the provided 9.5 mm (3/8”) screws (x4).
OPERATING INSTRUCTIONS
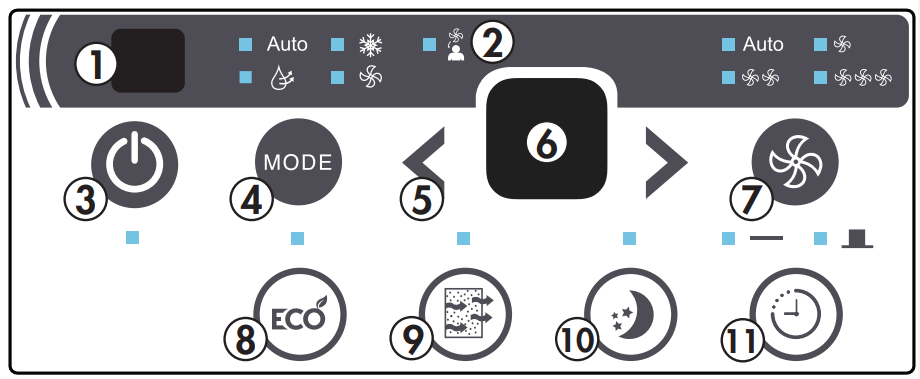
CONTROL PANEL
Remote Control Receiver: Ensure this receiver is not obscured by curtains or other items as it could impact remote control functioning.
Follow Me Indicator Light: Illuminates when the Follow Me function is active. Follow Me can only be set from the remote control.
Power Button: Used to turn the appliance on or off.
Mode Button: Used to choose the operating mode.
Up and Down Arrows: Used to adjust the set temperature in 1° increments and the timer function in 30 minute increments up to 10 hours and then in 1 hour increments up to 24 hours.
Display Panel: Displays the set temperature, the ambient temperature and the timer settings. To change the temperature scale being displayed, press the up and down buttons at the same time.
Fan Button: Used to set the fan speed. The fan can be set to Low, Medium, High and Auto.
Energy Saver Button: Used to set the energy saver function.
Filter Button: The indicator light will illuminate as a reminder to check the filter. Once the filter has been cleaned, use this button to resume operation.
Sleep Button: Used to set the Sleep function.
Timer Button: Used to set the auto on and auto off timer.
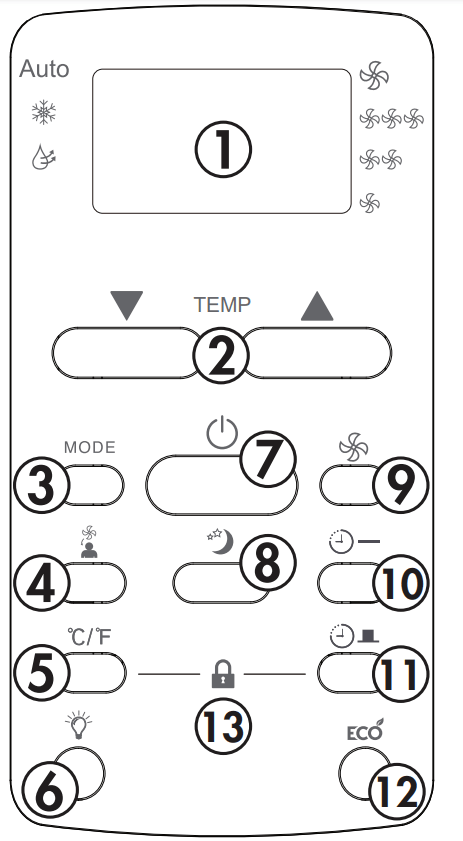
REMOTE CONTROL
Display Panel: Displays the set temperature, the ambient temperature and the timer settings. To change the temperature scale being displayed, press the °C/°F button.
Up and Down Arrows: Used to adjust the set temperature in 1° increments and the timer function in 30 minute increments up to 10 hours and then in 1 hour increments up to 24 hours.
Mode Button: Used to choose the operating mode.
Follow Me Button: Used to set the follow me function. 5. °C/°F button: Use to change the temperature scale.
LED Button: Press to turn the LED back light on or off.
Power Button: Used to turn the appliance on or off.
Sleep Button: Used to set the sleep function.
Fan Button: Used to set the fan speed. The fan can be set to low, medium, high and auto.
Timer On Button: Used to set the auto on timer.
Timer Off Button: Used to set the auto off timer.
Energy Saver Button: Used to set the energy saver function.
Lock Button: Press the °C/°F button and the timer button at the same time to lock the remote control and prevent the settings from being inadvertently changed.
REMOTE CONTROL BATTERIES
The remote control requires two AAA alkaline batteries (included). Batteries should be replaced when:
No sound is heard when attempting to program the appliance.
The appliance does not respond to a command issued by the remote control.
Battery replacement:
Slide the rear cover on the remote in the direction of the arrow.
Insert two AAA batteries following the same orientation depicted inside the battery chamber (+/-).
Reinstall the rear cover.
If the remote control will not be used for extended periods of time, the batteries should be removed.
Notes:
Protect the remote control from high temperatures, and keep it away from radiation exposure.
Keep the control panel receiver out of direct sunlight.
Do not mix old and new batteries.
Do not mix alkaline, standard (carbon-zinc), or rechargeable (ni-cad, ni-mh,etc) batteries.
The remote operates within a range of 8 meters (26 ft.) from the receiver located inside the main appliance. Any obstruction between the receiver and remote may cause signal interference, limiting the ability to program the main unit.
OPERATING MODES
There are four operating modes to choose from. Press the mode button repeatedly to choose the desired mode. The adjacent indicator light will illuminate to show which mode has been selected.
Cool Mode
Choose cool mode to set the cooling function. Use the up and down arrows to choose the desired temperature. When cool mode is selected, the fan speed can be adjusted by pressing the fan button.
Dry Mode
Choose dry mode to remove excess moisture from the air during periods of high humidity. All water pulled from the air will condense inside the appliance and drain out the back. The fan speed will be automatically set and cannot be modified in dry mode.
Fan Mode
Choose fan mode to run the internal fan without engaging the cooling function. Press the fan button repeatedly to choose the fan speed.
Auto Mode
Auto mode is a pre-set factory program that automatically defines the mode and fan speed based on the set temperature, the ambient temperature and the ambient humidity
UP AND DOWN ARROWS
The up and down arrows will modify the set temperature in 1° increments.
The up and down arrows will modify the set time of the timer function in 0.5 hour increments up to 10 hours and then in 1 hour increments up to 24 hours maximum.
SLEEP
The sleep function can be used to conserve energy during sleeping hours.
When selected, the set temperature will increase by 1°C/2°F every half hour for one full hour. The appliance will hold the new set temperature for 6 hours before automatically returning to normal operation.
The Sleep Function can be canceled at any time by pressing the Sleep Button.
ENERGY SAVER
The energy saver function will automatically cycle the fan on and off when the compressor is not in use to minimize how often the compressor needs to turn on.
When selected, the fan will continue to run for 3 minutes after the compressor turns off. The fan will then cycle on for 2 minutes in 10 minute intervals until the ambient temperature is above the set temperature, at which point the compressor will turn on and cooling will resume.
FOLLOW ME
There is a temperature sensor built into the remote control that will monitor the room temperature. Keep the remote control with you and the appliance will automatically adjust the set temperature based on the temperature where you are located.
The remote will display the temperature at its location. The remote will send a signal to the air conditioner every 3 minutes, so long as you remain within range of the appliance.
The follow me light on the control panel will illuminate for 5 seconds every 3 minutes to indicate that it has received a signal from the remote. If the appliance does not receive a signal from the remote during any 7 minute interval it will beep to indicate that the follow me mode has ended.
The maximum distance for the follow me feature is 8 meters (26 feet). This feature is available in cool and auto modes.
TIMER
The timer can be used to turn the appliance on or off after a set period of time.
The control panel has one timer button. Press once to set the auto off timer and twice to set the auto off timer. The remote control has separate timer on and timer off buttons.
Auto On Timer
Press the timer on button on the remote or press the timer button on the control panel twice.
Use the up and down arrows to select the desired amount of time before the appliance should turn on.
Use the mode button to select the desired mode.
Use the fan button to select the desired fan speed.
The time selected will appear on the display panel and will count down until the appliance turns on.
Auto Off Timer
Press the timer off button on the remote or press the timer button on the control panel once.
Use the up and down arrows to select the desired amount of time before the appliance should turn off. The appliance will run in the currently selected mode.
The time selected will appear on the display panel and will count down until the appliance turns off.
Using On and Off Timers Simultaneously
The on and off timers can be used at the same time.
To set the appliance to turn on, run for a set period of time and then turn off, set the auto on timer first and then set the auto off timer.
To set the appliance to run for a period of time, turn off for a period of time and then turn back on, set the auto off timer first and then set the auto on timer.
Both indicator lights will illuminate and the display will count down to the appliance either turning off or on, whichever function was set first.
The timer will not cycle the appliance on and off indefinitely. The on and off timers will function one time and then the appliance will return to regular functioning.
Turning the appliance off or unplugging the appliance will clear all memory settings, including the timer.
CARE & MAINTENANCE
AIR FILTER
The air filter should be cleaned approximately every 2 weeks. The air filter may require more frequent cleaning if there is significant dander or fur in the air.
Approximately every two weeks, the filter indicator light on the control panel will illuminate as a reminder to clean the filter. Follow the steps below to clean the filter and return the appliance to normal functioning.
The air filter is located behind the front intake grill. To remove the air filter, grasp the filter tab on the right side of the grill and slide it out to the right. If the front intake grill has two indents, pull the grill forward to remove the air filter.
Use a vacuum cleaner with a soft brush attachment to remove any large debris or dust build up from the air filter.
Wash the filter in lukewarm, soapy water, below 40°C (104°F), or use a neutral cleaning agent.
Rinse the filter with clean water and dry thoroughly before reinstalling in the appliance.
Press the filter button on the control panel to resume normal functioning.
Note: Do not operate the appliance without the air filter installed.
ERROR CODES
If the display panel shows any of the below error codes, unplug the appliance, let it stand for 5-10 minutes and then plug it back in. If the error persists, call for service.
AS - Room temperature sensor error
HS - Electric heating sensor error
. - Evaporator temperature sensor error
CLEANING
To avoid possible electric shock, ensure that the appliance is unplugged before performing any cleaning or maintenance.
The outside of the appliance can be wiped clean with a soft cloth or with a lukewarm, damp cloth if necessary.
Do not use gasoline, benzene, thinner or any other chemicals to clean this appliance as these substances can cause damage to the finish and deformation of plastic parts.
Never pour water directly onto the appliance as this will cause deterioration of electrical components and wiring insulation.
END OF SEASON CARE
Before removing the appliance from service for the year, operate the appliance on high fan mode for half a day to ensure the inside of the appliance is dry. This will help avoid the growth of mold or mildew inside the appliance. Ensure the filterfilter is clean and dry. Store the appliance covered in a dry location.
Note: When installing or removing the appliance from the window, ensure that caution is taken to prevent it from falling backward. It is recommended that installation or removal is completed with assistance to prevent injury to persons or damage to property or the appliance.
DISPOSAL
Check for local regulatory compliance regarding approved and safe disposal of this appliance.
TROUBLESHOOTING
PROBLEM
POSSIBLE CAUSE
Appliance will not operate
Plug is not fully inserted into the wall outlet
Blown fuse or circuit breaker
Insufficient cooling
Air filter is dirty
Blocked air flow
Appliance size is too small for application
Noise
Inadequate support in window installation
Odors
Formation of mold or mildew on internal wet surfaces
Place an algaecide tablet in base pan; push the tablet through the grill on either side of the appliance
Water dripping inside
Appliance is not properly angled to allow water to drain to the outside
Water dripping outside
On very hot or humid days dripping water from the back of the appliance is normal
Frost build up
When outdoor temperatures are below 18.3°C (65°F) frost may form when the appliance is in cooling mode
Switch the appliance to fan only mode until the frost melts
This Class B digital apparatus complies with the Canadian ICES-003 standard. CAN ICES-3 (B)
This equipment has been tested and found to comply with the limits for a Class B digital device, pursuant to Part 15 of the FCC Rules. These limits are designed to provide reasonable protection against interference in a residential installation.
This equipment generates, uses and can radiate radio frequency energy and, if not installed and used in accordance with the instructions, may cause interference to radio communications. However, there is no guarantee that interference will not occur in a particular installation.
If this equipment does cause interference to radio or television reception, which can be determined by turning the equipment off and on, the user is encouraged to try to correct the interference by one or more of the following measures:
Reorient or relocate the receiving antenna.
Increase the separation between the equipment and receiver.
Connect the equipment into an outlet on a circuit different from that to which the receiver is connected.
Consult the dealer or an experienced radio/TV technician for help.
Changes or modifications not approved by the party responsible for FCC compliance could void the user’s authority to operate the equipment. This appliance complies with Part 15 of the FCC Rules.
Operation is subject to the following two conditions:
This device may not cause interference.
This device must accept any interference received, including interference that may cause undesired operation.
Water is collected during the air conditioning process. This water will drain out of the unit and onto the ground and is why the unit should be installed on a slight downward tilt.
All Danby window air conditioners come complete with all required hardware for installation. Danby provides the installation guide in the manual as well as providing a video on our YouTube channel under the “How To” play list.
Danby window air conditioners have a sound rating from 39.5 decibels to 61 decibels. The exact decibel range is determined by the model of the unit and whether it is in fan, cooling or dry mode.
#8 Can I leave my AC in place through the winter? Will this damage it?
No, this is not recommended. Please bring your AC unit indoors during the winter months.
#9 Why is my air conditioner not cooling my entire apartment?
Danby air conditioners are designed to cool a room and not multiple rooms. Any walls or doors will interfere with the air flow.