
English - 1 -
Markings on the Product......................................... 2
Features ................................................................. 3
OLED TV Operations (depending on the model) ........... 4
Specication ........................................................... 6
Disposal information ............................................... 6
Remote Control RC A3 _49141 (depending on the
model)................................................................................. 7
TV and Operating Buttons (depending on the
model)................................................................... 10
Connect Power .................................................... 10
Antenna Connection (depending on the model) .......... 10
USB Connection ....................................................11
Inserting the Batteries into the Remote .................11
Environmental Information.....................................11
Standby Notications .............................................11
First Time Installation (depending on the model).. 12
Using SatcoDX Feature (depending on the
model)................................................................... 12
Media Playback via USB Input (depending on the
model)................................................................... 13
Recording a Programme (depending on the
model)................................................................... 13
Timeshift Recording (depending on the model) .... 13
Instant Recording (depending on the model) ....... 13
Watching Recorded Programmes (depending on
the model)............................................................. 14
Recording Conguration (depending on the
model)................................................................... 14
Media Browser Menu (depending on the model).. 14
FollowMe TV (depending on the model) ............... 14
CEC and CEC RC Passthrough (depending on the
model)................................................................... 14
E-Manual (depending on the model) .................... 15
General TV Operation .......................................... 20
Using the Channel List ......................................... 20
Conguring Parental Settings ............................... 20
Electronic Programme Guide (EPG) ................... 20
Software Upgrade................................................. 21
Troubleshooting & Tips ......................................... 21
Connectivity Functions (depending on the model) 22
Supported Picture File Formats for USB Mode .... 27
Supported Subtitle File Formats for USB Mode ... 29
Supported DVI Resolutions .................................. 30
Internet Portal functionality information ................ 31
DVB functionality information ............................... 31
Contents
English - 2 -
Safety Information
CAUTION
RISK OF ELECTRIC SHOCK
DO NOT OPEN
CAUTION: TO REDUCE THE RISK OF ELECTRIC SHOCK DO
NOT REMOVE COVER (OR BACK).
NO USER-SERVICEABLE PARTS INSIDE. REFER
SERVICING TO QUALIFIED SERVICE PERSONNEL.
Note: Follow the on screen instructions for operating the
related features.
In extreme weather (storms, lightning) and long inactivity
periods (going on holiday) disconnect the TV set from the
mains.
The mains plug is used to disconnect TV set from the mains
and therefore it must remain readily operable. If the TV set is
not disconnected electrically from the mains, the device will
still draw power for all situations even if the TV is in standby
mode or switched off.
IMPORTANT - Please read these
instructions fully before installing or
operating
WARNING: Never let people (including
children) with reduced physical, sensory or
mental capabilities or lack of experience and / or
knowledge use electrical devices unsupervised.
• Use this TV set at an altitude of less than 2000
meters above the sea level, in dry locations and in
regions with moderate or tropical climates.
• The TV set is intended for household and similar
general use but may also be used in public places.
• For ventilation purposes, leave at least 5cm of free
space around the TV.
• The ventilation should not be impeded by covering
or blocking the ventilation openings with items, such
as newspapers, table-cloths, curtains, etc.
• The power cord plug should be easily accessible. Do
not place the TV, furniture, etc. on the power cord.
A damaged power cord/plug can cause re or give
you an electric shock. Handle the power cord by the
plug, do not unplug the TV by pulling the power cord.
Never touch the power cord/plug with wet hands
as this could cause a short circuit or electric shock.
Never make a knot in the power cord or tie it with
other cords. When damaged it must be replaced,
this should only be done by qualied personnel.
• Do not expose the TV to dripping or splashing of
liquids and do not place objects lled with liquids,
such as vases, cups, etc. on or over the TV (e.g.,
on shelves above the unit).
• Do not expose the TV to direct sunlight or do not
place open ames such as lit candles on the top of
or near the TV.
• Do not place any heat sources such as electric
heaters, radiators, etc. near the TV set.
• Do not place the TV on the floor and inclined
surfaces.
• To avoid danger of suffocation, keep plastic bags
out of the reach of the babies, children and domestic
animals.
• Carefully attach the stand to the TV. If the stand is
provided with screws, tighten the screws rmly to
prevent the TV from tilting. Do not over-tighten the
screws and mount the stand rubbers properly.
• Do not dispose of the batteries in fire or with
hazardous or ammable materials.
Warning: Batteries must not be exposed to excessive
heat such as sunshine, re or the like.
• Do not place the TV where it will be exposed to
direct sunlight or other strong light sources as this
will result in display defects.
• Remove the protective lm carefully from the display
before using the TV.
Caution
Serious injury or death risk
Risk of electric shock
Dangerous voltage risk
Maintenance
Important maintenance
component
Markings on the Product
The following symbols are used on the product as
a marker for restrictions and precautions and safety
instructions. Each explanation shall be considered
where the product bears related marking only. Note
such information for security reasons.
Class II Equipment: This appliance is
designed in such a way that it does not require
a safety connection to electrical earth.
Class II Equipment With Functional
Earthing: This appliance is designed in such
a way that it does not require a safety
connection to electrical earth, the earth connection is
used for functional purposes.
Protective Earth Connection: The marked
terminal is intended for connection of the
protective earthing conductor associated with
the supply wiring.
Hazardous Live Terminal: The marked
terminal(s) is/are hazardous live under normal
operating conditions.
Caution, See Operating Instructions: The
marked area(s) contain(s) user replaceable
coin or button cell batteries.
i
English - 3 -
CLASS 1
LASER PRODUCT
Class 1 Laser Product: This
product contains Class 1 laser
source that is safe under
reasonably foreseeable
conditions of operation.
WARNING
Do not ingest the battery, Chemical Burn Hazard
This product or the accessories supplied with the
product may contain a coin/button cell battery. If
the coin/button cell battery is swallowed, it can ca-
use severe internal burns in just 2 hours and can
lead to death.
Keep new and used batteries away from children.
If the battery compartment does not close secu-
rely, stop using the product and keep it away from
children.
If you think batteries might have been swallowed
or placed inside any part of the body, seek imme-
diate medical attention.
WARNING
Never place a television set in unstable or inclined
locations. A television set may fall, causing serious
personal injury or death. Many injuries, particularly
to children, can be avoided by taking simple pre-
cautions such as;
• Using cabinets or stands recommended by the
manufacturer of the television set.
• Only using furniture that can safely support the
television set.
• Ensuring the television set is not overhanging the
edge of the supporting furniture.
• Not placing the television set on tall furniture
(for example, cupboards or bookcases) without
anchoring both the furniture and the television set
to a suitable support.
• Not standing the television set on cloth or other
materials placed between the television and
supporting furniture.
• Educating children about the dangers of climbing
on furniture to reach the television set or its
controls. If your existing television set is being
retained and relocated, the same considerations
as above should be applied.
WALL MOUNTING WARNINGS
• Read the instructions before mounting your TV
on the wall.
• The wall mount kit is optional. You can obtain from
your local dealer, if not supplied with your TV.
• Do not install the TV on a ceiling or on an inclined
wall.
• Use the specied wall mounting screws and other
accessories.
• Tighten the wall mounting screws rmly to prevent
the TV from fall. Do not over-tighten the screws.
WARNING
Apparatus connected to the protective earthing of
the building installation through the MAINS con-
nection or through other apparatus with a connec-
tion to protective earthing – and to a television dist-
ribution system using coaxial cable, may in some
circumstances create a re hazard. Connection to
a television distribution system has therefore to be
provided through a device providing electrical iso-
lation below a certain frequency range (galvanic
isolator, see EN 60728-11)
Features
• TV supports Ultra HD (Ultra High Denition - also
known as 4K) which provides resolution of 3840 x
2160 (4K:2K). It equals 4 times the resolution of Full
HD TV by doubling the pixel count of the Full HD TV
both horizontally and vertically. Ultra HD contents are
supported from HDMI, USB inputs and over DVB-T2
and DVB-S2 broadcasts.
• Remote controlled colour TV
• Fully integrated digital terrestrial/cable/satellite TV
(DVB-T-T2/C/S-S2)
• HDMI inputs to connect other devices with HDMI
sockets
• USB input
• OSD menu system
• Scart socket for external devices (such as DVD
Players, PVR, video games, etc.)
• Stereo sound system
• Teletext
• Headphone connection
• Automatic programming system
• Manual tuning

English - 4 -
• Automatic power down after up to eight hours.
• Sleep timer
• Child lock
• Automatic sound mute when no transmission.
• NTSC playback
• AVL (Automatic Volume Limiting)
• PLL (Frequency Search)
• PC input
• Game Mode (Optional)
• Picture off function
• Programme recording
• Programme timeshifting
• Ethernet (LAN) for Internet connectivity and service
• 802.11n WIFI Support via USB dongle
• Audio Video Sharing
High Dynamic Range (HDR) / Hybrid Log-Gamma
(HLG): Using this feature the TV can reproduce
greater dynamic range of luminosity by capturing
and then combining several different exposures.
HDR/HLG promises better picture quality thanks to
brighter, more realistic highlights, more realistic color
and other improvements. It delivers the look that
lmmakers intended to achieve, showing the hidden
areas of dark shadows and sunlight with full clarity,
colour and detail. HDR/HLG contents are supported
via native and portal applications, HDMI, USB inputs
and over DVB-S broadcasts. Set the related HDMI
source input as Enhanced from the Sources option
in the Settings menu in order to watch HDR/HLG
images, if the HDR/HLG content is received through
an HDMI input. The source device should also be at
least HDMI 2.0a compatible in this case.
Dolby Vision: Dolby Vision™ delivers a dramatic vis-
ual experience, astonishing brightness, incomparable
contrast, and captivating color, that brings entertain-
ment to life. It achieves this stunning image quality by
leveraging breakthrough HDR and wide color gamut
imaging technologies. By increasing the brightness of
the original signal and using a higher dynamic color
and contrast range, Dolby Vision presents stunning,
true-to-life images with amazing amounts of detail
that other post-processing technologies in the TV
aren’t able to produce. Dolby Vision is supported via
native and portal applications, HDMI and USB inputs.
In the System>Picture>Mode menu two predened
picture modes will be available if Dolby Vision content
is detected: Dolby Vision Bright and Dolby Vision
Dark. As of their names indicate, you may experience
the content as the creative intended, with bright and
dark options, considering the ambient luminance.
Functions and features may vary in
accordance with the model.
OLED TV Operations (depending on the model)
OLED panels have some procedures in order to
extend the panel lifetime and provide protection
from image sticking problem.
OFF-RS
• After every 4 hours of use, the TV will perform OFF-
RS operation automatically and the next time TV is
switched into standby mode.
• It will take about 6 minutes. In order not to interrupt
the operation it is recommended to wait until the
operation is completed.
• The LED will be blinking during the operation.
• When the operation is completed, the TV will switch
into the standby mode.
• This operation can be interrupted by cutting the
power supply to the TV or switching the TV on. In
this case OFF-RS operation will be performed when
next time the TV is switched into standby mode.
ON-RF
• This operation will be performed automatically every
time the TV is switched on.
• Do not do anything during boot-up procedure. Do
not interrupt the process.
• It will take about 6 seconds for the rst picture to
appear on the screen.
• The boot logo will thus appear later and will remain
for a lesser period of time on the screen.
JB
• This operation will be performed automatically at any
time of the day when the TV is switched into standby
mode after every 1500 hours of use.
• First, OFF-RS operation will be performed when the
TV is switched into standby mode.
• Then, the TV will remain in standby mode for a
period of 1 hour in order to cool down the panel.
• After a period of 1 hour in standby mode the TV
will switch on with blank screen and JB function will
be performed if the panel is at proper temperature.
• This will take about 1 minute and during the
operation the LED will blink and a horizontal line
will appear on the screen, moving from the top to
the bottom of the screen.
• After JB operation is completed the TV will switch
into standby mode.
• JB operation can be interrupted at any time by
cutting the power supply to the TV or switching
the TV on.
• If JB operation is interrupted a massage will appear
on the screen stating that the JB operation was
interrupted when next time the TV is switched on.

English - 5 -
• In this case, JB operation will be performed when
next time the TV is switched into standby mode.
• JB operation can be performed manually using
the OLED Panel Noise Clean option in the menu.
System>Picture>Advanced Settings.
Pixel Shifting
• The images will be automatically shifted one pixel
every three minutes to prevent image sticking.
Notication (depending on the model)
TRADEMARK ACKNOWLEDGMENT
Manufactured under license from Dolby Laboratories.
Dolby, Dolby Audio, Dolby Vision and the double-D
symbol are trademarks of Dolby Laboratories.
The terms HDMI and High-Definition Multimedia
Interface, and the HDMI Logo are trademarks
or registered trademarks of HDMI Licensing
Administrator, inc. in the United States and other
countries.
YouTube and the YouTube logo are trademarks of
Google Inc.
For DTS patents, see http://patents.dts.com.
Manufactured under license from DTS Licensing
Limited. DTS, the Symbol, & DTS and the Symbol
together are registered trademarks, and DTS
TruSurround is a trademark of DTS, Inc.
©
DTS, Inc.
All Rights Reserved.
For DTS patents, see http://patents.dts.com.
Manufactured under license from DTS Licensing
Limited. DTS, DTS-HD, the Symbol, & DTS or DTS-HD
and the Symbol together are registered trademarks of
DTS, Inc.
©
DTS, Inc. All Rights Reserved.
For DTS patents, see http://patents.dts.com.
Manufactured under license from DTS Licensing
Limited. DTS, the Symbol, & DTS and the Symbol
together are registered trademarks, and DTS
2.0+Digital Out is a trademark of DTS, Inc.
©
DTS, Inc.
All Rights Reserved.
This product contains technology subject to certain
intellectual property rights of Microsoft. Use or
distribution of this technology outside of this product
is prohibited without the appropriate license(s) from
Microsoft.
Content owners use Microsoft PlayReady™ content
access technology to protect their intellectual
property, including copyrighted content. This device
uses PlayReady technology to access PlayReady-
protected content and/or WMDRM-protected content.
If the device fails to properly enforce restrictions on
content usage, content owners may require Microsoft
to revoke the device’s ability to consume PlayReady-
protected content. Revocation should not affect
unprotected content or content protected by other
content access technologies. Content owners may
require you to upgrade PlayReady to access their
content. If you decline an upgrade, you will not be able
to access content that requires the upgrade.
English - 6 -
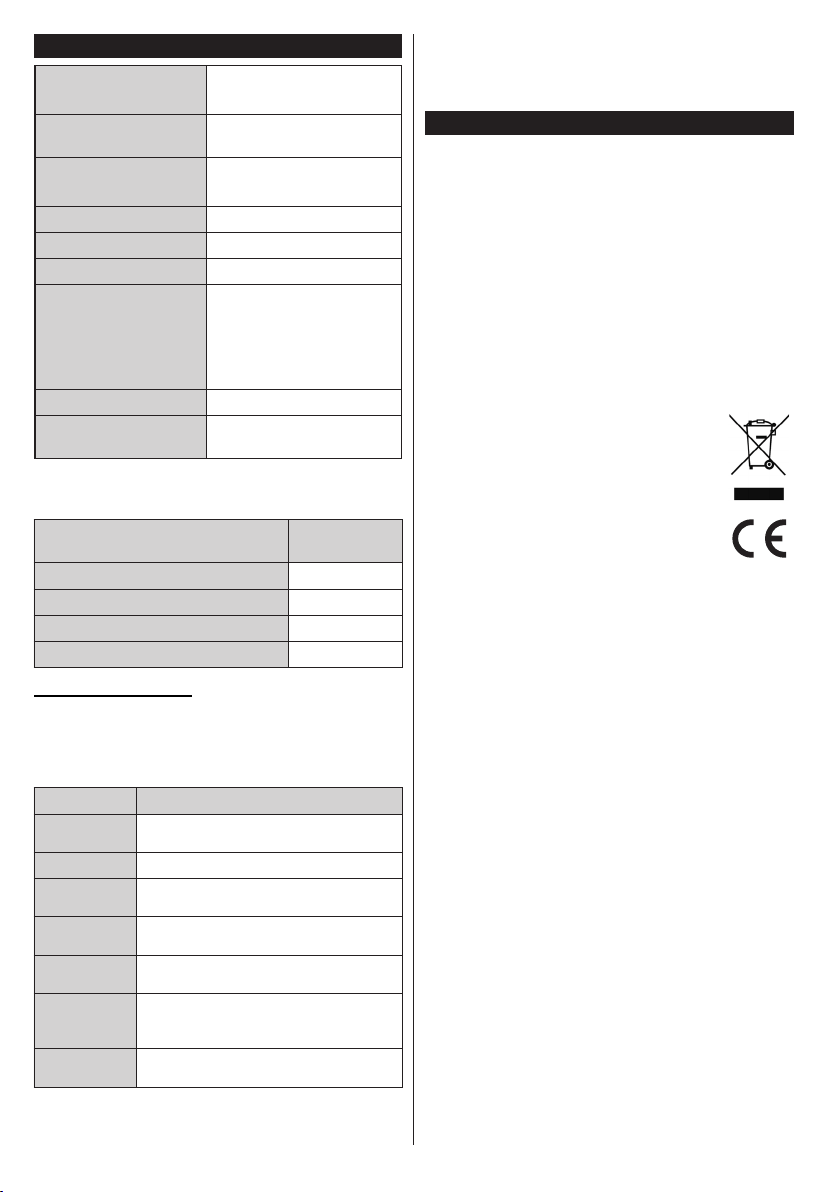
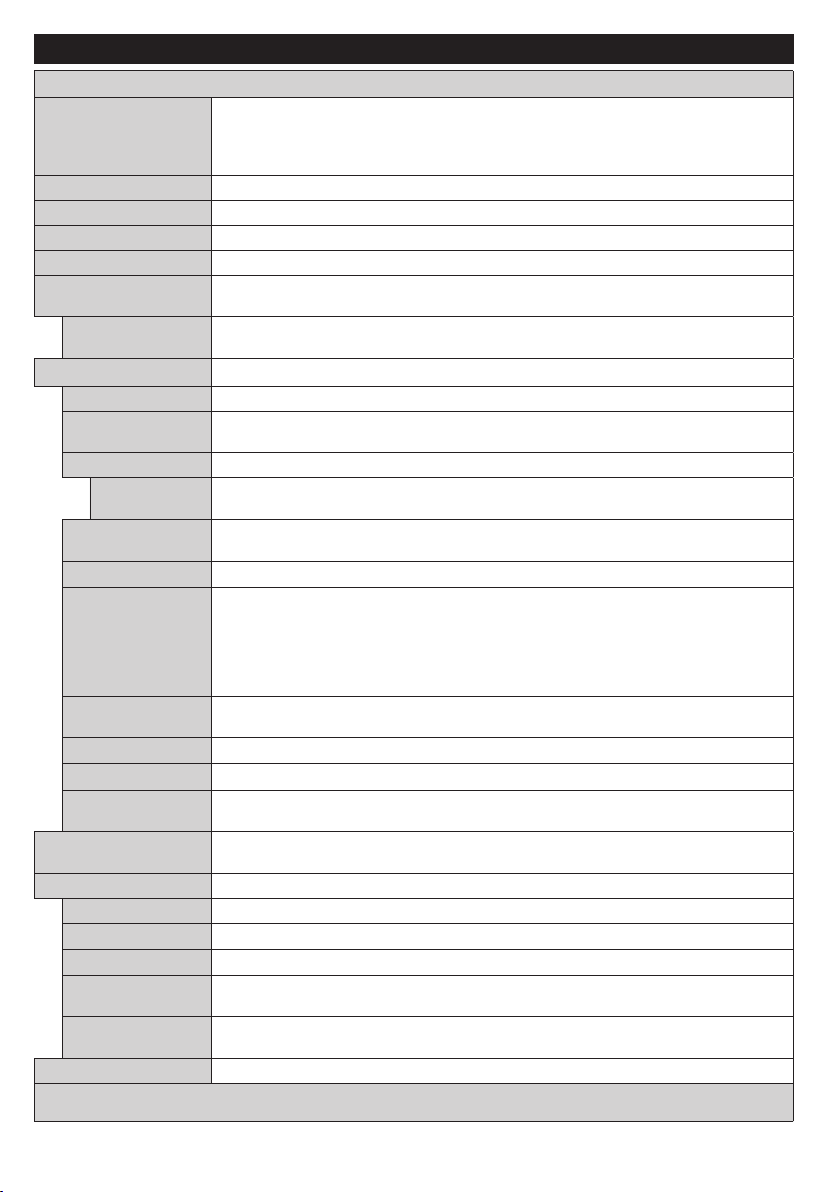
Specication
TV Broadcasting
PAL BG/I/DK/LL’
SECAM BG/DK
Receiving Channels
VHF (BAND I/III) - UHF
(BAND U) - HYPERBAND
Number of Preset
Channels
1000 (without satellite)
10000 (with satellite)
Channel Indicator On Screen Display
RF Aerial Input 75 Ohm (unbalanced)
Operating Voltage 220-240V AC, 50Hz.
Audio
German Nicam
SRS TruSurround (depends
on model)
DTS TruSurround (depends
on model)
Power Consumption (W) Refer to back cover label
Operation temperature
and operation humidity
0ºC up to 40ºC, 85%
humidity max
Wireless LAN Transmitter Specications
(depending on the model)
Frequency Ranges
Max Output
Power
2400 - 2483,5 MHz (CH1-CH13) < 100 mW
5150 - 5250 MHz (CH36 - CH48) < 200 mW
5250 - 5350 MHz (CH52 - CH64) < 200 mW
5470 - 5725 MHz (CH100 - CH140) < 200 mW
Country Restrictions
This device is intended for home and ofce use in
all EU countries (and other countries following the
relevant EU directive) without any limitation except
for the countries mentioned below.
Country Restriction
Bulgaria
General authorization required for outdoor
use and public service
France In-door use only for 2454-2483.5 MHz
Italy
If used outside of own premises, general
authorization is required
Greece
In-door use only for 5470 MHz to 5725
MHz band
Luxembourg
General authorization required for network
and service supply(not for spectrum)
Norway
Radio transmission is prohibited for the
geographical area within a radius of 20 km
from the centre of Ny-Ålesund
Russian Fed-
eration
In-door use only
The requirements for any country may change at any
time. It’s recommended that user checks with local
authorities for the current status of their national regu-
lations for both 2.4 GHz and 5 GHz wireless LAN’s.
Disposal information
Instructions for waste Disposal:
Packaging and packaging aids are recyclable and
should principally be recycled. Packaging materials,
such as foil bag, must be kept away from children.
Batteries, including those which are heavy metal-free,
should not be disposed of with household waste.
Please dispose of used battery in an environmentally
friendly manner. Find out about the legal regulations
which apply in your area.
• Don’t try to recharge batteries. Danger of explosion.
Replace batteries only with the same or equivalent
type.
Information for Users in European Union Countries
The mark shown on the right is in compliance
with the Waste Electrical and Electronic
Equipment Directive 2012/19/EU (WEEE). The
mark indicates the requirement NOT to dispose
the equipment including any spent or discarded
batteries as unsorted municipal waste, but use
the return and collection systems available. If
the batteries or accumulators included with this
equipment display the chemical symbol Hg, Cd,
or Pb, then it means that the battery has a heavy
metal content of more than 0.0005% Mercury,
or more than 0.002% Cadmium or more than,
0.004% Lead.
English - 7 -
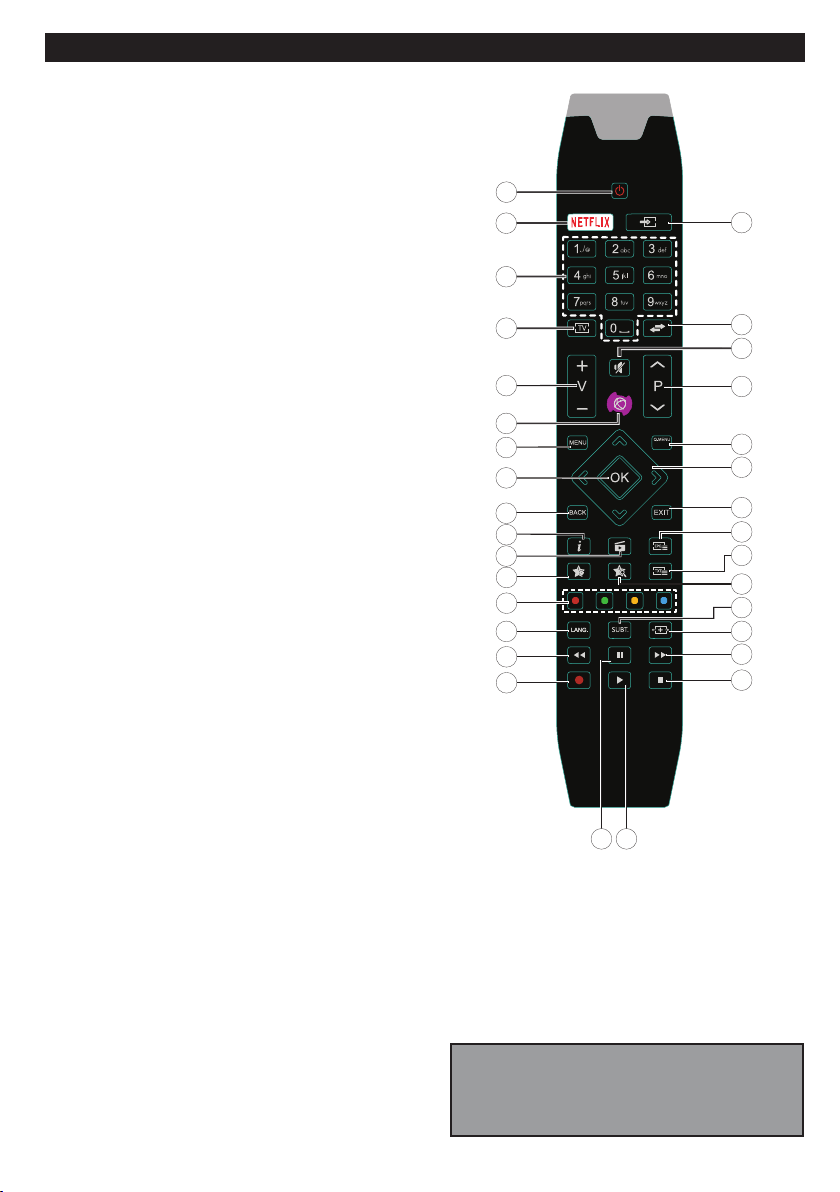
Remote Control RC A3 _49141 (depending on the model)
Note: Functional button indications on some
menu screens may vary in accordance with the
remote control of your TV. Follow the button
functions located at the bottom of the screen.
(*) MY BUTTON 1 & MY BUTTON 2:
These buttons may have default functions depending on
the model. However you can set a special function to these
buttons by pressing on them for ve seconds when on a
desired source or channel. A conrmation message will be
displayed on the screen. Now the selected MY BUTTON
is associated with the selected function.
Note that if you perform First Time Installation, MY
BUTTON 1&2 will return to their default function.
Netix: If this feature is supported by your TV, you can view
your ESN(*) number and deactivate Netix.
(*) ESN number is an unique ID number for Netix, created
especially to identify your TV.
1. Standby: Switches On / Off the TV
2. Netix: Launches the Netix application
3. Numeric buttons: Switches the channel, enters a
number or a letter in the text box on the screen.
4. TV: Displays channel list / Switches to TV Source
5. Volume +/-
6. Internet: Opens the portal page, where you can reach
many web based applications
7. Menu: Displays TV menu
8. OK: Conrms user selections, holds the page (in TXT
mode), views channel list (DTV mode)
9. Back/Return: Returns to previous screen, opens index
page (in TXT mode)
10. Info: Displays information about on-screen content,
shows hidden information (reveal - in TXT mode)
11. Media browser: Opens the media browsing screen
12. My button 1 (*)
13. Coloured Buttons: Follow the on-screen instructions for
coloured button functions
14. Language: Switches among sound modes (analogue
TV), displays and changes audio/subtitle language
(digital TV, where available)
15. Rapid reverse: Moves frames backwards in media
such as movies
16. Record: Records programmes
17. Pause: Pauses the media being played, starts timeshift
recording
18. Play: Starts to play selected media
19. Stop: Stops the media being played
20. Rapid advance: Moves frames forward in media such
as movies
21. Screen: Changes the aspect ratio of the screen
22. Subtitles: Turns subtitles on and off (where available)
23. My button 2 (*)
24. Text: Displays teletext (where available), press again
to superimpose the teletext over a normal broadcast
picture (mix)
25. EPG (Electronic programme guide): Displays the
electronic programme guide
26. Exit: Closes and exits from displayed menus or returns
to previous screen
27. Directional buttons: Helps navigate menus, content etc.
and displays the subpages in TXT mode when pressed
Right or Left
28. Quick Menu: Displays a list of menus for quick access
29. Programme +/-
30. Mute: Completely turns off the volume of the TV
31. Swap: Quickly cycles between previous and current
channels or sources
32. Source: Shows all available broadcast and content
sources
1
2
3
4
5
6
7
8
9
1
11
12
1
3
14
1
5
1
6
0
1
1
7
1
8
1
9
2
0
2
1
22
2
3
24
2
5
2
6
2
7
2
8
2
9
3
0
3
1
3
2
English - 8 -
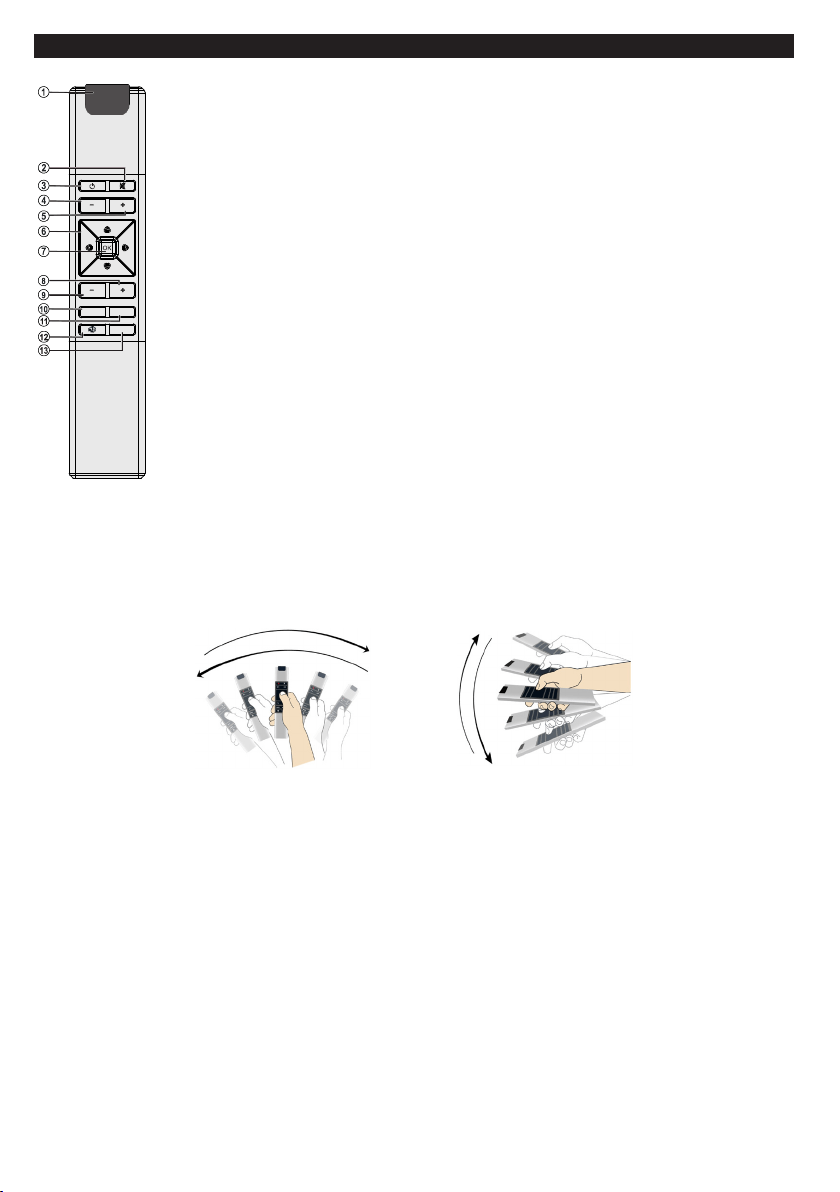
Remote Control - 2 (Air Mouse) (depending on the model)
You can use this air mouse as a mouse while using internet
browser and also as a regular remote to control your TV.
Air Mouse installation
To use air mouse, connect the USB receiver to the one of the USB
inputs of your TV. Afterwards it will automatically pair with your TV.
Air mouse is ready for use. Open the web browser in your
television and enjoy it.
Notes:
If there is no operation in ten seconds, it will switch to sleep
mode. To use again, just press any button.
Note that all applications in the portal are not compatible with
air mouse.
When batteries are low, green led will ash to remind battery
change everytime a button is pressed.
1. Operation LED light
2. Mute
3. Standby
4. Volume Down
5. Volume Up
6. Directional buttons
7. OK / Conrm
8. Programme Up
9. Programme Down
10. Back / Return
11. Menu on/off
12. Internet / Portal
13. Source selection
P
V
P
BACK
MENU
SOURCE
V
How to use Air Mouse
You can move the cursor on the screen by moving the air mouse in the air.
To move the cursor horizontally and vertically
Just move the remote like in the drawings below. The pointer on the screen will follow your movements.
To scroll Up-Down
To Scroll-up, please place the pointer at the top of the screen and press the up-directional button.
To Scroll-down, please place the pointer at the bottom of the screen and press the down-directional button.

English - 9 -
Connections (depending on the model)
Connector Type Cables Device
VGA
Connection
(bottom)
AUDIO IN
PC/YPbPr
Audio
Connection
(back)
YPbPr/PC Audio Cable
HDMI
Connection
(side&bottom)
SPDIF
SPDIF
(Optical Out)
Connection
(bottom)
BACK AV
/ Video
R
L
Back AV
(Audio/Video)
Connection
(back)
Composite Audio Video Cable
HEADPHONE
Headphone
Connection
(side)
YPBPR
/ V
ideo
YPbPr Video
Connection
(back)
Component Video (YPbPr ) Cable
USB
Connection
(side&back)
CI
Connection
(side)
CAM
module
LAN
Ethernet
Connection
(bottom)
LAN / Ethernet Cable
Subwoofer
Connection
(back)(*)
To enable PC/YPbPr audio, you
will need to use the back audio
inputs with a YPbPr/PC audio
cable for audio connection. |
When using the wall mounting
kit (available from a third party
in the market, if not supplied),
we recommend that you plug all
your cables into the back of the
TV before mounting on the wall.
| Insert or remove the CI module
only when the TV is SWITCHED
OFF. You should refer to the
module instruction manual for
details of the settings. | The/
Each USB input of your TV
supports devices up to 500mA.
Connecting devices that have
current value above 500mA may
damage your TV. | By connect-
ing an HDMI cable to your TV,
you have to use only a shielded
(high grade) HDMI cable to
guarantee a sufficient immu-
nity against parasitic frequency
radiation. And make sure to
use a High-Speed HDMI cable
that can transmit high denition
signals, such as 4K contents, for
trouble-free transmission.
If you want to connect a
device to the TV, make
sure that both the TV
and the device are turned off
before making any connection.
After the connection is done, you
can turn on the units and use
them.
(*) For external subwoofer connection
English - 10 -
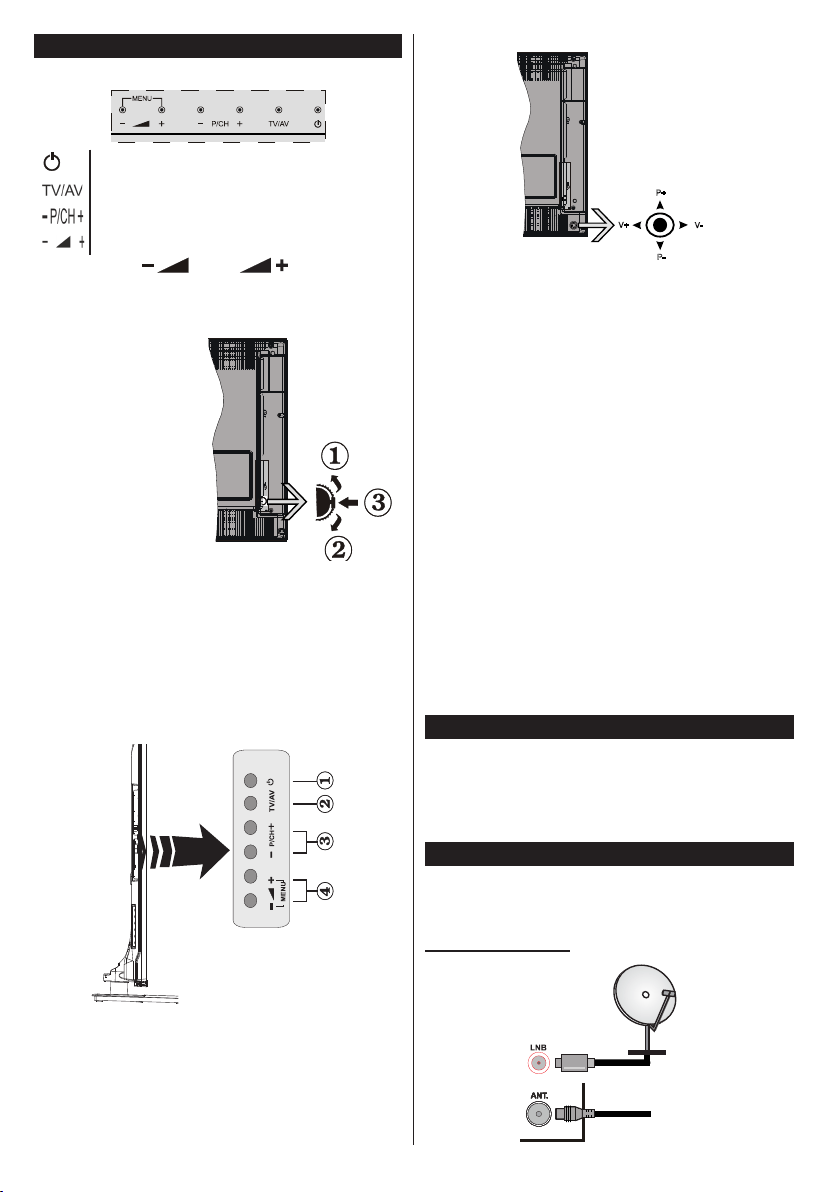
TV and Operating Buttons (depending on the model)
Standby/On
Source
Programme +/-
Volume +/-
Note: Press “ ” and “ ” buttons at the
same time to view main menu.
-or-
1. Up direction
2. Down direction
3. Programme/
Volume / AV
/ Standby-On
selection switch
Note: You can move
the switch, upward or
downward to change
the volume. If you want
to change channels,
press the middle of the switch once (Position 3)
and then move upward or downward. If you press
the middle of the switch once more, source OSD
will be displayed. If you press the middle of the
switch and hold about a few seconds, the TV will
switch to standby mode. Main menu OSD cannot
be displayed via control buttons.
-or-
1. Standby On/Off button
2. TV/AV button
3. Programme Up/Down buttons
4. Volume Up/Down buttons
-or-
P+
V+
V-
P-
The joystick allows you to control the Volume /
Programme / Source and Standby-On functions of
the TV.
Note: The position of the joystick may differ depending on
the model.
To change volume: Increase the volume by pushing
the joystick right. Decrease the volume by pushing
the joystick left.
To change channel: Scroll through the stored
channels by pushing the joystick up or down.
To change source: Press the centre of the joystick
in, the sources list will appear on the screen. Scroll
through the available sources by pushing the joystick
up or down.
To turn the TV off: Press the centre of the joystick in
and hold it down for a few seconds, the TV will turn
into standby mode.
To turn on the TV: Press the centre of the joystick
in, the TV will turn on.
Note: Main menu OSD cannot be displayed via
control button.
Connect Power
IMPORTANT: The TV set is designed to operate on
220-240V AC, 50 Hz socket. After unpacking, allow
the TV set to reach the ambient room temperature
before you connect the set to the mains. Plug the
power cable to the mains socket outlet.
Antenna Connection (depending on the model)
Connect the aerial or cable TV plug to the AERIAL
INPUT (ANT) socket or satellite plug to the SATELLITE
INPUT (LNB) socket located on the rear side of the TV.
Rear side of the TV
satellite
aerial
or
cable
English - 11 -
USB Connection
You can connect USB devices to your TV by using
the USB inputs of the TV. This feature allows you to
display/play JPG, MP3 and video les stored in a USB
stick. It is possi ble that certain types of USB devices
(e.g. MP3 Players) may not be compatible with this
TV. You should back up your les before making
any connections to the TV set in order to avoid any
possible data loss. Note that manufacturer will not be
responsible for any le damage or data loss. Do not
pull out USB module while playing a le.
CAUTION: Quickly plugging and unplugging USB
devices, is a very hazardous operation. Especially,
do not repeatedly quickly plug and unplug the drive.
This may cause physical damage to the USB player
and especially the USB device itself.
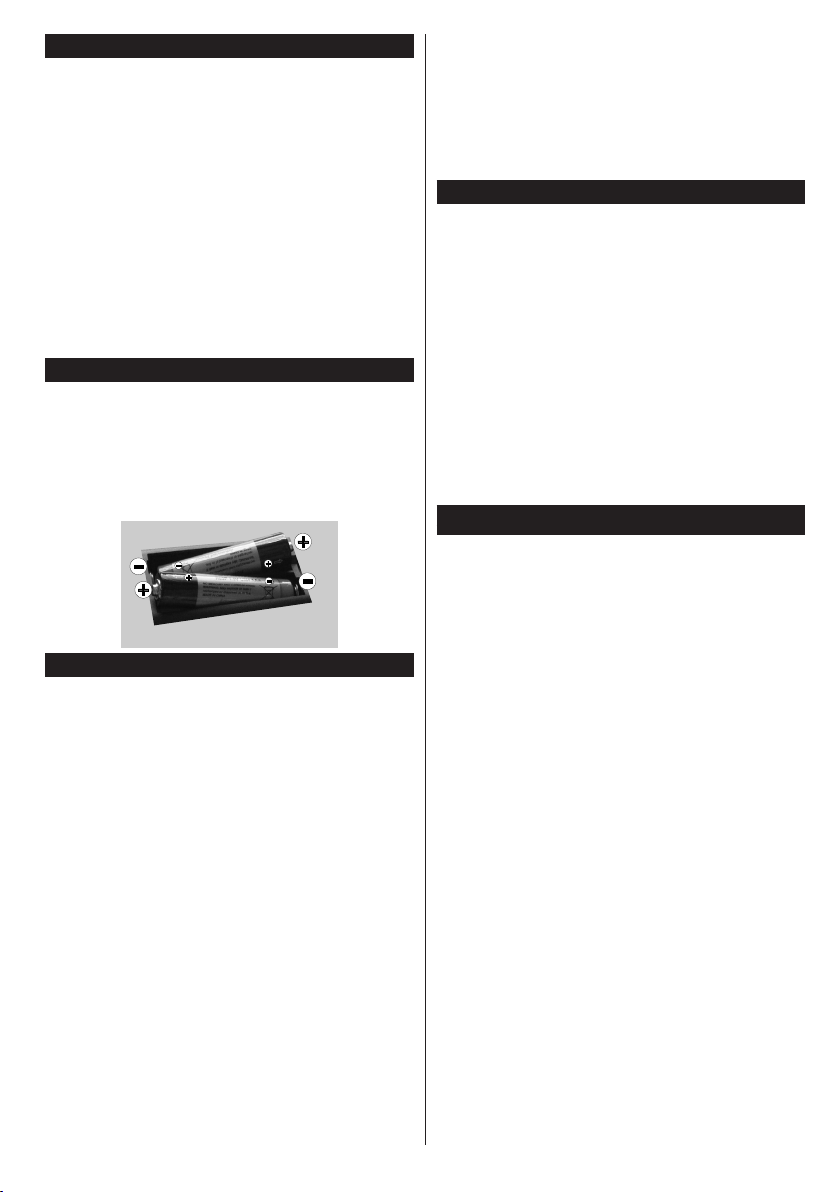
Inserting the Batteries into the Remote
Remove the screw that secure the battery compartment
cover on the back side of the remote control rst.
Remove the cover gently. Insert two AAA batteries.
Make sure the (+) and (-) signs match (observe correct
polarity). Do not mix old and new batteries. Replace
only with same or equivalent type. Place the cover
back on. Then screw the cover back on again.
Environmental Information
This television is designed to be environment friendly.
To reduce energy consumption, you can follow these
steps:
If you set the Energy Saving to Minimum, Medium,
Maximum or Auto the TV will reduce the energy
consumption accordingly. If you like to set the
Backlight to a xed value set as Custom and adjust
the Backlight (located under the Energy Saving
setting) manually using Left or Right buttons on the
remote. Set as Off to turn this setting off.
Note: Available Energy Saving options may
differ depending on the selected Mode in the
System>Picture menu.
The Energy Saving settings can be found in the
System>Picture menu. Note that some picture
settings will be unavailable to be changed.
If pressed Right button while Auto option is selected or
Left button while Custom option is selected, “Screen
will be off in 15 seconds.” message will be displayed
on the screen. Select Proceed and press OK to turn
the screen off immediately. If you don’t press any
button, the screen will be off in 15 seconds. Press
any button on the remote or on the TV to turn the
screen on again.
Note: Screen Off option is not available if the Mode
is set to Game.
When the TV is not in use, please switch off or
disconnect the TV from the mains plug. This will also
reduce energy consumption.
Standby Notications
If the TV does not receive any input signal (e.g. from
an aerial or HDMI source) for 3 minutes, it will go
into standby. When you next switch-on, the following
message will be displayed: “TV switched to stand-by
mode automatically because there was no signal
for a long time.” Press OK to continue.
The Auto TV OFF option(in the System>Settings>More
menu) may be set to a value between 1 and 8 hours
by default. If this setting is not set as Off and the TV
has been left on and not been operated during the
set time, it will switch into standby mode after the set
time has expired. When you next switch-on the TV, the
following message will be displayed. “TV switched to
stand-by mode automatically because no operation
was made for a long time.” Press OK to continue.
Switching On/Off (depending on the model)
To Switch the TV On
• Connect the power cord to the 220-240V AC, 50 Hz.
• Then the standby LED lights up.
To switch on the TV from standby mode either:
• Press the Standby button, Programme +/- or a
numeric button on the remote control.
Control buttons on the TV (depending on model)
• Press the Standby button or Programme +/- button
on the TV. The TV will then switch on.
-or-
• Press and hold the middle of the control switch on
the left side of the TV until the TV comes on from
standby. The TV will then switch on.
-or-
• Press the centre of the joystick on the TV in or push
it up/down until the TV comes on from standby.
To Switch the TV Off (depending on model)
• Press the Standby button on the remote control or
press the Standby button on the TV or press and
hold the control switch on the TV until shut down,
so the TV switches into standby mode (depends on
the model).
• Press the Standby button on the remote control or
press the centre of the joystick on the TV in and
hold it down for a few seconds, the TV will switch
into standby mode.
• To power down the TV completely, unplug the
power cord from the mains socket.

English - 12 -
Note: When the TV is switched into standby mode,
standby LED can blink to indicate that features such as
Standby Search, Over Air Download or Timer is active.
The LED can also blink when you switch on the TV from
standby mode.
First Time Installation (depending on the model)
When turned on for the first time, the language
selection screen is displayed. Select the desired
language and press OK.
On the next screen, set your preferences using the
directional buttons.
Note: Depending on the Country selection you may be asked
to set and conrm a PIN at this point. The selected PIN cannot
be 0000. You have to enter it if you are asked to enter a PIN
for any menu operation later.
About Selecting Broadcast Type
Digital Aerial: If Digital Aerial broadcast search
option is turned on, the TV will search for digital
terrestrial broadcasts after other initial settings are
completed.
Digital Cable: If Digital Cable broadcast search
option is turned on, the TV will search for digital cable
broadcasts after other initial settings are completed.
According to your other preferences a conrmation
message may be displayed before starting to search.
Select YES and press OK to proceed. To cancel
operation, select NO and press OK. You can select
Network or set values such as Frequency, Network
ID and Search Step. When nished, press OK button.
Note: Searching duration will change depending on
the selected Search Step.
Satellite: If Satellite broadcast search option is
turned on, the TV will search for digital satellite
broadcasts after other initial settings are completed.
Before satellite search is performed some settings
should be made. Antenna Type menu will be
displayed rst. You can select Antenna Type as
Direct, Single Satellite Cable or DiSEqC switch by
using “ ” or “ ” buttons.
• Direct: If you have a single receiver and a direct
satellite dish, select this antenna type. Press OK to
continue. Select an available satellite on the next
screen and press OK to scan for services.
• Single Satellite Cable: If you have multiple
receivers and a single satellite cable system, select
this antenna type. Press OK to continue. Congure
settings by following instructions on the next screen.
Press OK to scan for services.
• DiSEqC switch: If you have multiple satellite dishes
and a DiSEqC switch, select this antenna type.
Press OK to continue. You can set four DiSEqC
options (if available) on the next screen. Press OK
button to scan the rst satellite in the list.
Analogue: If Analogue broadcast search option is
turned on, the TV will search for analogue broadcasts
after other initial settings are completed.
Additionally you can set a broadcast type as your
favourite one. Priority will be given to the selected
broadcast type during the search process and the
channels of it will be listed on the top of the Channel
List. When nished, press OK to continue.
You can activate Store Mode option at this point.
This option will congure your TV’s settings for store
environment and depending on the TV model being
used, the supported features of it may be displayed
on the top of the screen as an info banner. This option
is intended only for store use. It is recommended to
select Home Mode for home use. This option will be
available in System>Settings>More menu and can
be turned off/on later.
Press OK button on the remote control to continue
and the Network/Internet Settings menu will be
displayed, if you conrm the previously displayed
message asking whether you want to do the network
settings. Please refer to Connectivity section to
congure a wired or a wireless connection. After the
settings are completed press OK button to continue.
To skip to the next step without doing anything select
No and press the OK button when the message is
displayed asking whether you want to do the network
settings.
After the initial settings are completed TV will start
to search for available broadcasts of the selected
broadcast types.
After all the available stations are stored, scan results
will be displayed. Press OK to continue. The Edit
Channel List menu will be displayed next. You can
edit the channel list according to your preferences or
press the Menu button to quit and watch TV.
While the search continues a message may appear,
asking whether you want to sort channels according
to the LCN(*). Select Yes and press OK to conrm.
(*) LCN is the Logical Channel Number system that
organizes available broadcasts in accordance with a
recognizable channel number sequence (if available).
Note: Do not turn off the TV while initializing rst
time installation. Note that, some options may not be
available depending on the country selection.
Using SatcoDX Feature (depending on the
model)
You can perform SatcoDX operations using the
Installation>Satelite Settings menu. In the SatcoDX
menu, there are two options regarding to the SatcoDx.
You can download or upload SatcoDX data. In order
to perform these functions a USB device must be
connected to the TV.

English - 13 -
You can upload current services and related satellites
& transponders in TV, to a USB device.
Additionally you can download one of the SatcoDx
les stored in USB device, to the TV.
When you select one of these les, all services and
related satellites and transponders in the selected
le will be stored in the TV. If there are any installed
terrestrial, cable and/or analog services, they will be
kept and only satellite services will be removed.
Afterwards, check your antenna settings and make
changes if necessary. An error message stating “No
Signal” may be displayed if the antenna settings are
not congured properly.
Media Playback via USB Input (depending on
the model)
You can connect 2.5” and 3.5” inch (hdd with external
power supply) external hard disk drives or USB
memory stick to your TV by using the USB inputs
of the TV.
IMPORTANT! Back up the les on your storage devices
before connecting them to the TV. Manufacturer will
not be responsible for any le damage or data loss.
Certain types of USB devices (e.g. MP3 Players)
or USB hard disk drives/memory sticks may not be
compatible with this TV. The TV supports FAT32
and NTFS disk formatting but recording will not be
available with NTFS formatted disks.
While formatting USB hard drives which have
more than 1TB (Tera Byte) storage space you may
experience some problems in the formatting process.
Wait a little while before each plugging and unplugging
as the player may still be reading les. Failure to do
so may cause physical damage to the USB player
and the USB device itself. Do not pull out your drive
while playing a le.
You can use USB hubs with your TV’s USB inputs.
External power supplied USB hubs are recommended
in such a case.
It is recommended to use the TV’s USB input(s)
directly, if you are going to connect a USB hard disk.
Note: When viewing image les the Media Browser
menu can only display 1000 image les stored on the
connected USB device.
Recording a Programme (depending on the
model)
IMPORTANT: When using a new USB hard disk
drive, it is recommended that you rst format the disk
using your TV’s Format Disk option in the Media
Browser>Settings>Recording Settings menu.
To record a programme, you should rst connect a
USB disk to your TV while the TV is switched off. You
should then switch on the TV to enable the recording
feature.
To use recording your USB drive should have 2 GB
free space and be USB 2.0 compatible. If the USB
drive is not compatible an error message will be
displayed.
To record long duration programmes such as movies,
it is recommended to use USB Hard disk drives
(HDD’s).
Recorded programmes are saved into the connected
USB disk. If desired, you can store/copy recordings
onto a computer; however, these les will not be
available to be played on a computer. You can play
the recordings only via your TV.
Lip Sync delay may occur during the timeshifting.
Radio record is supported. The TV can record
programmes up to ten hours.
Recorded programmes are split into 4GB partitions.
If the writing speed of the connected USB disk is not
sufcient, the recording may fail and the timeshifting
feature may not be available.
It is recommended to use USB hard disk drives for
recording HD programmes.
Do not pull out the USB/HDD during a recording. This
may harm the connected USB/HDD.
If the AC cord is unplugged while there is an active
USB-recording timer setting, it will be cancelled.
Multipartition support is available. A maximum of two
different partitions are supported. The rst partition of
the USB disk is used for PVR ready features. It also
must be formatted as the primary partition to be used
for the PVR ready features.
Some stream packets may not be recorded because
of signal problems, as a result sometimes videos may
freeze during playback.
Record, Play, Pause, Display (for PlayListDialog) keys
can not be used when teletext is on. If a recording starts
from timer when teletext is on, teletext is automatically
turned off. Also teletext usage is disabled when there
is an ongoing recording playback.
Timeshift Recording (depending on the model)
Press Pause button while watching a broadcast to
activate timeshifting mode. In timeshifting mode, the
programme is paused and simultaneously recorded
to the connected USB disk.
Press Play button again to resume the paused
programme from where you stopped. Press the Stop
button to stop timeshift recording and return to the
live broadcast.
Timeshift cannot be used while in radio mode.
You cannot use the timeshift fast reverse feature before
advancing the playback with the fast forward option.
Instant Recording (depending on the model)
Press Record button to start recording an event
instantly while watching a programme. You can press
Record button on the remote control again to record
the next event after selecting the next programme

English - 14 -
from within the EPG. Press Stop button to cancel
instant recording.
You can not switch broadcasts or view the media
browser during the recording mode. While recording
a programme or during the timeshifting, a warning
message appears on the screen if your USB device
speed is not sufcient.
Watching Recorded Programmes (depending
on the model)
Select Recordings from the Media Browser menu.
Select a recorded item from the list (if previously
recorded). Press the OK button to view the Play
Options. Select an option then press OK button.
Note: Viewing main menu and menu items will not be
available during the playback.
Press the Stop button to stop a playback and return
to the Recordings.
Slow Forward
If you press Pause button while watching recorded
programmes, the slow forward feature will be
available. You can use Rapid advance button to
slow forward. Pressing Rapid advance button
consecutively will change slow forwarding speed.
Recording Conguration (depending on the
model)
Select the Recording Settings item in the Media
Browser>Settings menu to congure the recording
settings.
Format Disk: You can use the Format Disk feature
for formatting the connected USB disk. Your PIN is
required to use the Format Disk feature.
Note: Default PIN can be set to 0000 or 1234. If you have
dened the PIN(is requested depending on the country
selection) during the First Time Installation use the PIN
that you have dened.
IMPORTANT: Formatting your USB drive will erase
ALL the data on it and it’s le system will be converted
to FAT32. In most cases operation errors will be xed
after a format but you will lose ALL your data.
If “USB disk writing speed too slow to record”
message is displayed on the screen while starting a
recording, try restarting the recording. If you still get
the same error, it is possible that your USB disk does
not meet the speed requirements. Try connecting
another USB disk.
Media Browser Menu (depending on the model)
You can play photo, music and movie les stored
on a USB disk by connecting it to your TV. Connect
a USB disk to one of the USB inputs located on the
side of the TV. Pressing the Menu button while in
the Media Browser mode will access the Picture,
Sound and Settings menu options. Pressing the
Menu button again will exit from this screen. You
can set your Media Browser preferences by using
the Settings Menu.
Loop/Shufe Mode Operation
Start playback with the Play
button and activate
All les in the list will be
continuously played in original
order
Start playback with the OK
button and activate
The same le will be played
continuously (repeat)
Start playback with the Play
button and activate
All les in the list will be
played once in random order
Start playback with the Play
button and activate ,
All les in the list will be
continuously played in the
same random order.
FollowMe TV (depending on the model)
With your mobile device you can stream the current
broadcast from your smart TV using the FollowMe
TV feature. Install the appropriate Smart Center
application to your mobile device. Start the application.
For further information on using this feature refer to
the instructions of the application you use.
Note: This application may not be compatible with all
mobile devices. HD channels are not supported and both
of the devices must be connected to the same network.
CEC and CEC RC Passthrough (depending on
the model)
This function allows to control the CEC-enabled
devices, that are connected through HDMI ports by
using the remote control of the TV.
The CEC option in the System>Settings>More menu
should be set as Enabled at rst. Press the Source
button and select the HDMI input of the connected
CEC device from the Sources List menu. When
new CEC source device is connected, it will be listed
in source menu with its own name instead of the
connected HDMI ports name(such as DVD Player,
Recorder 1 etc.).
The TV remote is automatically able to perform the
main functions after the connected HDMI source has
been selected.
To terminate this operation and control the TV via
the remote again, press Quick Menu button on the
remote, highlight the CEC RC Passthrough and
set as Off by pressing Left or Right button. This
feature can also be enabled or disabled under the
System>Settings>More menu.
The TV supports also ARC(Audio Return Channel)
feature. This feature is an audio link meant to replace
other cables between the TV and the audio system
(A/V receiver or speaker system).
When ARC is active, TV does not mute its other audio
outputs automatically. So you need to decrease TV
volume to zero manually, if you want to hear audio
from connected audio device only (same as other
optical or co-axial digital audio outputs). If you want

English - 15 -
to change connected device’s volume level, you
should select that device from the source list. In that
case volume control keys are directed to connected
audio device.
Note: ARC is supported only via the HDMI3 input.
System Audio Control
Allows an Audio Amplier/Receiver to be used with
the TV. The volume can be controlled using the
remote control of the TV. To activate this feature set
the Speakers option in the System>Settings>More
menu as Amplier. The TV speakers will be muted
and the sound of the watched source will be provided
from the connected sound system.
Note: The audio device should support System Audio Control
feature and CEC option should be set as Enabled.
E-Manual (depending on the model)
You can nd instructions for your TV’s features in
the E-Manual.
To use E-Manual, press to the Info button while main
menu is displayed on the screen or press Quick Menu
button, select Information Booklet and press OK.
By using the directional buttons select a desired
category. Every category includes different topics.
Select a topic and press OK to read instructions.
To close the E-Manual screen press the Exit or Menu
button.
Note: The contents of the E-Manual may vary
according to the model.
English - 16 -
TV Menu Contents
System - Picture Menu Contents
Mode
You can change the picture mode to suit your preference or requirements. Picture mode can be
set to one of these options: Cinema, Game(optional), Sports, Dynamic and Natural.
Dolby Vision Modes: If Dolby Vision content is detected Dolby Vision Dark and Dolby
Vision Bright picture mode options will be available instead of Cinema and Natural modes.
Contrast Adjusts the light and dark values on the screen.
Brightness Adjusts the brightness values on the screen.
Sharpness Sets the sharpness value for the objects displayed on the screen.
Colour Sets the colour value, adjusting the colours.
Energy Saving
For setting the Energy Saving to Custom, Minimum, Medium, Maximum, Auto, Screen Off or Off.
Note: Available options may differ depending on the selected Mode.
OLED Luminance(**)
This setting controls the OLED luminance level. This function will be inactive if the Energy
Saving is set to an option other then Custom.
Advanced Settings
Dynamic Contrast You can change the dynamic contrast ratio to desired value.
Noise Reduction
If the signal is weak and the picture is noisy, use the Noise Reduction setting to reduce the
amount of noise.
Colour Temp Sets the desired colour temperature value. Cool, Normal, Warm and Custom options are available.
White Point
If the Colour Temp option is set as Custom, this setting will be available. Increase the ‘warmth’
or ‘coolness’ of the picture by pressing Left or Right buttons.
OLED Panel Noise
Clean(**)
Perform panel maintenance operations manually to protect the OLED panel and extend its
life time.
Picture Zoom Sets the desired image size format.
Movie Sense(**)
Press left/right buttons to set Movie Sense to Low, Medium, High or Off. While Movie Sense
is active, it will optimize the TV’s video settings for motional images to acquire a better quality
and readability. When Movie Sense option is set to Low, Medium or High, Movie Sense demo
option will be available. If one of these options is selected and if you press OK button, then the
demo mode starts. While demo mode is active, the screen will be divided into two sections,
one displaying the movie sense activity, the other displaying the normal settings for TV screen.
Film Mode
Films are recorded at a different number of frames per second to normal television programmes.
Turn this feature on when you are watching lms to see the fast motion scenes clearly.
Skin Tone Skin tone can be changed between -5 and 5.
Colour Shift Adjust the desired colour tone.
HDMI Full Range
While watching from a HDMI source, this feature will be visible. You can use this feature to
enhance blackness in the picture.
Dolby Vision
Notication(**)
Sets the notication appearance preference for Dolby Vision contents. When set as On, Dolby Vision
logo will be displayed on the upper right side of the screen when Dolby Vision content is detected.
PC Position Appears only when the input source is set to VGA/PC.
Autoposition Automatically optimizes the display. Press OK to optimize.
H Position This item shifts the image horizontally to the right hand side or left hand side of the screen.
V Position This item shifts the image vertically towards the top or bottom of the screen.
Dot Clock
Dot Clock adjustments correct the interference that appear as vertical banding in dot intensive
presentations like spreadsheets or paragraphs or text in smaller fonts.
Phase
Depending on the input source(computer etc.) you may see a hazy or noisy picture on the
screen. You can use phase to get a clearer picture by trial and error.
Reset Resets the picture settings to factory default settings (except Game mode).
While in VGA (PC) mode, some items in Picture menu will be unavailable. Instead, VGA mode settings will be added to the Picture Settings
while in PC mode.
(**)Depending on the model.

English - 17 -
System - Sound Menu Contents
Volume Adjusts the volume level.
Equalizer
Selects the equalizer mode. Custom settings can be made only when in User
mode.
Balance Adjusts whether the sound comes from the left or right speaker.
Headphone
Sets headphone volume.
Please ensure before using headphones that the headphone volume is set to a low
level, to prevent damage to your hearing.
Sound Mode You can select a sound mode (If the viewed channel supports).
Audio Link(**)
Press OK to open the Audio Link menu screen. Using this screen you can
discover and connect the sound devices to your TV wirelessly.
AVL (Automatic
Volume Limiting)
Sets the sound to obtain xed output level between programmes.
Headphone/Lineout
When you connect an external amplier to your TV using the headphone jack, you
can select this option as Lineout. If you have connected headphones to the TV, set
this option as Headphone.
Please ensure before using headphones that this menu item is set to Headphone.
If it is set to Lineout, the output from the headphone socket will be set to maximum
which could damage your hearing.
DTS TruSurround
HD(**)
Enables or disables the DTS TruSurround HD.
Digital Out Sets digital out audio type.
Bass Gain(**)
Controls the bass gain level. Use Left or Right button to set.
System - Settings Menu Contents
Conditional Access Controls conditional access modules when available.
Language You may set a different language depending on the broadcaster and the country.
Privacy Settings (*)
Manage your privacy privileges for smart TV related applications. Press OK to enter
the menu and set according to your preferences.
Parental
Enter correct password to change parental settings. You can easily adjust Menu Lock,
Maturity Lock, Child Lock or Guidance in this menu. You can also set a new PIN
or change the Default CICAM PIN using the related options.
Note: Some menu options may not be available depending on the country selection
in the First Time Installation. Default PIN can be set to 0000 or 1234. If you have
dened the PIN(is requested depending on the country selection) during the First Time
Installation use the PIN that you have dened.
Timers
Sets sleep timer to turn off the TV after a certain time. Sets timers for selected
programmes.
Date/Time
Sets date and time.
Sources
Enables or disables selected source options. There are Regular, Enhanced and
Disabled options available for HDMI sources. Regular and Enhanced options are
affecting the colour settings of the selected HDMI source. To be able to watch 4K
or HDR/HLG images from an HDMI source related source setting should be set as
Enhanced if the connected device is compatible with HDMI 2.0 and subsequent
versions. Set as Regular if the connected device is HDMI 1.4 compatible. Set
acoordingly or disable the related HDMI source by setting as Disabled.
Network/Internet
Settings
Displays network/internet settings.

English - 18 -
Accessibility Displays accessibility options of the TV.
Hard of Hearing Enables any special feature sent from the broadcaster.
Audio Description
A narration track will be played for the blind or visually impaired audience. Press OK
to see all available Audio Description menu options. This feature is available only if
the broadcaster supports it.
Note: Audio description sound feature is not available in recording or time shifting mode.
Netix(**)
If this feature is supported by your TV, you can view your ESN(*) number and deactivate Netix.
(*) ESN number is an unique ID number for Netix, created especially to identify your TV.
More
Displays other setting options of the TV.
Menu Timeout
Changes timeout duration for menu screens.
Standby LED
If set as Off the standby LED will not light up when the TV is in standby mode.
HBBTV (*)(**) You can enable or disable this feature by setting it as On or Off.
Software Upgrade Ensures that your TV has the latest rmware. Press OK to see the menu options.
Application
Version
Displays current software version.
Subtitle Mode
This option is used to select which subtitle mode will be on the screen (DVB subtitle /
Teletext subtitle) if both is available. Default value is DVB subtitle. This feature is available
only for the country option of Norway.
Auto TV OFF
Sets the desired time for the TV to automatically go into standby mode when not being
operated.
Biss Key(**)
Biss is a satellite signal scrambling system that is used for some broadcasts. If you
need to enter Biss key on a broadcast, you can use this setting. Highlight Biss Key and
press OK to enter keys on the desired broadcast.
Store Mode
Select this mode for store display purposes. Whilst Store Mode is enabled, some items
in the TV menu may not be available.
Audio Video
Sharing
Audio Video Sharing feature allows you to share les stored on your smartphone or tablet
pc. If you have a compatible smartphone or tablet pc and the appropriate software is installed,
you can share/play photos on your TV. See instructions of your sharing software for more
information. Audio Video Sharing mode will not be available with internet portal feature.
Power Up Mode
This setting congures the power up mode preference. Last State and Standby
options are available.
Virtual Remote
Enable or disable the virtual remote feature.
CEC
With this setting you can enable and disable CEC functionality completely. Press
Left or Right button to enable or disable the feature.
CEC Auto Power
On
This function allows the connected HDMI-CEC compatible device to turn on the TV
and switch to its input source automatically. Press Left or Right button to enable or
disable the feature.
Speakers
To hear the TV audio from the connected compatible audio device set as Amplier.
You can use the remote control of the TV to control the volume of the audio device.
Smart Remote(**)
Press OK to open the Smart Remote menu screen. Using this screen you can discover
and connect the remote controller devices to your TV wirelessly.
Show All Cookies (*)
Displays all saved cookies.
Delete All Cooki-
es (*)
Deletes all saved cookies.
OSS Displays Open Source Software license information.
(*) These features may not be available depending on the model of your TV and the selected country in
the First Time Installation.
(**)Depending on the model.

English - 19 -
Installation Menu Contents
Automatic
channel scan
(Retune)
Displays automatic tuning options. Digital Aerial: Searches and stores aerial DVB stations.
Digital Cable: Searches and stores cable DVB stations. Analogue: Searches and stores
analogue stations. Satellite: Searches and stores satellite stations.
Manual
channel scan
This feature can be used for direct broadcast entry.
Network
channel scan
Searches for the linked channels in the broadcast system. Digital Aerial: Searches for
aerial network channels. Digital Cable: Searches for cable network channels.
Analogue ne
tune
You can use this setting for ne tuning analogue channels. This feature is not available
if no analogue channels are stored.
Satellite
Settings(**)
Displays satellite settings. Satellite list: Displays available satellites. You can Add, Delete
satellites or Edit satellite settings on the list. Antenna installation: You can change satellite
anntenna settings and/or start a satellite scan. SatcoDX: You can upload or download SatcoDX
data using the related options.
Installation
Settings
Displays installation settings menu. Standby Search (Optional): Your TV will search for new
or missing channels while in standby. Any new found broadcasts will be shown.
Clear Service
List
Use this setting to clear channels stored. This setting is visible only when the Country option
is set to Denmark, Sweden, Norway or Finland.
Select Active
Network
This setting allows you to select only the broadcasts within the selected network to be
listed in the channel list. This feature is available only for the country option of Norway.
First time
installation
Deletes all stored channels and settings, resets TV to factory settings.
Fransat
Options(**)
Displays Fransat options.
Parental
Control
Displays parental control options. Enter the PIN number you have dened in the initial installation
to view current settings.
System
Information
Displays system information.
Reception
Information
Displays current satellite reception information.
CAS-
Module
Displays current CAS module information.
Upgrade
Displays software upgrade options.
(**)Depending on the model.

English - 20 -
General TV Operation
Using the Channel List
The TV sorts all stored stations in the Channel List.
You can edit this channel list, set favourites or set
active stations to be listed by using the Channel List
options. Press the OK/TV button to open the Channel
List. You can lter the listed channels by pressing the
Blue button or open the Edit Channel List menu by
pressing the Green button in order to make advanced
changes in the current list.
Managing the Favourite Lists
You can create four different lists of your favourite
channels. Enter the Channel List in the main menu
or press the Green button while the Channel List
is displayed on the screen in order to open the Edit
Channel List menu. Select the desired channel on
the list. You can make multiple choices by pressing
the Yellow button. Then press the OK button to open
the Channel Edit Options menu and select Add/
Remove Favourites option. Press the OK button
again. Set the desired list option to On. The selected
channel/s will be added to the list. In order to remove
a channel or channels from a favourite list follow the
same steps and set the desired list option to Off.
You can use the Filter function in the Edit Channel
List menu to lter the channels in the Channel list
permanently according to your preferences. Using this
Filter option, you can set one of your four favourite
lists to be displayed everytime the Channel list is
opened. The ltering function in the Channel list
menu will only lter the currently displayed Channel
list in order to nd a channel and tune in to it. These
changes will not remain the next time the Channel list
is opened if you don’t save them. To save the changes
on the list press the Red button after ltering while the
Channel list is displayed on the screen.
Conguring Parental Settings
The Parental Settings menu options can be used to
prohibit users from viewing of certain programmes,
channels and using of menus. These settings are
located in the System>Settings>Parental menu.
To display parental lock menu options, a PIN number
should be entered. After coding the correct PIN
number, Parental Settings menu will be displayed.
Menu Lock: This setting enables or disables access
to all menus or installation menus of the TV.
Maturity Lock: If this option is set, TV gets the
maturity information from the broadcast and if this
maturity level is disabled, disables access to the
broadcast.
Note: If the country option in the First Time
Installation is set as France, Italy or Austria, Maturity
Lock’s value will be set to 18 as default.
Child Lock: If this option is set to ON, the TV can only
be controlled by the remote control. In this case the
control buttons on the TV will not work.
Internet Lock: If this option is set to ON, the open
browser application in the portal will be disabled. Set
to OFF to release the application again.
Set PIN: Denes a new PIN number.
Default CICAM PIN: This option will appear as greyed
out if no CI module is inserted into the CI slot of the
TV. You can change the default PIN of the CI CAM
using this option.
Note: Default PIN can be set to 0000 or 1234. If you
have dened the PIN(is requested depending on the
country selection) during the First Time Installation
use the PIN that you have dened.
Some options may not be available depending on
the model and/or on the country selection in the First
Time Installation.
Electronic Programme Guide (EPG)
Some channels send information about their
broadcast schedules. Press the Epg button to view
the Programme Guide menu.
There are 3 different types of schedule layouts
available, Timeline Schedule, List Schedule and
Now/Next Schedule. To switch between them follow
the instructions on the bottom of the screen.
Timeline Schedule
Zoom (Yellow button): Press the Yellow button to
see events in a wider time interval.
Filter (Blue button): Views ltering options.
Highlight Genre (Subtitles button): Displays
Highlight Genre menu. Using this feature, you can
search the programme guide database in accordance
with the genre. Info available in the programme guide
will be searched and results matching your criteria
will be highlighted.
Options (OK button): Displays event options.
Event Details (Info button): Displays detailed
information about selected programmes.
Next/Prev Day (Programme +/- buttons): Displays
the programmes of previous or next day.
Search (Text button): Displays Guide Search menu.
Now (Source button): Displays current event of the
highlighted channel.
Rec./Stop (Record button): The TV will start to
record the selected programme. You can press again
to stop the recording.
List Schedule(*)
(*) In this layout option, only the events of the
highlighted channel will be listed.
Prev. Time Slice (Red button): Displays the
programmes of previous time slice.
Next/Prev Day (Programme +/- buttons): Displays
the programmes of previous or next day.

English - 21 -
Event Details (Info button): Displays detailed
information about selected programmes.
Filter (Text button): Views ltering options.
Next Time Slice (Green button): Displays the
programmes of next time slice.
Options (OK button): Displays event options.
Now/Next Schedule
Options (OK button): Displays event options.
Event Details (Info button): Displays detailed
information about selected programmes.
Filter (Blue button): Views ltering options.
Rec./Stop (Record button): The TV will start to
record the selected programme. You can press again
to stop the recording.
Programme Options
Use the directional buttons to highlight a programme
and press OK button to display Event Options menu.
The following options are available.
Select Channel: Using this option, you can switch to
the selected channel.
Record / Delete Rec. Timer: Select the Record
option and press the OK button. If the programme
is going to be broadcasted at a future time, it will be
added to Timers list to be recorded. If the selected
programme is being broadcasted at the moment,
recording will start immediately.
To cancel an already set recording, highlight that
programme and press the OK button and select
the option Delete Rec. Timer. The recording will be
cancelled.
Set Timer on Event / Delete Timer on Event: After
you have selected a programme in the EPG menu,
press the OK button. Select Set Timer on Event
option and press the OK button. You can set a timer
for future programmes. To cancel an already set timer,
highlight that programme and press the OK button.
Then select Delete Timer on Event option. The timer
will be cancelled.
IMPORTANT: Connect a USB disk to your TV while
the TV is switched off. You should then switch on the
TV to enable the recording feature.
Notes: You cannot switch to any other channel while
there is an active recording or timer on the current
channel.
It is not possible to set timer or record timer for two
or more individual events at the same time interval.
Software Upgrade
Your TV is capable of finding and updating
automatically via the broadcast signal or via Internet.
Software upgrade search via user interface
On the main menu select System and then More.
Navigate to Software Upgrade and press OK button.
In Upgrade Options menu select Scan for upgrade
and press OK button to check for a new software
upgrade.
If a new upgrade is found, it starts to download the
upgrade. After the download is completed conrm the
question asking about rebooting the TV by pressing
the OK to continue with the reboot operation.
3 AM search and upgrade mode
Your TV will search for new upgrades at 3:00 o’clock if
Automatic scanning option in the Upgrade Options
menu is Enabled and if the TV is connected to an
aerial signal or to Internet. If a new software is found
and downloaded successfully, it will be installed at
the next power on.
Note: Do not unplug the power cord while led is
blinking during the reboot process. If the TV fails
to come on after the upgrade, unplug, wait for two
minutes then plug it back in.
Troubleshooting & Tips
Tv will not turn on
Make sure the power cord is plugged in securely to
wall outlet. Check if batteries are exhausted. Press
the Power button on the TV.
Poor picture
• Check if you have selected the correct TV system.
• Low signal level can cause picture distortion. Please
check antenna access.
• Check if you have entered the correct channel
frequency if you have done manual tuning.
• The picture quality may degrade when two devices
are connected to the TV at the same time. In such
a case, disconnect one of the devices.
No picture
• This means your TV is not receiving any transmission.
Make sure the correct source has been selected.
• Is the antenna connected properly?
• Is the antenna cable damaged?
• Are suitable plugs used to connect the antenna?
• If you are in doubt, consult your dealer.
No sound
• Check if the TV is muted. Press the Mute button or
increase the volume to check.
• Sound may be coming from only one speaker. Check
the balance settings from sound menu.
Remote control - no operation
• The batteries may be exhausted. Replace the
batteries.
Input sources - can not be selected
• If you cannot select an input source, it is possible
that no device is connected. If not;
• Check the AV cables and connections if you have
tried to connect a device.
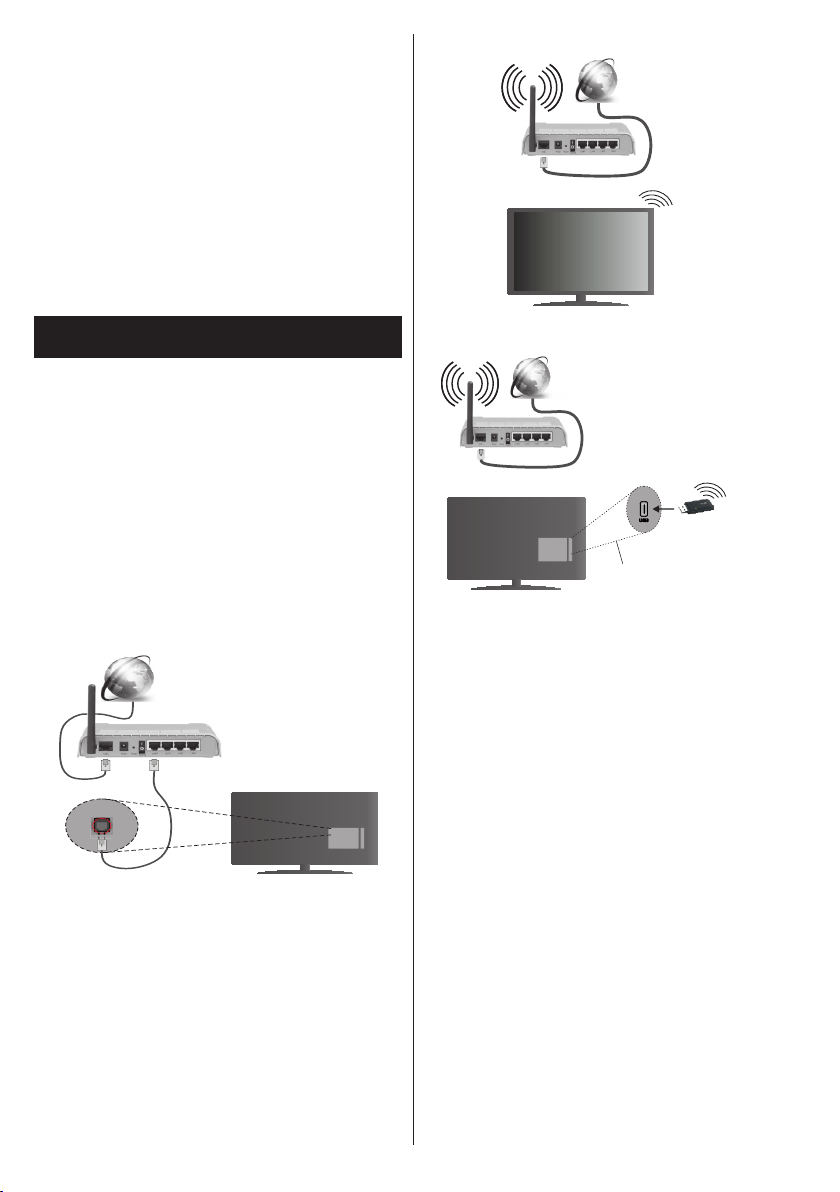
English - 22 -
Recording unavailable
To record a programme, you should rst connect a
USB disk to your TV while the TV is switched off.
You should then switch on the TV to enable recording
feature. If you cannot record, try switching off the TV
and then re-inserting the USB device.
USB is too slow
If a “USB disk writing speed too slow to record”
message is displayed on the screen while starting a
recording, try restarting the recording. If you still get
the same error, it is possible that your USB disk does
not meet the speed requirements. Try connecting
another USB disk.
Connectivity Functions (depending on the
model)
To configure wired/wireless settings please
refer to the Network Settings section in the
System>Options Menu.
Connecting TV to a Home Network
Connectivity feature allows the TV to connect to the
home network wired or wirelessly. You can use this
networking system to connect to the Internet Portal
or to access photo, video and audio les that are
stored on a media server connected to the network
and play/display them on the TV.
Wired connection
Connect the TV to the modem/router via a LAN
cable (not supplied). Select Network Type as Wired
Device in Network Settings menu.
Broadband ISP connection
LAN (ethernet) cable
LAN input on the rear
side of the TV
Wireless connection
IMPORTANT: If your TV does not have built-in wi
feature, USB dongle is required to use wireless
network features.
To connect the TV to the home network wirelessly
just select Network Type as Wireless Device in
Network Settings menu. The TV will search for
available networks. Select the desired network and
press OK. If the TV has a built-in WLAN system
there is no need for additional devices to connect to
a wireless network.
For models with built-in WLAN system:
Broadband
ISP
connection
For models without built-in WLAN system:
Broadband ISP
connection
Wireless LAN
adaptor
USB inputs on the
rear left side of the TV
About Using Connectivity Feature
PC/HDD/Media Player or any other devices that are
compatible should be used with wired connection for
higher playback quality.
For models without built-in wi system, connect the
wireless adaptor to one of the USB inputs of the TV.
While using the wireless connection type, consider
that the TV cannot connect to the networks with
hidden SSID.
Conguring Network Settings
Your TV’s network settings include wired and wireless
connection options. If you are connecting the TV via
ethernet input, select Network Type as Wired Device.
Select Wireless Device option if you are going to
connect the TV to your network wirelessly.
You can press OK button to scan available networks
for wireless connection. Afterwards, a list of networks
will be displayed. Select your network from the list
and press OK.
If the selected network is protected with a password,
enter the correct key by using the virtual keyboard.
Wait until the IP the address is shown on the screen.
This means that the connection is now established.

English - 23 -
To disconnect from a network, you should highlight
Network Type, press Left or Right button and set as
Disabled.
Connecting to your mobile device via WiFi
If your mobile device has WiFi feature, you can
connect it to your TV via a router, in order to access
the content in your device. For this, your mobile device
must have an appropriate sharing software.
Connect your mobile device to the router/modem and
then activate the sharing software on your mobile
device. Then, select les that you want to share with
your TV.
If the connection is established correctly, you will be
able to access the shared les from your mobile device
via the Media Browser of your TV.
Enter the Media Browser menu and the playback
device selection OSD will be displayed. Select your
mobile device and press the OK button to continue.
If available, you can download a virtual remote
controller application from the server of your mobile
device application provider. You can control the TV via
your wireless handheld device using this application.
To do this enable the Virtual Remote feature from the
System>Options>More menu by pressing Left or
Right button. Connect the TV and the mobile device
to the same network and start the application.
Note: This feature may not be supported on all mobile
devices.
Using Audio Video Sharing Network Service
Audio Video Sharing feature uses a standard that eases
the viewing process of digital electronics and makes
them more convenient to use on a home network.
This standard allows you to view and play photos, music
and videos stored in the media server connected to your
home network.
1. Connect to a Wired or Wireless Network
See the Wired/Wireless connection chapters for
detailed conguration information.
2. Play Shared Files via Media Browser
Select Media Browser by using the directional buttons
from the main menu and press OK. The media browser
will then be displayed.
Audio Video Sharing
Audio Video Sharing support is only available in the
Media Browser Folder mode. To enable folder mode,
go to the Settings tab in the main media browser screen
and press OK. Highlight View Style and set to Folder
using the Left or Right buttons. Select the desired media
type and press OK.
If sharing configurations are set properly, Device
Selection screen will be displayed after selecting the
desired media type. If available networks are found,
they will be listed on this screen. Select media server or
network that you want to connect to using the Up or Down
buttons and press OK. If you want to refresh the device
list, press the Green button. You can press Menu to exit.
If you select the media type as Videos and choose
a device from the selection menu. Then select the
folder with video les in it on the next screen and all
the available video les will be listed.
To play other media types from this screen, you must
go back to main Media Browser screen and select the
media type as desired and then perform the network
selection again. Refer to the Media Browser menu
section for further information on le playback.
Subtitle les do not work if you watch videos from
your network through Audio Video Sharing feature.
You can connect only one television to the same
network. If a problem occurs with the network, please
switch your television off at the wall socket and back
on again. Trick mode and jump are not supported with
the Audio Video Sharing feature.
Note: There may be some PC’s which may not be able to
utilize the Audio Video Sharing feature due to administrator
and security settings (such as business PC’s).
Wake ON
Wake-on-LAN (WoL) and Wake-on-Wireless LAN
(WoWLAN) are standards that allow a device to be
turned on or woken up by a network message. The
message is sent to the device by a program executed
on a remote device connected to the same local area
network, such as a smartphone.
Your TV is WoL and WoWLAN compatible. To enable
this feature set the Wake On option in the Network/
Internet Settings menu as On. It is necessary that
both the device, from which the network message will
be sent to the TV, and the TV are connected to the
same network. Wake On feature is only supported
for Android OS devices and can only be used via
YouTube and Netix applications.
In order to use this feature the TV and the remote
device should be connected at least once while the
TV is on. If the TV is powered off, the connection
should be reestablished, the next time it is switched
on. Otherwise this feature will be unavailable. This
does not apply, when the TV is switched into the
standby mode.
Wireless Display (depending on the model)
Wireless Display is a standard for streaming video and
sound content by Wi-Fi Alliance. This feature provides
the ability to use your TV as wireless display device.
Using with mobile devices
There are different standards which enable sharing of
screens including graphical, video and audio content
between your mobile device and TV.

English - 24 -
Plug the wireless USB dongle to TV rst, if the TV
doesn’t have internal WiFi feature.
Then press the Source button on the remote and
switch to Wireless Display source.
A screen appears stating that the TV is ready for
connection.
Open the sharing application on your mobile device.
These applications are named differently for each
brand, please refer to the instruction manual of your
mobile device for detailed information.
Scan for devices. After you select your TV and
connect, the screen of your device will be displayed
on your TV.
Note: This feature can be used only if the mobile
device supports this feature. Scanning and connecting
processes differ according to the programme you
use. Android based mobile devices should have the
software version V4.2.2 and above.
Connecting Other Wireless Devices (depending
on the model)
Your TV supports another short range wireless
connection technology too. A pairing is required before
using these kind of wireless devices with the TV set.
You should do the followings to pair your device with
the TV:
• Set the device to pairing mode
• Start device discovery on the TV
Note: Refer to the user manual of the wireless device
to learn how to set the device to pairing mode.
You can connect audio devices or remote controllers
wirelessly to your TV. Unplug or switch off any
other connected audio device in order for wireless
connection feature to work correctly. For audio
devices you should use the Audio Link option in the
System>Sound menu, for remote controllers the
Smart Remote option in the System>Settings>More
menu. Select the menu option and press the OK
button to open the related menu. Using this menu
you can discover and connect the devices that use
the same wireless technology and start to use them.
Follow the on-screen instructions. Start the device
discovery. A list of available wireless devices will be
displayed. Select the device you want to connect from
the list and press the OK button to connect. If “Device
connected” message is displayed, the connection
is successfully established. If the connection fails
try it again.
Note: Wireless devices may operate within the same
radio frequency range and may interfere with one
another. To improve the performance of your wireless
device place it at least 1 meter away from any other
wireless devices.
Internet Portal
Portal feature adds your TV a feature that allows you
to connect to a server on the Internet and view the
content provided by this server over your Internet
connection. Portal feature allows you to view the
music, video, clip or web content with defined
shortcuts. Whether you can view this content without
interruption depends on the connection speed
provided by your internet service provider.
Press “Internet” button on the remote to open internet
portal page. You will see icons of the available
applications and services on the portal screen. Use
the navigaiton buttons on your remote to select the
desired one. You may view the desired content by
pressing OK after selecting. Press BACK/RETURN
button to return back to the previous screen or EXIT
to quit internet portal mode
Note: Possible application dependent problems may
be caused by the content service provider.
Portal service content and the interface may be
changed at any time without prior notice.
Open Browser (depending on the model)
Open Browser function is one of the applications on
the portal that provides access to internet. Select the
internet browser logo on the portal page and press
OK to launch the browser. Logos of certain predened
websites will be displayed. You can select one of them
for quick access or enter the URL-address of a website
in the address bar on the top of the screen. To perform
searches on the internet enter a keyword in the adress
dialog box and move the cursor to search icon using
the navigation buttons on the remote and press OK
Smart Center (depending on the model)
Smart Center is a mobile application running on iOS
and Android platforms. With your tablet or phone,
you can easily stream your favourite live shows and
programmes from your smart TV using its FollowMe
TV technology. Also; you can launch your portal
applications, use your tablet as a remote control for
your TV and share media les.
To use Smart Center features, connections have to be
done properly. Make sure the TV and mobile device
are connected to the same network.
For media sharing feature Audio Video Sharing
option in the System>Options>More menu of your
TV should be enabled.
Download the appropriate Smart Center application
onto your mobile device from the application store on
the web and launch it to start to use.
Note: Being able to use all functions of this application
depends on the features of your TV.

English - 25 -
HBBTV System (depending on the model)
HbbTV (Hybrid Broadcast Broadband TV) is a standard
that seamlessly combines TV services delivered via
broadcast with services delivered via broadband
and also enables access to Internet only services for
consumers using connected TV’s. Services delivered
through HbbTV include traditional broadcast TV
channels, catch-up services, video-on-demand, EPG,
interactive advertising, personalisation, voting, games,
social networking and other multimedia applications.
HbbTV applications are available on channels where
they are signalled by the broadcaster. The applications
are generally launched with a small red button icon
to notify the user that there is an HbbTV application
on that channel. The user then should press the red
button to open the application page. To close the
application press the red button again. It should be
noted that the operation and control of the applications
may differ depending on the application.
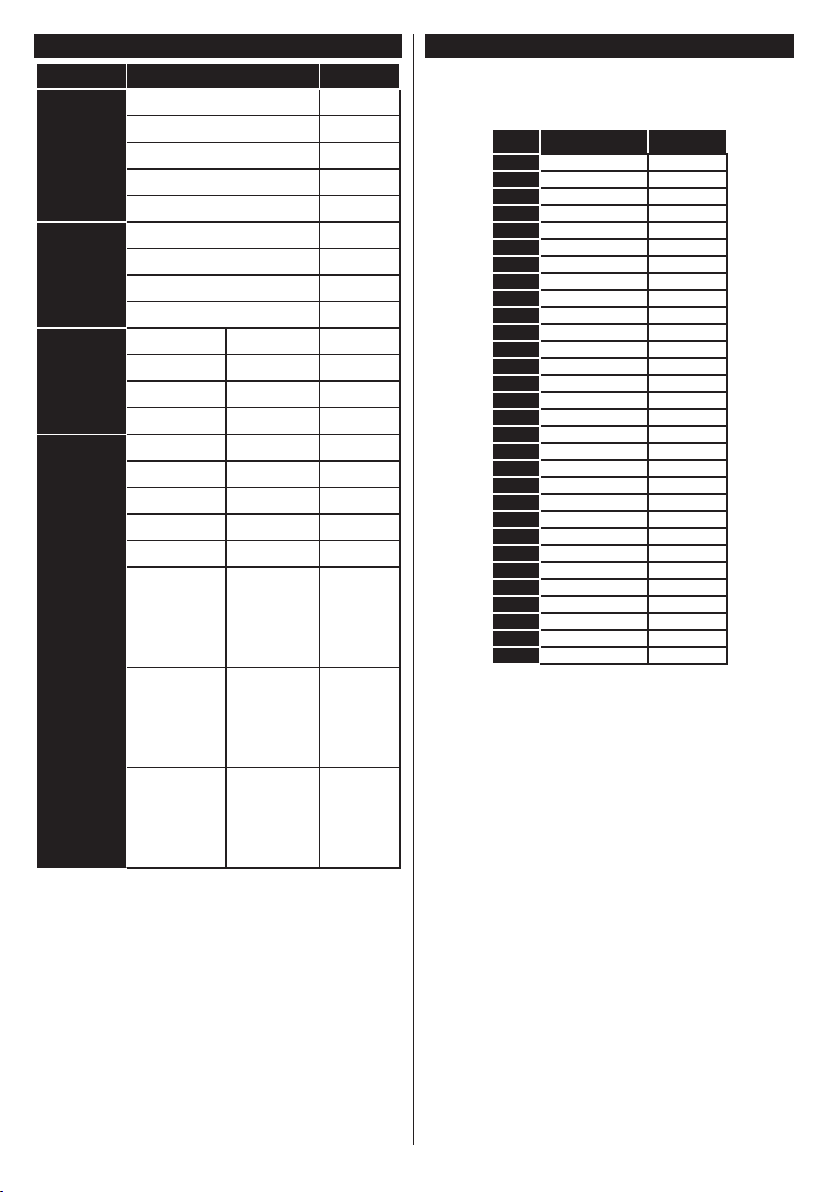
English - 26 -
AV and HDMI Signal Compatibility
Source
Supported Signals
Available
EXT
(SCART)
(depending on
the model)
PAL O
SECAM O
NTSC4.43 O
NTSC3.58
RGB 50/60 O
Side AV
PAL O
SECAM O
NTSC4.43 O
NTSC3.58 O
YPbPr
480i, 480p 60Hz O
576i, 576p 50Hz O
720p 50Hz,60Hz O
1080i 50Hz,60Hz O
HDMI
480i 60Hz O
480p 60Hz O
576i, 576p 50Hz O
720p 50Hz,60Hz O
1080i 50Hz,60Hz O
1080p
24Hz,
25Hz,
30Hz,
50Hz,
60Hz
O
3840x2160p
24Hz,
25Hz,
30Hz,
50Hz,
60Hz
O
4096x2160p
24Hz,
25Hz,
30Hz,
50Hz,
60Hz
O
(X: Not Available, O: Available)
In some cases a signal on the TV may not be displayed
properly. The problem may be an inconsistency with
standards from the source equipment (DVD, Set-top
box, etc. ). If you do experience such a problem please
contact your dealer and also the manufacturer of the
source equipment.
PC Input Typical Display Modes
The following table is an illustration of some of the
typical video display modes. Your TV may not support
all resolutions.
Index Resolution Frequency
1
640x350 85Hz
2
640x480 60Hz
3
640x480 72Hz
4
640x480 75Hz
5
800x600 56Hz
6
800x600 60Hz
7
800x600 72Hz
8
800x600 75Hz
9
1024x768 60Hz
10
1024x768 70Hz
11
1024x768 75Hz
12
1024x768 85Hz
13
1152x864 75Hz
14
1280x768 60Hz
15
1280x768 75Hz
16
1280x960 60Hz
17
1280x960 75Hz
18
1280x1024 60Hz
19
1280x1024 75Hz
20
1360x768 60Hz
21
1366x768 60Hz
22
1400x1050 59Hz
23
1400x1050 60Hz
24
1400x1050 75Hz
25
1440x900 60Hz
26
1440x900 75Hz
27
1600x1200 60Hz
28
1680x1050 59Hz
29
1680x1050 60Hz
30
1920x1080 60Hz
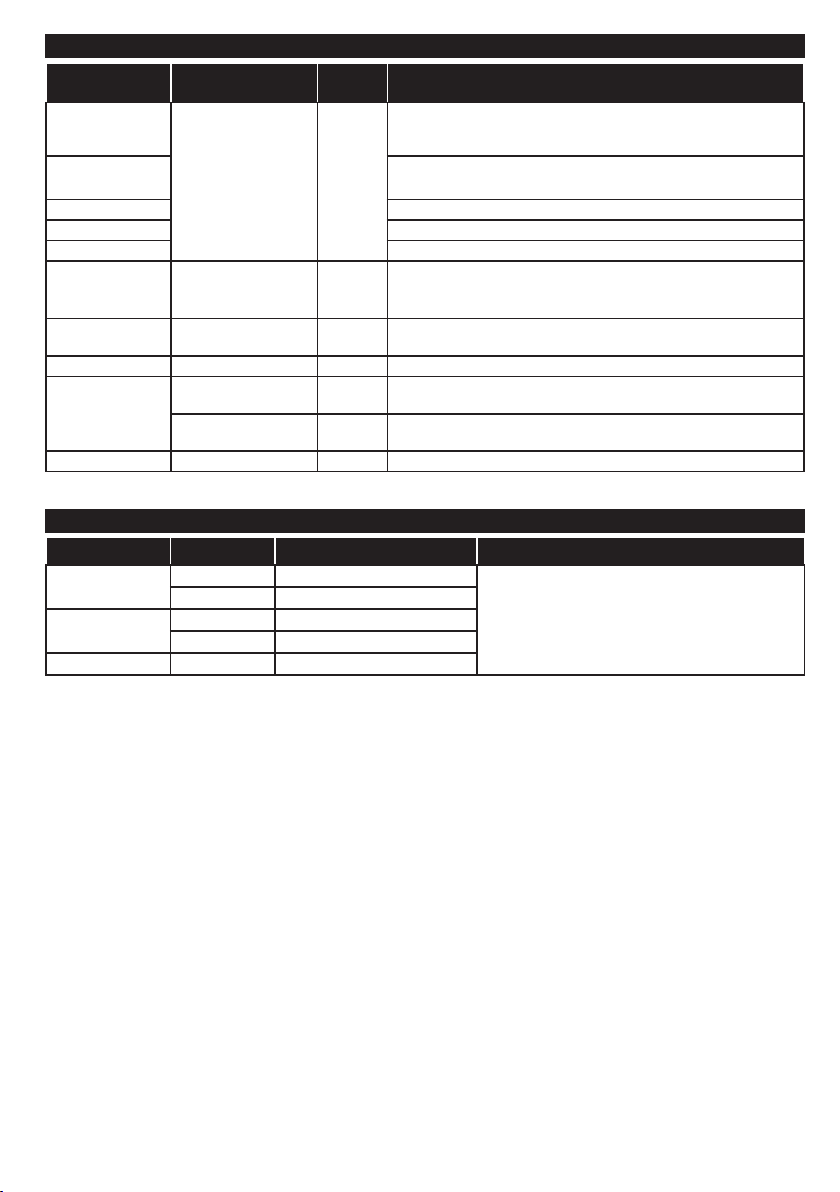
English - 27 -
Supported Video File Formats for USB Mode
Video Codec Resolution Bit Rate Container
MPEG1/2
1080Px2@30fps,
1080P@60fps
40Mbps
MPEG program stream (.DAT, .VOB, .MPG, .MPEG), MPEG
transport stream (.ts, .trp, .tp), MP4 (.mp4, .mov), 3GPP (.3gpp,
.3gp), AVI (.avi), MKV (.mkv), ASF (.asf)
MPEG4
MPEG program stream (.MPG, .MPEG), MP4 (.mp4, .mov),
3GPP (.3gpp, .3gp), AVI (.avi), MKV (.mkv), ASF (.asf)
XviD MP4 (.mp4, .mov), AVI (.avi), MKV (.mkv), ASF (.asf)
Sorenson H.263 FLV (.v), AVI (.avi), SWF(.swf)
H.263 MP4 (.mp4, .mov), 3GPP (.3gpp, .3gp), AVI (.avi), MKV (.mkv)
H.264
3840x2160@30fps,
1080P@60fps
135Mbps
FLV (.v), MP4 (.mp4, .mov), 3GPP (.3gpp, .3gp), MPEG
transport stream (.ts, .trp, .tp), ASF (.asf), AVI (.avi), MKV (.mkv)
Motion JPEG 720P@30fps 10Mbps
AVI (.avi), 3GPP (.3gpp, .3gp), MP4 (.mp4, .mov), MKV (.mkv),
ASF (.asf)
VP8 1080P@30fps 20Mbps MKV (.mkv), WebM (.webm)
HEVC/H.265
4K2K@60fps 100Mbps
MP4 (.mp4, .mov), MKV (.mkv), MPEG transport stream (.ts, .trp,
.tp)
1080P@60fps 50Mbps
MP4 (.mp4, .mov), MKV (.mkv), MPEG transport stream (.ts, .trp,
.tp), 3GPP (.3gpp, .3gp)
VP9 4K2K@30fps 100Mbps MKV (.mkv), WebM (.webm)
Supported Picture File Formats for USB Mode
Image Photo Resolution (width x height) Remark
JPEG
Base-line 15360x8640
The limit for max resolution depends on
DRAM size
Progressive 1024x768
PNG
non-interlace 9600x6400
interlace 1200x800
BMP 9600x6400

English - 28 -
Supported Audio File Formats for USB Mode
Audio Codec Sample rate Bit Rate Container
MPEG1/2 Layer1 16KHz ~ 48KHz
32Kbps ~
448Kbps
MP3 (.mp3), AVI (.avi), ASF (.asf), Matroska (.mkv, .mka),
MPEG transport stream (.ts, .trp, .tp), MPEG program stream
(.DAT, .VOB, .MPG, .MPEG), WAV (.wav)
MPEG1/2 Layer2 16KHz ~ 48KHz
8Kbps ~
384Kbps
MP3 (.mp3), AVI (.avi), ASF (.asf), Matroska (.mkv, .mka),
MPEG transport stream (.ts, .trp, .tp), MPEG program stream
(.DAT, .VOB, .MPG, .MPEG), WAV (.wav)
MPEG1/2 Layer3 16KHz ~ 48KHz
8Kbps ~
320Kbps
MP3 (.mp3), AVI (.avi), ASF (.asf), Matroska (.mkv, .mka), 3GPP
(.3gpp, .3gp), MP4 (.mp4, .mov, m4a), MPEG transport stream
(.ts, .trp, .tp), MPEG program stream (.DAT, .VOB, .MPG,
.MPEG), FLV (.v), WAV (.wav), SWF (.swf)
AC3
32KHz, 44.1KHz,
48KHz
32Kbps ~
640Kbps
AC3 (.ac3), AVI (.avi), Matroska (.mkv, .mka), 3GPP (.3gpp,
.3gp), MP4 (.mp4, .mov, m4a), MPEG transport stream (.ts, .trp,
.tp), MPEG program stream (.DAT, .VOB, .MPG, .MPEG)
EAC3
32KHz, 44.1KHz,
48KHz
32Kbps ~ 6
Mbps
EAC3 (.ec3), 3GPP (.3gpp, .3gp), MP4 (.mp4, .mov, m4a),
MPEG transport stream (.ts, .trp, .tp), MPEG program stream
(.DAT, .VOB, .MPG, .MPEG)
AAC, HEAAC 8KHz ~ 48KHz
AAC (.aac), AVI (.avi), Matroska (.mkv, .mka), 3GPP (.3gpp,
.3gp), MP4 (.mp4, .mov, m4a), MPEG transport stream (.ts, .trp,
.tp), MPEG program stream (.DAT, .VOB, .MPG, .MPEG), FLV
(.v), RM (.ra)
WMA 8KHz ~ 48KHz
128bps ~
320Kbps
ASF (.wma, .asf), AVI (.avi), Matroska (.mkv, .mka)
WMA 10 Pro M0 48KHz < 192kbps
WMA 10 Pro M1 48KHz < 384kbps
WMA 10 Pro M2 96KHz < 768kbps
G711 A/mu-law 8KHz
64Kbps ~
128Kbps
WAV (.wav), AVI (.avi), Matroska (.mkv, .mka), 3GPP
(.3gpp, .3gp), MP4 (.mp4, .mov, m4a)
LBR (cook)
8KHz, 11.025KHz,
22.05KHz,
44.1KHz
6Kbps ~
128Kbps
RM (.ra)
FLAC 8KHz~96KHz < 1.6Mbps Matroska (.mkv, .mka)
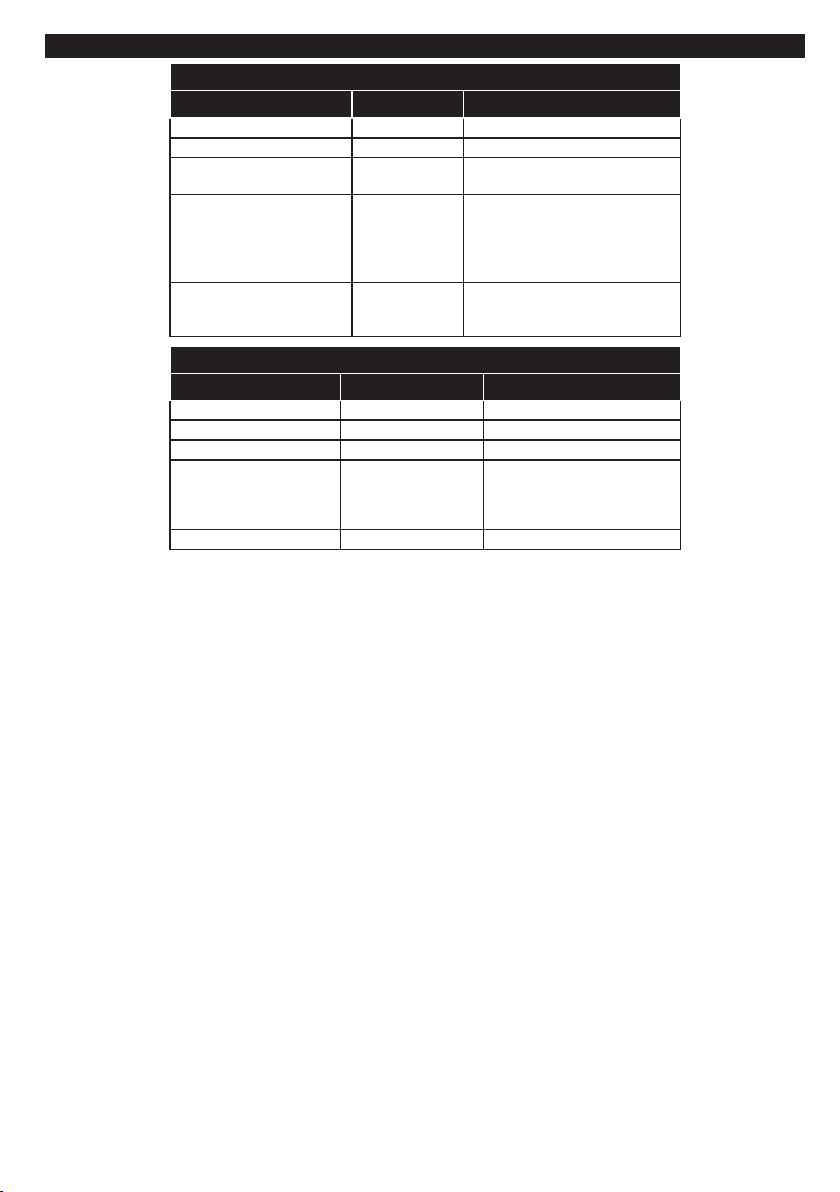
English - 29 -
Supported Subtitle File Formats for USB Mode
Internal Subtitles
Extension Container Subtitle Code
dat, mpg, mpeg, vob MPG, MPEG DVD Subtitle
ts, trp, tp TS DVB Subtitle
mp4 MP4
DVD Subtitle
UTF-8 Plain Text
mkv MKV
ASS
SSA
UTF-8 Plain Text
VobSub
DVD Subtitle
avi
AVI (1.0, 2.0),
DMF0,1, 2
XSUB
XSUB+
External Subtitles
Extension Subtitle Parser Remark
.srt Subrip
.ssa/ .ass SubStation Alpha
.smi SAMI
.sub
SubViewer
MicroDVD
DVDSusbtitleSystem
SubIdx (VobSub)
SubViewer 1.0 & 2.0 Only
.txt TMPlayer
English - 30 -
Supported DVI Resolutions
When connecting devices to your TV’s connectors by using DVI converter cable(DVI to HDMI cable - not
supplied), you can refer to the following resolution information.
56Hz 60Hz 66Hz 70Hz 72Hz 75Hz
640x480
þ þ
800x600
þ þ þ
1024x768
þ þ þ
1280x768
þ þ
1280x960
þ
1360x768
þ
1366x768
þ
1280x1024
þ þ þ
1400x1050
þ
1600x900
þ
1920x1080
þ

English - 31 -
Internet Portal functionality information
The content and services available through the SmarTVue portal are provided by third-party providers
and may be altered, suspended or discontinued at any time without notice.
Hitachi is not responsible for any of the content or services and does not warrant the availability of or
access to such content or services.
For information on a particular service or on any content, please visit the service/content provider’s
website. If you have any questions concerning, or problems with, any content or services then please
contact the relevant service/content provider directly. Hitachi is not responsible for providing customer
service in relation to content or services and accepts no liability in this regard.
DVB functionality information
This DVB receiver is only suitable for use in the country which it was designed to be used in.
Although this DVB receiver conforms to the latest DVB specifications at the time of manufacture, we
cannot guarantee compatibility with future DVB transmissions due to changes that may be implemented
in broadcast signals and technologies.
Some digital television functions may not be available in all countries.
We continually strive to improve our products; therefore, specifications may change without prior notice.
For advice on where to purchase accessories, please contact the store where you purchased your
equipment.