Certain internal parts are intentionally not grounded and may present a risk electric shock only during servicing. Service personnel – Do not contact the following parts while the appliance is energized: Control board, heat sink, motor, inlet valve, heater and pump.
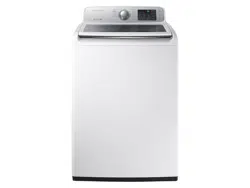
UNPACKING YOUR WASHER
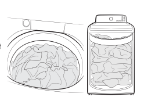
Unpack your washer and inspect it for shipping damage. Make sure you have received all the items shown below. If your washer was damaged during shipping, or you do not have all of the items, contact SAMSUNG (1-800-726-7864).
To prevent personal injury or strain, wear protective gloves whenever lifting or carrying the washer.
Packing materials can be dangerous to children. Keep all packing material (plastic bags, polystyrene, etc.) well out of children’s reach.
When unpacking the washer, 2 person collaboration is needed. To remove the cushion bottom of the packing materials, forward dumping is strictly prohibited. When you lay the washer down to remove carton base, should protect the side of washer and lay it carefully. Never lay your washer on its back or front.
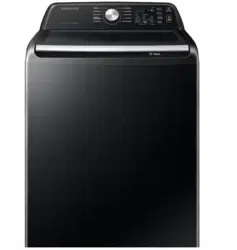
OVERVIEW OF YOUR WASHER
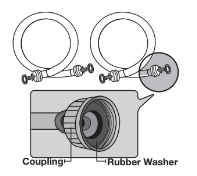
Parts supplied
Tools needed
Parts not supplied
If you lose an accessory and want to purchase a replacement, contact the Samsung service center (1-800-SAMSUNG (1-800-726-7864)).
The design of the parts and accessories may diff er from the pictures above. Their design is subject to change without notice for product improvement.
Do not reuse old hoses. Only use new water supply hoses when you install the washing machine. Old water supply hoses can leak or burst causing fl ooding and property damage.
Confirm that there are rubber washers inside the couplings of each water supply hoses.
BASIC LOCATION REQUIREMENTS
Electrical
120 Volt 60 Hz 15 AMP fuse or circuit breaker.
Individual branch circuit serving only your Washer is recommended.
Your Washer is equipped with a power cord.
NEVER USE AN EXTENSION CORD.
Grounding
ELECTRICAL GROUNDING IS REQUIRED FOR THIS APPLIANCE.
This appliance must be grounded. In the event of malfunction or breakdown, grounding will reduce the risk of electric shock by providing a path of least resistance for electric current.
This appliance is equipped with a power cord having a three-prong grounding plug for use in a properly installed and grounded outlet.
The plug must be plugged into an appropriate outlet that is properly installed and grounded in accordance with all local codes and ordinances.
An improperly connected equipment-grounding conductor can increase the risk of electrical shock. Check with a qualifi ed electrician or serviceman if you are not sure whether the appliance is properly grounded. Do not modify the plug provided with the appliance – if it does not fi t the outlet, have a proper outlet installed by a qualifi ed electrician.
IMPORTANT SAFETY PRECAUTIONS
To prevent unnecessary risk of fi re, electrical shock or personal injury, all wiring and grounding must be done in accordance with the National Electrical Code ANSI/FNPA, No. Latest Revision and local codes and ordinances. It is the personal responsibility of the appliance owner to provide adequate electrical service for this appliance.
NEVER CONNECT THE GROUND WIRE TO PLASTIC PLUMBING LINES, GAS LINES, OR HOT WATER PIPES.
Water
To correctly fi ll your Washer in the proper amount of time, water pressure of 20 to 116psi (137 to kPa) is required.
Water pressure less than 20 psi may cause water valve failure, or may not allow the water valve to shut off completely, or may extend the fi ll time beyond what your Washer controls allow, causing your Washer to turn off . A time limit is built into the controls to prevent fl ooding in your home if a hose becomes loose.
The water faucets must be within 4 feet / 122 cm of the back of your Washer to match the inlet hoses provided with your Washer.
Accessory inlet hoses are available in various lengths up to 10 feet / 275 cm for faucets that are further away from the back of your Washer.
To avoid the possibility of water damage:
Have water faucets easily accessible.
Turn off faucets when the washer is not in use.
Periodically check that there is no leakage from the water inlet hose fi ttings.
CHECK ALL CONNECTIONS AT THE WATER VALVE AND FAUCET FOR LEAKS. installing your washer
Drain facility
The recommended height of the standpipe is 39 in / 99 cm. The drain hose must be routed through the drain hose clip to the standpipe. The standpipe must be large enough to accept the outside diameter of the drain hose. The drain hose is attached to the washer at the factory.
Flooring
For best performance, you must install your washer on a solidly constructed fl oor. Wood fl oors may need to be reinforced to minimize vibration and/or unbalanced load situations. Carpeting and soft tile surfaces are contributing factors to vibration which can cause your washer to move slightly during the spin cycle.
Never install your washer on a platform or weakly supported structure.
Location considerations
Do not install your washer in areas where water may freeze, since your washer will always retain some water in its water valve, pump, and hose areas. Frozen water can damage the belts, the pump, hoses, and other components.
Alcove or closet installation
MINIMUM CLEARANCES FOR CLOSET AND ALCOVE INSTALLATIONS:
Sides – 1 in / 25 mm
Rear – 6 in / 152 mm
Closet Front – 2 in / 51 mm
TOP - 21 in / 533 mm
Gap between end of water valve and the wall
Case 1. Assemble supply hose after installing : Over 3.9 in (10 cm).
Case 2. Assemble supply hose before installing : Over 2.8 in (7cm).
If the washer and dryer are installed together, the closet front must have at least a 72 in2 (465 cm2) unobstructed air opening. Your washer alone does not require a specific air opening.
IMPORTANT NOTE TO INSTALLER
Please read the following instructions carefully before installing your washer.
These instructions should be retained for future reference.
We recommend you hire a professional to install this washer.
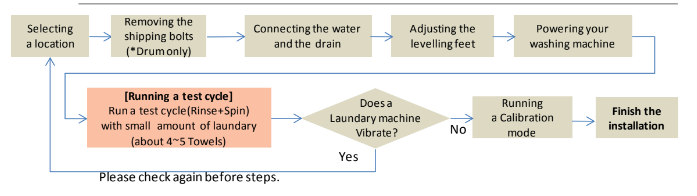
Installation fl ow chart
STEP 1 Selecting a Location
Before you install the washer, make sure the location:
Has a hard, level surface without carpeting or flooring that may obstruct ventilation.
Is away from direct sunlight.
Has adequate ventilation.
Is not exposed to freezing temperatures (temperatures under 32 °F or 0 °C).
Is away from heat sources such as oil or gas.
Has enough space so that the washer doesn’t rest on its power cord. STEP 2
Connecting the water and the drain
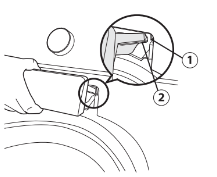
Connecting the water supply hose
Before installing the water supply hoses, make sure there are rubber gaskets inside the fittings at both ends of each new water hose. Installing the water supply hoses without rubber gaskets can cause water leakage.
When you initially install the washer, be sure to use new hoses. Failing to do so may result in a water leakage or overfl ow and may damage your property.
Do not connect multiple water supply hoses together to increase the length of the supply hose. Hoses connected this way can leak and the leakage can cause electrical shock. If a hose is too short, replace the hose with a longer, high pressure hose.
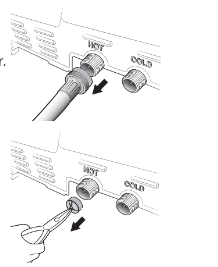
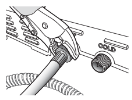
1. Connect the ends of the water supply hoses to the HOT and COLD faucets.
2. Tighten the fi ttings by hand until they are snug, and then tighten them an additional two-thirds of a turn with a plier.
When you fasten the fi ttings, do not fasten them too tightly or apply tape or sealant to the faucets or water supply intakes. This can damage the fi ttings.
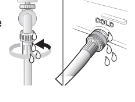
N After you have connected the water supply hoses to the faucets, ensure that they are connected correctly by pulling the water supply hoses downwards
3. Place the unconnected ends of the hoses into a bucket and open the faucets connected to the two water supply hoses for 10 or 15 seconds to remove any foreign substances from the hoses. Close the faucets before continuing.
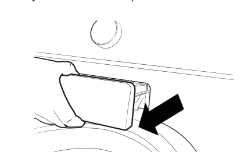
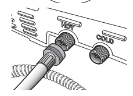
4. Connect the ends of the water supply hoses to the water supply intake connections at the back of the washer.
The water supply hose connected to the HOT faucet must be connected to the hot water supply intake and the water hose connected to the COLD faucet must be connected to the COLD water supply intake.
5. Tighten the fi ttings by hand until they are snug, and then tighten them an additional two-thirds of a turn with a plier.
To ensure the correct water usage, connect both the HOT and COLD water faucets. If either or both are not connected, an “4E” no fi ll) error can occur.
If you do not want to use the HOT water supply hose, insert the water intake cap into the HOT water supply intake hole. In this case, you must select the Tap Cold option for the water temperature. If you select the Tap Cold option, all the lamps for the water temperature options are turned off .
Confirm that the water supply hoses are not twisted or bent. If the hoses are twisted or bent, the hoses can leak and cause electric shock due to the water leakage.
6. Turn on the HOT and COLD water supplies and check all the water supply intake connections and the faucets for water leaks.
Connecting the drain hose
The end of the drain hose can be positioned in three ways:
In a Wall standpipe or Floor standpipe
The height of end of standpipe must be no lower than 39 in (99 cm) and no higher than 96 in (245 cm). If drain pipe are built into the wall with water valves (A), fasten the drain hose to the water hose.
Make sure that the connection between the drain hose and the standpipe is not airtight.
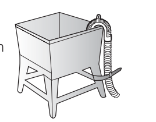
In a laundry tub
The height of the tub must be no lower than 39 in (99 cm) and no higher than in (245 cm).
Assemble the supplied Hose guide at the end of the drain hose, and put the hanger on laundry tub.
And fasten the drain hose to the leg of laundry tub.
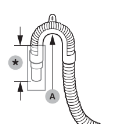
Connect the hose guide (A) within 3~5 in (7.6~12.7 cm)* from the end of the drain hose. If the drain hose is extended beyond the end of the hose guide, mold or microorganisms could spread inside the washer.
Drain Hose can be installed until 96 in (245cm) maximum. But drain capability can be reduced at this height. It causes the washer to have odor, because of remained water in the drain system.
If the drain hose is installed below 39 in (99 cm), water can be drained in cycles due to a siphon phenomenon. It causes the washer to display a “4E” error code.
STEP 3
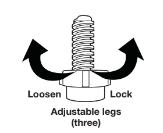
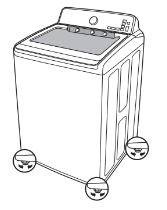
Leveling your washer
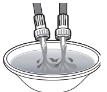
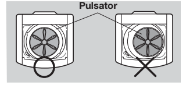
See if the washer is level by checking the position of the tub:
1. Slide the washer into position.
2. Open the lid of the washer, and pour the water into the tub to just below the pulsator level.
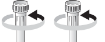
3. If the washer is level, the pulsator is positioned at the center of the water as shown in the fi gure. If not, level your washer by turning the front leveling feet clockwise or counterclockwise as necessary.
Turn the front leveling feet clockwise to raise the washer, and counterclockwise to lower the washer.
The number of leveling feet diff ers with the model.
STEP 4
Powering your washer
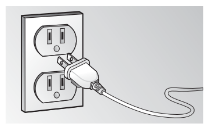
Plug the power cord into a 3-prong, well grounded 120 volt 60 Hz approved electrical outlet protected by a 15-amp fuse or comparable circuit breaker.
Your washer is grounded through the third prong of the power cord when plugged into a three-prong grounded electrical outlet.
Test run
Make sure that you install your washing machine correctly by running the Rinse+Spin cycle after the installation is complete.
STEP 5
Running a test cycle
Run a test cycle as follows to check if your washer is properly installed.
Load about 6 pounds of laundry into the tub.
Press the Power button to turn on your washer.
Select the Rinse+Spin cycle by turning the Cycle Selector.
Press the Start/Pause button to start the test cycle.
The washer should not rock or vibrate excessively when water is supplied or when washing or spinning, and should drain well during the spin cycle.
If water leaks while water is being supplied or drained, check the water connections. Refer to the “Connecting the water and the drain” section on pages 14~15 for instructions.
If the washer rocks and vibrates excessively, level your washer again. Refer to the “Leveling your washer” section on page 15 for instructions.
STEP 6
Calibration mode
Your Samsung washing machine detects the laundry weight automatically. For more accurate weight detection, please run Calibration Mode after the installation.
To run Calibration Mode, follow these steps:
Remove laundry or any contents in the machine.
Press the Temp. and Delay End buttons simultaneously, and then press the Power button. The machine turns on.
Press the Start/Pause button to activate “Calibration Mode”.
The pulsator rotates clockwise and counterclockwise for approximately 1 minute.
When “Calibration Mode” is fi nished, “End” (WA50M7450A*, WA50N7350A*) / “0” (WA45M7050A*, WA45N7150A*) appears on the display, and the machine automatically turns off . The washing machine is now ready for use. operating instructions
W WARNING: To reduce the risk of fi re, electric shock, or injury to persons when using your appliance, follow basic precautions, including the following:
LOADING YOUR WASHER
Fill the tub with dry, unfolded clothes evenly around in order to enhance washing effi ciency and prevent excess wear, or wrinkling of the load.
For optimal washing performance, make sure the laundry is piled up evenly.
Wash delicate items such as bras, hosiery, and other lingerie in the Delicates cycle with similar lightweight items.
When washing big bulky items or a few smaller items that don’t fi ll the tub completely – a rug, a pillow, stuff ed toys, or one or two sweaters, for example – add a few towels to improve spin performance.
Do not insert bulky items except for Bedding in this cycle.
During the spin cycle, the washer may add additional water to redistribute the clothes and correct an imbalance inside the drum.
When washing heavily soiled loads, do not overload your washer to ensure good cleaning results.
Infl atable items may cause damage to the laundry or the machine during the wash or drying process.
Regardless of the size, blankets or quilts are safer and cleaner to wash one item at a time. Two diff erent-sized blankets in the same load may compromise the drying performance due to unbalanced loads.
To input a blanket
Fold the blanket into the blanket-specifi c net as shown, and then insert in the tub below the plastic area of the tub.
Make sure the laundry is inserted completely.
Any exposed part of the laundry may cause damage to the machine or the laundry itself, or a water leak.
Do not overload the tub. Make sure no part of the laundry is exposed outside of the tub.
To add a forgotten item:
Press the Start/Pause button to pause the washer.
Wait for the door to unlock automatically, and then open the door.
Add the item, close the door, and then press the Start/Pause button. The cycle will resume.
GETTING STARTED
Load your washer.
Add liquid (or powder) detergent and additives to the dispenser (see pages 24~26).
Select the appropriate cycle and options for the load (see pages 18~23).
Close the lid.
Press the Start/Pause button.
The Wash Indicator light illuminates.
The estimated cycle time will appear in the display. The time may fl uctuate to indicate the time remaining in the cycle better.
Before your washer starts to fi ll, it will make a series of clicking noises to check the door lock and do a quick drain.
When the cycle is complete, the Door Lock light will go out and “End” (WA50M7450A*, WA50N7350A*) / “0” (WA45M7050A*, WA45N7150A*) will appear in the display.
Pressing the Power button cancels the cycle and stops your washer.
The Wash, Rinse , and Spin indicator lights will illuminate during those portions of the cycle.
OVERVIEW OF THE CONTROL PANEL
1. Cycle Selector
Select the appropriate cycle for the type of load. The cycle you select determines the tumble pattern and spin speed for the cycle.
To minimize wrinkling of laundry, select the PERM PRESS cycle.
NORMAL - For most fabrics including cottons, linens, and normally soiled garments.
HEAVY DUTY - For sturdy, colorfast fabrics and heavily soiled garments.
BRILLIANT WHITES (WA50M7450A*, WA50N7350A*) - For white fabrics with or without bleach.
BEDDING/WATERPROOF - For bulky and large items, such as comforters, blankets and sheets. When washing comforters, use liquid detergent, waterproof or water-resistant items.
Do not wash waterproof items and non-waterproof items together.
Check the specification label on the fabric item and see if the item is waterproof.
Use the bedding/waterproof cycle for waterproof or water-resistant items such as plastic mats, ski pants, raincoat and comforters which hardly absorb water.
DEEP WASH - Use more water in washing and rinsing.
DELICATES - For sheer fabrics, bras, lingerie, silks, and other handwash- only fabrics. For best results, use liquid detergent.
PERM PRESS - For wash-and-wear, synthetic fabrics, and lightly to normally soiled garments.
ACTIVE WEAR (WA50M7450A*, WA50N7350A*) - Use this cycle to wash exercise wear such as sports jerseys, training pants, shirts/tops and other performance clothing. This cycle provides eff ective soil removal with gentle action for special fabric care.
QUICK WASH - For lightly soiled garments needed quickly.
SPIN - Drains the water and spins at a high speed.
RINSE + SPIN - Use for loads that need rinsing only or to add rinse-added fabric softener to a load.
2. Display
Provides instructions and diagnostics while keeping you updated on the cycle status and time remaining.
3. Temp. selection button
Press the button repeatedly to cycle through the diff erent water temperature options.
Hot - Whites and heavily soiled, colorfast items.
Warm - Colorfast items.
Eco Warm - Moderately soiled, colorfast items; most wrinkle-free items.
Cool - Brightly colored, very lightly soiled items.
Cold - Cold water with no warm water added.
If you select the Cold option, all the lamps for the water temperature options are turned off .
4. Spin selection button
Press the button repeatedly to cycle through the diff erent spin speed options.
High - Use for underwear, t-shirts, jeans, and sturdy cottons.
Medium - Use for jeans, wrinkle-free or wash-and-wear items, and synthetics.
Low - Use for delicate items needing a slow spin speed.
No Spin - Drains your washer without spinning. Use for extremely delicate items that cannot tolerate any spin.
5. Soil Level selection button
Press the button to select the soil level/washing time.
Heavy - For heavily soiled loads.
Normal - For moderately soiled loads. This setting is best for most loads.
Light - For lightly soiled loads.
6. Select Cycle Option
Press these buttons to select diff erent cycle options.
Extra Rinse - Change from spray rinse mode to deep rinse mode, and rinse once again.
Delay End - Delay the end of any cycle for up to 19 hours in one-hour increments. Displayed hour indicates the time the wash will be ended.
Self Clean - Use to clean dirt and bacteria from the drum. Regular use (after every washes) is recommended.
Pre Soak - It adds 15 minutes soaking time at the start of the wash cycle for better stain removal.
7. Start/Pause selection button
Press to pause and restart cycles.
8. Power button
Press once to turn your washer on. Press again to turn your washer off . If the washer is left on for more than 10 minutes without any buttons being pressed, the power automatically turns off .
Child Lock [ ]
Child Lock prevents children from playing with your washer.
Activating the Child Lock function
Press and hold the Temp. and Spin buttons simultaneously for approximately 3 seconds.
When you activate the Child Lock function, the “Child Lock [ ]” lamp blinks.
Using the Child Lock function
If the lid is opened when the Child Lock function is on, “dE” is displayed and an alarm sounds.
If the water level in the tub is above the safe water level, “dE” is displayed on the LED display and the washing machine starts to drain water by force after 30 seconds.
If the water level in the tub is above the safe water level and the Child Lock function is turned on while the door is open, “CL” is displayed on the LED display even if the power of the washing machine is turned off and the washing machine drains water by force.
Even if the power of the washing machine is turned off , if the lid is opened while the water level in the tub is above the Reset water level, “CL” is displayed on the LED display without the alarm sounding and the washing machine starts to drain water. When the draining operation fi nishes, the power is automatically turned off again.
You have activated the Child Lock function while the washing machine is running, the Start/
Pause button will not work.
After the compulsory drain, the “CL” code display blinks at 1 second intervals and the product enters the “CL” mode. (When the product is in the “CL” mode, only the Power button works.)
To cancel the “CL” mode, you need to turn the power off and then on again.
To cancel the “dE” mode, deactivate the Child Lock function. To deactivate the Child Lock function, press and hold the Temp. and Spin buttons simultaneously for at least 3 seconds.
Adding laundry when Child Lock is on
To add laundry, deactivate the Child Lock function. To deactivate the Child Lock function, press and hold the Temp. and Spin buttons simultaneously for at least 3 seconds. See Pause Option” on page 23 for additional details.
Deactivating the Child Lock function
Press and hold both the Temp. and Spin buttons simultaneously for approximately 3 seconds.
When you deactivate the Child Lock function, the “Child Lock [ ]” is turned off .
The Child Lock function prevents children or the infi rm from accidently operating the washer and injuring themselves.
Sound
The Sound Off function can be selected during all cycles.
Garment
You can add or take out laundry items even after the wash has started, as long as the "Garment” light is on. Pushing the Start/Pause button unlocks the lid. If you open the lid and want to continue the wash cycle, close the lid, and then press the Start/Pause button.
If you have activated the Child Lock, you must deactivate it fi rst. See page 20.
Delay End
You can set the washing machine to start your wash automatically at a later time, by choosing a delay time.
The hour displayed indicates the time at which the wash will be ended.
Set your wash cycle.
Press the Delay End button repeatedly until the delay time is set.
Press the Start/Pause button. The “Delay End” indicator will be lit, and the clock will begin counting down until it reaches the set time.
To cancel a Delay End function, press the Power button and then turn the washing machine on again.
Pre Soak
Use this function when the laundry is heavily contaminated or stained. This function improves the wash performance by adding a Pre Soak cycle.
If you select this function, the total cycle time is increased by 15 minutes.
When the Pre Soak cycle starts, the washing machine repeats a wash cycle after supplying water and then performs a 15-minute soak cycle.
When the Pre Soak cycle is complete, the confi gured wash cycle starts without draining water.
Mist Shower
Mist Shower sprays water from a nozzle that is independent of the main water supply system.
This soaks the laundry with water from the beginning of the rinse cycle and ensures an eff ective wash even with a small amount of water.
(The Mist Shower function may not work if there is too large of a load in the machine.)
Smart Care (WA50M7450A*, WA50N7350A*)
This function enables you to check the status of the washing machine using a smartphone.
To enable the Smart Care function, press and hold the Self Clean key for 3 seconds after turning the power on or when an error occurs.
The Smart Care indicator is lit on the display.
Run the Smart Care app on your smart phone.
Focus your smart phone’s camera on the display panel of the washing machine.
If the smart phone’s camera is focused on the display panel of the washing machine, the panel and error message is automatically recognized and the error type and countermeasures are displayed on the smart phone.
If the smartphone fails to recognize the error code more than twice, please enter the error code displayed on the display panel of the washer manually into the Smart Care app.
Downloading the Smart Care app
Download the Samsung Laundry App into your mobile phone from the Android market or Apple App store. (Search word : Samsung Smart Washer/Dryer)
Precautions when using Smart Care
If light from a light bulb, fl uorescent bulb, or lamp is refl ected on the display panel of the washing machine, the smartphone may not be able to recognize the panel or error message easily.
If you hold the smartphone at too large an angle relative to the front of the display panel, it may not be able to recognize the error code. For best results, hold the smartphone so that the front of the panel and the smartphone are parallel or nearly parallel. washing a load of laundry
Washing clothes using the cycle selector
Your new washing machine makes washing clothes easy, using Samsung’s “Fuzzy Control” automatic control system. When you select a wash program, the machine will set the correct temperature, washing time, and washing speed.
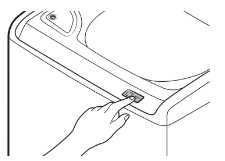
Press the Power button.
Open the lid.
Load the articles of clothing one at a time loosely into the drum, without overfi lling it.
Add liquid (or powder) detergent, softener, and/or bleach (if necessary) to the appropriate compartments. See pages 24~26.
Close the lid.
Use the Cycle Selector to select the appropriate cycle according to the type of material: NORMAL, HEAVY DUTY, COLORS/DARKS, BEDDING, DELICATES, WATERPROOF, PERM PRESS, ACTIVE WEAR, QUICK WASH, SPIN, RINSE+SPIN. The relevant indicators will illuminate on the control panel.
At this time, you can control the wash temperature, the number of rinse cycles, the spinning speed, and the delay time by pressing the appropriate option button.
Press the Start/Pause button on the Cycle Selector and the wash will begin. The process indicator will light up and the remaining time for the cycle will appear in the display.
Pause Option
To remove or add laundry items, follow these steps:
Press the Start/Pause button to unlock the lid.
Remove or add laundry items.
Close the lid, and then press the Start/Pause button to restart the wash.
When the cycle is fi nished:
After the total cycle has fi nished, the power will turn off automatically.
Open the lid.
Remove laundry.
ATC (AUTO TEMPERATURE CONTROL)
ATC is the control function that the washer controls water temperature with temperature sensor (thermistor).
Because there are numerous water temperatures depending on the customer’s environments (cold areas, warm areas, various water temperatures, settings of heater temperature, etcs.), ATC function in our washer maintains the certain level of wash temperature to output the best washing performance at each cycle.
If you select normal & heavy duty cycles, those cycles are the regulation and UL cycle. Since new washer must reduce the amount of energy usage at fi rst priority, customer will notice more cold water entering the washer. But This is Normal, not a problem.
In those regulation cycles, Hot temperature is similar to acceptable adult bath-water temperature and warm temperature is similar to comfortable swimming-pool water temperature. If customers want to wash clothes in specifi c water temperature, customers should choose a diff erent cycle at each temperature (Hot/Warm/Eco Warm)
PREWASH (WATER JET)
Water Jet helps you hand wash before the washing machine starts operation. Water Jet is available only when the door is open with the water level set to less than High.
1. Open the door.
2. Press the Water Jet button to supply water.
3. Hand wash your item.
If you want to hand wash while the machine is operating, press the Start/Pause button to stop operation, and then follow steps 1-3 above.
Water Jet stops
Water Jet stops operation automatically when the washing machine detects the maximum water level.
Water Jet stops operation automatically 5 minutes after it begins. To add more water, press the Water Jet button again to resupply water.
Water Jet drains
Select a cycle and press the Start/Pause button. Then the washing machine drains the water to be used during the prewash.
When the washing machine is turned off before starting the wash cycle, it drains the water to be used during the prewash. However, when it is turned off during the wash cycle, it does not drain the water.
Water Jet extracts the water through the Mist Shower nozzle for 1 second and then through the Water Jet nozzle from then on when it is fi rst activated after the washing machine turns on.
Do not abuse Water Jet. Excessive use of Water Jet increases water consumption.
Do not block the outlet of Water Jet with hands. Water may leak outside the tub, causing a system failure.
Due to a diff erence in air pressure, Water Jet may splash water from its outlet when it is first activated.
DETERGENT USE
Your washer is designed to use high effi ciency (HE) detergents.
For best cleaning results, use high-efficiency detergent such as Tide HE, Wisk HE, Cheer HE or Gain HE*. High efficiency detergents contain suds suppressors that reduce or eliminate suds. When fewer suds are produced, the load tumbles more efficiently and cleaning is maximized.
Regular detergent is not recommended. Use HE detergents only.
Reducing the amount of detergent may reduce the quality of cleaning. It is important to pre–treat stains, sort carefully by color and soil level, and avoid overloading. Brand names are trademarks of their respective manufacturers.
FEATURES
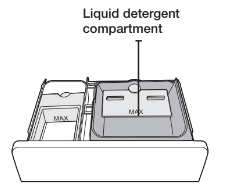
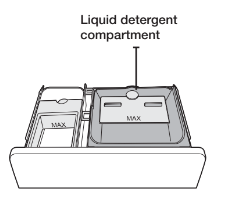
Automatic dispenser
Your washer has separate compartments for dispensing detergent and color-safe bleach and fabric softener. Add all laundry additives to their respective compartments before starting your Washer.
The automatic dispenser MUST ALWAYS be in place before you start your washer. DO NOT open the automatic dispenser when your washer is running.
Never exceed the manufacturer’s recommendations when adding detergent.
This compartment holds liquid detergent for the main wash cycle, which is added to the load at the beginning of the cycle.
When using powdered detergent, remove the liquid detergent compartment from the detergent drawer. The washer will not dispense powdered detergent from the liquid detergent compartment.
To add detergent to the automatic dispenser:
Open the dispenser drawer.
Load the recommended amount of liquid (or powder) detergent into the detergent compartment before you start your wash.
Close the drawer slowly and smoothly to avoid spilling, splashing, or premature dispensing of the contents.
It is normal for a small amount of water to remain in the dispenser compartments at the end of the cycle.
Do not put chlorine bleach in the dispenser drawer.
Loading the Liquid (or Powder) detergent compartment
Pour the recommended amount of laundry detergent directly into the detergent compartment before starting your washer.
If you are using color-safe bleach, add it with the detergent to the detergent compartment.
When adding color-safe bleach with detergent, it is best if both laundry products are in the same form – liquid.
When using powdered detergent, remove the liquid detergent compartment from the detergent drawer. The washer will not dispense powdered detergent from the liquid detergent compartment.
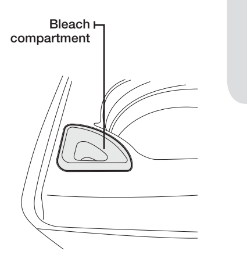
Loading the Bleach compartment (WA50M7450A*)
(Liquid chlorine bleach only)
1. Add chlorine bleach to the bleach compartment. DO NOT exceed the MAX FILL line.
Avoid splashing or over–filling the compartment.
Your washer automatically dispenses bleach into the tub at the appropriate time.
2. The dispenser automatically dilutes liquid chlorine bleach before it reaches the wash load.
Never pour undiluted liquid chlorine bleach directly onto the load or into the tub. It is a powerful chemical and can cause fabric damage, such as weakening of the fibers or color loss, if not used properly.
If you prefer to use color–safe, add it to the appropriate detergent compartment. DO NOT pour color–safe bleach into the Bleach compartment.
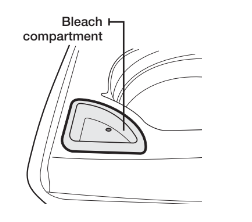
Loading the Bleach compartment (WA50N7350A*, WA45N7150A*, WA45M7050A*)
Use the liquid chlorine bleach only. Add chlorine bleach to the bleach compartment. DO NOT exceed the bleach compartment.
Avoid splashing or over–filling the compartment.
Never pour undiluted liquid chlorine bleach directly onto the load or into the tub. It is a powerful chemical and can cause fabric damage, such as weakening of the fibers or color loss, if not used properly.
If you prefer to use color–safe, add it to the appropriate detergent compartment.
DO NOT pour color–safe bleach into the Bleach compartment.
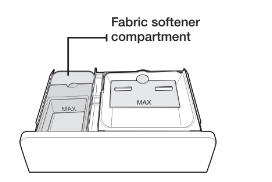
Loading the Fabric softener compartment
Pour the recommended amount of liquid fabric softener into the softener compartment. For smaller loads, use less than one capful.
Dilute the fabric softener with water until it reaches MAX FILL in the compartment.
The dispenser automatically releases liquid fabric softener at the proper time during the rinse cycle.
Use the softener compartment ONLY for liquid fabric softeners.
DO NOT use the Downy Ball* in the fabric softener compartment with this washer. It will not add fabric softener at the appropriate time.
Use the detergent compartment.
Do not use liquid fabric softener that is too sticky as it may not mix with the water suffi ciently.
Brand names are trademarks of their respective manufacturers. maintaining your washer
Certain internal parts are intentionally not grounded and may present a risk electric shock only during servicing. Service personnel – Do not contact the following parts while the appliance is energized: Control board, heat sink, motor, inlet valve, heater and pump.
CLEANING THE EXTERIOR
Turn off the water faucets after finishing the day’s washing.
This will shut off the water supply to your washer and prevent the unlikely possibility of damage from escaping water. Leave the lid open to allow the inside of your washer to dry out.
Use a soft cloth to wipe up all detergent, bleach or other spills as they occur.
Clean the following as recommended:
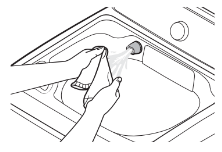
Control Panel – Clean with a soft, damp cloth. Do not use abrasive powders or cleaning pads. Do not spray cleaners directly on the panel.
CLEANING THE INTERIOR
Clean the interior of your washer periodically to remove any dirt, soil, odor, mold, mildew, or bacterial residue that may remain in your washer as a result of washing clothes. Failure to follow these instructions may result in unpleasant conditions, including odors and/or permanent stains on your washer or laundry. Hard water deposits may be removed, if needed. Use cleaners labeled “Washer safe”.
STORING YOUR WASHER
Washers can be damaged if water is not removed from hoses and internal components before storage. Prepare your washer for storage as follows:
Select the Quick Wash cycle and add bleach to the automatic dispenser. Run your washer through the cycle without a load.
Turn the water faucets off and disconnect the inlet hoses.
Unplug your washer from the electrical outlet and leave your washer lid open to let air circulate inside the drum.
If your washer has been stored in below–freezing temperatures, allow time for any leftover water in your washer to thaw out before use.
PRESERVING THE TOP COVER AND THE FRONT FRAME
Do not place any heavy or sharp objects or a detergent box on the washing machine. They can scratch or damage the top cover of the unit.
Since the entire washing machine has a high-gloss finish, the surface can be scratched or damaged. Avoid scratching or damaging the surface when using the washing machine.
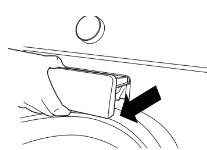
CLEANING MESH FILTER
Clean the mesh filter of the water hose once or twice a year.
Turn off the washer, and then unplug the power cord.
Close the faucet.
Loosen and disconnect the water hose from the back of the washer. Cover the hose with a cloth to prevent water from gushing out.
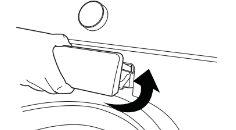
Use pliers to pull out the mesh filter from the inlet valve.
Submerge the mesh filter deeply in water so that the threaded connector is also submerged.
Dry the mesh filter completely in a shaded area.
Reinsert the mesh filter into the inlet valve, and reconnect the water hose to the inlet valve.
Open the faucet.
If the mesh filter is clogged, the “4E” information code appears on the washer’s display screen.
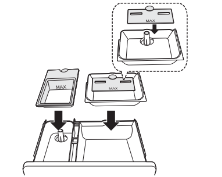
CLEANING THE DISPENSERS (WA45N7150A*, WA45M7050A*)
The automatic dispenser may need to be cleaned periodically due to laundry additive buildup.
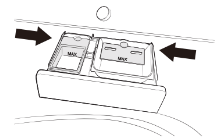
1. Pull the dispenser drawer straight back until it stops.
2. Tilt the dispenser drawer upward and remove it.
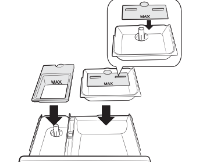
3. Remove the inserts from the 3 compartments. Rinse the inserts and the drawer with warm water to remove traces of accumulated laundry products.
4. To clean the drawer opening, use a small, non-metal brush to clean the recess. Remove all residue from the upper and lower parts of the recess.
5. Return the inserts to the proper compartments and replace the drawer. By placing the dispenser drawer rail on top of the compartment rail (Tilt the dispenser drawer downward and insert it.), and then push the drawer in firmly and slowly.
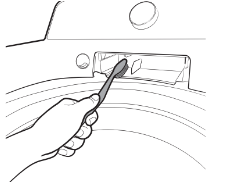
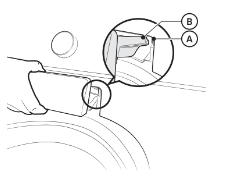
CLEANING THE DISPENSERS (WA50M7450A*, WA50N7350A*)
The automatic dispenser may need to be cleaned periodically due to laundry additive buildup.
1. Pull the dispenser drawer straight back until it stops.
2. Push the ends of each side of the case at the same time. When you feel the ends push, pull out the dispenser drawer.
3. Remove the inserts from the 3 compartments. Rinse the inserts and the drawer with warm water to remove traces of accumulated laundry products.
4. To clean the drawer opening, use a small, non-metal brush to clean the recess. Remove all residue from the upper and lower parts of the recess.
5. Return the inserts to the proper compartments and replace the drawer by placing the dispenser drawer rail (B) on top of the compartment rail (A) (Tilt the dispenser drawer downward and insert it). Then push the drawer in firmly and slowly.
SELF CLEAN
Certain usage and environmental conditions may result in some residue build-up or odor in the washer tub. To prevent this build-up of residue or odor causing bacteria and keep your washer tub fresh and clean, perform the Self Clean cycle at least once a month or every 20 cycles. Perform the recommended procedure below when using the Self Clean cycle.
1. Remove all items from the washer tub and ensure the tub is empty. Laundry left in the tub during the Self Clean cycle may be damaged.
2. Press the Power button.
3. Select the Self Clean cycle.
Once the Self Clean cycle is selected, the only function that can be set is Delay End.
4. Press the Start/Pause button.
If you press the Start/Pause button, Self Clean begins.
The water temperature for Self Clean is defaulted to Hot. This temperature cannot be changed.
In the case where residue is present in the washer tub, add 1 cup (8 fl .oz, 240 ml) of liquid chlorine bleach to the bleach compartment before you start the Self Clean cycle. Do not use or mix any other detergent or chemicals during the Self Clean cycle.
If necessary, run a RINSE+SPIN Cycle after the Self Clean cycle has completed to help remove any remaining residue.
C
Check the washer tub before using the Self Clean cycle. Remove any remaining water in the tub by running a SPIN cycle prior to starting the Self Clean cycle.
If there is chlorine bleach left in the washer tub for an extended period of time, rust can occur.
Self Clean reminder
After 20 washing cycles, the Self Clean LED reminder icon and the Self Clean cycle LED will blink on the control panel for an hour and then turn off automatically.
The reminder will appear on the control panel for 5 additional consecutive cycles before turning off . The next reminder will not appear until another 20 cycles have been completed.
Troubleshooting
CHECK THESE SOLUTIONS IF YOUR WASHER...
Will not start.
Make sure the lid is closed.
Make sure your washer is plugged in.
Make sure the water source faucets are open.
Make sure to press the Start/Pause button to start your Washer.
Make sure Child Lock is not activated. See page 20.
Before your washer starts to fi ll, it will make a series of clicking noises to check the lid lock and do a quick drain.
Check the fuse or reset the circuit breaker
Has no water or not enough water.
Turn both faucets on fully.
Straighten the water inlet hoses.
Disconnect hoses and clean the screens. Hose fi lter screens may be clogged.
Has detergent remaining in the automatic dispenser after the wash cycle is complete.
Make sure your washer is running with suffi cient water pressure.
Vibrates or is too noisy.
Make sure your washer is set on a level surface. If the surface is not level, adjust your washer’s feet to level the appliance.
Make sure your washer is not touching any other object.
Make sure the laundry load is balanced.
Stops
Plug the power cord into a live electrical outlet.
Check the fuse or reset the circuit breaker.
Close the lid and press the Start/Pause button to start your washer.
For your safety, your washer will not spin unless the lid is closed.
Before your washer starts to fi ll, it will make a series of clicking noises to check the lid lock and do a quick drain.
There may be a pause or soak period in the cycle. Wait and it may start.
Check the screens on the inlet hoses at the faucets for obstructions. Clean the screens periodically.
Fills with the wrong temperature water.
Turn both faucets on fully.
Make sure the temperature selection is correct.
Make sure the hoses are connected to the correct faucets.
Flush water lines.
Disconnect the hoses and clean the screens. The hose fi lter screens may be plugged.
As your washer is fi lling, the water temperature may change as the automatic temperature control feature checks incoming water temperature. This is normal.
While your washer is fi lling, you may notice just hot and/or just cold water going through the dispenser when you have selected cold or warm wash temperatures. This is a normal function of the automatic temperature control feature as your washer determines the temperature of the water.
Lid locked or will not open.
Press the Start/Pause button to stop your washer.
It may take a few moments for the lid lock mechanism to disengage.
Does not drain and/or spin.
Check the fuse or reset the circuit breaker.
Straighten the drain hoses. Eliminate kinked hoses. If there is a drain restriction, call for service.
Close the lid and press the Start/Pause button. For your safety, your washer will not spin unless the lid is closed.
Load is too wet at the end of the cycle.
Use the High spin speed.
Use high effi ciency detergent to reduce over–sudsing.
The Load is too small. Very small loads (one or two items) may become unbalanced and not spin out completely.
Leaks water.
Make sure all hose connections are tight.
Make sure the end of the drain hose is correctly inserted and secured to the drainage system.
Avoid overloading.
Use high effi ciency detergent to prevent over–sudsing.
Has excessive suds.
Use high effi ciency detergent to prevent over-sudsing.
Reduce the detergent amount for soft water, small or lightly soiled loads.
Non-HE detergent is NOT recommended.
Has an odor.
Check your Detergent . Excessive suds collect in nooks and crannies and cause mold.
Run cleansing cycles to sanitize the machine periodically. (Silver Care or Sanitize Cycle or Self Clean)
Dry the interior of your washer after the total cycle has finished.
INFORMATION CODES
The Washer may display information codes to help you understand what is occurring with your Washer better.
CODE SYMBOL
MEANING
SOLUTION
Ub
Unbalanced load prevents washer from spinning.
Redistribute the load, and then press the Start/ Pause button.
dC/dC1
The washer did not properly lock the door.
Make sure the door is fi rmly closed. Restart the washer. If the code reappears, call customer service.
dC3
Add Door did not lock.
Make sure the Add Door is fi rmly closed. Restart the washer. If the code reappears, call customer service.
ddC
Add Door open while working
5C
The washer does not drain. The washer may detect a small clog while draining.
Restart the washer.
Select the Spin Only cycle.
Press the Start/Pause button to drain the water.
If the washer still does not drain, call customer service.
4C
Water is not being supplied to the washer.
Make sure the water taps are open. Make sure the water hoses are not clogged. Make sure the water taps are not frozen. Make sure the washing machine is operating with suffi cient water pressure. Make sure that the cold water tap and the hot water tap are properly connected. Clean the mesh filter as it may be clogged.
4C2
The hot water was supplied from the course washing the delicacy clothes.
Make sure the cold water supply hose is fi rmly connected to the cold water tap. If it is connected to the hot water tap, the laundry may be deformed with some cycles.
tC
Temperature sensor problem.
Restart the washer. If the code reappears, call customer service.
3C
Motor problem.
9C1/9C2
High/low voltage detected.
HC
Water temperature control problem. (Heater control)
Call customer service.
LC
Water level problem
OC
Water level sensor problem
1C
The Water Level sensor is not working properly
bC2
Jammed button.
AC
Communication error (SUB (sensor) PBA <-> MAIN PBA)
AC4
Communication error (WIFI PBA <-> MAIN PBA)
AC3
Communication error (DR Module <-> MAIN PBA)
AC5
Communication error (LCD PBA <-> MAIN PBA)
AC6
Communication error (Inverter PBA <-> MAIN PBA)
8C
MEMS sensor problem.
SF
System error.
PC
Clutch Problem.
Sud
The washer has detected too many suds. The washer will stop operating until the amount of suds has reduced. The washer will then resume normal operation.
Ur
Additional rinsing.
Show additional rinsing in sensing unbalance.
Method of releasing the display.
Any key input.
For any codes not listed above, call 1–800–726–7864 (1–800–SAMSUNG).
UR code (Unbalanced Load Retry) means the washer is going to try to add more water, try to balance the load, and then try the spin cycle again. This will extend the length of the cycle. A UR code does not mean that there is an issue with your washer, it's just there to tell you what's happening.
 Certain internal parts are intentionally not grounded and may present a risk electric shock only during servicing. Service personnel – Do not contact the following parts while the appliance is energized: Control board, heat sink, motor, inlet valve, heater and pump.
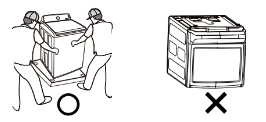


 NEVER USE AN EXTENSION CORD.
 An improperly connected equipment-grounding conductor can increase the risk of electrical shock. Check with a qualifi ed electrician or serviceman if you are not sure whether the appliance is properly grounded. Do not modify the plug provided with the appliance – if it does not fi t the outlet, have a proper outlet installed by a qualifi ed electrician.
 NEVER CONNECT THE GROUND WIRE TO PLASTIC PLUMBING LINES, GAS LINES, OR HOT WATER PIPES.
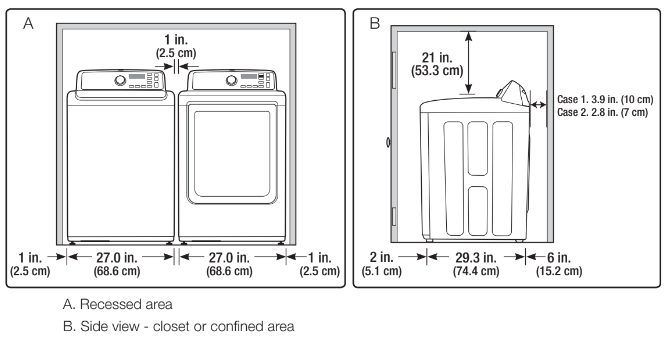


 ]
]