Use Manual Freezer
USING THE FREEZER
Operation
Starting the Freezer
- Clean the inside of the freezer with a mild solution of baking soda and water (see Care and Cleaning).
- Connect cord to power outlet.
- Make sure the temperature control is set at 4 (recommended setting) between 1 (least cold) to 7 (coldest).
- Allow freezer to operate for at least 6 to 8 hours before placing food inside.
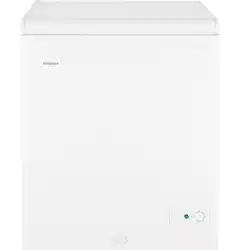
Features
Controls
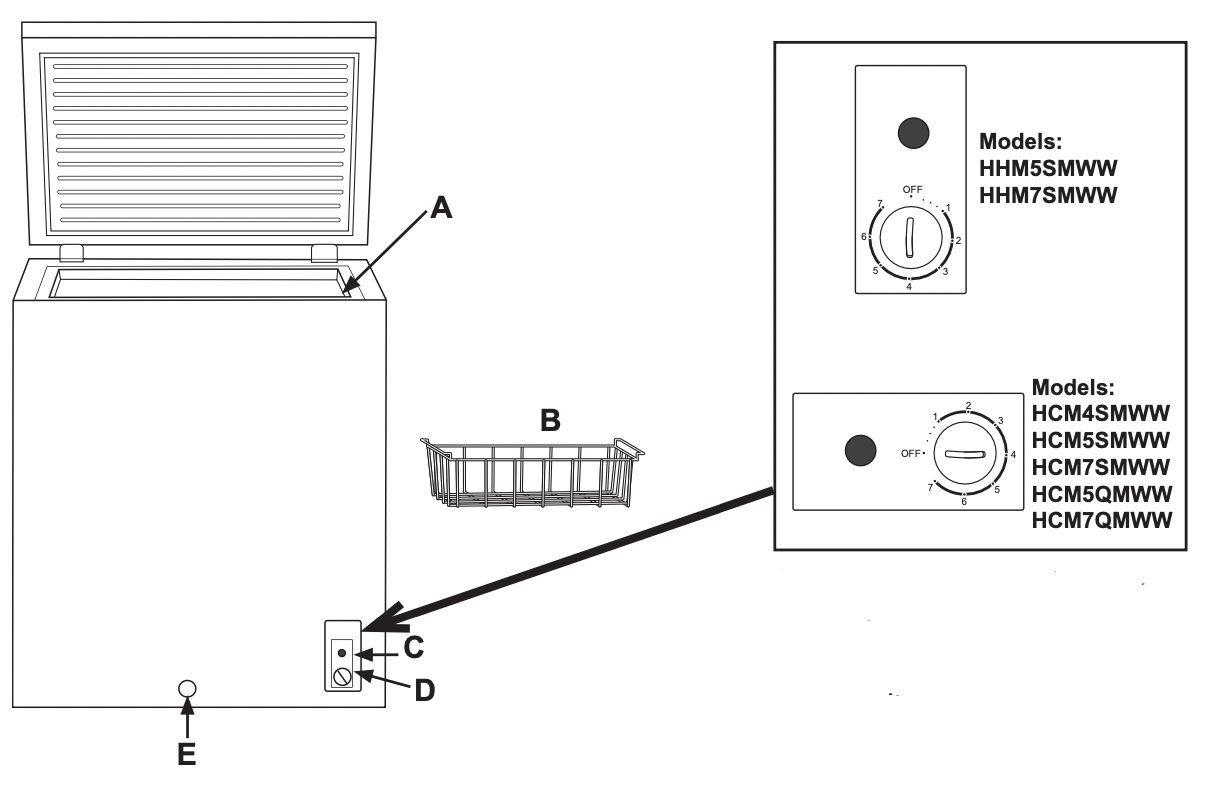
A. Interior Drain Plug (not shown)
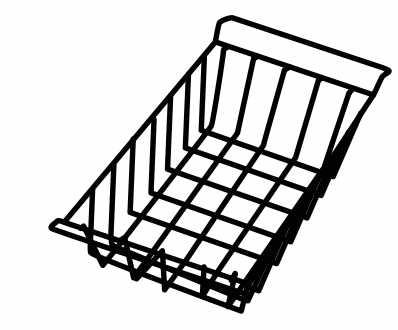
B. Vinyl Coated Wire Basket
C. Power Indicator - green light
D. Temperature Control Adjustment
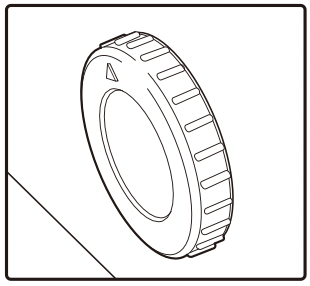
E. Exterior Drain Plug
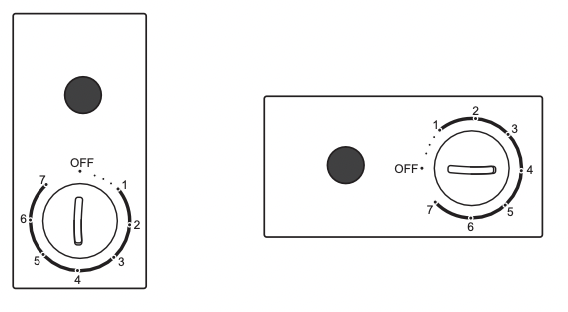
The control, located on the front of the freezer cabinet, is an adjustable dial with temperature settings ranging from 1 (least cold) to 7 (coldest) and Off.
- Turn the temperature control dial to 4 (recommended setting).
- Allow the freezer to cool for several hours before adding food.
Adjusting the temperature
- Adjust the control dial to one of the adjacent settings 3 (less cold) or 5 (colder).
NOTE: Except when starting the freezer, do not adjust the control more than one setting at a time.
- Wait 24 hours between adjustments for the freezer temperature to stabilize.
Recommended Grounding Method
A 115 Volt, 60 Hz, AC only, 15- or 20-amp fused, grounded electrical supply is required. It is recommended that a separate circuit serving only your freezer be provide. Use an oulet that cannot be turned off by a switch. Do not use an extension cord.
POWER INDICATOR
The Power Indicator illuminates when the freezer is properly connected to electrical power.
IMPORTANT: Turning the control dial to OFF does not disconnect the freezer from the power supply. Even when Cooling is turned Off, the Power Indicator will remain illuminated as long as the freezer is plugged into an outlet.
Sliding Basket
Store small packages in the basket to avoid losing them in the bottom of the freezer. The basket can be moved from side to side or it can be removed when loading or unloading the food below it.
To remove basket, lift it straight up and out. To replace basket, lower basket back into place.
Defrosting Instruction
In most climates, defrosting will be necessary only about twice a year.
To have your freezer operate most efficiently, do not permit more than 1/4" (6mm) thickness of frost on average to accumulate on the walls average, to accumulate on the walls.
To remove frost, scrape with a plastic or wood spatula or scraper.
Do not use an ice pick, metal, or sharp-edged instrument as it may damage or scratch the freezer.
Do not use boiling water as it may damage the freezer.
Do not use any electrical device in defrosting your freezer.
For Complete Defrosting
- Turn the temperature control to far left OFF setting and unplug the freezer
- Remove all food and place it in corrugated boxes, insulated bags, picnic coolers, etc. Use the towels and newspapers for insulation as needed. newspapers for insulation as needed.
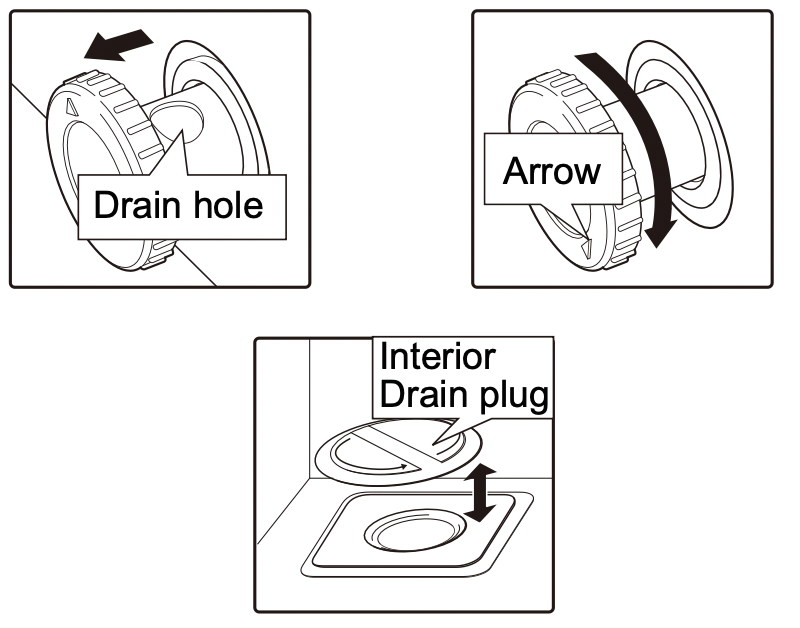
- Place a tray (not included) in front of the freezer, beneath the exterior drain plug to collect the water. Pull out the drain plug about 1" (2.5 cm) until the drain hole on the plug shows completely. Turn the drain plug clockwise until the arrow is pointed down. Unscrew counterclockwise to remove the indicator drain plug. This allows the water to flow out into the tray.
NOTE: Water that has accumulated at the bottom of the freezer during defrosting will drain into the tray.Monitor the tray under the drain to avoid overflow.
- With the lid open, you may choose to use pans of hot tap water (less than 120º F[49° C]) to speed defrosting. Directing air from an electric fan into the freezer will also help. Do not place fan or any electrical device in the freezer. Remove large pieces before they melt.
- Wipe water from walls with a towel or sponge.
- After defrosting, clean the inside of the freezer (see Care and Cleaning).
- Replace the drain plugs.
- Plug in the freezer. Return the temperature control to its previous position and return food to the freezer.
WARNING: Freezer must be unplugged to avoid electrical hazard from power source when defrosting unit.
CARE AND CLEANING
Cleaning Your Freezer
Outside
Protect the paint finish. The finish on the outside of the freezer is a high quality, baked-on paint finish. With proper care, it will stay new-looking and rust-free for years. Apply a coat of appliance polish wax when the freezer is new and then at least twice a year. Appliance polish wax also works well to remove tape residue from freezer surfaces.
Keep the finish clean. Wipe with a clean cloth lightly dampened with appliance polish wax or mild liquid dishwashing detergent. Dry and polish with a clean, soft cloth. Do not wipe the freezer with a soiled diswashing cloth or wet towel. Do not use scouring pads, powdered cleaners, bleach, or cleaners containing bleach.
NOTICE: Care should be taken in moving the freezer away from the wall. All types of floor coverings can be damaged, particularly cushioned coverings and those with embossed surfaces.
Inside
Clean the inside of your freezer at least once a year. We recommend that the freezer be unplugged before cleaning. If this is not practical, wring excess moisture out of sponge or cloth when cleaning in the vicinity of switches, lights or controls.
Use warm water and baking soda solution - about a tablespoon of baking soda to a quart of water. Rinse thoroughly with water and wipe dry. Do not use cleaning powders or other abrasive cleaners. DO NOT wash removable parts in a dishwasher.
An open box of baking soda in the freezer will absorb stale freezer odors. Change the box every three months.
CAUTION: Damp objects stick to cold metal surfaces. DO NOT touch interior metal surfaces with wet or damp hands.
In Case of Extended Power Failure
- Keep freezer lid closed. Your freezer will keep food frozen for 24 hours provided warm air is not admitted.
- If freezer is out of operation for 24 hours or more, add dry ice. Leave ice in large pieces. Add more ice as required.
CAUTION: Handling of dry ice can cause freezing of the hands—gloves or other protection is recommended.
- If dry ice is not available, move food to a frozen food locker temporarily—until power is restored.
Preparing to Move
Turn the temperature control to OFF. Disconnect the power cord plug from the wall outlet. Remove foods, defrost (on Manual Defrost models) and clean the freezer.
Secure all loose items such as baskets by taping them securely in place to prevent damage.
Be sure freezer stays in upright position during actual moving and during transportation. The freezer must be secured during transportation to prevent movement. Protect outside of freezer with blanket.
Preparing for Vacation
To maintain freezer in operation during vacations, be sure your house power is not turned off. For sure protection of freezer contents, you may want to ask a neighbor to check the power supply and freezer operation every 24 hours.
For extended vacations or absences, you may prefer to move your frozen foods to a storage locker temporarily. If your freezer is to be left empty, disconnect power cord plug from wall outlet. To prevent formation of odors, place open box of baking soda in freezer and leave freezer lid open.
Save Money and Energy
- The freezer should be located in the coolest area of the room, away from heat-producing appliances or heating ducts, and out of direct sunlight.
- Let hot foods cool to room temperature before placing in the freezer. Overloading the freezer forces the compressor to run longer. Foods that freezer too slowly may lose quality or spoil.
- Be sure to wrap foods properly, and wipe containers dry before placing them in the freezer. This cuts down on frost buildup inside the freezer.
- Freezer baskets should not be lined with aluminum foil, wax paper or paper towels. Liners interfere with cold air circulation, making the freezer less efficient.
- Organize and label food to reduce lid openings and extended searches. Remove as many items as needed at one time, and close the lid as soon as possible.
TROUBLESHOOTING
|
Problem
|
Possible Causes
|
What To Do
|
|
Freezer does not operate
|
Temperature control set to OFF position.
|
Turn the temperature control to a setting between 1 and 7.
|
|
Freezer is unplugged.
|
Push the plug completely into the outlet.
|
|
The fuse is blown/circuit breaker is tripped.
|
Replace fuse or reset the breaker.
|
|
Freezer starts/stops too frequently
|
Lid left open.
|
Check to see if package is holding lid open.
|
|
Too frequent or too long lid openings.
|
Open the lid less often.
|
|
Temperature control set too cold.
|
See About the operation of your freezer.
|
|
Freezer operates too long
|
Lid left open.
|
Check to see if package is holding lid open.
|
|
Too frequent or too long lid openings.
|
Open the lid less often.
|
|
Temperature control set too cold.
|
See About the operation of your freezer.
|
|
Inadequate air circulation space around cabinet.
|
See Preparing to install the freezer.
|
|
Room or outside weather is hot.
|
It’s normal for the freezer to work harder under these conditions.
|
|
Freezer has been disconnected recently for a period of time.
|
It takes 6-8 hours for the freezer to cool down completely.
|
|
Large amounts of warm or hot food have been stored recently.
|
Warm food will cause the freezer to run more until the desired temperature is reached
|
|
Noisy operation or cabinet vibrates
|
Floor may be weak, causing freezer to vibrate when compressor is on.
|
Check to make sure freezer is located on solid floor and use shims, as needed, to level the unit.
|
|
Cabinet is not positioned solidly on floor.
|
See Preparing to install the freezer. Use shims, as needed, to level the unit.
|
|
Freezer is touching the wall.
|
Level freezer or move slightly. See Level Freezer. |
|
Freezer temperature too warm
|
Lid left open.
|
Check to see if package is holding lid open.
|
|
Too frequent or too long lid openings.
|
Open the lid less often.
|
|
Temperature control is set too warm.
|
Turn control to a colder setting. Allow several hours for thetemperature to stabilize.
|
|
Large amounts of water or hot food may have been stored recently.
|
Wait until the freezer has had a chance to reach its selected temperature.
|
|
Freezer has been disconnected recently.
|
Freezer requires 6-8 hours to cool down completely. |
|
Foods defrosting
|
Temperature control set to OFFposition.
|
Turn the temperature control to a setting between 1 and 7.
|
|
Freezer is unplugged.
|
Push the plug completely into the outlet.
|
|
The fuse is blown/circuit breaker istripped.
|
Replace fuse or reset the breaker.
|
|
Lid left open.
|
Check to see if package is holding lid open.
|
|
Too frequent or too long lid openings.
|
Open the lid less often.
|
|
Freezer temperature too cold
|
Temperature control set too cold.
|
See About the operation of your freezer.
|
|
Moisture forms on outside of cabinet
|
Not unusual during periods of high humidity.
|
Wipe surface dry.
|
|
Lid may not be seating properly, causing cold airfrom inside the freezer to meet warm moist air from the outside.
|
See Preparing to install the freezer.
|
|
Lid won’t fully close by itself
|
Package holding lid open.
|
Move package to a different location.
|
|
Slow starting time after being off
|
Built-in overload protection.
|
This is normal after being off.
|
|
Excessive frost buildup
|
Lid left open.
|
Check to see if package is holding lid open.
|
|
Too frequent or too long lid openings.
|
Open the lid less often.
|
|
Not unusual during periods of high humidity.
|
Wipe surface dry.
|
|
Freezer external surface temperature is warm
|
The external freezer walls can be as much as 30°F(16.7° C) warmer than room temperature.
|
This is normal while the compressor works to transfer heat from inside the freezer cabinet.
|
|
Louder sound levels when ever freezer is on
|
Modern freezers have increased storage capacity and more stable temperatures. They require a high-efficiency compressor.
|
This is normal. When the surrounding noise level is low, you might hear the compressor running while it cools the interior.
|
|
Higher sound levels when compressor comes on
|
Freezer operates at higher pressures during the start of the ON cycle.
|
This is normal. Sound will level off or disappear as freezer continues to run.
|
|
Popping or cracking sound when compressor comes on
|
Metal parts under go expansion and contraction, as in hot water pipes.
|
This is normal. Sound will level off or disappear as freezer continues to run.
|
|
Bubbling or gurgling sound, like boiling water
|
Refrigerant (used to cool freezer) is circulating throughout the system.
|
This is normal.
|
|
Moisture forms on inside freezer walls
|
Weather is hot and humid, which increases internal rate of frost buildup.
|
This is normal.
|
|
Lid may not be seating properly.
|
See Preparing to install the freezer.
|
|
Lid is kept open too long, or is opened too frequently.
|
Open the lid less often.
|
|
Odors in freezer
|
Interior needs to be cleaned.
|
Clean interior with sponge, warm water and baking soda.
|
|
Foods with strong odors are in the freezer.
|
Cover the food tightly.
|
Normal Operating Characteristics
These things are normal and do not indicate a need for service.
- A warm cabinet exterior as the refrigeration system transfers heat from the inside to the outside through the exterior cabinet walls.
- The sound of the high-efficiency compressor motor.