User manual Electric Panel Heater
HOW TO OPERATE THE HEATER
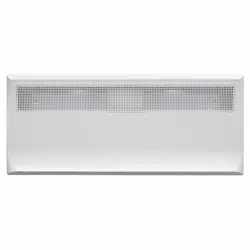
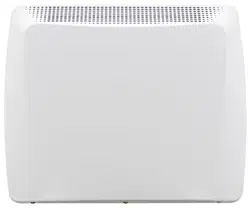
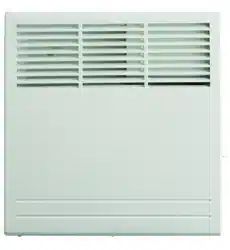
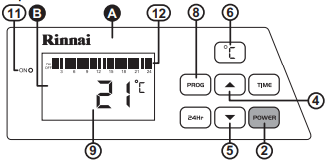
GENERAL DESIGN LAYOUT
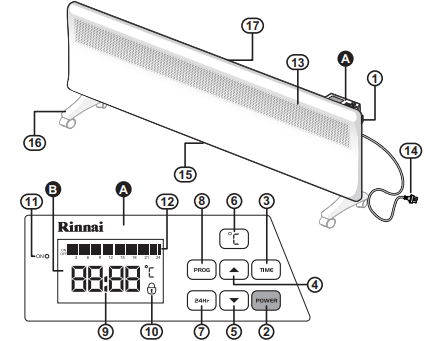
 Control panel console
 LCD display
- MAIN POWER Switch
- POWER `ON´ / `OFF´ button
- TIME setting button
- `UP´ button
- Z`DOWN´ button
- Temperature setting button
- 24 Hour reset button
- `PROGRAM´ button
- Clock / Temperature display
- Lock indicator
- Heater operation indicator (Red)
- Timer operation indicator
- Warm air discharge
- 240 Volt power cord & plug
- Air inlets
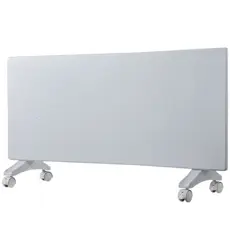
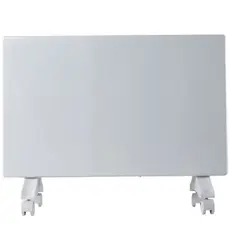
- Optional castors for floor mounting (see “INSTALLATION” on page 14 for installation options)
- Mounting bracket for wall installation (see “INSTALLATION” on pages 13 & 14 for installation options)
MANUAL OPERATION
To turn the heater on and set the temperature:
Ensure heater is plugged in and the power socket outlet is switched on.
1. Turn the main power switch (1)located on the right hand side of the appliance, to the ‘on’ position. The digital LCD Display will illuminate briefly and a double beep will be heard.
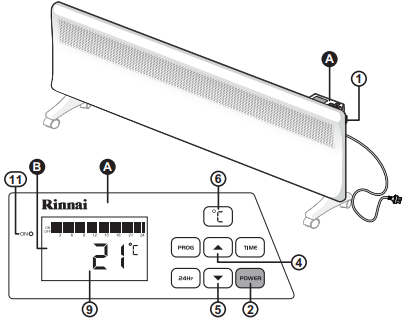
2. Press the POWER button (2) on the control panel console once to start heating operation. The red operation indicator (11) will illuminate. Two digits (9) on the display panel will show the programmed temperature setting. The factory setting temperature is 21°C.
3. To change the temperature setting press the °C button (6) once. The right-hand digits (9) on the display panel will flash.
Press the ‘Up’ (4) or ‘Down’ (5) buttons to increase or decrease the temperature setting. The available temperature setting range is from 5°C to 30°C.
4. To exit the temperature setting operation either press the °C button (6) or wait 60 seconds. The selected temperature will now be set and displayed alternately with the time display (see “Setting The Clock.” on page 9).
If the selected temperature is above that of the current room temperature the red operation indicator (11) will illuminate and the heater will begin to heat the room.
If the selected temperature is less than that of the current room temperature the red operation indicator (11) will go out and the heater will go into a standby state until the room temperature has fallen below the set temperature, when the heater will then automatically switch on and heat the room.
5. To stop heater operation completely press POWER button (2).
PROGRAMMED OPERATION
In addition to MANUAL OPERATION the heater can also be operated using a PROGRAMMED OPERATION function, allowing the user to program the heater to operate for a set time period(s) over a 24 hour cycle.
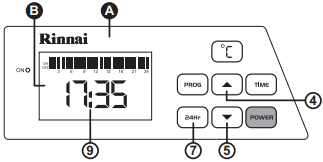
Setting The Clock.
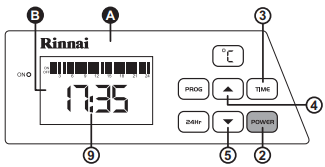
1. Press the POWER button (2) on the control panel console , press the TIME button (3) this activates the time "hour" edit mode, use the ‘Up’ (4) or ‘Down’ (5) buttons to set the Hours. Once the "hour" has been set press the TIME button (3) to set the "minutes" and use the ‘Up’ (4) or ‘Down’ (5) buttons to set the "minutes".
2. Once the "minutes" are set, press the time (3) button to save the set time. The time displayed is in 24 Hour time.
Setting The Programmed Operation Timer
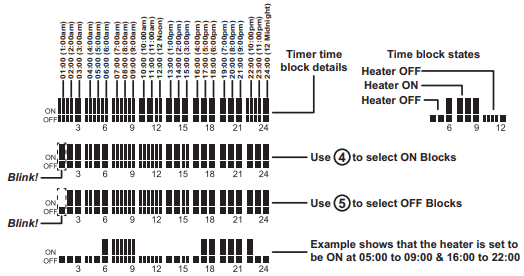
1. To set the ON and OFF timer periods for the heater press the PROG button (8). The first time block of the Timer Operation (12) indicator will begin to flash.
2. Press the ‘Up’ (4) button to make the selected block an ON block (the heater will be ON at this time) or press the down (5) button to make the selected block an OFF block (the heater will be OFF at this time), each press moves the selection on to the next available block cycling from left to right.
3. To save the timer settings press the PROG button (8).
4. Once the timer has been programmed, the heater will automatically turn ON and OFF and heat to the set temperature for the set times.
5. To edit the timer settings press the PROG button (8) then change the state of the desire block(s) press the ‘Up’ (4) or ‘Down’ (5)buttons. To save the new timer settings press the PROG button (8).
6. To stop Timer operation press the POWER button (2).
24 Hour Reset Button.
1. To completely cancel the programmed timer operation and restore the heater to manual operation press the 24Hr button (7), this resets all the time blocks to ON (the heater will be ON at this time) and does not reset the clock.
2. The heater will now operate as for “MANUAL OPERATION” on page 8.
ANTI-FROST PROTECTION FUNCTION

If the set temperature is set to CF 5 °C then the constant frost protection program will be activated.This is useful during winter in alpine areas where the ambient temperature is likely to fall below 5° C.
ELECTRONIC LOCK FUNCTION
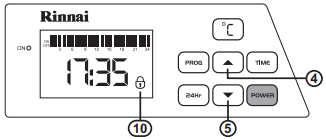
The Lock function is designed to prevent accidental operations and small children from altering the heater settings.
To Activate The Lock
Press the ‘Up’ (4) or ‘Down’ (5) buttons simultaneously until three beeps are heard and the padlock symbol (10) is displayed. All control functions are now locked and none of the buttons on the control will work.
To Deactivate The Lock
To deactivate the lock, repeat locking step above to return to normal operation.
CARE AND MAINTENANCE
CARE OF THE HEATER
Due to the ‘natural convection’ operating principle it is normal that some dust and fluff may build up at the air inlet and air outlet louvres over time. This will reduce operating effectiveness and may result in the appliance overheating if left for too long.
DO NOT use solvents to clean any parts.
To remove dust and clean the appliance:
- Unplug the electric plug of the heater from the socket outlet before commencing cleaning.
- Allow to cool down.
- Use a vacuum cleaner to remove any dust and fluff from the inlet and outlet louvres.
- All parts of the heater can be cleaned using a soft, damp cloth with some mild detergent (such as dishwashing liquid) if required.
- Ensure the heater is dry before reconnecting to the electricity supply.
SERVICE AND REPAIR
If the electric power cord or plug are damaged, they must be replaced by Rinnai or a Rinnai appointed service agent.
There are no user serviceable parts inside the appliance. All service and repair work must be carried out by persons competent and permitted by law to do so.
If the heater requires service or repair contact your supplier or Rinnai Australia.
DISPOSAL
Electrical appliances may contain materials which, if handled or disposed off incorrectly, present a hazard to humans or the environment.
DO NOT dispose of your old appliance with your household waste. Dispose of your old appliance at your local community waste collection / recycling centre and ensure it presents no danger to children whilst being stored for disposal.
INSTALLATION
GENERAL
This heater is suitable for Do It Yourself installation. It can be either wall mounted (fixed installation) or freestanding by mounting castors in accordance with these instructions. A phillips head screwdriver is included for freestanding installation. For wall installation other tools and hardware may be required, depending on the wall material.
WALL INSTALLATION
The clearance from the sides, front and top of the heater must be at least 100mm as shown in the diagram below.
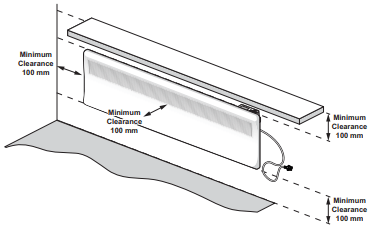
IMPORTANT
- This heater MUST NOT be located immediately below a socket-outlet.
- This heater MUST be positioned within one metre of a socket-outlet to ensure the flexible cord and plug can reach it.
- This heater is NOT designed to be built in.
- DO NOT attach the castors to the heater base for wall installations.
- The heater is suitable for installation in non-communal baths and shower areas or bathrooms. It is to be installed such that switches and other controls cannot be touched by a person in the bath or shower. Consult your licensed electrical trades person for installation in communal baths and shower areas or bathrooms.
1. Ensure the heater is unplugged from the power socket outlet and the ‘on / off’ switch is in the off position before commencing wall mounting.
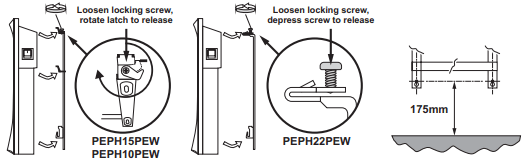
2. For models PEPH15PEW & PEPH10PEW, loosen the locking screw and rotate the locking latch on the taller leg of the mounting bracket and detach the mounting bracket from the back of the panel heater. For model PEPH22PEW, loosen the locking screw on each leg of the mounting bracket, depressing both to detach the mounting bracket from the back of the panel heater.
3. Position the mounting bracket on the wall. Ensure the two bottom mount holes are at least 175mm from the floor and drill holes as required.
4. Secure the mounting bracket to the wall with the 4 mounting screws. For masonry walls use the plastic plugs with screws provided. For plaster walls obtain suitable plasterboard fasteners from a building hardware supplier.
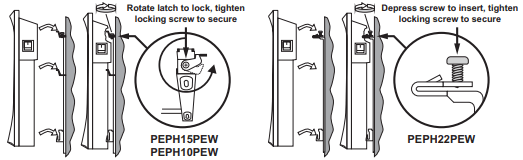
5. Re-attach heater to the mounting bracket (reverse method of step 2.) and secure with the locking screw(s).
6. Remove the cable tie from the flexible cord and insert the 2 pin plug of the heater into the power socket outlet. DO NOT bundle or coil the flexible cord to reduce it’s length as overheating and subsequent fire hazard could result.
FREESTANDING INSTALLATION
- Be sure heater is unplugged and power switches are off.
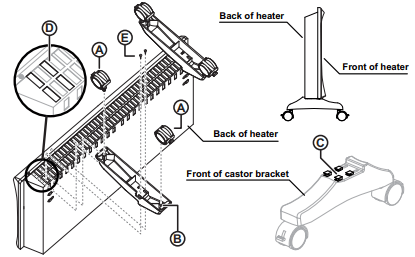
- Place the heater in an ‘upside down’ position with the back of the heater facing you.
- Assemble the 2 castors
 to the each castor bracket
  by pushing the metal shaft fully home.
- With the front end of the castor support bracket pointed towards the front of the heater, align the four locating tabs
 with the four of the outer most air inlets
  then push down and forward until the tabs are fully engaged with the heater. Then secure each of the castor brackets in place with retaining screws
  , using two for each.
- Remove the cable tie from the flexible cord and insert the 2 pin plug of the heater into the power socket outlet. DO NOT bundle or coil the flexible cord to reduce it’s length as overheating and subsequent fire hazard could result.