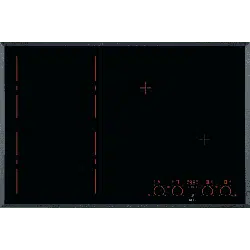
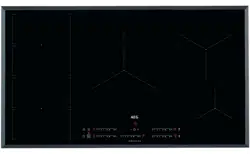
Flexible induction cooking area consisting of four sections
Control panel layout
Use the sensor fields to operate the appliance. The displays, indicators and sounds tell which functions operate.
Heat setting displays
OptiHeat Control (3 step Residual heat indicator)
The induction cooking zones make the heat necessary for cooking process directly in the bottom of the cookware. The glass ceramic is heated by the heat of the cookware.
DAILY USE
Activating and deactivating
Touch for 1 second to activate or deactivate the hob.
Automatic Switch Off
The function deactivates the hob automatically if:
• all cooking zones are deactivated,
• you do not set the heat setting after you activate the hob,
• you spill something or put something on the control panel for more than 10 seconds (a pan, a cloth, etc.). An acoustic signal sounds and the hob deactivates. Remove the object or clean the control panel.
• the hob gets too hot (e.g. when a saucepan boils dry). Let the cooking zone cool down before you use the hob again.
• you use incorrect cookware. The symbol comes on and the cooking zone deactivates automatically after 2 minutes.
• you do not deactivate a cooking zone or change the heat setting. After some time comes on and the hob deactivates.
The relation between the heat setting and the time after which the hob deactivates:
The heat setting
To set or change the heat setting:
Touch the control bar at the correct heat setting or move your finger along the control bar until you reach the correct heat setting.
Using the cooking zones
Place the cookware in the centre of the selected zone. Induction cooking zones adapt to the dimension of the bottom of the cookware automatically.
You can cook with large cookware placed on two cooking zones at the same time. The cookware must cover the centres of both zones.
Automatic Heat Up
Activate this function to get a desired heat setting in a shorter time. When it is on, the zone operates on the highest setting in the beginning and then continues to cook at the desired heating setting.
To activate the function for a cooking zone: touch ( comes on). Immediately touch a desired heat setting. After 3 seconds comes on.
To deactivate the function: change the heat setting. 6.6 PowerB
PowerBoost
This function makes more power available to the induction cooking zones. The function can be activated for the induction cooking zone only for a limited period of time. After this time the induction cooking zone automatically sets back to the highest heat setting.
To activate the function for a cooking zone: touch . comes on.
To deactivate the function: change the heat setting.
Timer
Count Down Timer
You can use this function to set how long the cooking zone should operate for a single cooking session.
First set the heat setting for the cooking zone then set the function.
To set the cooking zone: touch again and again until the indicator of a necessary cooking zone comes on.
To activate the function: touch of the timer to set the time (00 - 99 minutes). When the indicator of the cooking zone starts to flash slowly the time counts down.
To see the remaining time: set the cooking zone with . The indicator of the cooking zone starts to flash quickly. The display shows the remaining time.
To change the time: set the cooking zone with . Touch or .
To deactivate the function: set the cooking zone with and touch . The remaining time counts back to 00. The indicator of the cooking zone goes out.
To stop the sound: touch .
CountUp Timer (The count up timer) You can use this function to monitor how long the cooking zone operates.
To set the cooking zone: touch again and again until the indicator of a necessary cooking zone comes on.
To activate the function: touch of the timer. comes on. When the indicator of the cooking zone starts to flash slowly the time counts up. The display switches between and counted time (minutes).
To see how long the cooking zone operates: set the cooking zone with . The indicator of the cooking zone starts to flash quickly. The display shows how long the zone operates.
To deactivate the function: set the cooking zone with and touch or . The indicator of the cooking zone goes out.
Minute Minder
You can use this function as a Minute Minder when the hob is activated and the cooking zones do not operate. The heat setting display shows .
To activate the function: touch . Touch or of the timer to set the time. When the time comes to an end, the sound operates and 00 flashes.
To stop the sound: touch .
Pause
This function sets all cooking zones that operate to the lowest heat setting.
When the function operates, all other symbols on the control panels are locked.
When the function is active, and symbols can be used. The function does not stop the timer functions: and
Touch to activate the function. comes on. The heat setting is lowered to 1.
To deactivate the function, touch . The previous heat setting comes on.
Lock
You can lock the control panel while cooking zones operate. It prevents an accidental change of the heat setting.
Set the heat setting first.
To activate the function: touch . comes on for 4 seconds. The Timer stays on.
To deactivate the function: touch . The previous heat setting comes on.
Child Safety Device
This function prevents an accidental operation of the hob.
To activate the function: activate the hob with . Do not set the heat setting. Touch for 4 seconds. comes on. Deactivate the hob with .
To deactivate the function: activate the hob with . Do not set the heat setting. Touch for 4 seconds. comes on. Deactivate the hob with .
To override the function for only one cooking time: activate the hob with . comes on. Touch for 4 seconds.
Set the heat setting in 10 seconds. You can operate the hob. When you deactivate the hob with the function operates again.
OffSound Control (Deactivating and activating the sounds)
Deactivate the hob. Touch for 3 seconds. The display comes on and goes out. Touch for 3 seconds. or comes on. Touch of the timer to choose one of the following:
• - the sounds are off
• - the sounds are on
To confirm your selection wait until the hob deactivates automatically.
When the function is set to you can hear the sounds only when:
• you touch
• Minute Minder comes down
• Count Down Timer comes down
• you put something on the control panel.
Power management
• Cooking zones are grouped according to the location and number of the phases in the hob. See the illustration.
• Each phase has a maximum electricity loading of 3700 W.
• The function divides the power between cooking zones connected to the same phase.
• The function activates when the total electricity loading of the cooking zones connected to a single phase exceeds 3700 W.
• The function decreases the power to the other cooking zones connected to the same phase.
• The heat setting display of the reduced zones alternates between the chosen heat setting and the reduced heat setting. After some timer the heat setting display of the reduced zones stays on the reduced heat setting.
CARE AND CLEANING
General information
• Clean the hob after each use.
• Always use cookware with clean bottom.
• Scratches or dark stains on the surface have no effect on how the hob operates.
• Use a special cleaner applicable for the surface of the hob.
• Use a special scraper for the glass.
Cleaning the hob
• Remove immediately: melted plastic, plastic foil, sugar and food with sugar. If not, the dirt can cause damage to the hob. Take care to avoid burns. Put the special scraper on the glass surface at an acute angle and move the blade on the surface.
• Remove when the hob is sufficiently cool: limescale rings, water rings, fat stains, shiny metallic discoloration. Clean the hob with a moist cloth and non-abrasive detergent. After cleaning, wipe the hob dry with a soft cloth.
• Remove shiny metallic discoloration: use a solution of water with vinegar and clean the glass surface with a moist cloth.
TROUBLESHOOTING
What to do if...
Problem
Possible cause
Remedy
You cannot activate or operate the hob.
The hob is not connected to an electrical supply or it is connected incorrectly.
Check if the hob is correctly connected to the electrical supply. Refer to the connection diagram.
The fuse is blown.
Make sure that the fuse is the cause of the malfunction. If the fuse is blown again and again, contact a qualified electrician
You do not set the heat setting for 10 seconds.
Activate the hob again and set the heat setting in less than 10 seconds.
You touched 2 or more sensor fields at the same time.
Touch only one sensor field.
Pause operates.
Refer to "Daily use".
There is water or fat stains on the control panel.
Clean the control panel.
An acoustic signal sounds and the hob deactivates. An acoustic signal sounds when the hob is deactivated.
You put something on one or more sensor fields.
Remove the object from the sensor fields.
The hob deactivates.
You put something on the sensor field .
Remove the object from the sensor field.
Residual heat indicator does not come on
The zone is not hot because it operated only for a short time or the sensor is damaged.
If the zone operated sufficiently long to be hot, speak to an Authorised Service Centre.
Hob²Hood does not work.
You covered the control panel.
Remove the object from the control panel.
Automatic Heat Up does not operate.
The zone is hot.
Let the zone become sufficiently cool.
The highest heat setting is set.
The highest heat setting has the same power as the function.
The heat setting changes between two levels.
Power management operates.
Refer to "Daily use".
The sensor fields become hot.
The cookware is too large or you put it too near to the controls.
Put large cookware on the rear zones if possible.
There is no sound when you touch the panel sensor fields.
The sounds are deactivated.
Activate the sounds. Refer to "Daily use".
The flexible induction cooking area does not heat up the cookware.
The cookware is in a wrong position on the flexible induction cooking area.
Place the cookware in the correct position on the flexible induction cooking area. The position of the cookware depends on the activated function or function mode. Refer to "Flexible induction cooking area".
The diameter of the bottom of the cookware is incorrect for the activated function or function mode.
Use cookware with a diameter applicable to the activated function or function mode. Use cookware with a diameter smaller than 160 mm on a single section of the flexible induction cooking area. Refer to "Flexible induction cooking area".
comes on.
Child Safety Device or Lock operates.
Refer to "Daily use".
comes on.
There is no cookware on the zone.
Put cookware on the zone.
The cookware is unsuitable.
Use suitable cookware. Refer to "Hints and tips".
The diameter of the bottom of the cookware is too small for the zone.
Use cookware with correct dimensions. Refer to "Technical data".
FlexiBridge operates. One or more sections of the function mode which operates are not covered by the cookware.
Place the cookware on the correct number of sections of the function mode which operates or change the function mode. Refer to "Flexible induction cooking area".
PowerSlide operates. Two pots are placed on the flexible induction cooking area.
Use only one pot. Refer to "Flexible induction cooking area".
and a number come on.
There is an error in the hob.
Deactivate the hob and activate it again after 30 seconds. If comes on again, disconnect the hob from the electrical supply. After 30 seconds, connect the hob again. If the problem continues, speak to an Authorised Service Centre.
You can hear a constant beep noise.
The electrical connection is incorrect.
Disconnect the hob from the electrical supply. Ask a qualified electrician to check the installation.
If you cannot find a solution...
If you cannot find a solution to the problem yourself, contact your dealer or an Authorised Service Centre. Give the data from the rating plate. Give also three digit letter code for the glass ceramic (it is in the corner of the glass surface) and an error message that comes on. Make sure, you operated the hob correctly. If not the servicing by a service technician or dealer will not be free of charge, also during the warranty period. The instructions about the Service Centre and conditions of guarantee are in the guarantee booklet.
TECHNICAL DATA
Cooking zones specification
The power of the cooking zones can be different in some small range from the data in the table. It changes with the material and dimensions of the cookware.
For optimal cooking results use cookware no larger than the diameter in the table.
With faster, more responsive heating, more energy- efficient cooking and easier cleaning, induction takes cooking to a whole new level. Using electromagnetic energy, heat is transferred directly to the cookware, so the cooktop remains cooler. And induction allows for more precise control when cooking – you can instantly adjust the heat to a delicate simmer or bring it to a quick boil.
#2 What can I do to ensure the best results when cooking with my induction cooktop?
There are many factors that can affect cooking, but you can help ensure best results by following these recommendations: Use heavier, high-quality cookware that is suitable for induction cooktops. High-quality cookware that is heavier and has a flat bottom will help your food cook more evenly. Adjust the recipe's suggested temperature or cooking time. Your induction cooktop provides exceptional temperature control that allows you to adjust heat with greater accuracy than gas or electric cooktops, especially at lower settings. Perfect for melting chocolate and cooking delicate foods and sauces.
#3 How can I prevent scratches on my electric or induction cooktop?
Prior to using your cooktop for the first time, apply the recommended cooktop cleanser to the surface and buff using a nonabrasive cloth or pad. The special cooktop cleansing cream leaves a protective finish that helps prevent scratches and abrasions. To further prevent scratches on your cooktop surface: Be sure that the cooktop and any pots, pans, or utensils you use are clean. If coarse particles (such as salt) come between your cooktop and utensils, scratches can result. Use pots and pans that have a smooth, flat bottom. Use cleaning materials that are recommended for ceramic/glass cooktops. Any small scratches that occur will not affect your cooktop’s performance, and will become less visible over time


 for 1 second to activate or deactivate the hob.
 comes on and the cooking zone deactivates automatically after 2 minutes.
 comes on and the hob deactivates.

 (
(  comes on). Immediately touch a desired heat setting. After 3 seconds
  comes on.
 again and again until the indicator of a necessary cooking zone comes on.
  of the timer to set the time (00 - 99 minutes). When the indicator of the cooking zone starts to flash slowly the time counts down.
  .
. comes on. When the indicator of the cooking zone starts to flash slowly the time counts up. The display switches between
  .
. and
and  symbols can be used. The function does not stop the timer functions:
  and
and 
 comes on. The heat setting is lowered to 1.
 .
.  comes on for 4 seconds. The Timer stays on.
  comes on. Deactivate the hob with
  comes on. Deactivate the hob with
  or
or  comes on. Touch
 .
. comes on.
 comes on.
 and a number come on.