Loading ...
Loading ...
Loading ...
8
BREWING INSTRUCTIONS
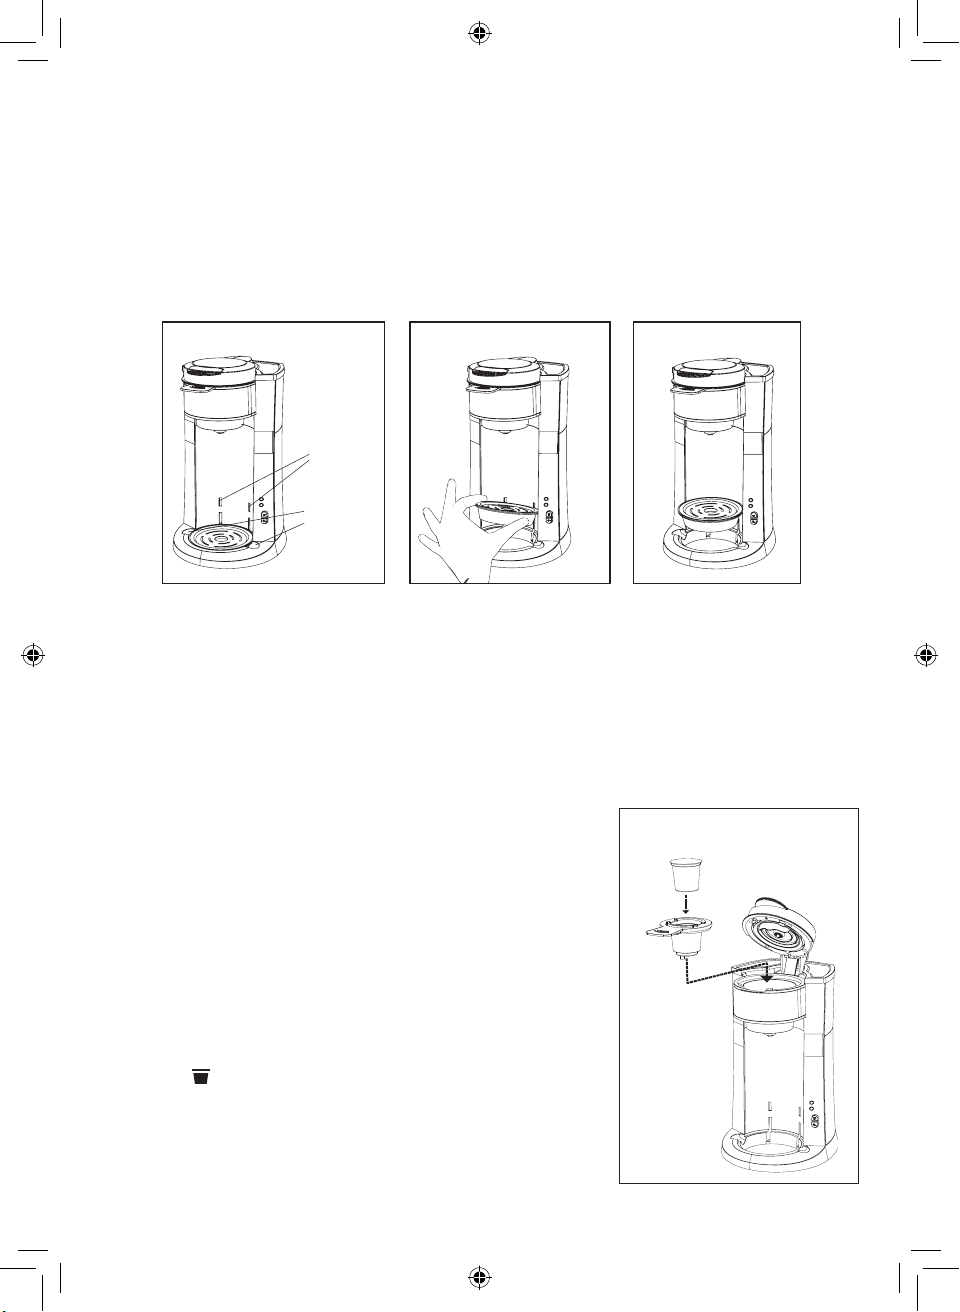
The drip tray adjusts to two heights to accommodate shorter cups or mugs to taller travel mugs/tumblers. For
taller travel mugs and tumblers, make sure the drip tray and cover are properly placed in the lower position.
(See Figure 2.) When brewing a smaller cup, raise the drip tray to the upper level to avoid splatter. (See Figure 4.)
ADJUSTING THE DRIP TRAY.
1. Grasp the drip tray and cover from the base cut-outs. (See Figure 2.)
2. Holding on to both pieces, slightly tilt upwards and slide out from the unit. (See Figure 3.)
3. Using the tab on the back of the drip tray as your guide, again slightly tilt both pieces upwards and glide
the tabs into the upper slots on the Coffee Maker body. (See Figure 4.) Press down on the drip tray with
your hand to make sure it is rmly and properly attached before placing the cup or mug on top.
SETTING UP YOUR DUALBREW SINGLE SERVE COFFEE MAKER USING THE
CAPSULE ADAPTOR.
WARNING: Before brewing, it is recommended the water tank be lled at least to the lowest 6-oz. step. To avoid
damage to your Coffee Maker, never operate your Single Serve Coffee Maker when the water tank is empty.
1. Lift the water tank lid located at the top back of the unit. (See Figure 1.)
2. Using the desired cup, mug, or tumbler as your measure, add water to the water tank. The water tank has
an easily visible, stepped water level indicator. Add water to the desired ll line to brew one cup of any hot
beverage. The level indicator marks 6-oz., 10-oz., and 15-oz. However, any amount of water may be added.
DO NOT EXCEED the 15-oz. MAX ll line.
3. Lower the lid.
IMPORTANT: For optimal avor, distilled water is preferred.
4. Position the cup under the nozzle and onto the center of the
drip tray cover.
5. Pull the adaptor compartment’s front tab up to unlock and lift the lid.
6. Choose the capsule adaptor. With the handle facing front, place the
capsule adaptor into the adaptor compartment. Slide the adaptor
handle into the grooves at the front of the Coffee Maker.
(See Figure 5.)
7. Add the capsule of your choice into the capsule adaptor.
8. Press the adaptor compartment’s lid down rmly. An audible click
can be heard as the lid is locked rmly into position. Both the top
and bottom of the capsule will be punctured.
9. Plug the Coffee Maker into a 120V AC electrical wall outlet.
10. Press the
button to begin the brew cycle.
11. The red PREHEAT indicator light will begin to ash as the Coffee
Maker begins heating the water.
12. When the water has reached the optimum temperature, the preheat
light will go out and the blue BREW light will illuminate.
13. The pump will then activate and coffee will begin to stream through
the nozzle.
BREW
PREHEAT
BREW
PREHEAT
Figure 2 Figure 3
Figure 4
BREW
PREHEAT
Upper
Slots
Base
Cut-Outs
BREW
PREHEAT
Figure 5
Capsule
Loading ...
Loading ...
Loading ...