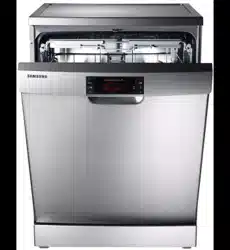
User manual Dishwasher
Before you start
Be sure to have your installer follow these instructions closely so that your new dishwasher works properly and that you’re not at risk of injury when washing dishes.
Unpacking your dishwasher
- Once your new dishwasher has been delivered to you, carefully unpack it and check for any damage.
If the dishwasher has been damaged, make note of it on the waybill and keep a copy.
Do not install the dishwasher, and contact Samsung Customer Service at the number listed on the next page.
- If there is no damage to the product, you can proceed with the installation. If you are going to install it yourself, make sure to read through the installation guide and follow the directions inside.
- After unpacking your dishwasher, keep the packaging out of the reach of children to ensure their safety.
Checking parts
When your dishwasher has been unpacked, make sure you’ve received all the parts shown below.
If your dishwasher was damaged during shipping, or if you do not have all the parts, contact Samsung Customer Service at 1-800-SAMSUNG (726-7864).
Accessories
-368268.png)
NOTE
Accessory parts - User/Installation manual, Installation Kit, Kick Plate.
CAUTION
- Do not wash items that are covered with ash, sand, wax, lubricating grease, or paint. These materials will damage the dishwasher. Ash does not dissolve and will spread inside the dishwasher.
- Remove food remains such as bones, fruit seeds, etc. and waste such as toothpicks, paper napkins, etc. from your dishes. Food remains and waste can make noise, cause the dishwasher to malfunction, and damage your dishes and dishwasher.
Unsuitable items for the dishwasher
WARNING
Wash only items such as glass, porcelain, and cutlery which the manufacturer states is dishwasher safe. Do not wash aluminium (e.g. grease filters). The dishwasher may damage aluminium, or in extreme cases, cause a severe chemical reaction.
Do not wash the following items in the dishwasher.
- Copper, brass, tin, ivory, and aluminium items or items with adhesive
- Non-heat resistant plastics
- Craft items, antiques, valuable vases, and decorative glassware
- Pottery or glazed-ceramic items
- Wooden cutlery and crockery or items with wooden parts
- Delicate glassware or glassware containing lead crystal. Clouding may occur on the glassware after frequent washing.
NOTE
Silverware that has contacted food containing sulphur may become discoloured. Food with sulphuric content include egg yolks, onions, mayonnaise, mustard, fish, fish brine, and marinades.
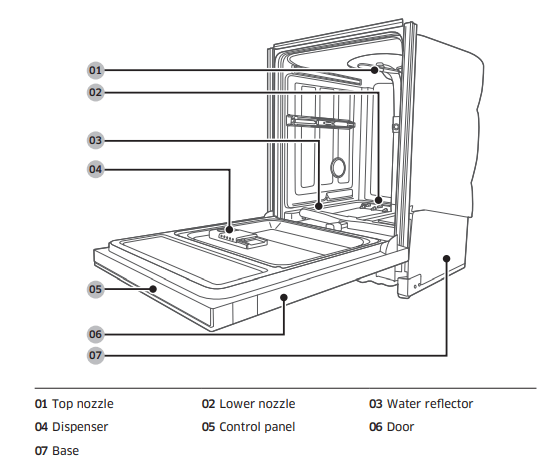
Water reflector
The water reflector automatically detects obstacles inside the dishwasher that can interfere with the reflector’s signal. If an obstacle is detected, the display blinks and the dishwasher chimes for several minutes. If this happens, remove the obstacle
Basic use of racks
Angle of the plate supports
In the Upper rack, you can adjust the angle of the tines to three different positions to match the size and shape of your dishes. To adjust the tines, grasp the handle at the front of the rack, and then push it left or right. See the illustration below.
In the Lower rack, you can easily fold down the fold-down tines to make room for large items such as pots and pans on the Zone Booster area. Remove the rack from the dishwasher, and then fold down the tines one at a time. See the illustration below.
-453188.png)
Height adjustment
You can adjust the height of the upper rack in your Samsung dishwasher so that the lower rack can accommodate larger sized dishes. Depending on where you set the upper rack height, the lower rack can accommodate plates up to 12 in. (30 cm) in diameter and the upper rack can accommodated plates up to 8 in. (20 cm) in diameter.
-805865.png)
To raise the upper rack
Pull the upper rack upwards. The adjustable handle will latch, and the upper rack will rise.
To lower the upper rack
Hold both the adjustable handles located at the left and right sides of the upper rack, and then evenly press down.
CAUTION
- Adjust the height of the upper rack before loading dishes into the rack. Adjusting the rack after loading the dishes may damage the dishes.
- Make sure to hold both handles when adjusting, or the dishwasher door may not close properly.
To remove the upper rack
-182283.png)
To remove the upper rack from the slide rail, pull the upper rack out from the tub until it is fully extended.
Hold down the holder rails on both sides to release the upper rack. Slide the upper rack out to the end of one holder rail, and then lift it up.
Repeat the steps above with the other holder rail.
CAUTION
- Do not operate the dishwasher without the upper rack. Otherwise, noises occur and the dishwasher does not operate properly.
- Because the upper rack is removable, insert the upper rack properly to ensure the dishwasher operates normally.
- Take care that you do not lose the holder rails during this process.
To remove the 3rd Rack
-707257.png)
-191847.png)
1. Put your finger on the lower area of the 3rd holder rail as shown, and then push the holder handle (see the arrow marks in this picture) to draw and remove the holder. Repeat this step on the other side.
2. When the holder is removed, remove the 3rd rack from the dishwasher.
3. Reverse the order of removal to re-insert the 3rd rack.
CAUTION
Make sure the hook-shaped part (circlemarked) of the holder faces downward when reinserting the holder into the rail.
Flexible 3rd RackTM adjustment
-47216.png)
When putting spatulas, serving spoons and similar items in the Flex Deck, pull or push the parts highlighted in the figure above in the direction of the arrows. Once the Flex Deck is lowered, you can put relatively bigger cookware items in it. To better use the upper rack, remove the 3rd rack or raise it to make more room.
Loading dishes
Loading the lower rack
The lower rack has been especially designed for dinner dishes, soup bowls, plates, pots, lids, casserole dishes, and plates.
Load large items such as pans and pots into the dishwasher so their open sides face downwards. We recommend loading cups, stemware, and small plates into the upper rack. See the recommended loading patterns below.
-377492.png)
Loading the Zone Booster areas
-806917.png)
For more effective cleaning, load large items into the left side of the lower rackZone Booster areas (Red zone).
The Zone Booster function supplies more powerful water jets in the Zone Booster areas.
Make sure pot handles and other items do not interfere with the rotation of the nozzles or the water reflector.
Loading the upper rack
The upper rack has been designed for small plates, mugs, glasses, and plastic items marked “dishwasher safe”. Load your plates into the dishwasher in two half rows, so that the front of each plate faces the back of the plate in front of it, and the open sides of the plates at the center of the dishwasher face each other. See the illustrations below. Make sure the loaded dishes do not interfere with the rotation of the nozzle which is located at the bottom of the upper rack. (Check this by rotating the nozzle by hand.) When loading dishes, pull the upper rack out sufficiently so you can load it without striking the counter above.
-988821.png)
Using the glass support
-751109.png)
The glass support is especially suited for wine glasses. Hang wine glasses onto the pegs of the glass support. Fold the glass support back when it is not being used.
CAUTION
Do not adjust the level of the upper rack with the glass support propped up. This will make it impossible to adjust the upper rack.
Loading the Flexible 3rd RackTM
-378320.png)
The cutlery rack is best suited for flatware and cooking or serving utensils. You can place cutlery and utensils randomly or regularly on the cutlery rack.
Heavily soiled utensils or items with baked on foods should be placed in the lower cutlery rack for the most effective cleaning.
Removing the Cutlery Rack
The entire cutlery rack can be removed if more space is needed on the upper rack for larger items
Loading the Cutlery rack
-747625.png)
The cutlery rack consists of two compartments. You can place each knife, spoon, or fork separately into the spoon stands in the basket’s covers to prevent chipping and discoloration. See the illustrations below. You can use the cutlery rack with the cover open. Refer to the illustration on the left.
-888265.png)
The spoon stands as seen from above with the suggested placement of cutlery items. Match the numbers in the diagram to the numbers in the list of cutlery items below.
-232672.png)
NOTE
DO NOT let any item extend through the bottom.
-423167.png)
1. Forks
2. Tea spoons
3. Dinner spoons
4. Knives
5. Serving spoons and Serving forks
6. Remaining items
To fill the detergent dispenser
-589672.png)
1. Gently press the dispenser flap to unlock, and then slide it open. Note that the dispenser flap opens at the end of each cycle.
-970795.png)
2. Apply the recommended amount of detergent to the main compartment.
3. Close the flap, and then press down to lock.
NOTE This dishwasher has no separate compartment for tablet detergent.
4. For better performace, pour a small amount of detergent onto the door especially for heavily soiled items. The additional detergent will activate during the pre-wash process.
The cover opens automatically to dispense the detergent during the wash.
-537792.png)
NOTE
The numbers inside the dispenser refer to grams.
Rinse aid
Rinse aid improves the drying performance of the dishwasher. When the Rinse Refill indicator lights up on the control panel, refill with rinse aid. Only use liquid rinse aid. Powdered rinse aid will clog the compartment opening and cause the dishwasher to malfunction.
CAUTION
- Do not apply any type of detergent to the rinse aid compartment.
- Do not over fill the compartment. Excessive rinse aid may overflow during a cycle.
-584702.png)
1. Turn the cap counter clockwise to remove.
2. Fill the compartment with rinse aid as specified by the rinse aid manufacturer.
-300502.png)
3. Turn the rinse aid dial to select a rinse aid level between 1 and 6.
- The higher the number, the more rinse aid the dishwasher uses.
- To improve the drying performance, select a higher level.
- If your dishes appear discolored after a wash, switch to a lower level.
4. Turn the cap clockwise to close.
Touchpad responsiveness
To prevent the touch-enabled controls from losing responsiveness, follow these instructions.
-35563.png)
- Touch the center of each button with one finger.
- Do not touch more than one button at a time, except as directed.
- Clean the surface of the control panel regularly with a soft, damp cloth.
Operations
Control panel
-755639.png)
01 POWER
When you press the POWER button, the Cycle On light for the most recently started cycle turns on. When the selected cycle is complete, the dishwasher powers off automatically.
02 Cycle Selector
Select the appropriate wash cycle depending on the soil level of your dishes. After you select a cycle, the Cycle On light for that cycle lights.
If you want to change the cycle once it has started, press the POWER button. Then, turn on the dishwasher again and select a new cycle.
03 Lower Rack
If selected, only the lower rack nozzle is activated to reduce both the cycle time and power consumption. Use this cycle to wash a small load of dishes or glasses in the lower rack. To wash heavily soiled items, select the Zone Booster option.
NOTE
If you want to wash heavily soiled items such as pots and pans, select the Zone Booster option. (This option consumes slightly more water and energy.)
The Zone Booster option applies intensive washing power to the left part of the lower rack. Selecting the Zone Booster option does not turn off the Upper Nozzle.
04 Speed Booster
Select this option to reduce washing time.
05 Hi-Temp Wash
Raises the main wash temperature to improve cleaning for loads containing tough, baked-on food.
06 Sanitize / (Control Lock)
With the Sanitize option selected, the water temperature is increased to 163 ˚F (73 ˚C) in the final rinse cycle for high temperature sanitization.
If you select the Sanitize option, the "Sanitize" lamp blinks when the water temperature reaches the sanitary temperature (over 155 ˚F (68 ˚C)), and then remains illuminated until the Sanitize option ends. When you open the door or press the POWER button, the "Sanitize" lamp turns off.
NOTE
The Sanitize feature operates in accordance with NSF/ANSI Standard 184 for Residential Dishwashers. Certified residential dishwashers are not intended for licensed food establishments. Your dishwasher is NSF Certified.
Only the Heavy cycle with the Sanitize option has been designed to meet the requirements for soil removal and sanitization efficacy in NSF 184.
Control Lock allows you to lock the buttons on the control panel so children cannot accidently start the dishwasher by pressing the buttons on the panel.
To lock and unlock the buttons on the control panel, hold the Sanitize button down for three (3) seconds when the power is On.
07 Smart Control
You can monitor and control the dishwasher remotely through a Wi-Fi connection. To connect the dishwasher to your smart phone for the first time, press and hold Smart Control. For more information, see the "SmartThings" section on page 37.
08 Display
Displays information about the current cycle including the cycle time, remaining time, Delay Start settings, and other cycle-specific information.
If a problem occurs during operation, an information code appears with a warning sound. Refer to the information codes on pages 51 and 52.
09 Delay Start
Delay a cycle for up to 24 hours in one-hour increments. To increase the delay start time, press or hold the Delay Start button. The hour displayed indicates the time at which the wash will start.
- After setting the delay time, press the START button, and then close the door to start the cycle.
- If you want to change the delay time once the dishwasher has started, press the Cancel button and turn off the dishwasher. Then, turn on the dishwasher again and select a new cycle with a new delay setting.
10 START
To start a cycle, press the START button before closing the door. Cancel & Drain: To cancel a currently running cycle and drain the dishwasher, press and hold the START button for three (3) seconds.
Once the dishwasher is reset, select a cycle and option, and then press START to restart the dishwasher.
Indicators
-826718.png)
Cycle overview
-984051.png)
01 Auto
This cycle detects the level of soil and automatically initiates the optimal cycle after a few minutes of operation.
02 Normal
Use this cycle for normally soiled dishes. The energy-usage label is based on this cycle.
03 Heavy
Use this cycle for heavily soiled dishes.
04 Delicate
Use this cycle for soiled, fragile items such as fine glassware and crystal glass (wine glass). Do not use this cycle for other glassware because clouding or etching may occur.
05 Express 60
Use this cycle when you need to wash dishes quickly. It takes about 1 hour.
06 Rinse Only
Use for rinsing dishes, glasses, and silverware that will not be washed right away. Do not use detergent.
07 Self Clean
Use the Self Clean function to clean the dishwasher's tub. If the dishwasher needs self cleaning, the Self Clean indicator will blink for 5 seconds when you turn the power on. If you start the dishwasher when the indicator is blinking, the indicator will turn off automatically. Always run the Self Clean cycle with the dishwasher empty. Never use it as a wash cycle to clean dishes.
Simple steps to start your dishwasher
- Open the door, and then load the dishwasher. Make sure dishes are empty.
- If applicable, put the dishes in the lower rack. If adding the Zone Booster option, put the dishes in the left side of the lower rack.
- Add detergent to the detergent dispenser. For better results, add rinse aid to the rinse aid compartment.
- NOTE
- You should use rinse aid for better drying performance. You can further improve drying performance by also selecting the Sanitize option.
- Press POWER, and then select a cycle with necessary options (Lower Rack, Zone Booster, Speed Booster, Hi-Temp Wash, Sanitize). If you change the cycle after selecting an option, the original cycle is reset.
- Press START, and then close the door within 3 seconds. The dishwasher starts the cycle after draining for a few seconds.
NOTE
- To change the cycle after it has started, press and hold START for 3 seconds to cancel the cycle. Then, select a new cycle.
- To resume after you have opened the door to stop the dishwasher while operating, simply press START first, and then close the door.
Settings
You can change the sound or Auto ReleaseTM settings to your preference. To change the settings, press the Sanitize and Delay Start buttons simultaneously for 3 seconds. Press Sanitize to navigate through the sub menus, and then press Delay Start to confirm your changes.
Sound U1/U0 > Auto Release™ A1/A0
Sound
Press Sanitize until ‘U1’ or ‘U0’ is displayed. To mute the dishwasher, select ‘U0’, and then press Delay Start. To unmute, select ‘U1’, and then press Delay Start.
Auto Release™
The Auto Release™ Dry function, which is designed to improve drying performance, automatically opens the dishwasher's door 5 to 15 minutes before a cycle ends.
You can enable or disable Auto Release™ Dry in two ways: Using the Setting Mode or using the toggle keys. Both methods are described starting below.
-610202.png)
Press Sanitize until “A1” or “A0” is displayed. Then, press Delay Start to enable (A1) or disable (A0) Auto Release™ Dry.
Using the Toggle Keys :
Press the Lower + Hi-Temp Wash button for 3 seconds to enable (A1) or disable (A0) Auto Release™ Dry.
NOTE
- Once the door opens on the Auto Release™ Dry mode, the door cannot be closed manually for the next 2 minutes.
- Disabling (A0) “Auto Release™ Dry” can affect the drying results. Enable (A1) “Auto Release™ Dry” for better drying result.
- After a cycle is complete, the door automatically opens to let steam out. This is normal and not a product malfunction.
Maintenance
Cleaning
Keep the dishwasher clean to improve performance, reduce unnecessary repairs, and lengthen its lifecycle.
Exterior
Clean spills on the surface of the dishwasher as they occur. Use a soft, damp cloth on the control panel to gently wipe away spills and dust.
CAUTION
- Do not use benzene, wax, thinner, chlorine bleach, alcohol, or other chemical substances. These materials may discolour the surface of the dishwasher and cause stains.
- The dishwasher has electric parts inside. Do not sprinkle water directly onto the dishwasher. Protect electrical components from coming in contact with water.
- For a stainless-steel door panel, clean using a stainless steel cleaner for home appliances and a clean, soft cloth.
Interior
Clean the interior of the dishwasher on a regular basis to remove any dirt or food particles. Wipe inside the dishwasher and inside the door with a wet dishcloth. To maintain optimum cleanliness, we recommend running the Self Clean cycle periodically with the dishwasher empty.
To keep the cutlery pad clean, turn it over after each use. To remove white spots and odors from the cutlery pad, run the Self Clean cycle with the dishwasher empty and no detergent until the cutlery pad flushes. Then, stop the cycle and put an 8-ounce cup of white vinegar into the lower basket. Close the door, and then resume the cycle.
CAUTION
Do not remove the front seal (the long rubber seal enclosing the opening of the dishwasher). The seal keeps the inner side of the dishwasher sealed.
-755534.png)
Use a damp cloth to remove lime scale or grease deposits inside the dishwasher. Alternatively, apply some detergent, and then run an empty cycle using the highest rinse temperature.
CAUTION
To avoid damaging the motor, use caution when manually moving the water reflector.
Nozzles
To prevent the nozzles from being clogged, or if the nozzles are clogged, remove and clean each nozzle. Use caution when removing the nozzles as they may break.
Upper nozzle
-125576.png)
- Open the door, and then pull out the upper rack to reveal the upper nozzle.
- Turn counter clockwise to remove the nozzle cap, and then remove the nozzle.
- Unclog and clean the nozzle.
- Reinsert the nozzle, and then tighten the cap clockwise.
- Rotate the nozzle by hand to make sure the nozzle is engaged correctly.
Top nozzle
-22826.png)
- Check whether the nozzle holes are clogged by food particles.
- If cleaning is needed, remove the top nozzle.
- To remove the top nozzle, pull out the upper rack first, unfasten the nozzle cap by turning it counterclockwise, and then remove the nozzle.
- Clean the nozzle, re-insert it, and then fasten the nozzle cap to the nozzle by turning the cap clockwise.
- Check whether the nozzle is engaged correctly by rotating it by hand.
Filter
We recommend cleaning the filter every month.
-362077.png)
- Open the door, and then remove the lower rack.
- Turn the filter handle counterclockwise to unlock the filter cover.
- Remove the filter cover, and then the cylindrical micro filter underneath.
-943124.png)
4. Remove any dirt and impurities from the micro filter and the filter cover.
5. Rinse them with running water, and then dry well.
6. Reinsert the filter, and then the filter cover.
7. Turn the filter handle clockwise to lock.
Long-term care
If you will not use the dishwasher for an extended period of time, first drain the unit completely, and then disconnect the water hose. Shut off the water supply valve and the circuit breaker. Water remaining in the hoses or the internal components can damage the dishwasher.
Cleaning the drain pump
If the dishwasher fails to drain because the drain pump is clogged with foreign matter or there is an abnormal noise coming from the drain pump, you must unclog and clean the drain pump as instructed below.
-227934.png)
- Remove the lower rack.
- See the "Filter" section to remove the cylindrical micro filter.
- Remove any moisture from the filter using a sponge.
- Remove the drain-pump cover by pushing its handle in the direction of the arrow (1), and then pulling up (2).
- Check the impeller to see if it's in good condition. Then, remove any foreign matter from the pump.
- Reinsert the drain-pump cover and then press down until you hear a click
Storing your dishwasher
If you need to store your dishwasher for an extended period of time, first drain and disconnect it. If you leave water in the hoses and internal components, you can damage the dishwasher.
After draining and disconnecting the dishwasher, be sure to turn off the water supply valve and circuit breaker.
Troubleshooting
| Problem |
Possible cause |
Solution |
| Will not start. |
The door is not closed completely. |
• Check if the door is latched and closed completely. Check whether the Upper Rack is properly joined to the Duct Nozzle.
• Also, check if the Upper Rack is crooked or unbalanced.
-449749.png)
|
| The START button was not pressed. |
• See the information code that appears on the display. |
| Doesn't operate at all. |
• Make sure the power cable is connected properly. |
| The water supply does not work. |
• Check if the water supply valve is open. |
| The Control Panel is locked. |
• Unlock the Control Lock, (See page 32.) |
| A circuit breaker is open. |
• Reset the circuit breaker. |
| An operation or cycle is taking too long. |
The dishwasher is connected to a cold water supply. |
• Check if the water supply line is connected to a cold water supply. To work properly, the dishwasher must be connected to a hot water supply. (If connected to a cold water supply, additional time is required to heat the cold water.) |
| There are food particles remaining on dishes. (Not cleaning properly.) |
The cycle selected was unsuitable. |
• Select a cycle according to the number and soil level of the dishes, as directed in this manual. |
| The water temperature is low. |
• Connect the water supply line to a hot water supply. For best performance, the temperature of the supplied water should be 120 ˚F (49 ˚C) |
| Low water pressure. |
• The water pressure should be between 20 and 120 psi (140-830 kPa). |
| The water is too hard. |
• Use a commercial dishwasher cleaner.
• Use high-quality, fresh detergent with rinse aid.
|
| Dishwasher detergent was not used. |
• Use automatic dishwasher detergent.
• We recommend a powder type or multifunction tablet dishwasher detergent.
|
| Detergent remains in the dispenser. |
• Make sure large items such as cookie sheets, cutting boards, or contaners, etc. are not blocking the detergent dispenser and preventing it from opening properly.
• Rearrange the dishes so they do not interfere with detergent dispenser operation.
|
| There are food particles remaining on dishes. (Not cleaning properly.) |
There is no rinse aid. |
• Check the dispenser and add rinse aid.
• Use liquid type rinse aid.
|
| A nozzle is clogged. |
• Clean the nozzle. See page 42. |
| The dishes are improperly loaded. Too many dishes have been loaded. |
• Rearrange the dishes so they do not interfere with nozzle rotation and detergent dispenser operation.
• Load only an appropriate number of dishes.
• Load your dishes as recommended. (See page 21.)
• Load the heavily soiled items onto the Zone Booster area. (See page 22)
|
| The filters are clogged or not correctly fastened. (Food soils remain on the filter.) |
• Scrape food from dishes prior to loading. (Do not pre-rinse.)
• Clean the filter. (See page 43.)
• Make sure the filters are correctly fastened.
|
| Leaves glasses with a light film |
The water supplied is soft and too much detergent was used. |
• Underload the dishwasher and use a rinse aid to minimize this. |
| Aluminum dishes were included in the wash load. |
• Remove the marks on the dishes using a low sensitivity cleaner. |
| Leaves a yellow or brown film on the inside of the dishwasher. |
This is caused by coffee and tea soils. |
• Remove the soils using a spot cleaner.
• Use a cycle with a higher temperature.
|
| Does not dry dishes well. |
There is no rinse aid in the dispenser or not enough rinse aid was used. |
• Check the dispenser and add rinse aid.
• Use a liquid type rinse aid.
• Check the rinse aid settings.
|
| The temperature of the water is low when the dishwasher is running. |
• Connect the water supply line to a hot water supply.
• Use rinse aid with the Sanitize option.
|
| Too many dishes have been loaded. |
• Proper loading of items can affect drying.
• Load your dishes as recommended. (See page 21.)
|
| lasses and cups with concave bottoms hold water. This water may spill onto other items when you unload. |
G• After finishing the cycle, empty the lower rack first and then the upper rack. This will prevent water dripping from the upper rack onto the dishes in the lower rack. |
| Auto Release™ is turned off. |
• Turn Auto Release™ Dry on. Press the Lower + Hi-Temp Wash button for 3 seconds to access the Auto Release™ menu. Select "A1" to activate Auto Release™ Dry. |
| Multiple detergent tablets were used without selecting the Sanitize option. |
• Select the Sanitize option or use rinse aid. |
| Has a bad odor. |
Water was left over from an incomplete cycle. |
• Clean the dishwasher by running the Self Clean cycle with the dishwasher empty and no detergent. |
| The Drain Hose is obstructed. |
• Contact a qualified service technician to remove any obstruction from the drain hose. |
| The dishwasher is not used daily or soiled dishes are left in unit too long. |
• With the dishwasher empty and no detergent, place a glass with 8 ounces of vinegar upright into the lower rack, and then run a Self Clean cycle |
| Is too noisy. |
Sound is generated when the dispenser cover is open and the drain pump is operating in an early stage. |
• This is normal operation. |
| The dishwasher is not level. |
• Ensure the dishwasher is level. |
| Foreign material (a screw, a plastic piece) is in the pump chamber. |
• Contact a qualified service technician to remove foreign material from the pump chamber. |
| There is a ‘chopping’ sound because a nozzle is bumping against the dishes. |
• Rearrange the dishes. |
| Does not have a smoothly rotating nozzle. |
Nozzle holes are clogged with food particles. |
• Clean the nozzle holes. (See page 42.) |
| The nozzle is blocked by a dish or pot and cannot rotate. |
• After placing the dishes into the racks, rotate the nozzles by hand to check whether any of the dishes interfere with them. |
| Water won’t pump out of the dishwasher. |
The drain is clogged. |
• Clean the drain pump by removing the drain-pump cover. (See page 45.) |
| Has a bent upper rack after dishes are loaded. |
The dishes are not loaded properly. |
• Load your dishes as recommended. (See page 21.) |
| Cannot close the door. |
Auto Release™ Dry mode is in operation. |
• Once the door opens in the Auto Release™ Dry mode, the door cannot be closed manually for the next 2 minutes. You may close the door after 2 minutes. |
| Cannot start Smart Control. |
The device registration is not finished. |
• Finish the device registration. (See page 37.) |
| The door is not closed within 3 seconds of pressing Smart control. |
• Push the door closed firmly within 3 seconds of pressing Smart Control. |
Information codes
The Control Panel displays information codes to help you understand what is occurring with your dishwasher
| Code |
Action |
| LC |
Leakage check.
• If a water supply valve connection leak occurs, close the water supply valve and go to your house circuit breaker panel, set the dishwasher’s circuit breaker switch to off, and then contact the installer to fix. If the problem continues, contact an authorized Samsung service center
|
| 4C |
Water supply check.
• Check if the water supply valve is closed, the water supply is suspended, or the water inlet valve or line is frozen or clogged by foreign particles. If the problem continues, close the water supply valve, and then contact an authorized Samsung service center.
|
| 5C |
Drain check.
• After closing the water supply valve, check whether the drain hose is clogged or folded. Also, check whether the drain hole inside the sump is clogged.
If the problem continues, contact an authorized Samsung service center
|
| HC |
High temperature heating check.
• Functional check. With the dishwasher empty, add detergent, and then run a cycle. If the problem continues, go to your house circuit breaker panel, set the dishwasher’s circuit breaker switch to off, and then contact an authorized Samsung service center
|
| 3C |
Pump operation check.
• Functional check. Turn off the dishwasher and try to start it again. If the problem continues, contact an authorized Samsung service center
|
| PC |
Zone wash function check.
• Functional check. Turn off the dishwasher and try to start it again. If the problem continues, contact an authorized Samsung service center
|
| AP |
Connect with smart phone.
• When the control panel displays AP, press and hold Smart Control on the control panel to connect your dishwasher with your smart phone.
• When you select Smart Control, AP blinks for 3 seconds.
• When you go
|
For any codes not listed above, call 1-800-SAMSUNG (726-7864).