Home
Bookmarks
Home
Neff
Neff KI2823F30G User Manual
Page 28
User Manual - Page 28
For KI2823F30G. Also, The document are for others Neff models: K846.., K646..
Page 28/31
Page 1
Page 2
Page 3
Page 4
Page 5
Page 6
Page 7
Page 8
Page 9
Page 10
Page 11
Page 12
Page 13
Page 14
Page 15
Page 16
Page 17
Page 18
Page 19
Page 20
Page 21
Page 22
Page 23
Page 24
Page 25
Page 26
Page 27
Page 28
Page 29
Page 30
Page 31
Contents
Table of Contents
Search
Previous
Next
Troubleshooting
Bookmarks
Loading ...
Loading ...
Loading ...
#$
%&
'(
Loading ...
Loading ...
Loading ...
<
25
26
27
28
29
30
>
File type: PDF
File name: 8657075_ki2823f30g.pdf
File size: 3.35 MB
File Language: English
Pages: 31
Author: Neff
Published: 2020-05-14
Updated: 2023-09-03
Verified by
Sunny Boehm
on 2023-09-03
Download File
Table of Contents
×
en Table of contents
2
en User manual
2
( Safety instructions 3
2
8 Intended use 5
2
7 Environmental protection 5
2
5 Installation and connection 6
2
* Getting to know your appliance 9
2
1 Operating the appliance 11
2
M Alarm 12
2
U Refrigerator compartment 12
2
W Freezer compartment 14
2
= Defrosting 16
2
D Cleaning 17
2
l Odours 18
2
9 Lighting 18
2
> Noises 18
2
3 Faults â what to do? 19
2
4 Customer service 20
2
( Safety instructions
3
Safety instructions
3
About these instructions
3
Risk of explosion
3
Risk of electric shock
3
Improper installations and repairs may put the user at considerable risk.
3
Risk of cold burns
3
Risk of injury
3
Danger due to refrigerants
4
The tubes of the refrigeration circuit contain a small quantity of the environmentally friendly but flammable refrigerant R600a. It does not damage the ozone layer and does not increase the greenhouse effect. If refrigerant escapes, it may injure you...
4
If the tubes are damaged:
4
Avoiding placing children and vulnerable people at risk
4
At risk are:
4
Measures:
4
Risk of suffocation
4
Damage
4
To prevent damage:
4
Weight
5
8 Intended use
5
Intended use
5
Use this appliance
5
7 Environmental protection
5
Environmental protection
5
Packaging
5
All materials are environmentally safe and recyclable:
5
Old appliances
5
: Warning
5
Children may become locked in the appliance and suffocate!
5
Caution!
5
Refrigerant and harmful gases may escape.
5
1. Remove the mains plug.
5
2. Sever the power cord.
5
3. Have the appliance disposed of professionally.
5
5 Installation and connection
6
Installation and connection
6
Contents of package
6
The delivery consists of the following parts:
6
Technical specifications
6
Installing the appliance
6
Installation location
6
Permitted room temperature
6
Climatic category
6
Permitted room temperature
6
Cavity depth
6
Tips for saving energy
7
If you follow the instructions below, your appliance will use less power.
7
Note:
7
The arrangement of the features does not affect the energy consumption of the appliance.
7
Installing the appliance
7
Note:
7
Caution!
7
Risk of burns!
7
Using the appliance
7
--------
8
Before using your appliance for the first time
8
1. Remove leaflets, adhesive tape and protective film.
8
2. Clean the appliance. ~ "Cleaning" on page 17
8
Electrical connection
8
Caution!
8
Note:
8
1. After installing the appliance, wait at least 1 hour before connecting it to prevent damaging the compressor.
8
2. Connect the appliance via a correctly installed socket.
8
3. Connect the appliance to a socket near the appliance.
8
* Getting to know your appliance
9
Appliance
9
Controls
9
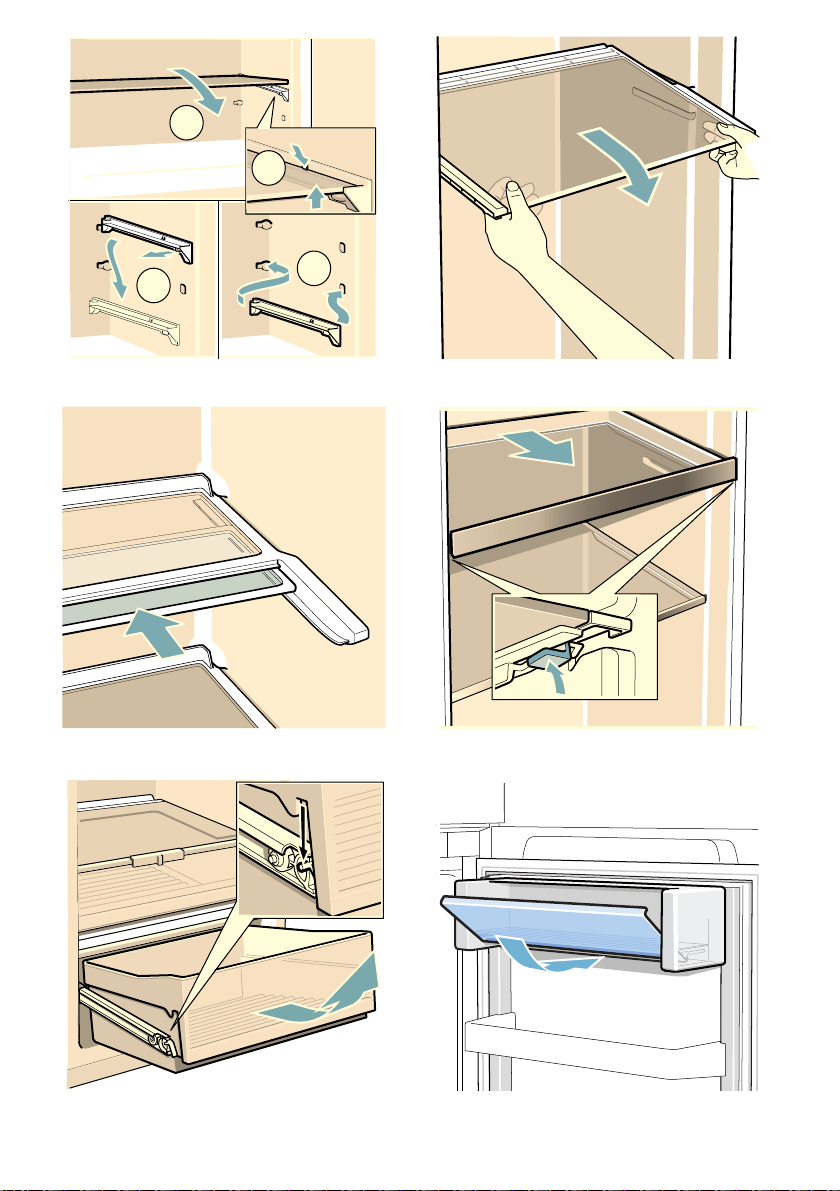
Interior fittings
9
Freezer compartment shelf
9
1. Lift shelf and remove.
9
2. Detach mounting bar and reposition.
9
3. Insert shelf.
9
Shelf
9
You can vary the shelf:
9
Vario shelf
10
You can store tall items (e.g. cans or bottles):
10
Extendable shelf
10
You can give yourself a better overview:
10
You can completely remove the shelf:
10
1. Press and hold down both buttons under the shelf.
10
2. Pull out the shelf, lower and swing out to the side.
10
Container
10
You can remove the container:
10
You can insert the container:
10
Butter and cheese compartment
10
The compartment is easy to open:
10
Storage compartment
10
You can remove the storage compartment:
10
Storage compartment Vario
10
You can store large bottles in the lower storage compartment:
10
Bottle holder
10
When you open and close the door:
10
Ice cube tray
10
You can make ice cubes:
10
1. Fill the ice cube tray 3/4 full with water and place in the freezer compartment.
10
Note:
10
2. To loosen the ice cubes, twist the ice cube tray slightly or hold briefly under flowing water.
10
1 Operating the appliance
11
Operating the appliance
11
Switching on the appliance
11
1. Press the % button.
11
2. Set the required temperature. ~ "Setting the temperature" on page 11
11
Operating tips
11
Switching off and disconnecting the appliance
11
Switching off the appliance
11
Disconnecting the appliance
11
If you do not use the appliance for a prolonged period:
11
1. Press the % button.
11
2. Pull out the mains plug or switch off the fuse.
11
3. Clean the appliance.
11
4. Leave the appliance open.
11
Setting the temperature
11
Recommended temperature
11
Refrigerator compartment
11
Freezer compartment
11
Sticker OK
11
Correct setting
11
Super function
12
Starting the Super function, e.g.:
12
Note:
12
Starting/ending Super function:
12
M Alarm
12
Alarm
12
Door alarm
12
The door alarm (continuous sound) switches on if the appliance door is open for longer than two minutes.
12
U Refrigerator compartment
12
Refrigerator compartment
12
Note when storing food
12
Note the chill zones in the refrigerator compartment
13
Coldest zone
13
Note:
13
Warmest zone
13
Note:
13
Vegetable container with humidity control
13
The air humidity in the vegetable container can be set according to the type and amount of products to be stored:
13
Notes
13
W Freezer compartment
14
Freezer compartment
14
The freezer compartment is suitable for:
14
The time between putting fresh food in the freezer compartment and it freezing solid depends on the following factors:
14
Freezer compartment door
14
Note the following points:
14
Maximum freezing capacity
14
Prerequisites for max. freezing capacity
14
1. When inserting fresh produce: switch on the Super function.
14
2. Move flip tray to the highest position.
14
3. Store large amounts of fresh food on the flip tray near the back wall. This is where food will freeze most quickly.
14
Purchasing frozen food
14
Note when loading products
15
Freezing fresh food
15
Before freezing food, make preparations appropriate to the food in order to retain the best possible nutritional value, flavour and colour:
15
Suitable for freezing
15
Not suitable for freezing
15
Packing frozen food
15
1. Place food in packaging.
15
2. Remove air.
15
3. Pack food airtight to prevent it from losing flavour and drying out.
15
4. Label packaging with contents and date of freezing.
15
Suitable packaging:
15
Suitable locks:
15
Not suitable packaging:
15
Shelf life of frozen food at â18 °C
16
Thawing frozen food
16
Thawing methods:
16
Caution!
16
= Defrosting
16
Defrosting
16
Refrigerator compartment
16
Note:
16
Freezer compartment
17
Caution!
17
Avoid any damage to the pipes of the refrigeration circuit.
17
Proceed as follows:
17
1. Switch on the Super function approx. 4 hours before defrosting.
17
2. Remove the frozen food and place temporarily in a cool location.
17
3. Switch off the appliance.
17
4. Pull out the mains plug or switch off the fuse.
17
5. To accelerate the defrosting process: place a pan of hot water on a trivet in the freezer compartment.
17
6. Wipe up the condensation water with a cloth or sponge.
17
7. Wipe the freezer compartment dry.
17
8. Switch on the appliance.
17
9. Put the frozen food back into the appliance.
17
D Cleaning
17
Cleaning
17
Caution!
17
Avoid damaging the appliance and the fittings.
17
Proceed as follows:
17
1. Switch off the appliance.
17
2. Pull out the mains plug or switch off the fuse.
17
3. Take out the food and store in a cool location.
17
4. If present: wait until the layer of frost has thawed.
17
5. Clean the appliance with a soft cloth, lukewarm water and a little pH-neutral washing-up liquid.
17
Caution!
17
6. Wipe door seal with clear water and dry thoroughly with a cloth.
17
7. Reconnect and switch on appliance and put in food.
17
Cleaning the equipment
18
Condensation channel
18
Shelf above the vegetable container
18
1. Pull out vegetable container.
18
2. Take out shelf and dismantle to clean.
18
l Odours
18
Odours
18
If you experience unpleasant odours:
18
1. Switch off the appliance with the On/Off button %.
18
2. Take all food out of the appliance.
18
3. Clean the inside.~ "Cleaning" on page 17
18
4. Clean all packages.
18
5. Seal strong smelling food in order to avoid odours from forming.
18
6. Switch the appliance on again.
18
7. Store food in the appliance.
18
8. Check whether the formation of odours is still occurring after 24 hours.
18
9 Lighting
18
Lighting
18
> Noises
18
Noise
18
Normal noises
18
Preventing noises
18
3 Faults â what to do?
19
Faults â what to do?
19
Before you call customer service, use this table to check whether you can rectify the fault yourself.
19
Temperature differs greatly from the set value.
19
Displays do not illuminate.
19
Display indicates âEâ¦â.
19
Appliance is not cooling, display and lighting are lit.
19
--------
19
4 Customer service
20
Customer service
20
Appliance self-test
20
1. Switch off the appliance and wait 5 minutes.
20
2. Switch on the appliance.
20
3. Within the first 10 seconds after switching on, press and hold the Super button for 3- 5 seconds.
20
Repair order and advice on faults
20
Guarantee
20
!
27
"
27
0
30
Search:
×
Search