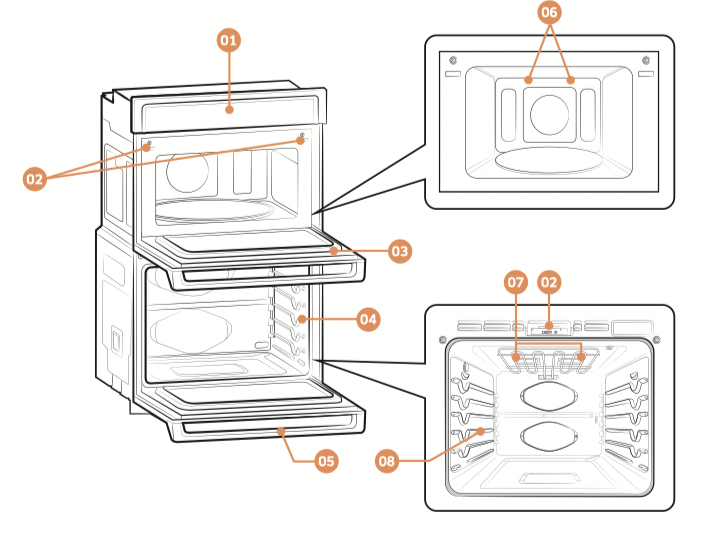
This oven ships with different kinds of accessories that help you cook what you want.
Accessories for oven
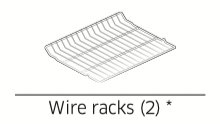
Wire racks
Use these racks in the oven when baking and broiling.
Accessories for microwave
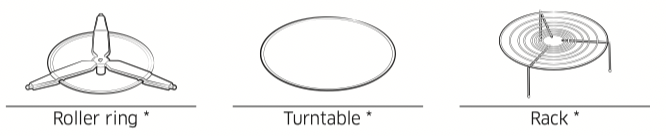
Roller ring
Put in the center of the base. It supports the turntable.
Turntable
Put on the roller ring with the center fitting of the coupler. It serves as a cooking base.
Rack
Use this rack as appropriate to cook two dishes simultaneously. You can put a smaller dish on the turntable, and the other dish on the rack. You can also use this rack with the Broil function.
NOTE
Do not use wire racks with Microwave mode except where specifically noted in this manual.
NOTE
• Do not use the turntable without the roller ring.
• If you need an accessory marked with a *, you can buy it from the Samsung Contact Center (1-800-SAMSUNG (726-7864)).
Before you begin
Before using the top and bottom ovens for the first time, remove all the accessories, and then clean the ovens thoroughly. Then, set the lower oven to Bake, and run it at 400 °F for 1 hour. Next, set the microwave (top) oven to Broil for 1 hour. There will be a distinctive odor. This is normal.
Ensure your kitchen is well ventilated during this conditioning period.
Energy saving tips
• During cooking, the oven door should remain closed except when you turn food over. Do not open the door frequently during cooking to maintain the oven temperature and to save energy.
• If cooking time is more than 30 minutes, you can switch the oven off 5-10 minutes before the end of the cooking time to save energy. The residual heat will complete the cooking process.
• To save energy and reduce the time needed for re-heating the oven, plan oven use to avoid turning the oven off between cooking one item and the next.
• Whenever possible, cook more than one item at a time.
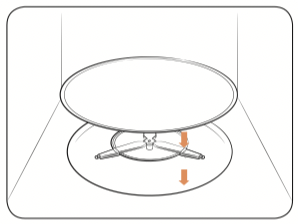
Turntable (For microwave oven)
Remove all packing materials inside the oven. Install the roller ring and turntable. Check that the turntable rotates freely.
Basic operations
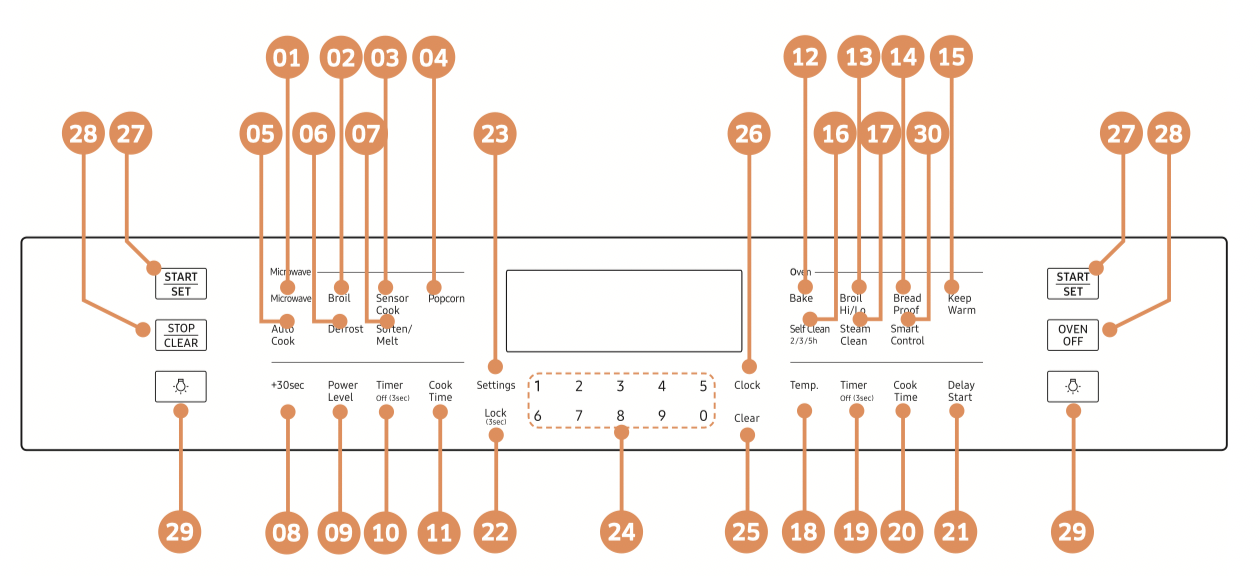
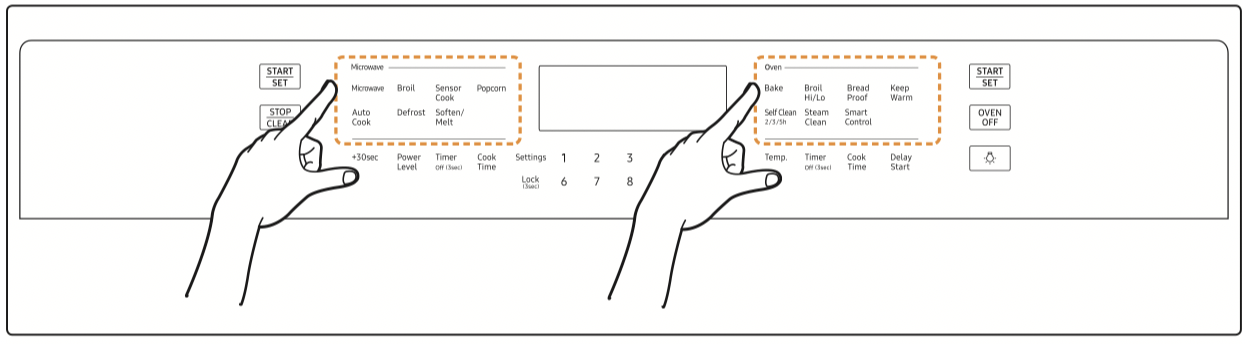
Control panel
READ THE INSTRUCTIONS CAREFULLY BEFORE USING THE OVEN. For satisfactory use of your oven, become familiar with the various features and functions of the oven as described below. Detailed instructions for each feature and function follow later in this user manual.
01 Microwave: Use to select the Microwave function.
02 Broil: Use to select the Broil function.
03 Sensor Cook: Use to select the Sensor Cook function.
04 Popcorn: Use to select the Popcorn function.
05 Auto Cook: Use to select the Auto Cook function.
06 Defrost: Use to select the Defrost function.
07 Soften/Melt: Use to select the Soften/Melt function.
08 +30sec: Press to add operation time during Microwave, Broil, Speed Broil mode.
09 Power Level: Use to change the Microwave power level.
10 Timer Off (3sec): Use to set or cancel the kitchen timer. The kitchen timer does not start or stop cooking (upper microwave oven).
11 Cook Time: Touch and then use the number pad to set the amount of time you want your food to cook. The oven will shut off when the cooking time has run out (upper microwave oven).
12 Bake: Use to select the Bake function.
13 Broil Hi/Lo: Use to select the Broil function.
14 Bread Proof: Use to select the Bread Proof function.
15 Keep Warm: Use to select the Keep Warm function to keep cooked foods warm.
16 Self Clean 2/3/5h: Use to select the Self-cleaning function.
17 Steam Clean: Use to select the steam cleaning function of the oven.
18 Temp.: Use to change the temperature when the oven is operating (lower oven).
19 Timer Off (3sec): Use to set or cancel the kitchen timer. The kitchen timer does not start or stop cooking (lower oven).
20 Cook Time: Touch and then use the number pad to set the amount of time you want your food to cook. The oven will shut off when the cooking time has run out (lower oven).
21 Delay Start: Use to set the oven to start and stop automatically at a time you set.
22 Lock (3sec): Use to disable all oven functions.
23 Settings: Use to bring up the User Preference menu in the display.
24 Number Pad: Use to set any function requiring numbers such as the time of day on the clock, the timer, the oven temperature, the start time, and the length of operation for timed cooking, etc.
25 Clear: Use to cancel a previously entered temperature or time.
26 Clock: Use to set the time of day.
27 START/SET: Use to start any cooking or cleaning function in the oven.
28 STOP/CLEAR / OVEN OFF: Use to cancel all oven operations except the clock
29 Lamp: Use to turn the oven light on or off.
30 Smart Control: Use to select the Smart Control feature.
Oven or Microwave Oven
The Combi Oven provides two operation modes: Oven and Microwave Oven. To select either Oven and Microwave Oven, touch the desired operation mode. Then, the control panel will be activated.
Setting the clock
The clock must be set to the correct time of day for the automatic oven timing functions to work properly.
• The time of day cannot be changed during timed cooking, delay-timed cooking, or a self-cleaning cycle.
• You can choose between a 12-hour or 24-hour display. The default is 12-hour.
How to set the clock
1. Touch Clock.
2. Touch Clock to select AM or PM. (Skip this step if you are setting the clock to 24 hour display mode.)
3. Touch keys in the number pad to set the current time of day.
4. Touch Clock or START/SET to save the changes.
Setting the kitchen timer
The kitchen timer serves as an extra timer that will beep when the set time has elapsed. It does not start or stop cooking functions. You can use the kitchen timer with any of the other oven functions.
How to set the timer
1. Touch Timer Off (3sec).
2. Touch number keys in the number pad to set the hours and minutes. The timer can be set for any amount of time from 1 minute to 9 hours and 59 minutes. If you make a mistake, touch Clear, and then enter the amount of time again.
3. Touch START/SET.
4. When the set time has elapsed, the oven will beep and the display will show End until you touch Timer Off (3sec). You can cancel the timer at any time by touching Timer Off (3sec).
Control Lockout
Control Lockout lets you lock the buttons on the touch pad so they cannot be activated accidently. Control Lockout also locks the lower oven door only so it cannot be opened. You can only activate Control Lockout when the oven is in standby mode.
How to activate the Control Lockout
1. Cancel or turn off all other functions.
2. Touch Lock (3sec) for 3 seconds.
The oven will display “Loc” and the lock icon along with the current time.
NOTE
• Control Lockout is available only when the oven temperature is under 400 °F.
• All other functions must be cancelled before you activate Control Lockout.
How to unlock the controls
Touch Lock (3sec) for 3 seconds.
“Loc” and the lock icon will disappear from the display.
NOTE It may take up to 10 seconds for the doors to unlock.
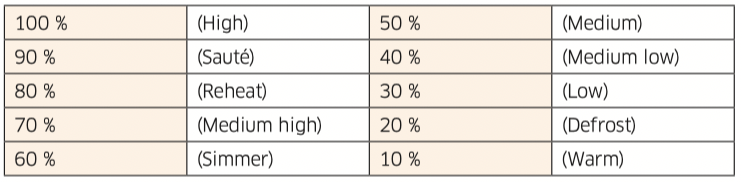
Setting the power level
1. Touch Power Level to set the power level of the microwave.
2. Enter the power level you want by using the number pad.
You can set the power level from 10 % to 100 % in 10 % increments.
Timed Cooking
In Timed Cooking mode, the oven turns on immediately and cooks for the length of time you select. At the end of the cooking time, the oven turns off automatically.
• You can use Timed Cooking only with another cooking operation (Microwave, Broil, Speed Broil).
How to set the oven for Timed Cooking
1. Touch the pad for the cooking operation you want, eg. Microwave.
Enter the power level or temperature you want, for example, 100 %, using the number pad.
2. Touch Cook Time. Enter the number of hours/minutes you want the oven to stay on using the number pad. You can set the cooking time for any amount of time from 1 second to the maximum time for each function.
3. Touch START/SET to begin cooking.
The oven will continue to cook until the set amount of time has elapsed, then turn off automatically.
4. You can cancel a cook time at any time by touching STOP/CLEAR.
When Timed Cooking is done, the oven will beep.
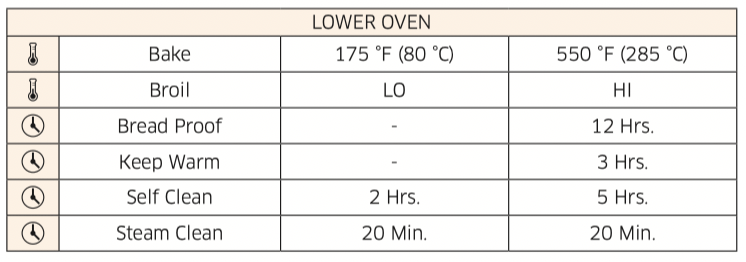
Minimum and maximum settings
All the features listed in the table below have minimum and maximum times, temperatures, and power level settings. A beep will sound each time a pad on the control panel is pressed and the entry is accepted. An error tone will sound in the form of a long beep if the entered temperature or time is below the minimum or above the maximum setting for the feature.
Upper Microwave Oven
Lower Oven
Microwave Oven (Upper Oven)
Microwave
Microwaves are high-frequency electromagnetic waves that can be used to cook or reheat food without changing either the form or color of the food.
1. Put food in a microwave-safe container, and then place the container in the center of the turntable. Close the door.
2. Touch Microwave.
3. Touch Power Level, and then use the number pad to input a desired power level.
4. Touch Cook Time, and then use the number pad to input a desired cook time. You can also use the +30sec button to add cooking time in 30 second increments. (Maximum cooking time is 1 Hr. 30 min.)
5. Touch START/SET to start cooking.
6. If you want to cancel Microwave cooking or if Microwave cooking is finished, touch STOP/CLEAR.
Power level
CAUTION
• Use only microwave-safe cookware.
• Do not use wire racks with Microwave mode.
Broil
The upper oven broil function uses a standard electronic heating element to broil food. It does not use microwave energy. When using the broil mode, do not put food in plastic, microwave-safe cookware. The cookware will melt.
Use glass, ceramic, or metal cookware. To broil food, follow the steps below.
1. Put the rack on the turntable. Put the cookware containing the food on the rack.
2. Touch Broil. If preheating is preferred, simply touch START/SET.
NOTE You cannot set the temperature in Broil mode.
3. Touch Cook Time, and then use the number pad to specify a cooking time.
(Maximum cooking time is 1 Hr. 30 min.)
4. Touch START/SET to start cooking.
5. If you want to cancel Broiling or if Broiling is finished, touch STOP/CLEAR.
CAUTION For the Broil function:
• Use glass, ceramic, or metal cookware.
• Do not use plastic cookware.
• Use oven gloves when taking out food.
Popcorn
You do not need to set either the cooking time or the power level. Once you have selected Popcorn and touched START/SET, the oven automatically sets the cooking time and starts to cook. The gas sensing animation effect shows the status of the sensing process.
1. Touch Popcorn.
2. Touch START/SET to start cooking.
3. If you want to cancel the Popcorn function or if the Popcorn function is finished, touch STOP/CLEAR.
CAUTION
• Use only microwave-safe cookware.
• Use oven gloves when taking out food.
Defrost
The oven provides 4 different defrosting programs for your convenience. The time and power levels are automatically adjusted according to your selection.
1. Put food in suitable cookware, then put the cookware on the turntable and close the door.
2. Touch Defrost, and then use the number pad to select a program.
3. Touch START/SET to move to the next step.
4. Use the number pad to select the weight of food.
5. Touch START/SET to start cooking.
6. If you want to cancel Defrost or if Defrost is finished, touch STOP/CLEAR.
CAUTION
• Use only microwave-safe cookware.
• Use oven gloves when taking out food.
Code/Food
Amount
Instructions
1 Meat
0.1-3.5 lbs.
Shield the edges with aluminium foil. Turn the meat over when the oven beeps. This program is suitable for lamb, pork, steaks, chops, and ground meat. For ground meat, place the meat directly on the turntable tray on wax paper. Do not use an extra tray. Let stand, covered with foil, for 5–10 minutes.
2 Poultry
0.1-3.5 lbs.
Shield the leg and wing tips with aluminium foil. Turn the poultry over when the oven beeps. This program is suitable for whole chicken as well as for chicken portions.
3 Fish.
0.1-3.5 lbs.
Shield the tail of a whole fish with aluminium foil. Turn the fish over when the oven beeps. This program is suitable for whole fish as well as for fish fillets.
4 Bread
0.1-2.0 lbs.
Put bread on a piece of paper towel. Turn over as soon as the oven beeps. This program is suitable for all kinds of bread, sliced or whole, as well as for bread rolls and baguettes. Arrange bread rolls in a circle.
Sensor Cook
The 15 Sensor Cook features include/provide pre-programmed cooking times.
You do not need to set either the cooking time or the power level. Once you have selected a program and touched START/SET, the oven automatically sets the cooking time and starts to cook. The gas sensing animation effect shows the status of the sensing process.
1. Put the food in the center of the turntable and close the door.
2. Touch Sensor Cook, and then use the number pad to select a program.
3. Touch START/SET to start cooking.
4. If you want to cancel Sensor Cook or if Sensor Cook is finished, touch STOP/ CLEAR.
CAUTION
• Use only microwave-safe cookware.
• Use oven gloves when taking out food.
Code/Food
Amount
Instructions
1 Potato
1 to 5 ea.
Pierce each potato several times with a fork. Place on the turntable in a spoke-like fashion. After cooking, let the potatoes stand for 3-5 minutes. Let the oven cool for at least 5 minutes before using it again.
2 Pizza
1 to 4 slices
Place 1-4 pizza slices on a microwave safe plate with the wide ends of the slices towards the outside edge of the plate. Do not let the slices overlap. Do not cover. Let the oven cool for at least 5 minutes before using it again.
3 Beverage
6 to 8 oz. (½ cup to 1 cup)
Use a measuring cup or mug and do not cover. Place the beverage in the oven. After heating, stir well. Let the oven cool for at least 5 minutes before using it again.
4 Dinner Plate
1 serving
Use only precooked, refrigerated foods. Cover the plate with vented (1 inch vent) plastic wrap or waxed paper tucked under the plate. If the food is not as hot as you would like after using the “Sensor” function, continue heating using additional time and power. Contents:
• 3-4 oz. meat, poultry, or fish (up to 6 oz. with bone)
• ½ cup starch (potatoes, pasta, rice, etc.)
• ½ cup vegetables (about 3-4 oz.)
5 Casserole
1 to 4 servings
Cover the plate with vented (1 inch vent) plastic wrap. If the food is not as hot as you would like after using the “Sensor” function, continue heating using additional time and power. Stir the food once before serving.
Contents:
Casseroles: refrigerated
6 Pasta
1 to 4 servings
Cover the plate with vented (1 inch vent) plastic wrap. If the food is not as hot as you would like after using the “Sensor” function, continue heating using additional time and power. Stir the food once before serving.
Contents:
Pasta: canned spaghetti
7 Soup
1 to 4 servings
Cover the plate with vented (1 inch vent) plastic wrap. If the food is not as hot as you would like after using the “Sensor” function, continue heating using additional time and power. Stir the food once before serving.
Contents:
Soup: refrigerated
8 Frozen Breakfast
4 to 8 oz.
Use this button for frozen sandwiches, breakfast entrees, pancakes, waffles, etc. Follow the package instructions for covering and standing. Let the oven cool for at least 5 minutes before using it again.
9 Frozen Dinner
13 to 18 oz.
Remove the food from its wrapping and follow the instructions on the box for covering and letting stand. Let the oven cool for at least 5 minutes before using it again.
10 Rice
1 to 2 cups
Add 1 cup of cold water for 1 cup of rice. Use a large glass pyrex bowl. Cover with vented (1 inch vent) plastic wrap. Rice doubles in volume during cooking. After the cooking time is over, stir before standing time, and then salt or add herbs and butter.
11 Mini Ravioli
8 to 14 oz.
Put mini ravioli evenly into a microwave safe glass bowl. Cover with vented (1 inch vent) plastic wrap. Let stand for 2-3 minutes. Stir the food once before serving.
12 Fresh Vegetables
1 to 4 servings
Place the fresh vegetables (broccoli florets, cauliflower florets, zucchini, egg plants etc.) in a microwave safe ceramic, glass, or plastic dish and add 2-4 tbsp. water. Cover with vented (1 inch vent) plastic wrap while cooking and stir before letting stand. Let the oven cool for at least 5 minutes before using it again.
13 Fresh Root Vegetables
1 to 4 servings
Place the fresh vegetables (carrots, leeks, potatoes, beet etc.) in a microwave safe ceramic, glass, or plastic dish and add 2-4 tbsp. water. Cover with vented (1 inch vent) plastic wrap while cooking and stir before letting stand. Let the oven cool for at least 5 minutes before using it again.
14 Frozen Vegetables
1 to 4 servings
Place the frozen vegetables in a microwave safe ceramic, glass, or plastic dish and add 2-4 tbsp. water. Cover with vented (1 inch vent) plastic wrap to cook. Stir before letting stand for 3-5 minutes. Let the oven cool for at least 5 minutes before using it again.
15 Canned Vegetables
1 to 4 servings
Place the canned vegetables in a microwave safe ceramic, glass, or plastic dish. Cover with vented (1 inch vent) plastic wrap while cooking and stir before letting stand. Let the oven cool for at least 5 minutes before using it again.
Notes on Sensor Cooking
The Auto Sensor cooks your food automatically by detecting the amount of gases generated from the food while it is cooking.
• When food is cooked, many kinds of gases are generated. The Auto Sensor determines the proper time and power level by detecting these gases, eliminating the need to set the cooking time and power level.
• When a container is covered with its lid or plastic wrap during Sensor Cooking, the Auto Sensor will detect the gases generated after the container has been saturated with steam.
NOTE
If using cling film or plastic wrap, leave a small opening (vent) near the edge of the dish for ventilation or pierce the plastic with a knife or fork in several places.
• Shortly before cooking ends, the microwave will begin to count down the remaining cooking time. This will be a good time for you to rotate or stir the food for even cooking if it is necessary.
• Before you begin Auto Sensor cooking, you can season food with herbs, spices, or browning sauces. A word of caution though: Salt or sugar may cause burn spots on food so these ingredients should be added after cooking.
Utensils & covers
• To obtain good cooking results with the Auto Sensor function, follow the directions in the tables in this manual for selecting appropriate containers and covers.
• Always use microwave-safe containers and cover them with their lids or with plastic wrap. When using plastic wrap, turn back one corner to allow steam to escape at the proper rate.
• Always cover your microwave safe dish or container with its matching lid. If the dish or container does not have its own lid, use plastic wrap.
• Fill containers at least half full.
• Foods that require stirring or rotating should be stirred or turned toward the end of the Sensor Cook cycle, after the time has started to count down on the display.
CAUTION
• After installing the oven and plugging it into an electrical outlet, do not unplug the power cord for 24 hours. The gas sensor needs time to stabilize in order to cook satisfactorily.
• It is not advisable to use the Auto Sensor cooking feature continuously. i.e. one cooking operation immediately after another.
• Install the oven in a well ventilated location for proper cooling and airflow and to ensure the sensor will operate accurately.
• To avoid poor results, do not use the Auto Sensor cooking function when the room ambient temperature is above 90 °F or below 45 °F.
• Do not use a volatile detergent to clean your oven. Gas resulting from this detergent may affect the sensor.
• Avoid placing the oven near high moisture or gas emitting appliances, since this will interfere with the proper performance of the Auto Sensor.
• Always keep the inside of the oven clean. Wipe all spills with a damp cloth. This oven is designed for household use only.
Auto Cook
You do not need to set either the cooking time or the power level. You can adjust the size of the serving.
1. Put the food in the center of the turntable and close the door.
2. Touch Auto Cook, and then use the number pad to select the appropriate food code.
3. Touch START/SET to go to the next step.
4. Use the number pad to specify amount of servings.
5. Touch START/SET to start cooking.
6. If you want to cancel Auto Cook or if Auto Cook is finished, touch STOP/CLEAR.
Layer 2 paper towels on a microwave safe plate and arrange the bacon on the towels. Do not overlap bacon. Cover with an additional paper towel. Remove the paper towel immediately after cooking.
2 Hot dog
1 serving: 2 each 2 servings: 4 each
Pierce the hot dogs 3 times with a fork. Place the hot dogs on a glass or ceramic plate, then place the plate on the rack. When the microwave beeps, add the buns and press start to continue.
3 Oatmeal
1 serving: 1 pack 2 servings: 2 packs
Follow the package directions for the recommended amount of water needed. Stir well before and afterwards.
4 Nachos
1 serving
Arrange the tortilla chips uniformly on a glass or ceramic plate, then place the plate on the rack. Sprinkle evenly with cheese.
Contents:
• 4 to 5 oz. tortilla chips
• ½ cup grated cheese
5 Baked Potato
1 serving: 2 each 2 servings: 4 each
Pierce the potatoes 3 times with a fork. Place the potatoes on a glass or ceramic plate, then place the plate on the rack. After cooking, let the potatoes stand for 3-5 minutes.
6 Quinoa
1 serving: 1 cup 2 servings: 2 cups
Follow the package directions for the recommended amount of water needed. If there are no directions, add an amount of water equal to the amount of Quinoa. Stir well before and after cooking.
7 Frozen Buffalo wings
1 serving: 12 oz. 2 servings: 16 oz.
Place the frozen chicken wings on a glass or ceramic plate, then place the plate on the rack.
8 Frozen French Fries
12 oz. 16 oz.
Place the frozen french fries on a glass or ceramic plate, then place the plate on the rack.
9 Frozen Chicken Nuggets
8 oz. 16 oz.
Place the frozen chicken nuggets on a glass or ceramic plate, then place the plate on the rack.
10 Frozen Pizza, 6 inch
6 inch
Place the pizza on the rack.
11 Frozen Pizza, 12 inch
12 inch
Place the pizza on the rack.
12 Bone-in Chicken Pieces
1.0 lb.
2.0 lbs.
Brush the chicken pieces with oil and seasonings. Place the pieces skin side down on the rack. When the microwave beeps, turn over bone-in chicken pieces, and then press Start to continue.
Place the hamburgers on a glass or ceramic plate. Place the plate on the rack. When the microwave beeps, turn the hamburgers over, and then press Start to continue.
Brush the salmon fillets with oil and seasonings. Place the salmon fillets on a glass or ceramic plate, then place the plate on the rack.
15 Sirloin Steak, Medium.
1 inch, 1.0 lb.
Place the steak on the rack. When the microwave beeps, turn over the steak, and then press Start to continue. Let the steak rest for 5 minutes before slicing. Brush the steaks with oil and seasonings.
16 Sirloin Steak, Well done
1 inch, 1.0 lb.
Place the steak on the rack. When the microwave beeps, turn over the steak, and then press Start to continue. Let the steak rest for 5 minutes before slicing. Brush the steaks with oil and seasonings.
Place the pork chops on the rack. When the microwave beeps, turn over the pork chops, and then press Start to continue. Brush the pork chops with oil and seasonings.
Soften/Melt
You do not need to set either the cooking time or the power level.
1. Put the food in the center of the turntable and close the door.
2. Touch Soften/Melt to select a program.
3. Touch START/SET to go to the next step.
4. Use the number pad to specify the weight of food.
5. Touch START/SET to start cooking.
6. If you want to cancel Soften/Melt or if Soften/Melt is finished, touch STOP/ CLEAR.
CAUTION
• Use only microwave-safe cookware.
• Use oven gloves when taking out food.
Code/Food
Amount
Instructions
1 Melt Butter.
0.25 lb. (1 stick)
0.5 lb. (2 sticks)
Unwrap the butter and cut the butter into several pieces. Place the butter on a microwave safe dish and cover with wax paper. Stir well afterwards.
2 Soften Butter
0.25 lb. (1 stick)
0.5 lb. (2 sticks).
Remove the butter from the packaging and place on a microwave safe dish.
3 Melt Chocolate
1 cup chips.
Place the chocolate chips in a microwave safe dish. When the microwave beeps, stir well, and then press Start to continue. Unless stirred, the chocolate chips will keep their shape even when the heating time is over.
4 Soften Ice Cream
1 serving: 1 pint 2 servings: 1.5 quarts
Remove the lid of the carton. Place the carton in the center of the microwave.
5 Soften Cream Cheese
4 oz. 8 oz.
Unwrap the cream cheese and place on a microwave safe dish.
6 Melt Cheese
4 oz. 8 oz.
Place the cheese in a microwave safe bowl and cover with wax paper. Stir well afterwards.
7 Melt Marshmallows
5 oz. 10 oz.
Place the marshmallows in a large microwave safe dish. Stir well afterwards.
8 Melt Caramel
4 oz. 8 oz.
Place the caramel in a large microwave safe dish. Stir well afterwards.
Oven (Lower Oven)
Timed Cooking
In Timed Cooking mode, the oven turns on immediately and cooks for the length of time you select. At the end of the cooking time, the oven turns off automatically.
• You can use Timed Cooking only with the Bake cooking operation.
How to set the oven for Timed Cooking
1. Touch the pad for the cooking operation you want, eg. Bake.
Enter the temperature you want, for example, 400 °F, using the number pad. (The default temperature is 350 °F).
2. Touch Cook Time. Enter the number of hours/minutes you want the oven to stay on using the number pad. You can set the cooking time for any amount of time from 1 minute to 9 hours and 59 minutes.
3. Touch START/SET to begin cooking. The temperature display will start to change once the oven temperature reaches 175 °F.
4. You can cancel a cook time at any time by setting the cook time to 0 minutes.
The oven will continue to cook until the set amount of time has elapsed, then turn off automatically. (Touch Cook Time -> set cook time to 0 min -> touch START/SET)
When Timed Cooking is done, the oven will beep.
CAUTION Use caution with the Timed Cooking or Delay Start features. You can use these features to cook cured or frozen meats and most fruits and vegetables. For food that can easily spoil, such as milk, eggs, and unfrozen or fresh fish, meat, or poultry, chill them in the refrigerator first. Even when chilled, they should not stand in the oven for more than 1 hour before cooking begins, and should be removed promptly when cooking is completed. Eating spoiled food can result in sickness from food poisoning.
Delay Start
With Delay Start, the oven’s timer turns the oven on and off at times you select in advance.
• You can use Timed Cooking only with the Bake cooking operation.
• You can set the oven for a delay start before setting other cooking operations.
• The clock must be set to the current time.
How to set the oven for delay start
1. Position the oven rack(s) and place the food in the oven.
2. Touch the pad for the cooking operation you want, eg. Bake. The default temperature is 350 °F.
3. Enter the temperature you want, eg. 375 °F, using the number pad.
4. Set the cooking time if you want. (Refer to the section on the Timed Cooking feature on page 33).
5. Touch Delay Start. Use the number pad to set the time.
6. Touch START/SET. At the set time, a short beep will sound. The oven will begin to cook.
Turning the light on and off
• The oven light turns on automatically when the door is opened.
• The oven light turns off automatically when the door is closed.
• You can turn the oven and door light on and off manually by touching the
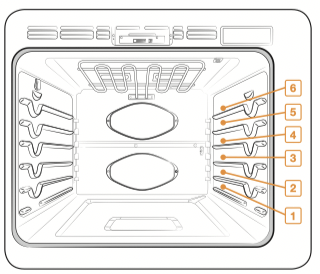
Using the oven racks
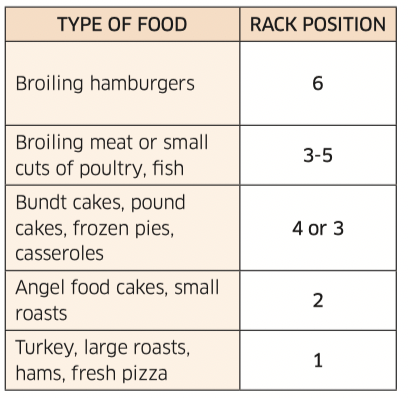
Oven rack positions
Recommended rack position for cooking
• This table is for reference only.
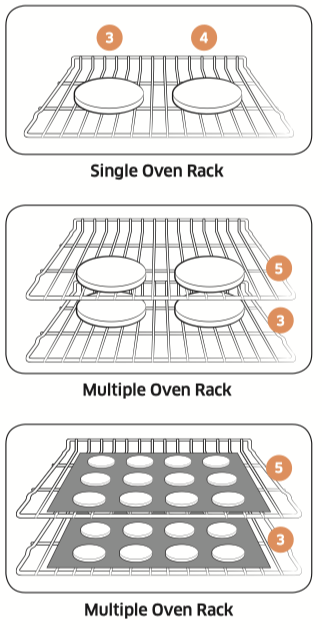
Rack and Pan placement
Centering baking pans in the oven as much as possible will produce better results. If baking with more than one pan, place the pans so each has at least 1˝ to 1½˝ of air space around it.
When baking on a single oven rack, place the oven rack in position 3 or 4.
See the figure on the left.
When baking cakes and cookies on multiple racks, place the oven racks in positions 3 and 5.
Using multiple oven racks
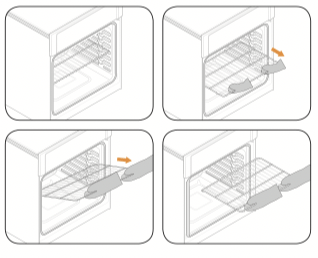
Before using the racks
Each rack has stops that need to be placed correctly on the supports. These stops will keep the rack from coming completely out.
Removing the racks
1. Pull the rack straight out until it stops.
2. Lift up the front of the rack, and then pull it out.
Replacing the racks
1. Place the end of the rack on the support.
2. Tilt the front end up and push the rack in.
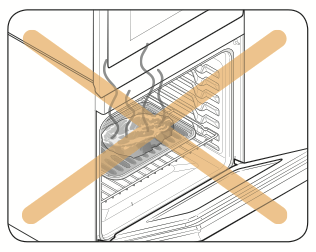
CAUTION
• Do not cover a rack with aluminum foil or place aluminum foil on the oven bottom. This will hamper heat circulation, resulting in poor baking, and may damage the oven bottom.
• Arrange the oven racks only when the oven is cool.
Baking
The oven can be programmed to bake at any temperature from 175 °F to 550 °F. Baking temperature and time will vary depending on the ingredients and the size and shape of the baking pan used. Dark or nonstick coatings may cook faster with more browning.
How to set the oven for baking
1. Touch Bake.
2. Enter the temperature you want using the number pad, eg. 3, 7, 5.
3. Touch Cook Time, and then use the number pad to set the cooking time.
4. Touch START/SET. The temperature display will start to change once the oven temperature reaches 175 °F.
5. If you want to cancel baking or if you have finished, touch OVEN OFF.
Place food in the oven after preheating if the recipe calls for it. Preheating is very important for good results when baking cakes, cookies, pastry, and breads. After the oven has reached the desired temperature, the oven will beep 6 times.
NOTE If you are using an oven thermometer in the oven cavity, the temperature registered by the thermometer may differ from the actual set oven temperature.
How to adjust the temperature while cooking
1. Touch Temp.. The display will show the present temperature, eg. 375 °F.
2. Enter the temperature you want, eg. 425 °F, using the number pad.
3. Complete the entry by touching START/SET.
Broiling
Broiling is a method of cooking tender cuts of meat by direct heat under the broil element of the oven.
The high heat cooks quickly and gives a rich, brown outer appearance. Broil mode is best for meat, fish, and poultry up to 1” thick.
How to set the oven for broiling
1. Touch Broil once for Hi or twice for Lo.
Use Lo to cook foods such as poultry or thick cuts of meat thoroughly without over-browning them.
2. To start broiling, touch START/SET.
Broil one side until the food is browned. Turn over and broil the other side.
3. Touch OVEN OFF once you have finished cooking or if you want to cancel broiling.
NOTE
• This oven is designed for CLOSED DOOR broiling. The oven door must be closed during broiling.
• If you leave the oven door open for more than 2 minutes when the oven is on, all heating elements will shut off automatically.
• When you have finished cooking, the cooling fan will continue to run until the oven has cooled down.
• If you are using an oven thermometer in the oven cavity, the temperature registered by the thermometer may differ from the actual set oven temperature.
CAUTION Always broil with the oven door closed. Use care when opening the door. Let hot air or steam escape before you remove food from or put food into the oven.
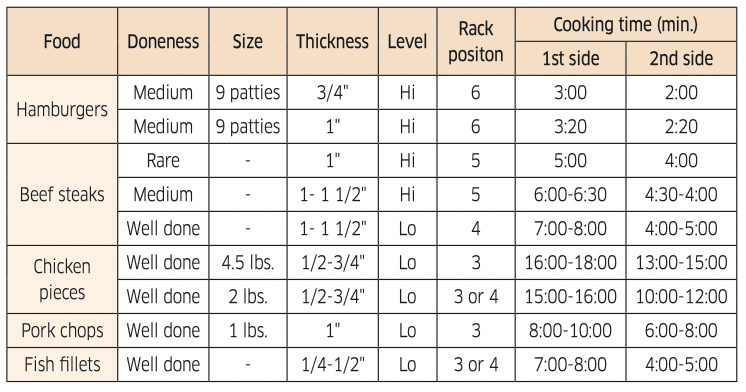
Broiling recommendation guide
The size, weight, thickness, starting temperature, and your doneness preference will affect broiling times. This guide is based on meats at refrigerator temperature. Always use a broiler pan and its grid when broiling. Always preheat the oven for 5 minutes before broiling.
Using Bread Proof
Bread Proof provides an optimal temperature for the bread proofing process and therefore does not require a temperature adjustment.
For the best results, always start the Bread Proof option with a cool oven.
1. Touch Bread Proof.
2. Touch START/SET.
3. Touch OVEN OFF at any time to turn off Bread Proof.
NOTE Use rack position 3 for Bread Proof.
Using Keep Warm
Keep Warm will keep cooked food warm for serving up to 3 hours after cooking has finished.
After 3 hours, the feature will shut off automatically. You can use the Keep Warm feature without any other cooking operations or you can set it to activate after a timed or delay timed cooking operation.
You should not use this feature to reheat cold food.
How to use Keep Warm
1. Touch Keep Warm.
2. Touch START/SET.
3. Touch OVEN OFF at any time to turn the feature off.
How to set the oven to activate Keep Warm after a timed cooking
1. Set up the oven for Timed cooking. (Refer to the Timed Cooking section on page 33.)
2. Touch Keep Warm before touching START/SET to begin cooking.
3. Touch OVEN OFF at any time to turn the feature off.
Using Settings
This function lets you control various electronic control settings. These settings include Temp Adjust, Temp Unit, Time of Day, 12 hour energy saving, Sound On/ Off, and Demo mode.
The setting menu is only available when the oven is not being used (not cooking).
Options
Feature
1. Temp Adjust
Lets you correct the temperature in the oven.
2. Temp Unit
Lets you program the oven control to display temperatures in Fahrenheit or Centigrade.
3. Time of Day
Lets you set the clock to display the time of day in the 12 hour or 24 hour mode.
4. 12 hour energy saving
This feature automatically turns off the oven after 12 hours during baking functions or after 3 hours during a broil function.
5. Sound On/Off
Lets you set the oven controls to operate silently.
0. Demo mode
This option is for use by retail establishments for display purposes only.
Temp Adjust
The temperature in the oven has been calibrated at the factory. When first using the oven, be sure to follow recipe times and temperatures. If you think the oven is too hot or too cool, you can correct the temperature in the oven. Before correcting, test a recipe by using a temperature setting that is higher or lower than the recommended temperature. The baking results should help you to decide how much of an adjustment is needed.
The oven temperature can be adjusted ±35 °F (±19 °C ).
How to correct the oven temperature
1. Touch Settings, and then 1 on the number pad.
2. Touch Settings to set the temperature higher or lower than the current temperature.
3. Enter the adjustment you want to make using the number pad. (±35)
4. Touch START/SET to save the changes.
NOTE
This adjustment will not affect the broiling or the self-cleaning temperatures. The adjustment will be retained in memory after a power failure.
Temp Unit (Fahrenheit or Celsius temperature selection)
You can program the oven control to display the temperature in Fahrenheit or Celsius. The oven has been preset at the factory to display in Fahrenheit. How to change the display from Fahrenheit to Celsius or Celsius to Fahrenheit
1. Touch Settings, and then 2 on the number pad.
2. Touch 1 (Fahrenheit) or 2 (Celsius) on the number pad.
3. Touch START/SET to save the changes.
Time of Day (12hr/24hr)
The oven control can be programmed to display the time of day in the 12 hour or 24 hour mode.
The oven has been preset at the factory to display in the 12 hour mode.
How to change between the 12 and 24 hour time of day display
1. Touch Settings, and then 3 on the number pad.
2. Touch 1 (12hr) or 2 (24hr) on the number pad.
3. Touch START/SET to save the changes.
12 hour energy saving
If you accidently leave the oven on, this feature will automatically turn off the oven after 12 hours during baking functions or after 3 hours during a broil function.
How to turn the 12 hour energy saving feature on or off
1. Touch Settings, and then 4 on the number pad.
2. Touch 1 (On) or 2 (Off) on the number pad.
3. Touch START/SET to save the changes.
Sound On/Off
Using Sound On/Off, you can set the oven controls to operate silently. How to turn the sound on or off
1. Touch Settings, and then 5 on the number pad.
2. Touch 1 (On) or 2 (Off) on the number pad.
3. Touch START/SET to save the changes.
Demo mode
This option is for use by retail establishments for display purposes only.
(When Demo mode is on, the heating element is disabled and does not operate.)
How to enable or disable the demo mode
1. Touch Settings, and then 0 on the number pad.
2. Touch 1 (On) or 2 (Off) on the number pad.
3. Touch START/SET to save the changes.
Maintaining your appliance
Self-cleaning (Lower oven only)
This self-cleaning oven uses high temperatures (well above cooking temperatures) to burn off leftover grease and residue completely or reduce them to a finely powdered ash that you can wipe away with a damp cloth.
CAUTION
• During the self-cleaning cycle, the outside of the oven will become very hot to the touch. Do not leave small children unattended near the appliance.
• Some birds are extremely sensitive to the fumes given off during the self-cleaning cycle of any oven. Move birds to another well-ventilated room.
• Do not line the oven walls, racks, bottom, or any other part of the oven with aluminum foil. Doing so will result in poor heat distribution, poor baking results, and cause permanent damage to the oven interior. Aluminum foil will melt and adhere to the interior surface of the oven.
• The oven door locks during self-cleaning. Do not force the oven door open.This can damage the automatic door locking system. Use care when opening the oven door after the self-cleaning cycle is complete. Stand to the side of the oven when opening the door to allow hot air or steam to escape. The oven may still be VERY HOT.
Before a self-cleaning cycle
• We recommend venting your kitchen with an open window or using a ventilation fan or hood during the self-cleaning cycle.
• Remove the wire rack, broil pan, broil pan insert, all cookware, and any aluminum foil from the oven.
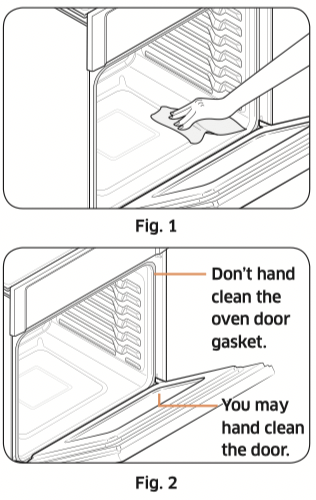
• Wipe up debris from the oven bottom. (Fig. 1)
• The silver-colored oven racks can be self-cleaned, but they will darken, lose their luster, and become hard to slide.
• Residue on the front frame of the oven and outside the gasket on the door will need to be cleaned by hand. Clean these areas with hot water, soap-filled steel-wool pads, or cleansers such as Soft Scrub. Rinse well with clean water and dry.
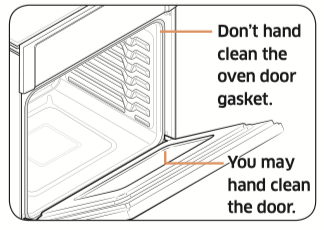
• Do not clean the gasket. The fiberglass material of the oven door gasket cannot withstand abrasion. It is essential for the gasket to remain intact. If you notice it becoming worn or frayed, have it replaced. (Fig. 2)
• Make sure the oven light cover is in place and the oven light is off.
NOTE
Remove oven racks and accessories before starting the self-clean mode.
How to run a self-cleaning cycle
1. Select the length of time for the self-cleaning operation, eg. 3 hours. Touch Self Clean 2/3/5h once for a 3 hour clean time, twice for a 5 hour clean time, or 3 times for a 2 hour clean time. (The default setting is 3 hours.)
2. Touch START/SET to start the self-cleaning cycle. The motor-driven door lock will engage automatically.
IMPORTANT: Both doors lock when you run a self cleaning cycle on either oven.
NOTE
• You will not be able to start a self-cleaning cycle if the Control Lockout feature is activated or if the oven’s temperature is too hot.
• The oven doors lock automatically. The display will show the cleaning time remaining. You cannot to open the oven doors until the temperature drops to a safe/cool temperature.
• The self-clean feature can be used in only one oven at a time. While one oven is in self-cleaning mode, you cannot use the other oven for cooking.
3. When the self-cleaning cycle is done, End will appear in the display and the oven will beep 6 times.
How to delay the start of self-cleaning
1. Touch Self Clean 2/3/5h. Select the desired self-clean time by touching Self Clean 2/3/5h.
2. Touch Delay Start.
3. Enter the time you want the self-clean cycle to start.
4. Touch START/SET. The display will show Delay, Self clean, and the Lock icon. The motor-driven door lock will engage automatically.
5. The Self-Cleaning cycle will turn on automatically at the set time.
How to turn off the self-cleaning feature
If you need to stop or interrupt a self-cleaning cycle:
1. Touch OVEN OFF.
2. You will be able to open the oven door once the oven has cooled down for approximately 1 hour.
After a self-cleaning cycle
• You may notice some white ash in the oven. Wipe it up with a damp cloth after the oven cools. (If white spots remain, remove them with a soap-filled steel wool pad and rinse thoroughly with a vinegar and water mixture.)
• If the oven is not clean after one cycle, repeat the cycle.
• You cannot set the oven for cooking until the oven is cool enough for the door to unlock.
Wall Oven Steam Clean
How to set the oven for steam-cleaning
For light cleaning, the Steam-cleaning function saves time and energy. For heavier duty cleaning, use the self-cleaning function.
1. Remove all accessories from the oven.
2. Pour approximately 10 oz. (300 ml) of water onto the bottom of the empty oven and close the oven door. Use tap water only, not distilled water.
3. Press Steam Clean.
4. Press START/SET. When the operation is complete, the display will blink and a beep will sound.
5. Press OVEN OFF.
6. Clean the oven’s interior. There will be a significant amount of water remaining on the bottom of the oven after a steam-cleaning cycle. Remove the residual water with a sponge or soft dry cloth.
When steam-cleaning, use exactly 10 oz. of water since this produces the best results.
NOTE
If you press Steam Clean when the oven temperature is above 100 °F, Hot will appear in the display. Because these functions produce the best results when started while the oven is cool, we recommend that you wait until the oven has cooled down and Hot disappears from the display.
After a steam-cleaning cycle
• Take care when opening the door after a steam-cleaning procedure has ended. The water on the bottom is hot.
• Open the oven door and remove the remaining water with a sponge. Do not leave the residual water in the oven for any length of time. Wipe the oven clean and dry with a soft cloth. Do not forget to wipe under the oven door seal.
• Use a detergent-soaked sponge, a soft brush, or a nylon scrubber to wipe the oven interior. Remove stubborn residue with a nylon scourer. You can remove lime deposits with a cloth soaked in vinegar.
• If the oven remains dirty, you can repeat the procedure once the oven has cooled.
• For heavy residue, such as grease left over from roasting, we recommend that you rub detergent into the residue before activating the steam-cleaning function.
• After cleaning, leave the oven door ajar at a 15° angle to allow the interior enamel surface to dry thoroughly.
Care and cleaning of the oven
Cleaning painted parts and decorative trim
• For general cleaning, use a cloth with hot, soapy water.
• For more difficult residue and built-up grease, apply a liquid detergent directly onto the area and leave for 30 to 60 minutes. Wipe with a damp cloth and dry. Do not use abrasive cleaners on any oven surface. They can be scratched.
Cleaning stainless steel surfaces
1. Shake a bottle of stainless steel appliance cleaner or polish well.
2. Place a small amount of stainless steel appliance cleaner or polish on a damp cloth or damp paper towel.
3. Clean a small area, rubbing with the grain of the stainless steel if applicable.
4. Dry and buff with a clean, dry paper towel or soft cloth.
5. Repeat as necessary.
NOTE
• Do not use a steel-wool pad. It will scratch the surface.
• If a mineral oil-based stainless steel appliance cleaner has been used before to clean the appliance, wash the surface with dishwashing liquid and water prior to using the stainless steel appliance cleaner or polish.
Oven racks
If the racks are left in the oven during a self-cleaning cycle, their color will turn slightly blue and the finish will be dull. After the self-cleaning cycle is complete and the oven has cooled, rub the sides of the racks with wax paper or a cloth containing a small amount of oil. This will help the racks glide more easily on their tracks.
NOTE
• Do not clean in a dishwasher.
• If the rack becomes hard to remove or replace, lightly wipe the oven rack guides with cooking oil. Do not wipe cooking oil on the slides.
• If the rack becomes difficult to slide, the rack may need to be lubricated using a graphite lubricant.
• To order graphite lubricant., call Samsung Customer Care at 1-800-SAMSUNG (726-7864) or visit our homepage (samsung/us/support, samsung/ca/support, or samsung/ca_fr/support) and search for part number DG81-01629A.
• If you want to buy it directly, go to samsungparts.
Oven door
• Use soap and water to thoroughly clean the top, sides, and front of the oven door. Rinse well. You may use a glass cleaner on the outside glass of the oven door. DO NOT immerse the door in water. DO NOT spray or allow water or the glass cleaner to enter the door vents. DO NOT use oven cleaners, cleaning powders, or any harsh abrasive cleaning materials on the outside of the oven door.
• DO NOT clean the oven door gasket. The oven door gasket is made of a woven material which is essential for a good seal. Care should be taken not to rub, damage, or remove this gasket.
Removing the oven door (Lower oven only)
CAUTION
• The door is very heavy. Be careful when removing and lifting the door.
• Do not lift the door by the handle. Use two hands to remove an oven door.
WARNING
You can’t remove the upper oven door for safety reasons.
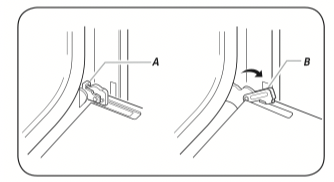
A. Oven door hinge lock in locked position
B. Oven door hinge lock in unlocked position
1. Prior to removing the oven door, prepare a surface where you will place it. This surface should be flat and covered with a soft blanket. You can also use the corner posts from your packaging material.
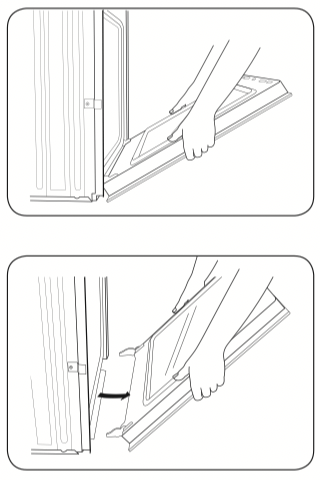
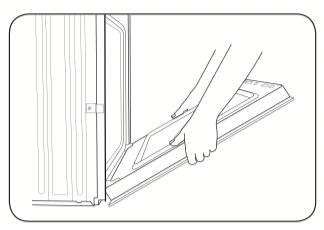
2. Open the oven door.
3. Locate the oven door hinge locks in both corners of the oven door, and then rotate the hinge locks toward the oven door to the unlocked position. If the door hinge lock is not rotated fully (see illustration B on the left for an example of full rotation), you will not be able to remove the door properly.
4. Partially close the door to engage the door latch locks.
5. Using two hands, grasp the edges of the oven door. Lift and pull the oven door toward you and remove. You may need to gently shift the door from side to side as you pull.
6. Set the oven door aside on the prepared covered work surface with the oven door resting on its handle.
Replacing the oven door (Lower oven only)
CAUTION
The door is very heavy. You may need help lifting the door high enough to slide it into the hinge slots. Do not lift the door by the handle.
WARNING
You can’t replace the upper oven door for safety reasons.
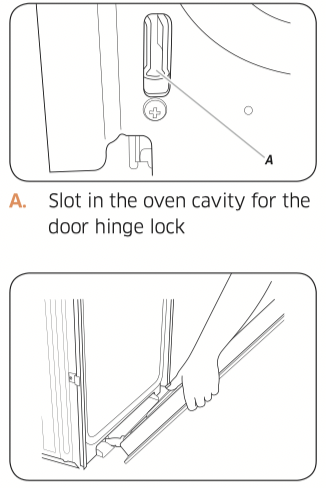
1. Using two hands, grasp the side edges of the door at the midpoint. Face the oven cavity.
2. Locate the slots on each side of the oven cavity for the door hinge locks.
3. Hold the door at a 45° angle, and then align the door hinges with the slots in the lower front of the oven cavity. Slowly insert the door, making sure you maintain the 45° angle. You will know the door is engaged in the slot when you feel a slight drop.
4. Lower the oven door to the fully open position. If the oven door does not open to a full 90°, repeat steps 1 through 3.
5. Locate the oven door hinge locks in the corners of the oven door, and then rotate the hinge locks toward the oven cavity to the locked position. See Step 3 (illustration A) in the “Removing the oven door” section for the proper locked position.
6. Close the oven door.
7. When the hinges are properly installed and the door is closed, there should be an even gap between the door and the control panel. If one side of the oven door is hanging lower than the other, the hinge on that side is not properly installed.
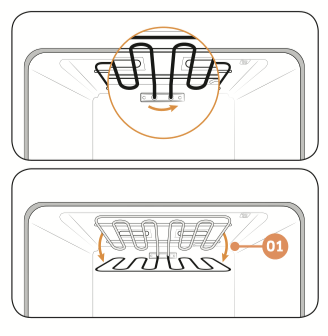
Changing the oven light (Lower oven only)
The oven light is a standard 40-watt appliance halogen bulb. It comes on when the oven door is open. When the oven door is closed, touch to turn the light on or off. It will not work during a self-cleaning.
CAUTION
Before changing the oven light, make sure to wear gloves to protect your hands.
1. To change the halogen bulb, you must tilt the broil heater down. To do this, turn the circular nut on the support counterclockwise while holding the broil heater. The broil heater should loosen and tilt down.
CAUTION
The broil heater is not a removable part. Do not force the broil heater down. Do not let it drop down.
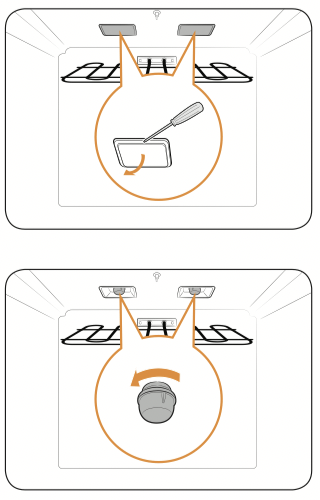
2. While holding the glass cover with one hand, insert a flat-sharp tool such as a table knife between the glass and the frame to remove the glass cover.
3. Turn the bulb cap counterclockwise to remove.
NOTE
If necessary, remove the metal rings and clean the bulb cap.
4. Replace the bulb.
5. Place the bulb cap and glass cover back into their position.
6. Return the broil heater back by following step 1 in reverse order.
CAUTION
Before changing your oven light, disconnect the electrical power to the oven at the main fuse or circuit breaker panel. Make sure the oven and the halogen bulb are cool.
Troubleshooting
Samsung works hard to ensure that you don’t have problems with your new electric oven. If you run into unexpected trouble, look first for a solution in the tables starting below. If you’re still having trouble after trying the suggested solution, call Samsung at 1-800-SAMSUNG (726-7864).
Control Display
Symptom
Possible cause
Solution
The display goes blank.
A fuse in your home may be blown or the circuit breaker tripped.
Replace the fuse or reset the circuit breaker.
The buttons cannot be pressed properly.
• There is foreign matter caught between the buttons
• Touch model: There is moisture on the exterior
• The lock function is set
• Remove the foreign matter and try again.
• Remove the moisture and try again.
• Check whether the lock function is set.
For the Microwave Oven
Symptom
Cause
Action
General
The buttons cannot be pressed properly.
Foreign matter may be caught between the buttons.
Remove the foreign matter and try again.
For touch models: Moisture is on the exterior.
Wipe the moisture from the exterior.
Child lock is activated.
Deactivate Child lock.
The oven does not work.
Power is not supplied.
Make sure power is supplied. Make sure the oven is plugged in. Check if a fuse has been blown or ciruit breaker has been tripped.
The door is open.
Close the door and try again.
The door open safety mechanisms are covered in foreign matter.
Remove the foreign matter and try again.
The oven stops while in operation.
The user has opened the door to turn food over.
After turning over the food, press the Start button again to start operation.
The power turns off during operation.
The oven has been cooking for an extended period of time.
After cooking for an extended period of time, let the oven cool.
The cooling fan is not working.
Listen for the sound of the cooling fan.
Trying to operate the oven without food inside.
Put food in the oven.
There is not sufficient ventilation space for the oven.
There are intake/exhaust outlets on the front and rear of the oven for ventilation.
Keep the gaps specified in the product installation guide.
Several power plugs are being used in the same socket.
Designate only one socket to be used for the oven.
There is a popping sound during operation, and the oven doesn't work.
Cooking sealed food or using a container with a lid may cause popping sounds.
Do not use sealed containers as they may burst during cooking due to expansion of the contents.
The oven exterior is too hot during operation.
There is not sufficient ventilation space for the oven.
There are intake/exhaust outlets on the front and rear of the oven for ventilation. Keep the gaps specified in the product installation guide.
Objects are on top of the oven.
Remove all objects on the top of the oven.
The door cannot be opened properly.
Food residue is stuck between the door and oven interior.
Clean the oven and then open the door.
Heating including the Warm function does not work properly.
The oven may not work, too much food is being cooked, or improper cookware is being used.
Put one cup of water in a microwave-safe container and run the microwave for 1-2 minutes to check whether the water is heated. Reduce the amount of food and start the function again. Use a cooking container with a flat bottom.
The thaw function does not work.
Too much food is being cooked.
Reduce the amount of food and start the function again.
The interior light is dim or does not turn on.
The door has been left open for a long time.
The interior light may automatically turn off when the Eco function operates. Close and reopen the door or press the Cancel button.
The interior light is covered by foreign matter.
Clean the inside of the oven and check again.
A beeping sound occurs during cooking.
If the Auto Cook function is being used, this beeping sound means it's time to turn over the food during thawing.
After turning over the food, press the Start button again to restart operation.
The oven is not level.
The oven is installed on an uneven surface.
Make sure the oven is installed on flat, stable surface.
There are sparks during cooking.
Metal containers are used during the oven/thawing functions.
Do not use metal containers.
When power is connected, the oven immediately starts to work.
The door is not properly closed.
Close the door and check again.
There is electricity coming from the oven.
The power or power socket is not properly grounded.
Make sure the power and power socket are properly grounded.
1. Water drips.
2. Steam is emitted through a door crack.
3. Water remains in the oven.
There may be water or steam in some cases depending on the food. This is not an oven malfunction.
Let the oven cool and then wipe with a dry dish towel.
The brightness inside the oven varies.
Brightness changes depending on power output changes according to function.
Power output changes during cooking are not malfunctions. This is not an oven malfunction.
Cooking is finished, but the cooling fan is still running.
To ventilate the oven, the cooling fan continues to run for about 3 minutes after cooking is complete.
This is not an oven malfunction.
Turntable
While turning, the turntable comes out of place or stops turning.
There is no roller ring, or the roller ring is not properly in place.
Install the roller ring and then try again.
The turn table drags while turning.
The roller ring is not properly in place, there is too much food, or the container is too large and touches the inside of the microwave.
Adjust the amount of food and do not use containers that are too large.
The turn table rattles while turning and is noisy.
Food residue is stuck to the bottom of the oven.
Remove any food residue stuck to the bottom of the oven.
Broiling
Smoke comes out during operation.
During initial operation, smoke may come from the heating elements when you first use the oven.
This is not a malfunction, and if you run the oven 2-3 times, it should stop.
Food is on the heating elements.
Let the oven cool and then remove the food from the heating elements.
Food is too close to the grill.
Put the food a suitable distance away while cooking.
Food is not properly prepared and/or arranged.
Make sure food is properly prepared and arranged.
For the Lower Oven
Symptom
Possible cause
Solution
The oven will not turn on.
The oven is not completely plugged into the electrical outlet.
Make sure the electrical plug is inserted into a live, properly grounded outlet.
A fuse in your home may be blown or a circuit breaker may have tripped.
Replace the fuse or reset the circuit breaker.
The oven controls have been set improperly.
See the chapter on operating the oven starting on page 21.
The oven is too hot.
Allow the oven to cool.
Incomplete service wiring.
Call for service.
Power outage.
Check to see if the house lights will turn on. If necessary, call your local electric company for service.
The oven light will not turn on.
The light is loose or defective.
• Tighten or replace the lamp.
• Call for service if the door light does not turn on.
The switch operating the light is broken.
Call for service.
The oven smokes excessively during broiling.
The oven controls have not been set properly.
Refer to the section on operating the oven starting on page 21.
The meat has been placed too close to the element.
Reposition the rack to provide proper clearance between the meat and the element. Preheat the broil element for searing.
The meat has not been properly prepared.
Remove excess fat from the meat. Cut away fatty edges that may curl, leaving the lean intact.
Grease has built up on oven surfaces.
Regular cleaning is necessary when broiling frequently.
Food does not bake or roast properly.
The oven controls have not been set correctly.
See the chapter on operating the oven starting on page 21.
The oven rack has been positioned incorrectly or is not level.
See the section on Using the oven racks starting on page 34.
Incorrect cookware or cookware of improper size is being used.
The oven temperature needs to be adjusted.
See the Temp Adjust section on page 38.
Food does not broil properly.
The serving size may not be appropriate.
Refer to the Broiling recommendation guide for serving sizes on page 36, and then try again.
The rack has not been properly positioned.
See the Broiling recommendation guide on page 36.
The cookware is not suited for broiling.
Use suitable cookware.
In some areas, the power (voltage) may be low.
• Preheat the broil element for 10 minutes.
• See the Broiling recommendation guide on page 36.
The oven temperature is too hot or too cold.
The oven temperature needs to be adjusted.
See the section on adjusting the temperature on page 38.
There is water dripping.
You may see water or steam in some cases depending on the food you are cooking. This is not a product malfunction.
Let the oven cool and then wipe with a dry dish towel.
There is steam coming through the crack between the oven body and the door.
Water is remaining in the oven.
The oven will not self-clean.
The oven temperature is too high to start a self-clean operation.
Allow the oven to cool and then reset the controls.
The oven controls have been set incorrectly.
See the section on Self- cleaning on page 42.
A self-cleaning cycle cannot be started if the oven lockout feature has been activated.
Deactivate the oven lockout (see page 23).
Excessive smoking during a self-cleaning cycle.
There is excessive soiling in the oven.
Touch OVEN OFF. Open the windows to rid the room of smoke. Wait until the self- cleaning cycle is cancelled. Wipe up the excessive soil and then start the self- cleaning cycle again.
The oven door will not open after a self- cleaning cycle.
The oven is too hot.
Allow the oven to cool.
The oven is not clean after a self-cleaning cycle.
The oven controls were not set correctly.
See the section on Self- cleaning on page 42.
The oven was heavily soiled.
Wipe up heavy spillovers before starting the self- cleaning cycle. Heavily soiled ovens may need to be self- cleaned again or for a longer period of time.
A burning or oily odor is coming from the vent.
This is normal for a new oven and will disappear in time.
• To speed the process, set a self-cleaning cycle for a minimum of 3 hours.
• See the section on Self- cleaning on page 42.
Strong odor.
An odor coming from the insulation around the inside of the oven is normal for the first few times the oven is used.
Operate the oven empty on the bake setting at 400 °F for 1 hour.
The oven racks are difficult to slide.
The shiny, silver-colored racks were cleaned in a self- cleaning cycle.
Apply a small amount of vegetable oil to a paper towel, and then wipe the edges of the oven racks with the paper towel.
The oven door is locked.
The circuit breaker has been tripped or there was a power failure while the oven door was locked.
Activate Control Lockout, and then unlock the control. See the Control Lockout section on page 23.
Information codes
Displayed Code
Possible cause
Solution
C-d0
This code occurs if the control key is short for 1 minute.
Clean the buttons and make sure there is no water on/ around them. Turn off the oven and try again. If the problem continues, contact a local Samsung service center.
C-d1
This code occurs if the door lock is mispositioned.
Touch OVEN OFF, and then restart the oven. If the problem persists, disconnect all power to the oven for at least 30 seconds and then reconnect the power. If this does not solve the problem, call for service.
C-F0
This code occurs if communication between the Main and Sub PBA is interrupted.
C-F2
This code occurs if communication between the Main and Touch is interrupted.
C-10
The cooking sensor is open when the microwave is operating.
The cooking sensor is short when the microwave is operating.
C-20
The oven sensor is open when the oven is operating.
The oven sensor is short when the oven is operating.
C-21.
This code occurs if the internal temperature rises abnormally high.
Touch OVEN OFF, and then restart the oven. If the problem persists, disconnect all power to the oven for at least 30 seconds and then reconnect the power. If this does not solve the problem, call for service.
C-30
The PCB sensor is open when the oven is operating.
The PCB sensor is short when the oven is operating.
C-31
This code occurs if the PCB temperature rises abnormally high.
Call for service
C-A2
The cooling motor is operating abnormally.
Call for service.
bAd LinE
This code occurs if the power connection is plugged in improperly.
Reconnect the power connection properly, and the message disappears.
 When Timed Cooking is done, the oven will beep.


 to turn the light on or off. It will not work during a self-cleaning.