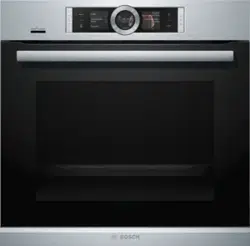
In the control panel, you can use the various buttons, touch fields, touch-screen displays and the rotary selector to set the different appliance functions. The current settings are shown on the display.
The overview shows the control panel when the appliance is switched on with the menu display
1. Buttons
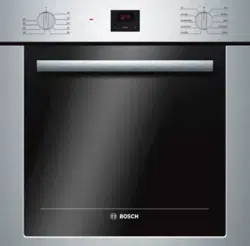
The buttons on the left- and right-hand side of the control panel have a pressure point. Press these buttons to activate them.
For appliances that do not have a stainless steel front, these two button touch fields do not have a pressure point.
2. Touch fields
There are sensors under the touch fields. Simply touch the respective symbol to select the function.
3. Rotary selector
The rotary selector is fitted so that you can turn it indefinitely to the left or right. Press it lightly and move it in the direction required using your finger.
4. Display
You can see the current adjustment values, options or notes in the display
5. Touch-screen displays
You can see the current selection options in the touch-screen displays. You can select these here directly by touching the appropriate text field. The text fields change depending on the selection.
Operating controls
The individual controls are adapted for the various functions of your appliance. You can set your appliance simply and directly
Buttons and touch fields
Here you can find a short explanation of the various buttons and touch fields.
Symbol
Meaning
Buttons
on/off
Switching the appliance on and off
start/stop
Starting, pausing or cancelling (hold down for approx. 3 secs) an operation
Touch fields
menu
Menu
Opens the "Operating modes" menu
Timer
Selects the timer
Information
Displays information
Child lock
Activating and deactivating (hold down for approx. 4 secs) the childproof lock
Rotary selector
You can use the rotary selector to change the setting values shown on the display.
You can also use the rotary selector to scroll through the selection lists on the touch-screen displays.
In most selection lists, you have to turn the rotary selector in the opposite direction once you reach the beginning or the end of the list.
Display
The display is structured so that the information can be read at a glance in any situation.
The value that you can currently set is highlighted in white text in the display. The value in the background is displayed in gray text.
Focus
The highlighted value can be changed immediately without first being selected.
After starting an operation, either the temperature or level remains highlighted. The white line also serves as the heating line and gradually turns red.
Enlargement
As long as you use the rotary selector to change the highlighted value, only this value will be displayed larger.
Display ring
The display ring can be found around the outside of the display.
If you change a value, the display ring shows you where you are in the selection list. Depending on the settings area and length of the selection list, the display ring may be continuous or divided into segments. During operation, the display ring turns red at second-long intervals. After every full minute, the segments turn red again from the beginning. As the cooking time counts down, one segment disappears every second.
Temperature display
After the operation has started, the current cooking compartment temperature is displayed graphically on the display
Heating line
The white line under the temperature turns red from left to right as the cooking compartment heats up. When you are preheating the appliance, the optimal time to place the food in the cooking compartment is when the line has completely turned red, and a beep indicates that preheating is complete.
For set levels, e.g. the broil setting, the heating line turns red immediately.
Residual heat indicator
When the appliance is switched off, the display ring shows the residual heat in the cooking compartment. As the residual heat cools down, the display ring becomes darker and disappears completely at some point.
Touch-screen displays
The touch-screen displays are both a display medium and control element at the same time. They show the options that you can select for a function and the current setting. To select a function, simply touch the text field directly.
The function currently selected is identified by a red vertical bar next to it. Its corresponding value is highlighted in white on the display.
The small red arrow next to the text field shows the functions to which you can scroll forwards or backward
Operating modes
Your appliance has various operating modes that make your appliance easier to use.
You can find more precise descriptions of these in the corresponding sections.
You can open the "Operating modes" menu by pressing the menu field.
Operating mode
Use
Heating modes → "Operation" on page 15
There are various finely tuned heating types for the optimal preparation of your food.
Assist → "Dishes" on page 35
For many dishes, there are preprogrammed setting values
EcoClean → "Cleaning function" on page 26
The cleaning function cleans the cooking compartment almost by itself.
Home Connect Assistant → "Home Connect" on page 21
This function allows you to connect your oven with a mobile device.
Basic settings →"Basic Settings" on page 18
You can change your appliance's basic settings to suit your needs.
Heating modes
To enable you to find the correct type of heating for your dish, we have explained the differences and scopes of application here.
The symbols for each type of heating help you to remember them.
When cooking at very high temperatures, the appliance lowers the temperature slightly after an extended period.
Default values
For each type of heating, the appliance specifies a default temperature or level. You can accept this value or change it in the appropriate area.
Further information
In most cases, the appliance provides notes and further information on the action just carried out. Touch the ° field. The note is shown in the display for a few seconds. Use the rotary selector to scroll to the end of longer notes. Some notes are displayed automatically, for example as confirmation, or to provide an instruction or warning.
Cooking compartment functions
The functions in the cooking compartment make your appliance easier to use. These functions include, for example, that the cooking compartment is well lit and that a cooling fan prevents the appliance from overheating.
Opening the appliance door
If you open the appliance door during an operation, the operation is paused. The operation continues to run when you close the door.
Interior lighting
When you open the appliance door, the interior lighting switches on. If the door remains open for longer than 15 minutes, the lighting switches off again. For most operating modes, the interior lighting switches on as soon as the operation is started. When the operation has finished, the lighting switches off.
Note: You can set the interior lighting not to come on during the operation in the basic settings. → "Basic Settings" on page 18
Cooling fan
The cooling fan switches on and off as required. The hot air escapes above the door.
Accessories
Your appliance is accompanied with a variety of accessories. Here, you can find an overview of the accessories included and information on how to use them correctly
Accessories Included
Your appliance is equipped with the following accessories:
Wire rack (3x) For ovenware, cake tins and ovenproof dishes, roasts, grilled items and frozen meals.
Only use original accessories. They are specially designed for your appliance. You can buy accessories from customer service or online.
Inserting accessories
The cooking compartment has five rack positions. The rack positions are counted from the bottom up. In some appliances, the highest rack position is marked on the cooking compartment with the grill symbol.
Always insert the accessory between the two guide rods for a rack position. The accessories can be pulled out approximately halfway without tipping.
Locking function
The accessories can be pulled out approximately halfway until they lock in place. The locking function prevents the accessories from tilting when they are pulled out. The accessories must be inserted into the oven cavity correctly for the tilt protection to work properly. When inserting the wire rack, ensure that the locking catch a is at the rear and is facing downwards. The open side must be facing towards the appliance door and the curvature must be facing downwards .
Special accessories
You can buy optional accessories from customer service or online. *You will find a list of products for your appliance in our brochures and online.
Availability of products differ by country and whether available for order online. Please see your sales brochures for more details.
Broiling Pan (available via eShop)
Pan: #00449757
Grill(top): #00449756
Before using the appliance for the first time
Initial use
After connecting the appliance to the power or following a power failure, the settings for initial use are shown in the display. It may take a few seconds for the instruction to appear.
Note: You can change these settings again at any time in the basic settings. → "Basic Settings" on page 18
With HomeConnect
You can apply the initial settings on the appliance or with Home Connect on your mobile device.
1. Touch the "With Home Connect" text field.
2. Follow the instructions in the "Home Connect" section.
On the appliance
Make the following initial settings on your appliance:
Setting the language
The language is the first setting displayed. "English" is the preset language.
1. Turn the rotary selector to set the required language.
2. Touch the next text field to confirm. The next setting appears.
Setting the time
The time starts at "12:00."
1. Touch the "Clock" text field.
2. Set the time using the rotary selector.
3. Touch the "Finish settings" text field to confirm.
A note appears in the display confirming that the initial use has been completed.
Cleaning the cooking compartment and accessories
Before using the appliance to prepare food for the first time, you must clean the cooking compartment and accessories.
Cleaning the cooking compartment
To eliminate the new-appliance smell, heat up the cooking compartment when it is empty and with the oven door closed.
Make sure that there is no leftover packaging, such as polystyrene pellets, in the cooking compartment. Before heating the appliance, wipe the smooth surfaces in the cooking compartment with a soft, damp cloth. Keep the kitchen ventilated while the appliance is heating. Apply the settings indicated below. You can find out how to set the heating function and the temperature in the next section. → "Operation" on page 15
Settings
Heating mode
Convection Multi-Rack
Temperature
maximum
Cooking time
1 hour
Switch off the appliance after the indicated cooking time using the On/Off button.
Once the cooking compartment has cooled down, clean the smooth surfaces with soapy water and a dishcloth.
Cleaning the accessories
Clean the accessories thoroughly using soapy water and a dish cloth or soft brush.
Operation
Switching the appliance on and off
Before you are able to set the appliance, you must switch it on.
Note: The childproof lock and the timer can also be set when the appliance is switched off. Certain displays and notes, such as those relating to the residual heat in the cooking compartment, remain visible on the display after the appliance has been switched off. Switch off your appliance when you do not need to use it. If no settings are applied for a long time, the appliance switches itself off automatically
Switching on the appliance
Press the On/Off button to switch on the appliance. The Bosch logo appears on the display, followed by the selection list for the heating modes.
Switching off the appliance
Press the On/Off button to switch off the appliance. Any functions that may be running are canceled. The time, or if applicable, the residual heat indicator, appears on the display.
Starting the operation
You must press the Start/Stop button to start each operation.
After starting the appliance, the time display is shown on the display along with the settings. The display ring and the heating line also appear.
Pausing the operation
You can also interrupt and then continue an operation using the Start/Stop button.
If you press and hold the Start/Stop button for approx. 3 seconds, the operation is canceled and all settings are reset.
Setting an operating mode
Once the appliance is switched on, the default operating mode is displayed.
If you would like to select a different operating mode, you can do so using the menu. You can find detailed descriptions of the individual operating modes in the corresponding sections.
The following always applies:
1. Touch the appropriate text field. The function is highlighted.
2. Turn the rotary selector to change the highlighted selection.
3. If necessary, apply other settings. To do this, touch the appropriate text field and change the value using the rotary selector.
4. Press the Start/Stop button to start.
The appliance starts the operation.
Setting the heating mode and temperature
If the "Heating modes" operating mode has not been selected, touch the "Heating modes" text field in the menu. The selection list for the heating modes appears on the touch-screen displays.
Example in the picture: Bake at 350° F (195 °C).
1. Touch the text field with the required heating mode. If necessary, scroll through the selection list using the rotary selector.
The temperature is highlighted white.
2. Turn the rotary selector to set the temperature
3. Press the Start/Stop button to start.
The time in the display shows how long the operation has already been running.
The appliance begins to heat up.
When your dish is ready, use the ÿ On/Off button to switch off the appliance.
Changing
After starting the appliance, the temperature remains highlighted. When you move the rotary selector, the temperature is changed and applied immediately. To change the type of heating, first use the l Start/Stop button to interrupt the operation and then touch the "Type of heating" text field. The selection list is displayed. Touch the required type of heating. The corresponding default temperature appears on the display.
Fast preheat
With Fast preheat, you can shorten the heat-up time for some heating types.
The heating types suitable for Fast preheat are:
Convection Multi-Rack
Bake
To achieve an even cooking result, do not place your food or accessories into the cooking compartment until "Fast preheat" is complete.
Setting
Ensure you have selected a suitable type of heating and set a temperature of at least 200° F (95 °C). Otherwise, rapid heating cannot be activated.
1. Set the type of heating and temperature.
2. Touch the "Rapid heating" text field. "On" is displayed in the text field. A confirmation message appears on the display.
When rapid heating comes to an end, an audible signal sounds and a message appears on the display. "Off" is displayed in the text field.Place your food in the cooking compartment.
Canceling
To cancel the fast preheat, touch the "Fast preheat" text field again. "Off" is displayed in the text field.
Time-setting options
Your appliance has different time-setting options.
Time-setting option
Use
Cooking time
Once the set cooking time has elapsed, the appliance will automatically stop heating.
End
Enter a cooking time and the required end time. The appliance will start up automatically so that it finishes cooking at the required time.
Timer
The timer functions like an egg timer. It runs independently of the operation and the other time-setting options. After the set time has elapsed, the appliance does not switch on or off automatically
You can call up the cooking time and the end time after setting an operation using the touch-screen displays. The timer has a separate field and can be adjusted at any time.
An audible signal will sound once the cooking time or timer duration has elapsed. You can cancel the audible signal early by touching a field or touch-screen display.
Setting the cooking time
You can set the cooking time for your food on the appliance. This prevents the food from accidentally being cooked for too long, and means that you do not have to stop what you are doing to switch off the oven.
Setting
Depending on which direction you turn the rotary selector first, the cooking time starts at a particular default value: Left = 10 minutes, right = 30 minutes. The cooking time can be set in one-minute increments up to one hour, and then in five-minute increments. The maximum time that can be set is 23 hours and 59 minutes.
Example in the picture: It is 10:00, cooking time of 45 minutes.
1. Set the operating mode and temperature or level.
2. Before starting the operation, touch the "Cooking time" text field.
The cooking time is highlighted in white in the display
3. Turn the rotary selector to set the cooking time. The end time is calculated automatically.
4. Press the Start/Stop button to start. The cooking time counts down.
The appliance begins to heat up.
Once the cooking time has elapsed, an audible signal sounds. The appliance stops heating up. The cooking time 00 m 00 s is shown in the display.
You can reset the cooking time using the "Cooking time" text field or you can press the Start/Stop button to continue the operation without a cooking time.
When your dish is ready, use the On/Off button to switch off the appliance.
Changing and canceling
To change the cooking time, touch the "Cooking time" text field. The cooking time is highlighted, and can be changed using the rotary selector. The change is applied immediately.
If you want to cancel the cooking time, reset the cooking time to zero. After the change has been adopted, operating continues without a cooking time.
Setting the end time
You can delay the time at which cooking is due to finish. You can, for example, put your food in the cooking compartment in the morning and set the cooking time so that it is ready at lunchtime.
Setting
The end of the cooking time can be delayed by up to 23 hours and 59 minutes.
Example in the picture: It is 10:00, the set cooking time is 45 minutes and the dish should be ready at 12:00.
1. Set the operating mode and temperature or level.
2. Set the cooking time.
3. Before starting the operation, touch the "End" text field. The projected end time is highlighted white in the display.
4. Turn the rotary selector to set a later end time.
5. Press the Start/Stop button to start. The time at which the appliance will start is shown in the display
The appliance is in standby mode. When the appliance starts, the cooking time counts down in the display. Once the cooking time has elapsed, an audible signal sounds. The appliance stops heating up. The cooking time 00 m 00 s is shown in the display.
You can reset the cooking time using the "Cooking time" text field or you can press the Start/Stop button to continue the operation without a cooking time.
When your dish is ready, use the On/Off button to switch off the appliance.
Changing and canceling
After starting the appliance, the end time can no longer be changed.
If you want to cancel the cooking time and end time, interrupt the operation by pressing the Start/Stop button. You can continue the operation without a cooking time or end time.
Setting the timer
The timer runs alongside other settings. You can set it at any time, even if the appliance has been switched off. It has its own audible signal so that you can tell whether it is the timer duration or a cooking time that has elapsed.
Setting
The timer duration always starts at zero minutes. The higher the value, the greater the time steps when setting the timer.
The maximum setting is 24 hours.
1. Touch the field. The symbol lights up red. On the display, the timer duration is shown in white and in focus.
2. Set the timer duration using the rotary selector.
3. Press the field to start.
The timer duration counts down.
The timer remains visible in the display if the appliance is switched off. When an operation is running, the settings for this operation are shown in the foreground. When you touch the field, the timer duration is displayed for a few seconds.
When the timer duration comes to an end, an audible signal sounds and a note appears on the display. The symbol is no longer lit up.
Tip: If the set timer duration is the duration for which you wish to cook your food, use the cooking time. The time is visible in the foreground and the appliance switches off automatically.
Changing and canceling
To change the timer duration, touch the field. The timer duration is displayed in white and in focus, and can be changed by using the rotary selector.
If you want to cancel the timer, reset the duration on the timer to zero. Once the change has been applied, the symbol is no longer lit up.
Child lock
Your appliance is equipped with a childproof lock so that children cannot switch it on accidentally or change any settings.
The control panel is locked and no settings can be made. The appliance can only be switched off using the On/Off button.
Activating and deactivating
You can activate and deactivate the childproof lock when the appliance is switched on or off. In each case, press the field for approx. 4 seconds. A confirmation note appears on the display.
The field lights up red when the appliance is switched on. The field does not light up when the appliance is switched off.
Basic Settings
Changing the basic settings
The appliance must be switched on.
1. Touch the menu field. The list of operating modes is displayed.
2. Touch the "Basic settings" text field. The settings appear on the touch-screen displays.
3. Touch the text field with the required setting. The red bar next to the text field identifies the setting that is currently selected. Its corresponding value is shown on the display.
4. Turn the rotary selector to change the value as required.
5. Touch the text field for the next setting. Its value is shown on the display and can be changed using the rotary selector.
6. Work through the settings and use the rotary selector to make changes as required. To scroll through the settings, touch the "Further settings" text field.
7. Touch the menu field to confirm. A query is displayed asking whether the changes should be saved.
8. Touch the "Save" text field. A message is shown on the display to confirm that the settings have been saved.
Canceling
If you do not want to save the settings, touch the menu field and then touch the "Do not save" text field. A message is shown on the display to confirm that the settings have not been saved. Switch off the appliance using the On/Off button if you do not need to use it.
List of basic settings
Depending on the features of your appliance, not all basic settings will be available.
Setting
Options
Language
Additional languages are available
Time
Clock in 12-hour format
Home Connect
Switches Wi-Fi on or off
Factory settings
Reset
Do not restore*
Beeping sound
Short cooking time (30 sec.)
Medium cooking time (1 min)*
Long cooking time ( 5 min.)
Volume
Scale with 5 levels
Button tone
Switched on
Switched off* (tone remains for On/Off)
Display brightness
Five levels
Clock display
Off
Digital*
Analog
Lighting
Off when in operation
On during operation*
Operation after switch-on
Main menu
Heating modes*
Assist
Night-time dimming
Switched off*
Switched on
Brand logo
Display*
Do not display
Fan run-on time
Recommended*
Minimum
Pull-out system
Not retrofitted* (for rails and single pull-out system)
Retrofitted (for double and triple pull-out systems)
Sabbath mode
Switched on
Switched off*
* Factory setting (factory settings may vary depending on the appliance model)
Power failure
The changes you make to the settings are retained even after a power failure. You only have to reset the settings for the initial use following a long-term power failure. The appliance can bridge a short-term power failure.
Changing the time
If you want to change the time, for example from summer to winter time, you must change the basic setting. The appliance must be switched on.
1. Touch the menu field. The list of operating modes is displayed.
2. Touch the "Basic settings" text field. The settings appear on the touch-screen displays.
3. Touch the "Clock" text field. The time appears on the display.
4. Turn the rotary selector to change the time.
5. Touch the menu field to confirm. A query is displayed asking whether the changes should be saved.
6. Touch the "Save" text field. A message is shown on the display to confirm that the settings have been saved
Cleaning and maintenance
Suitable cleaning agents
To ensure that the different surfaces are not damaged by using the wrong cleaning agent, follow the information in the following table. Depending on the appliance model, not all of the areas listed may be on/in your appliance.
CAUTION :
SURFACE DAMAGE! Do not use any
Harsh or abrasive cleaning agents,
Cleaning agents with a high alcohol content,
Hard scouring pads or cleaning sponges,
High-pressure cleaners or steam cleaners,
Special cleaners for cleaning the appliance while it is hot.
Tip: Recommended cleaning and care products can be purchased through customer service. Observe the respective manufacturer's instructions.
Area
Cleaning
Appliance exterior
Stainless steel front
Hot soapy water:
Clean with a dishcloth and then dry with a soft cloth.
Remove flecks of lime scale, grease, starch and albumin (e.g. egg white) immediately. Corrosion can form under such flecks.
Special stainless steel cleaning products suitable for hot surfaces are available for purchase from customer service or from specialist retailers. Apply a very thin layer of the cleaning product with a soft cloth.
Plastic
Hot soapy water:
Clean with a dishcloth and then dry with a soft cloth.
Do not use glass cleaner or a glass scraper.
Painted surfaces
Hot soapy water:
Clean with a dishcloth and then dry with a soft cloth.
Control panel
Hot soapy water:
Clean with a dishcloth and then dry with a soft cloth.
Do not use glass cleaner or a glass scraper.
Door panels
Hot soapy water:
Clean with a dishcloth and then dry with a soft cloth.
Do not use a glass scraper or a stainless steel scouring pad.
Door handle
Hot soapy water:
Clean with a dishcloth and then dry with a soft cloth.
If descaler comes into contact with the door handle, wipe it off immediately.
Otherwise, any stains will not be able to be removed.
Appliance interior
Enamel surfaces and self-cleaning surfaces
Observe the instructions for the surfaces of the cooking compartment that follow the table.
Glass cover for the interior lighting
Hot soapy water:
Clean with a dishcloth and then dry with a soft cloth.
If the cooking compartment is heavily soiled, use oven cleaner.
Door seal
Do not remove
Hot soapy water: Clean with a dish cloth.
Do not scour
Stainless steel door cover
Stainless steel cleaner:
Observe the manufacturer's instructions.
Do not use stainless steel care products.
Remove the door cover for cleaning.
Rails
Hot soapy water:
Soak and clean with a dish cloth or brush.
Accessories
Hot soapy water:
Soak and clean with a dish cloth or brush.
If there are heavy deposits of dirt, use a stainless steel scouring pad.
Surfaces in the cooking compartment
The slightly textured surface of the back wall, ceiling and sides in the cooking compartment are self-cleaning. The cooking compartment floor is enameled and has a smooth surface.
Cleaning Enamel Surfaces
Clean the smooth enamel surfaces with a dish cloth and hot soapy water or a vinegar solution. Dry with a soft cloth.
Soften baked-on food residues with a damp cloth and soapy water. If there are heavy deposits of dirt, use a stainless steel scouring pad or oven cleaner.
Cleaning self-cleaning surfaces
The self-cleaning surfaces are coated with a porous, matte ceramic layer. This coating absorbs and dispels splashes from baking and roasting while the appliance is in operation.
If the self-cleaning surfaces no longer clean themselves sufficiently and dark stains appear, they can be cleaned using the cleaning function. To do this, refer to the information in the relevant section. ~ "Cleaning function" on page 26
Keeping the appliance clean
Always keep the appliance clean and remove dirt immediately so that stubborn deposits of dirt do not build up.
Tips : Clean the cooking compartment after each use. This will ensure that dirt cannot be baked on.
Always remove flecks of limescale, grease, starch and albumin (e.g. egg white) immediately.
Use suitable ovenware for roasting, e.g. a roasting dish
Cleaning function
The self-cleaning surfaces in the cooking compartment are cleaned with the "EcoClean" cleaning function. The self-cleaning surfaces (back panel, ceiling panel and side panels) are coated with a porous, matt ceramic material. This coating absorbs and breaks down splashes from baking, roasting and grilling while the oven is in operation. If the surfaces no longer clean themselves adequately and dark patches appear, the surfaces can be cleaned by the cleaning function.
Before running the cleaning function
Remove racks, rails, accessories and ovenware from the cooking compartment.
Cleaning the cooking compartment floor and the inside of the appliance door
Remove the worst dirt from the cooking compartment floor, the inside of the appliance door and the interior lighting. Otherwise, patches will appear that cannot be removed
Setting the cleaning function
Before setting the cleaning function, ensure that you have followed all instructions for preparation. The duration of the cleaning function is preset to 1 hour. It cannot be changed.
1. Touch the menu field. The list of operating modes is displayed.
2. Touch the "EcoClean" text field.
3. Press the Start/Stop button l to start. The cooking time will count down on the display. The heating line does not appear for the cleaning function.
The cleaning function starts. Ventilate the kitchen when the cleaning function is running.
When the cleaning function has ended, an audible signal sounds. The cooking time 00 m 00 s is shown in the display. Press the On/Off button to switch off the appliance.
Setting a later end time
You can set a later end time. Before starting the appliance, touch the "End" text field and set a later end time using the rotary selector. The appliance switches to standby after it is started. The end time can no longer be changed.
Canceling
If you would like to cancel the cleaning function, switch the appliance off using the ÿ On/Off button. You can no longer pause the operation using the l Start/Stop button.
Once the cleaning function has ended
Once the cooking compartment has cooled down, wipe down the cooking compartment with a damp cloth if necessary.
Rails
With good care and cleaning, your appliance will retain its appearance and remain fully functioning for a long time to come. This will tell you how to remove the shelves and clean them.
Detaching and refitting the rails
RISK OF BURNS
The rails become very hot. Never touch the hot rails. Always allow the appliance to cool down. Keep children away from the appliance.
Detaching the rails
1. Lift the rail slightly at the front a and detach it b (figure 1).
2. Then pull the whole rail to the front and remove it (figure 2).
Clean the rails with cleaning agent and a sponge. For stubborn dirt deposits, use a brush.
Attaching the rails
The rails only fit on the right or the left side. For both rails, ensure that the curved rods are at the front.
1. First, insert the rail in the middle into the rear socket a , until the rail rests against the cooking compartment wall, and push it back slightly b (figure 1).
2. Then insert the rail into the front socket c until the rail also rests against the cooking compartment wall here and press it downwards d (figure 2).
Appliance door
With good care and cleaning, your appliance will retain its appearance and remain fully functioning for a long time to come. This will tell you how to remove the appliance door and clean it.
WHEN REMOVING THE OVEN DOOR:
Make sure oven is cool and power to the oven has been turned off before removing the door. Failure to do so could result in electrical shock or burns.
The oven door is heavy and parts of it are fragile. Use both hands to remove the oven door. The door front includes glass components. Handle carefully to avoid breakage.
Grasp only the sides of the oven door. Do not grasp the handle as it may swing in your hand and cause damage or injury.
Failure to grasp the oven door firmly and properly could result in personal injury or product damage.
To avoid injury from hinge bracket snapping closed, be sure that both locking levers are securely in place before removing the door. Also, do not force the oven door open or closed - the hinge could be damaged and injury could result.
Do not lay the removed door on sharp or pointed objects as this could break the glass. Lay the door on a flat, smooth surface, positioned so that the door cannot fall over
Removing and fitting the appliance door
To clean and remove the door panels, you can detach the appliance door.
The oven door hinges each have a locking lever. When the locking levers are closed (figure A 1), the oven door is secured in place. It cannot be detached. When the locking levers are open in order to detach the oven door (figure 2), the hinges are locked. They cannot snap shut.
RISK OF INJURY
Whenever the hinges are not locked, they can snap shut with great force. Ensure that the locking levers are always fully closed or, when detaching the appliance door, fully open.
The hinges on the appliance door move when opening and closing the door, and you may be pinched. Keep your hands away from the hinges.
Removing the appliance door
1. Open the appliance door fully and push it in the direction of the appliance.
2. Open the two locking levers on the left and right (figure 1).
3. Close the appliance door as far as it goes a. With both hands, grip the door on the left- and right-hand side b and pull it up and out (figure 2).
Refitting the appliance door
Follow the instructions in the reverse order to refit the appliance door.
1. When fitting the appliance door, ensure that both hinges are inserted straight into the opening (figure 1).
Place both hinges at the bottom on the outer panel and use this as a guide.
Ensure that the hinges are inserted into the correct opening. You must be able to insert them easily and without resistance. If you can feel any resistance, check that the hinges are inserted into the correct opening.
2. Open the appliance door fully.Close the two locking levers (figure 2).
3. Close the cooking compartment door
Removing the door cover
The stainless steel insert in the door cover can discolor. To carry out thorough cleaning, you can remove the cover.
1. Open the appliance door a little.
2. Press on the left and right of the cover (figure 1).
3. Remove the cover (figure 2). Close the appliance door carefully
4. Open the appliance door a little again. Put the cover back in place and press on it until it clicks audibly into place (figure 3).
5. Close the appliance door
Removing and installing the door panels
For better cleaning, you can remove the glass panels from the appliance door.
Removing door panels from the appliance
1. Open the appliance door a little.
2. Press on the left and right of the cover (figure 1).
3. Remove the cover (figure 2).
4. Undo and remove the screws on the left and right of the appliance door (fig. 3).
5. Fold a dish towel several times and place it between the appliance and the door before shutting the door on the dish towel (figure 4).
Pull out the front panel upwards and lay it on a flat surface with the door handle facing downwards.
Clean the panels with glass cleaner and a soft cloth
RISK OF INJURY
Scratched glass in the appliance door can burst. Do not use any glass scrapers or strong or abrasive cleaning agents.
The hinges on the appliance door move when opening and closing the door, and you may be pinched. Keep your hands away from the hinges
Refitting door panels on the appliance
1. Insert the front panel downwards into the retainers (figure 1).
2. Close the front panel until the two upper hooks are opposite the opening (figure 2).
Troubleshooting
Eliminating faults yourself
You can often easily eliminate technical faults on the appliance yourself.
If a dish does not turn out exactly as you wanted, you can find many tips and instructions for preparation at the end of the operating manual. → "Tested for You in Our Cooking Studio" on page 3
Fault
Possible cause
Notes/remedy
The appliance does not work
Faulty fuse.
Check the circuit breaker in the fuse box.
Power failure
Check whether the kitchen light or other kitchen appliances are working.
“Language English” appears on the display
Power failure
Reset the language and the time.
The time does not appear when the appliance is switched off.
Basic setting is changed.
Change the basic setting for the clock display
The appliance does not heat up; the symbol lights up on the display
Demo mode is activated in the basic settings.
Briefly disconnect the appliance from the mains (switch off the circuit breaker in the fuse box) and then deactivate demo mode in the basic settings within 3 minutes.
The appliance will not start and "Cooking compartment too hot" appears on the display
The cooking compartment is too hot for the selected dish or type of heating
Allow the cooking compartment to cool down and start again
The rotary selector has fallen out of the support in the control panel.
The rotary selector has been accidentally disengaged.
The rotary selector can be removed. Simply place the rotary selector back in its support in the control panel and push it in so that it engages and can be turned as usual.
The rotary selector can no longer be turned easily
There is dirt under the rotary selector.
The rotary selector can be removed. To disengage the rotary selector, simply remove it from the support. Alternatively, press on the outer edge of the rotary selector so that it tips and can be picked up easily.
Carefully clean the rotary selector and its support on the appliance using a cloth and soapy water. Dry with a soft cloth. Do not use any sharp or abrasive materials. Do not soak or clean in the dishwasher.
Do not remove the rotary selector too often so that the support remains stable.
HomeConnect does not work correctly.
Go to the page
Error messages on the display
When an error message appears on the display with "D" or "E", e.g. D0111 or E0111, switch the appliance off and on again using the On/Off button.
If it was a one-time error, the display goes out. If the error message appears again, call customer service and quote the exact error message.
Maximum operating time
If you do not change the settings on your appliance for several hours, the appliance stops heating up automatically. This prevents unwanted continuous operation.
The respective settings for the operating mode govern when the maximum operating time is reached.
Maximum operating time reached
A note appears on the display confirming that the maximum operating time has been reached. To continue operation, touch any field or turn the rotary selector.
Switch the appliance off using the ÿ On/Off button if you do not need to use it.
Tip: Set a cooking time so that the appliance does not switch off when you do not want it to, e.g. with an extremely long preparation time. The appliance heats up until the set cooking time has elapsed.
Replacing the cooking compartment bulb on the ceiling
If the cooking compartment light bulb burns out, it must be replaced. Heat-resistant, 40 watt, 230 V halogen bulbs are available from customer service or specialist retailers.
When handling the halogen bulb, use a dry cloth. This will increase the service life of the bulb. Only use these bulbs.
1. Place a dish towel in the cold cooking compartment to prevent damage.
2. Turn the glass cover counter-clockwise to remove it (figure 1).
3. Pull out the bulb – do not turn it (figure 2). Insert the new bulb, making sure that the pins are in the correct position. Push the bulb in firmly.
4. Screw the glass cover back on. Depending on the appliance model, the glass cover may have a sealing ring. If the glass cover has a sealing ring, put it back in place before screwing the cover back on.
5. Remove the dish towel and switch on the circuit breaker.
Glass cover
If the glass cover of the halogen bulb is damaged, it must be replaced. You can obtain a new glass cover from customer service. Please specify the E number and FD number of your appliance.


 .
.


 On/Off button.
  On/Off button to switch on the appliance. The Bosch logo appears on the display, followed by the selection list for the heating modes.
 Start/Stop button to start each operation.
 at 350° F (195 °C).


 Convection Multi-Rack
 Bake
Bake


 and can be adjusted at any time.


 to start. The time at which the appliance will start is shown in the display
 On/Off button to switch off the appliance.
 field. The symbol lights up red. On the display, the timer duration is shown in white and in focus.
 field for approx. 4 seconds. A confirmation note appears on the display.
 On/Off button to switch off the appliance.


 symbol lights up on the display
 On/Off button.