Use and Care Manual
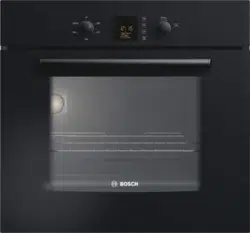
Built-in oven
HBE5451UC

2
Table of Contents
Use and care manual
9 Safety Definitions ..................................................... 3
IMPORTANT SAFETY INSTRUCTIONS ........................ 4
Proper Installation and Maintenance ................................ 4
Fire Safety .............................................................................. 4
Burn Prevention .................................................................... 5
Child Safety ........................................................................... 5
Cleaning Safety ..................................................................... 5
Cookware Safety .................................................................. 5
Proposition 65Warning: ..................................................... 5
Causes of Damage ........................................................ 6
Protecting the environment .......................................... 6
Tips for saving energy ......................................................... 6
Your new appliance ....................................................... 7
Oven ....................................................................................... 7
Function selector .................................................................. 7
Temperature selector .......................................................... 8
Timer ....................................................................................... 8
Accessories ........................................................................... 9
Before using the oven for the first time .................... 10
Setting the time .................................................................. 10
Baking out the oven .......................................................... 10
Cleaning the accessories ................................................ 10
Operation ...................................................................... 10
Switching on the oven ...................................................... 10
Kitchen timer ...................................................................... 10
Setting the automatic timer ............................................. 11
Basic Settings .................................................................... 11
Cleaning and maintenance ......................................... 12
Cleaning agents ................................................................. 12
Catalytic cooking compartment panels ........................ 13
Removing and installing the door panels ..................... 13
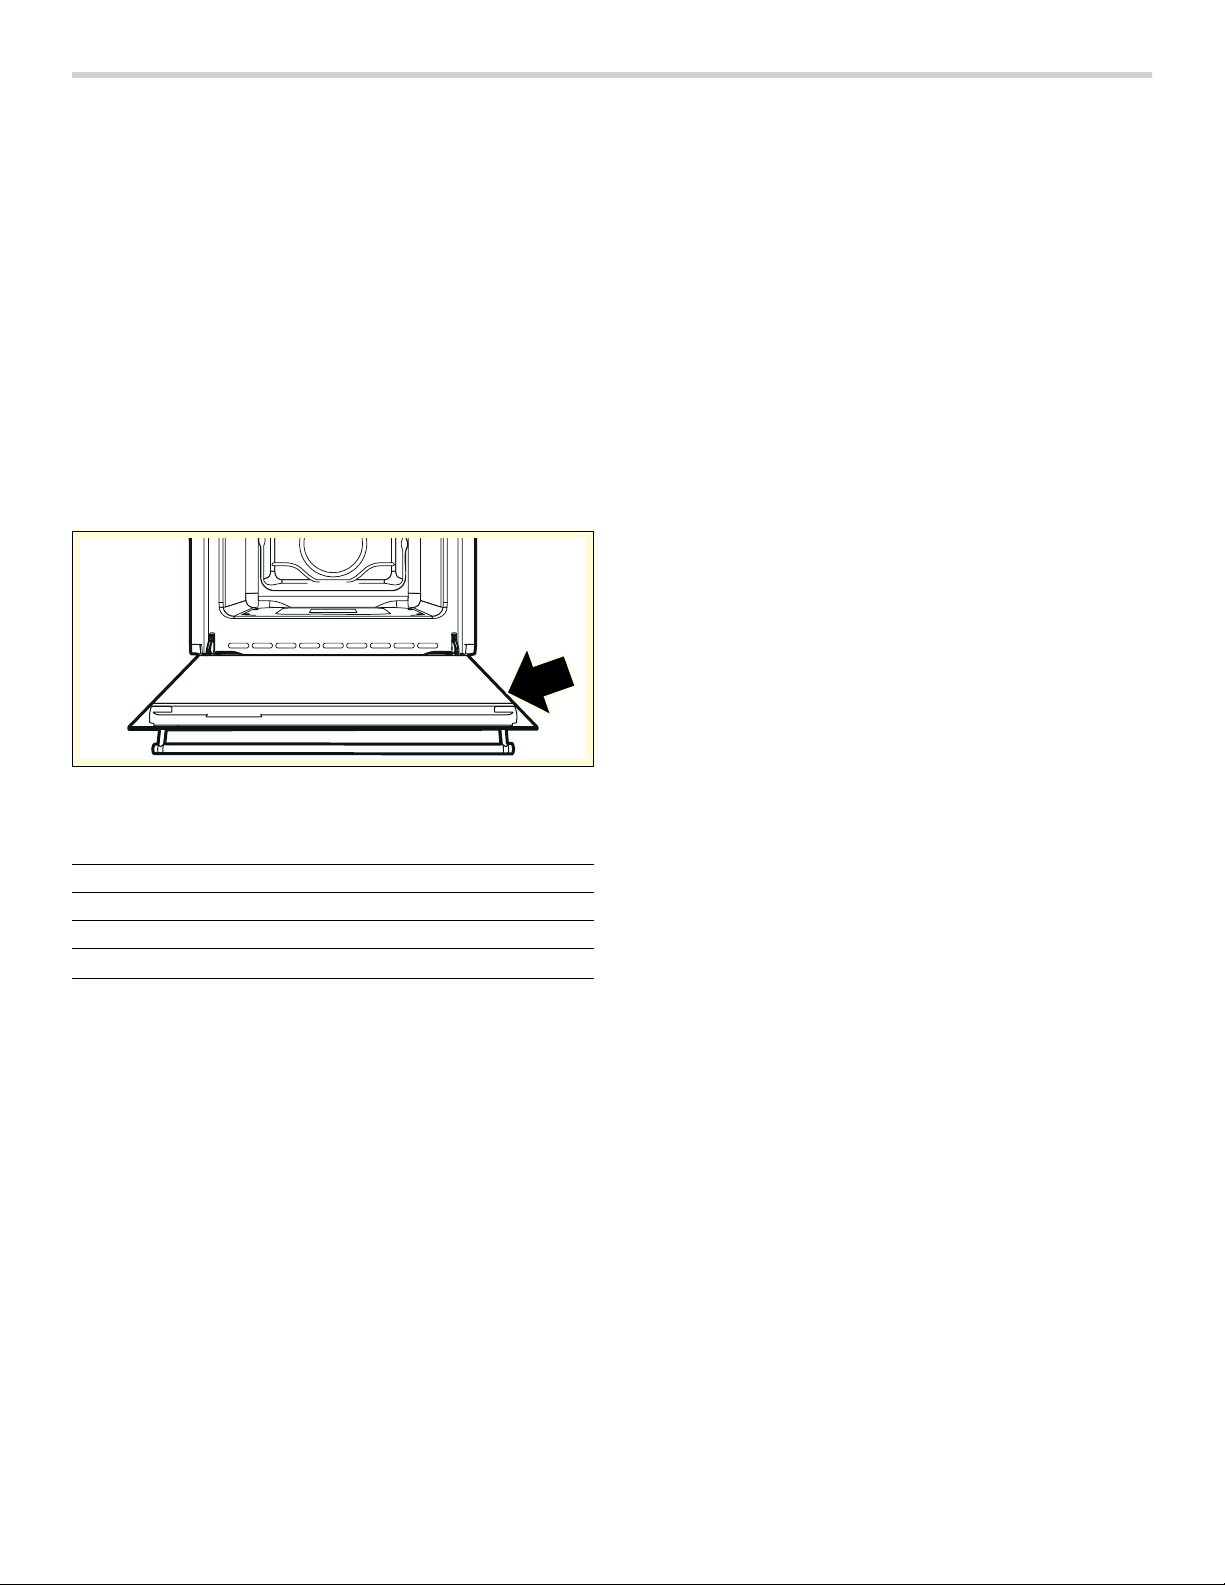
Removing and fitting the appliance door ..................... 14
Removing and inserting the hook-in racks ................... 14
Before Calling for Service ........................................... 15
Replacing the oven light bulb ......................................... 16
Bosch
®
Support ........................................................... 17
Before Calling Service ...................................................... 17
Data Plate ........................................................................... 17
Service ................................................................................. 17
Parts and Accessories ..................................................... 17
Tips for using your appliance .................................... 18
Baking ................................................................................. 18
Roasting and broiling ....................................................... 19
Tested for you in our cooking studio ............................ 20
STATEMENT OF LIMITED PRODUCT WARRANTY .. 21
What this Warranty Covers & Who it Applies to ......... 21
How Long the Warranty Lasts ........................................ 21
Repair/Replace as Your Exclusive Remedy ................ 21
Out of Warranty Product .................................................. 21
Warranty Exclusions ......................................................... 21
Pr odukt i nf o.
Additional information on products, accessories,
replacement parts and services can be found at
www.bosch-home.com and in the online shop
www.bosch-home.com/us/store

3
9 Safety Definitions
Safety Definitions
9 WARNING
This indicates that death or serious injuries may
occur as a result of non-observance of this warning.
9 CAUTION
This indicates that minor or moderate injuries may
occur as a result of non-observance of this warning.
NOTICE: This indicates that damage to the appliance or
property may occur as a result of non-compliance with
this advisory.
Note: This alerts you to important information and/or
tips.
4XHVWLRQV"
ZZZERVFKKRPHFRPXV
:HORRNIRUZDUGWRKHDULQJIURP\RX
7KLV%RVFK$SSOLDQFHLVPDGHE\
%6++RPH$SSOLDQFHV&RUSRUDWLRQ
0DLQ6WUHHW6XLWH
,UYLQH&$

9 IMPORTANT SAFETY INSTRUCTIONS
READ AND SAVE THESE INSTRUCTIONS
4
IMPORTANT SAFET Y I NS T RU CT I ONS READ AND SAVE THESE INSTRUCTIONS
WARNING
When properly cared for, your new appliance has been
designed to be safe and reliable. Read all instructions
carefully before use. These precautions will reduce the
risk of burns, electric shock, fire, and injury to persons.
When using kitchen appliances, basic safety precautions
must be followed, including those in the following pages.
Proper Installation and Maintenance
Have the installer show you the location of the circuit
breaker or fuse. Mark it for easy reference.
This appliance must be properly installed and grounded
by a qualified technician. Connect only to properly
grounded outlet. Refer to Installation Instructions for
details.
This appliance is intended for normal family household
use only. It is not approved for outdoor use. See the
Statement of Limited Product Warranty. If you have any
questions, contact the manufacturer.
Do not store or use corrosive chemicals, vapors,
flammables or nonfood products in or near this
appliance. It is specifically designed for use when
heating or cooking food. The use of corrosive chemicals
in heating or cleaning will damage the appliance and
could result in injury.
Do not operate this appliance if it is not working properly,
or if it has been damaged. Contact an authorized
servicer.
Do not obstruct oven vents.
Do not repair or replace any part of the appliance unless
specifically recommended in this manual. Refer all
servicing to an authorized servicer.
In the event of an error the display flashes and beeps
continuously. Disconnect appliance from the power
supply and call an authorized servicer.
WARNING
When removing the door make sure oven is cool and
power to the oven has been turned off before removing
the door. Failure to do so could result in burns.
The oven door is heavy and fragile. Use both hands to
remove the oven door. The door front is glass. Handle
carefully to avoid breaking.
Grasp only the sides of the oven door. Do not grasp the
handle as it may swing in your hand and cause injury or
damage.
Failure to grasp the oven door firmly and properly could
result in personal injury or product damage.
Lay the door on a flat smooth surface so that the door
cannot fall over. Failure to do so may result in personal
injury or damage to the appliance.
WARNING
To avoid injury from hinge bracket snapping closed, be
sure that both levers are securely in place before
removing door. Also, do not force door open or closed -
the hinge could be damaged and injury could result.
WARNING
Make sure the appliance and lights are cool and power
to the appliance has been turned off before replacing the
light bulb(s). Failure to do so could result in electrical
shock or burns. The lenses (if equipped) must be in
place when using the appliance. The lenses (if equipped)
serve to protect the light bulb from breaking. The lenses
(if equipped) are made of glass. Handle carefully to
avoid breaking. Broken glass can cause an injury.
WARNING
Light socket is live when door is open if main power
supply is not turned off.
Fire Safety
WARNING
NEVER cover any slots, holes or passages in the oven
bottom or cover an entire rack with materials such as
aluminum foil. Doing so blocks air flow through the oven.
Aluminum foil linings may also trap heat, causing a fire
hazard.
If materials inside an oven or warming drawer should
ignite, keep door closed. Turn off the appliance and
disconnect the circuit at the circuit breaker box.
WARNING
Use this appliance only for its intended use as described
in this manual. NEVER use this appliance as a space
heater to heat or warm the room. Doing so may result in
overheating the appliance. Never use the appliance for
storage.
Always have a working smoke detector near the kitchen.
In the event that personal clothing or hair catches fire,
drop and roll immediately to extinguish flames.
Have an appropriate fire extinguisher available, nearby,
highly visible and easily accessible near the appliance.
Smother flames from food fires other than grease fires
with baking soda. Never use water on cooking fires.

5
9 IMPORTANT SAFETY INSTRUCTIONS
READ AND SAVE THESE INSTRUCTIONS
WARNING
TO REDUCE THE RISK OF INJURY TO PERSONS IN
THE EVENT OF A GREASE FIRE, OBSERVE THE
FOLLOWING:
a.
SMOTHER FLAMES with a close-fitting lid, cookie
sheet, or metal tray, then turn off the burner. BE
CAREFUL TO PREVENT BURNS. If the flames do not
go out immediately, EVACUATE AND CALL THE FIRE
DEPARTMENT.
b.
NEVER PICK UP A FLAMING PAN – You may be
burned.
c.
DO NOT USE WATER, including wet dishcloths or
towels – a violent steam explosion will result.
d.
Use an extinguisher ONLY if:
- You know you have a Class ABC extinguisher, and
you already know how to operate it.
- The fire is small and contained in the area where it
started.
- The fire department is being called.
- You can fight the fire with your back to an exit.
Burn Prevention
DO NOT TOUCH HEATING ELEMENTS OR INTERIOR
SURFACES OF OVEN - Heating elements may be hot
even though they are dark in color. Interior surfaces of an
oven become hot enough to cause burns. During and
after use, do not touch, or let clothing, potholders, or
other flammable materials contact heating elements or
interior surfaces of oven until they have had sufficient
time to cool. Other surfaces of the appliance may
become hot enough to cause burns. Among these
surfaces are oven vent openings, surfaces near these
openings and oven doors.
Exercise caution when opening the appliance. Standing
to the side, open the door (or drawer) slowly and slightly
to let hot air and/or steam escape. Keep your face clear
of the opening and make sure there are no children or
pets near the unit. After the release of hot air and/or
steam, proceed with your cooking. Keep doors shut
unless necessary for cooking or cleaning purposes. Do
not leave open doors unattended.
Do not heat or warm unopened food containers. Build-up
of pressure may cause the container to burst and cause
injury.
Use caution when cooking foods with high alcohol
content (e.g. rum, brandy, bourbon) in the oven. Alcohol
evaporates at high temperatures. There is a risk of
burning as the alcohol vapors may catch fire in the oven.
Use only small quantities of alcohol in foods, and open
the oven door carefully.
Always place oven racks in desired location while oven is
cool. Always use oven mitts, when the oven is warm. If a
rack must be moved while oven is hot, do not let
potholder contact the heating elements.
CAUTION
To avoid possible injury or damage to the appliance,
ensure rack is installed exactly per installation
instructions and not backwards or upside down.
Always use dry potholders. Moist or damp potholders on
hot surfaces may result in burns from steam. Do not let
potholder touch hot heating elements. Do not use a towel
or other bulky cloth.
Secure all loose garments, etc. before beginning. Tie
long hair so that it does not hang loose, and do not wear
loose fitting clothing or hanging garments, such as ties,
scarves, jewelry, or dangling sleeves.
Child Safety
When children become old enough to use the appliance,
it is the responsibility of the parents or legal guardians to
ensure that they are instructed in safe practices by
qualified persons.
Do not allow anyone to climb, stand, lean, sit, or hang on
any part of an appliance, especially a door, warming
drawer, or storage drawer. This can damage the
appliance, and the unit may tip over, potentially causing
severe injury.
Do not allow children to use this appliance unless closely
supervised by an adult. Children and pets should not be
left alone or unattended in the area where the appliance
is in use. They should never be allowed to play in its
vicinity, whether or not the appliance is in use.
CAUTION
Items of interest to children should not be stored in an
appliance, in cabinets above an appliance or on the
backsplash. Children climbing on an appliance to reach
items could be seriously injured.
Cleaning Safety
Keep oven free from grease build up.
Cookware Safety
NOTICE: Do not place food directly on oven bottom.
Follow the manufacturer’s directions when using cooking
or roasting bags.
Do not place cookware on open oven door.
Proposition 65Warning:
This product may contain a chemical known to the State
of California, which can cause cancer or reproductive
harm. Therefore, the packaging of your product may
bear the following label as required by California:
&DQFHUDQG5HSURGXFWLYH+DUPZZZ3:DUQLQJVFDJRY
67$7(2)&$/,)251,$352326,7,21:$51,1*
:$51,1*

6
Causes of Damage
NOTICES:
▯ Accessories, foil, baking paper or cookware on the
bottom of the oven interior: do not place any
accessories on the bottom of the oven interior. Do not
line the bottom of the oven interior with any type of foil
or baking paper. Do not place cookware on the
bottom of the oven interior when a temperature above
122°F (50 °C) is set. This produces a build-up of heat.
Baking and roasting times are no longer correct and
the enamel is damaged.
▯ Do not use the oven with the Roof Liner fitted in the
bottom of the cavity.
▯ Water in the hot oven interior: Never pour water into
the hot oven interior. Steam is produced. Damage to
the enamel can arise due to the temperature change.
▯ Do not leave moist groceries in a closed oven for an
extended period of time. It can lead to corrosion inside
the oven.
▯ Fruit juice can leave stains in the oven. Always remove
fruit juice immediately and wipe up first with a damp
and then a dry cloth. Cool oven first to avoid steam
burns from wet dish cloth.
▯ Cooling with the appliance door open: only allow the
oven cavity to cool when it is closed. Even if the
appliance door is only open a little, front panels of
adjacent units could be damaged over time.
▯ Highly soiled door seal: the appliance door will no
longer close properly during operation if the door seal
is highly soiled. Adjoining furniture fronts may be
damaged. Always keep the door seal clean.
▯ Appliance door as a seat or storage surface: do not
stand, sit or hang on the appliance door. Do not place
any cookware or accessories on the appliance door.
▯ Inserting accessories: depending on the appliance
type, accessories can scratch the door pane when
closing the appliance door. Always slide accessories
fully into the oven interior.
▯ Do not hold or carry the appliance by the door handle.
The door handle cannot carry the weight of the device
and could break off.
Protecting the environment
Unpack the appliance and dispose of the packaging in
an environmentally friendly manner.
Tips for saving energy
▯ Open the appliance door as little as possible while
cooking, baking or roasting.
▯ Use dark, black-painted or enameled baking forms.
These absorb the heat particularly well.
▯ It is best to bake several cakes in succession. The
oven is still warm. This shortens the baking time for the
second cake. You can also slide in two loaf tins next to
each other.
▯ In the hot air mode, you can bake simultaneously on
several levels.
▯ For longer cooking times, you can switch off the oven
10minutes before the end of the cooking time and
you can use the residual heat to finish cooking.
7
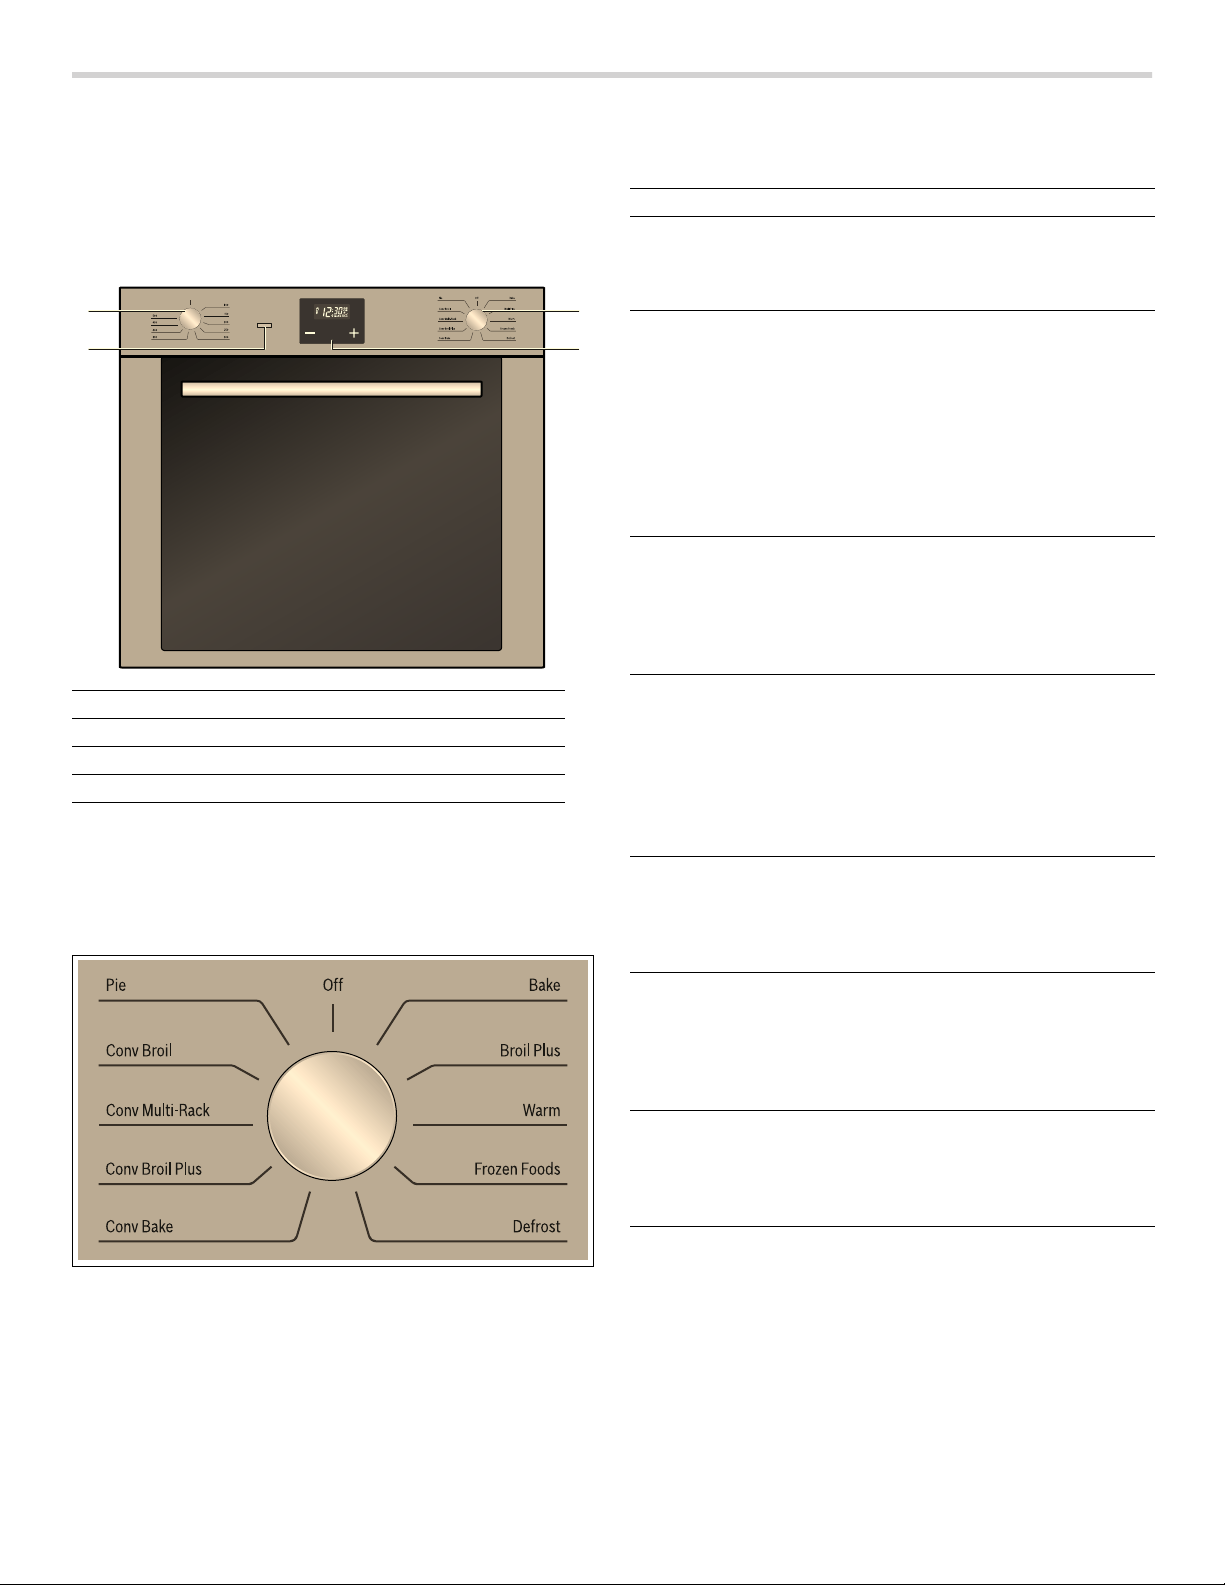
Your new appliance
Get to know your appliance. You will find information on
the control panel, the oven, types of heating and
accessories.
Oven
NOTICE: Do not place food directly on oven bottom.
Do not obstruct oven vents.
Function selector
Use the function selector to set the type of heating.
1 Temperature selector
2 Function lamp
3 Function selector
4 Display and function buttons
7,0(56
Position Use
Off The oven is turned off.
Bake For cakes, casseroles and lean roast
pieces. The heat comes evenly from
the upper and lower heating ele-
ments.
Broil Plus The heat coming from the broil ele-
ment gives perfect broiling results
above all for thin and medium thick-
ness meat and in combination with
the rotisserie (where present) gives
the food an even browning at the end
of cooking. Perfect for sausages, ribs
and bacon. This function enables
large quantities of food, particularly
meat, to be broiled evenly.
Warm The heat coming just from the bottom
allows you to complete the cooking
of foods that require a higher bottom
temperature, without affecting their
browning. Perfect for cakes, pies,
tarts and pizzas.
Frozen Foods The combination of fan-assisted
cooking and traditional cooking
allows different foods to be cooked
on several levels extremely quickly
and efficiently. Perfect for large vol-
umes that call for intense cooking,
useful not only for frozen, but also for
fresh food.
Defrost Rapid defrosting is helped by switch-
ing on the fan provided and the top
heating element that ensure uniform
distribution of low temperature air
inside the oven.
Conv Bake The operation of the fan, combined
with traditional cooking, ensures uni-
form cooking even with complex reci-
pes. Perfect for every type of food,
even when simultaneously cooked on
several levels.
Conv Broil Plus The air produced by the fan softens
the strong heatwave generated by
the broil element, broiling perfectly
even very thick foods. Perfect for
large cuts of meat.
Conv Multi-Rack The combination of the fan and the
circular element (incorporated in the
rear of the oven) allows you to cook
different foods on several levels, as
long as they need the same tempera-
tures and same type of cooking. Hot
air circulation ensures instant and
uniform distribution of heat. For multi-
ple level cooking we recommend
using 2nd and 4th shelves.
8
Note: When you set the heating function, the oven light
in the cooking compartment switches on.
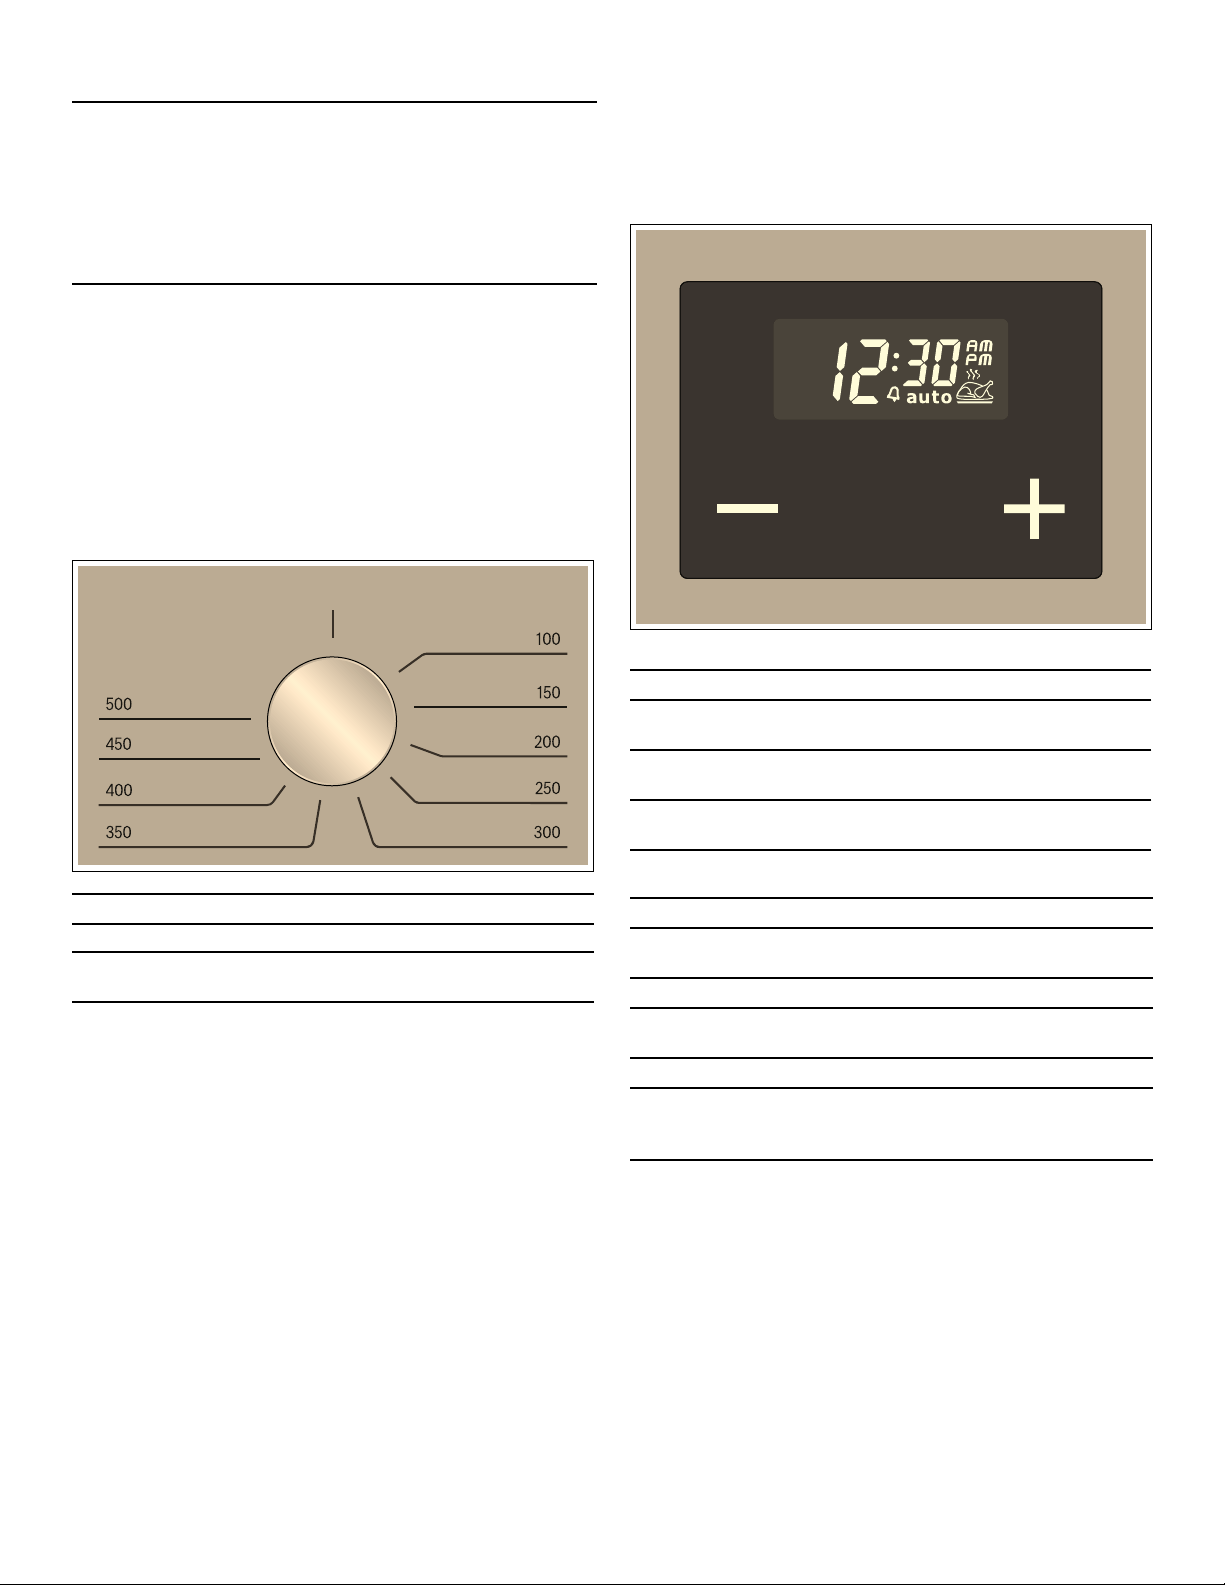
Temperature selector
Set the temperature using the temperature selector.
When the oven is heating, the display lamp blinks. When
the set temperature has been reached, it lights up
continuously and a signal sounds.
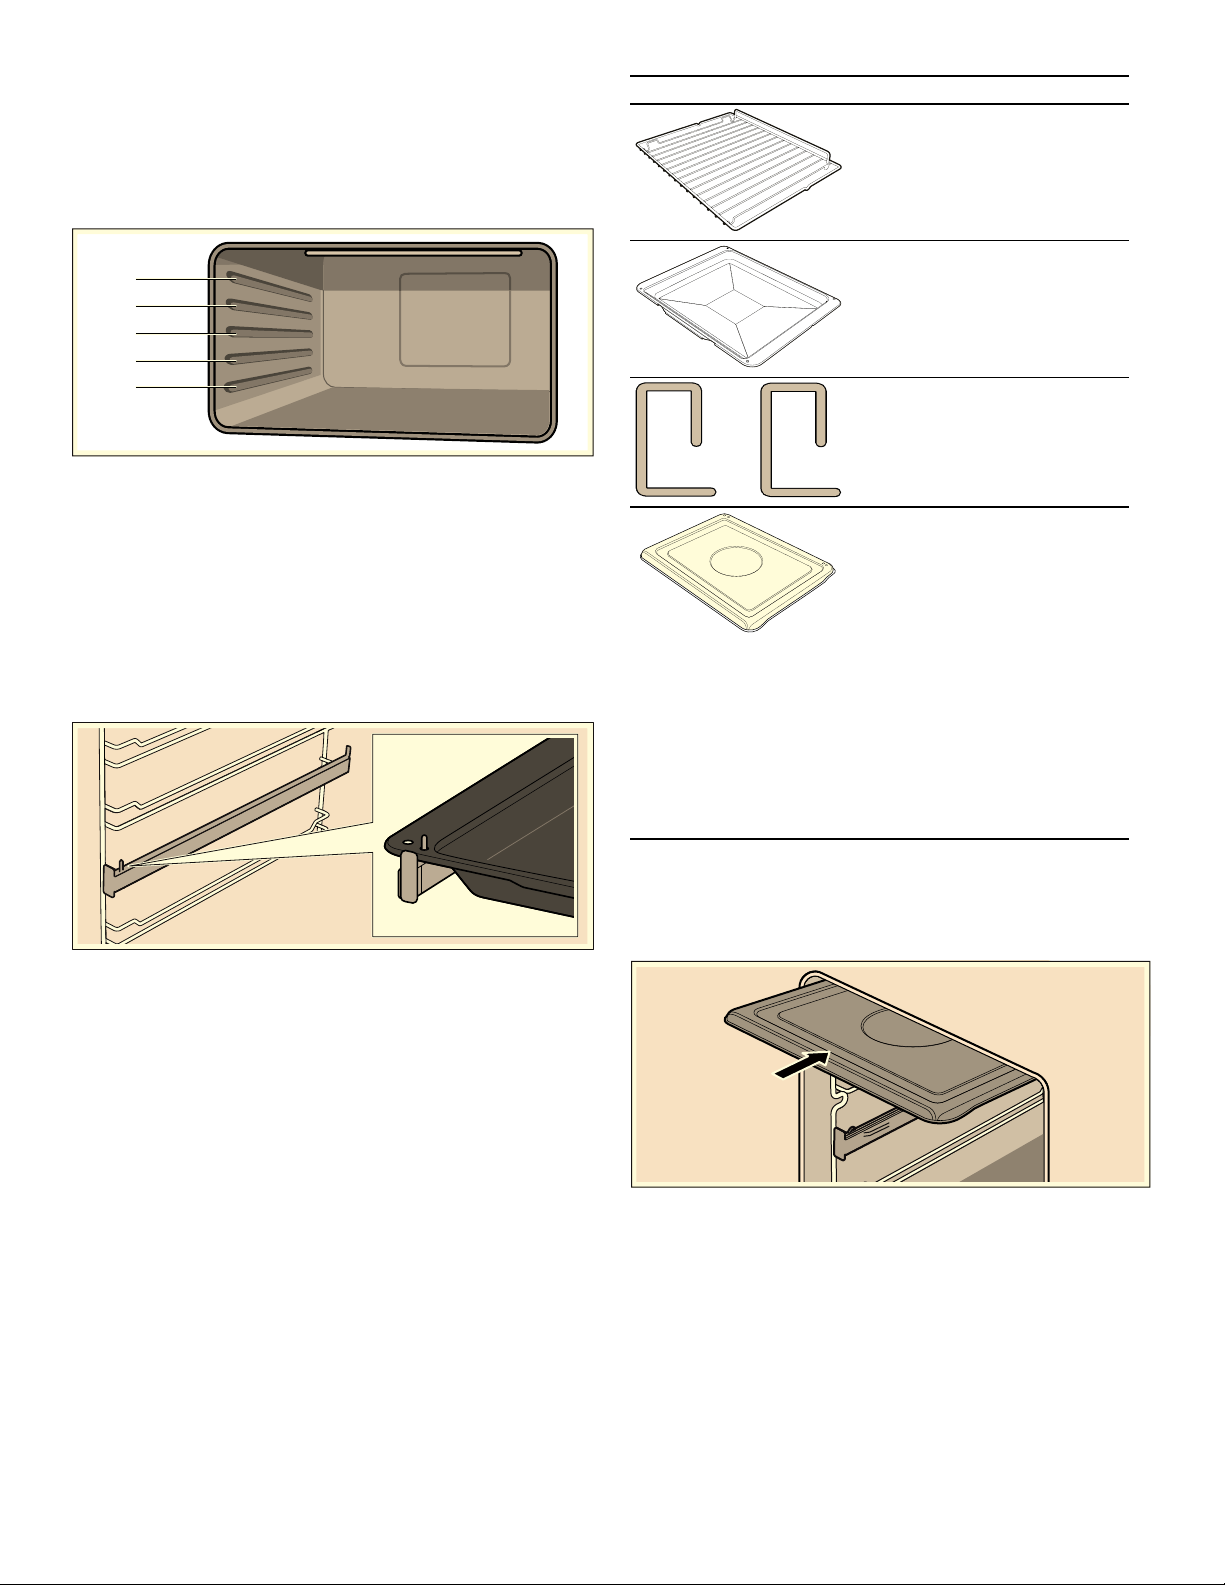
Timer
You can control your oven with the timer. This way you
can select the time at which the oven should switch on or
at which the timer should end the baking or cooking
process. The timer can also be used as a short-term
timer.
Function buttons
Display symbols
Conv Broil Through the combined action of the
fan and the heat of the central ele-
ment only, this function is perfect for
rapid cooking and cooking au gratin
of small quantites of food (particularly
meats), by bringing together the
dietary advantages of broiling and
the even cooking of the fan.
Pie The combination of the fan with lower
heating and a little of top heating ele-
ment allows cooking to be completed
more rapidly. Perfect for any type of
food, but in particular for pie and
cakes.
Position Meaning
0 Off The oven does not heat.
100-
500
Temperature
range
The temperature in the cook-
ing compartment in °F.
Position Use
Symbol Meaning Use
TIMERS Timer functions Set duration or cooking
time
A
Minus Reduce duration or
cooking time
@
Plus Increase duration or
cooking time
Symbol Meaning
‹‹:‹‹
Time / Cooking time / End time / Kitchen
timer
Ž
Oven is ready for operation.
auto Ž
A cooking time duration / Cooking time
duration with end time is programmed
†
The kitchen timer is active
„/…
Time display: 12h format
To change to 24h format, see the section
"Adjusting the time"
7,0(56
9
Accessories
The accessories can be inserted into the cooking
compartment at 5different levels.Always insert them as
far as they will go so that the accessories do not touch
the door panel. Ensure that you always insert the
accessories into the cooking compartment correctly.
You can pull out the accessories two thirds of the way
without them tipping. This allows meals to be removed
easily.
The accessories may become deformed when they
become hot. As soon as they have cooled down, the
deformation disappears with no effect on the function.
You can buy accessories from customer service, from
specialist retailers or online.
The pull-out rails allow you to pull accessories out
completely.
--------
Inserting the roof liner
Insert the roof liner by carefully sliding it in above the
broil element. To remove it pull it carfully out of the oven
cavity.
Accessories Explanation
Baking and roasting shelf
For ovenware, cake tins,
roasts, broiled items, frozen
meals.
Enamel baking tray
For moist cakes, pastries, fro-
zen meals and large roasts.
Can also be used as a drip
tray to collect run-off fat.
Locking pins
For locking the hinges.
Roof liner
The roof liner can be inserted
permanently above the oven
broil element to avoid soiling
of the cavity roof. It is remov-
able and coated with porce-
lain enamel to facilitate
cleaning.
Note: : The porcelain cover-
age on the roof liner is not
even, some areas will have a
less shiny surface. This is nor-
mal, the metal is still covered
and protected.

10
Before using the oven for the first time
In this section, you can find out what you must do before
using your oven to prepare food for the first time. Read
the Safety information section beforehand.
Remove the appliance packaging and dispose of it
appropriately.
Setting the time
After connecting the oven or after a power failure, ‹:‹‹
and auto will blink on the display.
1.
Hold the TIMERS button down until the colon blinks on
the display.
2.
Set the current time with the @ and A buttons. Hold the
@ or A button down to change the value faster.
The time set is taken over after 5seconds.
Setting the time during operation
1.
Hold the @ and A button down until the colon blinks
on the display.
2.
Set the current time with the @ and A buttons. Hold the
@ or A button down to change the value faster.
The time set is taken over after 5seconds.
Baking out the oven
Pre-cleaning the oven
1.
Remove the accessories, the hook-in racks and the
roof liner from the cooking compartment.
2.
Completely remove any leftover packaging, e.g. small
pieces of polystyrene, from the cooking compartment.
3.
Some parts are covered with a protective film. Remove
this scratch protection film.
4.
Clean the outside of the appliance with a soft, damp
cloth.
5.
Clean the cooking compartment with hot soapy water.
Heating up the oven
To remove the new smell, heat up the oven when it is
empty and closed.
1.
Turn the function selector to the Bake operating mode.
2.
Turn the temperature selector to the maximum
temperature.
3.
Switch the oven off after 40minutes.
Re-cleaning the oven
1.
Clean the cooking compartment with hot soapy water.
2.
Refit the hook-in racks.
Cleaning the accessories
Before using the accessories, clean them thoroughly
using a cloth and warm soapy water.
Operation
Switching on the oven
1.
Use the function selector to set the type of heating.
2.
Use the temperature selector to set the temperature.
The oven begins to heat up.
Switching off the oven
Turn the function selector and temperature selector to
the off position.
Changing settings
The heating function and temperature or broil setting can
be changed at any time using their respective selectors.
Heating up
In order to heat up the cooking compartment as quickly
as possible, use the "Conv Bake" heating type. When the
set temperature has been reached (indicator light lights
up continuously and signal sounds), set the desired
heating type.
Kitchen timer
The short-term timer has no influence on the functioning
of the oven. The duration of the short-term timer can be
set from 1minute to 23hours and 59minutes.
1.
Hold the TIMERS button down until the † blinks and
‹:‹‹ is displayed.
2.
Set the desired duration with the @ and A buttons.
The set time is taken over after 5seconds.
After the time has elapsed, a signal sounds and the †
symbol blinks.
Note: While the short-term timer is running, the time is
displayed and the † symbol lights up continuously.
Changing the set time:
To change the remaining time, hold the TIMERS button
down until the † symbol blinks on the display. Then
change the remaining time with the @ and A buttons.
Canceling the short-term timer
To delete the setting, hold the TIMERS button down until
the † symbol blinks on the display.Then press the @ and
A buttons simultaneously.

11
Switching the signal tone off
Hold the TIMERS button down until the clock disappears.
After seven minutes, the signal switches off
automatically.
Setting the automatic timer
With the TIMER function, you can set an operating time
duration or program a start and end time.
Automatic switch-off
1.
Press the TIMERS button down until the † symbol
blinks.
2.
Press the TIMERS button again.
On the display, auto and
šž§ blink.
3.
Use the @ and A buttons to set the operating time
duration.
The operating time duration can be set from 1minute
to 10hours.
4.
Set the desired heating type and temperature.
The oven starts. The Ž and auto signals light up on
the display, the current time is displayed.
The operating time duration has elapsed
A signal sounds, auto blinks on the display.
1.
Switch off the temperature selector and function
selector.
2.
Hold the TIMERS button down until the Ž symbol
appears.
The oven switches back to manual mode.
Canceling the operating time duration
To delete the setting, hold the TIMERS button down until
the † symbol blinks on the display. Then press the @
and A buttons simultaneously.
Automatic switch-on and switch-off
Baking or roasting starts for the set duration at a later
time which you chose.
1.
Press the TIMERS button down until the † symbol
blinks.
2.
Press the TIMERS button again.
On the display, auto and šž§ blink.
3.
Use the @ and A buttons to set the operating time
duration.
The operating time duration can be set from 1minute
to 10hours.
4.
Press the TIMERS button again. auto and the Ž
symbol blink on the display.
The end time for the programmed operating time
duration is displayed.
5.
Adjust the end time with the @ and A buttons.
The end time can be set up to 23hours and
59minutes.
The oven calculates the start time. After 5seconds,
the time set is taken over.
The Ž and auto signals go out, the current time is
displayed.
6.
Set the desired heating type and temperature.
The oven will begin to heat at the calculated start time.
On the display, the Ž and auto symbols light up.
The operating time duration has elapsed
A signal sounds, auto blinks on the display.
1.
Switch off the temperature selector and function
selector.
2.
Hold the TIMERS button down until the Ž symbol
appears.
The oven switches back to manual mode.
Canceling the operating time duration
To delete the setting, hold the TIMERS button down until
the † symbol blinks on the display. Then press the @
and A buttons simultaneously.
Basic Settings
You can always make the following basic settings:
Adjust the signal volume
The oven must be switched off.
1.
Hold the @ and A button down until the colon blinks
on the display.
2.
Press the TIMERS button again.
Signal appears on the display.
3.
Press the A button repeatedly until the required
volume is reached.
Changing the time format
The oven must be switched off.
Press and hold the @ button for 3seconds. „/…
appears on the display. To change to the 24h time
format, hold the @ button down again for 3seconds.
Basic setting Options
Acoustic signal ▯ quiet
▯ middle
▯ loud*
Time format ▯ 24h*
▯ 12h am/pm
* Factory setting

12
Cleaning and maintenance
With good care and cleaning, your oven will remain clean
and fully-functioning for a long time to come. Here we will
explain how to maintain and clean your oven correctly.
Notes
▯ Slight differences in the colors on the front of the oven
are caused by the use of different materials, such as
glass, plastic and metal.
▯ Shadows on the door panel that look like streaks, are
caused by reflections made by the oven light.
▯ Enamel is baked on at very high temperatures. This
can cause some slight color variation. This is normal
and does not affect operation. The edges of thin trays
cannot be completely enameled. As a result, these
edges can be rough. This will not impair the anti-
corrosion protection.
9 WARNING
RISK OF ELECTRICAL SHOCK
Moisture entering the appliance can cause an
electrical shock. Don't use a high-pressure cleaner
or steam cleaner.
9 WARNING
RISK OF BURNS
The appliance becomes very hot. Never touch the
hot inside surfaces of the oven interior or heating
elements. Always allow the appliance to cool down.
Keep children away.
Cleaning agents
Observe the following information to ensure that the
different surfaces are not damaged by using the wrong
type of cleaning agent.
Do not use:
▯ any harsh or abrasive cleaning agents,
▯ cleaning agents with a high concentration of alcohol,
▯ hard scouring pads or sponges,
▯ high-pressure cleaners or steam cleaners.
Wash new sponge cloths thoroughly before use.
Area Cleaning agents
Appliance exte-
rior
Hot soapy water:
Clean with a dish cloth and dry with
a soft cloth. Do not use glass
cleaner or a glass scraper.
Stainless steel Hot soapy water:
Clean with a dish cloth and dry with
a soft cloth. Remove flecks of lime
scale, grease, starch and albumin
(e.g. egg white) immediately. Corro-
sion can form under such flecks.
Special stainless steel cleaning
products suitable for hot surfaces
are available from our customer ser-
vice or from specialist retailers.
Apply a very thin layer of the clean-
ing product with a soft cloth.
Aluminum and
plastic
Glass cleaner:
Clean with a soft cloth.
Enamel surfaces
(smooth sur-
faces)
To facilitate cleaning, you can switch
on the interior lighting and detach
the appliance door if necessary.
Apply commercially available dish-
washing liquid or a vinegar solution
with a soft, damp cloth or chamois;
dry with a soft cloth. Soften baked-
on food residues with a damp cloth
and detergent. Leave the cooking
compartment open to dry after
cleaning.
Self-cleaning sur-
faces (rough sur-
faces)
Please see the notes in section: Self-
cleaning surfaces
Door panels Glass cleaner:
Clean with a soft cloth. Do not use a
glass scraper.
Glass cover for
the oven light
Hot soapy water:
Clean with a dish cloth.
Seal
Do not remove.
Hot soapy water:
Clean with a dish cloth. Do not
scour.
Rails Hot soapy water:
Soak and clean with a dish cloth or
brush.
Accessories Hot soapy water:
Soak and clean with a dish cloth or
brush.
Roof liner Hot soapy water:
Soak and clean with a dish cloth or
brush.
Remove from oven for cleaning.

13
Catalytic cooking compartment panels
The catalytic cooking compartment panels are coated
with self-cleaning enamel.
The surfaces clean themselves while the oven is in
operation. Larger splashes will only be removed after the
oven has been used several times.
Self-cleaning surfaces
The rear and side walls are covered with catalytic
paneling. So not use oven cleaner on the catalytic
panels. Slight discoloration of the enamel does not affect
self-cleaning.
Removing and installing the door panels
To facilitate cleaning, you can remove the glass panels
from the oven door.
Removing the door panels
1.
Open the oven door fully.
2.
Lock both hinges on the left and right using a locking
pin.
Note: The locking pins must be fully inserted into the
holes in the hinges.
3.
Lift the bottom of the inner panel slightly until the
fastening pins come out of the holder (1).
4.
Carefully lift the top of the inner panel until the
fastening pins come out of the holder (2).
9 CAUTION
When lifting the inner panel, the middle panel
may stick to the inner panel. Make sure that the
middle panel does not fall.
5.
Remove the inner panel.
6.
Remove the middle panel.
Note: The middle panel is kept in place with rubber
bushings rather than retaining pins.
Clean the panels with glass cleaner and a soft cloth.
9 WARNING
RISK OF INJURY
Scratched glass in the appliance door can burst. Do
not use any glass scrapers or strong or abrasive
cleaning agents.
Fitting the door panels
1.
Reinsert the middle panel.
Note: Make sure that the panel is seated correctly.All
rubber bushings must lay flat against the outer panel.
2.
Reinsert the inner panel.
Note: All four fastening pins must engage in the
holders provided for them.
3.
Remove the locking pins and close the oven door.

14
Removing and fitting the appliance door
In case of especially heavy soiling, the oven door can be
removed for better cleaning. Normally, however, this is
not necessary.
9 CAUTION
WHEN REMOVING THE OVEN DOOR:
▯ Make sure oven is cool and power to the oven
has been turned off before removing the door.
Failure to do so could result in electrical shock or
burns.
▯ The oven door is heavy and parts of it are fragile.
Use both hands to remove the oven door. The
door front includes glass components. Handle
carefully to avoid breakage.
▯ Grasp only the sides of the oven door. Do not
grasp the handle as it may swing in your hand
and cause damage or injury.
▯ Failure to grasp the oven door firmly and properly
could result in personal injury or product damage.
▯ To avoid injury from hinge bracket snapping
closed, be sure that both locking levers are
securely in place before removing the door. Also,
do not force the oven door open or closed - the
hinge could be damaged and injury could result.
▯ Do not lay the removed door on sharp or pointed
objects as this could break the glass. Lay the
door on a flat, smooth surface, positioned so that
the door cannot fall over.
Removing the appliance door
1.
Open the oven door fully.
2.
Lock both hinges on the left and right using a locking
pin (a).
Note: The locking pins must be fully inserted into the
holes in the hinges.
3.
Grip the oven door on either side with both hands and
close the oven door by approx. 30° (b).
4.
Raise the oven door slightly and pull it out.
Note: Do not fully close the oven door. The hinges
could become bent and the enamel could be
damaged.
Fitting the appliance door
1.
Grip the oven door on either side with both hands.
2.
Slide the hinges into the slots in the oven (a).
Note: The notch below the hinges must engage into
the frame of the oven (b).
3.
Lower the door downwards.
4.
Remove the locking pins.
9 WARNING
RISK OF INJURY
Do not touch the hinge if the oven door falls out
unintentionally or a hinge snaps closed. Call
customer service.
Removing and inserting the hook-in racks
You can remove the hook-in racks for easier cleaning.
Removing the hook-in racks
The hook-in racks are each fixed to the side panels of the
cooking compartment at three points.
1.
Grip the front of the hook-in rack and pull it to the
middle of the cooking compartment.
The front hook of the hook-in rack will release from the
hole.
2.
Fold out the hook-in rack further and pull it from the
rear holes of the side panel.
3.
Hold the catalytic cooking compartment panel in
place.
4.
Remove the hook-in rack from the cooking
compartment.
Inserting the hook-in rack
1.
Hold the catalytic cooking compartment panel in
place.
2.
Insert the hooks of the hook-in rack into the rear holes
in the side panel.
3.
Press the front hook of the hook-in rack into the hole.
DE
ED
D
E

15
Before Calling for Service
Before calling Customer Service, consider the
suggestions and instructions below:
9 WARNING
RISK OF ELECTRIC SHOCK
Incorrect repairs are dangerous.Repairs must only
be carried out by one of our trained customer
service technicians.
Incorrect repairs to your appliance may present
considerable risks for the user.
Fault Possible cause Notes/remedy
The appliance does not work. Faulty fuse Look in the fuse box and check that the circuit breaker for the
range is in working order.
Power failure Check whether the kitchen light works.
The oven cannot be switched
off.
Electronics are
faulty
Switch off the circuit breaker. Call customer service.
The clock display flashes. Power failure Reset the clock.
The oven does not heat. Faulty fuse Check the fuse and replace if necessary.
Function selector
not set
Set the function selector.
The door glass is broken. Switch off the appliance. Call customer service.
Fruit juice or albumen stains
on enameled surfaces.
Moist cake or meat
juices
Harmless change in the enamel, cannot be removed.
The oven stops operating in
the middle of a program, and
the cooling fan continues to
run at high speed even when
function selector is set to Off
position. The buzzer sounds
intermittently and the control
lamp is flashing.
Problem with ther-
mostat
1.
2.
3.
Set function selector to Off position.
The cooling fan continues to run at high speed.
Wait for 10 seconds.
Set function selector to a new position.
If the error occurs again when setting a new function: Dis-
connect the oven from power supply, then reconnect power
supply.
If the error occurs again after reconnecting power supply:
Call customer service.
16
Replacing the oven light bulb
If the oven light bulb fails, it must be replaced.
Replacement heat-resistant bulbs can be obtained from
customer service or from specialist retailers. Please
supply your appliance's E number and FD number. Do
not use any other type of bulb.
9 CAUTION
WHEN REPLACING AN OVEN LIGHT:
▯ Make sure the appliance and lights are cool and
power to the appliance has been turned off
before replacing the light bulb(s). Failure to do so
could result in electrical shock or burns.
▯ The lenses must be in place when using the
appliance.
▯ The lenses serve to protect the light bulb from
breaking.
▯ The lenses are made of glass. Handle carefully to
avoid breaking. Broken glass could cause an
injury.
▯ Light socket is live when door is open.
9 WARNING
Light socket is live when door is open if main power
supply is not turned off.
1.
Unplug the appliance from the mains or switch off the
circuit breaker in the fuse box.
2.
Allow the cooking compartment to cool down.
3.
Open the appliance door.
4.
Place a tea towel in the cooking compartment to
prevent damage.
5.
Remove the hook-in racks.
6.
Remove the glass cover.To do this, open the glass
cover at the front with your hand. Should you
experience difficulties removing the glass cover, use a
spoon to help.
7.
Remove the oven light bulb.
8.
Replace the oven light bulb with a bulb of the same
type:
Voltage (V): 12V;
Power: 20W;
Socket: G4
Temperature resistance: 570° F (300°C)
9.
Refit the glass cover for the oven light bulb.
10.
Refit the hook-in racks.
11.
Remove the tea towel.
12.
Switch the circuit breaker back on.
13.
Check that the oven lighting is working again.
17
Bosch
®
Support
Before Calling Service
See the Use and Care Manual for troubleshooting
information. Refer to the “Statement of Limited Product
Warranty” in the Use and Care Manual.
To reach a service representative, see the contact
information at the front of the manual or in the following
section. Please be prepared with the information printed
on your product rating label prior to calling.
Data Plate
The data plate shows the model and serial number. Refer
to the data plate on the appliance when requesting
service.
The data plate can be found at the right side of the
appliance door.
To avoid having to search for each piece of information
when calling, you can enter the four items needed in the
spaces provided below.
Keep your invoice or escrow papers for warranty
validation if service is needed.
Service
We realize that you have made a considerable
investment in your kitchen. We are dedicated to
supporting you and your appliance so that you have
many years of creative cooking.
Please don’t hesitate to contact our Customer Support
Department if you have any questions or in the unlikely
event that your Bosch® appliance needs service. Our
service team is ready to assist you.
USA
800-944-2904
www.bosch-home.com/us/support
Canada
800-944-2904
www.bosch-home.ca/en/support
Parts and Accessories
Parts, filters, descalers, stainless steel cleaners and more
can be purchased in the Bosch
®
eShop or by phone.
USA
www.bosch-home.com/us/store
Canada
Marcone 800-482-6022
or
Reliable Parts 800-941-9217
Model No.
FD-No.
Date of Purchase
Customer Service O

18
Tips for using your appliance
Here you will find a selection of tips about cookware and
preparation methods.
Notes
▯ Use the accessories provided. Additional accessories
may be obtained as optional accessories from
specialist retailers or from customer service.
Before using the oven, remove any unnecessary
accessories and cookware from the cooking
compartment.
▯ Always use oven gloves when taking hot accessories
or cookware out of the cooking compartment.
Baking
Baking tins
▯ Use light-colored baking tins and trays wherever
possible.
▯ Always place the baking tins on the middle of the
baking and roasting wire rack.
Baking tips
How to tell whether sponge cake is
baked through.
Approx. 10minutes before the end of the baking time stated in the recipe,
insert a toothpick into the cake at its deepest point. If the toothpick comes out
clean, the cake is ready.
The cake collapses. Use less fluid next time or set the oven temperature 50°F (10°C) lower.
Observe the specified mixing times in the recipe.
The cake has risen in the middle
but is lower around the edge.
Do not grease the sides of the springform cake tin. After baking, loosen the
cake carefully with a knife.
The cake browns too much on top. Place it lower in the oven, select a lower temperature and bake the cake for a
little longer.
The cake is too dry. When it is done, make small holes in the cake using a toothpick. Then drizzle
fruit juice or an alcoholic beverage over it. Next time, set the temperature 50°F
(10°C) higher and reduce the baking time.
The bread or cake (e.g. cheese-
cake) looks good but is sticky on
the inside (soggy with wet streaks).
Use slightly less fluid next time and bake for slightly longer at a lower tempera-
ture. For cakes with a moist topping, bake the base first. Sprinkle it with
almonds or bread crumbs and then place the topping on top. Please follow the
recipe and baking times.
The cake is unevenly browned. Select a slightly lower temperature to ensure that the cake is baked more
evenly. Excess greaseproof paper can affect the air circulation. For this reason,
always trim greaseproof paper to fit the baking tray.
The bottom of a cake topped with
fruit is too light.
Place the cake one level lower the next time.
The fruit juice overflows. Next time, use the deeper universal pan, if you have one.
Small baked items made out of
yeast dough stick to one another
during baking.
There should be a gap of approx. 2cm around each item. This gives enough
space for the baked items to expand and turn brown on all sides.
Condensation forms when you bake
moist cakes.
Baking may create water vapor, which escapes above the door. The steam may
settle and form water droplets on the control panel or on the fronts of adjacent
units. This is a natural process.

19
Roasting and broiling
Cookware
You may use any heat-resistant cookware. Always place
the cookware in the center of the wire rack. The
enameled baking tray is also suitable for large roasts.
Roasting tips
▯ A lower temperature results in more even browning.
▯ Depending on the size of the meat, add 2or
3tablespoons of liquid to lean meat and 8to
10tablespoons of liquid to pot roasts.
▯ When cooking duck or goose, pierce the skin on the
underside of the wings to allow the fat to run out.
▯ Poultry will turn out particularly crispy and brown if you
baste it towards the end of the roasting time with
butter, salted water or orange juice.
▯ Turn pieces of meat halfway through the cooking time.
▯ When the roast is ready, turn off the oven and allow it
to rest for an additional 10minutes. This will allow the
meat juices to distribute themselves better inside the
roast.
▯ When roasting large pieces of meat, you may find that
the amount of steam and condensation on the oven
door is more than usual. This is a normal occurrence
that has no effect on the oven's performance. Once
roasting is complete, dry the oven door and window
with a cloth.
▯ If you are roasting on the wire rack, insert the
enameled baking tray into shelf position 1to collect
the drips of fat.
Broiling tips
▯ As far as possible, the pieces of food you are broiling
should be of equal thickness. They should be at least
1inch thick. This will allow them to brown evenly and
remain succulent and juicy.
▯ Place the food to be broiled in the center of the wire
rack. Pour a little water into the enameled baking tray
and insert this into the shelf position underneath the
broil element to collect the drips of fat. Never place it
on the cooking compartment floor.
▯ Drizzle some oil over the food to be broiled before you
place it on the wire rack under the broil element.
▯ If the food to be broiled is thin, turn it over halfway
through broiling; if it is thick, turn it over several times
during broiling. Use tongs when turning the food to
avoid piercing it and, in the case of meat, to keep the
meat juices inside the meat.
▯ Dark meats such as lamb and beef brown better and
more quickly than light meats such as pork and veal.
Roasting tips
How can you tell when the roast is
ready?
Use a meat thermometer (available from specialist shops) or carry out a “spoon
test.” Press down on the roast with a spoon. If it feels firm, it is ready.If the
spoon can be pressed in, it needs to be cooked for a little longer.
The roast is too dark and the crack-
ling is partly burnt.
Check the shelf position and temperature.
The roast looks good but the juices
are burnt.
Next time, use a smaller roasting dish and add more liquid.
The roast looks good but the juices
are too clear and watery.
Next time, use a larger roasting dish and use less liquid.

20
Tested for you in our cooking studio
Here, you can find a selection of dishes and the ideal
settings for them. We will show you which type of
heating, temperature and shelf position are best suited
for your dish.
Notes
▯ The times specified in the tables are only guidelines.
They will depend on the quality and composition of the
food.
▯ Use the accessories provided. Additional accessories
may be obtained as optional accessories from
specialist retailers or from customer service.
Before using the oven, remove any unnecessary
accessories and ovenware from the cooking
compartment.
▯ Always use oven gloves when taking hot accessories
or cookware out of the cooking compartment.
Food Weight
lbs (kg)
Function Runner posi-
tion from the
bottom
Temperatur in
°F (°C)
Time (minutes)
Lasagne 6¾ - 8
(3- 4)
Bake 1 400- 450
(205- 230)
45- 50
Pasta bake 6¾ - 8
(3- 4)
Bake 1 400- 450
(205- 230)
45- 50
Pork 4½ (2) Conv Bake 2 350(175) 70- 80
Sausages 3¹/
3
(1.5) Conv Broil Plus 4 500(260) 15
Roast beef 2¼ (1) Conv Bake 2 500(260) 40- 45
Turkey breast 6¾ (3) Conv Bake 2 350(175) 110- 120
Roast chicken 2²/
3
(1.2) Conv Bake 2 350(175) 65- 70
1
st
surface 2
nd
surface
Pork chops 3¹/
3
(1.5) Conv Broil Plus 4 500(260) 15 5
Spare ribs 3¹/
3
(1.5) Conv Broil Plus 4 500(260) 10 10
Bacon 1¾ (0.7) Broil Plus 5 500(260) 7 8
Pork fillet 3¹/
3
(1.5) Conv Broil Plus 4 500(260) 10 5
Beef fillet 2¼ (1) Broil Plus 5 500(260) 10 7
Salmon
1
1
/
3
(0.6)
Conv Bake 2 300(150) 25- 30
Pizza 2¼ (1) Frozen Food 2 500(260) 8- 9
Bread 2¼ (1) Frozen Food 2 350- 400
(175- 205)
25- 30
Focaccia 2¼ (1) Frozen Food 2 350(175) 20- 25
Sponge cake 2¼ (1) Pie 2 300(150) 55- 60
Cheesecake 2¼ (1) Pie 2 300- 350 55- 60
Cream puffs 2²/
3
(1.2) Pie 2 350(175) 80- 90
Light sponge cake 2¼ (1) Pie 2 300- 350
(150- 175)
55- 60
Biscuits 2¼ (1) Conv Multi-Rack 2- 4 300(150) 20- 25
The times indicated in the table do not include preheating times and are provided as a guide only.

21
STATEMENT OF LIMITED PRODUCT WARRANTY
What this Warranty Covers & Who it
Applies to
The limited warranty provided by BSH Home Appliances
Corporation (“BSH“) in this Statement of Limited Product
Warranty applies only to the Bosch appliance (“Product“)
sold to you, the first using purchaser, provided that the
Product was purchased:
▯ For your normal, household (non-commercial) use,
and has in fact at all times only been used for normal
household purposes.
▯ New at retail (not a display, "as is", or previously
returned model), and not for resale, or commercial
use.
▯ Within the United States or Canada, and has at all
times remained within the country of original purchase.
The warranties stated herein apply to the original
purchaser of the product warranted herein and to each
succeeding owner of the product purchased for ordinary
home use during the term of the warranty.
Please make sure to return your registration card; while
not necessary to effectuate warranty coverage, it is the
best way for BSH to notify you in the unlikely event of a
safety notice or product recall.
How Long the Warranty Lasts
BSH warrants that the Product is free from defects in
materials and workmanship for a period of three hundred
sixty-five (365) days from the date of purchase. The
foregoing timeline begins to run upon the date of
purchase, and shall not be stalled, tolled, extended, or
suspended, for any reason whatsoever.
This Product is also warranted to be free from cosmetic
defects in material and workmanship (such as scratches
of stainless steel, paint/porcelain blemishes, chip, dents,
or other damage to the finish of the Product), for a period
of thirty (30) days from the date of purchase or closing
date for new construction. This cosmetic warranty
excludes slight color variations due to inherent
differences in painted and porcelain parts, as well as
differences caused by kitchen lighting, product location,
or other similar factors. This cosmetic warranty
specifically excludes any display, floor, “As Is”, or “B”
stock appliances.
Repair/Replace as Your Exclusive Remedy
During this warranty period, BSH or one of its authorized
service providers will repair your Product without charge
to you (subject to certain limitations stated herein) if your
Product proves to have been manufactured with a defect
in materials or workmanship. If reasonable attempts to
repair the Product have been made without success,
then BSH will replace your Product (upgraded models
may be available to you, in BSH’s sole discretion, for an
additional charge). All removed parts and components
shall become the property of BSH at its sole option. All
replaced and/or repaired parts shall assume the identity
of the original part for purposes of this warranty and this
warranty shall not be extended with respect to such
parts. BSH's sole liability and responsibility hereunder is
to repair manufacturer-defective Product only, using a
BSH-authorized service provider during normal business
hours. For safety and property damage concerns, BSH
highly recommends that you do not attempt to repair the
Product yourself, or use an un-authorized servicer; BSH
will have no responsibility or liability for repairs or work
performed by a non-authorized servicer. If you choose to
have someone other than an authorized service provider
work on your Product, THIS WARRANTY WILL
AUTOMATICALLY BECOME NULL AND VOID. Authorized
service providers are those persons or companies that
have been specially trained on BSH products, and who
possess, in BSH's opinion, a superior reputation for
customer service and technical ability (note that they are
independent entities and are not agents, partners,
affiliates or representatives of BSH). Notwithstanding the
foregoing, BSH will not incur any liability, or have
responsibility, for the Product if it is located in a remote
area (more than 100miles from an authorized service
provider) or is reasonably inaccessible, hazardous,
threatening, or treacherous locale, surroundings, or
environment; in any such event, if you request, BSH
would still pay for labor and parts and ship the parts to
the nearest authorized service provider, but you would
still be fully liable and responsible for any travel time or
other special charges by the service company, assuming
they agree to make the service call.
Out of Warranty Product
BSH is under no obligation, at law or otherwise, to
provide you with any concessions, including repairs, pro-
rates, or Product replacement, once this warranty has
expired.
Warranty Exclusions
The warranty coverage described herein excludes all
defects or damage that are not the direct fault of BSH,
including without limitation, one or more of the following:
▯ Use of the Product in anything other than its normal,
customary and intended manner (including without
limitation, any form of commercial use, use or storage
of an indoor product outdoors, use of the Product in
conjunction with air or water-going vessels).
▯ Any party's willful misconduct, negligence, misuse,
abuse, accidents, neglect, improper operation, failure
to maintain, improper or negligent installation,
tampering, failure to follow operating instructions,
mishandling, unauthorized service (including self-
performed "fixing" or exploration of the appliance's
internal workings).
▯ Adjustment, alteration or modification of any kind.
▯ A failure to comply with any applicable state, local,
city, or county electrical, plumbing and/or building
codes, regulations, or laws, including failure to install
the product in strict conformity with local fire and
building codes and regulations.

22
▯ Ordinary wear and tear, spills of food, liquid, grease
accumulations, or other substances that accumulate
on, in, or around the Product.
▯ Any external, elemental and/or environmental forces
and factors, including without limitation, rain, wind,
sand, floods, fires, mud slides, freezing temperatures,
excessive moisture or extended exposure to humidity,
lightning, power surges, structural failures surrounding
the appliance, and acts of God.
In no event shall BSH have any liability or responsibility
whatsoever for damage to surrounding property,
including cabinetry, floors, ceilings, and other structures
or objects around the Product. Also excluded from this
warranty are Products on which the serial numbers have
been altered, defaced, or removed; service visits to teach
you how to use the Product, or visits where there is
nothing wrong with the Product; correction of installation
problems (you are solely responsible for any structure
and setting for the Product, including all electrical,
plumbing or other connecting facilities, for proper
foundation/flooring, and for any alterations including
without limitation cabinetry, walls, floors, shelving, etc.);
and resetting of breakers or fuses.
TO THE EXTENT ALLOWED BY LAW, THIS WARRANTY
SETS OUT YOUR EXCLUSIVE REMEDIES WITH
RESPECT TO PRODUCT, WHETHER THE CLAIM ARISES
IN CONTRACT OR TORT (INCLUDING STRICT LIABILITY,
OR NEGLIGENCE) OR OTHERWISE. THIS WARRANTY
IS IN LIEU OF ALL OTHER WARRANTIES, WHETHER
EXPRESS OR IMPLIED. ANY WARRANTY IMPLIED BY
LAW, WHETHER FOR MERCHANTABILITY OR FITNESS
FOR A PARTICULAR PURPOSE, OR OTHERWISE,
SHALL BE EFFECTIVE ONLY FOR THE PERIOD THAT
THIS EXPRESS LIMITED WARRANTY IS EFFECTIVE. IN
NO EVENT WILL THE MANUFACTURER BE LIABLE FOR
CONSEQUENTIAL, SPECIAL, INCIDENTAL, INDIRECT,
"BUSINESS LOSS", AND/OR PUNITIVE DAMAGES,
LOSSES, OR EXPENSES, INCLUDING WITHOUT
LIMITATION TIME AWAY FROM WORK, HOTELS AND/
OR RESTAURANT MEALS, REMODELLING EXPENSES
IN EXCESS OF DIRECT DAMAGES WHICH ARE
DEFINITIVELY CAUSED EXCLUSIVELY BY BSH, OR
OTHERWISE. SOME STATES DO NOT ALLOW THE
EXCLUSION OR LIMITATION OF INCIDENTAL OR
CONSEQUENTIAL DAMAGES, AND SOME STATES DO
NOT ALLOW LIMITATIONS ON HOW LONG AN IMPLIED
WARRANTY LASTS, SO THE ABOVE LIMITATIONS MAY
NOT APPLY TO YOU. THIS WARRANTY GIVES YOU
SPECIFIC LEGAL RIGHTS, AND YOU MAY ALSO HAVE
OTHER RIGHTS WHICH VARY FROM STATE TO STATE.
No attempt to alter, modify or amend this warranty shall
be effective unless authorized in writing by an officer of
BSH.

23
Table des Matières
Notice d’uti l i sati on
9 Définitions de sécurité ........................................... 24
IMPORTANTES CONSIGNES DE SÉCURITÉ ............. 25
Installation et entretien corrects ..................................... 25
Sécurité-incendie ............................................................... 25
Prévention des brûlures ................................................... 26
Sécurité des enfants ......................................................... 26
Consignes en matière de nettoyage ............................. 27
Sécurité pour la batterie de cuisine ............................... 27
Avertissement issu de la proposition 65 : .................... 27
Causes des dommages ............................................... 28
Protection de l'environnement ................................... 28
Conseils d'économie d'énergie ...................................... 28
Votre nouvel appareil .................................................. 29
Four ...................................................................................... 29
Sélecteur des fonctions ................................................... 29
Sélecteur de température ................................................ 30
Minuterie ............................................................................. 30
Accessoires ........................................................................ 31
Avant la première utilisation ...................................... 32
Réglage de l’heure ........................................................... 32
Chauffe à vide du four ...................................................... 32
Nettoyer les accessoires ................................................. 32
Fonctionnement ........................................................... 32
Allumer le four .................................................................... 32
Minuterie de cuisine .......................................................... 33
Réglage de la minuterie automatique ........................... 33
Réglages de base ............................................................. 33
Entretien et nettoyage ................................................. 34
Nettoyants ........................................................................... 34
Panneaux catalytiques du compartiment de cuisson 35
Dépose et pose des vitres de la porte ......................... 35
Décrocher et accrocher la porte de l'appareil ............. 36
Retrait et montage des grilles porte-accessoires ....... 37
Dépannage ................................................................... 38
Changer la lampe du four ............................................... 39
Soutien Bosch
®
............................................................ 40
Avant d’appeler le service de réparations ................... 40
Plaque signalétique ........................................................... 40
Service ................................................................................. 40
Pièces et accessoires ..................................................... 40
Conseils pour l'utilisation ........................................... 41
Cuisson de pain et de pâtisseries ................................. 41
Rôtissage et grillade ......................................................... 42
Testés pour vous dans notre laboratoire ...................... 43
ÉNONCÉ DE LA GARANTIE LIMITÉE ........................ 44
Couverture de la garantie : ............................................. 44
Durée de la garantie ......................................................... 44
Réparation ou remplacement comme solution
exclusive ............................................................................. 44
Produit hors garantie ........................................................ 44
Exclusions à la garantie ................................................... 44
Pr odukt i nf o.
Vous trouverez des informations supplementaires
concernant les produits, accessoires, pièces de
rechange et services sur Internet sous :
www.bosch-home.com et la boutique en ligne :
www.bosch-eshop.com

24
9 Définitions de sécurité
Définitions de sécurité
9 AVERTISSEMENT
Ceci indique que le non-respect de cet
avertissement peut entraîner des blessures graves,
voire la mort.
9 ATTENTION
Ceci indique que le non-respect de cet
avertissement peut entraîner des blessures légères
ou de gravité moyenne.
AVIS : Ceci indique que la non-conformité à cet avis de
sécurité peut entraîner des dégâts matériels ou
endommager l'appareil.
Remarque : Ceci vous signale des informations et/ou
indications importantes.
9RXVDYH]GHVTXHVWLRQV"
ZZZERVFKKRPHFRPXV
ââ
1RXVQRXVIHURQVXQSODLVLUGHYRXVVHUYLU
&HWDSSDUHLOpOHFWURPpQDJHU%RVFKHVWIDEULTXpSDU
%6++RPH$SSOLDQFHV&RUSRUDWLRQ
0DLQ6WUHHW6XLWH
,UYLQH&$

25
9 IMPORTANTES CONSIGNES DE SÉCURITÉ
LIRE ET CONSERVER CES INSTRUCTIONS
IMPORTANTES CONSI GNES DE S ÉCURI T É LI RE ET CONSE RV E R CE S INSTRUCTIONS
AVERTISSEMENT
Votre nouvel appareil a été conçu pour un
fonctionnement sûr et fiable si vous en prenez bien soin.
Lire attentivement toutes les consignes avant l'emploi.
Ces précautions réduiront les risques de brûlures, de
choc électrique, d'incendie et de lésions corporelles.
Lors de l'utilisation d'un appareil électroménager,
quelques précautions de sécurité élémentaires doivent
être observées, y compris celles qui figurent aux pages
suivantes.
Installation et entretien corrects
Demandez à l'installateur de vous montrer où se trouve
le disjoncteur ou le fusible. Identifier sa position pour
pouvoir le retrouver facilement.
Cet appareil doit être adéquatement installé et mis à la
terre par un technicien agréé. Branchez l'appareil
uniquement dans une prise correctement reliée à la
terre. Pour plus de détails, reportez-vous à la notice
d'installation.
Cet appareil est destiné uniquement à une utilisation
domestique normale. Il n'est pas homologué pour un
usage en extérieur. Voyez la Ènoncé de la Garantie
Limitée. Si vous avez des questions, communiquez avec
le fabricant.
Ne pas entreposer ni utiliser de produits chimiques
corrosifs, vapeurs, substances inflammables ou produits
non alimentaires à l'intérieur ou à proximité de l'appareil.
Il a été spécialement conçu pour être utilisé pendant le
chauffage et la cuisson des aliments. L'emploi de
produits chimiques corrosifs pour chauffer ou nettoyer
l'appareil endommagera ce dernier et peut provoquer
des blessures.
Ne pas se servir de cet appareil s'il ne fonctionne pas
correctement ou s'il est endommagé. Communiquer
avec un réparateur autorisé.
Ne pas obstruer les évents du four.
Ne pas réparer ni remplacer toute pièce de l'appareil à
moins que cela ne soit spécifiquement recommandé par
ce manuel. Toute réparation doit être effectuée par un
réparateur autorisé.
En cas d'erreur, l'affichage clignote et émet un signal
sonore continu. Débrancher l'appareil de l'alimentation et
appeler un réparateur autorisé.
AVERTISSEMENT
Avant de démonter la porte, s'assurer que le courant qui
alimente le four est coupé. Le non respect de cette
instruction peut entraîner des brûlures.
La porte du four est lourde et fragile. Utilisez les deux
mains pour retirer la porte du four. La face avant de la
porte est en verre. Manipuler avec précaution pour éviter
les cassures.
Saisir la porte uniquement par les côtés. Ne pas tenir la
porte par la poignée car elle risque de tourner et
provoquer des blessures ou des dommages.
Si la porte n'est pas maintenue fermement et
correctement, des lésions corporelles ou des dommages
matériels pourraient survenir.
Placer la porte sur une surface plane et stable afin
qu'elle ne puisse pas tomber. Le non respect de cette
consigne peut entraîner des lésions corporelles ou des
dommages à l'appareil.
AVERTISSEMENT
Pour éviter les blessures dues à l'enclenchement des
charnières, s'assurer que les deux leviers sont bien en
place avant de retirer la porte. D'autre part, ne pas forcer
la porte pour la fermer ou l'ouvrir - cela pourrait
endommager une charnière et provoque des blessures.
AVERTISSEMENT
S'assurer que l'appareil et les ampoules ont refroidi et
que le courant qui alimente l'appareil a été coupé avant
de changer une ou plusieurs ampoules. Le non respect
de cette instruction peut entraîner un choc électrique ou
des brûlures. Les lentilles (le cas échéant) doivent être
mises en place lors de l'utilisation de l'appareil. Les
lentilles (le cas échéant) permettent d'éviter que les
ampoules ne se brisent. Les lentilles (le cas échéant)
sont en verre. Manipuler avec précaution pour éviter les
cassures. Le verre brisé peut être une cause de
blessures.
AVERTISSEMENT
Si l'alimentation principale n'est pas coupée, la douille
reste sous tension lorsque la porte est ouverte.
Sécurité-incendie
AVERTISSEMENT
Ne JAMAIS couvrir les encoches, orifices ou passages
pratiqués au fond du four et ne jamais recouvrir
complètement la grille avec des matériaux tels que le
papier d'aluminium. Vous risquez autrement de bloquer
la circulation de l'air à l'intérieur du four. Les feuilles
d'aluminium peuvent également emprisonner la chaleur
et présenter ainsi un risque d'incendie.
Si des matériaux à l'intérieur d'un four ou d'un tiroir-
réchaud venaient à prendre feu, conserver la porte
fermée. Éteindre l'appareil et déconnecter le circuit
depuis le boîtier de disjoncteurs.

9 IMPORTANTES CONSIGNES DE SÉCURITÉ
LIRE ET CONSERVER CES INSTRUCTIONS
26
AVERTISSEMENT
Utiliser cet appareil uniquement dans le cadre de
l'utilisation prévue tel que décrit dans ce manuel. NE
JAMAIS utiliser pour chauffer ou réchauffer une pièce.
Ceci pourrait faire surchauffer l'appareil. L'appareil ne
doit jamais servir à entreposer quoi que ce soit.
Toujours avoir un détecteur de fumée en état de marche
près de la cuisine.
Si des vêtements s’enflamment, rouler par terre
immédiatement pour éteindre les flammes.
Veillez à avoir à portée de main un extincteur d'incendie
en bon état de marche, placé visiblement près de
l'appareil et facile d'accès.
Étouffez les flammes d'un feu d'aliments autre qu'un feu
de graisse à l'aide de bicarbonate de soude. Ne jamais
utiliser d'eau sur les feux de cuisson.
AVERTISSEMENT
POUR RÉDUIRE LE RISQUE DE LÉSIONS
CORPORELLES DANS L'ÉVENTUALITÉ D'UN FEU DE
GRAISSE, OBSERVER LES CONSIGNES SUIVANTES :
a.
ÉTOUFFER LES FLAMMES à l'aide d'un couvercle bien
hermétique, d'une tôle à biscuits ou d'un plateau en
métal, puis éteindre l'appareil. FAIRE ATTENTION À NE
PAS SE BRÛLER. Si les flammes ne s'éteignent pas
immédiatement, ÉVACUER LES LIEUX ET FAIRE
APPEL AU SERVICE D'INCENDIE.
b.
NE JAMAIS SAISIR UN RÉCIPIENT QUI BRÛLE. Vous
pourriez vous brûler.
c.
NE PAS UTILISER D'EAU, y compris les chiffons ou
serviettes mouillées. Une violente explosion de vapeur
risque de se produire.
d.
Utiliser un extincteur uniquement si :
- Vous savez que vous possédez un extincteur de
CLASSE ABC, et vous en connaissez déjà le
maniement.
- L'incendie est de petite ampleuret contenu dans la
zone où il s'est déclaré.
- Le service d'incendie est appelé.
- On peut combattre l'incendie le dos tourné vers la
sortie.
Prévention des brûlures
NE PAS TOUCHER LES ÉLÉMENTS CHAUFFANTS OU
LES SURFACES INTÉRIEURES DU FOUR - Les éléments
chauffants peuvent être chauds même s'ils ne sont pas
rouges. Les parois intérieures d'un four peuvent devenir
suffisamment chaudes pour provoquer des brûlures.
Avant et après l'utilisation, ne pas toucher les éléments
chauffants ou les surfaces intérieures du four et ne pas
mettre des vêtements, des maniques ou d'autres
matériaux inflammables en contact avec ces éléments et
ces surfaces tant qu'ils n'auront pas suffisamment
refroidi. Les autres surfaces de l'appareil peuvent devenir
suffisamment chaudes pour provoquer des brûlures.
Parmi ces surfaces, citons les ouvertures d'évent, les
surfaces situées près de ces ouvertures et les portes du
four.
Faire attention en ouvrant le tiroir-réchaud. En se plaçant
sur le côté, ouvrir la porte (ou le tiroir) lentement et
légèrement pour laisser l'air chaud et/ou la vapeur
s'échapper du four. Éloigner le visage de l'ouverture et
s'assurer qu'aucun enfant ou animal ne se trouve près
de l'appareil. Une fois l'air chaud et/ou la vapeur sortis,
continuez la cuisson. Ne pas laisser les portes ouvertes
à moins que vous ne soyez en train de cuisiner ou de
nettoyer. Ne pas laisser les portes ouvertes sans
surveillance.
Ne pas chauffer ou réchauffer des contenants d'aliments
non ouverts. L'accumulation de pression peut faire
exploser le contenant et provoquer desblessures.
Prendre des précautions lors de la cuisson d'aliments au
contenu élevé en alcool (e.g. le rhum, le brandy, le
bourbon) dans le four. L'alcool s'évapore à des
températures élevées. Il existe un risque d'incendie car
les vapeurs d'alcool peuvent prendre feu à l'intérieur du
four. Utiliser de petites quantité d'alcool dans les
aliments et ouvrir la porte du four avec précautions.
Placez toujours les grilles du four à la position souhaitée
alors que le four est froid. Toujours utiliser des maniques
quand le four est chaud. Si une grille doit être déplacée
alors que le four est chaud, ne pas laisser les poignées
isolantes entrer en contact avec les éléments chauffants.
ATTENTION
Afin d'éviter toute blessure ou dommage potentiels,
s'assurer d'installer la grille en suivant exactement les
instructions d'installation, et ne pas la mettre à l'envers ni
dans le mauvais sens.
Toujours utiliser des poignées isolantes sèches. Des
poignées mouillées ou humides entrant en contact avec
les surfaceschaudes peuvent provoquer des blessures
par dégagement de vapeur. Ne laissez pas les poignées
toucher les éléments chauffants chauds. Ne pas utiliser
de serviette ni de chiffon volumineux.
Attacher les vêtements lâches, etc. avant de commencer.
Attacher les cheveux longs de façon à ce qu'ils ne
pendent pas et ne pas porter de vêtements lâches ou
d'habits ou objets qui pendillent, tels que cravates,
foulards, bijoux ou manches.
Sécurité des enfants
Lorsque les enfants sont assez âgés pour utiliser
l'appareil, il incombe aux parents ou tuteurs légaux de
veiller à ce qu'ils soient formés aux pratiques sécuritaires
par des personnes qualifiées.
Ne permettre à personne de grimper, rester debout,
s'appuyer, s'asseoir ou se pencher sur toute partie d'un
appareil, notamment une porte, un tiroir-réchaud ou un
tiroir de rangement. Ceci peut endommager l'appareil qui
risque de basculer et causer des blessures sérieuses.
Ne pas permettre aux enfants d'utiliser cet appareil sauf
sous la surveillance attentive d'un adulte. Ne pas laisser

27
9 IMPORTANTES CONSIGNES DE SÉCURITÉ
LIRE ET CONSERVER CES INSTRUCTIONS
les enfants et les animaux seuls ou sans surveillance
lorsque l'appareil est en service. Ne jamais les laisser
jouer aux alentours de l'appareil, que ce dernier soit en
service ou non.
ATTENTION
Les articles d’intérêt pour les enfants ne doivent pas être
rangés dans un appareil électroménager, dans les
armoires au–dessus de l’appareil ou sur le dosseret. Les
enfants peuvent grimper sur l’appareil pour atteindre ces
objets et se blesser sérieusement.
Consignes en matière de nettoyage
Ne laissez jamais de graisse s'accumuler dans le four.
Sécurité pour la batterie de cuisine
AVIS : Ne pas placer les aliments directement sur la
sole du four.
Observer les instructions du fabricant lors de l'utilisation
de sacs de cuisson ou de rôtissage.
Ne déposez pas d'ustensiles sur la porte ouverte du four.
Avertissement issu de la proposition 65 :
Ce produit pourrait contenir un produit chimique reconnu
par l'État de la Californie comme cancérigène ou ayant
des effets nocifs sur la reproduction. Par conséquent,
l'emballage de votre produit pourrait porter l'étiquette
suivante, comme requis par la Californie :
&DQFHUHWGRPPDJHVjODUHSURGXFWLRQ
ZZZ3:DUQLQJVFDJRY
$9(57,66(0(17,668'(/$352326,7,21â'(/e7$7'(
$9(57,66(0(17
/$&$/,)251,(â

28
Causes des dommages
AVIS:
▯ Accessoires, films plastiques, papier de cuisson ou
ustensiles de cuisson se trouvant sur le fond du four :
ne rien déposer sur le fond du four. Ne pas recouvrir
le fond du four de films ou autres papiers de cuisson
quelqu'ils soient. Ne pas déposer d'ustensiles de
cuisson sur le fond du four lorsque la température est
réglée à plus de 122°F (50 °C), car cela génère une
accumulation de chaleur, une modification des temps
de cuisson et une détérioration de l'émail.
▯ N'utilisez pas le four si le revêtement de voûte est
installé dans la portion inférieure de la cavité.
▯ Eau dans le four chaud : ne jamais verser d'eau dans
le four chaud, car cela produit de la vapeur qui peut
endommager l'enceinte émaillée sous l'effet du
changement de température.
▯ Ne pas laisser pendant une période prolongée dans le
four fermé des produits alimentaires humides, car cela
peut favoriser l'apparition de corrosion dans le four.
▯ Le jus de fruit peut tacher l'enceinte du four. Toujours
enlever le jus de fruit sans attendre, en utilisant
d'abord un chiffon mouillé, puis un chiffon sec. Laisser
refroidir le four pour éviter les brûlures de vapeur
causées par un chiffon humide.
▯ Refroidissement avec la porte ouverte : laisser le four
refroidir sans ouvrir la porte. Même si la porte n'est
que légèrement entrouverte, cela peut à la longue
endommager les façades des meubles voisins.
▯ Joint de porte très encrassé : lorsque le joint est très
sale, la porte ne se ferme plus correctement. Les
façades des meubles voisins risquent d'être
endommagées. Faire en sorte que le joint de la porte
soit toujours propre.
▯ Porte du four utilisée comme siège ou desserte : ne
pas monter sur la porte du four, ni s'asseoir dessus ou
s'y suspendre. Ne pas déposer sur la porte des
accessoires ou ustensiles de cuisson quelconques.
▯ Montage des accessoires : selon le type de four, les
accessoires peuvent rayer la porte lors de la fermeture
de cette dernière. Toujours mettre les accessoires
entièrement dans le four.
▯ Ne pas tenir ni porter l'appareil en le prenant par la
poignée de la porte. La poignée de la porte ne peut
pas supporter le poids de l'appareil et risque de se
casser.
Protection de l'environnement
Déballez l'appareil et jetez l'emballage dans le respect
de l'environnement.
Conseils d'économie d'énergie
▯ Pendant la cuisson, ouvrez le moins possible la porte
du four.
▯ Pour les gâteaux, utilisez des moules foncés, laqués
noir ou émaillés, car ils absorbent particulièrement
bien la chaleur.
▯ Si vous avez plusieurs gâteaux, faites-les cuire de
préférence l'un après l'autre. Le four est encore chaud
permet de réduire la durée de cuisson du gâteau
suivant. Vous pouvez aussi placer l'un à côté de l'autre
deux moules à cake.
▯ En mode chaleur tournante, vous pouvez cuire en
même temps sur plusieurs niveaux.
▯ Dans le cas de cuissons longues, vous pouvez
éteindre le four 10minutes avant la fin de cuisson, afin
de profiter de la chaleur résiduelle.
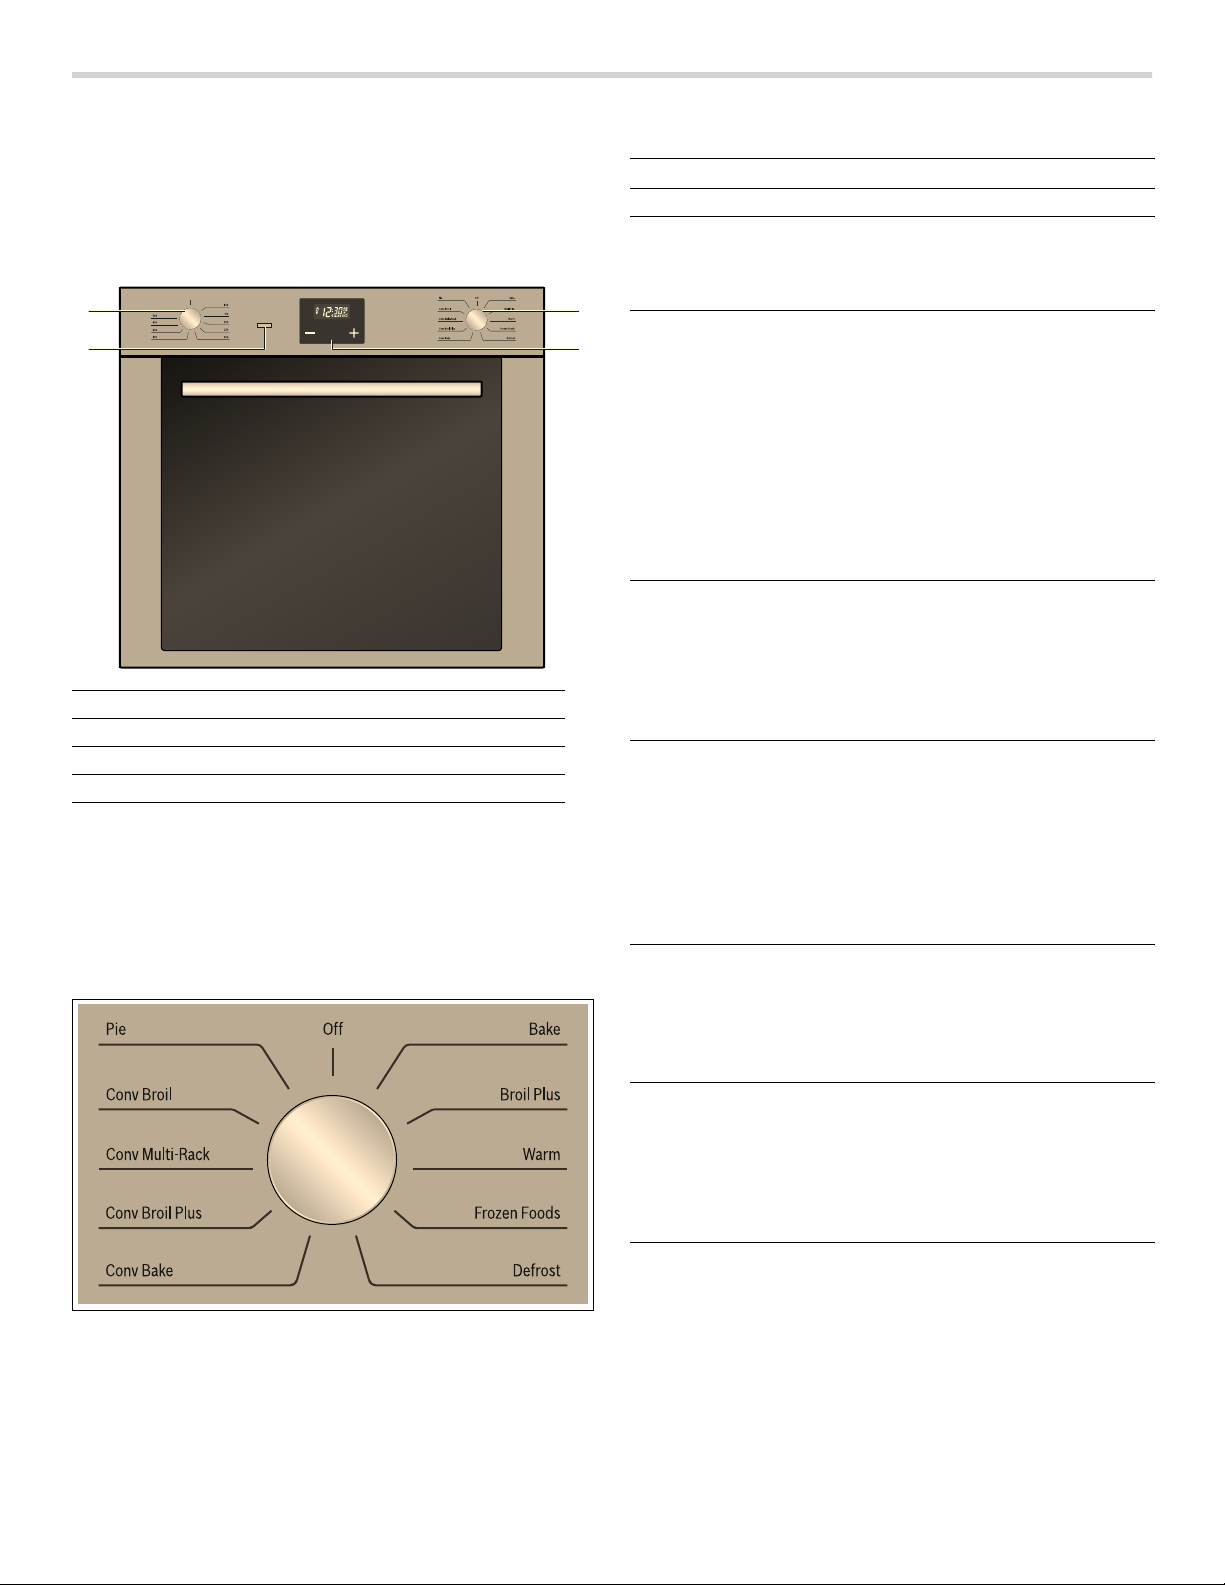
29
Votre nouvel appareil
Nous vous présentons ici votre nouvel appareil. Voici des
informations sur le bandeau de commande, le four, les
modes de cuisson et les accessoires.
Four
AVIS : Ne pas placer les aliments directement sur la
sole du four.
Ne pas obstruer les évents du four.
Sélecteur des fonctions
Avec le sélecteur des fonctions, vous réglez le mode de
cuisson.
1 Sélecteur de température
2 Témoin de service
3 Sélecteur des fonctions
4 Affichage et touches de fonction
7,0(56
Position Utilisation
Off (Désactivé) Le four est éteint.
Bake (Cuisson) Pour les gâteaux, les ragoûts et les
pièces minces à rôtir. La chaleur pro-
vient de façon égale de l'élément
chauffant supérieur et inférieur.
Broil Plus
(Gril Plus)
La chaleur provenant de l'élément
chauffant du gril donne des résultats
de cuisson parfaits, particulièrement
pour les coupes minces et moyennes
de viande, et avec l'option rôtissage
(si présente), vous pouvez faire dorer
les aliments à la fin de la cuisson.
Idéal pour les saucisses, les côtes et
le bacon. Cette fonction permet de
faire griller uniformément de grandes
quantités de nourriture, particulière-
ment la viande.
Warm (Réchaud) La chaleur provenant seulement du
bas permet de compléter la cuisson
des aliments qui nécessitent une
température de dessous plus élevée
sans affecter la façon de les dorer.
Idéal pour les gâteaux, les tartes, les
tartelettes et les pizzas.
Frozen Foods
(Aliments conge-
lés)
La combinaison de la cuisson assis-
tée par ventilateur et de la cuisson
traditionnelle permet de faire cuire
différents aliments sur plusieurs
niveaux rapidement et efficacement.
Idéal pour une grande quantité de
nourriture nécessitant une cuisson
intense, très utile pour les aliments
congelés en plus des aliments frais.
Defrost
(Décongélation)
La décongélation rapide est assistée
par l'activation du ventilateur et de
l'élément chauffant supérieur pour
assurer une distribution uniforme de
l'air à basse température à l'intérieur
du four.
Conv Bake (Cuis-
son à convec-
tion)
L'activation du ventilateur en plus de
la cuisson traditionnelle permet
d'obtenir une cuisson uniforme
même avec les recettes les plus
complexes. Idéal pour tous les types
de nourriture, même pour la cuisson
simultanée sur plusieurs niveaux.
Conv Broil Plus
(Gril plus à
convection)
L'air généré par le ventilateur adoucit
les puissantes ondes de chaleur pro-
duites par le gril, permettant de dorer
parfaitement même les aliments les
plus épais. Idéal pour les grosses
coupes de viande.

30
Remarque : Lorsque vous réglez le mode de cuisson, la
lampe du four dans le compartiment de cuisson s'allume.
Sélecteur de température
Avec le sélecteur de température vous réglez la
température.
Le voyant lumineux clignote lorsque le four chauffe.
Lorsque la température réglée est atteinte, le voyant est
allumé en continu et un signal retentit.
Minuterie
Avec la minuterie, vous pouvez contrôler votre four. Ainsi,
vous pouvez présélectionner par ex. le moment auquel le
four doit se mettre en marche ou bien auquel la
minuterie automatique doit terminer le processus de
cuisson. La minuterie peut aussi être utilisée comme
minuteur courte durée.
Touches de fonction
Symboles de l'affichage
Conv Multi-Rack
(Convection
Multi-Rack)
La combinaison du ventilateur et de
l'élément circulaire (incorporé dans la
partie arrière du four) permet de
cuire de la nourriture différente sur
plusieurs niveaux, à condition que la
température et le type de cuisson
soient identiques. La circulation de
l'air chaud assure une distribution
instantanée et uniforme de la cha-
leur. Pour la cuisson sur plusieurs
niveaux, nous vous recommandons
d'utiliser les positions 2et 4.
Conv Broil
(Gril à convec-
tion)
Grâce à l'action combinée du ventila-
teur et de la chaleur de l'élément
central seulement, cette fonction est
idéale pour la cuisson rapide et pour
gratiner de petites quantités de nour-
riture (particulièrement les viandes),
en alliant les avantages nutritionnels
du gril et la cuisson uniforme du ven-
tilateur.
Pie (Tarte) La combinaison du ventilateur et
d'une chaleur plus faible avec l'ajout
de l'élément supérieur permet à la
cuisson d'être effectuée plus rapide-
ment. Idéal pour tous les types de
nourriture, et tout particulièrement
pour les tartes et les gâteaux.
Position Signification
0 Position zéro Le four ne chauffe pas.
100-
500
Plage de tem-
pérature
La température dans le com-
partiment de cuisson en °F.
Position Utilisation
Symbole Signification Emploi
TIMERS Fonctions de
minuterie
Réglage d'une durée ou
du temps
A
Moins Réduire la durée ou
l'heure
@
Plus Augmenter la durée ou
l'heure
Symbole Signification
‹‹:‹‹
Heure / durée de fonctionnement / heure
de la fin / minuteur
Ž
Le four est prêt à fonctionner
auto Ž
Une durée de fonctionnement / durée de
fonctionnement avec heure de la fin est
programmée
†
Le minuteur est actif
„/…
Affichage de l'heure : format 12h
Pour passer au format 24h, voir le para-
graphe "Adapter l'heure"
7,0(56
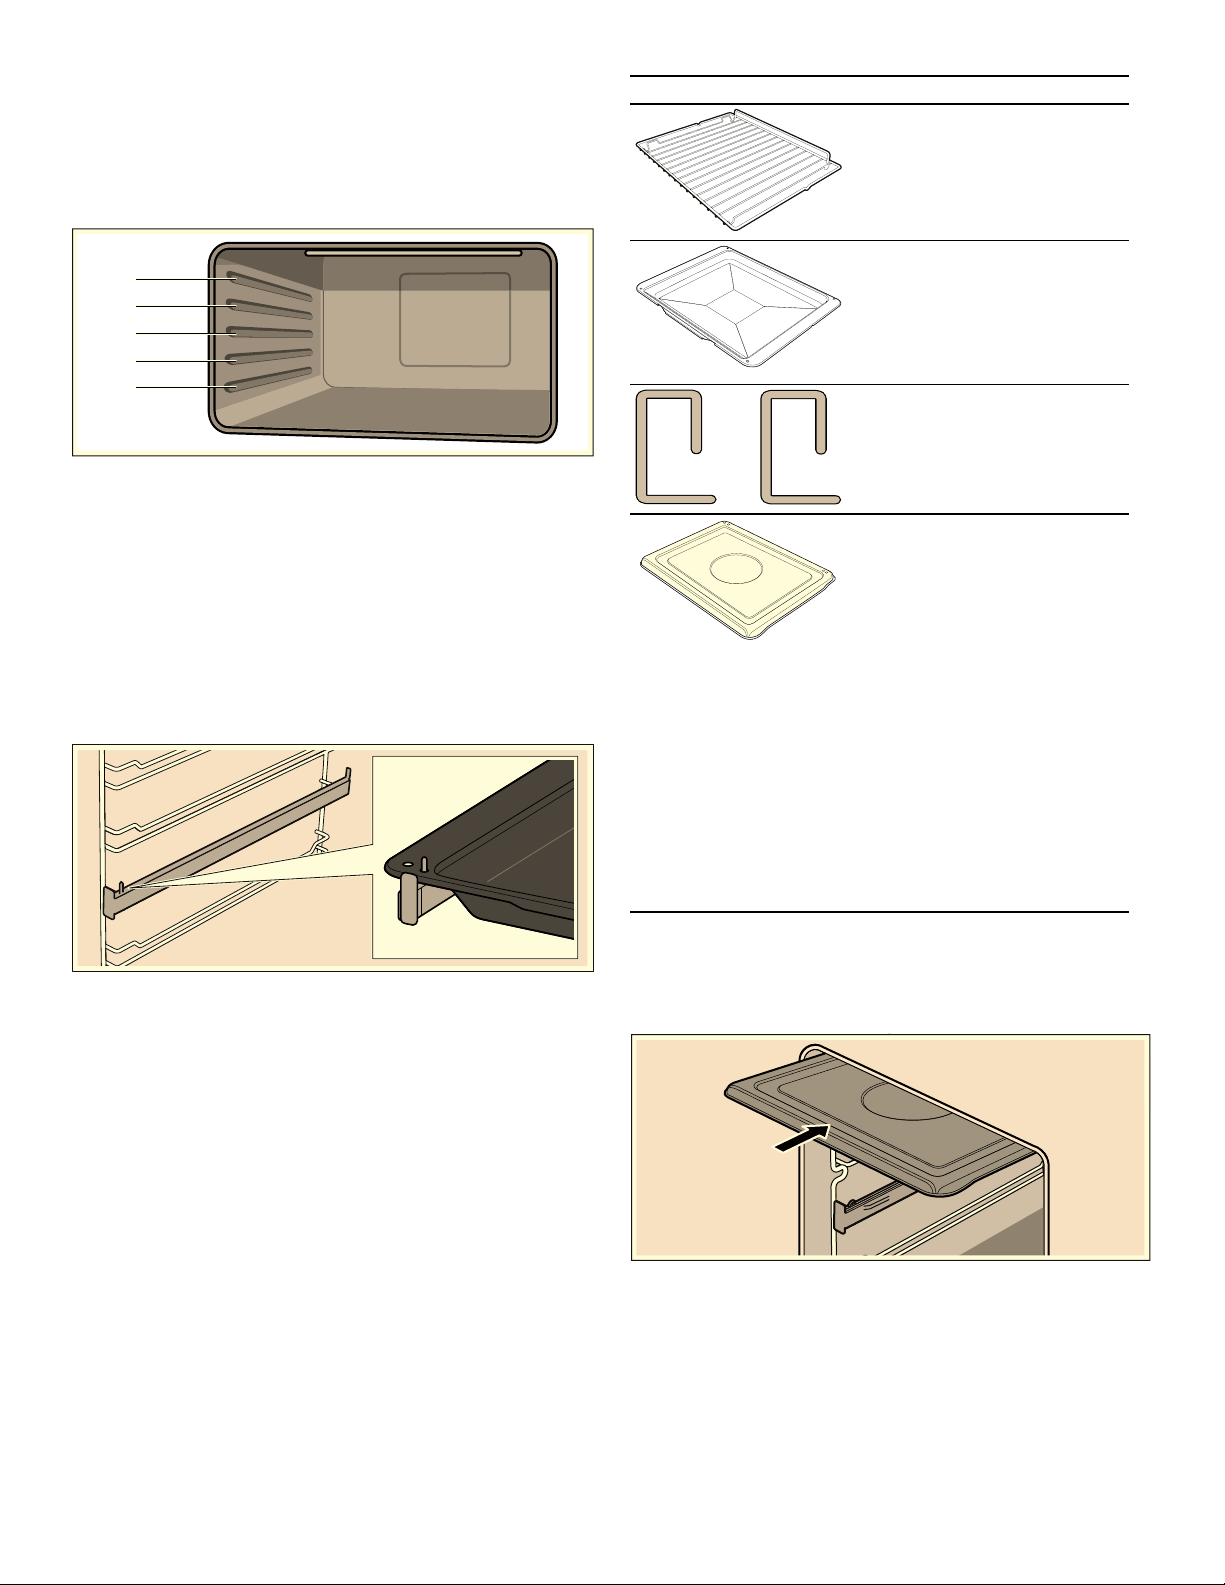
31
Accessoires
Les accessoires peuvent être enfournés à 5hauteurs
différentes. Introduire l'accessoire toujours jusqu'au fond,
afin qu'il ne touche pas la vitre de la porte. Veillez à
toujours introduire les accessoires dans le bon sens
dans le compartiment de cuisson.
Vous pouvez sortir les accessoires aux deux tiers sans
qu'ils ne basculent. Il est ainsi plus facile de retirer les
plats.
Lorsque l'accessoire devient chaud il peut se déformer.
Cela n'a aucune influence sur sa fonction, il reprend sa
forme dès qu'il a refroidi.
Vous pouvez acheter des accessoires auprès du service
après-vente, dans les commerces spécialisés ou sur
Internet.
Les rails télescopiques permettent de retirer l'accessoire
complètement.
--------
Insertion du revêtement de voûte
Insérez le revêtement de voûte en le glissant lentement
au-dessus de l'élément de gril. Pour le retirer, tirez-le
lentement de la cavité du four.
Accessoires Description
Grille à pâtisserie/de rôtis-
sage
Pour des récipients, des
moules à gâteaux, rôtis, gril-
lades, plats surgelés.
Plaque à pâtisserie émaillée
Pour des gâteaux fondants,
pâtisseries, plats surgelés et
gros rôtis. Également utili-
sable comme collecteur de
graisse.
Tiges de sécurité
Pour bloquer les charnières.
Revêtement de voûte
Le revêtement de voûte peut
être inséré de façon perma-
nente au-dessus de l'élément
du gril afin d'éviter de salir la
cavité de la voûte. Il peut être
retiré et est recouvert d'un
émail en porcelaine pour faci-
liter le nettoyage.
Remarque : : La couche en
porcelaine du revêtement de
voûte n'est pas uniforme, cer-
taines sections auront une
surface moins reluisante. Ceci
est normal, le métal demeure
entièrement recouvert et pro-
tégé malgré tout.

32
Avant la première utilisation
Vous trouverez ici des instructions à suivre avant
d'utiliser votre appareil pour la première fois et de
préparer des mets. Avant de commencer, lisez le
chapitre Consignes de sécurité.
Retirez l'emballage de l'appareil et éliminez-le
conformément aux réglementations en la matière.
Réglage de l’heure
Après le raccordement électrique de l'appareil ou après
une panne de courant, ‹:‹‹ et auto clignotent dans
l'affichage.
1.
Maintenir la touche TIMERS appuyée jusqu'à ce que le
deux-points clignote dans l'affichage.
2.
Régler l'heure actuelle à l'aide des touches @ et A.
Maintenir la touche @ ou A appuyée pour changer la
valeur plus rapidement.
Le temps réglé est validé au bout de 5secondes.
Réglage de l'heure pendant le fonctionnement
1.
Maintenir les touches @ et A appuyées, jusqu'à ce que
le deux-points clignote dans l'affichage.
2.
Régler l'heure actuelle à l'aide des touches @et A.
Maintenir la touche @ ou A appuyée pour changer la
valeur plus rapidement.
Le temps réglé est validé au bout de 5secondes.
Chauffe à vide du four
Nettoyage préalable du four
1.
Retirez les accessoires, les grilles à accrocher et le
revêtement de voûte du compartiment de cuisson.
2.
Enlevez tous les résidus d'emballage, par ex. petits
morceaux de polystyrène, du compartiment de
cuisson.
3.
Certaines parties sont recouvertes d'un film protecteur.
Retirez ce film protecteur.
4.
Nettoyez l'extérieur de l'appareil avec un chiffon doux
humide.
5.
Nettoyez le compartiment de cuisson à l'eau chaude
additionnée de produit à vaisselle.
Chauffer le four
Pour éliminer l'odeur du neuf, laissez chauffer le four à
vide, la porte fermée.
1.
Réglez le sélecteur des fonctions sur le mode de
fonctionnement Bake (cuisson).
2.
Réglez le sélecteur de température sur la température
maximale.
3.
Éteignez le four au bout de 40minutes.
Nettoyage de finition du four
1.
Nettoyez le compartiment de cuisson à l'eau chaude
additionnée de produit à vaisselle.
2.
Remettez les grilles porte-accessoires en place.
Nettoyer les accessoires
Avant d'utiliser les accessoires, nettoyez-les
soigneusement avec de l'eau chaude additionnée de
produit à vaisselle et une lavette.
Fonctionnement
Allumer le four
1.
Régler le mode de cuisson à l'aide du sélecteur des
fonctions.
2.
Régler la température au moyen du sélecteur de
température.
Le four commence à chauffer.
Éteindre le four
Régler le sélecteur des fonctions et le sélecteur de
température sur la position zéro.
Modifier les réglages
Vous pouvez modifier à tout moment le mode de cuisson
et la température ou la puissance du gril au moyen du
sélecteur correspondant.
Chauffe
Pour chauffer rapidement le compartiment de cuisson,
utiliser le mode de cuisson "Conv Bake". Lorsque la
température réglée est atteinte (le voyant lumineux est
allumé en continu et un signal retentit), régler le mode de
cuisson désiré.

33
Minuterie de cuisine
Le minuteur courte durée n'a pas d'influence sur les
fonctions du four. La durée du minuteur peut être réglée
de 1minute à 23heures et 59minutes.
1.
Maintenir la touche TIMERS appuyée jusqu'à ce que le
symbole
† clignote dans l'affichage et ‹:‹‹ s'affiche.
2.
Régler la durée désirée à l'aide des touches @ et A.
Le temps réglé est validé au bout de 5secondes.
Après écoulement du temps, un signal sonore retentit
et le symbole
† clignote.
Remarque : Pendant l'écoulement du minuteur, l'heure
est affichée et le symbole † est allumé en continu.
Modifier le temps réglé :
Pour modifier le temps de marche résiduel, appuyer sur
la touche TIMERS jusqu'à ce que le symbole
† clignote
dans l'affichage. Modifier ensuite le temps de marche
résiduel à l'aide des touches
@ et A.
Annuler le minuteur
Pour effacer le réglage, maintenir la touche TIMERS
appuyée, jusqu'à ce que le symbole
† clignote dans
l'affichage. Appuyer ensuite simultanément sur les
touches
@ et A.
Désactiver le signal sonore
Maintenir la touche TIMERS appuyée jusqu'à ce que
l'horloge s'éteigne. Le signal s'arrête automatiquement
au bout de sept minutes.
Réglage de la minuterie automatique
À l'aide de la fonction MINUTERIE vous pouvez régler
une durée de fonctionnement et programmer une heure
de début et de fin.
Arrêt automatique
1.
Maintenir la touche TIMERS appuyée, jusqu'à ce que
le symbole † clignote.
2.
Réappuyer sur la touche TIMERS.
auto et šž§ clignotent dans l'affichage.
3.
Régler la durée de fonctionnement à l'aide des
touches @ et A.
La durée de fonctionnement peut être réglée de
1minute à 10heures.
4.
Régler le mode de cuisson et la température désirés.
Le four démarre. Le symbole Ž et auto sont allumés
dans l'affichage, l'heure actuelle est affichée.
La durée de fonctionnement est écoulée
Un signal retentit, auto clignote dans l'affichage.
1.
Éteindre le sélecteur de température et le sélecteur
des fonctions.
2.
Maintenir la touche TIMERS appuyée, jusqu'à
l'apparition du symbole Ž.
Le four repasse au mode manuel.
Annuler la durée de fonctionnement
Pour effacer le réglage, maintenir la touche TIMERS
appuyée jusqu'à ce que le symbole † clignote dans
l'affichage. Appuyer ensuite simultanément sur les
touches @ et A.
Mise en marche et arrêt automatiques
La cuisson ou le rôtissage pour la durée réglée
commence à un moment ultérieur que vous avez
sélectionné.
1.
Maintenir la touche TIMERS appuyée, jusqu'à ce que
le symbole
† clignote.
2.
Réappuyer sur la touche TIMERS.
auto et šž§ clignotent dans l'affichage.
3.
Régler la durée de fonctionnement à l'aide des
touches
@ et A.
La durée de fonctionnement peut être réglée de
1minute à 10heures.
4.
Réappuyer sur la touche TIMERS. auto et le symbole
Ž clignotent dans l'affichage.
L'heure de la fin de la durée de fonctionnement
programmée est affichée.
5.
Modifier l'heure de la fin à l'aide des touches @ et A.
L'heure de la fin peut être différée de max. 23heures
et 59minutes.
Le four calcule l'heure du démarrage. Le temps réglé
est validé au bout de 5secondes.
Le symbole Ž et auto s'éteignent, l'heure actuelle
s'affiche.
6.
Régler le mode de cuisson et la température désirés.
Le four commence à chauffer à l'heure de départ
calculée. Le symbole Ž et auto s'allument dans
l'affichage.
La durée de fonctionnement est écoulée
Un signal retentit, auto clignote dans l'affichage.
1.
Éteindre le sélecteur de température et le sélecteur
des fonctions.
2.
Maintenir la touche TIMERS appuyée, jusqu'à
l'apparition du symbole Ž.
Le four repasse au mode manuel.
Annuler la durée de fonctionnement
Pour effacer le réglage, maintenir la touche TIMERS
appuyée jusqu'à ce que le symbole † clignote dans
l'affichage. Appuyer ensuite simultanément sur les
touches @ et A.
Réglages de base
Vous pouvez régler les réglages de base suivants de
manière permanente :
Réglage de base Options
Signal sonore ▯ faible
▯ moyen
▯ fort*
Format horaire ▯ 24h*
▯ 12h am/pm
* Réglage usine

34
Modifier le volume du signal sonore
Le four doit être éteint.
1.
Maintenir les touches @ et A appuyées, jusqu'à ce que
le deux-points clignote dans l'affichage.
2.
Appuyer une fois sur la touche TIMERS.
Signal apparaît dans l'affichage.
3.
Appuyer répétitivement sur la touche A, jusqu'à ce
que le volume souhaité soit atteint.
Modifier le format horaire
Le four doit être éteint.
Maintenir la touche @ appuyée pendant 3secondes.
„/… apparaît dans l'affichage. Pour revenir au format
horaire 24h, réappuyer sur la touche @ pendant
3secondes.
Entretien et nettoyage
Si vous entretenez et nettoyez soigneusement votre four
il gardera longtemps son aspect neuf et restera
opérationnel. Nous vous expliquons ici comment
entretenir et nettoyer correctement votre four.
Remarques
▯ Les légères variations de couleur apparaissant sur la
façade du four sont dues aux différents matériaux tels
que le verre, le plastique et le métal.
▯ Des ombres semblables à des stries sur la vitre de la
porte sont des reflets de la lampe du four.
▯ L'émail est cuit à des températures très élevées. Ceci
peut engendrer des différences de teintes. Ce
phénomène est normal et n'a aucune incidence sur le
fonctionnement. Les bords de plaques minces ne
peuvent pas être complètement émaillés. Ils peuvent
donc présenter des aspérités. La protection contre la
corrosion n'en est pas compromise.
9 AVERTISSEMENT
RISQUE DE CHOC ÉLECTRIQUE
La pénétration d'humidité peut provoquer un choc
électrique. Ne pas utiliser de nettoyeur à haute
pression ou à vapeur.
9 AVERTISSEMENT
RISQUE DE BRÛLURE
L'appareil chauffe beaucoup. Ne jamais toucher aux
surfaces intérieures du four chaud ni aux
résistances chauffantes. Toujours laisser l'appareil
refroidir. Tenir les enfants à distance.
Nettoyants
Afin de ne pas endommager les différentes surfaces par
des nettoyants inappropriés, veuillez respecter les
indications suivantes.
Ne pas utiliser
▯ de produits agressifs ou récurants
▯ de nettoyants fortement alcoolisés
▯ de tampons en paille métallique ni d'éponges à dos
récurant
▯ de nettoyeurs haute pression ni de nettoyeurs à
vapeur.
Avant d'utiliser des lavettes éponges neuves, les rincer
soigneusement.
Surface Nettoyants
Extérieur de
l'appareil
Eau chaude additionnée de liquide à
vaisselle :
Nettoyer avec une lavette et sécher
avec un chiffon doux. Ne pas utiliser
de nettoyant pour vitres ni de racloir
à verre.
Inox Eau chaude additionnée de liquide à
vaisselle :
Nettoyer avec une lavette et sécher
avec un chiffon doux. Éliminer immé-
diatement les dépôts calcaires, de
graisse, de fécule et de blanc
d'oeuf. De la corrosion peut se for-
mer sous ces salissures.
Des produits d'entretien spéciaux
pour inox qui sont appropriés pour
des surfaces chaudes sont en vente
auprès du service après-vente ou
dans les commerces spécialisés.
Appliquer une pellicule mince de
produit d'entretien avec un chiffon
doux.
Aluminium et
plastique
Nettoyant pour vitres :
Nettoyer avec un chiffon doux.

35
Panneaux catalytiques du compartiment
de cuisson
Les panneaux catalytiques du compartiment de cuisson
sont revêtus d'un émail autonettoyant.
Les parois se nettoient automatiquement pendant le
fonctionnement du four. Les projections plus importantes
disparaissent seulement au bout de plusieurs utilisations
du four.
Surfaces autonettoyantes
Les parois latérales et la paroi arrière sont dotées d'un
revêtement catalytique. Ne nettoyez jamais ces surfaces
avec un produit de nettoyage pour four. Une légère
décoloration du revêtement en émail n'a aucune
influence sur l'autonettoyage.
Dépose et pose des vitres de la porte
Pour faciliter le nettoyage, vous pouvez déposer les
vitres de la porte du four.
Dépose des vitres de la porte
1.
Ouvrir complètement la porte du four.
2.
Bloquer les deux charnières à gauche et à droite à
l'aide des tiges de sécurité.
Remarque : Les tiges de sécurité doivent être
complètement introduites dans les trous des
charnières.
3.
Lever légèrement la partie inférieure de la vitre
intérieure, jusqu'à ce que les tiges de fixation sortent
de la fixation (1).
4.
Lever délicatement la partie supérieure de la vitre
intérieure, jusqu'à ce que les tiges de fixation sortent
de la fixation (2).
9 ATTENTION
En levant la vitre intérieure, il se peut que la vitre
du milieu reste collée à la vitre intérieure. Veiller à
ce que la vitre du milieu ne tombe pas.
5.
Enlever la vitre intérieure.
Surfaces émail-
lées (surface
lisse)
Pour faciliter le nettoyage vous pou-
vez allumer l'éclairage du comparti-
ment de cuisson et décrocher la
porte de l'appareil, le cas échéant.
Appliquer un produit à vaisselle
usuel en vente libre ou de l'eau au
vinaigre avec un chiffon doux,
humide ou une peau de chamois;
sécher avec un chiffon doux. Ramol-
lissez les résidus d'aliment incrustés
avec un chiffon humide et du produit
à vaisselle. Après le nettoyage, lais-
ser le compartiment de cuisson
ouvert, afin qu'il sèche.
Surfaces autonet-
toyantes (surface
rugueuse)
Respectez les indications dans le
chapitre : Surfaces autonettoyantes
Vitres de porte Nettoyant pour vitres :
Nettoyer avec un chiffon doux. Ne
pas utiliser de racloir à verre.
Couvercle en
verre de la lampe
du four
Eau chaude additionnée de liquide à
vaisselle :
Nettoyer avec une lavette.
Joint
Ne pas l'enlever !
Eau chaude additionnée de liquide à
vaisselle :
Nettoyer avec une lavette. Ne pas
récurer.
Supports Eau chaude additionnée de liquide à
vaisselle :
Mettre à tremper et nettoyer avec
une lavette ou une brosse.
Accessoires Eau chaude additionnée de liquide à
vaisselle :
Mettre à tremper et nettoyer avec
une lavette ou une brosse.
Déflecteur du gril Eau chaude additionnée de liquide à
vaisselle :
Mettre à tremper et nettoyer avec
une lavette ou une brosse.
Surface Nettoyants
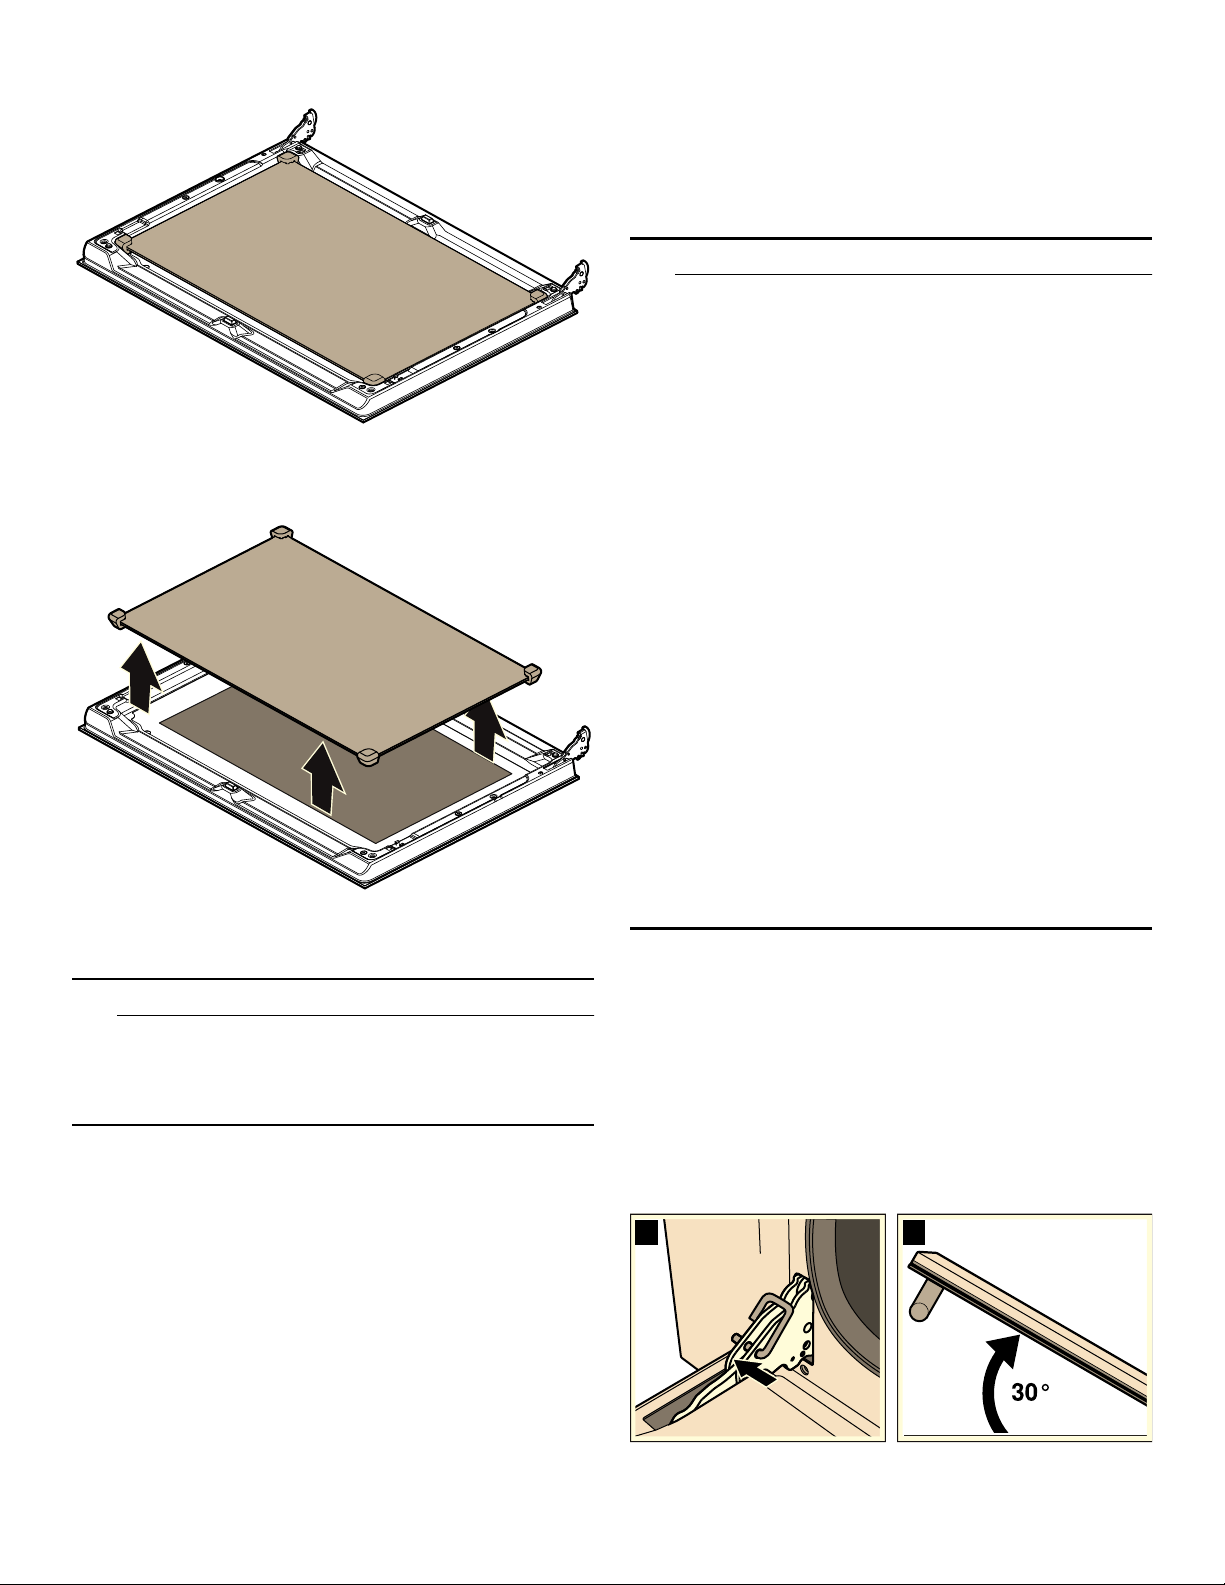
36
6.
Enlever la vitre du milieu.
Remarque : La vitre du milieu n'est pas fixée avec
des tiges de fixation mais est maintenue en position
par des supports en caoutchouc.
Nettoyer les vitres avec un nettoyant pour vitres et un
chiffon doux.
9 AVERTISSEMENT
RISQUE DE BLESSURE
Lorsque le verre de la porte est rayé, il peut
sauter.Ne pas utiliser de grattoir à verre, ni de
produits agressifs ou abrasifs.
Pose des vitres de la porte
1.
Remettre la vitre du milieu.
Remarque : Veiller à ce que la vitre soit correctement
en place. Tous les supports en caoutchouc doivent
reposer à plat sur la vitre extérieure.
2.
Remettre la vitre intérieure.
Remarque : Les quatre tiges de fixation doivent
s'enclencher dans les fixations prévues à cet effet.
3.
Enlever les tiges de sécurité et fermer la porte du four.
Décrocher et accrocher la porte de
l'appareil
En cas d'encrassement très important, la porte du four
peut être décrochée pour faciliter le nettoyage.
Cependant, cela n'est pas nécessaire en cas
d'encrassement normal.
9 ATTENTION
▯ Avant d'enlever la porte, s'assurer que le four est
froid et que le courant qui l'alimente a été coupé.
Le non-respect de cette précaution pourrait
entraîner un choc électrique ou des brûlures.
▯ La porte du four est lourde et certaines parties
sont fragiles. Utilisez les deux mains pour
l'enlever. Le devant de la porte est en verre.
Manipuler avec précautions pour éviter les
cassures.
▯ Saisir uniquement les côtés de la porte. Ne
prenez pas la poignée, car elle peut osciller dans
la main et causer des dommages ou des
blessures.
▯ Si la porte du four n'est pas saisie fermement et
correctement, il y a un risque de lésion corporelle
ou de dommage au produit.
▯ Pour éviter toute blessure causée par
l'enclenchement soudain du support charnière,
s'assurer que les deux leviers sont bien
enclenchés avant d'enlever la porte. En outre, ne
forcez la porte pour l'ouvrir ou la fermer, car la
charnière pourrait s'endommager et vous
pourriez vous blesser.
▯ Après avoir démonté la porte, ne pas la poser sur
des objets acérés ou pointus car ceux-ci risquent
de briser la vitre. Disposer la porte sur une
surface plane et lisse afin qu'elle ne risque pas
de tomber.
Décrocher la porte de l'appareil
1.
Ouvrir complètement la porte du four.
2.
Bloquer les deux charnières à gauche et à droite au
moyen de la tige de sécurité (a).
Remarque : Les tiges de sécurité doivent être
complètement introduites dans les trous des
charnières.
3.
Saisir la porte du four des deux mains sur les côtés et
la fermer d'env. 30° (b).
DE
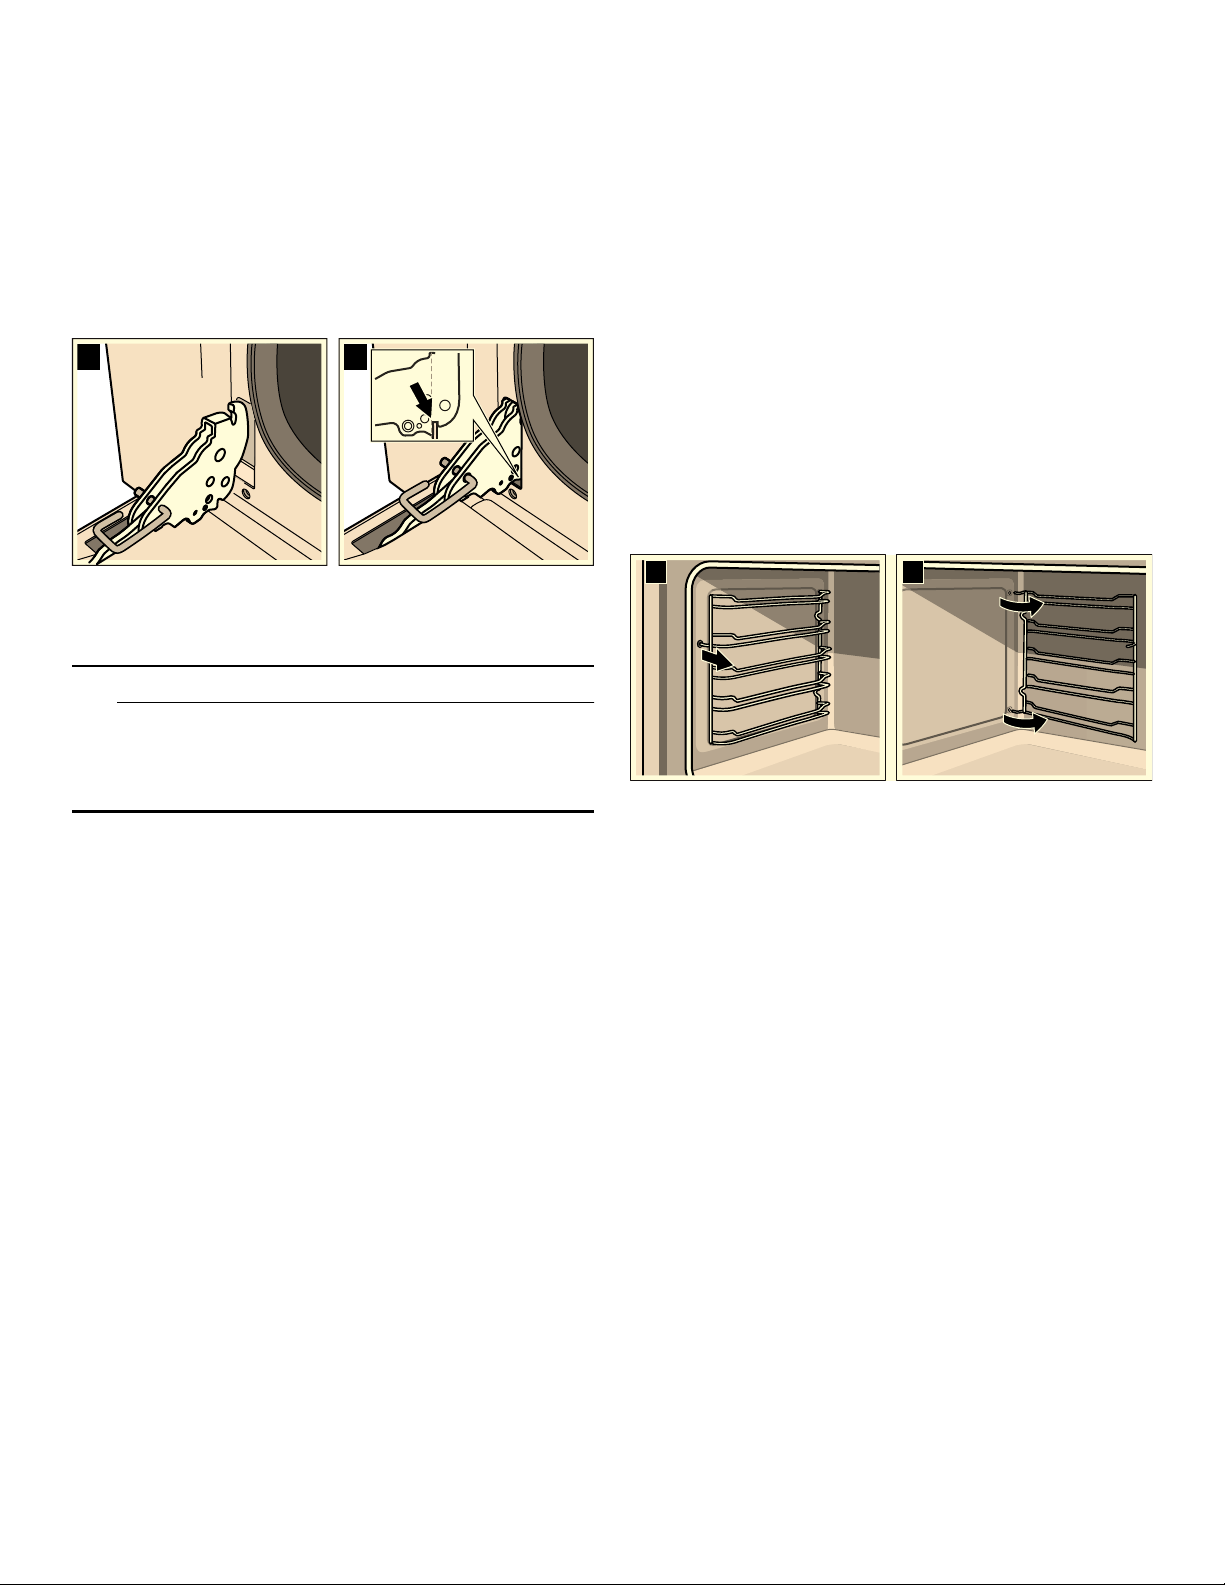
37
4.
Soulever légèrement la porte du four et la retirer.
Remarque : Ne pas fermer la porte du four
complètement. Cela risque de tordre les charnières et
d'endommager l'émail.
Accrocher la porte de l'appareil
1.
Saisir la porte du four des deux mains sur les côtés.
2.
Pousser les charnières dans les trous du four (a).
Remarque : L'encoche du bas des charnières doit
s'enclencher dans le cadre du four (b).
3.
Abaisser la porte.
4.
Retirer les tiges de sécurité.
9 AVERTISSEMENT
RISQUE DE BLESSURE
Si la porte du four tombe par inadvertance ou une
charnière se ferme, ne pas toucher la charnière.
Appeler le service après-vente.
Retrait et montage des grilles porte-
accessoires
Pour pouvez décrocher les grilles porte-accessoires pour
faciliter le nettoyage.
Retrait des grilles porte-accessoires
Les grilles porte-accessoires sont fixées respectivement
à trois points sur les parois latérales dans le
compartiment de cuisson.
1.
Saisir les grilles porte-accessoires sur le devant et les
tirer vers le milieu du compartiment de cuisson.
Le crochet avant de la grille porte-accessoires se
détache du trou.
2.
Ouvrir davantage les grilles porte-accessoires et les
retirer des trous arrière de la paroi latérale.
3.
Retenir les panneaux catalytiques du compartiment de
cuisson.
4.
Enlever les grilles porte-accessoires du compartiment
de cuisson.
Montage des grilles porte-accessoires
1.
Retenir les panneaux catalytiques du compartiment de
cuisson.
2.
Engager les crochets de la grille porte-accessoires
dans les trous arrière de la paroi latérale.
3.
Pousser le crochet avant de la grille porte-accessoires
dans le trou.
ED
D
E

38
Dépannage
Avant de contacter le Service Après-Vente, veuillez
songer à suivre les suggestions et les instructions ci-
dessous :
9 AVERTISSEMENT
RISQUE D'ÉLECTROCUTION
Des réparations non conformes sont dangereuses.
Les réparations doivent être effectuées par un de
nos techniciens qualifiés du service après-vente.
Des réparations non conformes sur votre appareil
peuvent présenter des risques considérables pour
l'utilisateur.
Problème Cause possible Notes/solution
L'appareil ne fonctionne pas. Fusible défectueux. Regardez dans la boîte à fusibles et vérifiez que le disjoncteur
pour l'appareil est fonctionnel.
Panne de courant. Vérifiez si la lumière de la cuisine fonctionne.
Le four ne peut pas être éteint. Les composants
électroniques sont
défectueux.
Désactivez le disjoncteur. Contactez le service après-vente.
L'affichage de l'horloge cli-
gnote.
Panne de courant. Réinitialisez l'horloge.
Le four ne chauffe pas. Fusible défectueux. Vérifiez le fusible et remplacez-le si nécessaire.
Le sélecteur de
fonction n'est pas
réglé.
Réglez le sélecteur de fonction.
La porte en vitre est brisée. Éteignez l'appareil. Contactez le service après-vente.
Taches de jus de fruit ou
d'albumen sur les surfaces
émaillées.
Gâteau humide ou
jus de viande.
Changement sans conséquence sur l'émail, ne peut être enlevé.
Le four cesse de fonctionner
au cours d'un programme et
le ventilateur de refroidisse-
ment continue de fonctionner
à une vitesse élevée même
lorsque le sélecteur de fonc-
tion est réglé à la position
Désactivé. La sonnerie retentit
de façon intermittente et la
lampe de contrôle clignote.
Problème avec le
thermostat
1.
2.
3.
Réglez le sélecteur de fonction à la position Désactivé.
Le ventilateur de refroidissement continue de fonctionner à
une vitesse élevée.
Attendez 10 secondes.
Réglez le sélecteur de fonction à une nouvelle position.
Si l'erreur se produit de nouveau en réglant une nouvelle
fonction : Débranchez le four de l'alimentation électrique
puis rebranchez l'alimentation électrique.
Si l'erreur se produit de nouveau après avoir rebranché
l'alimentation électrique : Contactez le service après-vente.
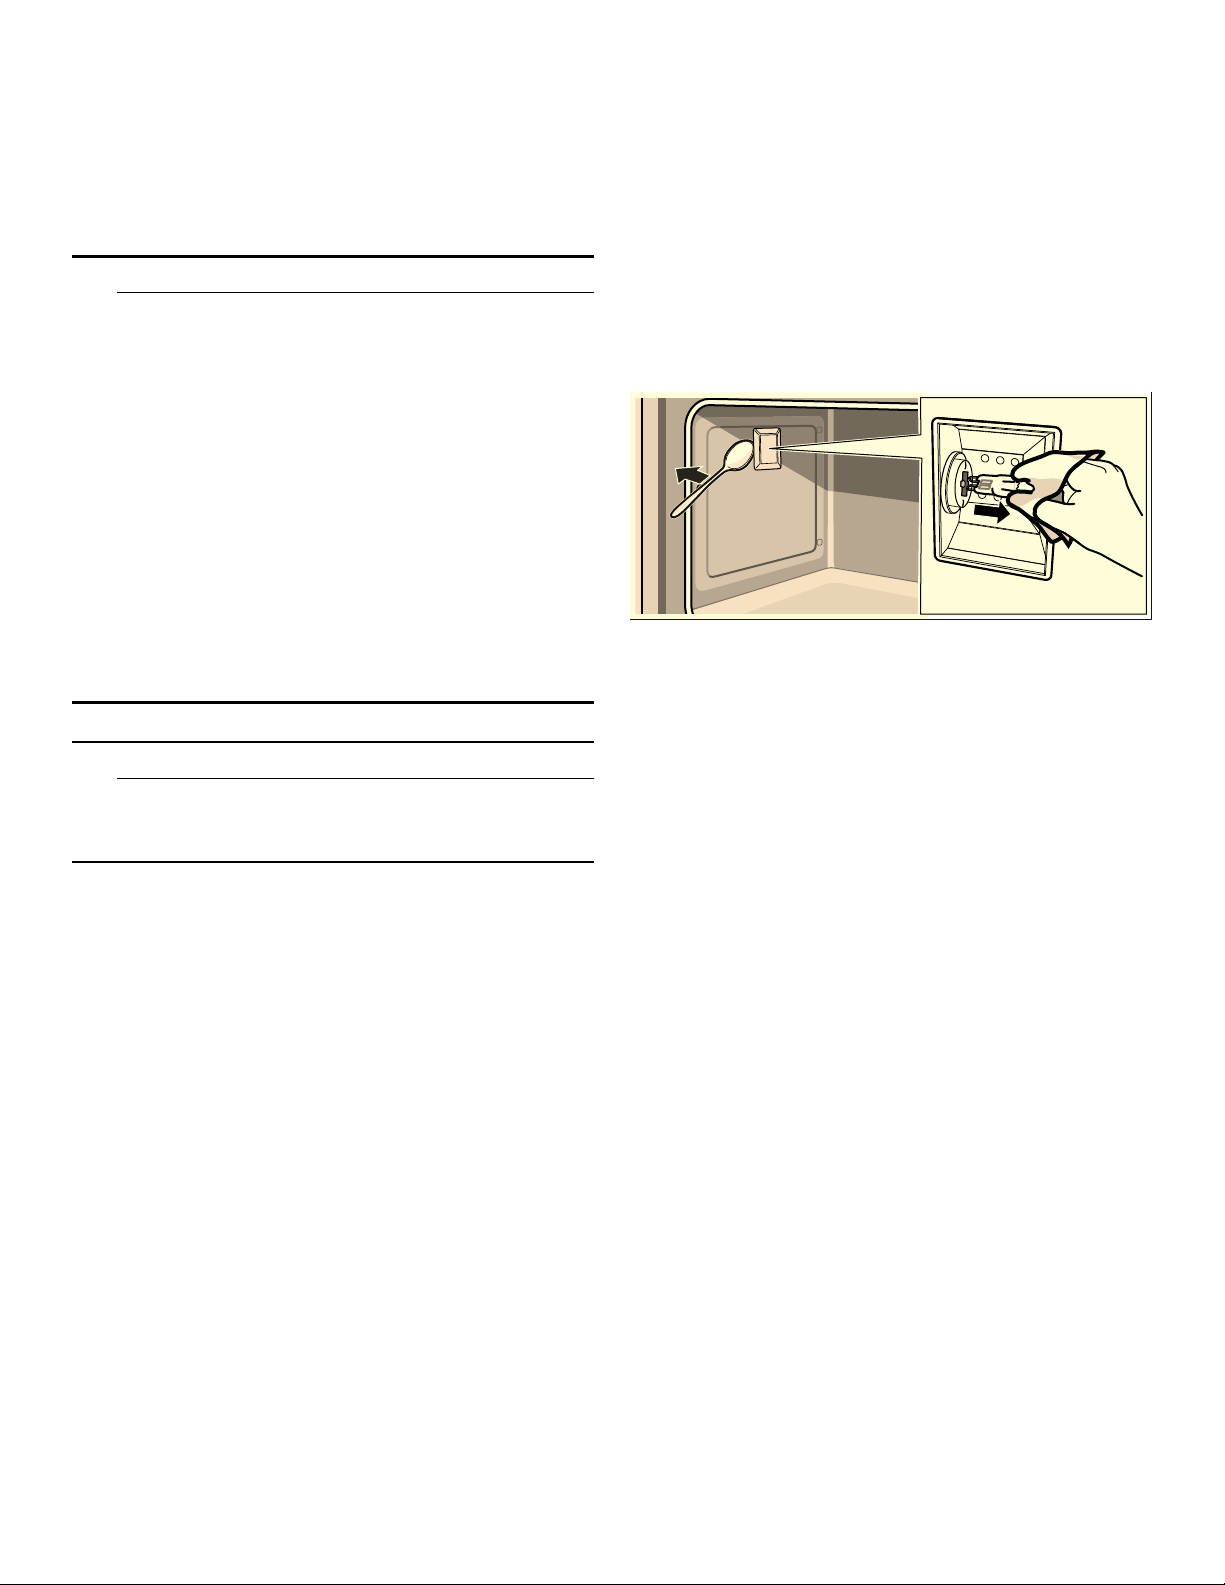
39
Changer la lampe du four
Si la lampe du four est défectueuse, vous devez la
changer. Des ampoules de rechange résistantes aux
températures élevées sont en vente auprès du service
après-vente ou dans les commerces spécialisés. Veuillez
indiquer les numéros E et FD de votre appareil. N'utilisez
pas d'autres ampoules.
9 ATTENTION
PENDANT LE REMPLACEMENT DE L'AMPOULE DU
FOUR :
▯ Avant de remplacer une ou plusieurs ampoules,
s'assurer que l'appareil et l'éclairage sont froids
et veiller à couper l'alimentation électrique de
l'appareil. Le non-respect de cette précaution
pourrait entraîner un choc électrique ou des
brûlures.
▯ Les lentilles doivent être en place lors de
l'utilisation de l'appareil.
▯ Elles permettent d'éviter que les ampoules ne se
cassent.
▯ Les lentilles sont en verre. Manipuler avec
précautions pour éviter les cassures. Les brisures
de verre peuvent blesser quelqu'un.
▯ La douille d'éclairage est sous tension lorsque la
porte est ouverte.
9 AVERTISSEMENT
Si l'alimentation principale n'est pas coupée, la
douille reste sous tension lorsque la porte est
ouverte.
1.
Retirer la fiche secteur ou désactiver le fusible dans le
boîtier à fusibles
2.
Laisser refroidir le compartiment de cuisson.
3.
Ouvrir la porte de l’appareil.
4.
Étaler un torchon dans le compartiment de cuisson
afin d'éviter des dommages.
5.
Retirer les grilles porte-accessoires.
6.
Enlever le couvercle en verre. Pour ce faire, ouvrir le
couvercle en verre frontal avec la main. Si le couvercle
en verre s'enlève difficilement, utiliser une cuillère
comme aide.
7.
Retirer l'ampoule du four.
8.
Remplacer l'ampoule du four par une ampoule de type
identique :
Tension : 12V;
Puissance : 20W;
Culot : G4
Résistance à la température : 570°F (300°C)
9.
Remettre en place le couvercle en verre de la lampe
du four.
10.
Monter les grilles porte-accessoires.
11.
Retirer le torchon à vaisselle.
12.
Réarmer le fusible.
13.
Vérifier si l'éclairage du four refonctionne.
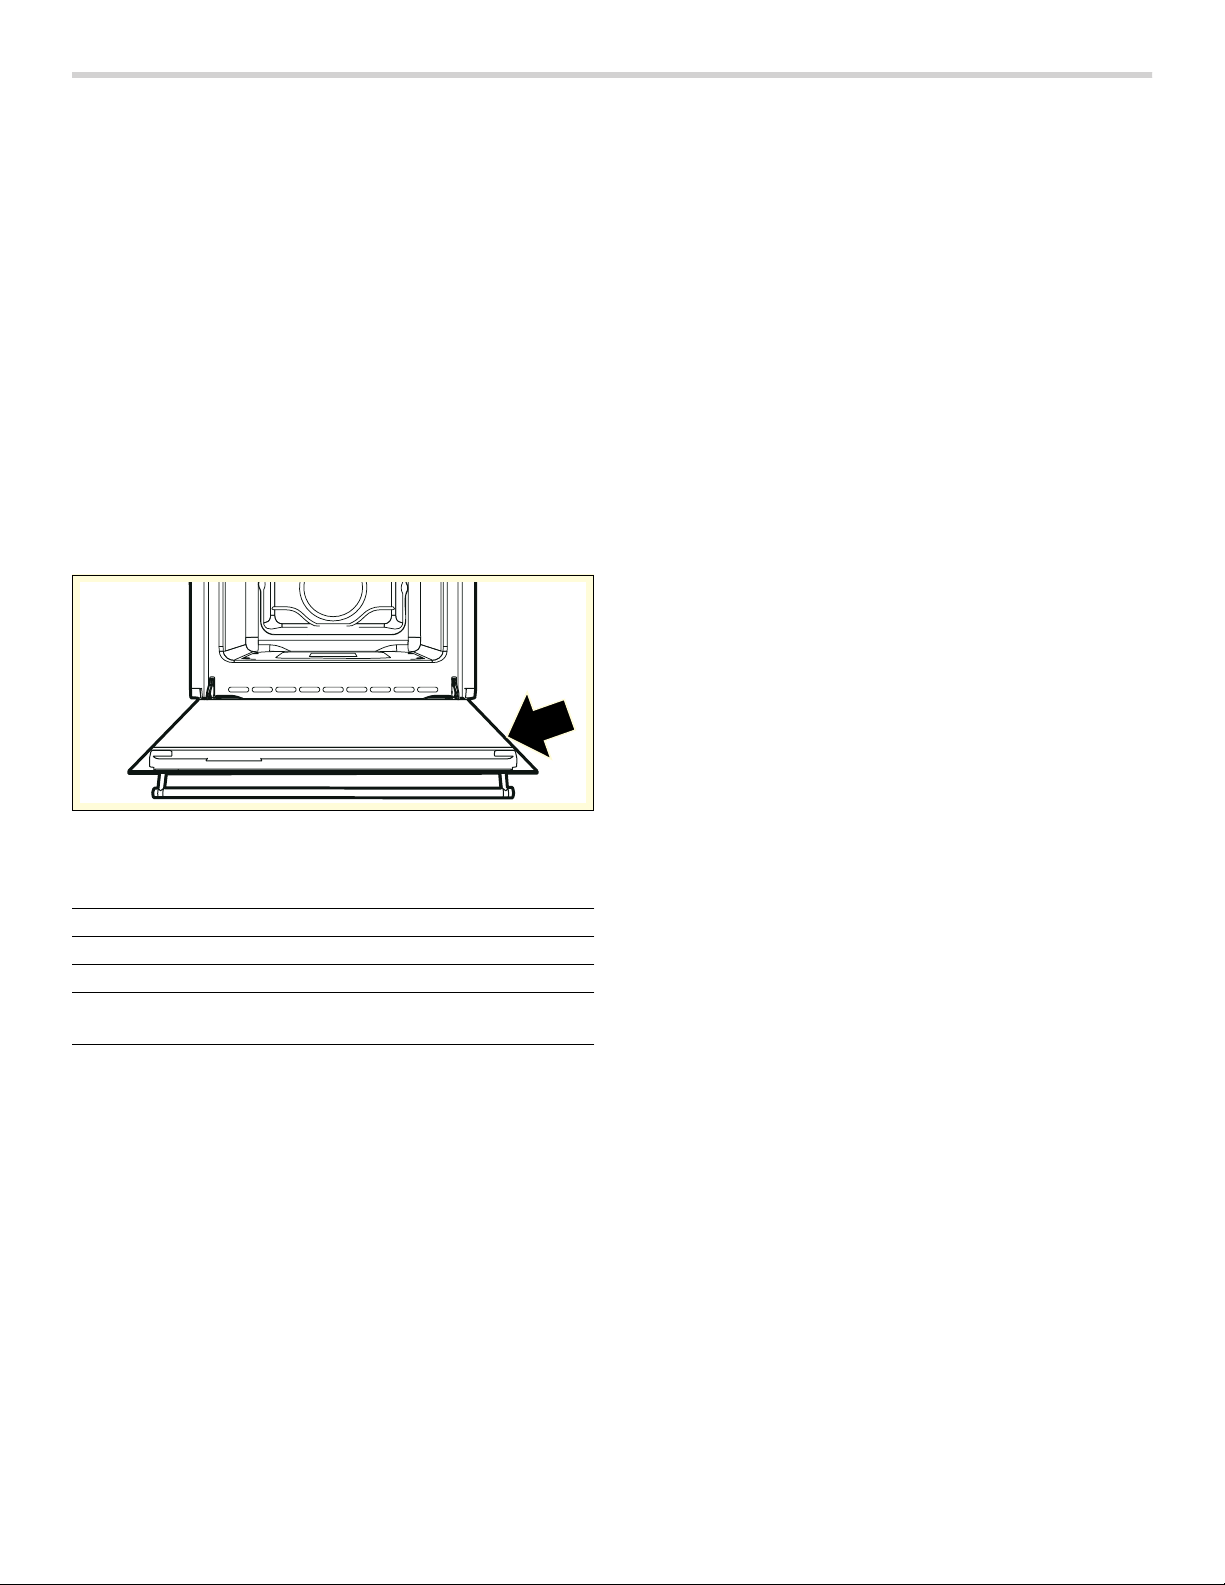
40
Soutien Bosch
®
Avant d’appeler le service de réparations
Consultez le manuel d'utilisation et d'entretien pour les
renseignements de dépannage. Consultez l'« Énoncé de
garantie limitée du produit » dans le manuel d'utilisation
et d'entretien.
Pour communiquer avec un représentant en réparations,
consultez les coordonnées au début du manuel ou dans
la section qui suit. Lorsque vous téléphonez, soyez prêt à
fournir les informations imprimées sur l'étiquette de cote
du produit.
Plaque signalétique
La plaque signalétique affiche le modèle et le numéro de
série. Consultez la plaque signalétique de l’appareil
lorsque vous sollicitez une réparation.
La plaque signalétique se trouve sur le côté droit à
l’intérieur de la porte de l’appareil.
Pour éviter de devoir chercher chaque information lors
de votre appel, vous pouvez inscrire les quatre éléments
requis dans les espaces fournis ci-dessous.
Conservez votre facture ou votre contrat aux fins de
validation de garantie si jamais vous avez besoin d'une
réparation.
Service
Nous réalisons que vous avez effectué un investissement
considérable dans votre cuisine. Nous nous engageons
à offrir tout le support dont vous et votre appareil avez
besoin afin que vous puissiez profiter pleinement de
votre appareil.
Ne pas hésiter à contacter notre département de service
à la clientèle si vous avez des questions ou dans le cas
peu probable que votre appareil Bosch® ait besoin
d’entretien. Notre équipe de service est prête à vous
aider.
USA
800-944-2904
www.bosch-home.com/us/support
Canada
800-944-2904
www.bosch-home.ca/en/support
Pièces et accessoires
Les pièces, les filtres, les décalamineuses, les nettoyants
en acier inoxydable et plus encore peuvent être achetés
dans le magasin en ligne Bosch ou par téléphone.
USA
www.bosch-home.com/us/store
Canada
Marcone 800-482-6022
ou
Reliable Parts 800-941-9217
Numéro de modèle
Numéro FD
Date d'achat
Service après-
vente O

41
Conseils pour l'utilisation
Vous trouverez ici des conseils concernant les récipients
et la préparation.
Remarques
▯ Utilisez les accessoires livrés avec l'appareil. Des
accessoires supplémentaires sont en vente dans les
commerces spécialisés ou auprès du service après-
vente comme accessoires optionnels.
Avant l'utilisation, retirez du compartiment de cuisson
tous les accessoires et récipients qui ne sont pas
nécessaires.
▯ Utilisez toujours des maniques pour retirer des
accessoires ou récipients chauds du compartiment de
cuisson.
Cuisson de pain et de pâtisseries
Moules
▯ Utilisez avant tout des moules ou plaques à pâtisserie
de couleur claire.
▯ Placez toujours les moules à gâteaux au centre de la
grille.
Conseils pour la pâtisserie
Comment vérifier si votre gâteau est
bien cuit.
À l'aide d'un bâtonnet en bois, piquez le sommet du gâteau environ 10minutes
avant la fin du temps de cuisson indiqué dans la recette. Le gâteau est cuit si la
pâte n'adhère plus au bâtonnet.
Le gâteau s'affaisse. La fois suivante, veillez à ce que la pâte soit moins liquide ou bien réduisez la
température du four de 10degrés. Respectez les temps de malaxage indiqués
dans la recette.
Le gâteau a monté davantage au
centre que sur les bords.
Ne graissez pas le tour du moule démontable. Après la cuisson, détachez soi-
gneusement le gâteau à l'aide d'un couteau.
Le dessus du gâteau est trop cuit. Enfournez-le plus bas, choisissez une température plus basse et faites cuire le
gâteau un peu plus longtemps.
Le gâteau est trop sec. À l'aide d'un cure-dent, percez plusieurs petits trous dans le gâteau cuit. Arro-
sez de jus de fruit ou de liquide légèrement alcoolisé. La prochaine fois, aug-
mentez la température de 10degrés et réduisez les temps de cuisson.
Le pain ou le gâteau (par ex.
gâteau au fromage blanc) a un bel
aspect mais l'intérieur est pâteux
(filets d'eau à l'intérieur)
La prochaine fois, utilisez moins de liquide, réduisez la température et augmen-
tez le temps de cuisson. En cas de gâteau avec une garniture fondante, faites
d'abord précuire le fond. Saupoudrez-le de poudre d'amandes ou de chapelure
et mettez ensuite la garniture. Respectez les recettes et les temps de cuisson.
Les pâtisseries ne sont pas unifor-
mément dorées.
Baissez la température, la cuisson sera plus uniforme. Le papier cuisson
dépassant de la plaque peut gêner la circulation de l'air. Découpez toujours le
papier aux dimensions de la plaque.
Le dessous de la tarte aux fruits est
trop clair.
La fois suivante, enfournez le gâteau un niveau plus bas.
Le jus des fruits a coulé. La fois suivante, utilisez la lèchefrite à bords hauts (s'il y en a).
Les petites pâtisseries en pâte
levée collent ensemble pendant la
cuisson.
Disposez les pièces de pâtisserie sur la plaque en respectant un espace d'env.
2cm autour de chaque pièce. Il y aura ainsi suffisamment de place pour que
les pièces de pâtisserie puissent gonfler et dorer tout autour.
La cuisson de gâteaux aux fruits
juteux produit de la condensation.
La cuisson peut générer de la vapeur d'eau. Elle s'échappe au-dessus de la
porte. Cette vapeur peut se condenser sur le bandeau de commande ou sur
les façades des meubles situés à proximité et se mettre à goutter. C'est là un
phénomène physique normal.

42
Rôtissage et grillade
Récipient
Vous pouvez utiliser tout récipient résistant à la chaleur.
Placez toujours le récipient au centre de la grille. La
plaque à pâtisserie émaillée est également appropriée
pour les gros rôtis.
Conseils pour le rôtissage
▯ Une température plus basse permet d'obtenir des
mets dorés plus uniformément.
▯ Versez 2à 3cuillerées à soupe de liquide sur la
viande maigre et 8à 10cuillerées à soupe sur les
rôtis à braiser, selon leur taille.
▯ Pour les canards ou les oies, piquez la peau sous les
ailes afin que la graisse puisse s'écouler.
▯ Pour obtenir une peau de volaille dorée et
croustillante, enduisez la peau de beurre ou versez de
l'eau salée ou du jus d'orange sur la peau vers la fin
de la cuisson.
▯ Retournez les pièces de viande à mi-cuisson.
▯ Une fois le rôti cuit, laissez-le reposer encore
10minutes dans le four éteint et fermé. Cela permet
au jus de rôti de mieux se répartir.
▯ Lors du rôtissage de gros morceaux de viande, une
plus forte formation de vapeur peut se produire et se
condenser sur la porte du four. C'est un phénomène
normal qui n'a aucune influence sur le bon
fonctionnement de l'appareil. Après la cuisson,
essuyez la porte du four et la vitre avec un chiffon.
▯ Si vous faites des grillades sur la grille, enfournez en
plus la plaque à pâtisserie émaillée au niveau 1pour
récupérer la graisse.
Conseils pour les grillades
▯ Prenez si possible des pièces à griller de la même
épaisseur. Elles doivent faire au moins 1 pouce (2à
3cm) d'épaisseur. Elles seront alors uniformément
dorées et bien juteuses.
▯ Placez les pièces à griller au centre de la grille. Versez
un peu d'eau sur la plaque à pâtisserie émaillée et
enfournez-la en plus sous la grille, afin de récupérer la
graisse. Ne la placez jamais sur la sole du
compartiment de cuisson.
▯ Badigeonnez les pièces à griller d'un peu d'huile,
avant de les placer sur la grille sous le gril.
▯ Retournez à mi-cuisson les pièces peu épaisses,
retournez les pièces épaisses plusieurs fois pendant le
temps de cuisson. Utilisez pour cela une pince à
grillade, les pièces à griller ne seront ainsi pas
transpercées et le jus de viande restera dans le rôti
par exemple.
▯ Les types de viande rouge comme l'agneau et le bœuf
brunissent davantage et plus rapidement que la
viande blanche comme le porc et le veau.
Conseils pour le rôtissage
Comment savoir si le rôti est cuit. Utilisez un thermomètre pour viande (en vente dans les commerces) ou bien
faites le « test de la cuillère ». Appuyez sur le rôti avec une cuillère. Si vous sen-
tez une résistance, le rôti est cuit. Si la cuillère s'enfonce, allongez le temps de
cuisson.
Le rôti est trop cuit et l'extérieur est
brûlé par endroits.
Vérifiez le niveau d'enfournement ainsi que la température.
Le rôti a un bel aspect mais la
sauce est brûlée.
La fois suivante, choisissez un plat à rôtir plus petit et ajoutez plus de liquide.
Le rôti a un bel aspect, mais la
sauce est trop claire et insipide.
La fois suivante, choisissez un plat à rôtir plus grand et ajoutez moins de
liquide.

43
Testés pour vous dans notre laboratoire
Vous trouverez ici un choix de plats et les réglages
optimaux correspondants. Nous vous indiquons le mode
de cuisson, la température et le niveau d'enfournement
les plus appropriés pour votre plat.
Remarques
▯ Les durées indiquées dans les tableaux sont des
valeurs indicatives. Elles dépendent de la qualité et de
la nature des aliments.
▯ Utilisez les accessoires livrés avec l'appareil. Des
accessoires supplémentaires sont en vente dans les
commerces spécialisés ou auprès du service après-
vente comme accessoires optionnels.
Avant l'utilisation, retirez du compartiment de cuisson
tous les accessoires et récipients dont vous n'aurez
pas besoin.
▯ Utilisez toujours des maniques pour retirer des
accessoires ou récipients chauds du compartiment de
cuisson.
Aliment Poids
lb (kg)
Fonction Position de
grille à partir
du bas
Température en
°F (°C)
Temps (minutes)
Lasagne 6¾ - 8
(3- 4)
Cuisson 1 400- 450
(205- 230)
45- 50
Pâtes au four 6¾ - 8
(3- 4)
Cuisson 1 400- 450
(205- 230)
45- 50
Porc 4½ (2) Cuisson à convec-
tion
2 350(175) 70- 80
Saucisses 3¹/
3
(1,5) Gril plus à
convection
4 500(260) 15
Rosbif 2¼ (1) Cuisson à convec-
tion
2 500(260) 40- 45
Poitrine de dinde 6¾ (3) Cuisson à convec-
tion
2 350(175) 110- 120
Poulet rôti 2²/
3
(1,2) Cuisson à convec-
tion
2 350(175) 65- 70
1
ère
surface 2
e
surface
Côtelettes de porc 3¹/
3
(1,5) Gril plus à
convection
4 500(260) 15 5
Côtes levées 3¹/
3
(1,5) Gril plus à
convection
4 500(260) 10 10
Bacon 1¾ (0,7) Gril Plus 5 500(260) 7 8
Filets de porc 3¹/
3
(1,5) Gril plus à
convection
4 500(260) 10 5
Filets de boeuf 2¼ (1) Gril Plus 5 500(260) 10 7
Saumon
1
1
/
3
(0,6)
Cuisson à convec-
tion
2 300(150) 25- 30
Pizza 2¼ (1) Aliments congelés 2 500(260) 8- 9
Pain 2¼ (1) Aliments congelés 2 350- 400
(175- 205)
25- 30
Focaccia 2¼ (1) Aliments congelés 2 350(175) 20- 25
Gâteau de Savoie 2¼ (1) Tarte 2 300(150) 55- 60
Gâteau au fromage 2¼ (1) Tarte 2 300- 350 55- 60
Choux à la crème 2²/
3
(1,2) Tarte 2 350(175) 80- 90
Gâteau de Savoie
léger
2¼ (1) Tarte 2 300- 350
(150- 175)
55- 60
Biscuits 2¼ (1) Convection Multi-
Rack
2- 4 300(150) 20- 25
Les temps indiqués dans le tableau ne comprennent pas les temps de préchauffage et sont fournis à titre indicatif
seulement.

44
ÉNONCÉ DE LA GARANTIE LIMITÉE
Couverture de la garantie :
La garantie limitée fournie par BSH Home Appliances
Ltd. (« BSH ») dans le présent énoncé de garantie limitée
s’applique seulement aux Bosch appareil (« Produit »)
vendu au premier acheteur, en autant que le produit ait
été acheté :
▯ pour une utilisation normale résidentielle (non
commerciale), et qu’en fait en tout temps a été utilisé
pour un usage domestique normal ;
▯ nouveau au détail (non en montre, tel quel ou un
retour), qu’il n’est pas destiné à la revente ni à un
usage commercial et ;
▯ aux États-Unis ou au Canada et qu’il est demeuré en
tout temps dans le pays où l’appareil a été acheté.
Les garanties données ici s’appliquent seulement au
premier acheteur du produit et ne sont pas transférables.
S’assurer de retourner la carte d’enregistrement,
quoiqu’elle n’est pas nécessaire pour la garantie, c’est la
façon dont BSH peut vous aviser dans le cas d’un avis
de rappel ou de sécurité du produit.
Durée de la garantie
BSH garantit que le produit ne présente aucun défaut de
matériaux ou de fabrication pour une période trois cent
soixante cinq (365) jours à compter de la date d’achat.
La durée commence à la date d’achat et ne sera pas
allongée, prolongée, interrompue pour quelle que raison
que ce soit.
Ce Produit est également garanti contre tout défaut de
matériau et de fabrication apparent (tels les éraflures sur
l'acier inoxydable, les défauts d'aspect de la peinture ou
de la porcelaine, les ébréchures, les bosselures, ou
autres dégâts au fini du Produit), pendant une période de
trente (30) jours à compter de la date d'achat ou de la
date de clôture pour une nouvelle construction. Cette
garantie relative à l'apparence exclut les légères
variations de couleur découlant des différences
inhérentes aux pièces peintes et en porcelaine, ainsi que
découlant des différences causées par l'éclairage de
cuisine, l'emplacement du produit ou d'autres facteurs
similaires. Cette garantie relative à l'apparence exclut
plus particulièrement tout appareil électroménager en
exposition, de plancher, « En l'état » ou de stock « B ».
Réparation ou remplacement comme
solution exclusive
Pendant la période de garantie, BSH ou un de ses
centres de service autorisés réparera le produit sans
frais (sujet à certaines limitations indiquées dans le
présent document), si le produit présente un défaut de
fabrication ou de matériaux. Si des tentatives
raisonnables pour réparer le produit sont vaines, alors
BSH remplacera le produit (un modèle supérieur peut
être disponible, à la seule discrétion de BSH, moyennant
des frais additionnels). Toutes les pièces ou les
composants enlevés demeurent la seule propriété de
BSH. Toute pièce et tout composant réparés doit être
identique à la pièce d’origine à des fins de cette garantie
et la garantie ne sera pas prolongée en regard de telles
pièces. La seule responsabilité de BSH est de faire
réparer le produit défectueux par un centre de service
autorisé pendant les heures d’affaires normales. Pour la
sécurité et éviter des dommages à la propriété, BSH
recommande fortement de ne pas réparer le produit soi-
même, par une personne non qualifié ; BSH ne sera pas
tenu responsable des réparations ou du travail effectué
par une personne non autorisée. Si le consommateur
désire faire réparer par une personne autre qu’une
personne autorisée, CETTE GARANTIE EST
AUTOMATIQUEMENT NULLE ET NON AVENUE. Les
centres de service autorisés sont les personnes ou les
compagnies qui ont été spécialement formées sur les
produits BSH et qui possèdent, selon l’opinion de BSH,
une réputation supérieure pour le service à la clientèle et
la capacité technique (il est à noter qu’elles sont des
entités indépendantes et non des agents, partenaires,
affiliations ou représentants de BSH). Nonobstant ce qui
suit, BSH ne sera pas tenu responsable d’aucune façon
si le produit est situé dans une région éloignée
(supérieure à 100miles d’un centre de service autorisé)
ou n’est pas accessible de façon raisonnable, dans un
environnement hasardeux, dangereux ; dans une telle
éventualité, à la demande du consommateur, BSH
pourrait payer les frais de main-d’oeuvre et de pièces et
expédier les pièces à un centre de service autorisé le
plus près, mais le consommateur serait entièrement
responsable pour toute durée de déplacement et autres
frais spéciaux encourus par le centre de service, en
autant qu’il accepte l’appel de service.
Produit hors garantie
BSH n’a aucun obligation, par loi ou autre, d’offrir toute
concession, incluant réparation, prorata ou
remplacement de produit une fois la garantie expirée.
Exclusions à la garantie
La couverture de garantie décrite aux présentes exclut
tout défaut ou dommage qui n'est pas une faute directe
de BSH, y compris sans limitation, un ou plusieurs des
cas suivants :
▯ utilisation du produit autre qu’un usage normal,
habituel et de la façon destinée (incluant sans
limitation toute forme d’utilisation commerciale,
d’utilisation ou de rangement d’un produit pour
l’intérieur à l’extérieur, utilisation du produit de concert
avec un transporteur aérien ou marin) ;
▯ mauvaise conduite, négligence, mauvaise utilisation,
abus, accidents, fonctionnement inadéquat, mauvais
entretien, installation inadéquate ou négligente,
altération, manquement d’observer les instructions de
fonctionnement, mauvaise manipulation, service non
autorisé (incluant réparation par le consommateur ou
exploration du fonctionnement interne du produit) ;
▯ ajustement, modification ou altération de toute sorte ;
▯ manquement à la conformité des normes applicables
fédérales, provinciales, municipales ou électrique du
pays, codes de plomberie et/ou de construction,

45
réglementation ou lois, incluant le manquement
d’installer le produit en stricte conformité avec les
codes et réglementations de construction et
d’incendie locaux ;
▯ usure ordinaire, déversements d’aliments, liquide,
accumulation de graisse ou autres substances
accumulées dans, sur ou autour du produit ;
▯ toute force ou tout facteur externe, élémentaire et/ou
environnemental, incluant sans limitation, pluie, vent,
sable, inondation, incendie, coulée de boue, gel,
humidité excessive et exposition prolongée à
l’humidité, foudre, surtension, problème de structure
autour de l’appareil et actes de Dieu.
En aucun cas, BSH ne sera tenu responsable des
dommages survenus à la propriété, incluant les
armoires, planchers, plafonds et autres objets ou
structures autour du produit. Également exclus de la
garantie sont des produit sur lequel le numéro de série a
été modifié, altéré, effacé, enlevé ; appel de service pour
enseigner le fonctionnement du produit ou les visites où
il n’y a aucun problème avec le produit ; correction de
problèmes d’installation (le consommateur est seul
responsable pour toute structure et tout réglage du
produit, incluant l’électricité, la plomberie et autres
connexions nécessaires, pour un plancher/fondation
appropriée, et pour toute modification incluant, sans
limitation, armoire, mur, plancher, tablette, etc.) et la
remise de coupe-circuit ou remplacement de fusible.
SELON LA PORTÉE PERMISE PAR LA LOI, CETTE
GARANTIE DONNE DES SOLUTIONS EXCLUSIVE
RELATIVEMENT AU PRODUIT, QUE LA RÉCLAMATION
SURVIENNE PAR CONTRAT OU TORT (INCLUANT
RESPONSABILITÉ STRICTE OU NÉGLIGENCE) OU
AUTRE. CETTE GARANTIE EST EN LIEU DE TOUTE
AUTRE GARANTIE, EXPRESSE OU IMPLICITE, TOUTE
GARANTIE PAR LOI, À DES FINS DE
COMMERCIALISATION OU À DES FINS
PARTICULIÈRES, OU AUTRE, SERA EN VIGUEUR
SEULEMENT POUR LA PÉRIODE EFFECTIVE DE LA
GARANTIE LIMITÉE EXPRESSE. EN AUCUN CAS, LE
FABRICANT NE PEUT ÊTRE TENU RESPONSABLE DES
DOMMAGES ACCESSOIRES, SPÉCIAUX, INDIRECTS,
PERTES D’AFFAIRES, ET/OU DOMMAGES PUNITIFS,
PERTES, FRAIS INCLUANT SANS LIMITATION LE
MANQUEMENT AU TRAVAIL, REPAS À L’HÔTEL ET/OU
AU RESTAURANT, FRAIS DE REMODELAGE
SURVENUS À CAUSE DE DOMMAGES DIRECTS
DÉFINITIVEMENT CAUSÉS EXCLUSIVEMENT PAR BSH
OU AUTRE. CERTAINS ÉTATS NE PERMETTENT PAS
L’EXCLUSION OU LA LIMITATION DES DOMMAGES
ACCESSOIRES OU INDIRECTS ET NE PERMETTENT
PAS LA LIMITATION SUR LA DURÉE D’UNE GARANTIE
IMPLICITE, PAR CONSÉQUENT LES LIMITATIONS
SUSMENTIONNÉES PEUVENT NE PAS S’APPLIQUER.
CETTE GARANTIE DONNE DES DROITS SPÉCIFIQUES
ET IL PEUT Y EN AVOIR D’AUTRES QUI VARIENT D’UN
ÉTAT À L’AUTRE.
Aucune tentative de modifier, changer ou amender cette
garantie ne peut être effective sansle consentement écrit
autorisé par un officier de BSH.

46
Contenido
Manual de instrucciones
9 Definiciones de seguridad .................................... 47
INSTRUCCIONES DE SEGURIDAD IMPORTANTES . 48
Instalación y mantenimiento adecuados ...................... 48
Seguridad para evitar incendios .................................... 48
Prevención de quemaduras ............................................ 49
Seguridad de los niños .................................................... 49
Seguridad en la limpieza ................................................. 50
Seguridad en los utensilios de cocina .......................... 50
Advertencia en virtud de la Proposición 65: ................ 50
Causas para los daños ............................................... 51
Protección del medio ambiente ................................. 51
Consejos para ahorrar energía ...................................... 51
Su nuevo aparato ........................................................ 52
Horno ................................................................................... 52
Selector de funciones ....................................................... 52
Selector de temperatura .................................................. 53
Timer (Temporizador) ....................................................... 53
Accesorios .......................................................................... 54
Antes del primer uso ................................................... 55
Ajuste de la hora ............................................................... 55
Calentamiento del horno ................................................. 55
Limpieza de los accesorios ............................................. 55
Operación ..................................................................... 55
Conexión del horno .......................................................... 55
Temporizador de cocina .................................................. 55
Ajuste del temporizador ................................................... 56
Ajustes básicos ................................................................. 56
Cuidados y limpieza .................................................... 57
Productos de limpieza ...................................................... 57
Revestimiento catalítico del interior del horno ............ 58
Montaje y desmontaje de los cristales de la puerta .. 58
Montaje y desmontaje de la puerta del aparato ......... 59
Montaje y desmontaje de las guías laterales .............. 60
Resolución de problemas ........................................... 60
Sustitución del foco del horno ........................................ 61
Soporte de Bosch
®
...................................................... 62
Antes de llamar al servicio técnico ................................ 62
Placa de características ................................................... 62
Servicio técnico ................................................................. 62
Piezas y accesorios .......................................................... 62
Consejos de aplicación ............................................... 63
Horneado ............................................................................ 63
Asado y asado al grill ....................................................... 64
Platos probados en nuestro estudio de cocina .......... 65
DECLARACIÓN DE GARANTÍA LIMITADA DEL
PRODUCTO .................................................................. 66
Cobertura de esta garantía y a quiénes se aplica ..... 66
Duración de la garantía ................................................... 66
Reparación/reemplazo como único recurso ............... 66
Producto fuera de garantía ............................................. 67
Exclusiones de la garantía .............................................. 67
Pr odukt i nf o.
Encontrará más información sobre productos,
accesorios, piezas de repuesto y servicios en internet:
www.bosch-home.com y también en la tienda online:
www.bosch-home.com/us/store

47
9 Definiciones de seguridad
Defi niciones de seguridad
9 ADVERTENCIA
Esto indica que pueden producirse heridas graves
o incluso la muerte si no se cumple con esta
advertencia.
9 ATENCION
Esto indica que pueden producirse heridas leves o
moderadas si no se cumple con esta advertencia.
AVISO: Esto indica que pueden producirse daños en el
aparato o en los bienes si no se cumple con este aviso.
Nota: Esto alerta sobre información o sugerencias
importantes.
¢3UHJXQWDV"
ZZZERVFKKRPHFRPXV
£(VSHUDPRVRLUGHXVWHG
(VWHHOHFWURGRPpVWLFRGH%RVFKHVKHFKRSRU
%6++RPH$SSOLDQFHV&RUSRUDWLRQ
0DLQ6WUHHW6XLWH
,UYLQH&$

9 INSTRUCCIONES DE SEGURIDAD IMPORTANTES
LEA Y CONSERVE ESTAS INSTRUCCIONES
48
I NSTRUCCI ONES DE SEGURI DAD IMPORTANTESLEA Y CONSE RV E EST AS INSTRUCCIONES
ADVERTENCIA
Su nuevo electrodoméstico ha sido diseñado para ser
seguro y confiable si recibe el cuidado adecuado. Lea
atentamente todas las instrucciones antes de usarlo.
Estas precauciones reducirán el riesgo de quemaduras,
descarga eléctrica, incendio y lesiones a personas. Al
utilizar electrodomésticos de cocina, se deben tomar
precauciones de seguridad básicas, incluidas las que se
encuentran en las páginas siguientes.
Instalación y mantenimiento adecuados
Pídale al instalador que le muestre la ubicación del
disyuntor o el fusible. Márquela para recordarla más
fácilmente.
Este electrodoméstico debe ser correctamente instalado
y conectado a tierra por un técnico calificado. Conéctelo
sólo a una toma de corriente eléctrica correctamente
conectada a tierra. Para obtener más información,
consulte las Instrucciones de instalación.
Este electrodoméstico ha sido diseñado para uso
doméstico normal únicamente. No está aprobado para
uso en exteriores. Consulte la Declaración de Garantía
limitada del Producto. Si tiene alguna pregunta,
comuníquese con el fabricante.
No almacene ni utilice productos químicos corrosivos,
vapores, materiales inflamables ni productos no
alimenticios dentro de este electrodoméstico ni cerca de
él. Está específicamente diseñado para calentar o
cocinar alimentos. El uso de productos químicos
corrosivos al calentar o limpiar dañará el
electrodoméstico y podría causar lesiones.
No utilice este electrodoméstico si no funciona
correctamente o si ha sido dañado. Comuníquese con
un centro de servicio técnico autorizado.
No obstruya las aberturas de ventilación del horno.
No repare ni cambie ninguna parte del electrodoméstico,
a menos que se recomiende específicamente en este
manual. Remita todas las reparaciones a un centro de
servicio técnico autorizado.
En caso de error, la pantalla titila y emite bips en forma
continua. Desconecte el electrodoméstico de la fuente
de alimentación eléctrica y llame a un técnico
autorizado.
ADVERTENCIA
Al retirar la puerta asegúrese de que el horno esté frío y
de que la alimentación eléctrica del horno esté apagada
antes de retirar la puerta. No hacerlo podría ocasionar
quemaduras.
La puerta del horno es pesada y frágil. Use las dos
manos para retirar la puerta del horno. El frente de la
puerta es de vidrio. Manipúlela con cuidado para que no
se rompa.
Tome la puerta del horno solamente por los costados.
No la tome de la manija, porque puede deslizarse de la
mano y causar lesiones o daños.
No tomar la puerta del horno con firmeza y
correctamente podría ocasionar lesiones personales o
daños al producto.
Coloque la puerta en una superficie plana y lisa de
manera que no se caiga. No hacerlo puede ocasionar
lesiones personales o daños al electrodoméstico.
ADVERTENCIA
Para evitar lesiones cuando se cierra la bisagra,
asegúrese de que ambas palancas estén firmemente en
su lugar antes de retirar la puerta. Tampoco abra ni
cierre la puerta forzándola; la bisagra se podría dañar y
ocasionar lesiones.
ADVERTENCIA
Asegúrese de que el electrodoméstico y las luces se
hayan enfriado, y de que la alimentación eléctrica del
electrodoméstico esté apagada antes de cambiar el (los)
foco(s). No hacerlo podría ocasionar una descarga
eléctrica o quemaduras. La lente (si viene incorporada)
debe estar en su lugar al usar el electrodoméstico. La
lente (si viene incorporada) sirve para proteger el foco
contra roturas. La lente (si viene incorporada) es de
vidrio. Manipúlela con cuidado para que no se rompa. El
vidrio roto podría causar una lesión.
ADVERTENCIA
El portalámparas tiene corriente cuando la puerta está
abierta si la fuente de alimentación eléctrica principal no
está apagada.
Seguridad para evitar incendios
ADVERTENCIA
NUNCA cubra ranuras, orificios ni conductos en la parte
inferior del horno ni cubra toda una rejilla con materiales
como papel de aluminio. Al hacerlo, bloquea el flujo de
aire a través del horno. Los revestimientos de papel de
aluminio también pueden atrapar el calor y causar un
peligro de incendio.
Si los materiales dentro de un horno o cajón calentador
se prenden fuego, mantenga la puerta cerrada. Apague
el electrodoméstico y desconecte el circuito en la caja
de disyuntores.

49
9 INSTRUCCIONES DE SEGURIDAD IMPORTANTES
LEA Y CONSERVE ESTAS INSTRUCCIONES
ADVERTENCIA
Utilice este electrodoméstico únicamente para el fin para
el cual fue diseñado, según se describe en este manual.
NUNCA utilice este electrodoméstico como estufa para
calentar o calefaccionar la habitación. Esto puede hacer
que el electrodoméstico se caliente en exceso. Nunca
utilice el electrodoméstico para almacenar objetos.
Siempre tenga un detector de humo en funcionamiento
cerca de la cocina.
En el caso de que su ropa se prenda fuego, arrójese al
piso y ruede de inmediato para extinguir las llamas.
Tenga un extinguidor de incendio disponible, cerca, en
un área fácilmente visible y accesible, cerca del
electrodoméstico.
Sofoque las llamas provocadas por alimentos que se
prenden fuego, que no sean incendios ocasionados por
grasa, con bicarbonato de sodio. Nunca use agua en
incendios ocasionados al cocinar.
ADVERTENCIA
PARA REDUCIR EL RIESGO DE LESIONES A
PERSONAS EN CASO DE INCENDIO OCASIONADO
POR GRASA, SIGA ESTAS INDICACIONES:
a.
SOFOQUE LAS LLAMAS con una tapa que ajuste
correctamente, una placa para galletas u otra bandeja
de metal, luego, apague el electrodoméstico.
ASEGÚRESE DE PREVENIR LAS QUEMADURAS. Si
las llamas no se apagan de inmediato, EVACUE EL
ÁREA Y LLAME AL DEPARTAMENTO DE BOMBEROS.
b.
NUNCA LEVANTE UNA OLLA EN LLAMAS. Puede
quemarse.
c.
NO USE AGUA, ni repasadores o toallas húmedos.
Puede ocasionar una violenta explosión por vapor.
d.
Use un extinguidor sólo si:
- Sabe que tiene un extinguidor CLASE ABC y ya sabe
cómo usarlo.
- El incendio es pequeño y se limita al área donde se
originó.
- Alguien llamó al departamento de bomberos.
- Puede combatir el incendio de espaldas a una
salida.
Prevención de quemaduras
NO TOQUE LOS ELEMENTOS DE CALENTAMIENTO NI
LAS SUPERFICIES INTERNAS DEL HORNO: Los
elementos de calentamiento pueden estar calientes,
aunque su color sea oscuro. Las superficies internas de
un horno pueden calentarse lo suficiente como para
ocasionar quemaduras. Durante el uso y con
posterioridad, no toque los elementos de calentamiento
ni las superficies internas del horno, ni deje que su ropa,
agarradores ni otros materiales inflamables entren en
contacto con estos hasta que haya transcurrido el
tiempo suficiente para que se enfríen. Otras superficies
del electrodoméstico pueden calentarse lo suficiente
como para ocasionar quemaduras. Entre estas
superficies, se encuentran las aberturas de ventilación
del horno, las superficies cercanas a estas aberturas y
las puertas del horno.
Tenga cuidado al abrir el electrodoméstico. Parado a un
lado, abra la puerta (o el cajón) lenta y ligeramente para
dejar escapar el aire caliente y/o el vapor. Mantenga la
cara lejos de la abertura y asegúrese de que no haya
niños ni mascotas cerca de la unidad. Después de
liberar el aire caliente y/o el vapor, continúe con la
cocción. Mantenga las puertas cerradas, a menos que
sea necesario para cocinar o limpiar. No deje las
puertas abiertas sin vigilancia.
No caliente recipientes de alimentos sin abrir. La
acumulación de presión puede hacer explotar el
recipiente y causar lesiones.
Proceda con cuidado al cocinar alimentos con alto
contenido de alcohol (p. ej., ron, brandy, bourbon) en el
horno. El alcohol se evapora a altas temperaturas. Existe
un riesgo de que se produzcan quemaduras, dado que
los vapores del alcohol pueden prenderse fuego en el
horno. Utilice sólo pequeñas cantidades de alcohol en
los alimentos, y abra la puerta del horno con cuidado.
Siempre coloque las rejillas del horno en la posición
deseada mientras el horno está frío. Utilizar siempre
agarradores si el forno está caliente. Si necesita mover
la rejilla mientras el horno está caliente, no deje que el
agarrador entre en contacto con los elementos de
calentamiento.
ATENCION
Para evitar posibles daños o lesiones en el
electrodoméstico, asegúrese de que la rejilla esté
instalada exactamente según las instrucciones de
instalación y no hacia atrás ni dada vuelta.
Siempre use agarradores secos. Los agarradores
húmedos o mojados sobre las superficies calientes
pueden ocasionar quemaduras por vapor. No deje que
los agarradores toquen los elementos de calentamiento
que estén calientes. No use toallas ni otros paños
gruesos.
Sujétese todas las prendas, etc. antes de comenzar.
Sujétese el cabello largo de manera que no quede
suelto, y no use prendas holgadas o sueltas, como
corbatas, bufandas, joyas o mangas amplias.
Seguridad de los niños
Cuando los niños tienen la edad adecuada para utilizar
el electrodoméstico, es responsabilidad de los padres o
tutores legales asegurarse de que reciban las
instrucciones sobre prácticas seguras por parte de
personas calificadas.
No deje que nadie se suba, pare, incline, siente o
cuelgue de cualquier parte de un electrodoméstico,
especialmente una puerta, cajón calentador o cajón para
almacenamiento. Esto puede dañar el electrodoméstico,
y la unidad puede caerse y, posiblemente, causar
lesiones graves.

9 INSTRUCCIONES DE SEGURIDAD IMPORTANTES
LEA Y CONSERVE ESTAS INSTRUCCIONES
50
No permita que niños utilicen este electrodoméstico, a
menos que sean supervisados de cerca por un adulto.
Los niños y las mascotas no deben quedar solos o sin
vigilancia en el área donde se utilice el electrodoméstico.
Nunca se les debe permitir jugar cerca del
electrodoméstico, independientemente de que esté en
funcionamiento o no.
ATENCION
Los objetos de interés para niños no deben almacenarse
en un electrodoméstico, en gabinetes sobre un
electrodoméstico ni en la placa antisalpicaduras. Si los
niños se suben a un electrodoméstico para alcanzar
estos objetos, podrían sufrir lesiones graves.
Seguridad en la limpieza
No deje que se acumule grasa en el horno.
Seguridad en los utensilios de cocina
AVISO: No coloque los alimentos directamente en la
parte inferior del horno.
Siga las indicaciones del fabricante al utilizar bolsas para
cocinar o asar.
No colocar los recipientes para cocinar sobre la puerta
del horno abierta.
Advertencia en virtud de la
Proposición 65:
Este producto puede contener un químico que el Estado
de California reconoce como potencialmente
cancerígeno o causante de daños reproductivos. Por
tanto, su producto debe llevar en su embalaje la
siguiente etiqueta de conformidad con la legislación de
California:
&iQFHU\GDxRUHSURGXFWLYRZZZ3:DUQLQJVFDJRY
$'9(57(1&,$(19,578''(/$352326,&,Ð1'(/
$'9(57(1&,$
(67$'2'(&$/,)251,$

51
Causas para los daños
AVISOS:
▯ Accesorios, papel de aluminio, papel de estraza o
utensilios de cocina en la parte inferior del interior del
horno: no coloque accesorios en la parte inferior del
interior del horno. No cubra la parte inferior del interior
del horno con ningún tipo de papel o papel de
estraza. No coloque utensilios de cocina en la parte
inferior del interior del horno cuando se establece una
temperatura por encima de 122°F (50°C). Esto
produce una acumulación de calor. Los tiempos para
hornear y asar ya no son correctos y se daña el
esmalte.
▯ No utilizar el horno si el protector del techo se
encuentra en la parte inferior de la cavidad.
▯ Agua en el interior del horno caliente: Nunca vierta
agua en el interior del horno caliente. Se produce
vapor. Se puede dañara el esmalte debido al cambio
de temperatura.
▯ No deje alimentos húmedos en un horno cerrado por
un período prolongado de tiempo. Puede conducir a
la corrosión dentro del horno.
▯ El jugo de frutas puede dejar manchas en el horno.
Siempre retire inmediatamente el jugo de frutas y
limpie primero con un trapo húmedo y luego con uno
seco. Deje enfriar el horno para evitar quemaduras
causado del vapor de un trapo húmedo.
▯ Enfriamiento con la puerta del equipo abierto:
Solamente deje enfriar la cámara de cocción con la
puerta cerrada. Incluso cuando la puerta del equipo
está abierta solamente una pequeña rendija, con el
tiempo los frentes de los muebles cercanos pueden
resultar dañados.
▯ Sello de la puerta muy sucio: si el sello de la puerta
está muy sucio, la puerta ya no se cerrará
correctamente durante el funcionamiento del equipo.
Los frentes de los muebles cercanos pueden dañarse.
Mantenga siempre limpio el sello de la puerta.
▯ La puerta del equipo como asiento o superficie de
almacenamiento: no pararse, sentarse o colgarse en
la puerta del equipo. No coloque ningún recipiente o
accesorios sobre la puerta.
▯ Inserción de accesorios: dependiendo del tipo de
equipo, los accesorios pueden rayar el panel de la
puerta al cerrarla. Siempre deslice completamente los
accesorios en el interior del horno.
▯ No sujete ni transporte el aparato por la manija de la
puerta. La manija de la puerta no puede soportar el
peso del equipo y podría romperse.
Protección del medio ambiente
Saque el equipo de su empaque y elimine éste de forma
ecológica.
Consejos para ahorrar energía
▯ Abra lo menos posible la puerta del equipo cuando
esté cociendo, horneando o asando.
▯ Para hornear, utilice moldes oscuros, barnizados en
negro, o esmaltados. Éstos absorben el calor
especialmente bien.
▯ Para hornear varios pasteles, lo mejor es hacerlo uno
después de otro. El horno está todavía caliente. De
esta manera se reduce el tiempo de cocción para el
segundo pastel. También puede introducir dos moldes
uno al lado del otro.
▯ En el funcionamiento con aire caliente puede hornear
en varios niveles al mismo tiempo.
▯ En tiempos de cocción largos puede apagar el horno
10minutos antes del fin del tiempo de cocción, y
aprovechar el calor restante para terminar de cocer.

52
Su nuevo aparato
Aquí conocerá a su nuevo aparato. Se presenta
información sobre el panel de operación, el horno, los
tipos de calentamiento y los accesorios.
Horno
AVISO: No coloque los alimentos directamente en la
parte inferior del horno.
No obstruya las aberturas de ventilación del horno.
Selector de funciones
Con el selector de funciones se puede seleccionar el
tipo de calentamiento.
1 Selector de temperatura
2 Luz indicadora de funciones
3 Selector de funciones
4 Pantalla y teclas de funciones
7,0(56
Posición Aplicación
Off (Apagado) El horno se apaga.
Bake (Horneado) Para pasteles, estofados y carne
magra de asado. El calor proviene
uniformemente de las resistencias
inferior y superior.
Broil Plus
(Asado Plus)
El calor proviene de la resistencia del
grill y proporciona un resultado
óptimo en carnes con poco grosor o
medianamente gruesas; en combina-
ción con el asador (en caso de estar
disponible), los alimentos adquieren
un dorado uniforme. Ideal para sal-
chichas, costillas y tocino. Esta fun-
ción permite asar al grill de forma
uniforme grandes cantidades de ali-
mentos, especialmente carne.
Warm (Caliente) El aire caliente proviene de la resis-
tencia inferior y permite cocinar ali-
mentos que requieren más calor en
la parte inferior, sin dorarlos dema-
siado. Ideal para pasteles, tartas y
pizzas.
Frozen Foods
(Alimentos ultra-
congelados)
El uso combinado del ventilador y el
asado tradicional permiten cocinar
distintos tipos de alimentos a diver-
sos niveles de manera rápida y efi-
ciente. Ideal para grandes
cantidades de alimentos que deben
cocinarse a fuego lento, apto tanto
para alimentos ultracongelados
como frescos.
Defrost (Descon-
gelar)
Para descongelar rápidamente con
ayuda del ventilador y la resistencia
superior que distribuyen el aire a
baja temperatura de forma uniforme
dentro del horno.
Conv Bake (Hor-
neado combi-
nado)
El funcionamiento del ventilador com-
binado con el asado tradicional
garantiza un asado uniforme, incluso
en la preparación de recetas más
complejas. Ideal para cualquier tipo
de alimento, incluso si se está coci-
nando simultáneamente a varios
niveles.
Conv Broil Plus
(Asado Combi-
nado Plus)
El aire producido por el ventilador
disminuye la temperatura del calor
generado por el grill. Para asar al
grill de forma óptima incluso alimen-
tos más gruesos. Ideal para cocinar
grandes trozos de carne.
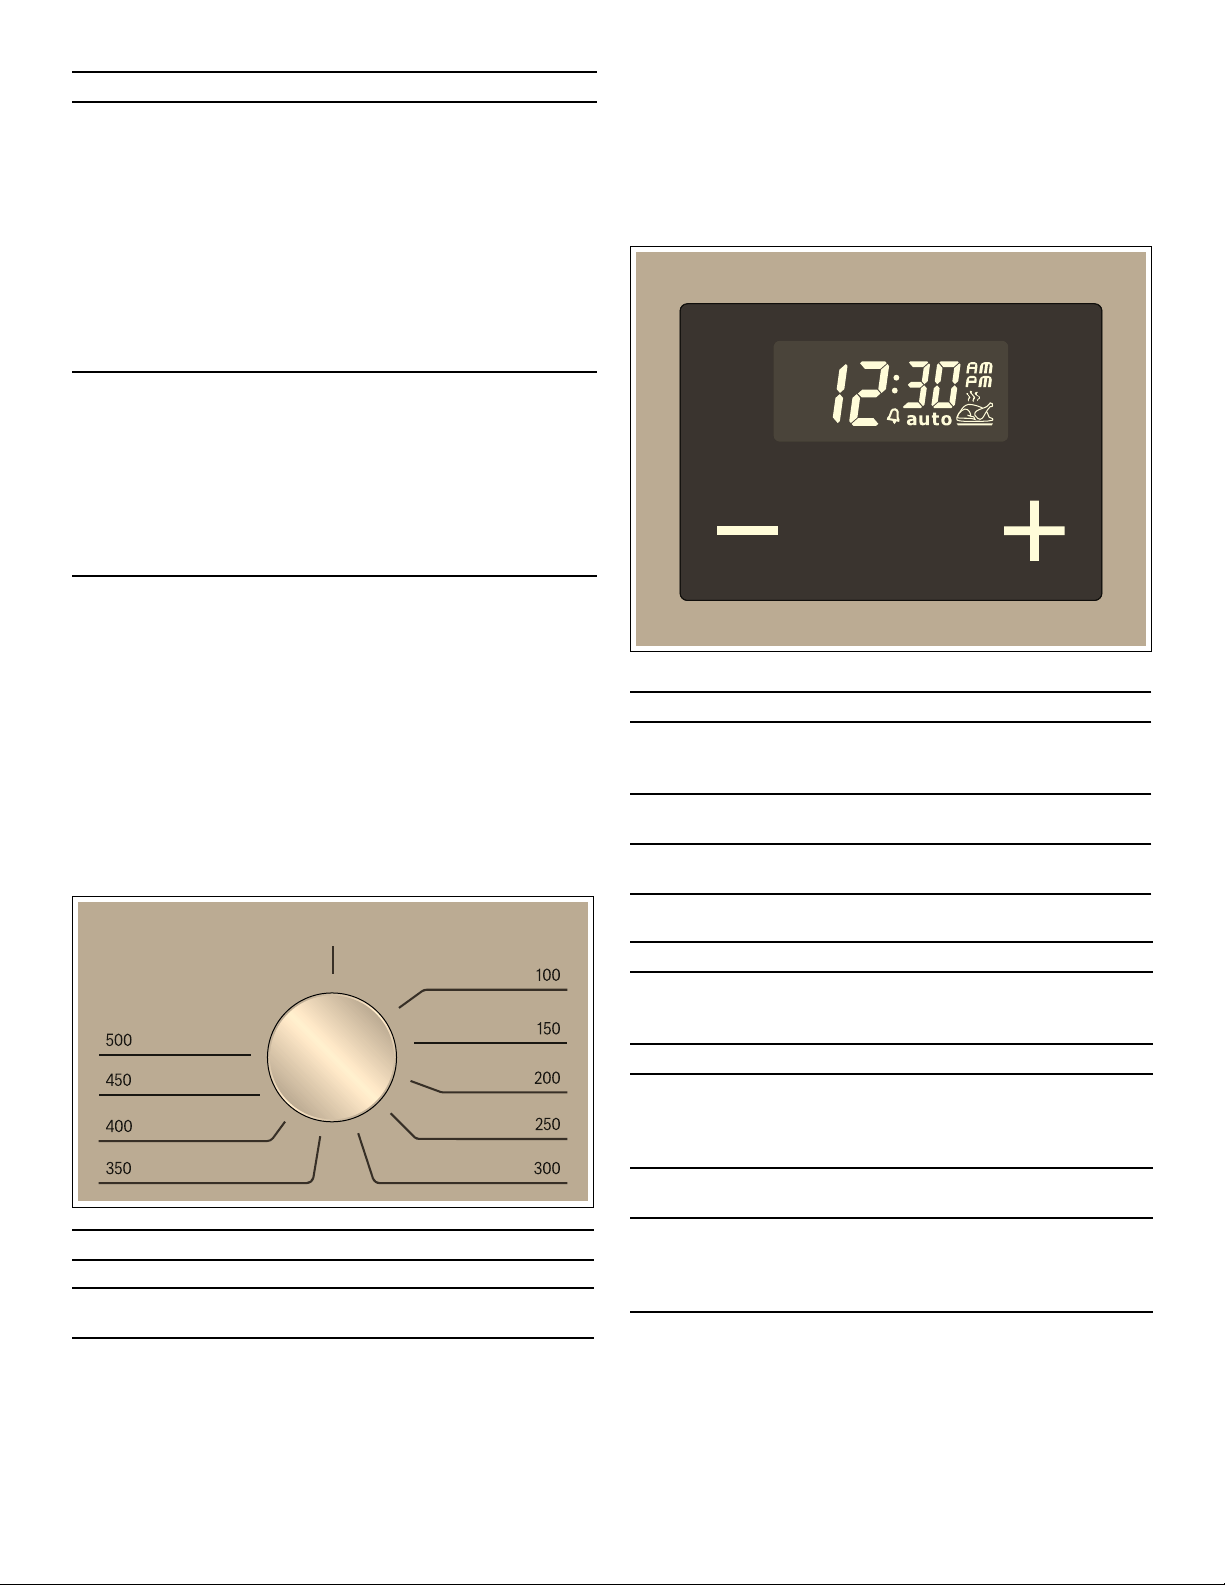
53
Nota: Cuando se selecciona el tipo de calentamiento,
se enciende la luz situada en el interior del horno.
Selector de temperatura
Con el selector de temperatura se ajusta la temperatura
del horno.
La lámpara indicadora parpadea cuando se calienta el
horno. Cuando se alcanza la temperatura programada,
la lámpara indicadora se ilumina de forma permanente y
suena una señal.
Timer (Temporizador)
Con el temporizador se puede controlar el
funcionamiento del horno. De esta manera puede
programarse, p. ej. a que hora debe conectarse el horno
o cuando debe detener el temporizador el proceso de
horneado o de cocción. El temporizador puede utilizarse
también como reloj avisador.
Teclas de funciones
Símbolos en la pantalla
Conv Multi-Rack
(Combinación
múltiple)
El funcionamiento combinado del
ventilador y la resistencia circular
(situada en la placa posterior del
horno) permiten cocinar diferentes
alimentos a distintos niveles, siempre
que estos deban prepararse a la
misma temperatura y del mismo
modo. La circulación del aire caliente
garantiza la distribución inmediata y
uniforme del calor. Para cocinar a
distintos niveles se recomienda utili-
zar las alturas 2y 4.
Conv Broil
(Asado Combi-
nado)
Gracias a la acción combinada del
ventilador y el calor generado por la
resistencia central, esta función es
ideal para cocinar de forma rápida y
gratinar pequeñas cantidades de ali-
mentos (especialmente carnes), reu-
niendo los beneficios nutritivos del
asado al grill y la cocción uniforme
del ventilador.
Pie (Tartas) La combinación del ventilador a una
temperatura baja y un poco de calor
generado por la resistencia superior
permite cocinar más rápidamente.
Ideal para cualquier tipo de alimento,
pero especialmente adecuado para
tartas y pasteles.
Posición Significado
0 Posición cero El horno no calienta.
100-
500
Margen de
temperatura
La temperatura del interior del
horno en °F.
Posición Aplicación
Símbolo Significado Aplicación
TIMERS Funciones del
reloj temporiza-
dor
Ajustar la duración o el
tiempo
A
Menos Disminuir la duración o
el tiempo
@
Más Aumentar la duración o
el tiempo
Símbolo Significado
‹‹:‹‹
Hora / Duración del tiempo de funciona-
miento / Hora de finalización / Reloj tem-
porizador de cocina
Ž
El horno está listo para funcionar
auto Ž
Se ha programado una Duración del
tiempo de funcionamiento / Duración del
tiempo de funcionamiento con hora de
finalización
†
El reloj temporizador de cocina está acti-
vado
„/…
Indicación de la hora: formato 12h
Para conmutar la indicación de la hora al
formato 24h, ver el apartado "Ajustar la
hora"
7,0(56

54
Accesorios
Los accesorios pueden introducirse en el interior del
horno a 5alturas distintas. Introducir los accesorios
siempre hasta el tope para que no golpeen en el cristal
de la puerta. Asegurarse de introducir los accesorios
siempre en la posición correcta en el interior del aparato.
Pueden extraerse dos terceras partes de los accesorios
sin que vuelquen. De esta manera, los alimentos pueden
retirarse con facilidad.
Si los accesorios se calientan, pueden deformarse. Una
vez que se hayan enfriado, desaparece la deformación y
no repercute sobre el funcionamiento.
Los accesorios pueden adquirirse en el Servicio de
Asistencia Técnica, en comercios especializados o en
Internet.
Los rieles de extracción permiten extraer por completo el
accesorio.
--------
Montaje del protector del techo
Deslizar el protector del techo con cuidado sobre la
resistencia del grill. Para retirarlo, extraerlo con cuidado
de la cavidad del horno.
Accesorios Descripción
Parrilla para hornear y asar
Para recipientes, moldes
para pasteles, asados, parri-
lladas y platos congelados.
Charola de horno esmaltada
Para pasteles jugosos, pas-
tas, platos congelados y asa-
dos grandes. También se
puede utilizar como charola
para recoger la grasa.
Varillas de seguridad
Para bloquear las bisagras.
Protector del techo
El protector del techo puede
insertarse permanentemente
sobre el asador del horno
para evitar que la cavidad del
techo se ensucie. El protector
puede extraerse y cuenta con
una superficie de porcelana
esmaltada para facilitar su
limpieza.
Nota: : El revestimiento de
porcelana del protector del
techo no es completamente
uniforme, en algunas zonas
pueden apreciarse pequeños
reflejos. Se trata de un fenó-
meno normal. El metal conti-
núa cubierto y protegido.

55
Antes del primer uso
A continuación, se indican los pasos que deben seguirse
antes de utilizar el aparato por primera vez. Leer antes el
capítulo Consejos y advertencias de seguridad.
Retirar el embalaje del aparato y desecharlo
debidamente.
Ajuste de la hora
Tras la conexión eléctrica del aparato o tras un corte de
la corriente, en la pantalla parpadea
‹:‹‹ y auto.
1.
Mantener pulsada la tecla TIMERS hasta que en la
pantalla parpadeen los dos puntos.
2.
Ajustar la hora actual con las teclas @ y A. Mantener
pulsada la tecla
@ o A para modificar rápidamente el
valor.
El tiempo programado se aplica transcurridos
5segundos.
Ajustar la hora mientras el horno está en
funcionamiento
1.
Mantener pulsadas las teclas @ y A hasta que en la
pantalla parpadeen los dos puntos.
2.
Ajustar la hora actual con las teclas @ y A. Mantener
pulsada la tecla @ o A para modificar rápidamente el
valor.
El tiempo programado se aplica transcurridos
5 segundos.
Calentamiento del horno
Limpiar previamente el horno
1.
Retirar los accesorios, los enganches y el protector
del techo del interior del horno.
2.
Retirar por completo todos los restos de embalaje del
interior del horno, como fragmentos de poliestireno.
3.
Algunas partes están cubiertas con una lámina
protectora anti-raspones. Retirar la lámina protectora
anti-raspones.
4.
Limpiar el aparato por fuera con un paño suave y
húmedo.
5.
Limpiar el interior del horno con agua caliente y jabón.
Calentar el horno
Para eliminar el olor a nuevo, calentar el horno vacío y
cerrado.
1.
Situar el selector de funciones en el modo de
funcionamiento "Bake".
2.
Girar el selector de temperatura hasta el nivel máximo.
3.
Transcurridos 40minutos, apagar el horno.
Limpieza posterior del horno
1.
Limpiar el interior del horno con agua caliente y jabón.
2.
Montar las guías laterales.
Limpieza de los accesorios
Antes de utilizar los accesorios, limpiarlos a fondo con
agua caliente con un poco de jabón y un trapo.
Operación
Conexión del horno
1.
Ajustar el tipo de calentamiento con el selector de
funciones.
2.
Ajustar la temperatura con el selector de temperatura.
El horno empieza a calentarse.
Desconectar el horno
Situar el selector de funciones y el selector de
temperatura en la posición cero.
Modificar los ajustes
El tipo de calentamiento y la temperatura o el nivel de
grill pueden modificarse en cualquier momento con el
correspondiente selector.
Calentamiento
Para calentar el horno lo más rápido posible, cambiar el
tipo de calentamiento a "Conv Bake". Si se alcanza la
temperatura programada (la lámpara indicadora se
mantiene encendida y suena una señal), ajustar el tipo
de calentamiento deseado.
Temporizador de cocina
El reloj avisador no afecta a las funciones del horno. La
duración del reloj avisador se puede ajustar desde
1minuto hasta 23horas y 59minutos.
1.
Mantener pulsada la tecla TIMERS hasta que en la
pantalla parpadee el símbolo † y se visualice ‹:‹‹.
2.
Ajustar la duración deseada con las teclas @ y A.
El tiempo programado se aplica transcurridos
5segundos.
Una vez transcurrido el tiempo suena una señal
acústica y en la pantalla parpadea el símbolo †.
Nota: Mientras el tiempo del reloj avisador transcurre,
en la pantalla se visualiza la hora y se mantiene
encendido el símbolo †.
Modificar el tiempo programado:
Para cambiar el tiempo restante, mantener pulsada la
tecla TIMERS hasta que en la pantalla parpadee el
símbolo †. A continuación, cambiar el tiempo restante
con las teclas @ y A.

56
Detener el reloj avisador
Para cancelar el ajuste, mantener pulsada la tecla
TIMERS hasta que en la pantalla parpadee el símbolo †.
A continuación, pulsar simultáneamente las teclas @ y A.
Desactivar el tono de aviso
Mantener pulsada la tecla TIMERS hasta que el indicador
de la hora se apague. Tras siete minutos, la señal se
apaga automáticamente.
Ajuste del temporizador
Con la función del reloj temporizador (TIMER) se puede
ajustar la duración del tiempo de funcionamiento o
programar una hora de inicio y finalización.
Desconexión automática
1.
Mantener pulsada la tecla TIMERS hasta que
parpadee el símbolo
†.
2.
Pulsar nuevamente la tecla TIMERS.
En la pantalla parpadea auto y šž§.
3.
Ajustar la duración del tiempo de funcionamiento con
las teclas @ y A.
La duración del tiempo de funcionamiento se puede
ajustar desde 1minuto hasta 10horas.
4.
Ajustar el tipo de calentamiento y temperatura
deseados.
El horno se enciende. En la pantalla se iluminan el
símbolo Ž y auto, y se visualiza la hora actual.
Ha concluido la duración del tiempo de
funcionamiento
Suena una señal y en la pantalla parpadea auto.
1.
Desconectar el selector de temperatura y el selector
de funciones.
2.
Mantener pulsada la tecla TIMERS hasta que aparezca
el símbolo Ž.
El horno cambia de nuevo al modo manual.
Cancelar la duración del tiempo de funcionamiento
Para cancelar el ajuste, mantener pulsada la tecla
TIMERS hasta que en la pantalla parpadee el símbolo †.
A continuación, pulsar simultáneamente las teclas @ y A.
Conexión y desconexión automática
El horneado o el asado empieza a la hora seleccionada
por el usuario según la duración programada.
1.
Mantener pulsada la tecla TIMERS hasta que
parpadee el símbolo †.
2.
Pulsar nuevamente la tecla TIMERS.
En la pantalla parpadea auto y šž§.
3.
Ajustar la duración del tiempo de funcionamiento con
las teclas @ y A.
La duración del tiempo de funcionamiento se puede
ajustar desde 1minuto hasta 10horas.
4.
Pulsar de nuevo la tecla TIMERS. En la pantalla
parpadean auto y el símbolo Ž.
Se visualiza la hora de finalización para la duración
del tiempo de funcionamiento programado.
5.
Ajustar la hora de finalización con las teclas @ y A.
La hora de finalización se puede ajustar hasta
23horas y 59minutos.
El horno calcula la hora de inicio. El tiempo
programado se aplica transcurridos 5segundos.
En la pantalla desaparecen el símbolo
Ž y auto, y se
visualiza la hora actual.
6.
Ajustar el tipo de calentamiento y temperatura
deseados.
Cuando se alcanza la hora de inicio, el horno empieza
a calentarse. En la pantalla se iluminan el símbolo
Ž
y auto.
Ha concluido la duración del tiempo de
funcionamiento
Suena una señal y en la pantalla parpadea auto.
1.
Desconectar el selector de temperatura y el selector
de funciones.
2.
Mantener pulsada la tecla TIMERS hasta que aparezca
el símbolo
Ž.
El horno cambia de nuevo al modo manual.
Cancelar la duración del tiempo de funcionamiento
Para cancelar el ajuste, mantener pulsada la tecla
TIMERS hasta que en la pantalla parpadee el símbolo
†.
A continuación, pulsar simultáneamente las teclas @ y A.
Ajustes básicos
Los siguientes ajustes básicos pueden ajustarse
permanentemente:
Ajustar el volumen de la señal
El horno debe estar apagado.
1.
Mantener pulsadas las teclas @ y A hasta que en la
pantalla parpadeen los dos puntos.
2.
Pulsar una vez la tecla TIMERS.
En la pantalla se muestra ton.
3.
Pulsar de nuevo la tecla A hasta lograr el volumen
deseado.
Modificar el formato de tiempo
El horno debe estar apagado.
Mantener pulsada la tecla @ durante 3segundos. „/
… se muestra en la pantalla. Para volver a cambiar al
formato de tiempo de 24h, mantener pulsada de nuevo
la tecla @ durante 3segundos.
Ajustes básicos Opciones
Tono de aviso ▯ bajo
▯ medio
▯ alto*
Formato de tiempo ▯ 24h*
▯ 12h am/pm
* Ajuste de fábrica

57
Cuidados y limpieza
El horno mantendrá durante mucho tiempo su aspecto
reluciente y su capacidad funcional siempre y cuando se
lleven a cabo la limpieza y los cuidados pertinentes. A
continuación se describe cómo efectuar el cuidado y la
limpieza óptimos del horno.
Notas
▯ Es posible que aparezcan diferentes tonalidades en la
parte frontal del horno debido a los diferentes
materiales como vidrio, plástico o metal.
▯ Las sombras apreciables en el cristal de la puerta,
que parecen suciedad, son reflejos de luz del foco del
horno.
▯ El esmalte se quema cuando se alcanza una
temperatura muy elevada. Esto puede dar lugar a la
aparición de pequeñas diferencias de color. Se trata
de un fenómeno normal que no afecta al
funcionamiento del horno. Los bordes de las charolas
finas no pueden esmaltarse por completo. Por está
razón pueden resultar ásperos al tacto. Esto no afecta
a la protección anticorrosiva.
9 ADVERTENCIA
PELIGRO DE DESCARGA ELÉCTRICA
La humedad penetrante puede causar una
descarga eléctrica. No use una hidrolavadora ni un
limpiador por vapor.
9 ADVERTENCIA
PELIGRO DE QUEMADURAS
El equipo se calienta mucho. Nunca toque las
superficies interiores de la cámara de cocción o los
elementos de calentamiento. Siempre deje enfriar el
equipo primero. Mantenga alejados a los niños.
Productos de limpieza
Observar las siguientes indicaciones con el fin de no
dañar las distintas superficies del horno por emplear un
producto de limpieza inadecuado.
No usar en ningún caso:
▯ productos de limpieza abrasivos o corrosivos
▯ productos con un alto contenido de alcohol
▯ estropajos o esponjas duras
▯ limpiadores de alta presión o por chorro de vapor.
Lavar a fondo los paños de cocina nuevos antes de
usarlos.
Zona Productos de limpieza
Parte exterior del
aparato
Agua caliente con jabón:
Limpiar con un trapo y secar con un
paño suave. No utilizar limpiacrista-
les ni rascadores para cristal.
Acero inoxidable Agua caliente con jabón:
Limpiar con un trapo y secar con un
paño suave. Limpiar inmediata-
mente las manchas de cal, grasa,
maicena y clara de huevo. Debajo
de estas manchas puede formarse
corrosión.
En el Servicio de Asistencia Técnica
o en comercios especializados pue-
den adquirirse los productos de lim-
pieza especiales para el acero
inoxidable, apropiados para superfi-
cies calientes. Aplicar una capa muy
fina del producto de limpieza con un
paño suave.
Aluminio y plás-
tico
Limpiacristales:
Limpiar con un paño suave.
Superficies
esmaltadas
(superficie lisa)
Para que la limpieza resulte más
fácil, se puede encender la ilumina-
ción interior e incluso desenganchar
la puerta del aparato. Limpiar con
un detergente convencional o con
agua con vinagre usando un trapo
suave y humedecido o una gamuza
y secar con un paño suave. Limpiar
los residuos de comida quemados
con un paño húmedo y un producto
de limpieza. Al finalizar la limpieza,
dejar el horno abierto para que se
seque.
Superficies auto-
limpiables (super-
ficie rugosa)
Tener en cuenta las advertencias
que aparecen en el capítulo: Superfi-
cies autolimpiables
Cristales de la
puerta
Limpiacristales:
Limpiar con un paño suave. No utili-
zar rascadores para cristal.
Cristal protector
del foco del
horno
Agua caliente con jabón:
Limpiar con un trapo.
Junta
No retirar.
Agua caliente con jabón:
Limpiar con un trapo. No frotar.
Rejillas Agua caliente con jabón:
Poner en remojo y limpiar con un
trapo o un cepillo.
Accesorios Agua caliente con jabón:
Poner en remojo y limpiar con un
trapo o un cepillo.
Roof Liner Agua caliente con jabón:
Poner en remojo y limpiar con un
trapo o un cepillo.
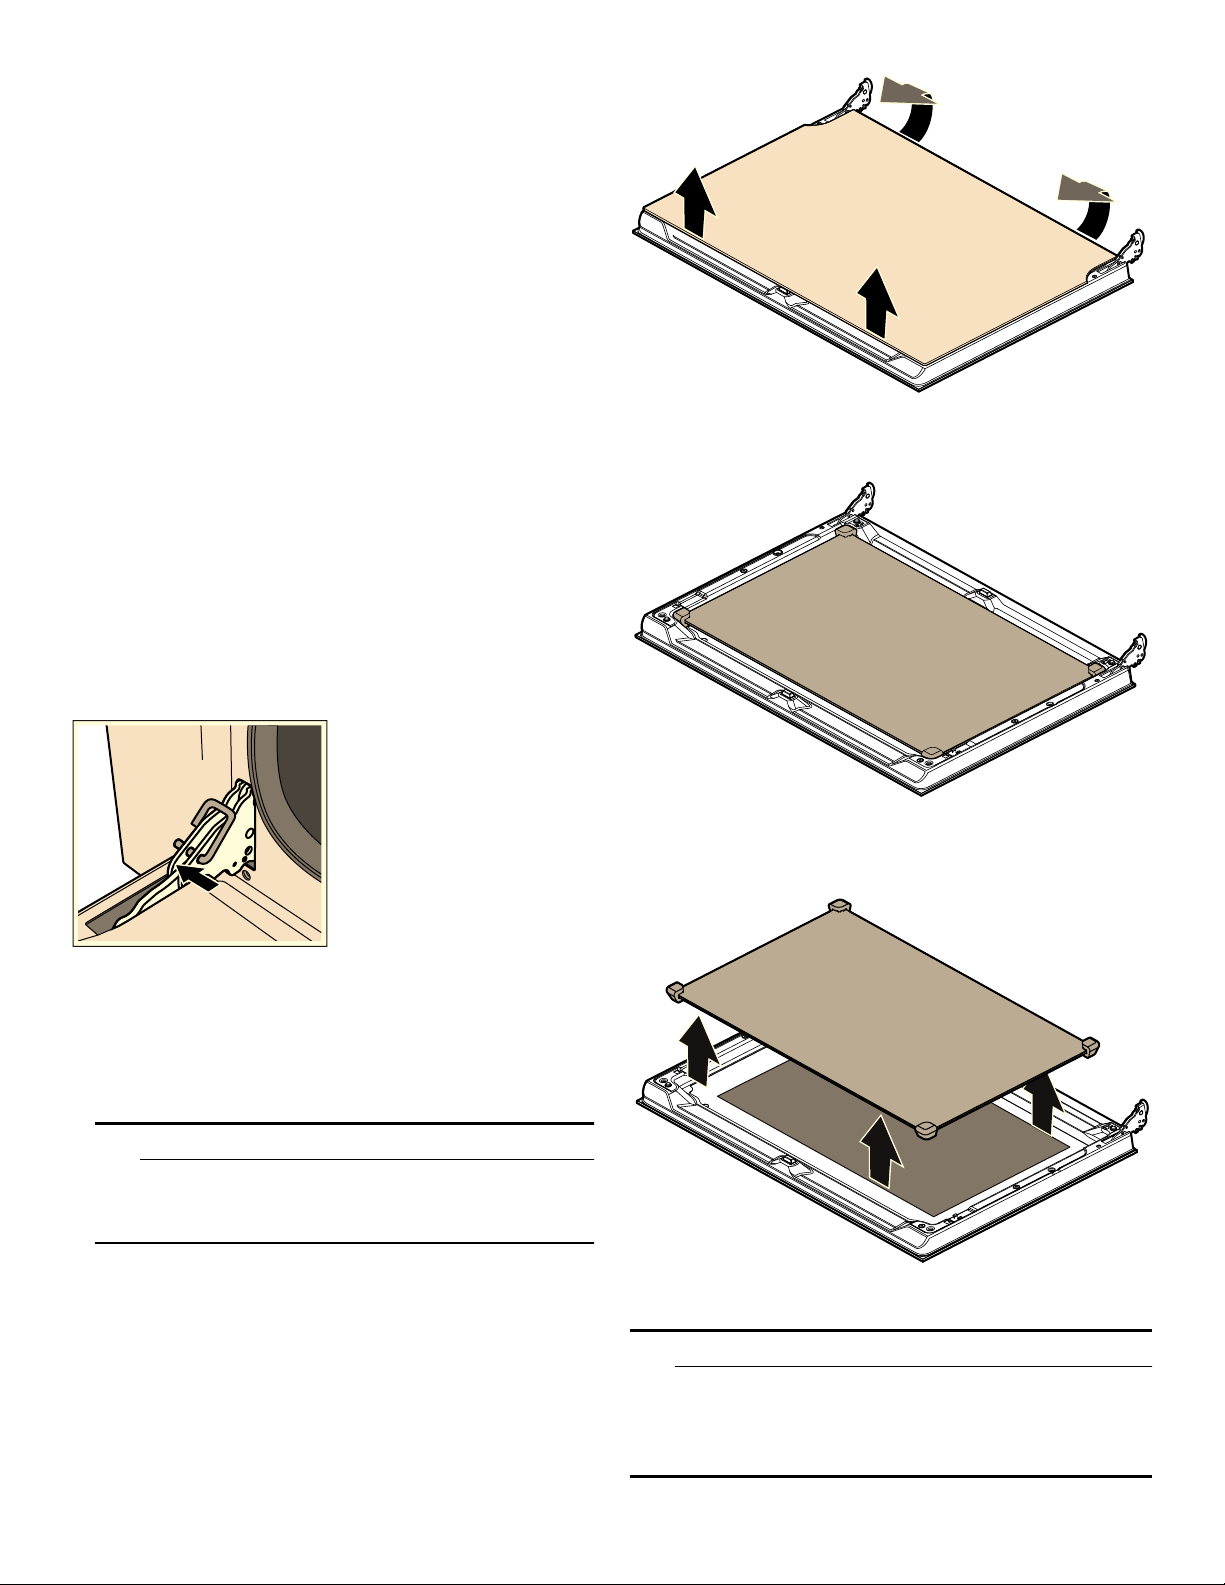
58
Revestimiento catalítico del interior del
horno
Los revestimientos catalíticos del interior del horno están
recubiertos con esmalte autolimpiable.
Las superficies se limpian por sí solas mientras el horno
está en funcionamiento. Las salpicaduras grandes no
desaparecen hasta que el horno ha funcionado
repetidas veces.
Superficies autolimpiables
Las paredes laterales y posterior tienen un revestimiento
catalítico. No limpiar estas superficies con limpiadores
para hornos. Una decoloración ligera de los esmaltes no
influye en la autolimpieza.
Montaje y desmontaje de los cristales de
la puerta
Los cristales de la puerta del horno pueden desmontarse
para facilitar su limpieza.
Desmontaje de los cristales de las puertas
1.
Abrir por completo la puerta del horno.
2.
Bloquear las bisagras a izquierda y derecha con la
varilla de seguridad.
Nota: Las varillas de seguridad deben estar
completamente insertadas en los orificios de las
bisagras.
3.
Levantar suavemente la parte inferior del cristal interior
hasta que se suelten del soporte los pasadores de
sujeción (1).
4.
Levantar con cuidado la parte superior del cristal
interior hasta que se suelten del soporte los
pasadores de sujeción (2).
9 ATENCION
El cristal intermedio puede quedarse unido al
cristal interior al levantar este último. Asegurarse
de que el cristal intermedio no se cae.
5.
Extraer el cristal interior.
6.
Extraer el cristal intermedio.
Nota: El cristal intermedio no está sujeto con
pasadores de sujeción, sino que se mantiene en su
posición mediante soportes de goma.
Limpiar los cristales con limpiacristales y un paño suave.
9 ADVERTENCIA
PELIGRO DE LESIONES
El cristal de la puerta del equipo puede romperse si
se rasca. No use rascadores para cristal, ni
productos de limpieza agresivos o por frotamiento.
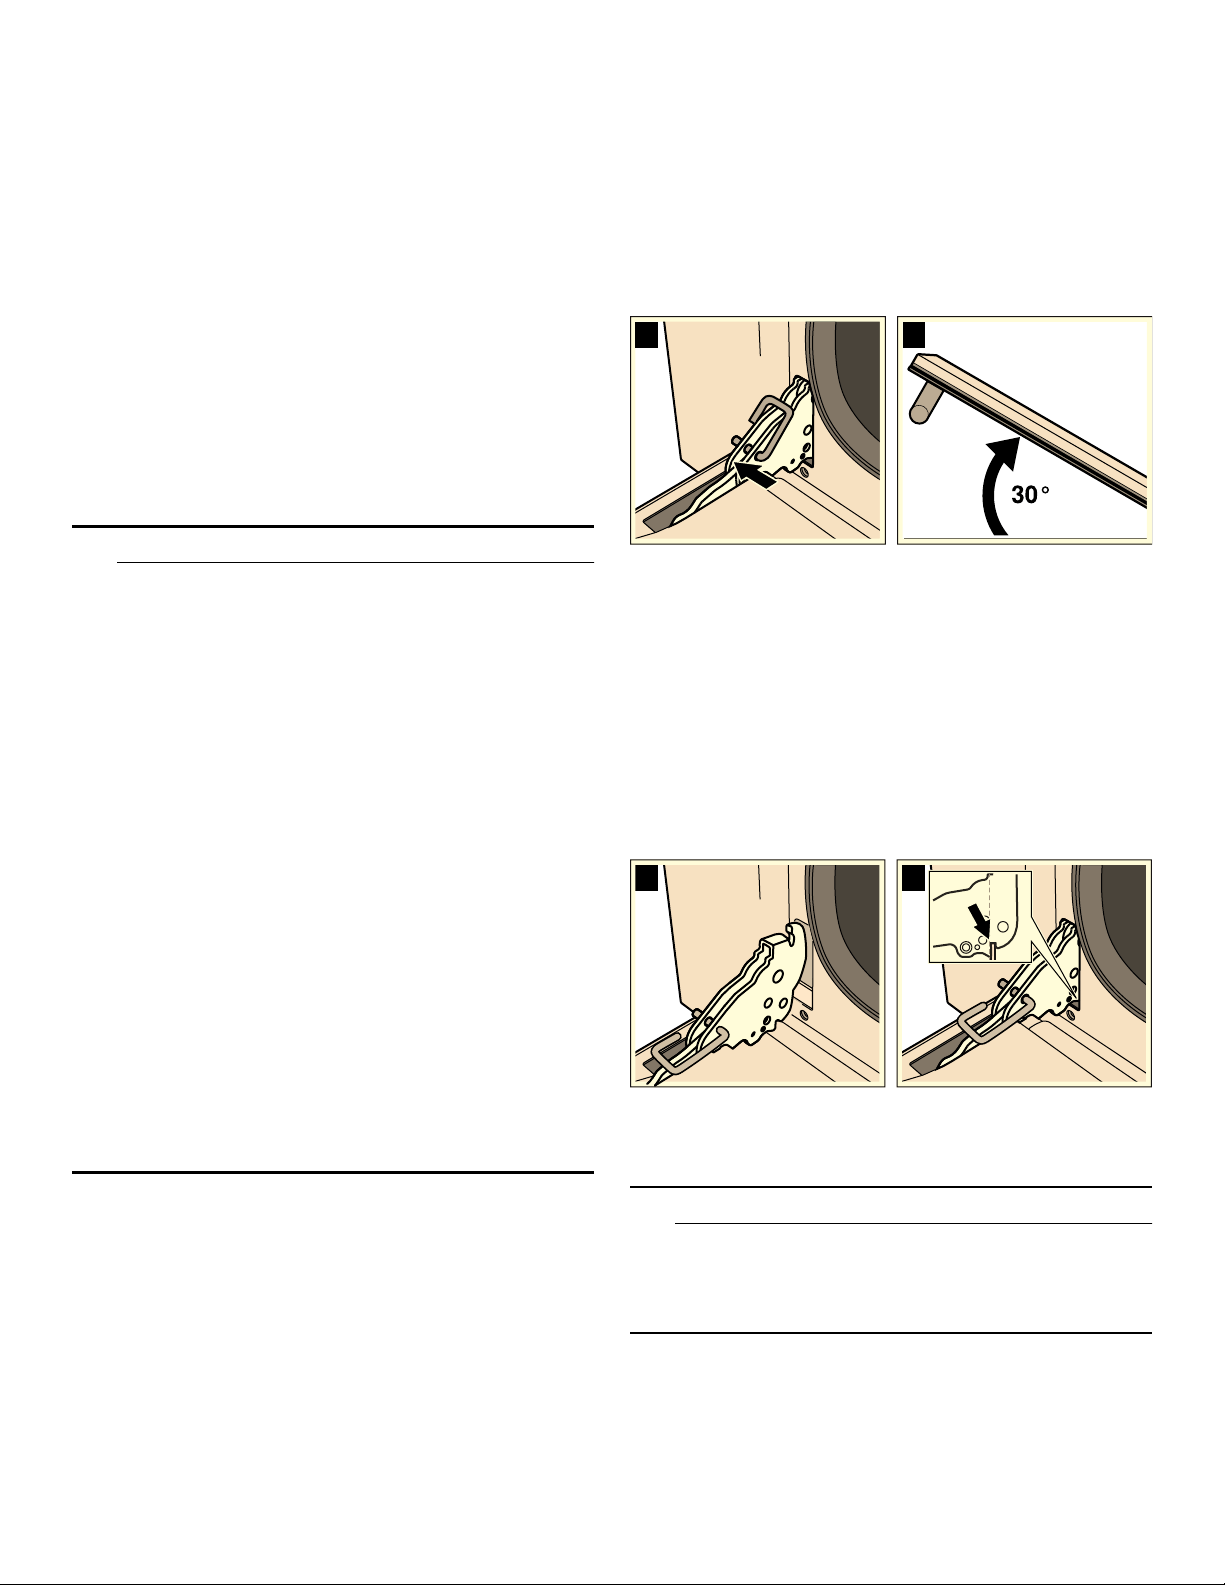
59
Montaje de los cristales de la puerta
1.
Colocar de nuevo el cristal intermedio.
Nota: Asegúrese de que el cristal esté colocado en la
posición correcta. Todos los soportes de goma deben
colocarse planos sobre el cristal exterior.
2.
Colocar de nuevo el cristal interior.
Nota: Los cuatro pasadores de sujeción deben
encajar en los soportes correspondientes.
3.
Retirar las varillas de seguridad y cerrar la puerta del
horno.
Montaje y desmontaje de la puerta del
aparato
En caso de una suciedad especialmente resistente, la
puerta del horno se puede desmontar para una mejor
limpieza. Sin embargo, habitualmente esto no es
necesario.
9 ATENCION
▯ Asegúrese de que el horno esté frío y de que la
alimentación eléctrica esté desactivada antes de
retirar la puerta. No hacerlo puede ocasionar una
descarga eléctrica o quemaduras.
▯ La puerta del horno es pesada y sus piezas son
frágiles. Use las dos manos para retirar la puerta
del horno. El frente de la puerta incluye
componentes de vidrio. Manipúlela con cuidado
para evitar que se rompan.
▯ Tome la puerta del horno solamente por los
costados. No la tome de la manija, porque puede
deslizarse de la mano y causar daños o lesiones.
▯ No tomar la puerta del horno con firmeza y
correctamente podría ocasionar lesiones
personales o daños al producto.
▯ Para evitar lesiones cuando se cierra la bisagra,
asegúrese de que ambas palancas de bloqueo
estén firmemente en su lugar antes de retirar la
puerta. Tampoco abra ni cierre la puerta del
horno forzándola: la bisagra puede dañarse y
ocasionar lesiones.
▯ No apoye la puerta que retiró sobre objetos
filosos o puntiagudos, dado que el vidrio podría
romperse. Apoye la puerta sobre una superficie
plana y lisa, de manera que la puerta no pueda
caerse.
Desmontaje de la puerta del aparato
1.
Abrir por completo la puerta del horno.
2.
Bloquear las bisagras a izquierda y derecha con la
varilla de seguridad (a).
Nota: Las varillas de seguridad deben estar
completamente insertadas en los orificios de las
bisagras.
3.
Sujetar la puerta del horno por los laterales con las
dos manos y cerrarla unos 30° (b).
4.
Levantar ligeramente la puerta y extraerla.
Nota: No cerrar la puerta del horno por completo. Las
bisagras podrían doblarse y producir daños en el
esmalte.
Montaje de la puerta del aparato
1.
Sujetar la puerta del horno por los laterales con las
dos manos.
2.
Insertar las bisagras en las escotaduras del horno (a).
Nota: La muesca en la parte inferior de las bisagras
debe encajar en el marco del horno (b).
3.
Empujar la puerta hacia abajo.
4.
Retirar las varillas de seguridad.
9 ADVERTENCIA
RIESGO DE LESIONES
No tocar la bisagra en caso de que la puerta caiga
involuntariamente o de que una bisagra se cierre de
golpe. Llamar al Servicio de Atención al Cliente.
DE
ED
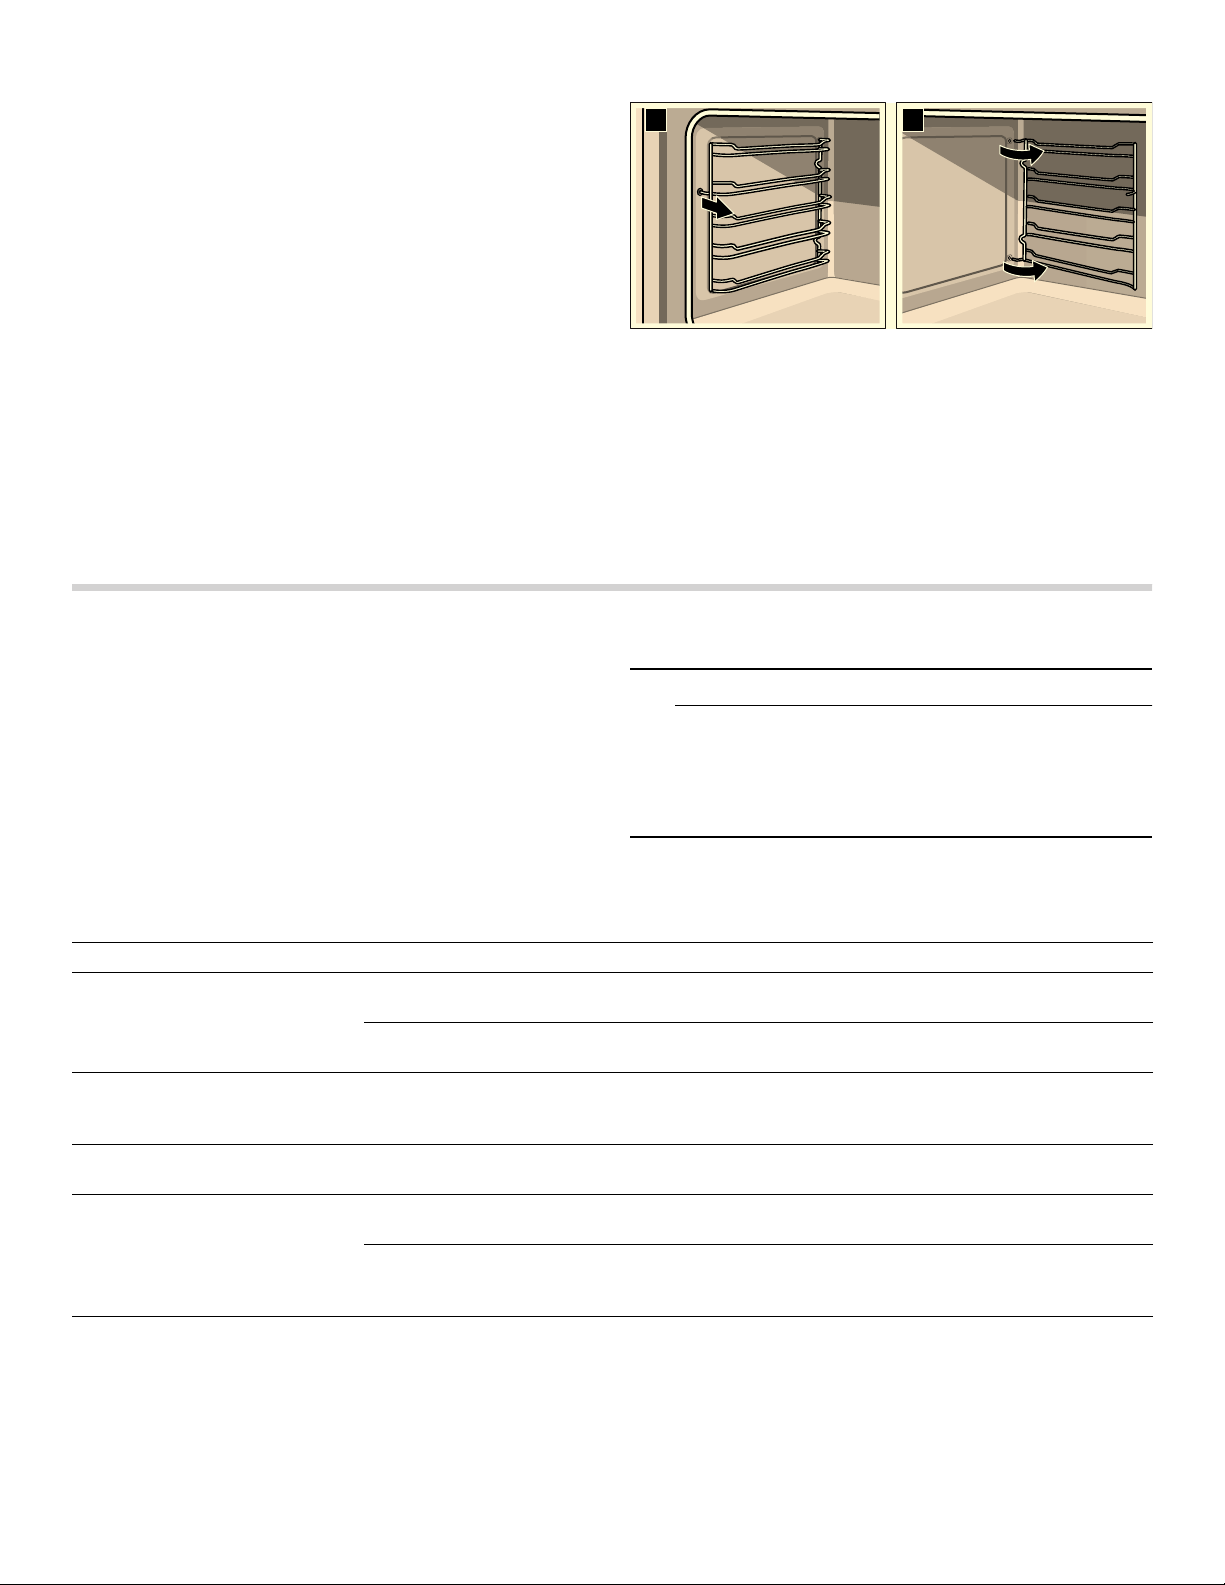
60
Montaje y desmontaje de las guías
laterales
Las guías laterales pueden desmontarse para facilitar su
limpieza.
Desmontaje de las guías laterales
Las guías laterales están fijadas en tres puntos a las
paredes laterales del interior del horno.
1.
Sujetar la guía lateral por la parte delantera y tirar de
ella hacia el centro.
El gancho delantero de la guía lateral se desprende
del orificio.
2.
Seguir abriendo la guía lateral y extraerla de los
orificios traseros de la pared lateral.
3.
Retener el revestimiento catalítico del interior del
horno.
4.
Extraer las guías laterales del interior del horno.
Montaje de las guías laterales
1.
Retener el revestimiento catalítico del interior del
horno.
2.
Insertar los ganchos de la guía lateral en los orificios
traseros de la pared lateral.
3.
Introducir el gancho delantero de la guía lateral en el
orificio.
Resolución de problemas
Antes de llamar al Servicio a Clientes, tenga en cuenta
las sugerencias y las instrucciones que aparecen a
continuación:
9 ADVERTENCIA
¡RIESGO DE DESCARGA ELÉCTRICA!
Las reparaciones inadecuadas son peligrosas. Las
reparaciones solo pueden ser efectuadas por
personal del Servicio de Asistencia Técnica
debidamente instruido.
Las reparaciones efectuadas en el aparato de modo
incorrecto pueden implicar serios peligros para el
usuario.
D
E
Avería Posible causa Consejos/solución
El aparato no funciona. El fusible está
defectuoso
Comprobar en la caja de fusibles si el interruptor de desco-
nexión funciona correctamente.
Corte en el suminis-
tro eléctrico
Comprobar si funciona la lámpara de cocina.
No es posible desconectar el
horno.
El sistema electró-
nico está defec-
tuoso
Apagar el interruptor de desconexión. Llamar a Servicio de
Asistencia Técnica.
La pantalla del reloj parpadea. Corte en el suminis-
tro eléctrico
Volver a programar el reloj.
El horno no calienta. El fusible está
defectuoso
Comprobar el fusible y sustituirlo si fuera necesario.
No se ha ajustado
el selector de fun-
ciones
Ajustar el selector de funciones.
El cristal de la puerta está
roto.
Desconectar el aparato. Llamar a Servicio de Asistencia Téc-
nica.
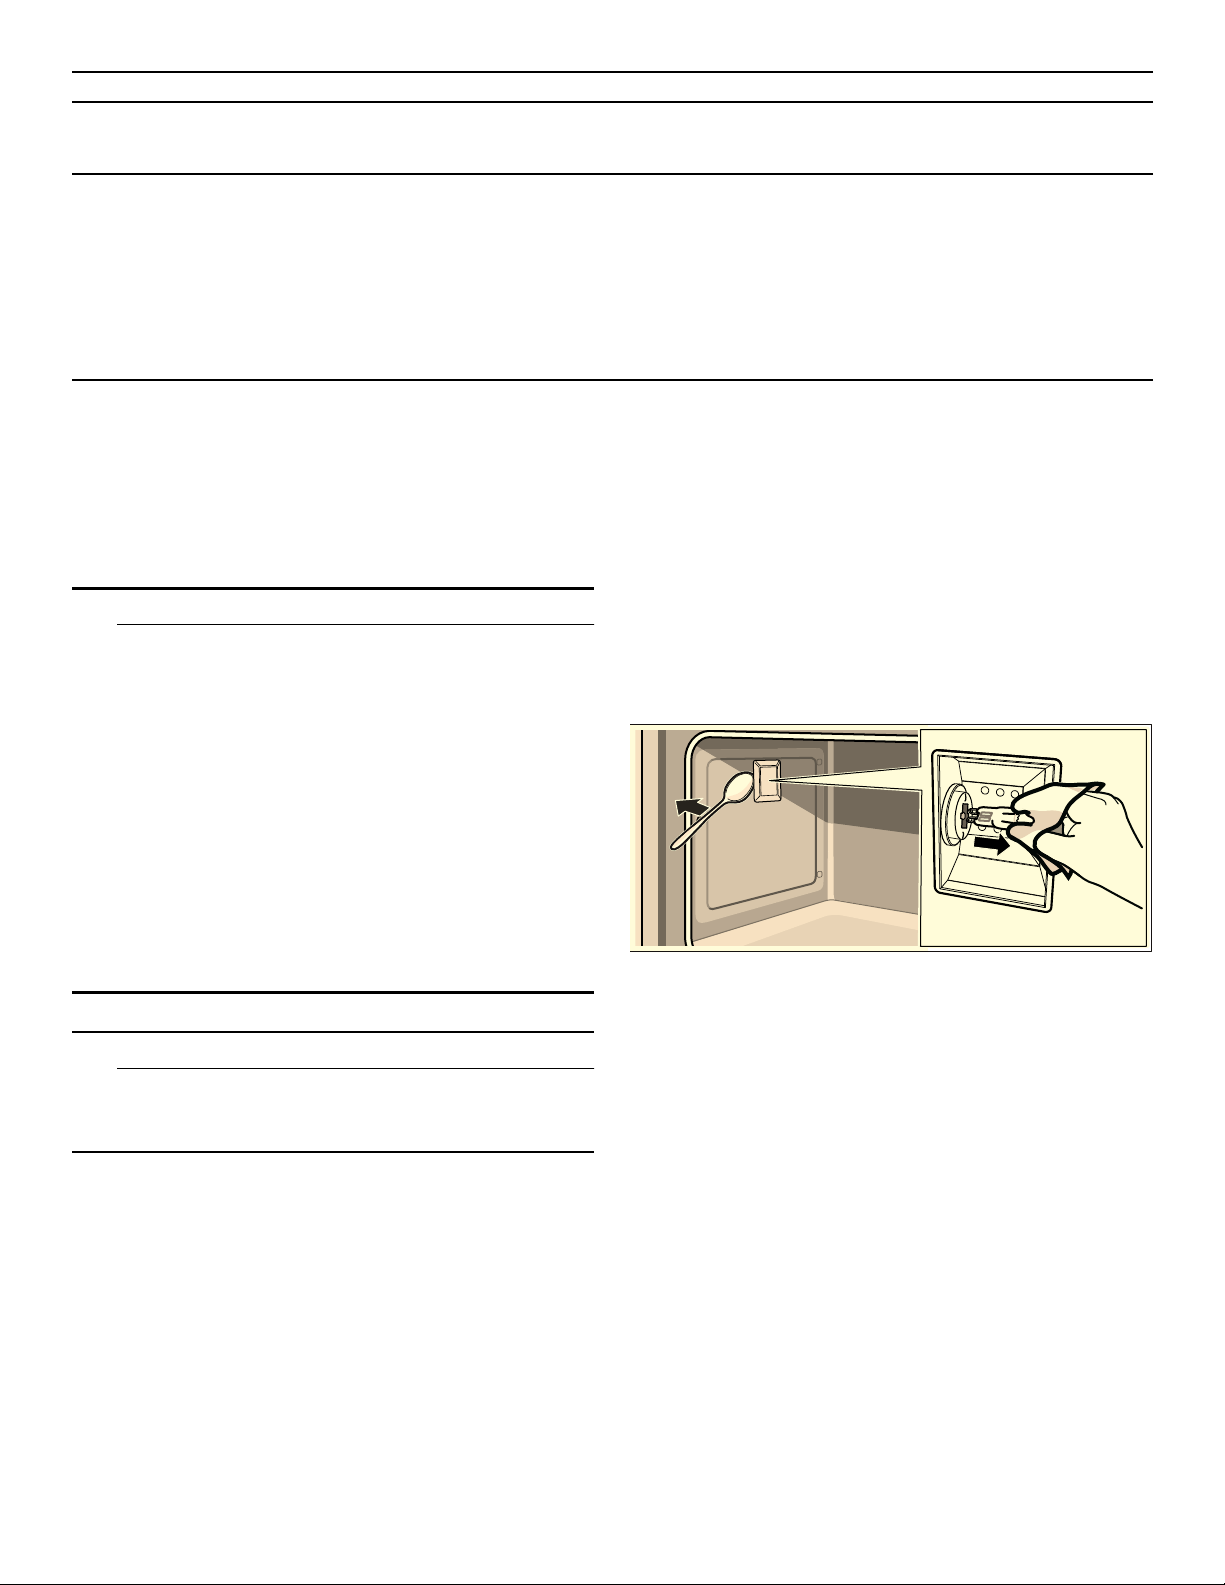
61
Sustitución del foco del horno
Si el foco del horno está quemado, hay que sustituirlo.
Los focos de refacción resistentes a la temperatura
pueden adquirirse a través del Servicio de Asistencia
Técnica o en comercios especializados. Indicar el
número de producto (E) y el número de fabricación (FD)
del aparato. No utilizar ningún otro foco.
9 ATENCION
AL REEMPLAZAR LA LUZ DEL HORNO:
▯ Asegúrese de que el electrodoméstico y las
luces se hayan enfriado y de que la alimentación
eléctrica al electrodoméstico esté apagada antes
de cambiar el (los) foco(s). No hacerlo puede
ocasionar una descarga eléctrica o quemaduras.
▯ Las lentes deben estar en su lugar al usar el
electrodoméstico.
▯ Las lentes sirven para proteger el foco contra
roturas.
▯ Las lentes son de vidrio. Manipúlela con cuidado
para que no se rompa. El vidrio roto puede
causar una lesión.
▯ El portalámparas tiene corriente cuando la puerta
está abierta.
9 ADVERTENCIA
El portalámparas tiene corriente cuando la puerta
está abierta si la fuente de alimentación eléctrica
principal no está apagada.
1.
Desenchufar el aparato de la red o desconectar el
fusible en la caja de fusibles
2.
Dejar enfriar el interior del horno.
3.
Abrir la puerta del aparato.
4.
Poner un paño de cocina en el interior del horno para
evitar daños.
5.
Extraer las guías laterales.
6.
Retirar el cristal protector. Para ello, abrir el cristal
protector con la mano desde adelante. En caso de
que resultase difícil retirar el cristal protector, utilizar
una cuchara como ayuda.
7.
Extraer el foco del horno.
8.
Sustituir el foco del horno por otro del mismo tipo:
Tensión: 12V;
Potencia: 20W;
Portalámparas: G4
Resistencia de temperatura: 570° F (300°C)
9.
Volver a colocar el cristal protector del foco del horno.
10.
Montar las guías laterales.
11.
Retirar de nuevo el paño de cocina.
12.
Volver a conectar el fusible.
13.
Comprobar que la iluminación del horno funciona
correctamente.
Zumo de frutas o manchas de
clara de huevo en las superfi-
cies esmaltadas.
Jugo de pasteles o
carne
Cambio inofensivo del esmalte que no se puede eliminar.
El horno se detiene e inte-
rrumpe el programa, pero el
ventilador sigue funcionando a
gran velocidad, aunque se
sitúe el selector de funciones
en la posición Off. La señal
acústica suena de forma irre-
gular y la lámpara de control
parpadea.
El termostato está
defectuoso
1.
2.
3.
Ajustar el selector de funciones en la posición Off.
El ventilador sigue funcionando a gran velocidad.
Esperar 10segundos.
Ajustar el selector de funciones en una nueva posición.
Si el error se repite cuando se ajusta una nueva función:
Desconectar el horno de la corriente y volverlo a conectar.
Si el error se repite al volver a conectar el horno a la
corriente: Llamar al Servicio de Asistencia Técnica.
Avería Posible causa Consejos/solución
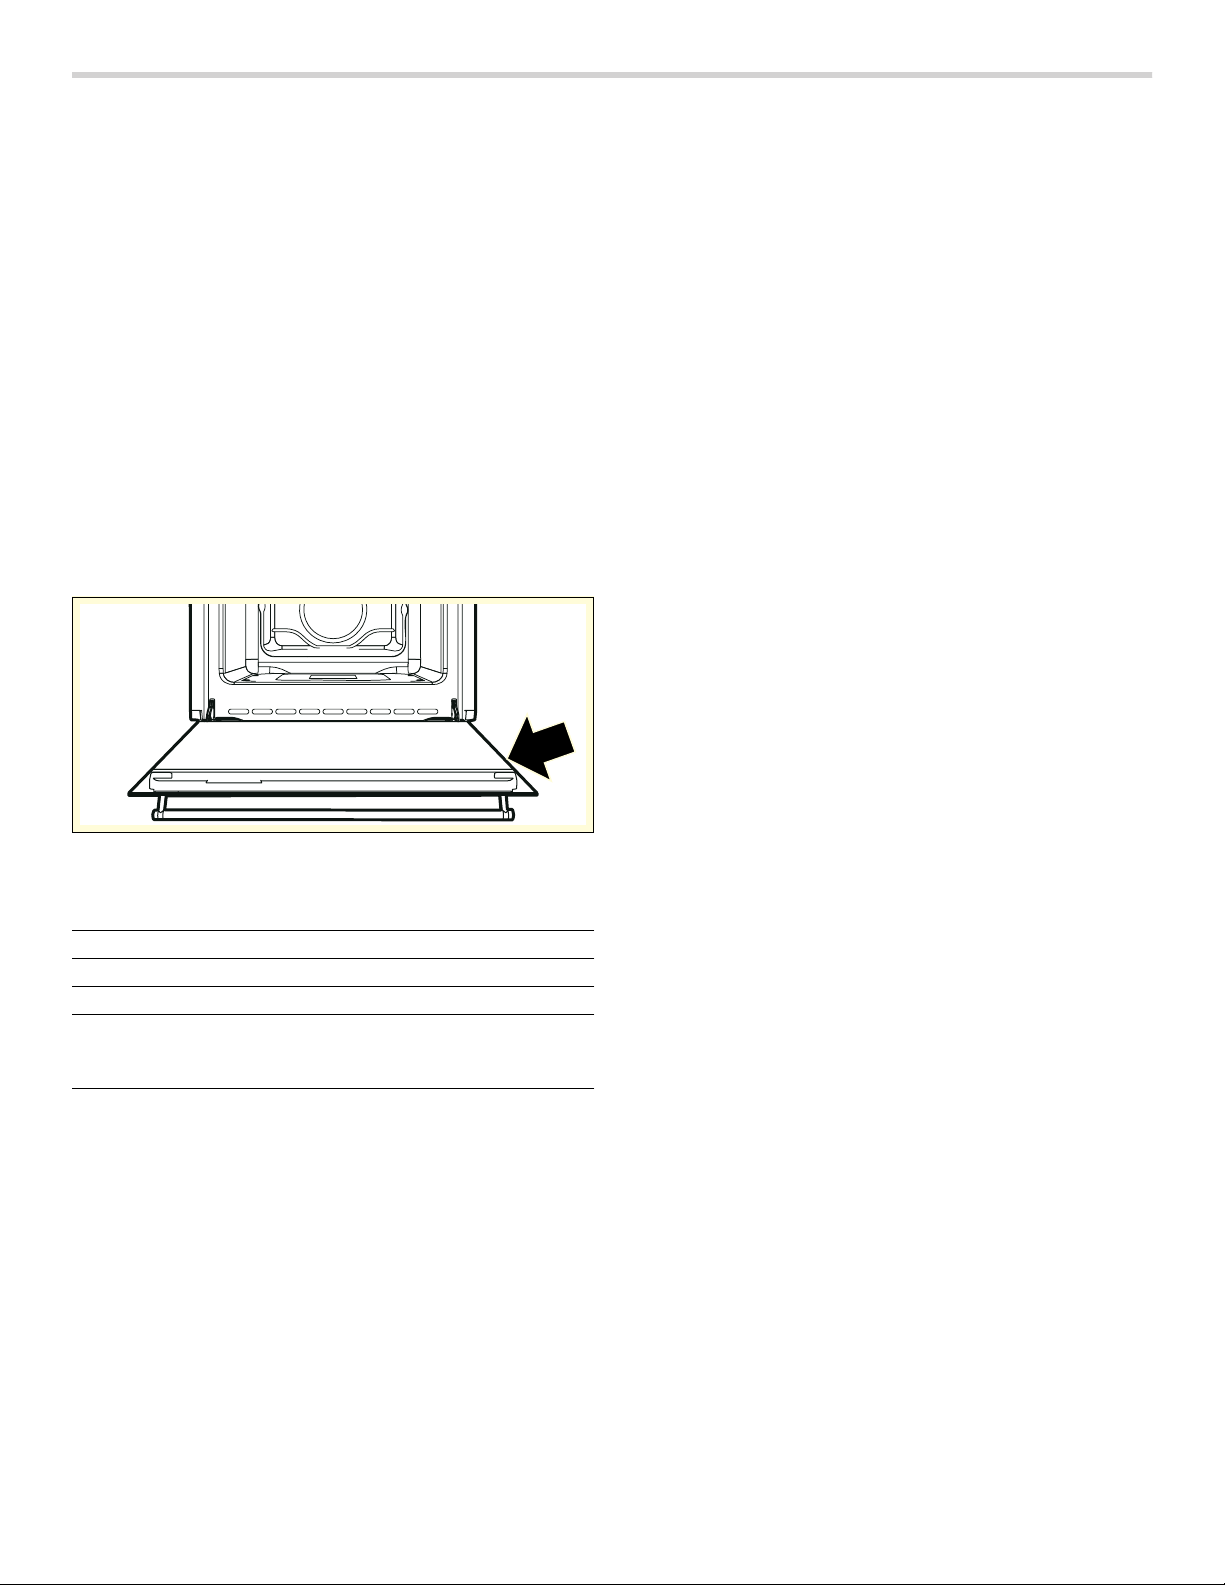
62
Soporte de Bosch
®
Antes de llamar al servicio técnico
Para obtener información sobre solución de problemas,
ver el Manual de uso y cuidado. Ver la «Declaración de
garantía limitada del producto» en el Manual de uso y
cuidado.
Para ponerse en contacto con un representante del
servicio técnico, ver la información de contacto en la
portada del manual o en la siguiente sección. Antes de
llamar, tener preparada la información que aparece en la
placa de características del producto.
Placa de características
La placa de característica incluye información sobre el
modelo y el número de serie del aparato. Si se solicita
información al Servicio de Asistencia Técnica, deberá
facilitarse la información indicada en la placa.
La placa de características se encuentra en el lateral
derecho de la puerta aparato.
Para no perder tiempo buscando los distintos datos
solicitados durante la llamada, estos pueden introducirse
previamente en los espacios libres abajo.
Conservar la factura o los documentos de compra que
confirmen la validación de la garantía, en caso de que el
aparato necesite ser reparado.
Servicio técnico
Sabemos que usted ha realizado una inversión
considerable en su cocina. Nos dedicamos a brindar
asistencia a usted y a su aparato de manera que tenga
muchos años de cocina creativa.
No dude en comunicarse con nuestro Departamento de
Atención al Cliente si tiene alguna pregunta o en el caso
poco probable de que su aparato Bosch® necesite
servicio técnico. Nuestro equipo de servicio técnico está
listo para asistirlo.
EUA
800-944-2904
www.bosch-home.com/us/support
Canadá
800-944-2904
www.bosch-home.ca/en/support
Piezas y accesorios
Puede comprar piezas, filtros, productos para eliminar el
sarro, limpiadores para acero inoxidable y más artículos
en la tienda electrónica de Bosch
®
o por teléfono.
EUA
www.bosch-home.com/us/store
Canadá
Marcone 800-482-6022
o
Reliable Parts 800-941-9217
N.º de producto
N.º de fabricación
Fecha de compra
Servicio de
Asistencia
TécnicaO

63
Consejos de aplicación
Aquí se pueden encontrar consejos acerca de los
recipientes y de la preparación de platos.
Notas
▯ Utilizar los accesorios suministrados. Los accesorios
adicionales están disponibles como accesorios
especiales en los comercios especializados o en el
Servicio de Asistencia Técnica.
Antes de su utilización, retirar del interior del horno los
accesorios y recipientes que no sean necesarios.
▯ Utilizar siempre un agarrador para retirar los
accesorios o los recipientes calientes del interior del
horno.
Horneado
Moldes para hornear
▯ Utilizar especialmente moldes y charolas de horno de
color claro.
▯ Colocar siempre los moldes en el centro de la parrilla
para hornear y asar.
Sugerencias para el horneado
De este modo se comprueba si el
pastel de masa de bizcocho ya está
en su punto.
Unos 10minutos antes de finalizar el tiempo de horneado indicado en la
receta, picar la parte superior del pastel con un palillo. El pastel estará en su
punto cuando la masa no se adhiera al palillo.
El pastel se desmorona. La próxima vez, utilizar menos líquido o reducir 10grados la temperatura del
horno. Tener en cuenta los tiempos de mezclado que se indican en la receta.
El pastel se ha levantado bien en el
centro, pero hacia los bordes tiene
menos altura.
No engrasar las paredes del molde desarmable. Después del horneado, des-
prender el pastel con cuidado con la ayuda de un cuchillo.
El pastel está quedando demasiado
oscuro.
Colocar el pastel a una altura inferior, seleccionar una temperatura más baja y
dejar que se hornee durante más tiempo.
El pastel está demasiado seco. Picar con un palillo pequeños agujeros en el pastel una vez esté listo. A conti-
nuación, verter en los agujeros unas gotas de zumo de fruta o de alguna
bebida alcohólica. La próxima vez, aumentar 10grados la temperatura del
horno y reducir el tiempo de horneado.
El pan o el pastel (p. ej., pastel de
queso) tiene buen aspecto, pero
por dentro es inconsistente (líquido,
con tiras de agua)
La próxima vez, emplear menos líquido y hornear el producto a una tempera-
tura más baja y durante más tiempo. Para pasteles con una capa jugosa, hor-
near primero la base. Cubrir la base con almendras o pan rallado y añadir la
cobertura. Tener en cuenta las recetas y los tiempos de cocción.
Las pastas se han dorado de forma
irregular.
Reducir un poco la temperatura para que las pastas se doren de forma homo-
génea. Si el papel de hornear sobresale, la circulación del aire puede verse
afectada. Recortar siempre el papel de hornear de forma que coincida con los
bordes de la charola.
El pastel de frutas está demasiado
claro por la parte de abajo.
La próxima vez, colocar el pastel una altura más abajo.
El jugo de fruta se sale. La próxima vez, utilizar la charola universal más profunda, si está disponible.
Las pastas pequeñas hechas con
levadura se pegan unas a otras
durante el horneado.
Procurar dejar un espacio de unos 2cm entre unas y otras. Así tendrán espa-
cio suficiente para crecer y dorarse por todos los lados.
Al hornear pasteles jugosos se
forma agua condensada.
Al hornear puede originarse vapor de agua que se escapa por encima de la
puerta. El vapor de agua puede condensarse en el panel de control o en las
partes frontales de los muebles contiguos y escurrirse en forma de agua con-
densada. Esto se debe simplemente a las leyes de la física.

64
Asado y asado al grill
Recipiente
Se puede utilizar cualquier recipiente resistente al calor.
Colocar el recipiente siempre en el centro de la parrilla.
La charola de horno esmaltada también se puede usar
para asados grandes.
Consejos para el horneado
▯ Con una temperatura más baja se consigue un
dorado más uniforme.
▯ Añadir de 2a 3cucharadas soperas de líquido en la
carne magra, y de 8a 10cucharadas en el estofado,
en función del tamaño de las piezas.
▯ Al asar pato o ganso, picar la piel por debajo de las
alas para que se desprenda la grasa.
▯ Las aves quedan muy doradas y crujientes si, más o
menos al final del tiempo de cocción, se untan con
mantequilla, agua con sal o jugo de naranja.
▯ Dar la vuelta a la carne cuando haya transcurrido la
mitad del tiempo.
▯ Cuando el asado esté listo, deberá reposar unos
10minutos en el horno cerrado y desconectado. De
esta manera, el jugo del asado se distribuye mejor.
▯ Al asar grandes piezas de carne puede generarse
mucho vapor y causar condensación en la puerta del
horno. Se trata de un fenómeno normal que no afecta
el funcionamiento del aparato. Una vez finalizado el
proceso de asado, secar la puerta del horno y el
cristal de la puerta con un paño.
▯ Para asar en la parrilla, colocar además la charola de
horno esmaltada en la altura de inserción 1para
recoger la grasa.
Consejos para asar al grill
▯ En la medida de lo posible, tomar piezas del mismo
grosor. Estas deberán tener un grosor mínimo de
1pulgada. Así se doran de forma homogénea y se
conservan jugosas.
▯ Colocar los alimentos en el centro de la parrilla.
Añadir un poco de agua en la charola de horno
esmaltada y colocarla en la altura de inserción inferior
para que pueda recoger la grasa. No colocarla nunca
sobre la base del horno.
▯ Humedecer el alimento con aceite antes de colocarlo
sobre la parrilla debajo del grill.
▯ Dar la vuelta a los alimentos más delgados cuando
haya transcurrido la mitad del tiempo, y a los
alimentos más gruesos varias veces mientras dure el
asado al grill. Para ello, utilizar unas pinzas para grill,
de manera que los alimentos no se perforen y el jugo
de la carne permanezca, p. ej. en el asado.
▯ La carne oscura, como la carne de cordero o de res,
se dora más rápido y mejor que la carne de cerdo o
ternera.
Consejos para el horneado
¿De qué manera se puede compro-
bar si el asado está en su punto?
Utilizar un termómetro para carnes (disponible en comercios especializados) o
hacer la “prueba de la cuchara". Presionar el asado con la cuchara. Si está
firme, significa que está listo. Si la carne cede, todavía le falta un poco de
tiempo.
El asado está demasiado oscuro y
la corteza quemada por algunas
partes.
Comprobar la altura de inserción y la temperatura.
El asado tiene buen aspecto, pero
la salsa se ha quemado.
La próxima vez, utilizar una cacerola más pequeña y añadir más líquido.
El asado tiene buen aspecto, pero
la salsa es demasiado clara y
líquida.
La próxima vez, utilizar una cacerola más grande y añadir menos líquido.

65
Platos probados en nuestro estudio de
cocina
Aquí figuran una selección de platos y sus ajustes
óptimos correspondientes. Se detalla el tipo de
calentamiento, la temperatura y la altura de inserción
más apropiados para cada plato.
Notas
▯ Las indicaciones de tiempo que figuran en las tablas
son valores orientativos. Vienen determinadas por la
calidad y la composición de los alimentos.
▯ Utilizar los accesorios suministrados. Los accesorios
adicionales están disponibles como accesorios
especiales en los comercios especializados o en el
Servicio de Asistencia Técnica.
Antes de su utilización, retirar del interior del horno los
accesorios y recipientes que no sean necesarios.
▯ Utilizar siempre un agarrador para retirar los
accesorios o los recipientes calientes del interior del
horno.
Alimento Peso
lb (kg)
Función Posiciones
respecto a la
posición cero
(Off)
Temperatura en
°F (°C)
Tiempo (minutos)
Lasaña 6¾ - 8
(3- 4)
Horneado 1 400- 450
(205- 230)
45- 50
Gratinado pasta 6¾ - 8
(3- 4)
Horneado 1 400- 450
(205- 230)
45- 50
Cerdo 4½ (2) Horneado com-
binado
2 350(175) 70- 80
Salchichas 3¹/
3
(1,5) Asado Combi-
nado Plus
4 500(260) 15
Rosbif 2¼ (1) Horneado com-
binado
2 500(260) 40- 45
Pechuga de pavo 6¾ (3) Horneado com-
binado
2 350(175) 110- 120
Pollo asado 2²/
3
(1,2) Horneado com-
binado
2 350(175) 65- 70
1
er
lado 2
o
lado
Chuletas de cerdo 3¹/
3
(1,5) Asado Combi-
nado Plus
4 500(260) 15 5
Costillas 3¹/
3
(1,5) Asado Combi-
nado Plus
4 500(260) 10 10
Tocino 1¾ (0,7) Asado Plus 5 500(260) 7 8
Filete de cerdo 3¹/
3
(1,5) Asado Combi-
nado Plus
4 500(260) 10 5
Filete de res 2¼ (1) Asado Plus 5 500(260) 10 7
Salmón
1
1
/
3
(0,6)
Horneado com-
binado
2 300(150) 25- 30
Pizza 2¼ (1) Alimentos ultra-
congelados
2 500(260) 8- 9
Pan 2¼ (1) Alimentos ultra-
congelados
2 350- 400
(175- 205)
25- 30
Focaccia 2¼ (1) Alimentos ultra-
congelados
2 350(175) 20- 25
Pastel esponjoso 2¼ (1) Tartas 2 300(150) 55- 60
Los valores relativos al tiempo que figuran en la tabla no incluyen los datos sobre el tiempo de precalentamiento y
son solo orientativos.

66
DECLARACIÓN DE GARANTÍA LIMITADA DEL PRODUCTO
Cobertura de esta garantía y a quiénes se
aplica
La garantía limitada otorgada por BSH Home Appliances
Corporation (“BSH“) en esta Declaración de Garantía
Limitada del Producto se aplica únicamente al
electrodoméstico Bosch (“Producto“) vendido a usted, el
primer comprador usuario, siempre que el Producto
haya sido comprado:
▯ Para uso doméstico (no comercial) normal y haya sido
utilizado en todo momento únicamente para fines
domésticos normales.
▯ Nuevo en una tienda minorista (que no sea un
producto de exhibición, ni un producto vendido "en las
condiciones en que se encuentra" ni un modelo
devuelto anteriormente) y no esté destinado para
reventa ni uso comercial.
▯ Dentro de los Estados Unidos o Canadá, y
permanezca en todo momento dentro del país de
compra original.
Las garantías incluidas en el presente se aplican
únicamente al primer comprador del Producto y no son
transferibles.
Asegúrese de devolver su tarjeta de registro; si bien no
es necesario para hacer efectiva la cobertura de la
garantía, es la mejor manera para que BSH le notifique
en el caso poco probable de que se emita un aviso de
seguridad o se retire del mercado un producto.
Duración de la garantía
BSH garantiza que el Producto estará libre de defectos
en los materiales y en la mano de obra por un período
de trescientos sesenta y cinqo (365) días a partir de la
fecha de compra. El período precedente comienza a
regir a partir de la fecha de compra y no se interrumpirá,
dejará sin efecto, extenderá ni suspenderá por ningún
motivo.
También se garantiza que este Producto no presenta
defectos estéticos en el material ni en la mano de obra
(como rayas en el acero inoxidable, imperfecciones en la
pintura/porcelana, astillas, abolladuras ni ningún otro
daño en el acabado del Producto) durante un período de
treinta (30) días desde la fecha de compra o fecha de
cierre para una nueva construcción. Se excluyen de esta
garantía por defectos estéticos las variaciones leves de
color que se deban a diferencias inherentes a las piezas
pintadas y de porcelana, así como diferencias
provocadas por la iluminación de la cocina, la ubicación
del producto u otros factores similares. Se excluye
específicamente de esta garantía por defectos estéticos
cualquier electrodoméstico en exposición, de piso,
vendido “en el estado en que se encuentra” o de
segunda selección.
Reparación/reemplazo como único
recurso
Durante el período de esta garantía, BSH o uno de sus
proveedores de servicio técnico autorizados reparará su
Producto sin cargo para usted (con sujeción a
determinadas limitaciones especificadas en el presente)
si se prueba que su Producto ha sido fabricado con un
defecto en los materiales o en la mano de obra. Si se ha
intentado de manera razonable reparar el Producto sin
éxito, BSH reemplazará su Producto (es posible que
usted tenga disponibles modelos mejorados, a entera
discreción de BSH, por un cargo adicional). Todas las
piezas y los componentes extraídos serán propiedad de
BSH, a su entera discreción. Todas las piezas
reemplazadas y/o reparadas se considerarán como la
pieza original a los fines de esta garantía, y esta garantía
no se extenderá con respecto a dichas piezas. En virtud
del presente, la única y exclusiva responsabilidad y
obligación de BSH es únicamente reparar el Producto
defectuoso de fábrica, a través de un proveedor de
servicio técnico autorizado por BSH durante el horario
normal de oficina. Por cuestiones de seguridad y daños
materiales, BSH recomienda categóricamente que no
intente reparar el Producto usted mismo ni use un centro
de servicio técnico no autorizado; BSH no tendrá
responsabilidad ni obligación alguna por las
reparaciones o trabajos realizados por un centro de
servicio técnico no autorizado. Si usted prefiere que una
persona que no es un proveedor de servicio técnico
Tarta rellena de
mermelada
2¼ (1) Tartas 2 300(150) 35- 40
Pastel de queso 2¼ (1) Tartas 2 300- 350 55- 60
Profiteroles 2²/
3
(1,2) Tartas 2 350(175) 80- 90
Pastel esponjoso
ligero
2¼ (1) Tartas 2 300- 350
(150- 175)
55- 60
Galletas 2¼ (1) Combinación
múltiple
2- 4 300(150) 20- 25
Alimento Peso
lb (kg)
Función Posiciones
respecto a la
posición cero
(Off)
Temperatura en
°F (°C)
Tiempo (minutos)
Los valores relativos al tiempo que figuran en la tabla no incluyen los datos sobre el tiempo de precalentamiento y
son solo orientativos.

67
autorizado trabaje en su Producto, ESTA GARANTÍA SE
ANULARÁ AUTOMÁTICAMENTE. Los proveedores de
servicio técnico autorizados son aquellas personas o
compañías que han sido especialmente capacitadas
para manejar los productos de BSH y que tienen, según
el criterio de BSH, una reputación superior de servicio al
cliente y capacidad técnica (debe tener en cuenta que
son entidades independientes y no son agentes, socios,
afiliados ni representantes de BSH). Sin perjuicio de lo
que antecede, BSH no tendrá responsabilidad ni
obligación alguna por el Producto que se encuentre en
un área remota (a más de 100millas de un proveedor
de servicio técnico autorizado) o en un lugar, área
circundante o entorno que no sea accesible por medios
razonables o que sea peligroso, hostil o arriesgado; en
cualquier caso, a su solicitud, BSH de todas maneras
pagará por la mano de obra y las piezas, y enviará las
piezas al proveedor de servicio técnico autorizado más
cercano, pero usted seguirá siendo totalmente
responsable por el tiempo de viaje y demás cargos
especiales de la compañía de servicio técnico,
suponiendo que acepte hacer la visita de servicio
técnico.
Producto fuera de garantía
BSH no tiene obligación alguna, en virtud de la ley o por
otro motivo, de otorgarle ninguna concesión, incluidos
reparaciones, prorrateos o reemplazo del Producto, con
posterioridad al vencimiento de la garantía.
Exclusiones de la garantía
La cobertura de garantía descrita en el presente excluye
todos los defectos o daños que no fueron provocados
directamente por BSH, incluidos, entre otros, alguno de
los siguientes:
▯ Uso del Producto de maneras distintas del uso
normal, habitual y previsto (incluidos, entre otros,
cualquier forma de uso comercial, uso o
almacenamiento en exteriores de un producto
diseñado para interiores, uso del Producto en
aeronaves o embarcaciones).
▯ Conducta indebida, negligencia, uso indebido, abuso,
accidentes, descuido, operación inadecuada, omisión
de mantener, instalación inadecuada o negligente,
adulteración, omisión de seguir las instrucciones de
operación, manipulación inadecuada, servicio técnico
no autorizado (incluidos "arreglos" o exploración de
los mecanismos internos del electrodoméstico
realizados por uno mismo) por parte de cualquier
persona.
▯ Ajuste, alteración o modificación de cualquier tipo.
▯ Incumplimiento de los códigos, reglamentaciones o
leyes de electricidad, plomería y/o construcción
locales, municipales o de condado, incluida la omisión
de instalar el producto cumpliendo estrictamente con
los códigos y reglamentaciones locales de
construcción y protección contra incendios.
▯ Desgaste habitual, derrames de alimentos, líquidos,
acumulaciones de grasa u otras sustancias que se
acumulen sobre, dentro o alrededor del Producto.
▯ Y cualquier fuerza y factor externo, elemental y/o
ambiental, incluidos, entre otros, lluvia, viento, arena,
inundaciones, incendios, aludes de lodo, temperaturas
bajas extremas, humedad excesiva o exposición
prolongada a la humedad, rayos, sobrecargas
eléctricas, fallas estructurales alrededor del
electrodoméstico y caso fortuito.
En ningún caso, BSH tendrá responsabilidad ni
obligación alguna por los daños ocasionados a los
bienes circundantes, incluidos los gabinetes, pisos,
techos y demás estructuras u objetos que se encuentren
alrededor del producto. También se excluyen de esta
garantía productos en los cuales los números de serie
hayan sido alterados, modificados o eliminados; visitas
del servicio técnico para enseñarle a usar el Producto o
visitas en las que se determine que no hay ningún
problema con el Producto; corrección de los problemas
de instalación (usted es el único responsable de
cualquier estructura y soporte del Producto, incluidas las
instalaciones de electricidad y plomería o demás
instalaciones de conexión, de la correcta instalación en
bases/pisos y de cualquier alteración, incluidos, entre
otros, gabinetes, paredes, pisos, repisas, etc.); y el
restablecimiento de disyuntores o fusibles.
EN LA MEDIDA PERMITIDA POR LA LEY, ESTA
GARANTÍA ESTABLECE SUS RECURSOS EXCLUSIVOS
CON RESPECTO AL PRODUCTO,
INDEPENDIENTEMENTE DE QUE LA RECLAMACIÓN
SEA CONTRACTUAL O EXTRACONTRACTUAL
(INCLUIDA LA RESPONSABILIDAD OBJETIVA O LA
NEGLIGENCIA), O DE CUALQUIER OTRO MODO. ESTA
GARANTÍA REEMPLAZA TODAS LAS DEMÁS
GARANTÍAS EXPRESAS O IMPLÍCITAS. LAS
GARANTÍAS IMPLÍCITAS POR LEY, YA SEA DE
COMERCIABILIDAD O APTITUD PARA UN FIN
ESPECÍFICO, O DE CUALQUIER OTRO TIPO, TENDRÁN
VIGENCIA ÚNICAMENTE POR EL PERÍODO DE
VIGENCIA DE LA PRESENTE GARANTÍA LIMITADA
EXPRESA. EN NINGÚN CASO, EL FABRICANTE SERÁ
RESPONSABLE POR LOS DAÑOS CONSECUENTES,
ESPECIALES, INCIDENTALES, INDIRECTOS, POR
"PÉRDIDAS COMERCIALES" Y/O DAÑOS PUNITIVOS,
PÉRDIDAS O GASTOS, INCLUIDOS, ENTRE OTROS,
TIEMPO FUERA DEL TRABAJO, HOTELES Y/O
COMIDAS EN RESTAURANTES, GASTOS DE
REMODELACIÓN QUE SUPEREN LOS DAÑOS
DIRECTOS, QUE DEFINITIVAMENTE HAYAN SIDO
CAUSADOS DE MANERA EXCLUSIVA POR BSH O DE
OTRO MODO. ALGUNOS ESTADOS NO PERMITEN LA
EXCLUSIÓN O LIMITACIÓN DE DAÑOS INCIDENTALES
O CONSECUENTES, Y ALGUNOS ESTADOS NO
PERMITEN LIMITACIONES CON RESPECTO AL PLAZO
DE VIGENCIA DE UNA GARANTÍA IMPLÍCITA; POR LO
TANTO, ES POSIBLE QUE LAS LIMITACIONES
PRECEDENTES NO SE APLIQUEN. ESTA GARANTÍA LE
OTORGA DERECHOS LEGALES ESPECÍFICOS, Y
TAMBIÉN PUEDEN CORRESPONDERLE OTROS
DERECHOS QUE PUEDEN VARIAR SEGÚN EL ESTADO.
Ningún intento de alterar, modificar o enmendar la
presente garantía entrará en vigencia, a menos que fuera
autorizado por escrito por un ejecutivo de BSH.

1901 Main Street, Suite 600 • Irvine, CA 92614 • 800-944-2904
www.bosch-home.com • © 2018 BSH Home Appliances
914775747
990121
*9000983953*
9000983953