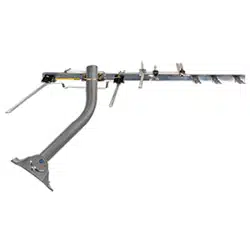

ANT800
Outdoor Antenna
User’s Guide
Getting Started
Remove the antenna and the hardware bag from package. Make sure the
following parts are in the package:
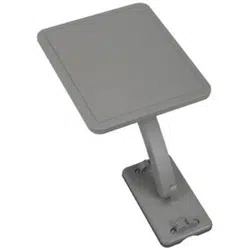
• Antenna
• AmplierInsert •PowerAdapter
• MountingBase •MountingArm
• Hardwarebag:
(2) Screws (4) Screw Covers
(2)U-Bolts (2) Clamps
(4) Wing Nuts (4) Wood Screws
(1)RubberBootforAntennaConnector/CoaxialCable
Finding the Right Location
BeforeyoumounttheANT800,considerthefollowingfactorsinreception
performance:
• TheANT800usuallyperformsbestwhenmountedhorizontally
• TheANT800shouldbemountedonthesideofyourhousethatfaces
mostofyourlocalbroadcasttowers(Seeillustrationbelow)Visit
www.antennaweb.orgtoseethelocationsofyourlocalbroadcast
towers.
• Thehighertheelevationoftheantenna,thebetterthereception
performance will be.
BEFORE YOU START!!!
PleasereadtheIMPORTANTSAFETYINFORMATIONsheetincludedin
this package.
ENGLISH

2
Mounting the Antenna
TheANT800mountingbracketgivesyouexibilityinmountingtheantenna.
TheANT800canbemounted:
• To a surface, such as a rooftop, eaves, siding, or rafters in
an attic
— OR —
• To a standard mast (not included)
WARNING: Never hang anything from the ANT800; never attach foreign
objects to the ANT800.
NOTES: Do not install the ANT800 on any metal surface, including
aluminum siding. Mounting on a metal surface will seriously degrade
reception quality.
In most cases, the ANT800 provides the best performance when mounted
outdoors in a high location (such as on the roof or high up on the side of
your house). The ANT800 can also be mounted in an attic.
3
ENGLISH
Mounting to a Surface
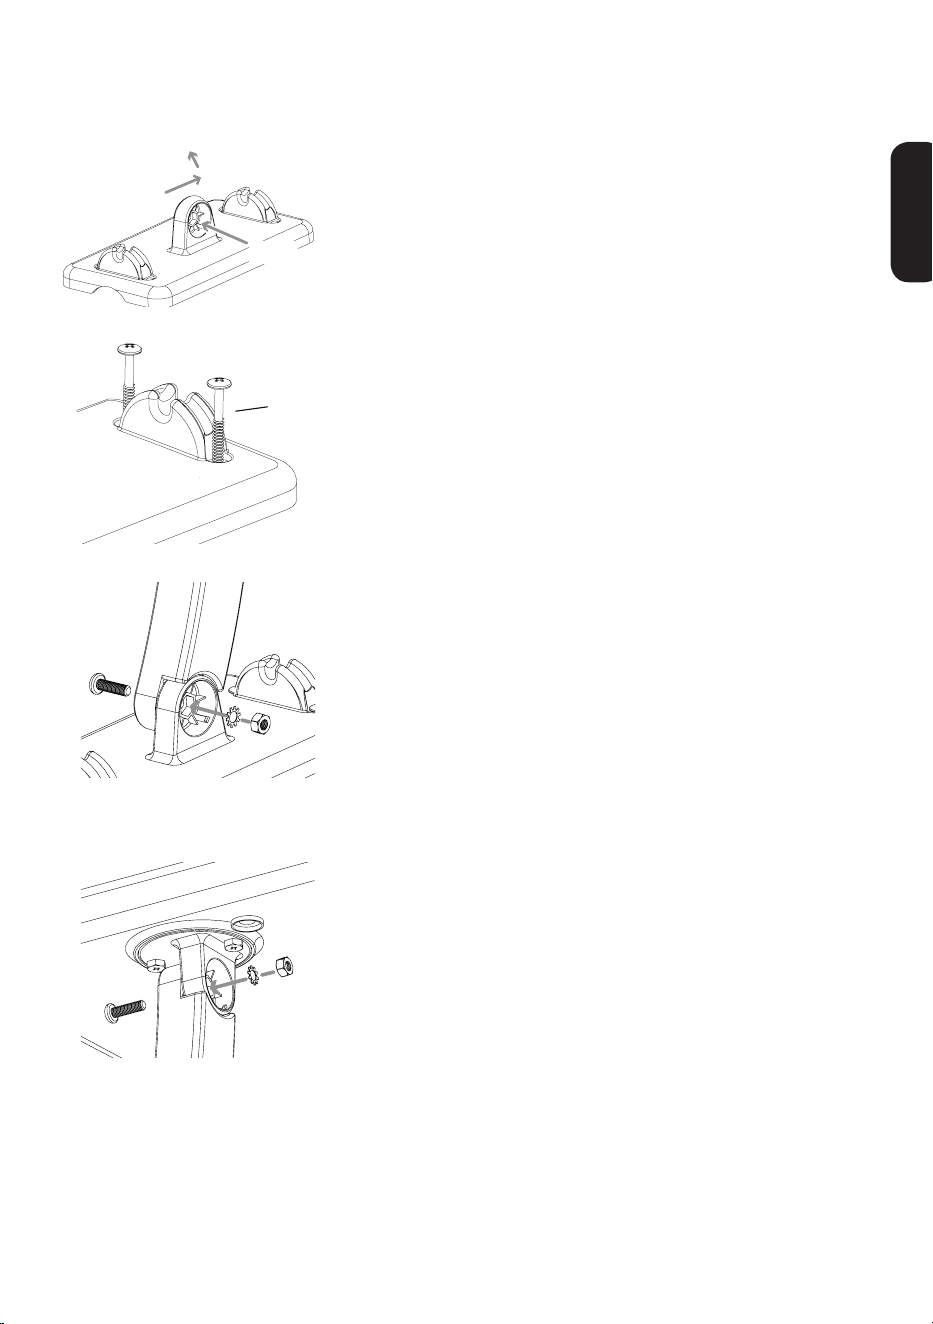
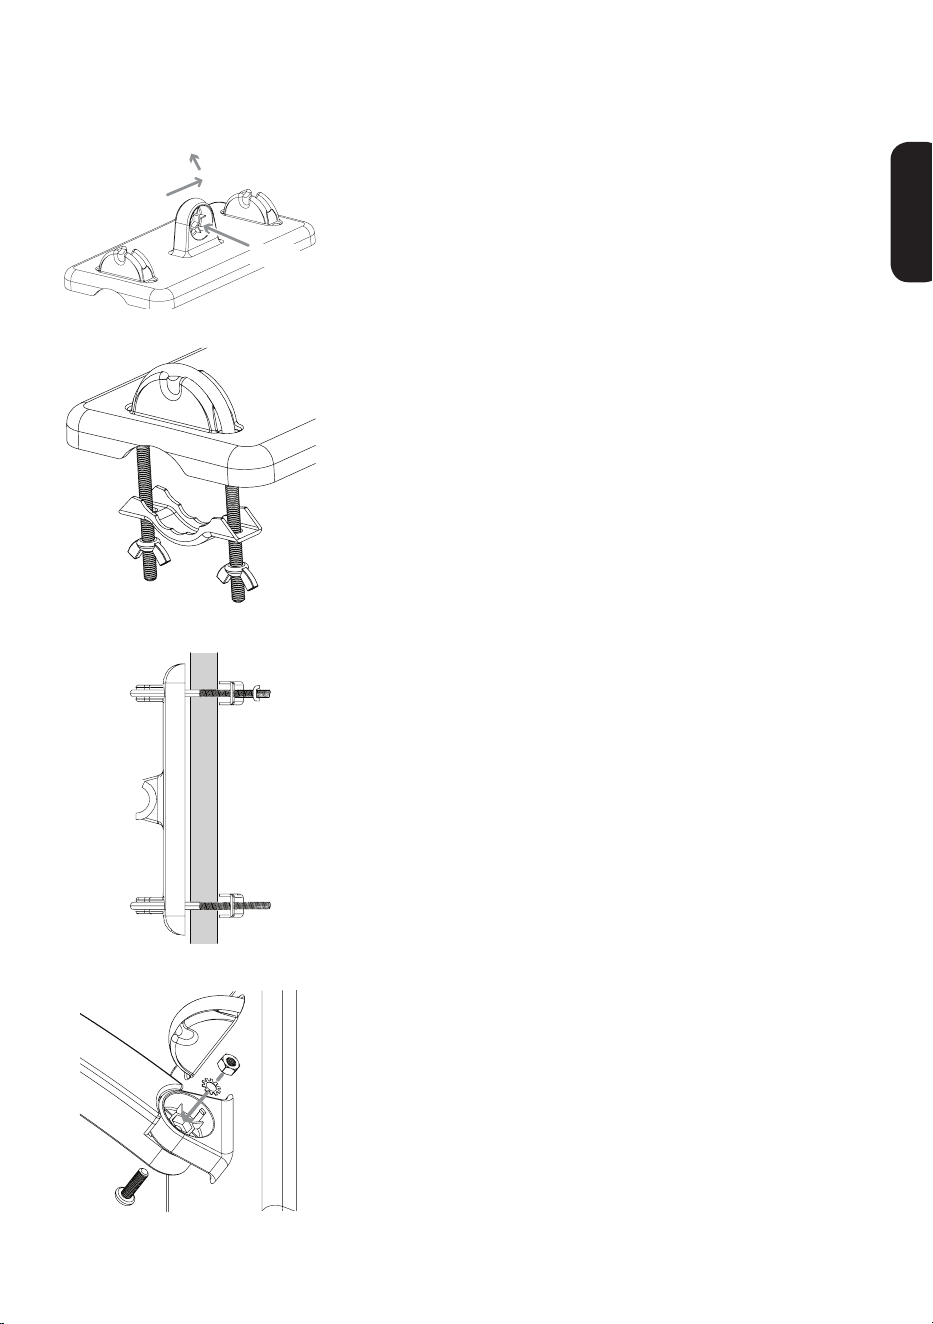
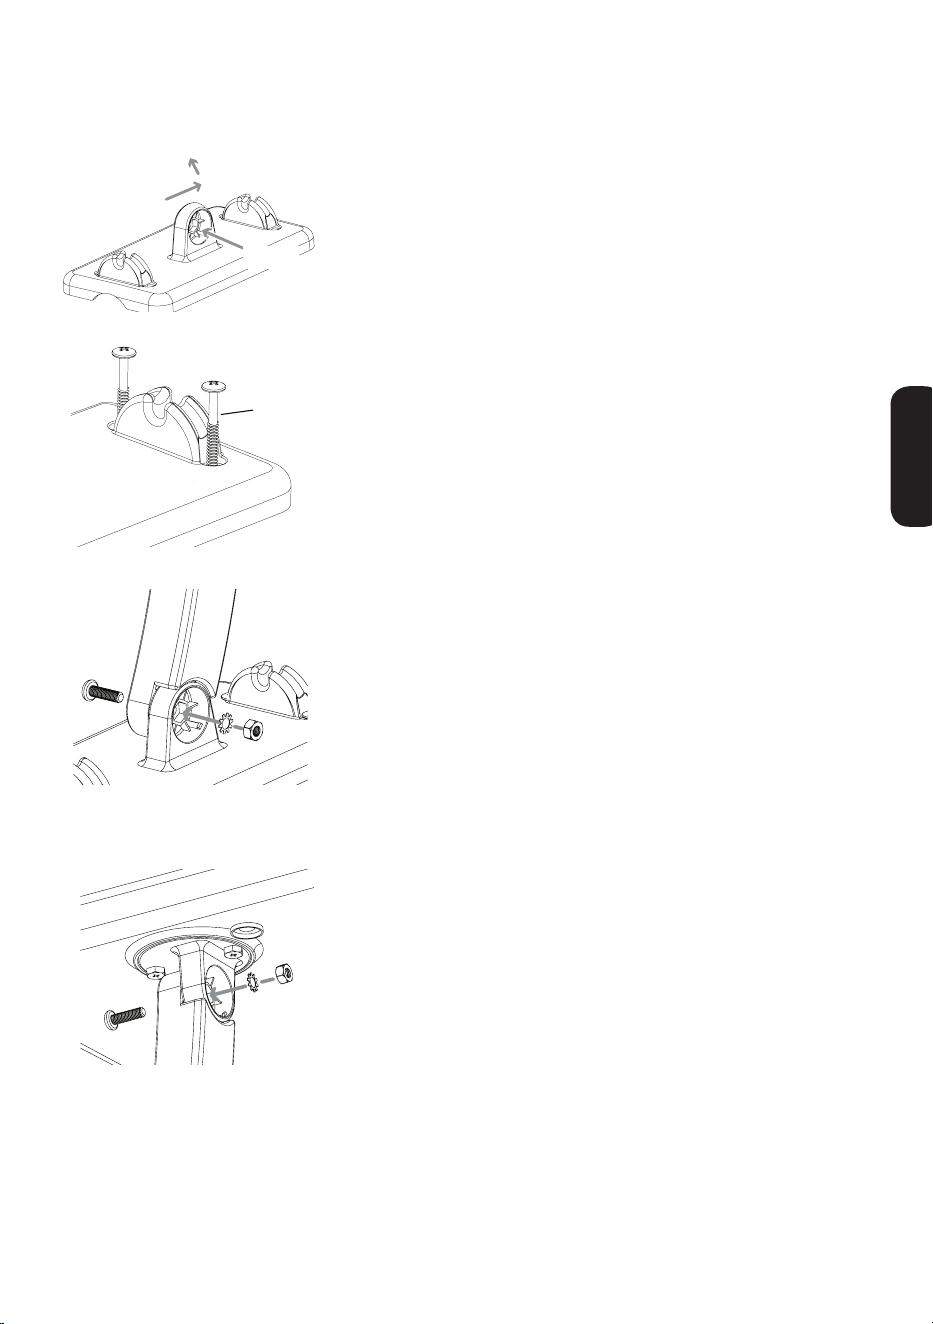
1. Orient the antenna base.
Makesurethebaseisorientedcorrectlyfor
thedirectionyouwanttopointtheantenna.
Use the illustration on the left as a guide.
Mounting
Well
Antenna points this way...
...or this way.
Wood
screw
Mounting base
2. Mount the base to the surface.
Findthefourwoodscrewsincludedinthis
package.Usingthesescrews,attachthe
base to the surface as shown here.
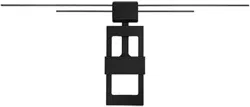
3. Attach the arm to the base.
Findoneofthescrews,washers,andnuts
included in the package.
First,setthewasherandnutinthe
mountingwell.Thenpositionthearmover
theothersideofthewell.Attachthearmto
the base as shown here.
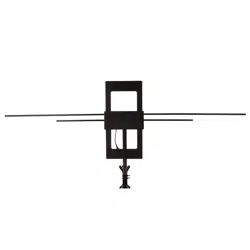
4. Attach the antenna to the arm.
Findtheotherscrew,washer,andnut.
First,setthewasherandnutinthe
antenna’smountingwell.Thenpositionthe
armovertheothersideofthewell.Attach
the arm to the antenna as shown here.
continues on next page...
4
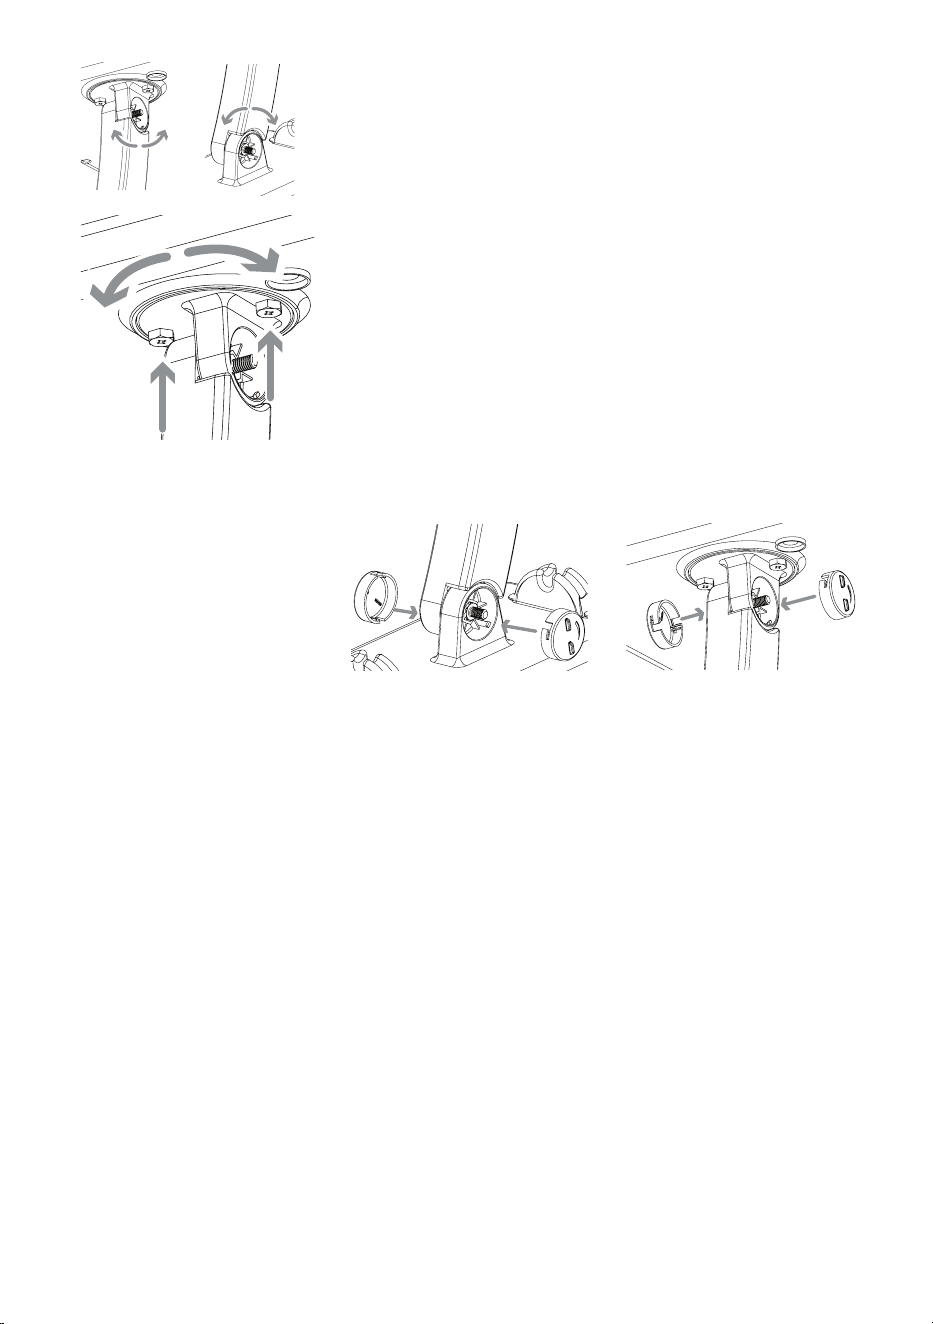
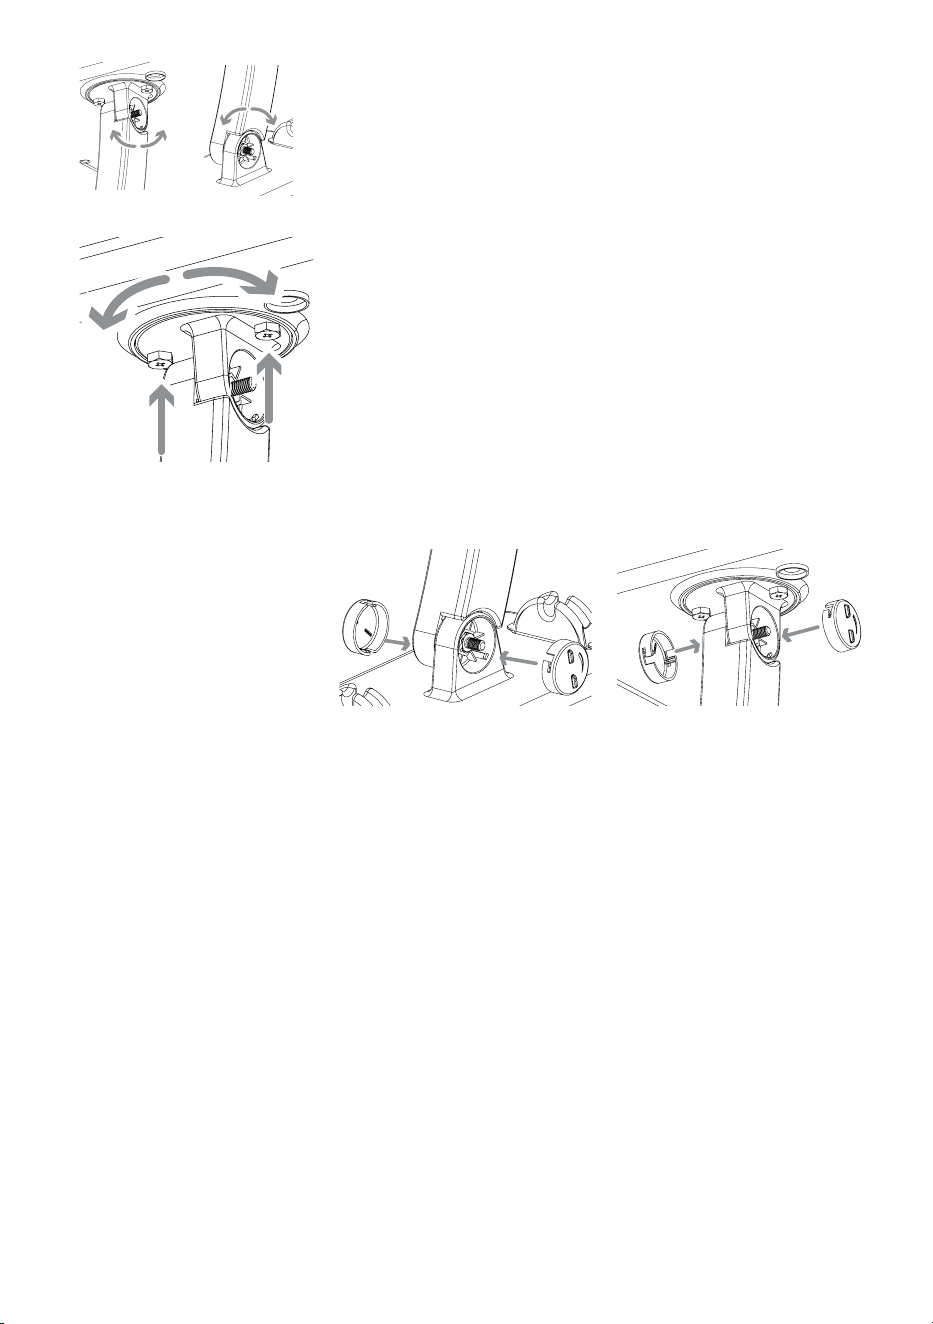
6. Tighten all screws. Attach the screw covers.
7. Skip to the “Connecting to Your TV”
section to complete installation.
5. Position and orient the antenna.
Loosenthescrewsbetweenthearmand
thebaseorantennajustenoughsothatyou
canpositionandorienttheantennatheway
youwant.
Youcanalsoadjusttheantenna’s
orientationontheantennaitself.Onthe
antenna’sunderside,nexttothearm,there
aretwoscrews.Loosenthesejustenough
sothatyoucanrotatetheantennaonthe
arm.Onceyou’vefoundtheorientationyou
want,tightenthesescrews.
5
ENGLISH
Mounting to a Mast
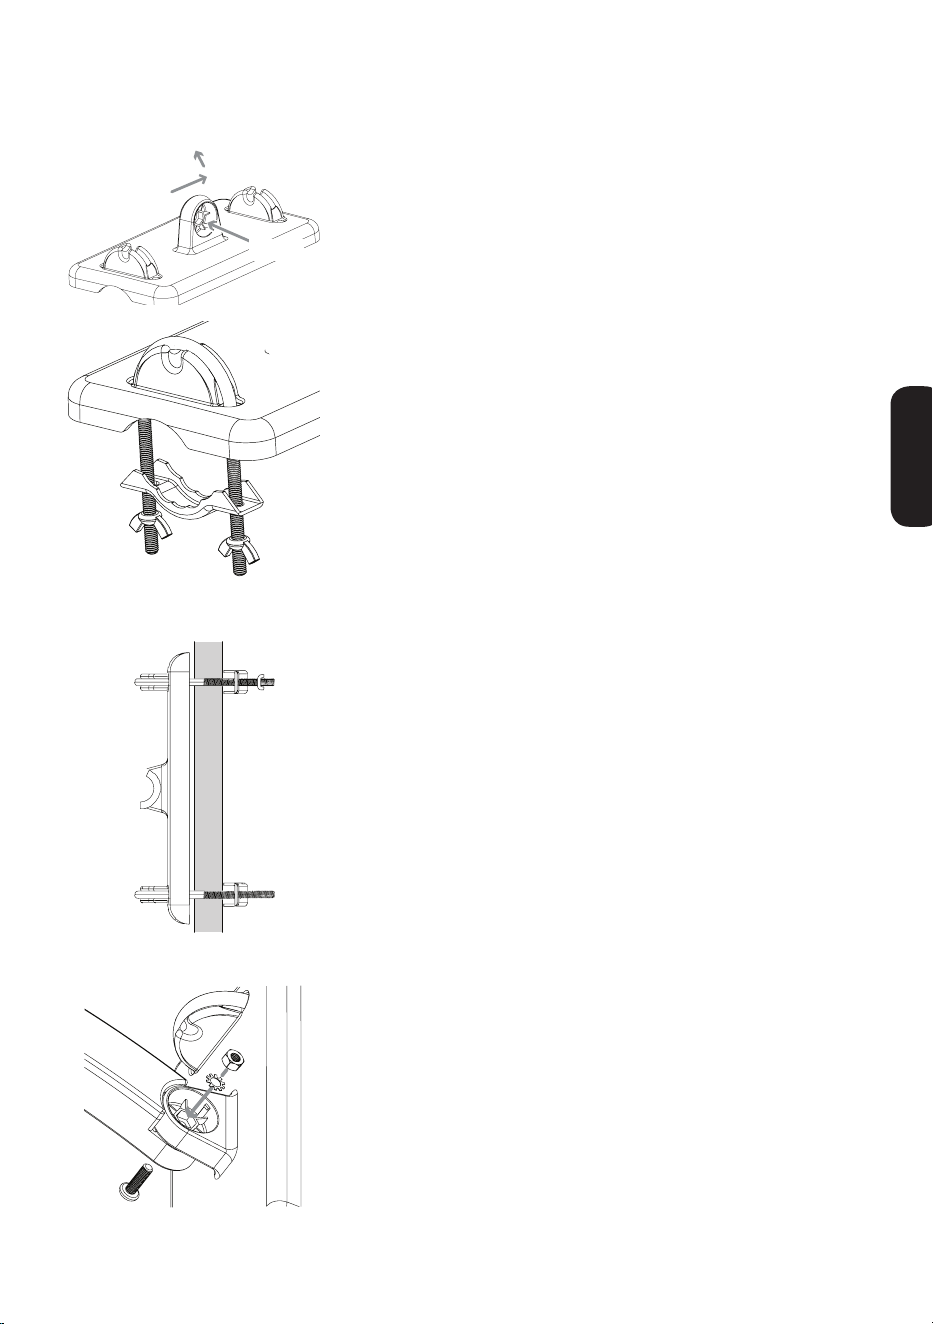
1. Orient the antenna base.
Makesurethebaseisorientedcorrectlyfor
thedirectionyouwanttopointtheantenna.
Use the illustration on the left as a guide.
Mounting
Well
Antenna points this way...
...or this way.
Screw Cover
Clamp
Wing Nut
U-Bolt
2. Attach the clamp assemblies to the base.
FindthetwoU-Bolts,thefourwingnuts,
and the two clamps included in this
package.
InserteachU-Boltintothebaseasshown
here.Thenpositionaclampandtwowing
nutsontheendofeachofU-Boltasshown
here.
3. Mount the base to the mast (not included).
Slidetheantennaclampassemblyoverthe
mastasshownhere,positioningthemast
between the clamp and the antenna.
PositiontheANT800antennaashighas
possibleonthemast.Orientthebaseinthe
directionyouwant.Thentightentheclamps
andwingnutssecurelyontothemast.
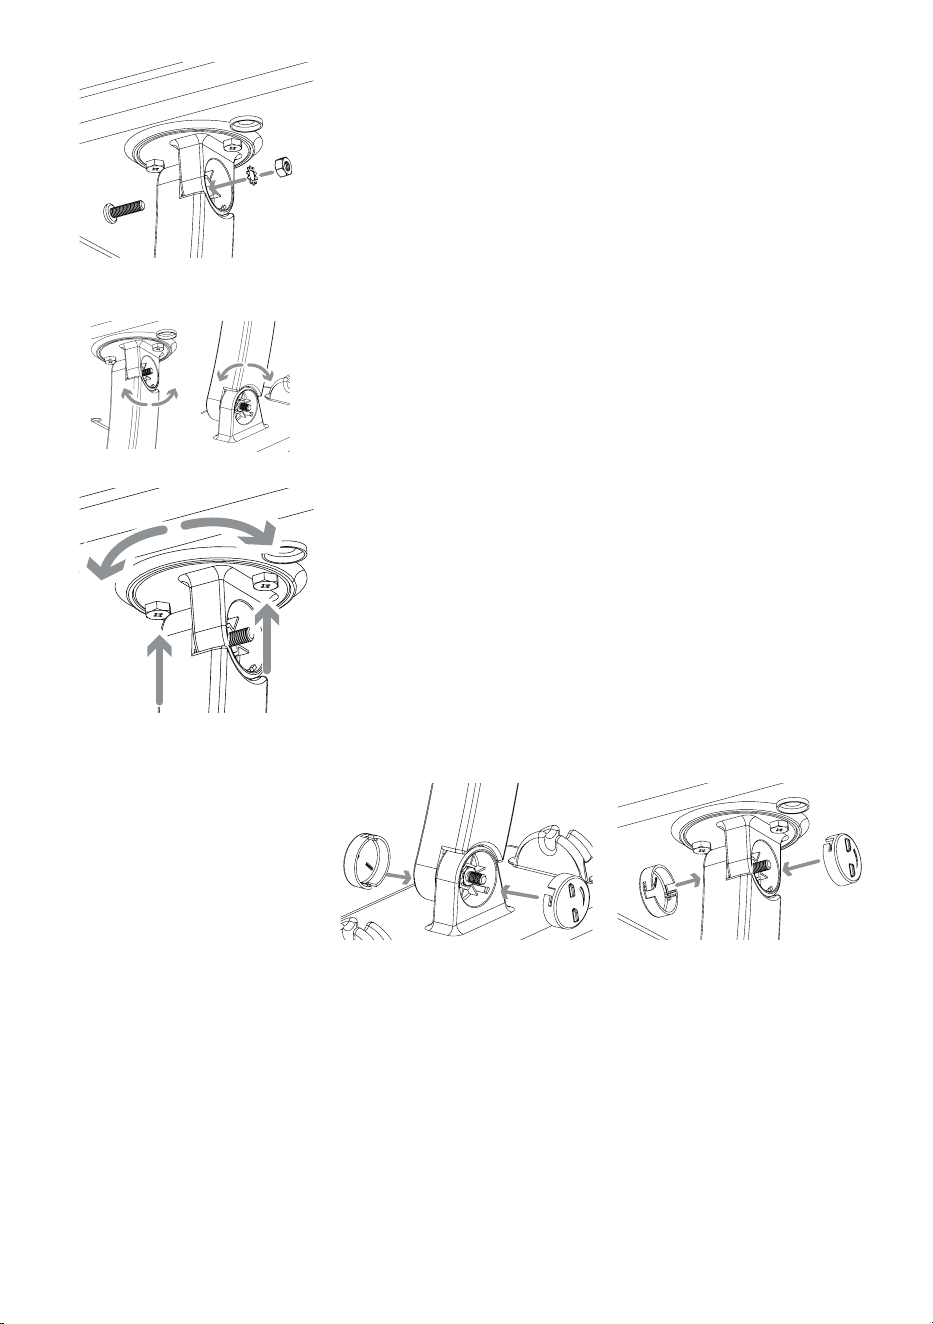
4. Attach the arm to the base.
Findoneofthescrews,washers,andnuts
included in the package.
First,setthewasherandnutinthe
mountingwell.Thenpositionthearmover
theothersideofthewell.Attachthearmto
the base as shown here.
continues on next page...
6
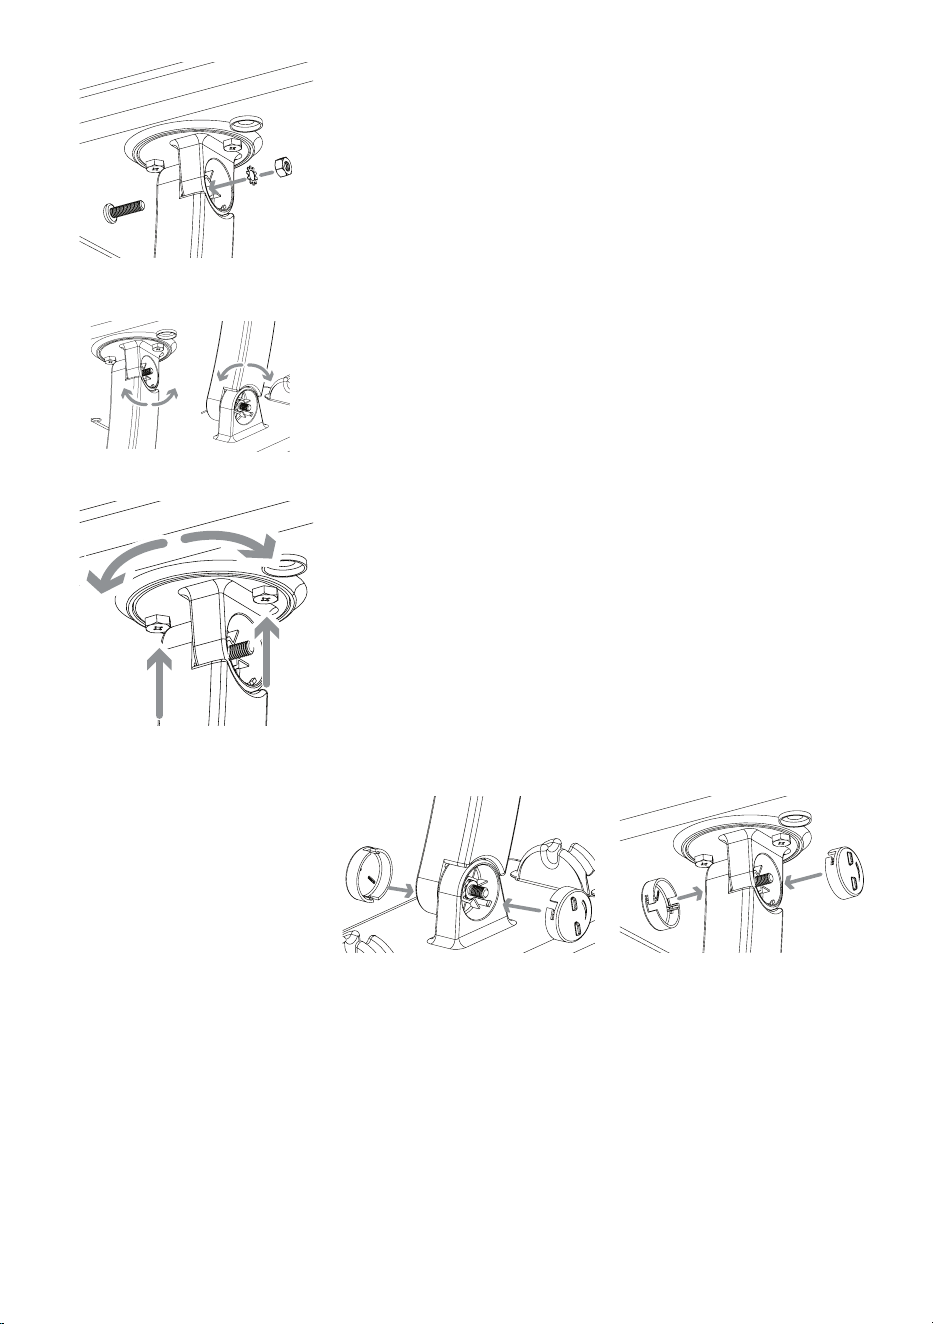
5. Attach the antenna to the arm.
Findtheotherscrew,washer,andnut.
First,setthewasherandnutinthe
antenna’smountingwell.Thenpositionthe
armovertheothersideofthewell.Attach
the arm to the antenna as shown here.
7. Tighten all screws. Attach the screw covers.
8. Skip to the “Connecting to Your TV”
section to complete installation.
6. Position and orient the antenna.
Loosenthescrewsbetweenthearmand
thebaseorantennajustenoughsothatyou
canpositionandorienttheantennatheway
youwant.
Youcanalsoadjusttheantenna’s
orientationontheantennaitself.Onthe
antenna’sunderside,nexttothearm,there
aretwoscrews.Loosenthesejustenough
sothatyoucanrotatetheantennaonthe
arm.Onceyou’vefoundtheorientationyou
want,tightenthesescrews.
7
ENGLISH
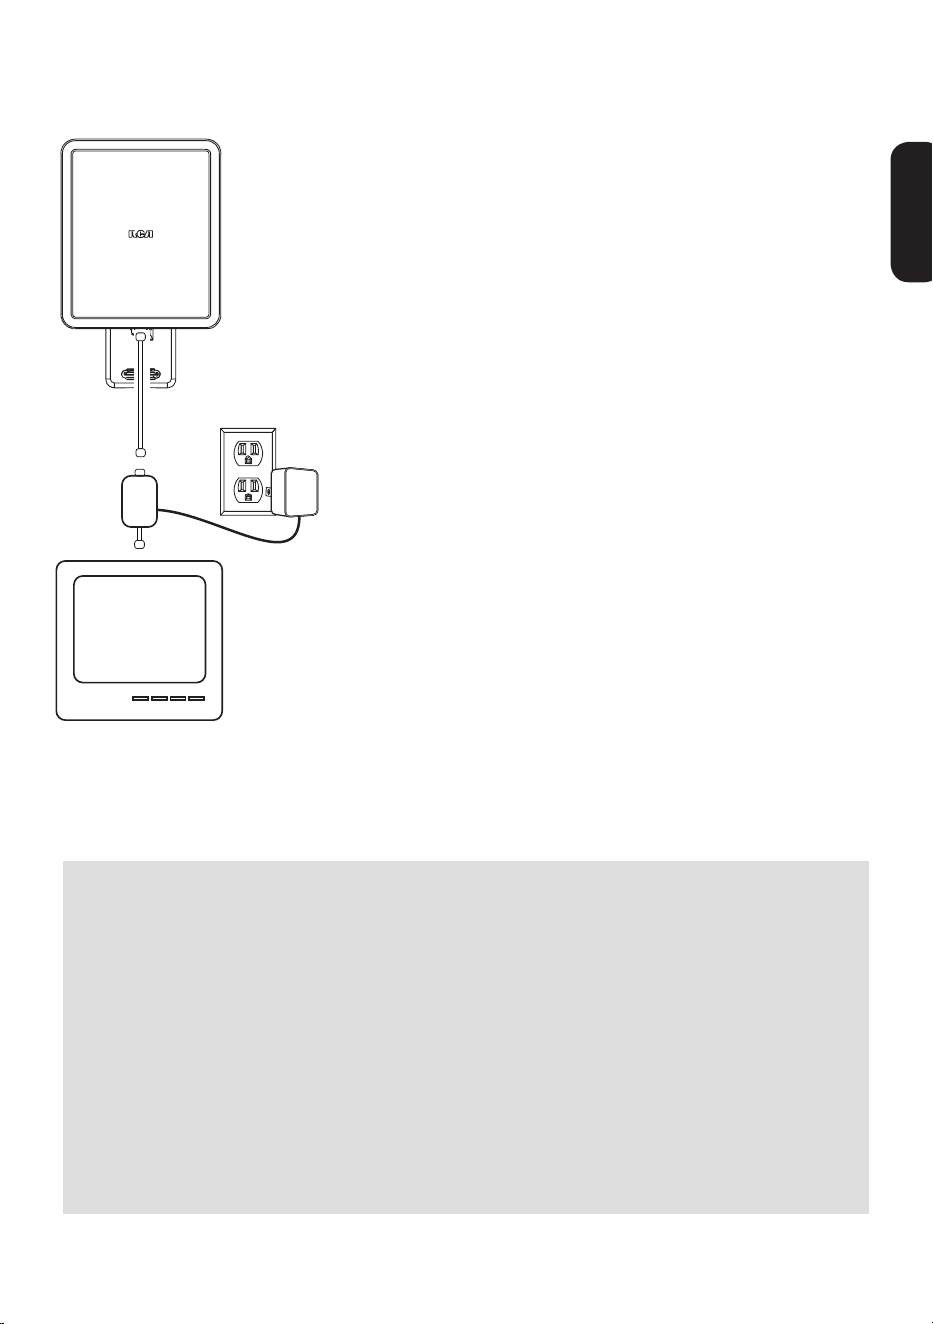
Connecting to Your TV
1.RunanRG6coaxialcablefromtheantenna
towardsyourtelevisionset.Connectthe
RG6coaxialcabletotheANTjackonthe
suppliedamplierinsert.
2.Connectbuilt-incoaxialcableonthe
amplierinserttotheantennainputjackon
yourTVorconverterbox.
Note: If you want to split the signal coming
from the antenna, connect the short coaxial
cable built into the amplifier insert to your
splitter (splitter sold separately). DO NOT
PUT THE SIGNAL SPLITTER BETWEEN THE
AMPLIFIER INSERT AND THE ANTENNA.
3.Afterallotherconnectionsaremade,
connect the power adapter into the
amplierinsert.PlugitintoastandardAC
outlet.
Important: This power adapter should be
plugged in so that it stays vertical or lays
flat.
The amplifier insert should always be
located indoors.
TV
ANT800
Coaxial Cable
Amplifier
Insert
ANTENNA
TV/STB
Water Damage Prevention:
Atthepointwhereyourcoaxialcableleadentersthehouse,youshould
allowforsomeslackinthecoaxialcableasa“driploop.”Thiswillprevent
moisturefromrunningdownthecoaxialcableandenteringthehouse.
Runthecoaxialcableapproximatelysixinchesbelowthewallentrypoint
andthenturnitupwardstowardsthisspot.Anymoisturethataccumulates
onthecoaxialcablewilldripoffinthebendinsteadofrunningintothe
house.Youshouldsealthepointwherethecableentersyourhomewith
arubberweatherinsulatororsiliconecaulking(notincluded).An“F”
connector wall plate can be used inside the home to cover the inside
portionofthehole.Youcantypicallyndan“F”connectorwallplateat
anylocalelectronicsorhardwarestore.

8
12 Month Limited Warranty
AudiovoxElectronicsCorporation(the“Company”)warrantstotheoriginalretail
purchaserofthisproductthatshouldthisproductoranypartthereof,under
normaluseandconditions,beprovendefectiveinmaterialorworkmanshipwithin
12monthsfromthedateoforiginalpurchase,suchdefect(s)willberepairedor
replaced(attheCompany’soption)withoutchargeforpartsandrepairlabor.To
obtainrepairorreplacementwithinthetermsofthisWarranty,theproductalong
withanyaccessoriesincludedintheoriginalpackagingistobedeliveredwithproof
ofwarrantycoverage(e.g.datedbillofsale),specicationofdefect(s),transportation
prepaid,totheCompanyattheaddressshownbelow.Donotreturnthisproductto
the Retailer.
ThisWarrantyisnottransferableanddoesnotcoverproductpurchased,serviced
orusedoutsidetheUnitedStatesorCanada.Thewarrantydoesnotextendtothe
eliminationofexternallygeneratedstaticornoise.ThisWarrantydoesnotapply
tocostsincurredforinstallation,removalorreinstallationoftheproduct,or,ifin
theCompany’sopinion,theproducthasbeendamagedthroughactsofnature,
alteration,improperinstallation,mishandling,misuse,neglect,oraccident.This
warrantydoesnotcoverdamagecausedbyanACadapternotprovidedwiththe
product.
THEEXTENTOFTHECOMPANY’SLIABILITYUNDERTHISWARRANTYISLIMITED
TOTHEREPAIRORREPLACEMENTPROVIDEDABOVEAND,INNOEVENT,SHALL
THECOMPANY’SLIABILITYEXCEEDTHEPURCHASEPRICEPAIDBYPURCHASER
FORTHEPRODUCT.ThisWarrantyisinlieuofallotherexpresswarrantiesor
liabilities.ANYIMPLIEDWARRANTIES,INCLUDINGANYIMPLIEDWARRANTY
OFMERCHANTABILITYORFITNESSFORAPARTICULARPURPOSE,SHALL
BELIMITEDTODURATIONOFTHISWARRANTY.ANYACTIONFORBREACH
OFANYWARRANTYHEREUNDER,INCLUDINGANYIMPLIEDWARRANTY,
MUSTBEBROUGHTWITHINAPERIODOF24MONTHSFROMTHEDATEOF
ORIGINALPURCHASE.INNOCASESHALLTHECOMPANYBELIABLEFORANY
CONSEQUENTIALORINCIDENTALDAMAGESWHATSOEVER.Nopersonor
representativeisauthorizedtoassumefortheCompanyanyliabilityotherthan
expressedhereininconnectionwiththesaleofthisproduct.
Somestates/provincesdonotallowlimitationsonhowlonganimpliedwarranty
lastsortheexclusionorlimitationofincidentalorconsequentialdamagesothe
abovelimitationsorexclusionsmaynotapplytoyou.ThisWarrantygivesyou
speciclegalrightsandyoumayalsohaveotherrightswhichvaryfromstate/
provincetostate/province.
U.S.A.: AudiovoxElectronicsCorporation,150MarcusBlvd.,Hauppauge,NY11788
CANADA: AudiovoxReturnCenter,c/oGenco,6685KennedyRoad,Unit#3Door16,
MississaugaOntarioL5T3A5

9
ESPAÑOL
ANT800
Antena Exterior
Guía del Usuario
Para empezar
Extraigalaantenaylabolsadeherrajesdelempaque.Asegúresequetodas
laspiezasseencuentrenincluidasenelempaque:
•Antena
•Amplicadoraccesorio •Adaptadordepotencia
•Basedemontaje •Brazodemontaje
•Bolsadeherrajes:
(2)Tornillos (4) Cubiertas para tornillo
(2)PernosenU (2)Abrazaderas
(4)Tuercasdemariposa (4)Tornillosparamadera
(1)Fundadecauchoparaelconectorantena-cablecoaxial
Cómo encontrar la ubicación adecuada
AntesdemontarlaantenaANT800,tomeencuentaestosfactoresque
afectan la calidad de la recepción:
• Generalmente,eldesempeñoesmejorcuandosemontalaantena
ANT800enposiciónhorizontal.
• LaantenaANT800debemontarseenelcostadodelaviviendaque
mirehacialamayoríadelastorresderadiodifusióndelalocalidad
(véaselailustración).Visitewww.antennaweb.orgparaconocerla
ubicación de las torres de radiodifusión de su localidad.
• Mientrasmáselevadasealaubicacióndelaantena,mejorserála
recepción.
¡¡¡ANTES DE COMENZAR!!!
LealahojadeINFORMACIÓNIMPORTANTEDESEGURIDADincluidaen
esteempaque.

10
Montaje de la antena
LaexibilidadqueofreceelsoportedelaantenaANT800permiteelegir
dóndemontarla.LaantenaANT800puedemontarse:
• En supercies como, por ejemplo, tejados, aleros, el
revestimiento de paredes exteriores o las vigas de áticos
— O —
• En un mástil estándar (no se incluye)
ADVERTENCIA: Nunca cuelgue nada ni monte objetos extraños en la
antena ANT800.
NOTAS: No instale la ANT800 en superficies metálicas, ni siquiera en el
revestimiento de aluminio de paredes exteriores. Montarla en superficies
metálicas empobrece gravemente la calidad de la recepción.
En la mayoría de los casos, el mejor desempeño se obtiene cuando se
monta la antena ANT800 en lugares exteriores elevados (p. ej., el tejado
o la parte alta de un costado de la vivienda). También puede montarse en
áticos.
11
ESPAÑOL
Montaje en supercies
1. Oriente la base de la antena.
Esfundamentalorientarlabaseenla
mismadirecciónenquedebeapuntar
laantena.Guíeseporlailustracióndela
izquierda.
La antena apunta en esta
dir e cción...
...o en esta
dirección.
Receptáculo
de montaje
Tornillo
para
madera
Base de montaje
3. Fije el brazo en la base.
Busqueuntornillo,unaarandelayunatuerca
entrelosqueincluyeelpaquete.
Primero,pongalaarandelaylatuercaenel
receptáculodemontaje.Luego,coloqueel
brazoalotrocostadodelreceptáculo.Fijeel
brazoenlabasecomoseindica.
2. Monte la base en la superficie.
Busqueloscuatrotornillosparamadera
queincluyeelpaquete.Conellos,jela
baseenlasuperciecomoseindica.
4. Fije la antena en el brazo.
Busqueelotrojuegodetornillo,arandelay
tuerca.
Primero,pongalaarandelaylatuercaen
elreceptáculodemontajedelaantena.
Luego,coloqueelbrazoalotrocostadodel
receptáculo.Fijeelbrazoenlaantenacomo
se indica.
continúa en la página siguiente...
12
6. Apriete los tornillos. Coloque las cubiertas
para tornillos.
7. Vaya a la sección “Cómo conectar a su
televisor” para finalizar la instalación.
5. Coloque y oriente la antena.
Aojelostornillosquejanelbrazoala
baseoalaantena,apenaslonecesariopara
colocarlaantenayorientarlaenladirección
queinterese.
Tambiénpuedeajustarlaorientaciónsobre
lamismaantena.Enlacarainferiordela
antena,juntoalbrazo,haydostornillos.
Aójelosapenaslonecesarioparagirar
laantenaenelbrazo.Unavezquehaya
logradolaorientaciónqueinterese,apriete
estos tornillos.
13
ESPAÑOL
Montaje en mástil
1. Oriente la base de la antena.
Esfundamentalorientarlabaseenla
mismadirecciónenquedebeapuntar
laantena.Guíeseporlailustracióndela
izquierda.
La antena apunta en esta
dir e cción...
...o en esta
dirección.
Receptáculo
de montaje
Abrazadera
Tuerca de
mariposa
Perno
en U
2. Fije los conjuntos de abrazadera en la base.
BusquelosdospernosenU,lascuatro
tuercasdemariposaylasdosabrazaderas
queincluyeelpaquete.
IntroduzcalospernosenUenlabasecomo
seindica.Luego,coloqueunaabrazaderay
dostuercasdemariposaenelextremode
cada perno en U como se indica.
3. Monte la base en el mástil (no se incluye).
Desliceelconjuntodeabrazaderadela
antenasobreelmástilcomoseindica,de
maneraqueéstequedeentrelaabrazadera
ylaantena.
SubalaantenaANT800sobreelmástiltan
altocomoseaposible.Orientelabaseen
ladirecciónqueinterese.Luego,aprietelas
abrazaderasylastuercasdemariposaenel
mástil.
4. Fije el brazo en la base.
Busqueuntornillo,unaarandelayuna
tuercaentrelosqueincluyeelpaquete.
Primero,pongalaarandelaylatuercaenel
receptáculodemontaje.Luego,coloqueel
brazoalotrocostadodelreceptáculo.Fijeel
brazoenlabasecomoseindica.
continúa en la página siguiente...
14
5. Fije la antena en el brazo.
Busqueelotrojuegodetornillo,arandelay
tuerca.
Primero,pongalaarandelaylatuercaen
elreceptáculodemontajedelaantena.
Luego,coloqueelbrazoalotrocostadodel
receptáculo.Fijeelbrazoenlaantenacomo
se indica.
7. Apriete los tornillos. Coloque las cubiertas
para tornillos.
8. Vaya a la sección “Cómo conectar a su
televisor” para finalizar la instalación.
6. Coloque y oriente la antena.
Aojelostornillosquejanelbrazoala
baseoalaantena,apenaslonecesariopara
colocarlaantenayorientarlaenladirección
queinterese.
Tambiénpuedeajustarlaorientaciónsobre
lamismaantena.Enlacarainferiordela
antena,juntoalbrazo,haydostornillos.
Aójelosapenaslonecesarioparagirar
laantenaenelbrazo.Unavezquehaya
logradolaorientaciónqueinterese,apriete
estos tornillos.

15
ESPAÑOL
Cómo conectar a su televisor
1.TiendauncablecoaxialRG6desdelaantena
hastaeltelevisor.AcopleelcablecoaxialRG6
enelconectorANTdelamplicadoraccesorio
queseproporciona.
2.Acopleelcablecoaxialintegradodel
amplicadoraccesorioenelconectorde
entradadeltelevisorodeldescodicadorque
corresponda a la antena.
Aviso: Si le interesa dividir la señal
proveniente de la antena, conecte en el divisor
el cable coaxial corto que viene integrado al
amplificador accesorio (el divisor se vende
por separado). NO COLOQUE EL DIVISOR DE
SEÑAL ENTRE EL AMPLIFICADOR ACCESORIO
Y LA ANTENA.
3.Despuésdehacertodaslasdemásconexiones,
conecte el adaptador de potencia en el
amplicadoraccesorio.Enchúfeloenun
tomacorrientedeCAestándar.
Importante: Este adaptador de potencia debe
enchufarse de manera que permanezca en
posición vertical o recostado.
El amplificador accesorio debe instalarse
siempre en espacios interiores.
T e levisor
ANT800
Cable coaxial
Amplificador
accesorio
ANTENNA
TV/STB
Cómo evitar daños por ltración de agua:
Enellugarporelqueentraalavivienda,elcablecoaxialdebequedarunpocoojo,
demaneraqueformeun“lazodegoteo”.Conelloseimpidequelacondensaciónde
humedadbajeporelcablecoaxialyentreenlavivienda.
Tiendaelcablecoaxialunas6pulgadas(15cm)pordebajodelpuntodeingresoen
laparedydóblelohaciaarribaenesadirección.Lacondensacióndehumedadsobre
elcablecoaxialgotearáenelcodo,enlugarderecorrerelcablehaciaelinteriorde
lavivienda.Serecomiendausarcauchoimpermeabilizanteosiliconadecalafatear
(noseincluye)paracerrarellugarporelqueentraelcableenlacasa.Puede
usarunconectorFparataparlaparteinteriordelagujerodentrodelavivienda.
Generalmente,lasplacasmuralesconconectorFsevendenenferreteríasotiendas
de artefactos electrónicos.

Garantía Limitada de 12 Meses
AudiovoxElectronicsCorporation(la“Compañia”)legarantizaausted,elcomprador
originaldeesteproductoquesi,bajocondicionesyusonormales,seencontraraque
esteproductooalgunapiezapresentadefectosmaterialesodemanodeobradentro
delosprimeros12messesapartirdelafechadecompraoriginal,talesdefectos
seránreparadosoreemplazados(aopcióndelaCompañia)sincargoalgunoporlas
piezasylaboresdereparación.Paraobtenerlosserviciosdereparaciónoreemplazo
dentrodelostérminosdeestaGarantia,elproductojuntoconcualquieraccesorio
incluidoenelempaqueoriginalseentregaránconpruebadegarantia.Nodevuelva
esteproductoalDistribuidor.
EstaGarantíanoestransferibleynocubreunproductoadquirido,mantenido
outilizadofueradelosEstadosUnidosoCanadá.Estagarantíanoincluyela
eliminacióndeestáticaoruidogeneradosexternamente.Estagarantíanoincluyelos
costosincurridosenlainstalaciónremociónoreinstalacióndeesteproducto,o,si
esopinióndelaCompañia,queesteproductohasufridodañosdebidoacausasde
fuerzamayor,alteraciones,instalacióninadecuada,abuso,usoindebido,negligencia
oaccidente.EstagarantianoincluyedañosocasionadosporunadapadordeCAque
nohayasidosuministradoconelproducto.
ELALCANCEDELARESPONSABILIDADDELACOMPAÑIABAJOESTAGARANTÍA
ESTÁLIMITADOALAREPARACIÓNOELREEMPLAZOPROVISTOARRIBAY,EN
NINGÚNCASO,DEBERÁLARESPONSABILIDADDELACOMPAÑIAEXCEDEREL
PRECIODECOMPRAPAGADOPORELCOMPRADORDEESTEPRODUCTO.Esta
Garantíareemplazacualesquieraotrasresponsabilidadesogarantíasexpresas.
CUALESQUIERAGARANTÍASIMPLÍCITAS,INCLUYENDOCUALQUIERGARANTÍA
IMPLÍCITADECOMERCIABILIDADOADAPTABILIDADPARAUNPROPÓSITO
ENPARTICULARESTARÁNLIMITADASALADURACIÓNDEESTAGARANTÍA.
CUALQUIERACCIÓNPARAELINCUMPLIMIENTODECUALQUIERGARANTÍA
ENELPRESENTE,INCLUYENDOCUALQUIERGARANTÍAIMPLÍCITA,DEBERÁ
PRESENTARSEDENTRODEUNPERÍODODE24MESESAPARTIRDELAFECHADE
COMPRAORIGINAL.ENNINGÚNCASOLACOMPAÑÍASERÁRESPONSABLEPOR
DAÑOSEMERGENTESOINCIDENTALES.Ningunapersonanirepresentanteestá
autorizadoaasumir,anombredelaCompañía,ningunaresponsabilidadsalvola
expresadaaquíenconexiónconlaventadeesteproducto.
Algunosestados/provinciasnopermitenlimitacionessobreladuracióndeuna
garantíaimplícitaolaexclusiónolalimitacióndedañosincidentalesoemergentes,
demodoqueesposiblequelaslimitacionesoexclusionesanterioresnoseapliquen
ensucaso.EstaGarantíaleconerederechoslegalesespecícos;segúnelestado/
provincia,puededisfrutarademásdeotrosderechos.
U.S.A.:AudiovoxElectronicsCorporation,150MarcusBlvd.,Hauppauge,NY11788
CANADÁ:AudiovoxReturnCenter,c/oGenco,6685KennedyRoad,Unit#3Door16,
MississaugaOntarioL5T3A5
©2009AudiovoxAccessoriesCorporation,111CongressionalBlvd.,Suite350,
Carmel,IN46032
ANT800USIB00