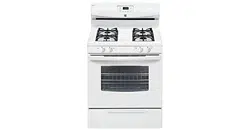
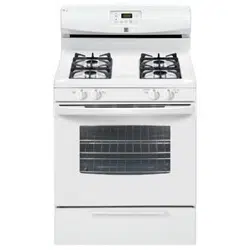
Kenmore 75233 - 5.6 cu. ft. Gas Range
Product's Documents
Below are documents related to this product, you can read online or download:
- Owner's manual - (English) Read Online | Download pdf
Gas Range User Manual
Minimum and Maximum Control Settings
All of the features listed have minimum and maximum time and temperature settings that may be entered into the control. An entry acceptance beep will sound each time a key is touched.
An entry error tone (three short beeps) will sound if the entry of the temperature or time is below the minimum allowable setting or above the maximum setting for the cooking feature. The error tone will also sound any time a key is pressed if the entry is determined to be an invalid selection.
Important note:
1. Press  .
.
2. Enter 1 3 0 using numeric keypad or press the Up / Down
arrow keys until 130 appears in the display.
3. Press  .
.
Important note:
The clock cannot be changed when a Cook Time, Self Clean, Delay Start, or cooking feature is active.
The minute timer allows you to track your cooking times without interfering with the cooking process. The timer may be set from a minimum time of 1 minute to a maximum of 11 hours and 59 minutes.
To set timer for 5 minutes:
1 Press Timer ON/OFF.
2 Enter 5 using numeric keypad or press the Up arrow key until 5 appears in the display.
3 Press to start the timer. When set time ends, END will show in the display and the control will sound a beep three times every 30 seconds until Timer ON/OFF key is pressed.
To cancel the timer when active, press Timer ON/OFF again.
Important note:
The oven control has a factory preset built-in 12 Hour Energy
Saving feature that will turn off the oven if the oven is left on for more than 12 hours. The control may be programmed to override this feature to bake continuously.
To change between continuous bake or 12 hour energy saving feature:
1. Press and hold Timer ON/OFF for 6 seconds
2. Press the Up / Down arrow keys to toggle between 12 Hour OFF or Stay On feature
3. Press to accept choice

The electronic oven control is set to display °F when shipped from the factory. The display may be changed to show either °F or oC oven temperatures.
To change temperature display mode from °F to °C or from °C to °F:
1 Press and hold Broil for 6 seconds.
2 Once F (or C) appears in the display, press the Up / Down arrow keys to toggle between Fahrenheit and Celsius temperature display modes (See Figure 22).
3 Press to accept the choice.
Important note:
The oven temperature display cannot be changed during the cooking process or if a Delay Start has been set or Self Clean is active.

To set for silent or audible mode:
1. Press and hold Delay Start for 6 seconds.
2. Press the Up / Down arrow keys to toggle between BEEP On or BEEP OFF (See Figure 23).
3. Press to accept the choice.

To activate the oven lockout features:
To cancel the oven lockout feature:
Important note:
The interior oven lights will automatically turn on when the oven door is opened. Oven lights will not operate during a self clean cycle.
Press  to turn the interior oven lights on and off whenever the oven door is closed.
The interior oven lights are located on the rear wall of the oven interior and are covered with a glass shield. The glass shield protects the bulb from high temperatures and should always be in place whenever the oven is in use.
1. Press Bake.
2. Enter 4 2 5 using numeric keypad or press the Up arrow key until 4 2 5 appears in the display.
3. Press . The word BAKE will appear on the display. To cancel Bake at any time, press  .
.
Baking tips
Benefits of convection cooking include:
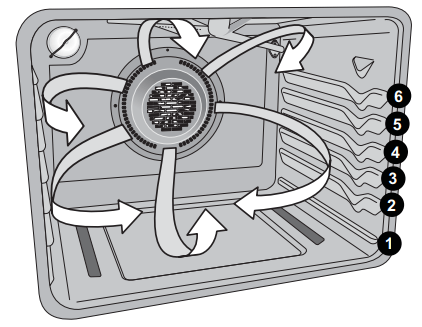
Convection functions use a fan to circulate the oven's heat uniformly and continuously around the oven. This improved heat distribution allows for fast, even cooking and browning results. It also gives better baking results when using two oven racks at the same time. Heated air flows around the food from all sides, sealing in juices and flavors. Breads and pastry brown more evenly. Most foods baked in a standard pan will cook faster and more evenly with the convection feature. Convec Bake may be set for any oven temperature between 300°F (148°C) and 550°F °C).
To set Convec. Bake with a default oven set temperature of 350°F:
1. Press Conv Bake.
2. Press . To cancel Bake at any time, press
Baking tips
The Conv Roast function combines a cook cycle with the convec- tion fan to roast meats and poultry. Meats cooked using the
Conv Roast function will be juicier, and poultry will be crisp on the outside while staying tender and moist on the inside.
Conv Roast may be set for any oven temperature between °F (149°C) and 550°F (288°C).
Suggestions for Conv Roast:
To set Conv Roast with a default oven set temperature of 350°F:
1. Press Conv Bake.
2. Press . To cancel Bake at any time, press
Important note:
Setting Conv Convert
Pressing the Conv Convert key automatically converts the cooking temperature entered for any standard baking recipe to the lower temperature required for convection baking.
When Conv Convert is used with a timed Conv Bake setting of minutes or more, the Conv Convert function will display a CF message as a reminder to check food when the bake time is complete. At this time the oven control will sound one long beep at regular intervals until the set cook time has finished.

The Slow Cook feature cooks foods more slowly and at lower oven temperatures for longer periods of time. Slow Cook is ideal for roasting beef, pork and poultry. Slow cooking meats may result in the exterior of meats becoming dark but will not burn the outside as it seals in the meat’s juices.
Two Slow Cook settings are available: high (Hi) and low (Lo). The high setting is best for cooking foods between 4 and 5 hours.
The low setting is best for cooking foods up to 9 hours or longer.
Some tips for best results when using Slow Cook:
Important note:
To set Slow Cook:
Food poisoning hazard. Do not let food sit for more than one hour before or after cooking. Doing so can result in food poisoning or sickness. Foods that can easily spoil such as milk, eggs, fish, meat or poultry, should be chilled in the refriger- ator first. Even when chilled, they should not stand in the oven for more than 1 hour before cooking begins, and should be removed promptly when finished cooking.
to activate Slow Cook. To cancel Slow Cook at any time, press .This appliance provides special settings for use when observing the Jewish Sabbath/Holidays. Sabbath mode disables all audible tones or visual display changes on the oven control. Bake heating is the only cooking feature available while in the Sabbath mode. Oven controls are locked during Sabbath mode.
You must first set the Bake feature and temperature(s) needed for the oven, the Cook Time, and the Delay Start options (if needed). Any settings made prior to setting the Sabbath mode will be visible in the displays. The Cook Time option, if set prior to the Sabbath mode, will give one audible alert at the end of Cook Time.
The Sabbath mode will override the factory preset 12 hour energy saving mode, and the appliance will stay on until the cooking features are cancelled. If any of the cooking features are cancelled when the appliance is in the Sabbath mode, no audible or visual indicators will be available to verify the can- cellation.
If the oven interior lights are needed, be sure to activate them prior to setting the Sabbath mode. Once the oven light is turned on and the Sabbath mode is active, the oven light will remain on until the Sabbath mode is turned off and the oven lights are turned off. The oven door will not activate the interior oven lights when the oven door is opened or closed.
It is recommended that any oven temperature modification made within an active Sabbath mode be followed with two presses of the START key. This will ensure the oven remains on even if an attempt is made to set the oven temperature outside of its temperature range. If the oven temperature is set outside of the temperature range, the oven will default to the nearest available temperature. Try to set the desired oven temperature again.
WARNING
Food poisoning hazard. Do not let food sit for more than one hour before or after cooking. Doing so can result in food poisoning or sickness. Foods that can easily spoil such as milk, eggs, fish, meat or poultry, should be chilled in the refriger- ator first. Even when chilled, they should not stand in the oven for more than 1 hour before cooking begins, and should be removed promptly when finished cooking.
To program oven to Bake with default oven temperature of 350°F and activate the Sabbath feature:
.
Important note:
A self cleaning oven cleans itself with high temperatures (well above normal cooking temperatures), which eliminate soils com- pletely or reduces them to a fine powdered ash you can wipe away afterwards with a damp cloth.
The Self Clean function on this model can be programmed for any duration between 2 and 4 hours. Use numeric keypad or the Up / Down arrow keys. Each time an arrow key is pressed, the time is changed by 1 minute up or down. Press START.
Read before starting Self Clean. Be sure to read all following caution and important statements before starting a self clean cycle.
CAUTION Do not leave small children unattended near appliance. During self clean cycle, the outside of the oven can become very hot and cause burns if touched.
CAUTION Do not line the oven walls, racks, oven bottom, or any part of the range with aluminum foil. This will cause per- manent damage to the oven interior and destroy heat distribu- tion, and will melt to the oven interior.
CAUTION Do not force the oven door open. This will damage the automatic door locking system. Use caution when opening the oven door after the self clean cycle ends. The oven may still be very hot and cause burns. To avoid possible burns, stand to side of oven when opening door to allow steam or hot air to escape.
CAUTION The health of some birds is extremely sensitive to fumes given off during the self clean cycle of any range. Move birds to a well ventilated room.
Important notes:
Do not clean the oven door gasket. The woven material in the gasket is essential for a good seal. Care should be taken not to rub, damage, or remove the oven door gasket.
Doing so could cause damage to the door gasket and compromise the performance of the oven.
Important notes:
| Surface Type | Recommendation |
|---|---|
| Control knobs Painted body parts Painted decorative trim Aluminum, plastic, or vinyl trim | For general cleaning, use hot, soapy water and a cloth. For more difficult soils and built-up grease, apply a liquid detergent directly onto the soil. Leave on soil for 30-60 minutes. Rinse with a damp cloth and dry. Do not use abrasive cleaners on any of these materials; they can scratch. To remove control knobs, turn to OFF position. Grasp firmly and pull straight off the shaft. To replace knobs after cleaning, line up the flat sides of both knob and shaft, then push knob into place |
| Control panel Control keypad membrane Decorative trim (some models) | Before cleaning the control panel, turn all controls off, activate oven lockout (on some models), and if needed remove any knobs from panel. Do not use abrasive cleaners on any of these materials; they can scratch. Clean using hot, soapy water and a cloth or sponge. Be sure to squeeze excess water from cloth or sponge before wiping control panel, especially when wiping around the controls area. Excess water in or around the controls may cause damage to the appliance. When rinsing, use clean water and a cloth or sponge and be sure to squeeze excess water from cloth or sponge before wiping the control panel. |
| Porcelain enamel parts and door liner | Gentle scrubbing with a soapy non-abrasive scouring pad will remove most spots. Rinse with a solution of clear water and ammonia. If necessary, cover difficult spots with an ammonia- soaked paper towel for 30 to 40 minutes. Rinse with clean water and a damp cloth, and then scrub with a soap-filled non-abrasive scouring pad. Rinse and wipe dry with a clean cloth. Do not allow food spills with high sugar or acid content (milk, tomatoes, sauerkraut, fruit juices, or pie filling) to remain on the surface; they may cause a dull spot even after cleaning. |
| Oven interior | For oven interior remove excessive spillovers from oven cavity bottom before starting Self Clean.Clean any soils from oven frame and door liner outside the oven door gasket. |
| Porcelain coated oven racks | Porcelain coated heavy duty oven racks may be left in oven during Self Clean. After a self- cleaning cycle, let the oven completely cool. If needed use a damp cloth to wipe any ash from oven racks. |
| Oven door | Use soap and water to thoroughly clean the top, sides, and front of the oven door. Rinse well. You may use a glass cleaner on the outside glass of the oven door. Do not immerse the door in water. Do not spray or allow water or the glass cleaner to enter the door vents. Do not use oven cleaners, cleaning powders, or any harsh abrasive cleaning materials on the outside of the oven door. |
| Cooktop surface Surface burners Burner grates | Do not use spray oven cleaners on the cooktop. |
| Stainless Steel (some models) | Only use cleaners and polishes that are specifically manufactured for cleaning stainless steel. Always rub in direction of metal grain to avoid damaging. Do not use cleaners with high concentrations of chlorides or chlorine. Do not use harsh scrubbing cleaners. Polish with a lint- free cloth. Always be sure to wipe excess cleaner/polish off from the metal surface as bluish stains may occur during future oven heating that cannot be removed. Clean heavier soils with hot, soapy water and a cloth or sponge. Rinse and dry using clean water and a cloth. |
CAUTION Before manually cleaning any part of the range, be sure all controls are turned off and the range is cool. The range may be hot and can cause burns.
CAUTION Ammonia must be rinsed before operating the oven. Provide adequate ventilation.
WARNING Never cover any slots, holes, or passages in the oven bottom or cover an entire oven rack with materials such as aluminum foil. Doing so blocks air flow through the oven and may cause carbon monoxide poisoning. Aluminum foil linings may trap heat, causing a fire hazard.
WARNING Protective Liners — Do not use aluminum foil to line the oven bottom. Only use aluminum foil as recommended in this manual. Improper installation of these liners may result in risk of electric shock, or fire.
CAUTION To avoid possible burns, do not attempt any of the cooktop cleaning instructions provided before turning OFF all of the surface burners and allow them to completely cool.
CAUTION Any additions, changes or conversions required in order for this appliance to satisfactorily meet the application needs must be made by an authorized qualified agency.
Routinely clean the cooktop. Wipe with a clean, damp cloth and wipe dry to avoid scratches.
Keeping the surface burner head ports and slots clean will prevent improper ignition and an uneven flame.
If a spill occurs on or in the recessed or contoured areas, blot up spill with an absorbent cloth. Rinse with a clean, damp cloth and wipe dry.
To clean surface burner grates:
To clean burner caps:
.
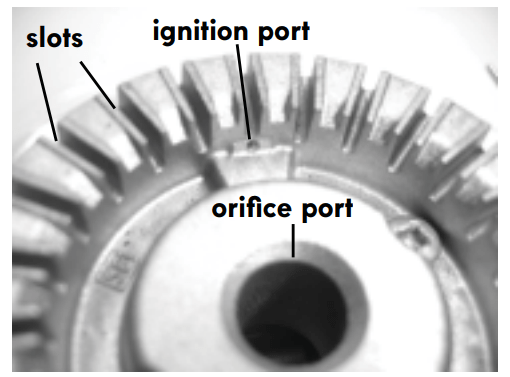
For proper gas flow it may be necessary to clean the burner head and slots. To clean, first use a clean damp cloth to soak up any spills. Remove any food from between the burner slots using a small nonabrasive brush like a toothbrush and afterwards wipe up using a damp cloth. For stubborn soils located in the slots, use a small-gauge wire or needle to clean.
Any spill on or around the electrode must be carefully cleaned. Take care not to hit the electrode with any thing hard or it could be damaged.
Each burner head has a small ignition port located as shown.
Should you experience ignition problems it may be that this port hole is partially blocked with soil. With the burner head in place, use a small wire gauge needle or the end of a paper clip to clear the ignition port (Refer to Figure 40; round style shown; oval burner on some models not shown).
Important notes:
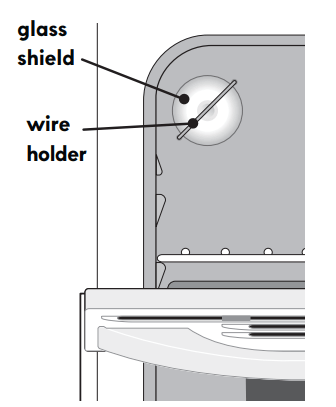
The oven light is located at the rear of the oven cavity and is covered with a glass shield held by a wire holder. The glass shield protects the light bulb and must be in place whenever the oven is in use.
CAUTION
Be sure the range is unplugged and all parts are cool before replacing oven light. Wear a leather-faced glove for protection against possible broken glass.
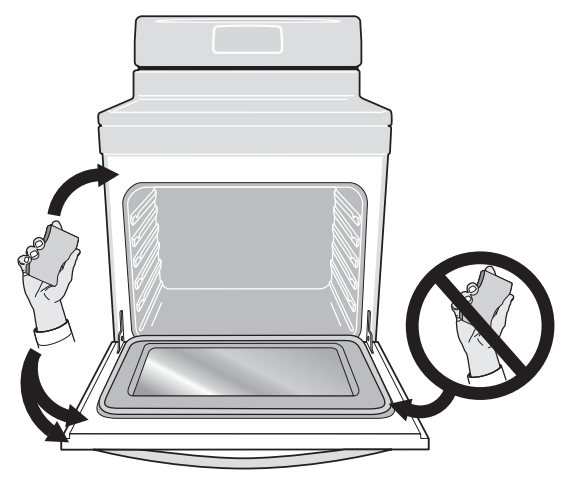
CAUTIONTo avoid possible injury when removing or replacing the oven door, follow the instructions below carefully and always hold the oven door with both hands positioned away from the door hinge area.
The door is heavy. For safe, temporary storage, lay the door flat with the inside of the door facing down.
To remove the oven door:
1. Open oven door completely (horizontal with floor -
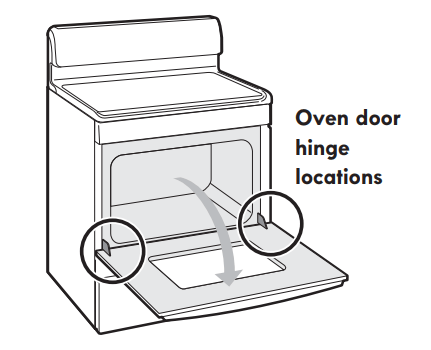
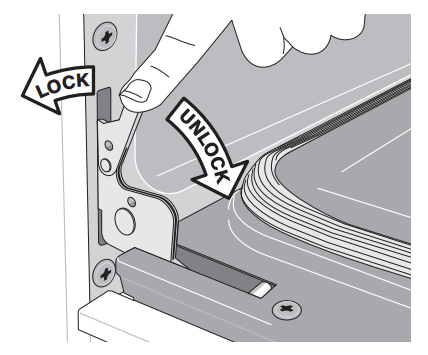
2 Pull the door hinge locks on both left and right door hinges down from the oven frame completely towards the oven door (Figure 43). A tool such as a small flat-blade screw- driver may be required.
3. Firmly grasp both sides of oven door along the door sides
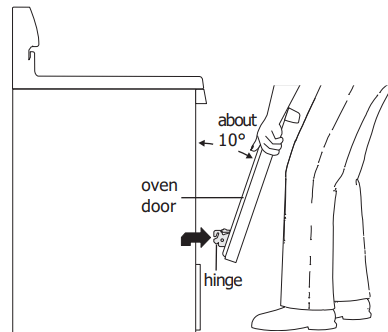
4. Close the door to the stop position (the oven door will stop into this position just before fully closing).
5. With the oven door in the stop position, lift the oven door hinge arms over the roller pins located on each side of the oven frame.
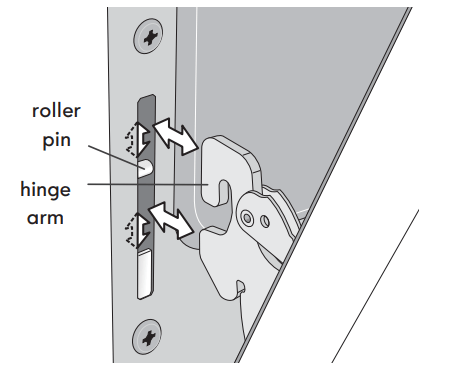
To replace oven door:
1. Firmly grasp both sides of oven door along the door sides
2. Holding the oven door at the same angle as the removal position, seat the hook of the hinge arm over the roller pins located on each side of the oven door frame. The hook of the hinge arms must be fully seated onto the roller pins.
3 Fully open the oven door (horizontal with floor
4. Push the door hinge locks up towards and into the oven frame on both left and right oven door hinges to the locked position; then, close the oven door.
Most oven doors contain glass that can break. Follow these recommendations:
Cookies and biscuits burn on the bottom.
Cakes too dark on top or bottom
Cakes not done in center
Cakes not level.
Foods not done when cooking time is over.
Poor baking results
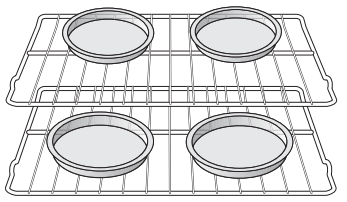
Center food in the oven and space pans to allow air to circulate. Allow the oven to preheat to the set temperature before placing food in the oven. Try adjusting the recipe's recommended temperature or baking time.
Appliance is not level.
Cannot move appliance easily. Appliance must be accessible for service.
Entire appliance does not operate.
Oven portion of appliance does not operate.
Oven light does not work.
Oven smokes excessively when broiling.
Flames inside oven or smoking from oven vent.
Oven control panel beeps and displays any F code error.
Try Bake or Broil function. If the F code error repeats, remove power from appliance, wait minutes, and then repower appliance and set clock with the correct time of day.
Self Clean does not work.
Soil not completely removed after Self Clean.
Convection fan does not rotate.
Surface burners do not ignite.
Surface burner flame uneven or only part way around burner cap.
Surface burner flame is too high.
Surface burner flame is orange.
Reference file: Kenmore 75233 - 5.6 cu. ft. Gas Range
Additionally, the document applies to other Kenmore models: 790.7523*