USER MANUAL TV
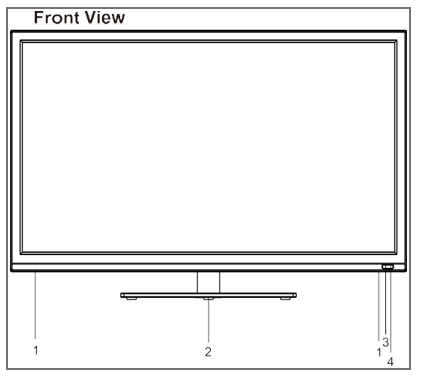
LOCATION OF CONTROLS

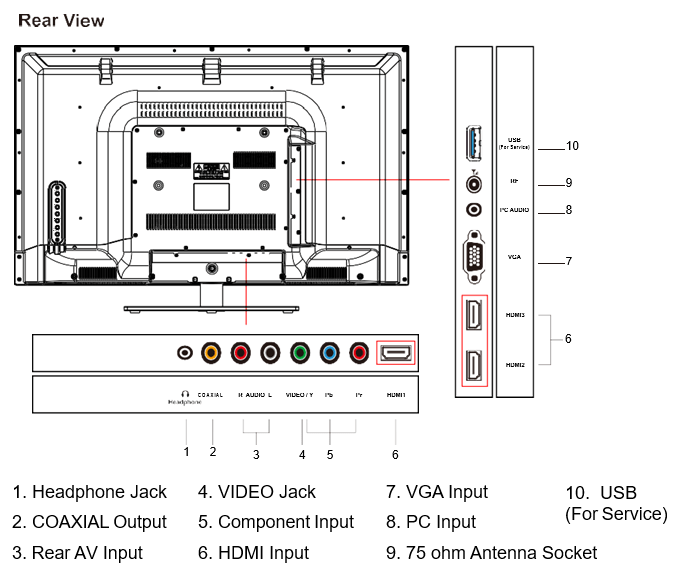
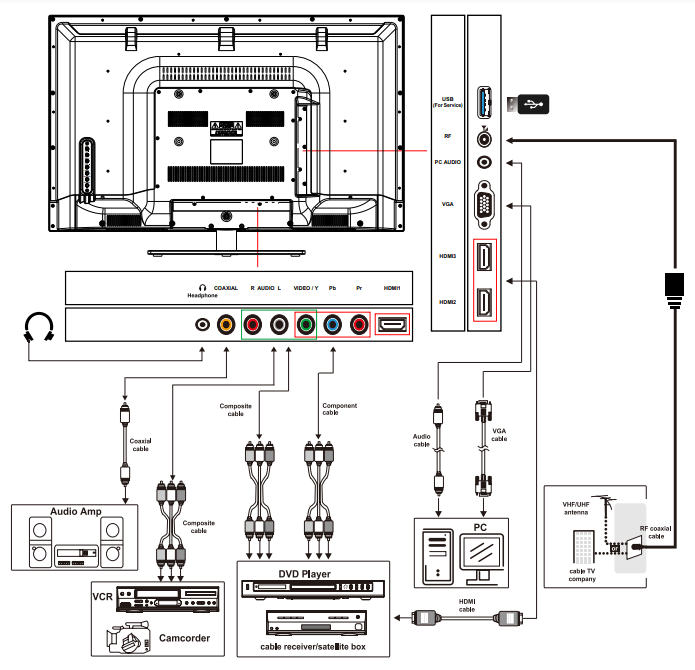
External Device Connections
You can enjoy picture, sound and a PC monitor by connecting a DVD player, video game system or computer to the inputs located on the rear of the LED TV set.
- For the cable, use a commercially available audio/video cable.
- For more information about extemal device connections, see the operation manuals of your external devices.
- Make sure that the corresponding cables are connected to each input. Connecting other cables) may result in a malfunction.
- VIDEO and S-VIDEO inputs: If your external device has an S-VIDEO output, S:VIDEO connection is recommended. S-video provides a finer, more detailed picture. If inputs are connected, S-VIDEO input takes a priority.
- Component Input (YPBPr): Picture can be displayed only when a 480i or 480p or greater signal is received.
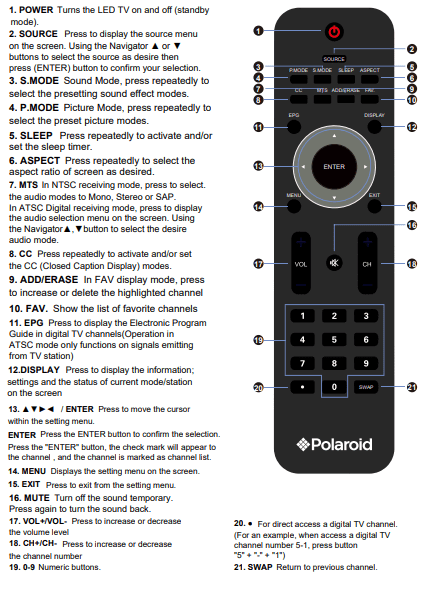
Remote Control
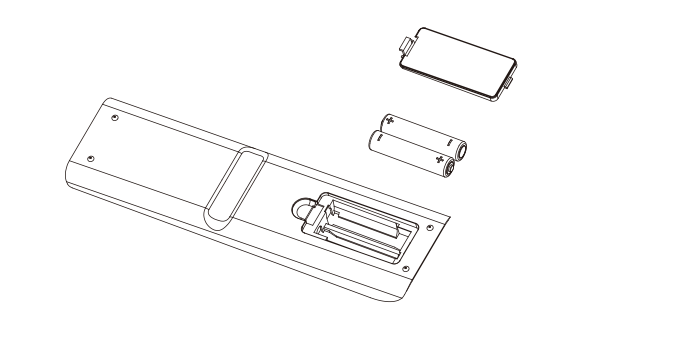
Inserting Remote Control Batteries
On the back of the remote control, push down the cath on the battery compartment cover and Itt
Insert the two AMA batteries supplied, ensuring that you flow the polarity diagram inside the battery compartment
Refit the cover
Battery Disposal
Please ensure bates are disposed safely. Never dispose batteries in a fire or with household waste. Check with your local authority for deposal regulations.
The bates (battery pack or batteries installed) shall not be exposed to excessive heat such
as sunshine, fires or the like.
CAUTION
Do not attempt to recharge, short-circuit, disassemble, heat or tow the bats into the fire.
Placing with wrong or mixed polarities bates will result in damage to the batteries and/or may result in a malfunction of the unit
Do not mix old and new batteries
Dispose of batteries properly n accordance with local law.
Do not mix alkaline, standard (carbon-zinc), or chargeable (nickel-cadmium) batteries.
Using Remote Control
Changing Channels
- Press the “CH + / -” buttons to change higher or lower stored main channels and sub-channels.
- Press numeric button “0-9'' and ''
 '' button to select the main channels and sub-channels then press the “ENTER” button to confirm.
For example: to select CH90-2
- Press number “9” and number “0” button then press the “” button and press number “2” button.
Then press the“ENTER" button to confirm
To review the stored Channel
- Press the “ENTER ” button to review the stored channels.
To Select the Favorite Channel
- Press the “FAV.” button to enter to favorite channel list, to select the desired channel press the ''
 ” button then press the “ENTER” button.
To Change to Audio Channel
- Press the “MTS” button to choose the desired audio channel if the bilingual language is available by the broadcasting station.
To review the station information
- Press the “DISPLAY” button to review the station informations.
To review the program information
- Press the "EPG" button to enter to the guide menu, and press the “
 ” button to see next page if the contents of information is more than one page.
To change the screen aspect ratio
- Press the “ASPECT” button to change the aspect ratio of picture size
To return back to the previous channel viewed
- Press the "SWAP" button to review the previous channel.
To turn on or turn off the close captioning
- Press the "CC" button to turn ON or turn OFF close caption function.
To change the picture effect
- Press the "P.MODE" button to select the picture effect.
- There are four modes for picture with different effect.
User (The picture brightness/contrast/color/sharpness is preset by user)
Standard (Fixed mode for normal condition)
Dynamic (Fixed mode for day time with high brightness environment)
Mild (Fixed mode suitable for bedroom without light condition)
To set the sleep time
- Press the “SLEEP” button to select a predetermined time the TV will turn off. The sleep time can be set to count down from 15 to 240 minutes.
To mute the sound
- Press the “MUTE” button to mute the sound, press once again to resume the sound.
To select Input mode
- Press the “INPUT” button to select source model.
AUTO POWER OFF
If no signal is continuously detected from the antenna or broadcasting for more than 10
minutes, the TV will power-off automatically.
OPERATING YOUR TV
Once you have connected your TV to an antenna or cable system, plugged the TV in, and put batteries in the remote, you are ready to use the TV. The first thing you should do is program your TV to memorize alll of the available channels in you area.
Turning Your TV On
To turn your TV ON, press the “ '' button on the remote control or press the “” button on the front
panel. (The LED light is red when the TV is in the standby mode and blue when powered up.)
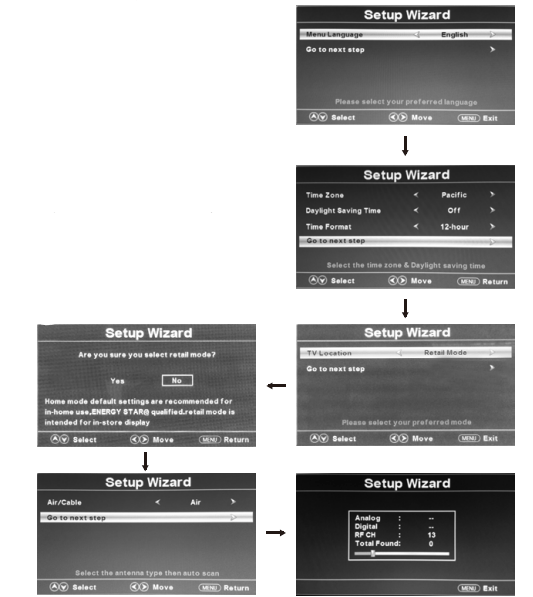
First time installation
When you power ON the unit for the first time, the screen will show the initial setup dialog.
�
There are 6 option in initial setup menu:
- Menu Language: English, Francais, Espanol
- Time Zone, Daylight Saving Time, Time Format:
Press the “” button to select.
- In Retail Mode, the television provides a more dynamic picture that will increase power consumption beyond Energy Star standards.
- In Home Mode, the television display meets Energy Star standards to reduce power consumption.
- Signal type: Air, Cable
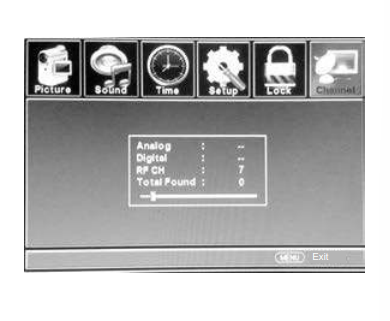
- Auto Channel Search: Execute
- Press the “” button to highlight desired menu language or signal type and press the “” but-ton to select desired menu language and signal type.
- Press the “” button to highlight Auto Channel Search and press “ENTER” button to perform auto channel scan, the Auto Scan process will take about 30 minutes, while the auto scan process is finished then the first memorized channel will appear on the screen.
You can Scan for channels at any time using the following instructions:
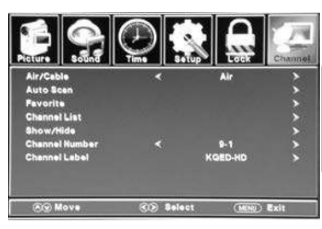
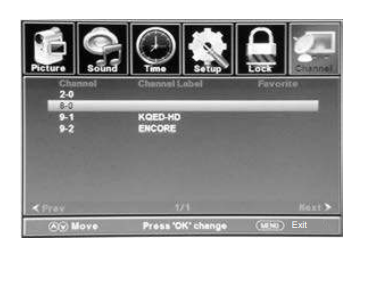
Chanel Programming
1. Press the "MENU" button on the remote control, then press the “" button to highlight CHANNEL. and press the “ENTER’ button to access to the sub-menu.
There are 6 items in CHANNEL Sub-menu:
- Air/Cable
- Auto Scan
- Favorite
- Channel List
- Show/Hide
- Channel Number
- Channel Label
�
2. Press the " '' button to highlight Signal Type, then press the ''
 " button to select desired Air or Cable.
- Press the “” button to highlight Auto Channel Search, and press the “ENTER” button to launch the Auto channels scanning. The scanning process will take about 30 minutes or more (depends on how many TV stations are in your area), when the auto scanning process is finished the first memorized station will appear on the screen.
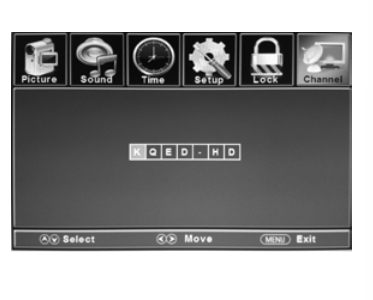
Channel Label
- Press the “” button to highlight the Channel Label then press the “ENTER” button to access.
- Press the “” button to move the position of cursor, then press the “" button one or more times to select each desired character for the name of channel.
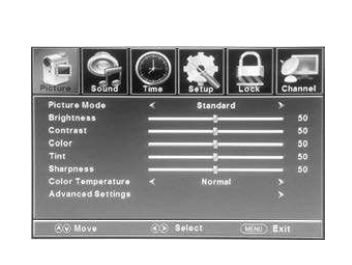
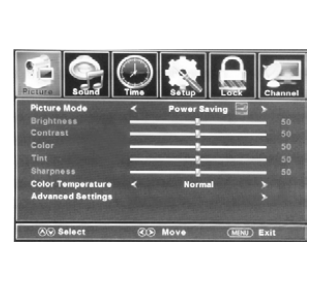
Picture
Press the “MENU” button then press the “@[IMAGE]” button to highlight the PICTURE and press “ENTER”
button to access to the sub-menu.
There are 7 items in the menu:
- Picture Mode
- Brightness
- Contrast
- Color
- Tint
- Sharpness
- Color Temparature
- Advanced Settings
�
Picture settings
- Press the “” button to highlight Picture Settings and press the “ENTER” button to enter to the sub-menu.
- In sub-menu press the “” button to high light desired item that you want to adjust, then press the “” button to change the parameter of selected item.
- Picture Mode: Standard, Dynamic, Soft,
- Power Saving or User.
- Brightness
- Contrast
- Color
- Tint
- Sharpness
- Color Temparature
- Advanced Settings
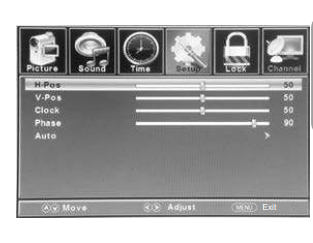
PC Settings
When PC Settings is highlighted, press the “ENTER” button to enter to the sub-menu, then press the “” button to highlight desired item which you want to adjust, then press the “”
button to change the parameter of selected item.
- H-Pos
- V-Pos
- Clock
- Phase
- Auto
Press the “MENU” button to close the menu.
PC input signal chart
The following chart shows the suggested screen resolutions
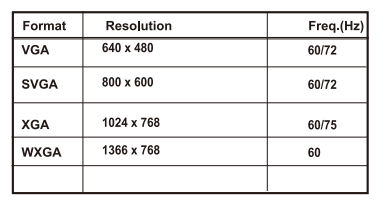
If “Unsupported” appears on the screen, adjust the PC display setting to correspond to one of the
settings in the above table.
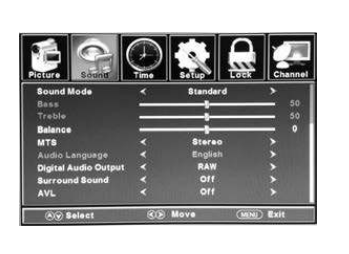
Sound
Press the “MENU” button then press the “” button to highlight the SOUND and press “ENTER” button
to access to the sub-menu.
There are 6 items in the menu:
- Sound Mode
- Bass
- Treble
- Balance
- MTS
- Audio Language
- Digital Audio Output
- Surround Sound
- AVL

Sound Mode
- Press the “" button to highlight Sound Mode and press the “ENTER” button to enter to the sub-menu.
- In sub-menu press the “” button to high light desired item that you want to adjust, then press the “” button to change the parameter of selected item.
- Sound Mode: Standard, Music, Movie
- Sports or User.
- Bass
- Treble
- Balance
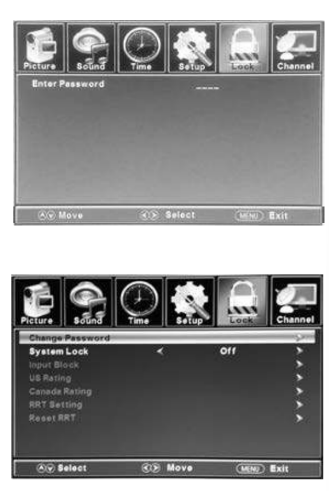
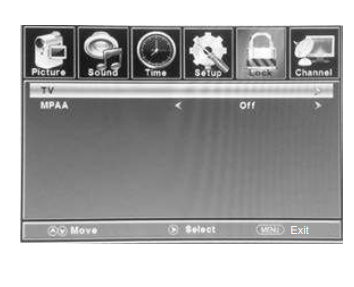
Parental Control
The parental control menu provide the ability to set rating that block programming that may be inappropriate for the viewing audience such as programs and movies that contain violence, adult language or nudity.
- Press the “MENU” button then press the “” button to highlight the PARENTAL CONTROL and press “ENTER” button to access to the sub-menu.
To make setting, need to input 4 digit password (the default password is 0000)
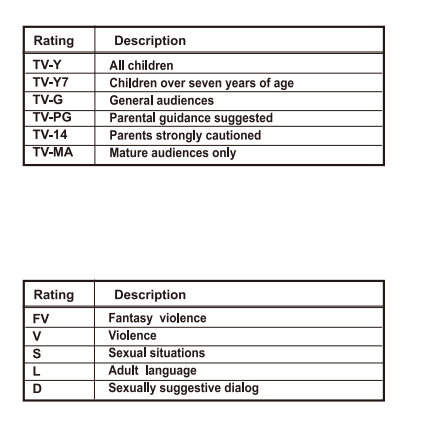
There are 3 items in the menu:
- Change Password
- System Lock
- Input Block
- US Rating
- Canada Rating
- RRT Setting
- Reset RRT
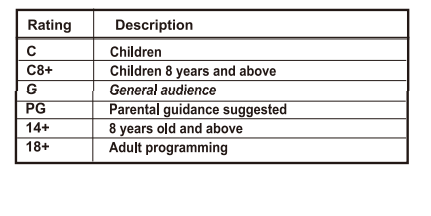
USA TV Ratings as determined by FCC
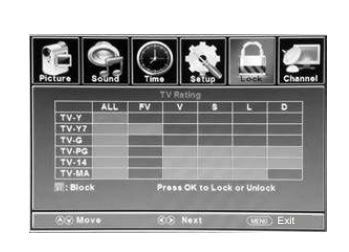
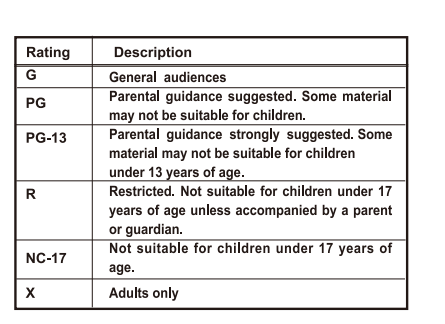
USA Movie Ratings as determined by the MPAA (Motion Picture Association of
America)
Canada English(Movies parental control level)
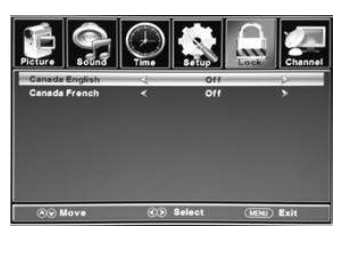
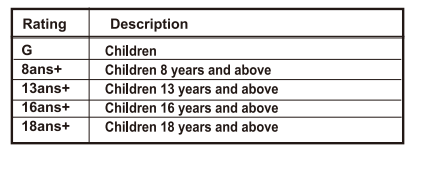
Canada French(Movies parental control level)
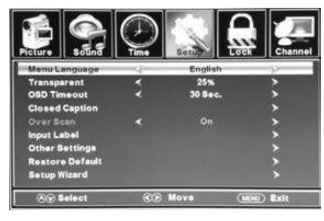
Setup
Press the “MENU” button then press the “” button to highlight the SETUP and press “ENTER” button
to access to the sub-menu.
There are 5 items in the menu:
- Menu Language
- Transparent
- OSD Timeout
- Closed Caption
- Over Scan
- Input Label
- Other Settings
- Restore Default
- Setup Wizard
�
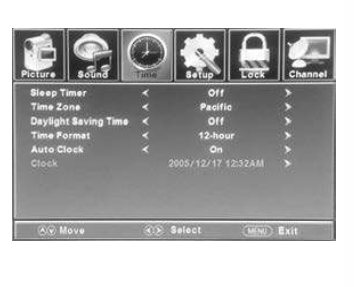
Date & Time
Press the “MENU” button then press the “” button to highlight the TIME and press “ENTER” button to access to the sub-menu.
There are 5 items in the menu:
- Sleep Timer
- Time Zone
- Daylight Saving Time
- Time Format
- Auto Clock
- Clock
Changing Channels
- Press the “CH+” or “ CH- ” button on the unit or on the remote control to change to higher or lower channels or press the numeric button to key in the channel number directly.
Use the numeric button to select the main channel and sub-channel(Digital channels):
In digital TV mode, a main channel can have one or more sub-channels, to select the main and sub channel by following below procedures:
- Press the numeric buttons(0-9) on the remote control, and input the desired main channel, and press the “” button to input to the sub-channel number.
For example:
If you want to watch channel 5.2, press “5” then “” then the “2” buttons.
�
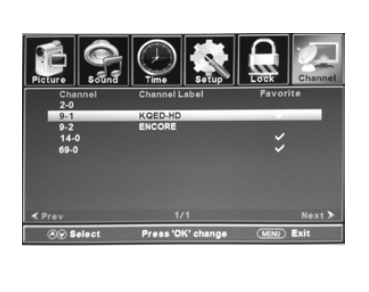
Add or delete channels to the favorite list:
- Press the “ ENTER * button to enter to the Channel List menu.
- Press the “” button to select a channel which you want to add or delete to the favorite channel list.
- Press the “ENTER” button, the check mark will appear to the channel, and the channel is marked as channel list.
- Repeat the same procedure for other channels.
- Press the “MENU” button to exit.
Use the favorite channel list
1. Press the “FAV.” button on the remote control and the favorite list will appear on the screen.
2. Press the “" button to highlight the desired channel that you want to watch, then press
the “ENTER” button to call out this channel.
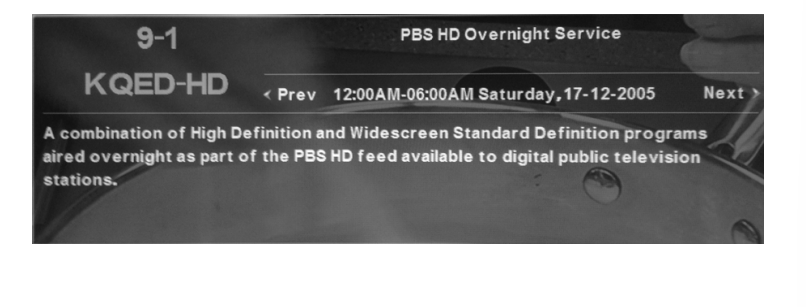
Use The Electronic Program Guide(EPG)
Your TV has an Electronic Program Guide (EPG) that supplies information, such as program lists and start and end times for programs. In addition, detailed information about the program is often, available in the EPG. (The availability and the amount of program details will vary depending on the broadcaster.)
To use the EPG
- In digital TV mode, select a channel you want to watch.
- Press the “EPG" button on the remote control and the EPG menu will appear with the currently active channel.
- By repeatedly pressing the “" button, the information for additional future programs will be displayed.
- Press the “” button to select the previous or next program.
- Press the “EPG" button one or more times to close the menu.
TROUBLE SHOOTING
�
Your television is designed to give you trouble-free performance for many years. If you have a prob-lem with your TV, try the solutions listed below.
There is no picture or sound, or the TV doesn’t turn on.
- Make sure the TV is plugged in.
- Make sure MUTE is not set on.
- Make sure the POWER is on.
- Make sure a headphone is not inserted.
- If there is neither picture nor sound, unplug the TV for 30 seconds, then plug it in and try again.
There is no picture or sound on some UHF channels.
- Try another station. If the other stations are OK, it may be a station problem.
- Check that the antenna is connected and adjusted correctly, in good working order and has no broken wires.
- See if anything is interfering with the antenna signal.
The sound is OK, but the picture is poor.
- Try another station. If the other stations are OK, it may be a station problem.
- Check that the antenna is connected and adjusted correctly, in good working order and has no broken wires.
There is poor reception on some channels.
- Try another station. If the other stations are OK, it may be a station problem.
- Check that the antenna is connected and adjusted correctly, in good working order and has no broken wires. Antenna not included.
�
�
The picture rolls, slants, shows lines, is grainy, has poor color, or has ghosts.
- Try another station. If the other stations are OK, it may be a station problem.
- Check that the antenna is connected and adjusted correctly, in good working order and has no broken wires.
- See if anything is interfering with the antenna signal.
The remote control does not work.
- Make sure the TV is plugged in.
- Make sure there are fresh batteries in the remote control.
- Make sure there is nothing blocking the remote control signal.
Lost the parental control password
- In the password screen, enter the universal password “5963”. After using the universal password, you must create a new password.
�
CARE & MAINTENANCE
This television receiver represents a fine example of electronic engineering and construction. As such it should be treated with care. We offer the following suggestions so you will enjoy this product for many years to come.
Keep it dry. If water shoul get on it, wipe off immediately. Water contains minerals that can corode electronic circuits.

Do not store in hot areas. High ampertures can shorten the Iife of electronic devices, damage batteries, and can even distort or melt certain plastics.

Do not dop your product. This wil likely result in failure to operate.

Do net use or store in areas with high level of dt or dust The electronic pats may be contaminated or weer prematurely.

Do not use harsh chemical or stong caning solvents to clean your und, wipe th a alghty most doth

Make make sure any bates used are fresh and are of he corect type. Old or almost-dead batons are dangerous.
A vorn out batery can leak chemicals which will damage the electronic circuits.

TECHNICAL SPECIFICATION
TV Section
Television system
- NTSC
- ATSC(BVSB terrestrial)
- QAM on cable
- ATSC compliant 64 QAM/256 QAM
Channel coverage
- Terrestrial(analog)
- Cable TV(analog)
- Terrestrial( digital)
- Cable TV (digital)
Antenna
- 75-ohm external antenna terminal for VHF/UHF
�
Audio
HDMI
- Support format
- HOMI 1.1, HDMI 1.2, HDMI 1.3
- Support definition
- 480i, 480p, 720p, 1080i, 1080p
General
- AC Power Supply
- Power Consumption
- Remote Control Batteries
- Dimensions(mm)
- Net Weight
�
�