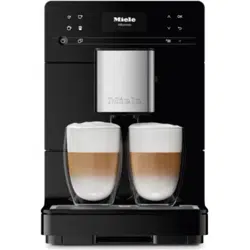
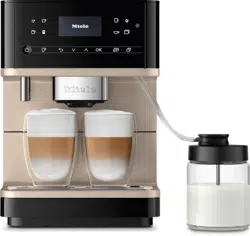
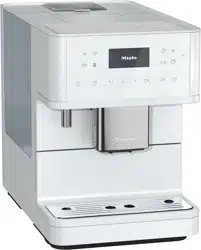
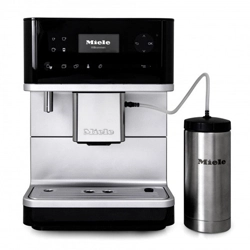
Miele CM6350 Countertop Coffee Machine
Product's Documents
Below are documents related to this product, you can read online or download:
- Owner's manual - (English) Read Online | Download pdf

1. Hot water spout*
2. Controls and display
3. Cup heating*
4. Water container
5. Ground coffee chute
6. Bean container
7. Grinder setting (behind the service panel)
8. Brew unit (behind the service panel)
9. Main dispenser with cappuccinatore
10. Park position for milk pipework (behind the service panel)
11. Drip tray with lid and grounds container
12. Milk tube opening
13. Lower panel with drip tray cover
14. Stainless steel milk flask*


Clean the appliance thoroughly before filling it with water and coffee beans (see "Cleaning and care").
When the coffee machine is turned on for the first time, after the welcome screen has appeared you will be asked to set the following settings:
– Language and country
– Time of day
 .
.Miele - Willkommen appears briefly on the display.
Selecting a language
 to highlight the desired language.
Then tap OK.
to highlight the desired country.Then tap OK.
The setting is now saved.
Setting the time of day
until the time of day appears.Then tap OK.
The setting is now saved.
The coffee machine is now successfully set up for use. The coffee machine will heat up and rinse the pipework. Rinse water flows out of the main dispenser.
Please note that the coffee aroma and the characteristic crema only develops after the first few coffees have been made.
Turn the appliance off with the On / Off button. Do not unplug the power cord to switch off the coffee machine. If you unplug the coffee machine while using it for the first time, you will have to set it up for use again.
A larger quantity of coffee beans is ground for the first coffee drinks and powder from the coffee grounds may adhere to the cover of the drip tray.
The water hardness level indicates how much calcium is dissolved in the water. The higher the calcium content, the harder the water, and the harder the water, the more often the coffee machine will need to be descaled.
The coffee machine measures the amount of water used and steam made. Depending on the level of water hardness set, more or fewer drinks can be dispensed before the appliance needs to be descaled.
Program the coffee machine to the water hardness level of your area so that it functions correctly and does not get damaged. At the correct time a prompt will then appear in the display to descale the appliance.
Your local water authority will be able to tell you the hardness of water in your area.
The water hardness level is set to 3 at the factory.
You can program four hardness levels on the machine:
|
°dH |
gr/gal |
Setting |
|
0 - 8.4 |
0 – 8.7 |
Soft 1 |
|
8.4 – 14 |
8.7 - 14.6 |
Medium 2 |
|
14 – 21 |
14.6 - 21.9 |
Hard 3 |
|
> 21 |
> 21.9 |
Very hard 4 |
* The water hardness settings in the display may differ from the water hardness level in your area. To set the correct water hardness level for your area always refer to the values in the chart.
Setting the water hardness level
 . to select Water hardness and tap OK. to select the required water hardness. Then tap OK.
The setting is now saved.
To operate the coffee machine, tap the sensor buttons with your finger.
CM 6350: An audible signal is generated each time a button is touched. You can adjust the volume of the signal tones or switch the tones off (see "Settings – Volume").
When the following appears on the display, you are in the drinks menu:

To make a coffee drink, tap one of the drink buttons.
You can find more drinks in the Additional programs  menu.
menu.
To select a menu, tap the relevant button. You will then be able to start an action or change settings in the menu.

A scroll bar at the right of the display shows that additional options or text are available. Use the arrow keys to display them.
The setting which is currently selected will have a checkmark  beside it.
To select a setting use the arrow keys until the setting you want is highlighted.
To confirm the selection, tap OK.
To exit the current menu, tap Back.
 Change the water every day to prevent a build-up of bacteria.
Only use cold, fresh tap water to fill the water tank.
Hot or warm water or other liquids can damage the coffee system.
Do not use mineral water. Mineral water will cause serious limescale deposits to build up in your machine and damage it.

If the water reservoir is a little high or at a slant, check whether the surface that the water reservoir sits on is dirty. If the water reservoir is not sitting correctly, the drain valve will not be sealed.
Clean the surface if necessary.
Fill the coffee bean container with roasted coffee or espresso beans if you want to use freshly ground coffee beans for each cup of espresso or coffee.
Alternatively, you can make coffee or espresso with ground coffee (see "Making coffee drinks from ground coffee").
Important! Risk of damage to the grinder.
Only put roasted coffee or espresso beans in the container. Anything else, including ground coffee, will damage the grinder.
Do not pour liquids in the bean container.
Important! Sugar damages the coffee system.
Do not use coffee beans that have been treated with sugar, caramel, or other substances containing sugar in the coffee bean container.
Do not use green (unroasted) coffee beans or mixtures of coffee beans which contain green coffee beans. Green coffee beans are very hard and still contain a certain amount of residual moisture. These can damage the coffee system grinder as soon as grinding begins.
Tip: You can use a nut or seed grinder to grind green coffee beans. These types of grinder generally have a rotating stainless steel blade. You can then add the ground green coffee portion by portion to the ground coffee chute and make the desired coffee drink (see "Making coffee drinks from ground coffee").

Tip: Only add enough beans to last for a few days as contact with air causes coffee beans to lose their aroma.
.The appliance heats up and rinses the lines. Hot water will run out of the main dispenser.
When Select drink appears on the display, you can make drinks.
If the operating temperature exceeds 140°F (60°C) when you switch the machine on, the rinsing process will not take place.
If no buttons are touched or maintenance programs carried out, the display will turn off after approx. 7 minutes to save energy.
The LED on the right flashes as long as the machine is switched on.
Turning the appliance off
.After a coffee drink has been dispensed, the pipework will be rinsed before the appliance turns off.
If you have made a drink using milk, Place milk pipe in drip tray will appear in the display.
If the milk system is not rinsed out before turning off, it will have to be rinsed the next time the appliance is turned on.
If the coffee machine is not going to be used for a longer period of time, e.g. if you are going on vacation:
The time of day will not be saved. It will have to be reset next time the appliance is turned on.
Cups should always be pre-heated to allow the flavor of the coffee to develop and be retained.
The smaller the volume of the coffee/ espresso and the thicker the cup, the more important it is to pre-heat the cup.
You can pre-heat cups or glasses on the cup heating surface on the top of the coffee machine.
The cup heating function must first be switched on.
The cup heating surface will be heated continually until the coffee system is turned off.
To turn cup heating on or off
.The setting is now saved.
Pre-heating cups

You can adjust the main dispenser to suit the height of the cup you are using so that the coffee or espresso will not cool down as quickly and the crema will have a better consistency.

Alternatively, push the main dispenser up until there is enough room to fit a larger cup or mug underneath.
You can choose from a variety of specialty coffees:
– Ristretto  is a concentrated, strong espresso. The same quantity of coffee powder as for an espresso is prepared with very little water.
– Espresso is a strong, aromatic coffee with a thick hazelnut-brown cream layer – the crema – on top. Use espresso-roasted coffee beans for preparing espresso.
– Coffee  differs from espresso by the increased amount of water and the roast of the beans.
Use coffee beans of the correct roast to make coffee.
– Lungo coffee  is a coffee with significantly more water.
Danger of burning and scalding from the dispensers.
The liquids and steam dispensed are very hot.
Keep away from the area underneath the dispensers when hot liquids and steam are being dispensed.
Do not touch hot components.

– Espresso
– Coffee
– in Additional programs: Ristretto, Long Coffee
Dispensing will start.
To ensure that any residues from the factory testing process are removed from the brewing system, please discard the first two cups of coffee when using the appliance for the first time.
Canceling preparation
To cancel preparation:
for drinks from Additional programs again.Drink preparation will be canceled.
Tip: You can cancel making a drink by tapping OK as soon as Stop appears in the display.
When making coffee with milk or two portions of a drink you can cancel each stage individually.
Drink preparation will be canceled.
You can dispense two portions into one cup or dispense two portions into two cups at the same time.

 .
.Two portions of the desired drink will be dispensed from the main dispenser.
Tip: Tip: If, after a while, you have not tapped one of the drink buttons, the "Double portion" option will revert back to single portions.
With the Coffee pot function you can make several cups of coffee one after the other automatically - up to max. 1 quart (1 liter) - to fill a coffee pot, for example. In this way, up to eight cups of coffee can be made.
. to highlight Coffee pot. Tap OK. to highlight the desired number of cups (3 to 8). Then tap OK.Each portion of coffee will be brewed and dispensed individually. The display will inform you about the progress.
Canceling preparation
Dispensing will stop.
Canceling Coffee pot
.Coffee pot dispensing will stop.
To make drinks using ready-ground coffee, add a portion of ground coffee to the ground coffee chute.
This allows you to make a decaffeinated coffee, if the bean container is already filled with regular coffee beans for example.
The coffee system will automatically recognize that ground coffee has been placed in the chute.
Only one portion of coffee or espresso can be prepared at a time when using ground coffee.
Add a maximum of two level spoons of coffee to the ground coffee chute. If too much is added, the brew unit will not be able to process the coffee.
Adding ground coffee
The coffee system will use all the ground coffee that has been added to the chute to make the next coffee.
Use the scoop supplied with the appliance to ensure that the correct amount of ground coffee is used.

Add a maximum of two level spoons of coffee to the ground coffee chute.
Use ground coffee appears on the display.
Making coffee with ground coffee
If you want to make a drink with preground coffee:
You can now choose which coffee drink to make with ground coffee.
The coffee machine will now prepare the desired drink.
If you select No and confirm with OK, the ground coffee is emptied unused into the waste container. The appliance will rinse itself.
Caution! Danger of burning and scalding. The water dispensed is very hot.

.Hot water will run into the container under the hot water spout.
To cancel preparation
Drink preparation will be canceled.
You can enter individual profiles to cater for different tastes and preferences.
If you have already created your own profile (see "User Profiles"), you can select this to make a drink according to your own taste.
 . and tap OK.
The name of the selected user profile will appear in the top of the display.
You can now make your drink.
.Now you can check or change any settings.
The check next to the individual entry shows you which setting is currently active.
Tap  if you want to access the previous menu.
Tap to return to Select drink.
. and tap OK. to highlight the required option. Then tap OK.The setting is now saved.
The factory default for each option is indicated by *.
|
Menu item |
Available settings |
|
Language |
German*, English and other languages Country |
|
Time |
Clock format – 12 h / 24 h* Set |
|
Timer |
Set : Turn on at / Turn off after (12:30)* / Turn off at Activate : Turn on at Yes / No*) / Turn off at (Yes / No*) |
|
Eco mode |
On* / Off |
|
Lighting |
Set the brightness |
|
Info |
Number of drinks – Total no. of uses / Espresso / Coffee / Coffee Americano / Cappuccino / Latte macchiato / Caffè latte / Milk froth / Hot milk / Hot water No. of uses until appliance needs descaling: No.of uses until brew unit needs degreasing: |
|
System lock |
On / Off* |
|
Water hardness |
Soft Medium Hard* Very hard |
|
Display brightness |
Set the brightness |
|
Volume |
Buzzer tones Keypad tone. |
|
Cup heating |
On / Off* |
|
Showroom program |
Demo mode (On / Off*) |
|
Factory default |
Do not reset Reset |
The lighting, cup heating and volume functions are only available on the CM 6350.
You can select the language (and country variant of that language) for all display text.
Tip: If you select the wrong language by mistake, you can find the "Language" option by following the flag symbol  .
.
You can set the clock display and the time of day.
Clock Format
Available options are:
– 24-hour display (24 h)
– 12-hour display (12 h)
Setting
Use the arrow keysto set the hours and minutes.
Timer
The timer offers the following options:
The coffee system:
– switches on at a particular time, e.g.in the morning for breakfast (Turn on at).
– switches off at a particular time (Turn off at),
– switches off after a particular length of time if no buttons have been pressed (Turn off after).
For Turn on at and Turn off at to be set, the timer must be activated.
Turn on at:
Please note that the coffee system will not turn on at the time specified if you have activated the system lock.
Use the arrow keys to set the hours and minutes.
If the coffee system has turned itself on three times via the Turn on at timer function and no drinks have been dispensed, the machine will not switch itself on again automatically. This prevents the coffee system from switching itself on unnecessarily, for example, while you are away on vacation.
The programmed times will, however, remain in memory and will be reactivated after manually switching the machine on again.
Turn off at
Use the arrow keys to set the hours and minutes.
In the event of a longer absence the programmed times will remain in memory and will be reactivated after manually switching the machine on again (see "Turn on at").
Turn off after
If none of the keys have been pressed or no drink has been prepared, the coffee system will turn itself off after 30 minutes to save energy.
You can change this pre-setting using the arrow buttons to a time between 15 minutes and 9 hours.
Activating and deactivating the timer
When the system lock is activated, the Turn on at option for the timer cannot be selected.
The selected option will have a next to it.
 repeatedly until Accept is highlighted. Then tap OK.
Eco mode is an energy-saving mode.
If Eco mode is switched on, the coffee machine will heat up anew every time a drink is made, so that making a drink takes longer.
If Eco mode is turned off, significantly more energy is used. The coffee machine heats up for the first drink preparation after being switched on. After that the appliance remains heated up and drinks can be prepared without having to wait very long.
The coffee machine will indicate that the energy consumption has been altered.
Lighting
(CM 6350)
Change the brightness using the arrow buttons .
If no keys are touched or maintenance programs carried out, the lighting will turn off after approximately 7 minutes to save energy.
Tip: To switch off the lights, touch the arrow buttons until no more segments are filled in and Turned off appears.
The following must be cleaned by hand only:
– Stainless steel central spout cover
– Brew unit
– water reservoir lid
– Bean container lid
– Stainless steel milk flask
– Lower panel
Some components of the coffee system are dishwasher-safe. However, cleaning these in the dishwasher frequently can cause them to become discolored due to regular contact with food residues (e.g. tomatoes) in the dishwasher. The surface of these components can also become damaged.
The following parts are dishwashersafe:
– Drip tray and lid
– Drip tray cover
– Waste unit
– Water container
– Central spout (without stainless steel cover)
Danger of burning and scalding on hot components or by hot liquids! Always allow the coffee machine to cool down before cleaning it. Caution: Water in the drip tray can be very hot.
Do not use a steam cleaner to clean this machine. Steam could cause a short circuit.
It is important to clean the machine regularly as used coffee grounds go mouldy quickly. Milk residue can spoil and clog the milk pipework.
All external surfaces are susceptible to scratching. Scratches on glass surfaces could even cause a breakage. Contact with unsuitable cleaning agents can discolor the external surfaces. Wipe up any spillages or splashes of descaling agent immediately.
To better maintain your appliance avoid the following:
– Cleaning products containing soda, ammonia, acid, or chloride
– Cleaners containing solvents
– Lime removers
– Stainless steel cleaners
– dishwasher detergent,
– Oven cleaners
– Abrasive cleaning agents, e.g. powder cleaners and cream cleaners
– Scouring pads, such as pot scrubbers and brushes, or used sponges that still contain abrasive cleanser residue
– Eraser sponges
– Metal scrapers
Glass cleaners may be used to clean the exterior. However do not allow them to sit or "puddle", this can cause damage to the surface.
Remove the cleaner promptly.
Clean the drip tray and grounds container every day every day to avoid unpleasant smells and mildew.
The grounds container is located in the drip tray. Water from rinsing also collects in the grounds container.
A prompt will appear in the coffee system display when the drip tray and/or the grounds container is full and needs to be emptied. Empty the drip tray and the grounds container.
Danger of burns.
If the rinsing process has just finished, wait a while before removing the drip tray as the water used for rinsing will run out of the coffee spouts.

 off.
off. and the lower panel
 .
.Clean the lower panel by hand only using warm water and a little washing-up liquid.
All other parts are dishwasher safe.
Make sure the drip tray has been pushed into its niche as far as it will go.

Clean the water reservoir lid by hand only using warm water and dishwashing liquid.

Make sure that the valve, the underside of the water reservoir and the surface the water reservoir sits on are clean. Otherwise the water reservoir will not sit correctly.
The stainless steel water intake valve filter is located in the recess for the water container.

Particles in the water can collect on the fine mesh in the filter. Therefore the stainless steel filter should be checked monthly for soiling.
Clean the stainless steel filter with water only without detergent in order to avoid possible unpleasant flavors.
Clean the main dispenser cover by hand only using warm water and dishwashing liquid.
All other components are dishwasher safe.


with the holder for the milk pipework and pull it off. Then pull the Y-shaped piece off. Remove the dispensing spouts .
If the milk pipe is blocked, clean it under running water with the brush supplied:
The milk flask should be taken apart and cleaned every day.
Residual dishwashing liquid can affect the taste of milk from the appliance and the quality of the milk froth.
Make sure that the milk pipework is cleaned regularly and thoroughly. Milk contains natural bacteria that will multiply if the pipework is not sufficiently clean. Contamination in the coffee machine can be a health hazard.
The milk pipework must be cleaned at least once a week. A message in the display will prompt you when this needs to be done.
When you confirm the message Clean milk pipework with OK, the internal counter for the cleaning interval will be reset. You will not be reminded again.
There are two options for cleaning the milk pipework:
– You can remove and dismantle the central spout with its integrated cappuccinatore and either wash it in the dishwasher or by hand with hot water and a little washing-up liquid (see "Central spout with integrated cappuccinatore").
– Or you can clean the milk pipework using the Clean milk pipework maintenance program together with the Miele cleaning agent for milk pipework (see "Maintenance program - Cleaning the milk pipework").
Danger of injury from the grinder! Switch off the machine and unplug the power cord to disconnect the machine before cleaning the bean container.
Coffee beans contain oils which can deposit on the walls of the bean container and hinder the flow of the beans. Therefore, clean the bean container regularly with a soft cloth.
Tip: Use a vacuum cleaner to remove any coffee residues from the bean container and the ground coffee chute.
The coffee bean container can now be refilled.
If necessary, clean the ground coffee chute:
Housing
If soiling is not removed promptly, it could cause the surface of the appliance to alter or discolor. Remove any soiling immediately.
Make sure that water cannot get behind the display.
The surfaces are susceptible to scratching. Contact with unsuitable cleaning agents can alter or discolor the surfaces.
Ensure that any splashes of descaling solution are wiped up immediately.
The following maintenance programs are available:
– Rinsing the coffee system
– Rinsing the milk pipework
– Cleaning the milk pipework
– Degreasing the brew unit
– Descaling the machine
Perform the respective maintenance program when prompted to do so in the display. You will find more information in the following pages.
Accessing the "Maintenance" menu
. , select Maintenance. Then tap OK.
Now you can select a maintenance program.
You can rinse the water and coffee pipework of the coffee machine manually.
After a coffee has been dispensed, the appliance is rinsed before it turns off. This removes any residual coffee grounds.
.You may also be prompted to insert the end of the milk pipe into the drip tray.
Milk residue can clog up the milk pipes and so the milk pipework should be rinsed regularly. If a drink has been made using milk, the prompt to insert the end of the milk tube into the drip tray will appear at the latest when you switch the appliance off.
You can also rinse the milk pipework manually.
.
The milk pipework will now be rinsed.
Most problems that occur during daily use can be easily corrected. With the help of the following guide, you will be able to find the causes of problems and rectify them. However, please note:
Important! Never open the casing of the appliance.
Repairs and other work by unqualified persons could be dangerous. The manufacturer cannot be held responsible for unauthorized work.
Repairs to electrical appliances should only be carried out by a suitably qualified person in accordance with local and national safety regulations.
If you cannot remedy the problem yourself, please contact Miele.
Fault messages must be confirmed with OK, otherwise the message can reappear in the display even though the problem has been remedied.
To address the fault, follow the instructions on the display.
If the fault message appears in the display again, contact Miele.
|
Message |
Possible cause and solution |
|
F1, F2, F80, F82 |
There is an internal fault.
|
|
F41, F42, F74, F77, F235, F236 |
There is an internal fault.
|
|
F10, F17 |
No water or very little water is being drawn in.
|
|
F73 or Check the brew unit |
The brew unit cannot be positioned correctly.
This will initialize the brew unit motor and put in back into the start position.
|
|
Too much ground coffee |
There is too much ground coffee in the coffee chute. If more than two level scoops of ground coffee is added to the coffee chute, the brew unit cannot process the coffee. The ground coffee will be directed into the waste unit and the fault message will appear in the display.
|
|
Problem |
Possible cause and solution |
|
The display remains dark when the coffee system is turned on using the On / Off |
The On / Off
|
|
The plug is not properly plugged into the electrical outlet.
|
|
|
The fuse has tripped because the coffee system, voltage or another appliance is defective.
|
|
|
CM 6350: The lighting remains off after the coffee machine has been turned on. |
The lighting has been turned off.
|
|
The lamp is defective.
|
|
|
The coffee system turns off suddenly. |
The switch-off time programmed using the timer has been reached.
|
|
The plug is not properly plugged into the electrical outlet.
|
|
|
CM 6350: The coffee machine is switched on. The lighting switches off suddenly. |
This is not a fault. The lighting turns off approximately 7 minutes after the coffee machine was last used. |
|
The sensor buttons do not respond. The machine can no longer be operated. |
There is an internal fault.
|
|
The coffee system does not switch itself on, al- though the timer setting Turn on at has been acti- vated. |
The system lock feature has been activated.
|
|
The appliance was not used after being switched on automatically three times in succession.
|
|
|
The display is hard to see or not legible. |
The display brightness has been set too low.
|
|
Fill and replace the water container appears in the display even though the water container is full and is in the appliance. |
The water container is not sitting properly in the appliance.
|
|
The water container was not correctly filled up and inserted during descaling.
|
|
|
Fill and replace the water container appears after switching on even though the container is filled and fitted in the appliance. The appli- ance does not rinse. |
The coffee system needs to be descaled.
|
|
After switching on the appliance the message Empty the drip tray and the waste container appears even though they are both empty. |
This is not a fault. The drip tray and grounds container was probably not emptied after making the last coffee, or the internal counter was not reset.
|
|
Neither milk nor milk froth comes out of the central spout. |
The milk pipework is blocked.
|
|
Empty the drip tray and the waste container appears in the display, even though the drip tray is empty. |
The drip tray is not positioned correctly in the appliance.
|
|
Insert the drip tray and the waste container appears in the display even though both are fitted. |
The drip tray is not correctly fitted and is therefore not detected.
|
|
The service is open.
|
|
|
The drip tray or the grounds container is too full or runs over al- though the drip tray and the grounds container were emptied after each message on the display. |
This is not a fault. The drip tray and grounds container were probably re- moved or the appliance was opened without the drip tray and grounds container being emptied. When the drip tray is removed or the appliance opened, the internal counter for emptying the drip tray and grounds container is automatically reset.
|
|
Fill the bean container appears in the display even though the bean container has just been filled. |
This is not a fault.
|
|
The coffee system does not rinse itself when turned on. |
This is not a fault. If the coffee system still has an operating temperature higher than 140°F (60°C), rinsing will not take place. |
|
Coffee dispensing is repeatedly interrupted and the message Fill the bean container appears in the display. |
This is not a fault. The brew unit does not sense the ground coffee.With particular types of coffee, it can happen that too little coffee is ground or the ground coffee is too fine. Usually the grinding – fine and the ground coffee quantity – are set too low.
Tip: If the coffee is too strong for you or it tastes bitter, try another type of bean. If the message appears during the preparation of all coffee specialties:
Also consider any changed drinks in "User profiles" |
|
If the message only appears during the preparation of selected coffee specialties:
|
|
|
The descaling program was started uninten- tionally. |
The descaling program cannot be stopped once the OK button has been tapped. Descaling must be continued through to completion. This is a safety precaution to make sure the machine is descaled correctly. This is important for the longevity and functional efficiency of your coffee system.
|
|
Coffee is not flowing out of the central spout, or is only being dis- pensed via one spout. |
The main dispenser has a blockage.
If there is still no coffee coming out, or coffee is only coming out of one side
|
|
Milk is dripping out of the cappuccinatore even though no milk is being dispensed. |
The level of milk in the milk flask is higher than the cappuccinatore.
|
| The milk sputters when it is dispensed. Hissing noises can be heard when milk is being heated up or frothed. Although the milk should be frothed, only hot milk is comes out of the main dispenser. |
The milk temperature is too high. Good milk froth can only be achieved when cold milk (below 50°F/10°C) is used.
|
|
The main dispenser with integrated cappucinatore is not correctly fitted and is taking in air. Or the spouts are blocked.
|
|
|
The milk pipework, connections or the intake tube on the milk flask are blocked.
|
|
|
The steam jet on the main dispenser has a blockage.
|
|
| Coffee grounds have settled on the lid of the drip tray and in the interior around the brew unit. |
This does not indicate a fault. The movement of the brew unit during the brewing process can cause some ground coffee to fall around it. The type of beans used, the fineness of the ground coffee and the amount of coffee ground also affect the amount. Important! Clean the inside of the brew unit regularly to prevent mold and the like. |
|
The display lights up but the coffee machine does not heat up and no drinks are made. The coffee machine cannot be turned off with the On/Off button |
The Demo mode of the coffee system has been activated.
|
|
Problem |
Possible cause and solution |
|
The coffee is not hot enough. |
The cup has not been pre-heated. The smaller the cup and the thicker its walls, the more important it is to pre-heat it.
|
|
The brewing temperature is set too low.
|
|
|
The brew unit filters are blocked.
|
|
|
Heating-up is taking longer. The amount of water is no longer correct and the coffee machine is not performing properly. Coffee flows into the cup very slowly. |
The coffee machine needs to be descaled.
|
|
The amount of coffee or espresso dispensed has changed. |
This is not a fault. You probably changed the drink size by pressing the sensor longer. Touching the drink buttons for longer starts quantity programming for the respective drink ("Portion size"). If you do not save a portion size, the maximum possible amount is saved for this drink. |
|
The consistency of the milk froth is unsatisfactory. |
The milk temperature is too high. Good milk froth can be achieved when cold milk (< 50°F/10°C) is used.
|
|
The milk pipework is blocked.
|
|
The coffee grinder makes a louder noise than usual. |
The coffee bean container has become empty during the grinding process.
|
|
There may be stones in among the coffee beans.
|
|
|
The coffee flows too quickly into the cup. |
The grind level is too coarse.
|
|
The coffee trickles too slowly into the cup. |
The grind level is too fine.
|
|
The crema on the coffee or espresso is "not right". |
The grinder setting is not correct.
|
|
The brew temperature is too high for the type of cof- fee being used.
|
|
|
The coffee beans are no longer fresh.
|
Reference file: Miele CM6350 Countertop Coffee Machine
Additionally, the document applies to other Miele models: CM6150


 and restart the descaling program.