MX-DN230A
DVD MINI HI-FI SYSTEM
1 2
Contents:
Safety Instructions:
Class I Laser Product
Only use in altitudes below 5,000m.
Please read the user and maintenance guide
carefully and keep it in a safe place for future
reference. To avoid the risk of electric shock, do not
disassemble any of the units. Refer all servicing to
qualied service personnel.
Power Supply:
Operate only from the power source specied on the
rating label of the unit.
Ventilation:
The ventilation holes in the shell of the unit are
designed for heat dissipation to prevent the unit
from overheating. The holes should not be blocked
or covered. Do not place the unit on a bed or sofa.
Heat Sources:
Do not place the unit near heat sources such as a
boiler, electric furnace etc. Avoid direct sunlight.
Water and Moisture:
Never use the unit in areas like the bathroom,
kitchen or any area where it may be exposed to
water.
Please do not place a vessel containing liquid on the
unit.
Foreign Matter:
Please do not insert foreign matter like metal
articles etc. into the unit.
Power Cable:
When plugging or unplugging the power cable,
please hold the plug tightly, and do not pull the cable.
If the unit is not used for a long time or in use during
a thunderstorm , please immediately unplug it from
the socket.
Disc Door:
When the disc door closes, keep ngers away from
the door in order to avoid injury or damage to the
unit.
Loading of Weight:
To avoid damage, do not place heavy articles on the
unit or step on it.
Connection with Other Equipment:
When connecting other equipment, ensure that the
power plug of each unit is unplugged. Otherwise,
there may be risk of damage to the equipment and/
or personal injury.
Laser:
When the cover is opened and the unit is working,
do not directly look at the laser so as to avoid
damage to one's eyesight.
DO NOT OPEN THE EQUIPMENT!
Discs:
Do not use broken, deformed or amended discs,
otherwise, the unit will malfunction and the service
life will be shortened.
Maintenance, Service and Repairs:
Do not operate the product with a damaged cord or
plug, or if the product malfunctions, or is dropped or
damaged in any manner.
If any one of the following situations arise, please
unplug the unit and contact qualied maintenance
personnel:
A.When the power wire or plug is damaged.
B. When liquid or foreign matter has fallen into the
unit.
C. When the unit has been exposed to water or rain.
D. When the unit doesn't work normally in
accordance with the operating instructions.
Please do not adjust any control buttons not
stipulated in the instructions as this can cause
damage to the unit.
E. When the unit falls from a high place or is
damaged due to other reasons.
F. When smoke is emitted from the unit.
Maintenance:
Please do not try to maintain or repair the unit
yourself .Please contact qualied maintenance
personnel.
General:
Use only with attachments/ accessories specied
by the manufacturer. Use of attachments/
accessories not recommended can be hazardous.
If any component is damaged, it must be replaced
with components from the same model. Refer all
repairs to qualied service personnel.
This unit is not intended for use by persons
(including children) with reduced physical, sensory
or mental capabilities, or lack of experience and
knowledge, unless they are supervised or given
instruction concerning use of the unit by a person
responsible for their safety.
This product is not a toy! Children should be
supervised to ensure that they do not play with the
unit.
If the supply cord is damaged, it must be replaced
by the manufacturer, its service agent or similarly
qualied person in order to avoid hazard.
Safety Instructions
Caution
System Connection
Front Panel Functions
Rear Panel Functions
Remote Functions
System Setup
Bluetooth Operation/USB Copy
Common Operation
Radio Station/ Audio Input Operation
Fault Guide
Specications
2
3
4
5
6
7
8-11
11-12
12-17
17
18
19
3 4
System Connection:
Caution:
1.Correctly place the batteries inside the battery
box of the remote.
2.The maximum reception distance between the
remote and the unit is about 7m.
3.The maximum effective angle of the remote
aligning at the reception window is 30°.
Please Note:
1. When the unit is moved, please use the original
paper box and packing materials and the factory
packing method to optimally protect the unit.
2. Do not place volatile liquids beside the unit, and
do not allow rubber or plastic to make contact with
the unit for extended periods of time as these
products may mark the surface of the unit.
3. After the unit has been in use for a lengthy period
of time, it may heat up on top and at the rear plate.
This is normal.
4. When the unit is not used, please take out the
disc, close the disc door and turn the power off.
5. If you have not used the unit for a long time and
nd that certain function keys are not working,
please refer the unit to qualied service
personnel for maintenance.
Location :
When your unit is placed near the TV, radio or video
tape recorder, poor image quality and sound
distortion may occur. In that case, please relocate
the unit away from such equipment.
Cleaning:
1. Use a soft cloth to clean the unit.
2. Please use the cloth with a small amount of
diluted cleaning agent to deal with dirty spots
which are not easily cleaned. Do not use any
solvents with corrosive substances like diluted,
gasoline solvent, abrasive solution, etc. which will
damage the surface of the unit.
Warning: The cleaning and adjustment of internal
parts should be conducted by trained authorised
personnel.
1. How to take care of your discs: Do not touch the
playing side of the disc.
2. How to clean your discs: Use a soft cloth to wipe
the disc from the centre out.Fingerprints and dust
remaining on the disc will affect the quality of the
image and sound. When cleaning stubborn dirt,
use a clean soft cloth dipped into a little water to
wipe the disc, then use a dry soft cloth to dry it.
Do not use solutions like methylbenzene,
cleaning agents or antistatic spray to clean the
disc.
3. How to store your discs: Do not place the discs in
a place with heavy moisture, dust or direct
sunlight. When the discs are not used, please
place them in their boxes.
Batteries:
Using the batteries incorrectly will cause leakage
or corrosion of the battery uid. Please use the
batteries in accordance with the following
instructions:
1. Do not reverse the positive and negative
polarity when the batteries are inserted.
2. Do not recharge non-rechargeable batteries,
disassemble the batteries, make them short
circuit or throw them into a re.
3. Do not mix different types of batteries or old and
new batteries .
4. Do not keep damaged batteries in the remote.
5. If the remote is not used for a long time, please
remove the batteries to avoid damage caused by
the leaking of the battery uid.
6. If the remote is faulty or its effective scope is
reduced, please replace with new batteries.
7. If the batteries have leaked battery uid, please
dry the battery box and replace with new batteries.
Remote Control:
Using the remote incorrectly will result in poor
performance. Please use the remote in accordance
with the following instructions:
1. The emitter of the remote should not be exposed
to sunlight.
2. Please aim the remote at the reception window of
the unit.
3. Do not drop the remote as it may get damaged.
4. Do not allow water or any other liquids to come
into contact with the remote.
5. Do not disassemble the remote.
Tips:
VID EO IN
TV
(Yellow)
(Yellow)
Video Connecting Wire
cr
cb
y
TV
(cb)
(Green)
(Y/CR/CB Terminal)
(Yellow)(Yellow)
(Red) (Red) (Red)
(White) (White)
Please note: The component output terminals Y/g C/b C/r are the same as Y, U, and V.
TV
R
L
(Red)
(Red)
TV Audio Terminal
(White)
(White)
Please note:
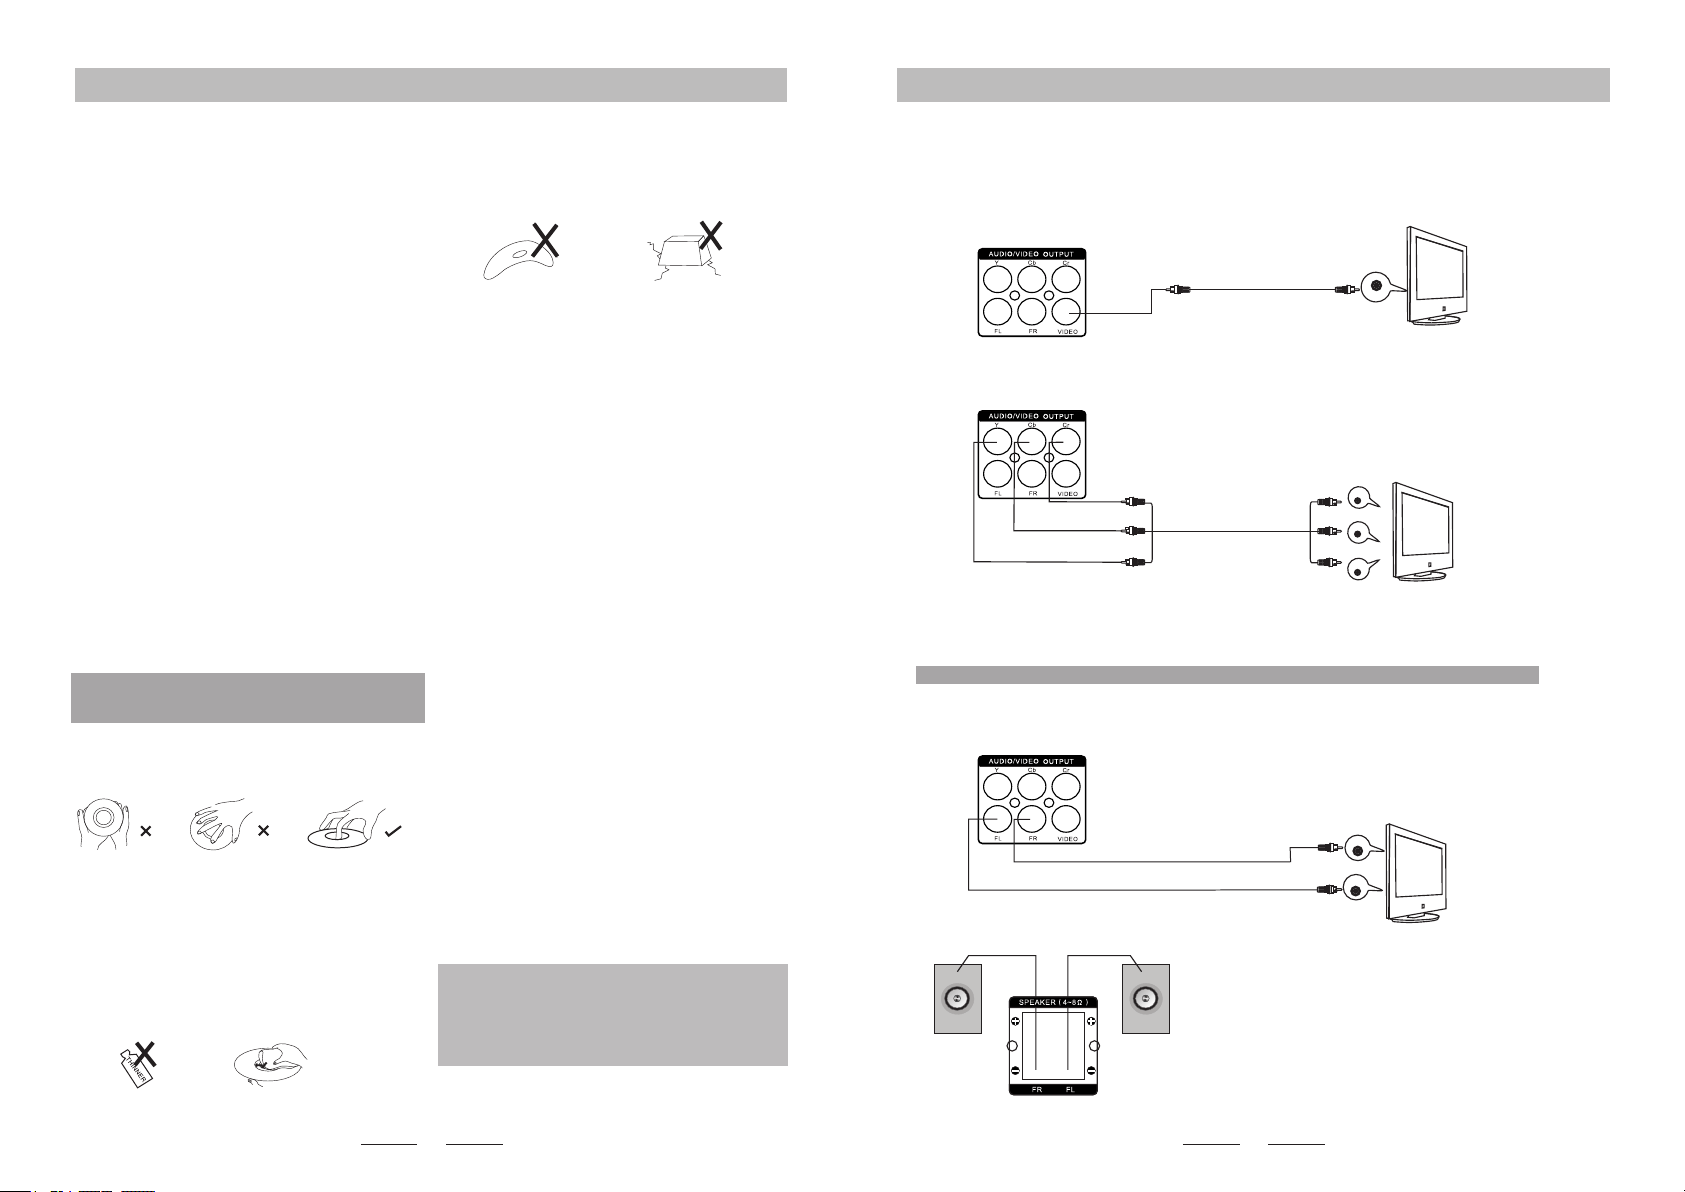
1. When connecting speakers, please make sure the
right and left speakers are connected
correctly to the terminals. Do not short circuit the
connections as this will cause damage to the system.
2. To connect correctly, connect red wire to “+” and
black wire to “_”.
Surround Right Speaker Surround Left Speaker
Surround Speaker Connecting Guide:
Caution: Always disconnect the unit from the power when making or changing any connections to avoid
risk of electric shock.
Please note: An AV cable is included as an accessory. This can be used to make any ONE of the
following connections.
Video Connection:
Choose one of the following two methods to connect to the TV.
1. Composite Video Connection
2. Component (YCbCr) Connection
Please note: If you use this option for video connection, you will need an extra stereo RCA cable for the
audio connection (see below).
Audio Connection:
Connect to the L-R Audio output of the TV.
Please note: If using YCbCr connection (see above) for video, you will need an additional cable for
this audio connection.
The component output terminals provide Y,U,V or Y,Pb,Pr to correspond with the Y,U,V or Y,Pb,
Pr input of the TV. The image quality of component output is better than AV output (in the Setup Menu,
set Video Output to Y,U,V or Y,Pb,Pr according to the TV inputs, otherwise the image may not be
displayed).
Discs:
Front Panel Functions: Rear Panel Functions:
1 2 3 4 5 6
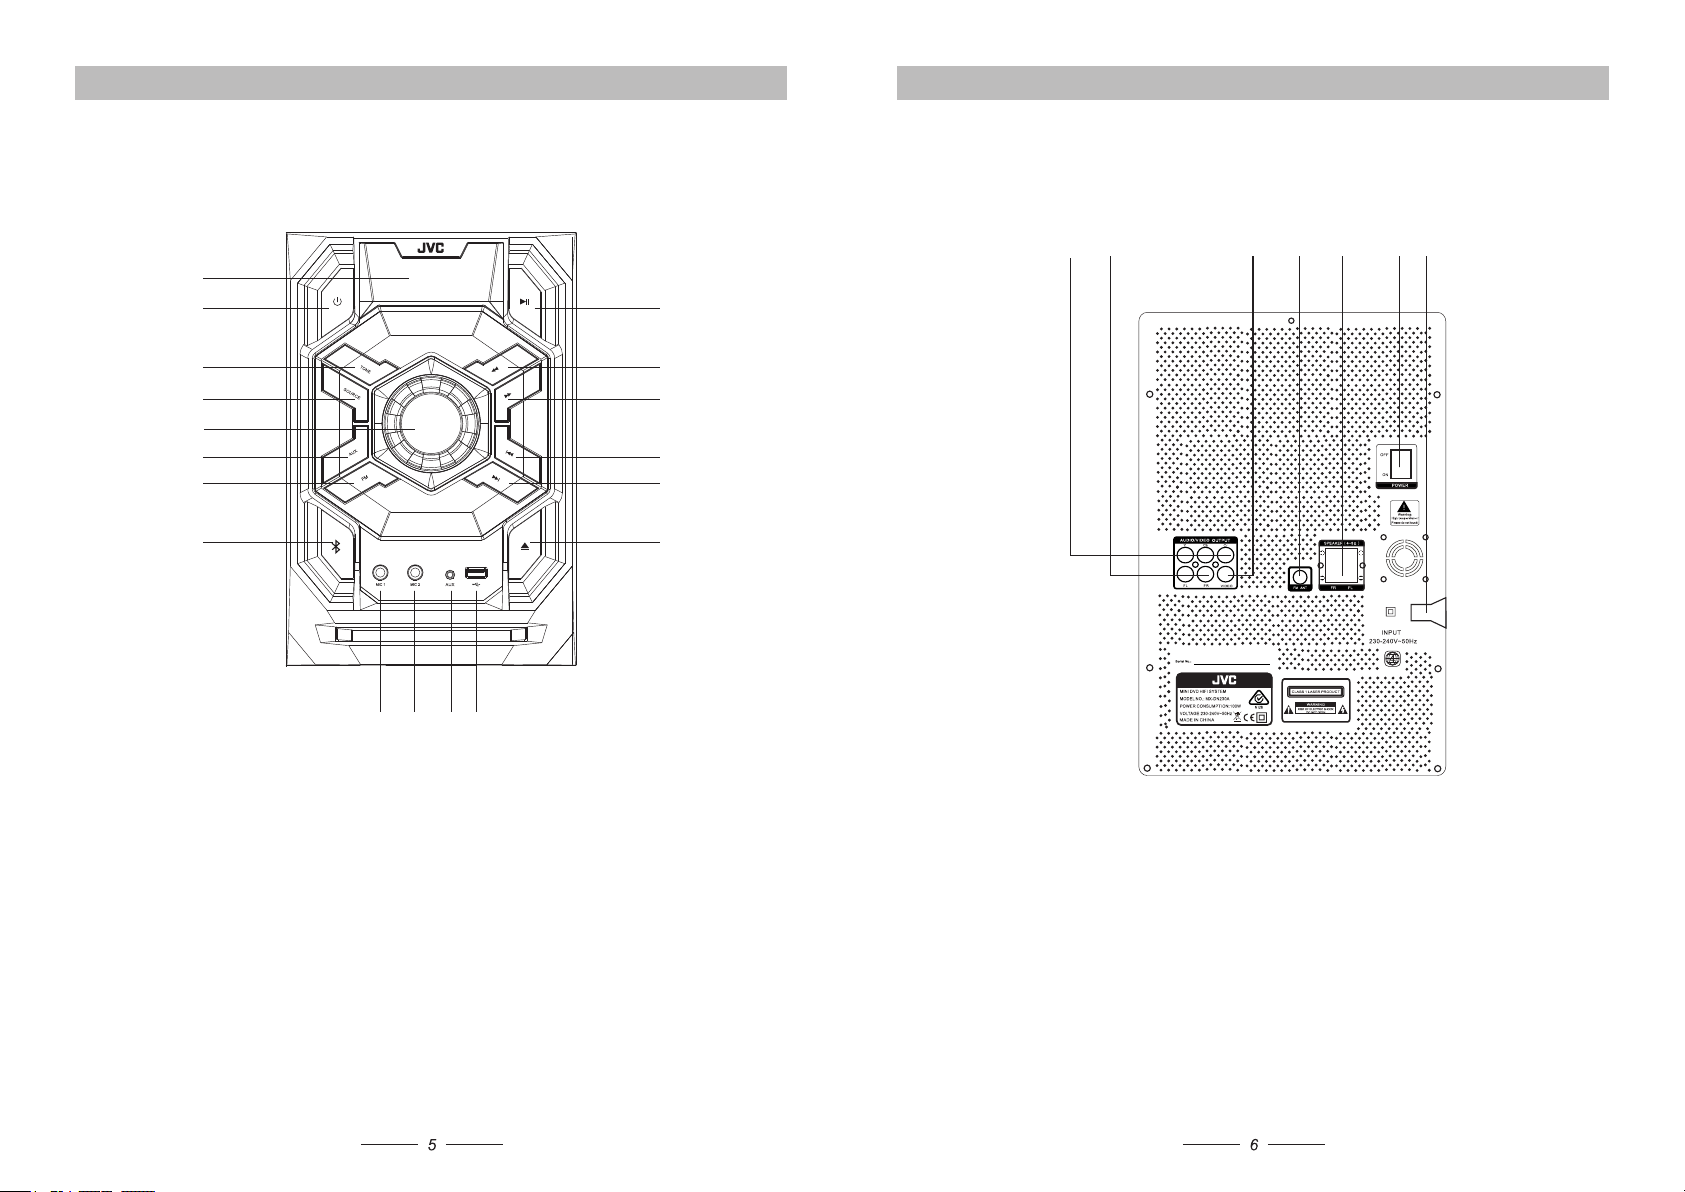
1.Component (YCbCr) Output
2. L-R Audio Output
3. Video Output
4. FM Antenna Terminal
5. Speaker Left and Right Terminal
6.Power Switch
7. Power Input
1
8
9
10
11
13
16 17 18
2
3
4
5
7
6
14
12
15
7
1. Display Window
2. Power Buon
3. Tone Buon
4. USB/DISC Buon
5. Volume Knob
6. AUX Funcon Key
7. FM Funcon Key
8. Bluetooth Funcon Key
9. Play/Pause Buon
10. Backward Buon
11. Forward Buon
12. Previous Buon
13. Next Buon
14. Open/Close Buon
15. Microphone Interface 1
16. Microphone Interface 2
17. Aux Input Interface
18. USB Reading Interface
8
7
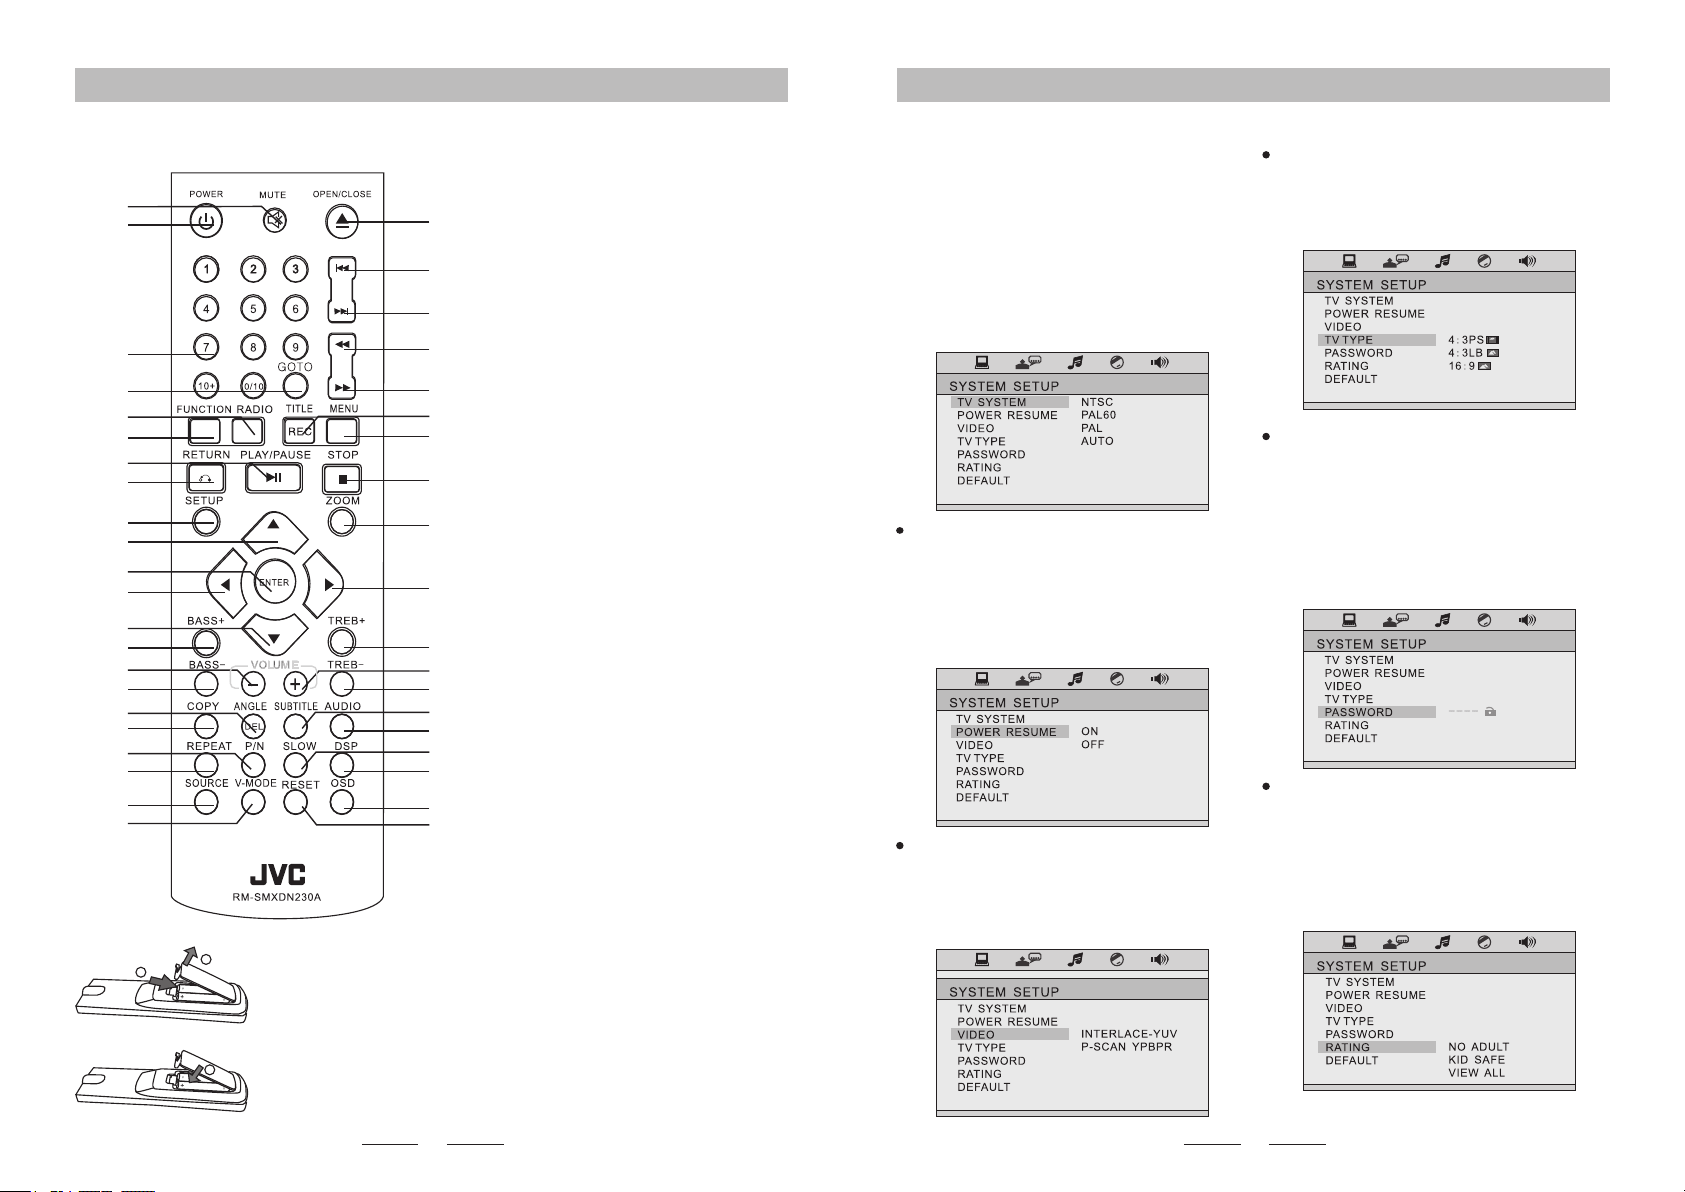
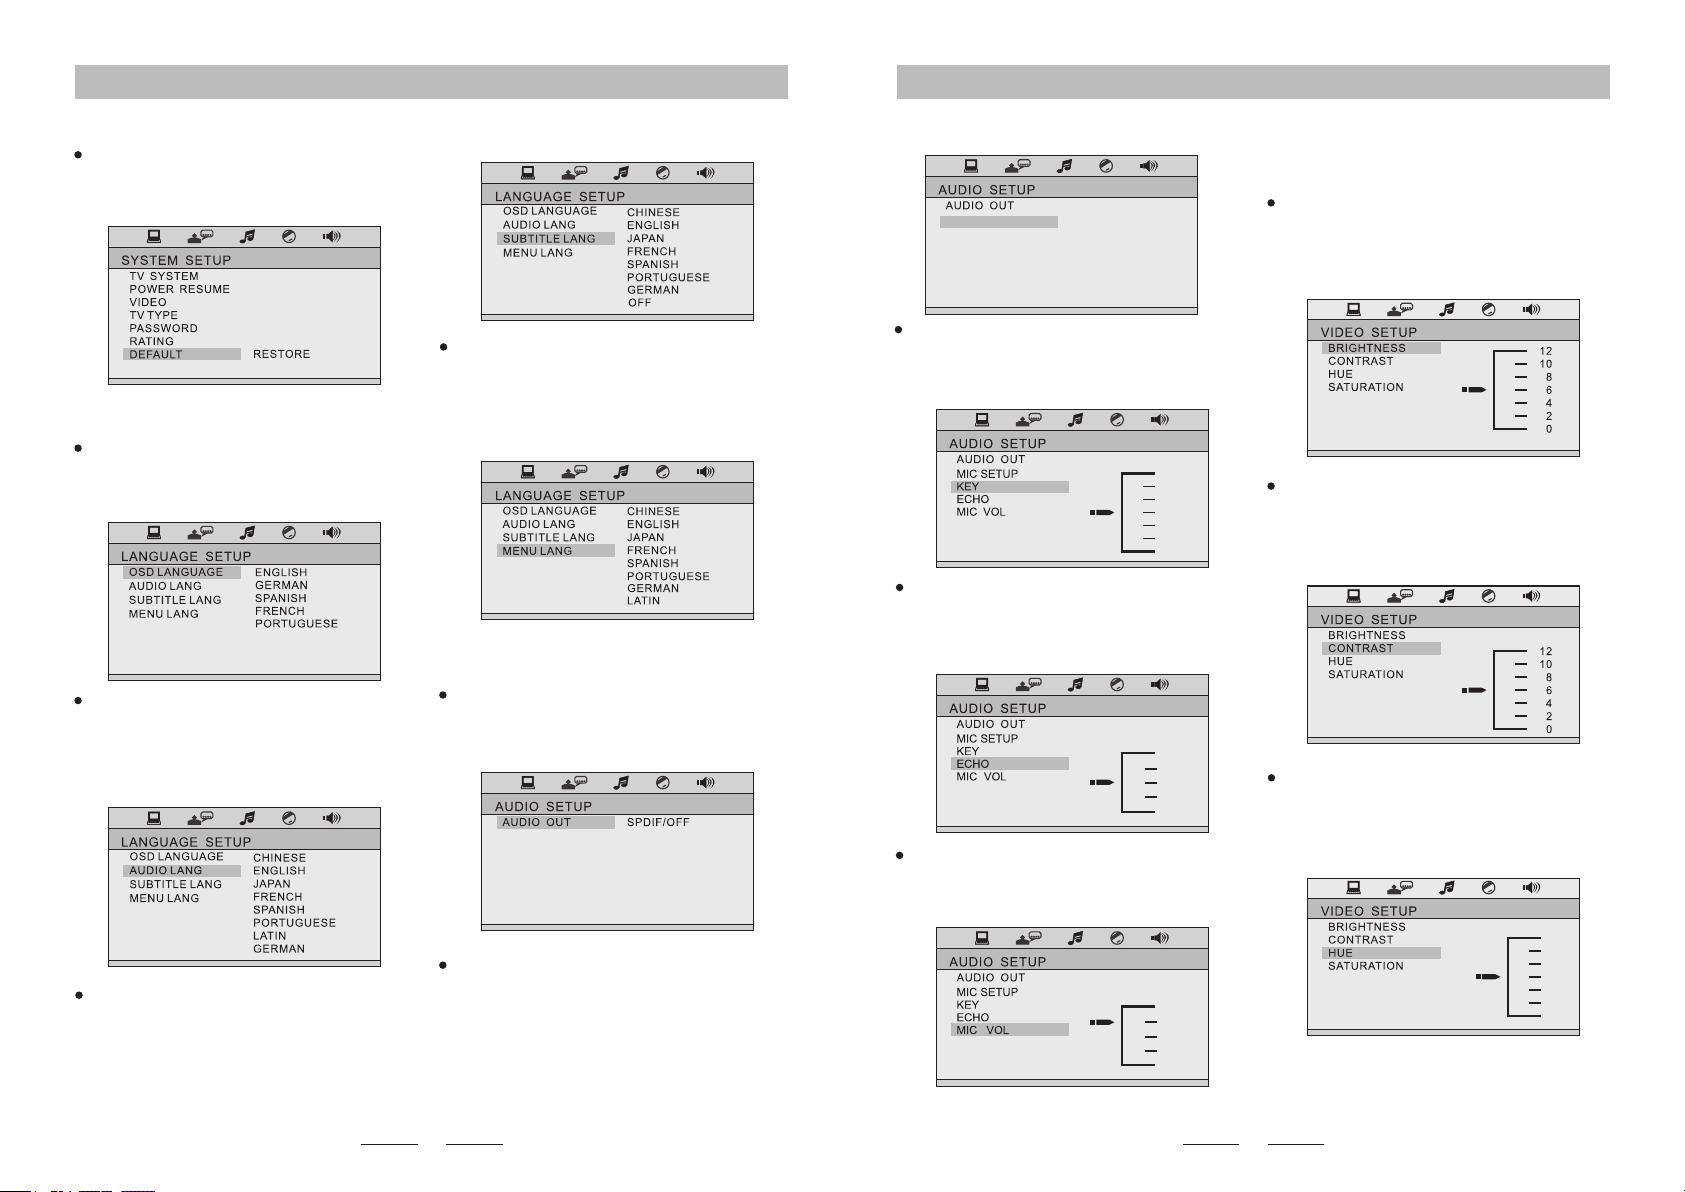
System Setup:
System Setup:
First press the 【Setup】 key on the remote control
to enter the Setup menu. Then press Up, Down,
Left or Right to highlight the option you want to
adjust in the menu and press 【Enter】 to enter. To
exit the Setup menu, press the 【Setup】 key.
The setup operations are as follows:
I.TV System:
Enter the 【TV System】 option, then 【►】 key to
enter the sub-menu and select one of the following
systems: NTSC, PAL or AUTO.
Power Resume:
Enter the 【Power Resume】 option and press
【►】 key to enter the sub-menu. There are two
options: "ON" or "OFF". If you choose "ON", then
when the power resumes or the CD door is closed
again, it will continue playing. If you choose "OFF",
then when the power resumes or the CD door is
closed again, it will play from the beginning.
Video:
Enter the 【Video】 option, then 【►】 key to enter
the sub-menu then select the output mode you
require.
TV Type:
Enter the 【TV Type】 option and press 【►】 key
to enter the sub-menu. There are three modes to
choose from: 4:3PS, 4:3LB or 16:9. Please select
the mode that is the most compatible with your TV.
Password Child Lock:
Enter the 【Password】 option and press 【►】
key to enter the sub-menu. When the initial setting
is in “Password Lock” state, the “Rating” cannot be
set and the password cannot be modied. If you
need to modify the “Rating” and password, rst
enter the initial password and press 【Enter】key
to unlock (initial passw ord: 0000 ). The new
password entered must be four digits and then
press 【Enter】 key to take effect.
Rating:
When playing a disc with a locking function, select
the suitable play control rating. This setup can only
be carried out when the password lock is off.
Remember to switch the password lock back on
after you have completed the setup so that the
rating restrictions can be applied.
Remote Functions:
To insert the remote control batteries:
1. Open the battery compartment.
2. Insert 2xAAA batteries with correct polarity(+/-) as indicated.
3. Close the battery compartment.
Please Note:
·If you are not going to use the remote for a long time, remove the batteries.
·Do not use old and new or different types of batteries in combination.
·Batteries contain chemical substances, so they should be disposed of properly.
1
3
2
1
2
3
4
5
6
7
8
9
10
11
12
13
14
15
16
17
18
19
20
21
22
23
24
25
26
27
28
29
30
31
32
33
34
35
36
37
38
39
40
41
1. Mute Button
2. Power Button
3. Number Button
4. GOTO (Time Selection) Button
5. FM Button
6. Function Button(Switch between Disc/FM/
AUX/Bluetooth )
7. Play/Pause Button
8. Return Button
9. Setup Button
10. Up Button
11. Enter/Radio Auto Search Button
12. Left Button
13. Down Button
14. Bass+ Button
15. Volume- Button
16. Bass- Button
17. Angle/Delete Button
18. Copy Button
19 P/N Button
20. Repeat Button
21. USB/DISC Button
22. V-Mode Button
23. Open/Close Button
24. Last/FM- Button
25. Next/FM+ Button
26. Backward/Radio Frequency Trim- Button
27. Forward/Radio Frequency Trim+ Button
28. Title/Record Button
29. Menu Button
30. Stop Button
31. Zoom Button
32. Right Button
33. Treb+ Button
34. Volume+ Button
35. Treb- Button
36. Subtitle Selection Button
37. Language Button(Press this button to
switch the disc language when playing
DVD disc;
Press this button to switch the channel
when playing VCD disc;)
38. Slow Button
39. DSP Button
40. OSD Button
41. Reset Button
10
9
System Setup: System Setup:
Default:
Enter 【Default】 option, press 【►】 key to select
“Restore”, then press 【Enter] key, so each setup
will restore to factory default automatically.
II. Language Setup:
The setup operations are as follows:
OSD Language:
Enter the 【OSD Language】 option, press 【►】
key to enter the sub-menu and select the interface
display language you want.
Audio Language:
Enter the 【Audio Lang】 option, press 【►】 key
to e nte r t he s ub -me nu a nd sel ect the aud io
language you need; ensure that the disc you wish
to play has the required capability.
Subtitle Language:
Enter the 【Subtitle Lang】 option, press 【►】 key
to enter the sub-menu and select the subtitle
language you want; ensure that the disc you wish to
play has the required capability.
Menu Language:
Enter the 【Menu Lang】 option, press 【►】 key
to ent er th e s ub-menu an d s el ec t t he men u
language you need; ensure that the disc you wish
to play has the required capability.
III. Audio Setup:
The setup operations are as follows:
Audio Out
Enter the 【Audio Out】 option, press 【►】 key to
enter the sub-menu then select an audio out mode.
ARABIC
MIC SETUP
KEY
ECHO
MIC VOL
#
+4
+2
0
-2
-4
b
MIC SETUP
KEY
ECHO
MIC VOL
AUTO
OFF
8
6
4
2
OFF
8
6
4
2
OFF
Key
Enter the【Key】 option, press 【►】 key to enter
the sub-menu then use the direction keys “Up” or
“Down” to adjust the Key Volume.
Echo
Enter the【Echo】 option, press 【►】 key to enter
the sub-menu then use the direction keys “Up” or
“Down” to adjust the Echo to the effect you desire.
Mic Vol
Enter the【Mic Vol】 option, press 【►】key to
enter the sub-menu then use the direction keys
“Up” or “Down” to adjust Mic Volume .
Mic Setup
Enter the【Mic Setup】option, press 【►】 key to
enter the sub-menu then press【Enter】key to turn
on or turn off the Mic function. The Mic will be on if
you select "Auto" and it will be off if you select "Off".
SHARPNESS
SHARPNESS
IV. Video Setup
The setup operations are as follows:
Brightness
Enter the【Brightness】option, press【►】key to
enter the sub-menu then use the direction keys
“ U p ” a n d “ D o w n” t o a d j u s t t h e B r ig h t n es s
parameters.
Contrast
Enter the【Contrast】 option, press 【►】 key to
enter the sub-menu then use the direction keys
“Up” or “Down” to adjust the Contrast parameters.
+6
+4
+2
0
-2
-4
-6
SHARPNESS
Hue
Enter the【Hue】 option, press 【►】key to enter
the sub- menu then use the direction keys “Up” or
“Down” to adjust the Hue parameters.

11 12
System Setup/Bluetooth Operation/USB Copy:
Bluetooth Operation/USB Copy/Common Operation:
V. Speaker Setup:
The setup operations are as follows:
Downmix:
Enter the【Downmix】 option and press【►】 key
to enter the sub-menu; there are three modes to
choose from: LT/RT, STEREO or VSS.
Front:
Enter the【Front】 option and press【►】 key
to enter the sub-menu; there are two modes
to choose from: LARGE or SMALL.
Bluetooth Reception:
To connect an external device to this unit via
Bluetooth:
USB Copy:
To Copy an MP3 File:
When playing an MP3 disc, press 【Copy】 key on
the remote and enter the copy selection interface;
the content that can be copied are the tracks of the
current disc being played.
To Copy an MP4 File:
When playing an MPEG4 disc, press the 【Stop】
key to return to the menu interface, press the
【Copy】 key on the remote and enter the copy
selection interface; the content that can be copied
are the tracks of the current disc being played.
To Copy a CD File:
When playing a CD disc, press 【Copy】 key on the
remote and enter the copy operation interface.
1. Press "Function" button on the remote control or
button on the panel to select the Bluetooth
function. The corresponding screen will then
display "BT" indicating that the Bluetooth function
is on.
2. Ensure the Bluetooth function is on on the
external device and search for MX-DN230A.
Once found, click on it and pair. Once connected,
you will hear a signal indicating that the connection
is successful.
Please note: Bluetooth is only controlled by an
external device.
1. Move the highlight bar to the “SPEED” option,
press the 【ENTER】 key then select the desired
multiple (i.e. copy speed).
2. In the copying process, select “CHANGE SPEED”
option or press 【ENTER】 key to switch the copy
speed.
Bit Rate Setup:
BITRATE Move the highlight bar to the “ ” option and
press to set up; for the le with high bit 【ENTER】
rate, the capacity will be enlarged and the quality of
le will be closer to that of original le. The system
default is: 128 . KBPS
Create ID3 Information:
Move the highlight bar to “CREATE ID3 TAG” option
then press 【ENTER】 key to select or cancel. By
selecting this option during the copying process,
the le will be created with ID3 information which is
produced automatically by the system.
Create File List:
Move the highlight bar to “CREATE FILE LIST"
option then press 【ENTER】 key to select or
cancel. By selecting this option during the copying
process, a le list will be produced automatically.
Create Playlist:
Move the highlight bar to “TRACK” option, press
rig h t k e y t o s e l e c t tr a c k o p t i o n t h e n pre s s
【ENTER】key to select the song to be copied or to
be cancelled.
Copy:
Move the highlight bar to “START” option; at this
time, the information about this copy will be shown
on the right hand side (TOTAL TRACKS, TOTAL
TIME and TOTAL SIZE). Then press 【ENTER】
key to start copying and the system will write the
CD in MP3 format onto the designated USB. When
copying at normal speed, you can listen to the
content that is being copied at the same time; when
selecting 4 times speed, it will be mute. Please
note: When you press the 【ENTER】 key to switch
spe eds , th ere wil l be a sli ght so und whi ch
continues for a few seconds.
Cancel Copy:
During copy, you can move the highlight bar to
“CANCEL” option and press 【ENTER】 key to
conrm.
Return from Copying Screen:
Move the highlight bar to “RETURN” option and
press 【ENTER】key to conrm return.
Ple a s e n o t e : D u r i n g co p y, e n s u r e t h a t t he
available space on the USB is enough for the size
of the le(s) to be copied and insert USB into the
USB interface. If
SHARPNESS
Sharpness
Enter the【Sharpness】option, press 【►】key to
enter the sub-menu then use the direction keys
“ U p ” o r “ D o w n ” t o a d j u s t t h e S h a r p n e s s
parameters.
you have two tracks with the same title, rename
one of the tracks, otherwise one track will be
saved over the other. While copying, do not pull
the USB out or shut the unit down, as this could
damage the unit or USB. If the USB cannot be
read after it has been copied, please format the
USB on your computer.Before formatting, please
save the important data from the USB.
SHARPNESS
Saturation
Enter the【Saturation】option, press【►】key to
enter the sub-menu then use the direction keys
“ U p ” o r “ D o w n ” t o a d j u s t t h e S a t u r a t i o n
parameters.
Multiple Setup:
Disc Playing Operation:
Sequence:
1. After reading the disc, the unit will automatically go into
sequence play mode.
2. Press 【PLAY/PAUSE】key in pause mode and play mode
will be recovered.
Menu:
Press 【MENU】 when using discs with VCD 2.0, or DVD
format. Different formats of discs have different menus.
Title:
When playing a DVD, you can choose this play mode.
Record:
When playing VCD, CD and MP4, you can press “RECORD”
key to transfer audio file(s) in MP3 format to the USB.
Select:
You can press the number keys on the remote to directly select
the required track that you want to play. When VCD is in MENU
mode, the track cannot be selected and can only be selected
when the MENU mode is off. Different formats of discs have
different selecting approaches(for example press number key
“5” to select the 5 track. When selecting “23”, press “10+”
th
twice and the screen will show “20+”; then press number key
“3” or try to press “2” then hold “3” and the unit will
select 23).

13
14
Common Operation:
Common Operation:
FILE COPY DELETE -
OPTIONS
FOLDERS
TRACKS
START
QUIT
FILE TYPE OPTIONS
MUSIC
PHOTO
VIDEO
TEXT
SOURCE DEVI CE
DISC
FILE COPY DELETE -
OPTIONS
FOLDERS
TRACKS
START
QUIT
FOLDER
1.---- -----
2.---- ----1
3.---- ---- 3
4.---- ----- 4
5. UNKNO WN ALB
6.RECO RD
FILE DELETE -
OPTIONS
FOLDERS
TRACKS
START
QUIT
TRK TITLE LENGTH
1.PERRTY BOY.MP3 4.31M
2.---- ------------- -.MP3 4.34M
3.---- ------------- -.MP3 3.70M
4.---- ------------- -.MP3 4.44M
5.M12- -----------.M P3 4.34M
6.---- ------------- -.MP3 3.44M
7.---- ------------- -.MP3 3.71M
8.---- ------------- -.MP3 4.52M
9.---- ------------- -.MP3 3.48M
FILE DELETE -
OPTIONS
FOLDERS
TRACKS
START
QUIT
SUMMARY
TOTAL FILES: I
TOTAL SIZE:58M 758KB
PRESS EN TER TO BEGIN
FILE DELETE -
OPTIONS
FOLDERS
TRACKS
START
QUIT
PRESS EN TER TO BEGIN
1.OERRTY BOY
DELETE PROGRESS
TOTAL PROGRESS
ok
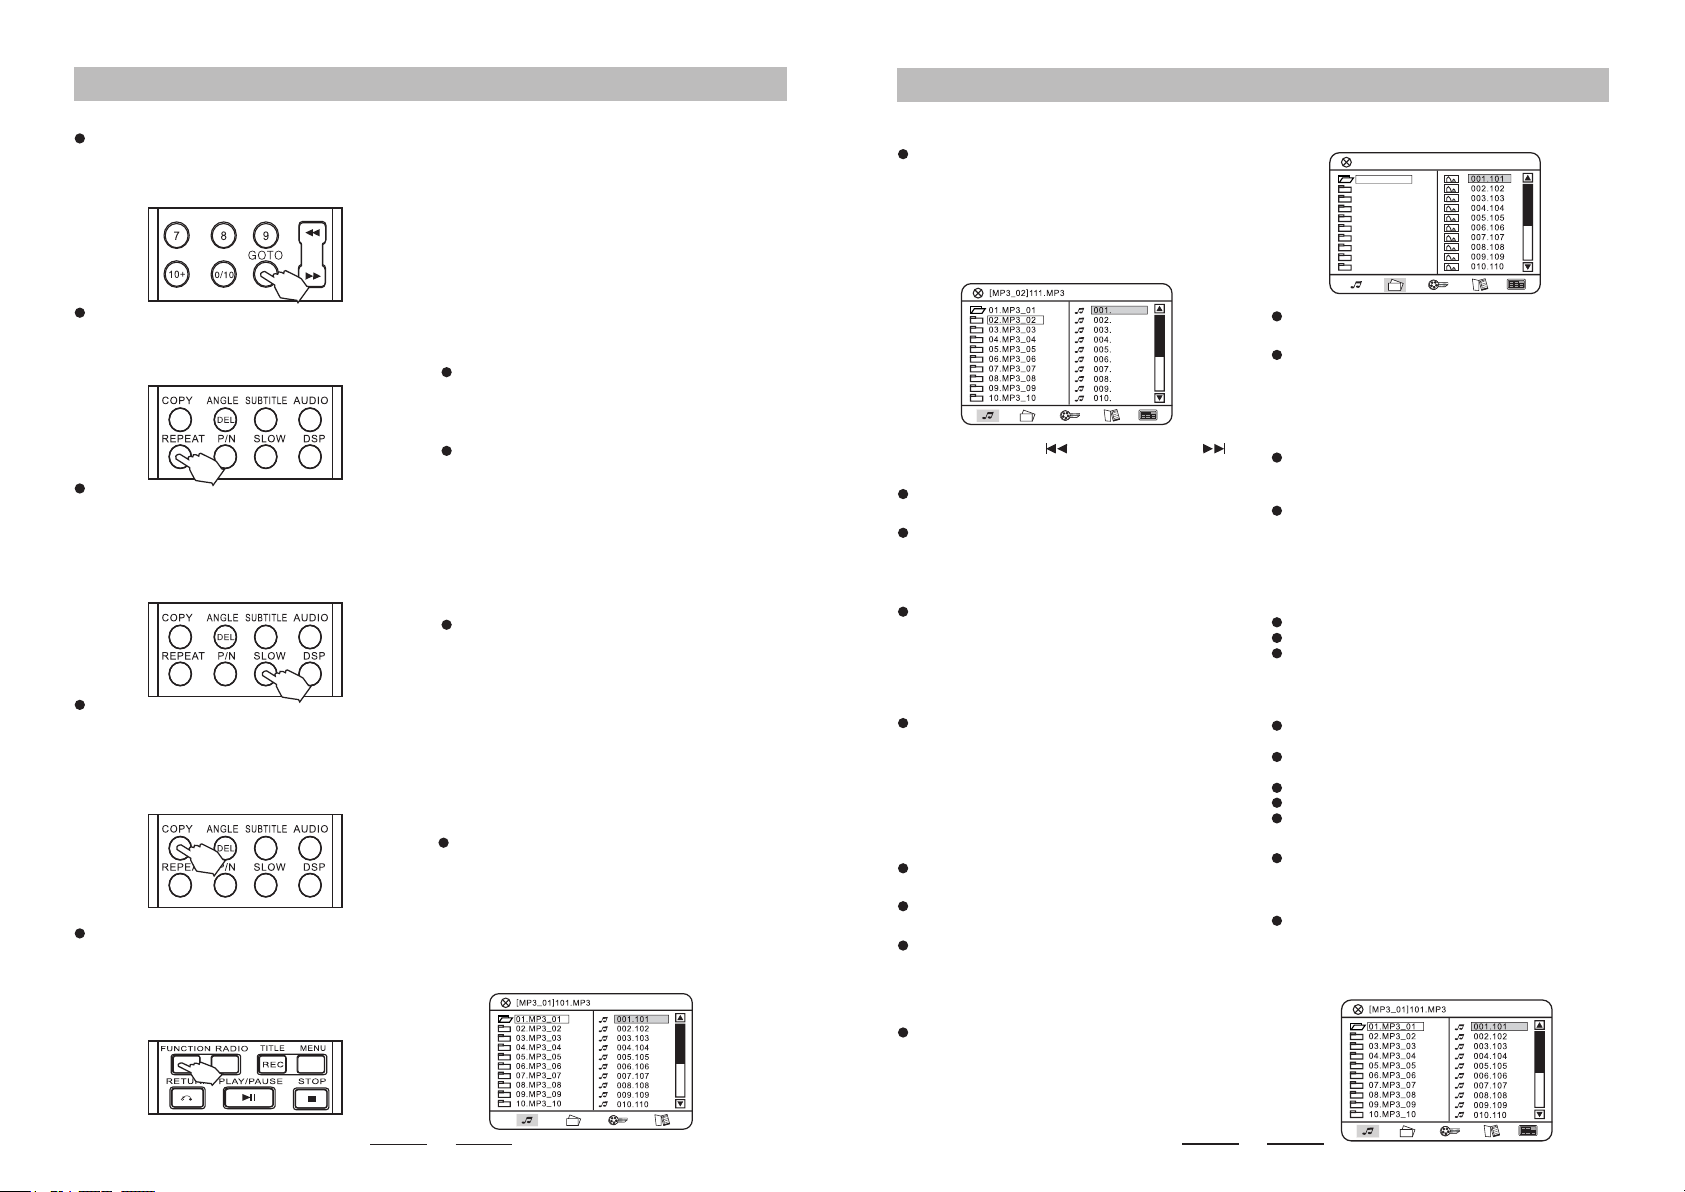
ANGLE
Press 【ANGLE】key when playing DVD discs
and you can switch to a different angle of the
screen.
Please note: This function is only valid for DVD
discs with angle function.
P/N
Press【P/N】key in DVD mode and you can switch
to a different video system. There are four video
systems: NTSC PAL60 PAL AUTO.The video
system has to be consistent with the video
system of the TV.
DSP
Press【DSP】key to select different sound
effect modes.
OSD
In DVD mode, press【OSD】 key to show
information about the DVD being played.
V-MODE
In DVD mode, use【V-MODE】key to switch
between Interlace and Progressive Scan.
DEL
In USB mode, press 'DEL' key to delete les from
the USB drive. Use the direction keys (UP, DOWN,
LEFT or RIGHT) to select. Press 'ENTER' key to
conrm.
Sub-menu explanation below:
1. Press【DEL】key ;
OPTIONS is for deleting the folder containing the
selected le.
2. FOLDERS is for deleting the subcatalog
containing the selected le.
3. TRACKS is for deleting the selected le.
You can choose single or multiple les for
deletion at the same time.
4. START refers to starting to delete.
The screen below indicates that the deletion is complete.
5.QUIT refers to quitting the operation.
RESET
In DVD mode,press【RESET】 key and all preset
will resume to the factory setting.
15
16
Common Operation:
Common Operation:
Please note: Please see Function Introduction for
specic operation of FM and audio input.
Volume Adjustment:
Master Volume:
Press “VOLUME +” or “VOLUME -” on the remote or
turn the volume control knob on the panel to adjust
the volume.
Low Pitch:
1. Press 【VOLUME】key on the panel, select
“LOW PITCH BA” adjusting state; press “VOLUME
+” or “VOLUME-"key on the remote, or turn the
volume control knob on the panel to adjust low
pitch.
2. Press “BASS +” or “BASS -” key on the remote to
directly adjust low pitch.
3. Adjustable range of low pitch: from -14 to +14.
High Pitch:
1. Press 【VOLUME】 key on the panel, select
“HIGH PITCH TR” adjusting state; press “VOLUME
+” or “VOLUME -” key on the remote, or turn the
volume control knob on the panel to adjust high
pitch.
2. Press “TREB +” or “TREB -” key on the remote to
directly adjust high pitch.
3. Adjustable range of high pitch: from -14 to +14.
Disc Playing Operation:
Play MP3 Disc:
After inserting an MP3 disc, the system will
automatically search all directories containing an
MP3 le. After searching, the system will enter the
rst directory by preference and play the rst track
of this directory (cursor stops in 01 position).The
unit will play the tracks of this directory in sequence.
At this time, you can press number keys to select
which song you want to play.
When the image is idle and not zoomed in,
press direction keys to rotate the image.
P re ss 【PL AY】 ke y t o p la y t he image in
sequence.
After entering le menu on the right hand side,
press UP/DOWN keys and the image content will
be shown on the left hand side of the screen. You
can also use this approach to view le(s).
Play MP3-JPEG Disc:
If you want to view images while playing MP3-
JPEG mixed directory discs, use the LEFT/RIGHT
keys to select modes then use the direction keys to
move the cursor to the icon of the required image
and press 【ENTER】 to view the image.
111
112
113
114
115
116
117
118
119
120
Directory Selecting/ Press LEFT key to return to
directory list on the left hand side. Then use
UP/DOWN keys to select folder directory on the left
hand side. After the selection process is complete,
press 【ENTER】key to enter the playlist of the
f o l d e r a n d t h e t r a c k s o f t h e p l a y l i s t w i l l
automatically be played in sequence; or you can
press number keys to select a specic song.
While playing, press 【 /PREVIOUS】or 【
/NEXT】 key to select the previous or next song.
Press 【REPEAT】 key to select single cycle,
directory cycle or disc cycle modes.
While playing, press 【PAUSE】 key to enter
“Pause" state; press 【PLAY】 key to recover from
that state.
Play JPEG Disc:
Af te r i n se r ti ng a J PEG di sc , t he uni t w il l
automatically search and stop at the rst image of
the rst directory found. Use UP/DOWN keys to
select image les; after you have nished selecting
the images, press 【PLAY】 key to play from
current image.
Use UP/DOWN keys to select image les; after
you have nished selecting the images, press
【ENTER】 key to view the image. At this time, the
image is in an idle state and you can press
【ZOOM】 key to zoom in on the image or press
direction keys to move the image in different
directions.
[01_JPG]101.JPG
01.JPG
02.JPG
03.JPG
04.JPG
05.JPG
06.JPG
07.JPG
09.JPG
10.JPG
08.JPG
The method to viewing images is the same as
that for playing JPEG discs.
If you want to view other types of les while
playing MP3-other mixed directory discs, use the
LEFT/RIGHT keys to select mode then use the
direction keys to move the cursor to the icon you
want to view and press 【ENTER】 to play the
selected le.
While playing discs with mixed directories, the
approach to select a le is the same as playing MP3
disc.
The unit will automatically load the les to be
played when a disc is inserted. The music les will
play by default if there are also supported photo,
movie and E book les on the disc.
Play USB:
Compatible USB Storage Devices:
USB ash memory(USB 2.0 or USB1.1)
USB ash players(USB 2.0 or USB1.1)
Memory
GOTO:
Press 【G OTO】 key on the rem ote and use
direction keys and number keys to select the time
or track , then press 【ENTER】key.
Repeat:
While p laying , press 【REPEAT】 key on the
remote. Different formats of discs have different
repeating cycles: single cycle, title cycles.
Slow:
During play, press 【SLOW】 key on the remote
control. To go back to the normal speed, press
【PLAY】.
Please note: In this mode, no audio will be heard
and it only affects the video les.
Copy:
Please note: For CD and MP3 discs, the unit will
copy in MP3 format onto the USB. For MPEG4
discs, it will copy directly.
Please see Copy Function Introduction for specic
operating instructions.
Function Switching:
W h e n y ou t u rn t he u ni t o n, y ou c an p r es s
“F UN CT IO N” to sw i tc h b et we en th e diffe re nt
function modes: FM radio, LINE external audio
input, Bluetooth or DVD.
The unit is set to DVD function as the default.
Supported Formats:
USB or memory le format FAT12,
FAT16,FAT32(sector size:512 bytes)
MP3 bitrate(data rate):32-320 kbps and
variable bitrate
Directory nesting up to a maximum of 8levels
Number of albums/folders:maximum99
Number of tracks/titles:maximum 999
When the USB has only one type of le, the
playing method is the same as when you play a
disc.
When the USB has various types of les, the
unit will play the audio les with the MP3 or WMA
formats after it has nished its search. The method
to playing other types of les is the same as when
you play a disc.
Memory cards (require an additonal card
reader to work with this apparatus)
TONE:
There are two options: Bass and Treble adjustment.
To use TONE:
1.Press “TONE” button once, and will show Bass
symbol on the display window, then turn on the
volume knob to to turn down or up Bass (between
-14 and +14).
2.Press “TONE” button twice, and will show Treble
symbol on the display window, then turn on the
volume knob to to turn down or up Treble (between
-14 and +14).

18
17
Common Operation/Radio Station/ Audio Input Operation:
At this time, the unit will display “LINE”.
Radio Station Selection and Storing:
After operating the "Auto Search", the unit will
automatically store the radio station/s found in
sequence. After operating “manual search” or
“frequency-selecting search”, the unit will
automatically store current radio frequency into
current station.
External Audio Input Setting:
Press 【FUNCTION】 key or 【AUX】 key on
the remote or panel to switch the unit into audio
input state.
En su re the “A UX ” o r “Aud io In pu t ” c ha nn e l
interface of the unit is connected to AF generator
input of any machine.
Radio Program Selection:
Press【 】 and 【 】 keys on the remote
or【 / PREVIOUS 】 and【 /NEXT】keys on
the panel to select a stored radio program.
FM Operation:
FM Radio:
Press 【FUNCTION】 or 【FM】 key on the
panel or remote to switch the unit to FM operation
mode.
Manual Search:
Press 【Fast Backward】or【Fast Forward】 keys
on the panel or remote to manually tune and
search. You can search the desired radio station
backwards or forwards.
Auto Search:
Press 【SEARCH】keys on the panel or press and
hold 【SEARCH】 key on the remote control then
the unit will automatically search in full band. FM
frequency ra ng e: 87 -1 08 MH Z( 50 KH Z f or each
step).
Please note: After you have found your specic
station, the uni t will automatically store it into
current program. The FM search is affected by the
radio signal strength. If no program is found during
auto search or an offset frequency occurs, please
use manual search, frequency-selecting search or
adjust frequency by adjusting the antenna position.
Frequency-Selecting Search:
Press 【GOTO】 key on , the unit will the remote
display frequency-selecting state then use number
keys to input your desired radio frequency. FM
frequency range: 87-108 MHZ.
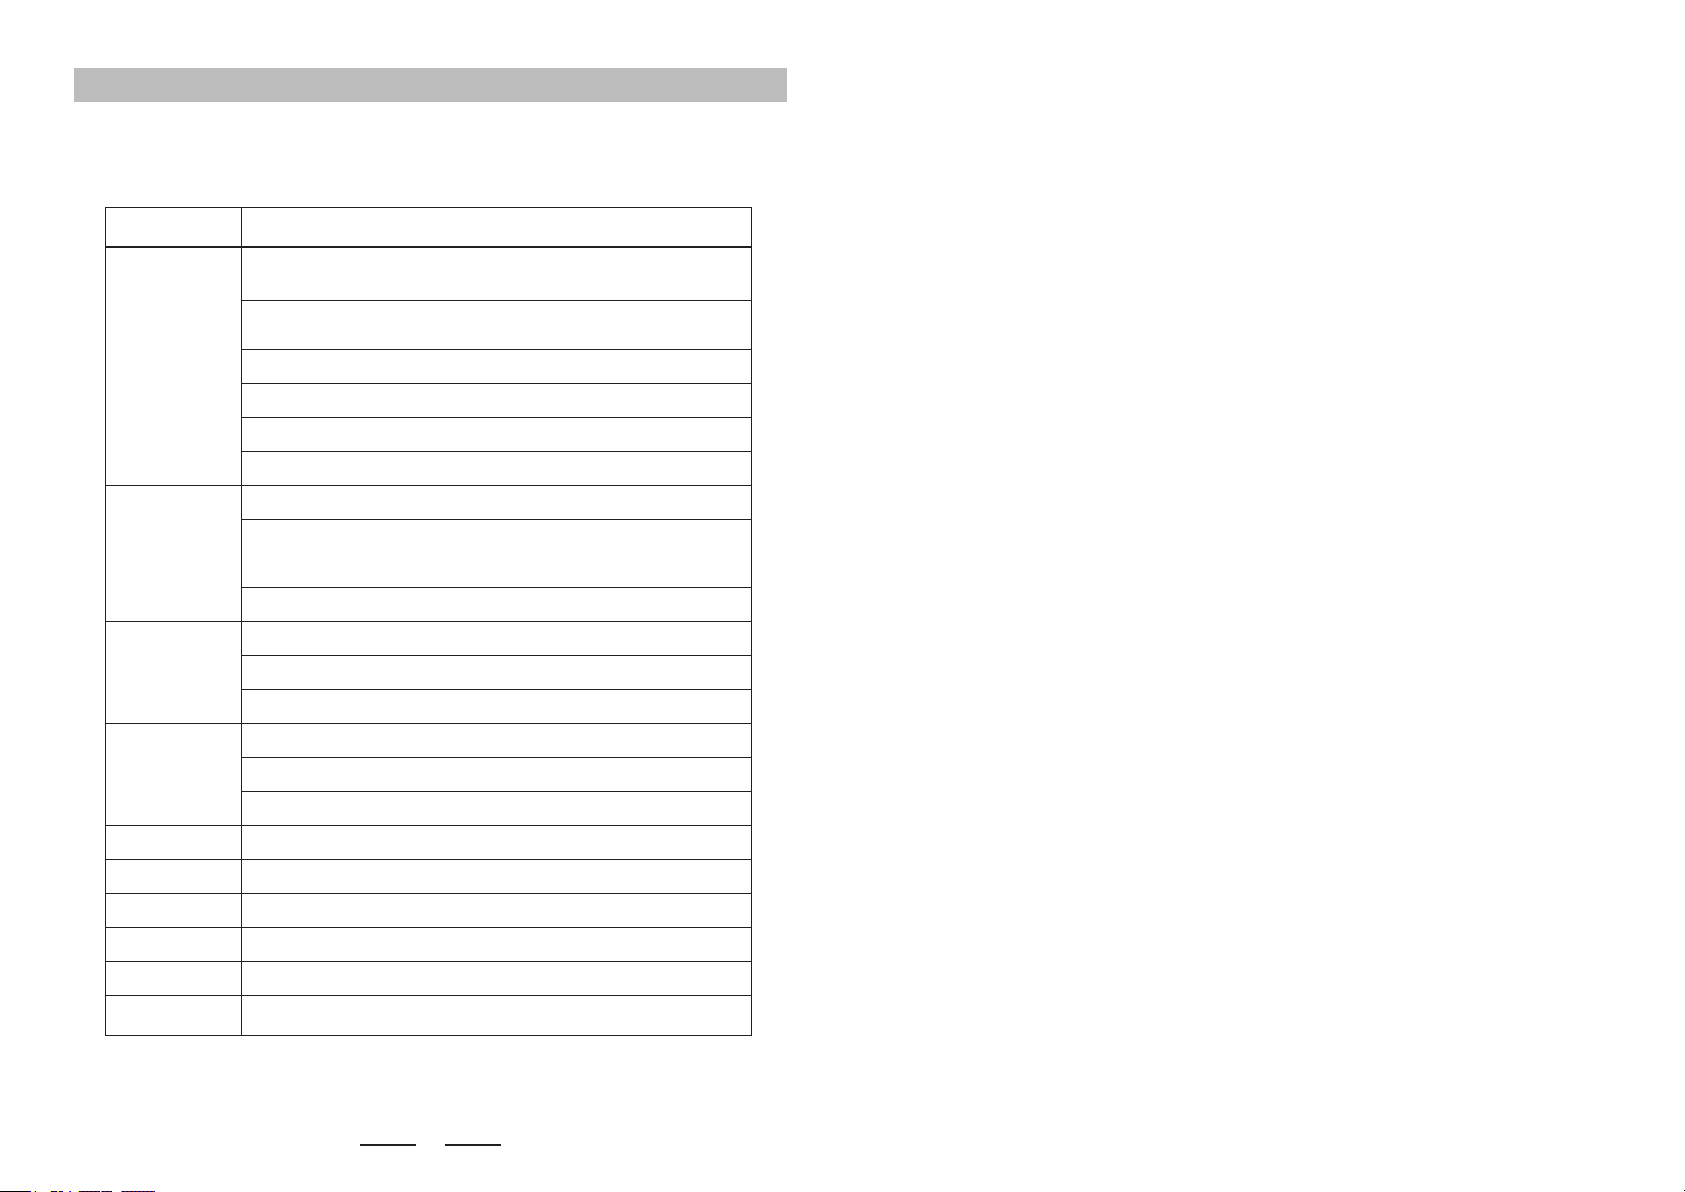
Troubleshooting
Before repairing, please take a look at the following problems and possible solutions rst.
Problem Reason Measure
No power.
No image.
No sound.
Bad image quality.
DVD player is not
activated.
Mp3 no sound
or with noise.
No disc or USB inserted.
Bad video connection or not
connected well.
Connected TV doesn't work.
Not set to current connecting
channel.
Bad audio connection or not
connected well.
Connected unit doesn't work
or volume is muted.
Disc is dirty.
Bad image quality of disc.
No disc inserted.
Disc installed upside down.
Disc installed incorrectly into it's slot.
Disc is dirty.
TV displays setting screen.
Remote is not aimed at the
receiving window.
The remote and DVD player are too
far away from each other.
There is a large obstacle between
the remote and the receiving window.
Remote has low batteries.
Unsupported le format.
No le in USB, format is incorrect.
USB damaged.
Locking level is activated.
Connect plug properly.
Insert disc or USB.
Set TV to current output platform.
Replace TV connection or connect
correctly.
Ensure TV works properly.
Set to current connecting channel.
Replace audio connection or
connect correctly.
Ensure connected unit works
properly or turn volume up.
Clean disc.
Replace disc with good image quality.
Insert disc.
Place the silk-screen side upwards.
Place disc into it's slot correctly.
Clean disc.
Quit setting state.
Unlock or change locking level.
Aim remote at the receiving window.
Please operate within effective
range of 7m.
Please move obstacle.
Please replace with new batteries.
Skip the le.
Repair or replace USB.
Remote
malfunction.
USB le(s)
unavailable.
The unit doesn't work
after the power has
been switched on.
TV isn't set to DVD output.
Plug is not properly connected.
Please store supportable le formats
or format the USB, then re-copy
the les.
Fault Guide:
Source Switching:
1.While the disc is playing, press [SOURCE] key on
remote control to switch to USB mode.
2. An interface will appear when switching from disc
to USB. Press direction keys to select the le then
press 【ENTER】key for conrmation.
3.System will automatically load the USB les when
there is no disc loaded.
E.g. If the frequency is less than 100Mhz, a zero should be
added before the first figure, such as 95Mhz should input 0950,
and 89.2 Hz should input 0892. The frequency input must have
4 figures.
19
Specifications:
Disc Type
Output Interface
Video
Characteristics
Audio
Characteristics
Power Voltage
Consumed Power
Item Parameter Index
MPEG4
SVCD VCD DVCD
MP3
CD
CD-R CD-RW
Audio: 2.0 track independent output
Video: Composite signal (AV) output
Y, Pb/Cb, Pr/Cr component video output
Video range: 1. 0Vp_p(75Ω loading)
Y output range: 1. 0Vp_p(75Ω loading)
C output range: 0. 286Vp⼀p/NTSC; 0. 3Vp_p/PLA (75Ω loading)
Frequency characteristics: 20Hz ~20KHz (±75dB)
SNR: >80dB
THD: <0.01%
230-240V ~ 50Hz
≤100W
-10℃~+45℃
15~75% (No drop condensation)
Spares
Operating Humidity
Operating
Temperature
Main Technical Parameters:
Please note: Design and specication parameters can change without prior notice.
Amplier Output
Audio/Video Cable, Remote, Manual, FM Antenna
2x35W
DVD±R/ DVD±RW/ Kodak Picture discs