Documents: Go to download!
User Manual
- User Manual - (English, Spanish)
- Quick Specs - (English)
- Installation Instruction - (English)
- Using The Oven
- Upper Oven
- Lower Oven
- Care and Cleaning
- Troubleshooting
Table of contents
Owner Manual Wall Oven
Using The Oven
Oven Controls

- Timer On/Off: Works as a countdown timer. Press the Timer On/Off pad, select the timer type (hours and minutes or minutes and seconds), use the selector dial to set the time, and press the selector dial to start the timer countdown. The oven will continue to operate when the timer countdown is complete. To turn the timer off, press the Timer On/Off pad.
- Settings/Lock Controls: Find oven options for: Help, Clock Settings, Display Mode, Auto Conversion, Auto Shut Off, Beeper Volume, Reminder, Temperature Units, Thermostat Adjust and Oven Information under this selection. See the Oven Settings section for more details. Press and hold Settings pad for 3 seconds to lock or unlock the controls. This locks out the control so that pressing any of the control pads does not activate the feature. Clear/Off is always active, even when the control is locked.
- Selector Dial: The selector dial is used for both the upper and lower ovens. Rotate dial to select oven settings, upper/lower oven options and cooking options then press to confirm the selection. Rotate dial to increase or decrease temperatures or time and then press to confirm the set temperature or time.
- Back: Press this pad to go back a menu level in the display.
- Start/Pause: Press the Start/Pause pad to start any cooking, clean or timed function. Press the Start/Pause pad to pause any upper oven features.
- Display: Information about both the upper and lower ovens is shown in this display window.
- Microwave: Press the Microwave pad for microwaving options. Use the selector dial to find the microwaving option desired and press the selector dial to select it.Options available include Cook by Time, Cook, Defrost, Beverage, Popcorn, Melt, Reheat, Simmer and Soften. Use the clear glass tray and microwave-safe cookware when using the microwave features. See Upper OvenMicrowaving section for more detail.
- Add 30 Sec: Press the Add 30 Sec pad for 30 seconds of microwave cooking time. Each time this pad is pressed an additional 30 seconds is added to the remaining cooking time. The oven starts immediately.
- Defrost: Press the Defrost pad to defrost, rotate selector dial to select the type of defrost and press to select. Type of defrost available include; Defrost by Food Type, Defrost by Time, Defrost by Weight, 1.0 lb. Quick Defrost, Melt, and Soften. See the Microwaving section for more information.
- Reheat: Press the Reheat pad to reheat, rotate selector dial to select food type to reheat and press to select. Types of food available under the Reheat feature include; Beverage, Casserole, Chicken, Pasta, Pizza, Plate of Food, Rice, Soup, Steaks/Chops, and Vegetables.
- Popcorn: Press the Popcorn pad to microwave popcorn, press the selector dial to select. Popcorn feature is a microwave sensor feature and automatically senses when popcorn is done and shuts itself off. Do not use theSensor Features twice in succession on the same food portion.
- Clear/Off: The Clear/Off pad cancels ALL upper oven programs except the clock and timer.
- Light: Press the Light pad to turn the oven light on or off in the lower oven. Note that light in the lower oven will not turn on if the oven is in a clean mode.
- Bake: Press the Bake pad to bake, rotate selector dial to select baking temperature and press to select.
- Broil: Press the Broil pad to broil, rotate selector dial to select Hi/Lo and press to select.
- Options: Find the Delay Start, Proof, Sabbath, Self Clean, Steam Clean and Warm features under this selection. See the Oven Options section for more details.
- Warm: Press the Warm pad to warm, press the selector dial to select. Do not use Warm to cook or heat cold food. See the Cooking Mode section for more information.
- Clear/Off: The Clear/Off pad cancels ALL lower oven programs except the clock and timer.
Oven Settings
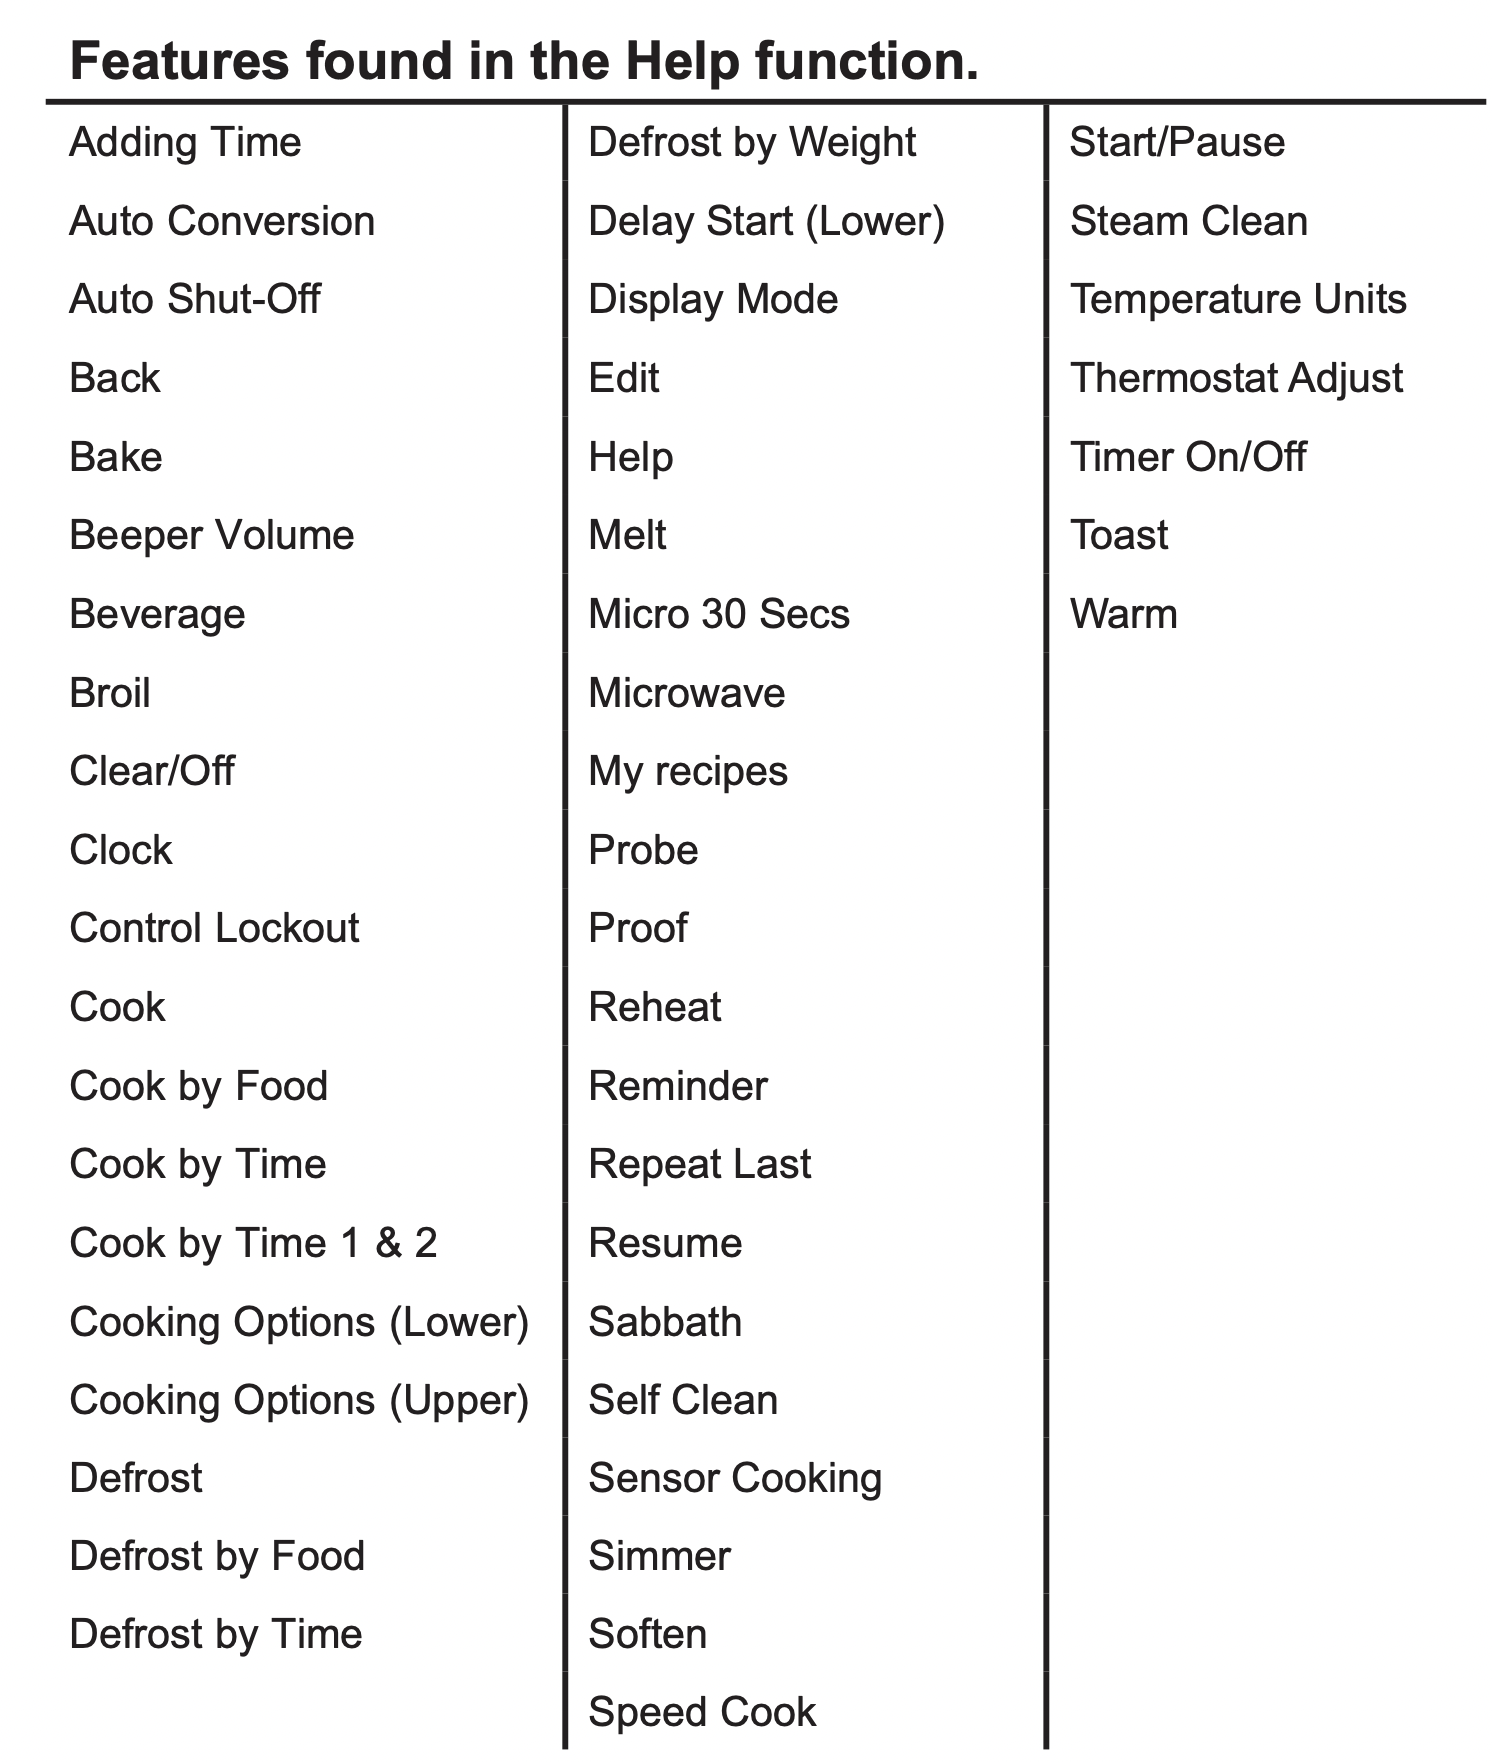
Help
Use this feature to find out more about your oven and its features by pressing the Settings pad and selecting help. Turn the selector dial and press to select the feature you want to find out more about.
NOTE: Not all features of help may be on your oven model. Below are features found in the Help function:
Clock Settings
Use this feature to set the time of day and to specify how the time of day will be displayed. You can select a standard 12-hour clock (12 hr) or 24-hour military time display (24 hr). Prior to the first use of your oven, the clock must be set.
Display Mode
Use this feature to set Power Saver or Display Always On display mode.
Auto Shut-Off
Use this feature to activate/deactivate Auto Shut-Off. Activating the Auto Shut-Off feature will turn off the lower oven after 12 hours of continuous operations. The factory setting for Auto Shut-Off feature is activated. When in Sabbath mode Auto Shut-Off will be deactivated.
Beeper Volume
Use this feature to set Beeper Volume to Mute or Normal
NOTE: Some tones are not mutable.
Reminder
Use this feature to Set, Review, or Clear Reminder.
Temperature Units
See other models: PB911EJES JTS5000BNTS PGB960FEJDS JB625RKSS GTX42GASJWW
Use this feature to set the display temperature unit to °F (Fahrenheit) or °C (Celsius).
Thermostat Adjust
This feature allows the oven baking and convection baking temperature to be adjusted up to 35°F hotter or down to 35°F cooler on the lower oven. The upper oven cannot be adjusted. Use this feature if you believe your oven temperature is too hot or too cold and wish to change it. This adjustment affects Bake modes. No other cooking modes are affected.
Oven Information
This feature shows the Oven Model and Serial number.
Oven Options
Lower Oven Options
Delay Start
Use this feature to delay starting a Bake or Self Clean feature. To use this feature select Delay Start and set the time to start, then select cook mode. You can also use the Delay Start feature while programming a Bake cooking feature.
Proof
Use this feature to proof dough. See Lower Oven Cooking Modes for more detail.
Sabbath
Use this feature to enter Sabbath mode. Sabbath mode sets the oven for observance of the Jewish Sabbath and Holidays. This feature conforms to the Star-K Jewish Sabbath requirements. Sabbath mode disables the oven lights (the oven light will not turn on when the door is opened), all sounds (the control will not beep when a button is pressed, but will still beep if certain oven faults occur), and all upper oven functions and lower oven functions, except lower oven Bake. During Sabbath mode only lower oven Bake is available. While in Sabbath mode, after setting/changing a bake temperature, a random delay of approximately 30 seconds to 1 minute will occur before the oven will begin baking. To stop cooking, press the Back pad and then the Start/Pause pad. Your oven will shut off after a random delay of approximately 30 seconds to 1 minute.To immediately exit lower oven Bake, press the Clear/Off pad at any time - cooking elements will immediately turn off and Sabbath Bake will change to Sabbath on the display, indicating that the oven has turned off. To exit Sabbath mode press and hold the Back pad for 3seconds. Do not press any other buttons until Sabbath mode has exited, or Sabbath mode will be re-initialized and will not exit. See Lower Oven Sabbath Mode for more detail.
NOTE: If power outage occurs during Sabbath mode the unit will remain in Sabbath mode but will no longer be cooking when power is restored.
Self Clean
Use this feature to enter Self Clean mode. See CleaningThe Oven section for more detail.
Steam Clean
Use this feature to enter Steam-Clean mode. See Cleaning The Oven section for more detail.
Warm
Use this feature to warm. See Lower Oven Cooking Modes for more detail.
Upper Oven
Microwaving
Using The Microwave Features
Make sure the turnable and clear glass tray are in place.
Place food or microwavable container directly on the clear glass tray to cook your food.

The turntable must always be in place when using the oven.

The clear glass tray should always be in place when microwaving.
How To Use Pre-Set Microwave Selections
- Press the Microwave pad.
If no selection is made within 15 seconds, the display will revert back to the time of day. - Turn the selector dial to find the food or beverage you want to cook, defrost, soften, melt, simmer or reheat. Press the selector dial to enter.
- Turn the selector dial to select the type, amount, weight and/or size. (As required, the oven will prompt you). Press the selector dial after each selection.
- Press the selector dial or the Start/Pause pad to start cooking.
To review or edit settings during cooking, press the selector dial.
If the door is opened during cooking, the oven will stop and PAUSE will appear in the display. Close the door and press Start/Pause pad to resume cooking.
If you enter an undesired selection at any time, simply press the Back pad and reenter the desired selections.
- When the oven is on, light may be visible around the door or outer case.
- The oven cavity light will come on during a microwave cooking cycle.
- Steam or vapor may escape from around the door.
Cook By Time And Cook By Time 1 & 2
Use Cook By Time and Cook By Time 1 & 2 to microwave food that is not in the recipe section and at the time(s) you set.
The power level is automatically set at high, but you can change it for more flexibility.
- Press the Microwave pad.
- Turn the selector dial to select Cook By Time or Cook By Time 1 & 2 and press the selector dial to enter.
- Turn the selector dial to set the cook time and press the selector dial to enter.
- Select power level setting.
If you selected Cook By Time 1 & 2, turn the selector dial to set the second cook time, second power level setting and press the selector dial to enter. - Press the selector dial or the Start/Pause pad to start cooking.
You may open the door during Cook By Time and Cook By Time 1 & 2 to check the food. Close the door and press Start/Pause to resume cooking.
Microwave Power Level(s)
You can change the power level during most cooking program.
- Press the selector dial to edit
- Rotate selector dial to change time and/or press selector dial to enter.
- Turn the selector dial clockwise to increase and counter clockwise to decrease the power level. Press the selector dial to enter.
Here are some examples of uses for various power levels:
High 10: Fish, bacon, vegetables, boiling liquids.
Med-High 7: Gentle cooking of meat and poultry; baking casseroles and reheating.
Medium 5: Slow cooking and tenderizing for stews andl ess tender cuts of meat.
Low 2 or 3: Defrosting, simmering, delicate sauces.
Warm 1: Keeping food warm, softening butter.
Defrost By Food Type
Auto Defrost automatically sets the defrosting times and power levels to give even defrosting results for meats, poultry and fish weighing up to 6 pounds.
- Remove food from the package and place it on a microwave-safe dish.
- Press the Microwave pad and select defrost.
- Turn the selector dial to Defrost By Food Type.Press the selector dial to enter.
- Turn the selector dial to select food type. Press the selector dial to enter.
- Turn the selector dial to the food weight, using the Conversion Guide at the right. For example, dial 1.2 for 1.2 pounds (1 pound, 3 oz.) Press the selector dial to enter.
- Press the selector dial or Start/Pause pad to start defrosting.
- Turn the food over when the oven signals Turn Food Over.
- Remove defrosted meat or shield warm areas with small pieces of foil for even defrosting.
- After defrosting, most meats need to stand 5 minutes to complete defrosting. Large roasts should stand for about 30 minutes.
Conversion Guide
If the weight of food is stated in pounds and ounces, the ounces must be converted to tenths (.1) of a pound.

Defrost By Time
Use Defrost By Time to defrost for a selected length of time.
- Press the Microwave pad and select defrost.
- Turn the selector dial to Defrost By Time. Press the selector dial to enter.
- Turn the selector dial to select the time you want. Press the selector dial to enter.
- Press the selector dial or Start/Pause pad to start defrosting.
- Turn the food over when the oven signals Turn FoodOver.
Power level is automatically set at 3, but can be changed. To change the power levels, see the Microwave Power Level(s) section. You can defrost small items quickly by raising the power level after entering the time. Power level 7 cuts the total defrosting time in about half; power level 10 cuts the total time to about 1/3. When defrosting at high power levels, food will need more frequent attention than usual.
Defrost By Weight
Use Defrost By Weight to defrost for a selected length of time.
- Press the Microwave pad and select defrost.
- Turn the selector dial to Defrost By Weight. Press the selector dial to enter.
- Turn the selector dial to select the weight you want. Press the selector dial to enter.
- Press the selector dial or Start/Pause pad to start defrosting.
- Turn the food over when the oven signals Turn Food Over.
Power level cannot be changed during this setting.
1.0 Ib.Quick Defrost
Use 1.0 Ib. Quick Defrost for quick defrost of 1.0 Ib. of frozen food.
- Press the Microwave pad and select 1.0 Lb. quick defrost.
- Press selector dial or Start/Pause pad to start defrosting. Press the selector dial to enter.
- Turn the food over when the oven signals Turn Food Over.
Power level cannot be changed during this setting.
Defrosting Tips
- Foods frozen in paper or plastic can be time defrosted in the package, but foods should be taken out of the package when using Defrost By Food Type. Closed packages should be slit, pierced or vented after food has partially defrosted. Plastic storage containers should be partially uncovered.
- Family-size, prepackaged frozen dinners can be defrosted and microwaved. If the food is in a foil container, transfer it to a microwave-safe dish.
- Foods that spoil easily should not be allowed to sit out for more than one hour after defrosting. Room temperature promotes the growth of harmful bacteria.
- For more even defrosting of larger foods, such as roasts, use Defrost By Time. Be sure large meats are completely defrosted before cooking.
- When defrosted, food should be cool but softened in all areas. If still slightly icy, return to the microwave very briefly, or let it stand a few minutes.
Microwave Sensor Cooking
The sensor feature detects the increasing humidity released during cooking. The oven automatically adjusts the cooking time to various types and amounts of food.
Do not use the Sensor Features twice in succession on the same food portion- it may result in severely overcooked or burnt food. If food is undercooked after the first countdown, use Cook By Time for additional cooking time.
The proper containers and covers are essential for best sensor cooking.
- Always use microwave-safe containers and cover them with lids or vented plastic wrap. Never use tight sealing plastic containers-they can prevent steam from escaping and cause food to overcook.
- Be sure the outside of the cooking containers and the inside of the oven are dry before placing food in the oven. Beads of moisture turning into steam can mislead the sensor.
- Beverages are best heated uncovered.
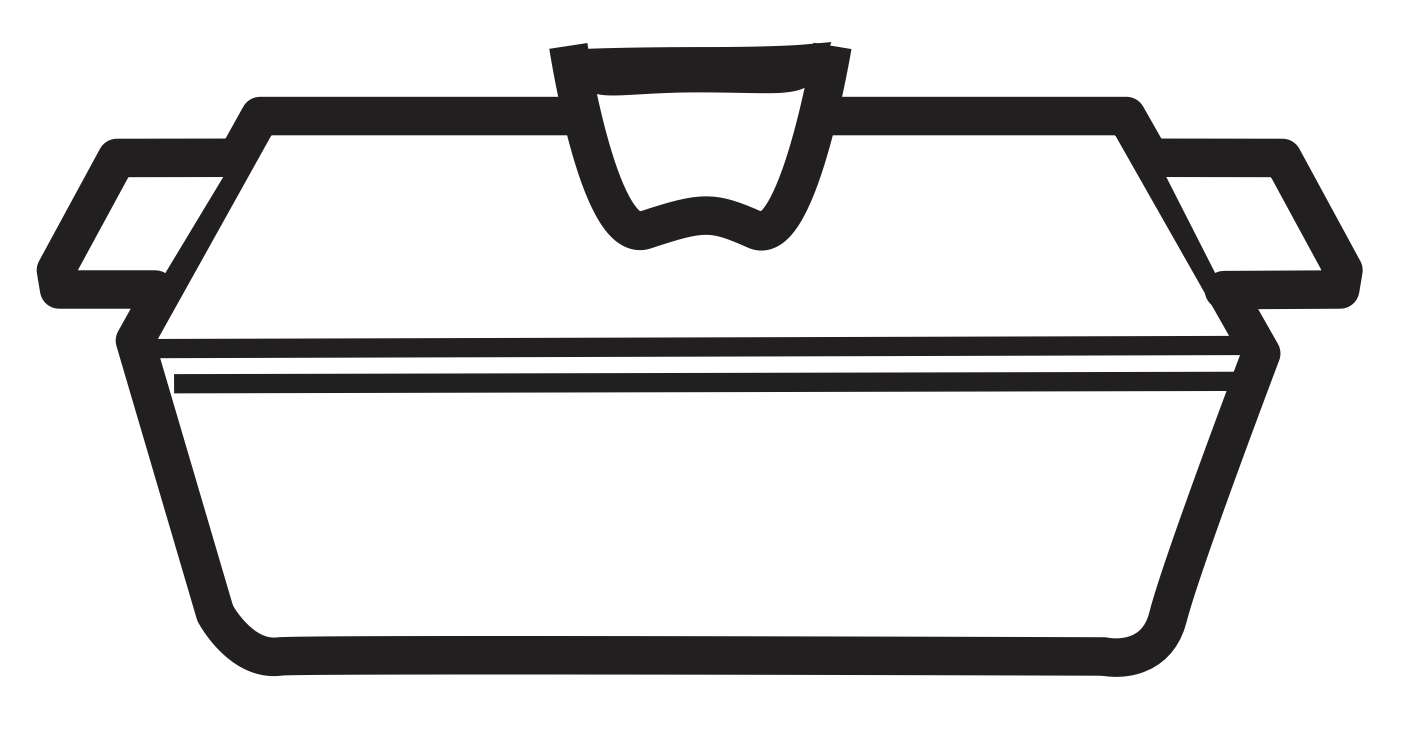
Covered
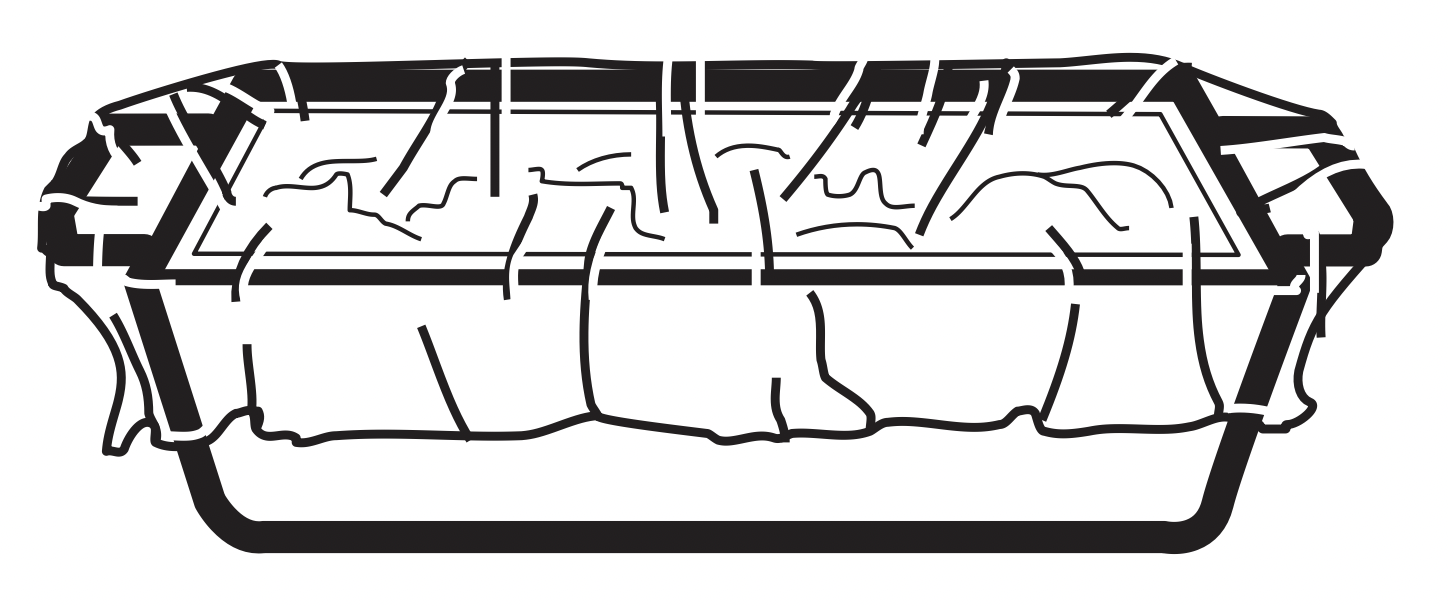
Vented

Dry off dishes so they don’t mislead the sensor.
To Use All Sensor Programs
Upper Oven microwave mode features sensor cooking. It automatically senses when food is done and shuts it self off-eliminating the need to program cook times and power levels.
- Press the Microwave pad and turn the selector dial to Cook By Food Type or Reheat. Press the selector dial to enter.
- Turn the selector dial to select the food you want. Press the selector dial to enter.
- Press the selector dial or press the Start/Pause pad to start cooking.
Do not open the oven door until time is counting down in the display or the microwave stop cooking. If the door is opened, close it and press Start/Pause immediately. If the food is not done enough, use Cook By Time in the microwave selector to cook for more time.
NOTE: Do not use the Sensor Features twice in succession on the same food portion-it may result in severely overcooked or burnt food.
- If you have been speed cooking and the oven is already hot, it may indicate that it is too hot for sensor cooking. Of course, you can always continue with Cook By Time.
NOTE: If the oven is too hot then it will automatically change to time cooking.
- To shorten or lengthen the cook time, wait until the time countdown shows in the display. Then turn the selector dial to add or subtract time.
- If you open the door while Sensor Cooking, Sensor Error will appear. Close the door, press Start/Pause to begin again.
Notes about the Reheat program:
Reheated foods may have wide variations in temperature. Some areas may be extremely hot.
It is best to use Cook By Time and not Reheat for these foods:
- Bread products
- Food that must be reheated uncovered.
- Foods that need to be stirred or turned.
- Foods calling for a dry look or crisp surface after reheating.
Lower Oven
Cooking Modes
Your new oven has a variety of cooking modes to help you get the best results. These modes are described below. Refer to the Cooking Guide section for recommendations for specific foods. Remember, your new oven may perform differently than the oven it is replacing.
Baking and Roasting Modes
Select a mode for baking and roasting based on the type and quantity of food you are preparing. When preparing baked goods such as cakes, cookies, and pastries always preheat the oven first. Follow recipe recommendations for food placement. If no guidelines are provided, center food in the oven.
Traditional Bake
The traditional bake mode is intended for single rack cooking. This mode uses heat primarily from the lower element but also from the upper element to cook food. To use this mode press the Bake pad, turn the selector dial to set the oven temperature and press to enter, then press Start. Preheating is generally recommended when using this mode.
Broiling Modes
Always broil with the door closed. The broil element in this oven is very powerful. Monitor food closely while broiling. Use caution when broiling on upper rack positions as placing food closer to the broil element increases smoking, spattering, and the possibility of fats igniting. Broiling on rack position 6 is not recommended.
Try broiling foods that you would normally grill. Adjust rack positions to adjust the intensity of the heat to the food. Place foods closer to the broil element when a seared surface and rare interior is desired. Thicker foods and foods that need to be cooked through should be broiled on a rack position farther from the broiler or by using Broil Lo. For best performance center food below the broil heating element.
Broil Hi
The Traditional Broil Hi mode uses intense heat from the upper element to sear foods. Use Broil Hi for thinner cuts of meat and/or foods you prefer less done on the interior. To use this mode press the Broil pad, turn the selector dial to Hi and press to enter, and then press Start. It is not necessary to preheat when using this mode.
Broil Lo
The Traditional Broil Lo mode uses less intense heat from the upper element to cook food thoroughly while also producing surface browning. Use Broil Lo for thicker cuts of meat and/or foods that you would like cooked all the way through. To use this mode press the Broil pad, turn the selector dial to Lo and press to enter, and then press Start. It is not necessary to preheat when using this mode.
Proof
Proof mode is designed for rising (fermenting and proofing) bread dough. Press the Options pad, turn the selector dial to select Proof and press to select, then press Start. Cover dough well to prevent drying out. Bread will rise more rapidly than at room temperature. Note that for double wall ovens, proof cannot be run when running a clean mode in the lower oven.
Warm
Warm mode is designed to keep hot foods hot for up to 3 hours. To use this mode, press the Options pad, turn the selector dial to select Warm and press to select, or press the Warm pad, then press Start. Cover foods that need to remain moist and do not cover foods that should be crisp. Preheating is not required. Do not use warm to heat cold food other than crisping crackers, chips or dry cereal. It is also recommended that food not be kept warm for more than 2 hours.
Sabbath Mode
Your new oven conforms to the Star-K Jewish Sabbath requirements with the Sabbath mode cooking feature. Below describes the detail of Sabbath mode feature.
To Enter Sabbath Mode
Press the lower oven Options pad and turn the selector dial to Sabbath and press to select. The display will show “During Sabbath Mode the upper oven is unavailable”. Press the selector dial to continue. Any upper oven features running will exit, and the lower oven will immediately transition into Sabbath mode.
To Change Temperature
Once in Sabbath mode, in order to change oven temperature or start a bake feature, the user can change temperature to one of 10 pre-set temperatures as indicated below:
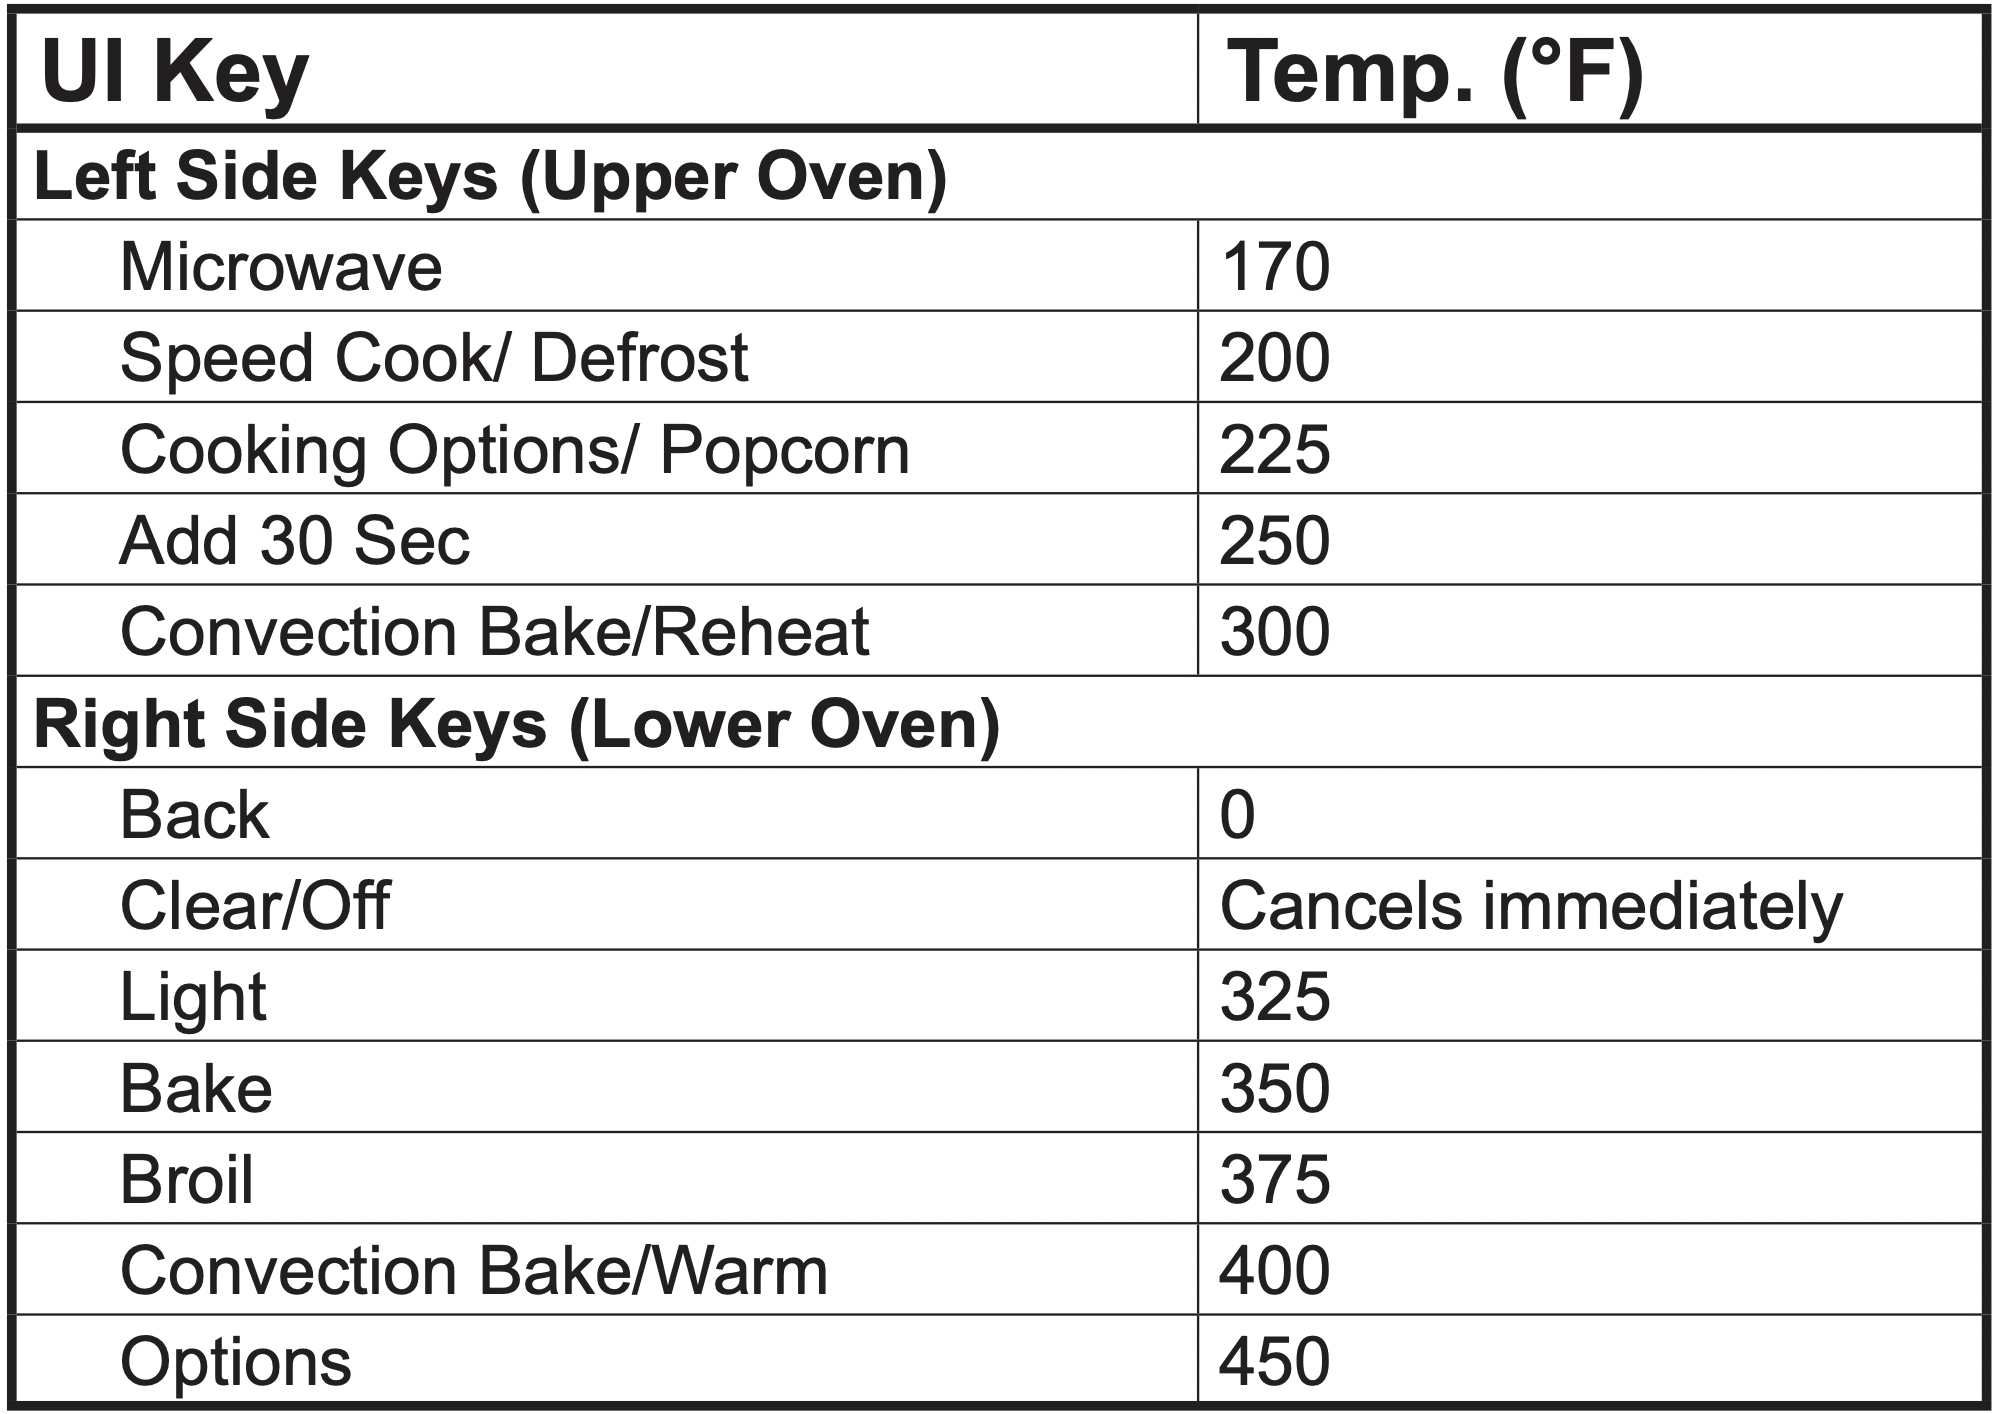
Changing to one of the above temperatures requires the user to press the keypad associated with the desired temperature and then press the Start/Pause pad. For example, to set a Bake 350°F, the user will press the Bake pad on the lower oven and then press Start/Pause pad.
The Bake feature will start (or if already running, the oven temperature will change) at a random time between 30-60 seconds after the Start/Pause pad is pressed, with the exception of pressing the Clear/Off pad, which will immediately cancel the cooking settings. (The unit will remain in Sabbath mode). Change of temperature may be executed at any time in the cooking cycle.
To Turn Oven Off
Press Clear/Off pad or Back and then Start pads at any time. The oven will immediately turn off but will stay in Sabbath mode and return to the standby Sabbath display screen.
To Exit Sabbath Mode
Press and hold the Back pad for 3 seconds.The oven will shut down at a random time between 30-60 seconds after the Back pad is pressed and held.
NOTE: Do not press any other pads during this time, or the Sabbath mode will be re-initialized and will not exit. The oven will exit Sabbath mode and return to its default screen.
Timed Cook Feature In Sabbath Mode
The Sabbath mode is not capable of running a timed cook feature on its own. If there is a desire to run aTimed Cook, the following steps must be followed:
- Use the Settings pad to set your Beeper Volume toMute.
- Use the Light pad to set your lower oven Light to On.
- Use Bake to program a temperature. After programming a temperature select a cook time and enter your cook time. Press Start to start the oven.
- Once the oven is started, do NOT open the door until the oven has finished preheating and reached a steady state temperature. Doing so prior to preheating completing will result in the air distribution fan de-energizing immediately upon door opening.
- Once the food has been placed in the oven, do not open the door until cooking has completed. Doing so will result in the display on the screen changing to prompt you to close your door.
- Do NOT open the upper oven door.Doing so will turn the light on immediately.
- Do not press any additional buttons on the lower oven controls once started or the display will change immediately upon the button press.
NOTES
- During Sabbath mode only lower oven Bake is available. Broil, Warm, or other functions are not available.
- When in Sabbath mode, the 12-hour auto shut off is disabled regardless of the setting selected in theSettings.
- Sabbath mode can be entered only if no cooking mode is running in the lower oven. Entering theSabbath Mode will cancel all functions in the lower and upper oven (including timer and reminder).
- When any buttons are pressed in Sabbath Mode, there are no beeps or tones, no changes to lights or change in the display. Also, when the door is opened or closed in Sabbath Mode, there are no beeps or tones, no changes to lights or change in the display.
- If a power outage occurs during Sabbath mode baking, the unit will return to Sabbath Mode when power comes back, but will not return in the baking mode.
Cooking Guide
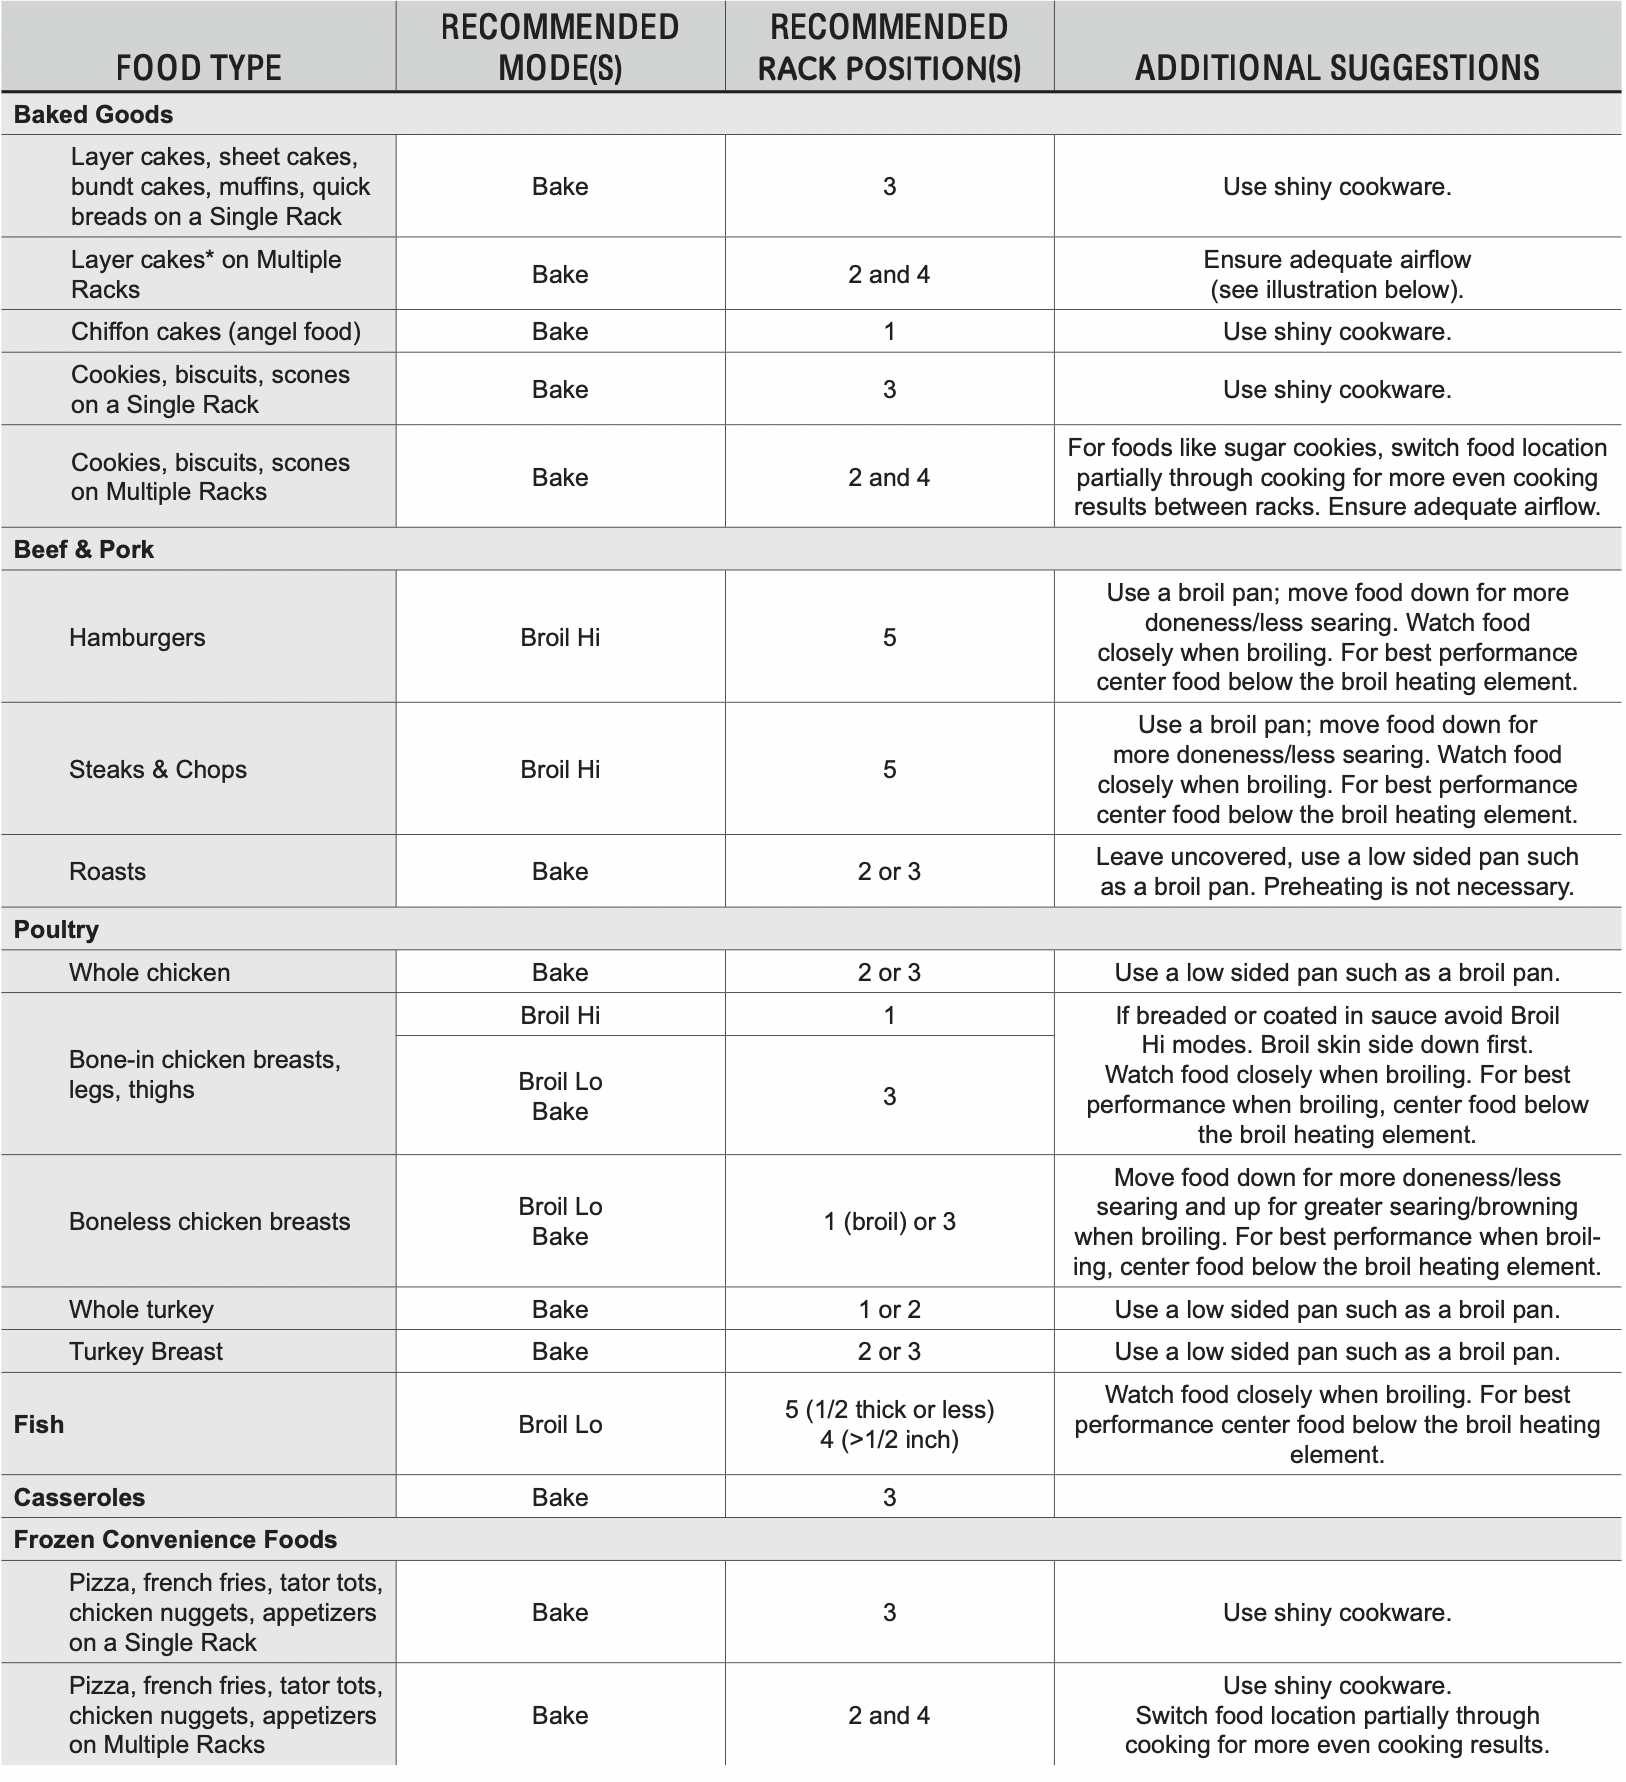
*When baking four cake layers at a time, use racks 2 and 4. Place the pans as shown so that one pan is not directly above another.

Racks
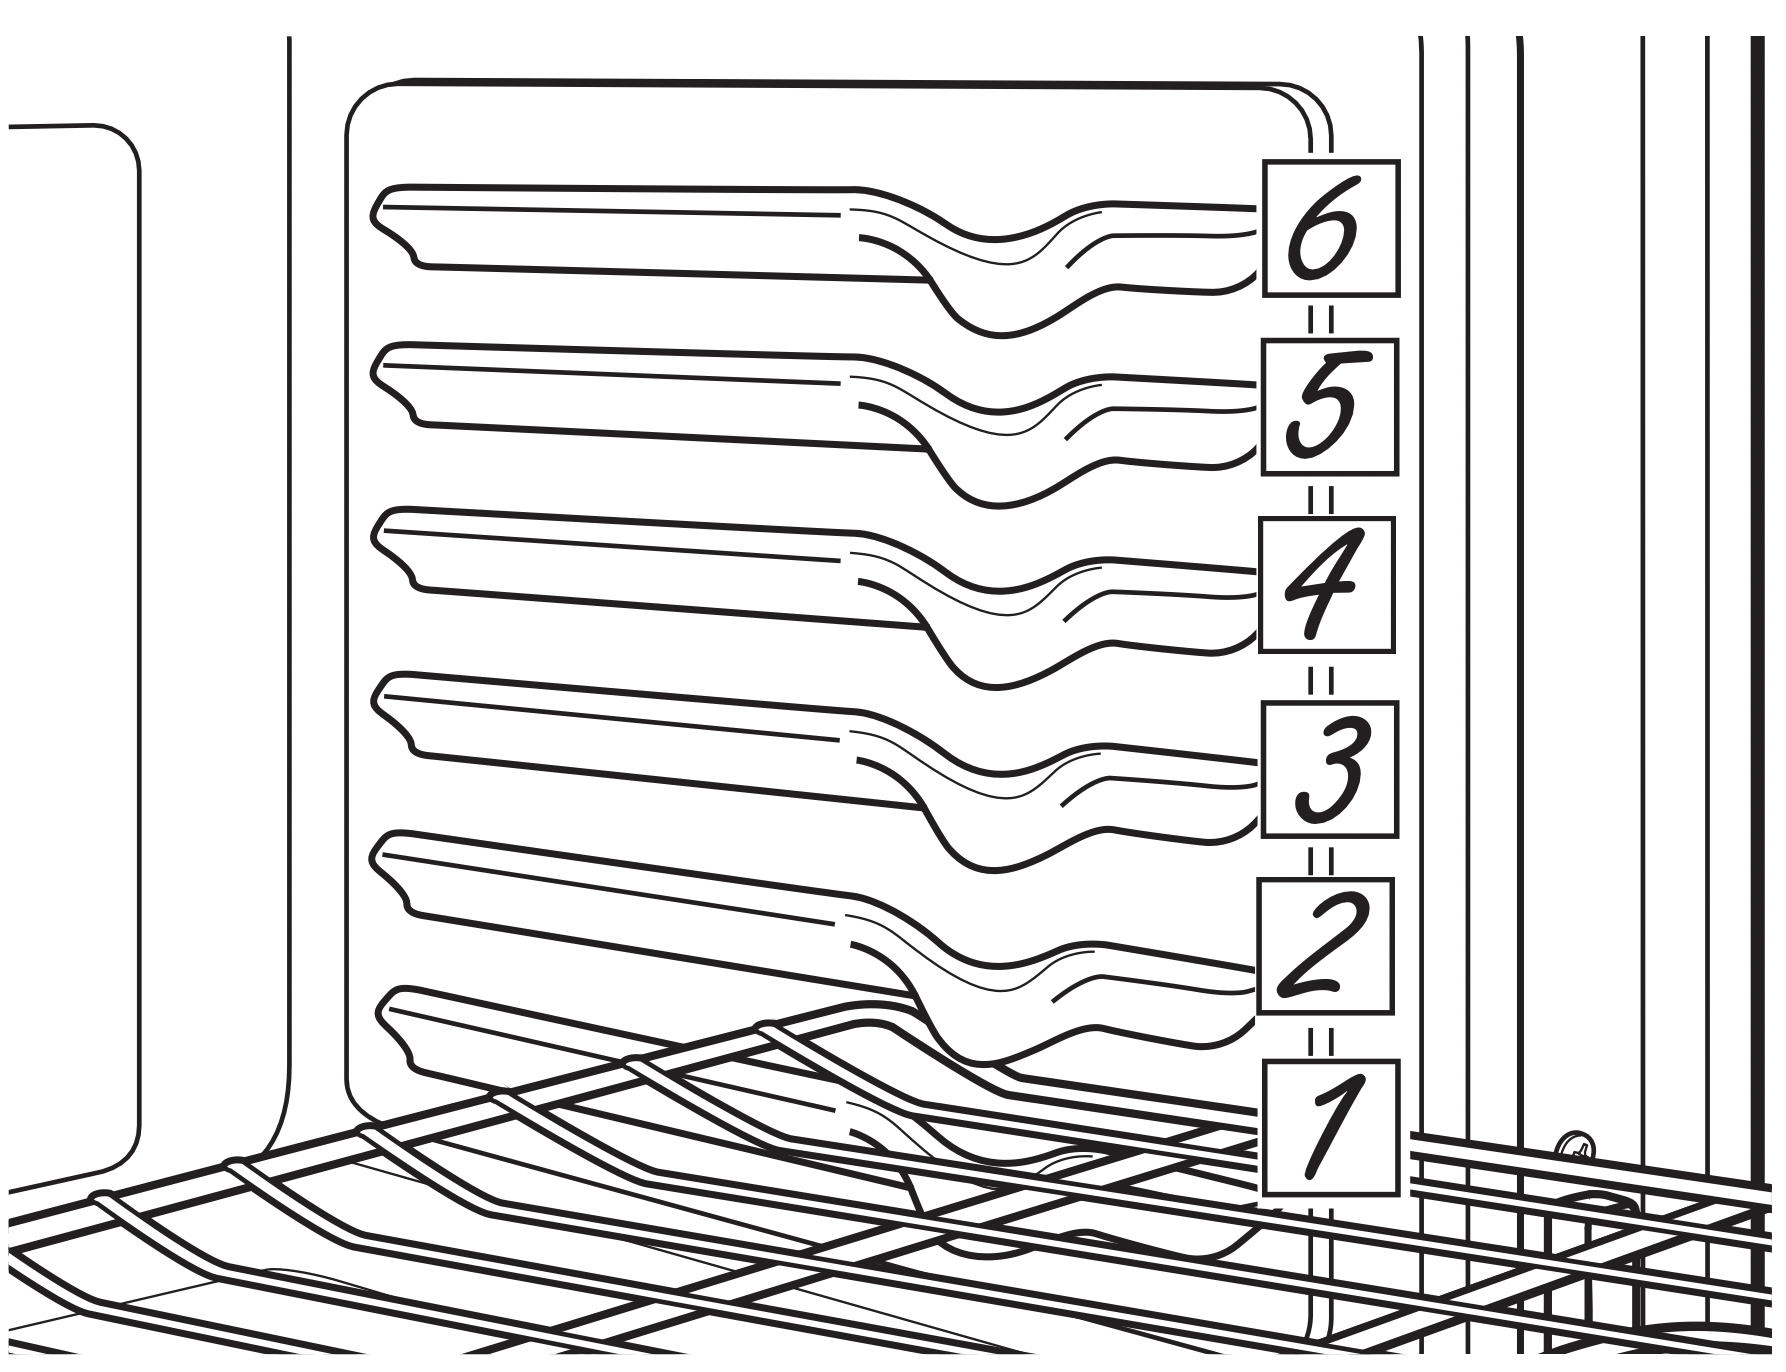
Your oven has six rack positions. Recommended rack positions for various types of foods are provided in the Cooking Guide. Adjusting rack position is one way to impact cooking results. For example, if you would prefer darker tops on cakes, muffins, or cookies, try moving food one rack position higher. If you find foods are too brown on top try moving them down next time.
When baking with multiple pans and on multiple racks, ensure there is sufficient space between pans to allow air to flow.
Flat Racks
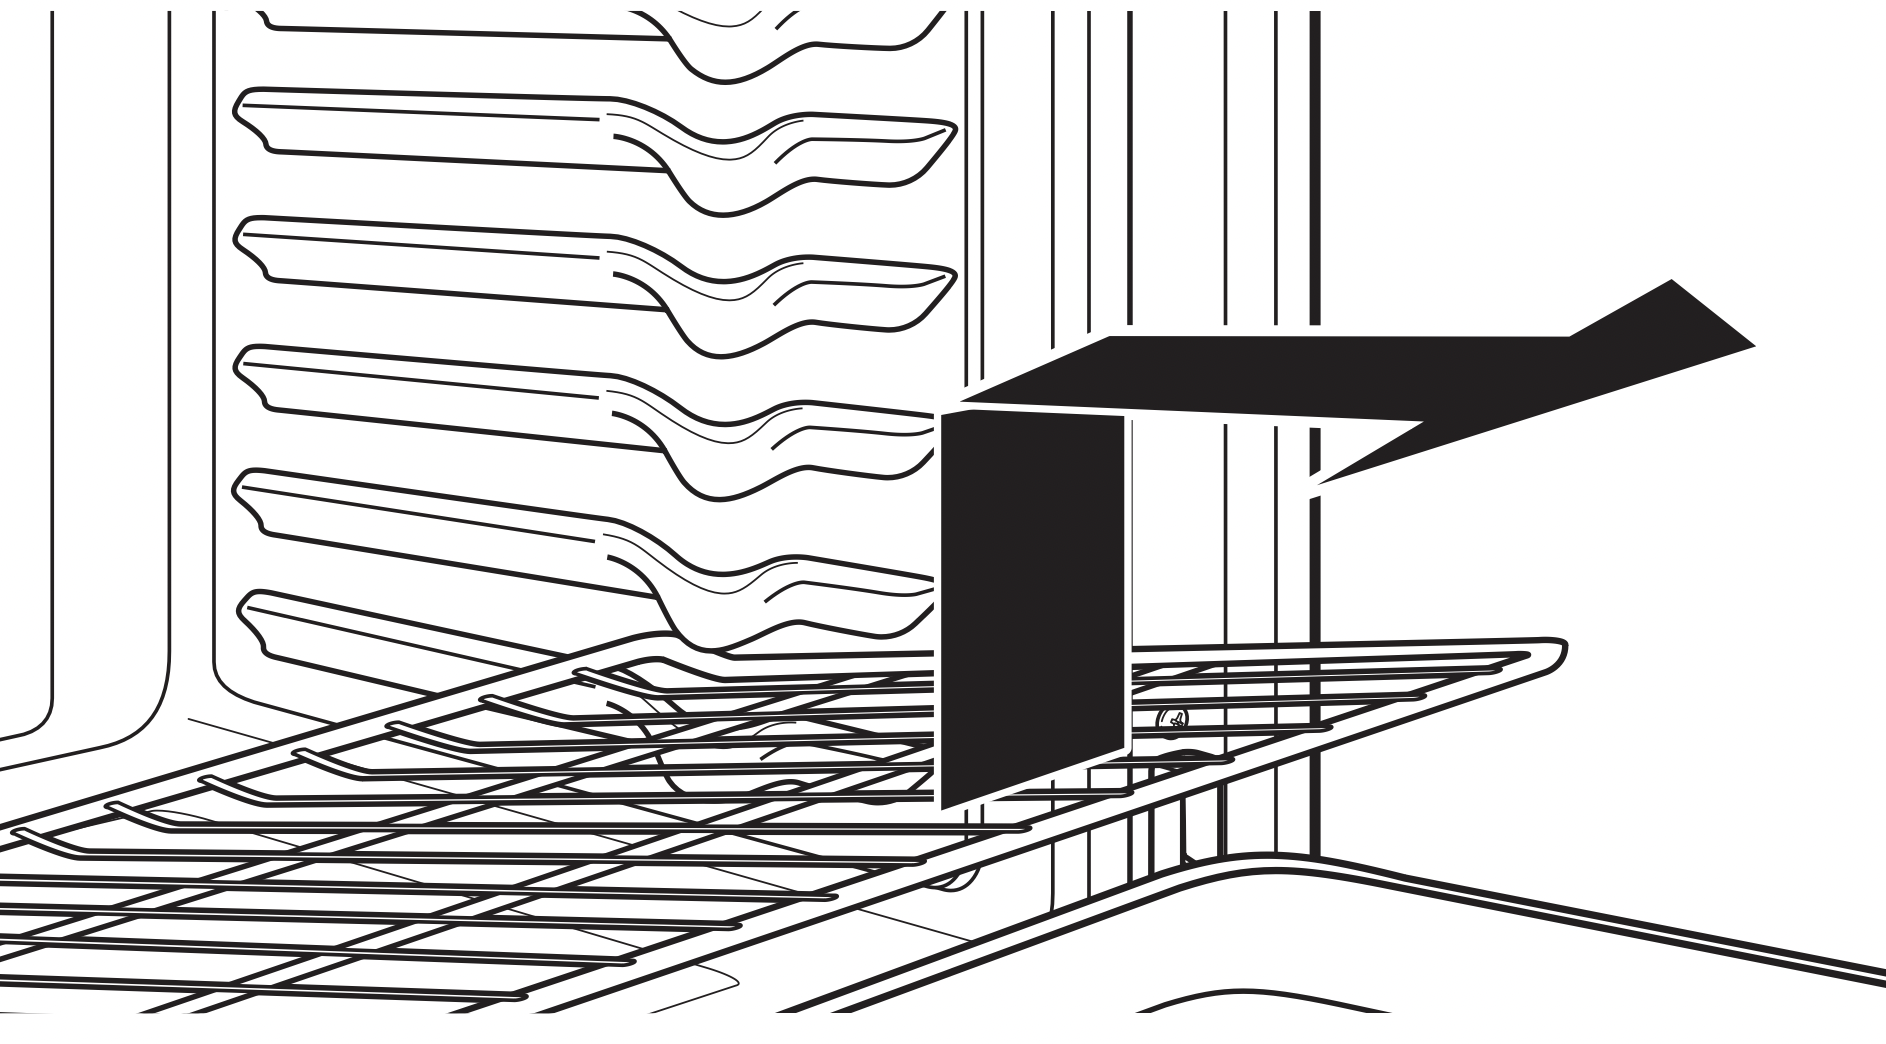
When placing and removing cookware, pull the rack out to the bump(stop position) on the rack support.
To remove a rack, pull it toward you, tilt the front end up and pull it out.
To replace, place the curved end of the rack (stop-locks) onto the oven supports, tilt up the front of the rack and push the rack in.
Racks may become difficult to slide, especially after a self-clean. Put some vegetable oil on a soft cloth or paper towel and rub onto the left and right edges.

Aluminum Foil and Oven Liners
CAUTION: Do not use any type of foil or oven liner to cover the oven bottom. These items can trap heat or melt, resulting in damage to the product and risk of shock, smoke or fire. Damage from improper use of these items is not covered by the product warranty.
Foil may be used to catch spills by placing a sheet on a lower rack, several inches below the food. Do not use more foil than necessary and never entirely cover an oven rack with aluminum foil. Keep foil at least 1-1/2” from oven walls to prevent poor heat circulation.
Cookware
Cookware Guidelines
The material, finish, and size of cookware affect baking performance.
Dark, coated and dull pans absorb heat more readily than light, shiny pans. Pans that absorb heat more readily can result in a browner, crisper, and thicker crust. If using dark and coated cookware check food earlier than minimum cook time. If undesirable results are obtained with this type of cookware consider reducing oven temperature by 25° F next time.
Shiny pans can produce more evenly cooked baked goods such as cakes and cookies.
Glass and ceramic pans heat slowly but retain heat well.
These types of pans work well for dishes such as pies and custards.
Air insulated pans heat slowly and can reduce bottom browning.
Keep cookware clean to promote even heating.
Care and Cleaning
Cleaning The Oven
Be sure electrical power is off and all surfaces are cool before cleaning any part of the oven.
Helpful Hints
An occasional thorough wiping with a solution of baking soda and water keeps the inside fresh. Also we recommend against using cleaners with ammonia or alcohol, as they can damage the appearance of the oven. If you choose to use a common household cleaner, first apply the cleaner directly to a clean cloth, then wipe the soiled area.
Control Panel
It's a good idea to wipe the control panel after each use.Clean with mild soap and water or vinegar and water, rinse with clean water and polish dry with a soft cloth.
Do not use abrasive cleansers, strong liquid cleansers, plastic scouring pads or oven cleaners on the control panel-they will damage the finish.
Oven Exterior
Do not use oven cleaners, abrasive cleansers, strong liquid cleansers, steel wool, plastic scouring pads, or cleaning powders on the interior or exterior of the oven. Clean with a mild soap and water or vinegar and water solution. Rinse with clean water and dry with a soft cloth.
When cleaning surfaces, make sure that they are at room temperature and not in direct sunlight.
If stain on the door vent trim is persistent, use a mild abrasive cleaner and a sponge-scrubber for best results.
Spillage of marinades, fruit juices, tomato sauces and basting liquids containing acids may cause discoloration and should be wiped up immediately. Let hot surfaces cool, then clean and rinse.
Stainless Steel Surfaces (on some models)
Do not use a steel wool pad; it will scratch the surface.
To clean the stainless steel surface, use warm sudsy water or a stainless steel cleaner or polish. Always wipe the surface in the direction of the grain. Follow the cleaner instructions for cleaning the stainless steel surface.
To inquire about purchasing cleaning products including stainless steel appliance cleaner or polish, read the Assistance and Accessories section at the beginning of this manual.
How To Clean The Upper Oven Interior
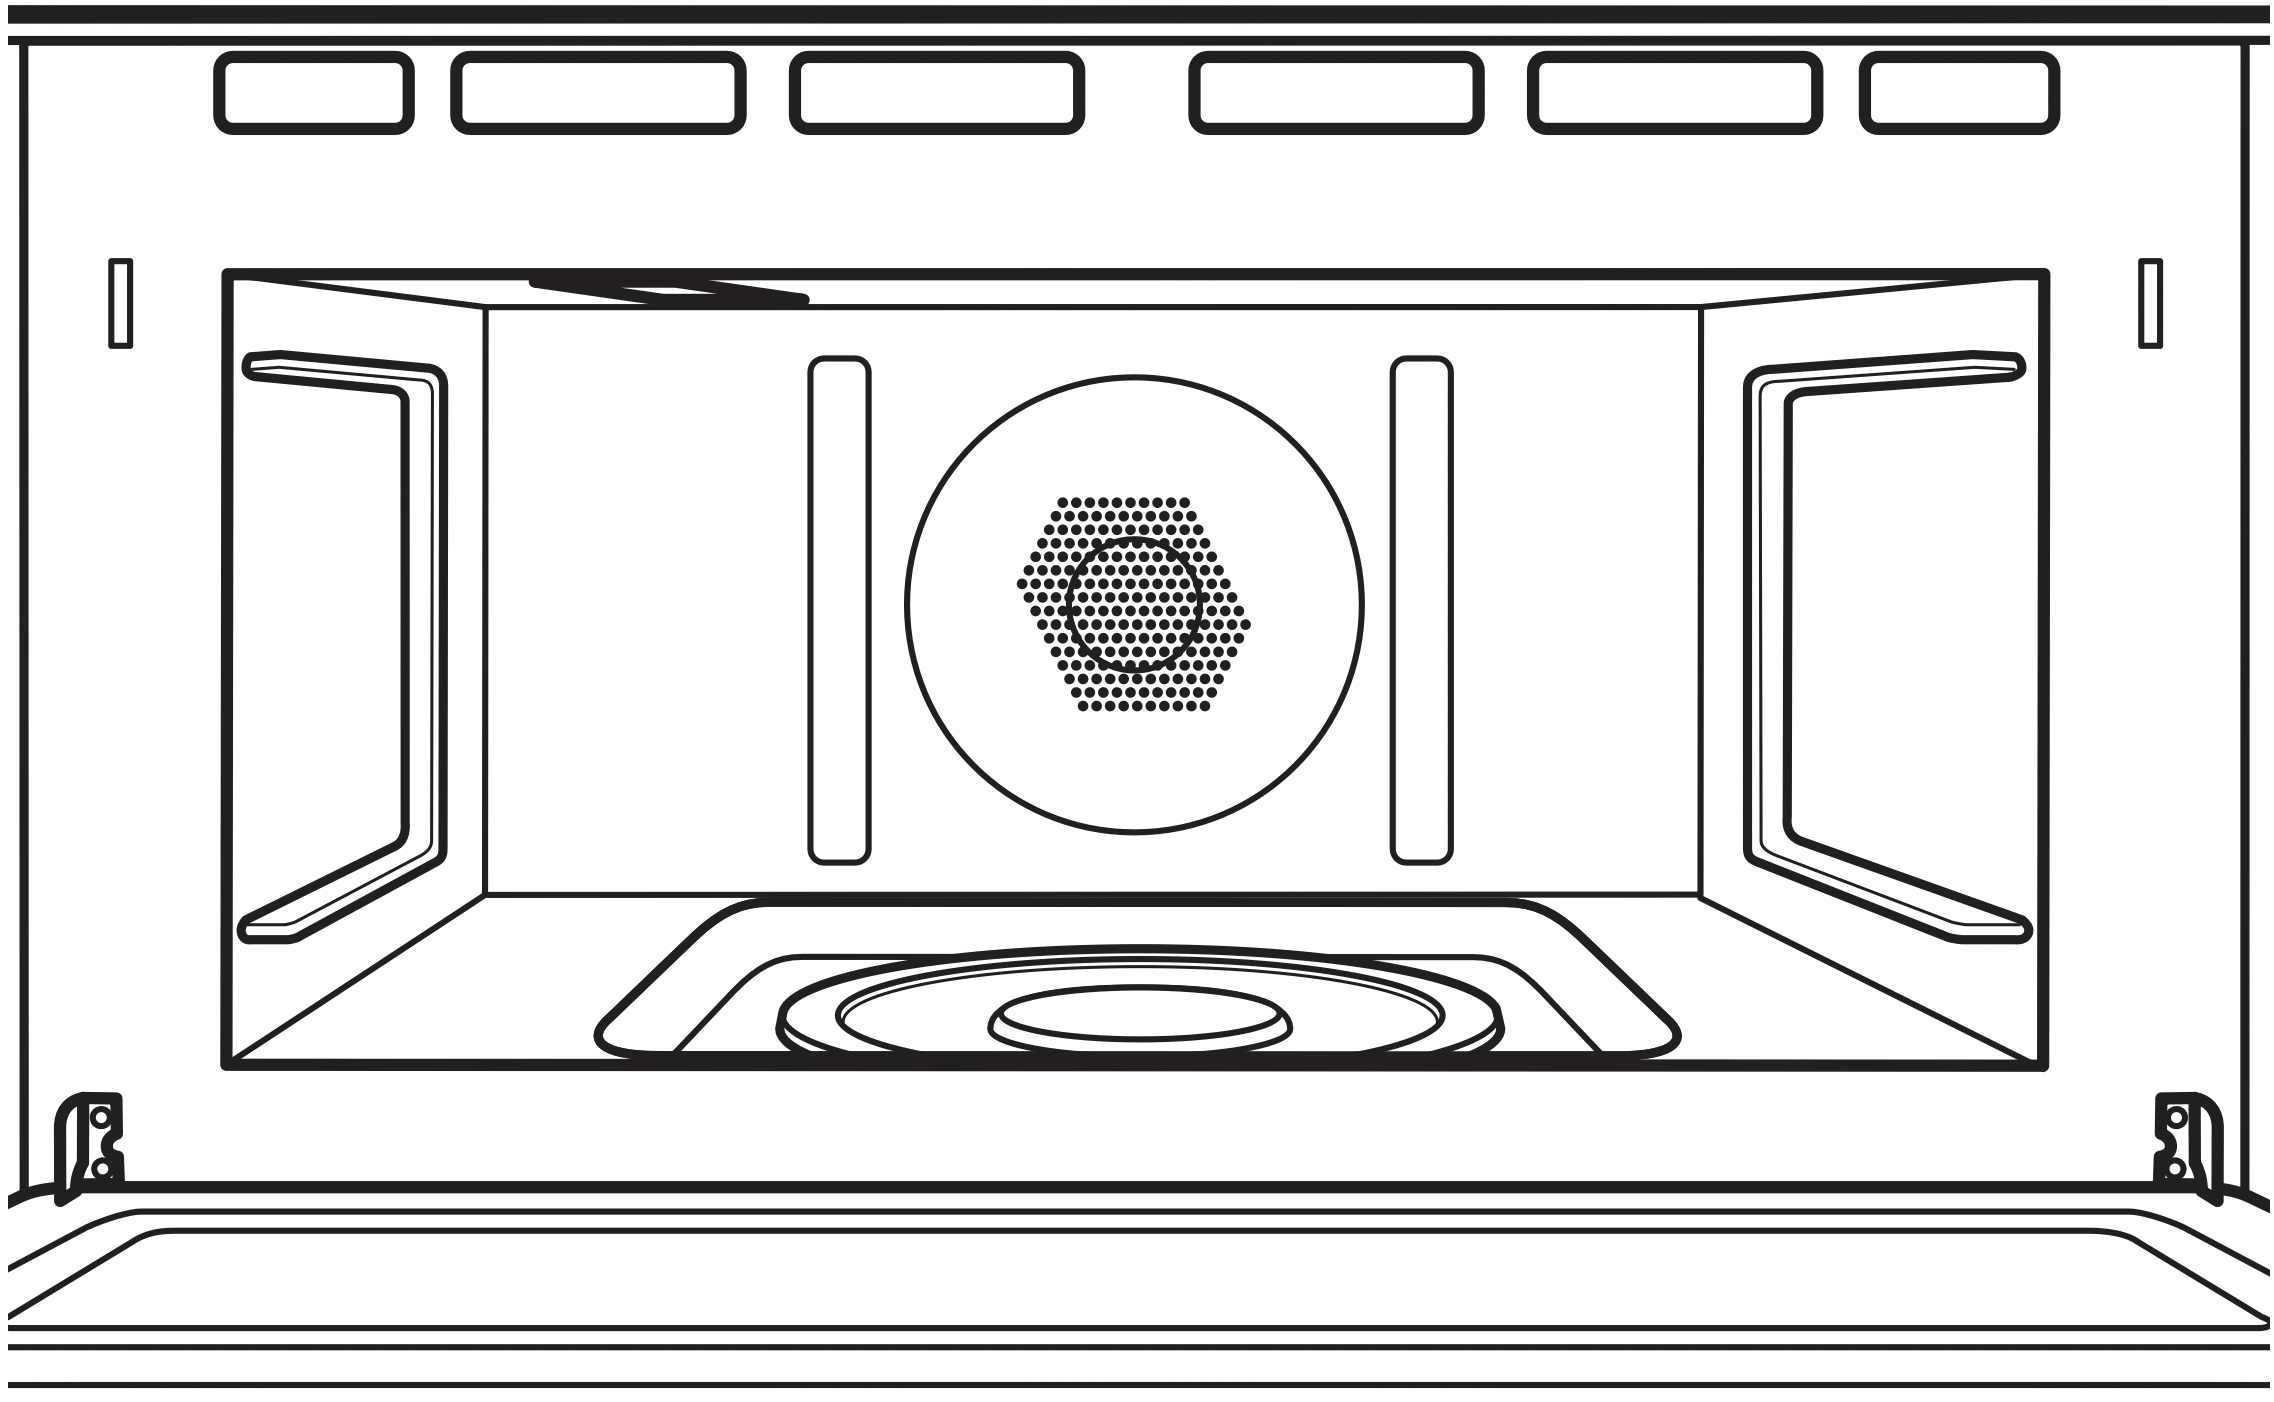
Walls, Floor, Inside Window, Metal and Plastic Parts on the Door
Clean the inside of the oven often for proper heating performance.
Some spatters can be removed with a paper towel, others may require a warm soapy cloth. Remove greasy spatters with a sudsy cloth; then rinse with a damp cloth.
Do not use abrasive cleaners or sharp utensils on oven walls.
Never use a commercial oven cleaner on any part of your oven.
Do not clean the inside of the oven with metal scouring pads. Pieces can break off the pad, causing electrical shock.
Door Seal
It's important to keep the area clean where the door seals against the oven. Use only mild, non abrasive detergents applied with a clean sponge or soft cloth. Rinse well.
Removable Turntable
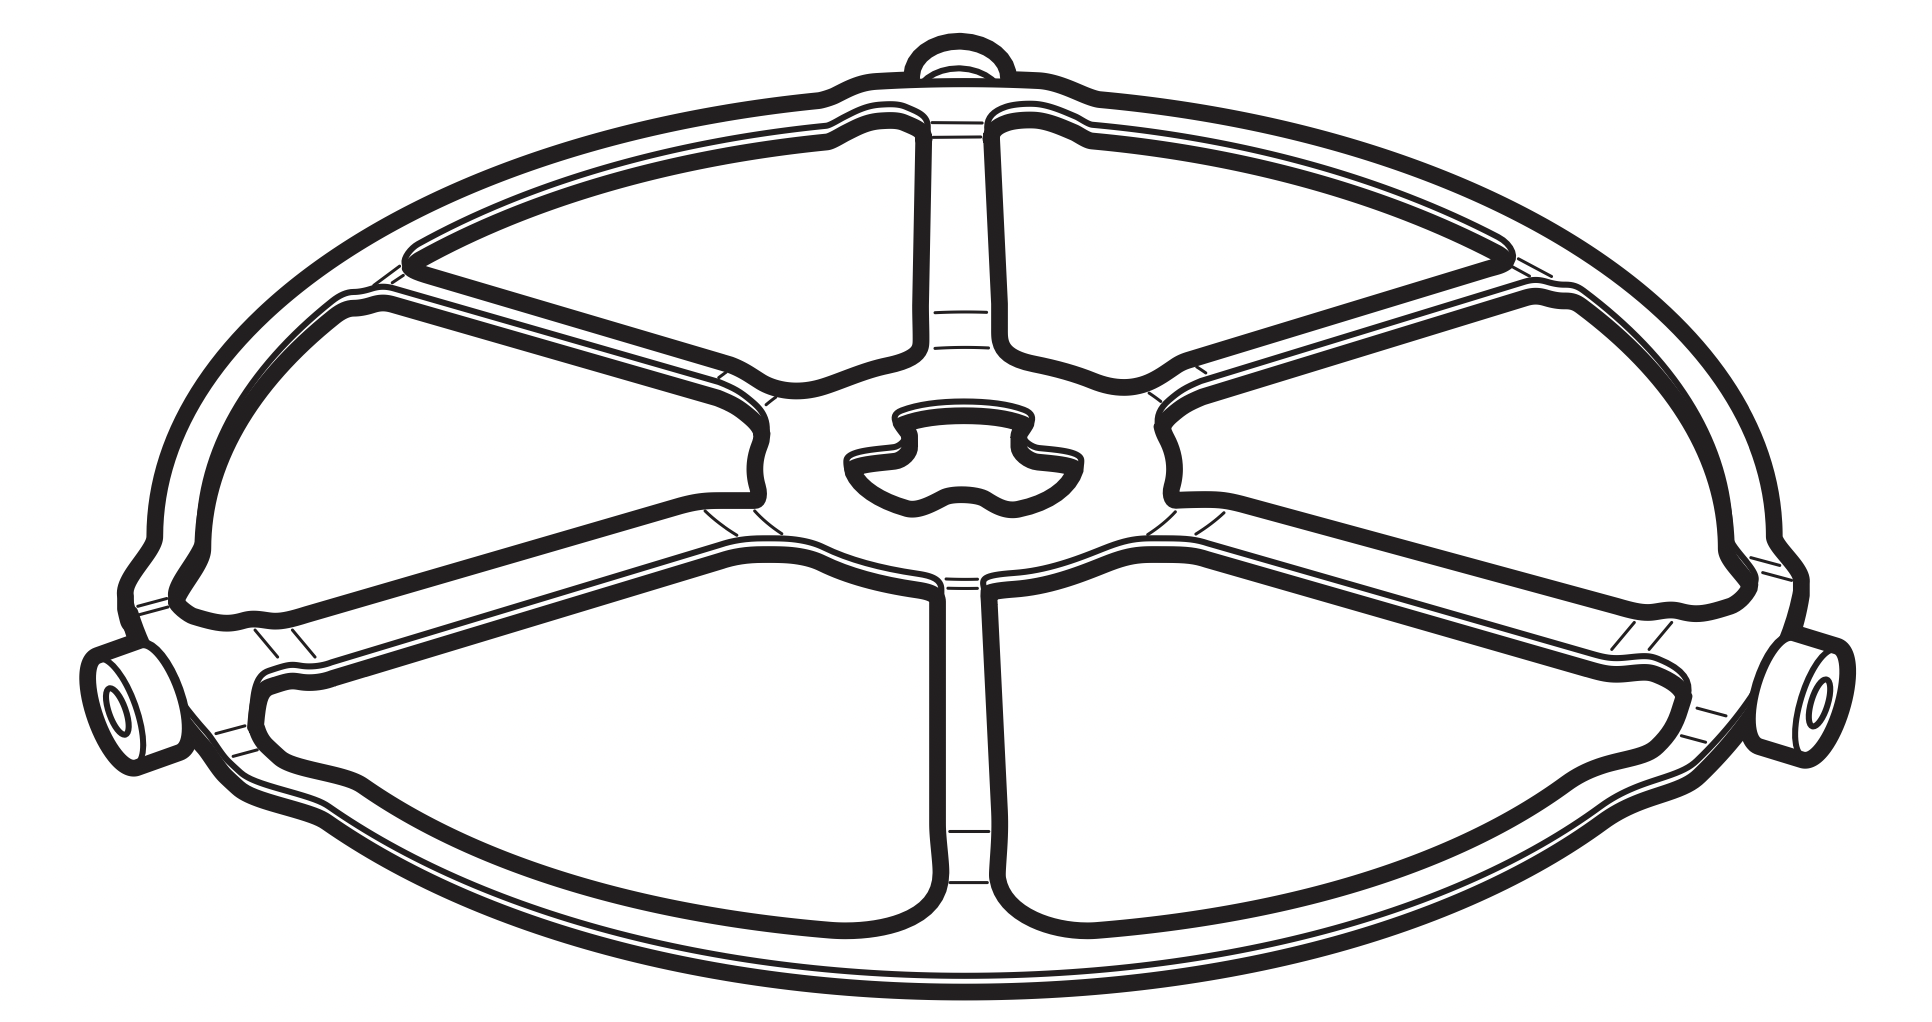
Turntable
Do not use the oven without the turntable in place.
The area underneath the turntable should be cleaned frequently to avoid odors and smoking during a cooking cycle.
The turntable can be broken if dropped. Wash carefully in warm, sudsy water. Dry completely and replace.
To replace the turntable, place its center over the spindle in the center of the oven and turn it until it seats into place. (Make sure the smooth side of the turntable is facing up and that its center seats securely on the spindle).
Cooking Trays And Baking Sheet
To prevent breakage, allow the trays to cool completely before cleaning. Wash carefully in warm, sudsy water orin the dishwasher.
Do not use metal scouring pads or abrasives, as they may damage the finish. A soap-filled scouring pad maybe used to clean the trays.

Clear glass tray for microwaving
How To Clean The Lower Oven Interior
The interior of your new oven can be cleaned manually or by using the Steam Clean or Self Clean modes.
Spillage of marinades, fruit juices, tomato sauces and basting liquids containing acids may cause discoloration and should be wiped up immediately. Let hot surfaces cool, then clean and rinse.
Manual Cleaning
Do not use oven cleaners, abrasive cleaners, strong liquid cleansers, steel wool, scouring pads, or cleaning powders on the interior of the oven. Clean with a mild soap and water or vinegar and water solution. Rinse with clean water and dry with a soft cloth. When cleaning surfaces, make sure that they are at room temperature.
Steam Clean Mode
Steam clean is intended to clean small spilIs using water and a lower cleaning temperature than Self Clean.
To use the Steam Clean feature, wipe grease and soils from the oven. Pour one cup of water into the bottom of the oven.Close the door. Press the Options pad, select Steam Clean, and then press Start. The oven door will lock. You can not open the door during the30 minute steam clean as this will decrease the steam clean performance. At the end of the steam clean cycle the door will unlock. Wipe out any excess water and any remaining soil.
Self Clean Mode
Read Self-Cleaning Oven Safety Instructions at the beginning of this manual before using Self Clean Mode. Self-clean uses very high temperatures to clean the oven interior. The oven door will lock when using this feature.Before operating the self-clean cycle, wipe up grease and soils from the oven. Remove all items from the oven other than enameled (dark color) racks. Shiny or silver racks and any cookware or other items should all be removed from the oven before initiating a self-clean cycle. Close the door. Press the Options pad, select Self Clean, and a default self-clean time is displayed. The clean time can be changed to 3:00, 4:00, or 5:00 hours by using the selector dial. For heavily soiled ovens, the maximum 5 hour clean time is recommended. If you wish to use the default time, press the Start pad immediately after selecting the Self Clean. The oven will turn off automatically when the self-clean cycle is complete. The door will stay locked until the oven has cooled down. After the oven has cooled down wipe any ash out of the oven.
IMPORTANT: The health of some birds is extremely sensitive to the fumes given off during the self-cleaning cycle of any range. Move birds to another well-ventilated room.
Flat Racks
Flat racks can be left in the cavity during self-clean (if enameled racks, not shiny) or can be washed with warm, soapy water.
Racks may be more difficult to slide, especially after a self-clean. Put some vegetable oil on a soft cloth or paper towel and rub onto the left and right edges.
Lower Oven Maintenance
Lower Oven Light Replacement
WARNING - SHOCK OR BURN HAZARD: Before replacing oven light bulb, disconnect the electrical power to the oven at the main fuse or circuit breaker panel. Failure to do so may result in electric shock or burn.
CAUTION - BURN HAZARD: The glass cover and bulb should be removed when cool. Touching hot glass with bare hands or a damp cloth can cause burns.
- Disconnect power at the main fuse or circuit breaker panel.
- Remove oven racks.
- Slide a flat blade screwdriver between the housing and the glass light cover.
- Support the glass light cover with two fingers to prevent the cover from falling to the bottom of the oven. Be careful not to chip the oven coating.
- Gently twist the screwdriver blade to loosen the glass light cover.
- Remove the glass light cover.
- Remove the bulb by firmly grasping and sliding the bulb straight out until the two prongs have cleared the ceramic holder.
- Do not touch the glass of the new replacement bulb with your fingers. It will cause the bulb to fail when it lights. Grasp the replacement bulb with a clean towel or facial tissue with the prongs facing down. Align the two prongs in the ceramic holder, pressing gently until the bulb is securely in the ceramic socket.
- Slide the protective lens into the holder and push until the clips snap into the housing.
- Reconnect power.
Lift-Off Lower Oven Door
The door is very heavy. Be careful when removing and lifting the door. Do not lift the door by the handle.
To remove the door:
- Fully open the door.
- Pull the hinge locks down toward the door frame, to the unlocked position. A tool, such as a small flat-blade screwdriver, may be required.
- Firmly grasp both sides of the door at the top.
- Close door to the door removal position. The door should be open approximately 3" with no obstruction above the door.
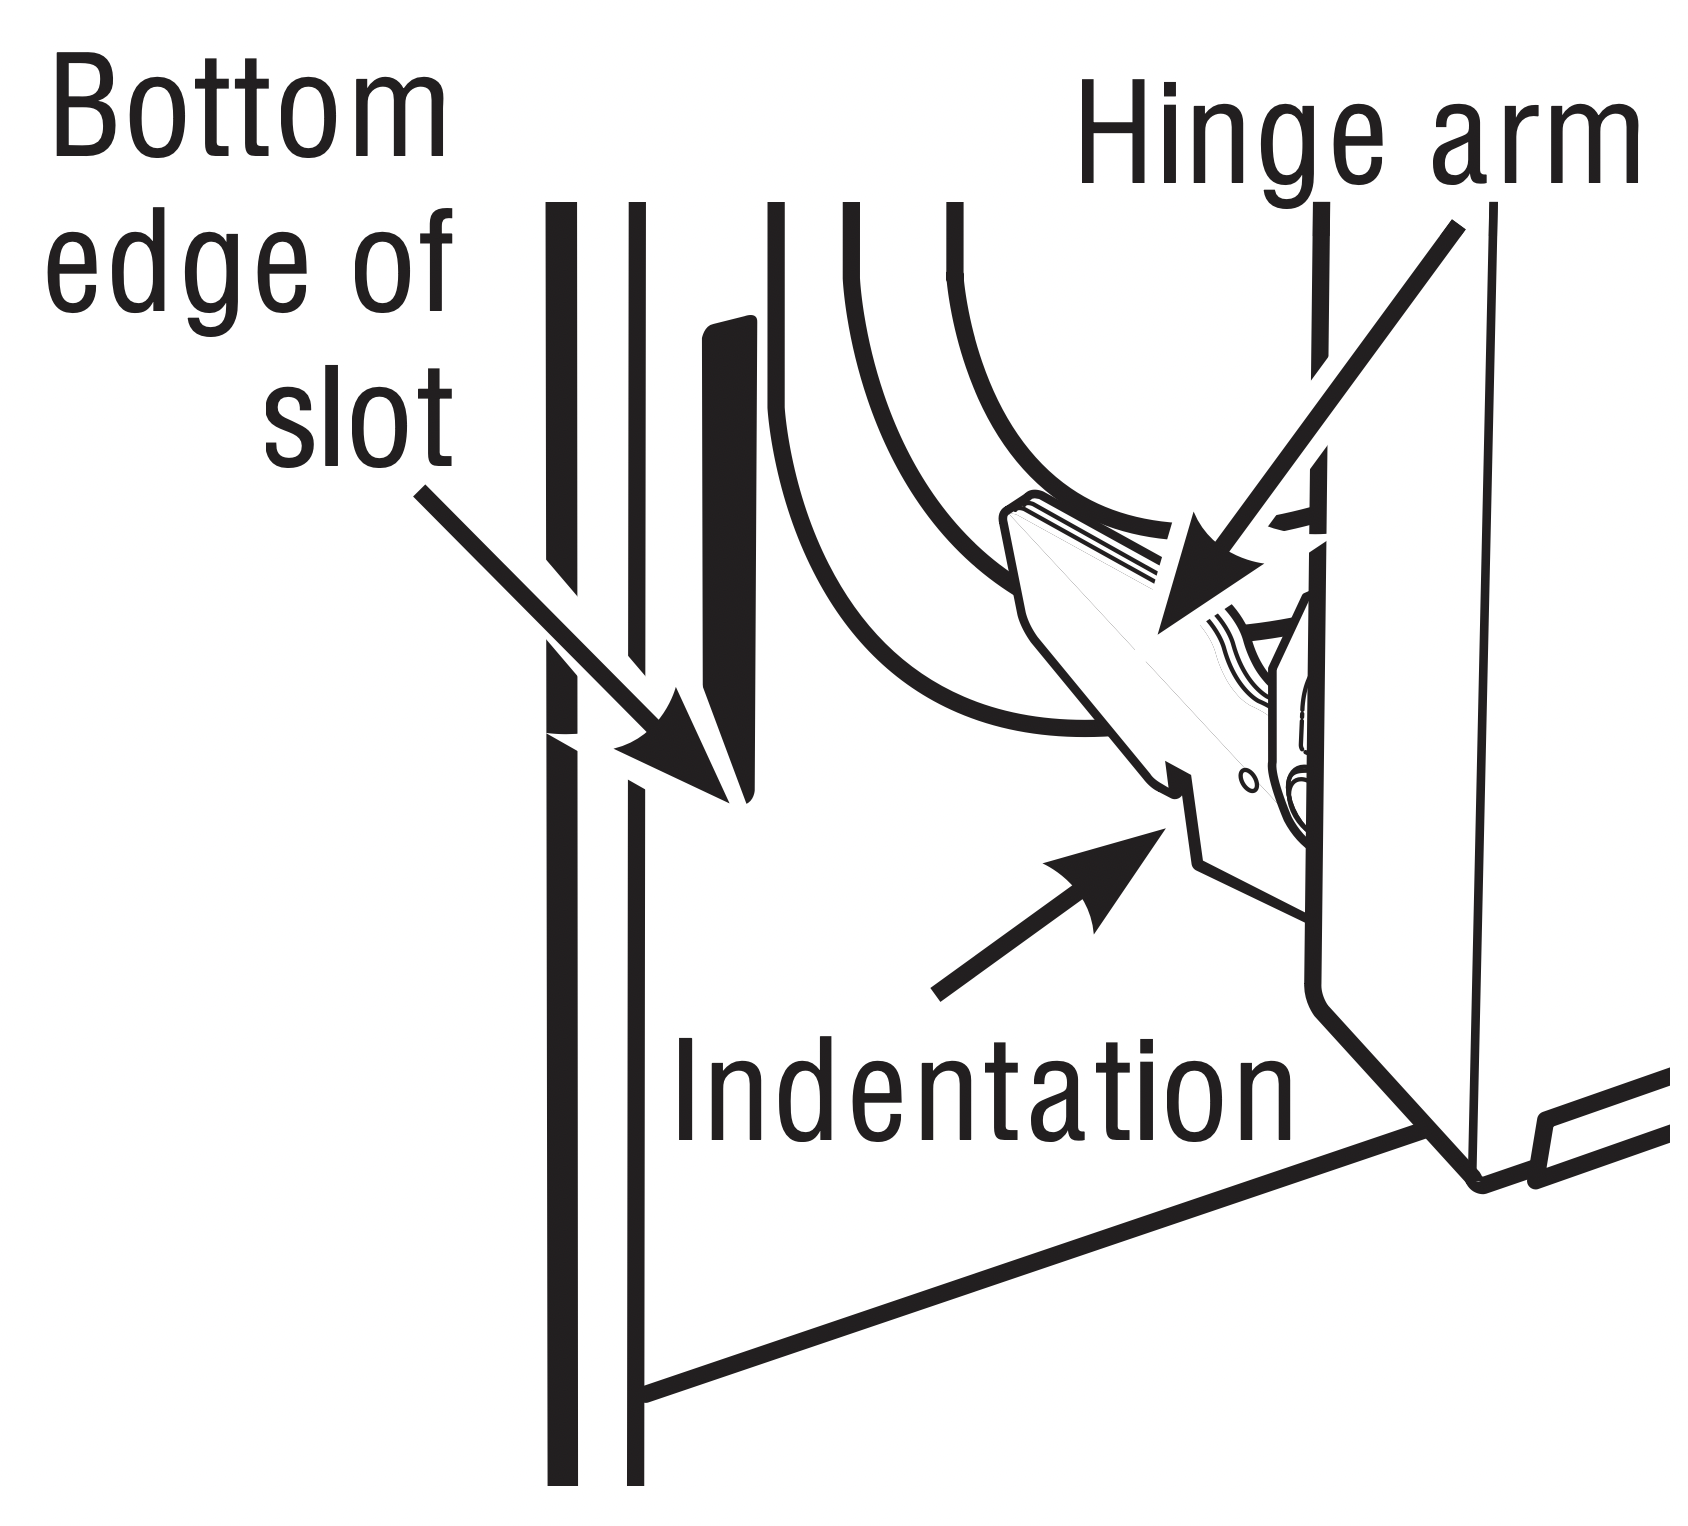
- Lift door up and out until both hinge arms are clear of the slots.

Pull hinge locks down to unlock

Removal position
To replace the door:
- Firmly grasp both sides of the door at the top.
- Starting on the left side, with the door at the same angle as the removal position, seat the indentation of the hinge arm into the bottom edge of the hinge slot. The notch in the hinge arm must be fully seated into the bottom of the slot. Repeat for right side.
- Fully open the door. If the door will not fully open, the indentation is not seated correctly in the bottom edge of the slot.
- Push the hinge locks up against the front frame of the oven cavity, to the locked position.
- Close the oven door.

Push hinge locks up to lock
Troubleshooting
|
Problem |
Possible Cause |
What To Do |
|
FAN |
||
|
Fan continues to run after cooking stops |
The oven is cooling. |
The fan will automatically shut off when the internal parts of the oven have cooled. |
|
Oven vent emits warm air while oven is on |
This is normal. |
|
|
Fan comes on automatically when using the microwave |
This is normal. |
|
|
COOKING |
||
|
The oven makes unusual sounds while cooking |
Clicks and fans blowing are normal. The relay board is turning the components on and off. |
These sounds are normal |
|
Smoke comes out of the oven when I open the door |
Food is high in fat content. Aerosol spray used on the pans. |
Smoke is normal when cooking high-fat foods. |
|
Food is not fully cooked or browned at the end of a cooking program |
Programmed times may not match the size or amount of food you are cooking. |
Adjust time for doneness or adjust the upper or lower lamps for browning and doneness. |
|
SENSOR ERROR displayed along with an oven signal |
Food amount or type placed in the ovendoes not match the program that wasset. |
Press the Clear/Off pad. Set the oven program to match the food or liquid to be cooked or heated. |
|
Steam was not sensed by the oven because plastic wrap was not vented, a lid too tight was on the dish or a liquid was covered. |
Vent plastic wrap, use a looser lid or uncover liquids when cooking or heating. |
|
|
DISPLAY |
||
|
The display is blank |
Power saver mode may be activated. |
Check the Settings menu for clock display settings. |
|
A fuse in your home may be blown or the circuit breaker tripped. |
Replace the fuse or reset the circuit breaker. |
|
|
Power outage or surge |
Reset the clock. If the oven was in use, you must reset it by pressing the Clear/Off pad, setting the clock and resetting any cooking function. |
|
|
“Control is LOCKED” appears in display |
The control has been locked. |
Press and hold Settings pad for 3 seconds to unlock the control. |
|
Control display is lit yet oven will not start |
Clock is not set. |
Set the clock |
|
Door not securely closed. |
Open the door and close securely |
|
|
Start/Pause pad or selector dial not pressed after entering cooking selection. |
Press Start/Pause pad or selector dial. |
|
|
Another selection already entered in oven and Clear/Off pad not pressed to cancel it. |
Press Clear/Off pad. |
|
|
Size, quantity or cooking time not entered after final selection. |
Make sure you have entered cooking time after selecting. |
|
|
Clear/Off pad was pressed accidentally. |
Reset cooking program and press Start/Pause pad. |
|
|
OTHER PROBLEMS |
||
|
The door and inside of the oven feels hot |
The heat lamps produce intense heat in a small space. |
This is normal. Use oven mitts to remove food when ready. |
|
Oven will not start |
A fuse in your home may be blown or the circuit breaker tripped. |
Replace fuse or reset circuit breaker. |
|
Cannot edit cooking features |
Some pre-programmed cooking features may not be able to be edited to prevent degradation of cooking performance. |
This is normal. |
|
The pads on one side of the control do not function |
The control has locked out the use of these pads and need to be reset. |
Press and hold the Clear/Off pad on the other side of the display for 30 seconds. If this does not reset the control, it may be necessary to cycle the circuit breaker. |
|
My new oven doesn't cook like my old one. Is something wrong with the temperature settings? |
Your new oven has a different cooking system from your old oven and therefore may cook differently than your old oven. |
For the first few use, follow your recipe times and temperatures carefully. If you still think your new oven is too hot or too cold, you can adjust the temperature yourself to meet your specific cooking preference. NOTE: This adjustment affects Bake temperatures; it will not affect Broil or Clean. |
|
Food does not bake properly |
Oven controls improperly set. |
See the Cooking Modes section. |
|
Rack position is incorrect or rack is not level. |
See the Cooking Modes section and Cooking Guide. | |
|
Incorrect cookware or cookware of improper size being used. |
See the Cookware section. |
|
|
Oven temperature needs adjustment. |
See the Settings section. |
|
|
Ingredient substitution |
Substituting ingredients can change the recipe outcome. |
|
|
Food does not broil properly |
Oven controls improperly set. |
Make sure you select the appropriate broil mode. |
|
Improper rack position being used. |
See Cooking Guide for rack location suggestions. |
|
|
Food being cooked in a hot pan. |
Make sure cookware is cool. |
|
|
Cookware not suited for broiling. |
Use a pan specifically designed for broiling. |
|
|
Aluminum foil used on the broiling pan and grid has not been fitted properly and slit as recommended. |
If using aluminum foil conform to pan slits. |
|
|
In some areas the power (voltage) may be low. |
Preheat the broil element for 10 minutes. |
|
|
Oven temperature too hot or too cold |
Oven temperature needs adjustment. |
See the Settings section. |
|
Oven does not work or appears not to work |
A fuse in your home may be blown or the circuit breaker tripped. |
Replace the fuse or reset the circuit breaker. |
|
Oven controls improperly set. |
See the Using the Oven sections |
|
|
Oven is in Sabbath Mode. |
Verify, that the oven is not in Sabbath Mode. See the Sabbath Mode section. |
|
|
“Crackling” or “popping” sound |
This is the sound of the metal heating and coolingduring both the cooking and cleaning functions. |
This is normal. |
|
Why is my range making a "clicking" noise when using my oven? |
Your range has been designed to maintain a tighter control over your oven's temperature. You may hear your oven's heating elements "click" on and off more frequently than in older ovens to achieve better results during baking, broiling, convection, and self-clean cycles. |
This is normal. |
|
Clock and timer do not work |
A fuse in your home may be blown or the circuit breaker tripped. |
Replace the fuse or reset the circuit breaker. |
|
Oven light does no twork |
Light bulb is loose or defective. |
Tighten or replace bulb. |
|
Pad operating light is broken. |
Call for service |
|
|
Oven will not self-clean |
The temperature is too high to set a self-clean operation. |
Allow the oven to cool and reset the controls |
|
Oven controls improperly set. |
See the Cleaning the Oven section. |
|
|
Excessive smokingduring clean cycle |
Excessive soil or grease. |
Press the Clear/Off pad. Open the windows to rid the room of smoke. Wait until the OVEN IS COOLING DOOR IS LOCKED display goes off. Wipe up the excess soil and reset the clean cycle. |
|
Excessive smoking during broiling |
Food too close to burner element. |
Lower the rack position of the food. |
|
Oven door will not open after a clean cycle |
Oven too hot. |
Allow the oven to cool below locking temperature. |
|
Oven not clean after a clean cycle |
Oven controls improperly set. |
See the Cleaning the Oven section. |
|
Oven was heavily soiled. |
Clean up heavy spillovers before starting the clean cycle. Heavily soiled ovens may need to self-clean again or for a longer period of time. |
|
|
"CLOSE DOOR TO CONTINUE COOKING" show on display section |
The door is open during a cooking orcleaning feature. |
Close the oven door. |
|
"OVEN IS COOLING DOOR IS LOCKED" show on display section |
The oven door is locked because the temperature inside the oven has not dropped below the unlocking temperature. |
Press the Clear/Off pad. Allow the oven to cool. |
|
An oven error and "SERVICE MAY BE NEEDED" show in the display |
You have a function error code. |
Press the Clear/Off pad. Allow the oven to cool for one hour. Put the oven back into operation. |
|
If the function code repeats. |
Disconnect all power to the oven for at least 30 seconds and then reconnect power. If the function error code repeats, call for service. |
|
|
“Burning” or “oily” odor emitting from the vent |
This is normal in a new oven and will disappear in time. |
To speed the process, set a self-clean cycle for a minimum of 3 hours. See the Cleaning the Oven section. |
|
Strong odor |
An odor from the insulation around theinside of the oven is normal for the firstfew times the oven is used. |
This is temporary and will go away after several uses or a self-clean cycle. |
|
Fan noise |
A cooling fan may automatically turnon. |
This is normal.The cooling fan will turn on to cool internal parts. It may run for up to 1-1/2 hours after the oven is turned off. |
|
My oven door glass appears to be "tinted" or have a "rainbow" color. Is this defective? |
No. The inner oven glass is coated witha heat barrier to reflect the heat backinto the oven to prevent heat loss andkeep the outer door cool while baking. |
This is normal. Under certain light or angles, you may see this tint or rainbow color. |
|
Sometimes the oven takes longer to preheat to the same temperature |
Cookware or food in oven |
The cookware or food in the oven will cause the oven to take longer to preheat. Remove items to reduce preheat time. |
|
Number of racks in oven |
Adding more racks to the oven will cause the oven to take longer to preheat. Remove some racks. |
|
