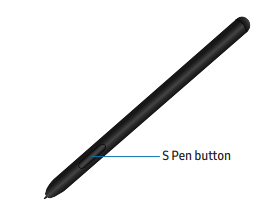
The S Pen provides a variety of helpful functions. Use your S Pen to launch apps, take notes, or draw a picture. Some S Pen functions, such as charging or tapping the touchscreen, may not work if the device is near a magnet.
Air Actions
The S Pen can be used to perform remote functions using the button and movements or gestures. You can set up shortcuts to your favorite apps, navigate screens on your devices, complete actions, and more. The S Pen remote feature is only supported by Samsung-approved S Pens with Bluetooth Low Energy (BLE). If the S Pen is too far from the device, or if there is interference, the S Pen disconnects from the device. The S Pen must be connected for Air actions to work.
Hold the S Pen button shortcut
Set a shortcut when you press and hold the S Pen button. By default, this option is set to launch the Camera app.
1. From Settings, tap Advanced features > S Pen > Air actions.
2. Tap Hold down Pen button to, and tap to enable the feature.
3. Tap an option to set the shortcut. Anywhere actions Anywhere actions are configurable shortcuts that are accessed by holding the S Pen button while making one of the following gestures: up, down, left, right, or shake. These can be accessed from any screen and can include navigation, S Pen features, or apps.
Anywhere actions
Anywhere actions are configurable shortcuts that are accessed by holding the S Pen button while making one of the following gestures: up, down, left, right, or shake. These can be accessed from any screen and can include navigation, S Pen features, or apps.
Back : Left to right
Recent apps : Right to left
Home : Up and down
Smart select : Down and up
Screen write : Zigzag
You can change the Anywhere actions in Settings.
1. From Settings, tap Advanced features > S Pen > Air actions.
2. Tap a Gesture icon under Anywhere actions to customize the shortcut.
App actions
You can use your S Pen to do specific actions in certain apps. These are some of the default App actions:
You can change the app actions in Settings.
1. From Settings, tap Advanced features > S Pen > Air actions.
2. Tap an app to view the available shortcuts.
3. Tap to enable the shortcuts while using that app
General app actions
You can customize some general actions while using camera and media apps not specified in the app action list.
1. From Settings, tap Advanced features > S Pen > Air actions.
2. Under General app actions, tap an action to change it.
Air view
Hover the S Pen over the screen to preview content or view information about an item on the screen. The following Air view features are available:
• Preview an email message before opening it.
• Preview the contents of a photo album or enlarge a picture.
• Preview a video and navigate to a specific scene by hovering over the timeline.
• View the name or description of an icon or a button.
Air command
Access signature S Pen features from any screen, including Smart select, Screen write, and Samsung Notes.
1. Tap Air command or hold the S Pen near the screen so that the pointer appears, and then press the S Pen button once.
2. Tap an option:
• Create note: Launch a new note in the Samsung Notes app.
• View all notes: Launch the Samsung Notes app and view a listing of the notes you have created.
• Smart select: Draw around an area of the screen to collect it in the Gallery app.
• Screen write: Capture screenshots and write or draw on them.
• Live messages: Create a short animated message by drawing or writing with the S Pen.
• AR Doodle: Draw interactive doodles using the AR camera feature.
• Translate: Hover the S Pen over a word to see it translated into another language and listen to its pronunciation.
• PENUP: Use the S Pen to draw, color, edit, and share live drawings.
• Add shortcuts: Add more apps or functions to the Air command menu.
• Settings: Customize Air command by configuring apps and functions, and by changing how the Air command menu appears.
Create note
Launch a new note directly in the Samsung Notes app. For more information, see Samsung Notes.
◌ Tap Air command > Create note.
View all notes
Launch the Samsung Notes app and view a listing of the notes you have created.
◌ Tap Air command > View all notes.
Smart select
The Smart select feature allows you to copy content from any screen. You can then add it to your Gallery app or share it with your contacts.
1. Tap Air command > Smart select.
2. Tap a shape in the menu, and then drag the S Pen to select content. The following options appear:
• Extract text: Identify and extract text from the selected content.
• Auto select: Allow Smart select to automatically select content to extract.
• Draw: Draw on the captured content.
• Share: Choose a sharing method to share your content.
3. Tap Save.
Screen write
Screen write allows you to capture screenshots and write or draw on them.
1. Tap Air command > Screen write. c
2. The current screen is captured, and a pen tool appears. The following editing tools are provided:
• Crop: Drag the edges of the screen to crop the captured content.
• Pen type: Draw on the screenshot. Tap the Pen icon a second time to change the pen tip, size, and color.
• Eraser: Erase the writing or drawings on the screenshot.
• Undo: Reverse the last action.
• Redo: Repeat the last action that was undone.
• Share: Choose a sharing method to share your content.
3. Tap Save. The content is saved to the Gallery app
TIP : Hold the S Pen button to erase your drawings on the screen memo.
Live messages
Record an animated drawing or written message.
1. Tap Air command > Live messages.
2. Select one of the following background options:
• Collection: See all live messages you have created.
• Gallery: Pick an image or video for the background.
• Camera: Capture an image to use for the background.
• Color: Pick a color for the background.
3. Follow the prompts to begin creating your live message.
4. Tap Done to save.
AR Doodle
Draw interactive doodles on faces or other objects seen through the camera using augmented reality.
1. Tap Air command > AR Doodle.
2. Select either the front or rear cameras by tapping Switch cameras.
3. Position the camera so that your target is in the center of the screen.
4. Use the S Pen to draw a doodle.
• The doodle follows the movements of the face in real-time.
5. Tap Record to save a video of your AR Doodle.
Translate
Hover over words with the S Pen to translate them and listen to their pronunciation.
1. Tap Air command > Translate.
2. Tap the source and target languages to change them to the desired languages.
3. Hover the S Pen over a word.
• Tap Sound to hear the word pronounced in the source language.
• Tap Copy to save the selected text and the translation to your clipboard.
4. Tap Close to close Translate.
PENUP
Use the S Pen to draw, color, edit, and share live drawings. For more information, see PENUP.
◌ Tap Air command > PENUP.
Add shortcuts
You can customize the Air command menu by adding shortcuts to apps and functions.
1. Tap Air command > Add shortcuts.
2. Tap the apps or functions you would like to add to the Air command menu.
• To remove an app shortcut, tap Remove.
3. Tap Back to save your selection.
Screen off memo
You can write memos without turning your device on.
1. While the screen is off, press the S Pen button and tap the screen.
2. Tap an option to customize your memo:
• Color: Change the pen color.
• Pen settings: Tap to use the pen tool. Double tap to adjust the line thickness.
• Eraser: Tap to use the eraser tool. Double tap to erase all.
3. Tap Save to save your memo to the Samsung Notes app.
Configure S Pen settings
To configure S Pen settings:
◌ From Settings, tap Advanced features > S Pen to configure the following settings: l Air actions:
• Configure how the remote control functions while using apps.
• S Pen unlock: Use the S Pen button to unlock the device. A secure screen lock must be set to use this feature.
• Screen off memo: Create memos without turning on the screen. Screen off memos are saved in Samsung Notes.
• Create note with Pen button: Press and hold the S Pen button, then tap the screen twice with your S Pen to start a new note.
• Air view: Turn Air view on or off.
• Show pointer when hovering: Turn the pointer on or off. The pointer appears on the screen when the tip of the S Pen is near the screen, showing available actions.
• Allow multiple S Pens: Let other S Pens write on the screen.
Air Command
• Shortcuts: Configure the Air command menu with S Pen features, apps, and functions.
• Show floating icon: Show an Air command icon that you can move around the screen.
• Open Air command with Pen button: Open the Air command menu when you hover your S Pen over the screen and press the Pen button.
Removal
• When S Pen is removed: Choose what happens when you detach the S Pen. Choose Open Air command, Create note, or Do nothing.
Feedback
• Sound: Set your device to make sounds when writing on the screen.
General
• Tips for using your S Pen: Find out how to use S Pen features.
• About S Pen features: View version information for the S Pen features.
• Contact us: Contact Samsung support through Samsung Members.
Replace the S Pen tip
If the S Pen tip becomes worn, you can replace it with a new one (sold separately).
Mobile continuity
Access storage and other functions of your device across compatible mobile devices and computers.
Samsung DeX
Connect your device to a PC or TV for an enhanced multitasking experience.
• Send DeX to your TV and keep using your device, or turn your device into a trackpad.
• Connect to a TV or monitor either wirelessly or with an HDMI cable.
• Get DeX on your PC for quick and easy file transfers.
Enable DeX
1. From Quick settings, tap DeX.
2. Follow the instructions on your device to connect to your TV or PC.
• If connecting to a PC, download the DeX app on to your computer
Call and text on other devices
This feature allows you to make and answer calls and text messages from your Galaxy devices that are signed in to your Samsung account.
1. From Settings, tap Advanced features > Call & text on other devices.
2. Tap to turn on the feature. Connection occurs automatically.
3. Sign in to your Samsung account on your Galaxy devices.
TIP : Move your contacts from your device to your Samsung account so you can access them on all registered devices.
Bixby
Bixby is a virtual assistant that learns, evolves, and adapts to you. It learns your routines, helps you set up reminders based on time and location, and is built in to your favorite apps. Visit samsung.com/us/support/owners/app/Bixby for more information.
◌ From a Home screen, press and hold the Side key.
TIP : You can also access Bixby from the Apps list
Biometric security
Use biometrics to securely unlock your device and log in to accounts.
Face recognition
You can enable Face Recognition to unlock your screen. To use your face to unlock your device, you must set a pattern, PIN, or password.
• Face recognition is less secure than Pattern, PIN, or Password. Your device could be unlocked by someone or something that looks like your image.
• Some conditions may affect face recognition, including wearing glasses, hats, beards, or heavy make-up.
• When registering your face, ensure that you are in a well-lit area and the camera lens is clean
1. From Settings, tap Biometrics and security > Face recognition.
2. Follow the prompts to register your face.
Face recognition management
Customize how face recognition works.
◌ From Settings, tap Biometrics and security > Face recognition.
• Remove face data: Delete existing faces. • Add alternative look: Enhance face recognition by adding an alternative appearance.
• Face unlock: Enable or disable face recognition security.
• Stay on Lock screen: When you unlock your device with face recognition, stay on the Lock screen until you swipe the screen.
• Faster recognition: Turn on for faster face recognition. Turn off to increase security and make it harder to unlock using an image or video of your likeness.
• Require open eyes: Facial recognition will only recognize your face when your eyes are open.
• Brighten screen: Increase the screen brightness temporarily so that your face can be recognized in dark conditions.
• Samsung Pass: Access your online accounts using face recognition.
• About unlocking with biometrics: Learn additional information about securing your device with biometrics.
Fingerprint scanner
Use fingerprint recognition as an alternative to entering passwords in certain apps. You can also use your fingerprint to verify your identity when logging in to your Samsung account. To use your fingerprint to unlock your device, you must set a pattern, PIN, or password.
1. From Settings, tap Biometrics and security > Fingerprints.
2. Follow the prompts to register your fingerprint.
Fingerprint management
Add, delete, and rename fingerprints.
◌ From Settings, tap Biometrics and security > Fingerprints for the following options:
• The list of registered fingerprints is at the top of this list. You can tap a fingerprint to remove or rename it.
• Add fingerprint: Simply follow the prompts to register another fingerprint.
• Check added fingerprints: Scan your fingerprint to see if it has been registered.
Fingerprint verification settings
Use fingerprint recognition to verify your identity in supported apps and actions.
◌ From Settings, tap Biometrics and security > Fingerprints.
• Fingerprint unlock: Use your fingerprint for identification when unlocking your device.
• Show icon when screen is off: Show the fingerprint icon when the screen is off (Galaxy Tab S7+ 5G only).
• Show animation when unlocking: Show an animation when you use fingerprint verification (Galaxy Tab S7+ 5G only).
• Fingerprint always on: Wake and unlock your device by just touching the Side key (Galaxy Tab S7 5G only).
• Samsung Pass: Use your fingerprint for identification when using supported apps.
• About unlocking with biometrics: Read details on the requirements each biometric security feature has for using your pattern, PIN, or password as a backup.
Biometrics preferences
Configure your preferences for biometric security options.
◌ From Settings, tap Biometrics and security > Biometrics preferences for the following:
• Screen transition effect: Show a transition effect when you use biometrics to unlock your device.
Dark mode
Dark mode allows you to switch to a darker theme to keep your eyes more comfortable at night, darkening white or bright screens and notifications.
◌ From Settings, tap Display for the following options:
• Light: Apply a light color theme to your device (default).
• Dark: Apply a dark color theme to your device.
• Dark mode settings: Customize when and where Dark mode is applied.
– Turn on as scheduled: Configure Dark mode for either Sunset to sunrise or Custom schedule.
– Apply to wallpaper: Apply Dark mode settings to the wallpaper when it is active.
– Adaptive color filter: Turn on Blue light filter automatically between sunset and sunrise to reduce eye strain (Galaxy Tab S7+ 5G only)
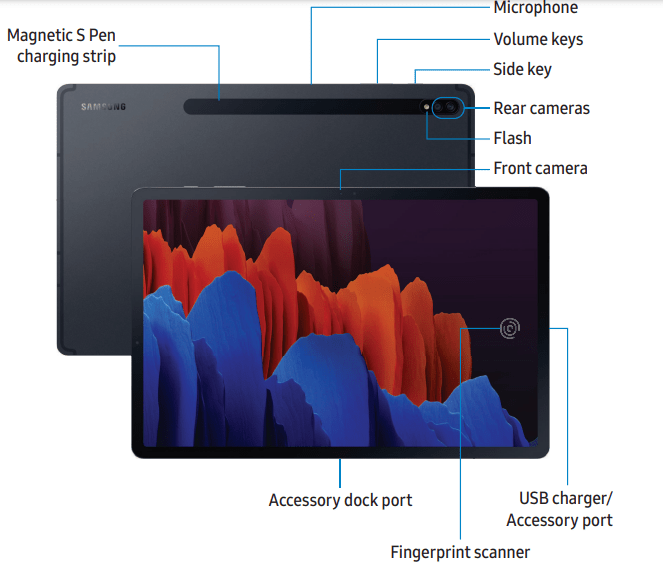
Getting started
Galaxy Tab S7 5G
Galaxy Tab S7+ 5G
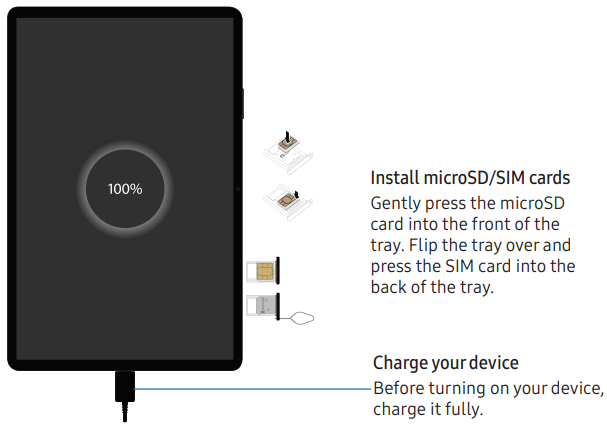
Set up your device
Charge the battery
Your device is powered by a rechargeable battery. A charger (charging head and USB Type-C cable) is included with the device for charging the battery from a power outlet.
Accessories
Supported accessories (sold separately) can be configured through Settings. This option may only appear after you have connected an accessory to your device.
Start using your device
Turn on your device
Use the Side key to turn your device on. Do not use the device if the body is cracked or broken. Use the device only after it has been repaired.
◌ Press and hold the Side key to turn the device on.
• To turn the device off, open the Notification panel, and tap Power > Power off. Confirm when prompted.
• To restart your device, open the Notification panel, and tap Power > Restart. Confirm when prompted.
Use the Setup Wizard
The first time you turn your device on, the Setup Wizard guides you through the basics of setting up your device. Follow the prompts to choose a default language, connect to a Wi-Fi® network, set up accounts, choose location services, learn about your device’s features, and more.
Transfer data from an old device
Use Smart Switch™ to transfer contacts, photos, music, videos, messages, notes, calendars, and more from your old device. Smart Switch can transfer your data via USB cable, Wi-Fi, or computer.
1. From Settings, tap Accounts and backup > Smart Switch.
2. Follow the prompts and select the content to transfer. Visit samsung.com/smartswitch for more information.
Lock or unlock your device
Use your device’s screen lock features to secure your device. By default, the device locks automatically when the screen times out. For more information about screen locks, see Lock screen and security.
Side key settings
You can customize the shortcuts assigned to the Side key.
Double press
Choose which feature is launched when the Side key is pressed twice.
1. From Settings, tap Advanced features > Side key.
2. Tap Double press to enable this feature, and tap an option:
Quick launch camera (default)
Open Bixby
Open app
Press and hold
Choose which feature is launched when you press and hold the Side key.
1. From Settings, tap Advanced features > Side key.
2. Under the Press and hold heading, tap an option:
Wake Bixby (default)
Power off menu
Accounts
Set up and manage your accounts.
Add a Google Account
Sign in to your Google Account to access your Google Cloud Storage, apps installed from your account, and make full use of your device’s Android™ features.
1. From Settings, tap Accounts and backup > Accounts.
2. Tap Add account > Google.
Add a Samsung account
Sign in to your Samsung account to access exclusive Samsung content and make full use of Samsung apps.
1. From Settings, tap Accounts and backup > Accounts.
2. Tap Add account > Samsung account.
Add an Outlook account
Sign in to your Outlook® account to view and manage email messages.
1. From Settings, tap Accounts and backup > Accounts.
2. Tap Add account > Outlook.
Navigation
A touch screen responds best to a light touch from the pad of your finger or a capacitive stylus. Using excessive force or a metallic object on the touch screen may damage the surface of the screen and the damage will not be covered by the warranty.
Tap
Lightly touch items to select or launch them.
Tap an item to select it.
Double-tap an image to zoom in or out.
Swipe
Lightly drag your finger across the screen.
Swipe the screen to unlock the device.
Swipe the screen to scroll through the Home screens or menu options.
Drag and drop
Touch and hold an item, and then move it to a new location.
Drag an app shortcut to add it to a Home screen.
Drag a widget to place it in a new location.
Zoom in and out
Bring your thumb and forefinger together or apart on the screen to zoom in and out.
Move your thumb and forefinger together on the screen to zoom out.
Move your thumb and forefinger apart on the screen to zoom in.
Touch and hold
Touch and hold items to activate them.
Touch and hold a field to display a pop-up menu of options.
Touch and hold a Home screen to customize the Home screen.
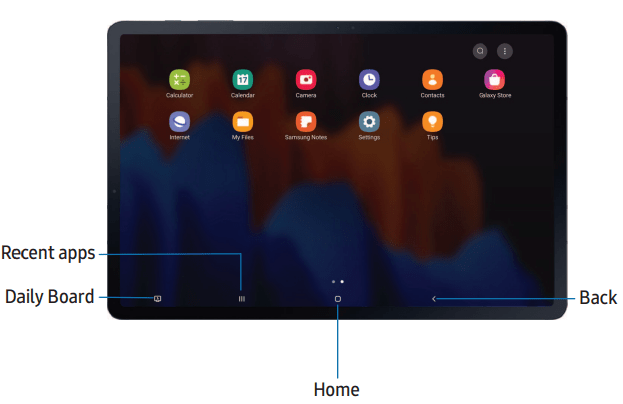
Navigation bar
You may navigate your device by using either the navigation buttons or full screen gestures.
Navigation buttons
Use buttons along the bottom of the screen for quick navigation.
1. From Settings, tap Display > Navigation bar > Navigation buttons.
2. Tap an option under Button order to choose which side of the screen the Back and Recent apps icons display
Navigation gestures
Hide the navigation buttons at the bottom of the screen for an unobstructed screen experience. Instead swipe to navigate your device.
1. From Settings, tap Display > Navigation bar > Full screen gestures to enable the feature.
2. Tap an option to customize:
More options: Choose a gesture type and sensitivity.
Gesture hints: Display lines at the bottom of the screen where each screen gesture is located.
Show button to hide keyboard: Show an icon on the bottom right corner of the screen to hide the keyboard when the device is in portrait mode. l Block gestures with S Pen: Prevent the S Pen from making navigation gestures.
Customize your home screen
The Home screen is the starting point for navigating your device. You can place your favorite apps and widgets here, in addition to setting up additional Home screens, removing screens, changing the order of screens, and choosing a main Home screen
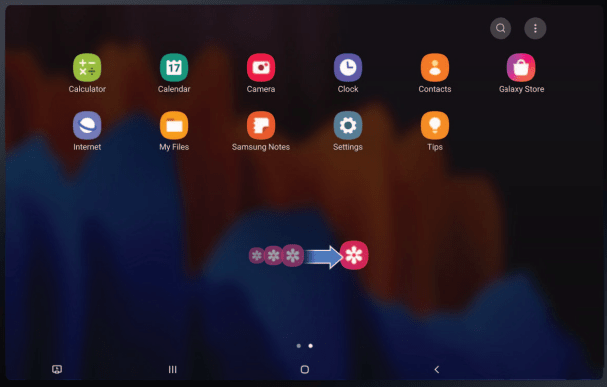
App icons
Use app icons to launch an app from any Home screen.
◌ From Apps, touch and hold an app icon, and tap Add to Home.
◌ From a Home screen, touch and hold an app icon, and then tap Remove from Home.
Wallpaper
Change the look of the Home and Lock screens by choosing a favorite picture, video, or preloaded wallpaper.
1. From a Home screen, touch and hold the screen, and then tap Wallpaper.
2. Tap one of the following menus for available wallpapers:
• My wallpapers: Choose from featured and downloaded wallpapers.
• Gallery: Choose pictures and videos saved in the Gallery app.
• Wallpaper services: Enable additional features including guide page and Dynamic Lock screen.
• Apply Dark mode to Wallpaper: Enable to apply Dark mode to your wallpaper.
3. Tap a picture or video to choose it.
4. Tap Set on Home screen, Set on Lock screen, or Set on Lock and Home screens (depending on which screens are applicable).
• If applying a wallpaper to both the Home and Lock screens, enable Sync my edits if you want any edits made to that wallpaper to be applied to both screens.
Widgets
Add widgets to your home screens for quick access to info or apps.
1. From a Home screen, touch and hold the screen.
2. Tap Widgets, and then touch and hold a widget, drag it to a Home screen, and release it.
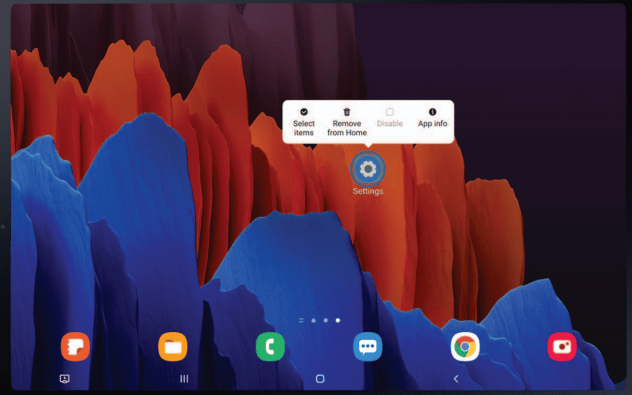
Customize Widgets
Once you have added a widget, you can customize where it's located and how it functions.
◌ From a Home screen, touch and hold a widget, and tap an option:
• Remove from Home: Delete a widget from your screen.
• Widget settings: Customize the function or appearance of the widget.
• App info: Review the widget usage, permissions, and more.
Home screen settings
Customize your Home and Apps screens.
1. From a Home screen, touch and hold the screen.
2. Tap Home screen settings to customize:
• Home screen layout: Set your device to have separate Home and Apps screens, or only a Home screen where all apps are located.
• Home screen grid: Choose a layout to determine how icons are arranged on the Home screen.
• Apps screen grid: Choose a layout to determine how icons are arranged on the Apps screen.
• Apps button: Add a button to the Home screen for easy access to the Apps screen.
• App icon badges: Enable to show badges on apps with active notifications. You can also choose the badge style.
• Lock Home screen layout: Prevent items on the Home screen from being removed or repositioned.
• Add apps to Home screen: Automatically add newly-downloaded apps to the Home screen.
• Swipe down for notification panel: Enable this feature to open the Notification panel by swiping down anywhere on the Home screen.
• Hide apps: Choose apps to hide from the Home and App screens. Return to this screen to restore hidden apps. Hidden apps are still installed and can appear as results in Finder searches.
• About Home screen: View version information.
Status bar
The Status bar provides device information on the right side and notification alerts on the left.
Status icons
Notification icons
Configure display options for the Status bar.
◌ From Quick settings, tap More options > Status bar for the following options:
• Show notification icons: Choose how to display notification icons on the Status bar.
• Show battery percentage: Display the battery charge percentage next to the battery icon on the Status bar.
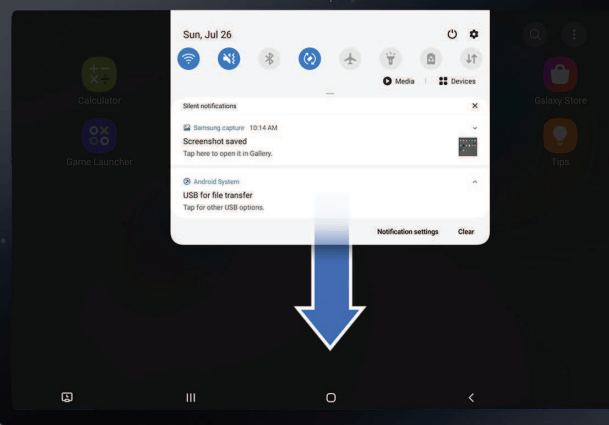
Notification panel
For quick access to notifications, settings, and more, simply open the Notification panel.
View the Notification panel
You can access the Notification panel from any screen.
1. Drag the Status bar down to display the Notification panel.
2. Swipe down the list to see notification details.
• To open an item, tap it.
• To clear a single notification, drag the notification left or right.
• To clear all notifications, tap Clear.
• To customize notifications, tap Notification settings.
3. Drag upward from the bottom of the screen or tap Back to close the Notification panel.
Quick settings
The Notification panel provides quick access to device functions using Quick settings.
1. Drag the Status bar down to display the Notification panel.
2. Drag View all downward.
• Tap a quick setting icon to turn it on or off.
• Touch and hold a quick setting icon to open the setting.
• Tap Finder search to search the device.
• Tap Power off for Power off, Restart, and Emergency mode options.
• Tap Open settings to quickly access the device's settings menu.
• Tap More options to reorder Quick settings or to change the button layout.
• Drag the Brightness slider to adjust the screen brightness.
3. Drag View all upward to close Quick settings.
Samsung Daily
The Samsung Daily page displays customized content based on your interactions.
◌ From a Home screen, swipe right.
TIP : You can add a Samsung Daily icon to your Apps list. Tap More options > Settings > Add Samsung Daily icon.
Customize Samsung Daily
Use the More options menu to add and reorder cards, customize settings, and learn how to use Samsung Daily.
1. From a Home screen, swipe right.
2. Tap More options for the following options:
• Cards: Tap cards to add them to your Samsung Daily page.
• Settings: View the privacy policy, terms and conditions, open source licensing, and add a Samsung Daily icon to your Apps list.
• Notices: View Samsung Daily notices.
• Tips: Learn how to navigate Samsung Daily.
• Help: View FAQ and email customer service.
Digital wellbeing and parental controls
You can monitor and manage your digital habits by getting a daily view of how frequently you use apps, how many notifications you receive, and how often you check your device. You can also set your device to help you wind down before going to bed.
◌ From Settings, tap Digital wellbeing and parental controls for the following features:
• Screen time: Tap the time value in the dashboard for details on how long each app has been opened and used today.
• Notifications: Tap to see how many notifications have been received from each app today.
• Unlocks: Tap to see how many times each app has been opened today.
• Your goals: Set up screen time and unlock goals and view your daily averages.
• App timers: Set a daily limit for how long you use each app.
• Focus mode: Configure times and activities to avoid distractions from your device.
• Wind down: Enable to turn the screen to grayscale and limit notifications before going to bed.
• Parental controls: Supervise your children’s digital life with Google’s Family Link app. You can choose apps, set content filters, keep an eye on screen time, and set screen time limits.
Multi window
Multitask by using multiple apps at the same time. Apps that support Multi window™ can be displayed together on a split screen. You can switch between the apps and adjust the size of their windows.
1. From any screen, tap Recent apps.
2. Tap the app icon, and then tap Open in split screen view.
3. Tap an app in the other window to add it to the split screen view.
• Drag the middle of the window border to adjust the window size.
Window controls
The Window controls modify the way app windows are displayed in split screen view.
1. Drag the middle of the window border to resize the windows.
2. Tap the middle of the window border for the following options:
• Split horizontally: View the windows horizontally. (This option will change to split vertically when viewing windows horizontally.)
• Switch windows: Swap the two windows.
• Add app combo to Edge panel: Create and add an app pair shortcut to the Apps panel on the Edge screen.
Edge screen
The Edge screen is made up of several customizable edge panels. Edge panels can be used to access apps, tasks, and contacts, as well as view news, sports, and other information.
Apps panel
You can add up to ten apps in two columns to the Apps panel.
1. From any screen, drag the Edge handle to the center of the screen. Swipe until the Apps panel is displayed.
2. Tap an app or app pair shortcut to open it. You can also tap All apps for the complete app list.
• To open additional windows in pop-up view, drag the app icon from the Apps panel to the open screen.
To configure Apps panel:
1. From any screen, drag the Edge handle to the center of the screen. Swipe until the Apps panel is displayed.
2. Tap Edit panel to add other apps to the Apps panel.
• To add an app to the Apps panel, find it on the left side of the screen and tap it to add it to an available space on the right column.
• To create a folder shortcut, drag an app from the left side of the screen on top of an app in the columns on the right.
• To change the order of the apps on the panel, drag each app to the desired location.
• To remove an app, tap Remove.
3. Tap Back to save changes.
Configure Edge panels
You can customize the Edge panels.
1. From the Edge screen, tap Settings.
2. Tap to enable the feature. The following options are available:
• Reset to default settings: Return keyboard to original settings and clear personalized data.
• About Samsung keyboard: View version and legal information for the Samsung keyboard.
• Contact us: Contact Samsung support through Samsung Members.
Use Samsung voice input
Instead of typing, enter text by speaking.
◌ From the Samsung keyboard, tap Voice input and speak your text.
Configure Samsung voice input
Set customized options for Samsung voice input.
1. From the Samsung keyboard, tap Voice input.
2. Tap Settings for options.
• Keyboard language: Choose the language for the keyboard.
• Voice input language: Select the language for Samsung voice input.
• Hide offensive words: Hide potentially offensive words with asterisks.
• About Samsung voice input: View version and legal information for Samsung voice input.
Security
Lock screen and security
Screen lock types
You can choose from the following screen lock types that offer high, medium, or no security: Swipe, Pattern, PIN, Password, and None.
1. From Settings, tap Lock screen > Screen lock type and tap a secure screen lock (Pattern, PIN, or Password).
2. Tap to enable showing notifications on the lock screen. The following options are available:
• View style: Display notification details or hide them and show only an icon.
• Hide content: Do not show notifications in the Notification panel.
• Notifications to show: Choose which notifications to show on the Lock screen.
3. Tap Done when finished.
4. Configure the following screen lock options:
• Smart Lock: Unlock your device automatically when trusted locations or other devices have been detected. A secure screen lock is required for this feature.
• Secure lock settings: Customize your secure lock settings. A secure screen lock is required for this feature.
Clock and information
You can configure features that appear on the Lock screen, like the clock and other useful information
◌ From Settings, tap Lock screen for the following options:
• Wallpaper services: Enable additional features such as guide page and Dynamic Lock Screen.
• Clock style: Set the type and color of the clock on the Lock screen.
• Roaming clock: Show the time both where you are and at home while you are roaming.
• FaceWidgets: Enable widgets on the Lock screen to get quick access to useful information.
• Contact information: Show your contact information, such as your phone number or email address.
• Notifications: Select which notifications to display on the Lock screen.
• Shortcuts: Select which app shortcuts to add to the Lock screen.
• About Lock screen: Update the Lock screen’s software.
Google Play Protect
You can configure Google Play to regularly check your apps and device for security risks and threats.
◌ From Settings, tap Biometrics and security > Google Play Protect.
• Updates are checked for automatically.
Security update
You can easily check the date of the last installed security software update and find out if newer updates are available.
◌ From Settings, tap Biometrics and security > Security update to see the latest security update installed and check if a newer update is available.
Find My Mobile
You can protect your device from loss or theft by allowing your device to be locked, tracked online, and for your data to be deleted remotely. A Samsung account is required, and Google location service must be turned on in order to use Find My Mobile.
Turn on Find My Mobile
Before you can use the Find My Mobile feature, you must turn it on and customize the options. To access your device remotely, visit findmymobile.samsung.com.
1. From Settings, tap Biometrics and security > Find My Mobile.
2. Tap to enable Find My Mobile and log in to your Samsung account. The following options are available:
• Remote unlock: Allow Samsung to store your PIN, pattern, or password, allowing you to unlock and control your device remotely.
• Send last location: Allow your device to send its last location to the Find My Mobile server when the remaining battery charge falls below a certain level.
Samsung Pass
Use Samsung Pass to access your favorite services with biometric data. You must sign in to your Samsung account to use Samsung Pass.
1. From Settings, tap Biometrics and security > Samsung Pass.
2. Sign in to your Samsung account and add your biometric data.
Secure Folder
You can create a secure folder on your device to protect private content and apps from anyone who may be using your device. You must sign in to your Samsung account to set up and use Secure folder.
◌ From Settings, tap Biometrics and security > Secure Folder and follow the prompts to secure content on your device.
Install unknown apps
You can allow installation of unknown third-party apps from selected apps or sources.
1. From Settings, tap Biometrics and security > Install unknown apps.
2. Tap an app or source, and then tap Allow from this source.
TIP : Installing unknown third-party apps could make your device and personal data more vulnerable to security risks.
Secure Wi-Fi
Get extra privacy protection while using unsecured Wi-Fi networks. You must sign in to your Samsung account to set up and use Secure Wi-Fi.
◌ From Settings, tap Biometrics and security > Secure Wi-Fi and follow the prompts to configure privacy protection.
Encrypt or decrypt SD card
You can encrypt your optional memory card (not included) to protect its data. This only allows the SD card information to be accessed from your device with a password.
1. From Settings, tap Biometrics and security > Encrypt or decrypt SD card.
2. Tap Encrypt SD card and follow the prompts to encrypt all data on your memory card.
Decrypt SD card
You can decrypt an optional memory card (not included) if it was encrypted by this device. You may want to decrypt the memory card if you plan to use it with another device or before performing a Factory data reset.
1. From Settings, tap Biometrics and security > Encrypt or decrypt SD card.
2. Tap Decrypt SD card and follow the prompts to decrypt all data on your memory card.
View passwords
You can have characters displayed briefly in password fields as you type them.
◌ From Settings, tap Biometrics and security > Other security settings > Make passwords visible to turn on the feature.
Device administration
You can authorize security features and apps (like Find My Mobile) to have administrative access to your device.
1. From Settings, tap Biometrics and security > Other security settings > Device admin apps.
2. Tap an option to turn it on as a device administrator.
Credential storage
You can manage the trusted security certificates installed on your device, which verify the identity of servers for secure connections.
◌ From Settings, tap Biometrics and security > Other security settings for the following options:
• Storage type: Select a storage location for credential contents.
• View security certificates: Display certificates in your device’s ROM and other certificates you have installed.
• User certificates: View user certificates that identify your device.
• Install from device storage: Install a new certificate from storage.
• Clear credentials: Erase credential contents from the device and reset the password.
Advanced security settings
You can use these options to configure advanced security settings to better protect your device.
◌ From Settings, tap Biometrics and security > Other security settings for the following options:
• Trust agents: Allow trusted devices to perform selected actions when connected.
– This option is only displayed when a lock screen is turned on. For more information, see Set a secure screen lock.
• Pin windows: Pin an app on your device screen, which prevents access to other features of your device.
• Security policy updates: Keep your device secure by checking for security updates.
Location
Location services use a combination of GPS, mobile network and Wi-Fi to determine the location of your device.
1. From Settings, tap Location.
2. Tap to turn on Location services.
App permissions
Configure permissions for apps that want to access your location information.
1. From Settings, tap Location > App permissions.
2. Tap an app and select which of the following location permissions to grant it:
• Allow all the time
• Allow only while using the app
• Deny
Improve accuracy
Enable other location scanning tools.
1. From Settings, tap Location > Improve accuracy.
2. Tap connection method to add or remove from location services:
• Wi-Fi scanning: Allow apps and services to scan for Wi-Fi networks automatically, even when Wi-Fi is turned off.
• Bluetooth scanning: Allow apps to scan for and connect to nearby devices automatically through Bluetooth, even when Bluetooth is turned off.
Recent location requests
View a list of apps that have requested your location.
1. From Settings, tap Location.
2. Tap to turn on Location services.
3. Tap an entry under Recent location requests to view the app’s settings.
Location services
Location services store and use your device’s most recent location data. Certain apps can use this data to improve your search results based on places that you have visited.
1. From Settings, tap Location.
2. Tap an entry under Location services to see how your location information is used.
Permission manager
Apps might access features of your device that you permit them to (like the camera, microphone, or location) when they are running in the background, not just when you are using the app. You can set your device to notify you when this happens.
1. From Settings, tap Privacy > Permission manager.
2. Tap a category, then tap an app to select which permissions you want to be notified about by tapping Allow or Deny.
Send diagnostic data
Send diagnostic information about your device to Samsung when you are having technical problems.
1. From Settings, tap Privacy > Send diagnostic data.
2. Read and accept the consent information to enable this feature.
Other settings
Tips and help
View tips and techniques as well as the user manual for your device.
◌ From Settings, tap Tips and help.
Daily Board
View a slideshow of your photos when your tablet is charging.
1. From Settings, tap Advanced features > Daily Board.
2. Tap to enable Daily Board.
3. Choose one of the following options:
• Slideshow: Enable a button that launches a slideshow of images from Gallery.
• Time, weather, and calendar: Display the current time, current weather, and a calendar.
• Memo: Display a memo for quick notes.
• Music: Display playing music.
• Dark mode: Use a darker theme for easier viewing at night.
• Turn off as scheduled: Set a schedule time to turn the device off. – Set time: Select a turn off time.
• About Daily Board: View the app version and other information.
About tablet
View information about your device, including current status, legal information, hardware and software versions, and more.
1. From Settings, tap About tablet, and then view your model number, serial number, and IMEI information.
2. Tap additional items to view more information about your device.
TIP : You can view your device's FCC ID from About tablet > Status.
 Advanced features > S Pen > Air actions.
 to enable the feature.
 Back : Left to right
 Recent apps : Right to left
 Home : Up and down
 Smart select : Down and up
 Screen write : Zigzag
 Advanced features > S Pen > Air actions.
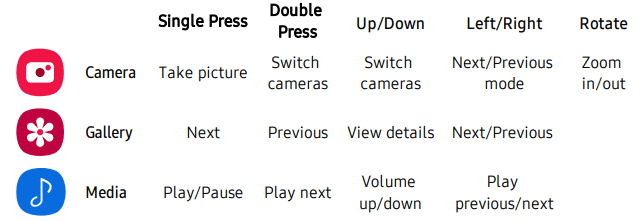
 Advanced features > S Pen > Air actions.
 to enable the shortcuts while using that app
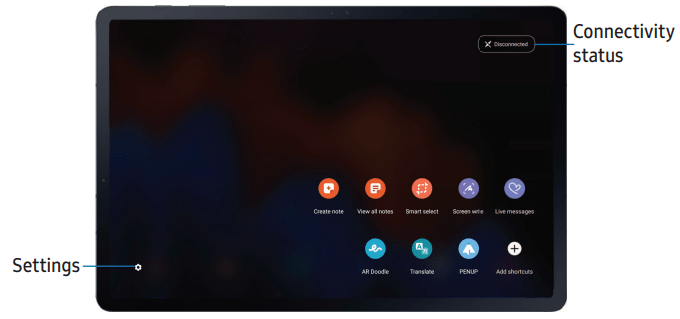
 Air command or hold the S Pen near the screen so that the pointer appears, and then press the S Pen button once.
 Create note: Launch a new note in the Samsung Notes app.
 View all notes: Launch the Samsung Notes app and view a listing of the notes you have created.
 Smart select: Draw around an area of the screen to collect it in the Gallery app.
 Screen write: Capture screenshots and write or draw on them.
 Live messages: Create a short animated message by drawing or writing with the S Pen.
 AR Doodle: Draw interactive doodles using the AR camera feature.
 Translate: Hover the S Pen over a word to see it translated into another language and listen to its pronunciation.
 PENUP: Use the S Pen to draw, color, edit, and share live drawings.
 Add shortcuts: Add more apps or functions to the Air command menu.
 Settings: Customize Air command by configuring apps and functions, and by changing how the Air command menu appears.
 Air command >
  Create note.
 View all notes.
 Smart select.
 Auto select: Allow Smart select to automatically select content to extract.
 Draw: Draw on the captured content.
 Share: Choose a sharing method to share your content.
 Save.
Save.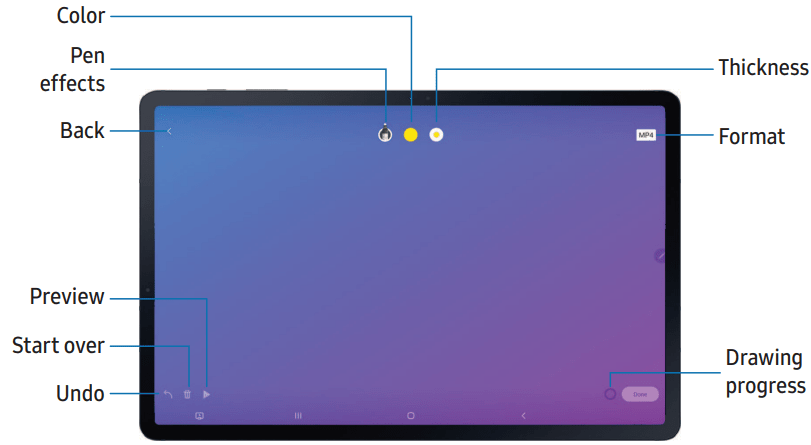

 Switch cameras.
 Record to save a video of your AR Doodle.
 Translate.
 Tap Sound to hear the word pronounced in the source language.
 Copy to save the selected text and the translation to your clipboard.
 Close to close Translate.
 Add shortcuts.
 Remove.
 Back to save your selection.
 Color: Change the pen color.
 Pen settings: Tap to use the pen tool. Double tap to adjust the line thickness.
 Eraser: Tap to use the eraser tool. Double tap to erase all.
 Advanced features > S Pen to configure the following settings: l Air actions:
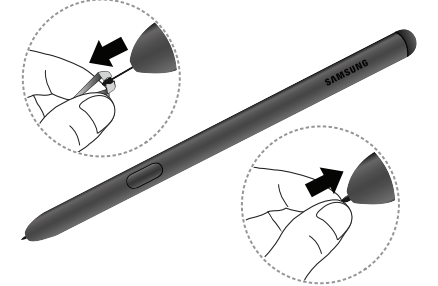
 DeX.
DeX. Advanced features > Call & text on other devices.
 to turn on the feature. Connection occurs automatically.
 Biometrics and security > Face recognition.
 Display for the following options:
 Power >
  Power off. Confirm when prompted.
 Restart. Confirm when prompted.
 Accounts and backup > Smart Switch.
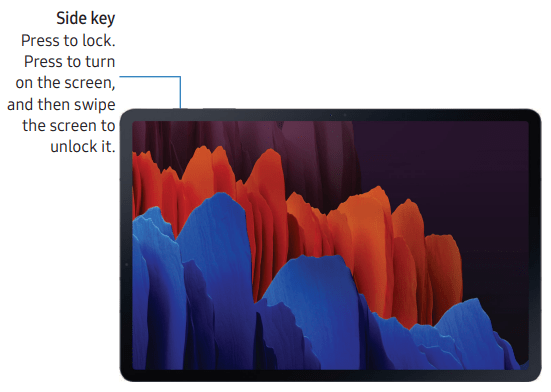
 Advanced features > Side key.
 Accounts and backup > Accounts.
 Add account > Google.

 Display > Navigation bar > Navigation buttons.
 Add to Home.
 Remove from Home.
 Wallpaper.
 Widgets, and then touch and hold a widget, drag it to a Home screen, and release it.
 Remove from Home: Delete a widget from your screen.
 Widget settings: Customize the function or appearance of the widget.
 App info: Review the widget usage, permissions, and more.
 Home screen settings to customize:
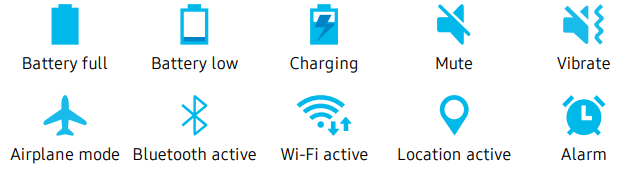

 More options > Status bar for the following options:
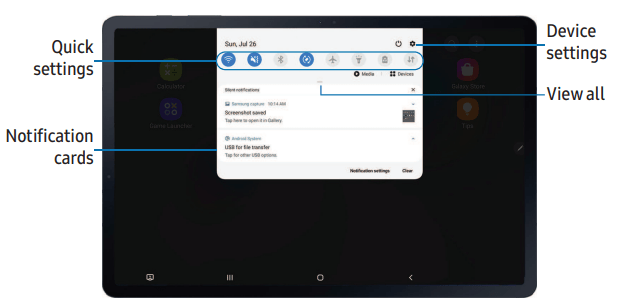
 View all downward.
 Finder search to search the device.
 Power off for Power off, Restart, and Emergency mode options.
 Open settings to quickly access the device's settings menu.
 More options to reorder Quick settings or to change the button layout.
 More options > Settings > Add Samsung Daily icon.
 Digital wellbeing and parental controls for the following features:
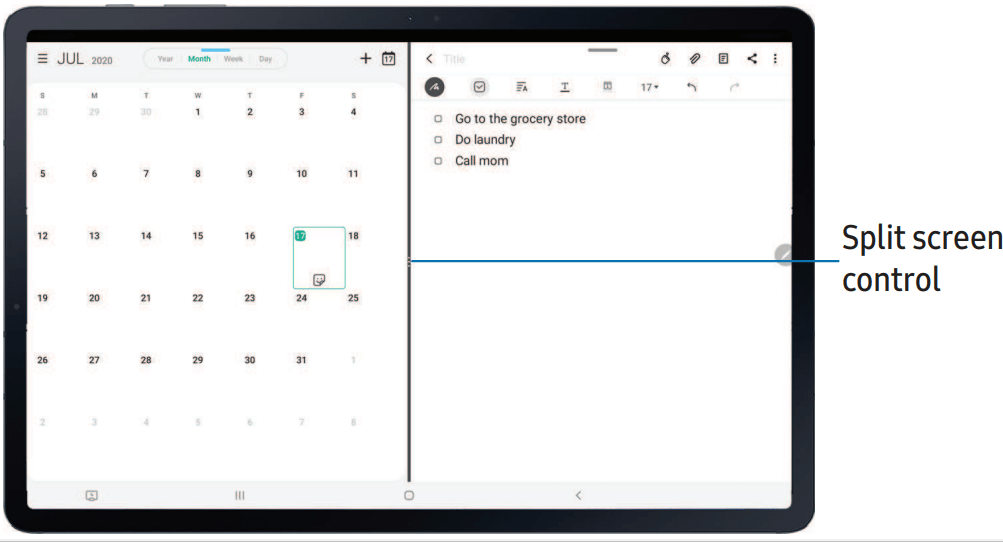
 Recent apps.
 Split horizontally: View the windows horizontally. (This option will change to split vertically when viewing windows horizontally.)
 Switch windows: Swap the two windows.
 Add app combo to Edge panel: Create and add an app pair shortcut to the Apps panel on the Edge screen.
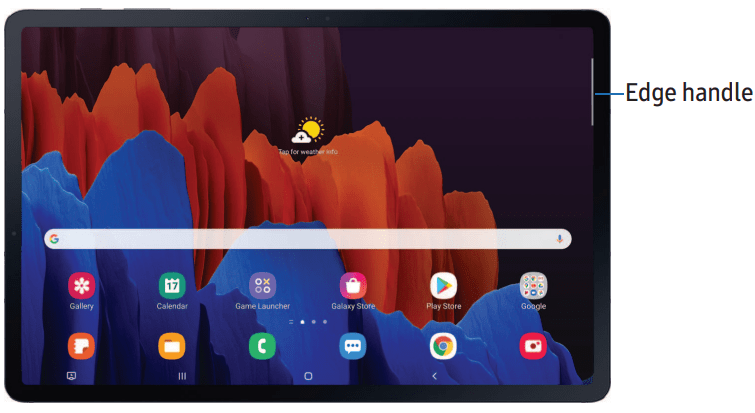
 All apps for the complete app list.
 Edit panel to add other apps to the Apps panel.
 Remove.
 Back to save changes.
 Settings.
 to enable the feature. The following options are available:
 Checkbox: Enable or disable each panel.
 More options:
 Back to save changes.
 Edge handle: Drag to change the position of the Edge handle along the edge of the screen.
 Display > Edge screen > About Edge screen.
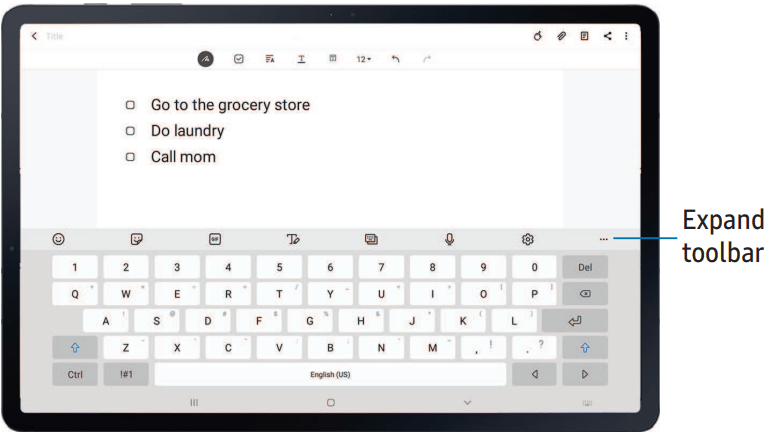
 Expand toolbar for the following options:
 AR Emoji: Create your own personal emoji and use it in stickers you can share.
 Bitmoji: Create your own personal emoji and use it in stickers.
 Clipboard: Access the clipboard.
 Emojis: Insert an emoji.
 GIFs: Add animated GIFs.
 Handwriting: Use your handwriting to enter text.
 Keyboard size: Adjust the height and width of the keyboard.
 Modes: Select a keyboard layout.
 Mojitok: Create your own stickers or insert automatically suggested ones.
 Samsung Pass: Use biometrics for secure access to apps and services.
 Search: Locate specific words or phrases in your conversations.
 Settings: Access keyboard settings.
 Spotify: Add music from Spotify.
 Stickers: Add illustrated stickers.
 Text editing: Use an editing panel to help pinpoint text that you want to cut, copy, and paste.
 Translate: Type words or sentences in the keyboard to translate them into another language.
 Voice input: Use Samsung voice input.
 YouTube: Add videos from YouTube.
 Settings for the following options:
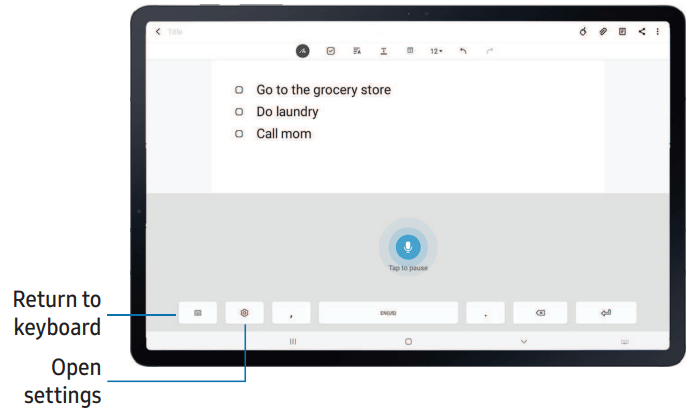
 Voice input and speak your text.
 Lock screen > Screen lock type and tap a secure screen lock (Pattern, PIN, or Password).
 to enable showing notifications on the lock screen. The following options are available:
 Biometrics and security > Google Play Protect.
 to enable Find My Mobile and log in to your Samsung account. The following options are available:
 Location.
 to turn on Location services.
 Privacy > Permission manager.
 Tips and help.
 Advanced features > Daily Board.
 to enable Daily Board.
 About tablet, and then view your model number, serial number, and IMEI information.