Owner's Manual
Manual Del Propietarie
Vacuum Cleaner
Aspiradora
Model, Modelo
116.35922
116.35923
iMPORTANT
Before returning this product-
For replacement parts, please contact:
Sears Parts and Repair Center
(1 =800-488-1222)
Anytime, day or night
(U_S.A. only)
For any other issue, please contact:
Vacuum Cleaner Help Line
(1-877-531-7321)
7:30am-4:00pm EST, M-F
(U.S.A. and Canada)
CAUTION:
Read and follow all
safety and operating
instructions before first
use of this product.
CUIDADO:
Lea y sigue todas las
instrucciones de peraci6n
y seguridad antes del uso
de este producto.
Sears, Roebuck and Co., Hoffman Estates, IL 60179 U.S.A.
www.sears.com
Part No. C_IZCRC5_U_-KC_IZCRCZ_U_
Printed in Mexico
impreso en Mexico

Before Using Your New
Vacuum Cleaner ........................ 2
Kenmore Vacuum Cleaner Warranty .,, 3
Important Safety Instructions ........... 4
Parts and Features ..................... 5
Assembly Instructions ............. 6-7
Operating Instructions ............... 7
Cord Release ...................... 7
Releasing the Handle .......................... 8
Touch Control ...................... 8
InteliCLEAN ......................... 9
Performance Indicator ..................... t0
Gentle Sweep Function ............... t0
Pile Height Selection and Setting ....... !0
Attachments ..................... I1-!2
Attachment Use Table ............... t3
Vacuum Cleaner Care ............... 16
Vacuum Cleaner Storage ............... 16
Cleaning Exterior and Attachments ...... 16
Dust Bag Replacement ................. 17
Motor Safety Filter CIeaning .................. 18
Exhaust Filter Replacement ............ 1B
Light Bulb Replacement .............. 19
Dust Bag Cover Replacement ............... !9
Agitator Cleaning ................... 20
Clog Removal ..................... 20
Troubleshooting .................... 21
Master Protection Agreements ........ 22
Requesting Assistance Or Service back page
li! !iiiiiiiii!!ii
Please read this guide, It wil! help you assemble and operate your new Kenmore vacuum
cleaner in the safest and most effective way.
For more information about vacuum cleaner care and operation, cal! your nearest Sears store,
You wil! need the complete model and serial numbers when requesting information. Your vacu-
um cleaner's model and serial numbers are located on the Model and Serial Number Plate.
Use the space below to record the model number and serial number of your new Kenmore
vacuum cleaner,
Model No.
Serial No,
Date of Purchase
Keep this book and your sales check (receipt) in a safe place for future reference,
OneYearLimitedWarranty
Whenassembled,operatedandmaintainedaccordingto allinstructionssuppliedwith
theproduct,ifthisvacuumcleanerfailsduetoadefectin materialorworkmanshipwithin
oneyearfromthedateofpurchase,returnitto anySearsstore,SearsParts&Repair
Centerorother Kenmore outlet for free repair°
If this vacuum cleaner is used for other than private family purposes, this warranty
applies for only 90 days from the date of purchase.
This warranty covers only defects in material and workmanship. Sears will NOT
pay for:
1. Expendable items that can wear out from normal use, including but not limited to
filters, belts, light bulbs, and bags.
2. A service technician to instruct the user in correct product assembly, operation or
maintenance.
3. A service technician to clean or maintain this product.
4. Damage to or failure of this product if it is not assembled, operated or maintained
according to all instructions supplied with the product..
5. Damage to or failure of this product resulting from accident, abuse, misuse or use for
other than its intended purpose.
6. Damage to or failure of this product caused by the use of detergents, cleaners,
chemicals or utensils other than those recommended in all instructions supplied with
the product.
7. Damage to or failure of parts or systems resulting from unauthorized modifications
made to this product.
Disclaimer of implied warranties; limitation of remedies
Customer's sole and exclusive remedy under this limited warranty shall be product repair
as provided herein. Implied warranties, including warranties of merchantability or fitness
for a particular purpose, are limited to one year or the shortest period allowed by law.
Sears shall not be liable for incidental or consequential damages. Some states and
provinces do not allow the exclusion or limitation of incidental or consequential damages,
or limitations on the duration of implied warranties of merchantability or fitness, so these
exclusions or limitations may not apply to you°
This warranty applies only while this vacuum cleaner is used in the United States and
Canada.
This warranty gives you specific legal rights, and you may also have other rights which
vary from state to state.
Sears, Roebuck and Co., Hoffman Estates, IL 60179
Sears Canada lnc.,Toronto, Ontario, Canada MSB 2B8
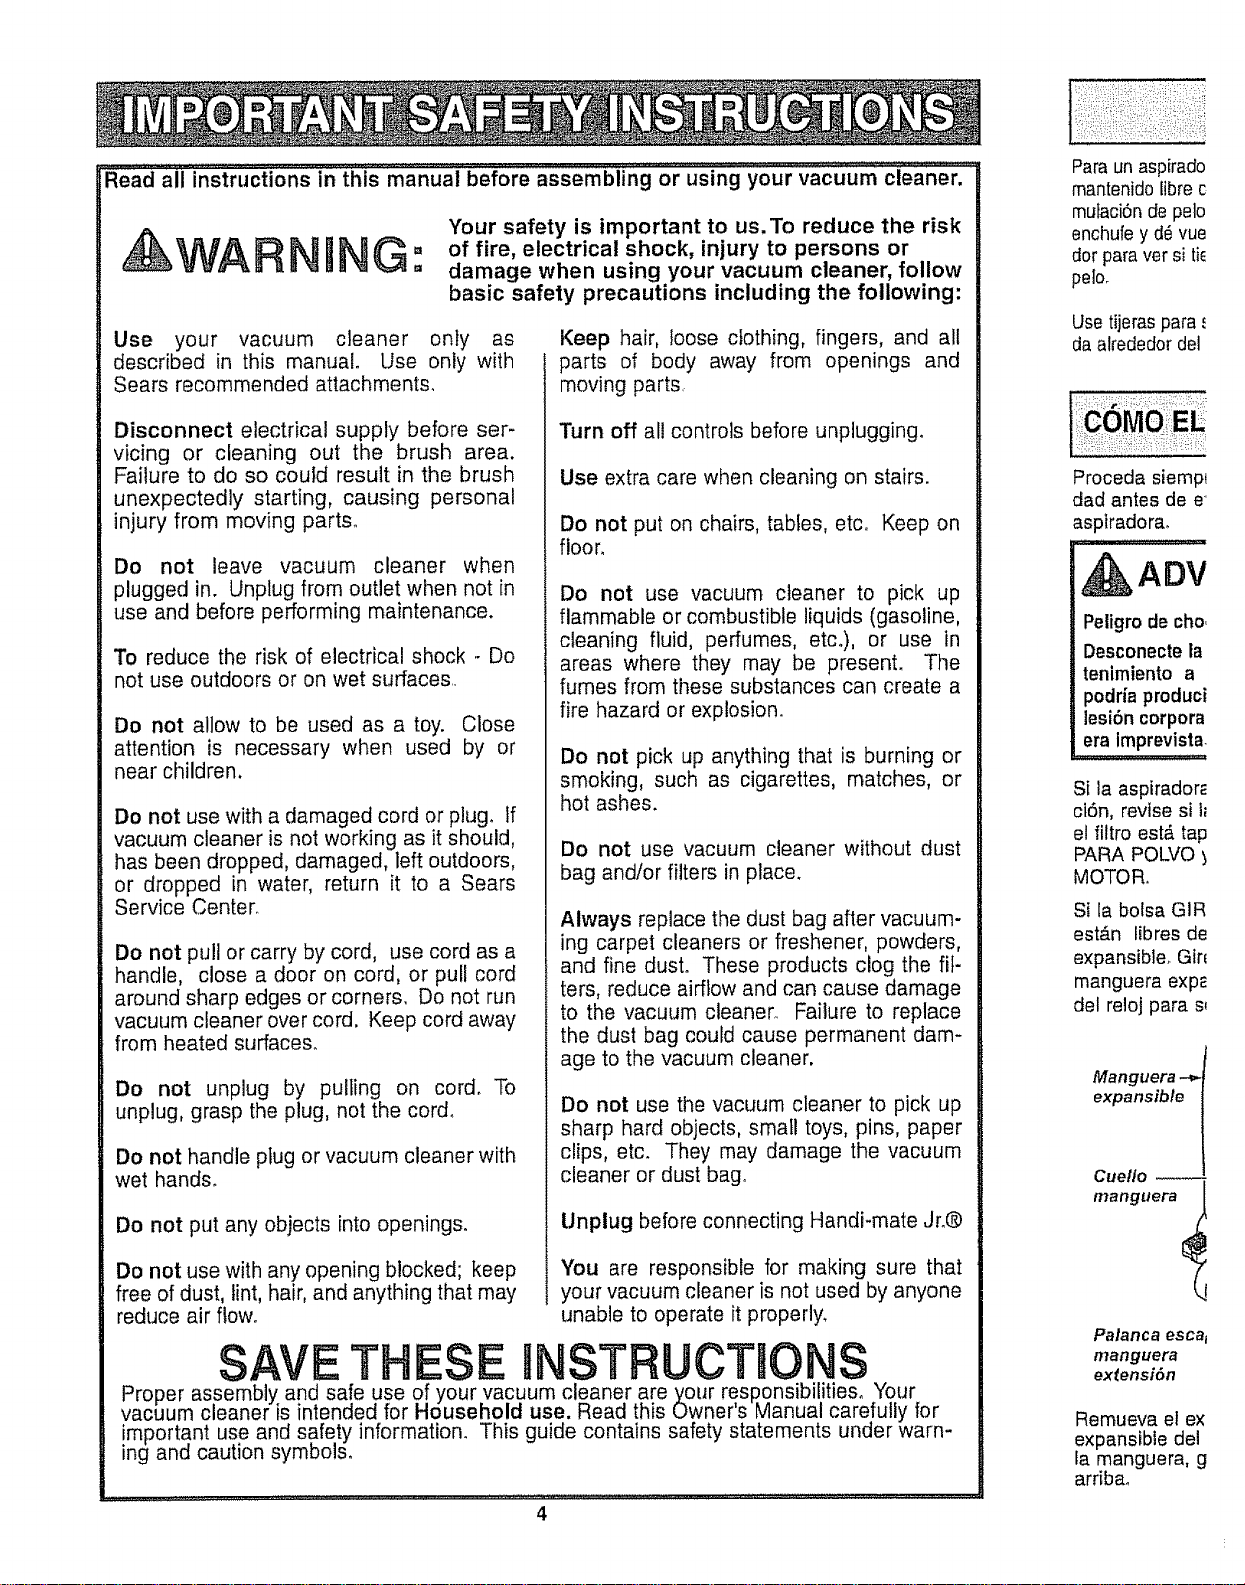
Readali instructions in this-manual before assembiing'0r"using""'your vacuumcieanerl ......
&WAR
m I_I
Your safety is important to us. To reduce the risk
of fire, electrical shock, injury to persons or
damage when using your vacuum cleaner, follow
basic safety precautions including the following:
Use your vacuum cleaner only as
described in this manual. Use only with
Sears recommended attachments.
Disconnect electrical supply before ser-
vicing or cleaning out the brush area.
Failure to do so could result in the brush
unexpectedly starting, causing personal
injury from moving parts°
Do not leave vacuum cleaner when
plugged in. Unplug from outlet when not in
use and before performing maintenance.
To reduce the risk of electrical shock .. Do
not use outdoors or on wet surfaces..
Do not allow to be used as a toy. Close
attention is necessary when used by or
near children.
Do not use with a damaged cord or plug. If
vacuum cleaner is not working as it should,
has been dropped, damaged, left outdoors,
or dropped in water, return it to a Sears
Service Center.
Do not pull or carry by cord, use cord as a
handle, close a door on cord, or pull cord
around sharp edges or corners. Do not run
vacuum cleaner over cord, Keep cord away
from heated surfaces.
Do not unplug by pulling on cord. To
unplug, grasp the plug, not the cord.
Do not handle plug or vacuum cleaner with
wet hands.
Do not put any objects into openings.
Do not use with any opening blocked; keep
free of dust, tint, hair, and anything that may
reduce air flowo
SAVE THESE
Keep hair, loose clothing, fingers, and all
parts of body away from openings and
moving parts.
Turn off all controls before unplugging.
Use extra care when cleaning on stairs.
Do not put on chairs, tables, etc. Keep on
floor.
Do not use vacuum cleaner to pick up
flammable or combustible liquids (gasoline,
cleaning fluid, perfumes, etc_), or use in
areas where they may be present. The
fumes from these substances can create a
fire hazard or explosion.
Do not pick up anything that is burning or
smoking, such as cigarettes, matches, or
hot ashes.
Do not use vacuum cleaner without dust
bag and/or filters in place.
Always replace the dust bag after vacuum-
ing carpet cleaners or freshener, powders,
and fine dust° These products clog the fil-
ters, reduce airflow and can cause damage
to the vacuum cleaner,. Failure to replace
the dust bag could cause permanent dam-
age to the vacuum cleaner.
Do not use the vacuum cleaner to pick up
sharp hard objects, small toys, pins, paper
clips, etc. They may damage the vacuum
cleaner or dust bag.
Unplug before connecting Handi-mate Jr.®
You are responsible for making sure that
your vacuum cleaner is not used by anyone
unable to operate it properly_
STRUCT!ONS
Proper assembly and sa!e use o[ your.vacuum cleaner are your resp.onsibilitieso Your
vacuum cleaner is intenaea Tor Nousenola use. Read this Owner's rvlanual carefully for
important use and safety information. This guide contains safety statements under warn-
ing and caution symbols.
4
Para un aspirado
mantenido fibre c
rnulaci6nde polo
enchufe y d_vue
dor para ver si tie
pelo_
Use tijeraspara.,
da alrededor del
Proceda siempt
dad antes de e
aspiradora.
ADV
Peligrode cho,
Desconecte la
tenimiento a
podria produci
lesi6n corpora
era imprevista
Si la aspiradorE
ci6n, revise si t_
el filtro est,_ tap
PARA POLVO
MOTOR.
Si la bolsa GIR
est&n libres de
expansible. GirE
manguera expa
del reloj para s_
Manguera
expansible
Cuello
manguera _
Palanca esca i
manguera
ex{ensi6n
Remueva el ex
expansible del
la manguera, g
arribao

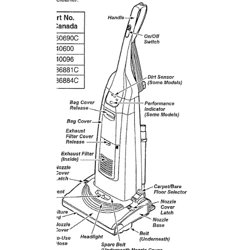
it is important to know your vacuum cleaner's parts and features to assure its proper and safe
use. Review these before using your vacuum cleaner.
Object Style No, Part No. Part No.
in USA in Canada
Headlight Bulb ..... 20-5248 .....
Exhaust Filter EF-! 20-86889 20-40324
Dust Bag 0 20-50690 20-50510
Touch
Control
Combination------__tllLtk-:_I1!I_
.o°dlo-J / '_ "%_/
Exhaust Ftlter',--_-l!!rt Z"-tl 11 II
A:
Release Lever /
Motor Prolector
(Behind Hose)
Telescopic
Wand
iF Dust Bag
Cover
(Dust Bag
inside)
Crevice
Tool
Agitator_
Pile Height
Adjustment
Headlig
[/i ."_.. Furniture
Nozzle
_--//'_ __ --- B-_-_nu, Attachments
'_--\Wa.d (do not store on vacuum cleaner)
Holder o_
FI Wand
Brush
(1
Please pay special attention to these hazard alert boxes, and follow any instructions
& givem WARNING statements alert you to such hazards as fire, electric shock, burns
and personal injury° CAUTION statements alert you to such hazards as personal
injury and/or property damage.
, WARNnNG
Electrical Shock Hazard
Do not plug into the electrical supply
until the assembly is complete, Failure
to do so could result in electrical
shock or injury.
Before assembling the vacuum cleaner,
check the PACKING LIST on the cover of
the separate REPAIR PARTS LIST. Use
this list to verify that you have received all
the components of your new Kenmore
vacuum cleaner°
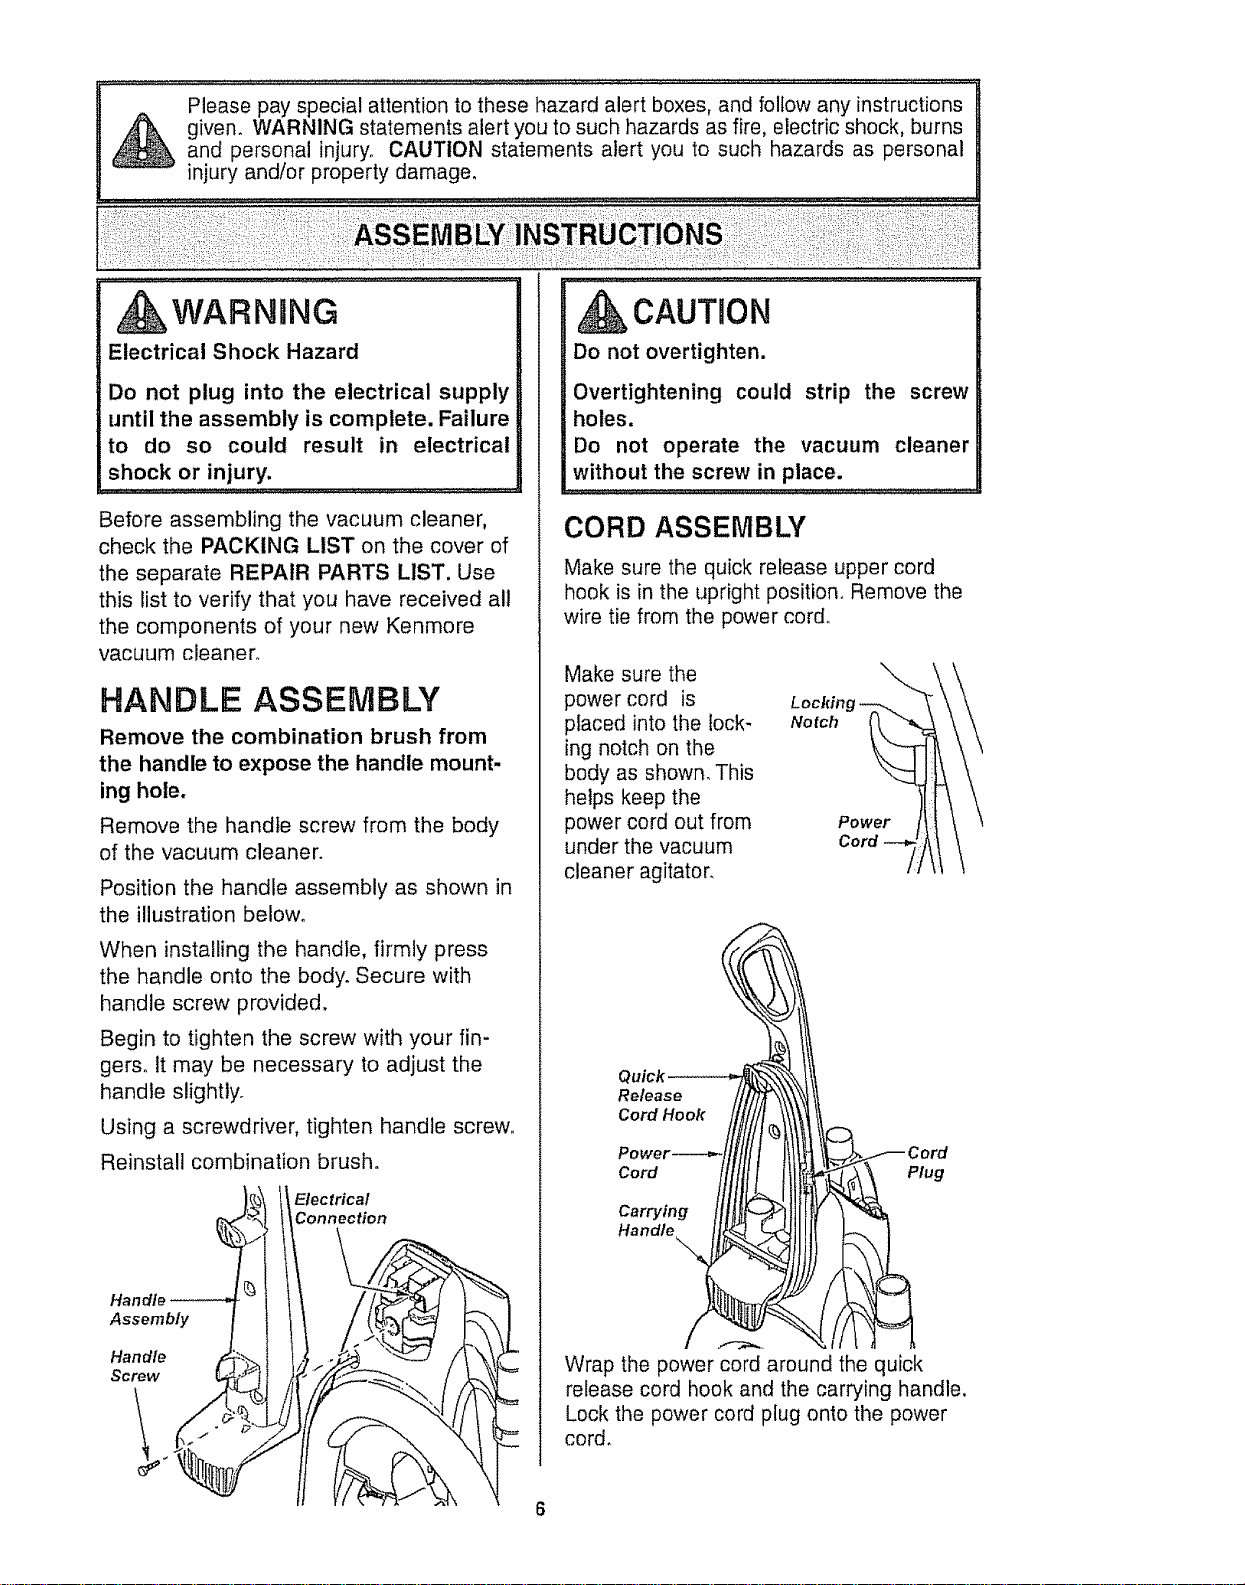
HANDLE ASSEMBLY
Remove the combination brush from
the handle to expose the handle mount-
ing hole.
Remove the handle screw from the body
of the vacuum cleaner.
Position the handle assembly as shown in
the illustration below°
When installing the handle, firmly press
the handle onto the body. Secure with
handle screw provided.
Begin to tighten the screw with your fin-
gers. tt may be necessary to adjust the
handle slightty_
Using a screwdriver, tighten handle screw_
Reinstall combination brush.
Elec trica!
Connection
Handle
Assembly
Handle
Screw
CAUTION
Do not overtighten.
Overtightening could strip the screw
holes.
Do not operate the vacuum cleaner
without the screw in place.
CORD ASSEMBLY
Make sure the quick release upper cord
hook is in the upright position° Remove the
wire tie from the power cord.
Make sure the
power cord is
placed into the lock-
ing notch on the
body as shown_ This
helps keep the
power cord out from
under the vacuum
cleaner agitator.
Lockin
Notch
Power
Cord
Release
Cord Hook
Cord Plug
Carrying
Handle_ .,-_--,_._.
Wrap the power cord around the quick
release cord hook and the carrying handle.
Lock the power cord plug onto the power
cord.
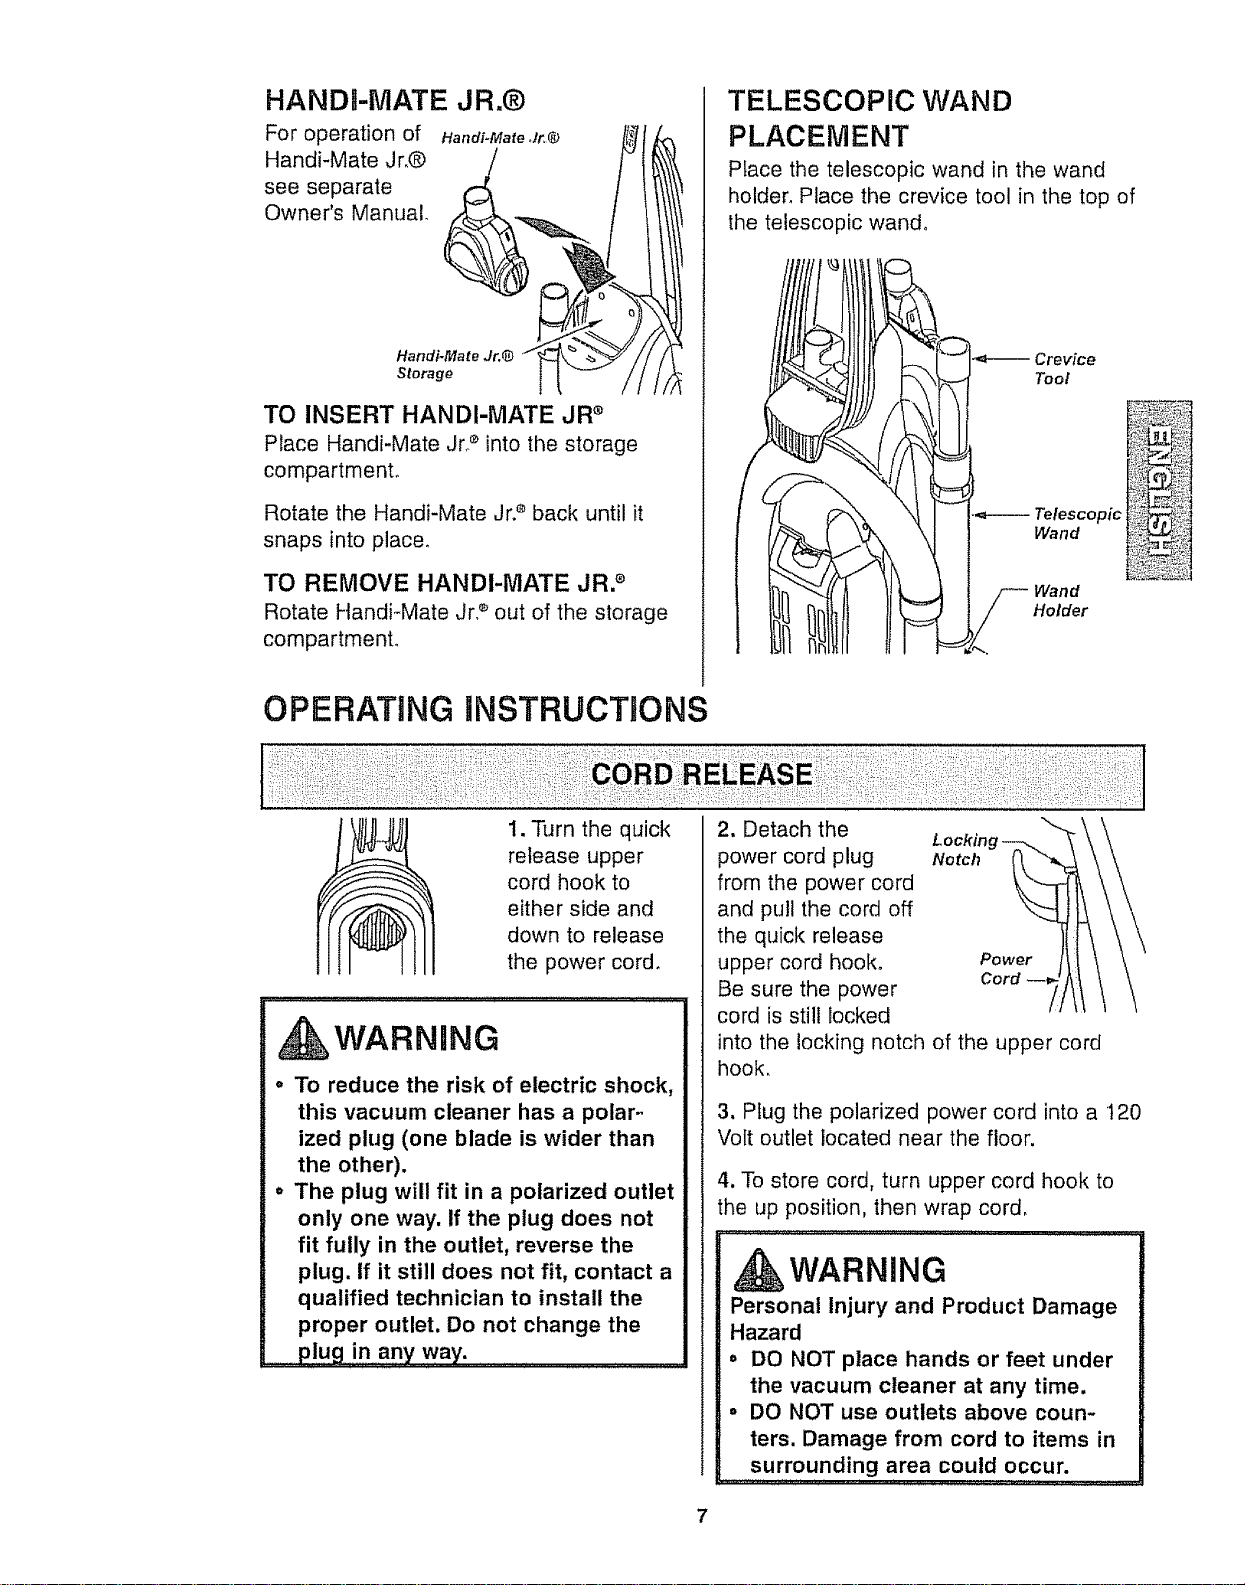
HANDR-MATE JR.®
For operation of Handi-Mate Jr,@ II_,_! [_
Handi-Mate jr.® _ _"
see separate
Owner's Manual. . _ _ /
Handi-MatestorageJr.@ I" _
TO INSERT HANDI-MATE JR ®
Place Handi-Mate Jr2 into the storage
compartment.
Rotate the Handi-Mate Jr2 back until it
snaps into place.
TO REMOVE HANDI'MATE JR2
Rotate Handi-Mate Jr. _'out of the storage
compartment°
TELESCOPIC WAND
PLACEMENT
PEace the telescopic wand in the wand
holder. Place the crevice tool in the top of
the telescopic wand°
Crevice
Tool
Telescopic
Wand
Wand
Holder
OPERATING INSTRUCTIONS
1. Turn the quick
release upper
cord hook to
either side and
down to release
the power cord.
WARNING
,, To reduce the risk of electric shock,
this vacuum cleaner has a polar-
ized plug (one blade is wider than
the other).
,, The plug will fit in a polarized outlet
only one way. If the plug does not
fit fully in the outlet, reverse the
plug. if it still does not fit, contact a
qualified technician to install the
proper outlet. Do not change the
2. Detach the
power cord plug Notch
from the power cord
and pull the cord off
the quick release
upper cord hook° Power
Cord
Be sure the power
cord is still locked
into the locking notch of the upper cord
hook.
3, Plug the polarized power cord into a t20
Volt outlet located near the floor.
4. To store cord, turn upper cord hook to
the up position, then wrap cord.
WARNING
Personal Injury and Product Damage
Hazard
= DO NOT place hands or feet under
the vacuum cleaner at any time.
° DO NOT use outlets above coun-
ters. Damage from cord to items in
surrounding area could occur.
7
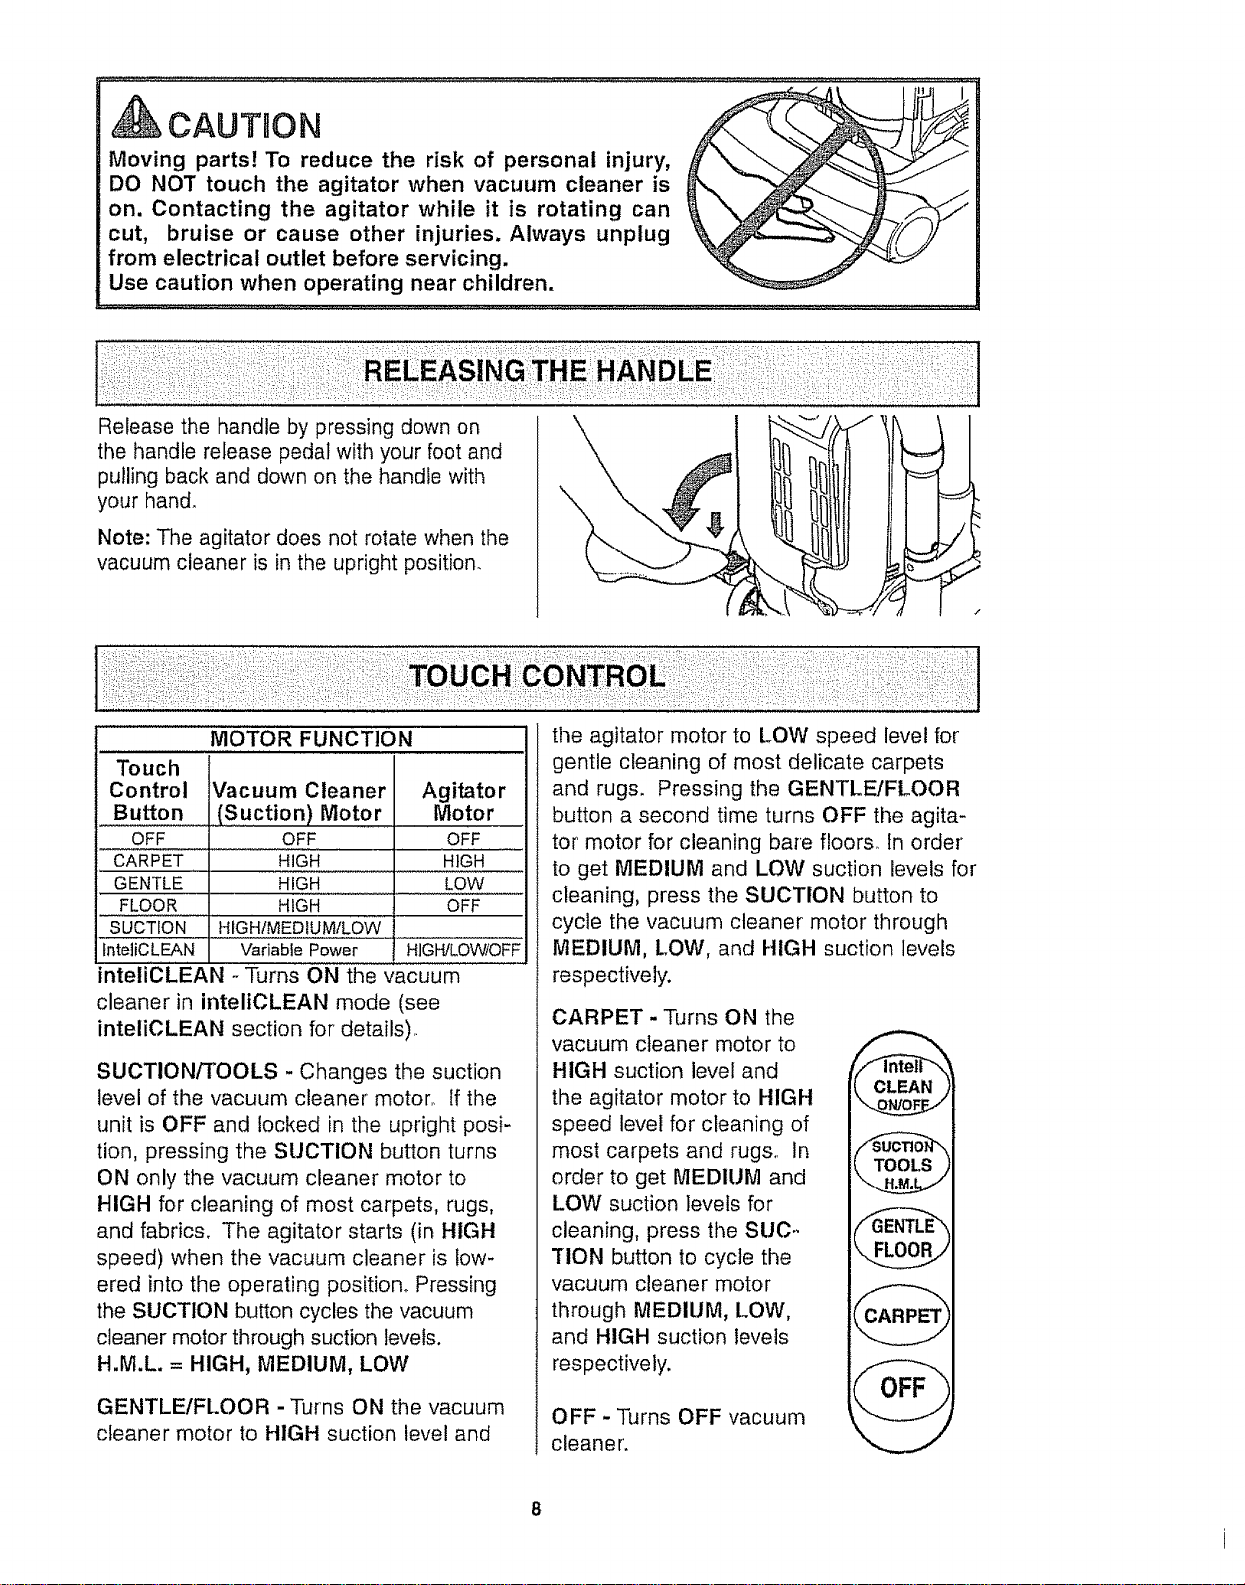
CAUTgON
Moving parts! To reduce the risk of personal injury,
DO NOT touch the agitator when vacuum cleaner is
on. Contacting the agitator while it is rotating can
cut, bruise or cause other injuries. Always unplug
from electrical outlet before servicing.
Use caution when operating near children.
\
Release the handle by pressing down on
the handle release pedal with your foot and
pulling back and down on the handle with
your hand.
Note: The agitator does not rotate when the
vacuum cleaner is in the upright position.
MOTOR FUNCTION
Touch
Control Vacuum Cleaner Agitator
Button (Suction) Motor Motor
OFF OFF OFF
CARPET
GENTLE
FLOOR
the agitator motor to LOW speed level for
gentle cleaning of most delicate carpets
and rugs. Pressing the GENTLE/FLOOR
button a second time turns OFF the agita-
tor motor for cleaning bare floors, tn order
HIGH .................HIGH to get MEDIUM and LOW suction levels for
HIGH LOW cleaning, press the SUCTION button to
HIGH OFF
SUCTION HIGHIMEDtUM/LOW
fnteliCLEAN Variable Power HIGH!LOW/OFF
inteliCLEAN -Turns ON the vacuum
cleaner in inteliCLEAN mode (see
inteliCLEAN section for details)..
SUCTION/TOOLS - Changes the suction
level of the vacuum cleaner motor., tf the
unit is OFF and locked in the upright posi-
tion, pressing the SUCTION button turns
ON only the vacuum cleaner motor to
HIGH for cleaning of most carpets, rugs,
and fabrics. The agitator starts (in HIGH
speed) when the vacuum cleaner is low-
ered into the operating position° Pressing
the SUCTION button cycles the vacuum
cleaner motor through suction levels.
H.M.L = HIGH, MEDIUM, LOW
GENTLEIFLOOR - Turns ON the vacuum
cleaner motor to HIGH suction level and
cycle the vacuum cleaner motor through
MEDIUM, LOW, and HIGH suction levels
respectively.
CARPET - Turns ON the
vacuum cleaner motor to
HIGH suction level and
the agitator motor to HIGH
speed level for cleaning of
most carpets and rugs., In
order to get MEDIUM and
LOW suction levels for
cleaning, press the SUC..
TION button to cycle the
vacuum cleaner motor
through MEDIUM, LOW,
and HIGH suction levels
respectively.
OFF - Turns OFF vacuum
cleaner.
CLEAN
@
OFF

"Your Kenmore vacuum cleaner is equipped with the latest technology in floor care. The
Kenmore inteliCLEAN automatically chooses the right cleaning power for any cleaning
need. Medium power for everyday pickup, High power for normal dirt, and Maximum
power for deep cleaning high traffic areas°
When inteliCLEAN mode is activated the inteliCLEAN indicator is green.
To turn OFF or de-activate inteliCLEAN press the inteliCLEAN button or TOOLS button.
When there is little or no dirt present the dirt
sensor is green, indicating that inteliCLEAN
power is at MEDIUM. At MEDIUM power the
vacuum cleaner operates at low energy con-
sumption and noise levels.
With normal dirt concentration the dirt sen-
sor is amber, indicating that inteliCLEAN
power is at HIGHo Energy consumption
and noise levels increase.
With heavy dirt concentration the dirt sen-
sor is amber and red, indicating that
inteliCLEAN power is at MAXIMUM, The
vacuum cleaner operates at its highest
energy consumption and noise levels.
InteliCLEAN Dirt Sensor
Indicator Lights Green
Motor/Fan Speed
:_:__::! :!::i_;:ii/_'¸
Motor/Fan Speed _Z_
Motor/Fan Speed _ _U
9
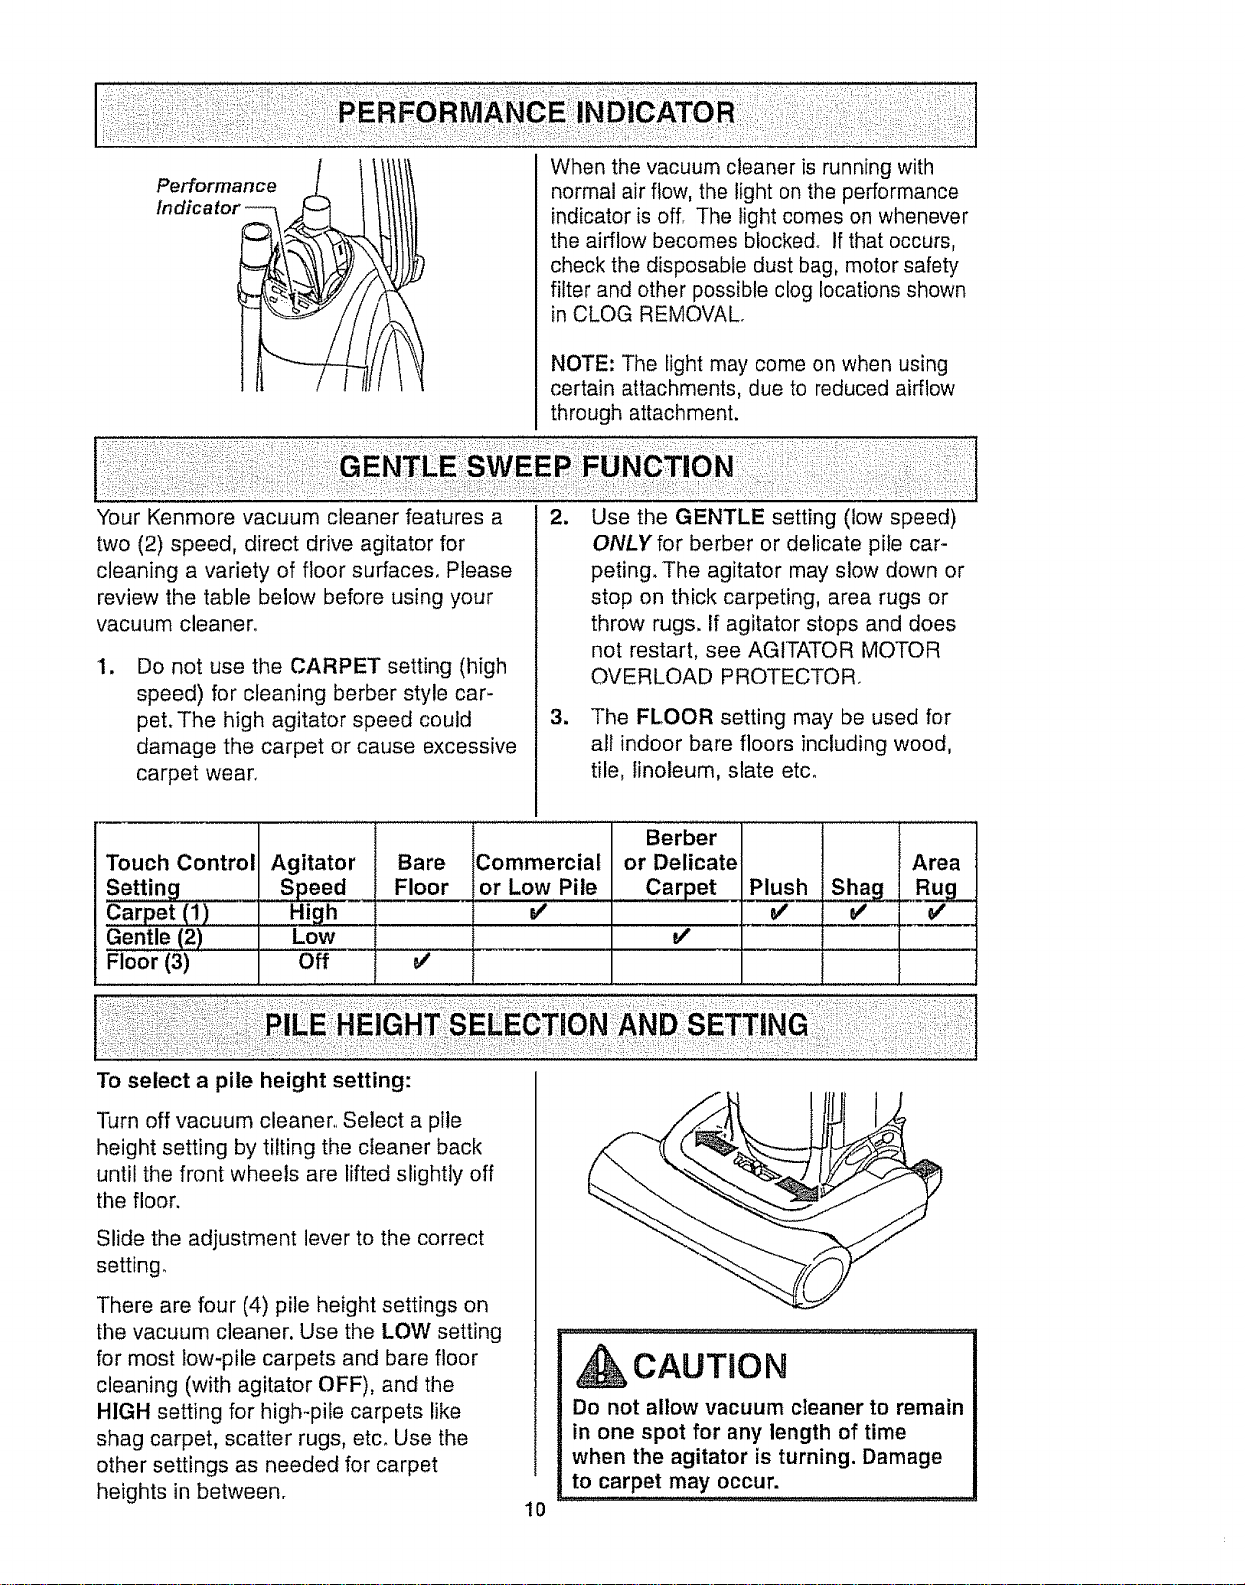
When the vacuum cleaner is running with
normal air flow, the light on the performance
indicator is off. The light comes on whenever
the airflow becomes blocked° If that occurs,
check the disposable dust bag, motor safety
filter and other possible clog locations shown
in CLOG REMOVAL.
NOTE: The light may come on when using
certain attachments, due to reduced airflow
through attachment.
Your Kenmore vacuum cleaner features a
two (2) speed, direct drive agitator for
cleaning a variety of floor surfaces, Please
review the table below before using your
vacuum cleaner,
I.
Do not use the CARPET setting (high
speed) for cleaning berber style car-
pet. The high agitator speed could
damage the carpet or cause excessive
carpet wear.
2_
1
Use the GENTLE setting (low speed)
ONLY for berber or delicate pile car-
peting. The agitator may slow down or
stop on thick carpeting, area rugs or
throw rugs. If agitator stops and does
not restart, see AGITATOR MOTOR
OVERLOAD PROTECTOR.
The FLOOR setting may be used for
all indoor bare floors including wood,
tile, linoleum, slate etc.
Touch Control
Setting _
Carpet (1)
Gentle (2)
Floor (3)
Agitator
s_.__Sp_e2
High
Low
Off
Bare
Floor
Commercial
or Low Pile
V'
Berber 1 I
or Delicate I ! j Area
Carpet PILP.J.u2hjShag" Rug
To select a pile height setting:
Turn off vacuum cleaner, Select a pile
height setting by tilting the cleaner back
until the front wheels are lifted slightly off
the floor.
Slide the adjustment lever to the correct
setting,
There are four (4) pile height settings on
the vacuum cleaner. Use the LOW setting
for most low-pile carpets and bare floor
cleaning (with agitator OFF), and the
HIGH setting for high-pile carpets like
shag carpet, scatter rugs, etc. Use the
other settings as needed for carpet
heights in between.
10
CAUTION
Do not allow vacuum cleaner to remain
in one spot for any length of time
when the agitator is turning. Damage
to carpet may occur.
Combination
Bru=h
Carrying
Handle
Tool
Extension
Release Lever
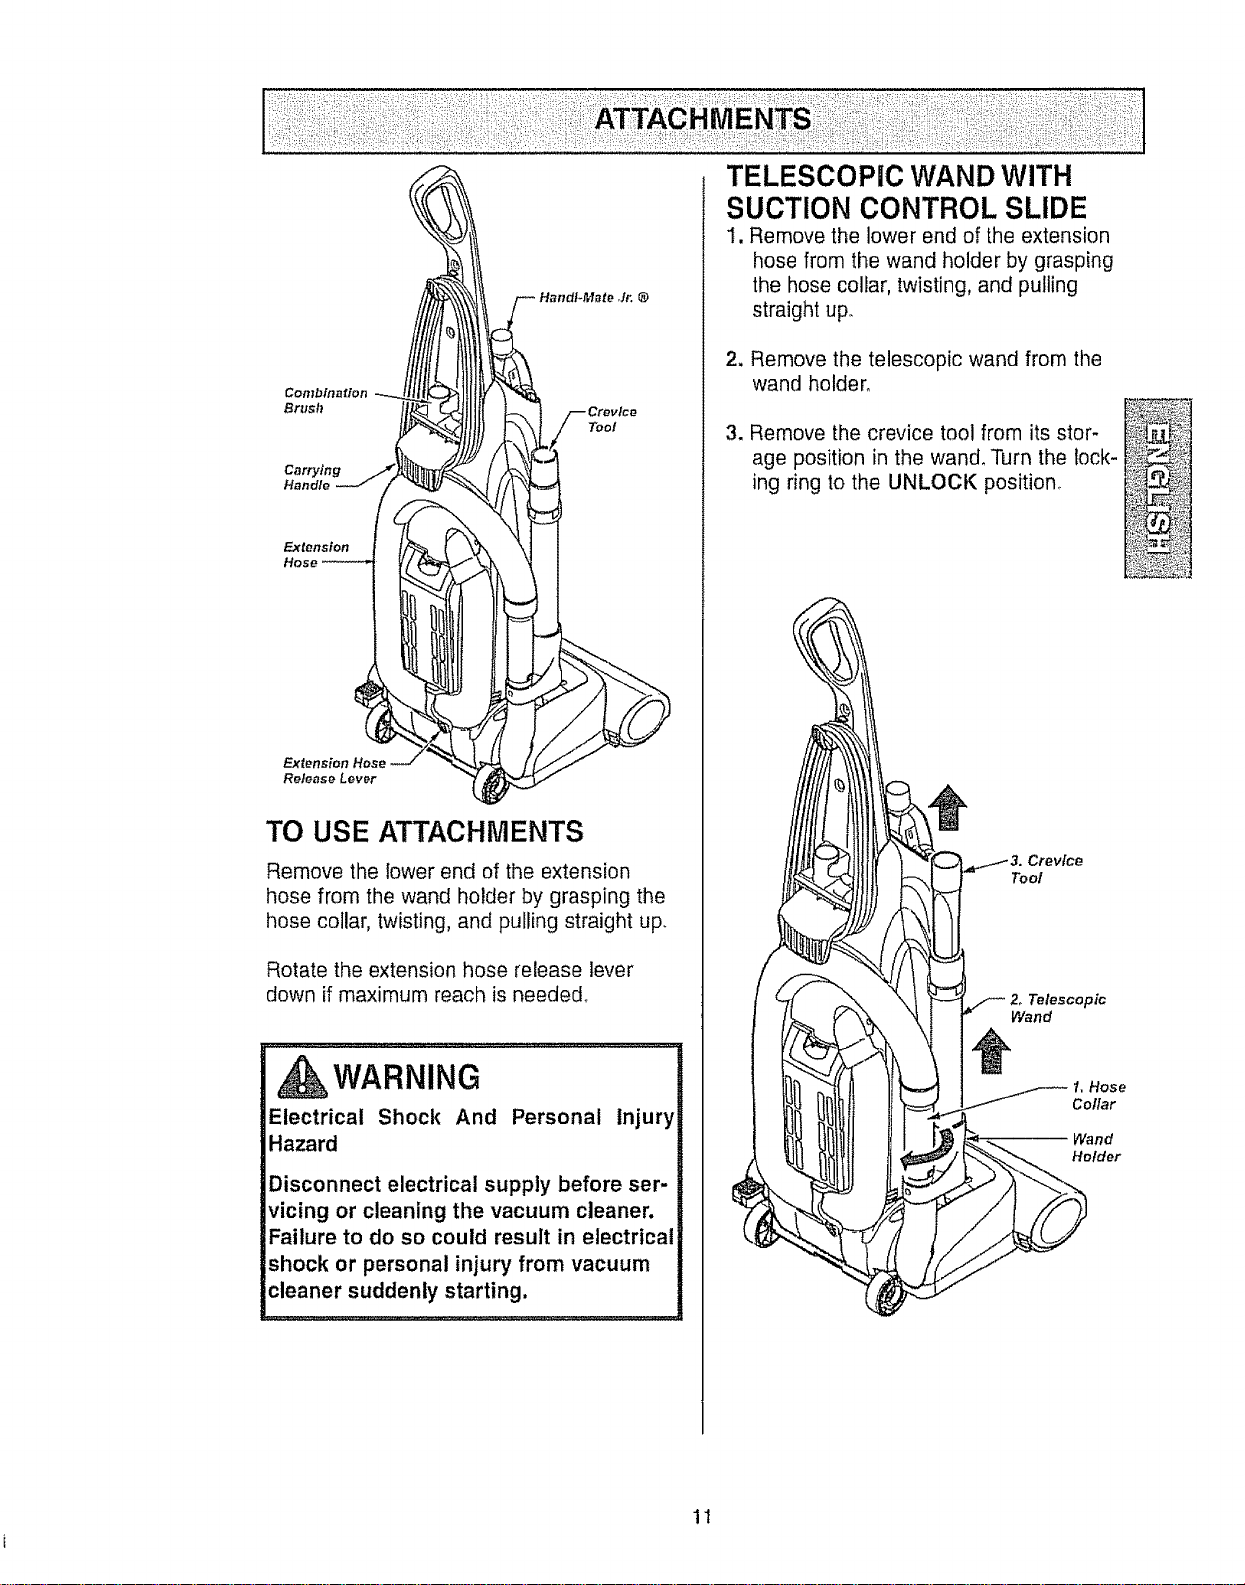
TO USE ATTACHMENTS
Remove the lower end of the extension
hose from the wand holder by grasping the
hose collar, twisting, and pulling straight uF
Rotate the extension hose release lever
down if maximum reach is needed,
_k WARNING
Electrical Shock And Personal Injury
Hazard
Disconnect electrical supply before ser-
vicing or cleaning the vacuum cleaner.
Failure to do so could result in electrical
shock or personal injury from vacuum
cleaner suddenly starting.
TELESCOPIC WAND WITH
SUCTION CONTROL SLIDE
1, Remove the lower end of the extension
hose from the wand holder by grasping
the hose collar, twisting, and pulling
straight up.
2. Remove the telescopic wand from the
wand holder°
3. Remove the crevice tool from its stor-
age position in the wand. Turn the lock-
ing ring to the UNLOCK position.
Crevice
Tool
Telescopic
Wand
1, Hose
Collar
Wand
Holder
11
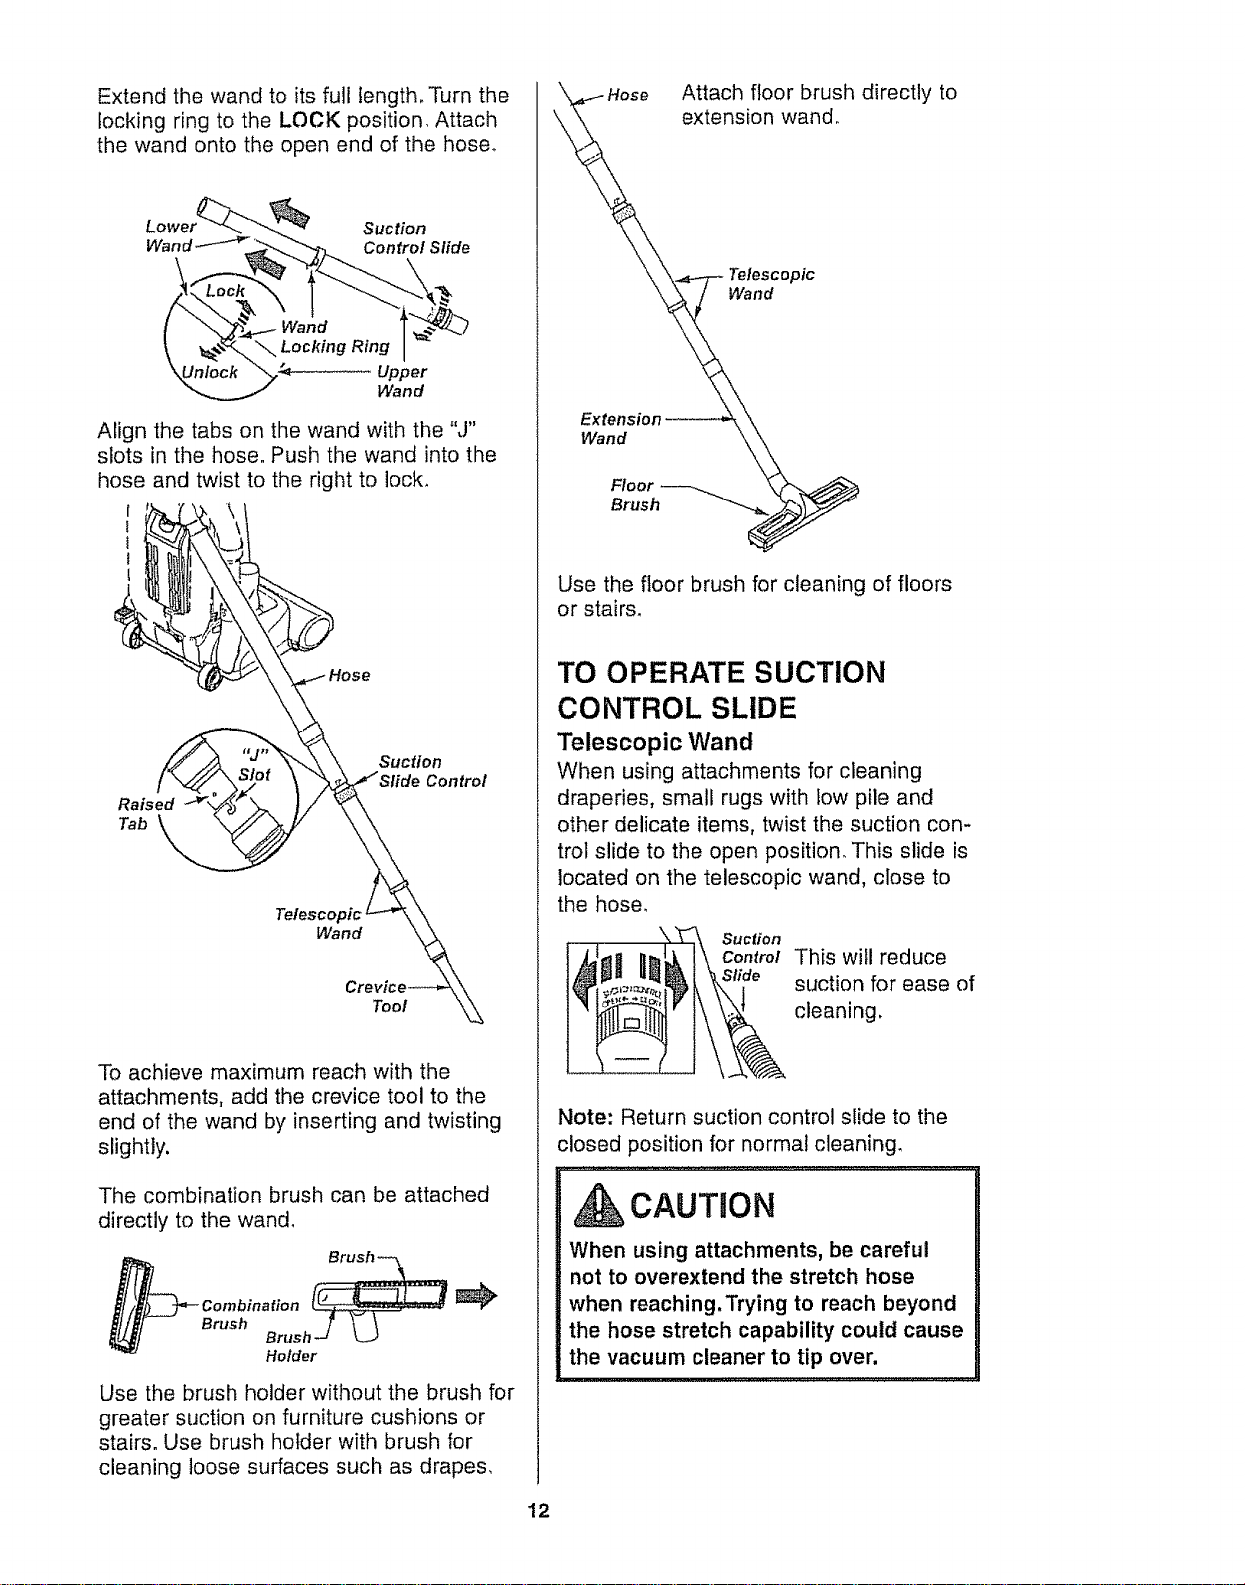
Extend the wand to its full length, Turn the
locking ring to the LOCK position, Attach
the wand onto the open end of the hose°
Suction
Control Slide
Wand
Align the tabs on the wand with the "J"
slots in the hose. Push the wand into the
hose and twist to the right to lock,
Raised
Tab
Suction
Control
Wand
Tool
To achieve maximum reach with the
attachments, add the crevice tool to the
end of the wand by inserting and twisting
slightly.
The combination brush can be attached
directly to the wand,
Brush
Brush-._ _.
Holder
Use the brush holder without the brush for
greater suction on furniture cushions or
stairs. Use brush holder with brush for
cleaning loose surfaces such as drapes,
,_k'_. \Hose Attach floor brush directly to
. extension wand.
_\ "\,_-/-- Teles;opic
Extension _. \\
Wand _.k
Floor _
Brush _J
Use the floor brush for cleaning of floors
or stairs,
TO OPERATE SUCTION
CONTROL SLIDE
Telescopic Wand
When using attachments for cleaning
draperies, small rugs with iow pile and
other delicate items, twist the suction con-
trol slide to the open position. This slide is
located on the telescopic wand, close to
the hose.
Suction
Control This will reduce
suction for ease of
cleaning,
Note: Return suction control slide to the
closed position for normal cleaning.
CAUTION
When using attachments, be careful
not to overextend the stretch hose
when reaching.Trying to reach beyond
the hose stretch capability could cause
the vacuum cleaner to tip over,
12
TO STORE ATTACHMENTS
Remove the combination brush. Snap into
appropriate storage location_
Remove crevice tool from the wand by twist-
ing. Lay aside,
Remove the telescopic wand from the hose.
Twist the wand to the left and pull from the
hose end.
Unlock the wand by turning the wand locking
ring to the UNLOCK position,
Slide the lower wand into the upper wand,
Turn the wand locking ring to the LOCK posi*
tiono
Place the crevice tool down into the com-
pressed wand. Place the telescopic wand in
the wand holder
.,,;_,,,j; ............
CAUTION
DO NOT pull the vacuum cleaner
around the room by the hose.
Property damage or personal injury
could result.
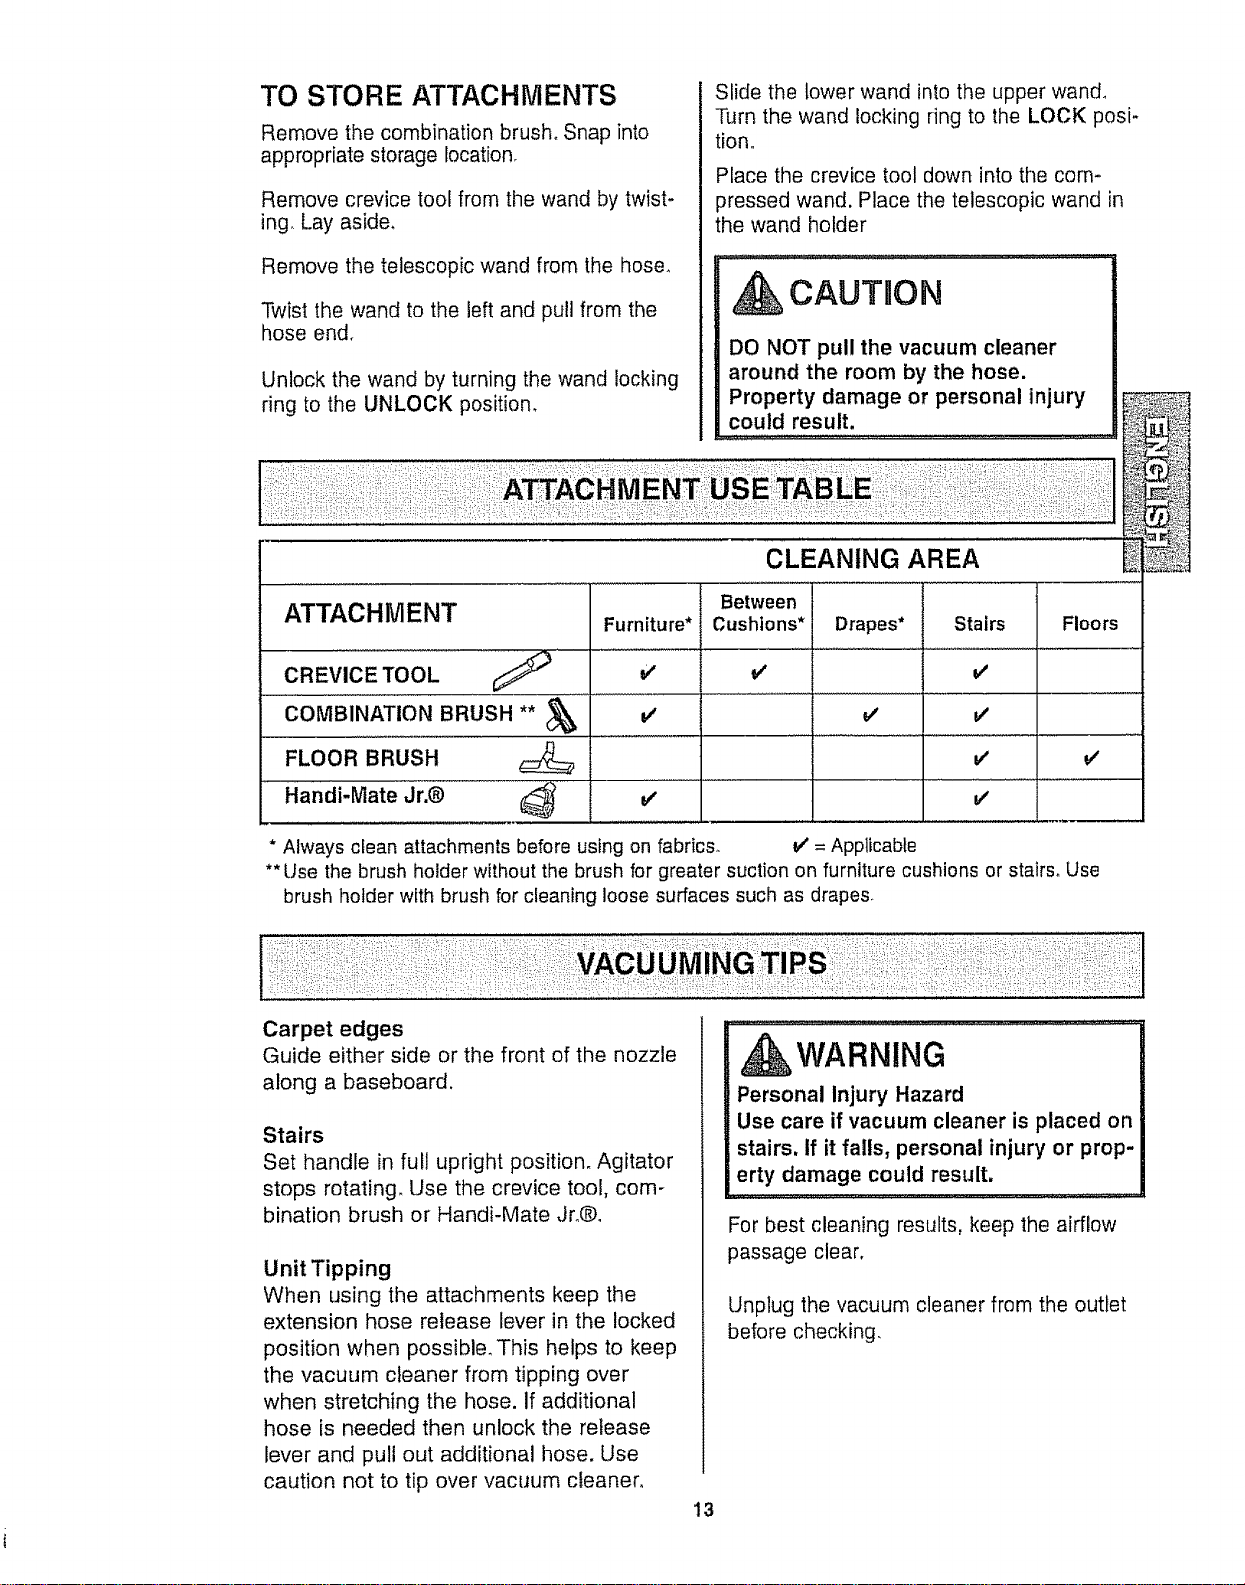
CLEANING AREA
ATTACHMENT Furniture*
CREVICE TOOL v'
coM ..............,
FLOOR BRUSH
Handi-Mate Jr_@ _ v'
Between
Cushions* Drapes* Stairs
J
v'
v'
Floors
v'
* Always clean attachments before using on fabrics. V' = Applicable
** Use the brush holder without the brush for greater suction on furniture cushions or stairs. Use
brush holder with brush for cleaning loose surfaces such as drapes.
Carpet edges
Guide either side or the front of the nozzle
along a baseboard.
Stairs
Set handle in full upright position. Agitator
stops rotating, Use the crevice tool, com-
bination brush or Handi-Mate Jro®,
Unit Tipping
When using the attachments keep the
extension hose release lever in the locked
position when possible, This helps to keep
the vacuum cleaner from tipping over
when stretching the hose. if additional
hose is needed then unlock the release
lever and pull out additional hose. Use
caution not to tip over vacuum cleaner,
WARNING
Personal Injury Hazard
Use care if vacuum cleaner is placed on
stairs, If it falls, personal injury or prop-
erty damage could result.
For best cleaning results, keep the airflow
passage clear,
Unplug the vacuum cleaner from the outlet
before checking.
13
MOTOR PROTECTION
SYSTEM
Motor Protector
This vacuum cleaner has a motor protector
by-pass valve which automatically opens to
provide cooling air to the vacuum cleaner
motor when a clog prevents the normal
flow of air to the motor. The by-pass valve
opens to prevent motor overheating and
possible damage to the vacuum cleaner.
You will notice a change of sound as air
rushes through the valve opening
To correct problem install a new dust
bag. If using attachments, adjust to
allow for greater air flow.
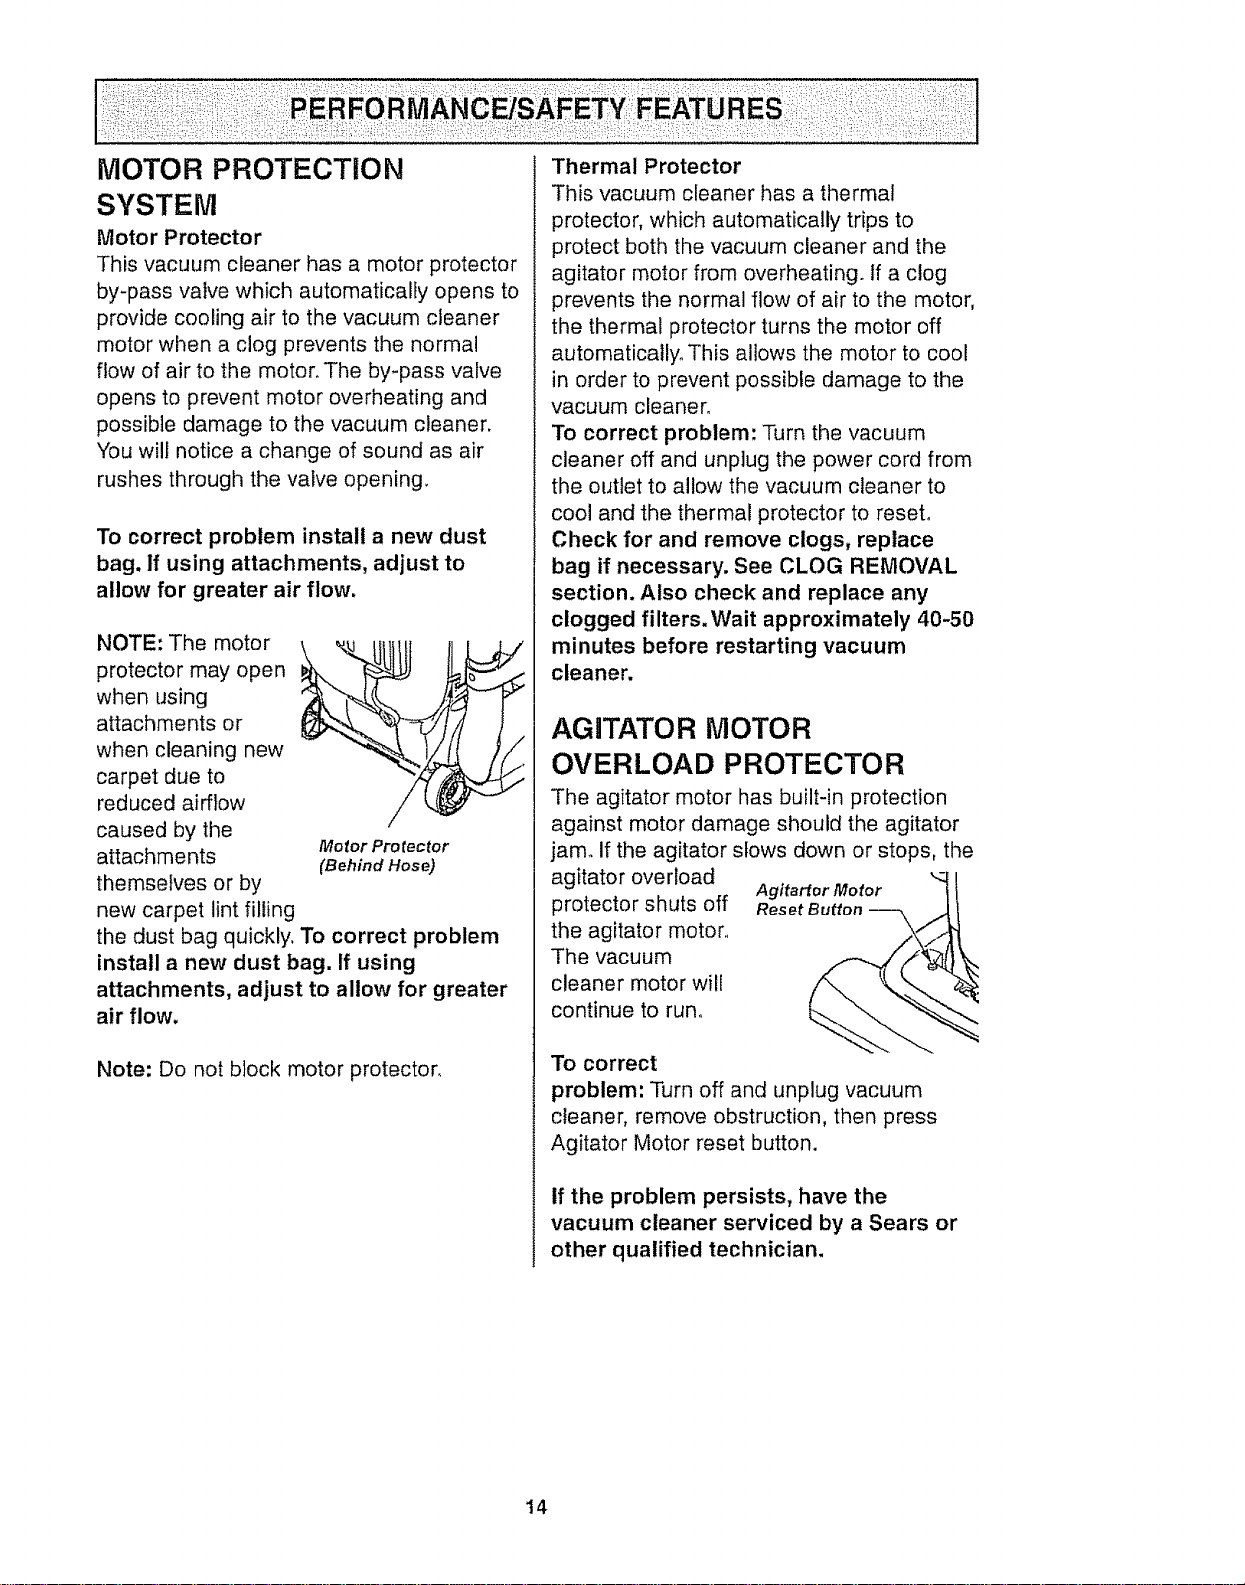
NOTE: The motor
protector may open
when using
attachments or
when cleaning new
carpet due to
reduced airflow
caused by the
Motor Pro rector
attachments (Behind Hose)
themselves or by
new carpet lint filling
the dust bag quickly. To correct problem
install a new dust bag. If using
attachments, adjust to allow for greater
air flow.
Note: Do not block motor protector.
Thermal Protector
This vacuum cleaner has a thermal
protector, which automatically trips to
protect both the vacuum cleaner and the
agitator motor from overheating. If a clog
prevents the normal flow of air to the motor,
the thermal protector turns the motor off
automatically° This allows the motor to cool
in order to prevent possible damage to the
vacuum cleaner°
To correct problem: Turn the vacuum
cleaner off and unplug the power cord from
the outlet to allow the vacuum cleaner to
cool and the thermal protector to reset.
Check for and remove clogs, replace
bag if necessary. See CLOG REMOVAL
section. Also check and replace any
clogged filters.Wait approximately 40-50
minutes before restarting vacuum
cleaner.
AGITATOR MOTOR
OVERLOAD PROTECTOR
The agitator motor has built-in protection
against motor damage should the agitator
jam. if the agitator slows down or stops, the
agitator overload
protector shuts off
the agitator motor,,
The vacuum
cleaner motor will
continue to run°
To correct
Agitartor Motor _ I
Reset Button -- _,/_
problem: Turn off and unplug vacuum
cleaner, remove obstruction, then press
Agitator Motor reset button.
If the problem persists, have the
vacuum cleaner serviced by a Sears or
other qualified technician,
14
DIRT SENSOR
The electronic dirt sensor is a feature
which wilt detect particles as they pass
through the vacuum cleaner.
The dirt sensor indicators are located on
the front of the vacuum cleaner above the
dust bag cover.
Dirt
Sensor
• When little or no dirt is present the dirt
sensor is green.
• With medium dirt concentration the dirt
sensor is amber.
o With heavy concentration the dirt
sensor is red and amber.
WARNING
Electrical Shock And Personal Injury
Hazard
Disconnect electrical supply before per-
forming maintenance to the vacuum
cleaner. Failure to do so could result in
electrical shock or personal injury from
vacuum cleaner suddenly starting.
i
OPERATION
As you vacuum, the amber and red
indicator lights will come on and stay on as
long as the sensor detects a high
concentration of particles passing through
the vacuum cleaner.
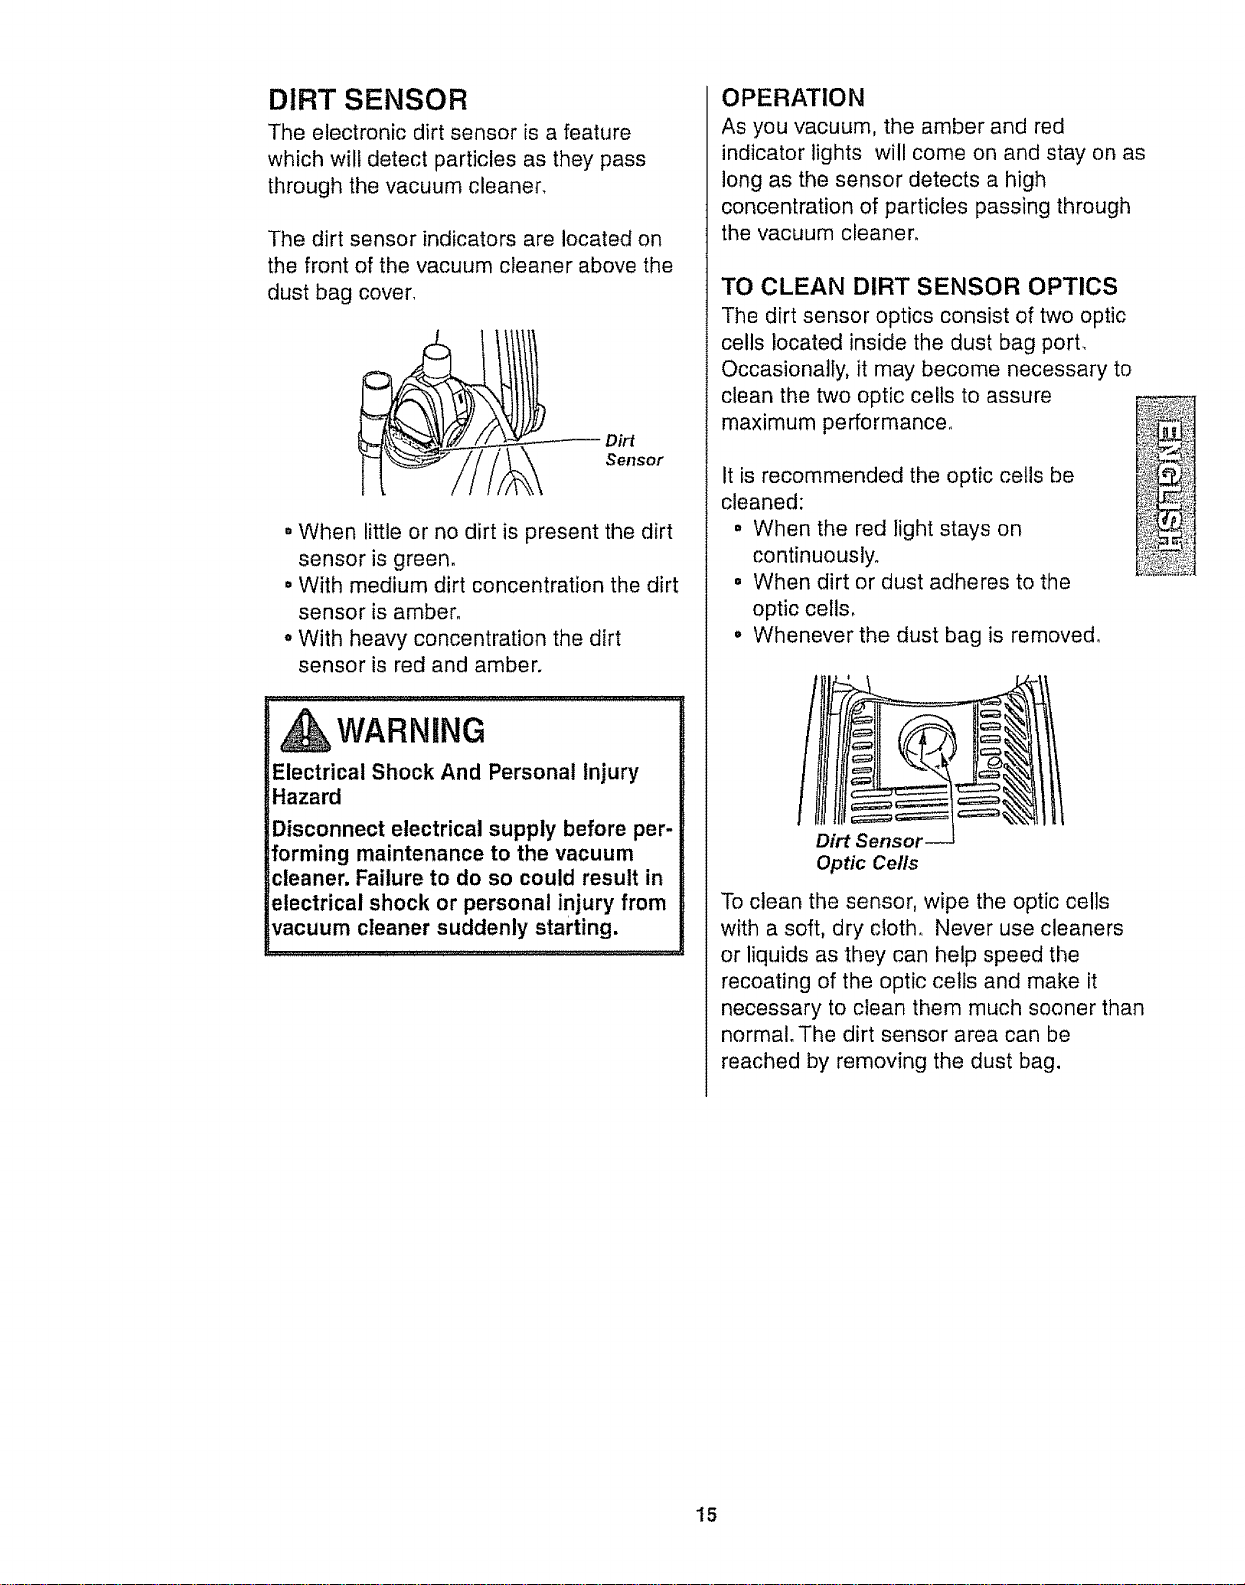
TO CLEAN DIRT SENSOR OPTICS
The dirt sensor optics consist of two optic
cells located inside the dust bag port.
Occasionally, it may become necessary to
clean the two optic cells to assure
maximum performance,,
It is recommended the optic cells be
cleaned:
= When the red light stays on
continuously.
° When dirt or dust adheres to the
optic cells,
• Whenever the dust bag is removed.
Dirt Senso_
Optic Cells
To clean the sensor, wipe the optic cells
with a soft, dry cloth, Never use cleaners
or liquids as they can help speed the
recoating of the optic cells and make it
necessary to clean them much sooner than
normal. The dirt sensor area can be
reached by removing the dust bag.
15
VACUUM CLEANER CARE
Always follow aII safety precautions when
performing maintenance to the vacuum
cleaner,
,WARNING
Electrical Shock And Personal Injury
Hazard
Disconnect electrical supply before
servicing or cleaning the vacuum
cleaner. Failure to do so could result in
electrical shock or personal injury from
vacuum cleaner suddenly starting.
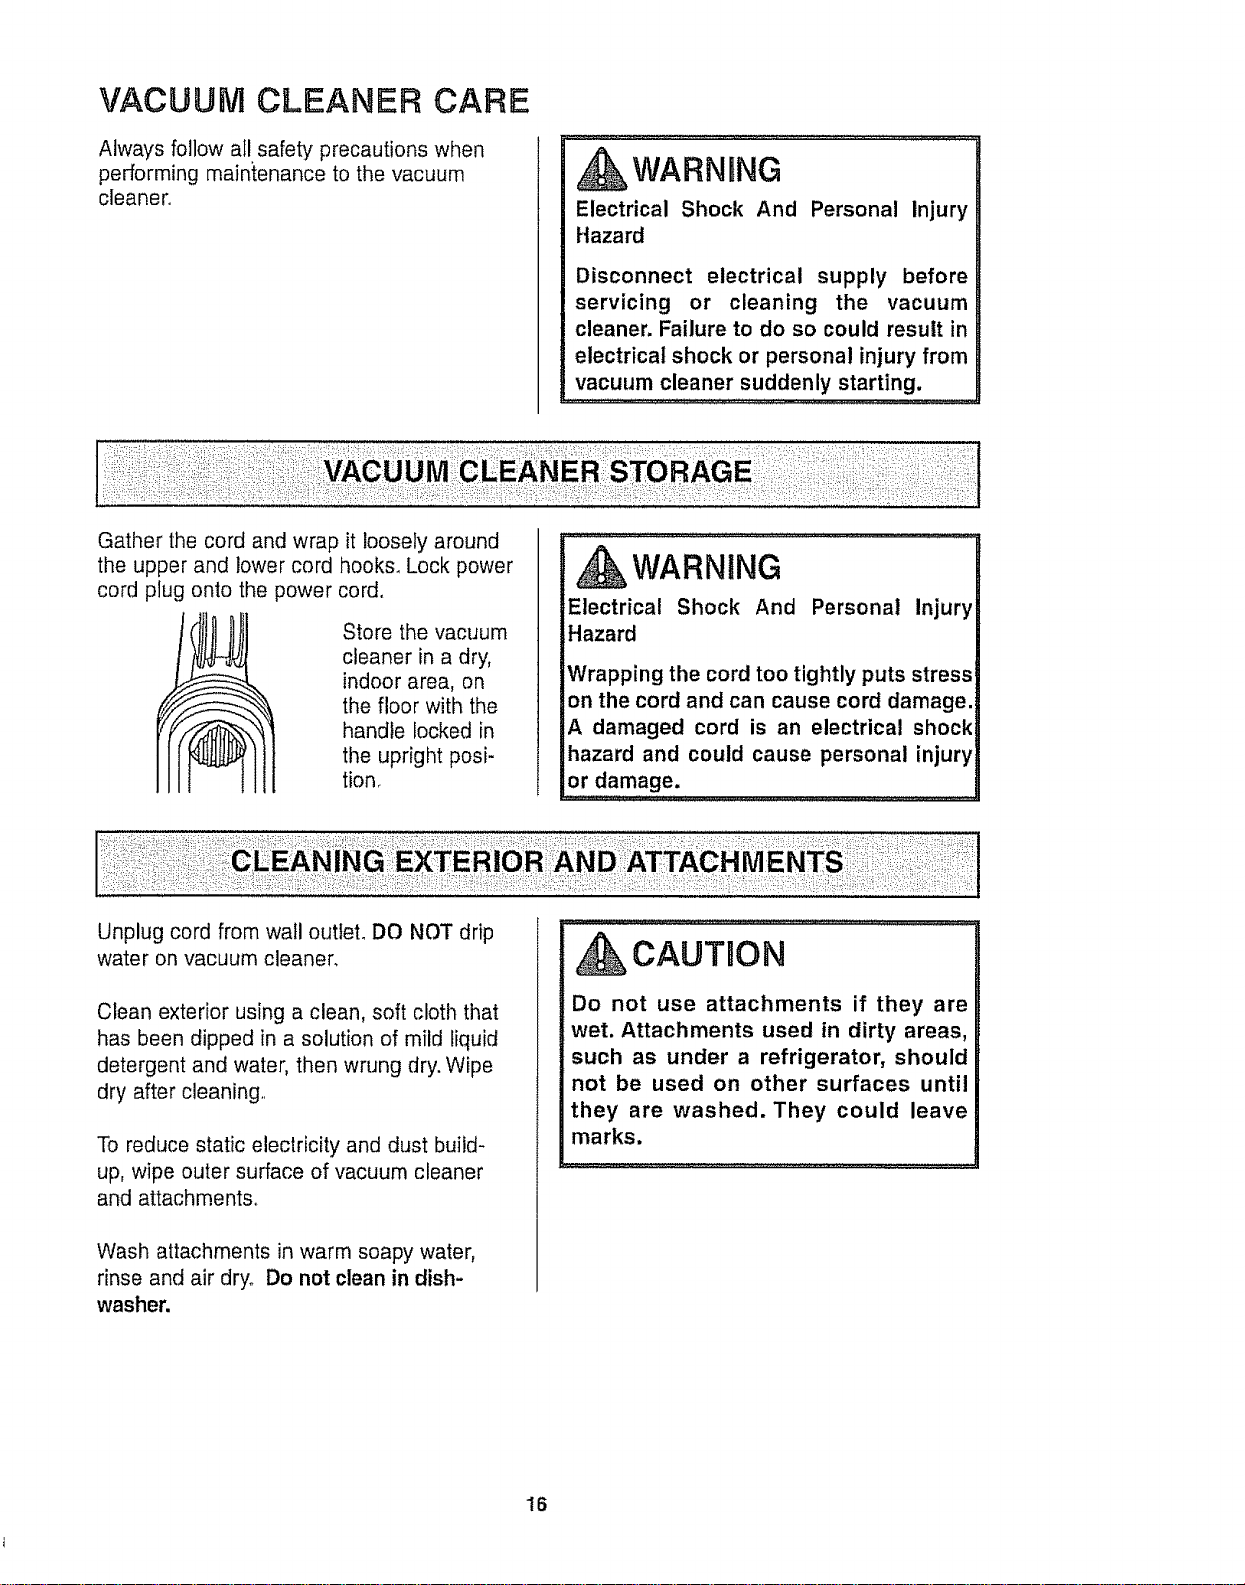
Gather the cord and wrap it loosely around
the upper and lower cord hooks. Lock power
cord plug onto the power cord.
Store the vacuum
cleaner in a dry,
indoor area, on
the floor with the
handle locked in
the upright posi-
tion.
WARNING
Electrical Shock And Personal Injury
Hazard
Wrapping the cord too tightly puts stress
on the cord and can cause cord damage.
A damaged cord is an electrical shock
hazard and could cause personal injury
or damage.
Unplug cord from wail outlet, DO NOT drip
water on vacuum cleaner,
Clean exterior using a clean, soft cloth that
has been dipped in a solution of mild liquid
detergent and water, then wrung dry. Wipe
dry after cleaning,,
To reduce static electricity and dust build-
up, wipe outer surface of vacuum cleaner
and attachments.
Wash attachments in warm soapy water,
rinse and air dry° Do not clean in dish-
washer.
CAUTBON
Do not use attachments if they are
wet. Attachments used in dirty areas,
such as under a refrigerator, should
not be used on other surfaces until
they are washed. They could leave
marks.
16

WARNING
Always unplug power cord from elec-
trical outlet before performing mainte-
nance to the vacuum cleaner,
,,.,..... :. :::: :...........
TO REMOVE DUST BAG
Cover _ .i
Pullon the dust bag cover latchlocated
on the side ofthe bag cover.
Grasp the dust bag collar and pull gently,
carefully removing the dust bag,
Throw awaythe g____[[_.._\_ti__;__oc _
used dust bag. I i--f tt_{L.,...L-,.._
Do not reuse
dust bag.
Bac Check the
Collar bag collar
and the
motor safety
filter for' dirt
Dust Bac
Chamber or clogs.
Safety
Filter
, CAOTiO. ........
NEVER REUSE A DUST BAG. Very
fine materials, such as carpet fresh-
ener, face powder, fine dust, plaster,
soot, etc, can clog the bag and cause
it to burst before it is full, Change bag
more often when vacuuming these
materials.
TO REPLACE DUST BAG
Unfold the
new dust bag. Dust
Bag
Fold the safety
seal tab on the
new dust bag
away from the //
opening that
Y
/
fits on the bag /
holder.
1
Seal Tab
Note: See PARTS AND FEATURES for
Bag number,
_ nsert the dust bag
onto the bag collar
completely by holding
the bag collar.
Place the dust bag collar into position.
Tuck the bag
behind each of
the four bag
retention corners
shown here, Be
sure the bottom
and sides of the
dust bag are
completely within
bag cavity prior to
closing the bag
cover.
Bag
Retention
Corner
Close the bag
cove r.
You will hear a dis-
tinct snap when
cover is securely
closed.
Check to see that the dust bag is fully
placed in the bag chamber,
-17
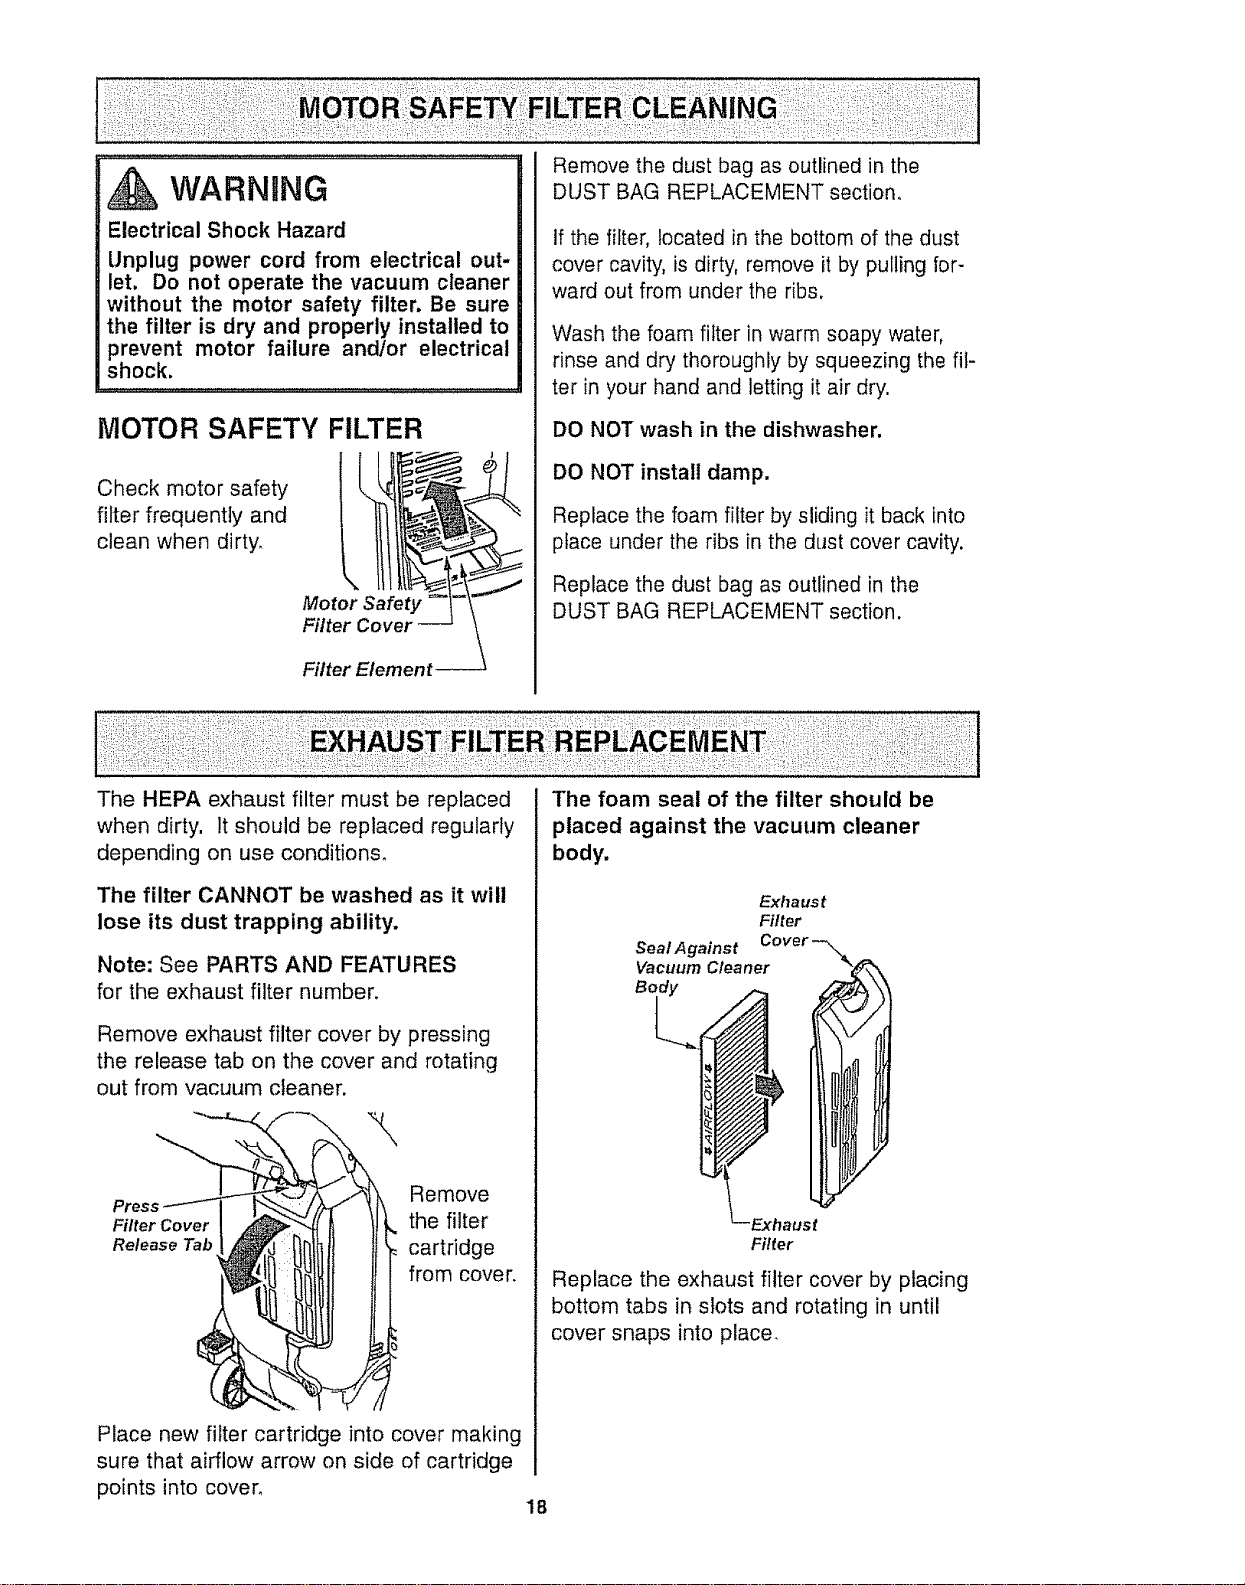
WARNWNG
Electrical Shock Hazard
Unplug power cord from electrical out-
let. Do not operate the vacuum cleaner
without the motor safety filter. Be sure
the filter is dry and properly installed to
prevent motor failure and/or electrical
shock.
MOTOR SAFETY FILTER
Check motor safety
filter frequently and
clean when dirty,
Motor Safety
Filter
Filter Element
Remove the dust bag as outlined in the
DUST BAG REPLACEMENT section,
If the filter, located in the bottom of the dust
cover cavity, is dirty, remove it by pulling for-
ward out from under the ribs,
Wash the foam filter in warm soapy water,
rinse and dry thoroughly by squeezing the fil-
ter in your hand and letting it air dry.
DO NOT wash in the dishwasher.
DO NOT install damp.
Replace the foam filter by sliding it back into
place under the ribs in the dust cover cavity.
Replace the dust bag as outlined in the
DUST BAG REPLACEMENT section,
The HEPA exhaust filter must be replaced
when dirty, it should be replaced regularly
depending on use conditions°
The filter CANNOT be washed as it will
lose its dust trapping ability,
Note: See PARTS AND FEATURES
for the exhaust filter number,
Remove exhaust filter cover by pressing
the release tab on the cover and rotating
out from vacuum cleaner.
Remove
Filter Cover the filter
Release Tab cartridge
from cover,
Place new filter cartridge into cover making
sure that airflow arrow on side of cartridge
points into cover,
The foam seal of the filter should be
placed against the vacuum cleaner
body,
Exha us t
Filter
SeaI Against Cover-_
Vacuum Cleaner
Body
/
LExhaust
Filter
Replace the exhaust filter cover by placing
bottom tabs in slots and rotating in until
cover snaps into place,
18
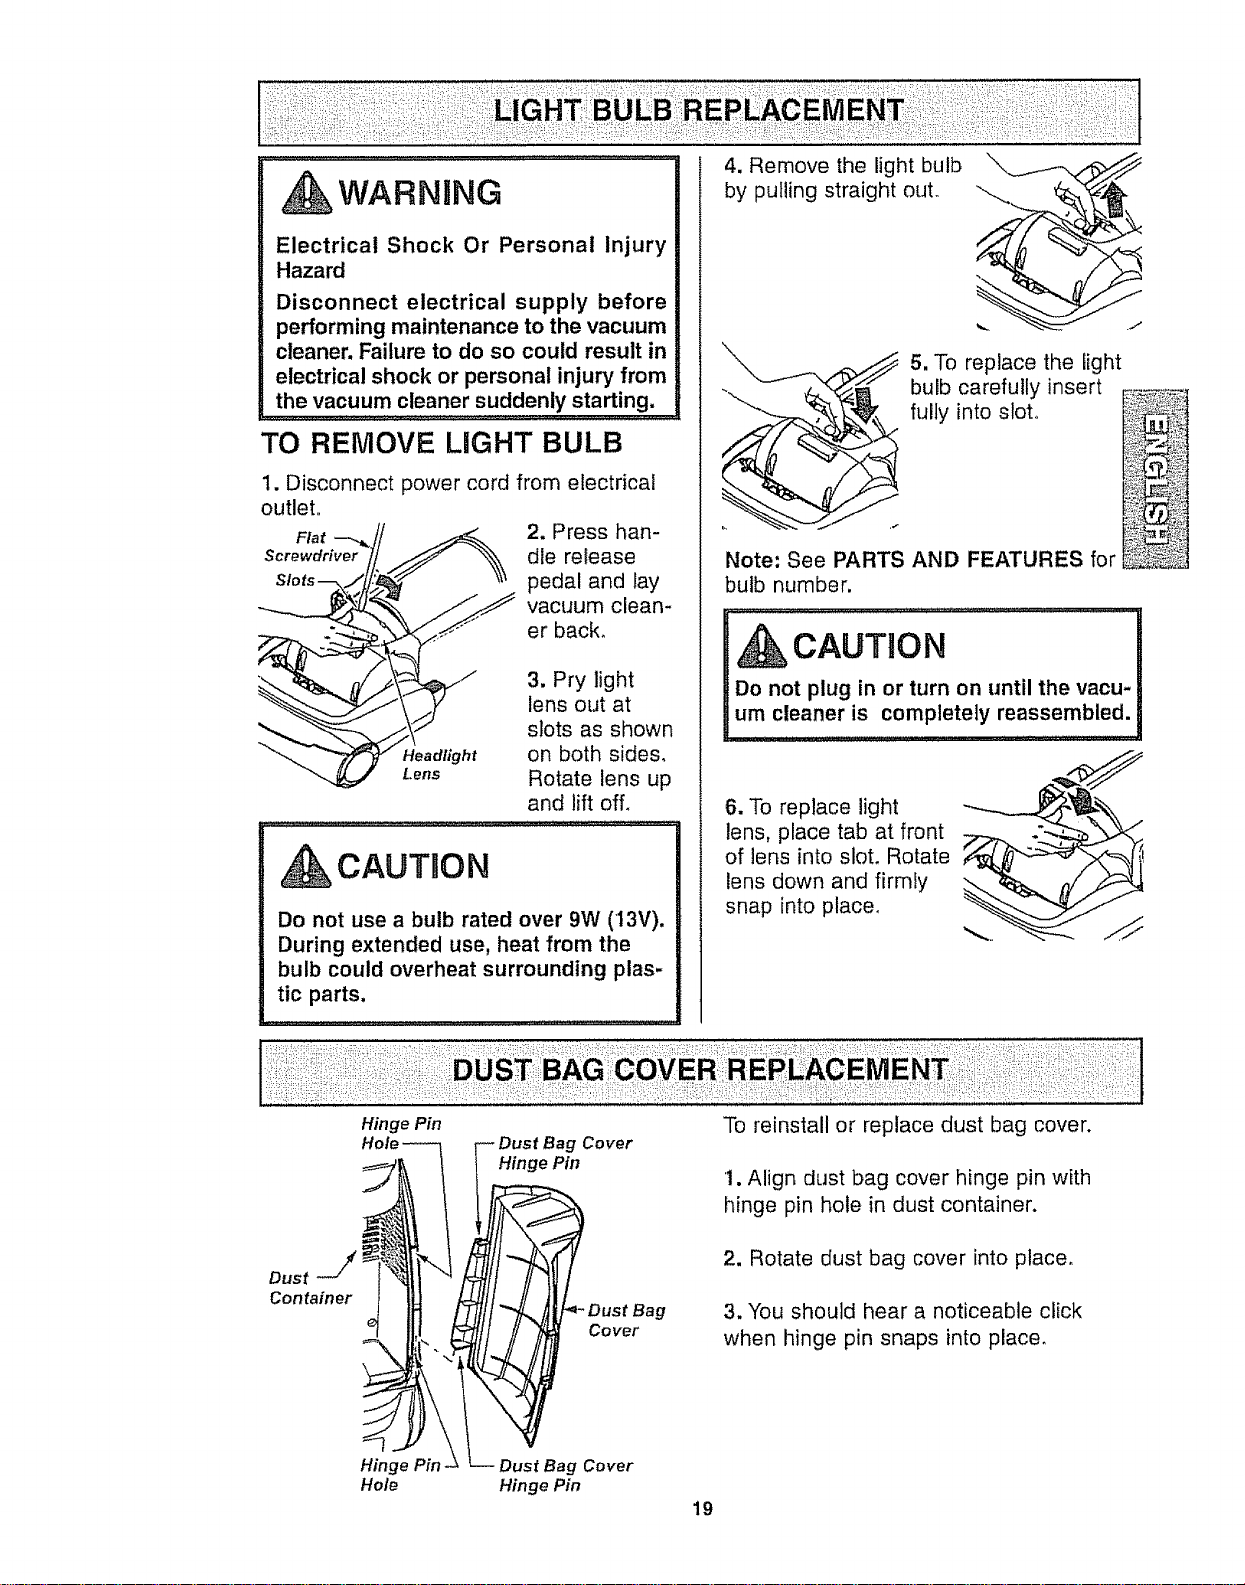
WARNING
Electrical Shock Or Personal Injury
Hazard
Disconnect electrical supply before
performing maintenance to the vacuum
cleaner. Failure to do so could result in
electrical shock or personal injury from
the vacuum cleaner suddenly starting.
TO REMOVE LIGHT BULB
1. Disconnect power cord from electrical
outlet.
Fl°,--..J/
"_ _ Headlight
Lens
2, Press han-
dle release
pedal and lay
vacuum clean-
er back,
3. Pry light
lens out at
slots as shown
on both sides,
Rotate lens up
and lift off,
CAUTBON
Do not use a bulb rated over 9W (13V).
During extended use, heat from the
bulb could overheat surrounding plas-
tic parts.
Hinge Pin
4. Remove the light bulb
by pulling straight ouL
Note: See PARTS AND FEATURES for
bulb number.
5. To replace the light
bulb carefully insert F__:_"_
fully into slot. _!
N
CAUTION
Do not plug in or turn on until the vacu-
um cleaner is completely reassembled.
6. To replace light
lens, place tab at front
of lens into slot. Rotate
lens down and firmly
snap into place.
Dust j
Container
g Cover
Hinge Pin
Dust Bag
Cover
To reinstall or replace dust bag cover.
1. Align dust bag cover hinge pin with
hinge pin hole in dust container.
2. Rotate dust bag cover into place.
3. You should hear a noticeable click
when hinge pin snaps into place.
Hinge Pin- Dust Bag Cover
Hole Hinge Pin
19
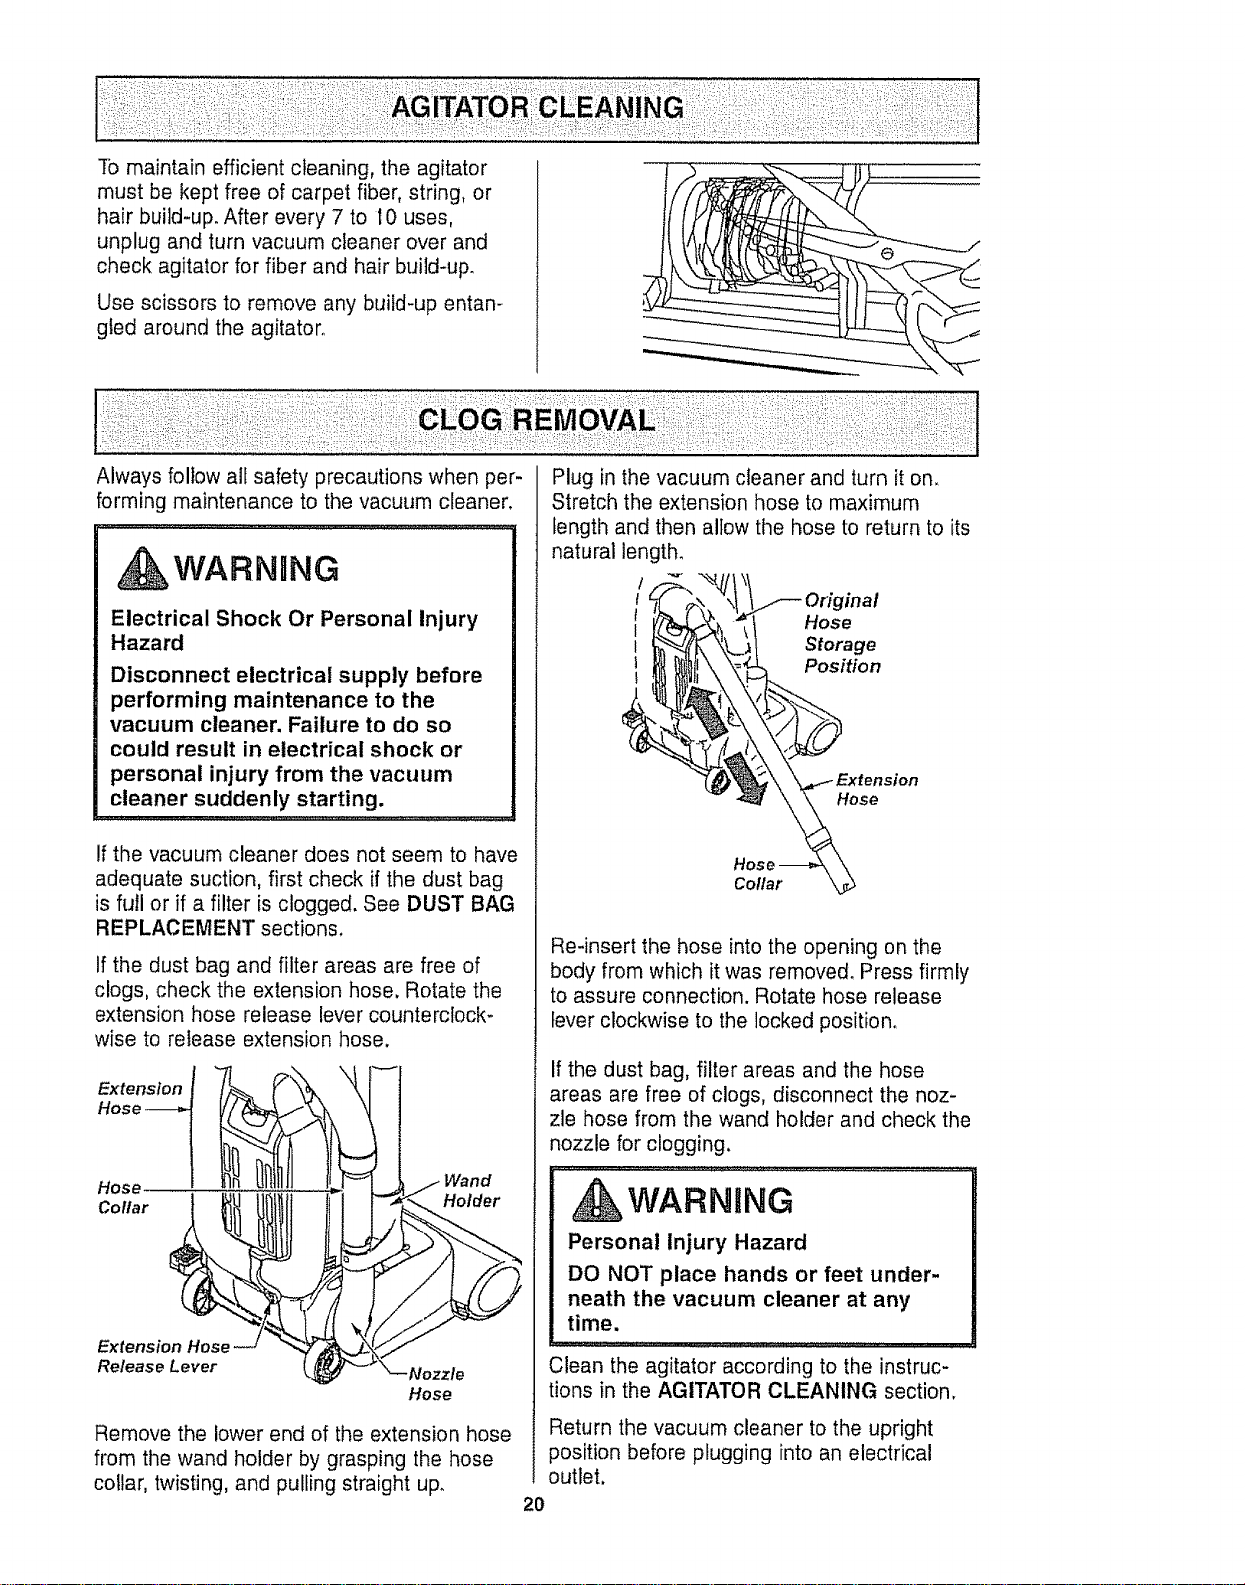
To maintain efficient cleaning, the agitator
must be kept free of carpet fiber, string, or
hair build-up. After every 7 to I0 uses,
unplug and turn vacuum cleaner over and
check agitator for fiber and hair build-up.
Use scissors to remove any build-up entan-
gled around the agitator,
Always follow all safety precautions when per-
forming maintenance to the vacuum cleaner.
...... ,,,,,,,,,,,,,,,,,,,,,,,,,,,,,,,,,,,,,,,,,,,,_..,,,, •
WARNnNG
Electrical Shock Or Personal Injury
Hazard
Disconnect electrical supply before
performing maintenance to the
vacuum cleaner. Failure to do so
could result in electrical shock or
personal injury from the vacuum
cleaner suddenly starting.
If the vacuum cleaner does not seem to have
adequate suction, first check if the dust bag
is full or if a filter is clogged. See DUST BAG
REPLACEMENT sections,
If the dust bag and filter areas are free of
clogs, check the extension hose. Rotate the
extension hose release lever counterclock-
wise to release extension hose.
Extension
Hose
Hose
Collar Holder
E_rtens
Release Lever
Hose
Remove the lower end of the extension hose
from the wand holder by grasping the hose
collar, twisting, and pulling straight up.
Plug in the vacuum cleaner and turn it on.
Stretch the extension hose to maximum
length and then allow the hose to return to its
natural length.
Original
Hose
: St°ratgil
_ "\ \..._ Extension
Hose
Hose _ \
Collar kd_
Re-insert the hose into the opening on the
body from which it was removed. Press firmly
to assure connection. Rotate hose release
lever clockwise to the locked position.
If the dust bag, filter areas and the hose
areas are free of clogs, disconnect the noz-
zle hose from the wand holder and check the
nozzle for clogging.
WARNING
Personal Injury Hazard
DO NOT place hands or feet under-
neath the vacuum cleaner at any
time.
Clean the agitator according to the instruc-
tions in the AGITATOR CLEANING section.
Return the vacuum cleaner to the upright
position before plugging into an electrical
outlet.
2O
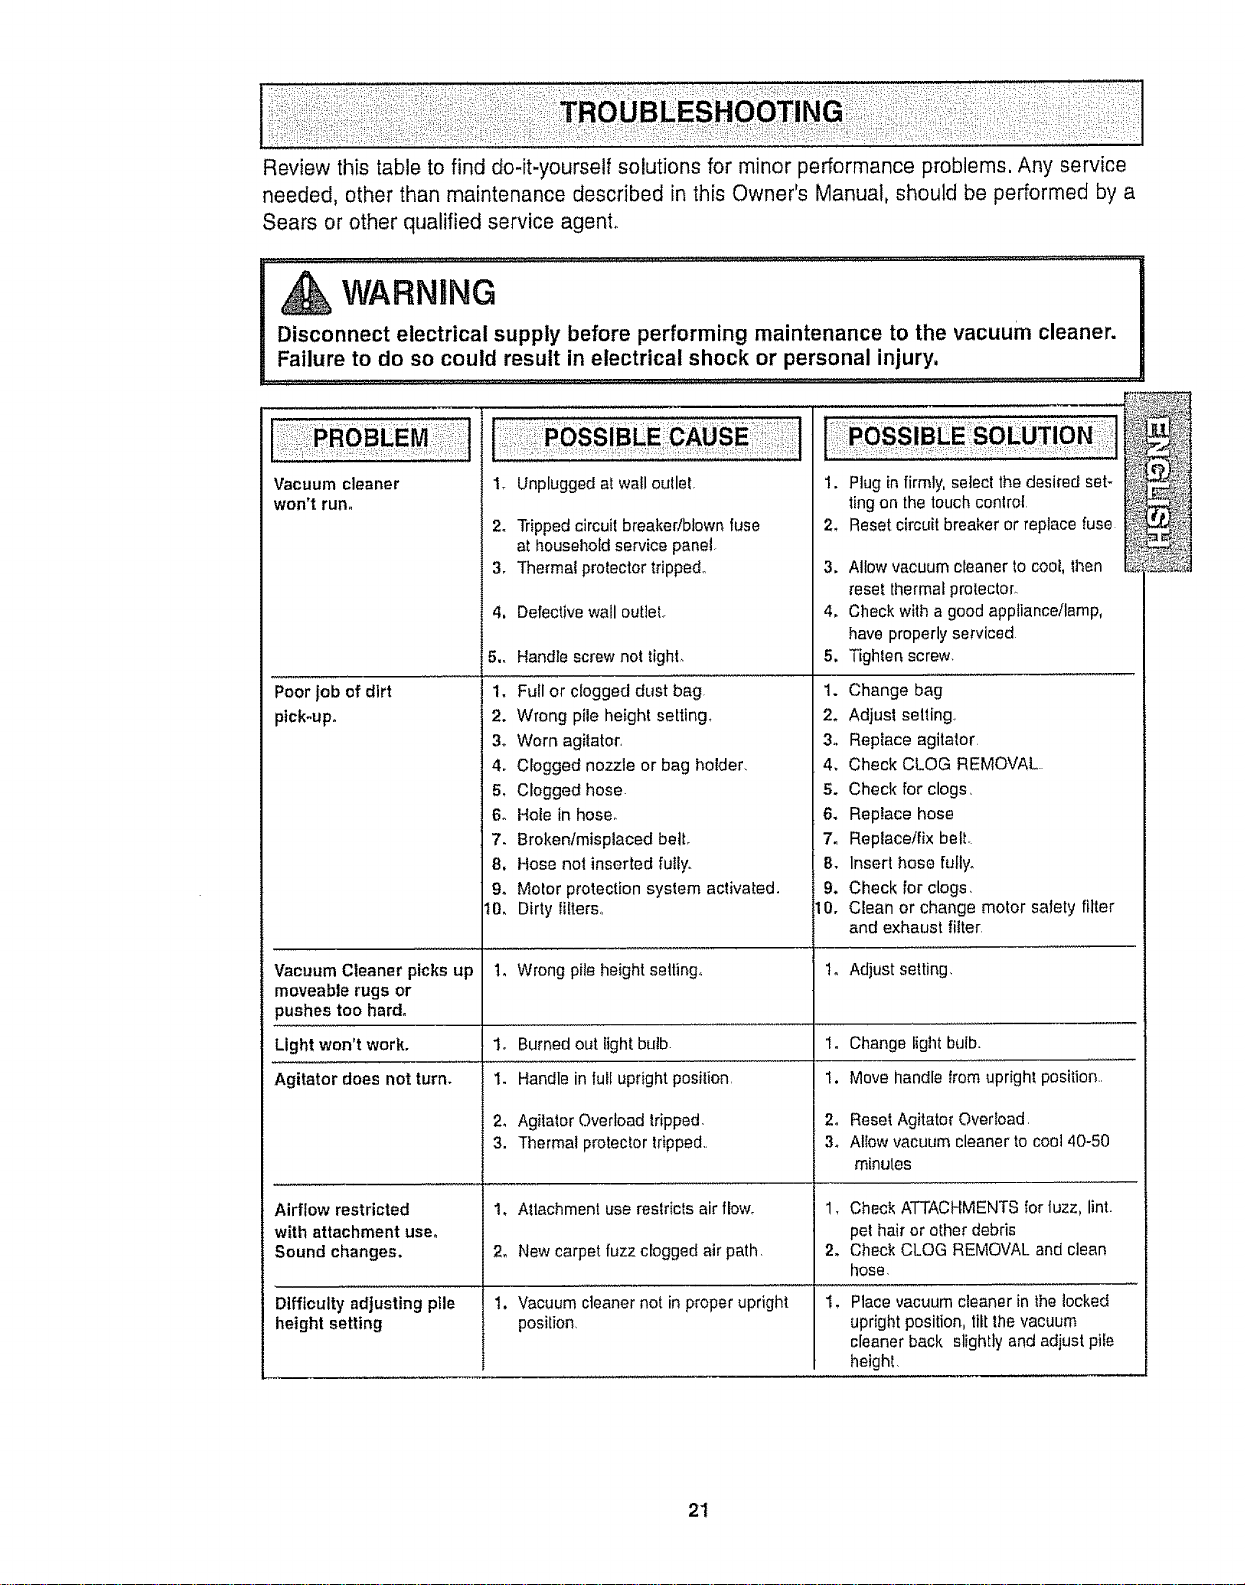
Review this table to find do-it-yourself solutions for minor performance problems, Any service
needed, other than maintenance described in this Owner's Manual, should be performed by a
Sears or other qualified service agent°
I Disconnect electrical supply before performing maintenance to the vacuum clean r.
e
_ Failure to do so cou_ld .result in electrical shock or personal injury. .................
Vacuum cleaner
won't run.
Poor jobof dirt
plck-upo
Vacuum Cleaner picks up
moveable rugs or
pushes too hard.
Light won't work.
Agitator does not turn.
Airflow restricted
with attachment user
Sound changes,
Difficulty adjusting pile
height setting
1. Unplugged at wail outlet,
24
3,
Tripped circuit breaker!blown fuse 2.
at household service pane].
Thermal protector tripped° 3.
4, Defective wall outieL
5., Handle screw not tight.
1. Full or clogged dust bag.
2. Wrong pile height setting.
3o Worn agitator,
4. Clogged nozzle or bag holder.
5, Clogged hose.
6. Hole in hose.
7. Broken/misplaced bell
8, Hose not inserted fully.
9. Motor protection system activated.
t0, Dirty filters.,
1_ Wrong pile height setting,
1. Burned out light bulb.
1. Handle in full upright posilion,
2, Agilalor Overload tripped,
3. Thermal protector tripped,,
1. Attachment use restricts air flow_
2. New carpet fuzz clogged air path.
1. Vacuum cleaner not in proper upright
positron,
1. Plug in firmly, select thedesked set-
ting on the touchcontrol
Reset circuit breaker or replace fuse
4_
Allow vacuum cleaner to cool, then
_esetthermal protector.
Check with a good appliance/lamp,
have properly serviced
5, Tighten screw.
1. Change bag
2. Adjust setting,
3. Replace agitator
4, Check CLOG REMOVAL..
5. Check for clogs,
6. Replace hose
7. Replace/fix belt.
8. Insert hose fully.
9. Check for clogs,
10. Clean or change motor salety filter
and exhaust filter
t. Adjust setting,
1.
2o
3_
Change Iight bulb.
Move handle trom upright position,,
Reset Agitator Overload.
Allow vacuum cleaner to cool 40-50
minutes
1, Check ATTACHMENTSfor tuzz. lint.
pet hair or other debris
2. Check CLOG REMOVAL and clean
tlose,
Place vacuum cleaner in the locked
upright position, tilt the vacuum
cleaner back slightly and adjust pile
heighl,
21
Master Protection Agreements
Congratulations on making a smart purchase. Your new Kenmore® productis designed and manu-
factured for years of dependable operation° But like all products, it may require preventive mainte-
nance or repair from time to time. That's when having a Master Protection Agreement can save you
money and aggravation_
The Master Protection Agreement also helps extend the life of your new product.. Here's what the
Agreement* includes:
[] Parts and labor needed to help keep products operating properly under normal use, not just
defects, Our coverage goes well beyond the product warranty, No deductibles, no functional
failure excluded from coverage-- real protectlom
[] Expert service by a force of more than 10,000 authorized Sears service technicians, which
means someone you can trust wilt be working on your product°
[] Unlimited service calls and nationwide service, as often as you want us, whenever you
want uso
[] "No-lemon" guarantee - replacement of your covered product if four or more product failures
occur within twelve months°
[] Product replacement if your covered product can't be fixe&
[] Annual Preventive Maintenance Check at your request- no extra charge,.
[] Fast help by phone - we call it Rapid Resolution - phone support from a Sears representa-
tive on all products. Think of us as a "talking owner's manuaL"
@ Power surge protection against electricaI damage due to power fluctuations°
$250 Food Loss Protection annually for any food spoilage that is the result of mechanical fail-
ure of any covered refrigerator or freezer..
Rental reimbursement if repair of your covered product takes longer than promised,
El 10% discount off the regular price of any non-covered repair service and related installed
parts_
Once you purchase the Agreement, a simple phone calf is all that it takes for you to schedule ser-
vice° You can call anytime day or night, or schedule a service appointment online°
The Master Protection Agreement is a risk free purchase° If you cancel for any reason during the
product warranty period, we will provide a full refund. Or, a prorated refund anytime after the product
warranty period expires. Purchase your Master Protection Agreement today!
Some limitations and exclusions apply, For prices and additional information in the U.S,A.
call 1_800_B27-6655,
* Coverage tn Canada varies on some items. For full details call Sears Canada at 1-800-361-
6665.
Sears Installation Service
For Sears professional installation of home appliances, garage door openers, water heaters, and
other major home items, in the U.&Ao or Canada call 1-800-4-MY-HOME®o
22
Antes de usar su aspiradora nueva ..... 1
Garantia de la aspiradora de Kenrnore o,,, 2
Instrucciones importantes de
seguridad .................................. 3
Piezas y caracteristicas de aspiradora
vertical ................................ 4
Instrucciones de ensamble ............ 5-6
Instrucciones de operaci6n .............. 6
LiberaciSn del cord6n el_ctrico .......... 6
Desprendimientodel mango .............. 7
Pulsadorde control .................... 7
inteliCLEAN ............................. 8
Indicadorde rendimienlo ..................... 9
Funci6nbarrido Suave .................. 9
Ajuste y selecci6n de nivelde pelo de la
alfombra ................................ 9
Accesorios ........................ 10-tl
Cuadrode usode los accesorios .......... t2
Sugerencias paraaspirar ............. 12
Carecteriisticas de
rendimiento/seguridad ............... 13-14
Cuidado de la aspiradora ............... 15
Almacenamiento de la aspiradora ............ 15
Limpieza del exteriory de los accesorios ,, +15
Cambio de fa bolsa parapolvo ............ 16
Filtro deprotecci6n al motor ............... 17
Filtro deescape ......................... I7
Cambio de la bombilla ................. !8
Como reinstalar lacubierta de la bolsa ...... 18
Umpieza del agitador ................. 19
C6mo eliminar los residuos de basura
en los conductos ..................... 19
Reconocimiento de problemas ......... 20
Acuerdos maestros de protecci6n ..... 21
Informaci6n de assistancia
o servicio ....................... paginaposterior
Pot favor leaesta guia que le ayudaraa assemblary operar su aspiradora nuevade Kenmoreen una manera
m,Ssseguray efectiva,
Paramas informaci6n acercadel cuidado y operaci6nde esta aspirador, Ilamea su tienda Sears mascercana,
Cuando preguntepor informaci6nusted necisitar#,el nSmerode serie complelo y modelode la aspiradoraque
estan en la placade los numeros de modeloy serie.
Use elespacio de abajo para registrarel nt)mero de modelo y serie desu nuevaaspiradora de Kenmore
NtJmerode Modelo
Numero deSerie
Fechade Compra
Matenga estelibro y su reciboen un lugar seguro parareferenciasfuturas,
+®
Garantia limitada de un afio
Siesta aspiradora falla por un defecto en sus materiales o fabricaci6n en el per[odo de
un a5o desde la fecha de compra, cuando se instala, maneja y mantiene siguiendo
todas las instrucciones incluidas con el producto, devu_lvala a cualquier tienda Sears,
Sears Parts & Repair Center (Centro de Reparaciones y Piezas Sears) u a otto
distribuidor Kenmore para que reparen el aparato de forma gratuitao
Si esta aspiradora se utiliza para otros fines que no sea uso familiar privado, esta
garant[a es vb_lida solamente durante 90 dias desde la fecha de compra.
Esta garantfa cubre exclusivamente los defectos de materiales y fabricaci6n.
Sears NO pagar_:
!. Los elementos desechables que puedan desgastarse con un uso normal, incluyendo
sin carActer exciuyente, filtros, correas, I#,mparas y bolsas.
2. Un t6cnico del servicio t6cnico para que ensehe at usuario a instalar, manejar o
mantener correctamente el producto.
3. Un t_cnico del servicio t_cnico para limpiar o mantener este producto.
4. DaSos o averia de este producto si no se ha instalado, manejado o mantenido
siguiendo todas las instrucciones incluidas con el producto.
5. DaSos o aver[a de este producto odginados por accidente, abuso, uso incorrecto u
uso del producto para otros fines distintos de los indicados.
6. DaRos o aver[a de este producto causados por el uso de detergentes, limpiadores,
productos qufmicos o utensilios diferentes a los recomendados en todas las
instrucciones que se incluyen con el producto_
7. DaSos o averia de las piezas o sistemas causados por modificaciones no
autorizadas que se hayan hecho a este producto.
Limitaci6n de responsabilidad de ias garantfas implicitas; limitaci6n de remedios
El unico y exclusivo remedio del cliente bajo esta garantia limitada ser_, la reparaci6n del
producto segun Io indicado en este documento. Las garantfas implicitas, incluyendo las
garantias de comerciabifidad o idoneidad para un propSsito especffico, se limitan a un
afio o el periodo m&s corto permitido por la ley. Sears no ser_ responsable por da5os
incidentales ni consecuenciales. Algunos estados o provincias no permiten la exclusi6n
o limitaciSn de daRos incidentales o consecuenciales, ni limitaciones en ta duraciSn de
las garantfas implicitas de comerciabilidad o idoneidad, por Io que estas exclusiones o
limitaciones podrian no aplicar en su casoo
Esta garant[a aplica solamente cuando esta aspiradora se utiliza en Estados Unidos o
CanadA,
Esta garant[a le otorga derechos legales especfficos, y usted podr[a tener otros
derechos que varian en funci6n de cada estado.
Sears, Roebuck and Co., Hoffman Estates, IL 60179
Sears Canada Inc.,Toronto, Ontario, Canada MSB 2B8
2
Lea todas las instrucclones en este manual antes de armar o usar su aspiradora.
, ADVERTENCIA
Su seguridades muy irnportantepara nosotms, Para
reducirel desgo de incendio,choqueel_ctrico, lesion cor-
poral odafos alutilizar su asptradora,actfiede acuerdo
con precaucionesb_sicasde seguridad,entreelias:
Use su aspiradora solamente como se
describe en este manuat_ Use sotamente con
los accesorios Sears recomendados.
Desconecte la fuente de electricldad antes de
hacer et servicio o limpiar el _rea del cepitlo.
La falla de hacer esto puede resultar en
choque el_ctrico o en el sL_bitoarranque del
cepitto.
No deje la aspiradora cuando est#,
enchufada, Desenchufe del tomacorriente
cuando no est_ en uso y antes de hacer el
servicio_
Para reducir el riesgo de choque el_ctrico -
No [a use afuera o sobre superficies mojadas.
No permita que se la use como un juguete.
Gran atenciSn es necesaria cuando es usada
pot o cerca de niSos.
No la use con un cord6n o clavija daSados_Si
la aspiradora no estz&trabajando como debe,
se la ha dejado caer, daSado, dejada afuera, o
volteada en el agua, ret6rneta a un Centro de
Servicio Sears.
No la tire o arrastre del cord6n, use el cordSn
como una manija, cierre una puerta sobre el
cord6n, o tire del cord6n alrededor de bordes
afilados o esquinaso No pase fa aspiradora
sobre el cordSn_Mantenga el cord6n lejos de
superficies calientes_
No desenchufe tirando del cord6n. Para
desenchufar, tome la ciavija, no el cordSn_
No tome la clavija o la aspiradora con las
manos mojadas_
No ponga ntngun objeto en las aberturas
No ta use con ninguna abertura bloqueada;
mant_ngata libre de poivo, hilachas, peto, y
cualquier cosa que pueda reducir la
circutaciSn de[ aire_
Mantenga los cabe!los, ropas sueltas,
dedos, y todas las partes del cuerpo lejos de
aberturas y partes movibies.
Apague todos los controies antes de
desenchufar.
Use cuidado extra cuando limpie escaleraso
No la ponga sobre sitlas, mesas, etco
Mant_ngafa sobre el pisoo
No use la aspiradora para levantar Ifquidos
inflamables o combustibles (gasolina, fluido de
limpiar, perfumes, etCo),o la use en _.reas
donde puedan estar presentes. Los vapores
de estas substancias pueden crear un peligro
de incendio o explosiSn.
No levante nada que est_ ardiendo o echando
humo, tal como cigarrilios, f6sforos, o cenizas
caiientes_
No use ]a aspiradora sin la bo{sa de potvo y!o
flttros en su lugar.
Siempre cambie la bolsa de polvo despu_s
de limpiar la alfombra, limpiadores o
refrescantes, polvos, y polvo finooEstos
productos obstruyen los filtros, reducen ia
circulaci6n del aire y pueden causar daSo a la
asplradora_ La falla en cambiar la bolsa de
polvo puede causar dafio permanente a la
aspiradora.
No use la aspiradora para Ievantar objetos
duros afitados, pequeSos juguetes, alfileres,
sujetapapeles, etc,.Eilos pueden daRar la
aspiradora o la bolsa de potvo,
Desenchufe antes de conectar el
Handi-mate Jr,®
Usted es responsable de estar seguro de que
su aspiradora no es usada por atguien
incapaz de operarla correctamente.
GUAR E ESTAS mNST UCCIO ES
El armadoy usoseguro de su aspiradorason su responsabilidad.Esta aspiradoraha sido diseRada
exclusivamentepara uso dom_stico.La aspiradoradeber,_almacenarseen un lugarseco yen e{interior,Lea
este Manualdel propietariodetenidamente,pues contiene informaciSnimportantesobre seguridady use.
Esta guiacontiene informaciSnsobreseguridad debajo desimbolos de advertienciao cuidadoo
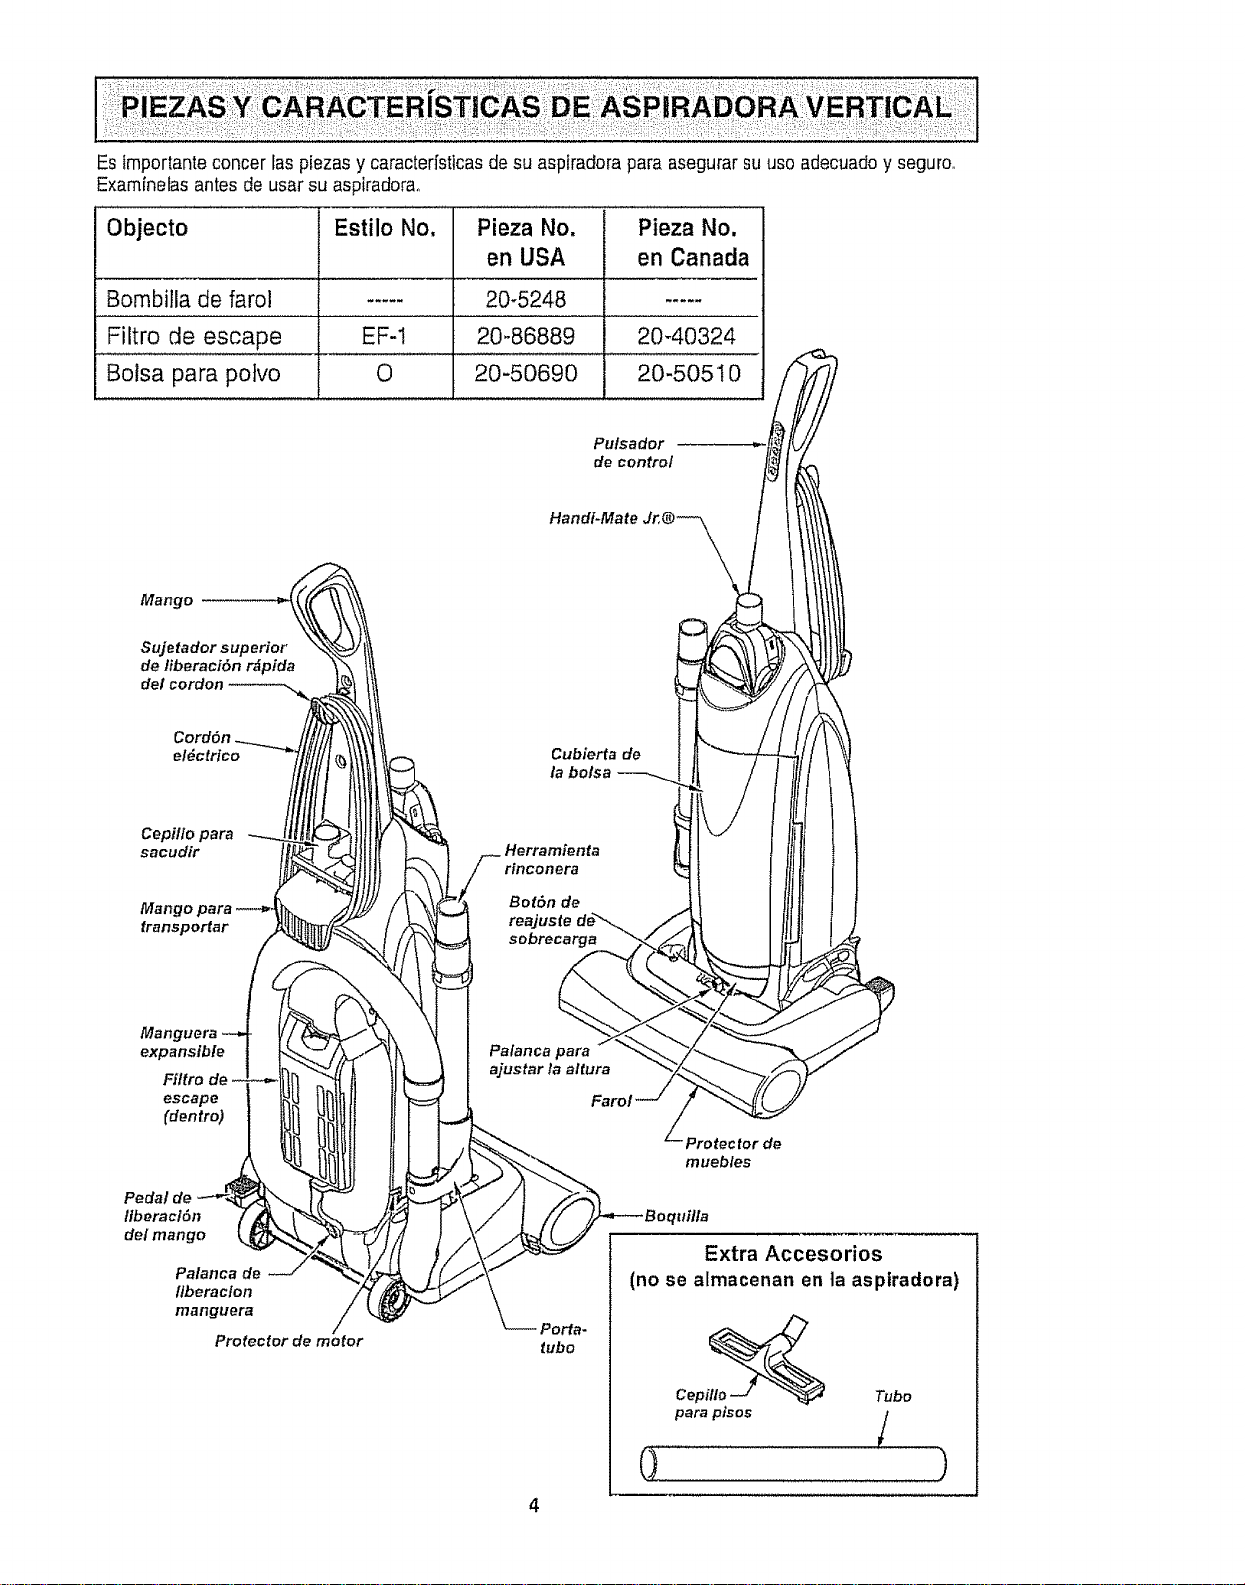
Esimportanteconcerlaspiezasycaracterfsticasdesuaspiradoraparaasegurarsuuseadecuadoyseguro.
Examfnetasantesdeusarsuaspiradorao
Objecto Estilo No, Pieza No. Pieza No,
Bombilla de farol .....
Filtro de escape . EF-1
Bolsa para polvo 0
en USA en Canada
20-5248 .....
20-86889 20-40324
20-50690 20-50510
Pulsador
de control
Hand#Mate Jr,® _\\ \,,,
Cubierfa de
la bolsa
Herramienta
/_ rinconera
\ I Palancapara1
.q l a,ust°r'aa't.ra
Protec for de
Fa
/\\./'/_ Extra Accesorios
_"_-- (no .e .Irnacenan en ]a asp , rado ra,
Perfa-
tube itlo_
Cep Tube
para p_sos /
i )
4
Por favorponga atenci6n especia!a estasinstruccionesdadas, Advertencia: Este informaci6n le
alertarb,de peligrode fuego, chequeselectricos,quemadasy lesiones_ Cuidado: Este
informaci6ntealertara de peligroscome lesionesy dafios de propieda&
ADVERTENCBA
Peligro de lesi6n personal y daSo al producto
No conecte la aspiradora hasta que termine
de armarla, De lo contrario podria causar un
cheque el_ctrlco o lesion corporal.
Antes de armar ta aspiradora, revise la LISTA
DE EMBALAJE en la cubterta separada de ]a
Lista de Partes para ReparaciSn. Use esta
lista para verificar que ha recibido todos los
componentes de su nueva aspiradora Kenmore_
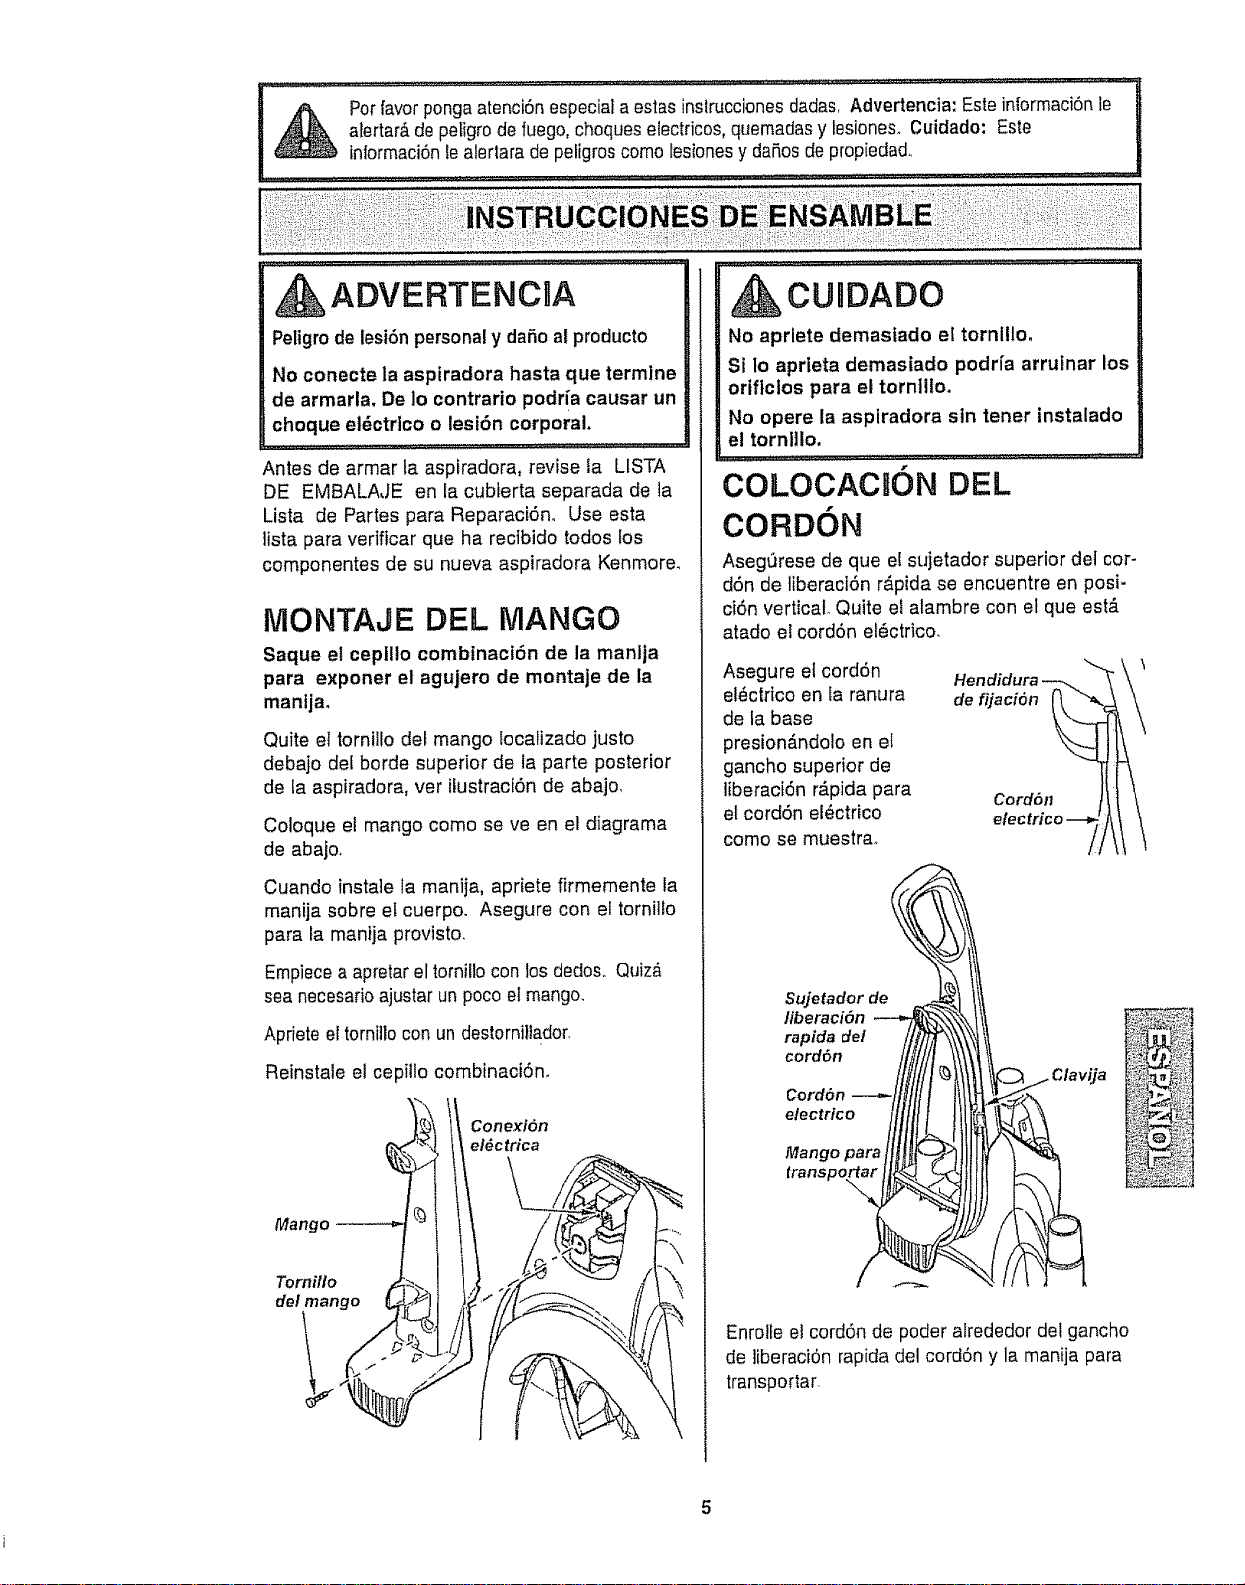
MONTAJE DEL MANGO
Saque el ceplllo combinaci6n de la manlja
para exporter el agujero de montaje de la
manijm
Quite el torniHodet mango Eocalizado justo
debajo del borde superior de la parte posterior
de ia aspiradora, ver ilustraciSn de abajo,
Coloque el mango come se ve en el diagrama
de abajo.
Cuando insta]e la manija, apriete firmemente la
manija sobre eLcuerpo. Asegure con el tornitlo
para ta manija provisto.
Empiecea apretarel tornillo con los dedosoQuiz_
sea necesarioajustar un poco et mango.
Aprieteer torni]lo con undestorniltador.
Reinstale el cepillo combinaci6n.
Conezi6n
el_ctrica
Mango
Tornillo
del mango
.......... _:-._ ................ ,..,..,,JJ,..._,LE." .. L 'L'L'L"L........
CUnDADO
No aprlete demasfado el tornillo,
St to aprieta demasiado podria arrutnar los
oriflclos para el torn]llo.
No opere la aspiradora sin tener instalado
el tornlllo,
COLOCACU6N DEL
CORD6N
AsegQrese de que el sujetador superior det cor-
dSn de liberaciOn r&pida se encuentre en posi-
ciSn vertical. Quite el alambre con et que est,.
atado el cordSn el_ctrico.
Asegure el cord6n
el_ctrico en Ia ranura
de la base
presion_ndolo en et
gancho superior de
liberaci6n Mpida para
el cordSn el_ctrico
come se muestrao
Sujetador de
c°rdon---"-Ilitlt t II t
i/llt tttl
Mtrangsppara l H!_r_ J![
Hendidura
de fijaci6n
Cord611
_a
Enrolfe el cordon de poder alrededor del gancho
de ]iberaciOnrapida del cordon y la manija para
transportar
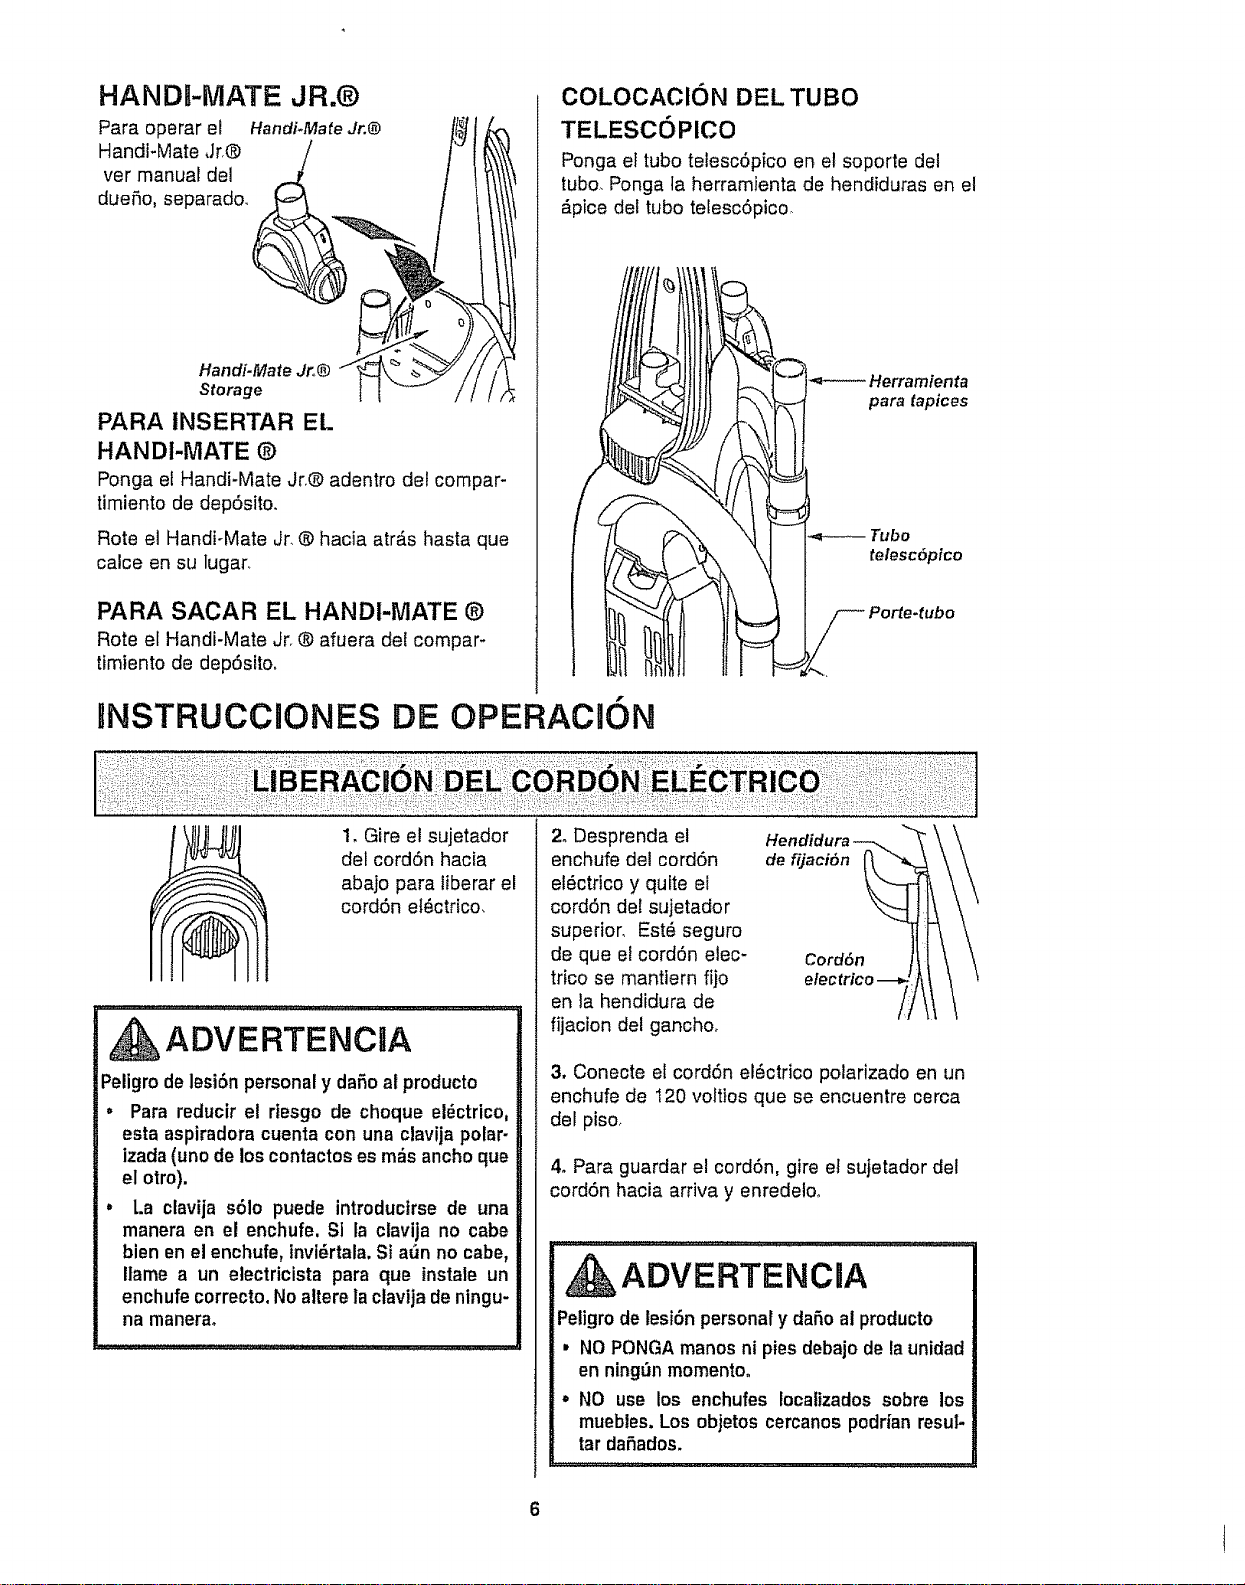
HANDI-MATE JR.®
Para operar el Handi+MafeJr.@
HandFMate Jr,® ___
vet manual de!
dueSo, separado.
Handi-Mate Jr+,®
Storage
PARA tNSERTAR EL
HANDI-iVlATE ®
Ponga et Handi-Mate Jr+®adentro del compar-
timiento de depSsito.
Rote el Handi+Mate Jr. ® hacia atr_s hasta que
calce en su lugar+
PARA SACAR EL HANDI-MATE ®
Rote el Handi-Mate Jr. ® afuera del compar+
timiento de depSsito,
COLOCAClON DEL TUBO
TELESCOPICO
Ponga el tubo telescSpico en el soporte del
tubo. Ponga la herramienta de hendiduras en el
_.pice del tubo telescSpico+
Herramienta
para tapices
telescdpico
Porte-tubo
RNSTRUCCaONES DE OPERACK)N
1, Gire el sujetador
det cordSn hacia
abajo para liberar el
cordSn elSctrico,
ADVERTENCIA
Peligrode lesi6n personal y dafio al producto
• Para reducir el rtesgo de choque el_ctrico,
esta aspiradora cuenta con una clavijapolar-
izada(unode los contactoses m_s ancho que
el otro).
= La ctavija s61o puede introductrse de una
manera en el enchufe. SI la clavija no cabe
bien en el enchufe, tnvi6rtala.Si aSn no cabe,
Ilame a un electricista para que instale un
enchufecorrecto.Noaltere la clavijade ningu-
na manera+
2+Desprenda el
enchufe del cordSn
el6ctrico y quite el
cordSn dot sujetador
superior. Est_ seguro
de que et cordSn elec-
trico se manttern fijo
en la hendidura de
fijacion del gancho.
Hendidura
de fijaci6n
Cord6n
3, Conecte el cordSn el_ctrico polarizado en un
enchufe de 120 voltios que se encuentre cerca
del piso+
4+Para guardar el cord6n, gire et sujetador del
cordSn hacia arriva y enredelo+
ADVERTENCnA
Petigro de lesi6n personal y daSo al producto
, NOPONGAmanos ni pies debajo de la unidad
en ningr3nmomento°
• NO use los enchufes Iocalizados sobre los
muebles. Los objetos cercanos podrfan resul-
tar daSados+
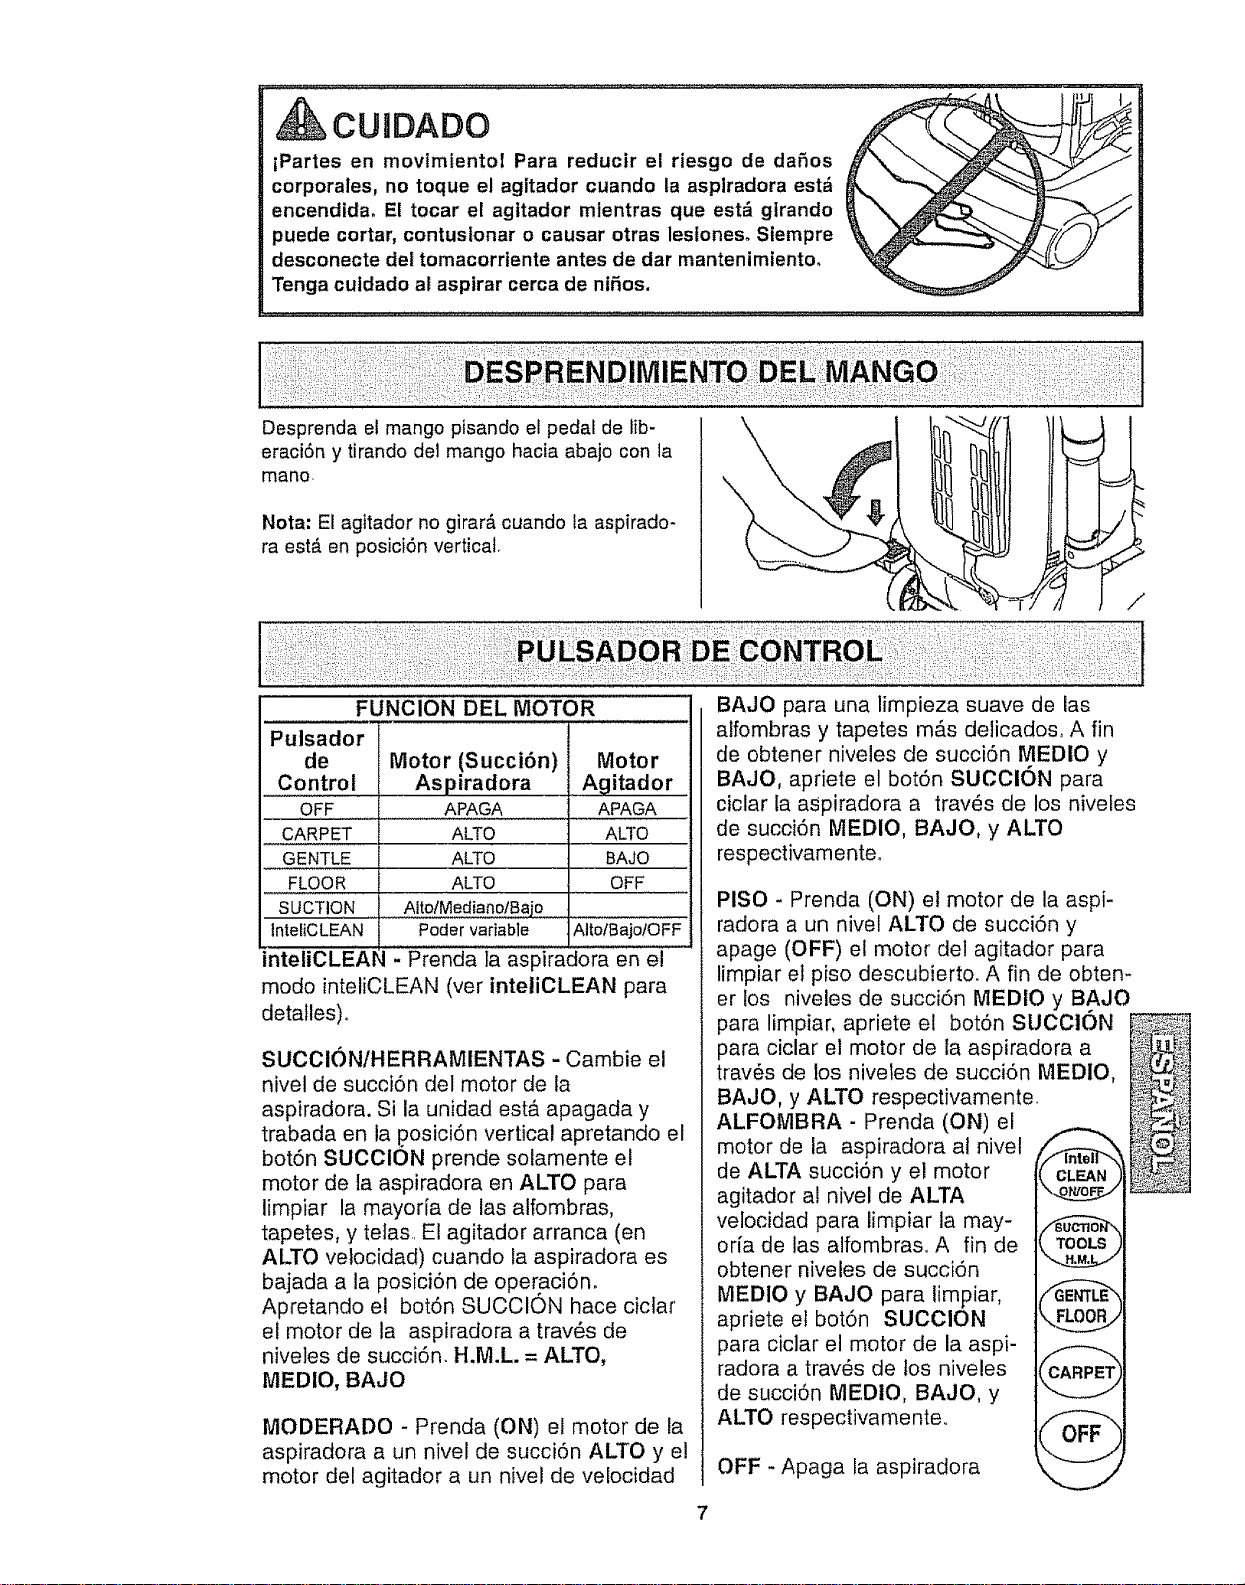
CUIDADO
tPartes en movimientol Para reducir el riesgo de daSos
corporales, no toque el agitador cuande In asplradora est_
encendida, El tocar el agttador mtentras que est_ girando
puede cortar, contuslonar o causar otras lesioneso Siempre
desconecte dei tomacorriente antes de dar mantenimiento,
Tenga culdado at aspirar cerca de ntSos.
\
Desprenda el mango pisando el pedal de fb-
eraci6n y tirando del mango hacia abajo con la
mane
Nota: El agitador no girard, cuando ta aspirado*
ra est,, en posici6n vertical,
\
/
FUNCION DEL MOTOR
Motor
Agitador
APAGA
ALTO
BAJO
OFF
AliolBajofOFF
Pulsador
de
Control
OFF
CARPET
GENTLE
FLOOR
SUCTION
IntefCLEAN
inteliCLEAl
Motor (Succi6n)
Aspiradora
APAGA
ALTO
ALTO
ALTO
Atto/Mediano/Bajo
Poder variable
- Prenda ta aspiradora en el
mode inteliCLEAN (ver inteliCLEAN para
detalles) o
SUCCI()N/HERRAMIENTAS - Cambie el
nivel de succi6n del motor de la
aspiradora. Si la unidad est,€ apagada y
trabada en la .posici6n vertical apretando el
bot6n SUCClON prende solamente el
motor de la aspiradora en ALTO para
limpiar la mayoria de las alfombras,
tapetes, y telas El agitador arranca (en
ALTO vetocidad) cuando la aspiradora es
bajada a la posici6n de operaci6n.
Apretando el bot6n SUCClON hace ciclar
el motor de la aspiradora a trav_s de
niveles de succi6n. H.M.L. = ALTO,
MEDIO, BAJO
MODERADO - Prenda (ON) el motor de la
aspiradora a un nivel de succi6n ALTO y el
motor del agitador a un nivel de velocidad
BAJO para una limpieza suave de las
alfombras y tapetes m_s delicados° A fin
de obtener niveles de succi6n MEDIO y
BAJO, apriete el bot6n SUCCl6N para
ciclar la aspiradora a trav_s de los niveles
de succi6n MEDIO, BAJO, y ALTO
respectivamenteo
PISO - Prenda (ON) el motor de la aspi-
radora a un nivel ALTO de succi6n y
apage (OFF) el motor det agitador para
limpiar el piso descubierto. A fin de obten-
er los niveles de succi6n MEDIO y BAJO
para limpiar, apriete el bot6n SUCCl6N
para ciclar el motor de la aspiradora a
trav_s de los niveles de succi6n MEDIO,
BAJO, y ALTO respectivamente
ALFOMBRA - Prenda (ON) el
motor de la aspiradora al nivel
de ALTA succi6n y el motor
agitador al nivel de ALTA
velocidad para limpiar la may-
oria de las alfombraso A fin de
obtener niveles de succi6n
MEDIO y BAJO para limpiar,
apriete el bot6n SUCClON
,,
para ciclar el motor de la aspi-
radora a tray,s de tos niveles
de succi6n MEDIO, BAJO, y
ALTO respectivamente.
OFF - Apaga la aspiradora
7
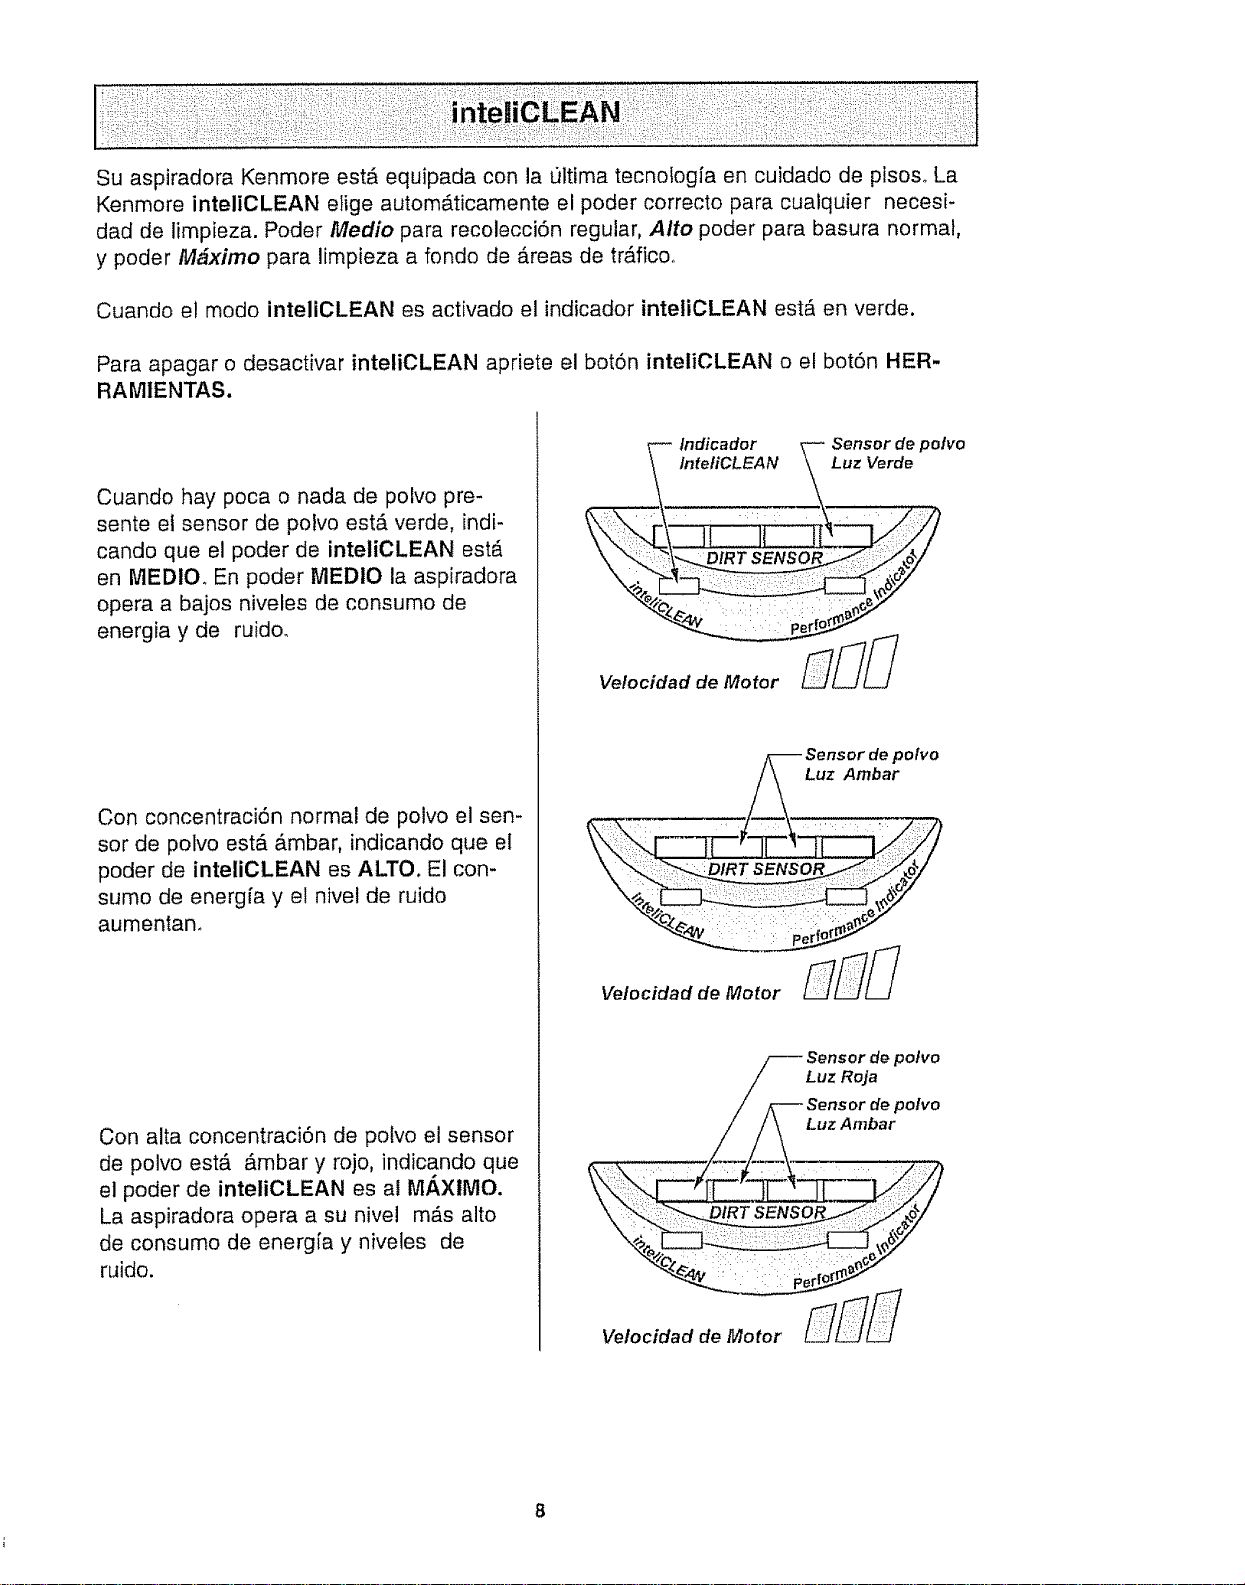
Su aspiradora Kenmore estA equipada con la ultima tecnologia en cuidado de pisoso La
Kenmore inteliCLEAN efige autom&ticamente el poder correcto para cualquier necesi-
dad de limpieza. Poder Medio para recolecci6n regular, Alto poder para basura normal,
y poder M#ximo para limpieza a fondo de Areas de trAficoo
Cuando el mode inteliCLEAN es activado el indicador inteliCLEAN est_ en verde.
Para apagar o desactivar inteliCLEAN apriete el bot6n inteliCLEAN o el bot6n HER-
RAMIENTAS.
Cuando hay poca o nada de polvo pre-
sente et sensor de potvo estA verde, indi-
cando que el poder de inteliCLEAN est,.
en MEDIO. En poder MEDIO la aspiradora
opera a bajos niveles de consumo de
energia y de ruido_
Con concentraci6n normal de polvo el sen-
sor de polvo est& _mbar, indicando que el
poder de inteliCLEAN es ALTO, El con-
sumo de energfa y el nivel de ruido
aumentan.
Con alta concentraci6n de potvo el sensor
de polvo est& Ambar y rojo, indicando que
el poder de inteliCLEAN es al M/_XlI_IO.
La aspiradora opera a su nivel mAs alto
de consumo de energ[a y niveles de
ruido.
lndicador Sensor de pot¢o
IntetiCLEAN Luz Verde
Velocidad de Motor
_ ensor de polvo
Luz Roja
Sensor de polvo
Luz Ambar

Cuando la unidad esta trabajando con un flujo de
aire normal, la luz en indicador de Rendimiento
esta apagada. En cualquier momento el flujo de
aire es restringido la tuz se enciende, Si esto
ocurre, revise la bolsa dot polvo, et fiitro de seguri-
dad al motor y otros fugares con posibles blo-
queos mostrados en COMO ELIMINAR RESIDU-
OS DE BASURA EN LOS CONDUCTOSo
Nota: Es posible que la luz encienda ai usar los
accesorios porque el flujo de aire es reducido pot
los accesorios.
Su Aspiradora nueva Kenmore esta equipada
con un agitador de acci6n directa con 2 veloci-
dades para limpiar una varledad de pfsoso
Revise por favor la gr&fica de abajo antes de
utilizar su Aspiradora.
1,
No utifice la funci6n CARPET (alta vetocidad)
pare limpiar su alfombra tipo Ber6beres. La
velocidad alta del agitador puede da5ar o
causer un desgaste excesivo a su alfombra.
3_
Utitice fa funci6n GENTLE (velocidad baja)
Qnicamente pare albmbras Ber_beres o de
cerdas delicadas. El agitador puede ir m&s
despacio o detenerse en _reas de cerdas
largas o tapeteso(Vea p_,gina 12 en el Manual
del Propietario "Protector de Sobrecarga del
Agitador" si el agitador se detiene y no
comienza nuevamente.)
La funci6n FLOOR puede ser usada en interi-
ores con pisos descubiertos, incluyendo
madera, mosaico, lin6leo, pizarra, etc_
Vetocidad Comercial Areas
Pulsador de de Piso o cerdas Ber_beres con
Control agitador descubierto cortes o delicadas Afetpada Gruesa tapete
Carpet (1) Aita _ v" v"
Gentle (2) Baja _"
Floor (3) Apagado V'
::DE:::EA:'ALFOMB
:::::: ! !i::
Para seleccionar un ajuste de nivel de pete
de la alfombra:
Apague la aspiradora. Seteccione un nivel de
ajuste inclinando la aspiradora hacia atr_,s
haste que las ruedas delanteras est6n un poco
despegadas del piso,.
Deslice la patanca de ajuste de nivel de pelo
de la alfombra a la posici6n deseada.
Hay cuatro (4) posiciones de ajuste de altura
en ia aspiradora. Use la posici6n LOW para la
mayoda de alfombras y suetos lisos (con el
agitador OFF), y la posici6n HIGH pare alfom-
bras de fibras ]argas o abundosas, tapetes
peque5os, etc, Utilice los otros ajustes como
sea necesario para las diferentes alturas de la
alfombra.
CUIDADO
No deje permanecer la aspiradora en un solo
tugar durante ntngt_n ttempo cuando el agita-
dor est& rotandm Se puede dafar la alfombra,
9

Ceptllo para
sacudir
J
Mango para
fransportar
Palanca
fiberaci6n
manguera
Handt-Mate Jr, @
TUBe TELESCOPICO CON
CONTROL DE ASPIRACION
1. Remueva el extreme inferior de la manguera
expansible del soporte de] tube tomando
del cuel]o de ]a manguera, rotando y tirando
derecho hacia arriba,
PARA USAR ACCESORIOS
Saque el extreme inferior de la manguera expansi-
ble del porta tube tomando el cuelfo de la
manguera, haci_ndola girar, y tirando derecho
hacia arriba_
Gire hacia abajo la patanca de soltar la manguera
expansible si necesita m_ximo alcance.
Nota: La v_lvula de protecci6npuede abrirse mien-
tras se usanlosaccesofios o para limpiaruna alfom-
bra nuevaa causa de un flujo reducidode aire per
losaccesofios mismos o per la pelusa de taalfembra
que ilene la botsarapidamente.,Consu]te el cuadro
RECONOCIMIENTODEPROBLEMAS.
ADVERTENCIA
Peligro de cheque el_ctrlco o lesi6n corpo-
ral
Desconecte la unldad antes de limplarla o
darle servicio, De Io contrario podrfa pro-
ducirse un cheque elSctrtco o causar
lest6n corporal sl la aspiradora arranca de
manera imprevtsta.
2. Saque el tube telesc6pfeo de su lugar de
almacenamientoo
3. Remueva la herramienta rinconera de su
posici6n en el tube, Gire el are de bloqueo a
la posicf6n ABRIR (UNLOCK),
Tube
telesc6ptco
I,, Cuetlo
mang_mra
Porta-tubo
10

Desptiegueeltubocompfetamente,Gireelarode
bloqueodeltubohastalaposici6nLOCK.
Instaleeltubodeextensi6nenefextremoabierlode
lamanguera°
Tubo
inferior
\
Deslizador
Tubo
superior
Alinee taspestafias del tubo deextensi6ncon tas
ranurasen forma de"J" dela manguera+Empuje el
tubo dentrode la mangueray gire hacia ]aderecha
para btoquearlo
Paraobtener la m_.ximaIongitudcon los accesorios,
instale laherramientapara hendidurasen et extremo
del tubo,Parahacerlo, introdtJzcalaen el tuboy girela
un poco+
ruera
expansible
Lengueta
levan_ada
Ranura
Deslizador
de asptract6n
telec6pico
Herramienta
rinconera
Use el soporte del cepillo sin et cepillo para
mayor succi6n sobre cubiertas de muebles o
escaleras,
sacudir
Cepille J LM
para cembinaci6n
Use el soporte del cepillo con el cepillo para
limpiar superficies sueltas tales como corti-
has,,
Manguera Ajuste el cepillo para pisos
risible directamente a ta vara,
_-'7 Tubo
_ telesc6pico
i\\ _-* Cepillo para
Vea el CUADRO DE USO DE LOS ACCESO-
RIOS para usos del cepil]o para pisos,
PARA OPERAR EL
DESLIZADOR DE CONTROL
DE ASPIRACl6N
Tubotelesc6pico
Cuandouse accesorios para limpiarcortinas,
tapetespequefios de pelo cortoy otros articulos
delicados,gire el deslizadorde control de
aspiraci6na la posici6nabierta. Estoreducir&la
potencia deaspiraci6npara facilitarla limpieza+
\ Deslizador
de control
deslizador decontrol de aspiraci6n
cerradapara la limpieza normal°
Esteselector
se encuentra
en eltubo
tetesc6pico,
cerca de ]a
manguera.
Nota:
Coloqueel
a la posici6n
CUIDADO
Cuando use los accesorfos, tenga cuidado
de no estirar demaslado ta manguera
expansfble para tratar de alcanzar m_s
lejos. Si trata de esttrar la manguera m&s de
lo debldo, podrfa causar que la aspiradora
se venga abajo.
11
ALMACENAJE DE LOS
ACCESORIOS
Retire elcepiltopara sacudiro el cepillopara
combinaci6n, Col6que]osfirmemente ensu lugar de
aimacenamiento correspondiente.
Retire laherramienta para hendidurasdel tube
gff_.ndofaoP6ngalaa un lade.
Retire eltube de extensi6nde la manguera.Gire el
',ubohaciataizquierday tire detextremede ta
manguera,
Desbloqueeel tubegirando el arede bloqueohasta la
posiciSn UNLOCK.
Desliceel tube inferior dentrodel tubesuperior.Gire
el arede bloqueode!tube a laposici6n LOCK.
introduzca taherramientapara hendidurasdentrodel
tubecomprimide+tnstalebien en su posici6nde a]ma-
cenamiento,
Asegurese de quela unidad est_a apagada.Inserte
nuevamentela mangueracomptetamentedentro de la
abertura ubicadaen taparte inferiorde la aspiradora,
de deridela sac6 inicialmente+
CU DADO
NO tire de la aspiradora per la manguera en
la habitacl6n. Podrian ocurrtr dares a sus
pertenenclaso
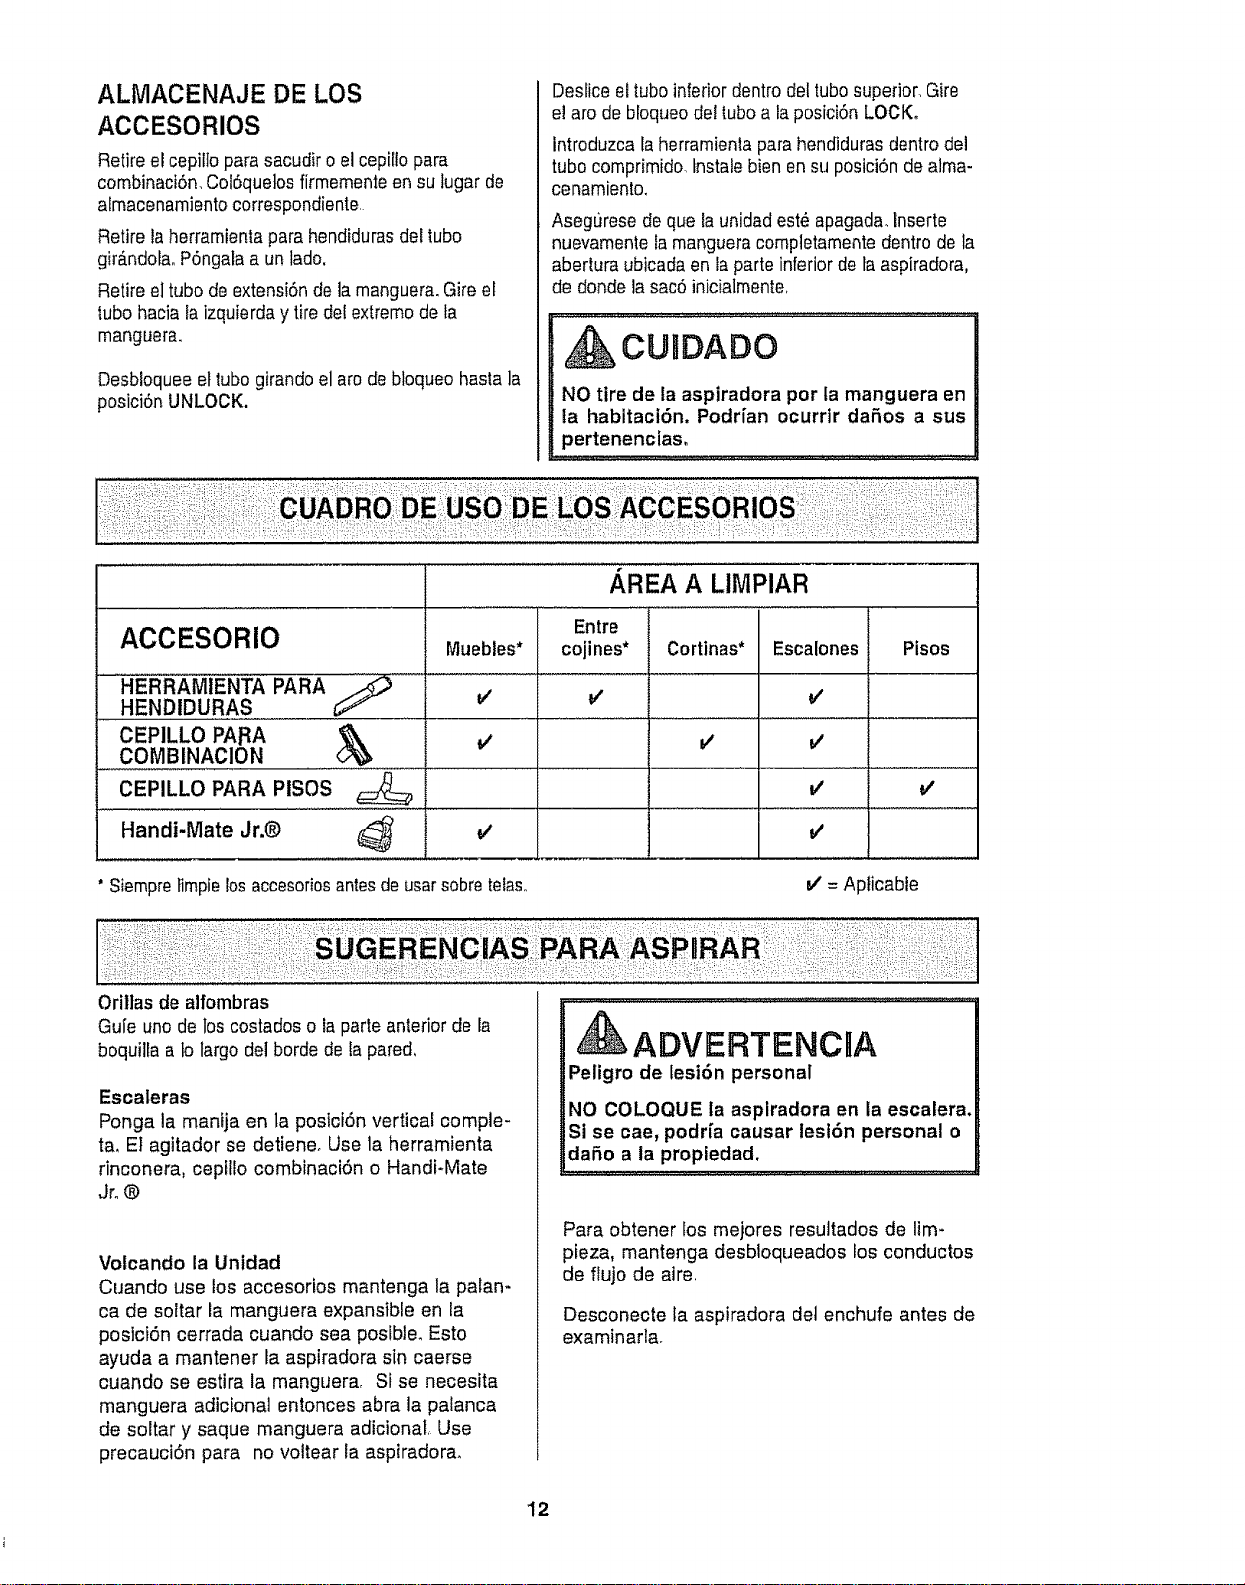
/ REA A LIMPIAR
ACCESORIO
.......................................HERRAMIENTA PARA S ................
HENDIDU,RA,S
CEPILLO PARA
COMBINAClON ......._ ................
CEPILLO PARA PISOS
Handi-Mate Jr.®
Muebles*
v'
v'
' Siempretimpielosaccesoriosantesde usarsebretelas+. J = Apficable
Entre !
cojines* Cortinas* Escalones Pisos
i
v'
= v' ........l
v' V'
.......I...........................
Orillas de alfombras
Guie uno de los costados o Is parle anterior de la
boquiltaa to largo del borde de la pared,
Escaleras
Ponga la manija en la posiciOn vertical comple-
ta, Et agitador se detiene, Use la herramienta
rinconera, cepflfo combinaciOn o Handi-Mate
Jr+®
Votcando la Unldad
Cuando use los accesorios mantenga la palan-
ca de soltar la manguera expansible en la
posiciOn cerrada cuando sea posible+ Esto
ayuda a mantener la aspiradora sin caerse
cuando se estira la manguera, Si se necesita
manguera adicional entonces abra la palanca
de soltar y saque manguera adicionaL Use
precauciOn para no voltear la aspiradora,
ADVERTENCRA
Peligro de lesi6n personal
NO COLOQUE la aspiradora en la escalera+
St se cae, podri'a causar lesion personal o
dare a la propiedad,
Para obtener los mejores resultados de lim+
pieza, mantenga desbloqueados los conductos
de flujo de aire,
Desconecte la aspiradora det enchufe antes de
examinart&
12
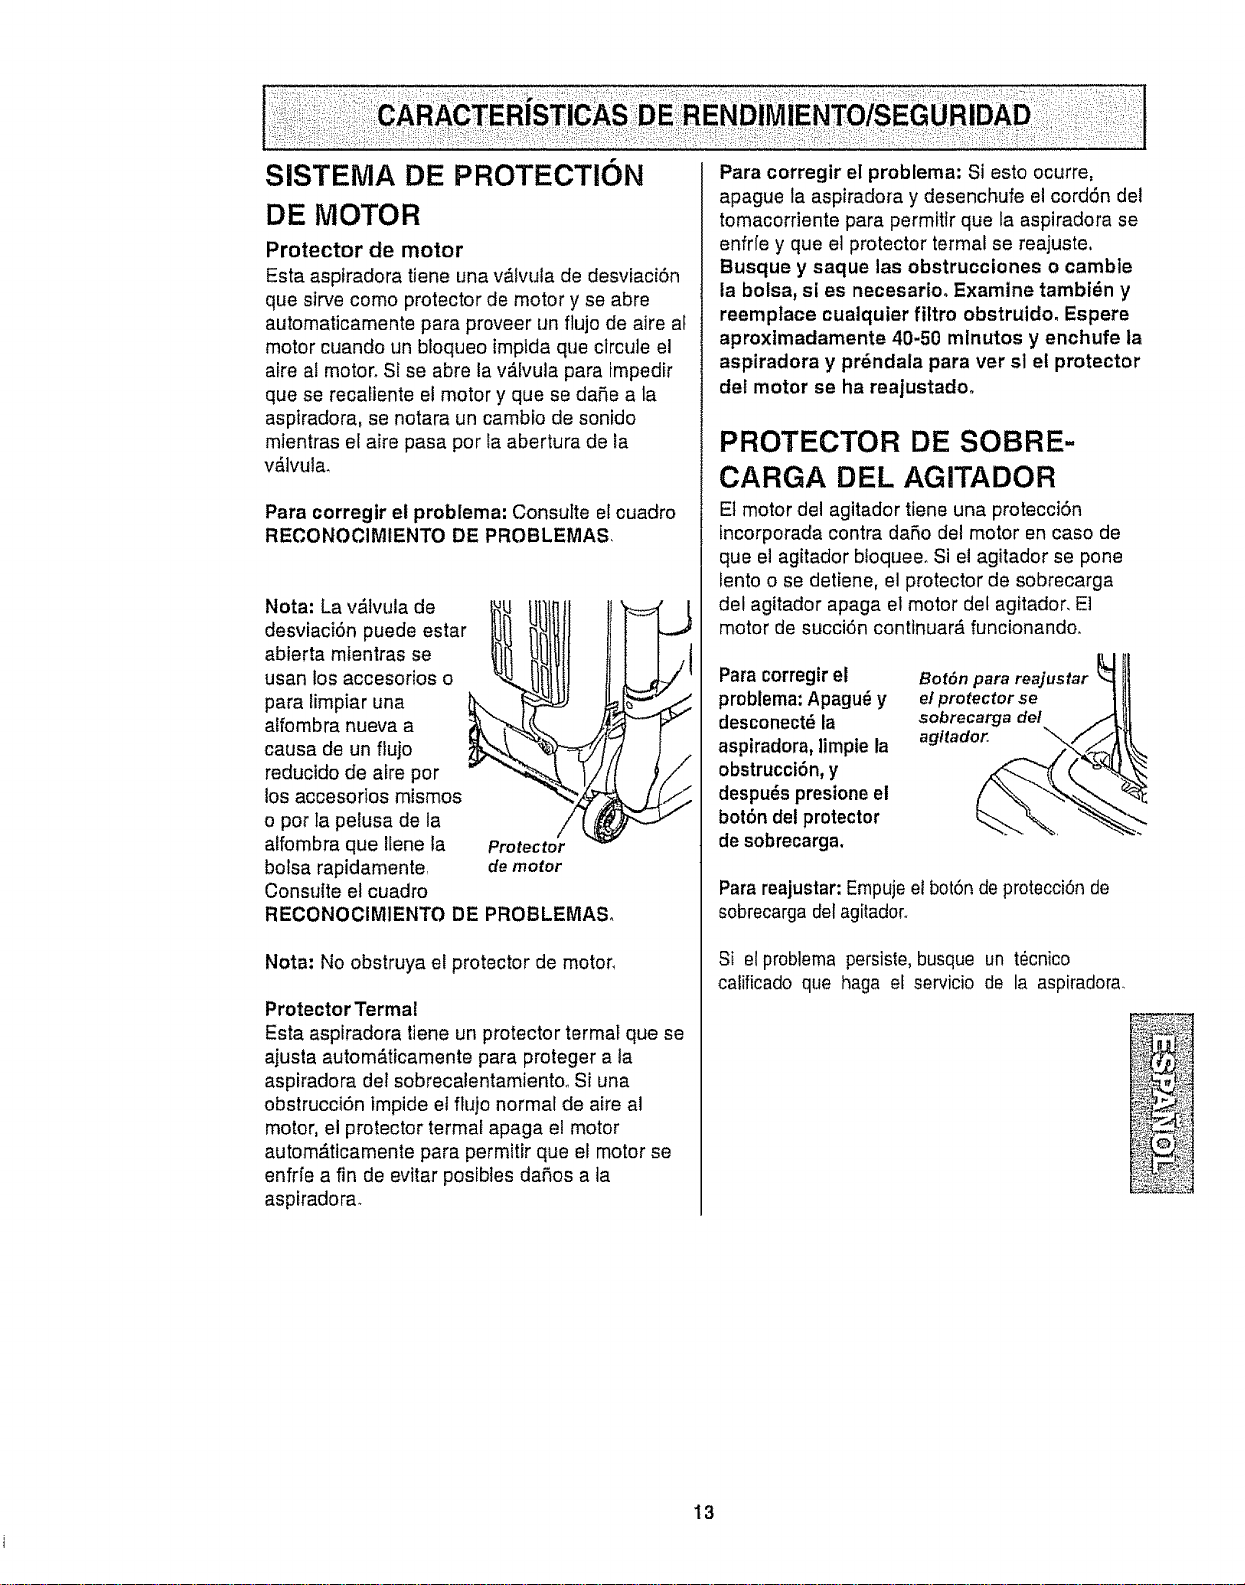
SISTEMA DE PROTECTION
DE MOTOR
Protector de motor
Esta asptradora tiene una v&lvula de desviaci6n
que sirve como protector de motor y se abre
automaticamente para proveer un flujo de aire al
motor cuando un bloqueo impida que circule el
aire al motor. Sf se abre la v_.lvula para impedir
que se recafiente el motor y que se dafie a la
aspiradora, se notara un cambio de sonido
mientras el affe paso por la abertura de la
v_tvula_
Para corregir el problema: Consutte el cuadro
RECONOCIMIENTO DE PROBLEMAS.
Nota: La v,_lvula de
desviaci6n puede estar
abterta mientras se
usan los accesorios o
para limpiar una
alfombra nueva a
causa de un ftujo
reducido de aire por
los accesorios mismos
o pot la pelusa de la
alfombra que ilene la
bolsa rapidamente
Consulte el cuadro
Protector
demotor
RECONOCIMIENTO DE PROBLEMASo
Nota: No obstruya el protector de motor,
Protector Termal
Esta aspiradora tiene un protector termat que se
ajusta autom#.ticamente para proteger a la
aspiradora del sobrecalentamiento_ Si una
obstrucci6n impide el flujo normal de aire al
motor, el protector termal apaga el motor
automdttcamente para permitir que el motor se
enfrfe a fin de evitar posibles dafios a ta
aspiradora_
Para corregir el problema: Si esto ocurre,
apague la aspiradora y desenchufe el cord6n del
tomacorriente para permtttr que la aspiradora se
enfrfe y que el protector termal se reajuste,
Busque y saque ias obstrucciones o camble
la bolsa, si es necesario. Examine tambi_n y
reemplace cualquier filtro obstruido. Espere
aproxlmadamente 40-50 mlnutos y enchufe la
aspiradora y prdndala para ver sl el protector
del motor se ha reajustado.
PROTECTOR DE SOBRE-
CARGA DEL AGITADOR
Et motor del agitador tiene una protecci6n
incorporada contra dafio del motor en caso de
que el agitador bioquee. Si el agitador se pone
lento o se detiene, el protector de sobrecarga
del agitador apaga el motor det agitador. E]
motor de succi6n conttnuar_, funcionando.
Para corregir et
problema:Apagu_ y
desconect_la
aspiradora, ]impte la
obstrucci6n,y
despu_spresione el
bot6n del protector
desobrecarga.
ILl
Bot6n para reajustar
elprotector se ]
sobrecarga de/
agitador.. _,,f ...'J
Para reajustar: Empujeel bot6n deprotecci6n de
sobrecarga delagitadoro
Si el problerna persiste, busque un t_cnico
calificado que haga el servicio de la aspiradora_
13
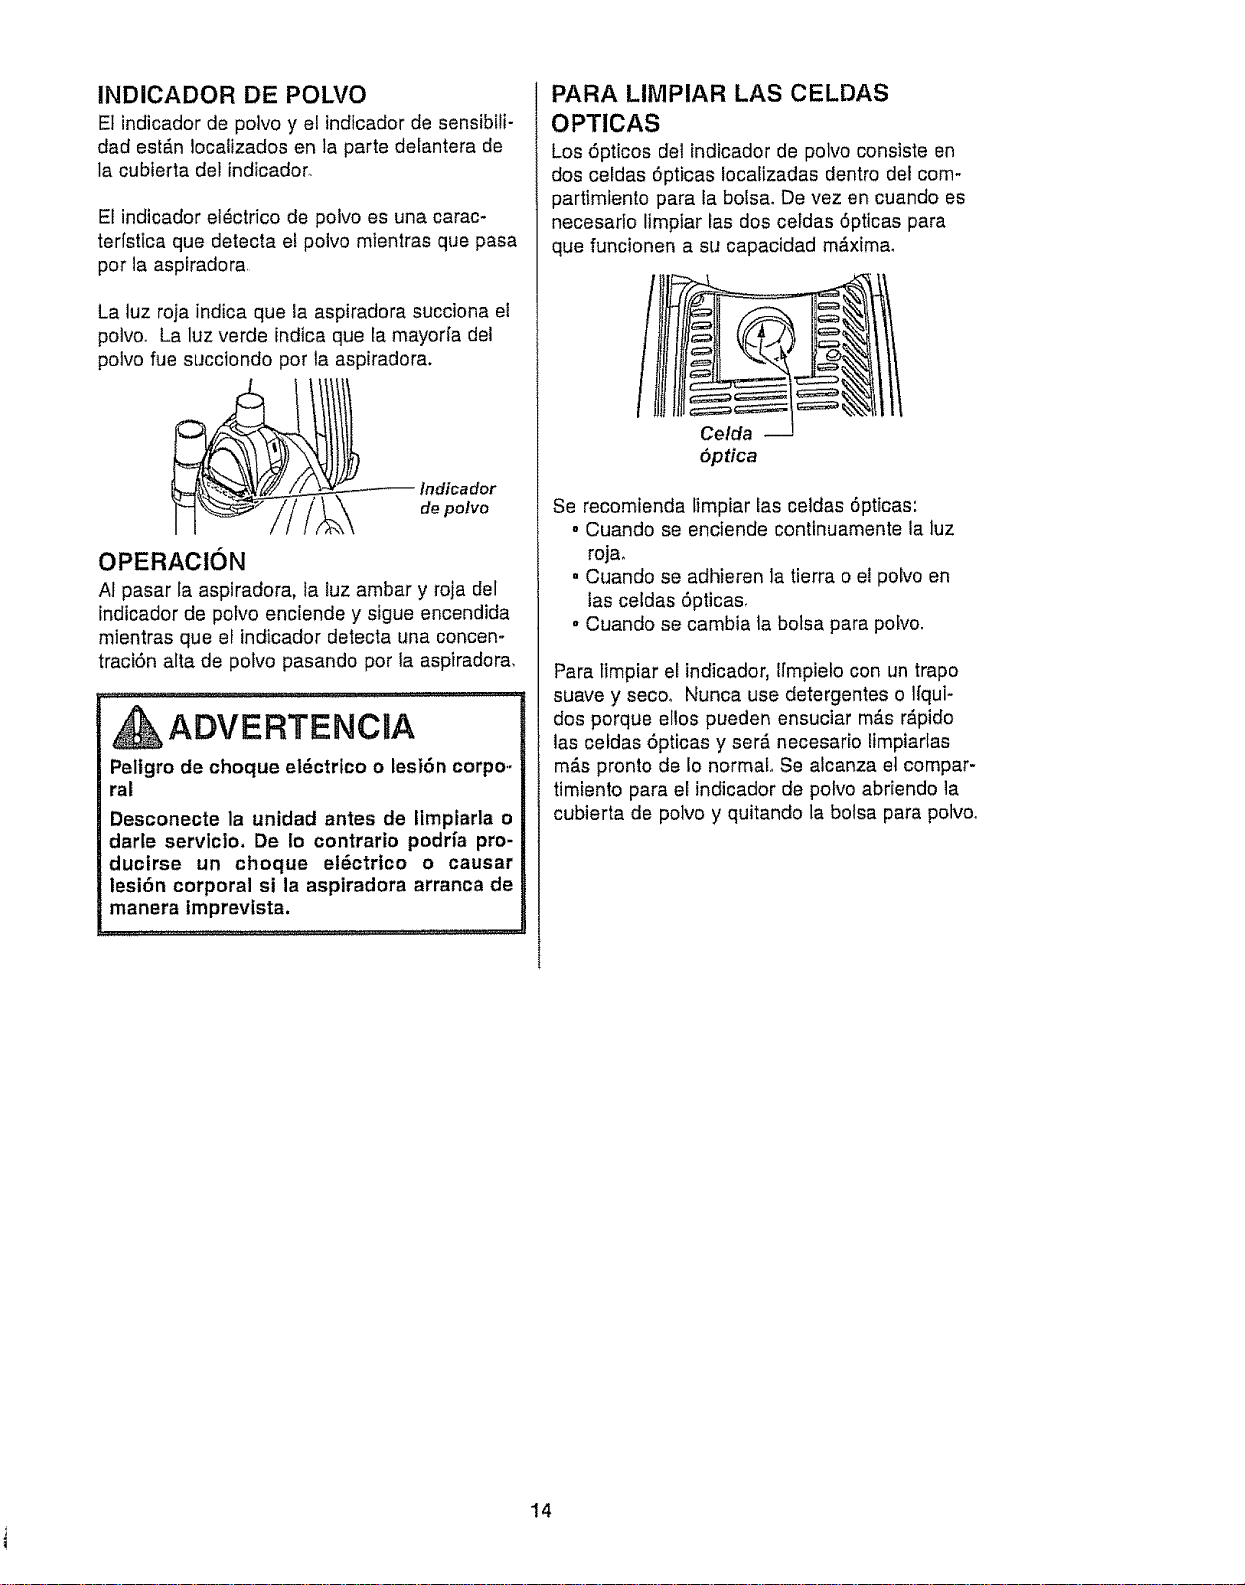
INDICADOR DE POLVO
El indicador de po]vo y el indicador de sensibili-
dad est_n localizados en la parte delantera de
la cubferta de! indicador,.
El indicador el_ctrico de polvo es una carac-
terfstica que detecta et polvo mientras que pasa
por la aspiradora,
La tuz roja indica que la aspiradora succiona el
polvoo La luz verde indica que la mayor[a del
polvo fue succiondo pot la aspiradora.
Indicador
de polvo
OPERAClON
At pasar la aspiradora, fa tuz ambar y roja del
indicador de potvo enc[ende y sigue encendida
mientras que el indicador detecta una concen-
traciSn alta de potvo pasando por la aspiradora,
ADVERTENCJA
Peiigro de choque el_ctrfco o lesiSn corpo,.
ral
Desconecte la unidad antes de Iimplarla o
darle servlc]o, De io contrario podHa pro-
ducirse un choque el_ctrico o causar
lesi6n corporal si la aspiradora arranca de
manera imprevista.
PARA LIMPIAR LAS CELDAS
OPTlCAS
Los 5pticos del indicador de polvo consiste en
dos celdas 5pticas Iocalizadas dentro de_com-
partimiento para Eabotsa. De vez en cuando es
necesado limpiar las dos celdas 5pticas para
que funcionen a su capacidad m_xima,
Celda
5ptica
Se recomienda fimpiar Easceidas 6pttcas:
o Cuando se enciende conttnuamente la luz
rojao
° Cuando se adhieren la tierra o el polvo en
las celdas 5pticas_
• Cuando se cambia ta botsa para pofvo.
Para timpiar el indicador, Ifmpielo con un trapo
suave y seco, Nunca use detergentes o Ifqui-
dos porque ellos pueden ensuciar m_.sr_pido
las celdas 5pticas y ser_ necesario limpiarlas
m_.spronto de Io normal Se alcanza et compar-
timiento para el indicador de potvo abriendo la
cubierta de polvo y quitando la botsa para potvo_
14
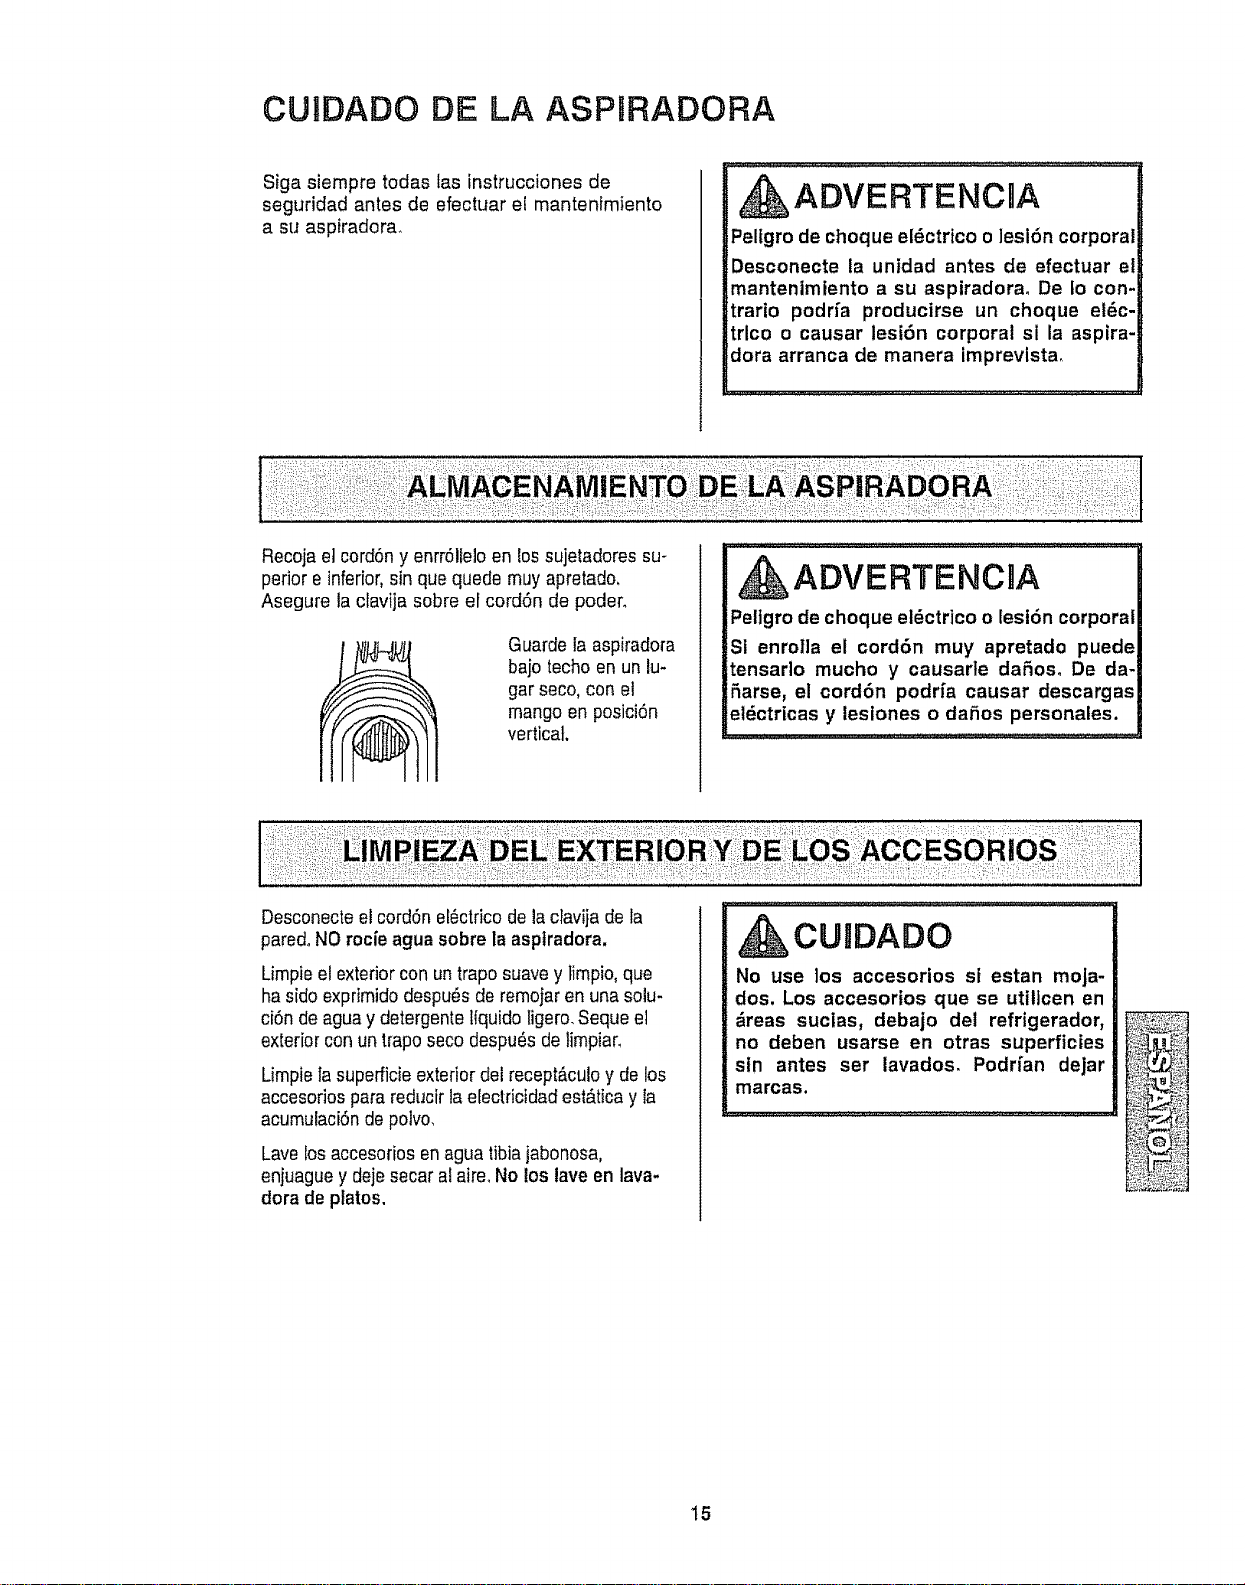
CUmDADO DE LA ASPIRADORA
Siga siempre todas fas instrucciones de
seguridad antes de efectuar el mantenlmiento
a su aspiradorao
,ADVERTENCaA
Pelfgro de choque el6ctrico o ]esi6n corporal
Desconecte la untdad antes de efectuar el
mantenlmiento a su aspiradora_ De Io con-
trario podrfa producirse un choque el_c-
trlco o causar lesi6n corporal si la aspira-
dora arranca de manera imprevlsta.
:.:i:! :,i:,= ::::
Recojael cord6ny enrr6!teloen tos sujetadores su-
perior einferior,sin que quede muy apretado.
Asegure la ctavija sobre el cord6n de poder.
Guarde la aspiradora
bajo techo en un lu-
gar seco, con et
mangoen posici6n
vertical.
ADVERTENCIA
Peltgro de choque el6ctrico o lesi6n corporal
Sl enrotla el cord6n muy apretado puede
tensado mucho y causarte daSoso De da-
LSarse, el cord6n podrfa causar descargas
iel_ctricas y lesiones o da_os personales.
Desconecteelcord6n el_ctricode la clavija dela
pared.NO rocfe agua sobre la asptradora.
Limpiee!exteriorcon un traposuavey timpio,que
hasido exprimidodespu6s de remojaren unasolu-
ci6n de aguay detergentelfquido ligero.Seque el
exterior conun trapo secodespu6s de limpiar,
Umpie lasuperficieexterior delreceptAculoy de los
accesorios parareducirla electricidad est&ticay Ta
acumulaci6nde polvo.
Lavebs accesorios enagua tibiajabonosa,
enjuague y dejesecar al aire.No los lave en lava-
dora de plates.
CUIDADO
No use los accesorios si estan moJa-
dos. Los accesorJos que se utJllcen en
areas suclas, debajo det refrigerador,
no deben usarse en otras superficies
sin antes ser lavados_ Podr[an dejar
marcas.
15
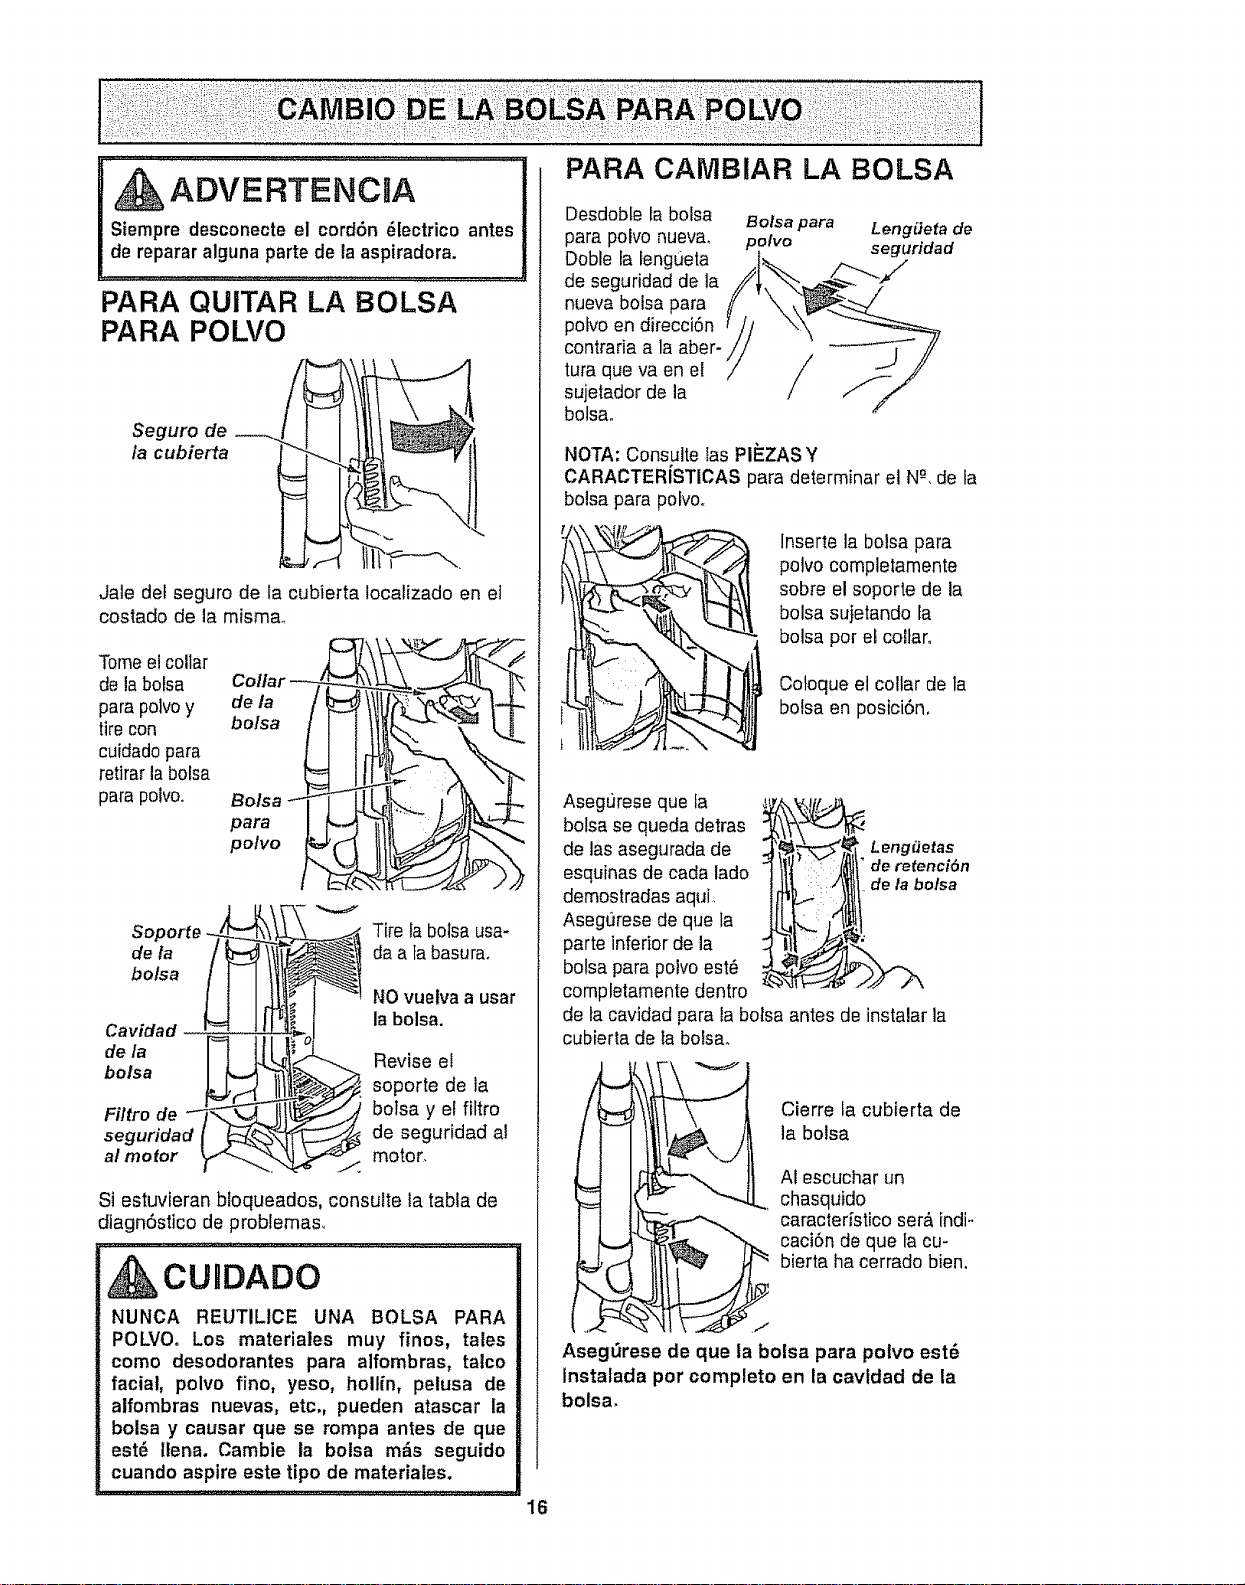
ADVEFITENC A PARA CAMBIAR LA BOLSA
Siempre desconeete el cordon 81ectrico antes
de reparar alguna parte de la aspiradora.
PARA QUITAR LA BOLSA
PARA POLVO
Seguro de
la cubierta
Jale del seguro de la cubierta Iocalizado en el
costado de la misma_
Tomeel collar ,J _"_tt,-_ L
de la bolsa Collar
para polvoy deo/saa
tire con
cuidadopara
retirar la bolsa
para polvo., i!i!2
bolsa
bolsa
Filtro de
seguridad I _¢_
al mofor _,1-_._
V
Tire la bolsa usa-
da a tabasura.
NOvuelva a usar
la bolsa.
Revise el
soporte de la
botsa y el fiftro
de seguridad al
motor
Si estuvieran bloqueados, consulte la tabla de
diagn6stico de problemas,
IAOU DADO
NUNCA REUTILICE UNA BOLSA PARA
POLVOo Los materiales muy finos, tales
como desodorantes para alfombras, talco
facial, polvo fino, yeso, hollin, pelusa de
aifombras nuevas, etc,, pueden atascar la
bolsa y causar que se rompa antes de que
est6 itena. Cambie la bolsa m__s seguido
cuando aspire este tipo de materiales.
Desdoble la bofsa Bolsa para Leng#eta de
para polvo nueva, polvo seguridad
Dob'e la lengue_a ,.___
de seguridad de la
nueva boisa para
pofvo en direcci6n
contraria a la aber-
tura que va en el
sujetador de la
bolsa.
NOTA: Consulte las PII_ZASY
CARACTERiSTICAS para determinar el N-%de la
bolsa para polvo..
lnserte la bolsa para
potvo completamente
sobre el soporte de la
bolsa sujetando la
bolsa por el coltar.
Coloque el collar de la
botsa en posici6n.
AsegL_reseque la
bolsa se queda detras
de las asegurada de
esquinas de cada lado
demostradas aqui,
Asegt]rese de que la
parte inferior de la
bolsa para polvo est6
completamente dentro
de la cavidad para la bolsa antes de instalar la
cubierta de ta boisa.
Leng_Jetas
de retenci6n
de la bolsa
Cierre la cubierta de
la bolsa
AI escuchar un
chasquido
caracteristico ser6 indi-
caci6n de que fa cu-
bierta ha cerrado bien,
Aseg_rese de que la bolsa para potvo est6
Instalada por completo en la cavldad de la
bolsa.
16
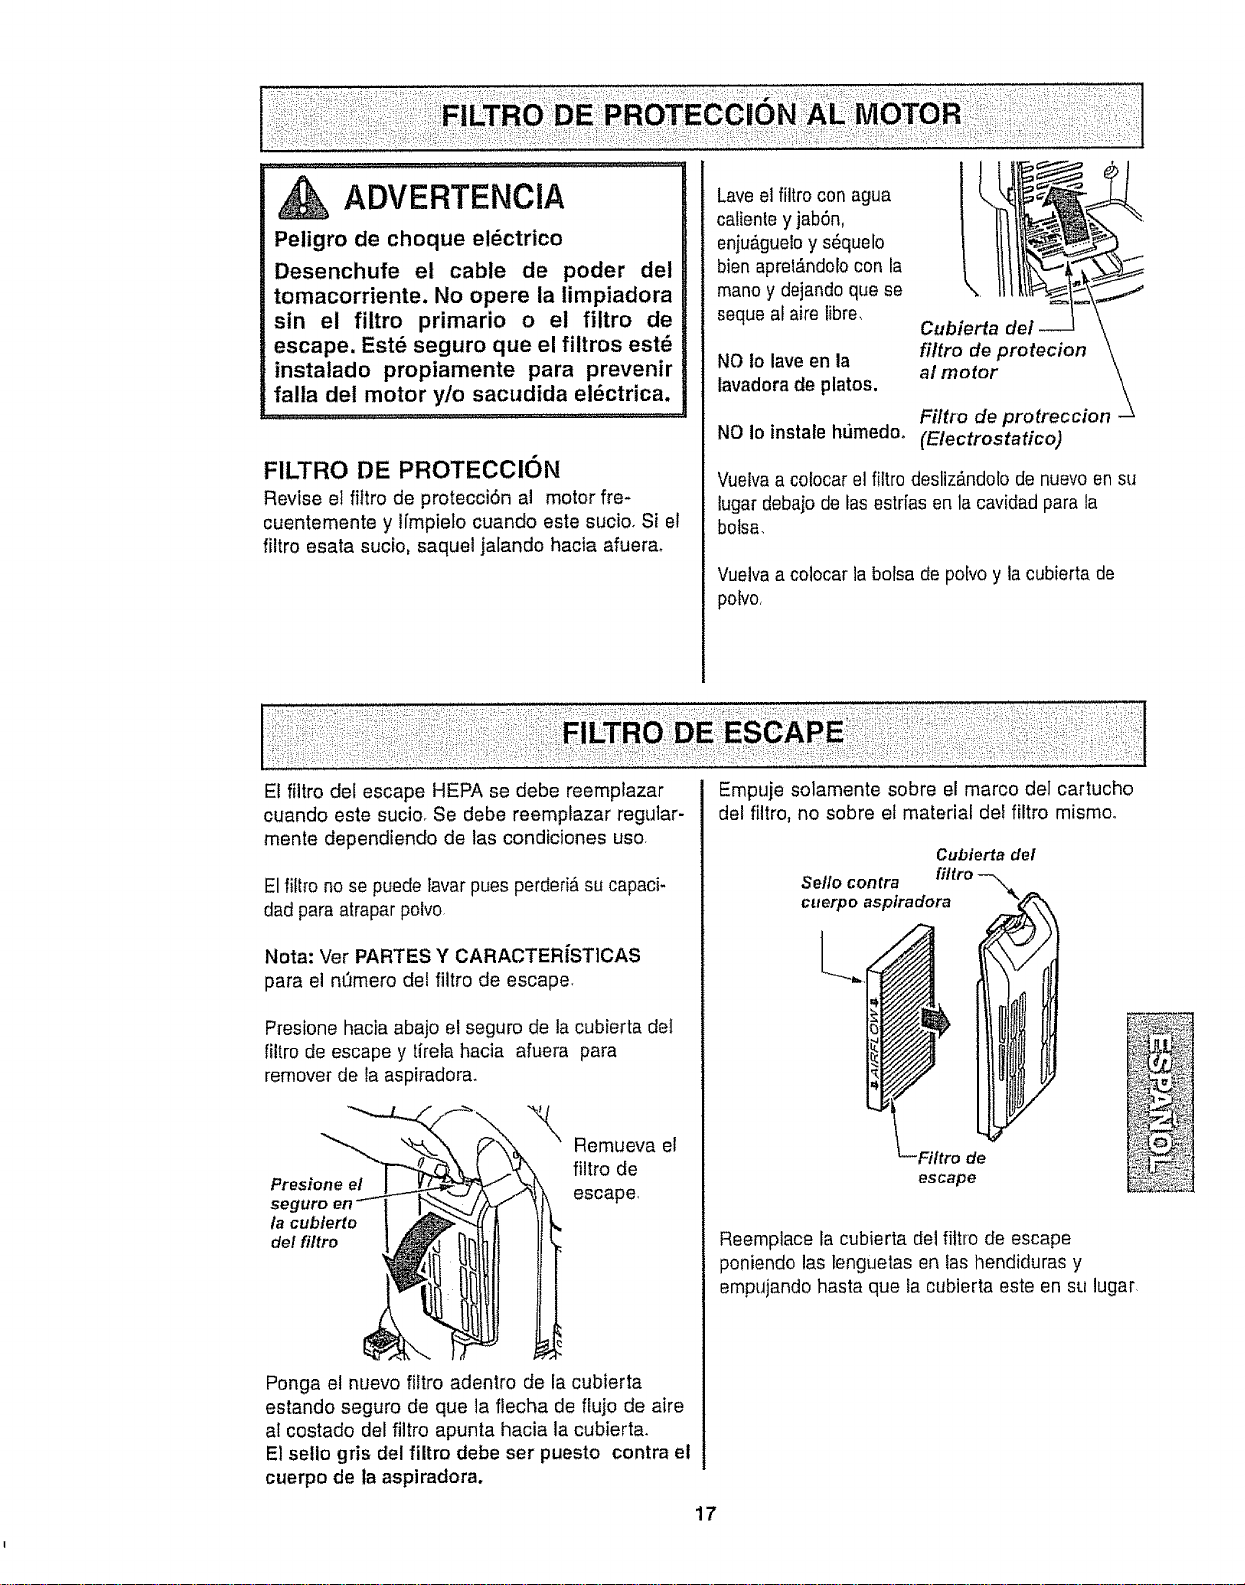
ADVERTENCIA
Peligro de choque el6ctrico
Desenchufe el cable de poder del
tomacorriente. No opere la limpiadora
sin el filtro primario o el filtro de
escape. Est_ seguro que el filtros est_
instalado propiamente para prevenir
falla del motor y/o sacudida el_ctrica.
FILTRO DE PROTECCION
Revise el _tro de protecci6n al motor fie-
cuentemente y lfmpielo cuando este sucio, Si et
filtro esata sucio, saquel jalando hacia afuera_
Laveel filtro con agua
catienteyjab6n,
enju_gueloy s_quelo
bien apre|#,ndolocon la
mano y dejando quese
seque al aire libre,
NO to lave en la
lavadora de platos.
NO Io instale hPJmedoo
(Electrostatico)
Vue[vaa colocar el filtro desliz_,ndolode nuevoen su
lugardebajo deIas estr[as en la cavidad para la
botsa,
Vuelvaa colocar la bolsa de pobo y la cubierta de
pobo,
El flltro del escape HEPA se debe reemplazar
cuando este sucior Se debe reempfazar regular-
mente dependiendo de las condiciones uso,
El filtro no se puede tavarpues perdedAsu capaci-
dad paraatrapar polvo
Nota: Ver PARTES Y CARACTERISTICAS
para el nt_mero del filtro de escape
Presione hacia abajo el seguro de la cubierta del
filtro de escape y tirela hacia afuera para
remover de la aspiradora.
Presione el
seg
la cublerto
de! fi/tro
Remueva el
filtro de
escape,
Ponga e! nuevo filtro adentro de la cubierta
estando seguro de que la flecha de flujo de aire
at costado del filtro apunta hacia la cubierta.
El selio gris del filtro debe ser puesto contra el
cuerpo de la aspiradora.
ii:: =i!: ! i:
Empuje solamente sobre el marco del cartucho
del filtro, no sobre et material deefiltro mismoo
Cubiertadel
Se/lo contra
cuerpoaspiradora
Filtro de
escape
Reemplace la cubierta del filtro de escape
poniendo las lenguetas en las llendiduras y
empujando hasta que la cubierta este en su lugar,
17
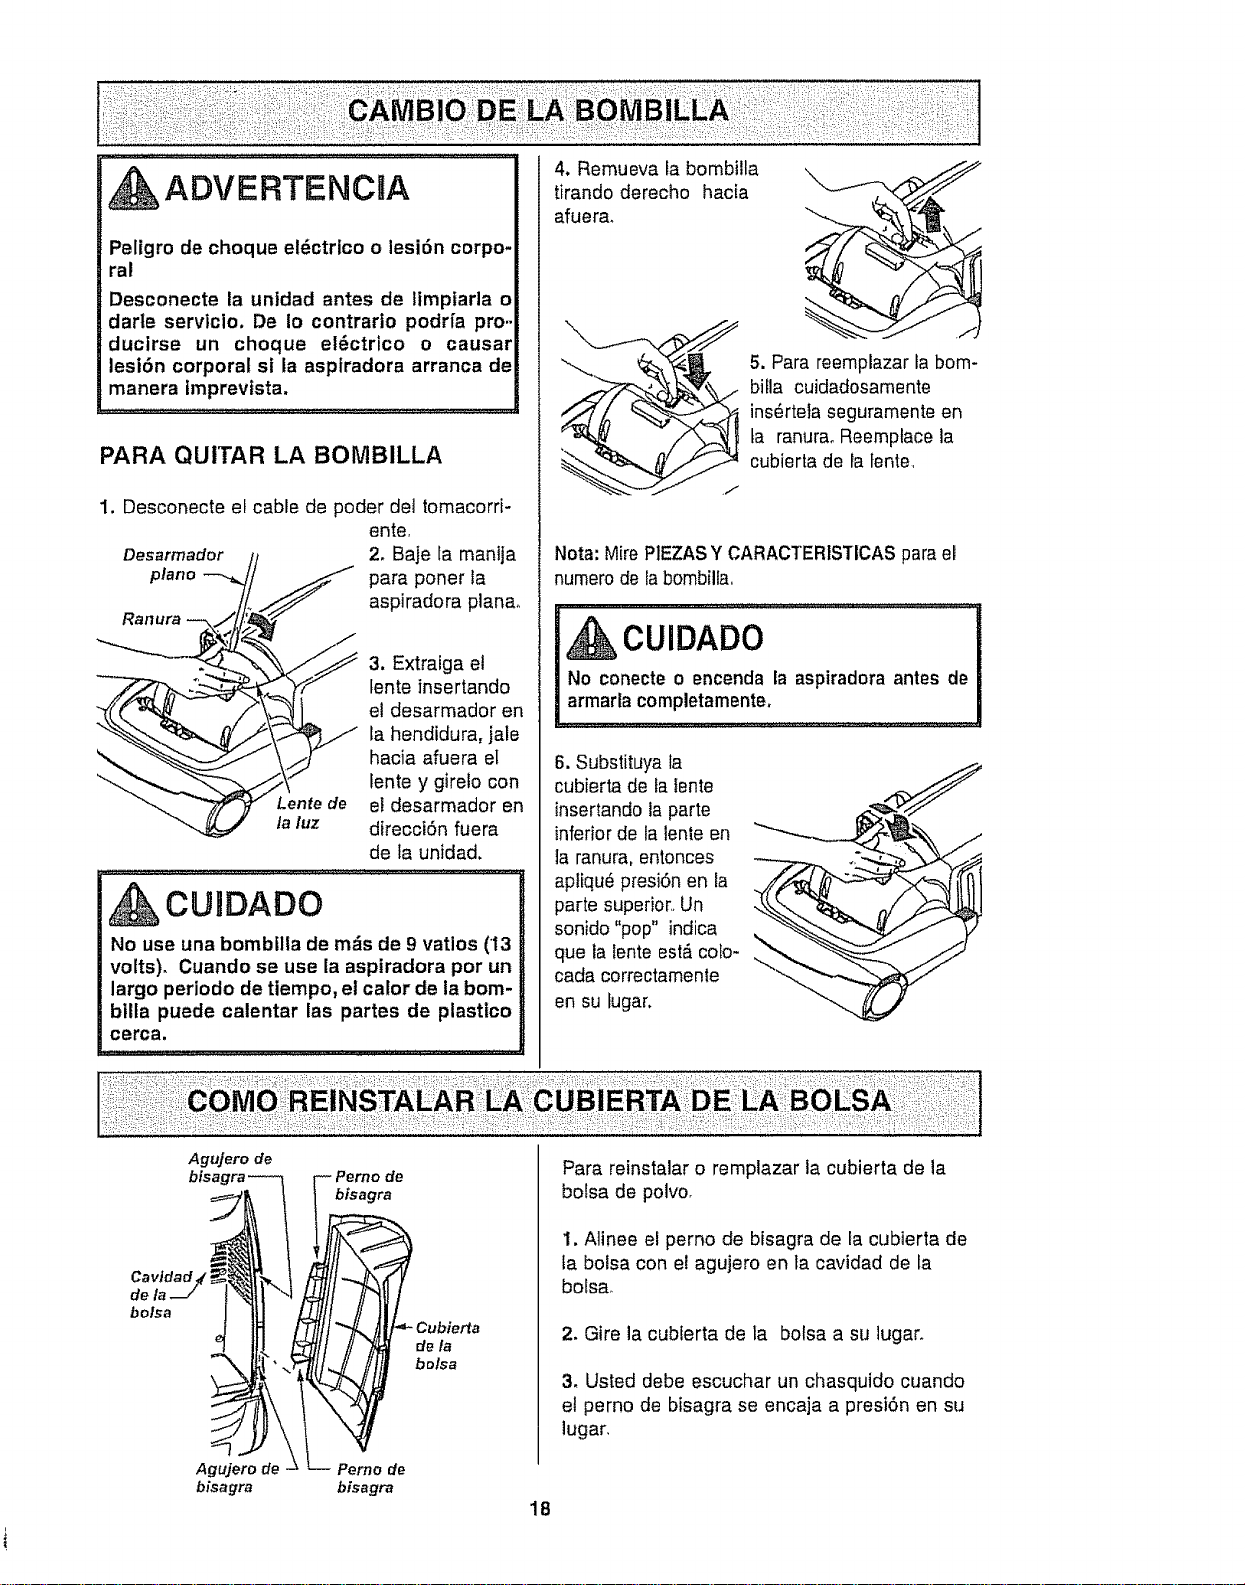
ADVERTENCIA
Peligro de choque el6ctrico o lesi6n corpo-
ral
Desconecte la unldad antes de timpiarla o
darte servtcio. De Io contrario podrfa pro..
ducirse un choque el6ctrico o causar
lesi6n corporal si la aspiradora arranca de
manera tmprevista,
PARA QUITAR LA BOMBILLA
1, Desconecte el cable de poder det tomacorri-
ente
2, Baje ta manija
la luz
para poner la
aspiradora plana,
3. Extraiga el
tente insertando
el desarmador en
la hendidura, jale
hacia afuera el
lente y girelo con
et desarmador en
direcci6n fuera
de ta unidad.
CURDADO
No use una bombilla de m_s de 9 ratios (13
volts), Cuando se use la aspiradora pot un
largo periodo de tlempo, el calor de la bom-
bilta puede calentar las partes de plastico
cerca.
4, Remueva fa bombilla
tirando derecho hacia
afuera_
5. Para reemplazar la bom-
billa cuidadosamente
ins6rtela seguramente en
ta ranuraoReemplace la
cubierta de la fente,
NOTE:Mire PIEZASY CARACTERISTICAS parael
numerode la bombilla
CUIDADO
No conecte o encenda la aspiradora antes de
armada completamente,
6. Substituya la
cubierta de fafente
insertando la parte
inferior de la lente en
1aranura, entonces
apliqu6 presi6n en la
parte superior,_Un
sonido "pop" indica
que la lente est_ colo-
cada correctamente
en su lugar.
Agujero de
bisagra
Perno de
bisagra
tL-- erno de
bisagra
de/a
bolsa
Para reinstalar o remplazar ia cubierta de la
botsa de polvo_
1, Alinee el perno de bfsagra de la cubierta de
la bolsa con e! agujero en la cavidad de la
bolsa_
2, Gire la cubierta de la bolsa a su lugar,
3, Usted debe escuchar un chasquido cuando
et perno de bisagra se encaja a presi6n en su
lugar,
18
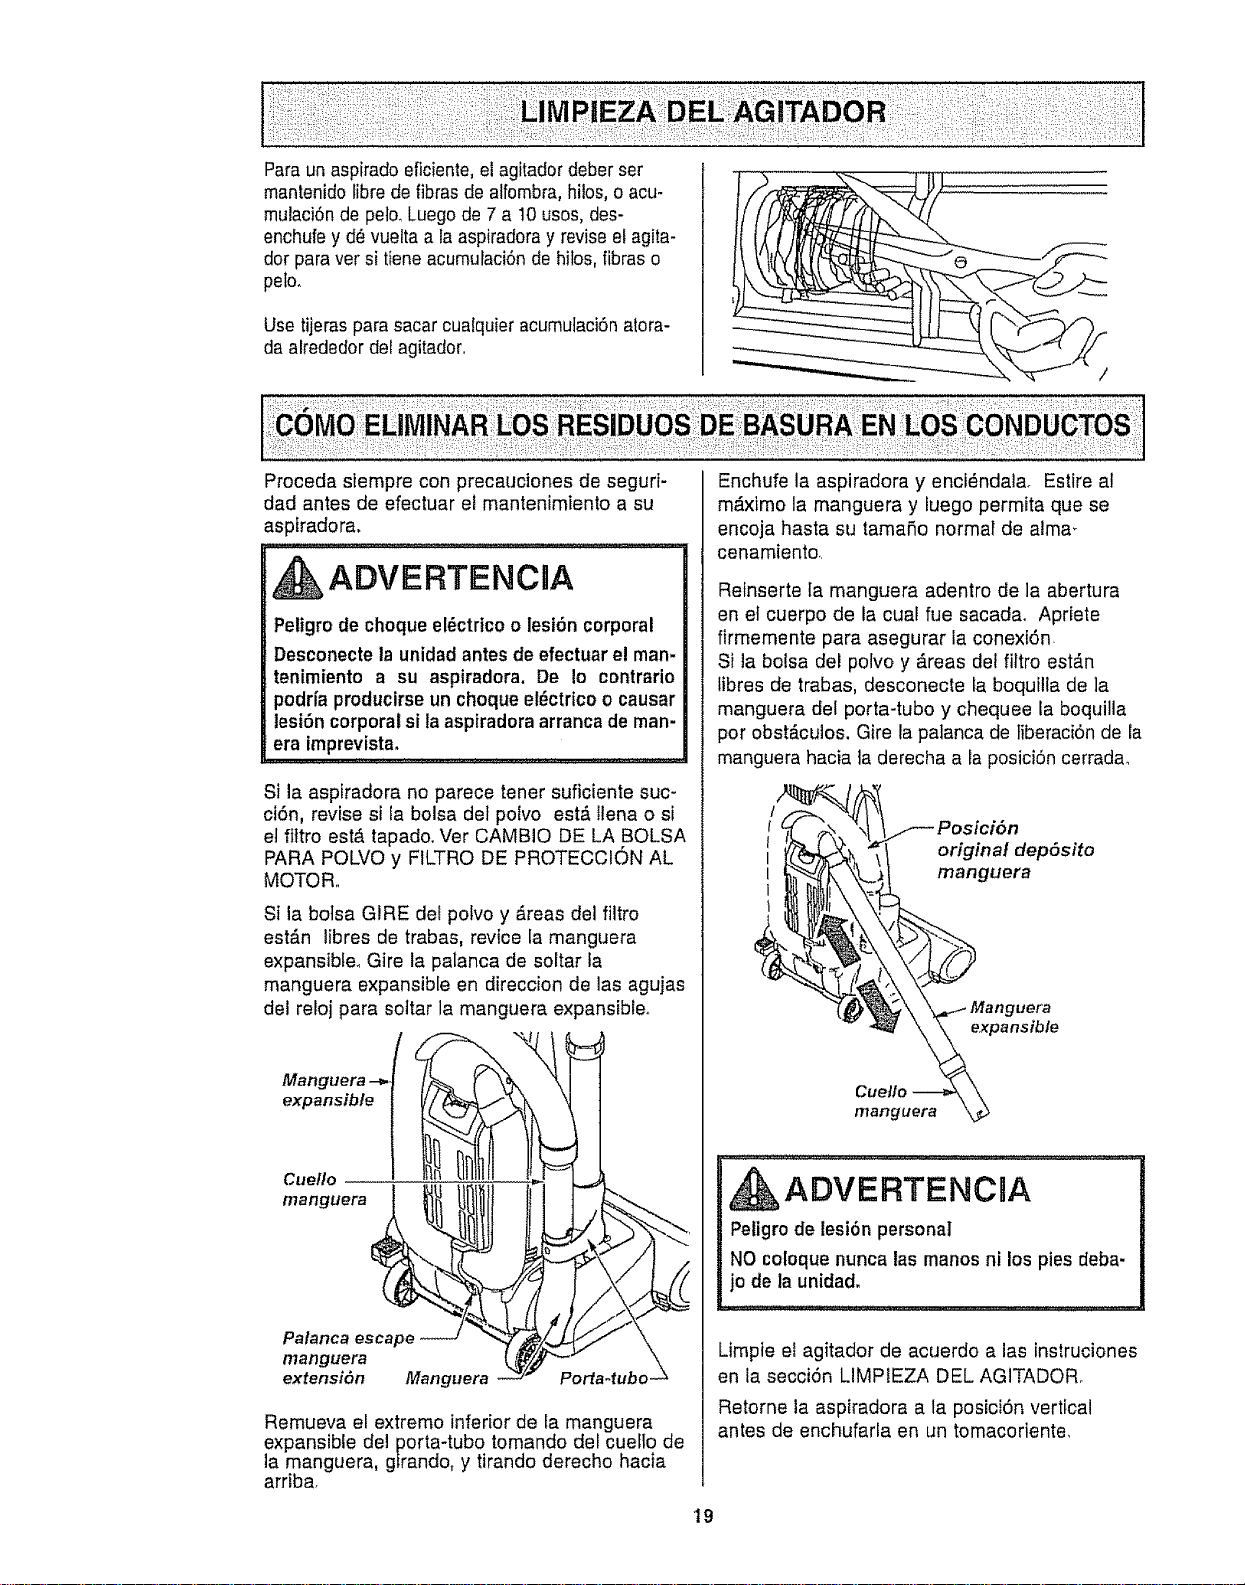
Paraunaspiradoeficienle,elagitadordeberser
mantenidolibredefibrasdealfombra,hilos,oacu-
mulaci6ndepelo.Luegode7a10usos,des-
enchufeyd_vueltaalaaspiradorayreviseelagita-
dorparaversitieneacumulaciSndehilos,fibraso
peto.
Usetijerasparasacarcualquieracumutaci6natora-
daalrededordelagitador..
Procedasiempreconprecaucionesdeseguri-
dadantesdeefectuarelmantenimientoasu
asptradora.
ADVERTENClA
Petigrode choque el_ctrico o lesi6n corporal
Desconecte la unidad antes de efectuar el man-
tenimiento a su aspiradora. De Io contrario
podrfa producirse un choque el_ctdco o causar
lesi6n corporal si la aspiradora arranca de man-
era imprevista.
Si la aspiradora no parece tener suficiente suc-
ct6n, revise si fa bolsa def polvo est#, llena o si
et fittro est#,tapado. Ver CAMBIO DE LA BOLSA
PARA POLVO y FILTRO DE PROTECCION AL
MOTOR,,
Si la botsa GIRE del polvo y _.reas del filtro
est_.n libres de trabas, revice la manguera
expansible. Gire la palanca de soltar la
manguera expansible en direccion de las agujas
del retoj para soltar la manguera expansible°
f
Manguera --=..
expansible
!
Cuello
manguera
Palanca escape
manguera
extensiSn Manguera
Porta-tubo.
Remueva el extremo inferior de la manguera
expansible del porta-tubo tomando del cuello de
la manguera, gfrando, y tirando derecho hacia
arriba.
Enchufe la aspiradora y enci6ndala. Estire at
m_.ximo la manguera y fuego permita que se
encoja hasta su tamafio normal de alma_
cenamiento.
Reinserte Ia manguera adentro de la abertura
en et cuerpo de la cual fue sacadao Apriete
firmemente para asegurar ia conexi6n.
Si la bolsa del polvo y dreas del filtro est_.n
tibres de trabas, desconecte la boquilla de ]a
manguera del porta-tubo y chequee la boquilla
pot obstdculos. Gire la palanca de tiberaci6n de la
manguera hacia ta derecha a la posici6n cerrada_
Posici6n
original depSsito
manguera
, ADVERTENCIA
Peligro de lesi6n personal
NO coloquenunca las manos ni los pies deba-
jo de la unidad.
Limpie el agitador de acuerdo a las instruciones
en la secci6n LIMPIEZA DEL AGITADOR.
Retorne la aspiradora a la posici6n vertical
antes de enchufarla en un tomacoriente,
19
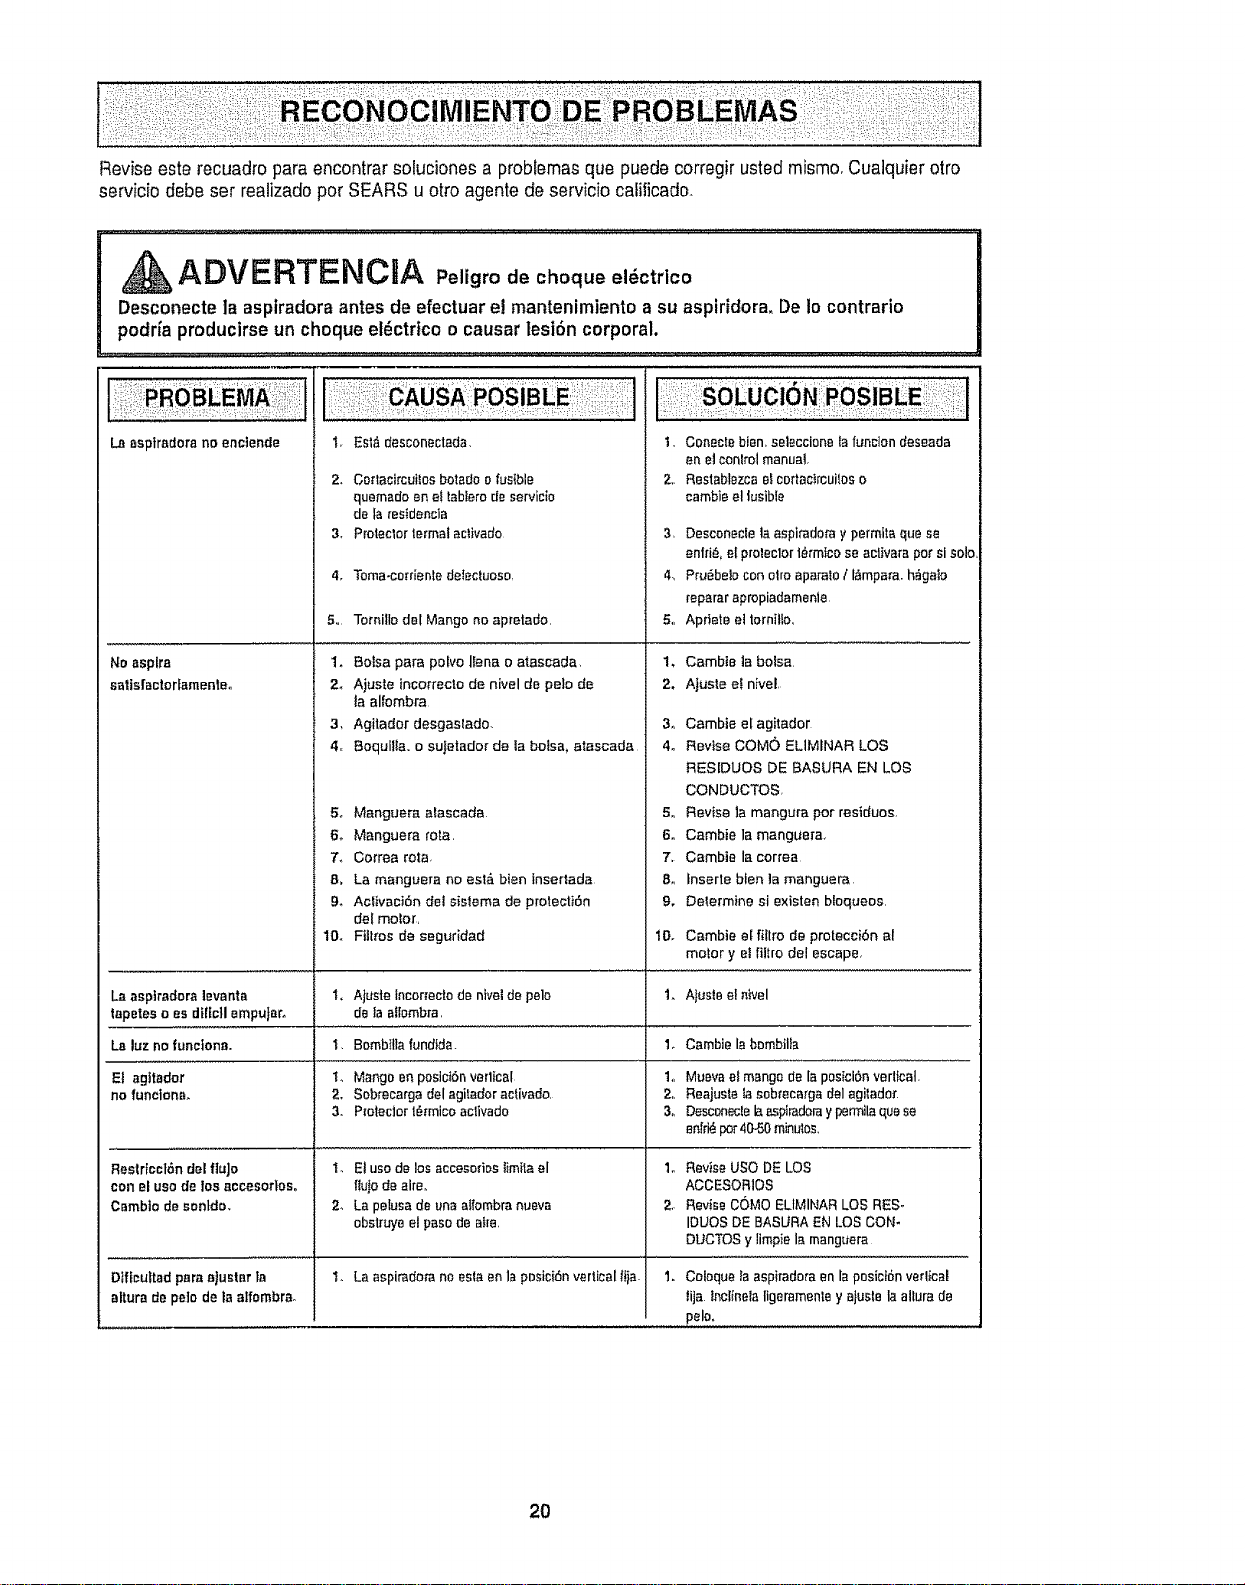
Reviseesterecuadroparaencontrarsolucionesaprobtemasquepuedecorregirustedmismo.Cualquierotro
serviciodebeserrealizadoperSEARSuottoagentsdeserviciocalificado.
ADVERTENCRA Peligro de choque el_ctrico
Desconecte la aspiradora antes de efectuar el mantenimiento a su aspiridora. De Io contrario
podria producirse un cheque el_ctrtce o causar lesi6n corporal.
La sspiradora no enoiende
t. EMfi dasconeclads. 1,
2. Co_tacircuitos botsdo o fusible 2,,
quemedo en at tabfero de servicio
de Is restdencls
3. Proteclor termal eclivado 3,
4. Tome-catalonia det:ectuoso, 4,
5,, Tornitle del Mango no apretado 5,,
1. Botsa pare polvo ffana o aiaseada, 1,
2_ Ajuste incorrecto de nivel de polo de 2,
la alfombra
3, Agitador desgastado. 3,
4,, Boquilla. o sujetador de la balsa, ataacada 4o
5_ Manguera alascada 5_
6. Manguera rata, 6.
7_ Correa rote, 7,
8, La manguera no est#_ bien InseMada 8,,
9_ Aclivaci6n det sistema de protecti6n 9.
del motor,
No aspire
satis(actorfamenleo
Conectebien.seleccionaIsfunctondeseada
en eJconlrolmanual
Restablezcae!eortacircuiloso
cambieel tusible
Desconecle la aspirado_'a y permila que se
I
enid& e[ proteclor t_rmtca se activate per si solol
Pru_beb [:on eiro aparato/ l,_mpara, hagaIo
repsrar apropiadsmenle,
Aprtete el tornitlo,
Cambta la balsa,
AjueIe el nivel
Cambie el agitador
Revise COMe ELIMINAR LOS
RESIDUES DE BASURA EN LOS
CONDUCTOS,
Revise la mangura per residues,
Cambie la manguer&
Cambia la correa
inserte blen ia manguera
Delermine si existen bloqueos
10. Flits'as de seguddad 10. Cambie el filtro de protecci6n al
motor y el filtro del escape,
La aspiradera levanta t, Ajuste incor_ecto de nivel do polo 1. Ajuste e! ntvel
tapetes e es di[lcII empuJaro de la aflombra,
La luz no functonao I. 8ombtlla fundfds. 1. Cambie la hornbills
El agitader t. Mango on pesictbn verlicat 1,, Mueva el mango de Ia posiciOn vertical.
no funclona. 2. Sobrecarga del agitador aclivado_ 2o Reajuste Ia sobrecargs delagiladof
3. P_oteclor t_rmico activado 3o Desconecle la asplradara y permila qua se
enfri_ per40-50 minutes,
Restrleet6n del flujo
con el use do los accesortoso
Camblo do sentdo.
Dfffcultad pare ajualar ta
allure de pelo de la etfombra.
t. El use de los accesm1Ds limita el 1_
ItuIo de airs,.
2, La pelusa de una aI[ombra nueva 2,,
obstruye el paso de atre,
t. La aspiradora no asia en la pDsici6n vertical f_)a. 1.
Revise use DE LOS
ACCESOR1OS
Revi_e COMe ELIMINAR LOS RES-
IDUES DE BASURA EN LOS CON.
DUCTOS y limpie la manguera
Coloque la aspiradora en la posicl6n verlical
tija incltnela ligeramenle y ajusle la allure de
polo.
2O
Acuerdos Maestros de Protecci6n
Enhorabuena pot hacer una cornpra inteligente. Su nuevo producto Kenmore® est,. disefiado y fabri-
cado para ofrecerle aSos de functonamiento confiable. Pero al igual que todos los productos pueden
precisar un mantenimiento preventivo o afguna reparaoiSn de vez en cuando, Por este motivo, tener
un Acuerdo Maestro de ProtecciSn puede ahorrarle dinero e inconvenientes..
E1Acuerdo Maestro de Proteccidn tambi_n ie ayuda a protongar ta vida Qtil de su nuevo producto. A
continuaciSn indicamos Io que el Acuerdo* incluye:
El Partes y mano de obra necesarios para ayudar a que estos productos funcione correctamente
bajo condtclonales normales de uso, no simplemente defectos. Nuestra cobertura va mucho
mrs alh_ de la garantfa del producto. Ningt_n deducible, nfnguna avefla funcional queda exclu-
ida de la cobertura- proteccldn real.
121 Servlclo experto ofrecido por una lista de mrs de 104000 t6cnlcos autorizados del servicio
t6cnlco de Sears, lo que significa que alguien en quien usted puede confiar estar_ trabajando
en su producto_
[] Numero ilimitado de Ilamadas al servicio t_cntco y serviclo en toda la naci6n, tan continuo
como usted nos Io solicite, sin tmportar donde est,,
[_ Garantfa serla de sustituct6n del producto. La sustitucl6n de su producto cubierto si se pro-
ducen cuatro o m#,s averfas en doce meses.
[] Sustitucldn del producto pot otro nuevo st su producto cubierto no puede repararse.
[] Revlsl6n y mantenlmlento anual preventivo siempre que Io desee y sin cargo alguno.
El Ayuda r_pida pot tel_fono - Nosotros Io llamamos Resoluct6n r_plda. Soporte telefdnico de
un representante de Sears en todos los productoso Piense en nosotros como un "manuaE del
usuario parlante".
[] Proteccl6n contra subidas de tensl6n que provoquen dafios eI_ctricos causados por las fluc-
tuaciones de la corriente.
[] $250 de protecci6n contra la p_rdtda de alimentos anualmente en caso de que se estropee
algun atimento come resultado de una averfa mec_nica de cualquier congelador o refrigerador
cubiertoo
[] Reembolso del atqutter si la reparaciSn de su producto cubierto toma m_.stiempo dei prometi-
do.
[] 10% de descuento en el precio regular de cuatquier servicio de reparaciSn no cubierto y de las
piezas instatadas reiacionadas.
Una vez que compre el Acuerdo, sSlo bastard, una simple Hamada tetefSnica para que pueda progra-
mar un servicio. Puede Ilamar a cuafquier hora del d[a o de la noche, o concertar una cita de ser-
vicio en lfnea,.
E1Acuerdo maestro de protecct6n es una compra fibre de riesgos. Si por cualquier raz6n cancela
durante el perfodo de garantfa del producto, le devolveremos todo e! dinero. O, un reembolso pror-
rateado despu6s del periodo de vencimiento de la garantfa, iCompre su Acuerdo maestro hoyl
Aptican algunas ttmltaciones y excluslones. Para precios y m_s informacl6n en EE°UU., Ilame
al 1-B00-B27-6655.
* La cobertura en Canad_ var[a en algunos artfculos. Para obtener todos los detailes_ llame a
Sears Canada al 1-800-361-6665.
Servicio de instalaci6n de Sears
Para la instalaci6n profesional por parte de Sears de electrodom_sticos, abridores de puertas de gara-
jes, calentadores de agua y otros articulos principales para el hogar, en EEUU, o Canad_ Ilame al 1-
800-4-MY-HOME®,
21
or-:ours!
Your Home
For repair - in your home - of all major brand appliances,
lawn and garden equipment, or heating and cooling systems,
no matter who made it, no matter who sold it!
For the replacemenl parts, accessories and
owner's manuals that you need to do-it-yourself,,
: For Sears professional installation of home appliances
and items like garage door openers and water heaters.
1-800-4-MY-HOME ® (1-800-469-4663)
Calf anytime, day or night (U.S.A. and Canada)
www,sears.com www.sears,ca
: For expert home solutions advice.: www.managemyhome.com
Our Home
For repair of carry-in items like vacuums, lawn equipment,
and electronics, call or go on-line for the nearest
Sears Parts and Repair Service Center.
1-800-488-1222 (us.A.) 1-800-469-4663 (Canada)
Call anytime, day or night (US.A and Canada)
ww-w.sears.com www.sears.ca
To purchase a protection agreement on a product serviced by Sears:
1-800-827-6655 (UoSoA.) 1-800-36'I-6665 (Canada)
Para pedir servicio de reparaci6n
a domicilio, y para ordenar piezas:
14388_SU-HOGAR®
(1-888-784-6427)
Au Canada pour service en francais:
1-80O-LE-FOYERMc
(I -800-533-6937)
www,sears.oa
SeriFs ............"
@JRegistered Trademark / T_ Trademark I s_ Service Mark of Sears Brands, LLC
@ Marca Registrada / T_ Marca de F&brica / sf._Me{ca de Servlcie de Sears Brands, LLC
_c Marque de commerce ! _{_Marque d_pesCe de Sears Brands, LLC
@ Sears, Roebuck and Co