Owner Manual Networking
Get to Know About Your Router
Product Overview
The TP-Link router is designed to fully meet the need of Small Office/Home Office (SOHO) networks and users demanding higher networking performance. The powerful antennas ensure continuous Wi-Fi signal to all your devices while boosting widespread coverage throughout your home, and the built-in Ethernet ports supply high-speed connection to your wired devices.
Moreover, it is simple and convenient to set up and use the TP-Link router due to its intuitive web interface and the powerful Tether app.
Appearance
The Front Panel
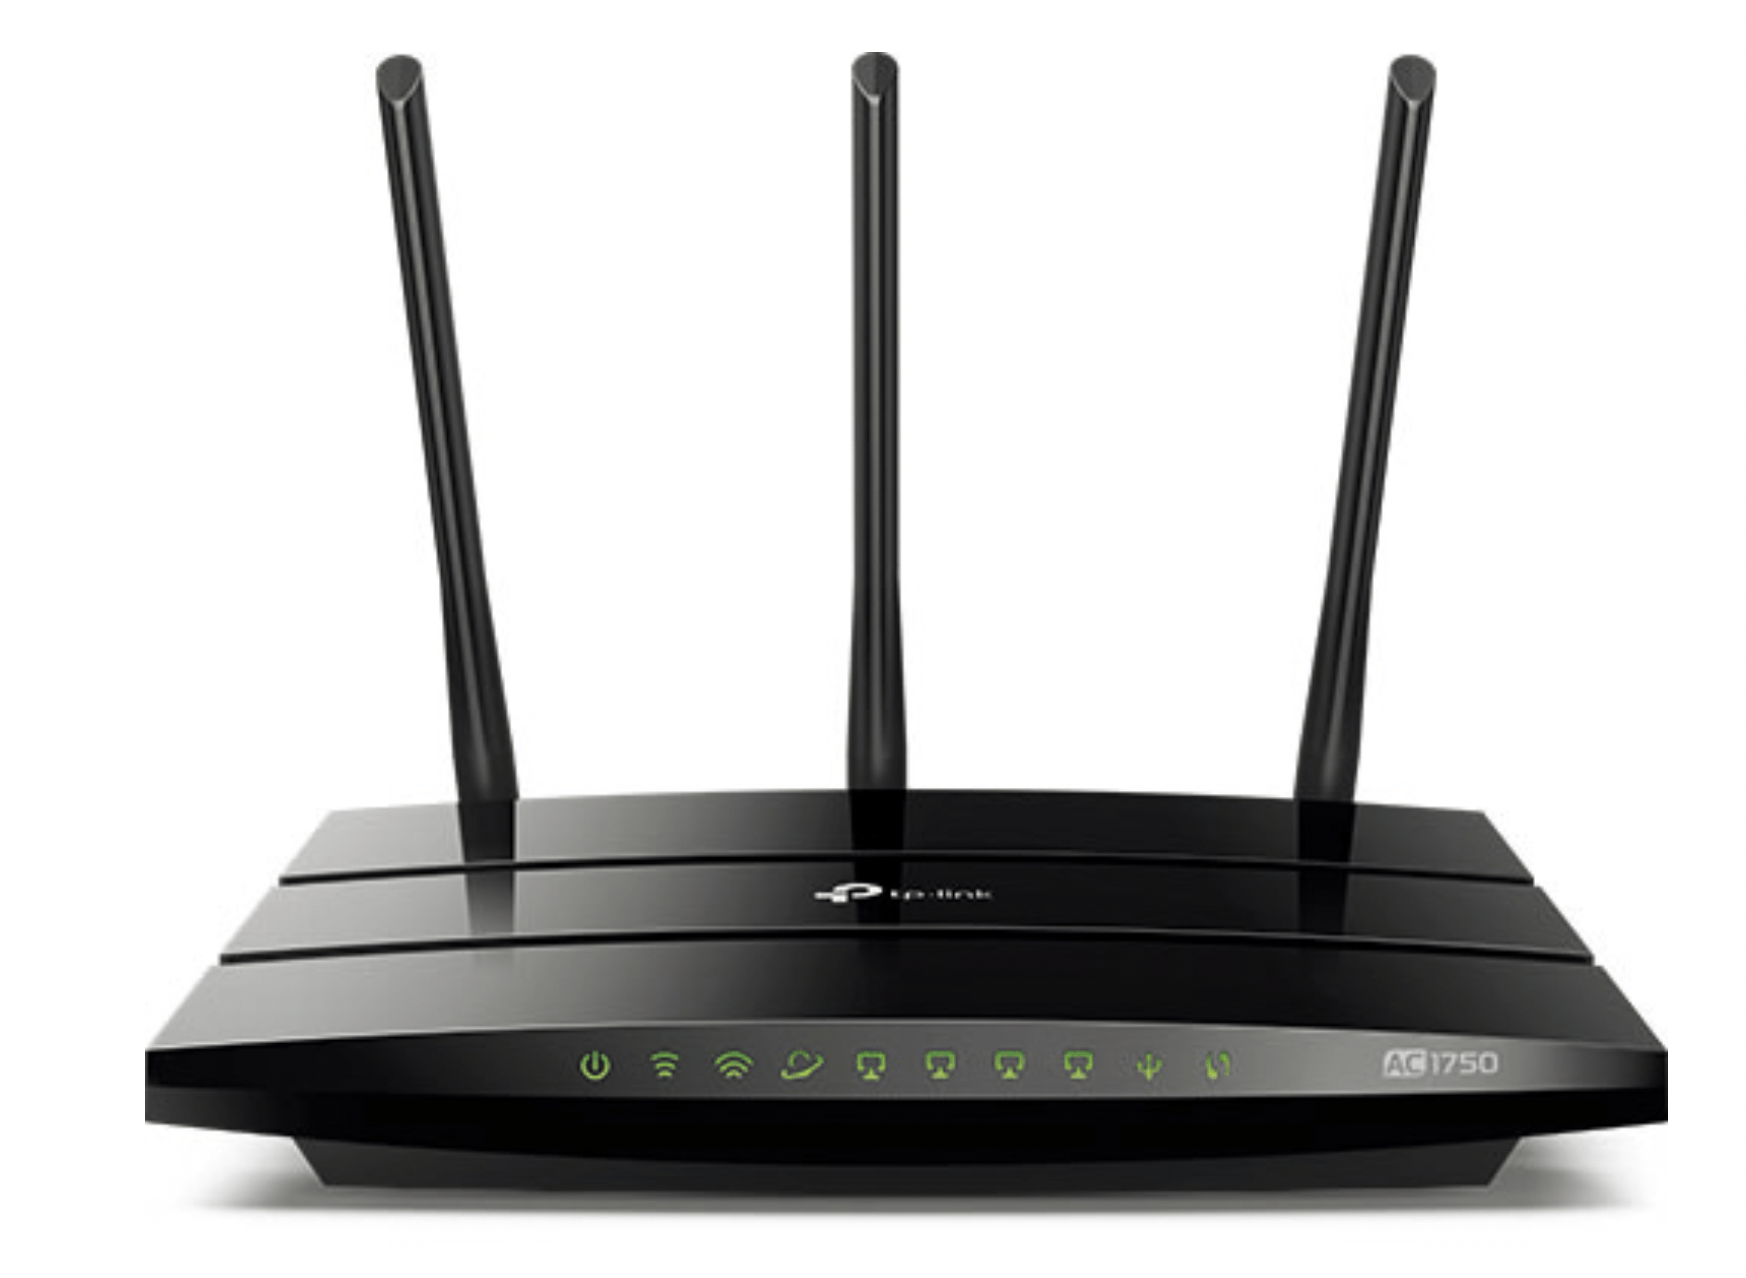
The router’s LEDs (view from left to right) are located on the front panel. You can check the router’s working status by following the LED Explanation table.
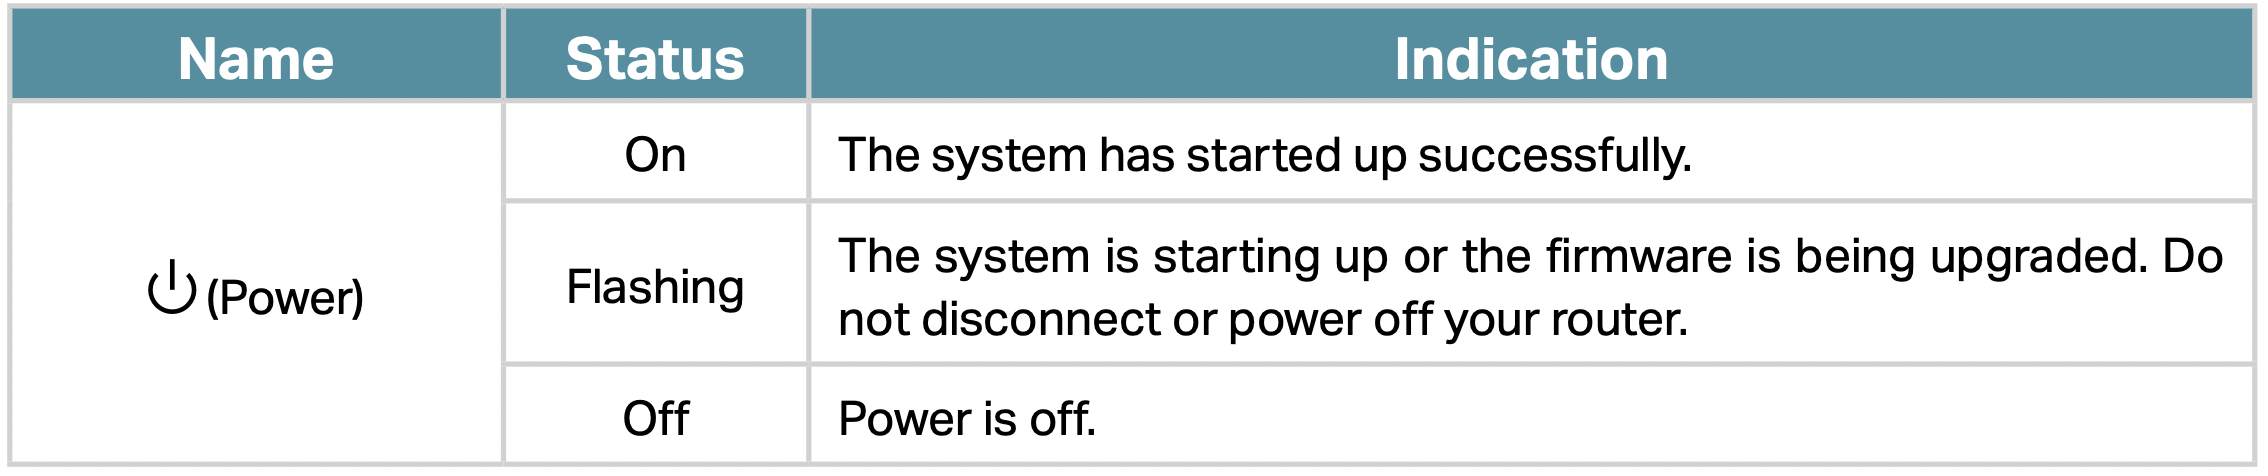
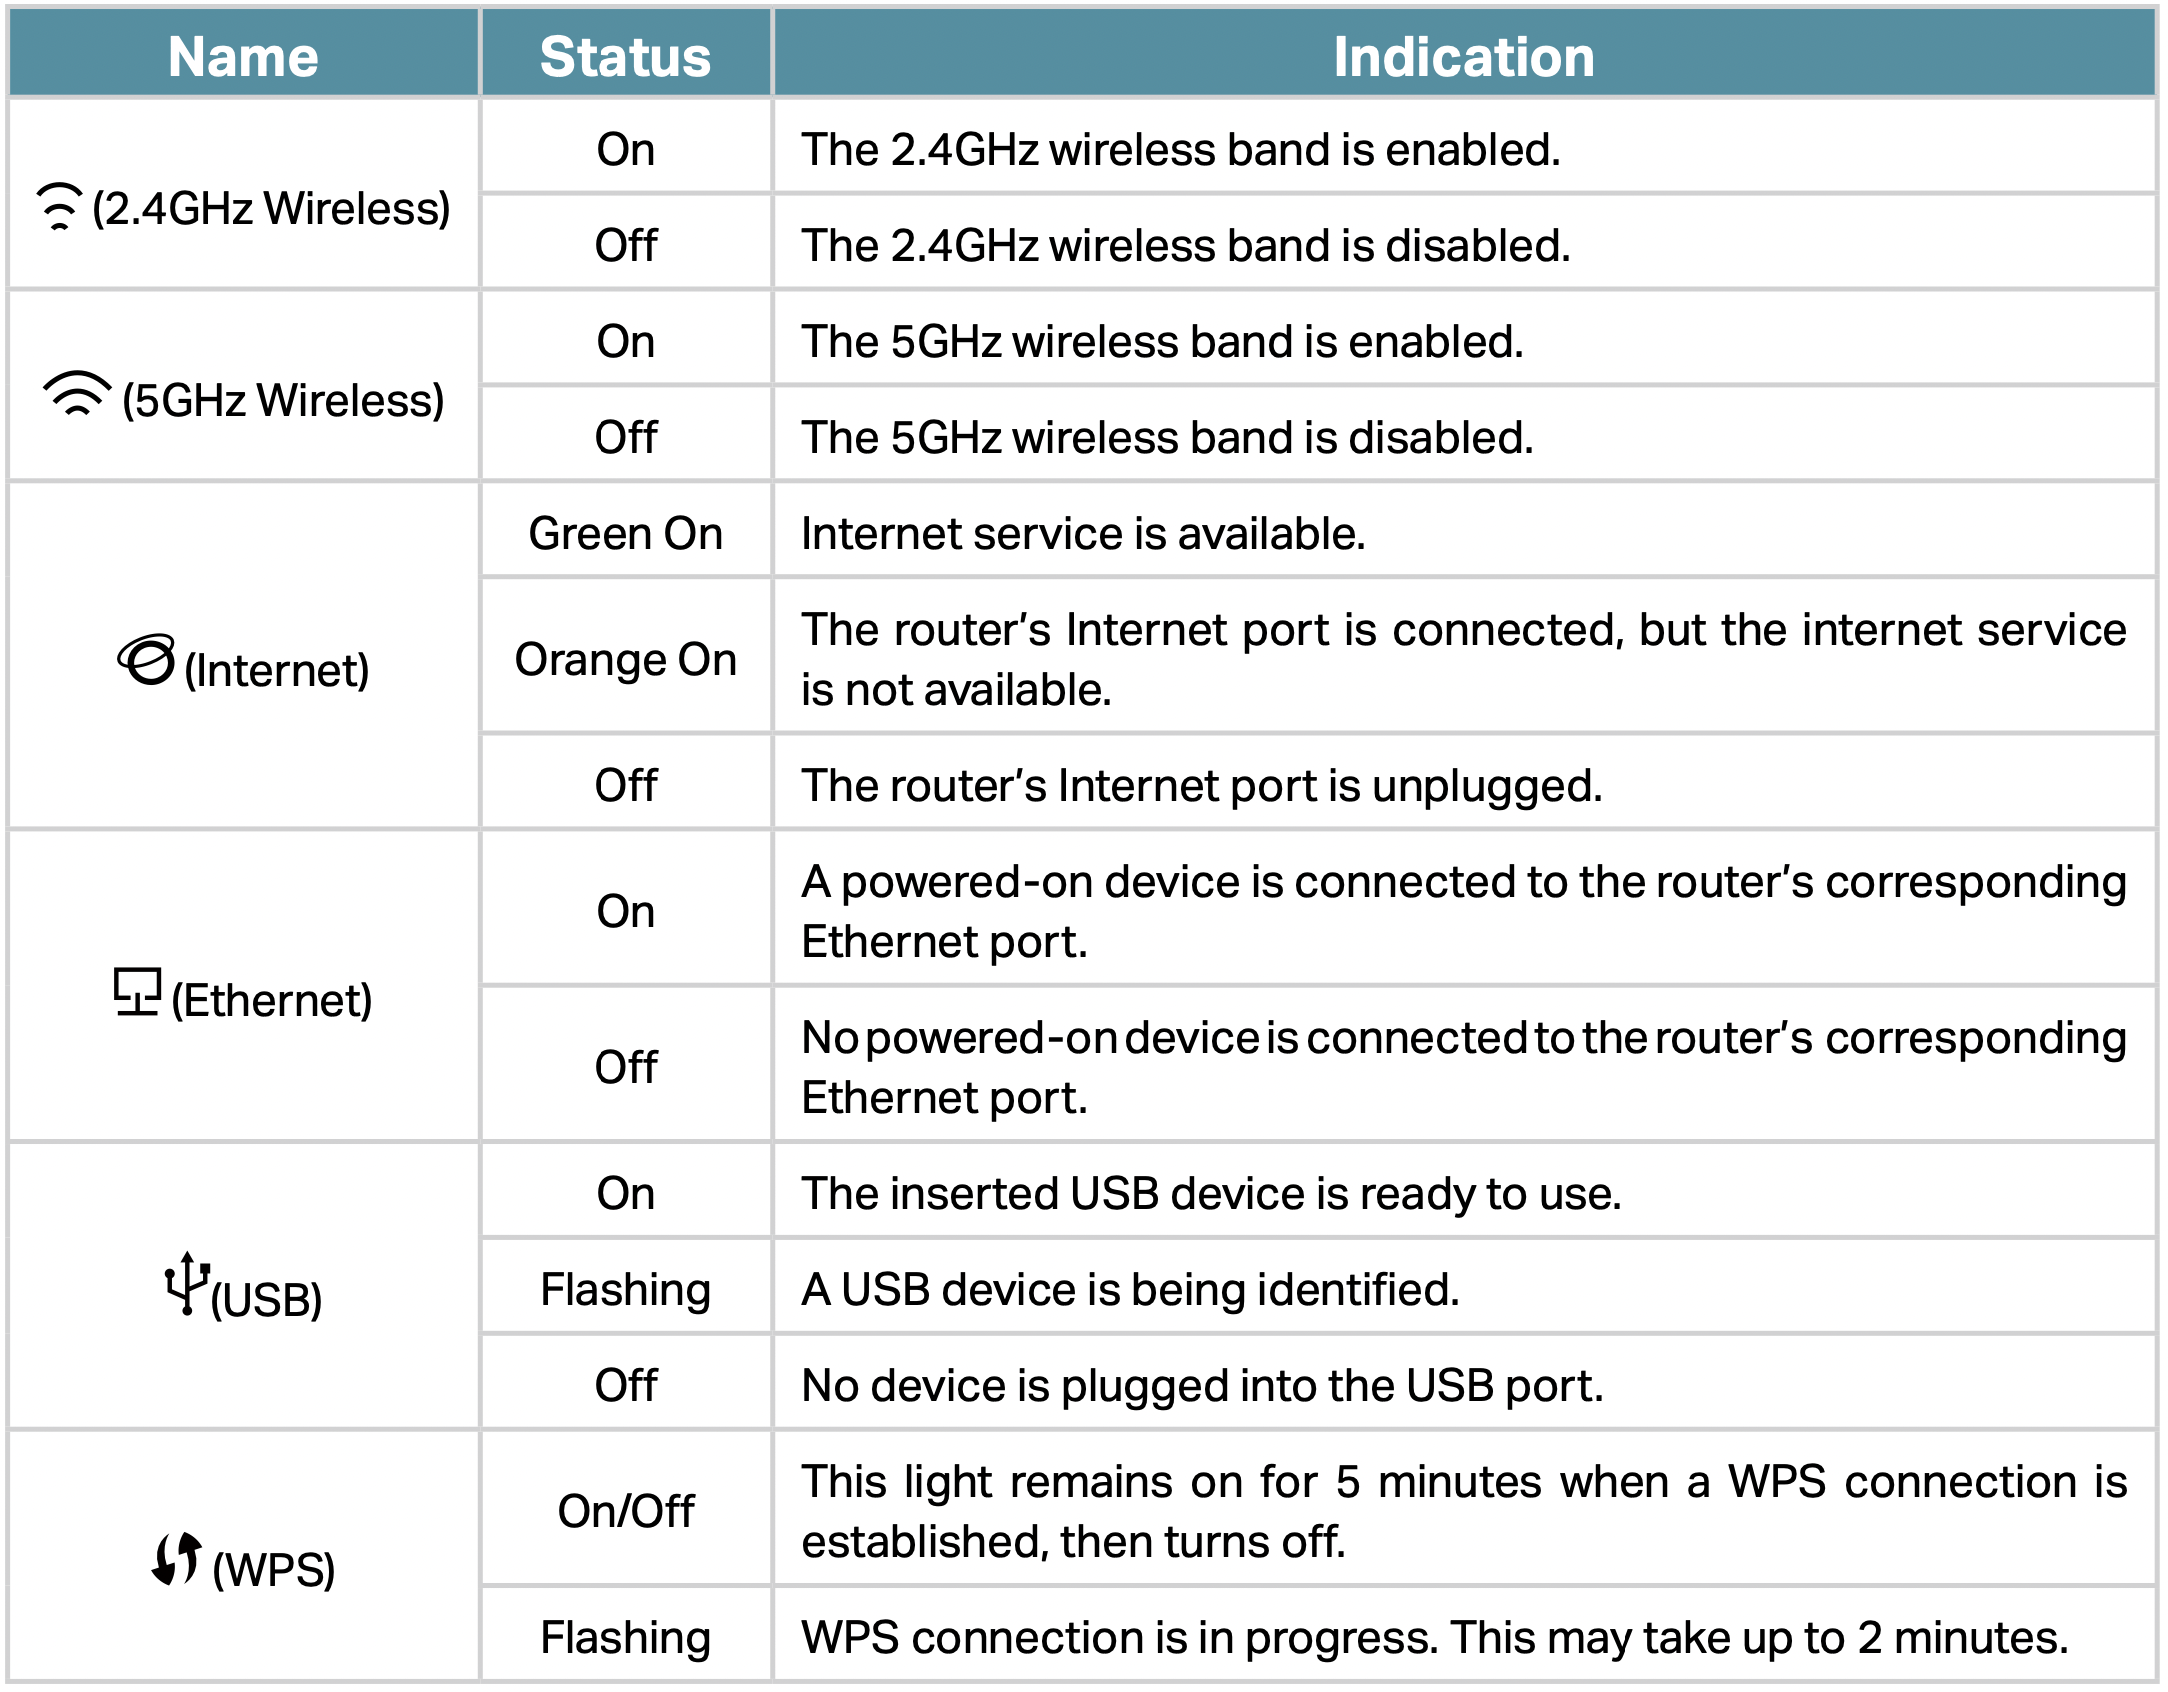
LED Explanation
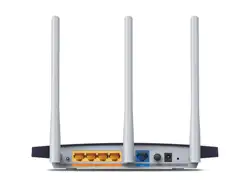
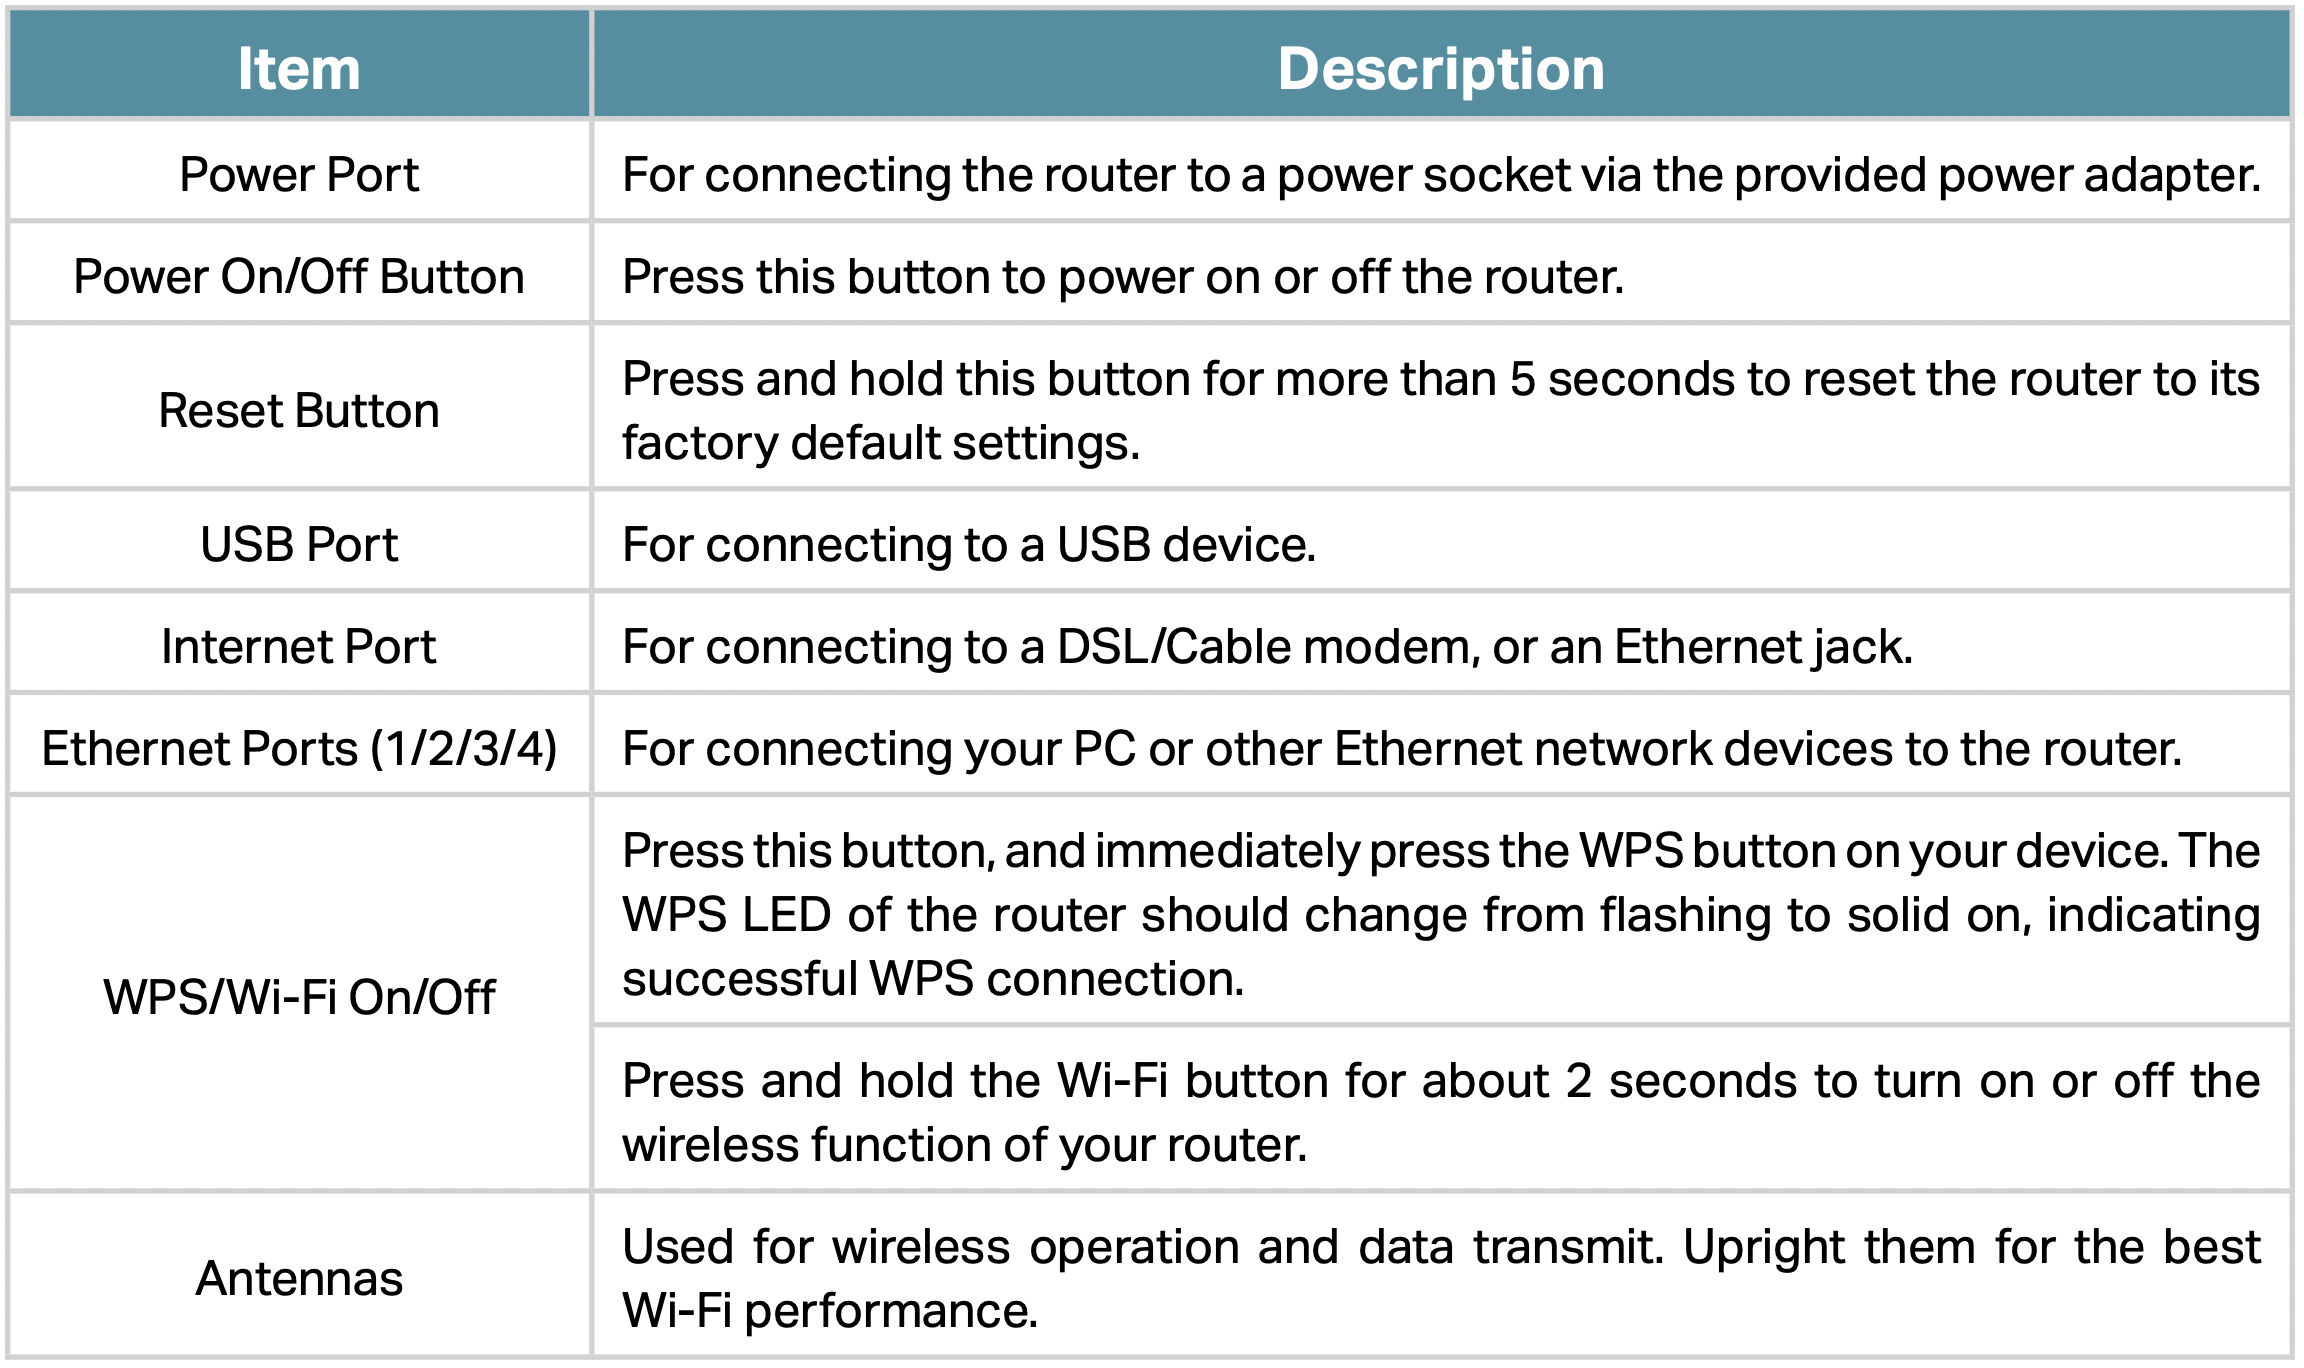
The Back Panel
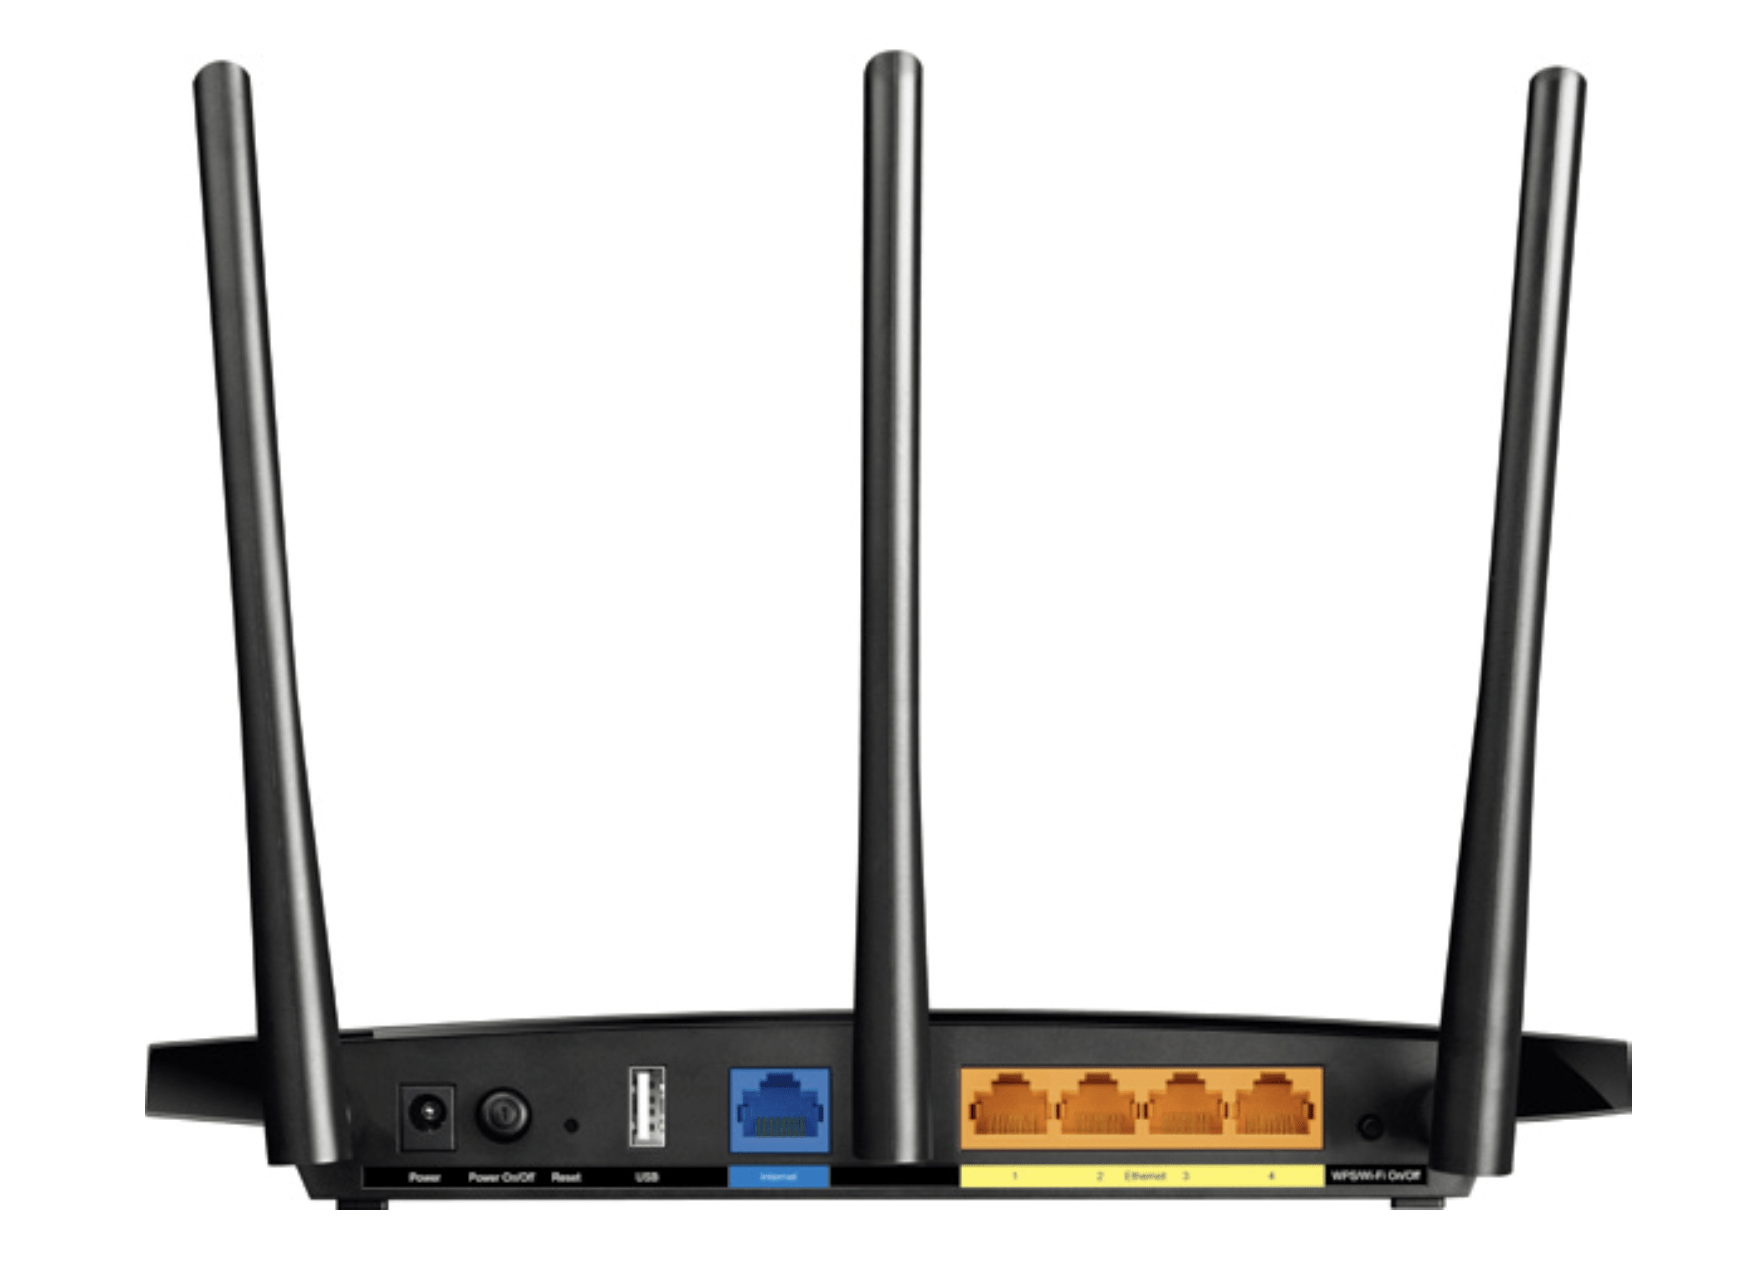
The router’s ports (view from left to right) are located on the rear panel.
Connect the Hardware
Position Your Router
- The product should not be located in a place where it will be exposed to moisture or excessive heat.
- Place the router in a location where it can be connected to multiple devices as well as to a power source.
- Make sure the cables and power cord are safely placed out of the way so they do not create a tripping hazard.
- The router can be placed on a shelf or desktop.
- Keep the router away from devices with strong electromagnetic reference, such as Bluetooth devices, cordless phones and microwaves.
Connect Your Router
Follow the steps below to connect your router.
If your internet connection is through an Ethernet cable directly from the wall instead of through a DSL / Cable / Satellite modem, connect the Ethernet cable to the router’s Internet port, and then follow Step 4 and 5 to complete the hardware connection.
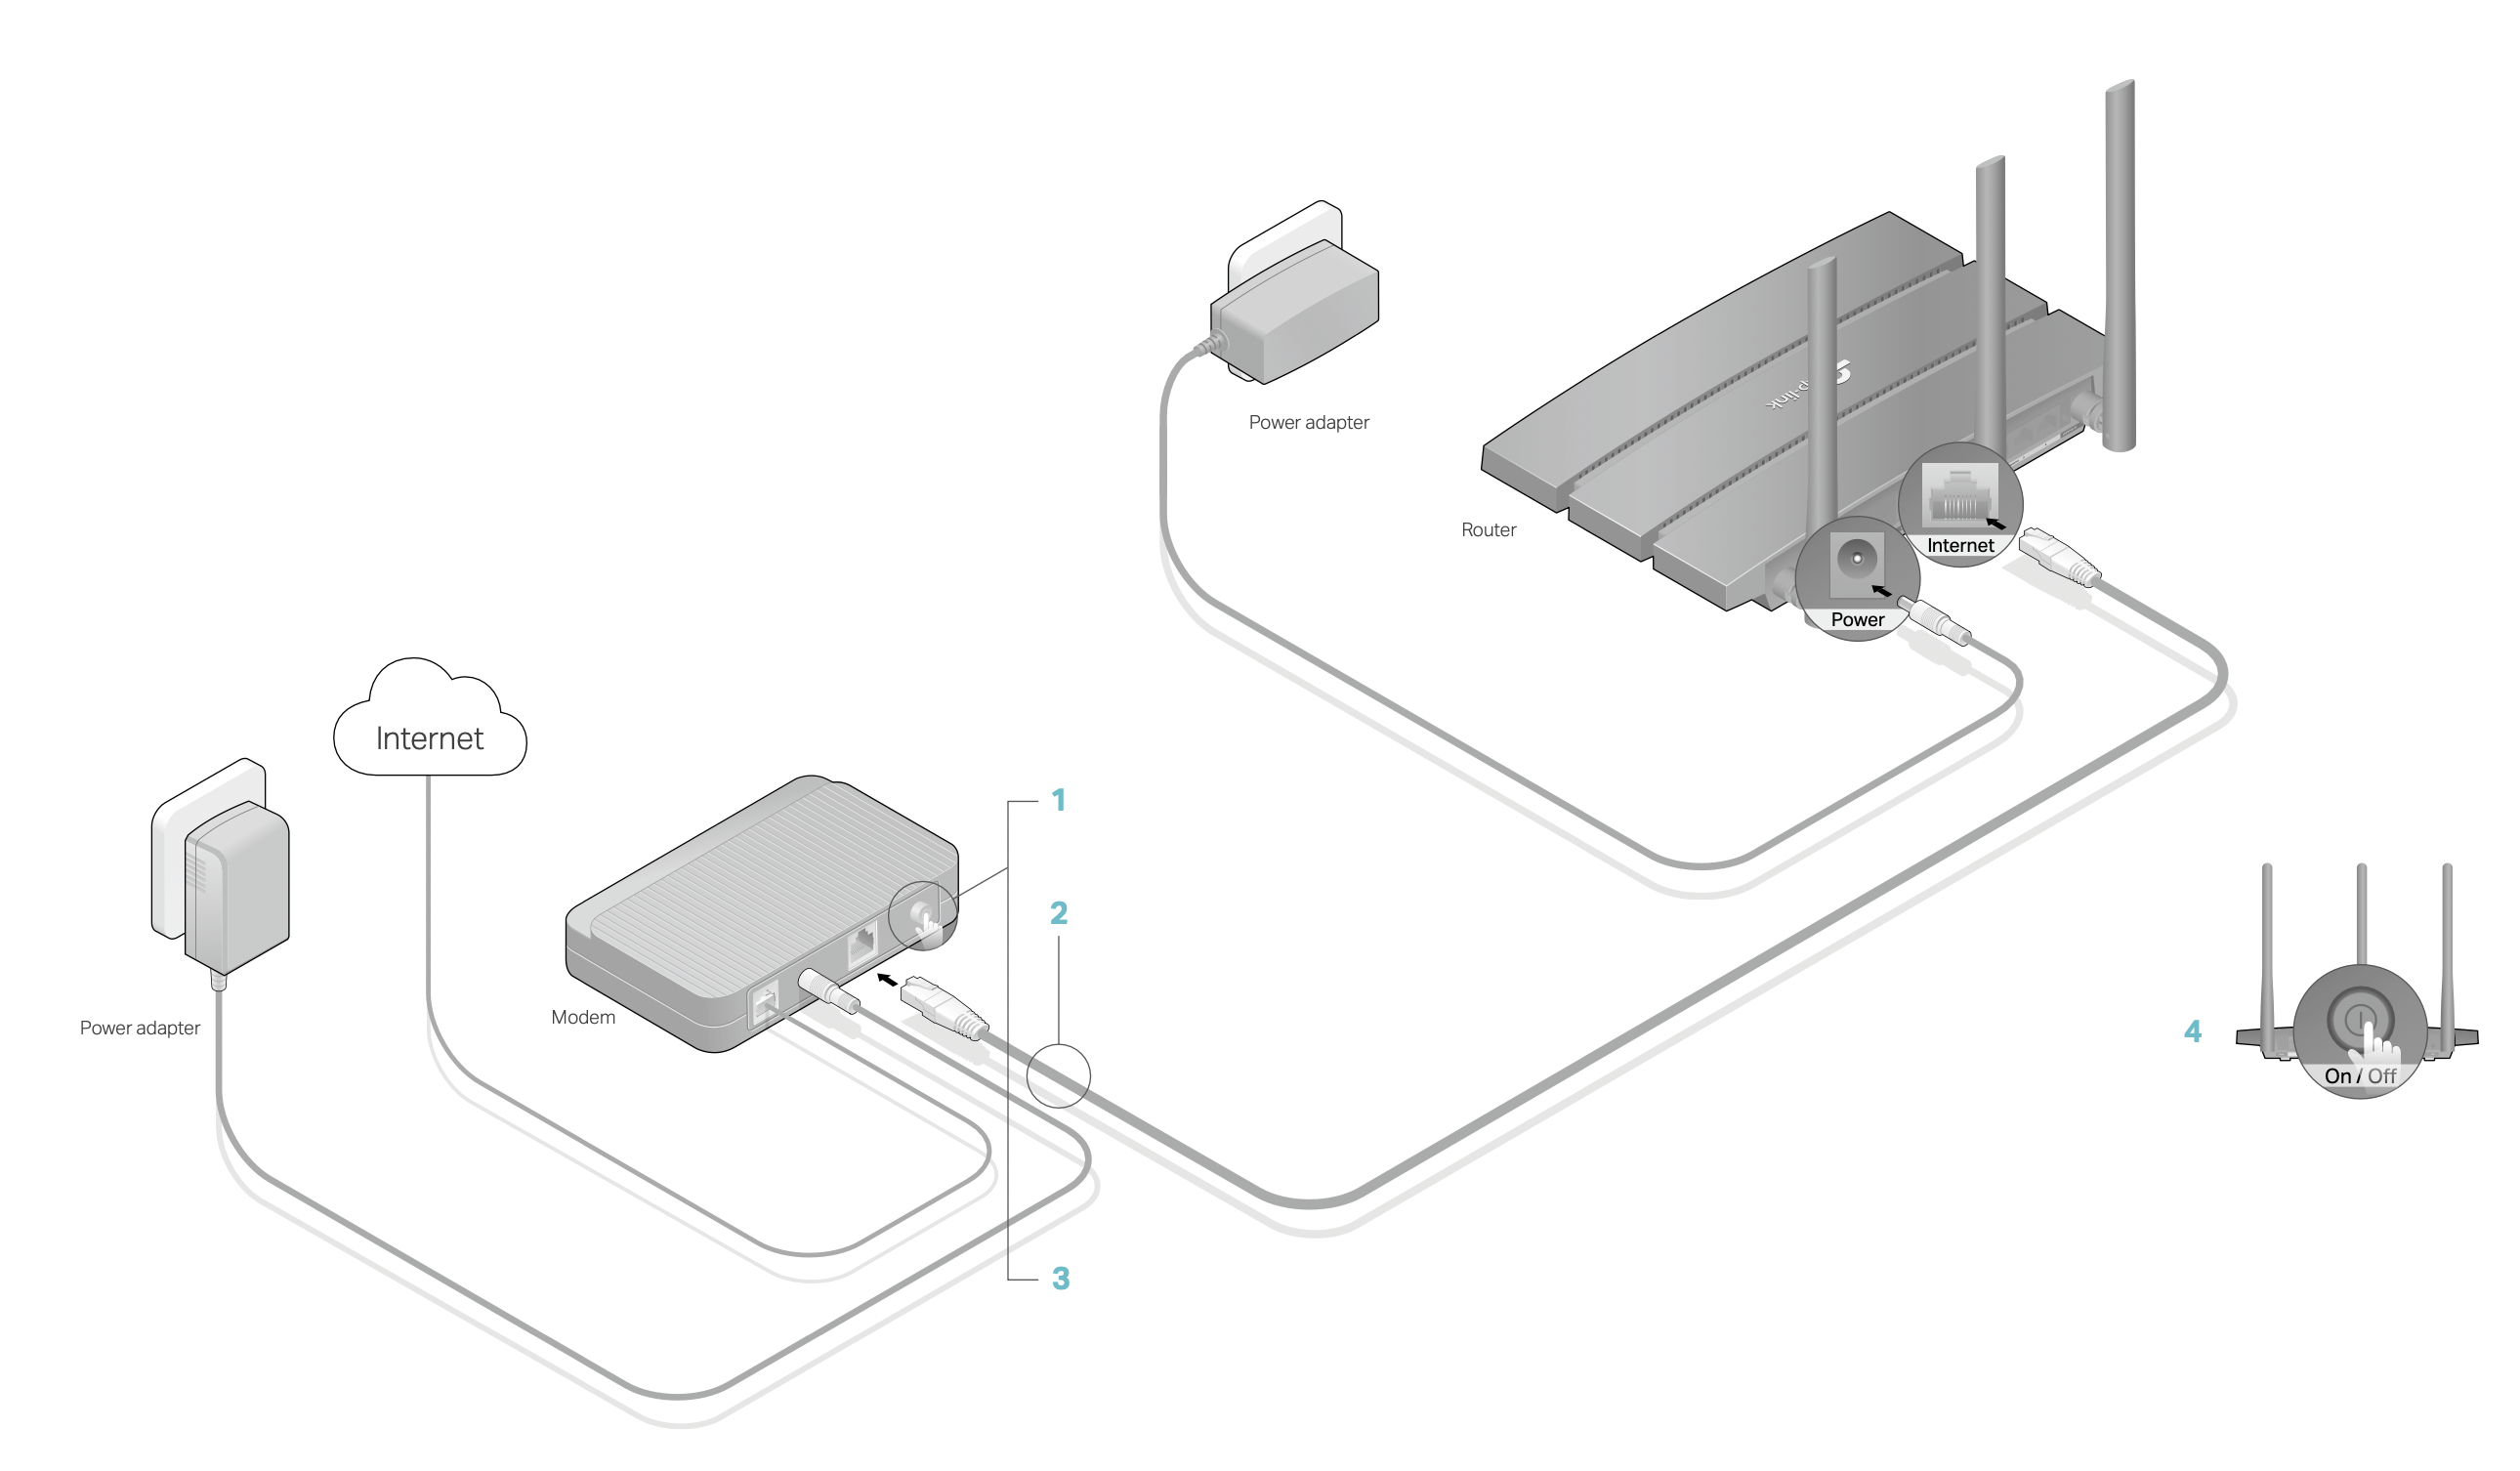
- Turn off the modem, and remove the backup battery if it has one.
- Connect the modem to your router’s Internet port with an Ethernet cable.
- Turn on the modem, and then wait about 2 minutes for it to restart.
- Connect the power adapter to the router and turn on the router.
- Verify that the following LEDs are on and solid to confirm the hardware is connected correctly.

Note: If the 2.4G LED and 5G LED are off, press and hold the WPS/Wi-Fi button on the back for more than 2 seconds. Both the LEDs should turn solid on.
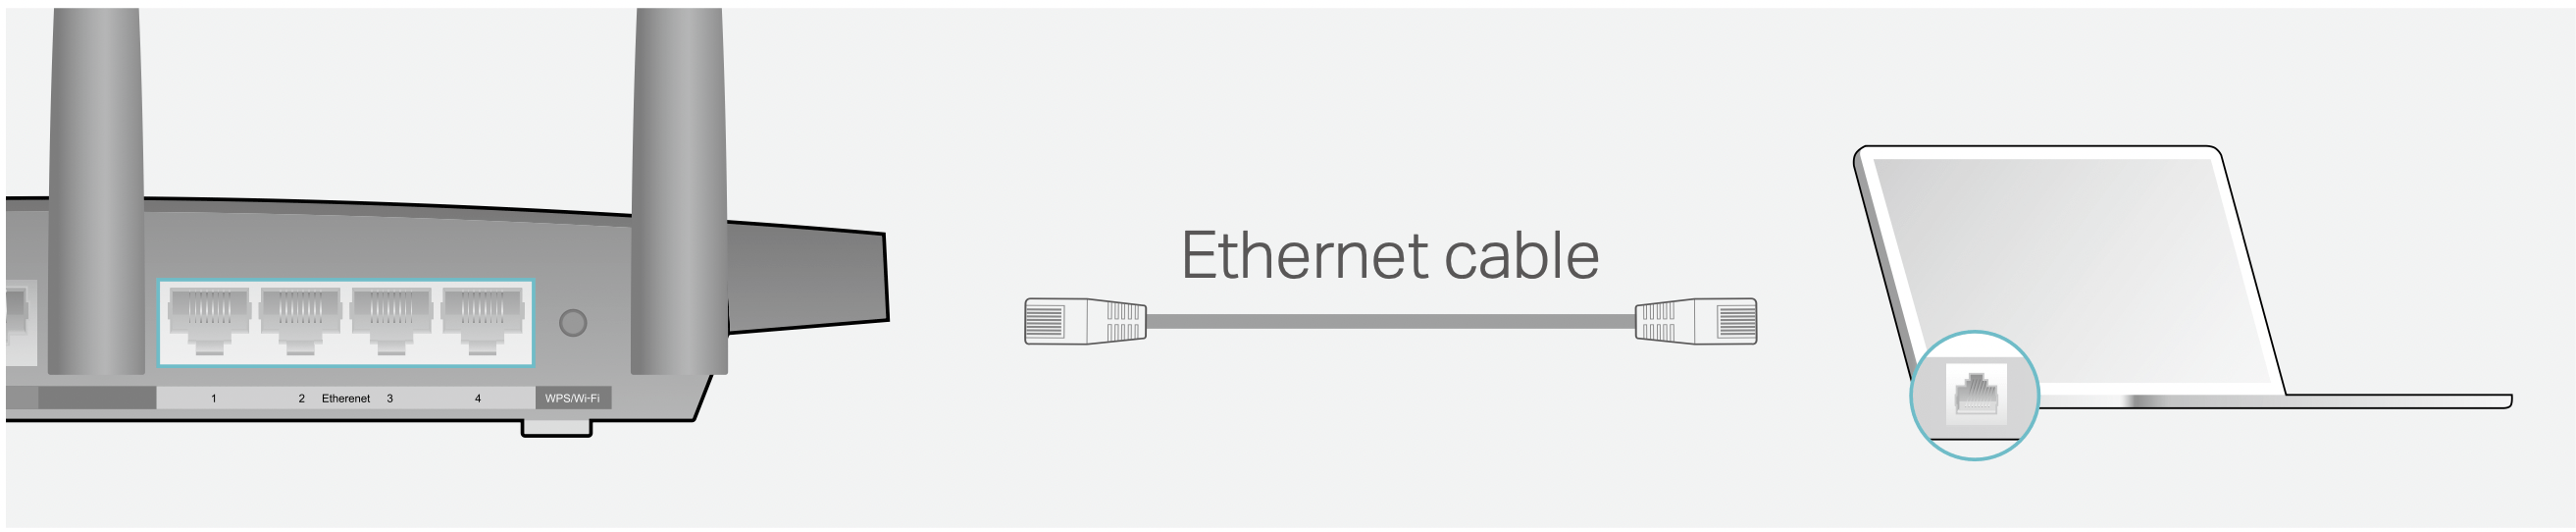
- Connect your computer to the router.
- Method 1: Wired
Turn off the Wi-Fi on your computer and connect the devices as shown below.
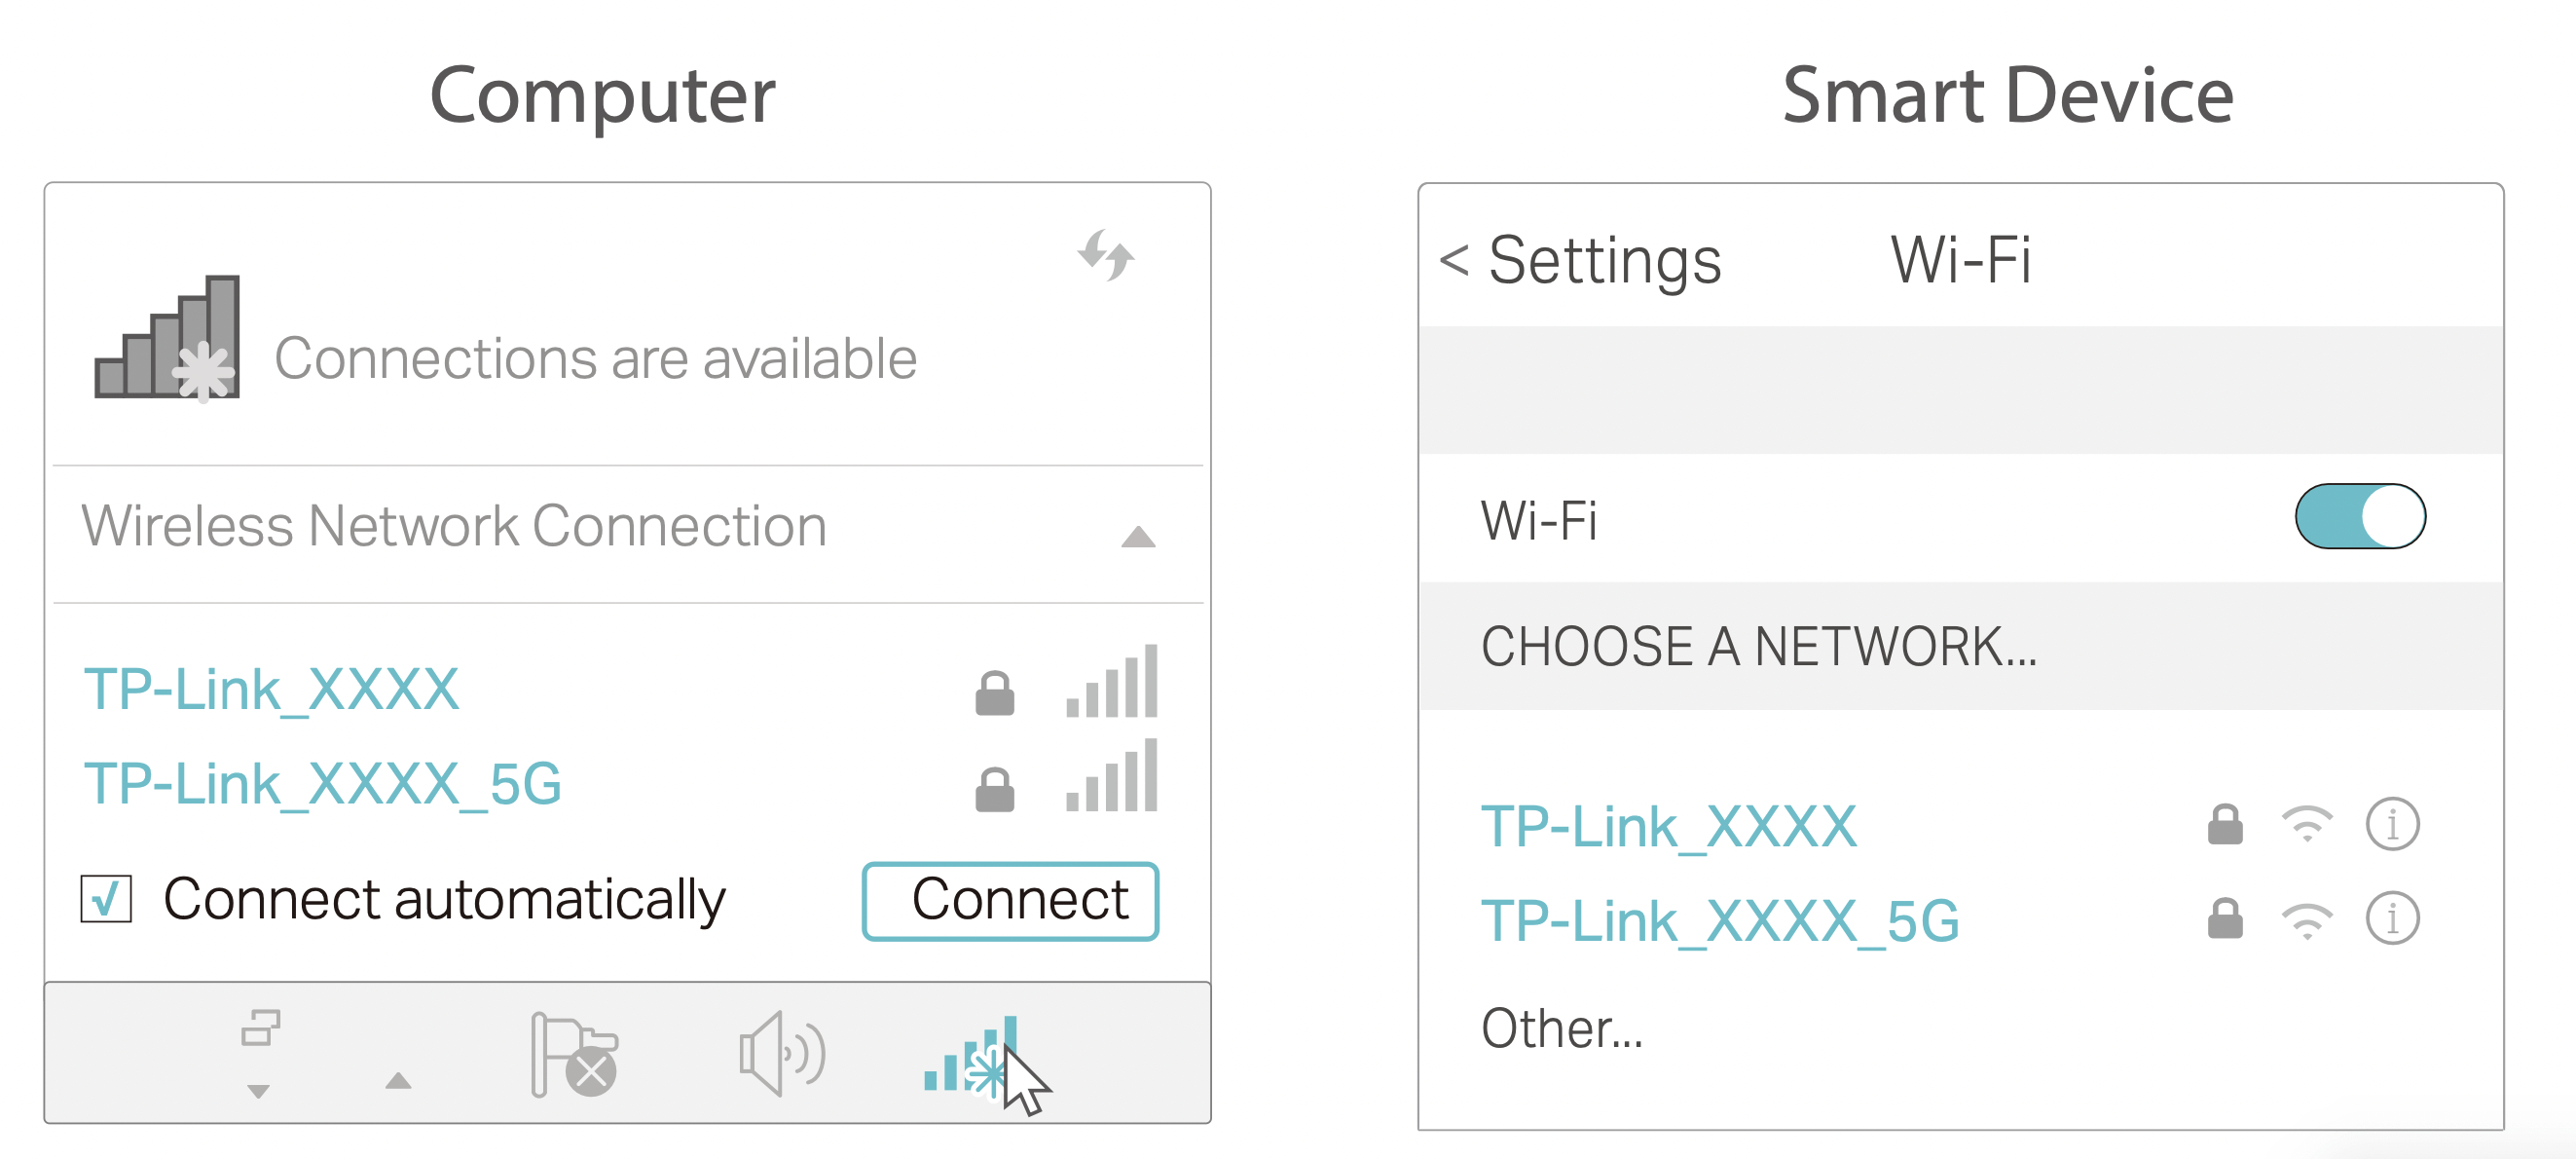
- Find the SSID (Network Name) and Wireless Password printed on the label at the bottom of the router.
- Click the network icon of your computer or go to Wi-Fi Settings of your smart device, and then select the SSID to join the network.
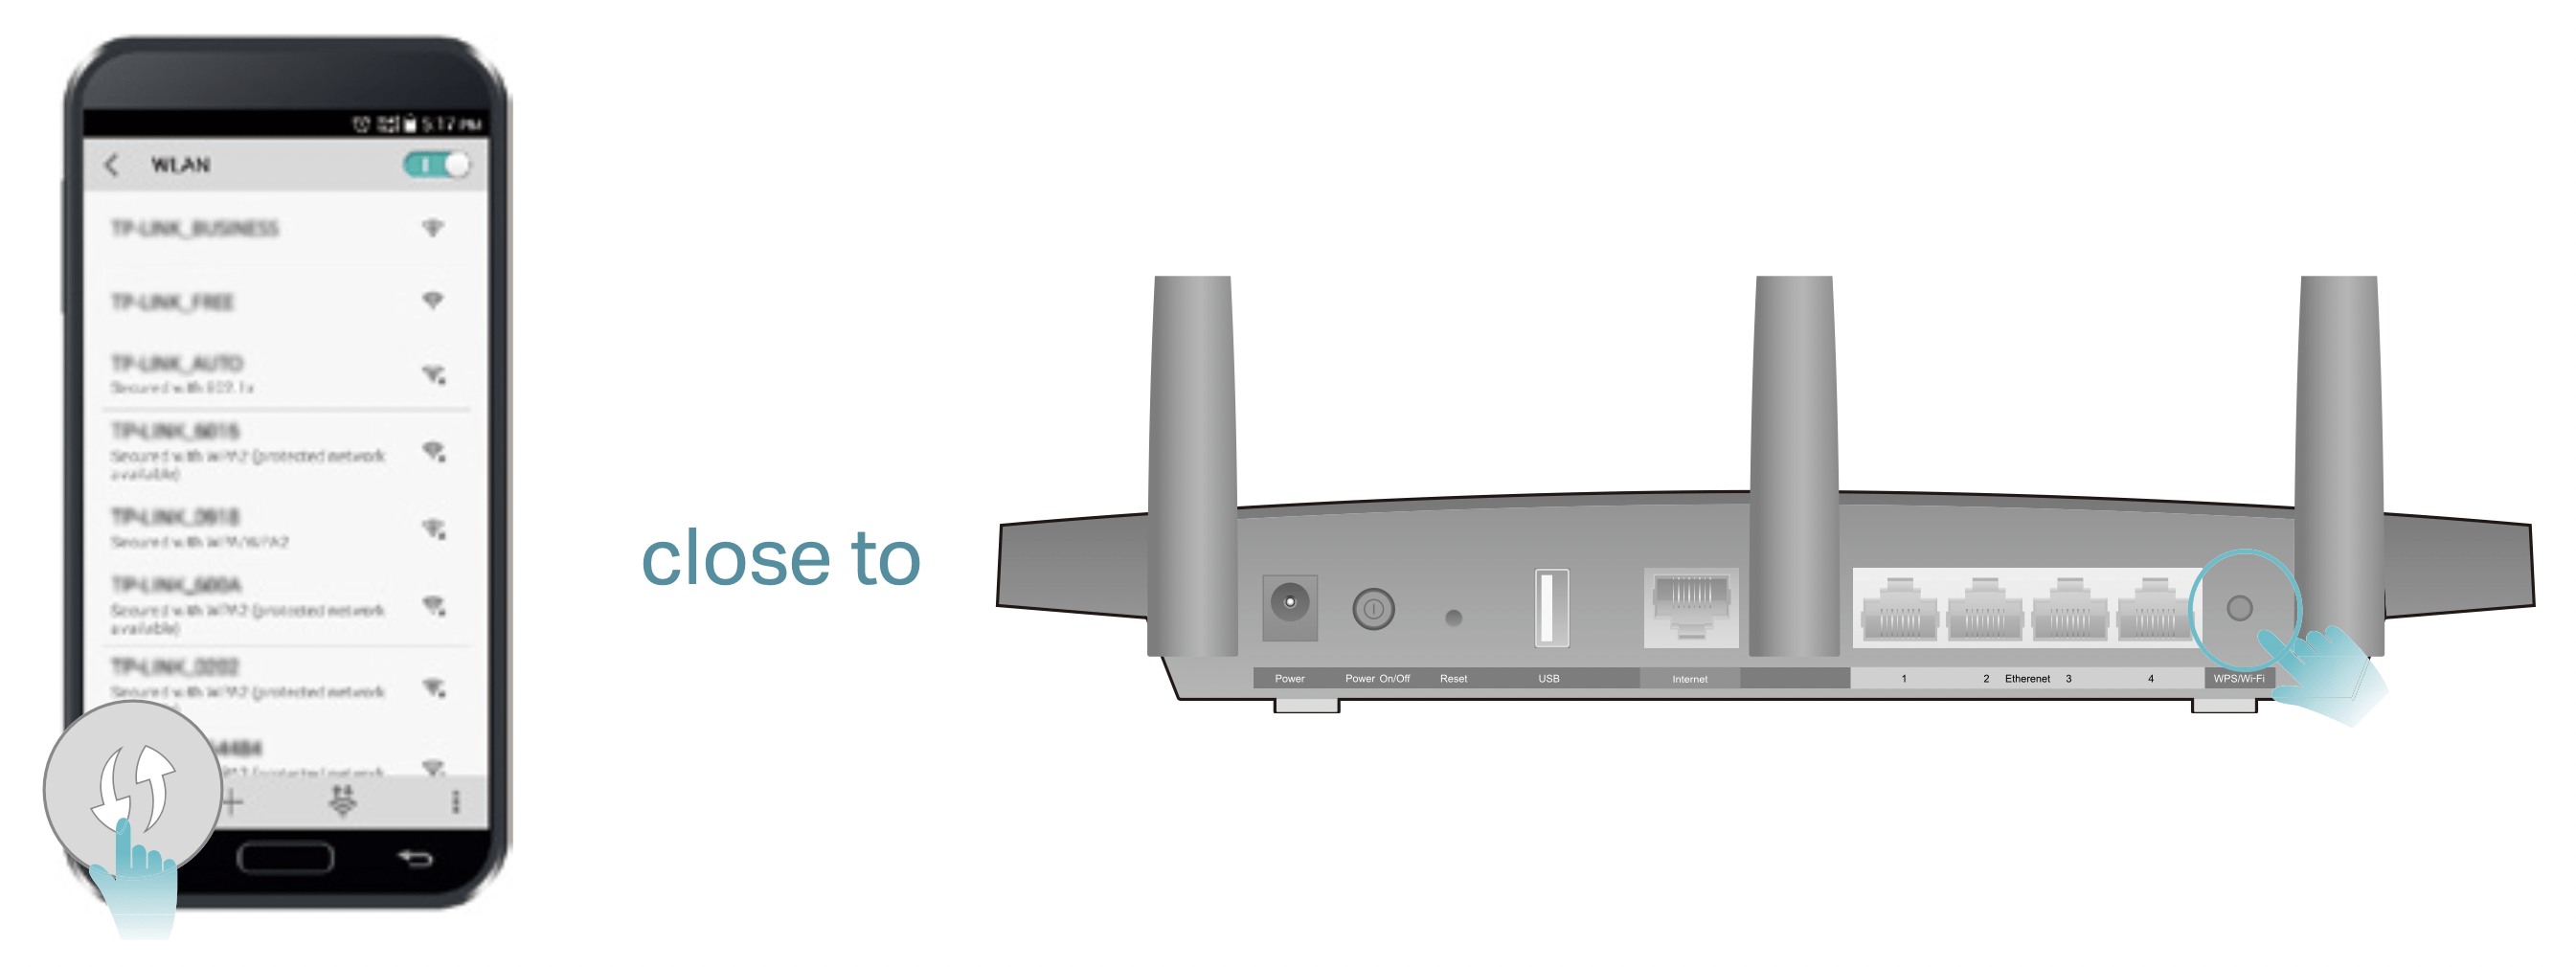
- Method 3: Use the WPS button
Wireless devices that support WPS, including Android phones, tablets, and most USB network cards, can be connected to your router through this method.
Note:
- WPS is not supported by iOS devices.
- The WPS function cannot be configured if the wireless function of the router is disabled. Also, the WPS function will be disabled if your wireless encryption is WEP. Please make sure the wireless function is enabled and is configured with the appropriate encryption before configuring the WPS.
- Tab the WPS icon on the device’s screen. Here we take an Android phone for instance.
- Within two minutes, press the Reset/WPS button on your router.
Set Up Internet Connection
Use Quick Setup Wizard
The Quick Setup Wizard will guide you to set up your router.
Tips: If you need the IPv6 internet connection, please refer to the section of Set Up an IPv6 Internet Connection.
Follow the steps below to set up your router.
- Log in with the password you set for the router.
- Click Quick Setup on the top of the page. Then follow the step-by-step instructions to connect your router to the internet.
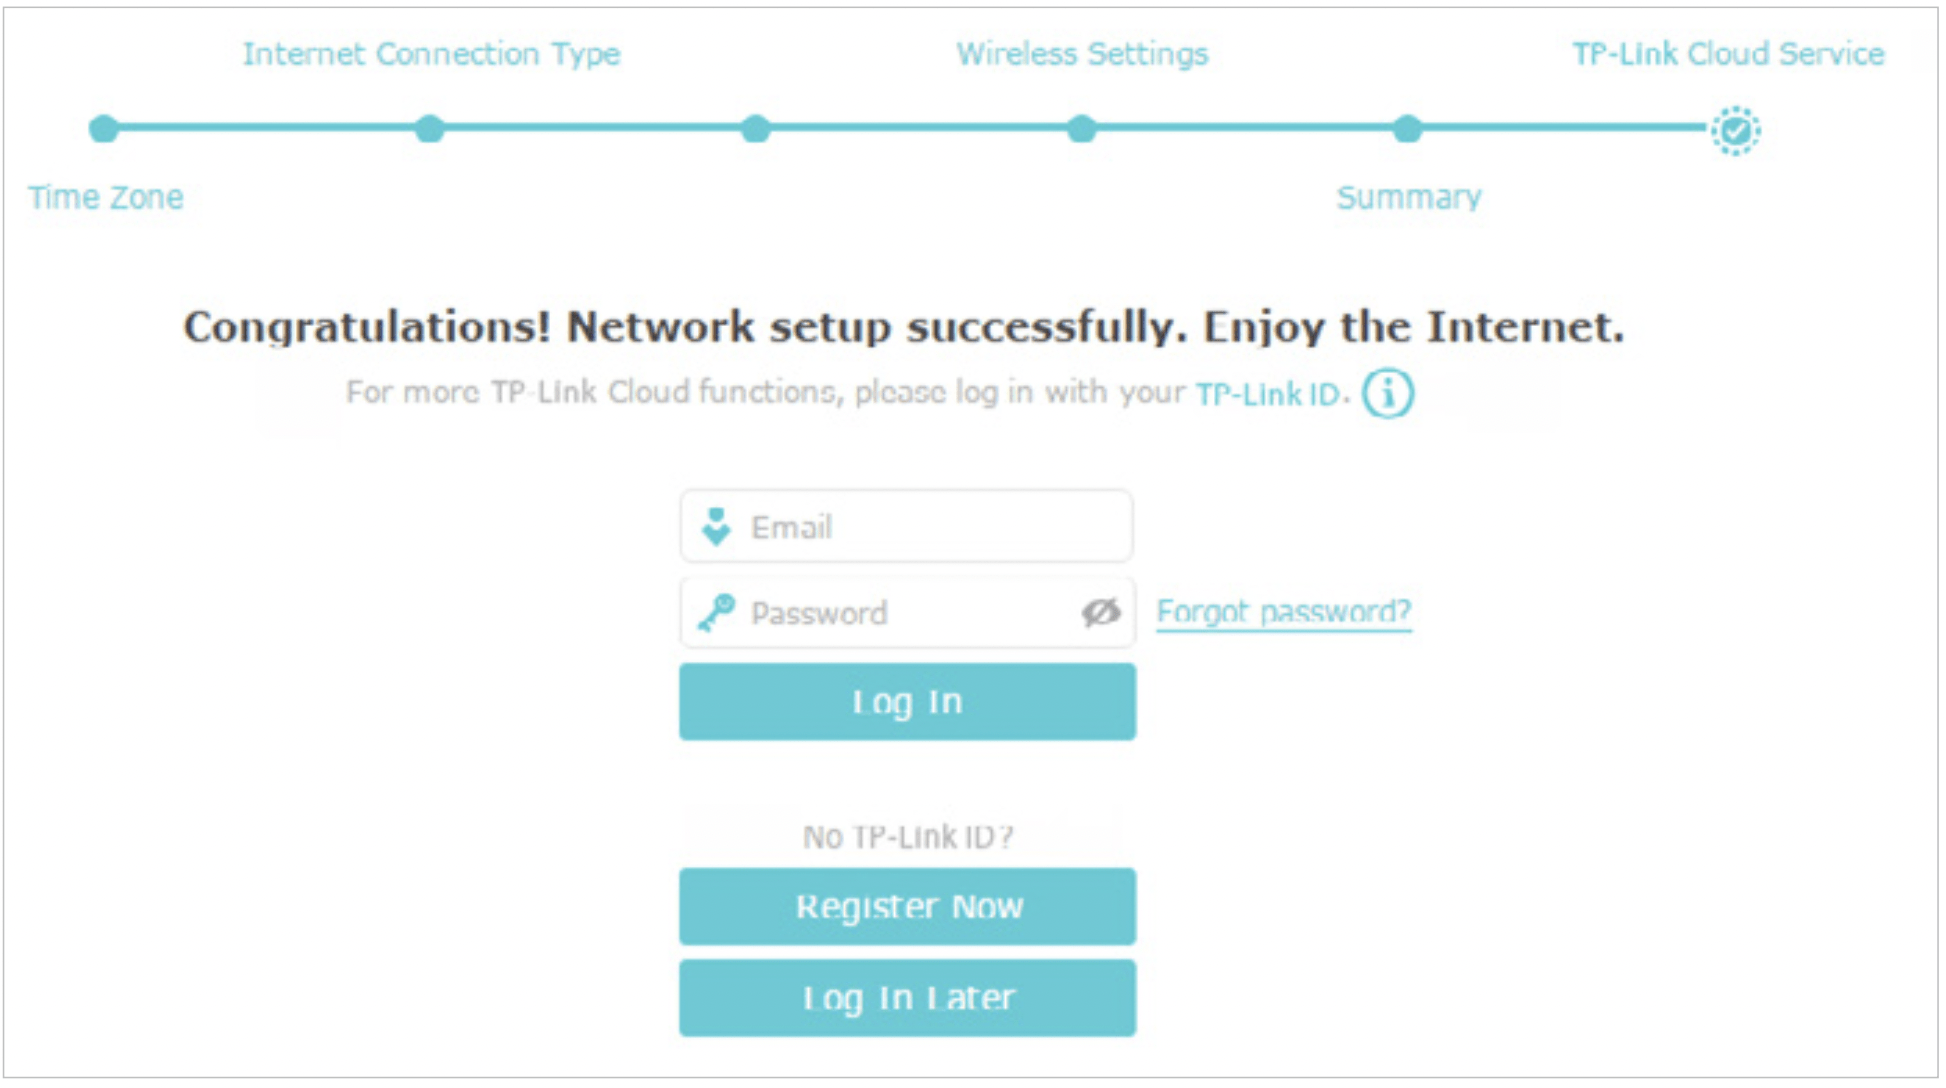
- To enjoy a more complete service from TP-Link (remote management, TP-Link DDNS, etc.), log in with your TP-Link ID or click Resigter Now to get one. Then follow the instructions to bind the cloud router to your TP-Link ID.
Note:
- To learn more about the TP-Link Cloud service, please refer to the TP-Link Cloud Service section.
- If you do not want to register a TP-Link ID now, you may click Log In Later to proceed.
- If you have changed the preset wireless network name (SSID) and wireless password during the Quick Setup process, all your wireless devices must use the new SSID and password to connect to the router.
Manually Set up Your Internet Connection
In this part, you can check your current internet connection settings. You can also modify the settings according to the service information provided by your ISP.
Follow the steps below to check or modify your internet connection settings.
- Log in with your TP-Link ID or the password you set for the router.
- Go to Basic > Internet.
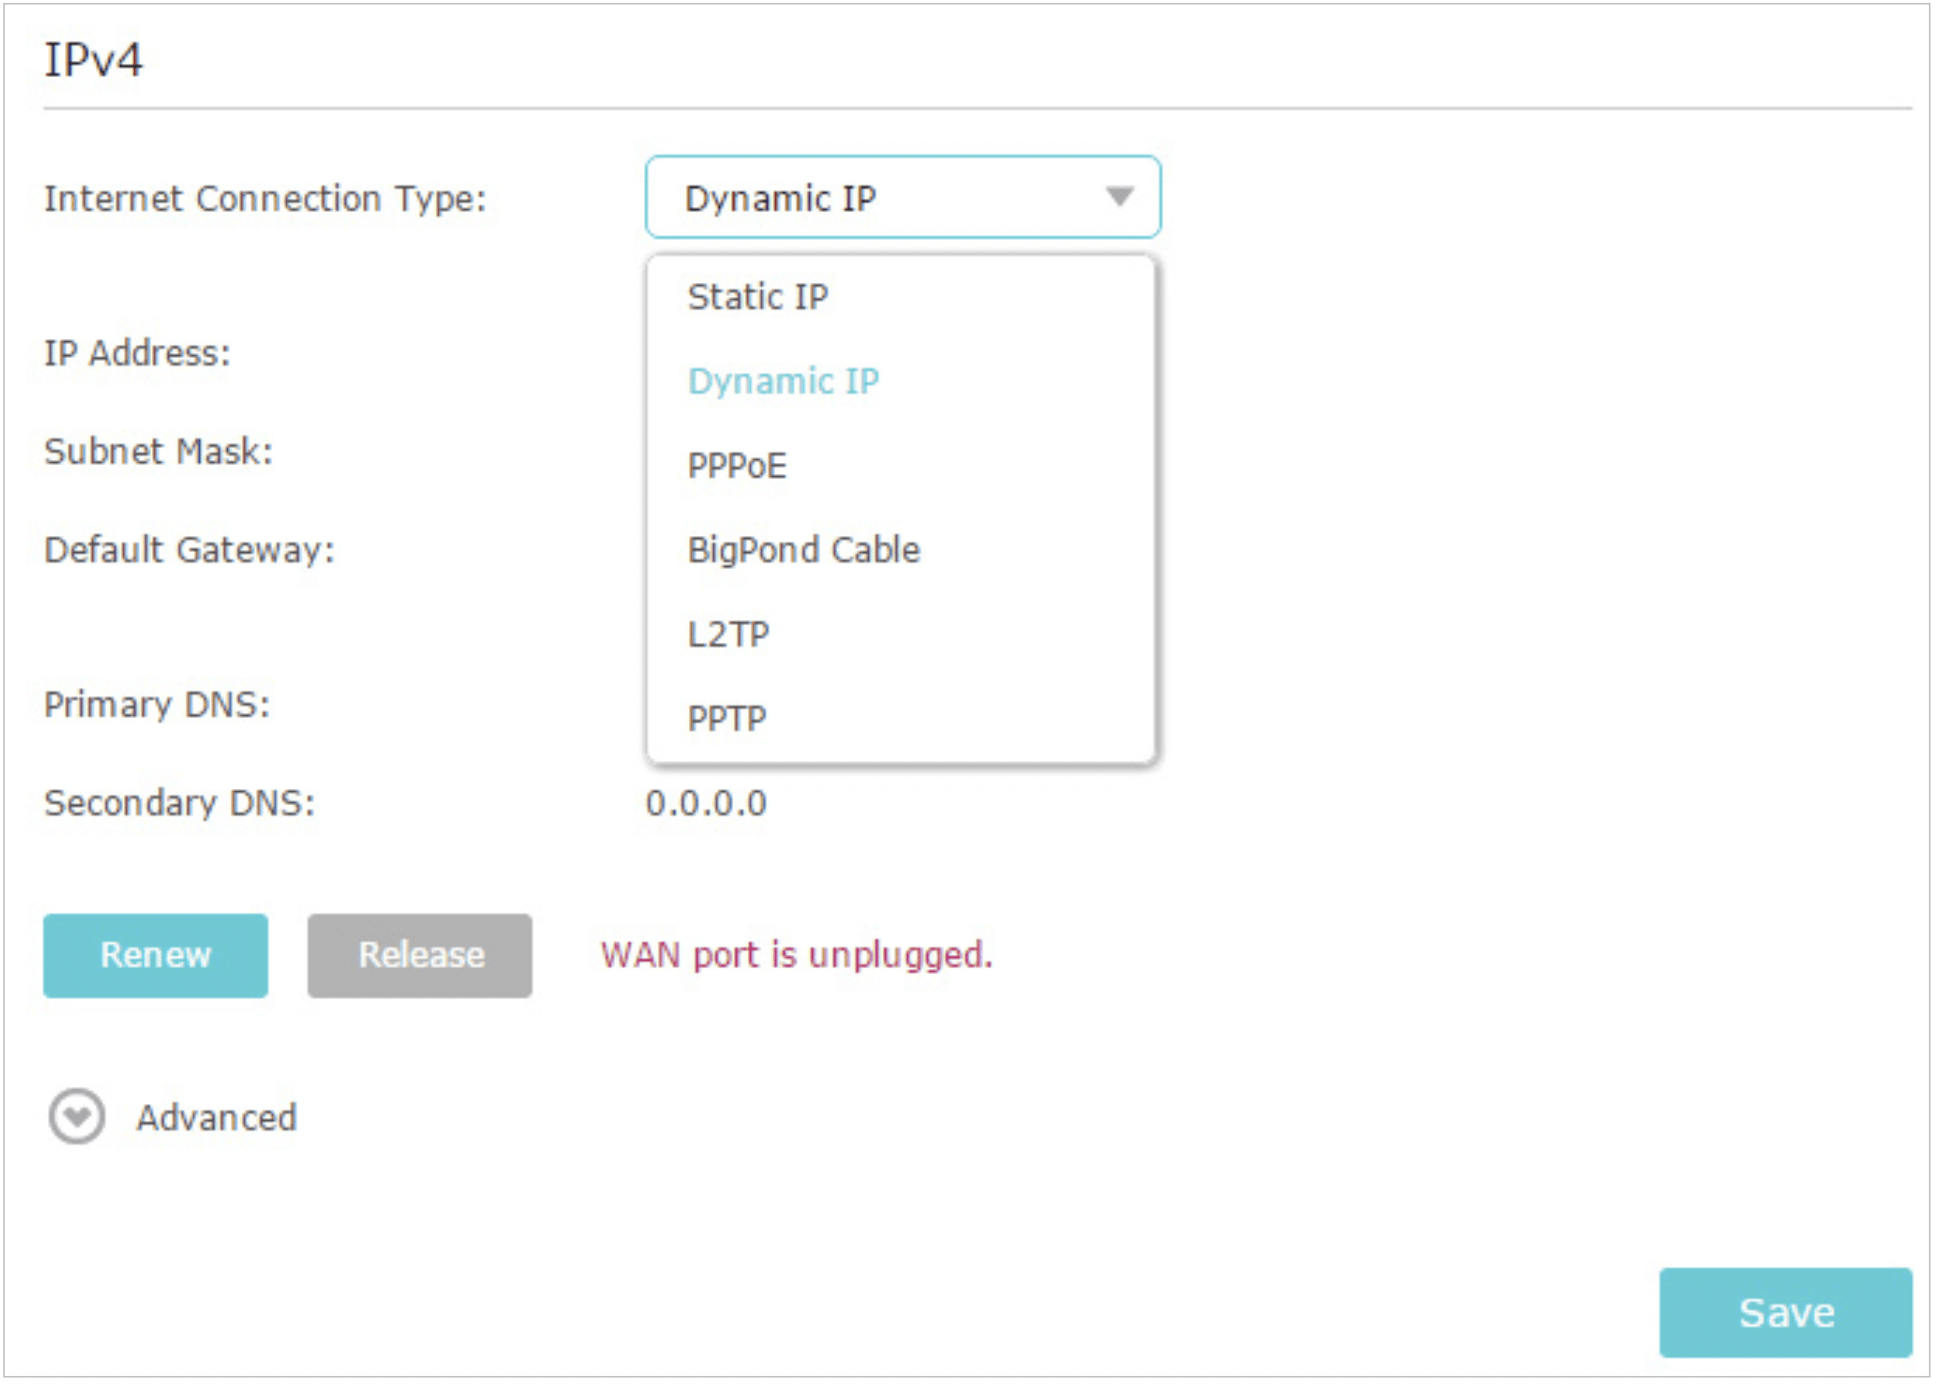
- Select your internet connection type from the drop-down list.
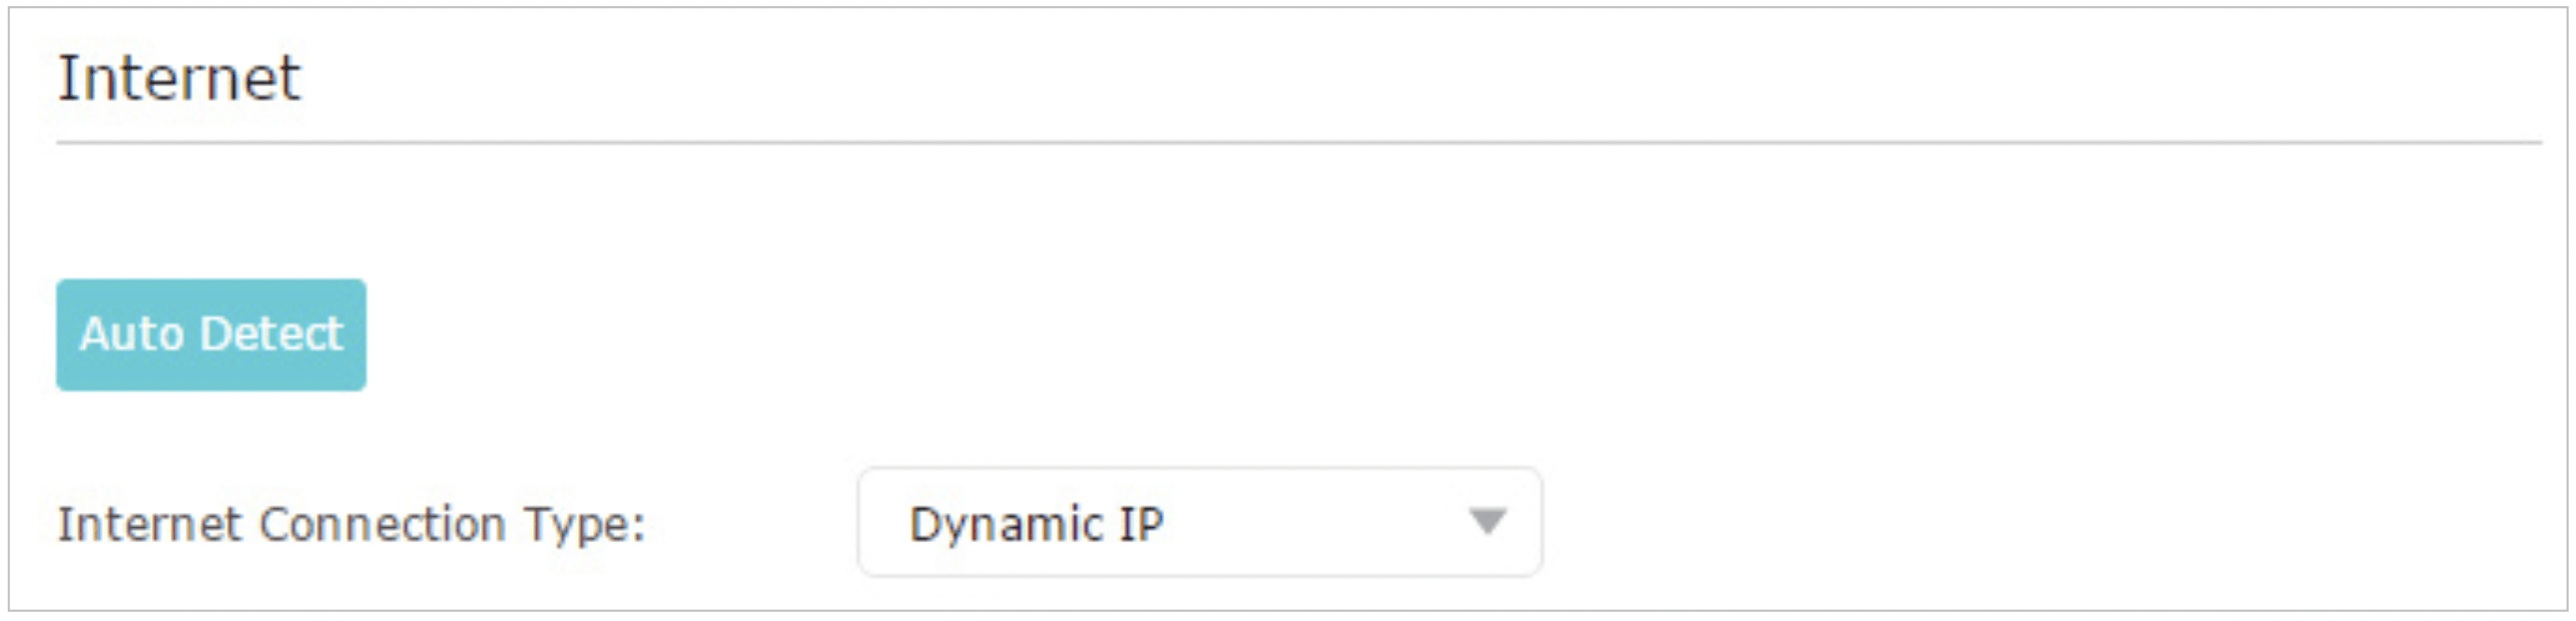
Note: If you are unsure of what your connection type is, click Auto Detect. Since different connection types require different cables and connection information, you can also refer to the demonstrations in Step 4 to determine your connection type.
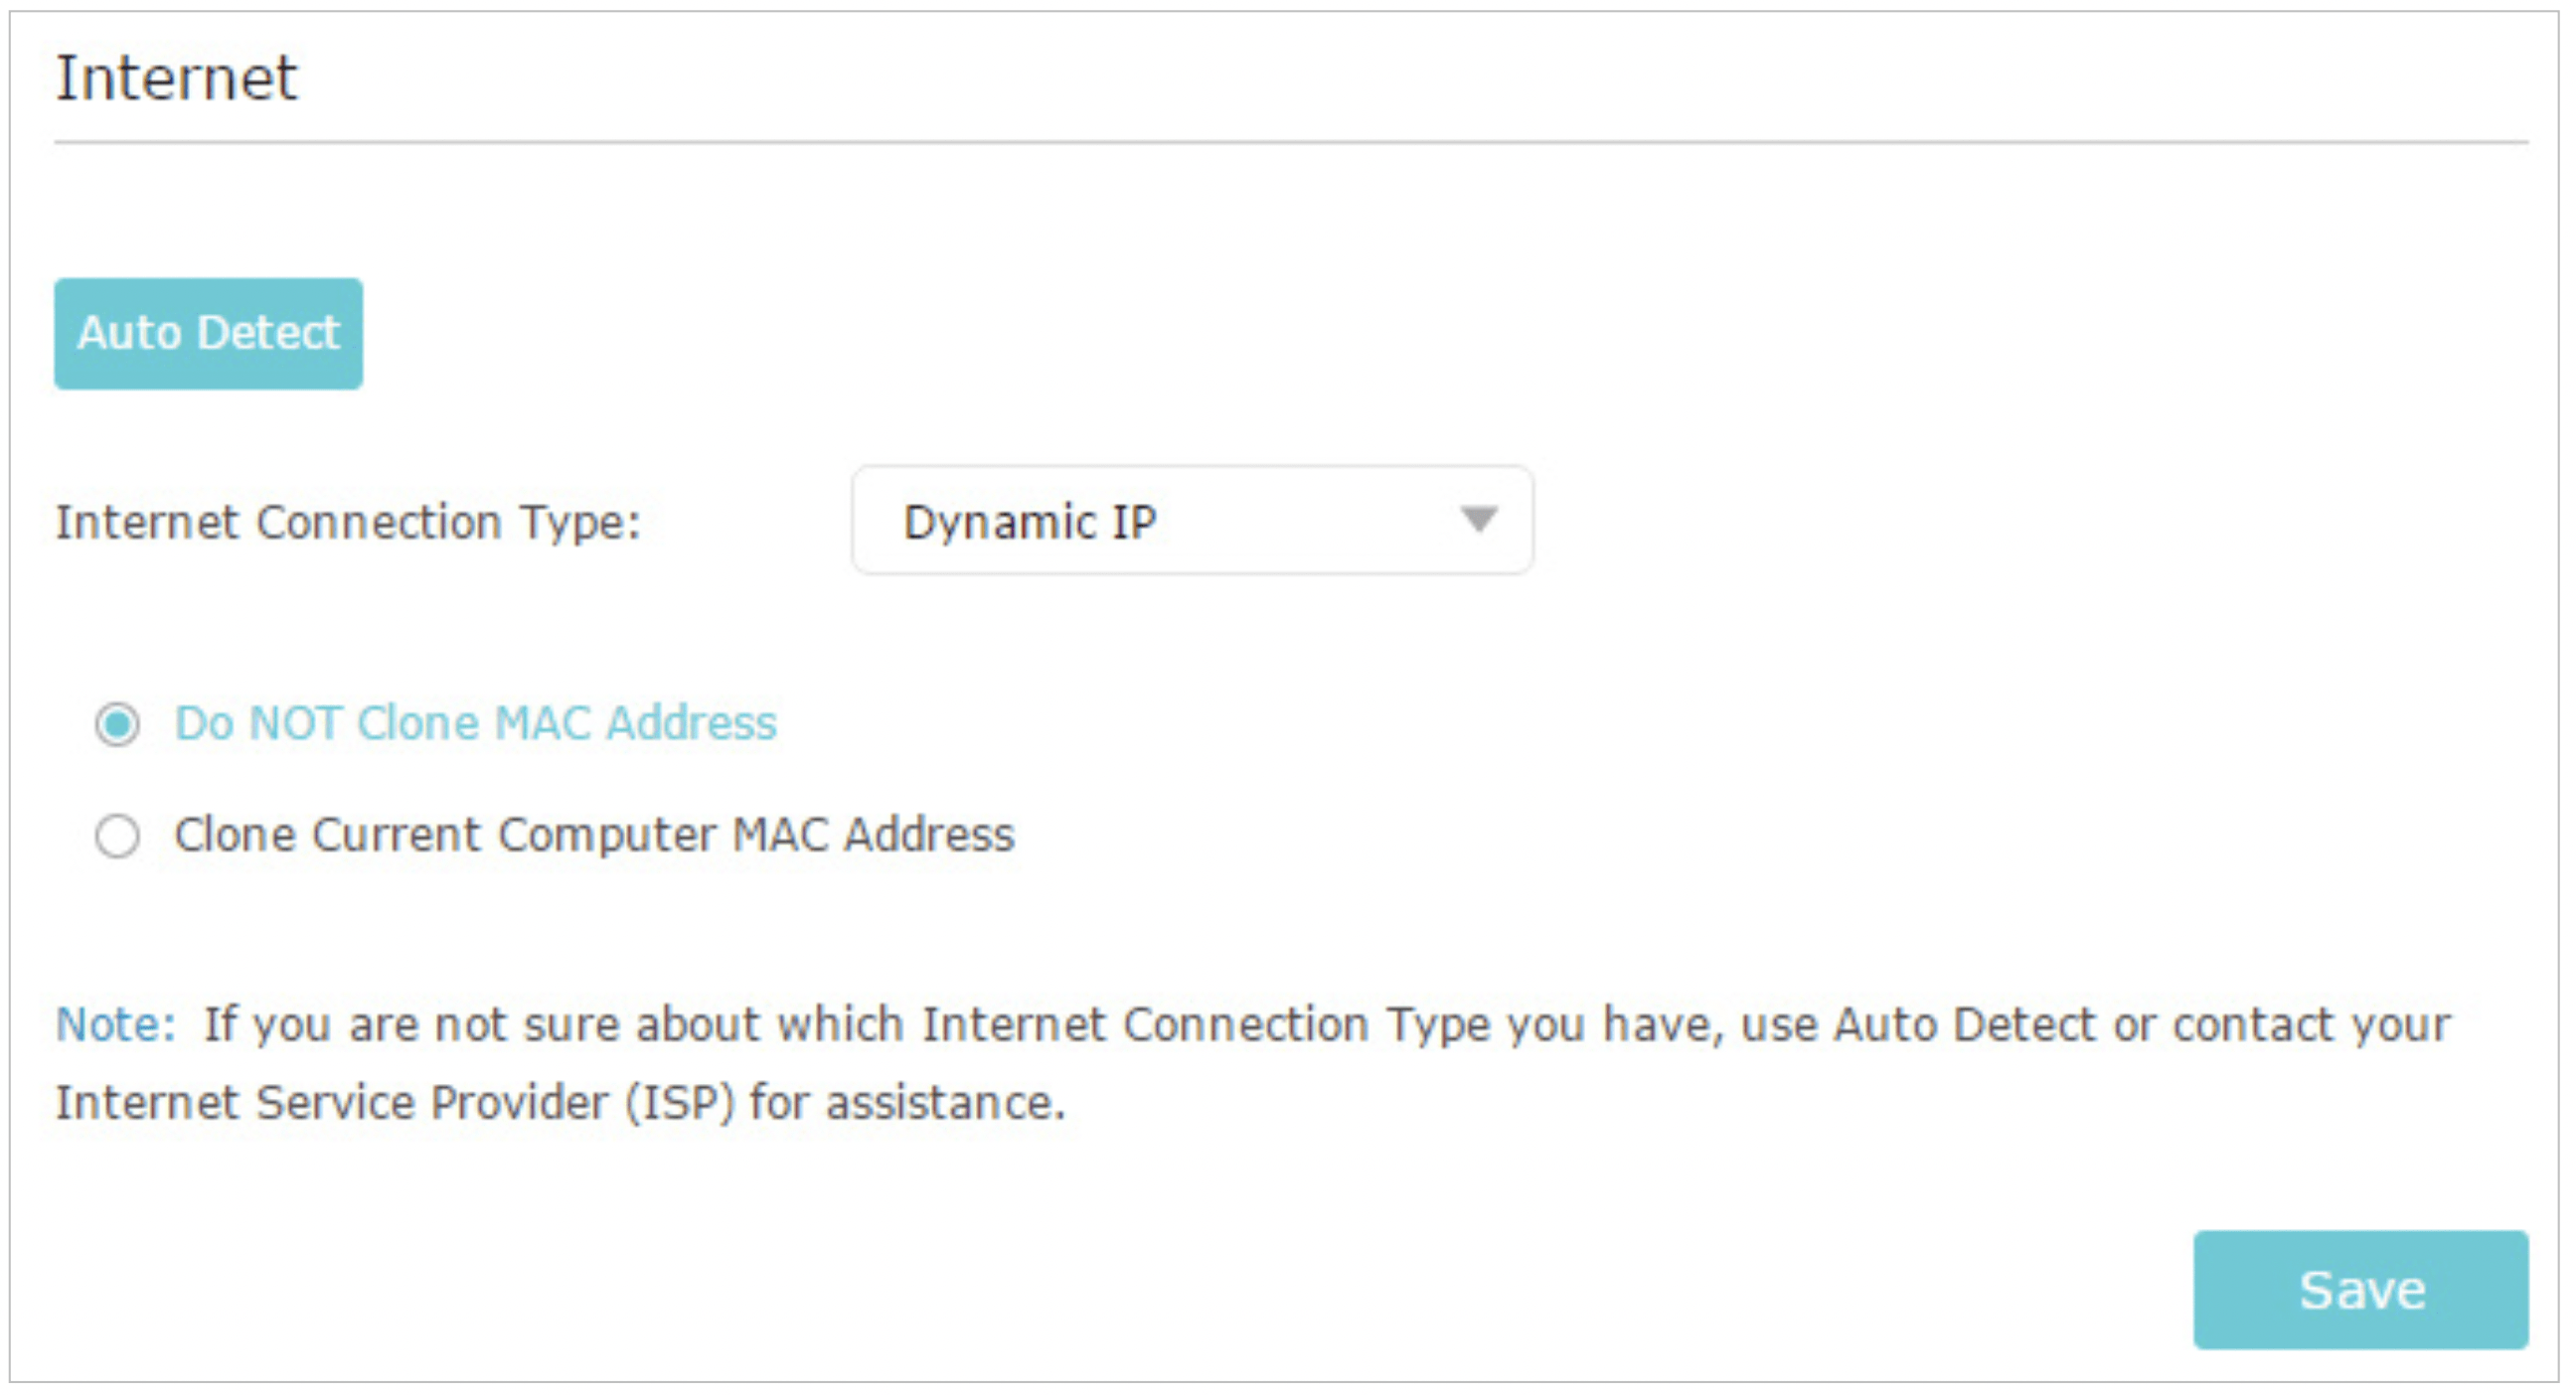
- Follow the instructions on the page to continue the configuration. Parameters on the figures are just used for demonstration.
If you choose Dynamic IP, you need to select whether to clone the MAC address. Dynamic IP users are usually equipped with a cable TV or fiber cable.
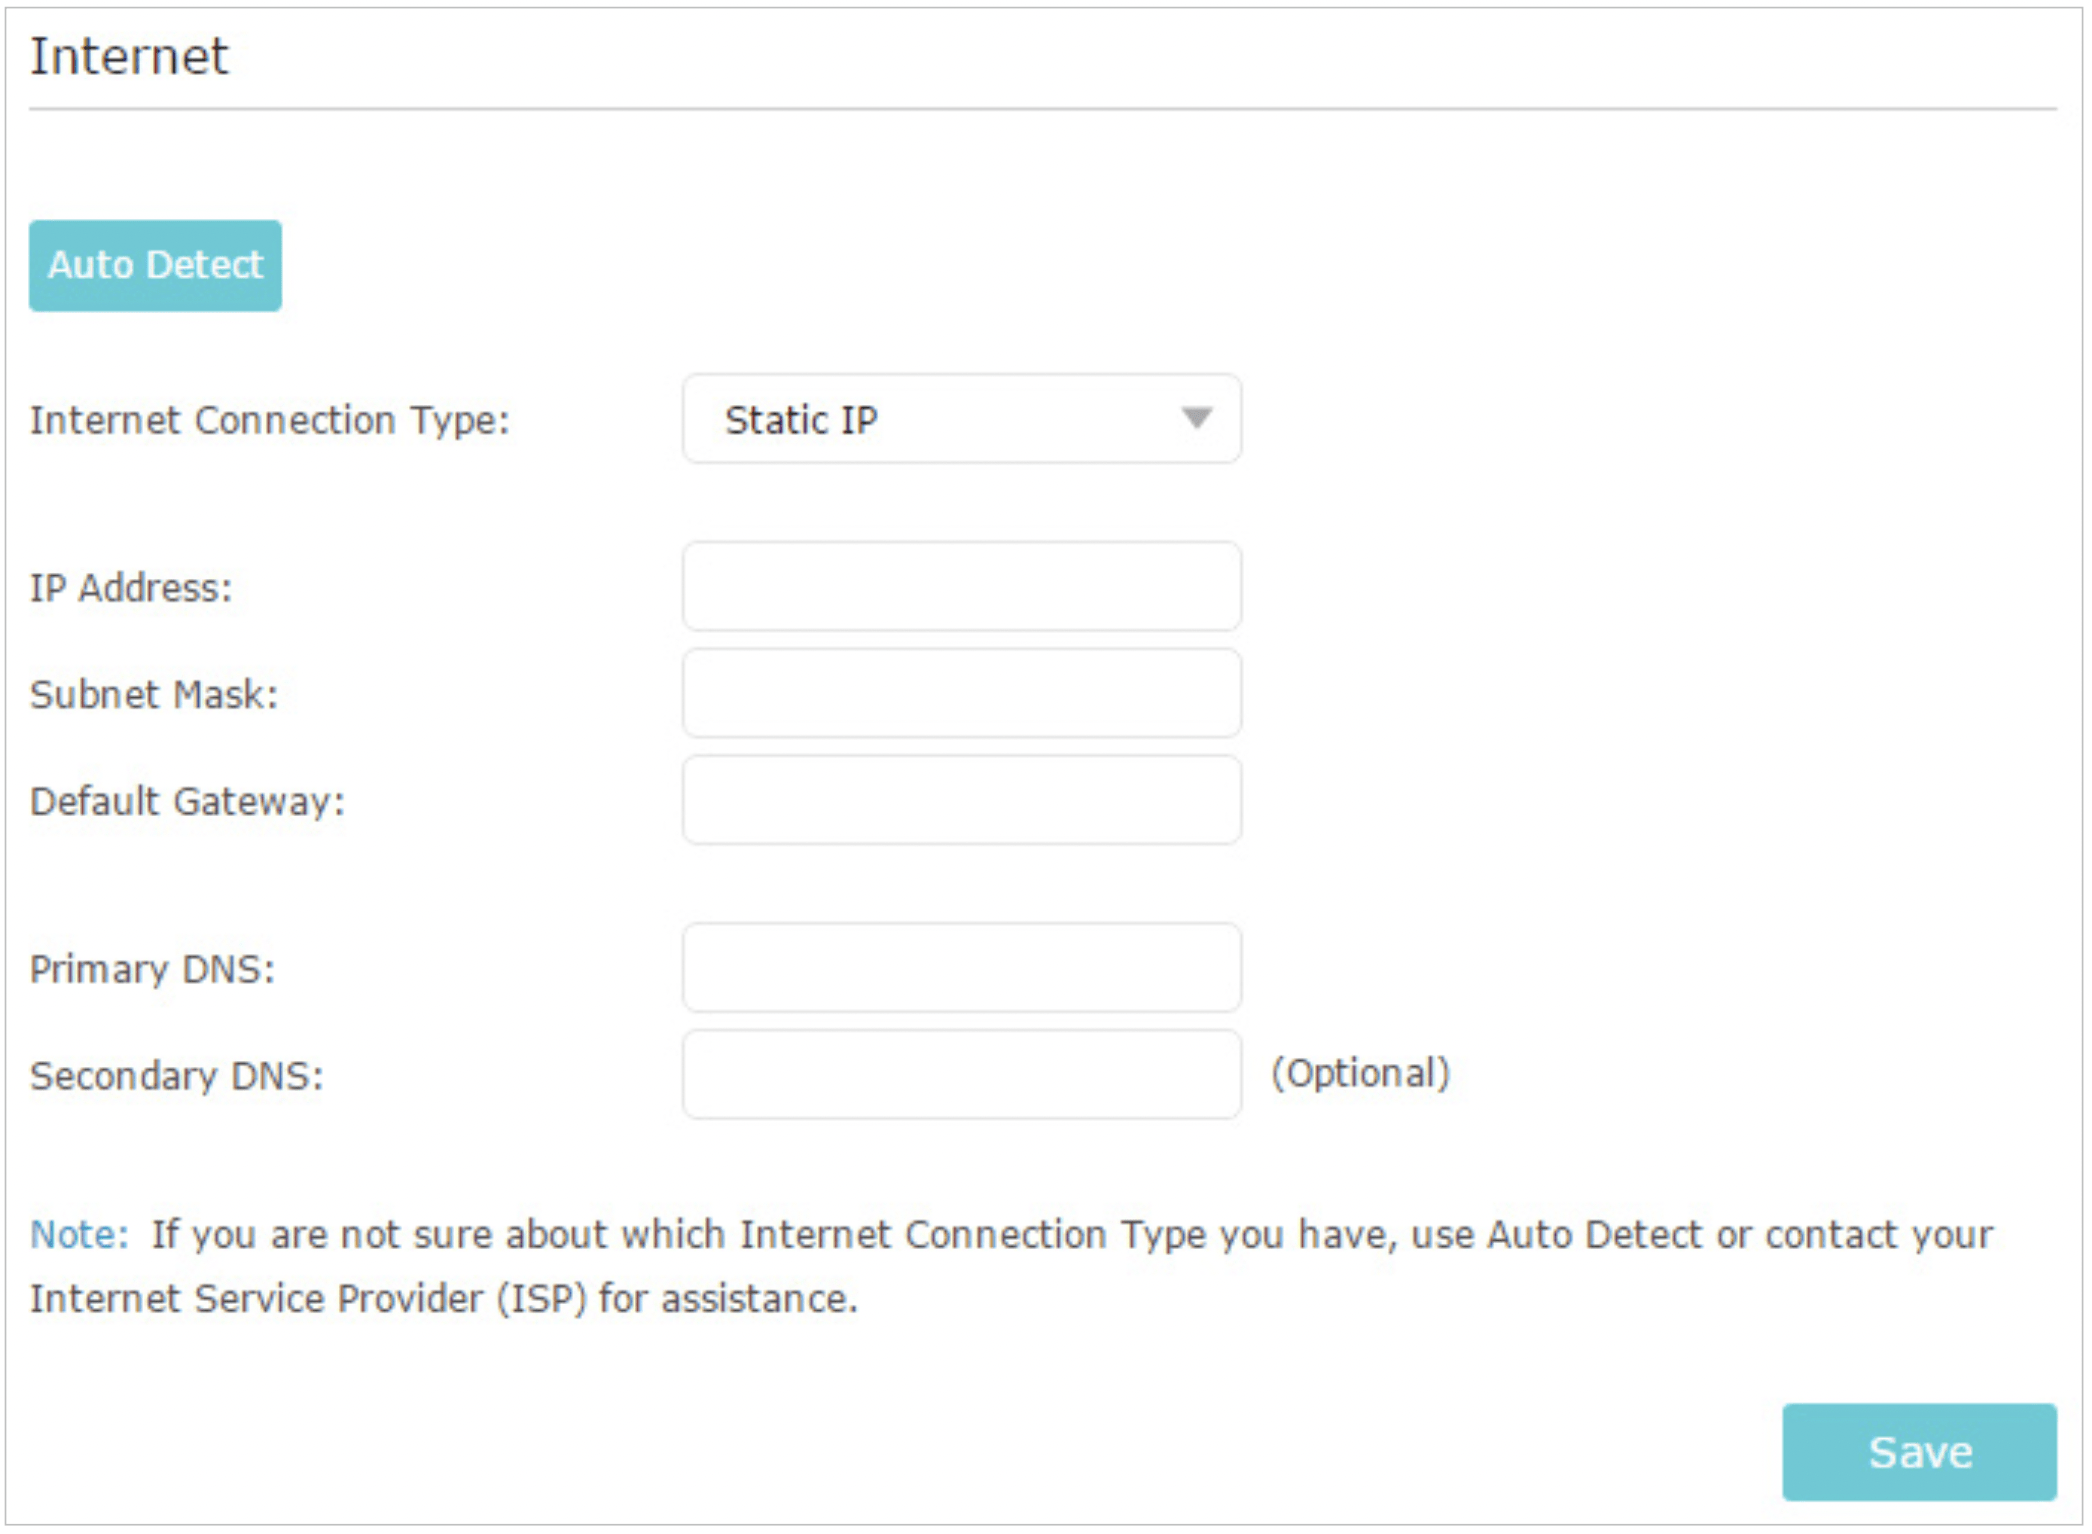
If you choose Static IP, enter the information provided by your ISP in the corresponding fields.
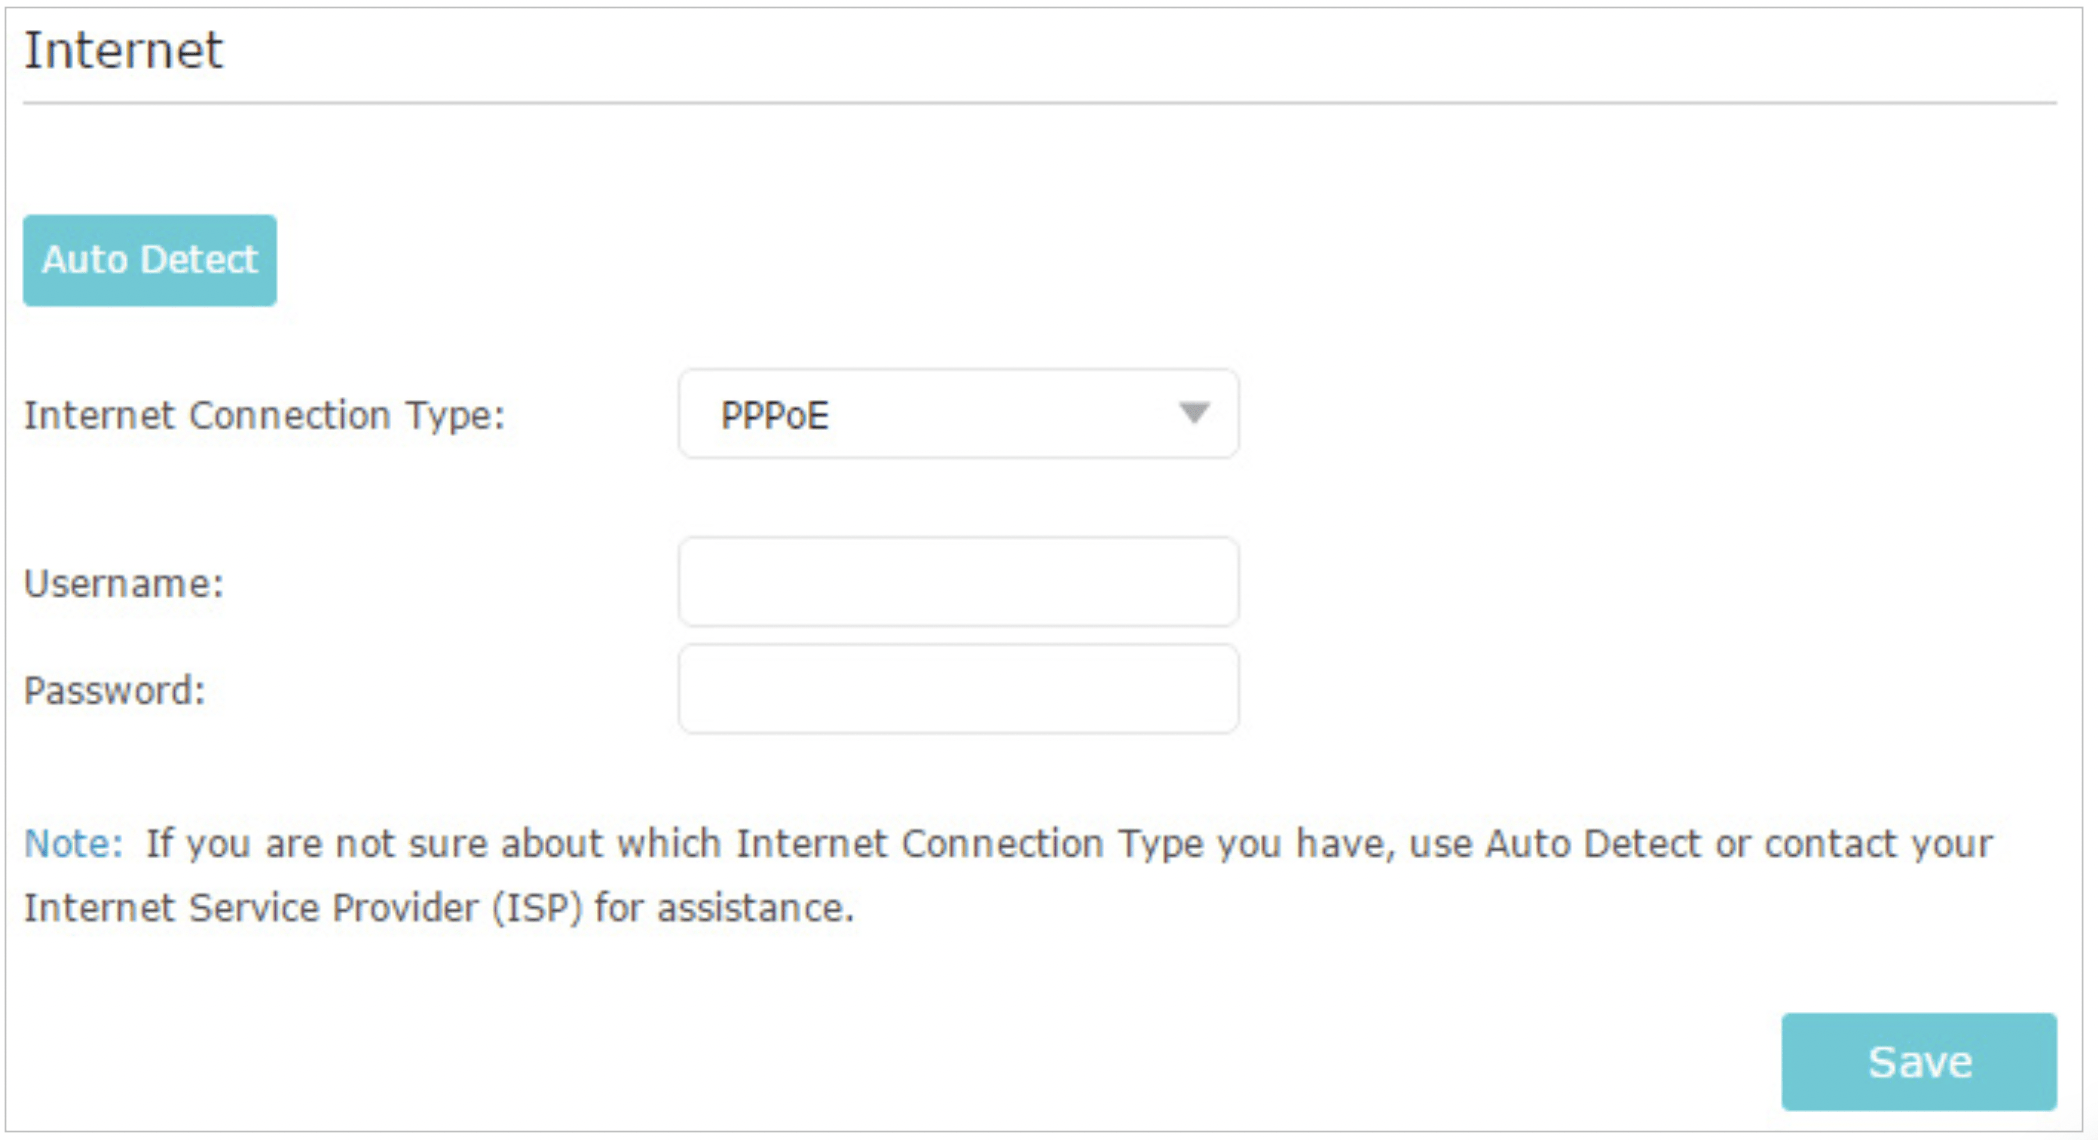
If you choose PPPoE, enter the username and password provided by your ISP. PPPoE users usually have DSL cable modems.
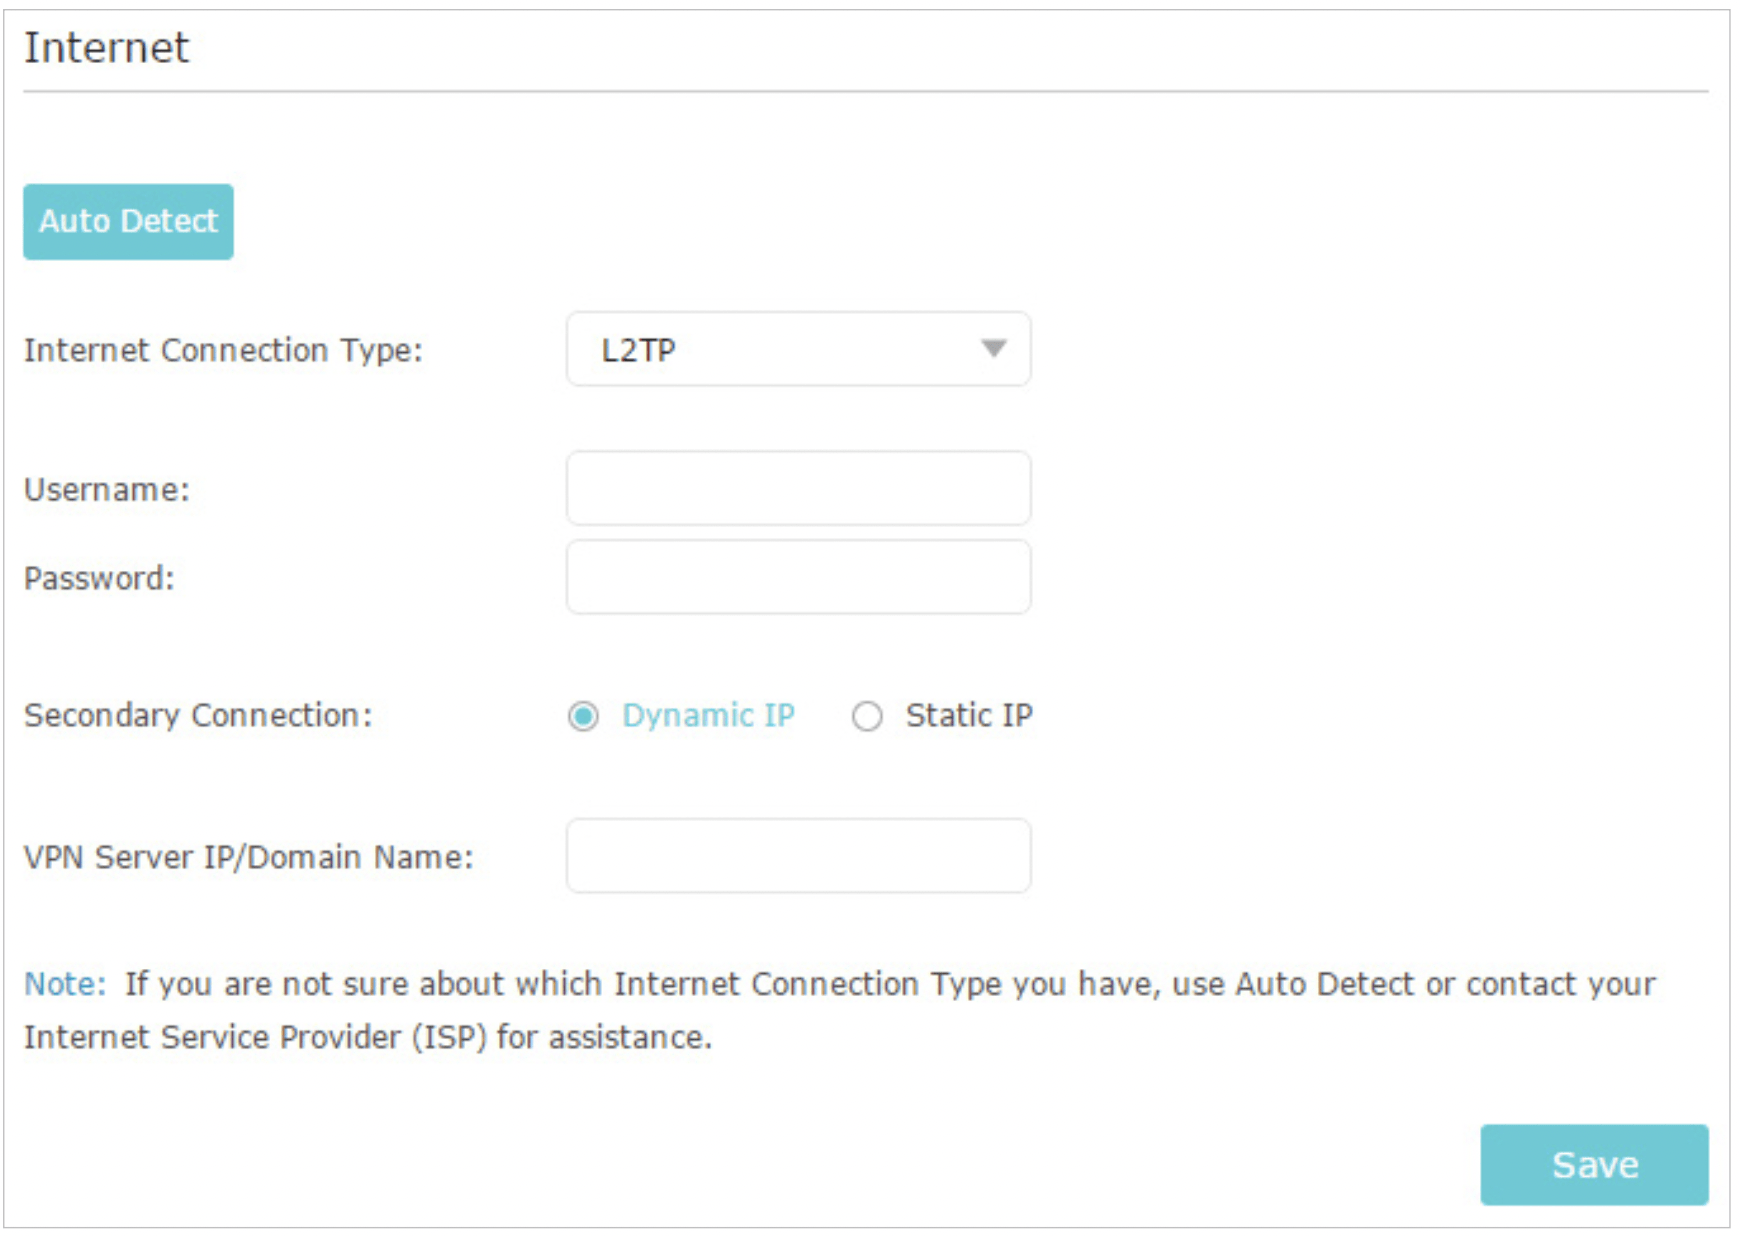
If you choose L2TP, enter the username and password and choose the Secondary Connection provided by your ISP. Different parameters are needed according to the Secondary Connection you have chosen.
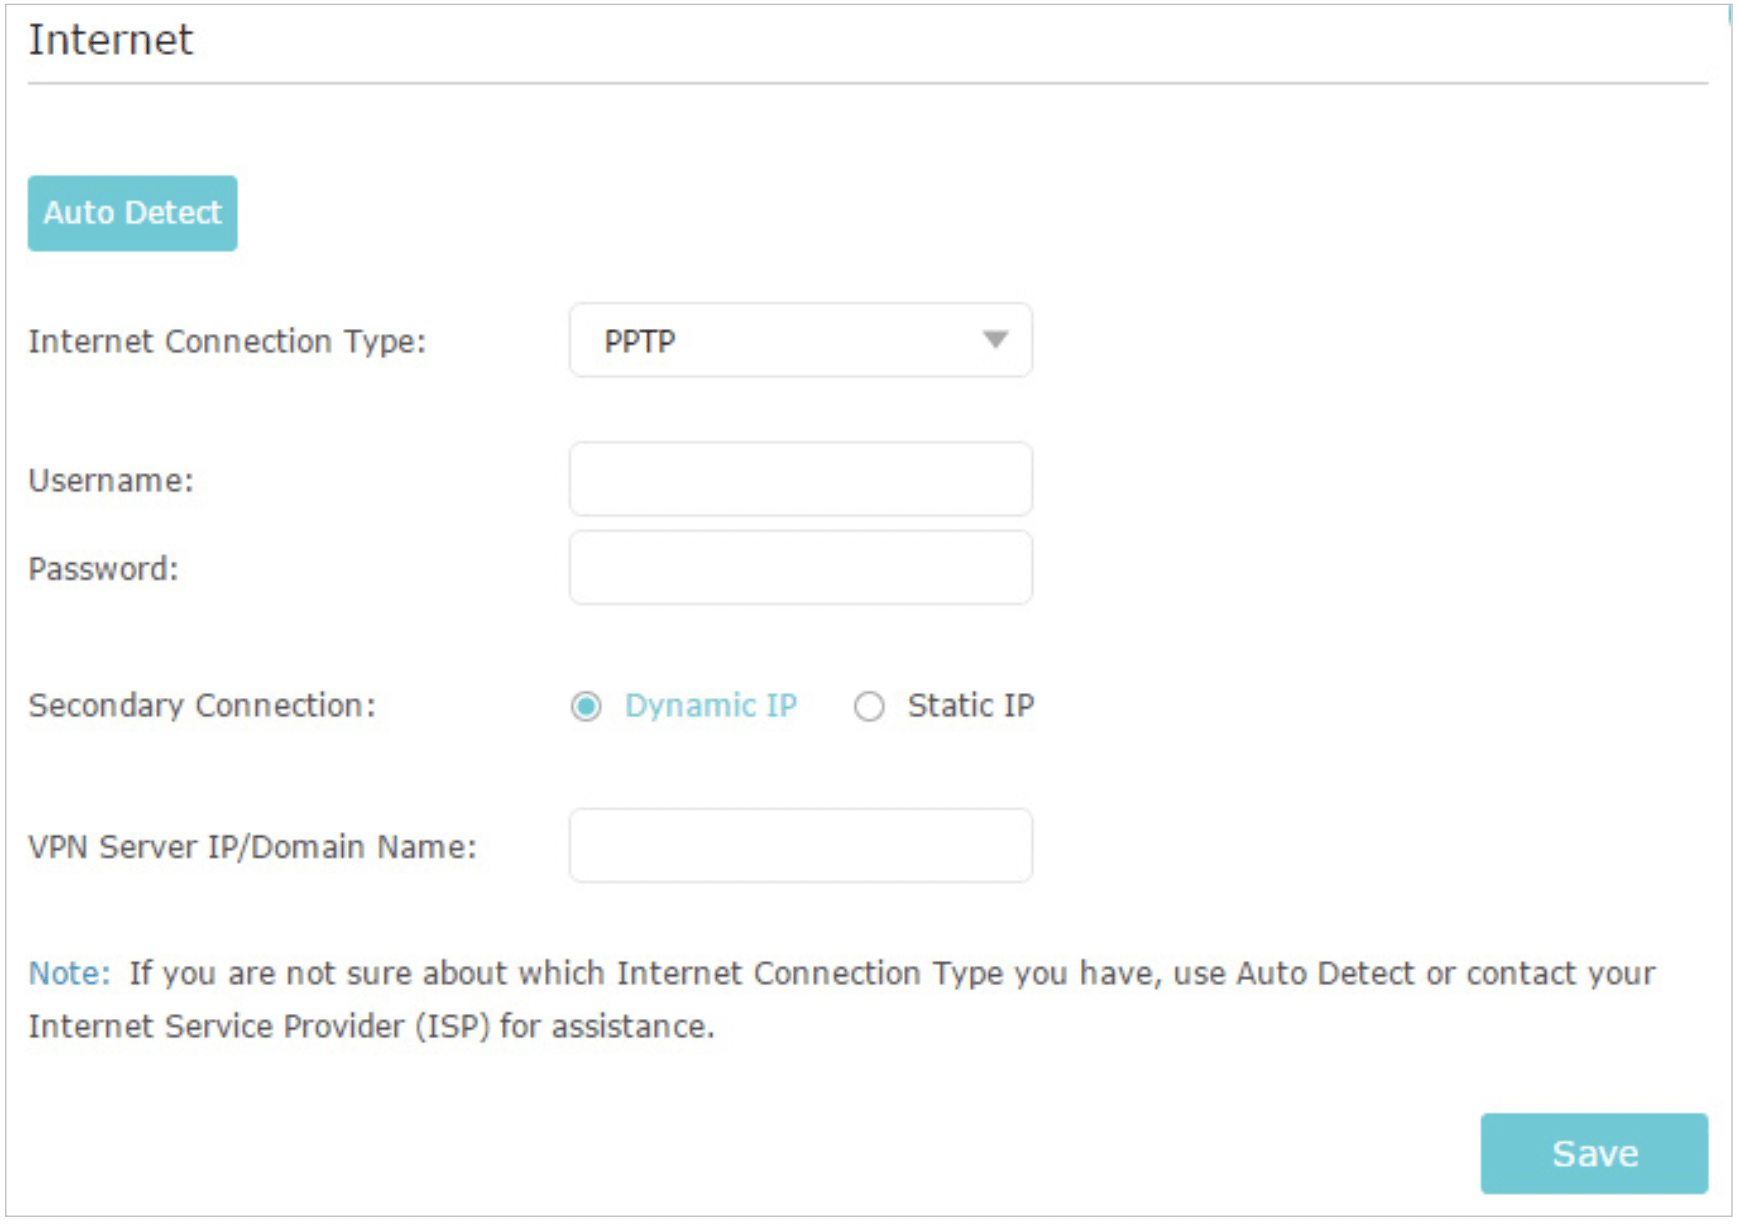
If you choose PPTP, enter the username and password, and choose the Secondary Connection provided by your ISP. Different parameters are needed according to the Secondary Connection you have chosen.
- Click Save.
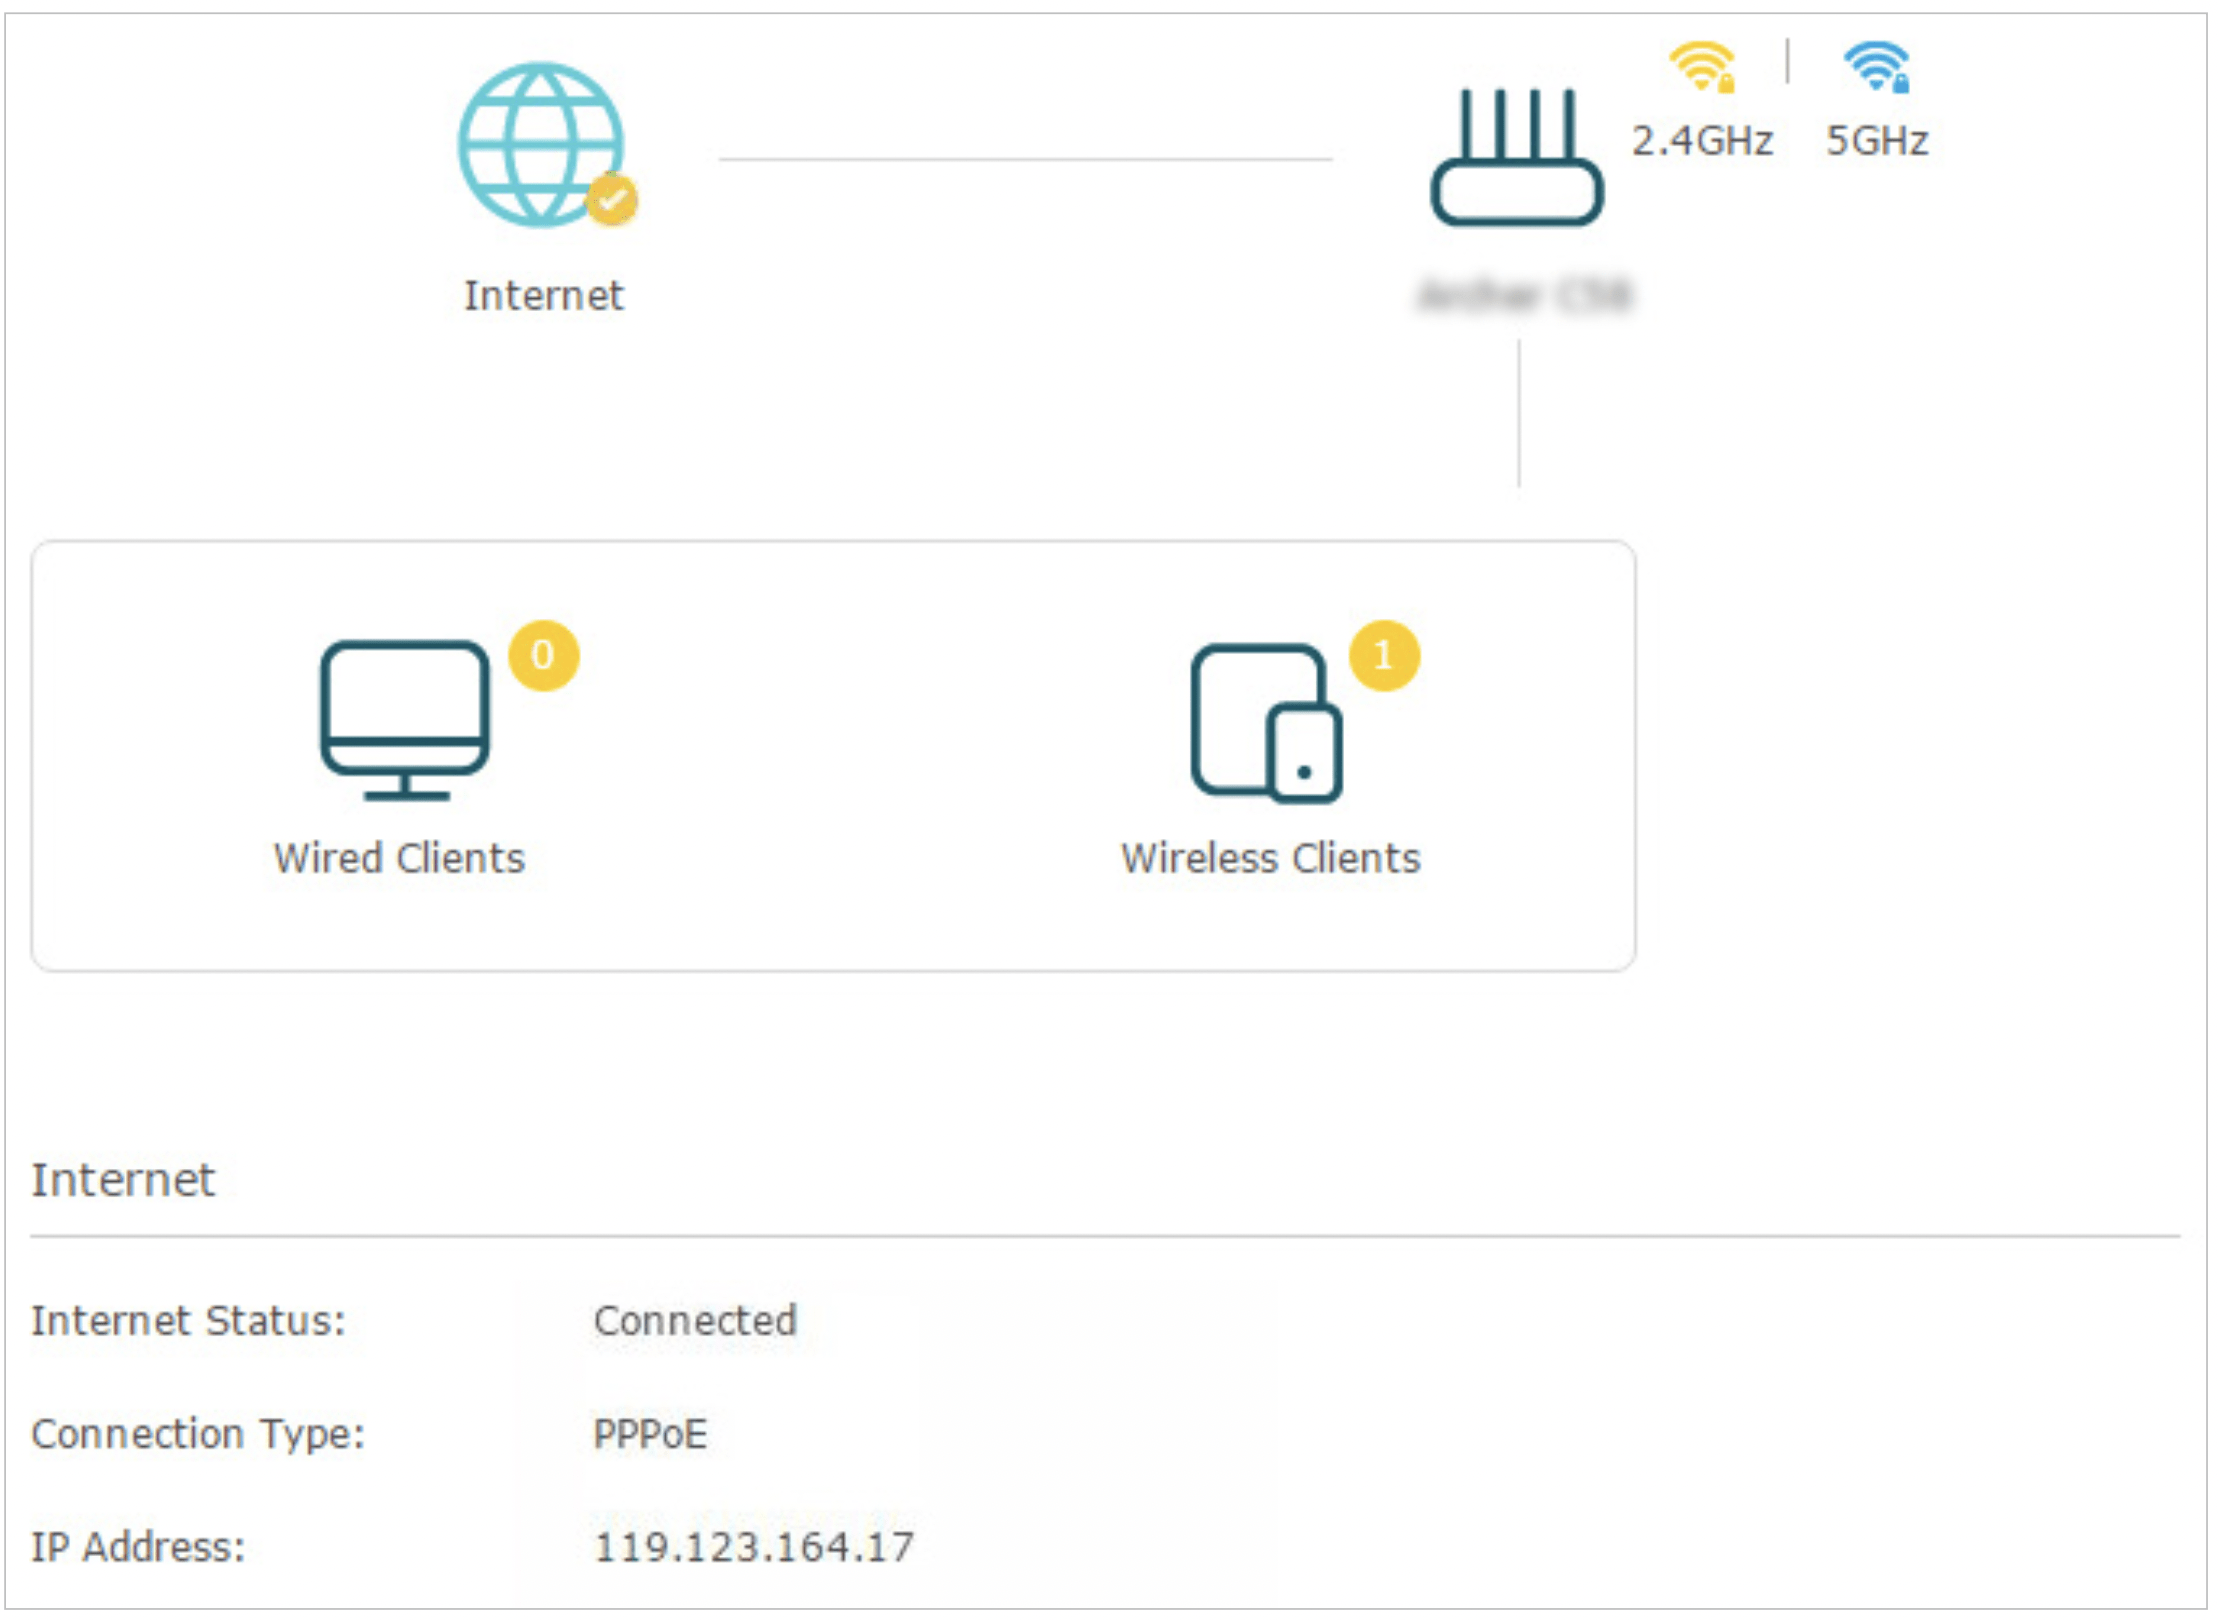
- To check your internet connection, click Network Map on the left of the page. After the connection succeeds, the screen will display as follows. Here we take PPPoE as an example.
Note: It may take 1-2 minutes to make the settings valid.
Tips:
- If your internet connection type is BigPond Cable, please go to Advanced > Network > Internet to set your router.
- If you use Dynamic IP and PPPoE and you are provided with any other parameters that are not required on the page, please go to Advanced > Network > Internet to complete the configuration.
- If you still cannot access the internet, refer to the FAQ section for further instructions.
Set Up an IPv6 Internet Connection
Your ISP provides information about one of the following IPv6 internet connection types: PPPoE, Dynamic IP(SLAAC/DHCPv6), Static IP, 6to4 tunnel, Pass-Through (Bridge).
- Log in with your TP-Link ID or the password you set for the router.
- Go to Advanced > IPv6.
- Enable IPv6 and select the internet connection type provided by your ISP.
Tips: If you do not know what your internet connection type is, contact your ISP or judge according to the already known information provided by your ISP.
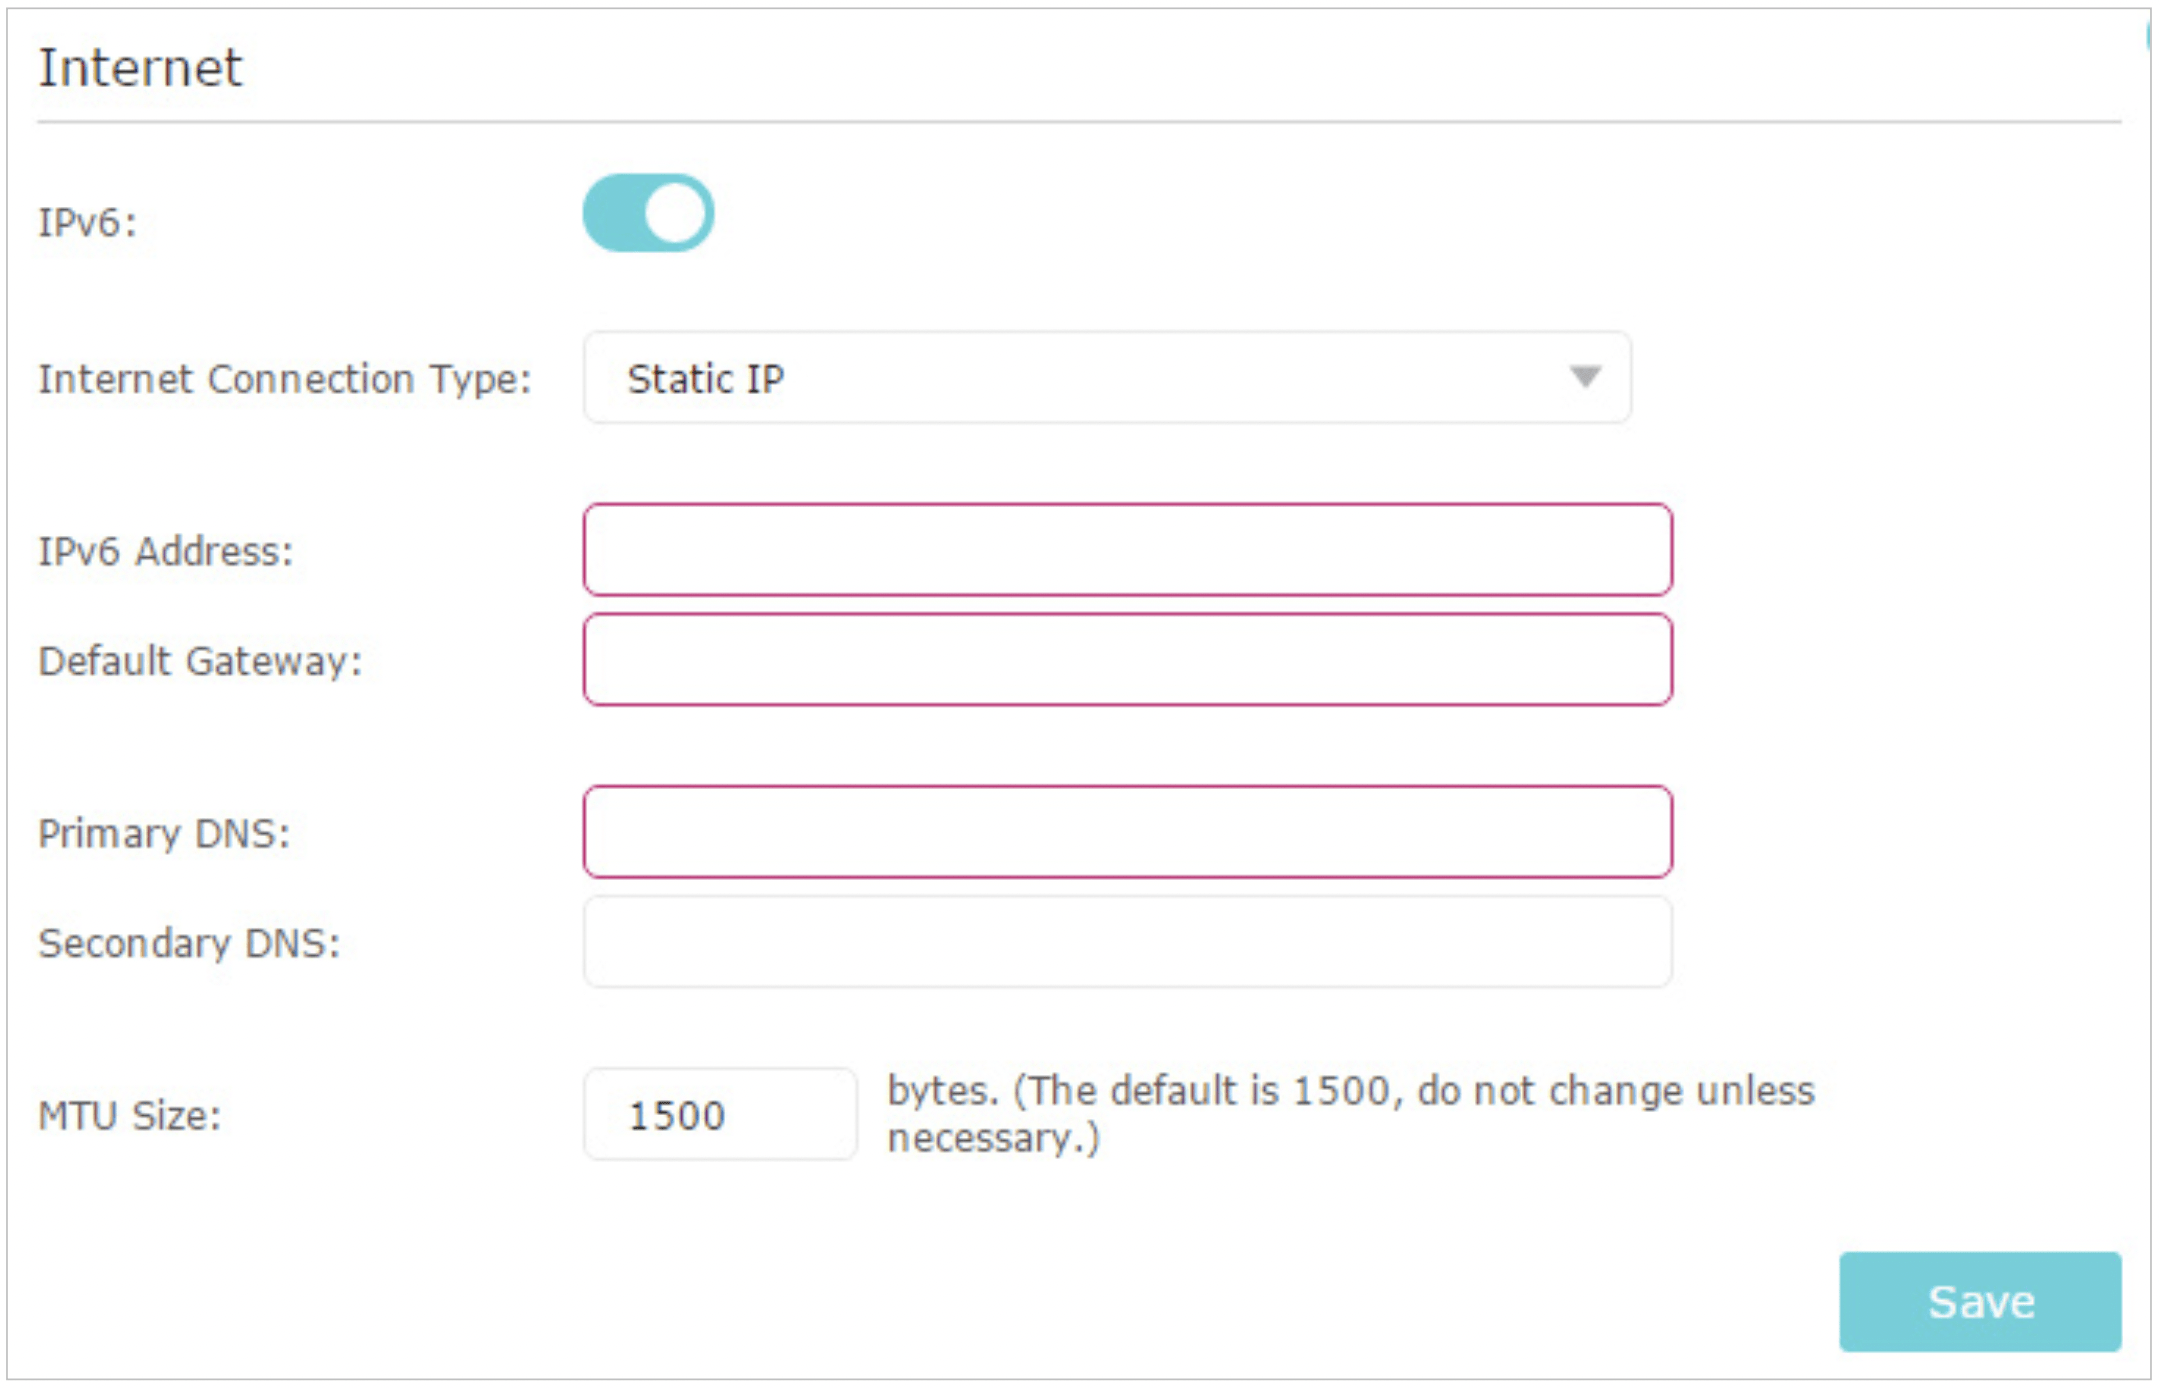
- Fill in information as required by different connection types. Red blanks must be filled in.
Static IP: Fill in blanks and click Save.
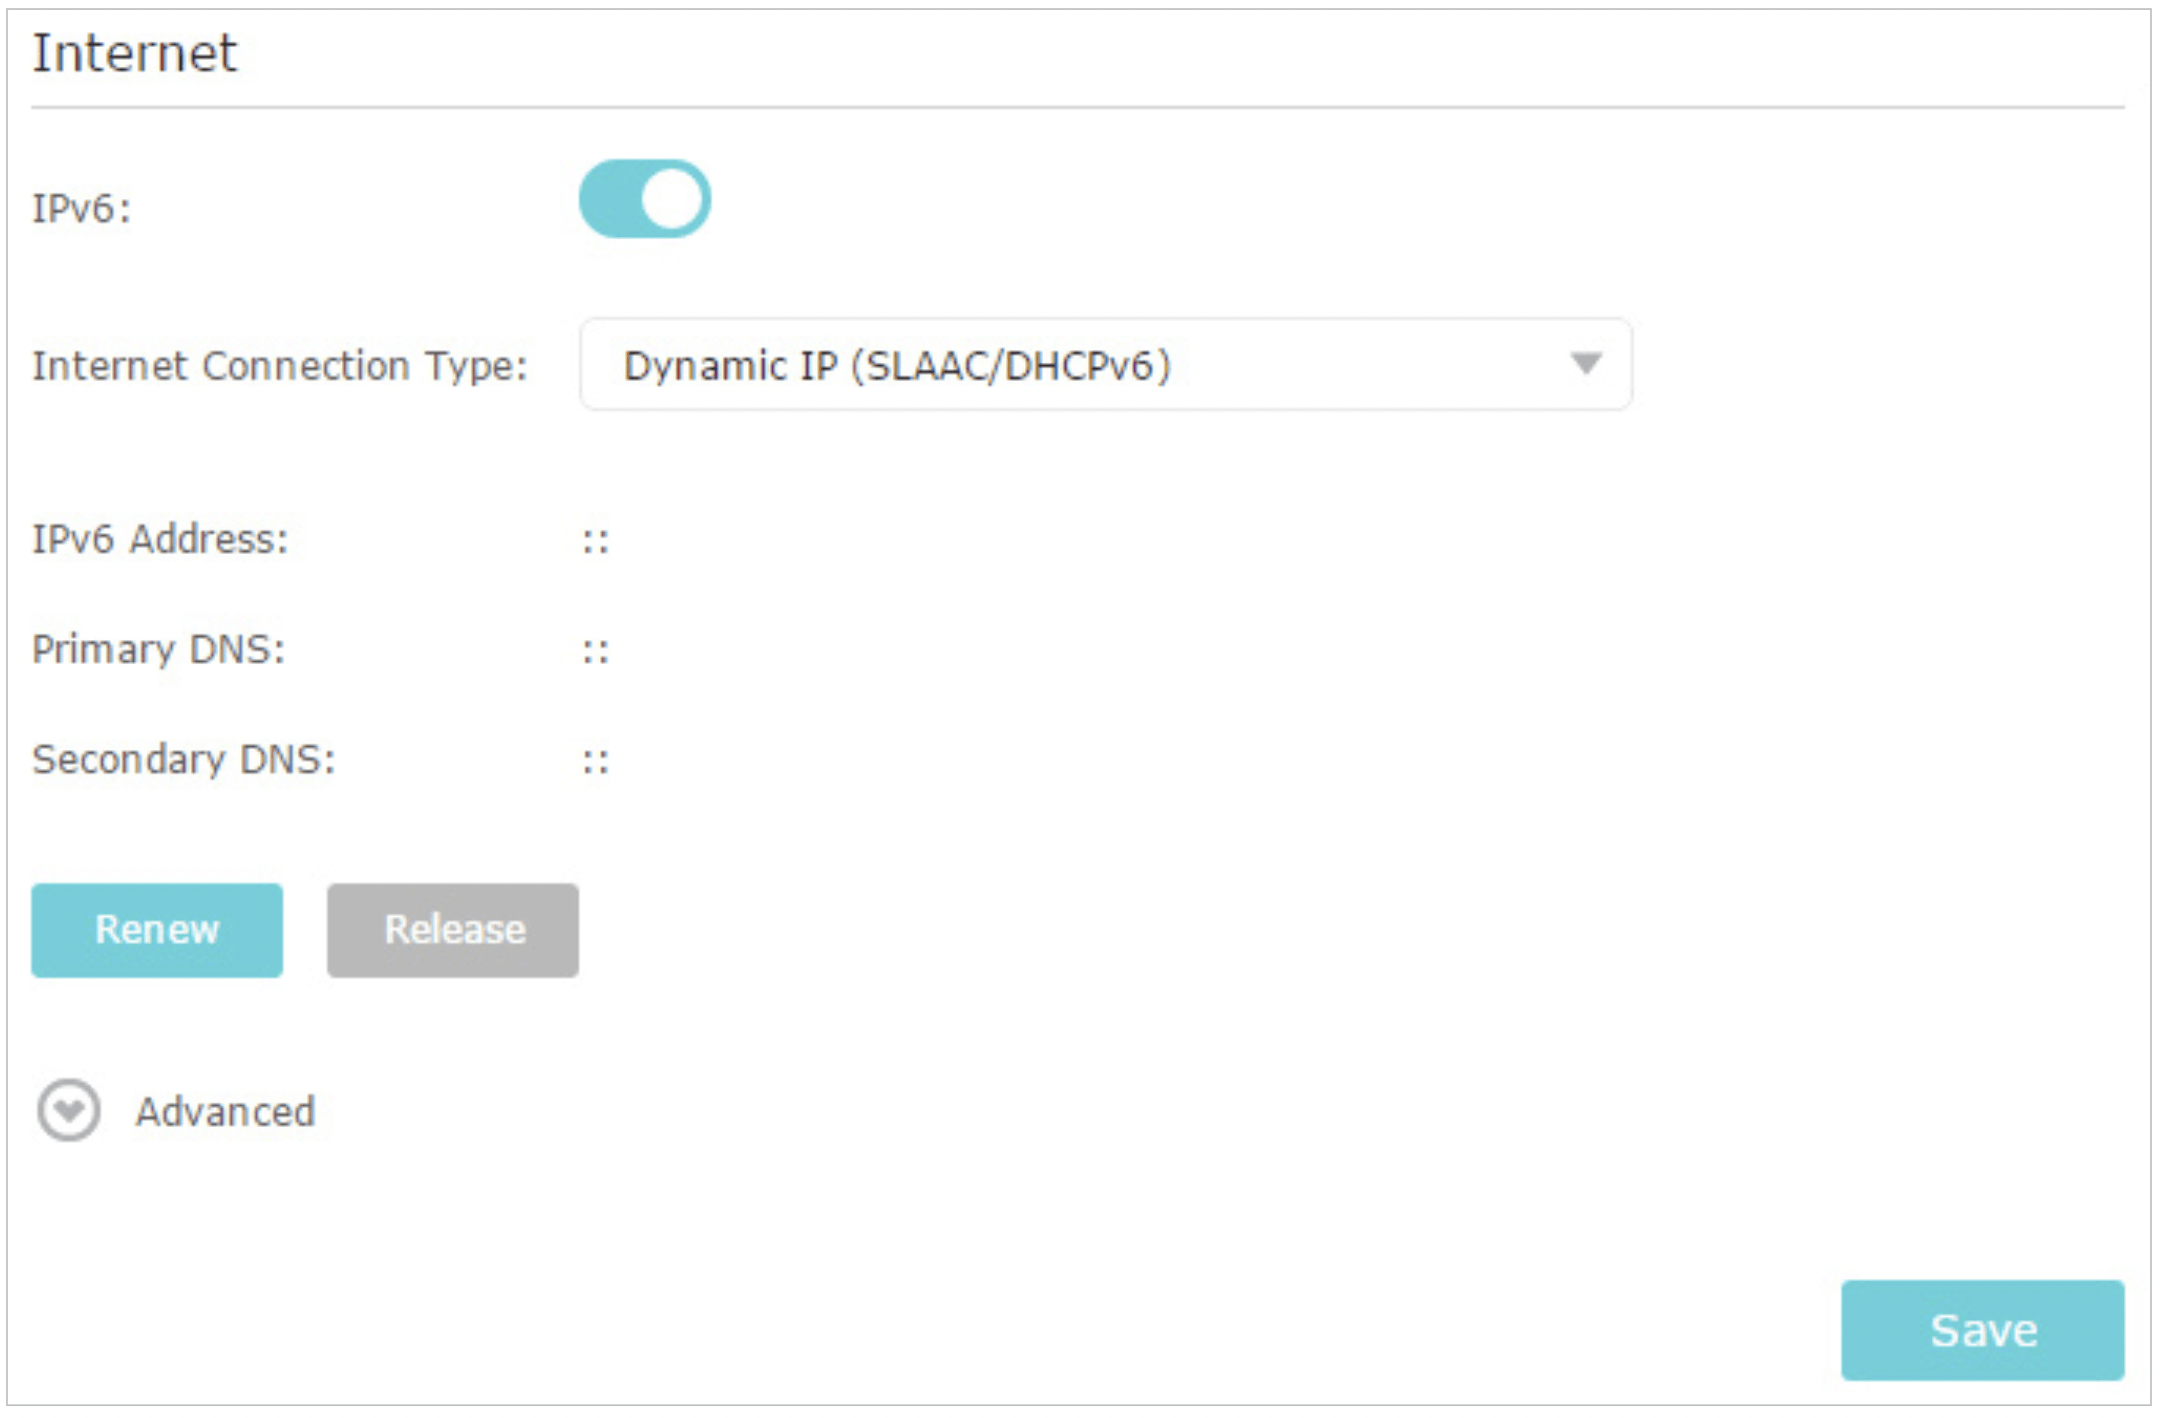
Dynamic IP(SLAAC/DHCPv6): Click Advanced to input further information if your ISP requires. Click Save and then click Renew.
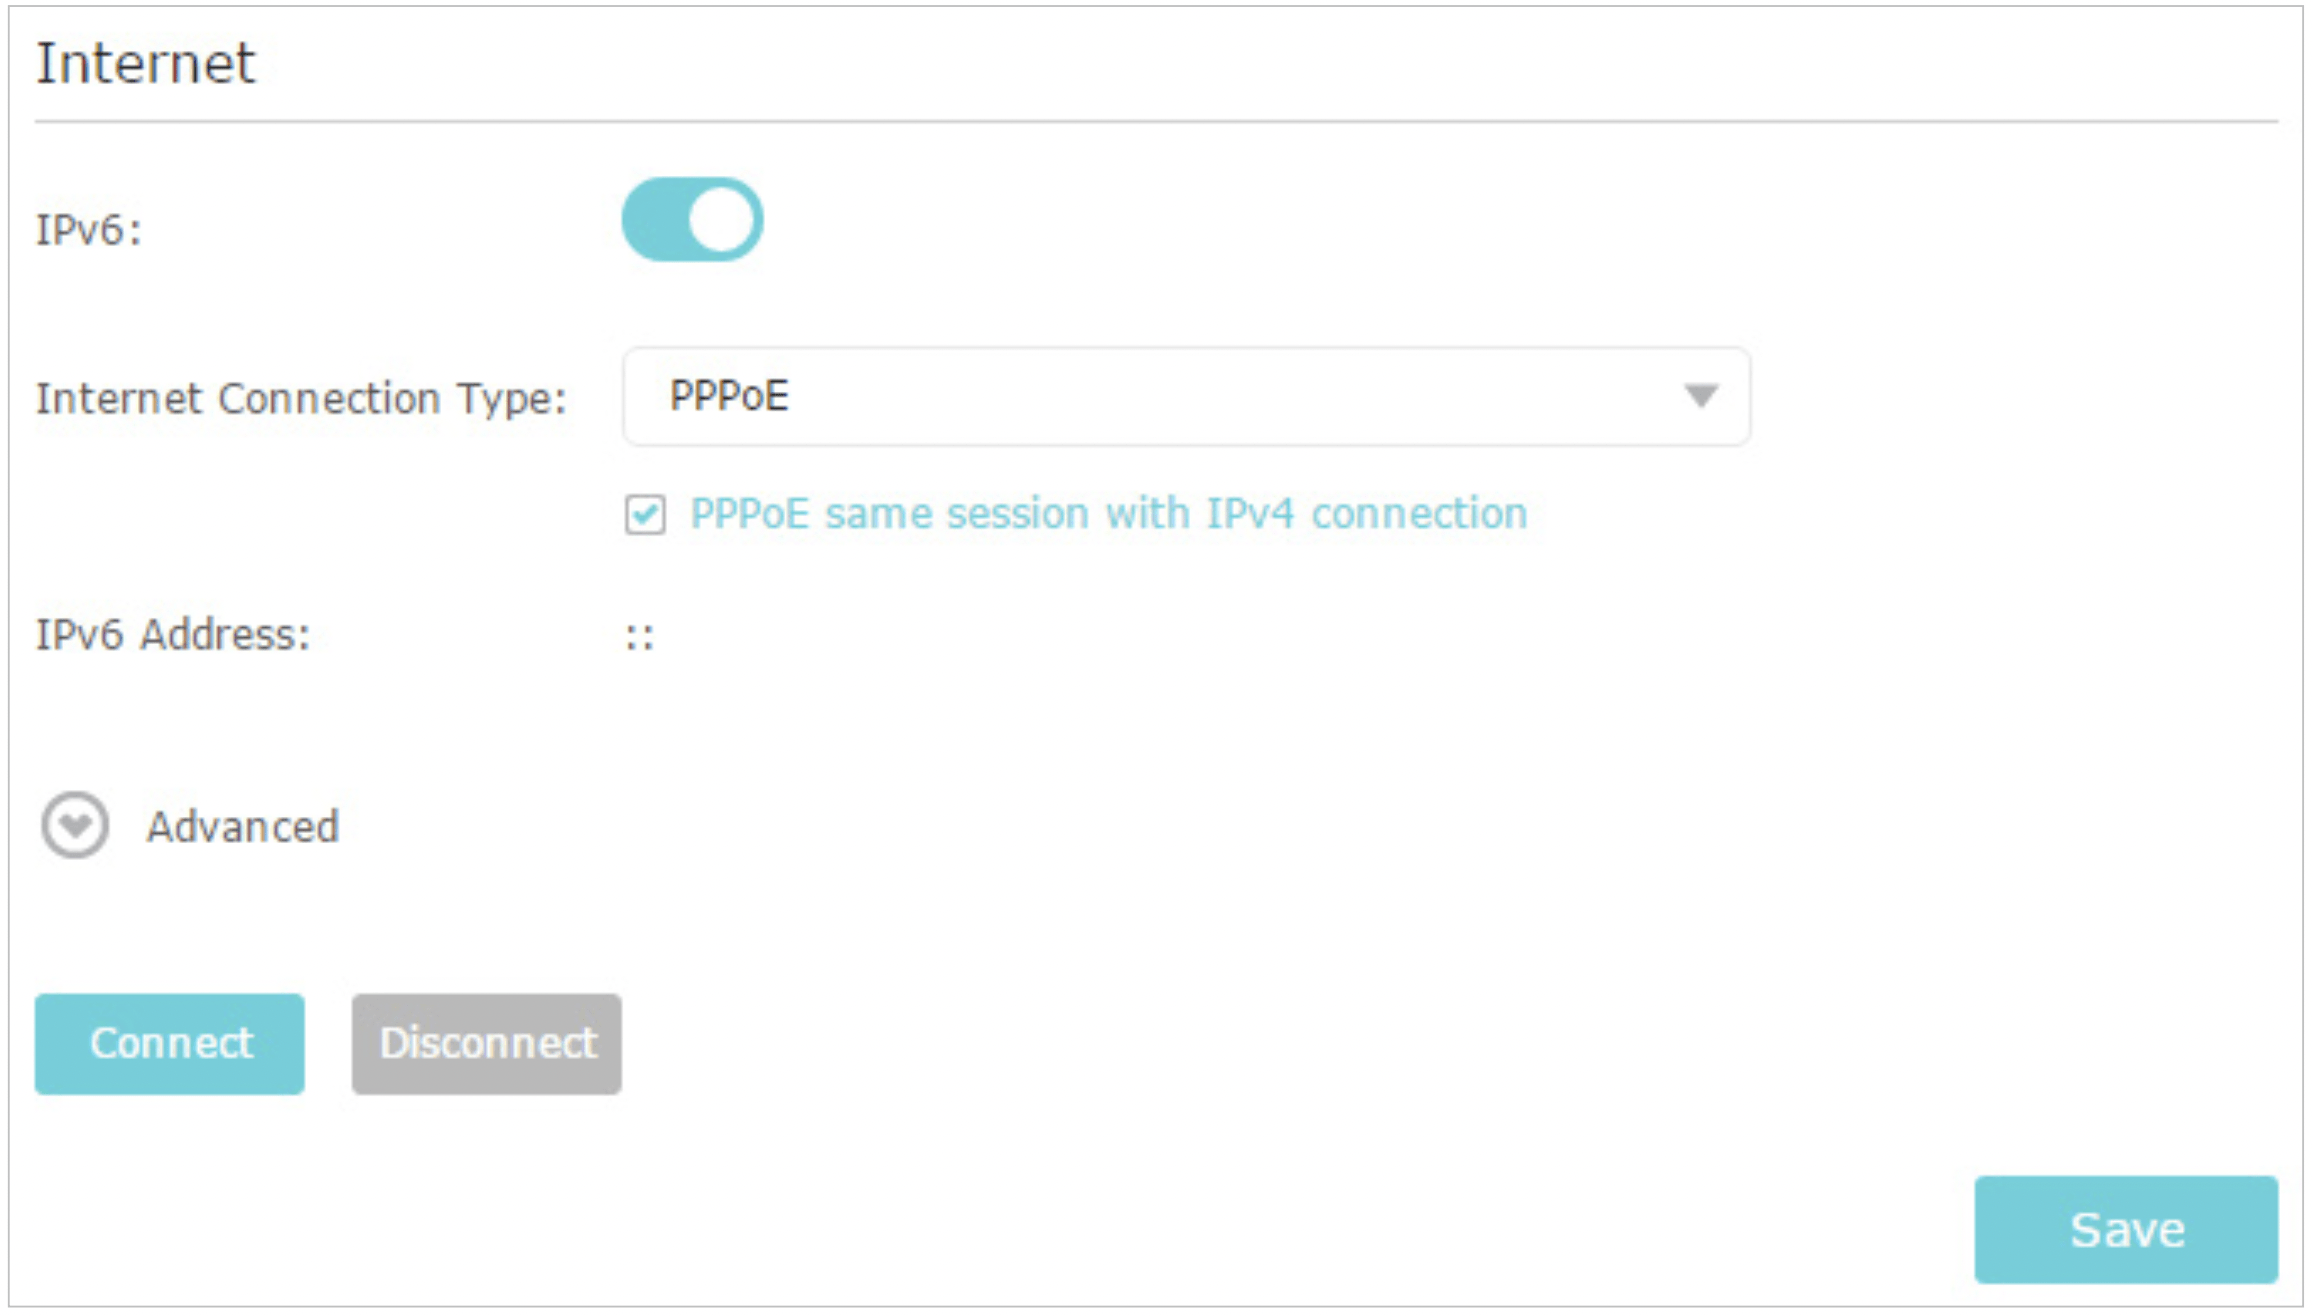
PPPoE: By default, the router uses the IPv4 account to connect to the IPv6 server. Click Advanced to input further information if your ISP requires. Click Save and then click Connect.
Note: If your ISP provides two separate accounts for the IPv4 and IPv6 connections, please untick the Use the same session with IPv4 connection checkbox and manually enter the username and password for the IPv6 connection.
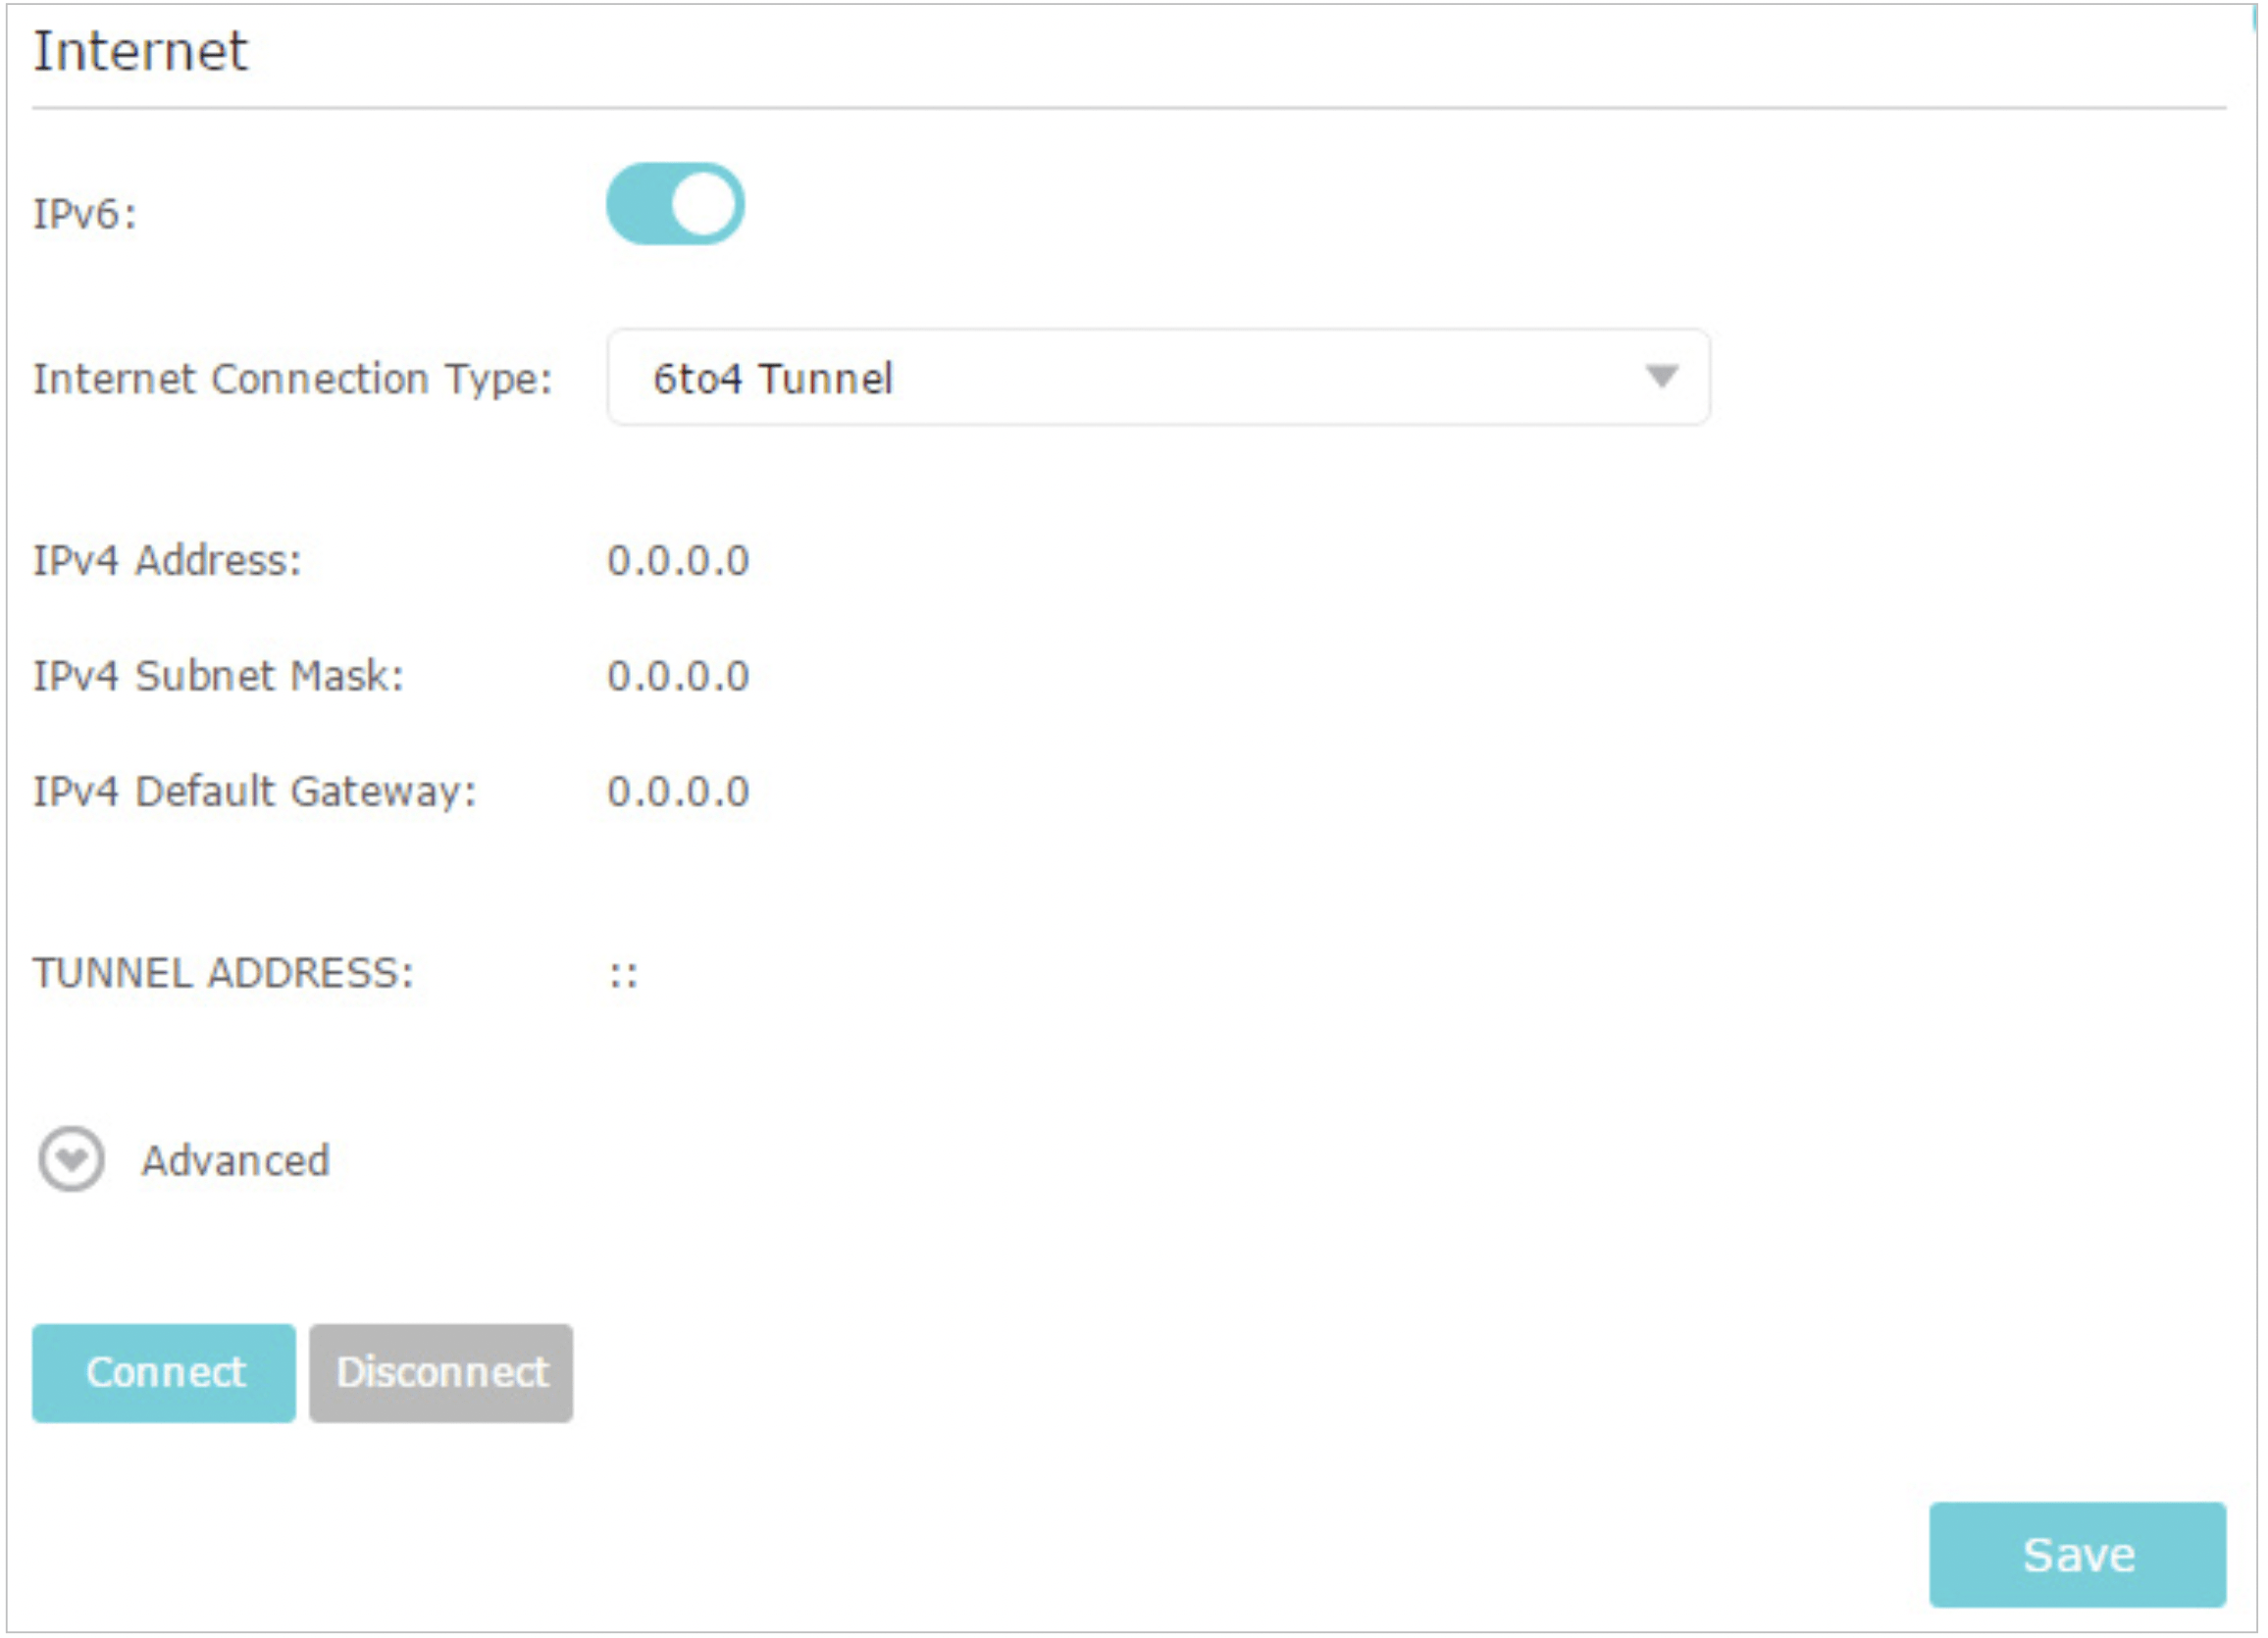
6to4 Tunnel: An IPv4 internet connection type is a prerequisite for this connection type (Manually Set up Your Internet Connection). Click Advanced to input further information if your ISP requires. Click Save and then click Connect.
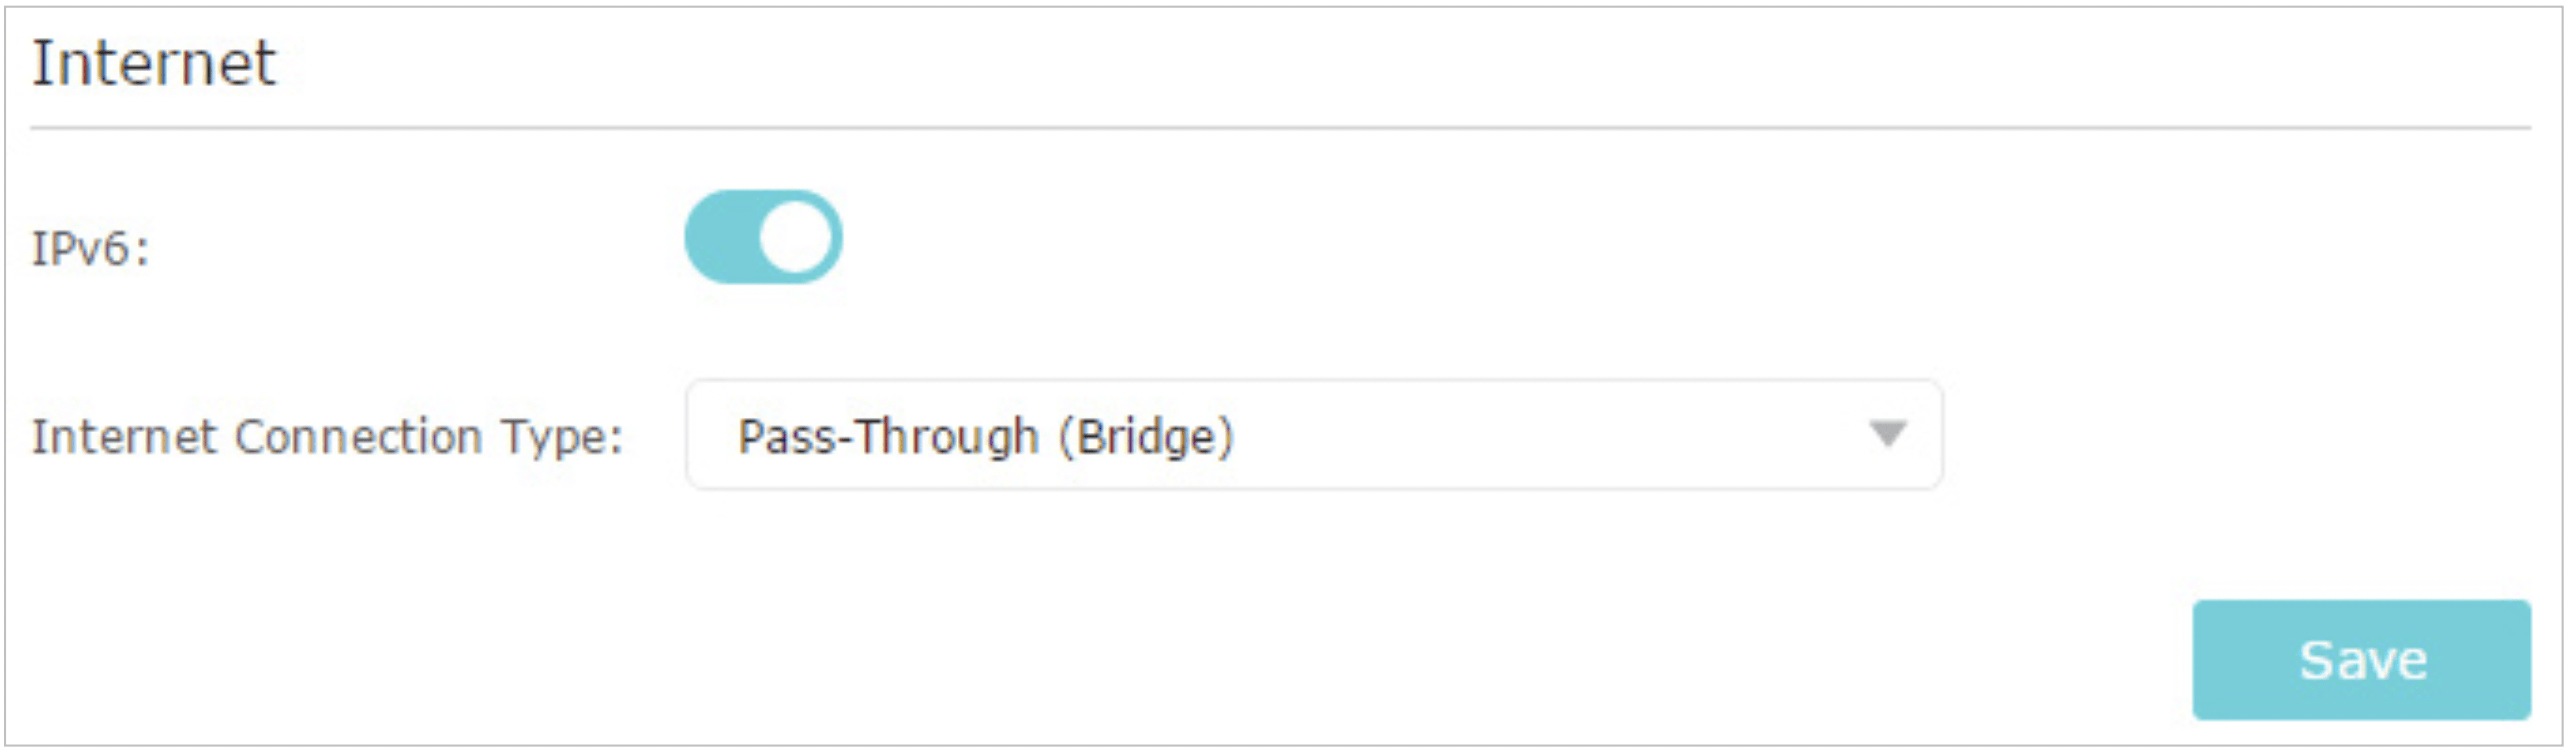
Pass-Through (Bridge): Click Save and skip to step 6.
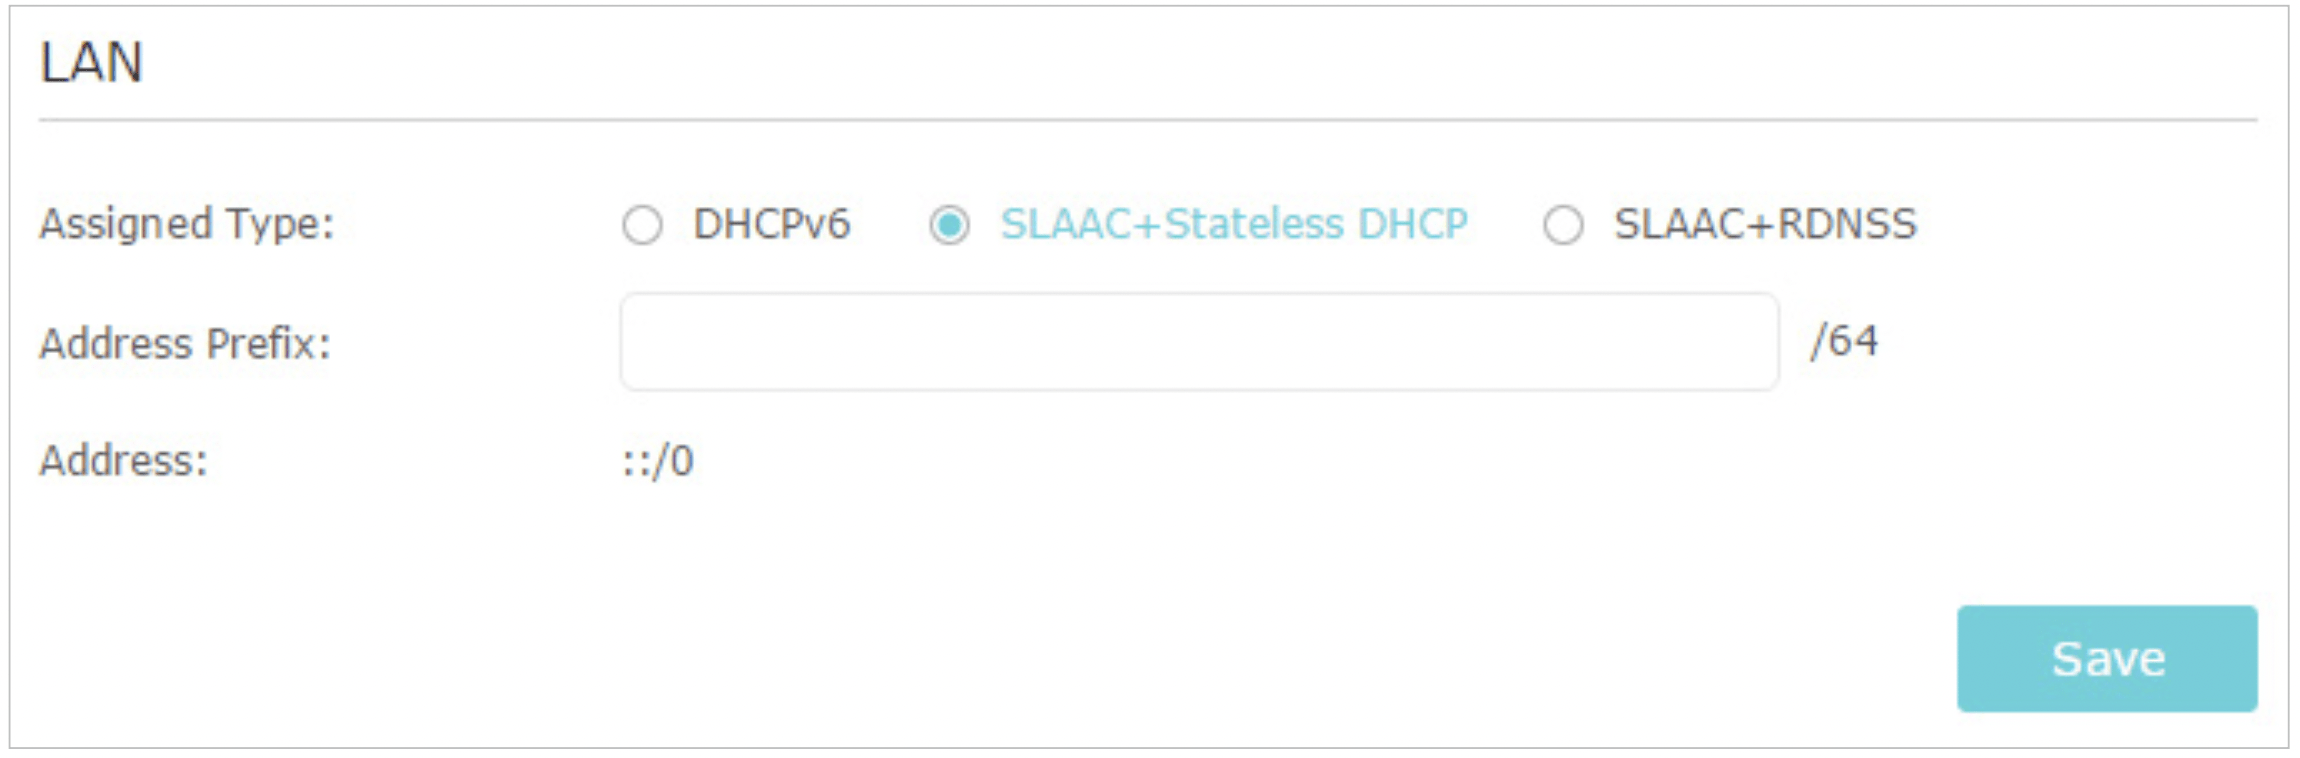
- Configure LAN ports. Windows users are recommended to choose from the first two types. Fill in Address Prefix provided by your ISP, and click Save.
Tips: Find Help on the management interface to know more about items.
- Click Status to check whether you have successfully set up an IPv6 connection. The following figure is an example of a successful PPPoE configuration.
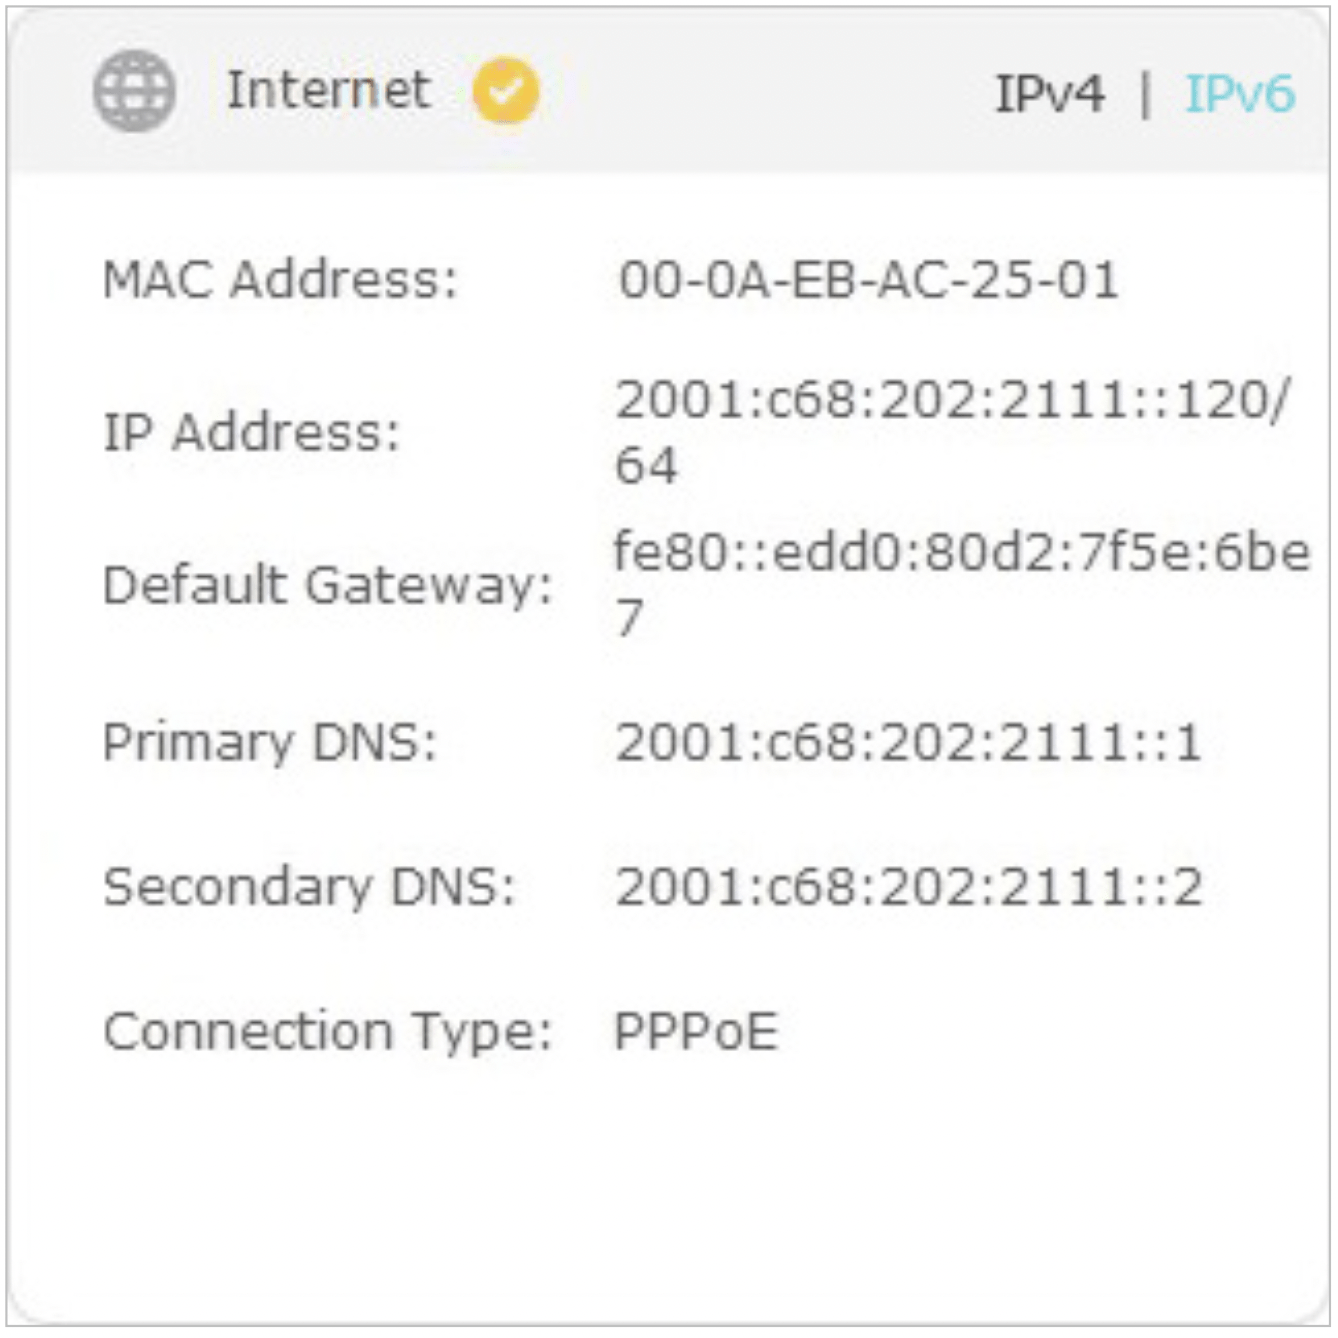
Tips: Visit the FAQ section if there is no internet connection.
Configure the Router in Access Point Mode
In this mode, your router connects to a wired or wireless router via an Ethernet cable and extends the wireless coverage of your existing network. Advanced functions like NAT, Parental Controls and QoS are not supported in this mode.
- Connect one of the router’s LAN ports to the existing network using an Ethernet cable.
- Log in with your TP-Link ID or the password you set for the router.
- Go to Advanced > Operation Mode, select Access Point and click Save.
- Go to Quick Setup or Settings > Wireless > Wireless Settings and set the SSIDs and passwords for the wireless network.
Now, you can connect to the SSIDs and enjoy your existing network.
Manage the Router
Set Up System Time
System time is the time displayed while the router is running. The system time you configure here will be used for other time-based functions like Parental Controls. You can choose the way to obtain the system time as needed.
- Log in with your TP-Link ID or the password you set for the router.
- Go to Advanced > System Tools > Time Settings. It is 12-hour time by default, and you can toggle on to change to 24-hour time.
To get time from the internet:
- In the Set Time field, select Get automatically from the Internet.
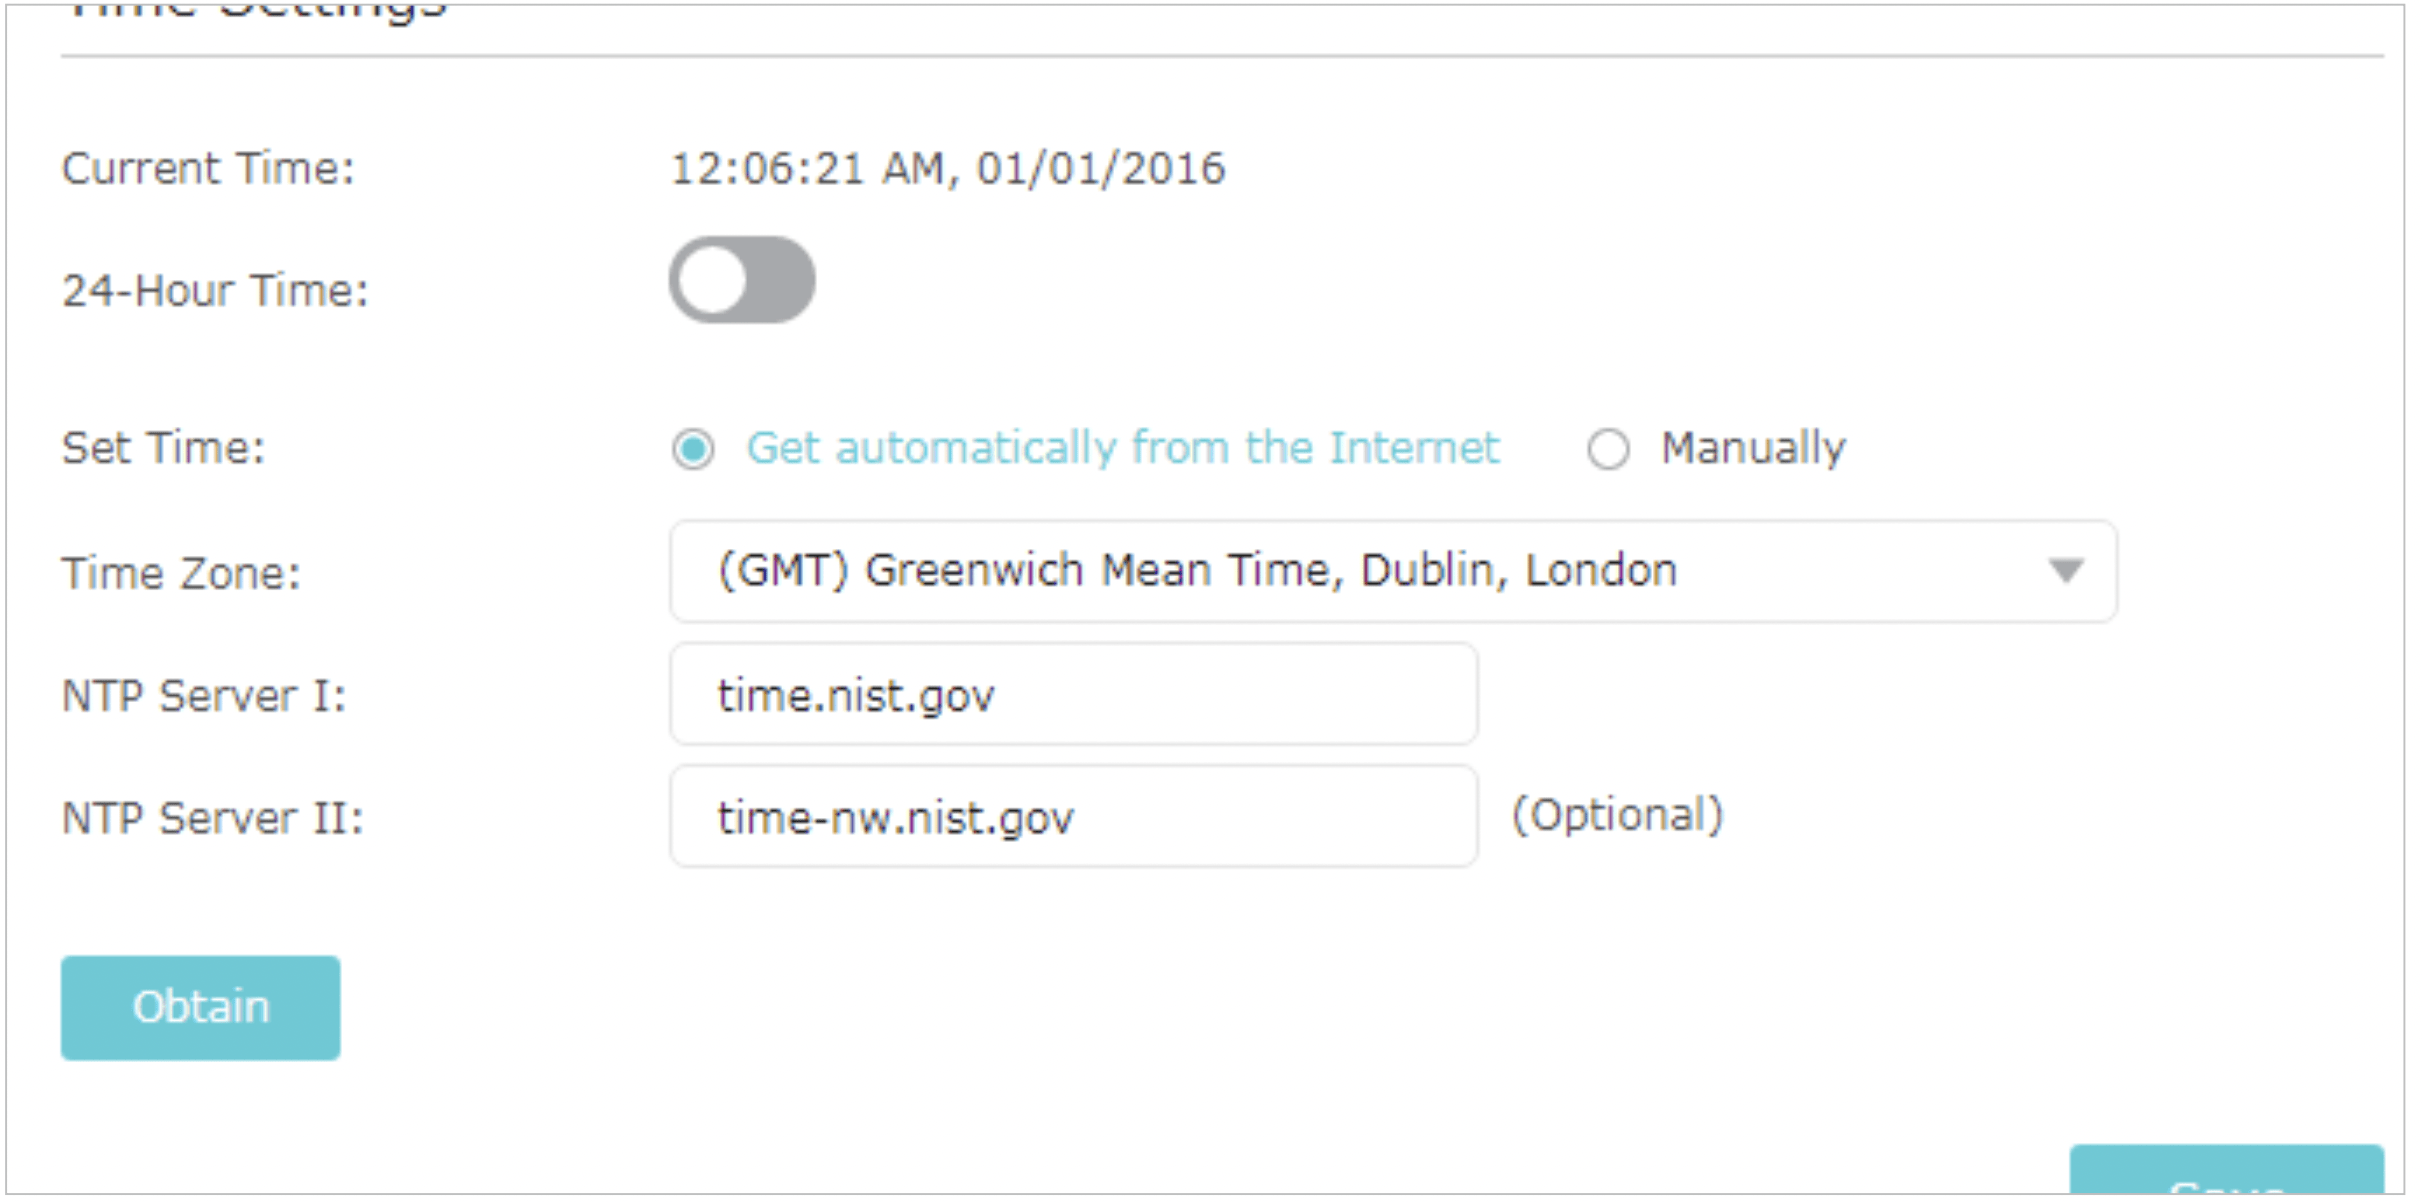
- Select your local Time Zone from the drop-down list.
- In the NTP Server I fileld, enter the IP address or domain name of your desired NTP Server.
- (Optional) In the NTP Server II fileld, enter the IP address or domain name of the second NTP Server.
- Click Obtain to get the current Internet time and click Save.
To manually set the date and time:
- In the Set Time field, select Manually.
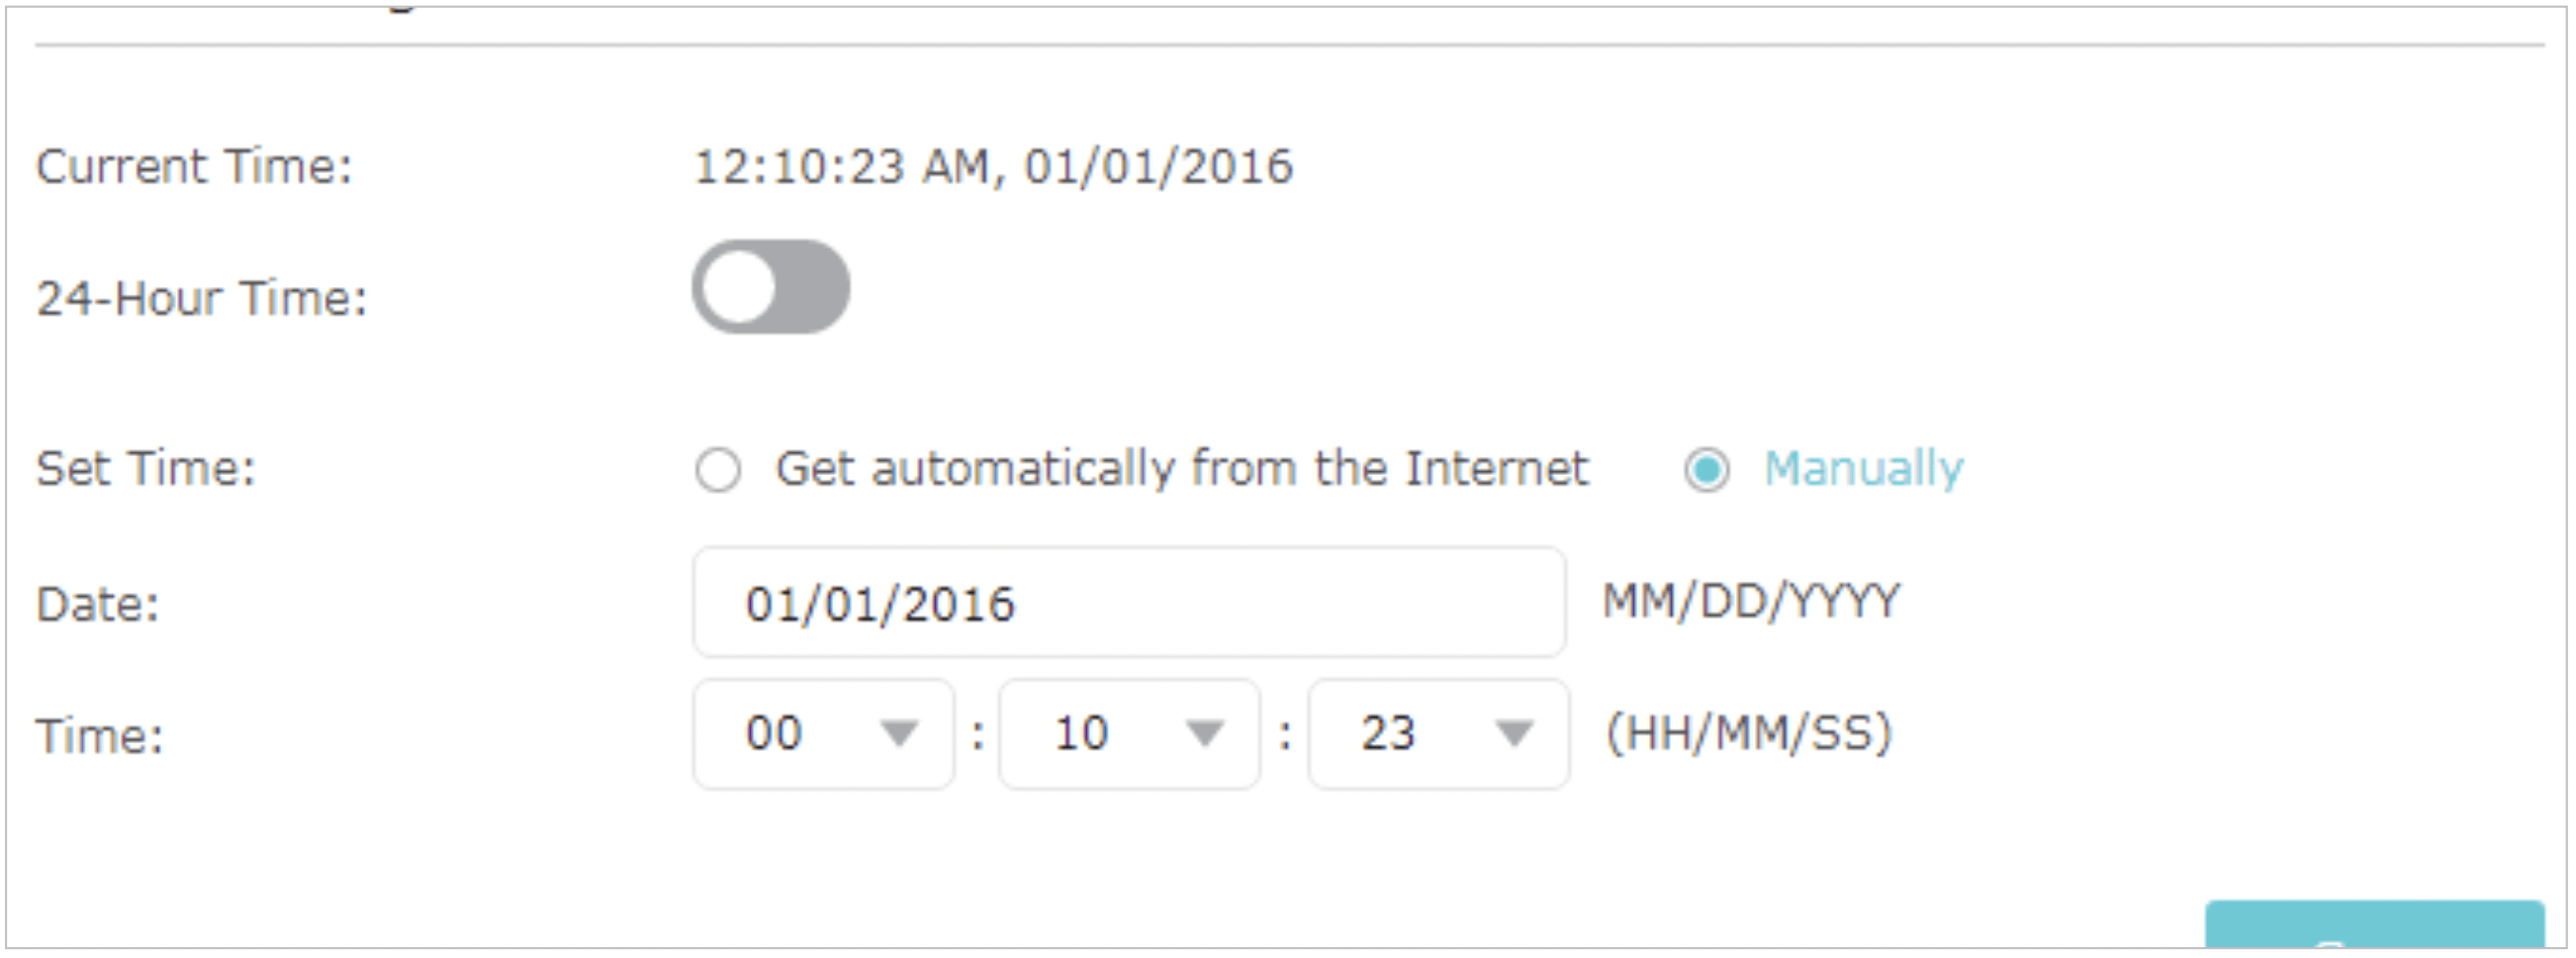
- Set the current Date (In MM/DD/YYYY format).
- Set the current Time (In HH/MM/SS format).
- Click Save.
To set up Daylight Saving Time:
- Select Enable Daylight Saving Time.
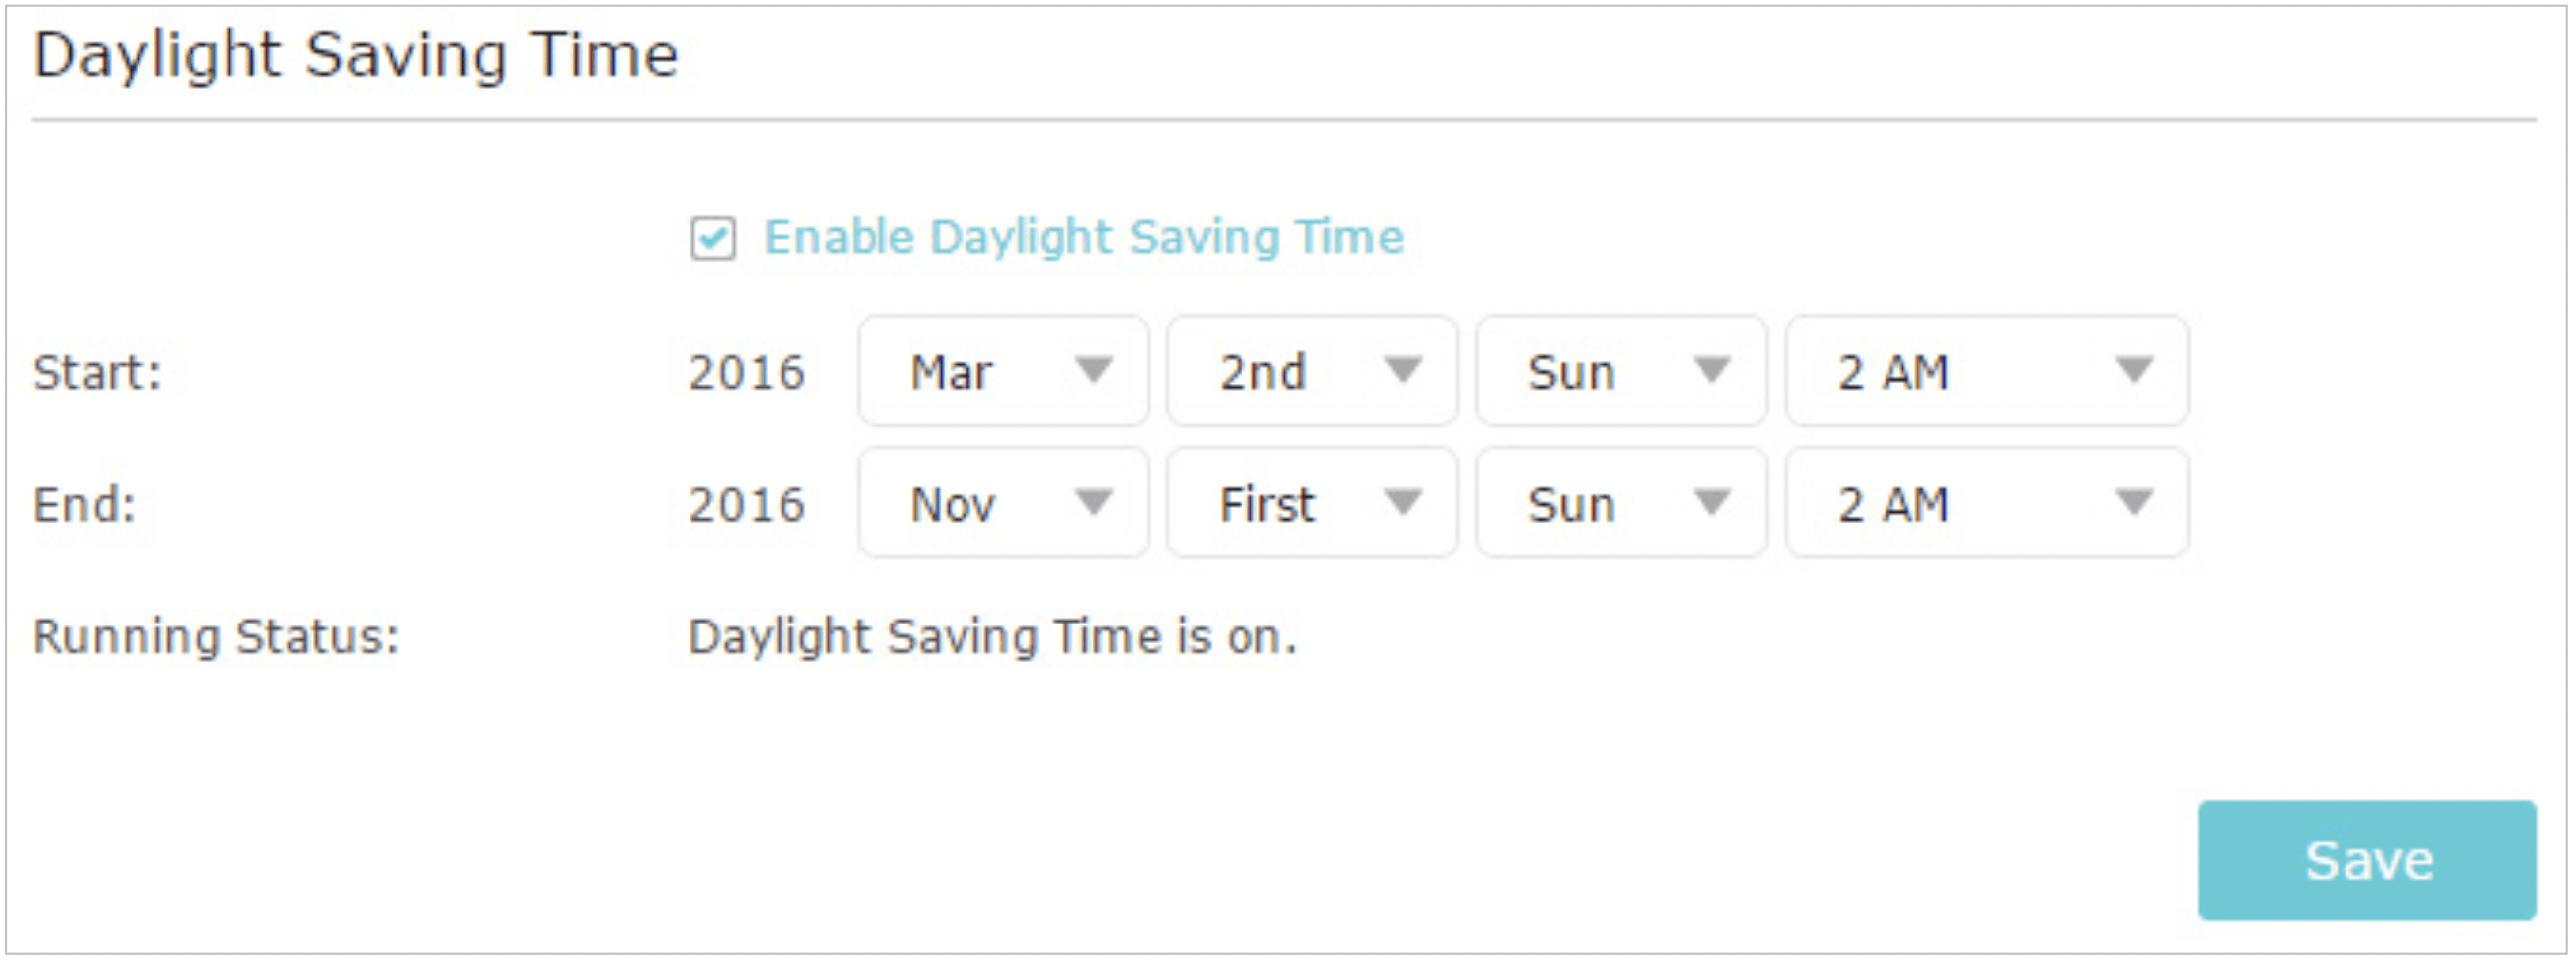
- Select the correct Start date and time when daylight saving time starts at your local time zone.
- Select the correct End date and time when daylight saving time ends at your local time zone.
- Click Save.
Control LEDs
The router‘s LEDs indicate router’s activities and status. You can turn on or turn off the LEDs either from the web management page or by pressing the LED button.
- Log in with your TP-Link ID or the password you set for the router.
- Go to Advanced > System Tools > System Parameters.
- In the LED Control section, toggle to turn on / off the LED.
- You can enable Night Mode if needed, and set a time period, and then the LEDs will be off during this period.

- Click Save.
Test the Network Connectivity
Diagnostics is used to test the connectivity between the router and the host or other network devices.
- Log in with your TP-Link ID or the password you set for the router.
- Go to Advanced > System Tools > Diagnostics.
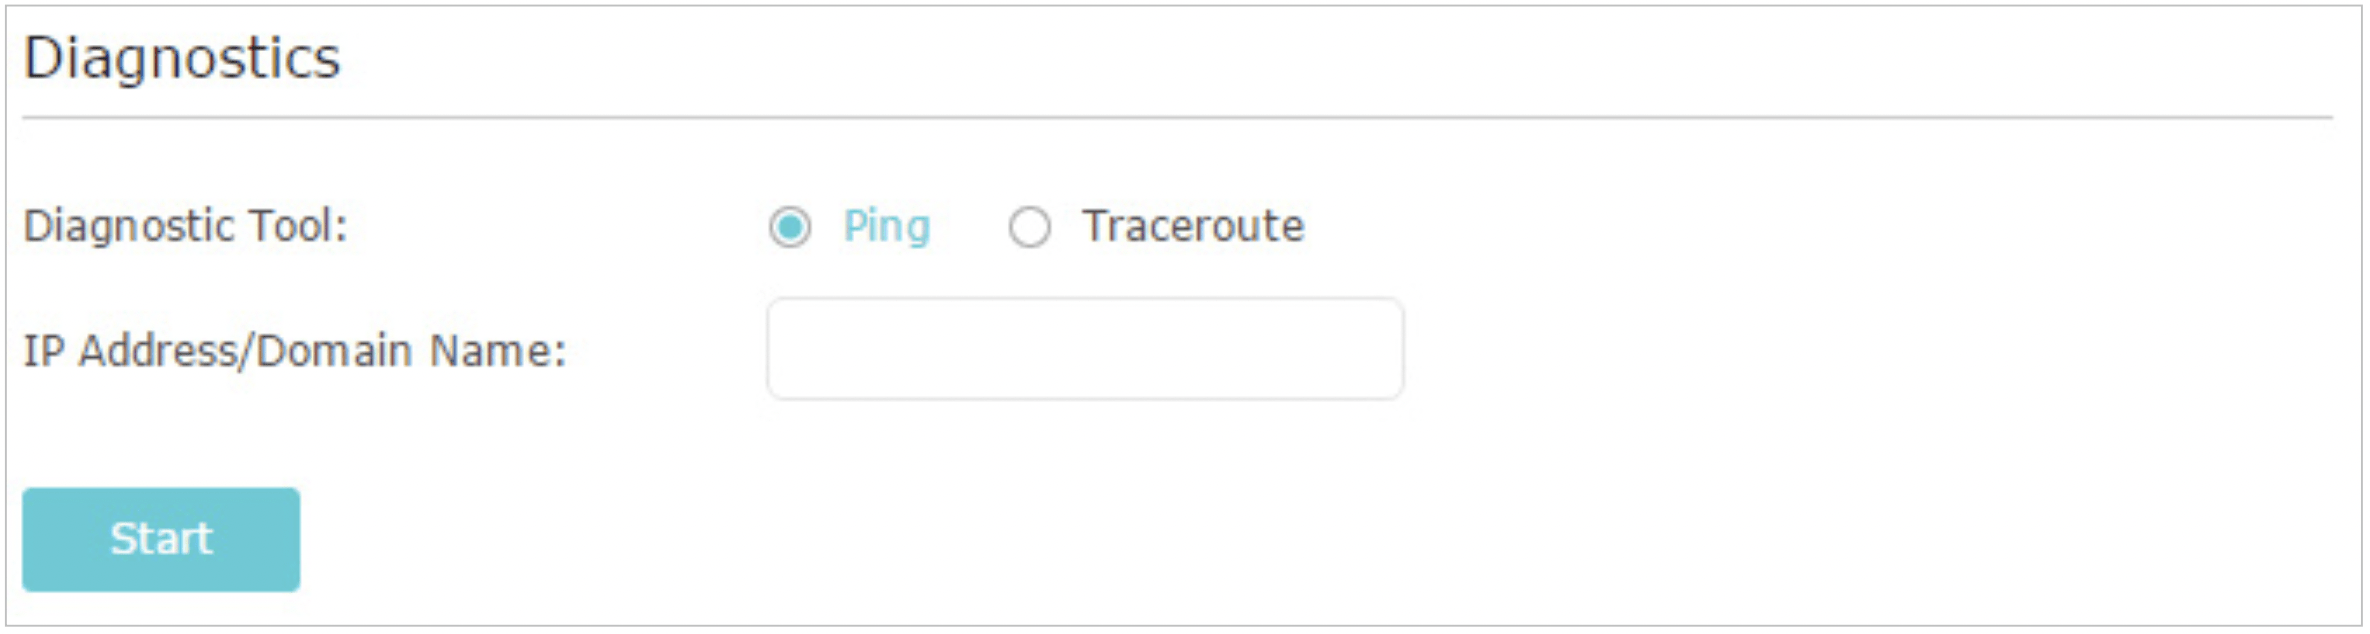
- Enter the information with the help of page tips:
Choose Ping or Traceroute as the diagnostic tool to test the connectivity:
Ping is used to test the connectivity between the router and the tested host, and measure the round-trip time.
Traceroute is used to display the route (path) your router has passed to reach the tested host, and measure transit delays of packets across an Internet Protocol network.
Enter the IP Address or Domain Name of the tested host.
- Click Start to begin the diagnostics.
Tips: Click Advanced, you can modify the ping count, ping packet size or the Traceroute Max TTL. It’s recommended to keep the default value.
Backup and Restore Configuration Settings
The configuration settings are stored as a configuration file in the router. You can backup the configuration file to your computer for future use and restore the router to a previous settings from the backup file when needed. Moreover, if necessary you can erase the current settings and reset the router to the default factory settings.
- Log in with your TP-Link ID or the password you set for the router.
- Go to Advanced > System Tools > Backup & Restore.
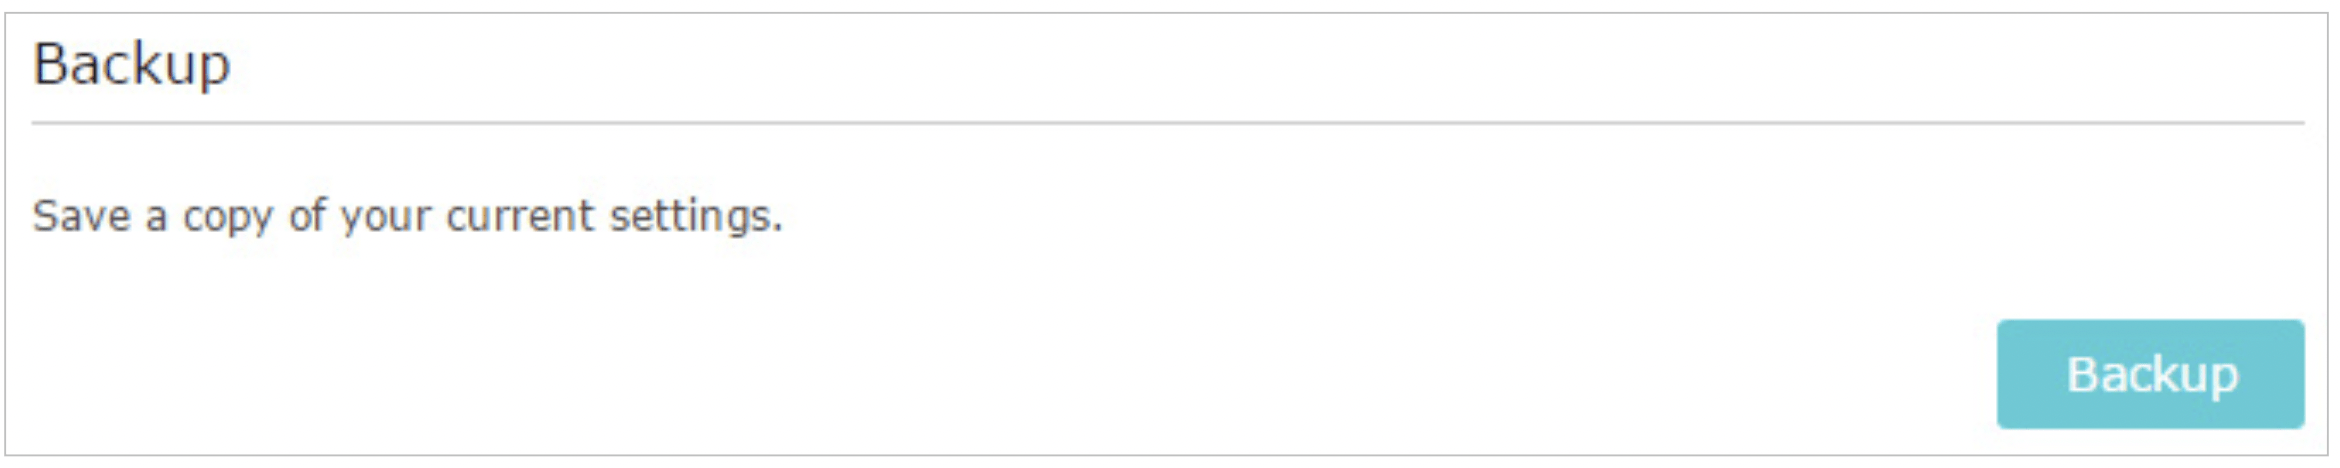
To backup configuration settings:
Click Backup to save a copy of the current settings to your local computer. A ‘.bin’ file of the current settings will be stored to your computer.
To restore configuration settings:
- Click Browse to locate the backup configuration file stored on your computer, and click Restore.
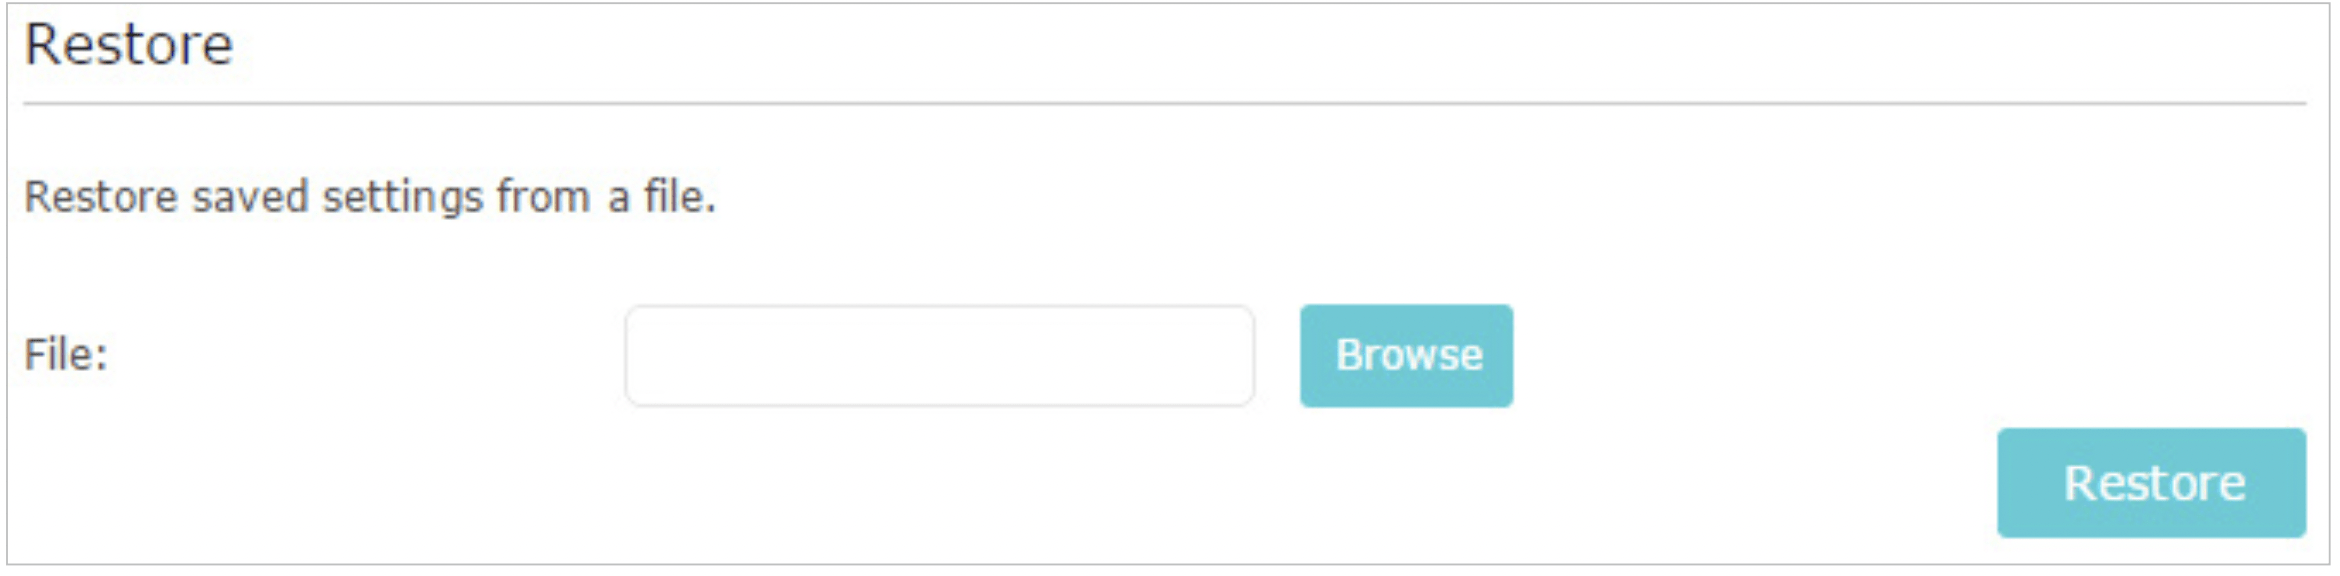
- Wait a few minutes for the restoring and rebooting.
Note: During the restoring process, do not turn off or reset the router.
To reset the router except your login password and TP-Link ID:
- Click Restore under the Factory Default Restore session.
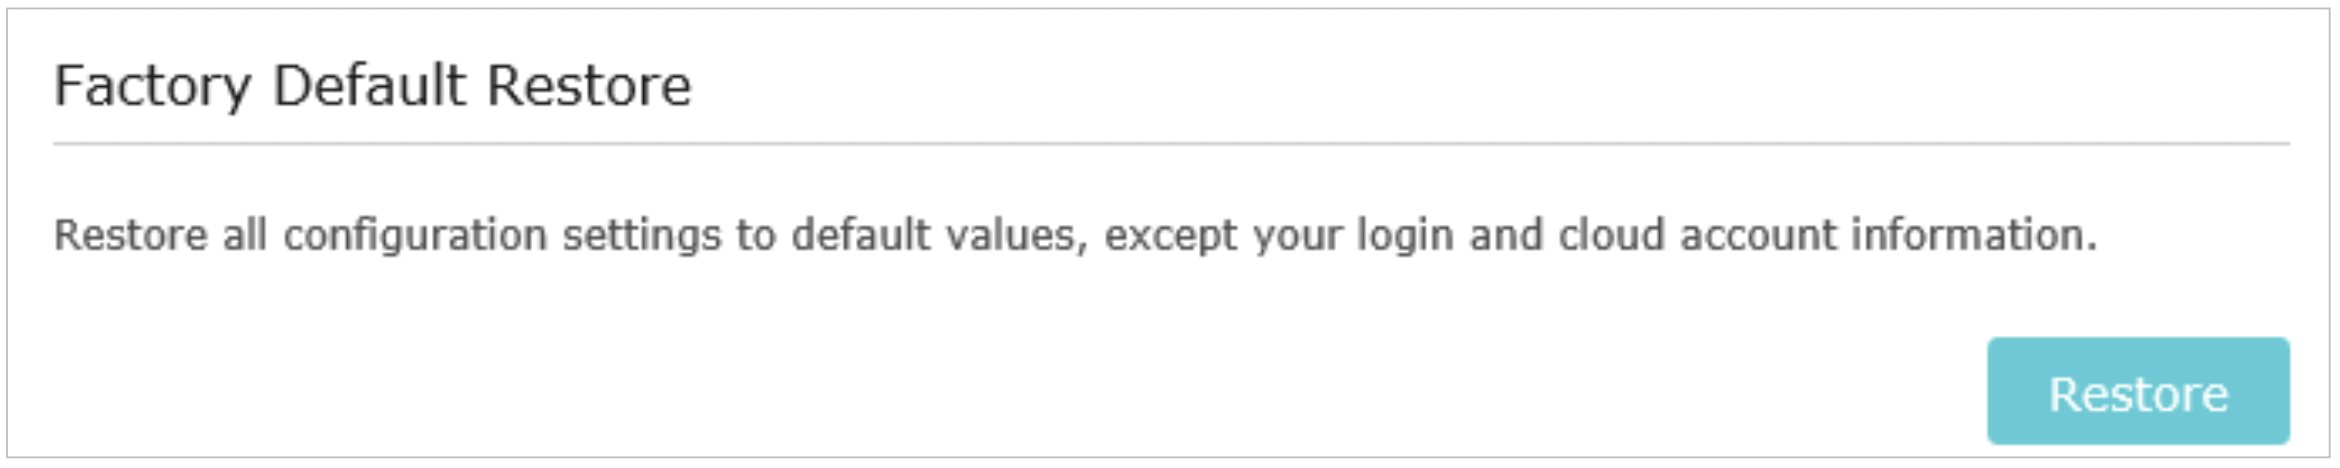
- Wait a few minutes for the resetting and rebooting.
Note:
- During the resetting process, do not turn off the router.
- After reset, you can still use the current login password or the TP-Link ID to log in to the web management page.
To reset the router to factory default settings:
- Click Factory Restore to reset the router.

- Wait a few minutes for the resetting and rebooting.
Note:
- During the resetting process, do not turn off or reset the router.
- We strongly recommend you backup the current configuration settings before resetting the router.
Set the Router to Reboot Regularly
The Scheduled Reboot feature cleans the cache to enhance the running performance of the router.
- Log in with your TP-Link ID or the password you set for the router.
- Go to Advanced > System Tools > Reboot Schedule.
- Check the box to enable Reboot Schedule.
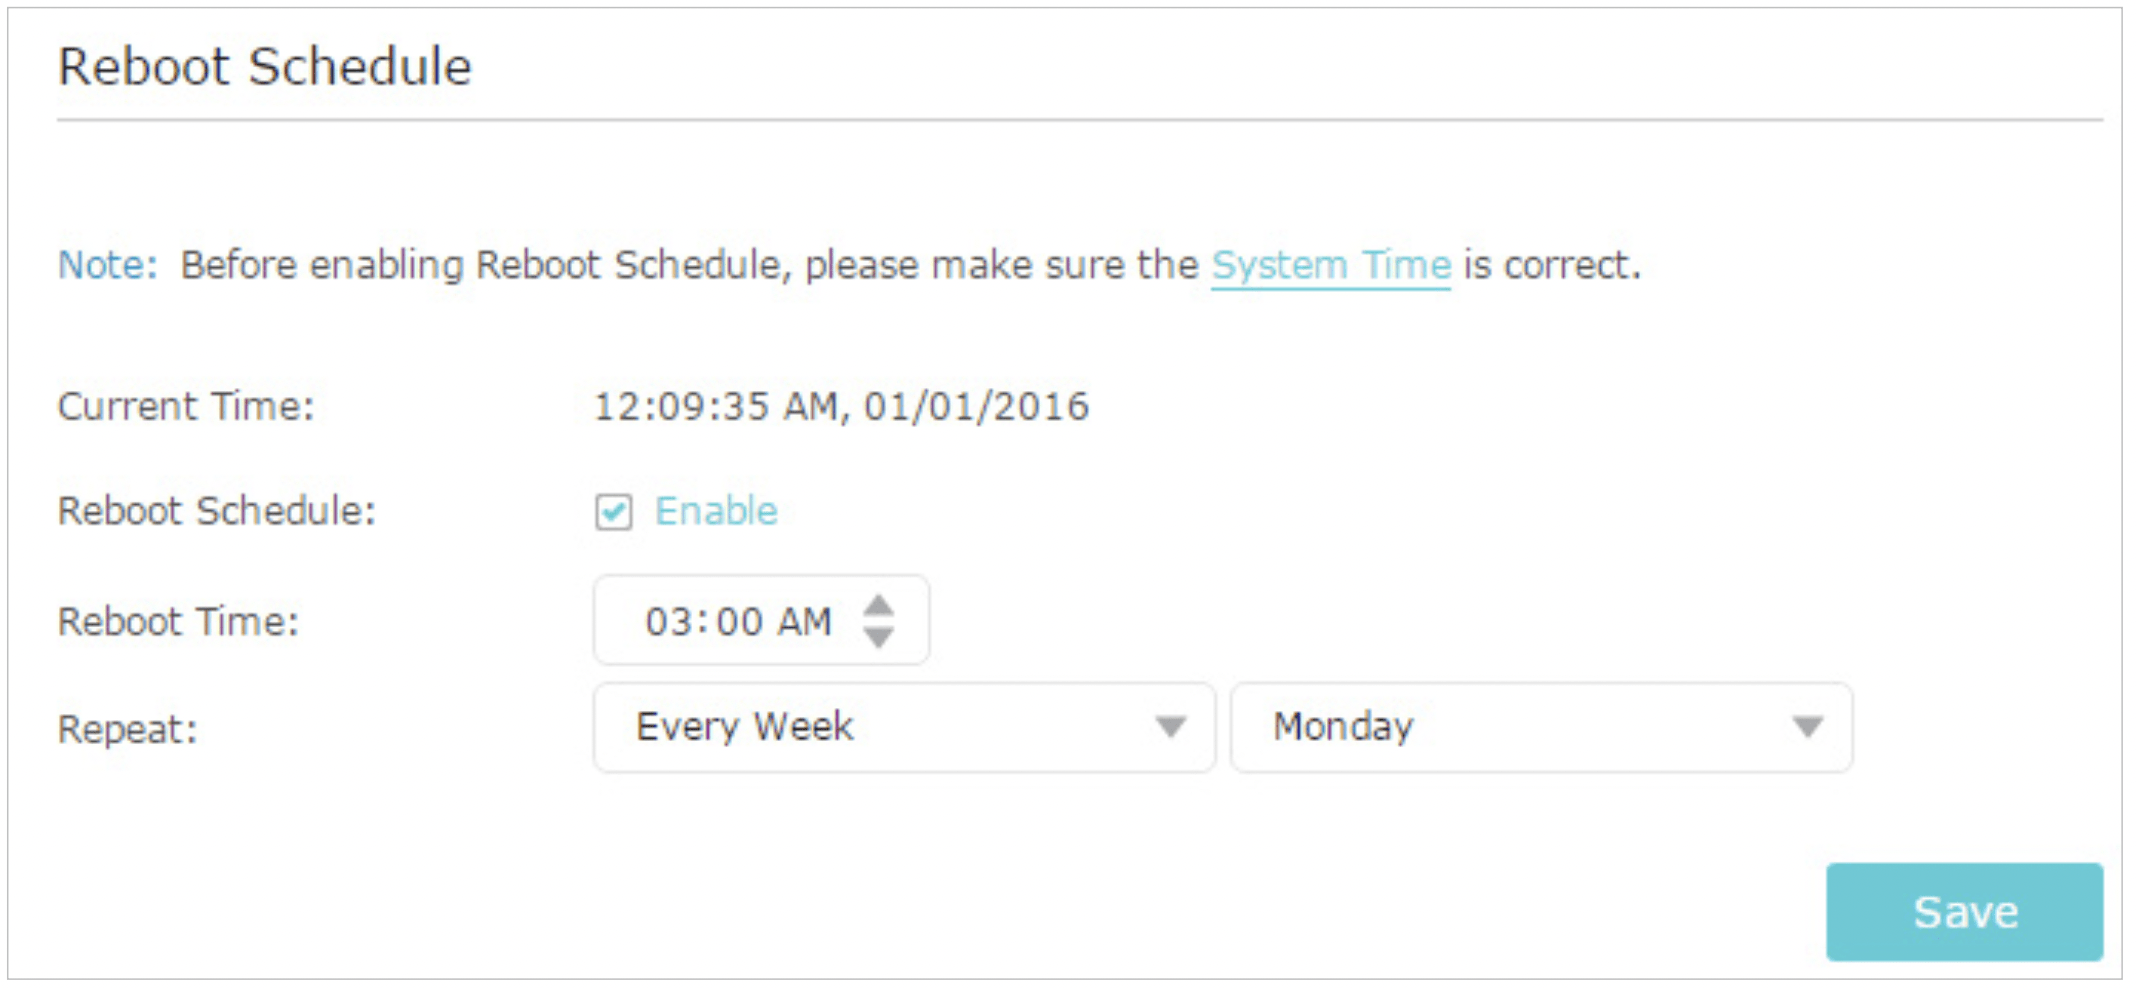
- Specify the Reboot Time when the router reboots and Repeat to decide how often it reboots.
- Click Save.
Change the Login Password
The account management feature allows you to change your login password of the web management page.
Note: If you are using a TP-Link ID to log in to the web management page, the account management feature will be disabled. To manage the TP-Link ID, go to Basic > TP-Link Cloud.
- Log in with the password you set for the router.
- Go to Advanced > System Tools > Administration and focus on the Account Management section.
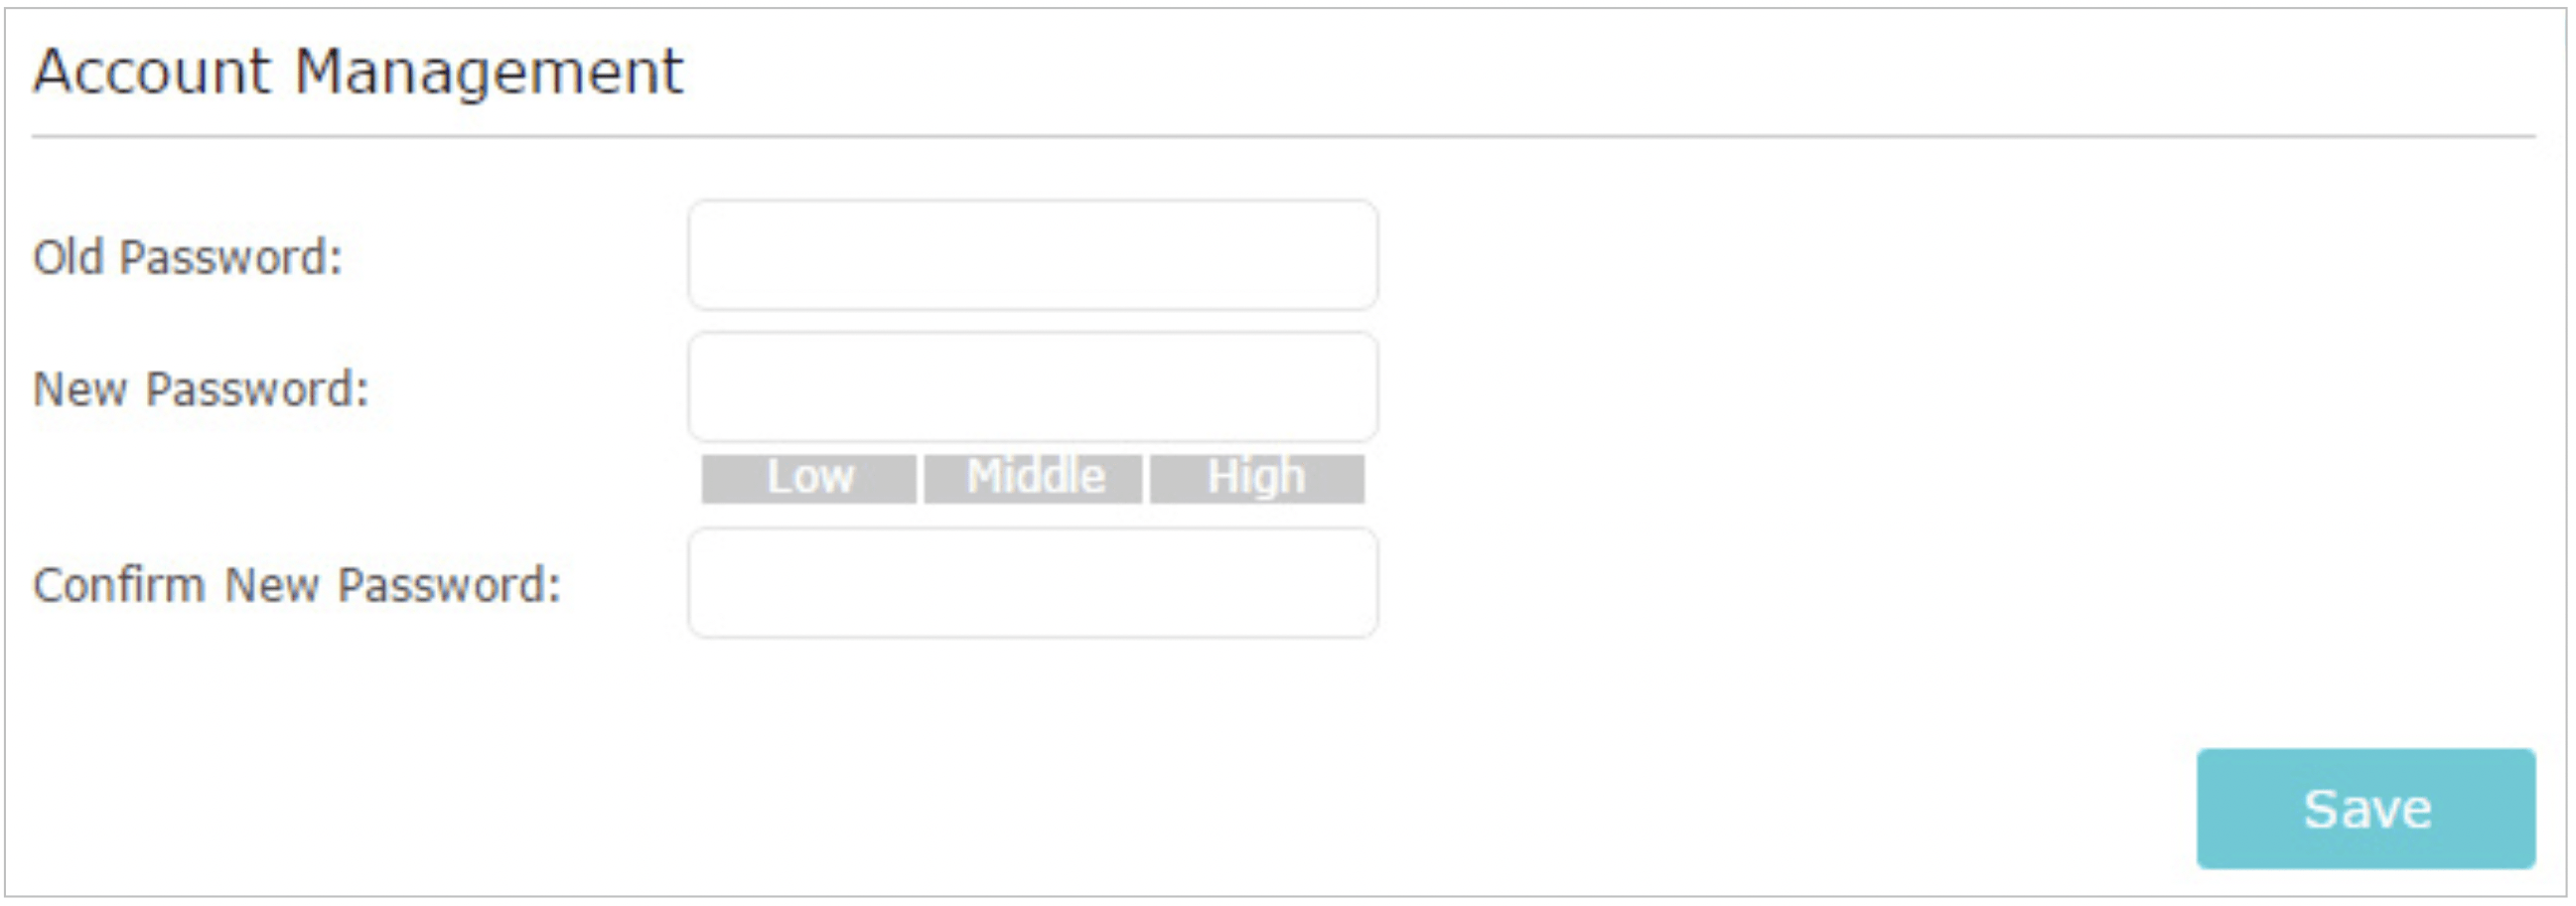
- Enter the old password, then a new password twice (both case-sensitive). Click Save.
- Use the new password for future logins.
Password Recovery
This feature allows you to recover the login password you set for you router in case you forget it.
Note: If you are using a TP-Link ID to log in to the web management page, the Password Recovery feature will be disabled. To manage the TP-Link ID, go to Basic > TP-Link Cloud.
- Log in with the password you set for the router.
- Go to Advanced > System Tools > Administration and focus on the Password Recovery section.
- Tick the Enable Password Recovery checkbox.
- Specify a mailbox (From) for sending the recovery letter and enter its SMTP Server address. Specify a mailbox (To) for receiving the recovery letter. If the mailbox (From) to send the recovery letter requires encryption, select Enable Authentication and enter its username and password.
Tips:
SMTP server is available for users in most webmail systems.
Generally, Enable Authentication should be selected if the login of the mailbox requires username and password.
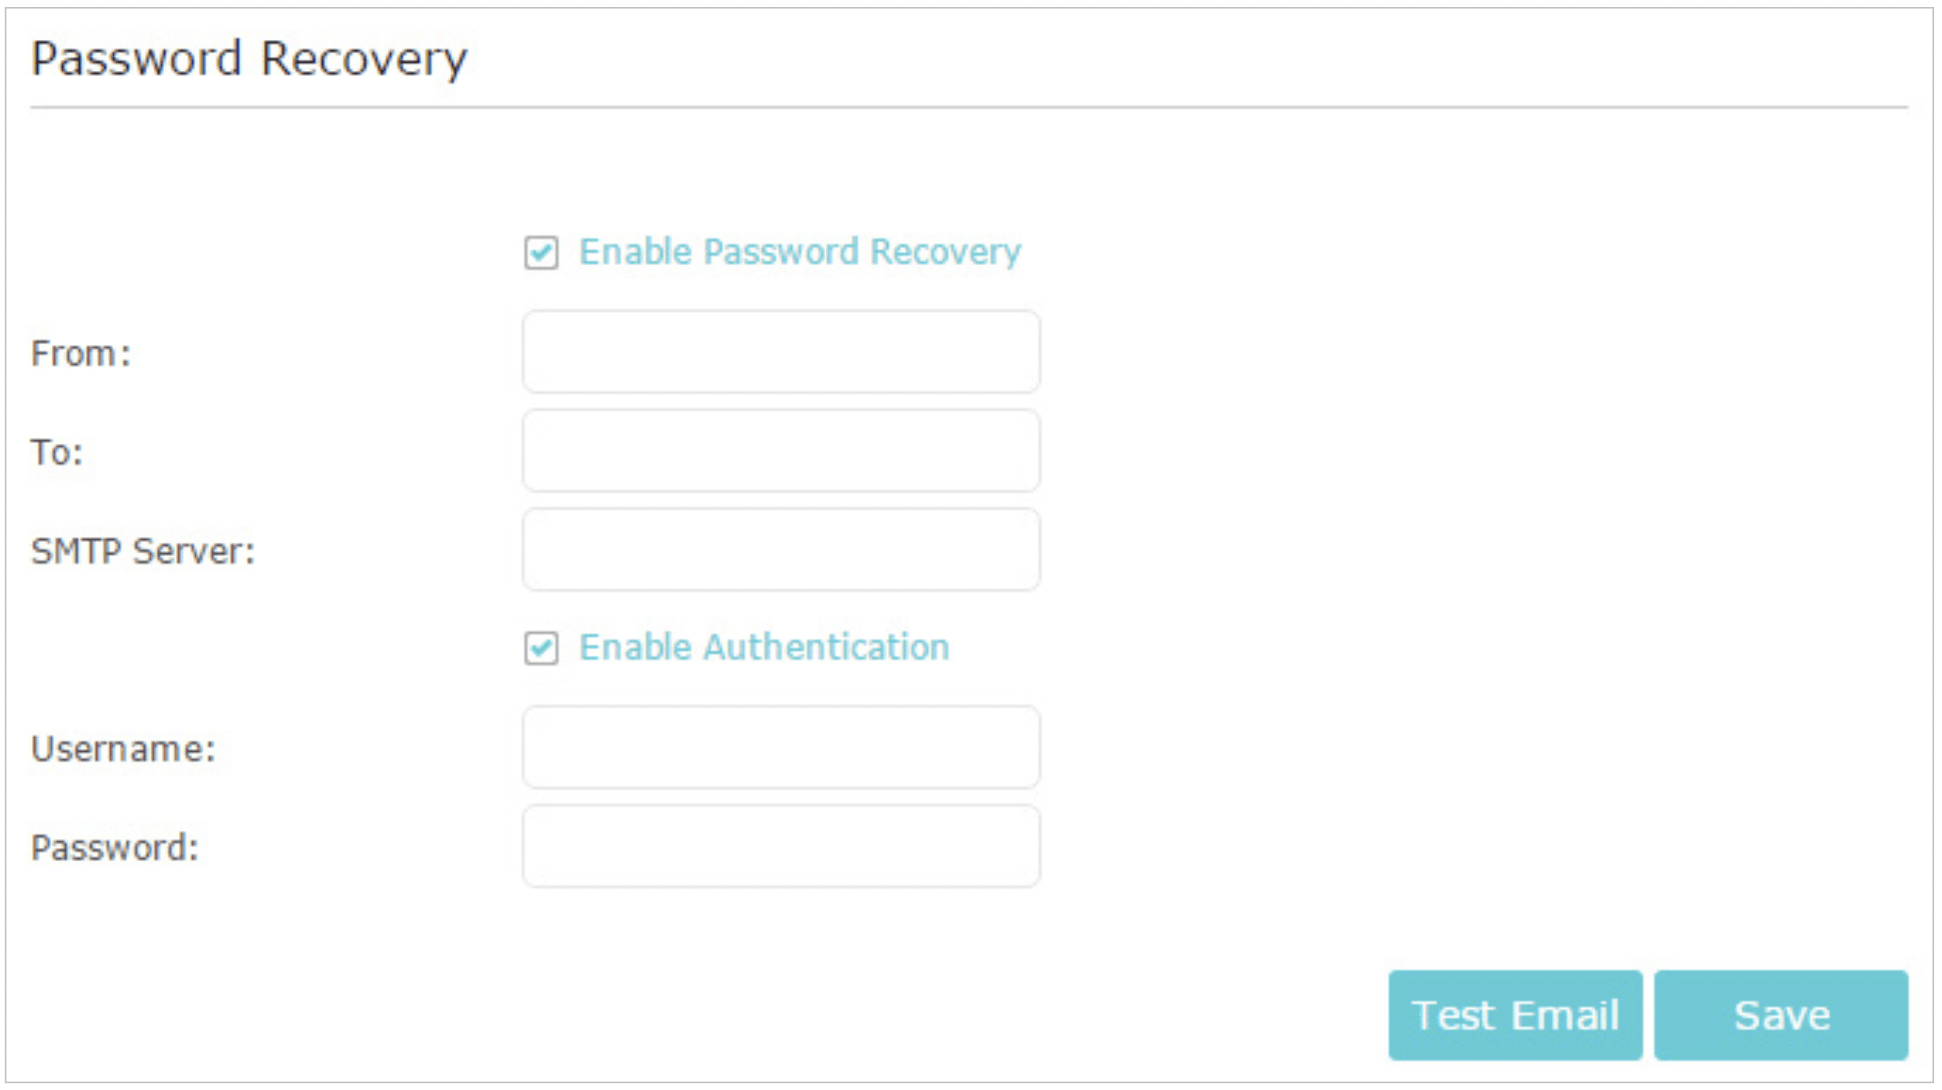
- Click Save.
You can click Test Email to test whether the configuration is successful.
FAQ
Q1. What should I do if I forget my wireless password?
The default wireless password is printed on the label of the router. If the password has been altered:
- Connect your computer to the router using an Ethernet cable.
- Log in with your TP-Link ID or the password you set for the router.
- Go to Basic > Wireless to retrieve or reset your wireless password.
Q2. What should I do if I forget my web management password?
- If you are using a TP-Link ID to log in, or you have enabled the Password Recovery feature of the router, click Forgot password on the login page and then follow the instructions to reset it.
- Alternatively, press and hold the Reset button of the router until the Power LED binks to reset it.
Note:
- Please refer to Password Recovery to learn how to configure Password Recovery.
- You’ll need to reconfigure the router to surf the internet once the router is reset, and please mark down your new password for future use.
Q3. What should I do if I cannot log in to the router’s web management page?
This can happen for a variety of reasons. Please try the methods below to log in again.
- Make sure your computer is connected to the router correctly and the corresponding LED indicator(s) light up.
- Make sure the IP address of your computer is configured as Obtain an IP address automatically and Obtain DNS server address automatically.
- Check your computer’s settings:
- Go to Start > Control Panel > Network and Internet, and click View network status and tasks.
- Click Internet Options on the bottom left.
- Click Connections and select Never dial a connection.
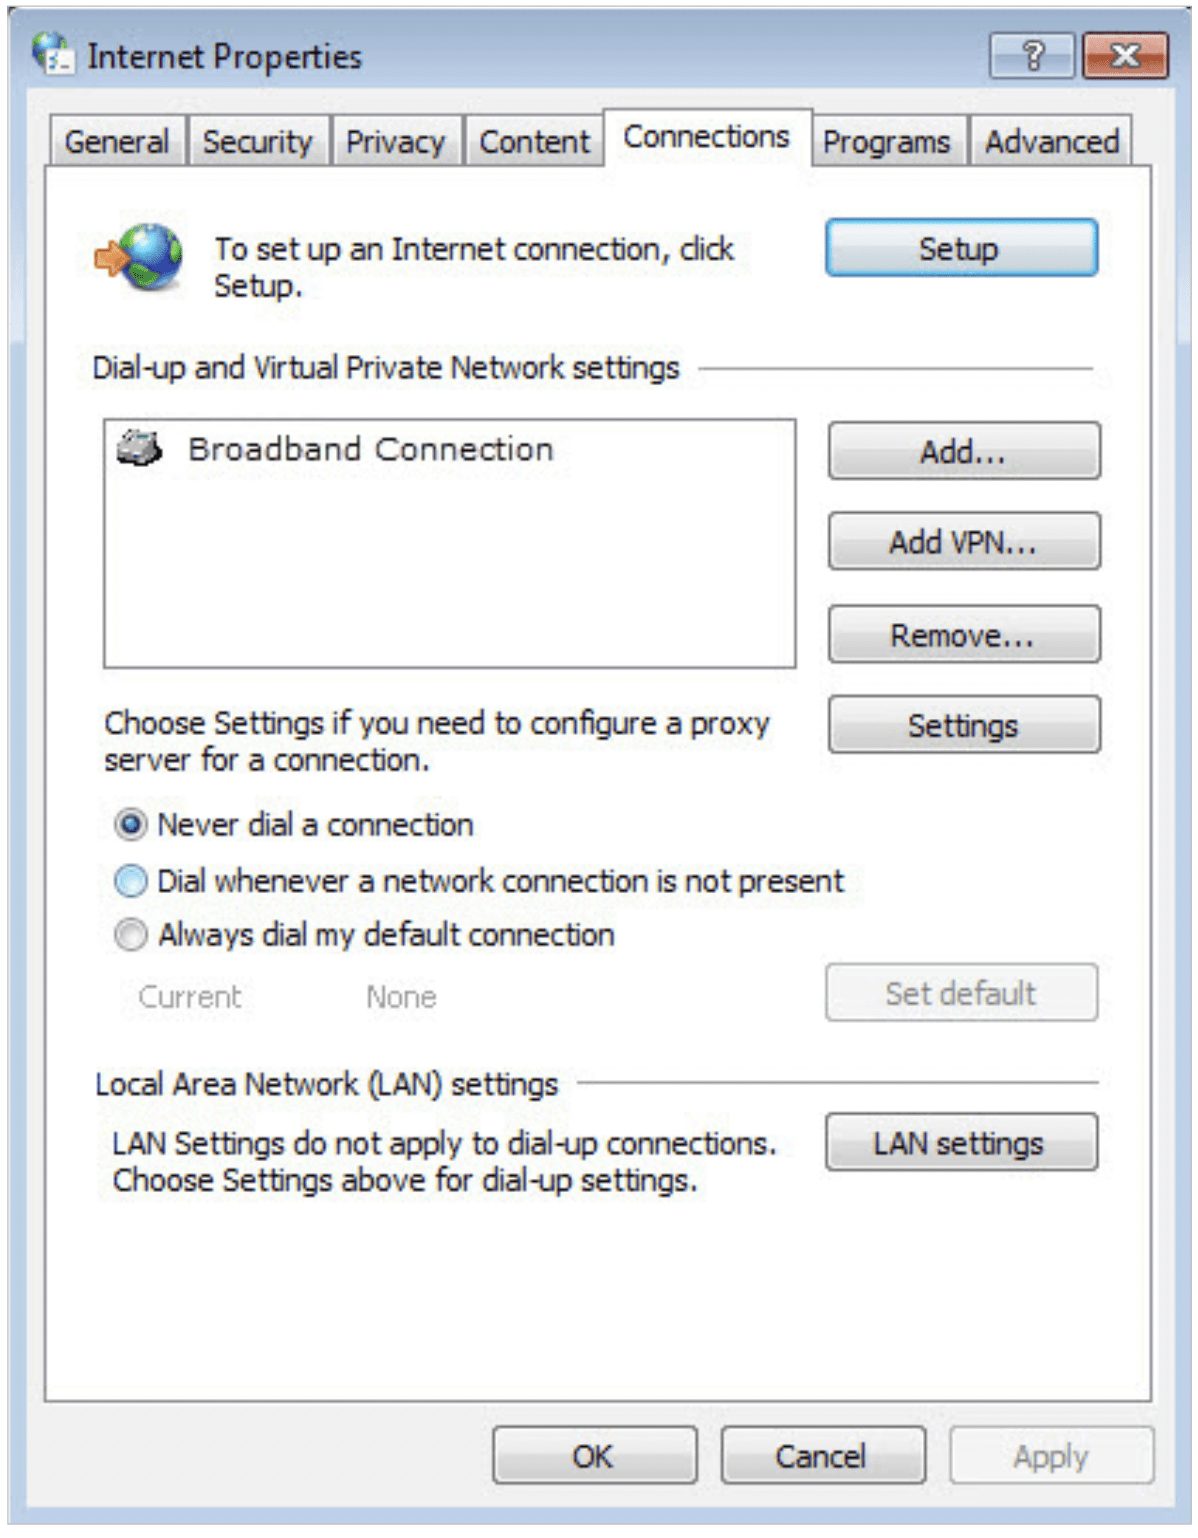
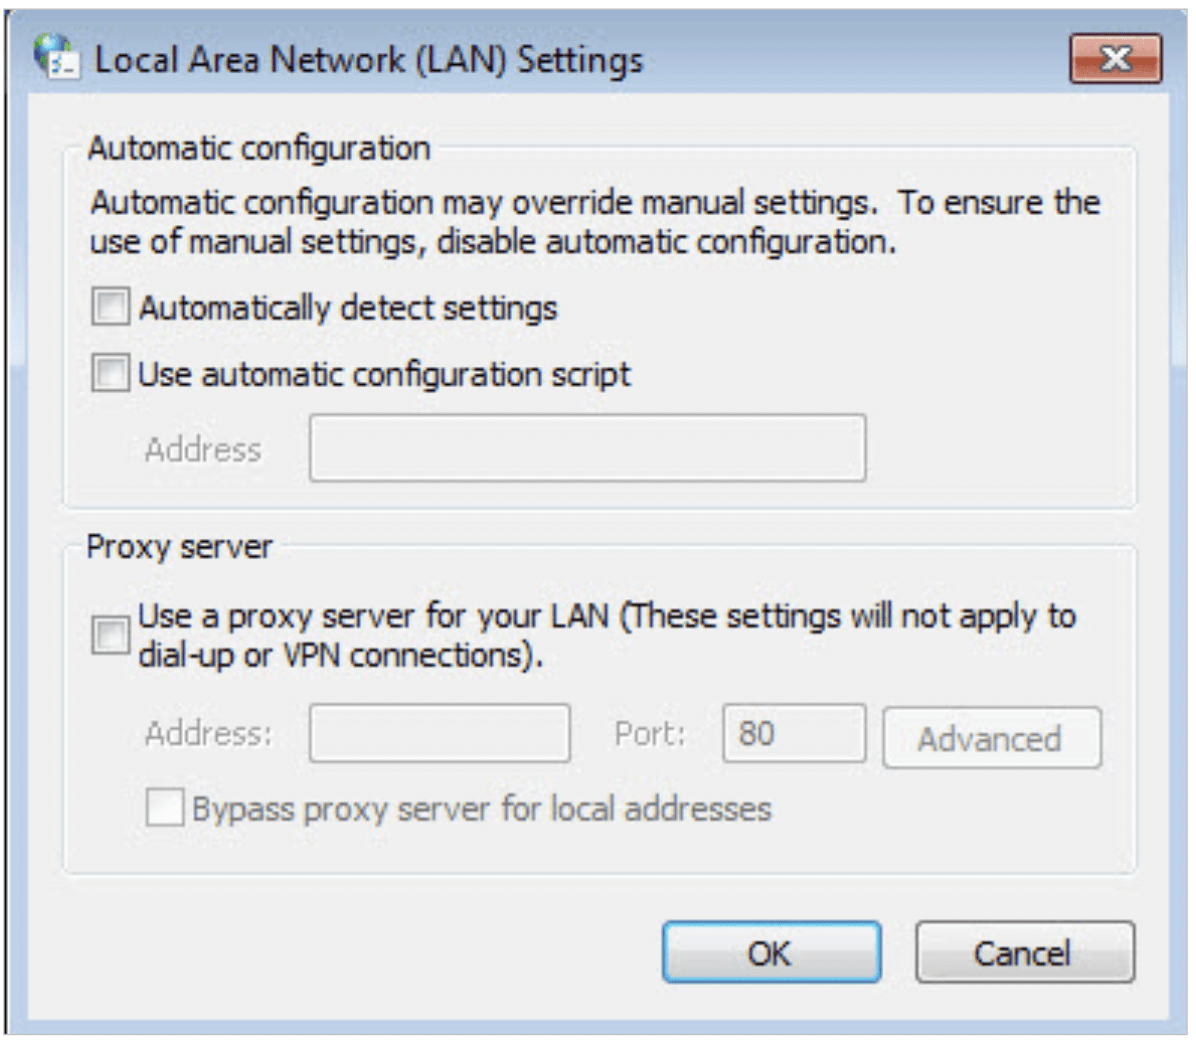
- Click LAN settings and deselect the following three options and click OK.
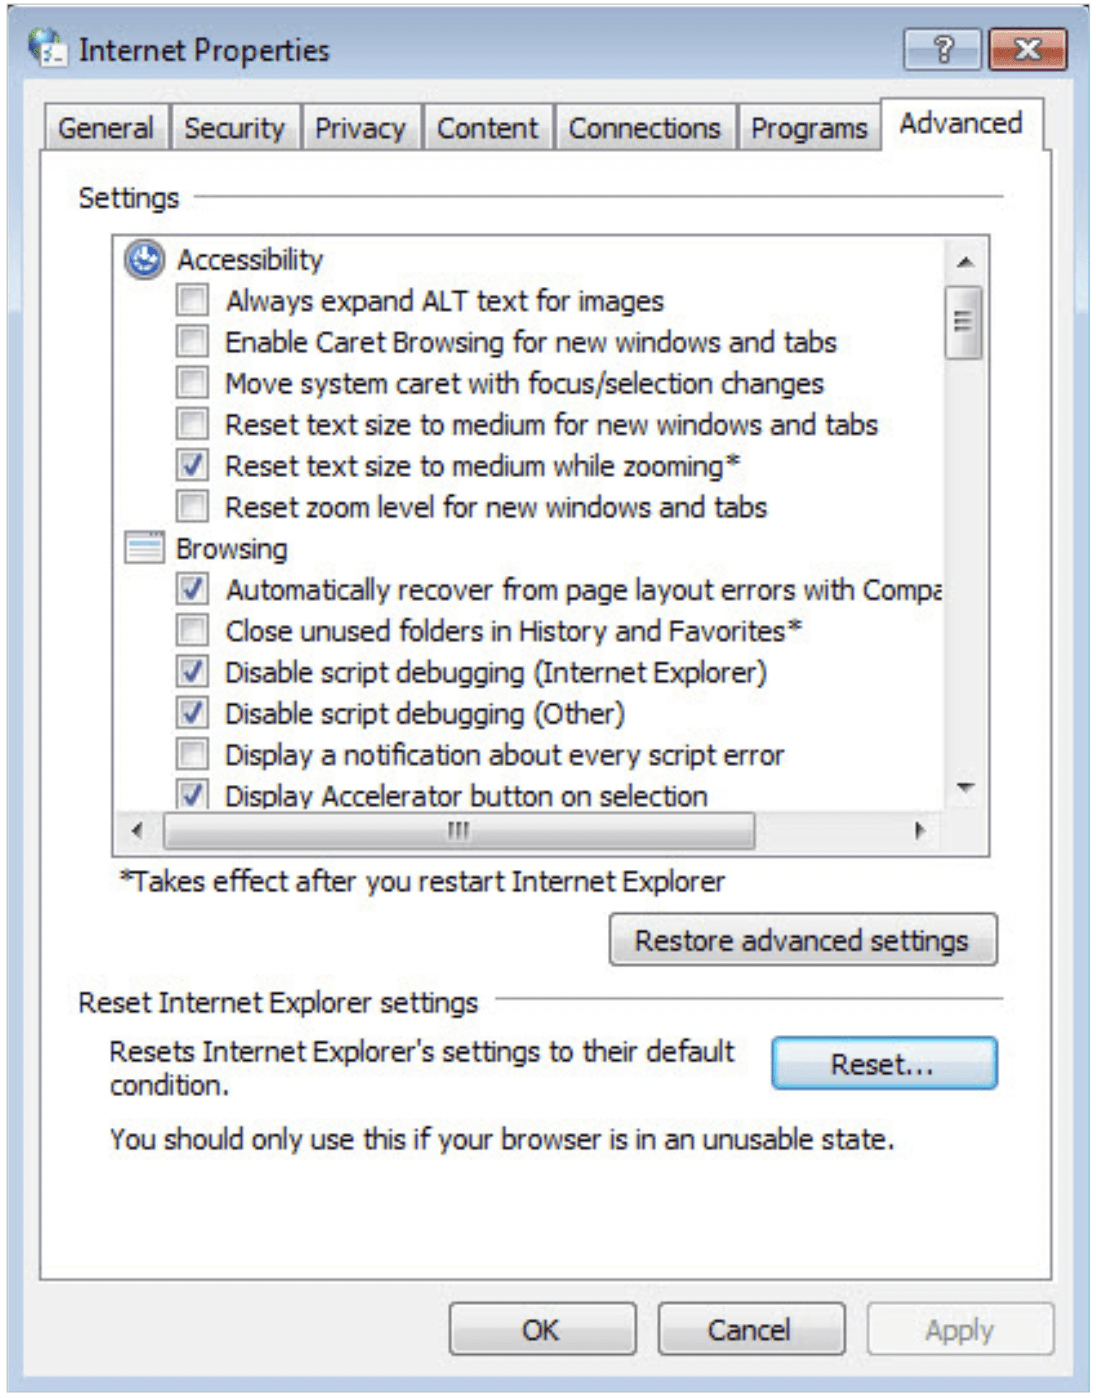
- Go to Advanced > Restore advanced settings, click OK to save the settings.
- Use another web browser or computer to log in again.
- Reset the router to factory default settings and try again. If login still fails, please contact the technical support.
Note: You’ll need to reconfigure the router to surf the internet once the router is reset.
Q4. How do I use the WDS Bridging function to extend my wireless network?
For example, my house covers a large area. The wireless coverage of the router I’m using (the root router) is limited. I want to use an extended router to extend the wireless network of the root router.
Note:
- WDS bridging only requires configuration on the extended router.
- WDS bridging function can be enabled either in 2.4GHz frequency or 5GHz frequency for a dual-band router. We use the WDS bridging function in 2.4GHz frequency as example.
- Log in with your TP-Link ID or the password you set for the router.
- Configure the IP address of the router:
Go to Advanced > Network > LAN, configure the IP address of the extended router to be in the same subnet with the root router; (For example, the IP address of the root router is 192.168.0.1, the IP address of the extended router can be 192.168.0.2~192.168.0.254. We take 192.168.0.2 as example.)
Click Save.
Note: Log in to the web management page again if the IP address of the router is altered.

- Survey the SSID to be bridged:
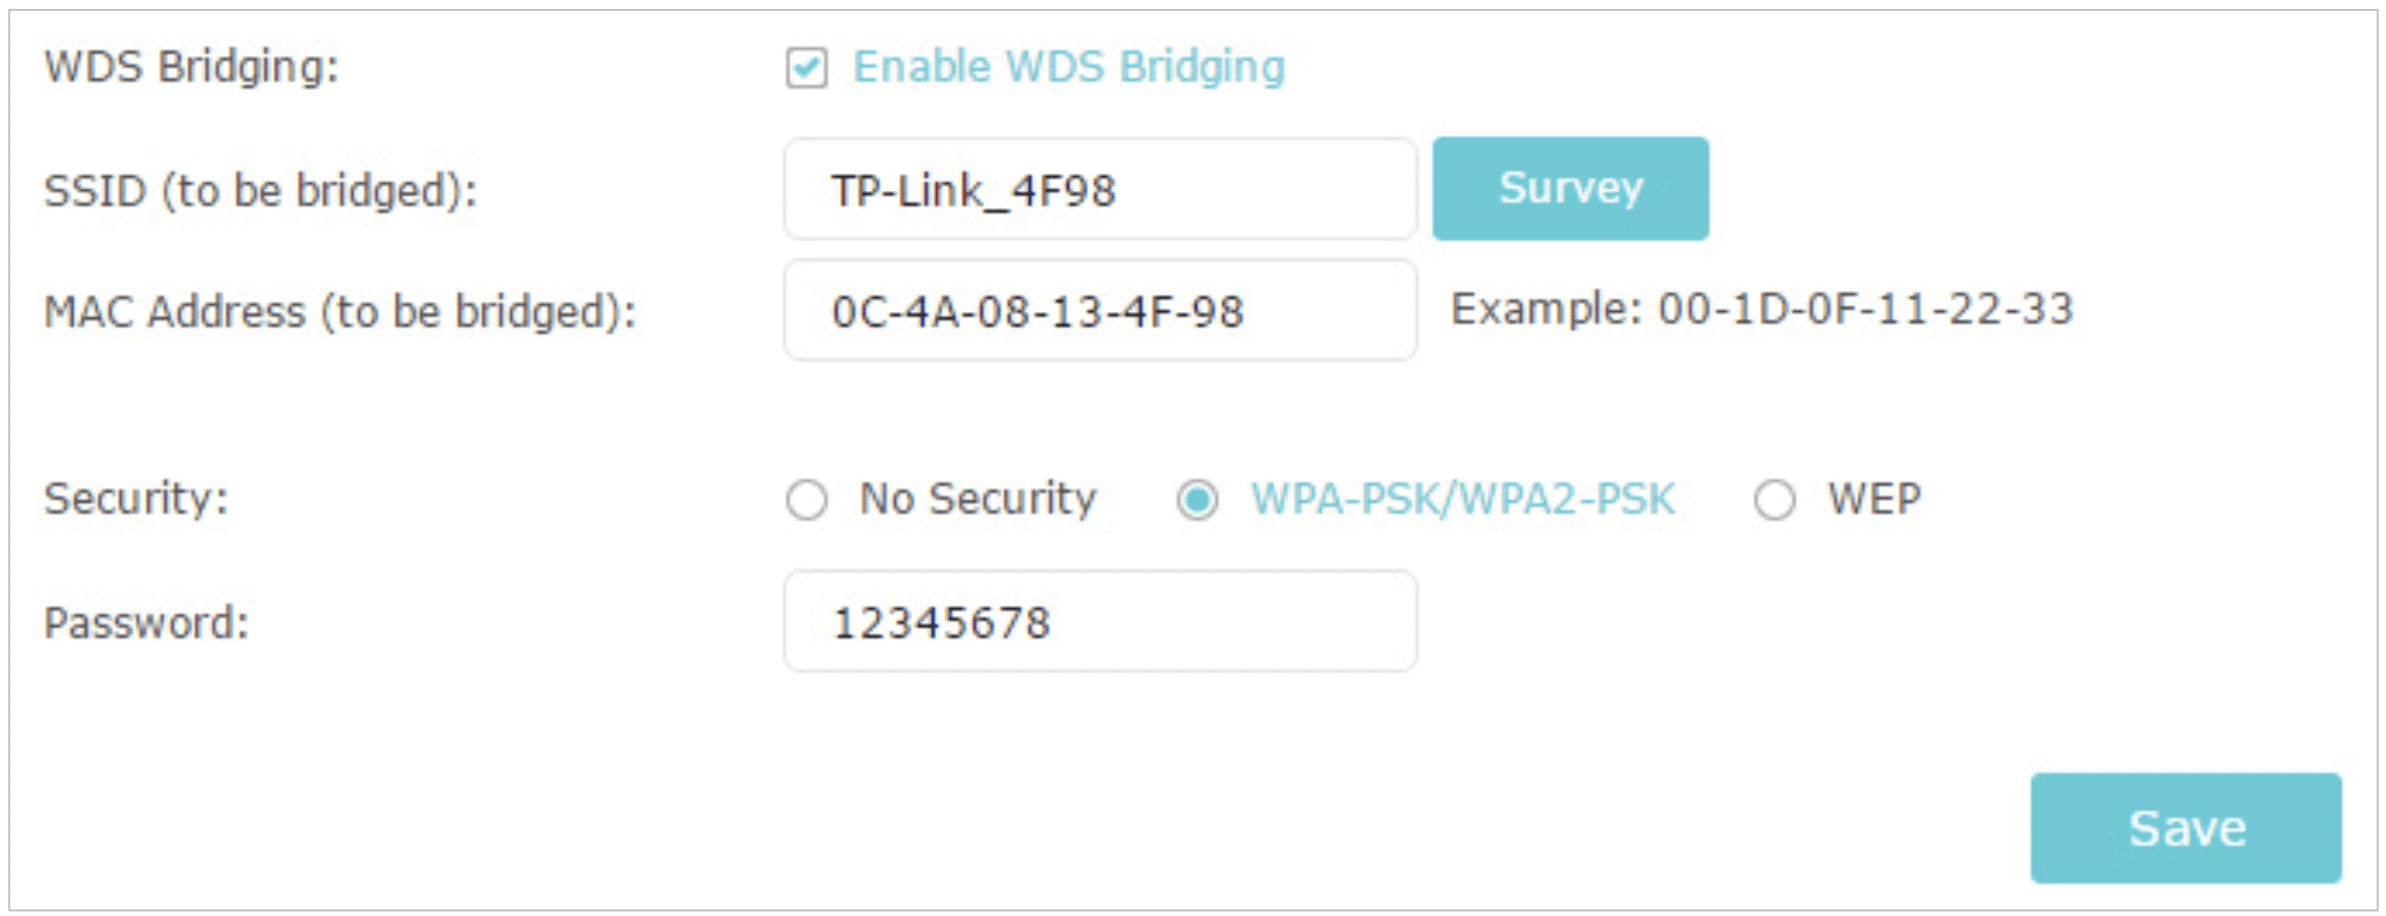
Go to Advanced > System Tools > System Parameters and focus on the 2.4GHz WDS section, click Enable WDS Bridging.
Click Survey, locate the root router’s SSID and click Choose (Here we take TP-Link_4F98 as example).
If the root router has wireless password, you should enter the wireless password of the root router.
Click Save.
- Disable DHCP:
Go to Network > DHCP Server.
Deselect Enable DHCP Server and click Save.
Now you can go to Advanced > Status > Wireless to check the WDS status. When the WDS status is Run, it means WDS bridging is successfully built.
Q5. What should I do if I cannot access the internet even though the configuration is finished?
- Log in with your TP-Link ID or the password you set for the router.
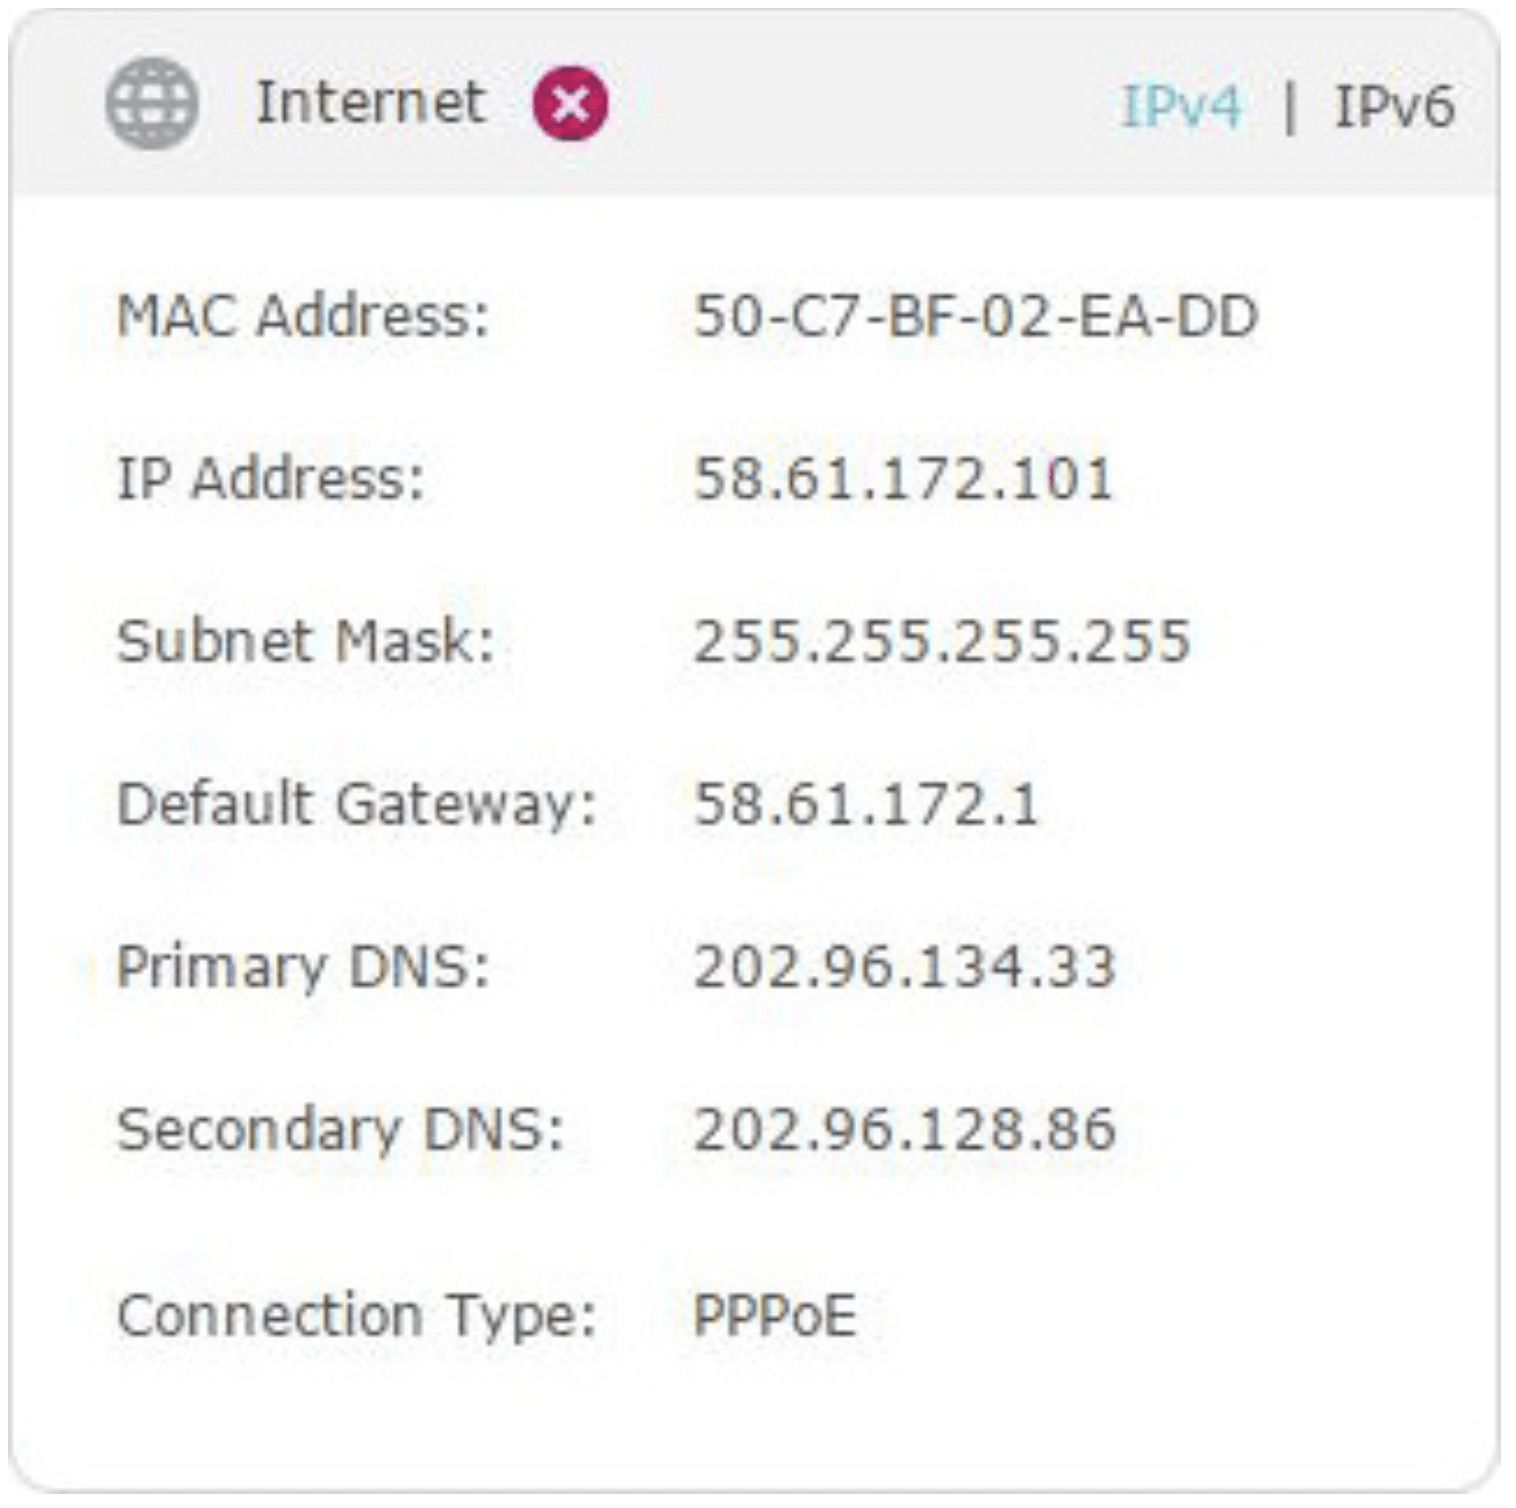
- Go to Advanced > Status to check internet status:
As the follow picture shows, if IP Address is a valid one, please try the methods below and try again:
Your computer might not recognize any DNS server addresses. Please manually configure the DNS server.
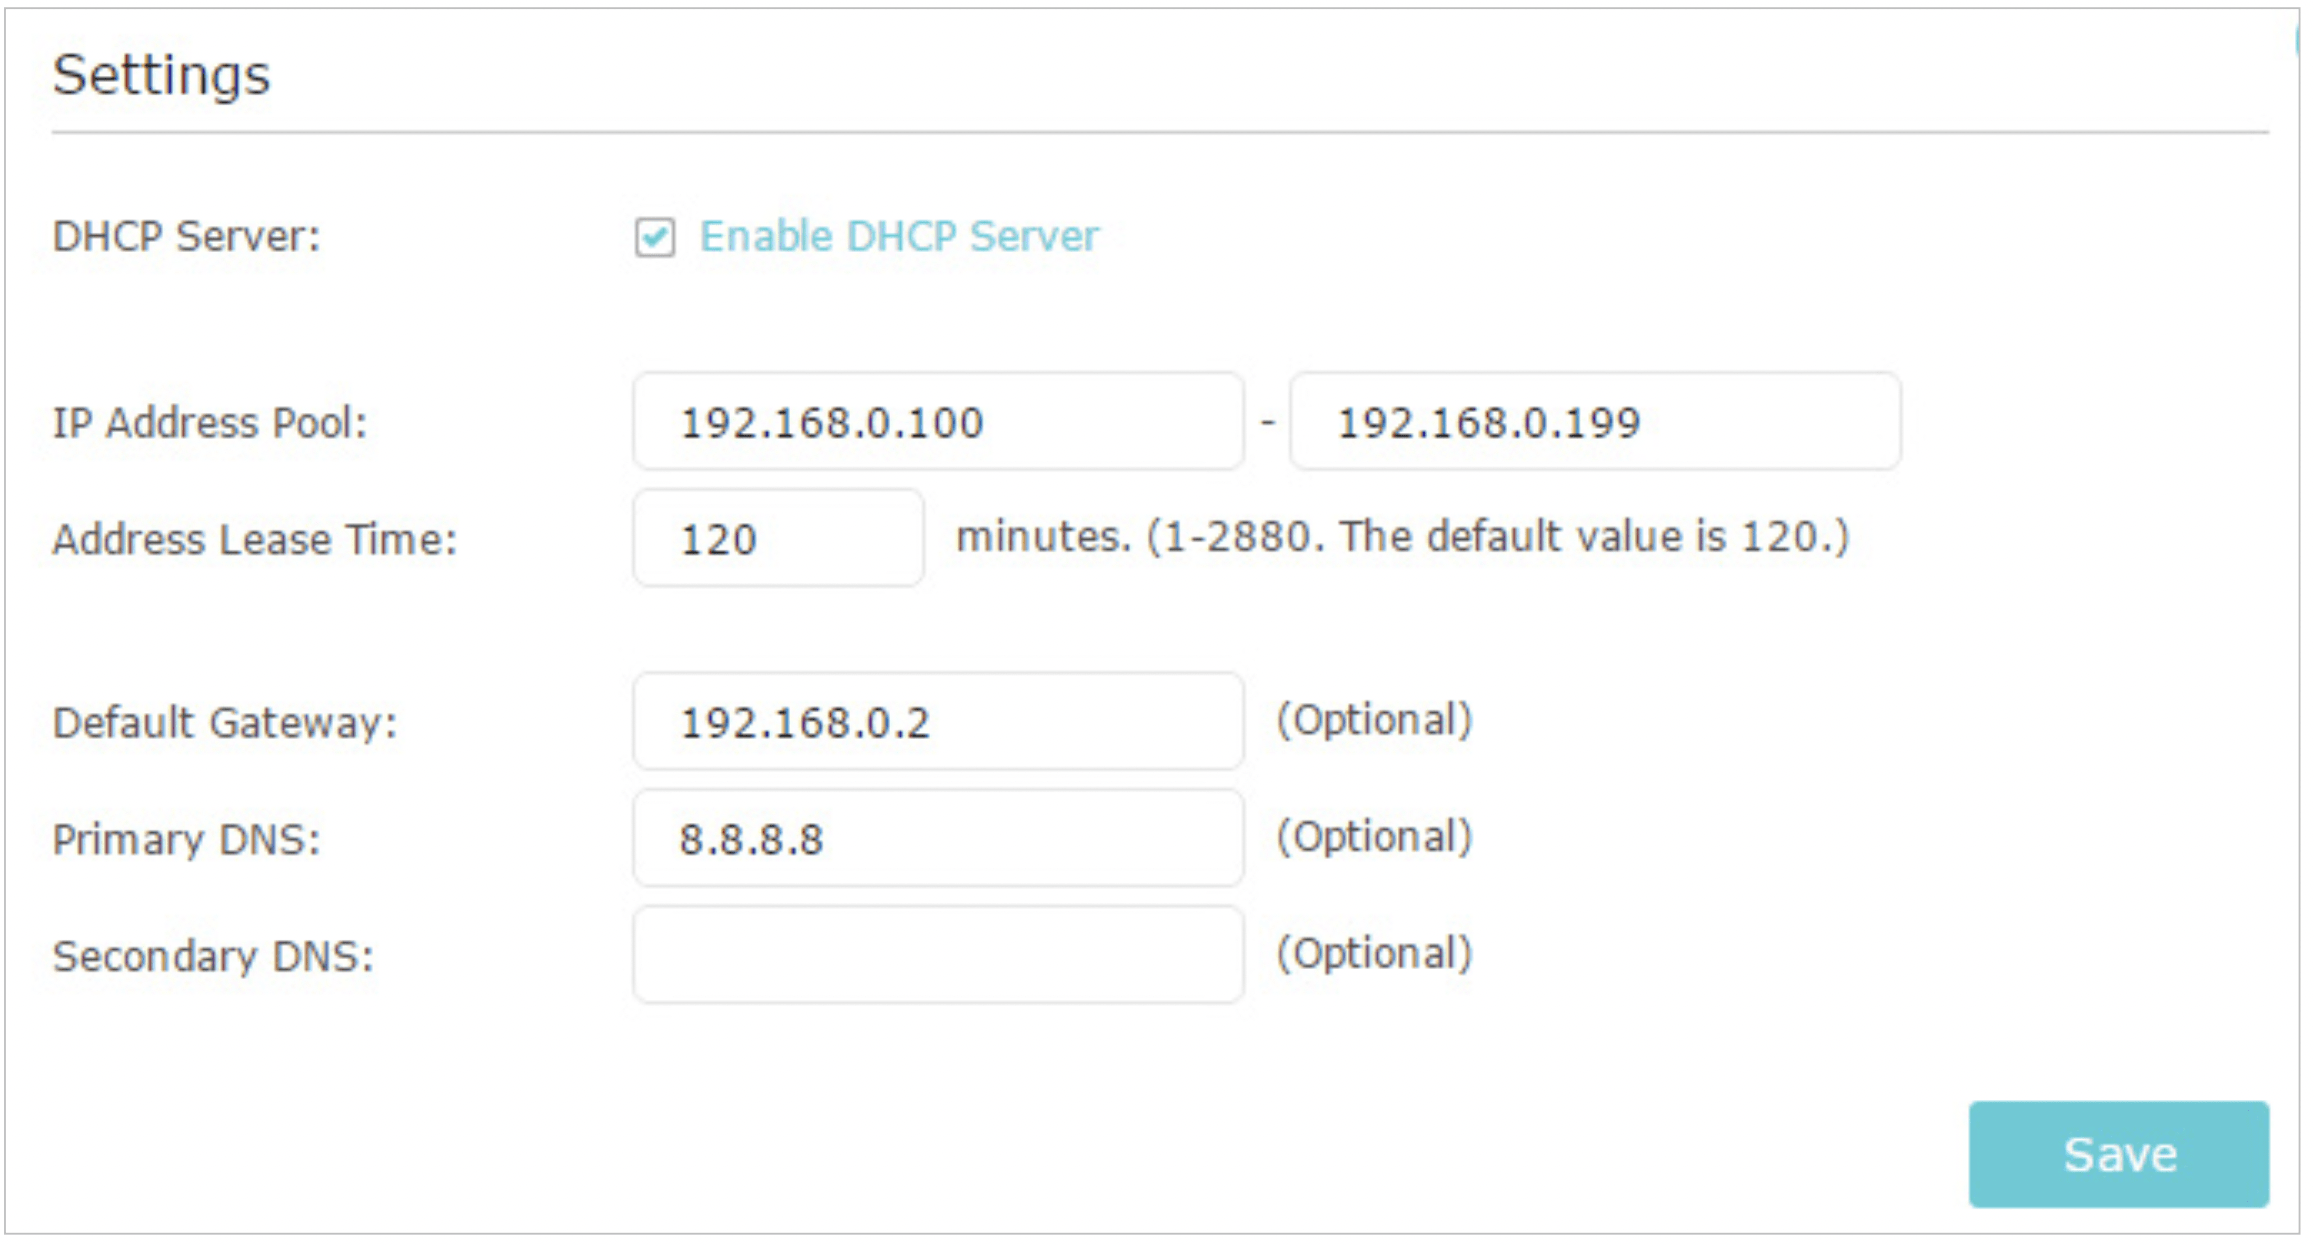
- Go to Advanced > Network > DHCP Server.
- Enter 8.8.8.8 as Primary DNS, click Save.
Tips: 8.8.8.8 is a safe and public DNS server operated by Google.
- Restart the modem and the router.
- Power off your modem and router, and leave them off for 1 minute.
- Power on your modem first, and wait about 2 minutes until it gets a solid cable or Internet light.
- Power on the router.
- Wait another 1 or 2 minutes and check the internet access.
- Reset the router to factory default settings and reconfigure the router.
- Upgrade the firmware of the router.
- Check the TCP/IP settings on the particular device if all other devices can get internet from the router.
As the picture below shows, if the IP Address is 0 0 0 0, please try the methods below and try again:
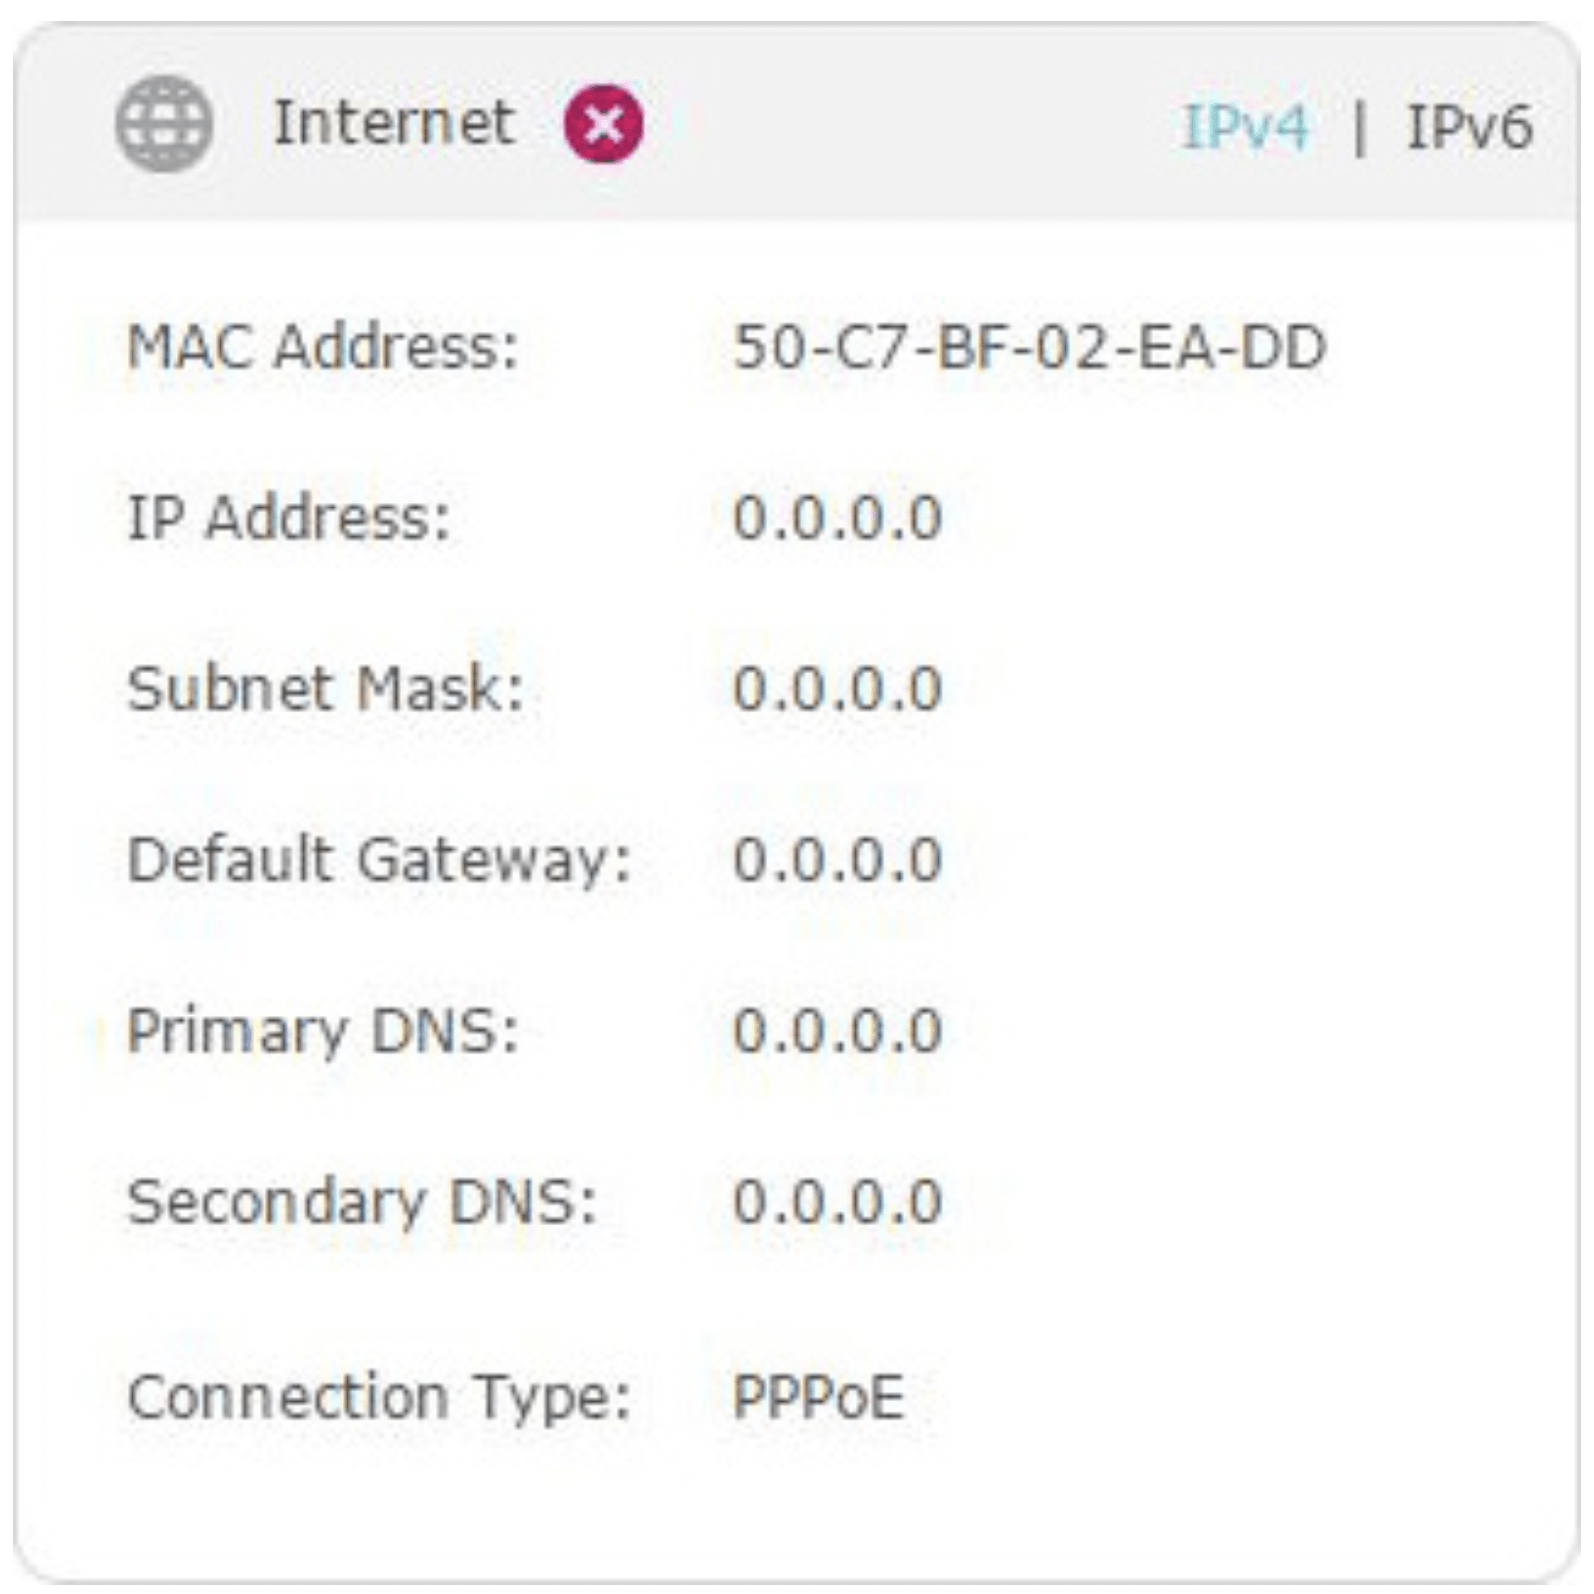
- Make sure the physical connection between the router and the modem is proper.
- Clone the MAC address of your computer.
- Log in with your TP-Link ID or the password you set for the router.
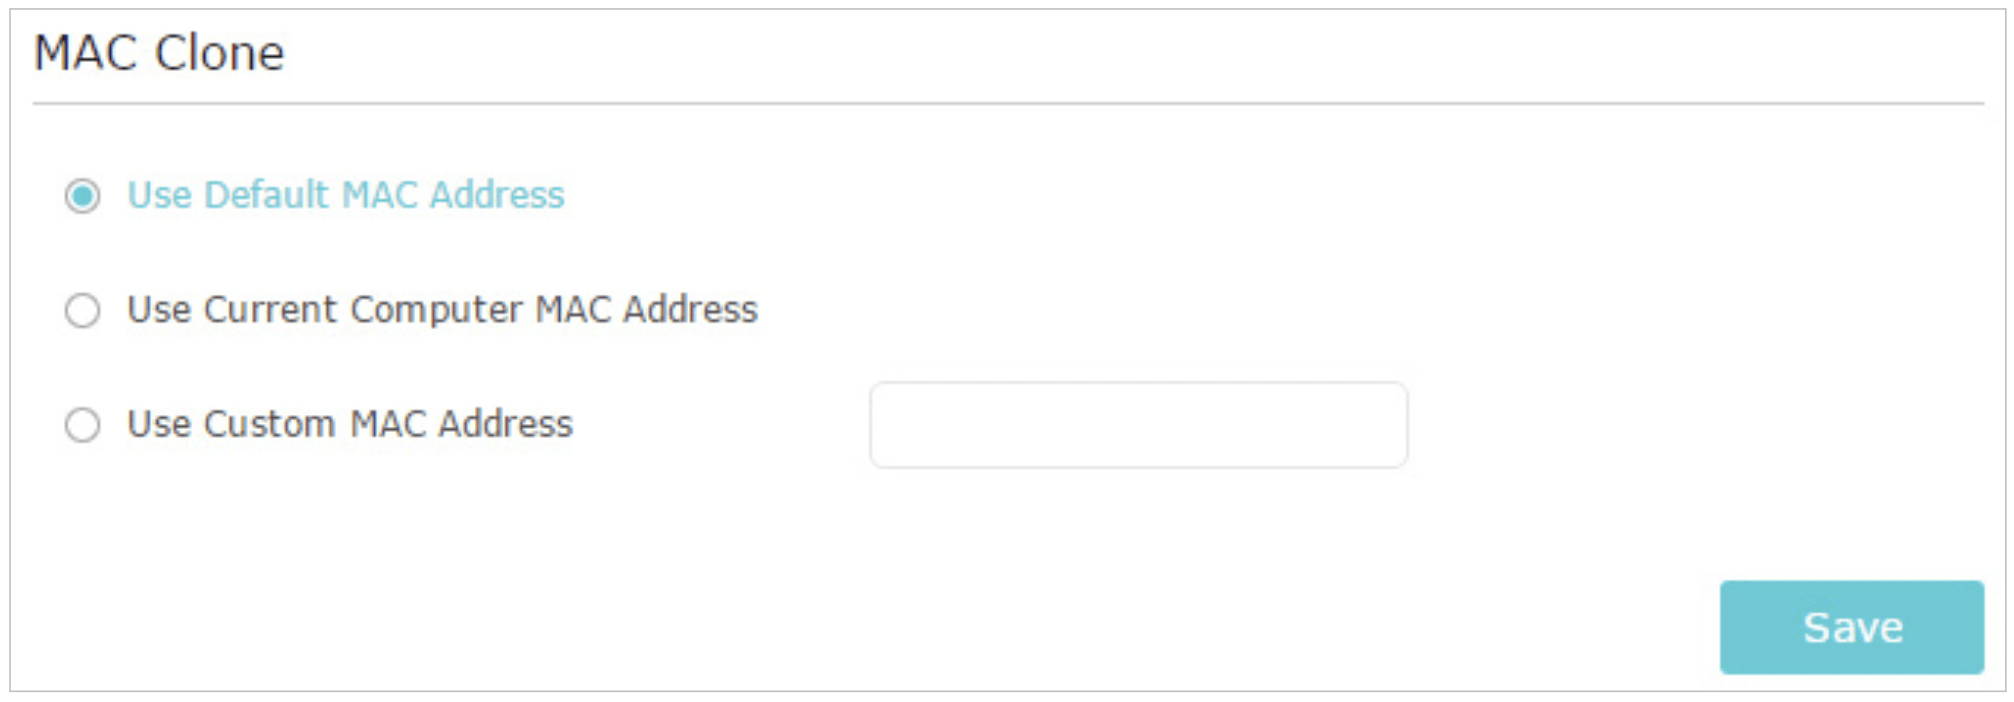
- Go to Advanced > Network > Internet and focus on the MAC Clone section.
- Choose an option as needed (enter the MAC address if Use Custom MAC Address is selected), and click Save.
Tips:
- Some ISP will register the MAC address of your computer when you access the internet for the first time through their Cable modem, if you add a router into your network to share your internet connection, the ISP will not accept it as the MAC address is changed, so we need to clone your computer’s MAC address to the router.
- The MAC addresses of a computer in wired connection and wireless connection are different.
Modify the LAN IP address of the router.
Note: Most TP-Link routers use 192.168.0.1/192.168.1.1 as their default LAN IP address, which may conflict with the IP range of your existing ADSL modem/router. If so, the router is not able to communicate with your modem and you can’t access the internet. To resolve this problem, we need to change the LAN IP address of the router to avoid such conflict, for example, 192.168.2.1.
- Log in with your TP-Link ID or the password you set for the router.
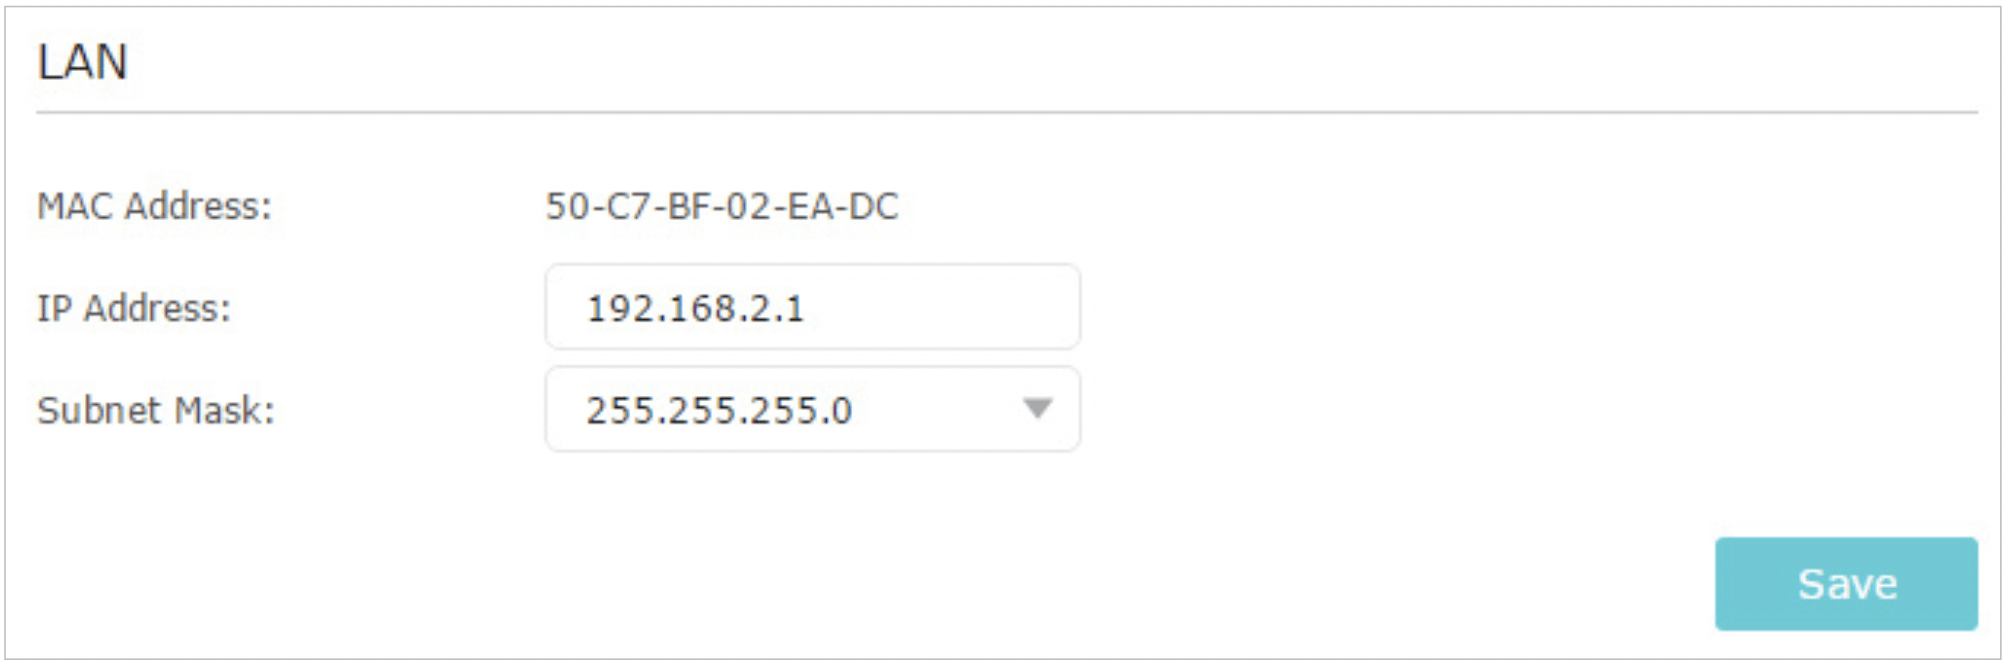
- Go to Advanced > Network > LAN.
- Modify the LAN IP address as the follow picture shows. Here we take 192.168.2.1 as an example.
- Click Save.
- Restart the modem and the router.
- Power off your modem and router, and leave them off for 1 minute.
- Power on your modem first, and wait about 2 minutes until it get a solid cable or Internet light.
- Power on the router.
- Wait another 1 or 2 minutes and check the internet access.
- Double check the internet connection type.
- Confirm your internet connection type, which can be learned from the ISP.
- Log in with your TP-Link ID or the password you set for the router.
- Go to Advanced > Network > Internet.
- Select your Internet Connection Type and fill in other parameters.
- Click Save.
- Restart the modem and the router again.
- Please upgrade the firmware of the router.
If you’ve tried every method above but still cannot access the internet, please contact the technical support.
Q6. What should I do if I cannot find my wireless network or I cannot connect the wireless network?
If you fail to find any wireless network, please follow the steps below:
Make sure the wireless function of your device is enabled if you’re using a laptop with built-in wireless adapter. You can refer to the relevant document or contact the laptop manufacturer.
Make sure the wireless adapter driver is installed successfully and the wireless adapter is enabled.
- If you see the message No connections are available, it is usually because the wireless function is disabled or blocked somehow.
- Click Troubleshoot and windows might be able to fix the problem by itself.
- If you see the message Windows cannot configure this wireless connection, this is usually because windows configuration utility is disabled or you are running another wireless configuration tool to connect the wireless.
- Exit the wireless configuration tool (the TP-Link Utility, for example).
- Select and right click on My Computer on desktop, select Manage to open Computer Management window.
- Expand Services and Applications > Services, find and locate Wireless Zero Configuration in the Services list on the right side.
- Right click Wireless Zero Configuration, and then select Properties.
- Change Startup type to Automatic, click on Start button and make sure the Service status is Started. And then click OK.
If you can find other wireless network except your own, please follow the steps below:
- Check the WLAN LED indicator on your wireless router/modem.
- Make sure your computer/device is still in the range of your router/modem. Move it closer if it is currently too far away.
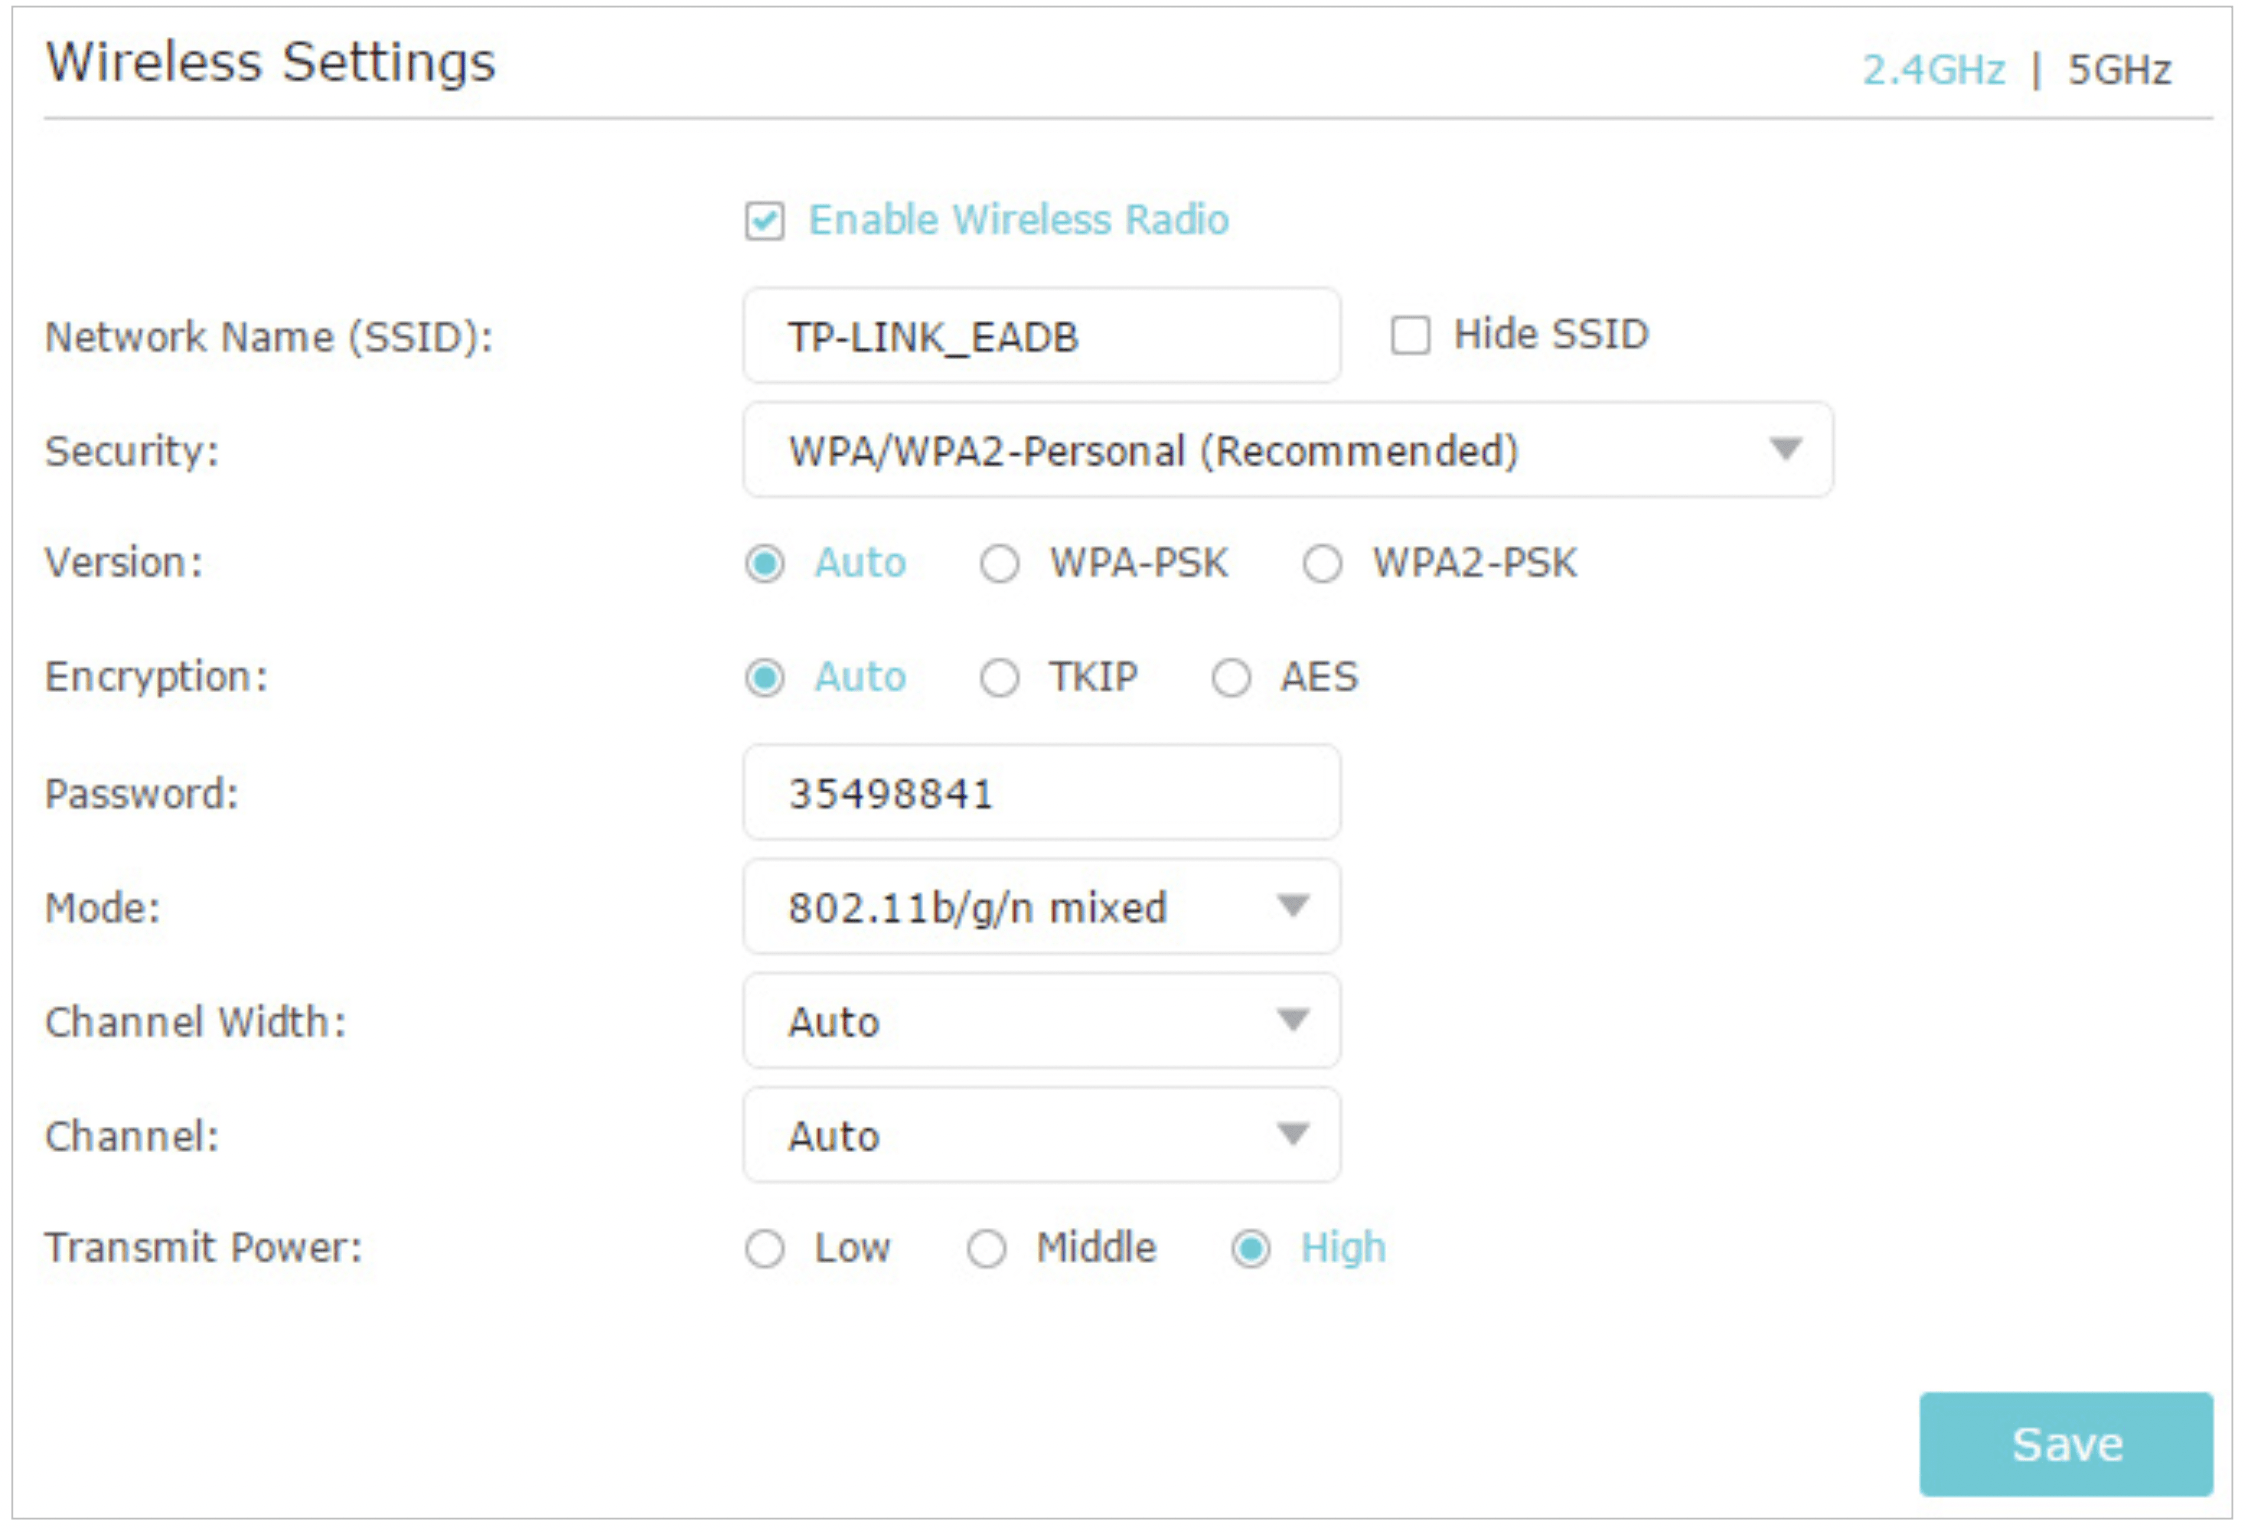
- Go to Advanced > Wireless > Wireless Settings, and check the wireless settings.
Double check your Wireless Network Name and SSID is not hided.
If you can find your wireless network but fail to connect, please follow the steps below:
- Authenticating problem/password mismatch:
- Sometimes you will be asked to type in a PIN number when you connect to the wireless network for the first time. This PIN number is different from the Wireless Password/Network Security Key, usually you can only find it on the label of your router.
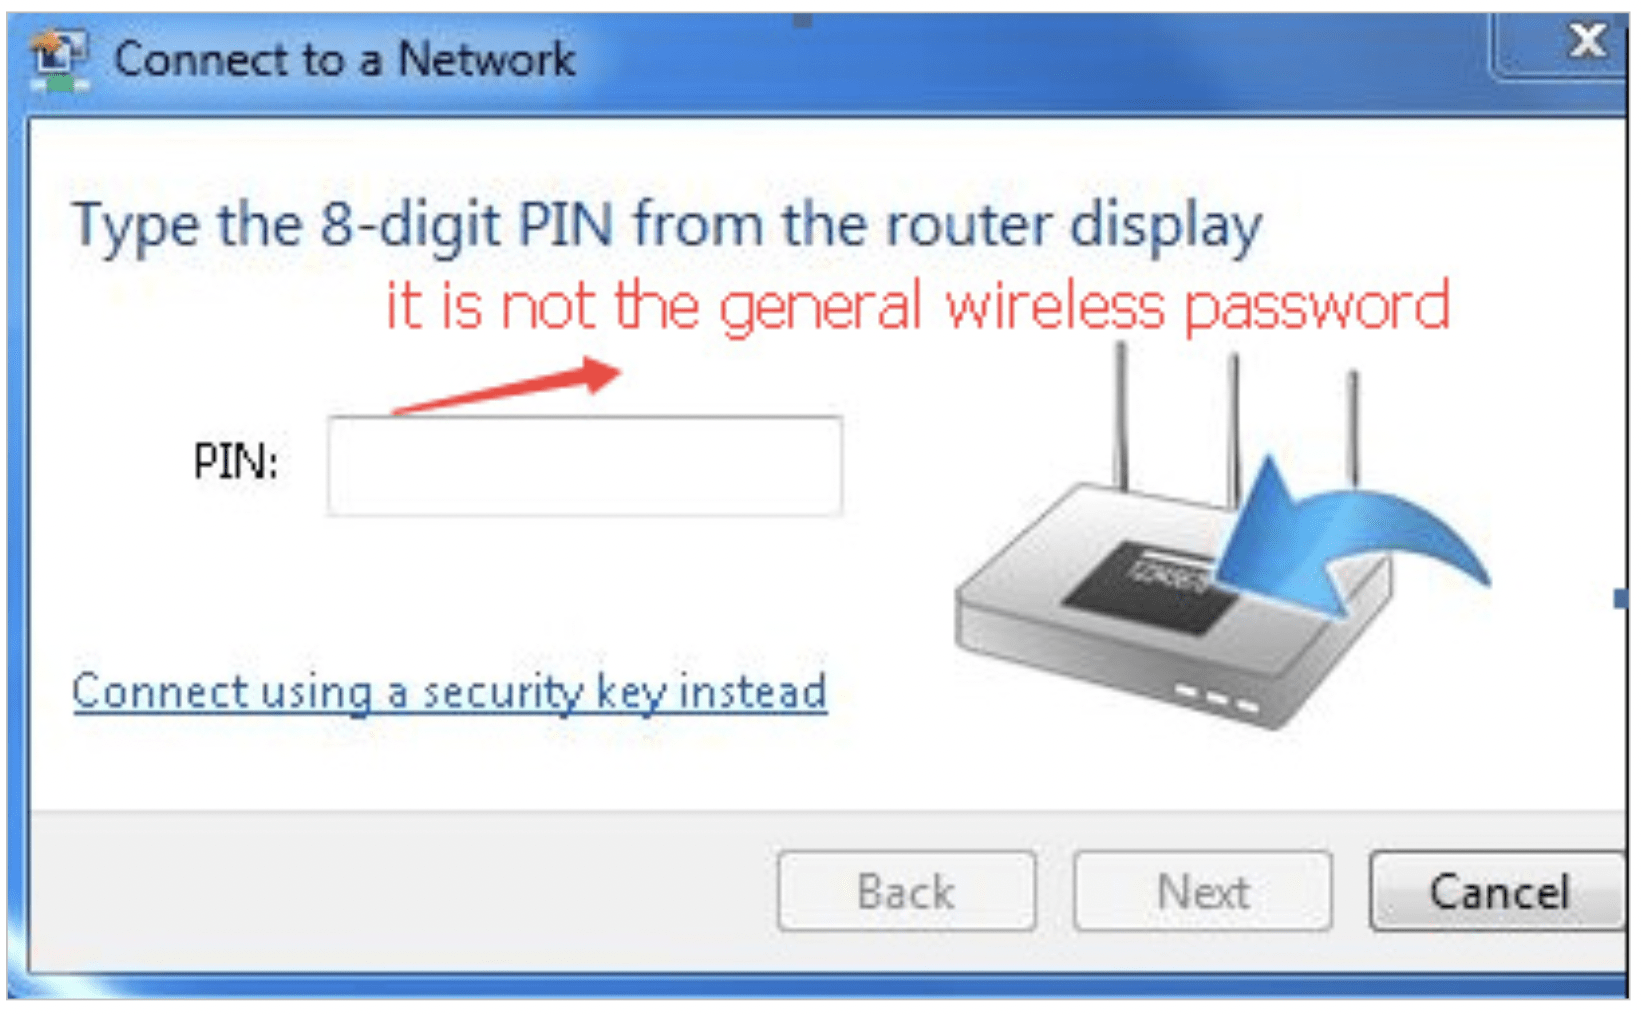
- If you cannot find the PIN or PIN failed, you may choose Connecting using a security key instead, and then type in the Wireless Password/Network Security Key.
- If it continues to show note of Network Security Key Mismatch, it is suggested to confirm the wireless password of your wireless router.
Note: Wireless Password/Network Security Key is case sensitive.
- Windows unable to connect to XXXX / Can not join this network / Taking longer than usual to connect to this network:
- Check the wireless signal strength of your network. If it is weak (1~3 bars), please move the router closer and try again.
- Change the wireless Channel of the router to 1, 6 or 11 to reduce interference from other networks.
- Re-install or update the driver for your wireless adapter of the computer.