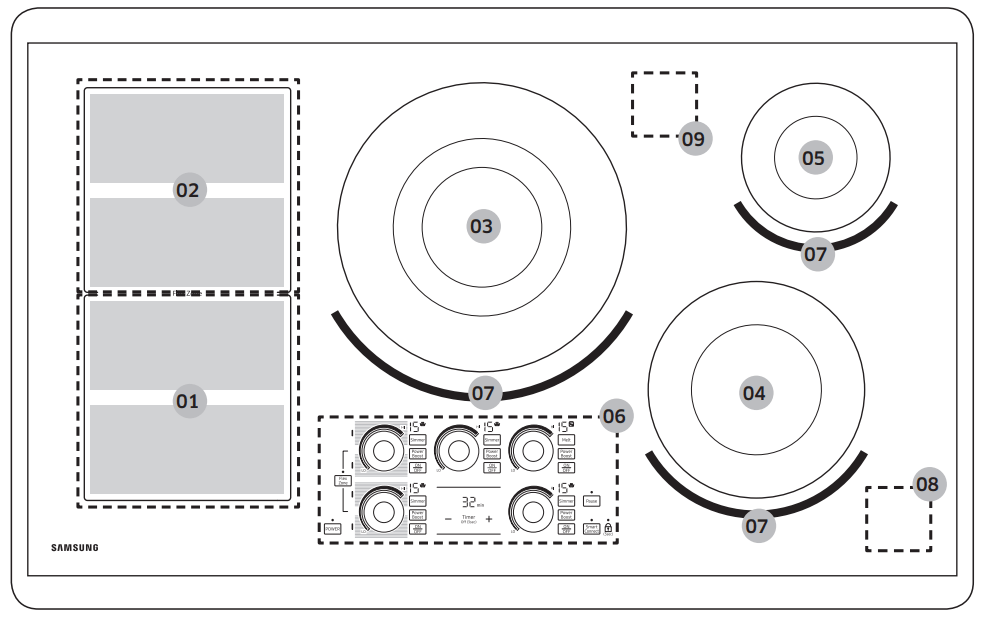
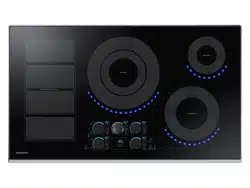
Induction front Wide Flex zone: 1800W. With Power Boost, 2600W
Induction rear Wide Flex zone: 1800W. With Power Boost, 2600W
Center: 11", 3600 W. With Power Boost, 4800 W
Right front: 8", 2200 W. With Power Boost, 3200 W.
Right rear: 6", 1400 W. With Power Boost, 2000 W.
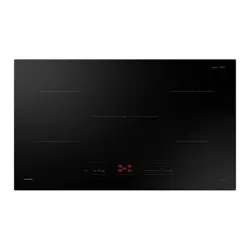
Control Panel
Virtual Flame 08 Wi-Fi communication area
Bluetooth communication area
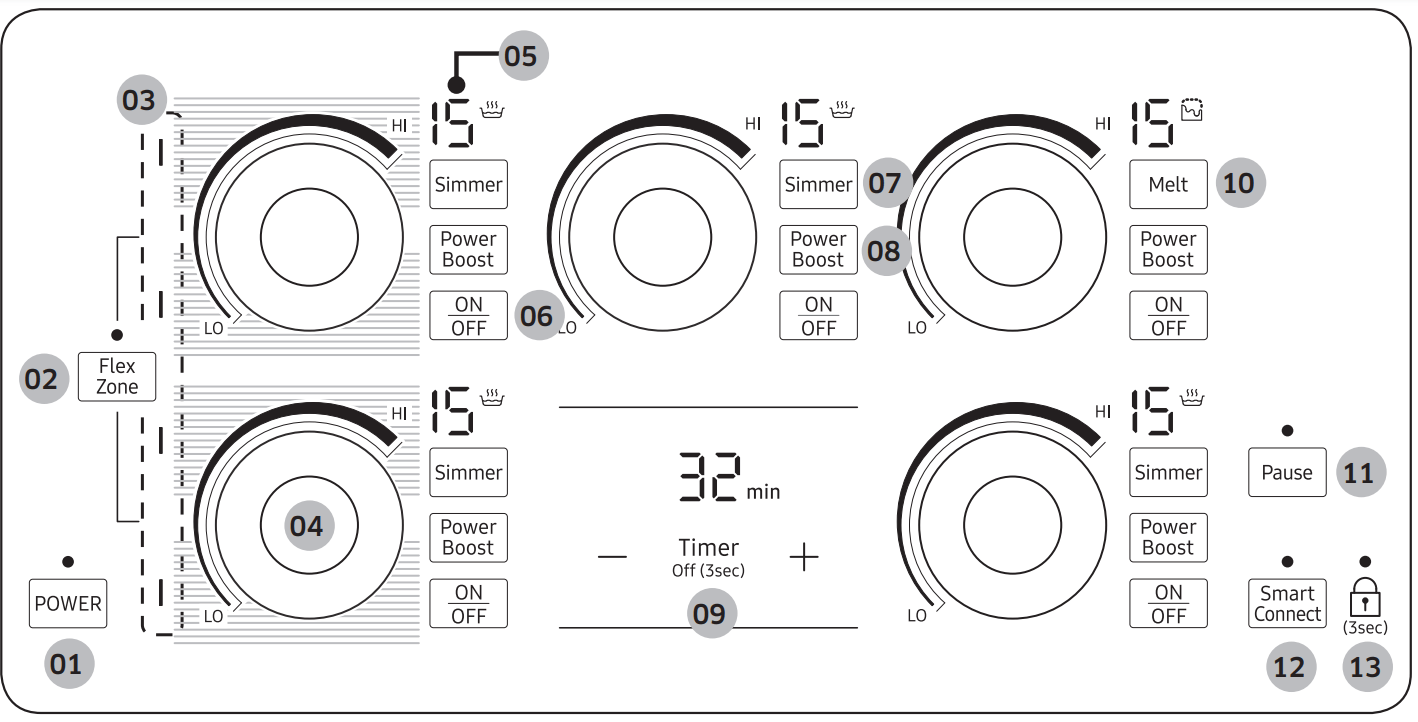
Control Panel
Power
Flex Zone selector
Flex zone indicator
Heat setting selector (Magnetic Knob)
Indicators for heat settings and residual heat
Cooking Zone selector
Simmer selector
Power Boost selector
Timer
Melt selector
Pause
Smart Connect
Child lock
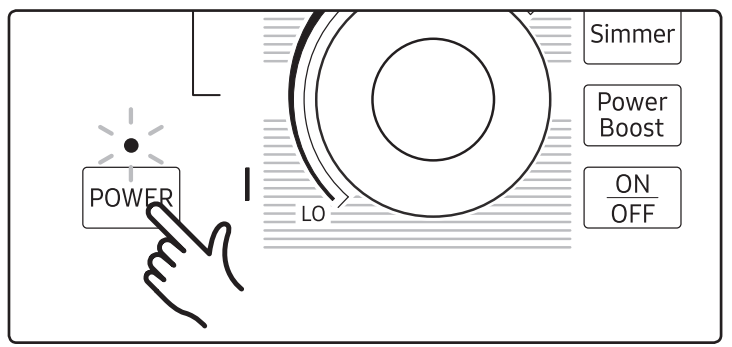
Switching the appliance on
Turn the cooktop on by touching the POWER key for approximately 1 second.
NOTE
After you have touched the POWER key to switch on your cooktop, you must select a cooking zone or element and a power setting within approximately 20 seconds. Otherwise, the cooktop will switch itself off for safety reasons.
Selecting a cooking zone and power setting
To select an element or cooking zone, touch the ON/OFF key of the zone or element.
To set or adjust the power level, run your finger clockwise or counterclockwise along the surface of the element or zone control as shown in the illustration.
If you do not set a power level after selecting an element, the element will turn off automatically after 10 seconds.
You can also use the magnetic knob to control the element or cooking zone.
NOTE
If you try to rotate the magnetic knob by grabbing its side or pushing it, it will not work. Grasp the knob with two fingers, and then turn it.
If you turn the magnetic knob while wearing oven gloves, the knob will not work. You must be bare handed.
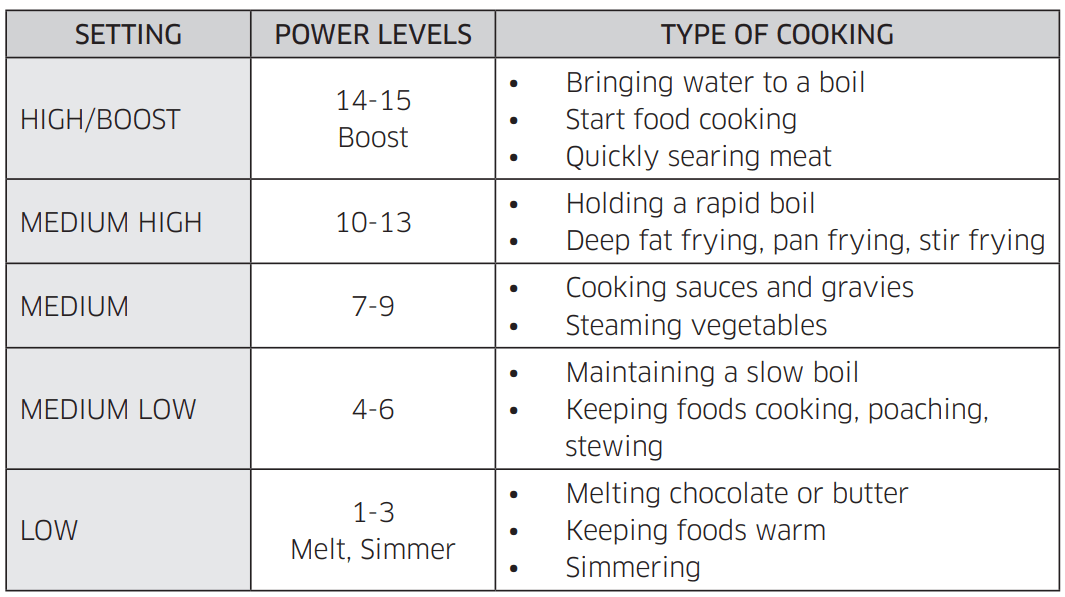
Recommended settings
Child lock
Touch the Child Lock key for approximately 1 seconds. An acoustic signal will sound as confirmation.
Touch any control key. will appear in the displays, indicating the child lock has been activated.
To switch the child lock off, touch the Child Lock key again for 1 second. An acoustic signal will sound as confirmation.
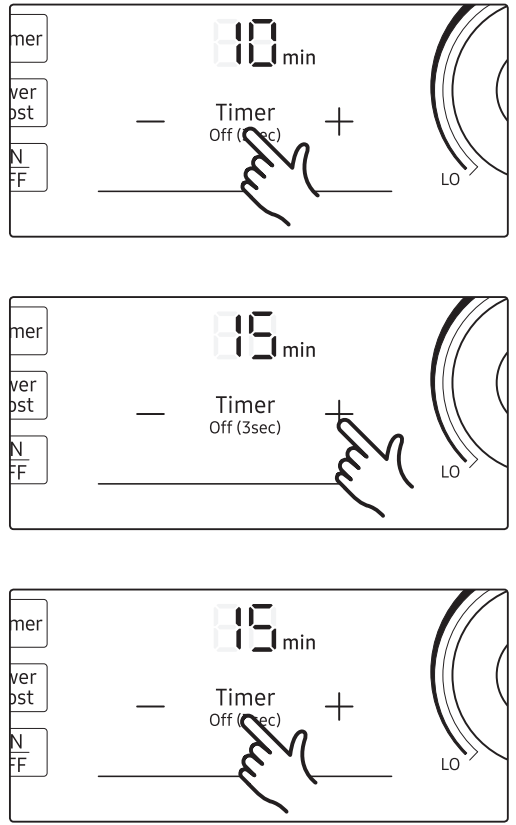
Timer
1 Press the Timer key. The number 10 will be displayed above the timer display.
2 Use the Timer setting selectors ( or to set the desired amount of time. Then, press Timer key again. The timer can be adjusted from 0 to 99.
3. To cancel the timer settings, hold down the Timer key for 3 seconds.
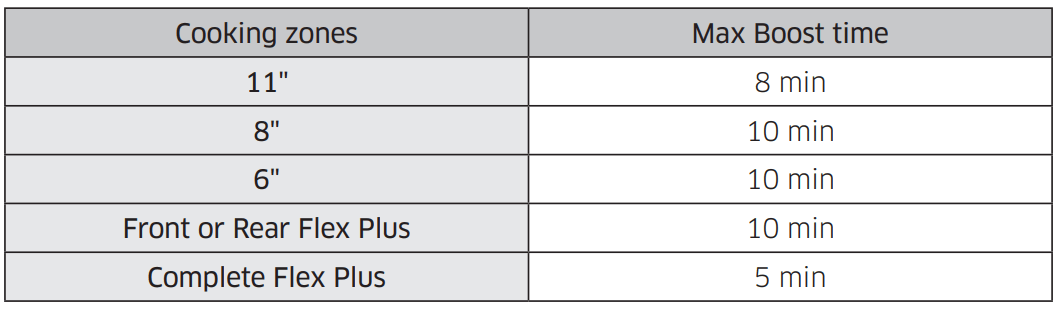
Power boost control
The Power Boost function makes additional power available to each cooking zone (for example, when you want to bring a large volume of water to a boil).
When the Max Boost times expire, the cooking zones automatically return to power level 15.
NOTE
In certain circumstances, the Power Boost function may be deactivated automatically to protect the internal electronic components of the cooktop.
Power management
The cooking zones have a maximum power available to them.
If this power range is exceeded in a cooking zone when you switch on the Power Boost function, Power Management automatically reduces the power setting of the cooking zone.
The indicator for the cooking zone alternates for some seconds between the set power setting and the maximum possible power setting. Then, the indicator changes from the set power setting to the maximum possible power setting.
Pause
The Pause function simultaneously switches all cooking zones that are switched on to the low power setting. This function can be used to briefly interrupt and then continue the cooking process e.g. to take a telephone call.
When the Pause function is activated, all touch keys except for the Pause, Child Lock, ON/OFF, and POWER keys are disabled. To resume cooking, touch the Pause button. The cooking zones return to their previous setting.
NOTE
Timer functions are not stopped by the Pause function.
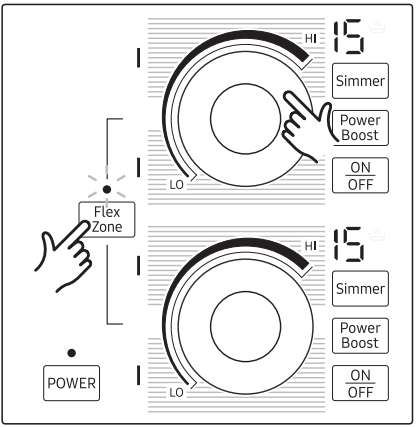
Flex zone
Touch the Flex Zone selector. The two left elements are synched and will now work together.
Use an element control as shown to adjust the power level of the two left elements. The power setting displays of the two left elements (front and rear) will change together.
To disable the Flex Zone function, touch the Flex Zone selector. You can also use the magnetic knob to control the two elements.
Flex zone Indicator
The Flex Zone indicator uses pan detection to display the active zone when the Flex Zone function is enabled.
NOTE
If an inappropriate pot or pan is placed on the cooking zone, the indicator blinks. If the pot or pan is not removed, the cooking zone turns off.
Any one element of the Flex zone may not operate properly with a small pan or pot if it slants to one element even slightly.
To turn the synched elements off, touch the ON/OFF key for any synched element. The two synced elements will turn off simultaneously.
Size of pans
Induction cooking zones adapt automatically to the size of the bottom of the cookware up to a certain limit. However the magnetic part of the bottom of the cookware must have a minimum diameter depending upon the size of the cooking zone.
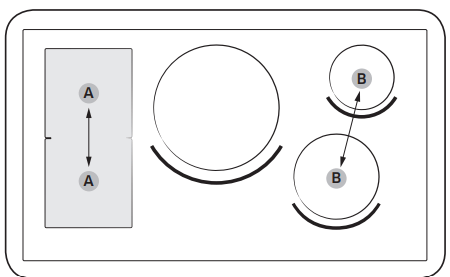
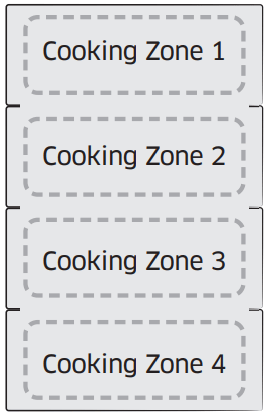
Flex zone Plus
The Flex zone is the large cooking area located on the left side of the hob (see the figure below) that is specially designed to accommodate multiple pots and pans of varying shapes and sizes at once. The Flex zone has four zones that are operated by individual inductors, allowing you to cook regardless of where cookware is placed on a cooking zone.
With Flex zone Plus, you can use a combination of different cooking zones to enlarge the cooking area. See the table below for the corresponding sensor to touch to activate the different combinations.
NOTE
When using only one cooking zone, the diameter of the bottom of the cookware must be less than 14 cm.
The hob may take 5-10 seconds to recognize the position of cookware.
Noises may occur while the hob recognizes the cookware.
Do not remove cookware during cooking. For safety purposes, the hob automatically stops if cookware has been removed for more than 5 seconds.
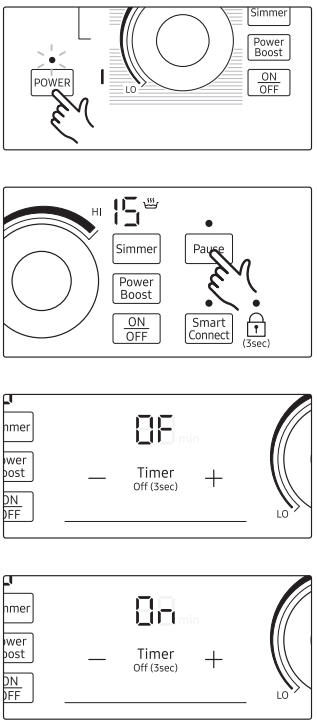
Virtual flame on/off
Touch the POWER key for approximately 1 second.
Touch the Pause key for 3 seconds within 10 seconds of pressing the POWER key.
Virtual flame will turn off and will appear in the Timer display.
To change the Virtual flame setting, repeat Steps 1 and 2. Virtual flame will turn ON and will appear in the Timer display.
NOTE
To change the Virtual flame On/Off setting, you must operate the Virtual flame On/Off function within 10 seconds of turning the power on.
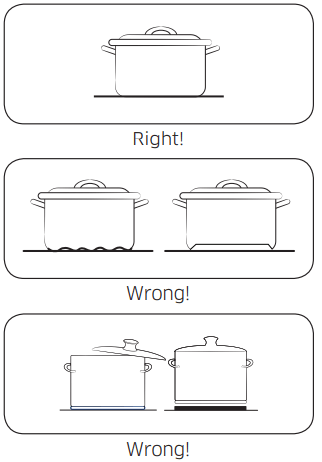
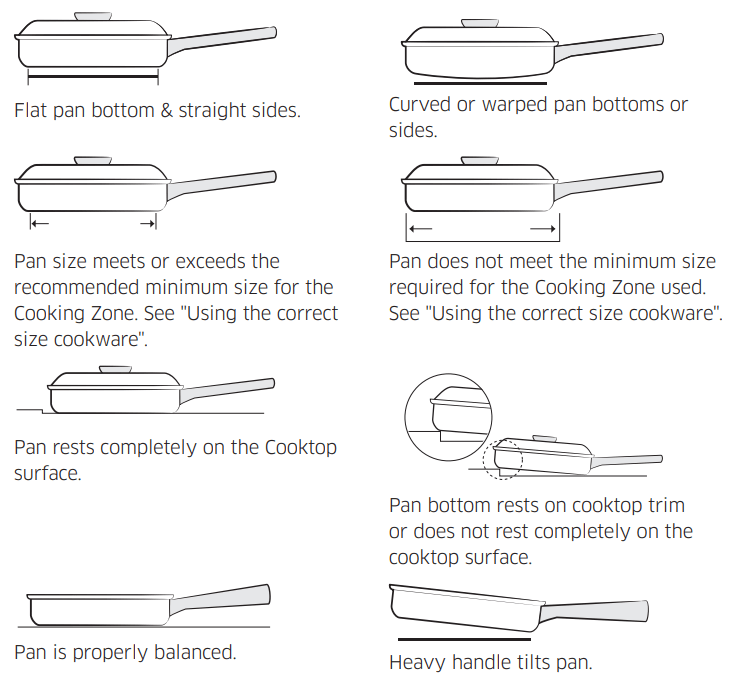
Cookware
NOTE
Use cookware made with the correct material for induction cooking.
Use quality cookware with heavier bottoms for better heat distribution. This provides for more even cooking results.
The pan size should match the amount of food being prepared.
Do not let pans boil dry. This may cause permanent damage in the form of breakage, fusion, or marring that can affect the ceramic cooktop. (This type of damage is not covered by your warranty).
Do not use dirty pans with grease buildup. Always use pans that are easy to clean after cooking.
CAUTION
The Cooking Zones may appear to be cool while turned ON and after they have been turned OFF. The glass surface may be HOT from residual heat transferred from the cookware and burns may occur.
DO NOT TOUCH HOT COOKWARE or PANS directly with your hands. Always use oven mitts or pot holders to protect your hands from burns.
DO NOT SLIDE cookware across the cooktop surface. Doing so may permanently damage the appearance of the ceramic cooktop.
NOTE
ANY one of the incorrect conditions listed above may be detected by the sensors located below the ceramic cooktop surface. If the cookware does not meet one or more of these conditions, one or more of the Cooking Zones will not heat, and settings will flash in the affected Cooking Zone display. Correct the problems before attempting to activate the cooktop.
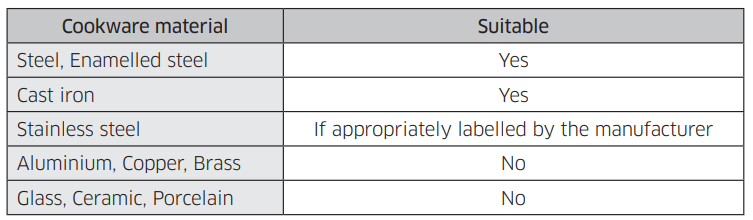
Cookware material
NOTE
Cookware appropriate for induction cooking is labelled as suitable by the manufacturer.
Certain cookware can make noise when being used on induction cooking zones. These noises do not indicate that the cooktop is malfunctioning and do not affect its operation in any way.
NOISE
You may hear the following operational noises:
Cracking noises : You may hear a cracking noise when you are using cookware made of two or more materials.
Whistling : A whistling noise occurs when both back burners are in use.
This is caused by vibrations. Whistling can vary depending on the weight or material of the cookware or the type of food you are cooking. (The noise can be reduced by using thicker cookware.)
Humming : You may hear a low humming when you set an element to a high power setting. This sound is generated by energy transmission, and it will disappear when cooktop is turned off.
Clicking : Electric switches are operating.
Hissing, Buzzing : You may hear a fan noise during cooktop operation. You may continue to hear it even after the cooktop is turned off. This is normal. The fan runs to cool down the temperature inside the cooktop. It will automatically shut itself off after a short period of time.
These noises are normal and do not indicate any defects.
Energy saving tips
Always position pots and pans before switching on the cooking zone.
Dirty cooking zones and pan bases increase power consumption.
When possible, position lids firmly on pots and pans so that the lids cover them completely.
Switch the cooking zones off before the end of the cooking time and use the residual heat to keep food warm.
Protecting the cooktop surface
Cleaning
Clean the cooktop before using it for the first time.
Clean your cooktop daily or after each use. This will keep your cooktop looking good and can prevent damage.
If a spillover occurs while you are cooking, immediately clean the spill while it is hot to prevent a tough cleaning chore later. Using extreme care, wipe the spill with a clean, dry towel.
Do not allow spills to remain on the cooking area or the cooktop trim for a long period of time.
Do not use abrasive cleansing powders or scouring pads, which will scratch the cooktop.
Do not use chlorine bleach, ammonia, or other cleansers not specifically recommended for use on a glass-ceramic surface.
Preventing marks and scratches
Do not use glass cookware. It may scratch the cooktop.
Do not place a trivet or wok ring between the cooktop and a pan or wok.
These items can mark or scratch the cooktop.
Make sure the cooktop and the pan bottom are clean.
Do not slide metal pans across the cooktop.
Preventing stains
Do not use a soiled dish cloth or sponge to clean the cooktop surface. A film will remain, which may cause stains on the cooking surface after the area is heated.
Continuously cooking on a soiled surface can result in a permanent stain.
Preventing other damage
Do not allow plastic, sugar, or foods with high sugar content to melt onto the hot cooktop. Should this happen, clean immediately.
Do not let a pan boil dry as this will damage the cooktop and the pan.
Do not use the cooktop as a work surface or cutting board.
Do not cook food directly on the cooktop. Always use the proper cookware.
Smart connect feature
The cooktop has built in a Wi-Fi module that you can use to sync the cooktop with the SmartThings app. On the smartphone app, you can: monitor the operating status and the power level settings of the cooktop elements. check and change the timer settings.
Functions that can be operated from the SmartThings app may not work smoothly if communication conditions are poor or the product is installed in a place with a weak Wi-Fi signal.
How to connect the cooktop
Before you can use the remote features of your Samsung cooktop, you must pair it to the SmartThings App.
Download and open the SmartThings app on your smart device.
Press the POWER key to turn the cooktop on.
Follow the app’s instructions, and then touch and hold the Smart Connect key for 3 seconds.
While the connection is being made, the LED indicator above the Smart Connect key blinks. Once the process is complete, the indicator glows without blinking. Now the cooktop is connected successfully.
If the Smart Connect LED indicator does not turn on, follow the instruction in the app to reconnect.
NOTE
Make sure to set the Smart Connect function only when no hob operation is in process.
For further instructions, refer to the web manual at www.samsung.com
Wi-Fi On/Off: Touch the Smart Connect key to turn on or turn off the Wi-Fi connection.
Hood control feature
This product features a Bluetooth device that you can use to connect the cooktop to Samsung hood control models. Through the Bluetooth connection, you can use the hood control function on the SmartThings app.
Download and run the SmartThings App on your smartphone. Then, complete the Smart Connect procedure to connect to the cooktop.
Follow the Bluetooth instructions of the hood control model and activate the Bluetooth connection.
Touch and hold the Smart Connect and Child lock buttons simultaneously to make the Bluetooth connection. When the Bluetooth connection is sucessfully established, appears on the display.
Follow the instructions in the user manual of the hood control model and the App guide to use the hood control.
NOTE
If the Smart Connect connection is not successful, you cannot use the SmartThings App to monitor and control the hood.
Without a Smart Connect connection to the cooktop, you can use a Bluetooth connection to pair the cooktop with the hood and sync them. To do this, follow steps 2 and 3 above.
MAINTENANCE
*WARNING
Do not clean the appliance by spraying water directly on to it.
Do not use benzene, thinner, or alcohol to clean the appliance. This may result in discoloration, deformation, damage, electric shock, or fire.
Take care not to hurt yourself when cleaning the appliance externally or internally). You may hurt yourself on the sharp edges of the appliance.
Do not clean the appliance with a steam cleaner. This may result in corrosion.
Keep the cooktop surface clean. Food particles or spattered oils stuck to the cooktop surface can cause paint damage and reduce the efficiency of the cooktop.
Care and cleaning of the glass cooktop
Normal daily use cleaning
Use only a ceramic cooktop cleaner. Other creams may not be as effective.
By following these steps, you can maintain and protect the surface of your glass cooktop.
Before using the cooktop for the first time, clean it with a ceramic cooktop cleaner.
This helps protect the top and makes cleanup easier.
Daily use of a ceramic cooktop cleaner will help keep the cooktop looking new.
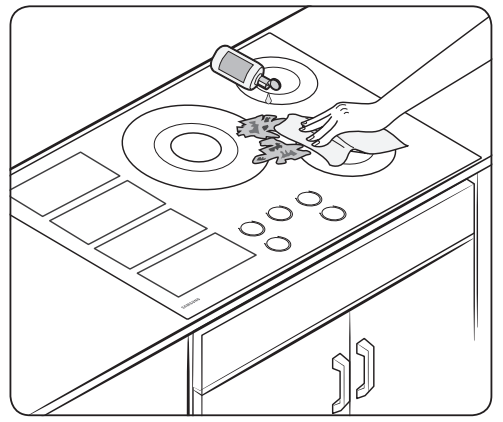
Shake the cleaning cream well. Apply a few drops of cleaner directly to the cooktop.
Use a paper towel or a cleaning pad for ceramic cooktops to clean the entire cooktop surface.
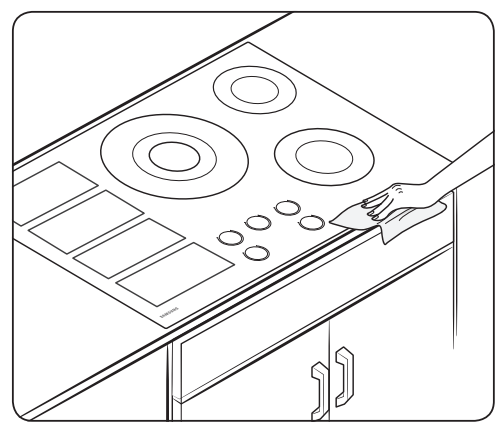
Use a dry cloth or paper towel to remove all cleaning residue. No need to rinse.
WARNING
DAMAGE to your glass surface may occur if you use scrub pads other than those recommended.
Removing burned-on residue
Allow the cooktop to cool.
Spread a few drops of ceramic cooktop cleaner on the entire burned residue area.
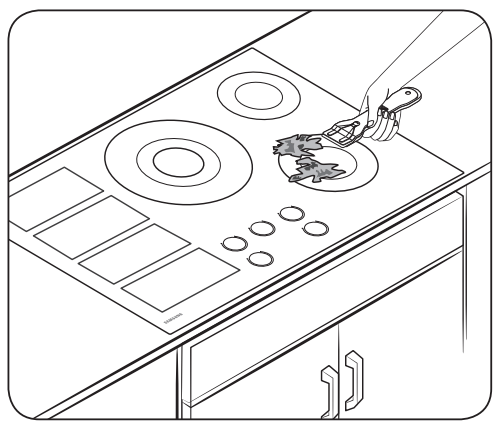
Using a cleaning pad for ceramic cooktops, rub the residue area, applying pressure as needed.
If any residue remains, repeat the steps listed above as needed.
For additional protection, after all residue has been removed, polish the entire surface by applying ceramic cooktop cleaner with a paper towel.
Removing heavy, burned-on residue
Allow the cooktop to cool.
Use a single-edge razor-blade scraper at approximately a 45° angle against the glass surface and scrape the soil. It will be necessary to apply pressure to remove the residue.
After scraping with the razor scraper, spread a few drops of ceramic cooktop cleaner on the entire burned residue area. Use a cleaning pad to remove any remaining residue. (Do not scrape the seal around the edges of the cooktop.)
For additional protection, after all residue has been removed, polish the entire surface by applying ceramic cooktop cleaner with a paper towel.
Removing metal marks and scratches
Be careful not to slide pots and pans across your cooktop. It will leave marks on the cooktop surface. You can remove these marks by applying ceramic cooktop cleaner with a cleaning pad for ceramic cooktops.
If pots with a thin overlay of aluminum or copper are allowed to boil dry, the overlay may leave black discoloration on the cooktop. You should remove this discoloration immediately or it may become permanent.
WARNING
Carefully check the bottoms of pans for roughness that may scratch the cooktop.
Cleaning the cooktop seal
To clean the seal around the edges of the glass, lay a wet cloth on it for a few minutes, then wipe clean with a nonabrasive cleaner.
Potential for permanent damage to the glass surface
Sugary spillovers (such as jellies, fudge, candy, syrups) or melted plastics can cause pitting of the surface of your cooktop. This is not covered under the warranty. You should clean the spill while it is still hot. Take special care when removing hot substances. Refer to the section below.
When using a scraper, be sure it is new and the razor blade is still sharp. Do not use a dull or nicked blade.
Cleaning sugary spills and melted plastic
Turn off all surface units. Remove hot pans.
Wearing an oven mitt, use a single-edge razor-blade scraper to move the spill to a cool area of the cooktop. Remove the spill with paper towels.
Any remaining spillover should be left until the surface of the cooktop has cooled.
Don’t use the surface units again until all of the residue has been completely removed.
NOTE
If pitting or indentations in the glass surface have already occurred, the cooktop glass will have to be replaced. In this case, service will be necessary.
TROUBLESHOOTING
Problem
Possible cause
Solution
The surface units will not maintain a rolling boil or will not cook fast enough.
You may be using inappropriate cookware.
Use pans that are flat and match the diameter of the surface unit selected.
In some areas, the power (voltage) maybe low.
Cover the pan with a lid until the desired heat is obtained.
The surface units will not turn on.
A fuse in your home may be blown or a circuit breaker may have tripped.
Replace the fuse or reset the circuit breaker.
The cooktop controls are set improperly.
Check if the correct control is set for the surface unit you are using.
Areas of discoloration on the cooktop.
Food spillover was not cleaned.
Refer to the section on the care and cleaning of the glass cooktop
The surface is hot and the model features a light-colored cooktop.
This is normal. The surface may appear discolored when it is hot. This is temporary and will disappear as the glass cools.
The surface unit frequently cycles on and off.
The element will cycle on and off to maintain the power setting.
This is normal operation, and not a system failure. Cycling at the high power setting is normal and can occur if the cookware is too small for the cooktop element or if the cookware bottom is not flat.
Use the cooktop as usual.
Scratches or abrasions on the cooktop surface.
The cooktop is being cleaned improperly.
Scratches are not removable.
Tiny scratches will become less visible in time as a result of cleaning. Use ceramic glass top cleaning cream. Do not use chemical or corrosive agents. These agents may damage the surface of the product.
Cookware with rough bottoms was used on the cooktop or there were coarse particles (eg. salt or sand) present between the cookware and the surface of the cooktop.
To avoid scratches, follow the recommended cleaning procedures. Make sure cookware bottoms are clean before use, and use cookware with smooth bottoms.
Cookware has been slid across the cooktop surface.
Brown streaks or specks.
Boilovers have been cooked onto the surface.
Wait until the surface cools down. Then, use a single-edge razor-blade scraper at approximately a 45° angle against the glass surface to remove the soil.
Areas of discoloration with metallic sheen.
Mineral deposits from water and food have been left on the surface of the cooktop.
Remove using a ceramic- glass cooktop cleaning cream.
Use cookware with clean, dry bottoms. Clean the cooktop with a ceramic cleaning agent regularly every week.
Cracking" or popping" sound.
This is the sound of the metal heating and cooling during cooking.
This is normal operation, and not a system failure. Use the cooktop as usual.
Information codes
C0
The top sensor is open when the burner is operating.
The top sensor is short when the burner is operating.
>>> Turn off the cooktop and then restart. If the problem continues, unplug the power cord for 30 seconds or more and then reconnect. If the problem is not fixed, please contact a local Samsung service center.
C1
This code appears if the internal temperature of a burner rises abnormally high.
>>> Turn off the cooktop and then restart. If the problem continues, unplug the power cord for 30 seconds or more and then reconnect. If the problem is not fixed, please contact a local Samsung service center.
C2
The IGBT sensor is open when the burner is operating.
The IGBT sensor is short when the burner is operating.
>>> Turn off the cooktop and then restart. If the problem continues, unplug the power cord for 30 seconds or more and then reconnect. If the problem is not fixed, please contact a local Samsung service center.
d0
The key is pressed for more than seconds.
>>> Check if the key pad is wet or a key is depressed. If the problem continues, restart the appliance using the POWER button. If the problem still continues, contact a local Samsung service center.
F0 Communications between main and sub PCBs failed.
F1 Communications between main and EEP-ROM failed.
F2 The touch-enabled IC communicates abnormally.
>>> Restart the appliance using the POWER button. If the problem continues, disconnect power for more than 30 seconds. Then, restart the appliance. If the problem still continues, contact a local Samsung service center.
UP The voltage is too high or low.
Check the power connection and make sure to turn the appliance on after regulating the voltage (208 V to 240 V).
A2 DC Motor Locking Information
It occurs when DC Motor cannot operate due to defects of PCB, wiring or blockage of on motor blade.
 SAMSUNG Electric Cooktop User manual