Model and Serial Number Label (under the cooktop, on the right side of the vent chamber!
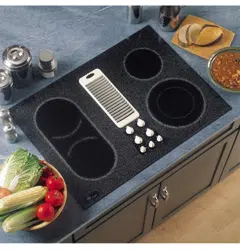
Left Rear Surface Unit Control
Left Front Surface Unit Control
Left Side Hot Surface Indicator Lights (one for each surface unit!
Vent Fan Speed Control
Control Lock Knob
Right Side Hot Surface Indicator Lights (one for each surface unit)
Dual Surface Unit Control
Right Rear Surface Unit Control
Surface Unit On Indicator Light
Operating The Cooking Elements
Using the Surface Units
Radiant Surface Units
Radiant Surface Units
The control for the radiant surface unit can be set anywhere between LO and HI for an unlimited number of heat settings. With the infinite switch the coil cycles on and off to maintain your selected control setting.
To bring liquids to a boil faster, use a lid to cover the pan.
The control knob must be pushed down and turned from the OFF position. When the control knobs are in any position other than off, they may be turned without pushing down.
Be sure you turn the control knob off when you finish cooking. You wi|| fee| a click at the OFF position.
Be sure you turn the control knob to OFF when you finish cooking.
The surface unit ON indicator light will glow when any surface unit is on.
The HOT surface indicator light will glow when the glass surface is hot and will remain on until the surface has cooled.
About the Surface Units
About the radiant surface units...
The radiant cooktop features heating units beneath a smooth glass surface.
NOTE: A slight odor is normal when a new cooktop is used for the first time. It is caused by the heating of new parts and insulating materials and will disappear in a short time.
NOTE: On models with light colored glass cooktops, it is normal for the cooking zones to change color when hot or cooling down. This is temporary and will disappear as the glass cools to room temperature.
The surface unit will cycle on and off to maintain your selected control setting.
It is safe to place hot cookware from the oven or surface on the glass surface when the surface is cool.
Even after the surface units are turned off, the glass cooktop retains enough heat to continue cooking. To avoid over-cooking, remove pans from the surface units when the food is cooked. Avoid placing anything on the surface unit until it has cooled completely.
Never cook directly on the glass. Always use cookware.
Always place the pan in the center of the surface unit you are cooking on.
Do not slide cookware across the cooktop because it can scratch the glass. The glass is scratch-resistant, not scratchproof.
Water stains (mineral deposits) are removable using the cleaning cream or full strength white vinegar.
Use of window cleaner may leave an iridescent film on the cooktop. The cleaning cream will remove this discoloration.
Don't store heavy items above the cooktop. If they drop onto the cooktop, they can cause damage.
Do not use the surface as a cutting board.
Dual Surface Unit
The right front surface unit has 2 cooking sizes to select from so you can match the size of the unit to the size of the cookware you are using.
To use the large (9-inch) surface unit, turn the knob clockwise to0 and select the desired setting. The unitwill heat the entire area contained by the larger circle.
To use the small (6-inch) surface unit, turn the knob counterclockwise toD and select the desired setting. The unit will only heat the area inside the smaller circle.
Bridge Surface Unit
Make sure the pan rests flat on the glass cooktop and it is not resting on the trim. If you notice poor cooking performance, move the pan to make sure it is flat on the cooktop.
To use the bridge burner, turn the burner knob toPl and select the desired setting. The unit will heat the front surface burner and the bridge.
Choose pans that match the circle/bridge area as closely as possible.
To use only the front surface unit, turn the burner knob toQ and select the desired setting. The unit will only heat the front surface burner.
You can create an oblong heated area by using the left rear unit in addition to the front unit bridge combination.
Surface Elements Cycle On and Off
Surface elements will cycle on and off to maintain the temperature you have selected.
All radiant surface elements have a temperature limiter that protects the glass cooktop from getting too hot.
The temperature limiter may cycle the elements off while cooking if:
The pan boils dry
The pan bottom is not flat.
The pan is off-center.
There is no pan on the element.
Temperature Limiter
Every radiant surface unit has a temperature limiter.
The temperature limiter protects the glass cooktop from getting too hot.
The temperature limiter may cycle the units off for a time if:
The cooktop is on while cooking.
The pan boils dry.
The pan bottom is not flat.
The pan is off-center.
There is no pan on the unit.
Control Lock-Out for Surface Units
To activate control lock-out, turn the Control Lock knob to LOCK. This will prevent surface units from heating. An indicator light will glow to show that they are locked. The downdraft fan will remain operable with control lockout engaged.
In the locked position, the cooktop will produce an audible sound if any surface unit control knob is engaged or moved to a position other than OFF.
How to Operate the Vent System
The built-in vent system helps remove cooking vapors, odors and smoke from foods prepared on the cooktop.
To operate the downdraft vent system, turn the vent fan speed control knob to HI, MED or LO, as needed.
Continuous use of the vent system while cooking helps keep the kitchen comfortable and less humid, reducing cooking odors and soiling moisture that normally creates a frequent need for cleaning.
Cookware Tips
Check pans for flat bottoms by using a straight edge.
Pans with rounded, curved, ridged or warped bottoms are not recommended.
Stainless Steel: recommended
Aluminum:
heavy weight recommended Good conductivity. Aluminum residues sometimes appear as scratches on the cooktop but can be removed if cleaned immediately. Because of its low melting point, thin weight aluminum should not be used.
Copper Bottom:
recommended
Copper may leave residues which can appear as scratches. The residues can be removed, as long as the cooktop is cleaned immediately. However, do not let these pots boil dry. Overheated metal can bond to glass cooktops. An overheated copper bottom pot will leave a residue that will permanently stain the cooktop if not removed immediately.
Porcelain Enamel on Cast Iron:
recommended if bottom of pan is coated
Porcelain Enamel on Steel:
not recommended
Heating empty pans can cause permanent damage to cooktop glass. The enamel can melt and bond to the ceramic cooktop.
Glass-ceramic:
not recommended
Poor performance. Will scratch the surface.
Stoneware:
not recommended
Poor performance. May scratch the surface.
Cast Iron:
not recommended—unless designed specifically for glass cooktops
Poor conductivity and slow to absorb heat. Will scratch the cooktop surface.
NOTE: Follow all cookware manufacturers recommendations when using any type of cookware on the ceramic cooktop.
For Best Results
Place only dry pans on the surface elements. Do not place lids on the surface elements, particularly wet lids.
Do not use woks that have support rings. This type of wok will not heat on glass surface elements.
We recommend that you use only a flat-bottomed wok. They are available at your local retail store. The bottom of the wok should have the same diameter as the surface element to ensure proper contact.
Some special cooking procedures require specific cookware such as pressure cookers, deep-fat fryers, etc. All cookware must have flat bottoms and be the correct size.
Avoid allowing foods to boil dry as some cookware may stick to the cooking surface, causing permanent damage to the cooktop.
Care and Cleaning
Care and cleaning the Cooktop
How to Remove Protective Shipping Film and Packaging Tape
Carefully grasp a corner of the protective shipping film with your fingers and slowly peel it from the appliance surface. Do not use any sharp items to remove the film. Remove all of the film before using the appliance for the first time.
To assure no damage is done to the finish of the product, the safest way to remove the adhesive from packaging tape on new appliances is an application of a household liquid dishwashing detergent. Apply with a soft cloth and allow to soak.
NOTE: The adhesive must be removed from all parts. It cannot be removed if it is baked on.
Vent Grille
Before cleaning the vent grille, be sure the exhaust blower is turned off.
To clean the vent grille, remove it from the cooktop by lifting it up and off. Wipe with a damp cloth. If necessary, the vent grille can be washed in the sink.
Use dishwashing liquid for cleaning.
Do not use abrasive cleaners. They will damage the vent grille's finish.
Do not clean the vent grille in the dishwasher.
Vent Filter and Chamber
The filter is held in place at an angle with a hold bump. Lift the filter up and out of the vent opening diagonally.
To clean the filter, swish it in hot, soapy water. Rinse well and dry thoroughly.
Do not operate the vent without the filter in place.
To order filters please call our toll−free number:
National Parts Center...........800.626.2002 Filter.............................….......# WB02X10651
Remove and replace the filter diagonally through the vent opening.
Do not operate the vent without the filter in place.
When replacing the filter, make sure it rests, at an angle, on the supports in the vent opening.
To clean the vent chamber, use hot, soapy water. Rinse with clean water and dry thoroughly. Do not use abrasive cleaners; they will damage the finish. Replace the filter after it is cleaned and dry.
Control Knobs
The control knobs may be removed for easier cleaning.
Make sure the knobs are in the OFF positions and pull them straight off the stems for cleaning.
To clean the knobг, place them in a dishwasher or wash with soap and water. Rinse with clean water. Make sure the insides of knobs are dry before replacing.
Replace the knobs in the OFF position to ensure proper placement.
Stainless Steel Surfaces(on some models)
Do not use a steel wool pad; it will гcratch the гurface.
To clean the stainless steel surface, use warm sudsy water or a stainless steel cleaner or polish. Always wipe the surface in the direction of the grain. Follow the cleaner instructions for cleaning the stainless steel surface.
To inquire about purchasing stainless steel appliance cleaner or polish, or to find the location of a dealer nearest you, please call our toll−free number: National Parts Center 1.800.626.2002 CEAppliances.com
Cleaning the Glass Cooktop
Normal Daily Use Cleaning
ONLY use CERAMA BRYTE® Ceramic Cooktop Cleaner on the glass cooktop. Other creams may not be as effective.
Clean your cooktop after each spill. Use CERAMA BRYTE® Ceramic Cooktop Cleaner.
To maintain and protect the surface of your glass cooktop, follow these steps:
Before using the cooktop for the first time, clean it with CERAMA BRYTE® Ceramic Cooktop Cleaner. This helps protect the top and makes cleanup easier.
Daily use of CERAMA BRYTE® Ceramic Cooktop Cleaner.will help keep the cooktop looking new.
Shake the cleaning cream well. Apply a few drops of CERAMA BRYTE® Ceramic Cooktop Cleaner directly to the cooktop.
Use a paper towel or CERAMA BRYTE® Cleaning Pad for Ceramic Cooktops to clean the entire cooktop surface.
Use a dry cloth or paper towel to remove all cleaning residue. No need to rinse.
NOTE: It is very important that DO NOT heat the cooktop until it has been cleaned thoroughly.
Burned-On Residue
1. Allow the cooktop to cool. 2. Spread a few drops of CERAMA BRYTE® Ceramic Cooktop Cleaner on the entire burned residue area. 3. Using a CERAMA BRYTE® Cleaning Pad for Ceramic Cooktops, rub the residue area, applying pressure as needed. 4. If any residue remains, repeat the steps listed above as needed. 5. For additional protection, after all residue has been removed, polish the entire surface with CERAMA BRYTE® Ceramic Cooktop Cleaner and a paper towel.
Use a CERAMA BRYTE® Cleaning Pad for Ceramic Cooktops.
Heavy, Burned-On Residue
1. Allow the cooktop to cool.
2. Use a 45° angle against the glass surface and scrape the soil. It will be necessary to apply pressure to the razor scraper in order to remove the residue.
3. After scraping with the razor scraper, spread a few drops of CERAMA BRYTE® Ceramic Cooktop Cleaner on the entire burned residue area. Use a CERAMA BRYTE® Cleaning Pad to remove any remaining residue. 4. For additional protection, after all residue has been removed, polish the entire surface with CERAMA BRYTE® Ceramic Cooktop Cleaner and a paper towel.
The CERAMA BRYTE® Ceramic Cooktop Scraper and all recommended supplies are available through our Parts Center. See instructions under “Assistance / Accessories” section. NOTE: Do not use a dull or nicked blade.
Metal Marks and Scratches
1. Be careful not to slide pots and pans across your cooktop. It will leave metal markings on the cooktop surface.
These marks are removable using the CERAMA BRYTE® Ceramic Cooktop Cleaner with a CERAMA BRYTE® Cleaning Pad for Ceramic Cooktops.
2. If pots with a thin overlay of aluminum or copper are allowed to boil dry, the overlay may leave black discoloration on the cooktop.
This should be removed immediately before heating again or the discoloration may be permanent.
WARNING: Carefully check the bottom of pans for roughness that would scratch the cooktop.
Damage from Sugary Spills and Melted Plastic
Turn off all surface units. Remove hot pans.
Wearing an oven mitt:
Use a single-edge razor blade scraper (CERAMA BRYTE® Ceramic Cooktop Scraper) to move the spill to a cool area on the cooktop.
Remove the spill with paper towels.
Any remaining spillover should be left until the surface of the cooktop has cooled.
Don't use the surface units again until all of the residue has been completely removed.
NOTE: If pitting or indentation in the glass surface has already occurred, the cooktop glass will have to be replaced. In this case, service will be necessary.
Troubleshooting
Problem
Possible Causes
What To Do
Water won't boil
• Cover pan with a lid.
• Turn the downdraft fan OFF until the water begins to boil.
Surface units will not maintain rolling boil or cooking is slow
Improper cookware being used
• Pan bottoms should be flat, fairly heavyweight and a the same diameter as the surface unit selected.
Surface units do not work properly
A fuse in your home may be blown or the circuit breaker tripped.
• Replace the fuse or reset the circuit breaker
Cooktop controls improperly set.
• Check to see the correct control is set for the surface unit you are using.
Tiny scratches or metalmarks (may appear cracks) or abrasions on radiant cooktop glass surface
Incorrect cleaning as methods being used.
• See the Cleaning the glass cooktop section
Cookware with roughbottoms being used orcoarse particles (salt or sand) were between the cookware and the surface of the cooktop.
• Be sure cookware bottoms and cookware are clean before use. Use cookware with smooth bottoms. Tiny scratches are not removable but will become less visible in time as a result of cleaning
Cookware has been slid across the cooktop surface.
Areas of discoloration or dark streaks on the cooktop
Improper cookwarebeing used.
• Marks from aluminum and copper pans as well as mineral deposits from water or food can be removed with the cleaning cream.
Hot surface on a model with a light-colored cooktop,
• This is normal. The surface may appear discolored when it ishot. This is temporary and will disappear as the glass cools.
Food spillovers not cleaned before next use.
• See the Cleaning the glass cooktop section
Incorrect cleaning methods being used.
• Use recommended cleaning procedures
Hot sugar mixtures or plastic melted to the surface
Hot cooktop came into contact with these substances.
• See the Glass surface-potential for permaent damage section in the Cleaning the glass cooktop section
Pitting (or indentation) of the cooktop
Hot sugar mixture spilled or plastic melted on the cooktop.
• Call a qualified technician for replacement
Cooktop making an audible sound
Cooktop is locked.
• Check to be sure the Control Lock knob is turned to UNLOCK.
Frequent cycling off and on of surface units
Improper cookware being used.
• Use only flat cookware to minimize cycling
Cooktop feels hot
Improper cookware being used.
• The glass cooktop surface may seem hotter than you are used to. This is normal. Use pans which are absolutely flat.
Control knob will not turn
Cooktop controls improperly set.
• When the knob is in the OFF position, it must be pusheddown before it can be turned. When the knob is in any other position, it can be turned without being pushed in.
Poor venting
Clogged filter.
• Clean filter per instructions.
House too airtight.
• Open a window slightly to provide fresh air source.
Wall cap obstructed.
• Remove blockage from exterior wall cap.
Wall cap damper door stuck.
• Check exterior wall cap damper door for free movement or obstruction.