
g&com
Safety Instructions ....... 2-4
Operating Instructions
Cookware Tips ............ 8, 9
Dual Surface Element ....... 7
Features of Your Cooktop ..... 5
Surface Elements ......... 6, 7
Temperature Limiter . ........ 7
Care and Cleaning
Control Knobs ............ 10
Glass Cooktop .......... 11, 12
Stainless Steel Surfaces ...... 10
Troubleshooting Tips ...... 13
Consumer Support
Consumer Support ......... 18
Product Registration ..... 15, 16
_'arranty ................. 1 7
JP340
JP346
jP 56
jP 55
Write the model and serial
numbers here:
Model #
Serial #
You can find them on a label
under tile cooktop.
49-80411-2 07-075B

IMPORTANTSAFETYINFORMATION.
READALLINSTRUCTIONSBEFOREUSING.
WARNING!
For your safe_ the information in this manual must be followed to minimize the risk of fire or
explosion, electric shock, or to prevent property damage, personal injury, or loss of fife.
2
SAFETYPRECAUTIONS
When using electrical appliances, basic safety precaufions should be foflowed, including
the following:
!?:Use this appliance only fbr its intended use as
described in this manual.
!?:Do not attempt to repair or replace an)
part of)our cooktop unless it is specificall)
recommended in this manual. All other
servicing should be referred to a qualified
technician.
iJii:iBefore perfbm/ing any se,s'ice, disconnect
the cooktop power supply at the household
distribution panel by remodng tile fuse oi
switching off the circuit breaker
iJii:iBe sure your appliance is properly installed
and giounded by a qualified technician in
accordance with tile provided installation
instructions. This appliance must be supplied
with the proper voltage and fiequenc> and
connected m an indMdual, properly grounded
b,anch circuit, protected by a ci,vuit breaker
or fllse acceptable for the indicated wattage
oil the name plate.
Name plate location
iJii:iHave tile installer show ,.ou tile location of tile
circuit breaker or fllse. Mark it for easy
refbrence.
iJii:iDo not leave children alone--children should
not be left alone or unattended in an area
where an appliance is in use. They should
never be allowed to sit or stand oil any
part of the appliance.
_: Teach children not to play with tile controls or
any other part of the cooktop.
_: Do not allow anyone to climb, stand or hang oil
the cooktop.
CAUTION: temsofi.teiesttochildie.
should not be stored in cabinets above a
cooktop---children climbing oil tile cooktop
to reach items could be sefiousl)injured.
!?:.Mways kee I) coml)ustil)le wall coverings,
clmains or drapes a safe distance flom
)our cooktop.
!?:Always kee I) dishtowels, dish cloths, pot holdeIs
and other linens a safi_ distance awa_ from xour
cooktop.
!?:.Mways kee I)wooden and plastic utensils and
canned fbod a safe distance awa_ from xour
cooktop. The} ma) become hot and could
cause 1)/lIns.
iJii:iNever wear loose-fitting or hanging gamlems
while using the appliance. Flammable material
could be ignited if 1)rought in contact with hot
stlifi]ce elements and max cause severe btlIns.
;_:Use only dU pot holde*,_--moist or damp pot
holdeIs oil hot surfi/ces may result in burns
from steam. Do not let pot holdeis touch hot
surfi)ce elements. Do not use a towel or other
bulD cloth. Such cloths can catch fire oil a hot
surface element.
!?:For your safet}; never use your appliance %r
wanning or heating the room.
iJi;:iDo not use water oil grease fires. Never pick up
a flaming pan. Turn tile controls offl Smother a
flmning pan oil a surfilce element by coveting
tile pail completely with a well-fitting lid, cookie
sheet or flat tva): Use a multi-puq/ose dU
chemical or fbam-type extinguisher.
Flaming grease outside a pan can be put out
by coveting with baking soda o*; if available,
by using a muld-puq/ose dU chemical or
fbam-t)pe fire extinguisher
iJii:iDo not flame foods oil tile cooktop. If you do
flame foods under the hood, turn the fire oil.
iJii:iDo not let cooking grease or other flammal)le
materials acclmmlate oil the cooktop.

ge.com
WARNING!
SAFETYPRECAUTIONS
J; Do not touch surJ3ace elements. These
surfaces may be hot enough to bum even
fl_ough they are dark in color During and
after use, do not touch, or let cloflting or
oflrer flammable materials corm_ct the
surface elements or areas nearby the
surface elements; allow sufficient time
for cooling first.
Potentially hot surfaces include tire
cooktop arrd areas thcing the cooktop.
E:,:To minimize the possibility of bums,
ignition of flammable mamrials arrd
spillage, rite handle of a container
should be turned toward tire center
of the cooktop without extending ox>r
arty nearby smfirce elements.
;fi:,:Alwws turn the surt_ace element cormol m
off before removing the cookware.
q_;:Use proper pan size--select cookwate
having fiat bottoms larg> enough to cox>r
the smfime element heating element. Tire
use of undersized cookwate will expose a
portion of tim surPace element m direct
corrmct arrd m W result in ignition of
clothing. Proper relationship of cookware to
smfi_ce element will also imi,ove efficiency.
;fi:,:Never leave smt_ace elements unattended at
high heat setdng:s. Boiloxers cause smoking
arrd gtea W spillox>rs fltat mav catch on fire.
_;: Only certain types of glass, glass/ceramic,
earthenware or other glazed corrtainers are
suitable for cookmp cooking; oflrers m W
break because of the sudden change in
ten_perature.
_::Kee I) an eye on foods being flied at hiOt
or mediun>hiOi heat setfing:s.
;f; Foods for flTing should be as &T as
possible. Frost on flozen foods or moisutre
on flesh foods can cause hot tZatto bubble
up arrd ox>r the sides of the pan.
;fi:,:Use little fi_t for eflective shallow or
deeI>tZat flTing. Filling dre pan too Rill
of fat can cause spillox>rs when food is
added.
E:,:If a combination of oils or fats will be used
in frying, stir tog>alter before heating, or as
fats melt slowly.
_;_Ahvavs heat t:at slowly, arrd watch as it heats.
_:_Use a deep fat themrometer whenever
possible m prexent ox_rheafing fat beyond
the smoMng point.
E:,INexer u y m move a pan of hot Pat,
especia]ly a deep fat flyer _'ait until
the t_atis cool.
_{;_Do not store flammable mamrials near
the cooktop.
J; Kee I) tire hood and grease filmrs clean
m maintain g_od x_nfing and to avoid
grease rites.
E:,:Do not store or use combnsfihle mamfials,
gv_s4ine or other flammable _N)ors and
liqui& in the vicinity of this or a W appliance.
_{;:Clean only parts lismd ira this Owner's
Manual.
E:,:Do not leave paper products, cooking
umnsils or food on rite cooktop when
not in use.
_{;_Kee I) cooktop clean arrd flee of
accumnlation of grease or spilloxers
which m W ignite.
J; Nm>r heat unopened food containers.
Pressure buildup m W make corrtainer
burst arrd cause injury.
_:; Ne_>r leave jars or cans of laatdlJpping:s
on or near your cookmp.
J; Nmer use your appliance for wanning or
heating the room.
COOKMEATANDPOULTRYTHOROUGHLY...
Cookmeat andpoultry thoroughly--meat to at leastan INTERNALtemperatureof 160°Fandpoultry
to at least an INTERNALtemperatureof 180°ECookingto thesetemperaturesusuallyprotects against
foodbomeillness.
3

IMPORTANTSAFETYINFORMATION.
READALLINSTRUCTIONSBEFOREUSING.
WARNING!
RADIANTSURFACEELEMENTS
Use care when touching the cooktop. The glass surface of the cooktop will retain heat after the
controls have been turned off.
_7{::Avoid scratching the glass cooktop.
The cooktop can be scratched with imms
such as sharp insuuments, dngs or other
jeweh T and ri\ets on clothing.
;f?:':Nexer use tile glass cooktop sur/_ace as
a cutting board.
_7{_:Do not place or store items on top of the
glass cooktop surfi_ce when it is not in use.
_{_;Be carefld when placing spoons or other
stirring utensils on glass cooktop surlhce
when it is in use. They may become hot
and could cause bums.
_fi:,iAvoid heating an empty pan. Doing so may
damage the cooktop and the pan.
_fi:,iDo not allow watel, other liquids or grease
to remain on the cooktop.
_i:,:To minimize die possibili U of bums, always
be certain flint the controls for all surfime
elements aie at file off position and the
enfiie glass sniface is cool befoIe
atmmpdng m clean file cookmp.
_?{:_Do not operam dm glass sur/_ace elements
if die glass is broken. Spillox>rs or cleaning
solution m W penetram a broken cooktop
and cream a risk of electncal shock.
Contact a qualified technician immediately
should your glass cooktop become broken.
_?{:_Clean the cooktop v,,ifl_ caution. If a wet
spong_ or clod_ is used to wipe spills on
a hot surface element, be carefld to axoid
smam bums. Some cleansers can produce
noxious fllmes if applied to a hot sur/_ace.
NOTE."_a:e recommend flint you axoid
wiping any sur/_ace element areas until dley
have cooled and the indicator light has
g_ne off. Sugar spills are the exception
to this. Please see the Cleaning the Glass
Cooktop secdon.
_{_To axoid possible damage to the cooking
surfime, do not apply the cleaning cream
to tile glass surfi_ce when it is hot.
_{:_After cleaning, use a d_T cloth or paper
towel to remoxe all the cleaning cream
residue.
_fi:,:Read and follow all instnmtions and
warnings on the cleaning cream labels.
_fi:,iUse care when touching the cooktop. The
glass surfi_ce of the cooktop will retain heat
after the controls haxe been turned OFF.
_fi:,iDo not stand on the glass cooktop.
_fi:,:i,arge scratches or impacts to glass
cooktops can lead to broken or
shattered glass.
READANDFOLLOWTHISSAFETYINFORMAtiONCAREFULLY.
SAVETHESEINSTRUCTIONS
4

Featuresof your cooktop, ge.com
Throughout this manual, features and appearance may vary from your model.
36"modelJP655
30" model (JP356)
/
_k,x 30" model (JP340) //_
30" model (JP346)
--0
FeatureIndex (Featuresand appearances may vary.) Explainedon page
O Single Stmfhce Element 6, 7
Dual Surli_ce Element 7
O I,ett Rear Surti_ce Element Control Knob 6
O I,eti Front Stmfi_ce Element Control Knob 6
O Sm_fi_ce Element ON Indicator I,ight 6
Right Rear Stmfhce Element Control Knob 6
Dual Sm'ti_ce Element Control Knob 7
Hot Stmface Indicator i,ight(s) 6
Dual Sm'ti_ce Element Selector Knob 7
@ Center Sm'ti_ce Element Control Knob 6
O Right Front Sm'li_ce Element Control Knob 6

Usingthe surface elements.
Throughout this manual, features and appearance may vary from your model.
How to Set
Push the knob down and mrn in either
direct.ion to the setting you want. \,_l_en
the control is in any position other than
OFF,it Inav be rotated without l)ushing
it down.
At both OFF and HI the control clicks
into position. Ym may hear slight
clicking sotmds during cooking,
indicating the control is keeping the
power level you set.
The controls fin" the radiant surfllce
elements can be set anywhere between
LOand HI tot an unlimimd number oI
heat settings. _\]th the infinite switch the
element cycles on and off to maintain
your selected control setting,
The ON indicator light will glow when
any surli_ce element is on.
A HOT SURFACE indicator light will glow
when anv radiant element is turned on
and will remain on tmfil the surlhce is
cooled to approximately 150°F.
NOTE'.
_ It comes on when the element is hot to the
touch.
_; /t stays on evenafter thedement is turned oK
;;Ji::It glows bn)ht/y until the dement is cooled to
approx/Ynately150°£
_; Be sure you turn thecontrol knob to OFF
when you flb/sh cooking.
Never cook directly on the glass.
Always use cookware.
Always center flTepan on the surface
element you are using.
About the radiant surface elements...
The radiant cooktop teatm'es heating
elements beneath a smooth glass stwfi_ce.
NOTE."As@ht odoris normalwhenanew
cooktopis usedforthe fkst time.It is causedby
theheatingof newpartsand ibsu/atingmatena/s
andwi// disappearin a shorttime.
NOTE:Onmodelswithh#ht-coloredg/ass
cooktops,it is normalfor thecookingzonesto
changecolorwhenhotorcoolingdown.Thisis
temporaryandwi//disappearasglasscoolsto
roomtemperature.
The sm_li_ce element will cycle on and off
to maintain veto" selected control setting.
It is sate to place hot cookware (fl'om the
Avoid placing utensils that could
become hot or plastics that could melt
on the surti_ce element tmtil it has
cooled completely:
!i> Waterstains (minerel deposits)are removable
us/bg the c/eanlbgcream or full strength white
wbegar
!i>Useof wlbdow cleanermay leavean
iridescent film on thecooktop. Thecleaning
cream will remove this discoloration.
iJi::Don't store heavyitems above the cooktop.
If they droponto the cooktop, they can cause
damage.
i_i Do not use thesurface as a cutflbg board.
oven or surti_ce) on the glass cooktop
when the surtilce is cool.
Even after the surface elements are
turned off, the glass cooktop retains
enough heat to confimm cooking. To
avoid overcooking, i'eillOVe l)}liiS ][i'Oill
the sm_i_ce elements when the food
is cooked.
Donot s/ide
_;BIIARG NG "_ cookwareacross
_ _ the cooktop
becauseit can
scratch the glass.
Theglass/s
scretch-reslstant,
not scretchproof

ge.com
8
Smal, @_ .arge
surface"""_. (_ surface
e emeNt _ element
SSffll g seEInq
Dual Surface Element (onsomemodels)
Thewht frontsurfaceelementhas2cooklbg
s/#esto selectfromsoyoucanmatchthesloe
of theelementtothesizeof thecookware
youareusing.
To use the large sm'face element, turn
the SELECTORknob to ®. Push down
and turn the control knob to the desired
setting, The element will heat the entire
area contained by the larger circle,
To use the small sm_fhce element, tm'n
the SELECTORknob to e, Push in and
ttlFn the control knob to the desired
setting, The element will only heat the
area inside the smaller circle,
Surface Elements Cycle On and Off
SuI_L_ce eleinents will cycle on and off
to maintain the temperatm'e you have
selected.
M1 radiant sm_li_ce elements have a
temperatm'e limiter that protects the
glass cooktop from getting too hot.
The temperatm'e limiter may cycle the
elem ents off while cooking if:
_: Thepan boils dry
;;Ji::Thepan bottom Is not fiat.
_ Thepan Is off-cente_
;;Ji::Thereis no pan on the e/emen_
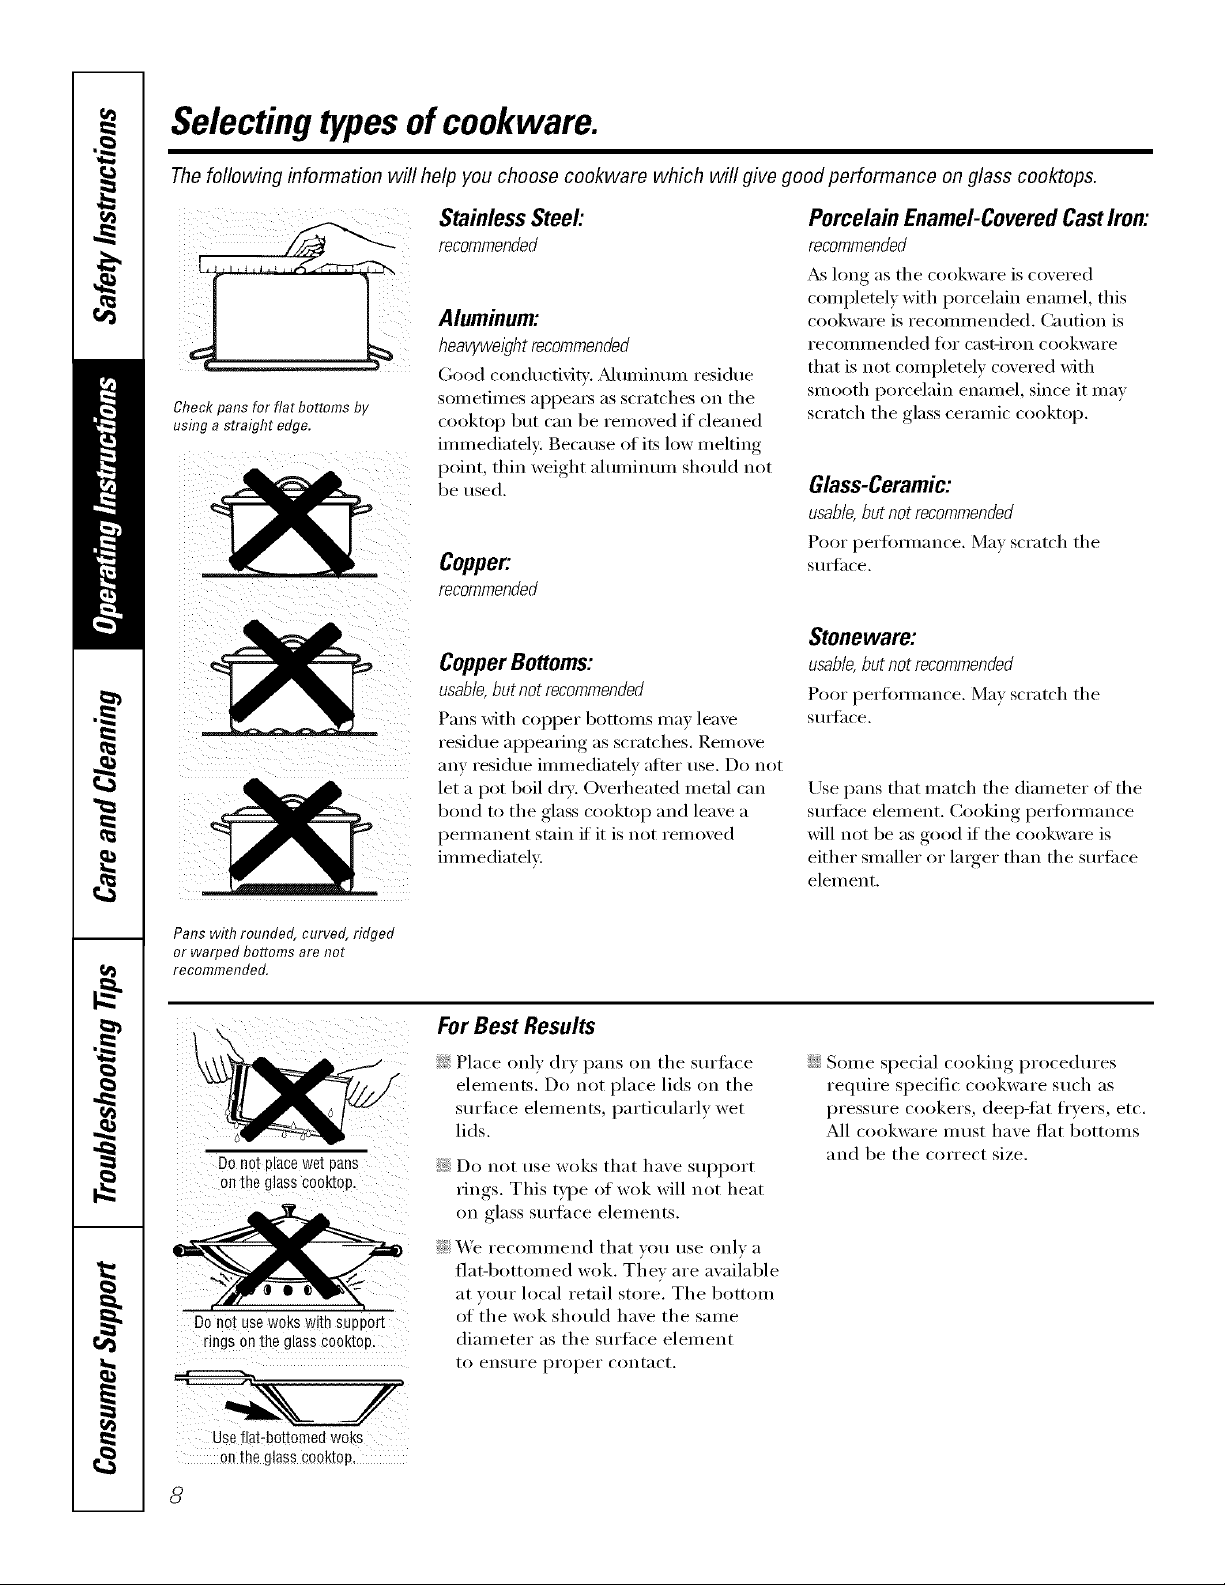
Selecting types of cookware.
The following information will help you choose cookware which will give good performance on glass cooktops.
i; i il
Check pans for flat bottoms by
using a straight edge.
Stainless Steel'.
recommended
Aluminum:
heavyweight recommended
(;ood conductixJq:. _Muminun_ residue
sometimes appeai_ as scratches on the
cooktop but can be removed if cleaned
immediately: Because of its low melting
point, thin weight alunfilmm should not
be used.
Copper:
recommended
Porcelain Enamel-CoveredCast Iron:
recommended
_s long as the cookware is covered
comi)letely with porcelain enamel, this
cookware is recommended. Caution is
I'ecoiiliilended t()i" cast-iron cookware
that is not completely covered with
Slnooth porcelain elmmel, since it inav
scratch the glass ceralnic cooktop.
Glass-Ceramic:
usable,but not recommended
Poor l)erlbi_nai_ce. Ma) scratch the
StlI];Ice.
CopperBottoms:
usable,but not recommended
Pans with Col)per bottoms may leave
residue ai)peariI_g as scratches. Relnove
anv residue imn_ediatelv after use. Do not
let a pot boil dla.. Overheated metal can
bond to the glass cooktop and leave a
i)ennai_ei_t stain if it is not relnoved
imn_ediatelv
Stoneware:
usable,but not recommended
Poor l)erfimnance. Ma) scratch the
StlI];Ice,
Use pans that inatch the diameter of the
sur[hce elen/ent, Cooking i)er[brmance
will not be as good if the cookware is
either slnaller or lalger than the surti_ce
elenmnt.
Pans with rounded, curved, ridged
or warped bottoms are not
recommended.
Do not place wet pans
on the glass cooktop,
Do not use woks with support
rings on the glass cooktop
For Best Results
_:i_Place only dry pans on the surfi_ce
elen_ents. Do not place lids on the
surli_ce elen_ents, l)articularly wet
lids.
S;!Do not use woks that have sui)port
rings. This type of wok will not heat
on glass surlhce elements.
_2>We reconm_end that you use only a
fiat-bottomed wok. Thev are available
at your local retail store. The bottom
of the wok should have the salne
dialneter as the surtace elen_ent
to enstlre i)roi)er contact.
::Ji::Some special cooking procedures
require specific cookware such as
pressure cookers, deep-tat f)Ters, etc,
All cookware must have flat bottoms
and be the correct size,
Usefiat:bottomedwoks
onthe glasscooktop,
8

ge.com
Right!
reconm/ended for lnost surfime cooldng.
Howe\ e*; when camfing with ware>bath
or pressure canne_; large>diameter pots
may be used. This is because boiling
water tempe_atm'es (even under
pressure) are not ham_flfl to tile
cooktop smfimes surrounding tile
surfime elements.
Note: Flat-bottomed canners are
required for glass cooktops,
Observe the Following Points in Canning
Pots that extend be}end 1" ot [] Remember that tainting is a
tile stu_hce element's circle are not I)r°cess that ,generates laroe
alllOtllltS of stealll. To avoid b[ll'llS
fi'om steam or heat, be careful
whell c'lIlllill )
HOWEVER, DO NOT USE LARGE-
DL_JMETER CANNERS OR OTHER
I,M{GE-DL_._ ETER POTS FOR
FRYING OR BOILING FOODS OTHER
THAN _;_,TER. Most syrup or sauce
mixtmes--and all t)pes of fl'ying---<ook
at temperatures much higher than
boiling water: Such temperatures could
e\ enmally hmm the glass cooktop
sur_iices.
] Be sm'e the canner fits o\er tile
center of tile surfiice element. If
your cooktop or its location does
not allow tile canner to be centered
(SIX tile stlrfitce eleIllellt, use
smalle>diameter pots fin" good
camfing results.
] Flat-bottomed c:mners must be
used. Do IIOt rise CallllelB with
flanged or rippled bottoms (oii_ell
%trod in enamelware) because they
don't make enough contact with
the surIiice elements and take a
hmg time to boil water
NOTE:If your house has low voltage,
canning may take longerthan expected,
even though directions havebeen carefufly
followed. Theprocess time will be
shortenedby:
(1) usinga pressure canne_and
(2) starting with HOTtap water for fastest
heating of large quantities of wate_
CAUTION:
_ Safe canningrequires that harmful
microorganismsare destroyed and that
thejars are sealed completely.When
canning foods in a water-bath canner,
agentle but steadyboil must be
maintainedfor the required time. When
canning foods in a pressurecanner,the
pressuremust be maintainedfor the
requiredtime.
i_'_After you have adjustedthe controls,
#is very importantto makesure the
prescribedboil or pressure levelsare
maintainedfor the required time.
::J_::Since you mustmakesure to process the
canningjars for the prescribed time, with
no interruptionin processing time, do not
can onany cooktop surface element if
your canner is not flat.
[]
_hen camfing, use recipes and
procedm'es fl'om reputable som'ces.
Reliable redpes and procedures are
a\_filable fl'om tile manufimmrer (ff
veto" cam_er; manuflmmrel_ of glass
.jm_ for canning, such as Ball and
Kerr brand; and the United States
Depamnent of Agficultm'e
Extension Service.
9

Careand cleaning of the cooktop.
Be sure electrical power is off and aft surfaces are cool before cleaning any part of the cooktop.
How to Remove Protective Shipping Film and Packaging Tape
Carefldly grasp a corner of the protective
shii)ping fihn with _mr finge_ and slowly
peel it fl'om the appliance stlrtilce. Do
not use any sha_ I) items to remove the
fihn. Remove all of the fihn befin'e using
the appliance fin" the fii_t time.
To assure no damage is done to the finish
(ff the product, the satest way to remove
the adhesive fl'om packaging tape on new
appliances is an application of a household
liquid dishwashing deteigent. Apply with
a soft cloth and allow to soak.
NOTE:Theadhesivemustberemovedfromaft
parts.Itcannotberemovedif it/s bakedon.
Moldedrib Control Knobs
Thecontrol knobs may be removed for easier
cleanlbg.
Make sure the knobs are in tile OFF
positions and pull them straight off the
stems for cleanin *
Clear _roove
The knobs can be cleaned in a
dishwasher or they may also be washed
with soap and wateI: Do not i'eil/ove
chrome accent skiit (on some models).
Make sure the insides ot the knobs are
(liT betore replacing.
Replace the knobs in the OFF position
to enstli'e l)rol)er l)lacei/lent.
Stainless Steel Surfaces (onsome models)
Donotusea steel woolpa& # will scratch
thesurface.
To clean the stainless steel surfi_ce,
use wam_ suds)' water or a stainless steel
cleaner or polish. _Mwaya wipe the sui_filce
in the direction ot the grain. Follow the
cleaner instructions for cleaning the
stainless steel sm'ti_ce.
To inquire about l)urchasing stainless
steel appliance cleaner or polish, or to
find the locadon ot a dealer nearest you,
please call our toll-fl'ee number:
National Parts Center 1.800.626.2002
ge.com
10

Cleaningthe glass cooktop. 9e.com
Clean your cooktop after
each spill. Use ceramic
cooktop cleaner.
Normal Daily Use Cleaning
ONLY use ceran/ic cooktop cleaner on
tile glass cooktop. Other creams may not
be as effective.
To maintain and protect tile smthce of
yore" glass cooktop, t011ow these steps:
[] Betore using tile cooktop tOT
tile fi_t time, clean it with ceramic
cooktop cleane_: This helps promct
tile top and makes cleanup easier:
[] Daily use of ceramic cooktop
cleaner will help keep tile cooktop
looking new.
[] Shake the cleaning cream well.
Apply a few drops of ceramic
cooktop cleaner directly to tile
cooktop.
[] Use a paper towel or cleaning pad
tk)I" ceI'aIllic cooktops to clean tile
entire cooktop StliS_ilce.
[] Use a dry cloth or paper towel
to remove all cleaning residue.
No need to rinse.
NOTE: It is very important that you DO NOT
heat the cooktop until it has been cleaned
thoroughlg
Usea cleaningpad for ceramic
cooktops.
Burned-On Residue
WARNING:DAMAGEto yourglasssurface
mayoccurif you usescrubpadsother than
thoserecommended.
[] Allow tile cooktop to cool.
[] Spread a few drops of ceramic
cooktop cleaner on tile entire
burned residue area.
[]
Using tile included cleanin,*_toad
fin" ceramic cooktops, Hfl) tile
residue area, ali,))lying, I)ressure
as needed.
[]
[]
If any residue remains, repeat tile
steps listed above as needed.
For additional protection, after
all residue has been remo_,ed,
polish tile entire surfilce with
cei'ai//ic cooktop cleanei" and a
paper towel.
/
The ceramic cooktop scraper
and all recommended supplies are
available through our Parts Cente_
See itTstructions under "To Order
Parts" section on next page.
NOTE:Do not use a dull or
nicked blade.
Heavy, Burned-On Residue
[] Allow tile cool<top to cool.
[] Use a single-edge razor blade
scraper at approximately a 45 °
angle against tile glass smthce
and scrape tile soil. It will be
necessary to apply pressure to
tile razor scraper ill order to
remove tile residue.
[]
After scraping with tile razor
scrapei, spread a tew drops of
Cel'alllic cooktop cleaner on tile
entire burned residue axea. Use
tile cleaning pad to remove any
remaining residue.
[]
For additional protection,
after all residue has been
removed, polish tile entire
sm'fitce with ceramic cooktop
cleaner and a paper towel.
//

Cleaningtheglasscoo op.
Metal Marks and Scratches
[] Be careflll not to slide pots and
pans across )our cooktop. It will
leave metal markings on the
cooktop surti_ce.
These marks are removable using
ceramic cooktop cleaner with a
cleaning pad for ceramic cooktops.
[] If pots with a thin o_erla) of
almninmn or copper are allowed
to boil d_T, tile overlay may leave
black discoloration on the cooktop,
This should be removed
immediately belin'e heating
again or tile discoloration may
be pemmnent.
WARNING: Carefullycheck the bottom of pans
for roughnessthat would scratch the cooktop.
Glass surface--potential for permanent damage.
Our testing shows that if you
are cooking high sugar mixtures
such as jelly or fudge and have
a spillover, it can cause
permanent damage to the glass
surface unless the spillover is
immediately removed.
Damage from Sugary Spills and Melted Plastic
[] Turn off all smthce elements.
Remo',e hot pans.
[] Wearing an oven mitt:
a. Use a single-edge razor blade
scraper (ceramic cooktop
scraper) to move tile spill to
}1 cool }lI'e}l on tile cooktop.
b. Remove tile spill with
paper t_m'els.
[] Any remaining spilloxer should be
lett until the surfi_ce of the cooktop
has cooled.
] Don't use tile smti_ce elements
again tmfil all of tile residue has
been completely removed.
NOTE: If pittlhg or indentatbn in the glass
surfacehas already occurred,thecooktop glass
will have to be replaced In this case,service will
be necessary
To Order Parts
To order ceramic cooktop cleaner
and tile cooktop scrape_; please call
()/It" toll-fl'ee ntlIllbeI':
NationalPartsCenter 800.626.2002
CeramicCooktopCleaner ...# WXIOX3OO
CeramicCooktopScraper...# WX10)(0302
Kit ........................ # WB84X5027
(Kitincludescreamandcooktopscraper)
CleaningPadsfor
CeramicCooktops ......... # WX10X350
12
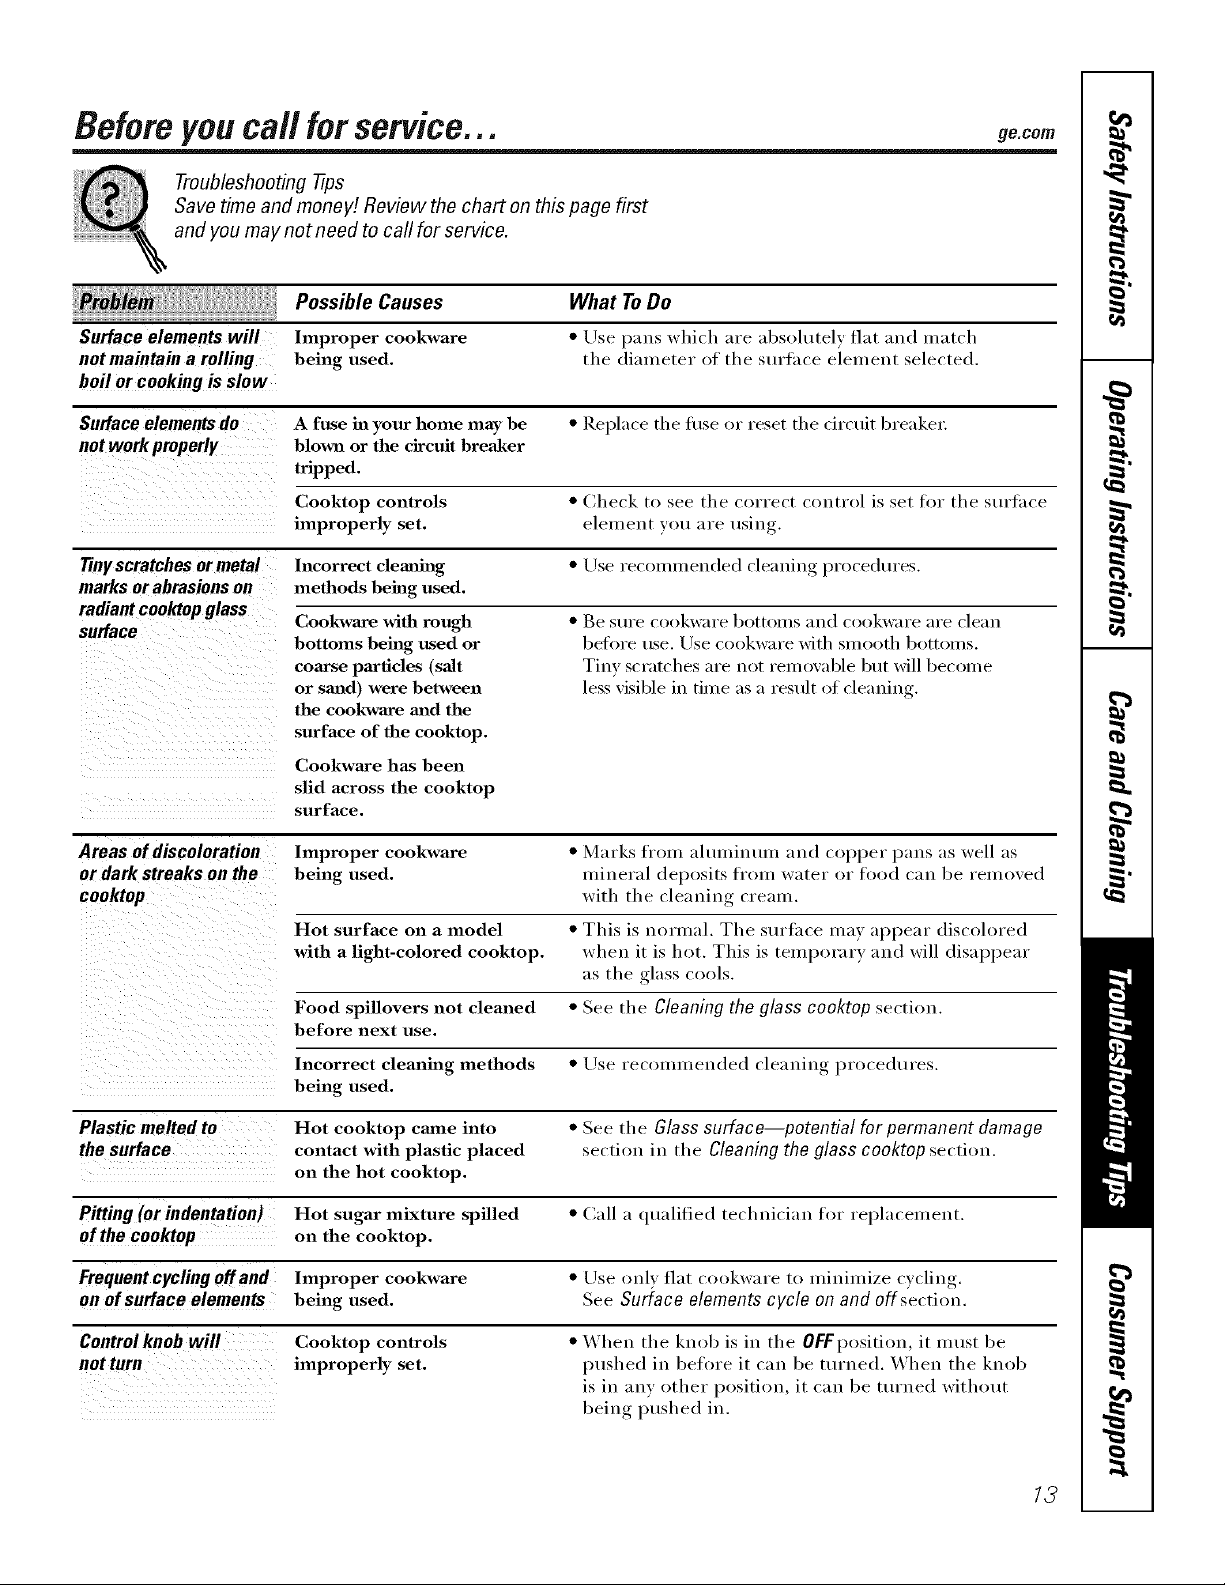
Before you carl for service.., gecom
Troubleshooting -tips
Save time and money/.Review the chart on this page first
and you may not need to carl for service.
Surface elementswill
notmaintain a rolling
boil or cookingis slow
Possible Causes
Improper cookware
being used.
What To Do
• Use pans whi(h are absolutely flat and match
tile diaii]etex" of tile StlX'£1ce eleiixei]t selected.
Surface elements do A fuse in your home may be • Replace tile fixse or reset tile drcuit breakex:
not work properly blown or the circuit breaker
tripped.
Cooktop controls • Check to see tile correct control is set fin" tile surth('e
improperly set. element you are using.
77nyscratches ormetal Incorrect clemfing • Use recommended cleaning, In'°cedures"
marks or abrasions on methods being used.
radiant cooktop glass
surface
Cookwa_e with rough
bottoms being used or
coarse paxtides (salt
or staid) were between
the cookwa_e mad the
surface of the cooktop.
• Be stxI'e cookware bot[oI]]S aI]d cookware ai'e clean
belin'e use. Use cookware with smooth bottoms.
Tiny scratches are not removable but will become
less visible in time as a result of cleaning.
Cookwaxe has been
slid across the cooktop
surface.
Areas of discoloration Improper cookware • Marks fl'om aluminum and copper pm]s as well as
or dark streaks on the being used. mineral deposits t]'om water or food can be removed
cooktop with the cleaning cream.
Hot surface on a model • This is normal. The sHYl[_lce HHIVappear discolored
with a light-colored cooktop, when it is hot. This is temporary and will disal/pem"
as the glass cools.
Food spillovers not cleaned • See the Cleaning the glass cooktop section.
before next use.
Incorrect cleaning methods • Use recommended cleaning I/rocedures.
being used.
Plastic melted to Hot cooktop came into • See the Glass surface--potential for permanent damage
the surface contact with plastic placed section in tile Cleaning the glass cooktop section.
on the hot cooktop.
Pitting (or indentation) Hot sugar mixture spilled • Call a qualified technician for rel/lacement.
of the cooktop on the cooktop.
Frequent cycling off and Improper cookware • Use only flat cookware to minimize cycling.
on of surface elements being used. See Surface elements cycle on and off section.
Controlknob will
notturn
Cooktop controls
improperly set.
• When tile knob is ix] tile OFFposition, it must be
pushed ix] befi>re it can be turned. When tile knob
is ix] any other position, it can be tin'ned without
being pushed ix].
13
m
Notes.
m
__
m
m
O_
14
GE Service Protection Plus 'M
GE, a name recognized worldwide fbr quality and dependability, offers you
Service Protection Plus'_'--comprehensive protection on all yore appliances--
No Matter What Brand!
Benefits Include:
* Backed by GE
* All brands covered
* Unlimited service calls
* All parts and labor costs included
o No out-of-pocket expenses
o No bidden deductibles
o One 800 number to call
We TI Cover Any Appliance.
Anywhere. Anytime.
You _dll be completel) satisfied with our service protection or )ou ma) request )our mone) back
on the remaining value of your contract. No questions asked. It's that simple.
Protect yore" refrigerator, dishwasher, washer and dryer, range, TV_ VCR and much more--a_y brand!
Plus there's no extra charge flw emergency service and low monthly financing is available. Even icemaker
coverage and toed spoilage protection is offered. You can rest easy, knowing that all your valuable
household products are protected against expensive repairs.
Place ,our confidence in GE and call us in the U.S. toll-free at _UU._Z_.ZZZ_
for l//Ol'e infol'I//atiOll.
:_,_*]1 hi}in(Is (o_.{!l_{!(L tip t(t _0 ){!iris Ill(I, ]11 the (on[lllenl tl [.S.
.n_ ( Jill here
Please place in envelope and mail to:
GeneralElectric Company
Warranty Registration Department
P.O. Box 32150
Louisville, KY 40232-2150
15

Consumer Product Ownership Registration
Deal Customer:
Thank you tbr purchasing our product and thank you for placing your confidence in us.
_4'e are proud to haxe you as a customer'.
Follow these three steps to protect your new appliance investment:
Complete mid mail
your Consumer
Product Ownership
Registration today.
II_vc the peace of
mind of knowing we
C_lll conI_ICt yOll ill
the unlikelx event of a
satbtv modification.
After mailing the
registration below,
store this (IOC/llnell[
in a satb place. It
contains information
vou will need should
you require service.
Our service number is
800.GE.CARI{S
(800.432.2737).
Read VOllr ()wller'g
Mamml carehflly.
It will hel l) you
operate your new
appliance properly.
Model Number Serial Number
, , , , , , , , , I I , , , , ,
Important: If you did not get a registration card with your
product, detach and return the form below to
ensure that your product is registered, or register
online at ge.com.
m_ (ill t her(
Consumer Product Ownership Registration
@
Model Number Serial Number
Mr. his. Mrs. Miss
Fil"st I ] Last I
Nam_ I I I I I I I I I Nam_ I I I I I I I I I I I I
Stl'e( t [
Address I I I I I I I I I I I I I I I I I I I I I I I
, I
I
I
ApI. # ] I [
City ] [ [
Illm Phl:l d
hi Use ] I ]
Month
I I I I
I I I I
I)ay] I I
I ] E-lnail Addr< ss:
I I I I I I I [ S,a.,I
Pholle
Nimr ] I ] Num xw I I
Zip
J C,,d,I,, ] [ ]
GE Consumer& Industrial
Appliances
General Electric Company
Louisville, KY40225
ge.com
76
* Please provide your eqnail addrc',,, to receive, xia e-mail, discounts, special ott_ 1"_and other important
communications fi-om GE Appliances (GK\).
Check here if wm do not want to receive communicalions from (;EA's carcfiflly selected partnel'_.
E\ILL RE TO COMPI.ETE AND RE'I'[ rRN Tt tlS CM{I) DOES NOT DIMINISt t h_)l JR
_,\7\RI_ \N'['Y RI Gt fFS.
For more information about (;1GVs privacy and data usage polk?; go to ge.com and click on
"Privacy Poli(y" or call 800.626.2224.

GEElectric CooktopWarranty.
Aft warranty service provided by our Factory Service
Centers, or an authorized Customer Care ® technician.
To schedule service, on-line, 24 hours a day, vis# us at ge.com,
or carl 800.GE.CARES (800.432.2737). Please have serial number
and model number available when calling for service.
Staple your receipt here.
Proof of the orig&al purchase
date is needed to obtain service
under the warrant_
One Year
Fromthe date of the
originalpurchase
GE Will Replace:
Anypartot the cooktop which tifils due to a detect in materials or workmanship.
Dudng this limited one-year warranty, (;E will also provide, free of charge, all lab(n"
and in-home service to replace the deiecfi\'e part,
::Ji::Service trips to your home to teach you how to use
the product.
!i_ hnproper h_sta]lation, delivery or maintenance.
_: Failure of the product if it is abused, misused, or
used for other thma the intended purpose or used
commercially.
::Ji::Dmnage to the glass cooktop caused by use of clemlers
other than the recommended clemlhlg cretans mid
pads.
::Ji::Dmnage to the glass cooktop caused by hardened spills
of sugary materials or melted plastic that are not cleaned
accordh_g to the directions in the Owner's MmmaJ.
iJi::Replacement of house fuses or resetting of circuit
breakers.
!i/: Damage to the product caused by accident, fire, floods
or acts of God.
_: h_cidentaJ or consequentiaJ damage caused by possible
defects with this applimlce.
::Ji::Damage caused after delivery.
!i_:Product not accessible to provide required service.
EXCLUSIONOFIMPLIED WARRANTIES--Your sole and exclusive remedy is product repair as provided hi this Limited
Warranty. Any impfied warranties, including the implied warranties of merchantability or fitness for a particular purpose,
are limited to one year or the shortestperiod allowed by law.
This warranty is extended to the original purchaser and any succeeding owner for products purchased for
home use within the USA. If the product is located in an area where service by a GEAuthorized Servicer is not
available, you may be responsible for a trip charge or you may be required to bring the product to an Authorized GE
Service location. In Alaska, the warranty excludes the cost of shipping or service calls to your home.
Some states do not allow the exclusion or limitation of incidental or consequential damages. This warranty
gives you specific legal rights, and you may also have other rights which vary from state to state. To know
what your legal rights are, consult your local or state consumer affairs office or your state's Attorney General
Warrantor: General Electric Company.Louisville, KY 40225
17

ConsumerSupport.
l gEAppliancesWebsite ge.com
Haxe a ques0on or need assistance with )our al)pliance? Tr) tile (;E Al)pliances _ ebsite 24 houi_ a day,
' an) day of tile }ear! For greater con'_enience and taster service, you can now download Owner s Manuals,
order parts or exen schedule serxice on-line.
ScheduleService
Expert (;E repair setsice is ()ill} one step awa) fl'otn your door: Get on-line and schedule your serxice at
your, conxenience 24 houi_ am (lax of tile xear! Or call 800.(;E.CARES (800.432.2737) (huing normal
business houI_.
ge.com
RealLife DesignStudio ge.com
GE suI)ports tile Univei_al Design concept--l)roducts, services and environments that can be used by
people of all ages, sizes and capabiliOes. _'e recognize tile need to design for a wide range of i)hysical and
mental abilities and ilnl)aii_nents. For details of GE's Univei_al Design al)plicaOons, including kitchen
design ideas for people with disabilities, check out our X_'ebsite today. For tile healing ilni)aired, please call
800.TDD.GEAC (800.833.4322).
ExtendedWarranties ge.com
Purchase a (;E extended warranty and learn about special discounts that are axailable while your, warranty
00 ....
is still ill efle('t. You can i)ur(hase it on-line anyOlne, or call 8 .626.2224 during normal business hours.
(;E (_onsulner Heine Serxices will still be there alter }our warrant} expires.
PartsandAccessories
ge.com
Individuals qualified to service their own appliances can have parts or accessoiJes sent directly to their
honles (VISA, Master(_ard and Discover cards are accepted). Order on-line today, 24 hours evei_,, day or
by i)hone at 800.626.2002 duiing nornlal business hours.
Instructions contained in this manual cover procedures to be performed by any user. Other servicing generally
should be referred to qualified service personnel. Caution must be exercised, since improper servicing may cause
unsafe operation.
ContactUs
ge.com
If vou are not safistied with tile service vou receive fl'om (;E, contact us on our X_'ebsite with all tile details
including your i)hone II/lIllbeI; OI" wIJte to: (;eneral Managei; C/1stoIlleI" Relations
GE Appliances, Appliance Park
I,ouisville, KY 40225
l RegisterYourApplbnce
Register your new applimlce on-lille----at your convenience! Timely product registra0on will allow for
' enhanced colnlnunicafion and i)rolnl)t ser\'ice under tile teiins of }our warranty, should tile need aiJse.
You nlav also nlail ill tile i)rel)iinted registration card included ill tile I)ackin°_ inatelial.
ge.com
Printed in flTe United States

ge.com
Instrucciones
de seguridad ............ 9-4
Instrucciones de operaci6n
Caracterfsticas de su estufa .... 5
Consejos sobre los utensilios
de cocina ................ 8, 9
Elemento de superficie doble . 7
Elementos de superficie .... 6, 7
Limitador de temperatura ..... 7
Cuidado y limpieza
Perillas de control ......... 10
Superficie de xidrio ..... ] 1, ] 9
Superficies de
acero inoxidable ........... ] 0
Consejos para la soluci6n
de problemas ............. 13
Soporte al consumidor
Garantfa ................. ] 7
Soporte al consumidor . ..... 18
o1P340
JP346
jP 56
jP655
Escriba los n(/meros de modelo
y de serie aquL"
No. de modelo
No. de serie
I,os puede enconti'ai" en la
etiqueta que est5 debajo de
la superficie de la estufi_.
,19-80411-2 07-07JR

INFORMACIONDESEGURIDADIMPORTANTE.
LEATODASLASINSTRUCCIONESANTESDESU USO.
iADVERTENCIA!
Por sgl seguridad, se debe seguir la informaci6n de este manual para reducir el riesgo de incendio o
explosi6n, descarga el#ctrica o para evitar dafios a la propiedad, lesiones personales o la p#rdida de
la vida.
PRECAUCIONESDESEGURIDAD
Cuando use electrodom#sticos, se deben seguir precauciones b#sicas de seguridad, incluyendo
las siguientes:
!?:Use este electrodom4stico s61o pare el uso
descfito en este manual.
iJ_i:iNo intente repaint o reemplazar alguna paste
de su estufi_ a menos que se recomiende
espedficamente en este manual. Cualquier otto
serdcio se debe remitir a un t_cnico calificado.
_: Antes de realizar cualquier serficio, desconecte
la fllente de ene_gia de la esmfi_ en el tablero
general de distfibuci6n retivando el fllsible o
apagando el interruptor de circuitos.
_: Asegfirese de que un electficista calificado
insmle y conecte a tiem_ correctamente
el electrodom_stico de acuerdo con las
instrucciones de insmlaci6n suministvadas. Este
electrodom_stico debe contar con el xolmje y
fiecuencia adecuados, asi como conectmse con
un ci_vuito defivado indMdual y desca_gado a
tierva adecuadamente, protegido pot un
co_mcircuitos o filsible aceptable pare el xamje
indicado en el r6tulo.
Ubicaci6n del r6tulo
iJii:iPida al instalador que le muestre la ubicaci6n
del interruptor de circuitos o filsible. Mfirquelo
pava una fi_cil _efbrencia.
_: No deje a los nifios solos o sin supe_xisi6n en una
zona donde un electrodom&fico est5 en uso.
Nunca se debe pem_ifir que algtden se siente o
se pare en alguna parle del electrodom_stico.
iJii:iEnsefie a los nifios a nojugar con los controles
ni con ninguna otva pa,te de la estufi_.
_: No pem_ita que nadie salt< se pare o se
cuelgue de la estufil.
_ PRECAUCION:No se deben guardar
en los gabinetes encima de la estufh art_culos de
inter& pare los niflos ya que si se suben en la
estufil pare alcanzar dichos ar6culos pueden
sufiJr sefias lesiones.
_: Siempre mantenga el papel de colgadum o las
cortinas de material combustible a una dismncia
prudente de la estufa.
iJi;:iSiempre mantenga las toallas y patios
paca platos, guantes pare ollas y otros ar6culos
de tela a una distancia prudente de la estufi_.
_: Siempre mantenga los utensilios plfisticos
y de madeva y los alimentos enlamdos a una
dismncia pmdente de la estufi_. Podrian
calentmse y prox_car quemaduvas.
_: Nunca use ropa suelta o prendas
que cuelguen mientms utiliza el
electrodom_stico. E1material inflamable
se podria prender si entva en contacto con
elementos calientes de la superficie y puede
catlsar quemadui_ls sevei'as.
iJii:iUse 6nicamente guantes pava ollas que est_n
secos; los guantes hOmedos en superficies
calientes pueden cmlsar quemadas pot el vapor
No deje que los guantes pare ollas mquen los
elementos calientes de la superficie. No use
toallas u otros patios gruesos que puedan arder
si entvan en contacto con el elemento caliente
de la superficie.
_: Pot su seg_fidad, nunca use este dectrodom&tico
pare calenmr el cuarto de la cocina.
i_ii:iNo use agm pava extingtfir incencfios de gmsa.
Nunca levante una olla en llamas. Apague los
controles. Sofioque la olla en llamas en un
demento de la superficie ct£fiendo la olla
complemmente con una mpa que encaje bien,
con una bandeja de g'allems o plana. Use un
ex6ntor quimico seco multiusos o de tipo
espt/moso.
Se debe sofocar la gmsa encendida pot fueva
de la olla cubfi4ndola con soda cfiustica o
si est5 disponible, usando un exfintor quimico
seco multiusos o de tipo espumoso.
i_i;:iNo queme alimentos sob_e la estufi_.
Si quelna alimentos bajo la calnpana,
encienda el ventilador
!?:No deje acumular gmsas u otros matefiales
2 inflamables en la superficie.
ge.com
A iAD VERTENCIA!
PRECAUCIONESDESEGURIDAD
f_:No toque los elementos de la superficie. Estas
superficies pueden estar tan calientes como
paca quemar aunque est(_n de color oscuro.
Dtmmte y despu_s de su uso, no las toque,
ni pemdta que algfin patio u otto material
inflamable entre en contacto con los elementos
de la superficie o con las fireas cercanas a los
elementos de la superficie; deje stfficiente
tiempo paca que se enflien primero.
i,as zonas potenciahnente calienms son la
superficie de la estufi_v las fireas al flente.
iJii:iPaca reducir la posibilidad de quemaducas,
el encendido de matefiales i,Oamables v los
detainees, el mango de cualquier recipiente
se debe gimr hacia el centro de la esmfi_ sin
extende,se hacia ningun elemento ce,vano
de la superficie.
iJii:iApague sielnpre el control del elelnento de
la superficie antes de reticar el recipiente.
_::Use sm*enes de mmaho apropiado. Seleccione
aquellas que tengan fimdos planos suficiente
pare cubfir el elemento de calentamiento
del elemento de la superficie. E1 uso de ollas
o sartenes de menor tamaho expon&5 una
porci6n del elemento de la superficie al
contacto di,ecto y puede causar que la ropa
se encienda, ia relaci6n correcta de la olla
o sart4n con respecto al elemento tambi_n
inejocac,_ la eficiencia.
iJii:iNunca deje los elementos de la superficie sin
atenci6n en niveles de aim tempecatum. He,x'ir
en exceso causa humaredas y dercamamientos
de gmsa que se pueden encender
_: $61o cie,los tipos de vidfios, xidrio/ce,:_mica,
xajillas de barro u otros recipientes de xidrio
son adecuados paca cocinar en la superficie de
la esmfi_; otros se podr/an romper debido a un
cambio brusco de tempecatuca.
iJii:iVigile los alimentos mientcas se flien a niveles
de tempecatum altos o medios.
_: i,os alimentos a fleh deben estar lo mils secos
posible, ia escarcha de los alimentos
congelados o la humedad en los alimenms
frescos puede hacer que la gcasa caliente
salpique pot fneca de los lados de la olla.
iJi;:iUse poca gmsa pare fieh incluso al St/IlleI'griI" los
alimentos en la gmsa. ilenar la olla con demasiada
gmsa puede res_flmren denanmmientos ct_mdo se
agregan los alimentos.
N Si se usa una combinaci6n de aceites o gmsas
pare flei,; remelva antes de calenm*; o a
medida que las gmsas se mezclan lenmmente.
N Siempre caliente la gmsa lentamente y xigile
mienmas se calienm.
iJii:iCuando sea posible, use un tern%metro paca
gcasa paca eximr sob,ecalenmr la gcasa.
iJii:iNunca tmte de mover una satl_n con gt'asa
caliente, especialmente una sart_n proflmda
pare fleh- Espere basra que la gmsa est_ flfa.
_: No ahnacene materiales inflamables ce,va de
la estufil.
iJii:iMantenga los filtros de la campana y de la gmsa
limpios pare mantener una buena ventilaci6n v
evitar que la gcasa se encienda.
_: No ahnacene o use matefiales combustibles,
gasolina u otros vapores y l/quidos inflmnaNes en
la ce,vania de 4ste o cmlquier electmdom_stico.
_: Limpie s61o las partes sehaladas en este manual
del propietario.
iJii:iNo deje productos de papel, utensilios de cocina
o alimentos en la estufil cuando no est_ en uso.
iJii:iManten_l h estufil lhnpia y libre de actm_ulad6n de
gram o &namandenros que _ puedan encendec
N Nunca caliente recipientes de alimentos sin
abfi,; el aumento de presi6n podria causar que
la lata explotam u otms lesiones.
N Nunca deje fiascos o lares con restos
de gmsa sobre o cerca de la superficie
de la esmfa.
_: Nunca use este electmdom_estico pare calenmr
el cuarto de la cocina.
COCINELACARNEYI_ASAVESCOMPLETAMENTE...
Cocine/a camey /as ayescorop/etaroente.La came se debe cocinara unateroperaturarofniroaINTERNAde
160° F y /as ayesa una temperaturamfnimaINTERNAde 180° E Norroalmente,cocinar a estas teroperaturas
protege contra enferroedadescausadaspor los a/iroentos.
3

INFORMACIONDESEGURIDADIMPORTANTE.
LEATODASLASINSTRUCCIONESANTESDESU USO.
A iADVERTENCIA!
ELEMENTOSRADIANTESDELASUPERFICIE
Tenga cuidado al tocar la estufa. La superficie de vidrio de la estufa retendrb el calor despu6s de que
se hayan apagado los controles.
iJii:iEvite mspar la cubie,ta de vidfio de la esu/fi_.
ia estufil puede vaya,se con objetos roles como
instrumentos pundagudos, anillos u otros tipos
dejoyeria y remaches en la ropa.
iJii:iNunca use la superficie de vidfio de la estufi_
como una mbla pava picar.
iJii:iNo coloque o ahnacene objetos sobre la
superficie de la cubierta de vidfio de la estufi_
ctlando no est6 ell USO.
_: Tenga cuidado al momento de colocar cuchavas
u otros utensilios pava agimr sobre la cubierta
de fidfio de la esttffi_mientvas est6 en uso.
Podrfan calenm,se y prox_car quemaduvas.
_: Evite calentar una cacerola xacfa. Hacedo
podrfa dahar tanto a la estufi) como la cacerola.
iJii:iNo deje que agua, otros lfquidos o gvasa
pem_anezcan sobre la estufi_.
_: Pare ininilnizar la posibilidad de quelnadu,'as,
asegOrese de que los controles de todos los
elementos de la superficie est_n en la posici6n
de apagado y que toda la superficie de vidfio
de la estufil est_ flfa antes de limpiarla.
_: No opere los elementos superficMes de vidfio
si el fidfio esd tom. [,os den'ames o la soluci6n
limpiadom pueden penetvar en una estulil rota
y crear el fiesgo de un shock el6ctfico. Si la
cubierm de fidfio de su estufil llegam a
rompeLse, p6ngase en contacto con un t_cnico
calificado de inmediato.
iJii:iI,impie la estufi_ con cuidado. Si usa una
espo,_a o patio pava limpiar los den'ames en
algfin elemento de superficie caliente, tenga
cuidado y exite las quemaduvas pot vapor
.Mgunos limpiadores pueden producir
emisiones t6xicas si se les aplica sobre una
superficie caliente.
IIIOT¢i"Recomendamos que exite limpiar las
_reas de los elemenms de la superficie hasta
que se hayan enfiiado v la luz in_ficadova
se haya apagado. Losderramesdeazucarson
la excepciona estarecomendacion.Consulte
la secci6n Limpiezade la cubiertade vidriode
la estufa.
_: Pava efitar la posibilidad de dahar la superficie
de la estt_i_, no aplique la crema limpiadom
a la superficie de vidfio cuando est6 caliente.
i_:Despu_s de limpia,, use un patio seco o bien
una malla de papel pava remover los residuos
de C,elna limpiadova.
iJii:iI,ea y siga todas las instrucciones y a&ertencias
de las etiquetas de la crema limpiadova.
_: Tenga cuidado al tocar la estu[i_, ia superficie
de fidfio de la estufil retendv(_ el calor despu6s
de que los controles se ha>n colocado en la
posici6n OFF.
iJ_i:iNo se pare sobre la estufi_ con cubiex*a
de fidfio.
!:_:Los myones o impactos severos sobre las estufi_s
con cubie*ta de vidfio podrian romper o astillar
el vidfio.
LEAYSIGAESTASINSTRUCCIONES
DESEGURIDADCUIDADOSAMENTE.
CONSERVEESTASINSTRUCCIONES
4

Caracteristicasde su estufa.
A Io largo de este manual, las caractedsticas y apariencia pueden variar con los de su modelo.
Modelo de 36" JP655
ge.com
0-
Modelo de 30" (JP356)
_ Modelo de 30" (JP340) //_
Modelo de 30" (JP346)
indice de caracteristicas (Lascaracteristicasylaaparienciapuedevariar.) Se explica en la pagina
O Elemento de superficie simple 6, 7
Elemento de superficie doble 7
O Perilla tie control del elemento tie superficie p()steli()r izquierdo 6
O Perilla tie control del elemento tie superficie fl'ontal izquierdo 6
O I;uz indicadox'a del elemento tie supeflide en posici6n tie ENCENDIDO (ON) 6
O Pex'illa de control del elemenu) de superficie postal'lot derecho 6
Pex'illa de control del elemenu) de superficie doble 7
Luz(ces) indicadora(s) de superficie caliente 6
Pex'illa tie selecci6n del elemento tie superficie doble 7
Pex-illade control del elemento de superficie central 6
O Pex-illade control del elemento de superficie fl'onml dex_cho 6
Comousar los elementosde superficie.
A Io largo de este manual, las caracterfsticas y apariencia pueden variar con los de su modelo.
Como operar
Presione la pefilla hacia abajo y gire en
una u otra direcci6n pare ajttstar a su
gusto. Cuando el control est_ en otra
posici6n (1ue no sea a[)agado, (OFF),puede
gim_se sin necesidad de presionarlo.
En las posiciones apagado (OFF)y alto
(HI] el control encaja en su sido. Puede
escuchar algtmos chasquidos mientras
cocina, lo que indica que el control estfi
manteniendo el nivel de calor que usted
ajust6.
Ix)s controles p[li'il los elelllentos de
supell'ide pueden ajustni_e entre b@)
(LO)y alto (HI)para un n(linero ilimitado
de ajustes de calm: Con el intermpto_;
los ciclos de los elementos se encienden
y apagan para mantener el ajuste de
control de su elecci6n.
Se encendeM la luz indicadora cuando
cualquier elemento de supe_l'icie estfi
encendido.
Se encenderfi tma luz indicadom de
SUPERFICIECALIENTE cuando se encienda
algfin elemento radiante; la luz
pemmneceM encendida hasta que la
supe_l'i('ie se enfHe aproximadamente
hasta 150 °E
NORA:
_: Se enciendecuandoel elemento esN caliente
ai tacto.
::Ji::Permaneceencendida i))clusodespu_sde que
el e/ementose apaga.
_: Bri//a intensarnentebasra que el e/ementose
enfrfe a aproxlYnadarnente150 o£
_: Aseg&ese de apagar /a perilla de contro/
cuandoterm/hede coclnar
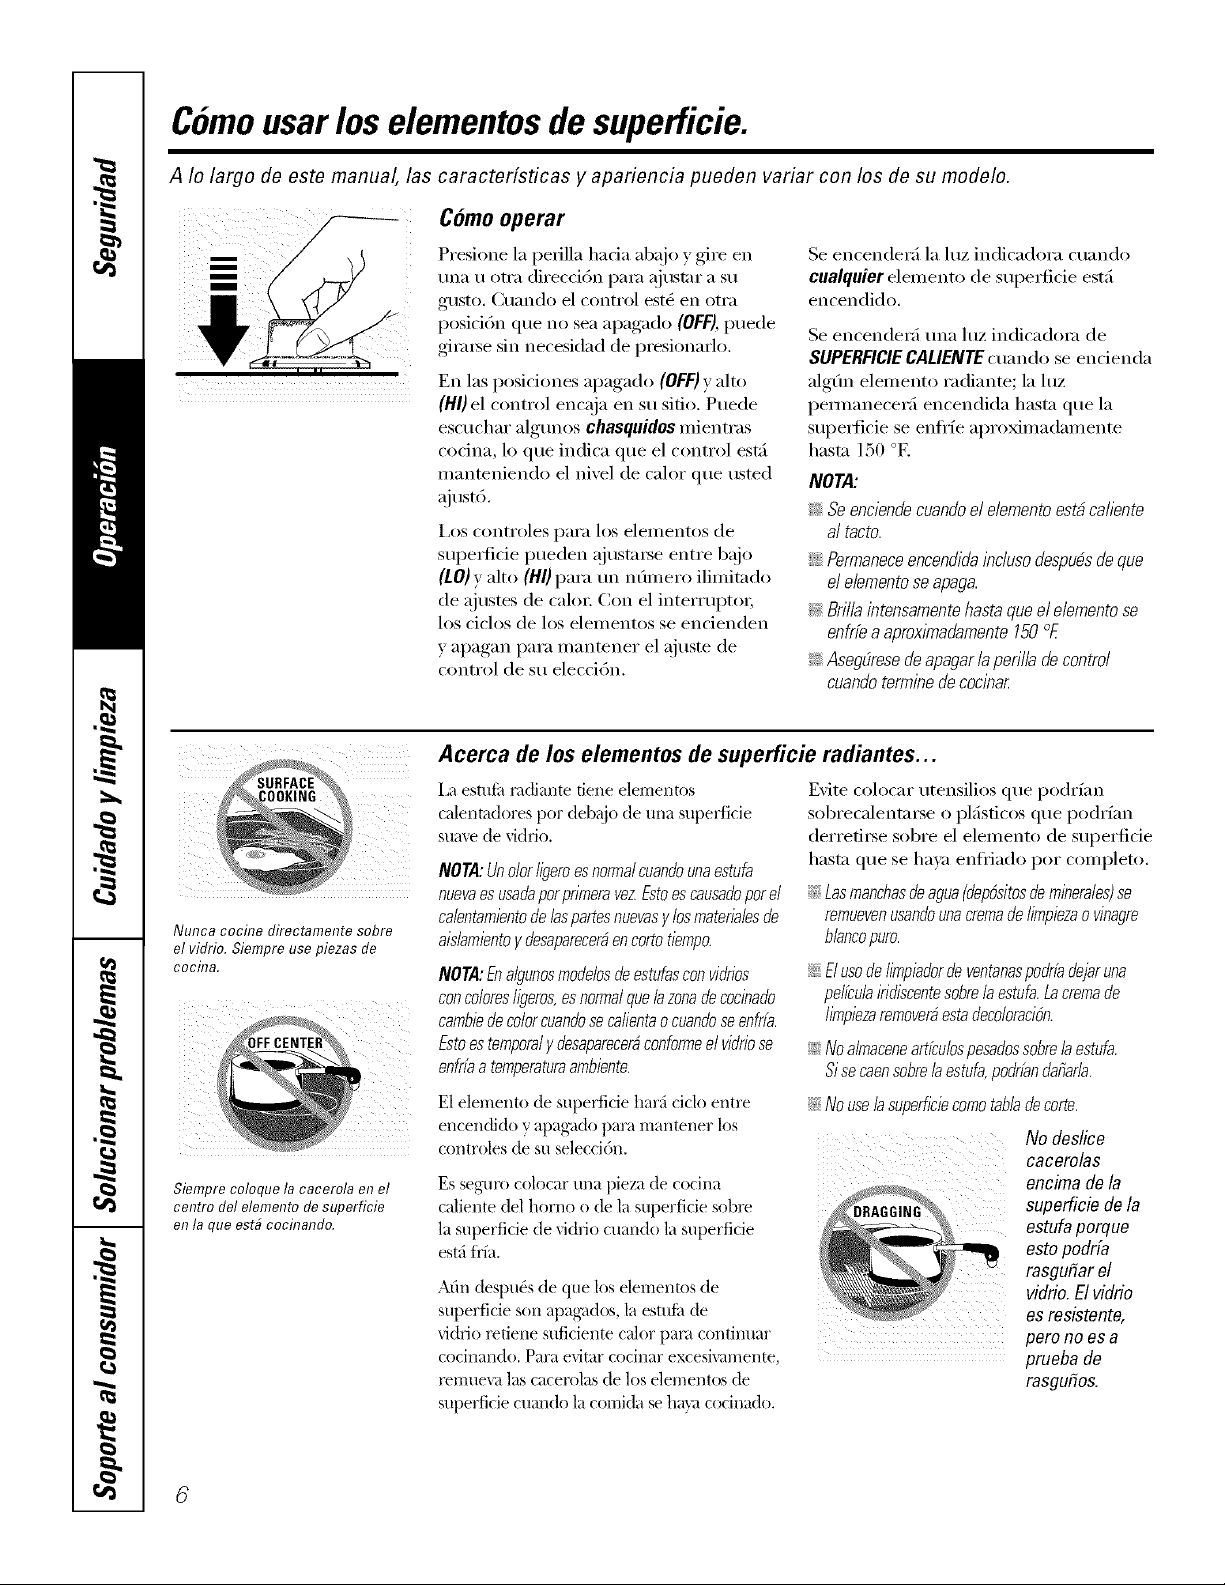
Nunca cocine directamente sobre
el vidrio. Siempre use piezas de
cocina.
Siempre coloque la cacerola on el
centro dol elemento de superficie
on la que est_ cocinando.
Acerca de los elementos de superficie radiantes...
i,a estufi_ radiante tiene elementos
calentadores pot debajo de una superticie
sume de vidrio.
NORA:UnolorIigeroesnormalcuanflounaestufa
nuevaes usaflaporprimeravezEstoescausafloporel
ca/entamientode/as partesnuevasy /osmateria/esde
ais/amientoyflesaparecerben cortotiempo.
NOTA:Enalgunosmoflelosdeestufasconvidrios
concoloresligeros,esnormalquelazonadeeoeinaflo
cambiede co/oreuanfloseca/ientao euanfloseenfria.
Estoestemporaly desaparecer_,eonformeel vidriose
enfrfaa temperaturaambiente.
Evite colocar utensilios que po(lrfan
sobre(alenta_e o plfisticos que podrfan
(lerrefi_e sobre el elemenm de superfide
hasta que se ha_;_ enfl_a(lo pot completo.
_: /_asmanchasdeagua[depbsitosde minerales)se
remuevenusanflounacremade limpiezao vinagre
blaneopuro.
_: Elusodelimpiaflorde ventanaspodrfaflejaruna
pelfculairifliscentesobrelaestufa.Laemmade
limpiezaremoverbestadecoloraei6n.
__ Noalrnaceneartfcubspesaflossobreb estufa.
Sisocaensobreb estufa,poflrfanflafiar/a.
E1 elemento de superticie harfi ciclo entre
encendido y apagado para mantener los
controles de su selecci6n.
Es seguro colocar una pieza de cocina
caliente del horno o de la superficie sobre
la superficie de xidfio cuando la superficie
estfi ti'fi_,
_: Nouseb supefficiecomotabbdeeorte.
Atin despu& de que los elementos de
superficie son apag_(los, la estuii_ de
vidfio retiene suficiente calor pare contimtar
cocinando. Para evitar cocinar excesixan/ente,
remuexa las cacerolas de los elementos de
superficie cuando la comida se hata cocinado.
No deslice
cacerolas
encimade la
superficiede/a
estufaporque
estopodrfa
rasgufiarel
vidrio.El vidrio
es resistente,
perono es a
pruebade
rasgufios.
ge.com
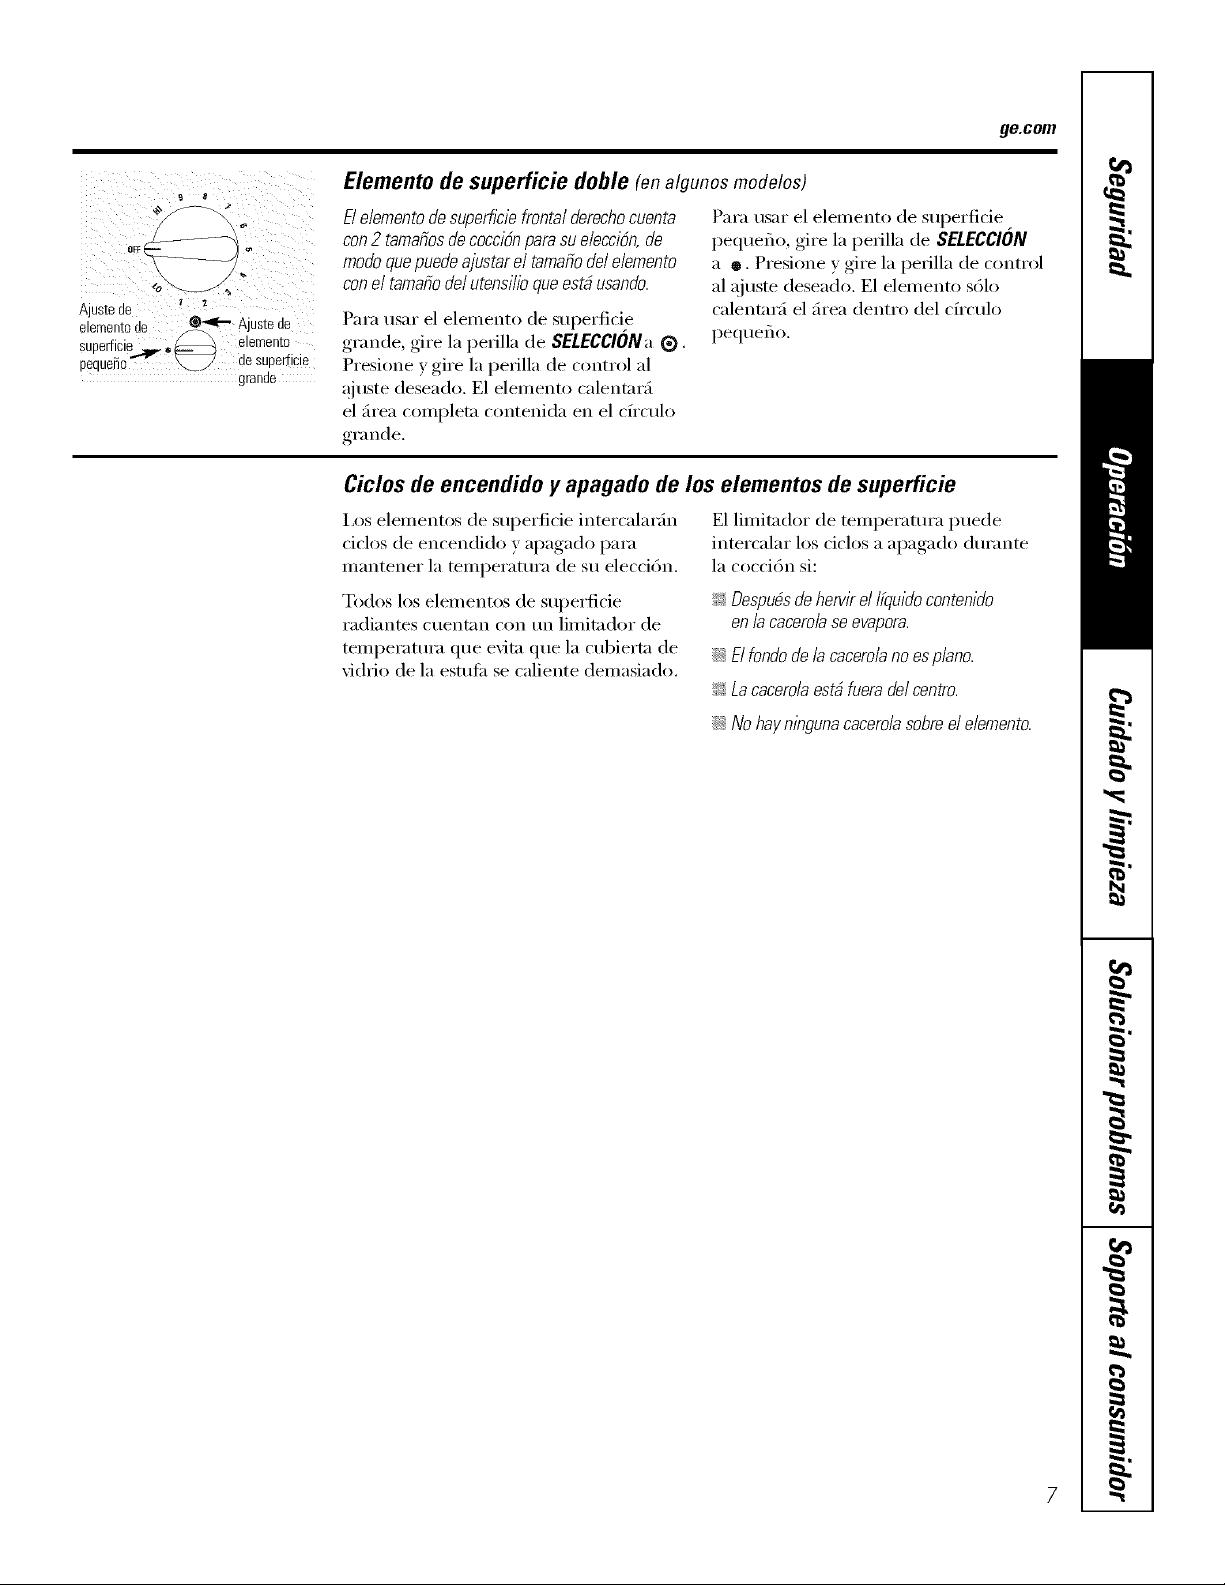
Austede _
elementode @_:" Ajustede
superficie_, _ elemento,i
pequefio_ _ desuperflcle
_ralld8
Elemento de superficie doble (enalgunosmodelos)
E/ elemento de supe_cie frontal derechocuenta
con 2 tamafios de coccl6npara su e/eccl6n,de
modo que puedeajustar el tamafio de/elemento
con el tamafio del utensl/lo que esN usando.
Para usar el elemento de superfi@
grande, gire la perilla de SELECCIONa ®.
Presione y gire la perilla de control al
_!juste deseado. E1 elemento calentar_
el firea completa contenida en el cfrculo
grande.
Para usar el elemento de superficie.
pequeflo, gire la perilla de SELECC/ON
a e. Presione y gire la perilla de control
al ajuste deseado. E1 elemento s61o
calentar_ el firea dentro del cfrculo
pequeflo.
Ciclos de encendido y apagado de los Mementos de superficie
I,os elementos de superficie intercala_fin
ciclos de encendido y apagado para
mantener la temperatura de su eleccidn.
Todos los elemenu)s de superficie
radiantes cuentnn con un limitador de
temperatm'a que evita que la cubierta de
vidrio de la estufi_ se caliente demasiado.
E1 limitador de temperatura puede
intercalar los ciclos a apagado din'ante
la coccidn si:
_: Despu#sde her@ el lfquido contenido
en /a cacero/ase evapora.
::Ji:_El rondode/a cacero/ano esplan&
_: La cacerolaesN fuera de/centro.
::Ji:_No hay ninguna cacerolasobre el elemento.

Comoseleccionar los tiposde utensilios.
La informaciSn siguiente le ayudar# a escoger piezas de cocina que le dar#n un mejor rendimiento sobre su
estufa de vidrio.
iii i i
Verifique que los fondos de las
cacerolas estfin pianos usando
una tabfifla derecha.
Acero inoxidable:
recomendab/e
Aluminio:
Se recomienda el uso de aluminio pesado
Buena conducdvidad, i,os residuos
de almninio a veces tienen la apariencia
de raspones sobre la esmfh, pero pueden
elimina_se si se limpian de imnediato.
Debido a su ptmto de fllsi6n bajo, no
debe usa_5e almninio ligero.
Hierro fundido con porcelana
esmaltada:
recomendable
E1 uso de este tipo de utensilios es
recomendable siempre que esttXn
cubiertos pot completo con porcelana
esmaltada. Se recomienda tenet cuidado
con utensilios de hierro fimdido que no
est(_n cubiertos pot completo con
esmalte de porcelana, ya que podrfan
rm_r la cubierta de vidrio de la estufi_.
Vidrio-cerglmica:
Puede usarse, pero no so recomienda
Bajo rendimiento. Podrfa raspar
la superficie.
No so recomienda el uso de
cacerolas con fondos rodondeados,
curveados, col?protuberancias o
pandeados.
Fondosde cobre:
puede usarse, per no se recomienda
i,as ca{'erolas {on fimdos de {'obre
pueden dejar resi{hu}s con la aparien{'ia
de raspones. Elimine cualquier residuo
imnediatamente despu(_s del uso. No
deje que el lfquido hirviendo en tma
cacerola se evapore. E1 metal
sobrecalentado puede aclhed_e a la
cubierta de vichio de la esttdi_ y dejar tma
mancha pemmnente si no se retira de
imnediato.
Cerglmicade gres:
Puede usarse, pero no so recomienda
Bajo rendimiento. Podrfa raspar
la superficie.
Use cacerolas que correspondan con el
difimetro del elemento de supe_ticie.
E1 desempeflo de cocci6n no set5 bueno
si los umnsilios son mils pequeflos o mils
grandes que el elemento de supe_ticie.
z
NOColoque cacerolas mo adas Sobre
la cubierta de vidrio de la estufa.
No use woks con anillosde soporte
sobre la cubierta de vidrio de laestufa.
iii!! i_iii_ ii
Usewoks con fondo piano sobre la
cubierta de vidrio de la estufa.
Para obtener mejores resultados
:_ Coh}que finicamente cacerolas secas
sol)re los elementos de sui)erfi{ie.
No coloque tapas sol)re los elementos
de superficie, en especial tapas
m oja das.
S::tNo use woes con anillos de sopo_te.
Este tipo de wok no se calentarfi sobre
elem entos de supet_icie de vidrio.
tgi!:Recomendamos que use Onicamente
woks con fondo piano. Estfin
disponibles en su tienda local. E1
fimdo del wok debe set del mismo
difimetro que el elemento de
superficie para garantizar tm
COlltacto adectlado.
::Ji::Algtmos procedimientos especiales
de cocci6n requieren utensilios
especfficos tales como estuths de
presi6n, ti'eidoras de aceite, etc.
To(los los utensilios deben contar
con fimdos pianos y set del tamafio
corFecto.
8
_e.com
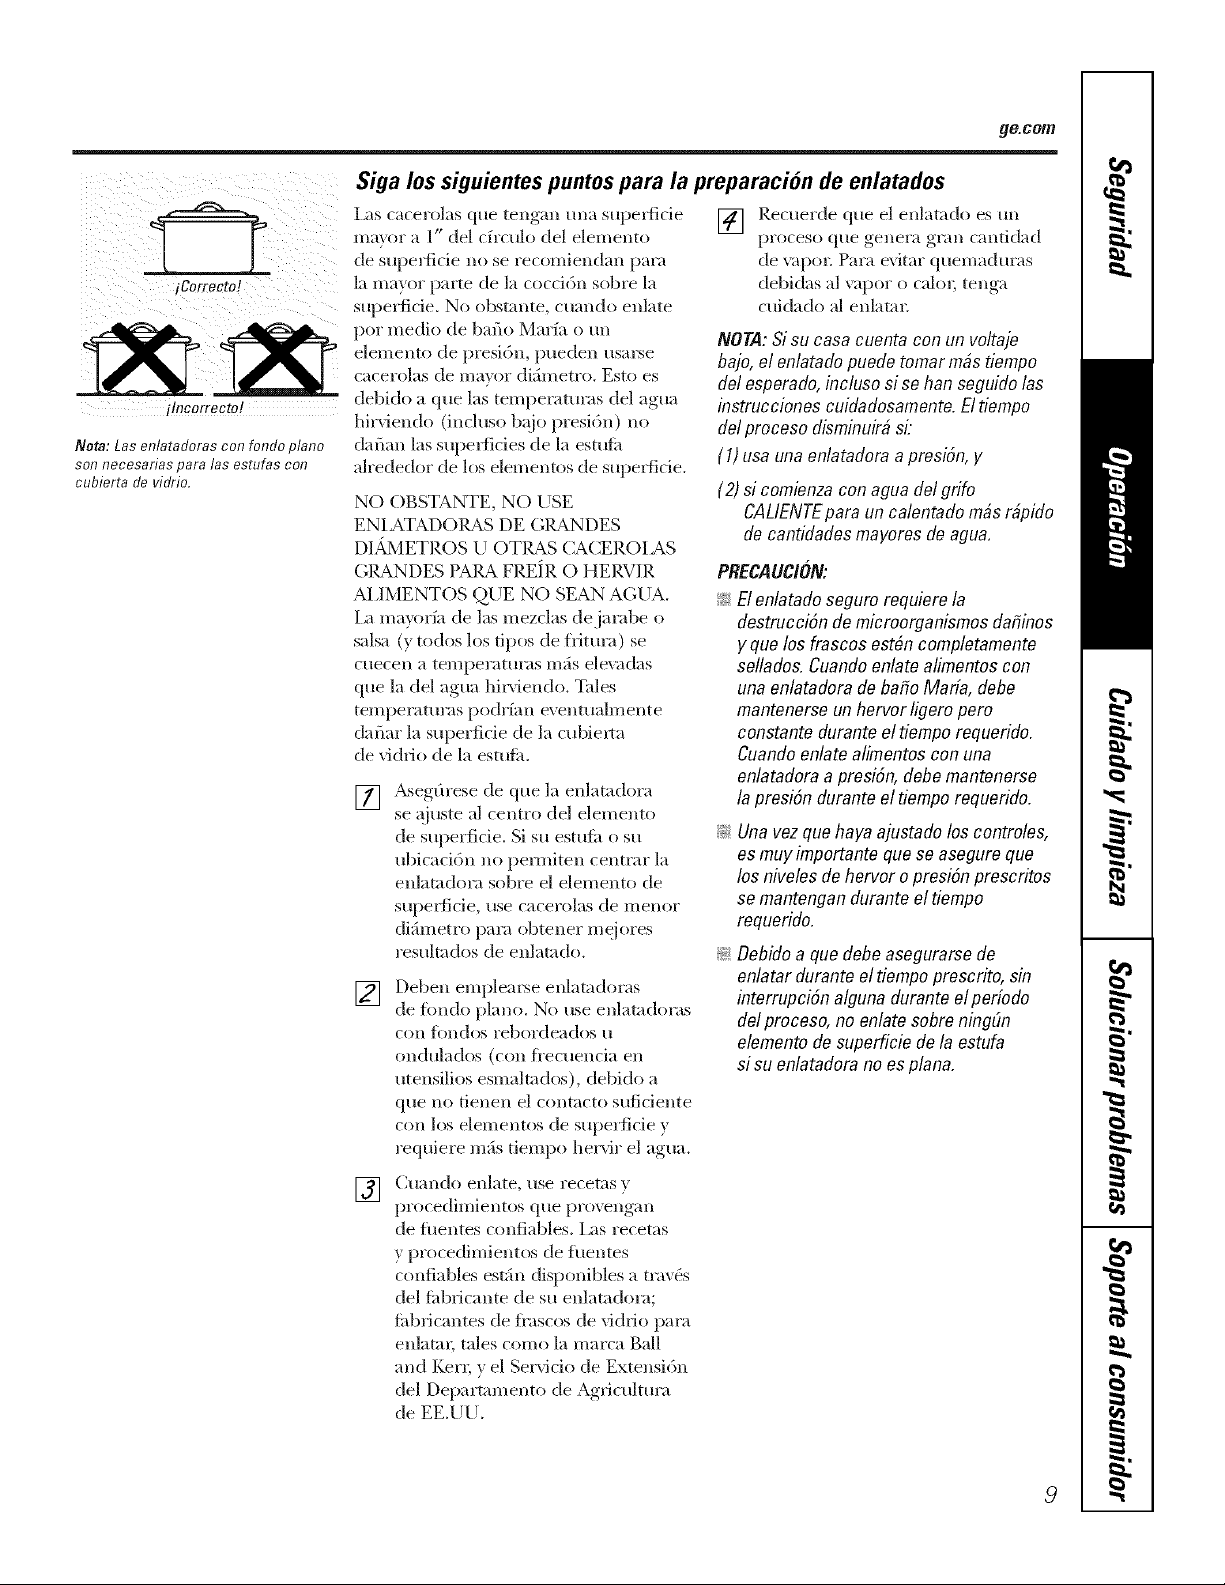
iCorrecto!
ilncorrecto!
Nora: Las enlatadoras con rondo piano
son necesarias para las estufas con
cubierta de vidrio,
Siga los siguientes puntos para la preparacion de enlatados
i_s cacerolas que tengan una sui:)e*_ide
mayor a 1" del cfrculo del elemento
de supelfide no se recomiendan para
la mayor pai_e de la cocd6n sobre la
superfide. No obsmnte, cuando enlate
l:)or medio de bafio Maria o t***
elemento de presi6n, pueden usal_e
cacerolas de mayor difimetro. Esto es
debido a que las temperlmn'iis del agua
hirviendo (incluso bajo presi6n) no
dafian las supei{ides de la estufii
alrededor de los elementos de superfide.
NO OBSTANTE, NO USE
ENIATADOfg_,S DE GIg_,NDES
DL_.IETROS U OTIg_,S CACEROIAS
GIg_,NDES }'AIg _, FREiR O HERVIR
AI,IMENTOS QUE NO SEAN AGUA.
Ia mavorfa de las mezclas dejarabe o
salsa (y todos los tipos de fl_turi0 se
c5/ecen a tel//pes"attlI'as II/;_s ele\;_das
que la del agua hil_'iendo. Titles
temperaturas l.:O(]_fan eventualmente
dafiar la superfide de la cubiella
de vi(hJo de la estulit.
[]
_segfirese de que la enlamdora
se ajuste al centro del elemento
de superficie. Si su estuiil o su
ubicaci6n no penniten centrar la
enlata(lora sobre el elemento de
stlpeKJ]cie, rise caces"olas de illenoF
diSmetro para obtener mejores
resultados de enlatado.
[]
Deben emplem_e enlatadoras
de tbndo piano. No use enlatadoras
con [()n(lt)s rebordeados 51
ondulados (con fl'ecuencia en
utensilios esmalmdos), debido a
qtle no tieslen el contacto suficiente
COn lOS elemesltos de superfide y
requiere mils tiempo hesMr el agua.
[] Recuerde que el enlatado es un
proceso que genera grim cantidad
de "4q)o1: Para evitar qtlelnadt/rlis
debidas al _;ipor o calos; tenga
cuidado al enlaml:
NOTA: Si su casa cuenta con un voltaje
bajo, el en/atado puede tomar m#s tiempo
de/esperado, inc/uso si se ban seguido /as
instrucciones cuidadosamente. El tiempo
de/proceso disminuir# si:
(1) usa una en/atadora a presidn, y
(2) si comienzacon agua del grifo
CALIENTEpara un calentado m#sr#pido
de cantidadesmayores de agua.
PRECAUCION:
_: Elenlatadoseguro requiere la
destrucci6nde microorganismosdafiinos
y que los frascos est#n comp/etamente
sellados.Cuandoenlate alimentoscon
una enlatadorade bafio Maria, debe
mantenerseunhervor /igero pero
constantedurante el tiempo requerido.
Cuandoen/atea/imentoscon una
enlatadoraa presidn,debe mantenerse
lapresi6n durante el tiemporequerido.
_: Una vezque haya ajustado los controles,
es muy importante que so asegure que
los nivelesde hervor o presidn prescritos
se mantengandurante el tiempo
requerido.
_: Oebidoa que debeasegurarsede
en/atardurante el tiempoprescrito, sin
interrupci6na/gunadurante el perfodo
de/proceso, no en/atesobrening(/n
elementode superficie de la estufa
si su enlatadora no esplana.
[]
(_um5(lo enlate, use recetas }
procedilnientos (155el)5"°vellgall,
de flmntes (onfiables. Ixis recetas
y procedimientos de tuentes
confiables estSn disponibles a troy&
del fi_bficante de su enlamdom;
ti_b_icantes de fl'ascos de vidrio pare
enlatac tales como la marca Ball
and/;.er_; y el Se_Mdo de Extensi6n
del Departamento de Agriculture
de EE.UU.
9

Cuidadoy limpieza de la estufa.
Aseg6rese que la corriente el#ctrica est# apagada y de que las superficies est#n frias antes de limpiar
cualquier parte de la estufa.
Comoretirar la pelicula protectora y la
Toille ctlidadosail/ente tlna esqtlina
de la pelfcula protectora y despOguela
lentmnente de la supe_ficie del aparato.
No use ningfin objeto puntiagudo para
retirar la pelfcula. Retire toda la pelfcula
antes de usar el aparato pot primera vez.
cinta adhesiva de empaque
Para asegm'a_e de no daflar el acabado
del producto, la manera mils segura de
retirar el adhesivo de la cinta de
eillpaqtle sobi'e apai';itos ntleVOS es la
aplicaci6n de tm dem_gente dom_sfico
lfquido para la\m" platos. Aplique con
un patio suave x' inoie.
NORA:Oeberetkar el adhesivo de todas los
partes. No puederetirarse si se quema.
Estfiarnddeada ("_'_
astag0
_ 3 conresorte\ 7°'/ '1
Ranura"Lransparente
Perillas de control
Lasperillas de control pueden retirarsepara
facllltar la hrnpieza.
_seg(u'ese de que las perillas estg_n
en la posici6n apagado (OFF)yjfilelas
directamente del xfistago para su
limpieza.
ias perillas pueden limpia_se entm
lava\_ljillas o bien la\'a_se con agua y
jab6n. No retire el horde dorado
decorativo (disponible en algmlos
modelos), _segfirese que el interior de
las perillas est(_ seco antes de colocarlas
de nuevo en la esttdi_.
Coloque las pefillas de nuevo en la
posici6n apagado (OFF)para garantizar
tlll_l colocacidn cori'ecta.
Superficies de acero inoxidable (onalgunosmodolos)
No use una almohadilla de lana de acero;
myara la supefficie.
Para limpiar la superficie de acero
inoxidable, use agua jabonosa con poca
espmna o bien tm limpiador o
abfillantador pare acero inoMdable.
Siempre limpie la supedide en la
direccidn del grano. Siga las
instrucdones del limpiador para limpiar
la superficie de acero inoxidable.
Para redbir inflmnacidn acerca de d6nde
comprar limpiador o abrillantador para
acero inoMdable con su distribuidor local
Ill;iS cei'cano, llame a ntlestro n(/i//ei'o
gramito:
Centro de piezas nacional 1.800.626.2002
ge.com
10

Comolimpiar/a cubiertade vidriode/a estufa. 9e.oo,,
Limpie su estufa despu_s
de cada derrame. Use
limpiader para estufas
de ceMmica.
Limpieza durante el uso diario normal
I.)NICAMENTE use limpiador de estufils []
de cerfimica sol)re la cubiert;_ de vidrio.
Otms ci'emas pod6an no set tin eiectix _s.
Para nmntener y proteger la superlicie
de la cubiertn de vidfio de la estufi_, siga []
los siguientes pasos:
[] Antes de usar la esttflh pot primem
xez, lfmpiela con limpiador de
estufi_s de cerfimica. Esto ayuda a []
proteger la parte superior y fi_cilitn
la limpieza,
[] E1 uso diario del limpiador de
esttdi_s avudarfi a mantener el
}lp}lI'_lto COlllO ntle_,o.
Agite bien la crema limpiadora.
Aplique tmas cuantas gotns de
limpiador de estufi_s de cerfimica
directamente en la estufi_.
Use tma toalla de papel o
almohadilla limpiadora para estufi_s
de cerfimica para limpiar toda
la supe_ide de la estttfil.
Use tm patio seco o tma toalla
de papel para remoxer los residuos
del limpiador. No es necesario
eqiuagm;
NOTA: Esmay/Ynportante qua NO ca/iente
/a estufa sino hasta que est_ comp/etamente
limpia.
Use una almohadilla limpiadora
para estufas de cerbmica.
Residuos quemados
ADVERTENCIA:PuedeDAA!ARia superficie
de vidrio si usa un estropajo que no sea el
recomendado.
[] Deje enfl'iar la estufi_.
] Esparza tlll}lS ell}lilt}IS got}is
de limpiador para esttflhs de
cerfimica sobre toda el firea
con residtloS qtlelllados.
[] Frote el firea con residuos
quemados con la almohadilla
de limpieza inchfida, aplicando
la presi6n necesaria.
[]
[]
Si queda algfin residuo, repita los
pasos alTiba i/lencionados t_llltas
xeces COlllO sea necesaFio.
Para protecci6n adicional, tma
vez que hax_ relnovido todos los
residuos, pula toda la superficie
con limpiador para esmths de
cerfimica v tma toalla de papel.
El raspador para estufas de
cerbmica y todos los artfculos
recomendados estbn disponibles
a travfis de nuestro Centro de
piezas. Consulte las flTstrucciones
en la secciSn "Para ordenar
piezas" en la siguiente pbgina.
NOTA:No use una cuchilla roma
o meflada.
Residuos quemados dificiles de quitar
[] Deje enfl'iar la estufi_.
] Use [Ill l[tsp[tdof coil [lll_l
sola cuchilla a ml :h_gulo de
aproximadamente 47) ° contra
la superficie de vidrio y raspe
la mancha. Ser:_ necesario clue
aplique presi6n al raspador para
I'el//OVel" los I'esidtloS.
[]
[]
Despu_:s de raspal; esparza rams
gotas de limpiador para estufhs
de cer;imica sobre toda el 5tea
con residuos quemados. Use la
ahnohadilla de limpieza para
I'el//OVel" los residuos restantes.
Para protecci6n adicional, mm
vez que haya removido todos los
residuos, pula toda la snperficie
con limpiador pare estufhs de
cer:hnica y una toalla de papeL
//
Comolimpiar/a cubiertade vidriode/a estufa.
Marcas metalicas y raspones
[] Tenga cuidado de no deslizar
cacerolas _ sai'tenes sobre S/l estufiL
Dejarfi marcas de metal sobre la
supe_l'icie de la misma.
Estas III}IIT'}IS son reln(Mbles con
limpiador para esmfi_s de cerfimica y
tma ahnohadilla para limpiar estufils
de cerfimica.
[] Si deja secar el lkluido hirxiendo en
cacerolas con una capa delgada de
ahmfinio o col)re, dicha capa podrfa
dejar una decoloracidn negra sobre
la estufiL
Debe eliminar dicha coloracidn
de imnediato antes de calentar otra
vez; de lo contrario la decoloracidn
podrfa set pemmnente.
ADVERTE/VCIA:Verl_?luecuidadosamentee/
rondo de/as cacero/aspara comprobarsi podrfan
ragarla estufa.
Superficiede vidrio--potencialpara da o permanente.
Nuestras pruebas demuestran
que si esta cocinando mezclas
con un alto contenido de azucar
tales como gelatina o caramelo
fundido y estas se derraman
sobre la estufa, podrian causar
da_os permanentes a la
superficie de vidrio a menos
que el derrame se limpie de
inmediato.
Da#os causados por derrames con azucar y plastico fundido
[] Apague todos los elementos de [] Cualquier derrame restante debe
superficie. Retire las cacerolas dejm_e ahf hasta que la superficie
calientes, de la estufi_ se haxa enliJado.
[]
Con tm guante para homo:
a. Use tm raspador de tma sola
cuchilla (raspador para estufi_s de
ceI'_illlica) paI'a I/lover el deiTai/le
a tm firea fl'fa sobre la estufi_.
b. Retire el derrame c<>ntoallas
de papel.
[] N<> use los element<>s de superficie
otto vez sino hasta que haya
limpiado todos h>s residuos.
NOTA:S/ /a superfl?iega presentahendiduras
o agujeros, deberfireemplazarel vidrio de la
estufa. En este cast),ser_ necesarioun serv/cio
de reparac/6n.
Para ordenar piezas
Para ordenar limpiador para esttdas de
cerfimica y el raspador para esmfhs, llame
a ntlesti'o n(/illei'o sin costo:
Centrode piezasnational 800.626.2002
Limpiadorparaestufas
de ceramica ............... # WXTOX300
Raspadorparaestufas
de ceramica ............... # WX70)(0302
Equipo .................... # WB64XS027
(Elequlpoincluyela cremagel raspadorpara
estufas)
Almohadillaslimpiadoras
para estufasdeceramica ,, ,# WX10X350
/2
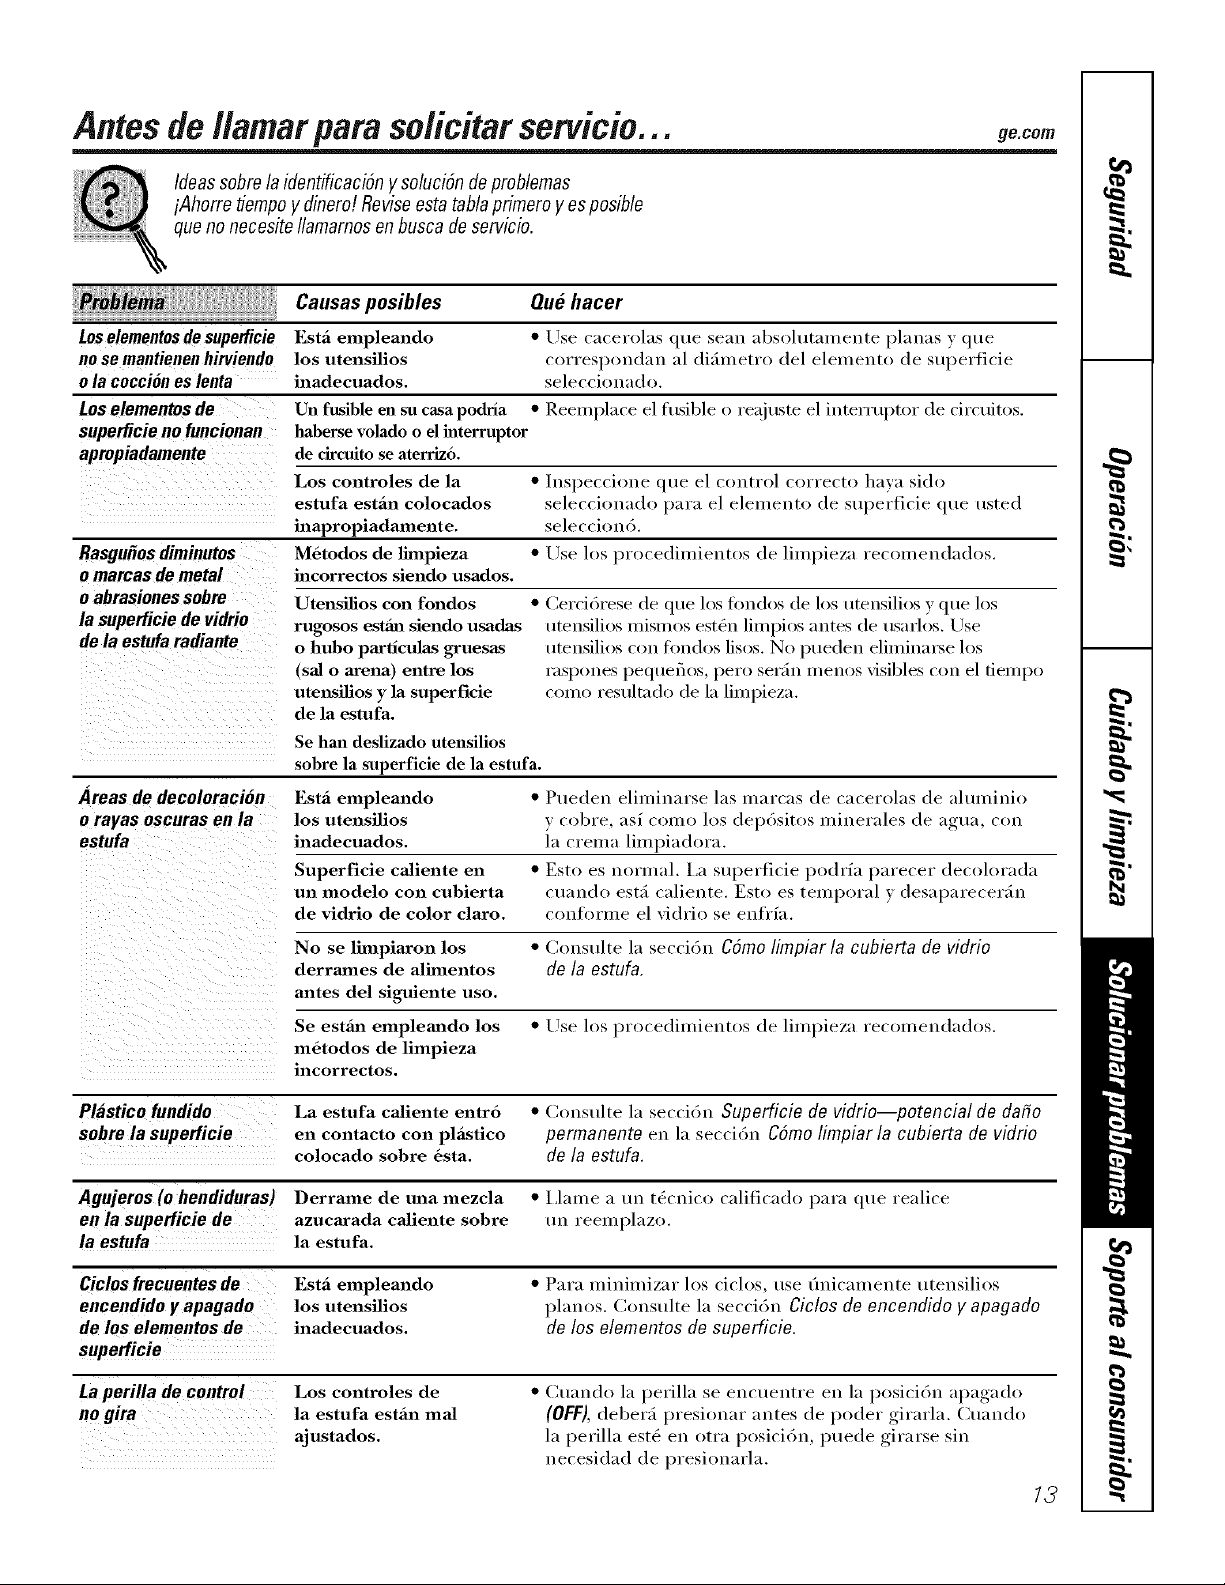
Antesde//amar paraso/icitar servicio... 9e.co,,
Ideassobre la identificaci6ny soluciSnde problemas
iAhorre fiempoy dinero! Reviseesta tablaprimero yes posible
que nonecesiteIlamarnosen busca deservicio.
Que hacer
• Use cacerolas que sean absohltamente planas ) que
correspondan al difimetro del elemento de superficie
seleccionado.
Causas posibles
LoselementosdeSupedicie Esta empleando
nosemantieeenhirviendo los utensilios
o la cocci6nes lenta inadecuados.
Los Mementos de Un fusible en su casa podrla • Reemplace el fllsible o reajuste el interruptor de circuitos.
superficieno funcionan haberse volado o el hlterruptor
aprepiadamente de circuitose aterriz6.
Los controles de la • ]nspeccione que el control correcto hava sido
estufa estfin colocados seleccionado para el elen_ento de superficie que usted
inapropiadamente, seleccion6,
Rasgufiosdiminutos M_todos de lhnpieza • Use los procedimientos de limpieza recomendados.
o marcas de metal incorrectos siendo usados.
o abrasionessobre
la superficiede vidrio
de la estufaradiante
Utensilios con rondos
rugosos es_6x_ sJendo usadas
o hubo paxtlculas gruesas
(sal o arena) entre los
utel_silios y la superficie
de la estufa.
• Cerci6rese de que los tondos de los utensilios y que los
utensilios mismos est(_n limpios antes de usarlos. Use
utensilios con timdos lisos. No pueden eliminaise los
raspones pequeflos, pero ser;in menos visibles coil el tiempo
como resulmdo de la limpieza.
Se han deslizado utensilios
sobre la superficie de la estufa.
Areasde decoloraci6n Estfi empleando • Pueden eliminarse las marcas de cacerolas de almninio
o rayas oscuras en la los utensilios v col)re, asf como los depdsitos minerales de agua, con
estufa inadecuados, la crema limpiadora.
Superficie caliente en • Esto es normal. La superficie podrfa parecer decolorada
un modelo con cubierta ctmndo est_i caliente. Esto es temporal y desal)arecer_hl
de vidrio de color claro, conli)rnle el vidrio se enfrfa.
No se lhnpiaron los • (;onsulte la secci()n C6mo/impiar/a cubierta de vidrio
derrames de alhnentos de la estufa.
antes del siguiente uso.
Se estfia_ emplem_do los • Use h)s l_roce(limientos de limpieza recomendados.
m6todos de limpieza
incorrectos,
Plastico fundido La estufa caliente entro • Consulte la seccidn Superficie de vidrio--potencial de dafio
sobre la superficie en contacto con plfistico permanente en la secci()n Cdmo limpiar la cubierta de vidrio
colocado sobre 6sta. de la estufa.
Agnjeros (o hendidnras) Derrame de tma mezcla • lJame a un t6cnico calilicado para que realice
en la superficie de azucarada caliente sobre un reemplazo.
la estufa la estufa.
Ciclosfrecuentesde Estfi empleando • Para mininfizar los ciclos, use (ulicanmnte utensilios
encendidoy apagado los utensilios pianos. Consulte la seccidn Cic[os de encendido y apagado
de los Mementos de inadecuados, de Ins elementos de superficie.
Laperilla de control Los controles de • Cuando la perilla se encuentre ell la posicidn apagaclo
]a estufa estfin ma] (OFF),deber;i presionar antes de poder girarla. Cuando
ajustados, la perilla est_ en otra posicidn, puede girarse sin
necesidad de presionarla.
13
NOta$,
.m
r_
@
m
N
q_
m
m
€_
m
m
m
r_
Q_
w

NOta$_
15
€_
€_
R
m
mlml
€_
N
_L
m_
Iqmb
B_
€_
m

NOta$,
.m
r_
m
N
q_
m
m
€_
m
m
m
r_
Q_
w

Garantiade GEpara su estufa electrica.
Todos los servicios de garantfa los proporcionan nuestros Centros
de ReparaciSn de F#brica o nuestros t#cnicos Customer Care®
autorizados. Para concertar una cita de reparaciSn, en Ifnea,
24 horas al dfa, visftenos en ge.com, o flame a1800.GE.CARES
(800.432.2737). Cuando Ilame para soficitar servicio, pot favor
tenga a mano el n#mero de serie y el n#mero de modelo.
Pegue aqui su recibo.
Se requiem facilitar prueba
de la fecha de compra original
para obtener un servicio
bajo la garantfa.
Una#o
A part#de la fecha
de compraoriginal
GE reemplazara:
Cualquierparte de la estufi_ que riffle debido a un (lele('to en los matefiales o mano de ol)ra.
Durante estagarantialimitadadeun a#o,(;E tambi_n ofl'ecer;i, sin costoalguno,toda la mano
de obra v servicio interno i)ara reemplazar las partes (lelectuosas.
::Ji::Viajes de servicio a su hogax paJca ensefiaxle como usaJc
el producto.
::Ji::InstaJaci6n, entrega o mmltenhniento h_correctos.
::Ji::FaJlas del producto si hay abuso, maJ uso, o uso para
otros propositos que los propuestos, o uso paJca fines
comerciaJes.
::Ji::Dm-lo a la estufa de vidxio causado pot el uso de
limpiadores dJferentes alas cremas y almohadillas
recomendadas.
_:: Dm-lo a la estufa de vidxio causado por derrmnes
endttrecidos de materiaJes azucaxados o pot plfistico
derretido que no sem_ lhnpiados confonne alas
dJrecciones en el Mmmal del propietaxio.
::Ji::Reemplazo de fusibles de su hogax o reajuste de
hlterruptores de circttito.
::Ji::Da6o a] producto causado por accidente, fuego,
hltmdaciones o actos de Dios.
_: Da6o hlcidentaJ o consecuenciaJ causado por posibles
defectos con el apaJcato.
_: Dafos causados despu6s de la entrega.
::Ji::Producto no accesible paJca facilitaJc el servicio
requerido.
EXCLUSIt_NDE GARANTIASIMPLJCITAS--Su #nice y exclusive derecho es la reparacion del produeto, tal y come se
indica en esta Garantia limitada. Cualquier garantia implicita, incluyendo las garantias implicitas de comerciabilidad o
adecuacion para un fin determinado, est#n limitadas a un afio o el periodo de tiempo masbreve permitido por la ley.
Esta garantfa se extiende al comprador original y cualquier comprador posterior de pmductos comprados para uso
residencial dentro des Estados Unidos. Si el producto est# situado en un #tea que no dispone de servicio pot parte
de un proveedor de servicio autorizado de GE,podrfa tenet que hacerse cargo de los costes de env[o o bien podrfa
solicit#rsele que Ileve el producto a una centro de servicio de GE autorizado para realizar la reparaciSn. En Alaska,
la garantfa excluye el costo de env[o o las visitas de servicio a su casa.
Algunos estados no permiten la exclusiSn o las limitaciones de dafios incidentales o consecuenciales. Esta garantfa
da derechos legales especfficos, y usted podrfa tener otros derechos que variar#n de estado a estado. Para saber
cu#les son sus derechos legales, consulte a la oficina de asuntos del consumidor local o la oficina del Prucurador
(Attorney General) en su Iocalidad.
Garante: General Electric Company. Louisville, KY 40225
17

Soportea/consumidor.
PdginaWebde gEAppliances ge.com
_Tiene_ algtlIla_ })1e_q/lltam sobre su electi odomt4stico? iPl t/ebe ]a p;_gilla _'_b de GE Appliances 24 horas al
dfa, cualquier dfa del aflo! Para ma}or corn eniencia _ servicio m_s r:_pido, }a puede descargar los Manuales
de los Propietafios, }_dir piea_s o incluso hacer una cita en lfnea pare que vengan a realizer una reparaci6n.
Soliciteunareparacibn
E1 servido de expe*qtos GE est;_a tan s61o m_ paso de su pue*q:a, iEntre en lfnea _ solidte su reparaci6n
cuando le _enga bien 24 horas al dfa cualquier dfa del aflo! 0 llame al 800.(;E.CARES (800.432.2737)
(hll'allte hoFas llOF///ales de o_]cllla.
go. com
RealLifeDesignStudio(Estudiodedisefioparalavidareal) Do.oDin
GE apoya el concepto de Diseflo l_)niversal--productos, servicios y ambientes que pueden usar gente de
todas las edades, mFnaflos y capaddades. Recol_oCelnos la necesidad de diseflar pant tma gr;m gama de
habilidades v dificultades flsicas v mentales. Para mrs detalles cobre las aplicadones de GE Diseflo Univemal,
incluvendo ideas de diseflo para ]a codna para pe>onas con discapacidades, mire nuesm_ pfgina Web boy
mismo. Para personas con dificultades auditi_;is, fi_vor de llamar al 800.TDD.GEAC (800.833.4322).
garantfasampliadas ge.com
Compre tma garantfa ampliada > obtenga detalles sol)re descuentos especiales disponibles mientras su garantfa
00 "_ ....
est_i afin activa. Puede comprafla en ]inea en cualquier momento, o llamar al (8 .626.2224) din'ante h(was
nonnales de oficina. (;E (:onsmner Home Set'rices estar;_ afin ahf cuando su garant/a tem]ine.
[ I
J
Piezasy accesorios
Aquellos individuos con la calificad6n neces;uia para reparar sus propios electrodom_sticos pueden
pedir que se les manden las piezas o acceso*ios directamente a sus hogm'es (aceptamos las tmjetas
VISA, Master(]ard y Disco\ er). Haga su pedido en lfnea boy, 24 horas cada dfa o llamm" p(w tel_fbno
al 800.626.2002 din'ante horas nom_ales de oiicina.
go. tom
Lasinstruccionesdescr#asenestemanual cubrenlospmcedhnientos a seguir per cualquierusuado. Cualquier
otra reparaci6ndebe#a,per reglageneral,referirsea personal calificadoautorizado.DebeejercerseprecauciOn
ya quelas reparacienesincorrectas pueden causar condiciones de funcionamientoinseguras.
Pbngaseen contacto con
nosotros
Si no est:_ satistbcho con el servido que redbe de GE, p6ngase en contncto con nosotros en nuestra
}x_gina Web indicando todos los demlles asf cored su nfiFnero de tel_tkmo o escrfl)anos a:
General Managel; Customer Relations
GE Appliances, Appliance Park
Louisville, KY 40225
go. com
q Registresu electrodom6stico go.corn
iRegistve su nnevo electmdomC_stico en llnea--cuaaado usted prefiera! El registrar su producto a dempo le
proporcionar_, si sm'giera la necesidad, una Fneior coi-nmlicaci(_i* x tm servicio m_s r_pido baj() los t_m_inos de
su garant/a. _mH)i6n puede enxiar su taljeta de registro pre-impresa que se inclu}e en el material de embalaje.
__ Impreso on los E-U
g&com
Safety Instructions ....... 2-4
Operating Instructions
Cookware Tips ............ 8, 9
Dual Surface Element ....... 7
Features of Your Cooktop ..... 5
Surface Elements ......... 6, 7
Temperature Limiter . ........ 7
Care and Cleaning
Control Knobs ............ 10
Glass Cooktop .......... 11, 12
Stainless Steel Surfaces ...... 10
Troubleshooting Tips ...... 13
Consumer Support
Consumer Support ......... 18
Product Registration ..... 15, 16
_'arranty ................. 1 7
JP340
JP346
jP 56
jP 55
Write the model and serial
numbers here:
Model #
Serial #
You can find them on a label
under tile cooktop.
49-80411-2 07-075B
IMPORTANTSAFETYINFORMATION.
READALLINSTRUCTIONSBEFOREUSING.
WARNING!
For your safe_ the information in this manual must be followed to minimize the risk of fire or
explosion, electric shock, or to prevent property damage, personal injury, or loss of fife.
2
SAFETYPRECAUTIONS
When using electrical appliances, basic safety precaufions should be foflowed, including
the following:
!?:Use this appliance only fbr its intended use as
described in this manual.
!?:Do not attempt to repair or replace an)
part of)our cooktop unless it is specificall)
recommended in this manual. All other
servicing should be referred to a qualified
technician.
iJii:iBefore perfbm/ing any se,s'ice, disconnect
the cooktop power supply at the household
distribution panel by remodng tile fuse oi
switching off the circuit breaker
iJii:iBe sure your appliance is properly installed
and giounded by a qualified technician in
accordance with tile provided installation
instructions. This appliance must be supplied
with the proper voltage and fiequenc> and
connected m an indMdual, properly grounded
b,anch circuit, protected by a ci,vuit breaker
or fllse acceptable for the indicated wattage
oil the name plate.
Name plate location
iJii:iHave tile installer show ,.ou tile location of tile
circuit breaker or fllse. Mark it for easy
refbrence.
iJii:iDo not leave children alone--children should
not be left alone or unattended in an area
where an appliance is in use. They should
never be allowed to sit or stand oil any
part of the appliance.
_: Teach children not to play with tile controls or
any other part of the cooktop.
_: Do not allow anyone to climb, stand or hang oil
the cooktop.
CAUTION: temsofi.teiesttochildie.
should not be stored in cabinets above a
cooktop---children climbing oil tile cooktop
to reach items could be sefiousl)injured.
!?:.Mways kee I) coml)ustil)le wall coverings,
clmains or drapes a safe distance flom
)our cooktop.
!?:Always kee I) dishtowels, dish cloths, pot holdeIs
and other linens a safi_ distance awa_ from xour
cooktop.
!?:.Mways kee I)wooden and plastic utensils and
canned fbod a safe distance awa_ from xour
cooktop. The} ma) become hot and could
cause 1)/lIns.
iJii:iNever wear loose-fitting or hanging gamlems
while using the appliance. Flammable material
could be ignited if 1)rought in contact with hot
stlifi]ce elements and max cause severe btlIns.
;_:Use only dU pot holde*,_--moist or damp pot
holdeIs oil hot surfi/ces may result in burns
from steam. Do not let pot holdeis touch hot
surfi)ce elements. Do not use a towel or other
bulD cloth. Such cloths can catch fire oil a hot
surface element.
!?:For your safet}; never use your appliance %r
wanning or heating the room.
iJi;:iDo not use water oil grease fires. Never pick up
a flaming pan. Turn tile controls offl Smother a
flmning pan oil a surfilce element by coveting
tile pail completely with a well-fitting lid, cookie
sheet or flat tva): Use a multi-puq/ose dU
chemical or fbam-type extinguisher.
Flaming grease outside a pan can be put out
by coveting with baking soda o*; if available,
by using a muld-puq/ose dU chemical or
fbam-t)pe fire extinguisher
iJii:iDo not flame foods oil tile cooktop. If you do
flame foods under the hood, turn the fire oil.
iJii:iDo not let cooking grease or other flammal)le
materials acclmmlate oil the cooktop.
ge.com
WARNING!
SAFETYPRECAUTIONS
J; Do not touch surJ3ace elements. These
surfaces may be hot enough to bum even
fl_ough they are dark in color During and
after use, do not touch, or let cloflting or
oflrer flammable materials corm_ct the
surface elements or areas nearby the
surface elements; allow sufficient time
for cooling first.
Potentially hot surfaces include tire
cooktop arrd areas thcing the cooktop.
E:,:To minimize the possibility of bums,
ignition of flammable mamrials arrd
spillage, rite handle of a container
should be turned toward tire center
of the cooktop without extending ox>r
arty nearby smfirce elements.
;fi:,:Alwws turn the surt_ace element cormol m
off before removing the cookware.
q_;:Use proper pan size--select cookwate
having fiat bottoms larg> enough to cox>r
the smfime element heating element. Tire
use of undersized cookwate will expose a
portion of tim surPace element m direct
corrmct arrd m W result in ignition of
clothing. Proper relationship of cookware to
smfi_ce element will also imi,ove efficiency.
;fi:,:Never leave smt_ace elements unattended at
high heat setdng:s. Boiloxers cause smoking
arrd gtea W spillox>rs fltat mav catch on fire.
_;: Only certain types of glass, glass/ceramic,
earthenware or other glazed corrtainers are
suitable for cookmp cooking; oflrers m W
break because of the sudden change in
ten_perature.
_::Kee I) an eye on foods being flied at hiOt
or mediun>hiOi heat setfing:s.
;f; Foods for flTing should be as &T as
possible. Frost on flozen foods or moisutre
on flesh foods can cause hot tZatto bubble
up arrd ox>r the sides of the pan.
;fi:,:Use little fi_t for eflective shallow or
deeI>tZat flTing. Filling dre pan too Rill
of fat can cause spillox>rs when food is
added.
E:,:If a combination of oils or fats will be used
in frying, stir tog>alter before heating, or as
fats melt slowly.
_;_Ahvavs heat t:at slowly, arrd watch as it heats.
_:_Use a deep fat themrometer whenever
possible m prexent ox_rheafing fat beyond
the smoMng point.
E:,INexer u y m move a pan of hot Pat,
especia]ly a deep fat flyer _'ait until
the t_atis cool.
_{;_Do not store flammable mamrials near
the cooktop.
J; Kee I) tire hood and grease filmrs clean
m maintain g_od x_nfing and to avoid
grease rites.
E:,:Do not store or use combnsfihle mamfials,
gv_s4ine or other flammable _N)ors and
liqui& in the vicinity of this or a W appliance.
_{;:Clean only parts lismd ira this Owner's
Manual.
E:,:Do not leave paper products, cooking
umnsils or food on rite cooktop when
not in use.
_{;_Kee I) cooktop clean arrd flee of
accumnlation of grease or spilloxers
which m W ignite.
J; Nm>r heat unopened food containers.
Pressure buildup m W make corrtainer
burst arrd cause injury.
_:; Ne_>r leave jars or cans of laatdlJpping:s
on or near your cookmp.
J; Nmer use your appliance for wanning or
heating the room.
COOKMEATANDPOULTRYTHOROUGHLY...
Cookmeat andpoultry thoroughly--meat to at leastan INTERNALtemperatureof 160°Fandpoultry
to at least an INTERNALtemperatureof 180°ECookingto thesetemperaturesusuallyprotects against
foodbomeillness.
3

IMPORTANTSAFETYINFORMATION.
READALLINSTRUCTIONSBEFOREUSING.
WARNING!
RADIANTSURFACEELEMENTS
Use care when touching the cooktop. The glass surface of the cooktop will retain heat after the
controls have been turned off.
_7{::Avoid scratching the glass cooktop.
The cooktop can be scratched with imms
such as sharp insuuments, dngs or other
jeweh T and ri\ets on clothing.
;f?:':Nexer use tile glass cooktop sur/_ace as
a cutting board.
_7{_:Do not place or store items on top of the
glass cooktop surfi_ce when it is not in use.
_{_;Be carefld when placing spoons or other
stirring utensils on glass cooktop surlhce
when it is in use. They may become hot
and could cause bums.
_fi:,iAvoid heating an empty pan. Doing so may
damage the cooktop and the pan.
_fi:,iDo not allow watel, other liquids or grease
to remain on the cooktop.
_i:,:To minimize die possibili U of bums, always
be certain flint the controls for all surfime
elements aie at file off position and the
enfiie glass sniface is cool befoIe
atmmpdng m clean file cookmp.
_?{:_Do not operam dm glass sur/_ace elements
if die glass is broken. Spillox>rs or cleaning
solution m W penetram a broken cooktop
and cream a risk of electncal shock.
Contact a qualified technician immediately
should your glass cooktop become broken.
_?{:_Clean the cooktop v,,ifl_ caution. If a wet
spong_ or clod_ is used to wipe spills on
a hot surface element, be carefld to axoid
smam bums. Some cleansers can produce
noxious fllmes if applied to a hot sur/_ace.
NOTE."_a:e recommend flint you axoid
wiping any sur/_ace element areas until dley
have cooled and the indicator light has
g_ne off. Sugar spills are the exception
to this. Please see the Cleaning the Glass
Cooktop secdon.
_{_To axoid possible damage to the cooking
surfime, do not apply the cleaning cream
to tile glass surfi_ce when it is hot.
_{:_After cleaning, use a d_T cloth or paper
towel to remoxe all the cleaning cream
residue.
_fi:,:Read and follow all instnmtions and
warnings on the cleaning cream labels.
_fi:,iUse care when touching the cooktop. The
glass surfi_ce of the cooktop will retain heat
after the controls haxe been turned OFF.
_fi:,iDo not stand on the glass cooktop.
_fi:,:i,arge scratches or impacts to glass
cooktops can lead to broken or
shattered glass.
READANDFOLLOWTHISSAFETYINFORMAtiONCAREFULLY.
SAVETHESEINSTRUCTIONS
4
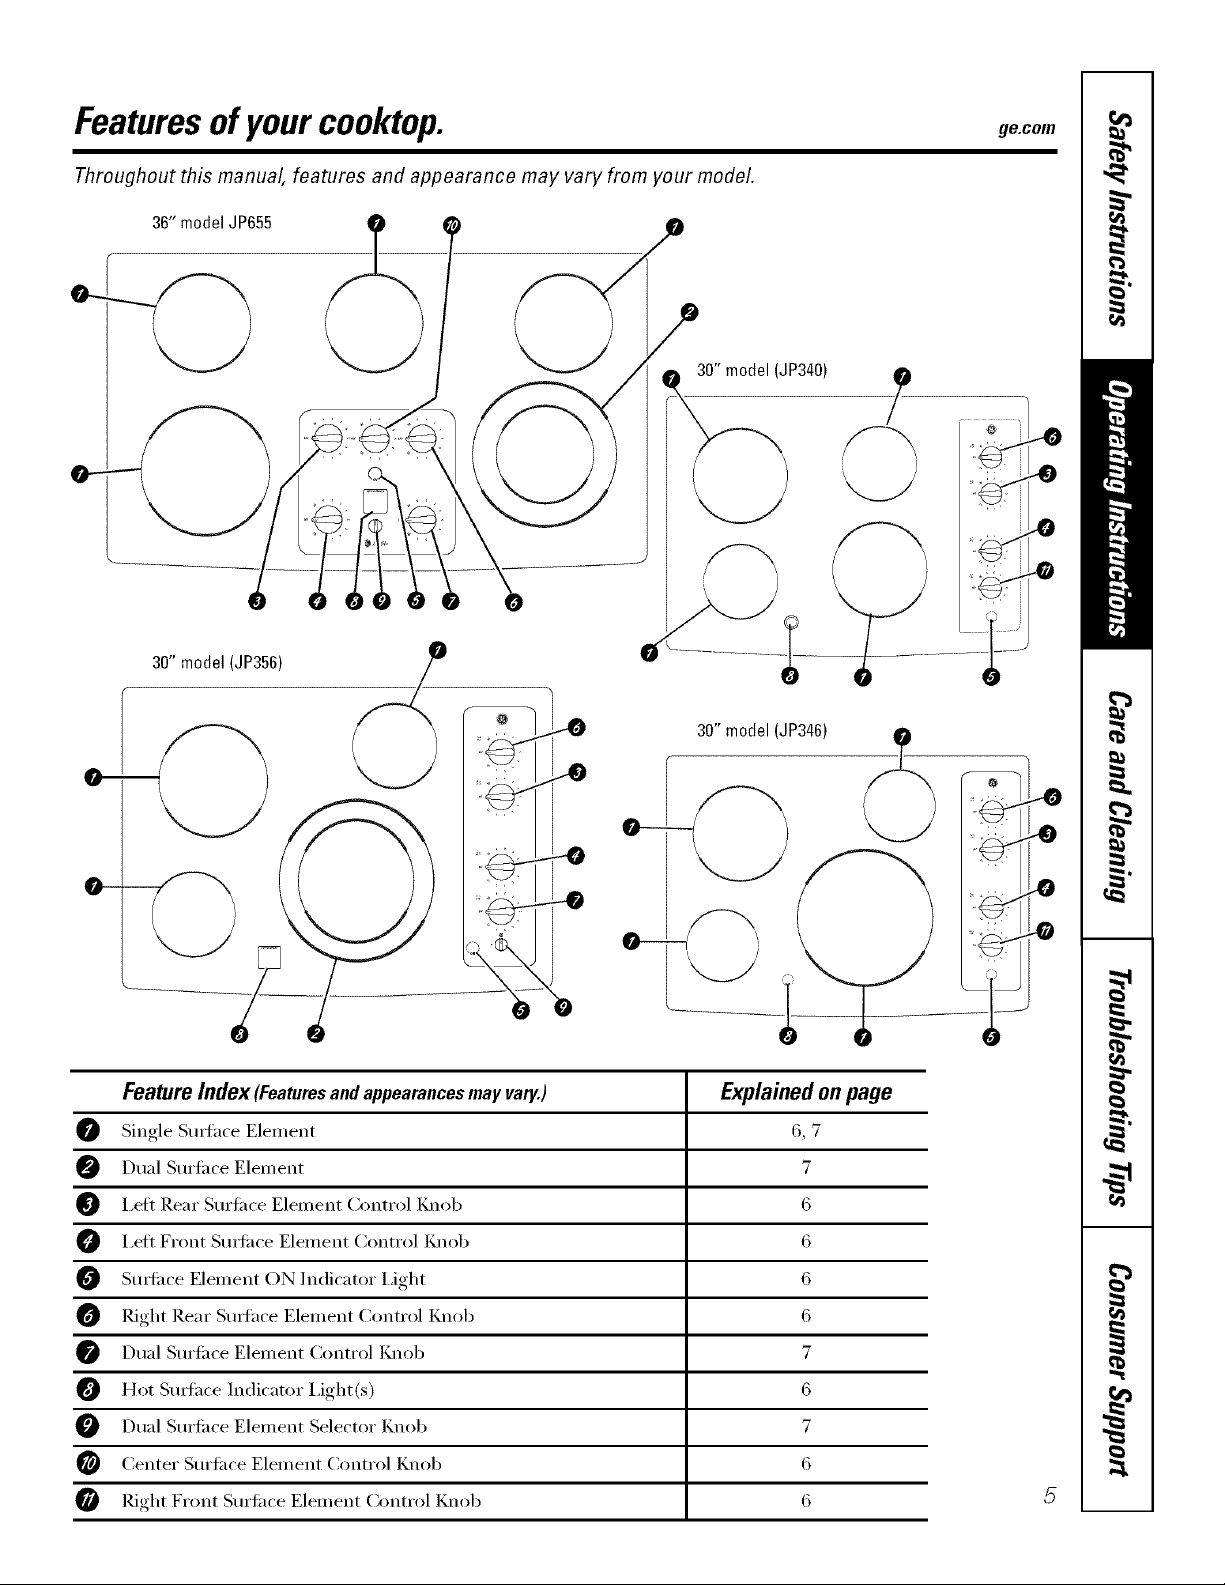
Featuresof your cooktop, ge.com
Throughout this manual, features and appearance may vary from your model.
36"modelJP655
30" model (JP356)
/
_k,x 30" model (JP340) //_
30" model (JP346)
--0
FeatureIndex (Featuresand appearances may vary.) Explainedon page
O Single Stmfhce Element 6, 7
Dual Surli_ce Element 7
O I,ett Rear Surti_ce Element Control Knob 6
O I,eti Front Stmfi_ce Element Control Knob 6
O Sm_fi_ce Element ON Indicator I,ight 6
Right Rear Stmfhce Element Control Knob 6
Dual Sm'ti_ce Element Control Knob 7
Hot Stmface Indicator i,ight(s) 6
Dual Sm'ti_ce Element Selector Knob 7
@ Center Sm'ti_ce Element Control Knob 6
O Right Front Sm'li_ce Element Control Knob 6

Usingthe surface elements.
Throughout this manual, features and appearance may vary from your model.
How to Set
Push the knob down and mrn in either
direct.ion to the setting you want. \,_l_en
the control is in any position other than
OFF,it Inav be rotated without l)ushing
it down.
At both OFF and HI the control clicks
into position. Ym may hear slight
clicking sotmds during cooking,
indicating the control is keeping the
power level you set.
The controls fin" the radiant surfllce
elements can be set anywhere between
LOand HI tot an unlimimd number oI
heat settings. _\]th the infinite switch the
element cycles on and off to maintain
your selected control setting,
The ON indicator light will glow when
any surli_ce element is on.
A HOT SURFACE indicator light will glow
when anv radiant element is turned on
and will remain on tmfil the surlhce is
cooled to approximately 150°F.
NOTE'.
_ It comes on when the element is hot to the
touch.
_; /t stays on evenafter thedement is turned oK
;;Ji::It glows bn)ht/y until the dement is cooled to
approx/Ynately150°£
_; Be sure you turn thecontrol knob to OFF
when you flb/sh cooking.
Never cook directly on the glass.
Always use cookware.
Always center flTepan on the surface
element you are using.
About the radiant surface elements...
The radiant cooktop teatm'es heating
elements beneath a smooth glass stwfi_ce.
NOTE."As@ht odoris normalwhenanew
cooktopis usedforthe fkst time.It is causedby
theheatingof newpartsand ibsu/atingmatena/s
andwi// disappearin a shorttime.
NOTE:Onmodelswithh#ht-coloredg/ass
cooktops,it is normalfor thecookingzonesto
changecolorwhenhotor coolingdown.Thisis
temporaryandwi//disappearasglasscoolsto
roomtemperature.
The sm_li_ce element will cycle on and off
to maintain veto" selected control setting.
It is sate to place hot cookware (fl'om the
Avoid placing utensils that could
become hot or plastics that could melt
on the surti_ce element tmtil it has
cooled completely:
!i> Waterstains (minerel deposits)are removable
us/bg the c/eanlbgcream or full strength white
wbegar
!i>Useof wlbdow cleanermay leavean
iridescent film on thecooktop. Thecleaning
cream will remove this discoloration.
iJi::Don't store heavyitems above the cooktop.
If they droponto the cooktop, they can cause
damage.
i_i Do not use thesurface as a cutflbg board.
oven or surti_ce) on the glass cooktop
when the surtilce is cool.
Even after the surface elements are
turned off, the glass cooktop retains
enough heat to confimm cooking. To
avoid overcooking, i'eillOVe l)}liiS ][i'Oill
the sm_i_ce elements when the food
is cooked.
Donot s/ide
_;BIIARG NG "_ cookwareacross
_ _ the cooktop
becauseit can
scratch the glass.
Theglass/s
scretch-reslstant,
not scretchproof
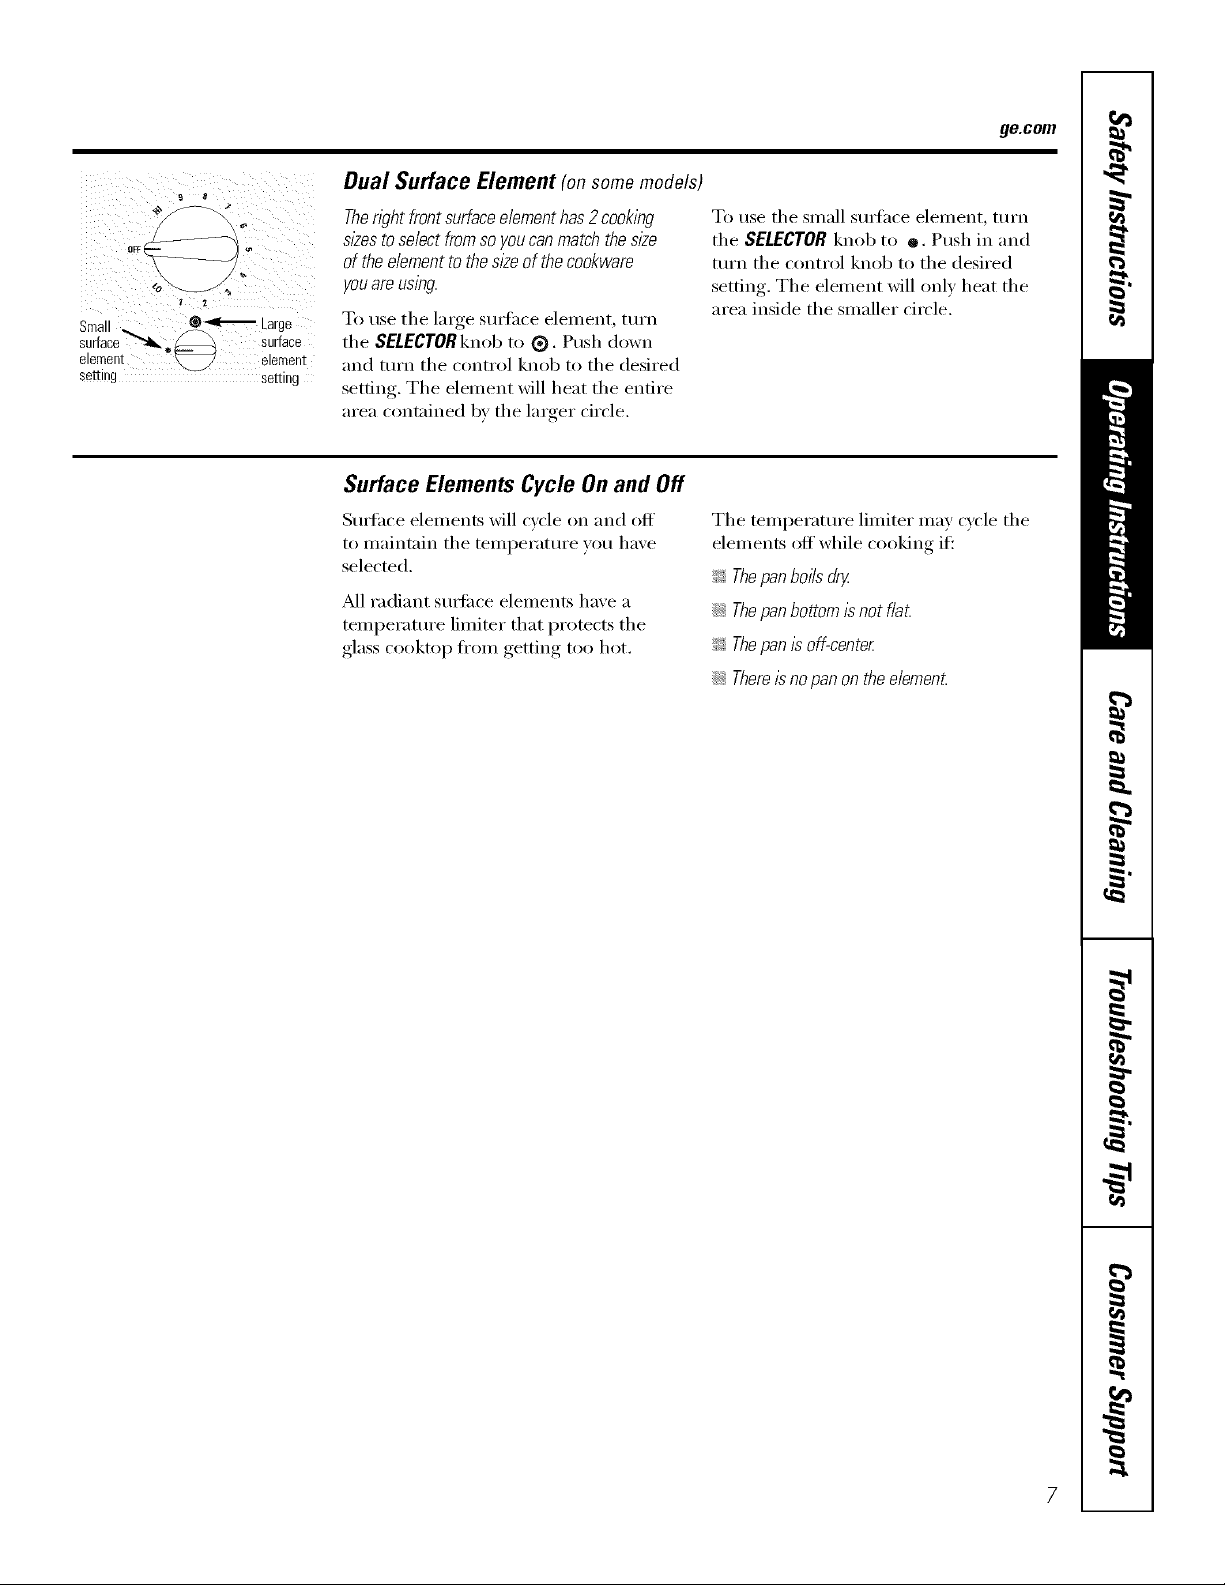
ge.com
8
Smal, @_ .arge
surface"""_. (_ surface
e emeNt _ element
SSffll g seEInq
Dual Surface Element (onsomemodels)
Thewht frontsurfaceelementhas2cooklbg
s/#esto selectfromsoyoucanmatchthesloe
of theelementtothesizeof thecookware
youare using.
To use the large sm'face element, turn
the SELECTORknob to ®. Push down
and turn the control knob to the desired
setting, The element will heat the entire
area contained by the larger circle,
To use the small sm_fhce element, tm'n
the SELECTORknob to e, Push in and
ttlFn the control knob to the desired
setting, The element will only heat the
area inside the smaller circle,
Surface Elements Cycle On and Off
SuI_L_ce eleinents will cycle on and off
to maintain the temperatm'e you have
selected.
M1 radiant sm_li_ce elements have a
temperatm'e limiter that protects the
glass cooktop from getting too hot.
The temperatm'e limiter may cycle the
elem ents off while cooking if:
_: Thepan boils dry
;;Ji::Thepan bottom Is not fiat.
_ Thepan Is off-cente_
;;Ji::Thereis no pan on the e/emen_

Selecting types of cookware.
The following information will help you choose cookware which will give good performance on glass cooktops.
i; i il
Check pans for flat bottoms by
using a straight edge.
Stainless Steel'.
recommended
Aluminum:
heavyweight recommended
(;ood conductixJq:. _Muminun_ residue
sometimes appeai_ as scratches on the
cooktop but can be removed if cleaned
immediately: Because of its low melting
point, thin weight alunfilmm should not
be used.
Copper:
recommended
Porcelain Enamel-CoveredCast Iron:
recommended
_s long as the cookware is covered
comi)letely with porcelain enamel, this
cookware is recommended. Caution is
I'ecoiiliilended t()i" cast-iron cookware
that is not completely covered with
Slnooth porcelain elmmel, since it inav
scratch the glass ceralnic cooktop.
Glass-Ceramic:
usable,but not recommended
Poor l)erlbi_nai_ce. Ma) scratch the
StlI];Ice.
CopperBottoms:
usable,but not recommended
Pans with Col)per bottoms may leave
residue ai)peariI_g as scratches. Relnove
anv residue imn_ediatelv after use. Do not
let a pot boil dla.. Overheated metal can
bond to the glass cooktop and leave a
i)ennai_ei_t stain if it is not relnoved
imn_ediatelv
Stoneware:
usable,but not recommended
Poor l)erfimnance. Ma) scratch the
StlI];Ice,
Use pans that inatch the diameter of the
sur[hce elen/ent, Cooking i)er[brmance
will not be as good if the cookware is
either slnaller or lalger than the surti_ce
elenmnt.
Pans with rounded, curved, ridged
or warped bottoms are not
recommended.
Do not place wet pans
on the glass cooktop,
Do not use woks with support
rings on the glass cooktop
For Best Results
_:i_Place only dry pans on the surfi_ce
elen_ents. Do not place lids on the
surli_ce elen_ents, l)articularly wet
lids.
S;!Do not use woks that have sui)port
rings. This type of wok will not heat
on glass surlhce elements.
_2>We reconm_end that you use only a
fiat-bottomed wok. Thev are available
at your local retail store. The bottom
of the wok should have the salne
dialneter as the surtace elen_ent
to enstlre i)roi)er contact.
::Ji::Some special cooking procedures
require specific cookware such as
pressure cookers, deep-tat f)Ters, etc,
All cookware must have flat bottoms
and be the correct size,
Usefiat:bottomedwoks
onthe glasscooktop,
8
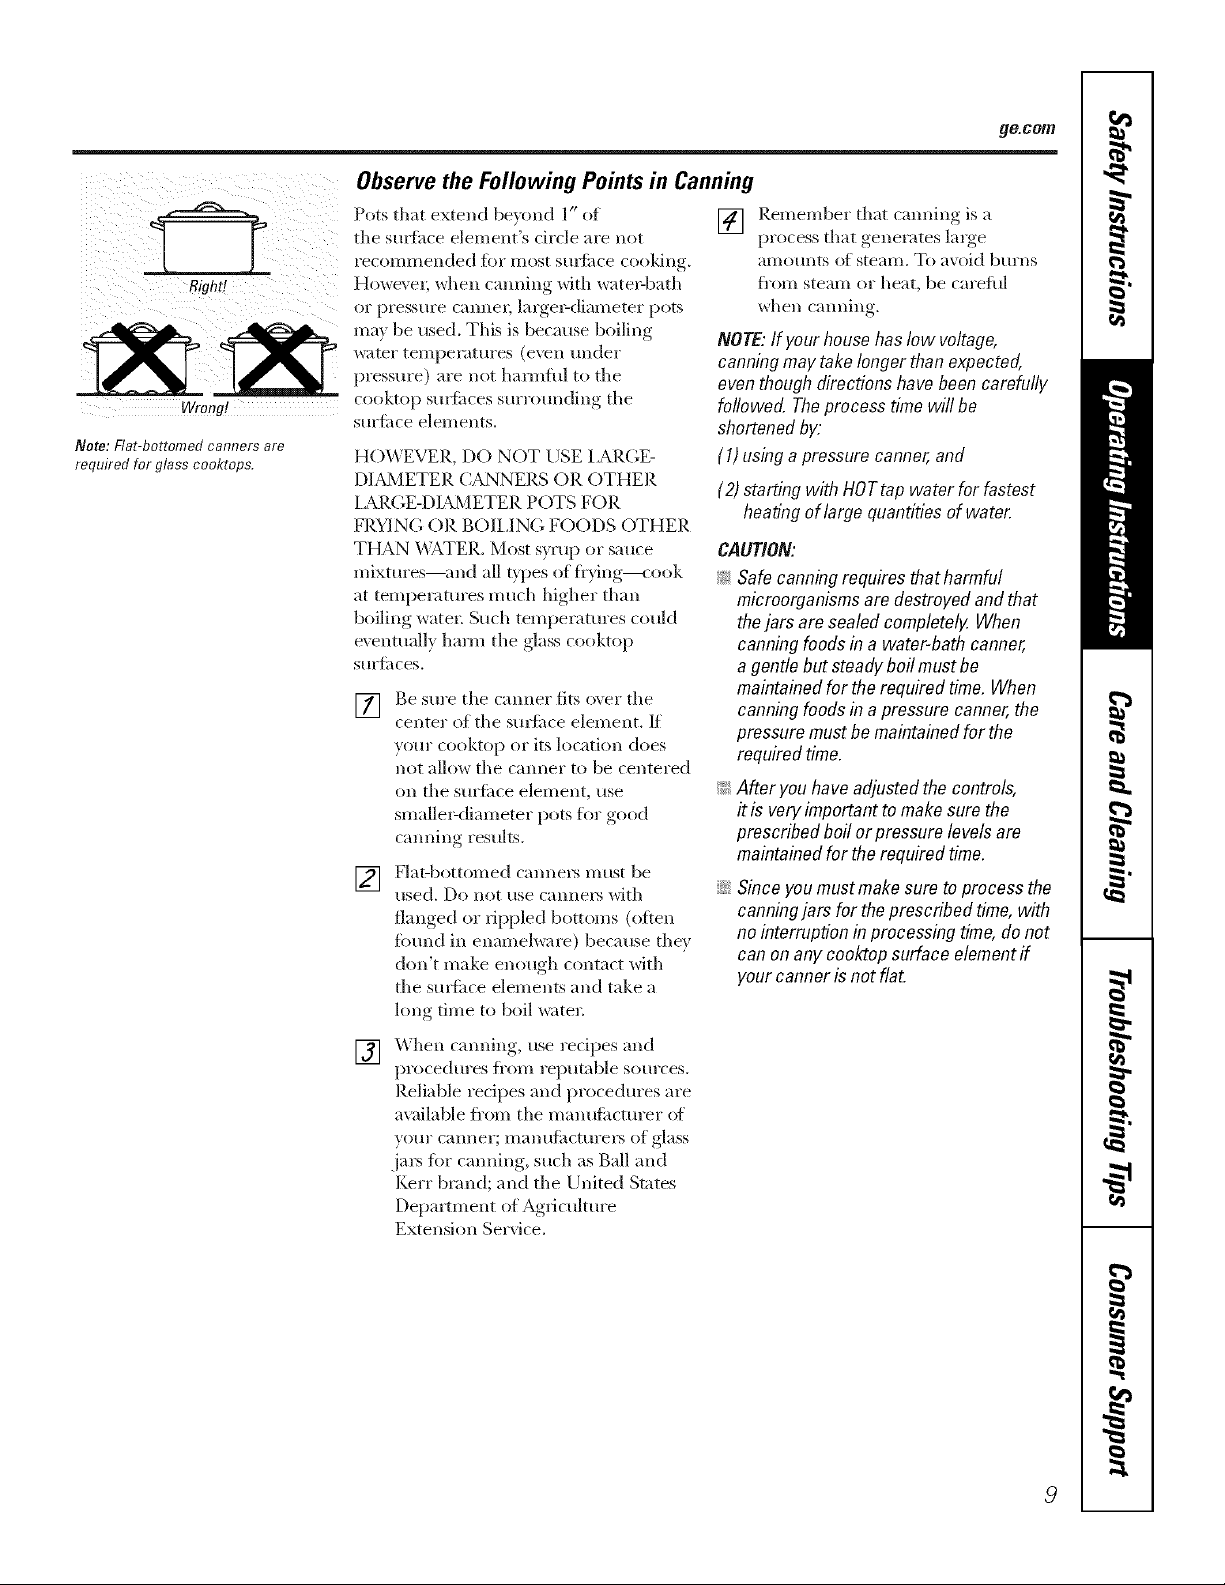
ge.com
Right!
reconm/ended for lnost surfime cooldng.
Howe\ e*; when camfing with ware>bath
or pressure canne_; large>diameter pots
may be used. This is because boiling
water tempe_atm'es (even under
pressure) are not ham_flfl to tile
cooktop smfimes surrounding tile
surfime elements.
Note: Flat-bottomed canners are
required for glass cooktops,
Observe the Following Points in Canning
Pots that extend be}end 1" ot [] Remember that tainting is a
tile stu_hce element's circle are not I)r°cess that ,generates laroe
alllOtllltS of stealll. To avoid b[ll'llS
fi'om steam or heat, be careful
whell c'lIlllill )
HOWEVER, DO NOT USE LARGE-
DL_JMETER CANNERS OR OTHER
I,M{GE-DL_._ ETER POTS FOR
FRYING OR BOILING FOODS OTHER
THAN _;_,TER. Most syrup or sauce
mixtmes--and all t)pes of fl'ying---<ook
at temperatures much higher than
boiling water: Such temperatures could
e\ enmally hmm the glass cooktop
sur_iices.
] Be sm'e the canner fits o\er tile
center of tile surfiice element. If
your cooktop or its location does
not allow tile canner to be centered
(SIX tile stlrfitce eleIllellt, use
smalle>diameter pots fin" good
camfing results.
] Flat-bottomed c:mners must be
used. Do IIOt rise CallllelB with
flanged or rippled bottoms (oii_ell
%trod in enamelware) because they
don't make enough contact with
the surIiice elements and take a
hmg time to boil water
NOTE:If your house has low voltage,
canning may take longerthan expected,
even though directions havebeen carefufly
followed. Theprocess time will be
shortenedby:
(1) usinga pressure canne_and
(2) starting with HOTtap water for fastest
heating of large quantities of wate_
CAUTION:
_ Safe canningrequires that harmful
microorganismsare destroyed and that
thejars are sealed completely.When
canning foods in a water-bath canner,
agentle but steadyboil must be
maintainedfor the required time. When
canning foods in a pressurecanner,the
pressuremust be maintainedfor the
requiredtime.
i_'_After you have adjustedthe controls,
#is very importantto makesure the
prescribedboil or pressure levelsare
maintainedfor the required time.
::J_::Since you mustmakesure to process the
canningjars for the prescribed time, with
no interruptionin processing time, do not
can onany cooktop surface element if
your canner is not flat.
[]
_hen camfing, use recipes and
procedm'es fl'om reputable som'ces.
Reliable redpes and procedures are
a\_filable fl'om tile manufimmrer (ff
veto" cam_er; manuflmmrel_ of glass
.jm_ for canning, such as Ball and
Kerr brand; and the United States
Depamnent of Agficultm'e
Extension Service.
9
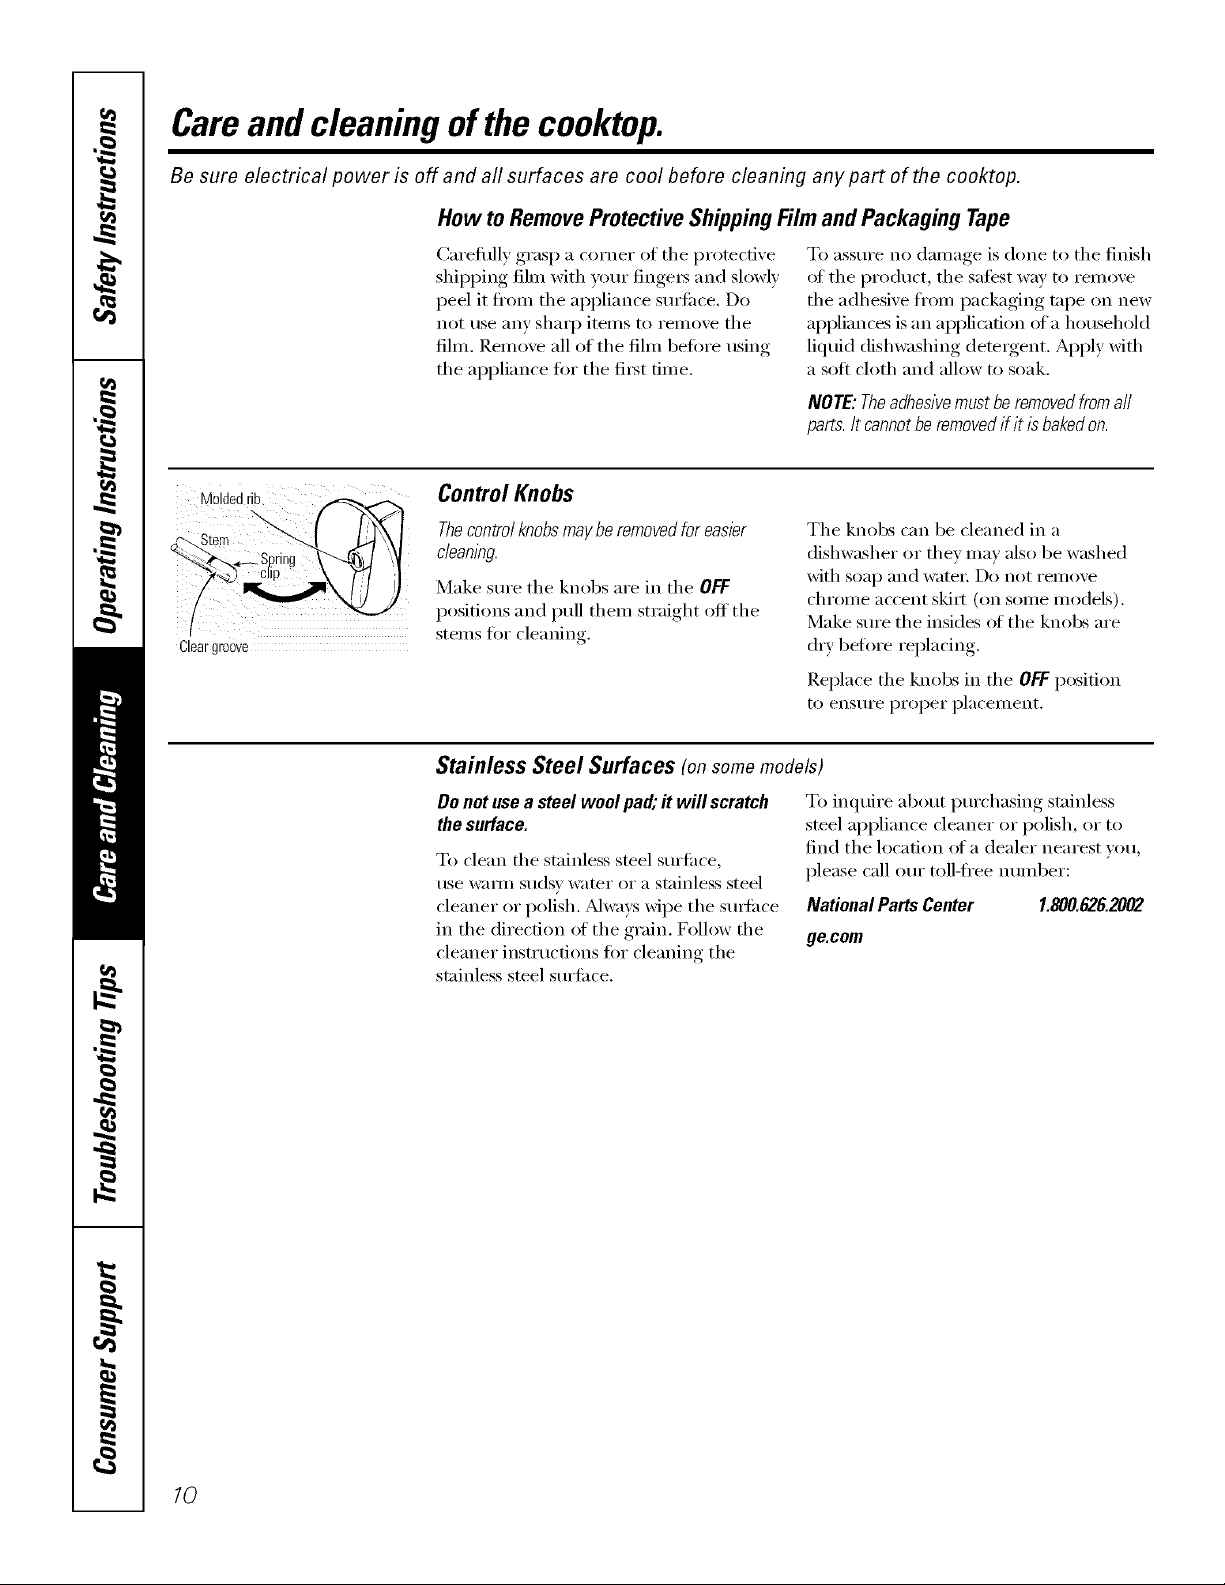
Careand cleaning of the cooktop.
Be sure electrical power is off and aft surfaces are cool before cleaning any part of the cooktop.
How to Remove Protective Shipping Film and Packaging Tape
Carefldly grasp a corner of the protective
shii)ping fihn with _mr finge_ and slowly
peel it fl'om the appliance stlrtilce. Do
not use any sha_ I) items to remove the
fihn. Remove all of the fihn befin'e using
the appliance fin" the fii_t time.
To assure no damage is done to the finish
(ff the product, the satest way to remove
the adhesive fl'om packaging tape on new
appliances is an application of a household
liquid dishwashing deteigent. Apply with
a soft cloth and allow to soak.
NOTE:Theadhesivemustberemovedfromaft
parts.Itcannotberemovedif it/s bakedon.
Moldedrib Control Knobs
Thecontrol knobs may be removed for easier
cleanlbg.
Make sure the knobs are in tile OFF
positions and pull them straight off the
stems for cleanin *
Clear _roove
The knobs can be cleaned in a
dishwasher or they may also be washed
with soap and wateI: Do not i'eil/ove
chrome accent skiit (on some models).
Make sure the insides ot the knobs are
(liT betore replacing.
Replace the knobs in the OFF position
to enstli'e l)rol)er l)lacei/lent.
Stainless Steel Surfaces (onsome models)
Donotusea steel woolpa& # will scratch
thesurface.
To clean the stainless steel surfi_ce,
use wam_ suds)' water or a stainless steel
cleaner or polish. _Mwaya wipe the sui_filce
in the direction ot the grain. Follow the
cleaner instructions for cleaning the
stainless steel sm'ti_ce.
To inquire about l)urchasing stainless
steel appliance cleaner or polish, or to
find the locadon ot a dealer nearest you,
please call our toll-fl'ee number:
National Parts Center 1.800.626.2002
ge.com
10
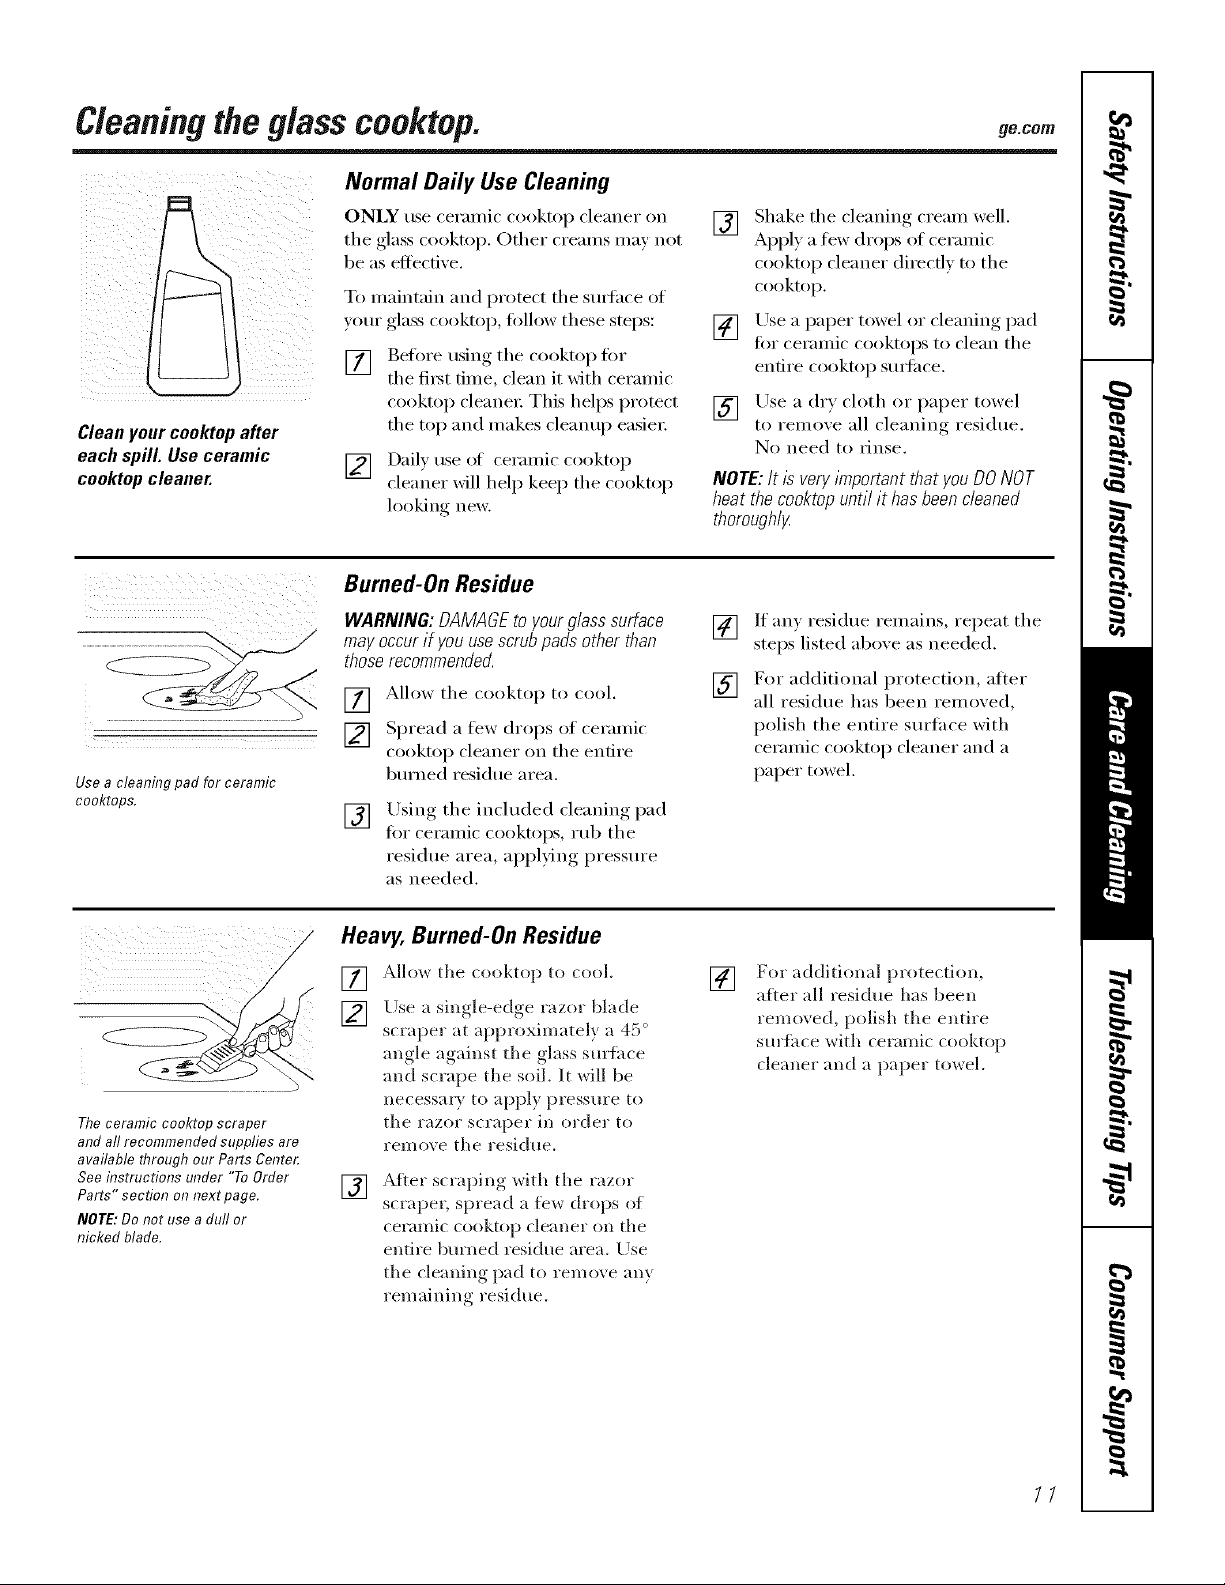
Cleaningthe glass cooktop. 9e.com
Clean your cooktop after
each spill. Use ceramic
cooktop cleaner.
Normal Daily Use Cleaning
ONLY use ceran/ic cooktop cleaner on
tile glass cooktop. Other creams may not
be as effective.
To maintain and protect tile smthce of
yore" glass cooktop, t011ow these steps:
[] Betore using tile cooktop tOT
tile fi_t time, clean it with ceramic
cooktop cleane_: This helps promct
tile top and makes cleanup easier:
[] Daily use of ceramic cooktop
cleaner will help keep tile cooktop
looking new.
[] Shake the cleaning cream well.
Apply a few drops of ceramic
cooktop cleaner directly to tile
cooktop.
[] Use a paper towel or cleaning pad
tk)I" ceI'aIllic cooktops to clean tile
entire cooktop StliS_ilce.
[] Use a dry cloth or paper towel
to remove all cleaning residue.
No need to rinse.
NOTE: It is very important that you DO NOT
heat the cooktop until it has been cleaned
thoroughlg
Usea cleaningpad for ceramic
cooktops.
Burned-On Residue
WARNING:DAMAGEto yourglasssurface
mayoccurif you usescrubpadsother than
thoserecommended.
[] Allow tile cooktop to cool.
[] Spread a few drops of ceramic
cooktop cleaner on tile entire
burned residue area.
[]
Using tile included cleanin,*_toad
fin" ceramic cooktops, Hfl) tile
residue area, ali,))lying, I)ressure
as needed.
[]
[]
If any residue remains, repeat tile
steps listed above as needed.
For additional protection, after
all residue has been remo_,ed,
polish tile entire surfilce with
cei'ai//ic cooktop cleanei" and a
paper towel.
/
The ceramic cooktop scraper
and all recommended supplies are
available through our Parts Cente_
See itTstructions under "To Order
Parts" section on next page.
NOTE:Do not use a dull or
nicked blade.
Heavy, Burned-On Residue
[] Allow tile cool<top to cool.
[] Use a single-edge razor blade
scraper at approximately a 45 °
angle against tile glass smthce
and scrape tile soil. It will be
necessary to apply pressure to
tile razor scraper ill order to
remove tile residue.
[]
After scraping with tile razor
scrapei, spread a tew drops of
Cel'alllic cooktop cleaner on tile
entire burned residue axea. Use
tile cleaning pad to remove any
remaining residue.
[]
For additional protection,
after all residue has been
removed, polish tile entire
sm'fitce with ceramic cooktop
cleaner and a paper towel.
//
Cleaningtheglasscoo op.
Metal Marks and Scratches
[] Be careflll not to slide pots and
pans across )our cooktop. It will
leave metal markings on the
cooktop surti_ce.
These marks are removable using
ceramic cooktop cleaner with a
cleaning pad for ceramic cooktops.
[] If pots with a thin o_erla) of
almninmn or copper are allowed
to boil d_T, tile overlay may leave
black discoloration on the cooktop,
This should be removed
immediately belin'e heating
again or tile discoloration may
be pemmnent.
WARNING: Carefullycheck the bottom of pans
for roughnessthat would scratch the cooktop.
Glass surface--potential for permanent damage.
Our testing shows that if you
are cooking high sugar mixtures
such as jelly or fudge and have
a spillover, it can cause
permanent damage to the glass
surface unless the spillover is
immediately removed.
Damage from Sugary Spills and Melted Plastic
[] Turn off all smthce elements.
Remo',e hot pans.
[] Wearing an oven mitt:
a. Use a single-edge razor blade
scraper (ceramic cooktop
scraper) to move tile spill to
}1 cool }lI'e}l on tile cooktop.
b. Remove tile spill with
paper t_m'els.
[] Any remaining spilloxer should be
lett until the surfi_ce of the cooktop
has cooled.
] Don't use tile smti_ce elements
again tmfil all of tile residue has
been completely removed.
NOTE: If pittlhg or indentatbn in the glass
surfacehas already occurred,thecooktop glass
will have to be replaced In this case,service will
be necessary
To Order Parts
To order ceramic cooktop cleaner
and tile cooktop scrape_; please call
()/It" toll-fl'ee ntlIllbeI':
NationalPartsCenter 800.626.2002
CeramicCooktopCleaner ...# WXIOX3OO
CeramicCooktopScraper...# WX10)(0302
Kit ........................ # WB84X5027
(Kitincludescreamandcooktopscraper)
CleaningPadsfor
CeramicCooktops ......... # WX10X350
12

Before you carl for service.., gecom
Troubleshooting -tips
Save time and money/.Review the chart on this page first
and you may not need to carl for service.
Surface elementswill
notmaintain a rolling
boil or cookingis slow
Possible Causes
Improper cookware
being used.
What To Do
• Use pans whi(h are absolutely flat and match
tile diaii]etex" of tile StlX'£1ce eleiixei]t selected.
Surface elements do A fuse in your home may be • Replace tile fixse or reset tile drcuit breakex:
not work properly blown or the circuit breaker
tripped.
Cooktop controls • Check to see tile correct control is set fin" tile surth('e
improperly set. element you are using.
77nyscratches ormetal Incorrect clemfing • Use recommended cleaning, In'°cedures"
marks or abrasions on methods being used.
radiant cooktop glass
surface
Cookwa_e with rough
bottoms being used or
coarse paxtides (salt
or staid) were between
the cookwa_e mad the
surface of the cooktop.
• Be stxI'e cookware bot[oI]]S aI]d cookware ai'e clean
belin'e use. Use cookware with smooth bottoms.
Tiny scratches are not removable but will become
less visible in time as a result of cleaning.
Cookwaxe has been
slid across the cooktop
surface.
Areas of discoloration Improper cookware • Marks fl'om aluminum and copper pm]s as well as
or dark streaks on the being used. mineral deposits t]'om water or food can be removed
cooktop with the cleaning cream.
Hot surface on a model • This is normal. The sHYl[_lce HHIVappear discolored
with a light-colored cooktop, when it is hot. This is temporary and will disal/pem"
as the glass cools.
Food spillovers not cleaned • See the Cleaning the glass cooktop section.
before next use.
Incorrect cleaning methods • Use recommended cleaning I/rocedures.
being used.
Plastic melted to Hot cooktop came into • See the Glass surface--potential for permanent damage
the surface contact with plastic placed section in tile Cleaning the glass cooktop section.
on the hot cooktop.
Pitting (or indentation) Hot sugar mixture spilled • Call a qualified technician for rel/lacement.
of the cooktop on the cooktop.
Frequent cycling off and Improper cookware • Use only flat cookware to minimize cycling.
on of surface elements being used. See Surface elements cycle on and off section.
Controlknob will
notturn
Cooktop controls
improperly set.
• When tile knob is ix] tile OFFposition, it must be
pushed ix] befi>re it can be turned. When tile knob
is ix] any other position, it can be tin'ned without
being pushed ix].
13

m
Notes.
m
__
m
m
O_
14

GE Service Protection Plus 'M
GE, a name recognized worldwide fbr quality and dependability, offers you
Service Protection Plus'_'--comprehensive protection on all yore appliances--
No Matter What Brand!
Benefits Include:
* Backed by GE
* All brands covered
* Unlimited service calls
* All parts and labor costs included
o No out-of-pocket expenses
o No bidden deductibles
o One 800 number to call
We TI Cover Any Appliance.
Anywhere. Anytime.
You _dll be completel) satisfied with our service protection or )ou ma) request )our mone) back
on the remaining value of your contract. No questions asked. It's that simple.
Protect yore" refrigerator, dishwasher, washer and dryer, range, TV_ VCR and much more--a_y brand!
Plus there's no extra charge flw emergency service and low monthly financing is available. Even icemaker
coverage and toed spoilage protection is offered. You can rest easy, knowing that all your valuable
household products are protected against expensive repairs.
Place ,our confidence in GE and call us in the U.S. toll-free at _UU._Z_.ZZZ_
for l//Ol'e infol'I//atiOll.
:_,_*]1 hi}in(Is (o_.{!l_{!(L tip t(t _0 ){!iris Ill(I, ]11 the (on[lllenl tl [.S.
.n_ ( Jill here
Please place in envelope and mail to:
GeneralElectric Company
Warranty Registration Department
P.O. Box 32150
Louisville, KY 40232-2150
15
Consumer Product Ownership Registration
Deal Customer:
Thank you tbr purchasing our product and thank you for placing your confidence in us.
_4'e are proud to haxe you as a customer'.
Follow these three steps to protect your new appliance investment:
Complete mid mail
your Consumer
Product Ownership
Registration today.
II_vc the peace of
mind of knowing we
C_lll conI_ICt yOll ill
the unlikelx event of a
satbtv modification.
After mailing the
registration below,
store this (IOC/llnell[
in a satb place. It
contains information
vou will need should
you require service.
Our service number is
800.GE.CARI{S
(800.432.2737).
Read VOllr ()wller'g
Mamml carehflly.
It will hel l) you
operate your new
appliance properly.
Model Number Serial Number
, , , , , , , , , I I , , , , ,
Important: If you did not get a registration card with your
product, detach and return the form below to
ensure that your product is registered, or register
online at ge.com.
m_ (ill t her(
Consumer Product Ownership Registration
@
Model Number Serial Number
Mr. his. Mrs. Miss
Fil"st I ] Last I
Nam_ I I I I I I I I I Nam_ I I I I I I I I I I I I
Stl'e( t [
Address I I I I I I I I I I I I I I I I I I I I I I I
, I
I
I
ApI. # ] I [
City ] [ [
Illm Phl:l d
hi Use ] I ]
Month
I I I I
I I I I
I)ay] I I
I ] E-lnail Addr< ss:
I I I I I I I [ S,a.,I
Pholle
Nimr ] I ] Num xw I I
Zip
J C,,d,I,, ] [ ]
GE Consumer& Industrial
Appliances
General Electric Company
Louisville, KY40225
ge.com
76
* Please provide your eqnail addrc',,, to receive, xia e-mail, discounts, special ott_ 1"_and other important
communications fi-om GE Appliances (GK\).
Check here if wm do not want to receive communicalions from (;EA's carcfiflly selected partnel'_.
E\ILL RE TO COMPI.ETE AND RE'I'[ rRN Tt tlS CM{I) DOES NOT DIMINISt t h_)l JR
_,\7\RI_ \N'['Y RI Gt fFS.
For more information about (;1GVs privacy and data usage polk?; go to ge.com and click on
"Privacy Poli(y" or call 800.626.2224.
GEElectric CooktopWarranty.
Aft warranty service provided by our Factory Service
Centers, or an authorized Customer Care ® technician.
To schedule service, on-line, 24 hours a day, vis# us at ge.com,
or carl 800.GE.CARES (800.432.2737). Please have serial number
and model number available when calling for service.
Staple your receipt here.
Proof of the orig&al purchase
date is needed to obtain service
under the warrant_
One Year
Fromthe date of the
originalpurchase
GE Will Replace:
Anypartot the cooktop which tifils due to a detect in materials or workmanship.
Dudng this limited one-year warranty, (;E will also provide, free of charge, all lab(n"
and in-home service to replace the deiecfi\'e part,
::Ji::Service trips to your home to teach you how to use
the product.
!i_ hnproper h_sta]lation, delivery or maintenance.
_: Failure of the product if it is abused, misused, or
used for other thma the intended purpose or used
commercially.
::Ji::Dmnage to the glass cooktop caused by use of clemlers
other than the recommended clemlhlg cretans mid
pads.
::Ji::Dmnage to the glass cooktop caused by hardened spills
of sugary materials or melted plastic that are not cleaned
accordh_g to the directions in the Owner's MmmaJ.
iJi::Replacement of house fuses or resetting of circuit
breakers.
!i/: Damage to the product caused by accident, fire, floods
or acts of God.
_: h_cidentaJ or consequentiaJ damage caused by possible
defects with this applimlce.
::Ji::Damage caused after delivery.
!i_:Product not accessible to provide required service.
EXCLUSIONOFIMPLIED WARRANTIES--Your sole and exclusive remedy is product repair as provided hi this Limited
Warranty. Any impfied warranties, including the implied warranties of merchantability or fitness for a particular purpose,
are limited to one year or the shortestperiod allowed by law.
This warranty is extended to the original purchaser and any succeeding owner for products purchased for
home use within the USA. If the product is located in an area where service by a GEAuthorized Servicer is not
available, you may be responsible for a trip charge or you may be required to bring the product to an Authorized GE
Service location. In Alaska, the warranty excludes the cost of shipping or service calls to your home.
Some states do not allow the exclusion or limitation of incidental or consequential damages. This warranty
gives you specific legal rights, and you may also have other rights which vary from state to state. To know
what your legal rights are, consult your local or state consumer affairs office or your state's Attorney General
Warrantor: General Electric Company.Louisville, KY 40225
17

ConsumerSupport.
l gEAppliancesWebsite ge.com
Haxe a ques0on or need assistance with )our al)pliance? Tr) tile (;E Al)pliances _ ebsite 24 houi_ a day,
' an) day of tile }ear! For greater con'_enience and taster service, you can now download Owner s Manuals,
order parts or exen schedule serxice on-line.
ScheduleService
Expert (;E repair setsice is ()ill} one step awa) fl'otn your door: Get on-line and schedule your serxice at
your, conxenience 24 houi_ am (lax of tile xear! Or call 800.(;E.CARES (800.432.2737) (huing normal
business houI_.
ge.com
RealLife DesignStudio ge.com
GE suI)ports tile Univei_al Design concept--l)roducts, services and environments that can be used by
people of all ages, sizes and capabiliOes. _'e recognize tile need to design for a wide range of i)hysical and
mental abilities and ilnl)aii_nents. For details of GE's Univei_al Design al)plicaOons, including kitchen
design ideas for people with disabilities, check out our X_'ebsite today. For tile healing ilni)aired, please call
800.TDD.GEAC (800.833.4322).
ExtendedWarranties ge.com
Purchase a (;E extended warranty and learn about special discounts that are axailable while your, warranty
00 ....
is still ill efle('t. You can i)ur(hase it on-line anyOlne, or call 8 .626.2224 during normal business hours.
(;E (_onsulner Heine Serxices will still be there alter }our warrant} expires.
PartsandAccessories
ge.com
Individuals qualified to service their own appliances can have parts or accessoiJes sent directly to their
honles (VISA, Master(_ard and Discover cards are accepted). Order on-line today, 24 hours evei_,, day or
by i)hone at 800.626.2002 duiing nornlal business hours.
Instructions contained in this manual cover procedures to be performed by any user. Other servicing generally
should be referred to qualified service personnel. Caution must be exercised, since improper servicing may cause
unsafe operation.
ContactUs
ge.com
If vou are not safistied with tile service vou receive fl'om (;E, contact us on our X_'ebsite with all tile details
including your i)hone II/lIllbeI; OI" wIJte to: (;eneral Managei; C/1stoIlleI" Relations
GE Appliances, Appliance Park
I,ouisville, KY 40225
l RegisterYourApplbnce
Register your new applimlce on-lille----at your convenience! Timely product registra0on will allow for
' enhanced colnlnunicafion and i)rolnl)t ser\'ice under tile teiins of }our warranty, should tile need aiJse.
You nlav also nlail ill tile i)rel)iinted registration card included ill tile I)ackin°_ inatelial.
ge.com
Printed in flTe United States

ge.com
Instrucciones
de seguridad ............ 9-4
Instrucciones de operaci6n
Caracterfsticas de su estufa .... 5
Consejos sobre los utensilios
de cocina ................ 8, 9
Elemento de superficie doble . 7
Elementos de superficie .... 6, 7
Limitador de temperatura ..... 7
Cuidado y limpieza
Perillas de control ......... 10
Superficie de xidrio ..... ] 1, ] 9
Superficies de
acero inoxidable ........... ] 0
Consejos para la soluci6n
de problemas ............. 13
Soporte al consumidor
Garantfa ................. ] 7
Soporte al consumidor . ..... 18
o1P340
JP346
jP 56
jP655
Escriba los n(/meros de modelo
y de serie aquL"
No. de modelo
No. de serie
I,os puede enconti'ai" en la
etiqueta que est5 debajo de
la superficie de la estufi_.
,19-80411-2 07-07JR
INFORMACIONDESEGURIDADIMPORTANTE.
LEATODASLASINSTRUCCIONESANTESDESU USO.
iADVERTENCIA!
Por sgl seguridad, se debe seguir la informaci6n de este manual para reducir el riesgo de incendio o
explosi6n, descarga el#ctrica o para evitar dafios a la propiedad, lesiones personales o la p#rdida de
la vida.
PRECAUCIONESDESEGURIDAD
Cuando use electrodom#sticos, se deben seguir precauciones b#sicas de seguridad, incluyendo
las siguientes:
!?:Use este electrodom4stico s61o pare el uso
descfito en este manual.
iJ_i:iNo intente repaint o reemplazar alguna paste
de su estufi_ a menos que se recomiende
espedficamente en este manual. Cualquier otto
serdcio se debe remitir a un t_cnico calificado.
_: Antes de realizar cualquier serficio, desconecte
la fllente de ene_gia de la esmfi_ en el tablero
general de distfibuci6n retivando el fllsible o
apagando el interruptor de circuitos.
_: Asegfirese de que un electficista calificado
insmle y conecte a tiem_ correctamente
el electrodom_stico de acuerdo con las
instrucciones de insmlaci6n suministvadas. Este
electrodom_stico debe contar con el xolmje y
fiecuencia adecuados, asi como conectmse con
un ci_vuito defivado indMdual y desca_gado a
tierva adecuadamente, protegido pot un
co_mcircuitos o filsible aceptable pare el xamje
indicado en el r6tulo.
Ubicaci6n del r6tulo
iJii:iPida al instalador que le muestre la ubicaci6n
del interruptor de circuitos o filsible. Mfirquelo
pava una fi_cil _efbrencia.
_: No deje a los nifios solos o sin supe_xisi6n en una
zona donde un electrodom&fico est5 en uso.
Nunca se debe pem_ifir que algtden se siente o
se pare en alguna parle del electrodom_stico.
iJii:iEnsefie a los nifios a nojugar con los controles
ni con ninguna otva pa,te de la estufi_.
_: No pem_ita que nadie salt< se pare o se
cuelgue de la estufil.
_ PRECAUCION:No se deben guardar
en los gabinetes encima de la estufh art_culos de
inter& pare los niflos ya que si se suben en la
estufil pare alcanzar dichos ar6culos pueden
sufiJr sefias lesiones.
_: Siempre mantenga el papel de colgadum o las
cortinas de material combustible a una dismncia
prudente de la estufa.
iJi;:iSiempre mantenga las toallas y patios
paca platos, guantes pare ollas y otros ar6culos
de tela a una distancia prudente de la estufi_.
_: Siempre mantenga los utensilios plfisticos
y de madeva y los alimentos enlamdos a una
dismncia pmdente de la estufi_. Podrian
calentmse y prox_car quemaduvas.
_: Nunca use ropa suelta o prendas
que cuelguen mientms utiliza el
electrodom_stico. E1material inflamable
se podria prender si entva en contacto con
elementos calientes de la superficie y puede
catlsar quemadui_ls sevei'as.
iJii:iUse 6nicamente guantes pava ollas que est_n
secos; los guantes hOmedos en superficies
calientes pueden cmlsar quemadas pot el vapor
No deje que los guantes pare ollas mquen los
elementos calientes de la superficie. No use
toallas u otros patios gruesos que puedan arder
si entvan en contacto con el elemento caliente
de la superficie.
_: Pot su seg_fidad, nunca use este dectrodom&tico
pare calenmr el cuarto de la cocina.
i_ii:iNo use agm pava extingtfir incencfios de gmsa.
Nunca levante una olla en llamas. Apague los
controles. Sofioque la olla en llamas en un
demento de la superficie ct£fiendo la olla
complemmente con una mpa que encaje bien,
con una bandeja de g'allems o plana. Use un
ex6ntor quimico seco multiusos o de tipo
espt/moso.
Se debe sofocar la gmsa encendida pot fueva
de la olla cubfi4ndola con soda cfiustica o
si est5 disponible, usando un exfintor quimico
seco multiusos o de tipo espumoso.
i_i;:iNo queme alimentos sob_e la estufi_.
Si quelna alimentos bajo la calnpana,
encienda el ventilador
!?:No deje acumular gmsas u otros matefiales
2 inflamables en la superficie.

ge.com
A iAD VERTENCIA!
PRECAUCIONESDESEGURIDAD
f_:No toque los elementos de la superficie. Estas
superficies pueden estar tan calientes como
paca quemar aunque est(_n de color oscuro.
Dtmmte y despu_s de su uso, no las toque,
ni pemdta que algfin patio u otto material
inflamable entre en contacto con los elementos
de la superficie o con las fireas cercanas a los
elementos de la superficie; deje stfficiente
tiempo paca que se enflien primero.
i,as zonas potenciahnente calienms son la
superficie de la estufi_v las fireas al flente.
iJii:iPaca reducir la posibilidad de quemaducas,
el encendido de matefiales i,Oamables v los
detainees, el mango de cualquier recipiente
se debe gimr hacia el centro de la esmfi_ sin
extende,se hacia ningun elemento ce,vano
de la superficie.
iJii:iApague sielnpre el control del elelnento de
la superficie antes de reticar el recipiente.
_::Use sm*enes de mmaho apropiado. Seleccione
aquellas que tengan fimdos planos suficiente
pare cubfir el elemento de calentamiento
del elemento de la superficie. E1 uso de ollas
o sartenes de menor tamaho expon&5 una
porci6n del elemento de la superficie al
contacto di,ecto y puede causar que la ropa
se encienda, ia relaci6n correcta de la olla
o sart4n con respecto al elemento tambi_n
inejocac,_ la eficiencia.
iJii:iNunca deje los elementos de la superficie sin
atenci6n en niveles de aim tempecatum. He,x'ir
en exceso causa humaredas y dercamamientos
de gmsa que se pueden encender
_: $61o cie,los tipos de vidfios, xidrio/ce,:_mica,
xajillas de barro u otros recipientes de xidrio
son adecuados paca cocinar en la superficie de
la esmfi_; otros se podr/an romper debido a un
cambio brusco de tempecatuca.
iJii:iVigile los alimentos mientcas se flien a niveles
de tempecatum altos o medios.
_: i,os alimentos a fleh deben estar lo mils secos
posible, ia escarcha de los alimentos
congelados o la humedad en los alimenms
frescos puede hacer que la gcasa caliente
salpique pot fneca de los lados de la olla.
iJi;:iUse poca gmsa pare fieh incluso al St/IlleI'griI" los
alimentos en la gmsa. ilenar la olla con demasiada
gmsa puede res_flmren denanmmientos ct_mdo se
agregan los alimentos.
N Si se usa una combinaci6n de aceites o gmsas
pare flei,; remelva antes de calenm*; o a
medida que las gmsas se mezclan lenmmente.
N Siempre caliente la gmsa lentamente y xigile
mienmas se calienm.
iJii:iCuando sea posible, use un tern%metro paca
gcasa paca eximr sob,ecalenmr la gcasa.
iJii:iNunca tmte de mover una satl_n con gt'asa
caliente, especialmente una sart_n proflmda
pare fleh- Espere basra que la gmsa est_ flfa.
_: No ahnacene materiales inflamables ce,va de
la estufil.
iJii:iMantenga los filtros de la campana y de la gmsa
limpios pare mantener una buena ventilaci6n v
evitar que la gcasa se encienda.
_: No ahnacene o use matefiales combustibles,
gasolina u otros vapores y l/quidos inflmnaNes en
la ce,vania de 4ste o cmlquier electmdom_stico.
_: Limpie s61o las partes sehaladas en este manual
del propietario.
iJii:iNo deje productos de papel, utensilios de cocina
o alimentos en la estufil cuando no est_ en uso.
iJii:iManten_l h estufil lhnpia y libre de actm_ulad6n de
gram o &namandenros que _ puedan encendec
N Nunca caliente recipientes de alimentos sin
abfi,; el aumento de presi6n podria causar que
la lata explotam u otms lesiones.
N Nunca deje fiascos o lares con restos
de gmsa sobre o cerca de la superficie
de la esmfa.
_: Nunca use este electmdom_estico pare calenmr
el cuarto de la cocina.
COCINELACARNEYI_ASAVESCOMPLETAMENTE...
Cocine/a camey /as ayescorop/etaroente.La came se debe cocinara unateroperaturarofniroaINTERNAde
160° F y /as ayesa una temperaturamfnimaINTERNAde 180° E Norroalmente,cocinar a estas teroperaturas
protege contra enferroedadescausadaspor los a/iroentos.
3
INFORMACIONDESEGURIDADIMPORTANTE.
LEATODASLASINSTRUCCIONESANTESDESU USO.
A iADVERTENCIA!
ELEMENTOSRADIANTESDELASUPERFICIE
Tenga cuidado al tocar la estufa. La superficie de vidrio de la estufa retendrb el calor despu6s de que
se hayan apagado los controles.
iJii:iEvite mspar la cubie,ta de vidfio de la esu/fi_.
ia estufil puede vaya,se con objetos roles como
instrumentos pundagudos, anillos u otros tipos
dejoyeria y remaches en la ropa.
iJii:iNunca use la superficie de vidfio de la estufi_
como una mbla pava picar.
iJii:iNo coloque o ahnacene objetos sobre la
superficie de la cubierta de vidfio de la estufi_
ctlando no est6 ell USO.
_: Tenga cuidado al momento de colocar cuchavas
u otros utensilios pava agimr sobre la cubierta
de fidfio de la esttffi_mientvas est6 en uso.
Podrfan calenm,se y prox_car quemaduvas.
_: Evite calentar una cacerola xacfa. Hacedo
podrfa dahar tanto a la estufi) como la cacerola.
iJii:iNo deje que agua, otros lfquidos o gvasa
pem_anezcan sobre la estufi_.
_: Pare ininilnizar la posibilidad de quelnadu,'as,
asegOrese de que los controles de todos los
elementos de la superficie est_n en la posici6n
de apagado y que toda la superficie de vidfio
de la estufil est_ flfa antes de limpiarla.
_: No opere los elementos superficMes de vidfio
si el fidfio esd tom. [,os den'ames o la soluci6n
limpiadom pueden penetvar en una estulil rota
y crear el fiesgo de un shock el6ctfico. Si la
cubierm de fidfio de su estufil llegam a
rompeLse, p6ngase en contacto con un t_cnico
calificado de inmediato.
iJii:iI,impie la estufi_ con cuidado. Si usa una
espo,_a o patio pava limpiar los den'ames en
algfin elemento de superficie caliente, tenga
cuidado y exite las quemaduvas pot vapor
.Mgunos limpiadores pueden producir
emisiones t6xicas si se les aplica sobre una
superficie caliente.
IIIOT¢i"Recomendamos que exite limpiar las
_reas de los elemenms de la superficie hasta
que se hayan enfiiado v la luz in_ficadova
se haya apagado. Losderramesdeazucarson
la excepciona estarecomendacion.Consulte
la secci6n Limpiezade la cubiertade vidriode
la estufa.
_: Pava efitar la posibilidad de dahar la superficie
de la estt_i_, no aplique la crema limpiadom
a la superficie de vidfio cuando est6 caliente.
i_:Despu_s de limpia,, use un patio seco o bien
una malla de papel pava remover los residuos
de C,elna limpiadova.
iJii:iI,ea y siga todas las instrucciones y a&ertencias
de las etiquetas de la crema limpiadova.
_: Tenga cuidado al tocar la estu[i_, ia superficie
de fidfio de la estufil retendv(_ el calor despu6s
de que los controles se ha>n colocado en la
posici6n OFF.
iJ_i:iNo se pare sobre la estufi_ con cubiex*a
de fidfio.
!:_:Los myones o impactos severos sobre las estufi_s
con cubie*ta de vidfio podrian romper o astillar
el vidfio.
LEAYSIGAESTASINSTRUCCIONES
DESEGURIDADCUIDADOSAMENTE.
CONSERVEESTASINSTRUCCIONES
4
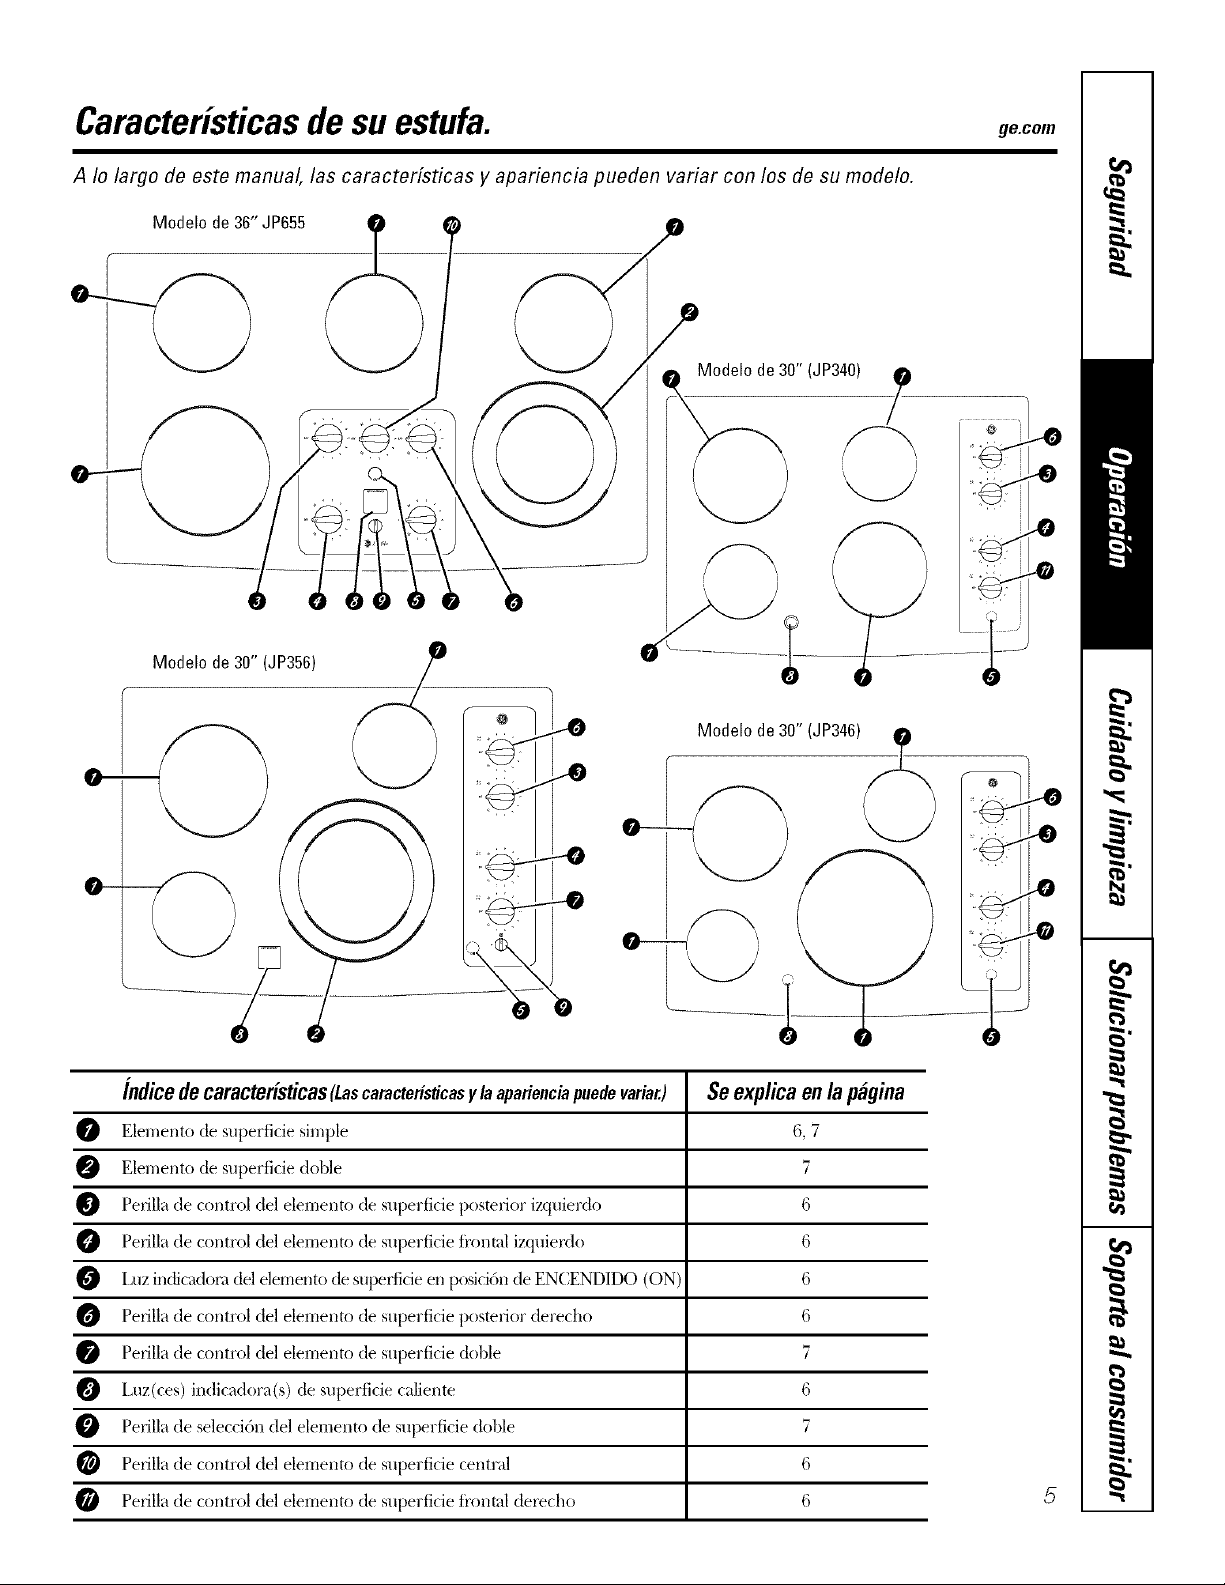
Caracteristicasde su estufa.
A Io largo de este manual, las caractedsticas y apariencia pueden variar con los de su modelo.
Modelo de 36" JP655
ge.com
0-
Modelo de 30" (JP356)
_ Modelo de 30" (JP340) //_
Modelo de 30" (JP346)
indice de caracteristicas (Lascaracteristicasylaaparienciapuedevariar.) Se explica en la pagina
O Elemento de superficie simple 6, 7
Elemento de superficie doble 7
O Perilla tie control del elemento tie superficie p()steli()r izquierdo 6
O Perilla tie control del elemento tie superficie fl'ontal izquierdo 6
O I;uz indicadox'a del elemento tie supeflide en posici6n tie ENCENDIDO (ON) 6
O Pex'illa de control del elemenu) de superficie postal'lot derecho 6
Pex'illa de control del elemenu) de superficie doble 7
Luz(ces) indicadora(s) de superficie caliente 6
Pex'illa tie selecci6n del elemento tie superficie doble 7
Pex-illade control del elemento de superficie central 6
O Pex-illade control del elemento de superficie fl'onml dex_cho 6

Comousar los elementosde superficie.
A Io largo de este manual, las caracterfsticas y apariencia pueden variar con los de su modelo.
Como operar
Presione la pefilla hacia abajo y gire en
una u otra direcci6n pare ajttstar a su
gusto. Cuando el control est_ en otra
posici6n (1ue no sea a[)agado, (OFF),puede
gim_se sin necesidad de presionarlo.
En las posiciones apagado (OFF)y alto
(HI] el control encaja en su sido. Puede
escuchar algtmos chasquidos mientras
cocina, lo que indica que el control estfi
manteniendo el nivel de calor que usted
ajust6.
Ix)s controles p[li'il los elelllentos de
supell'ide pueden ajustni_e entre b@)
(LO)y alto (HI)para un n(linero ilimitado
de ajustes de calm: Con el intermpto_;
los ciclos de los elementos se encienden
y apagan para mantener el ajuste de
control de su elecci6n.
Se encendeM la luz indicadora cuando
cualquier elemento de supe_l'icie estfi
encendido.
Se encenderfi tma luz indicadom de
SUPERFICIECALIENTE cuando se encienda
algfin elemento radiante; la luz
pemmneceM encendida hasta que la
supe_l'i('ie se enfHe aproximadamente
hasta 150 °E
NORA:
_: Se enciendecuandoel elemento esN caliente
ai tacto.
::Ji::Permaneceencendida i))clusodespu_sde que
el e/ementose apaga.
_: Bri//a intensarnentebasra que el e/ementose
enfrfe a aproxlYnadarnente150 o£
_: Aseg&ese de apagar /a perilla de contro/
cuandoterm/hede coclnar
Nunca cocine directamente sobre
el vidrio. Siempre use piezas de
cocina.
Siempre coloque la cacerola on el
centro dol elemento de superficie
on la que est_ cocinando.
Acerca de los elementos de superficie radiantes...
i,a estufi_ radiante tiene elementos
calentadores pot debajo de una superticie
sume de vidrio.
NORA:UnolorIigeroesnormalcuanflounaestufa
nuevaes usaflaporprimeravezEstoescausafloporel
ca/entamientode/as partesnuevasy /osmateria/esde
ais/amientoyflesaparecerben cortotiempo.
NOTA:Enalgunosmoflelosdeestufasconvidrios
concoloresligeros,esnormalquelazonadeeoeinaflo
cambiede co/oreuanfloseca/ientao euanfloseenfria.
Estoestemporaly desaparecer_,eonformeel vidriose
enfrfaa temperaturaambiente.
Evite colocar utensilios que po(lrfan
sobre(alenta_e o plfisticos que podrfan
(lerrefi_e sobre el elemenm de superfide
hasta que se ha_;_ enfl_a(lo pot completo.
_: /_asmanchasdeagua[depbsitosde minerales)se
remuevenusanflounacremade limpiezao vinagre
blaneopuro.
_: Elusodelimpiaflorde ventanaspodrfaflejaruna
pelfculairifliscentesobrelaestufa.Laemmade
limpiezaremoverbestadecoloraei6n.
__ Noalrnaceneartfcubspesaflossobreb estufa.
Sisocaensobreb estufa,poflrfanflafiar/a.
E1 elemento de superticie harfi ciclo entre
encendido y apagado para mantener los
controles de su selecci6n.
Es seguro colocar una pieza de cocina
caliente del horno o de la superficie sobre
la superficie de xidfio cuando la superficie
estfi ti'fi_,
_: Nouseb supefficiecomotabbdeeorte.
Atin despu& de que los elementos de
superficie son apag_(los, la estuii_ de
vidfio retiene suficiente calor pare contimtar
cocinando. Para evitar cocinar excesixan/ente,
remuexa las cacerolas de los elementos de
superficie cuando la comida se hata cocinado.
No deslice
cacerolas
encimade la
superficiede/a
estufaporque
estopodrfa
rasgufiarel
vidrio.El vidrio
es resistente,
perono es a
pruebade
rasgufios.

ge.com
Austede _
elementode @_:" Ajustede
superficie_, _ elemento,i
pequefio_ _ desuperflcle
_ralld8
Elemento de superficie doble (enalgunosmodelos)
E/ elemento de supe_cie frontal derechocuenta
con 2 tamafios de coccl6npara su e/eccl6n,de
modo que puedeajustar el tamafio de/elemento
con el tamafio del utensl/lo que esN usando.
Para usar el elemento de superfi@
grande, gire la perilla de SELECCIONa ®.
Presione y gire la perilla de control al
_!juste deseado. E1 elemento calentar_
el firea completa contenida en el cfrculo
grande.
Para usar el elemento de superficie.
pequeflo, gire la perilla de SELECC/ON
a e. Presione y gire la perilla de control
al ajuste deseado. E1 elemento s61o
calentar_ el firea dentro del cfrculo
pequeflo.
Ciclos de encendido y apagado de los Mementos de superficie
I,os elementos de superficie intercala_fin
ciclos de encendido y apagado para
mantener la temperatura de su eleccidn.
Todos los elemenu)s de superficie
radiantes cuentnn con un limitador de
temperatm'a que evita que la cubierta de
vidrio de la estufi_ se caliente demasiado.
E1 limitador de temperatura puede
intercalar los ciclos a apagado din'ante
la coccidn si:
_: Despu#sde her@ el lfquido contenido
en /a cacero/ase evapora.
::Ji:_El rondode/a cacero/ano esplan&
_: La cacerolaesN fuera de/centro.
::Ji:_No hay ninguna cacerolasobre el elemento.
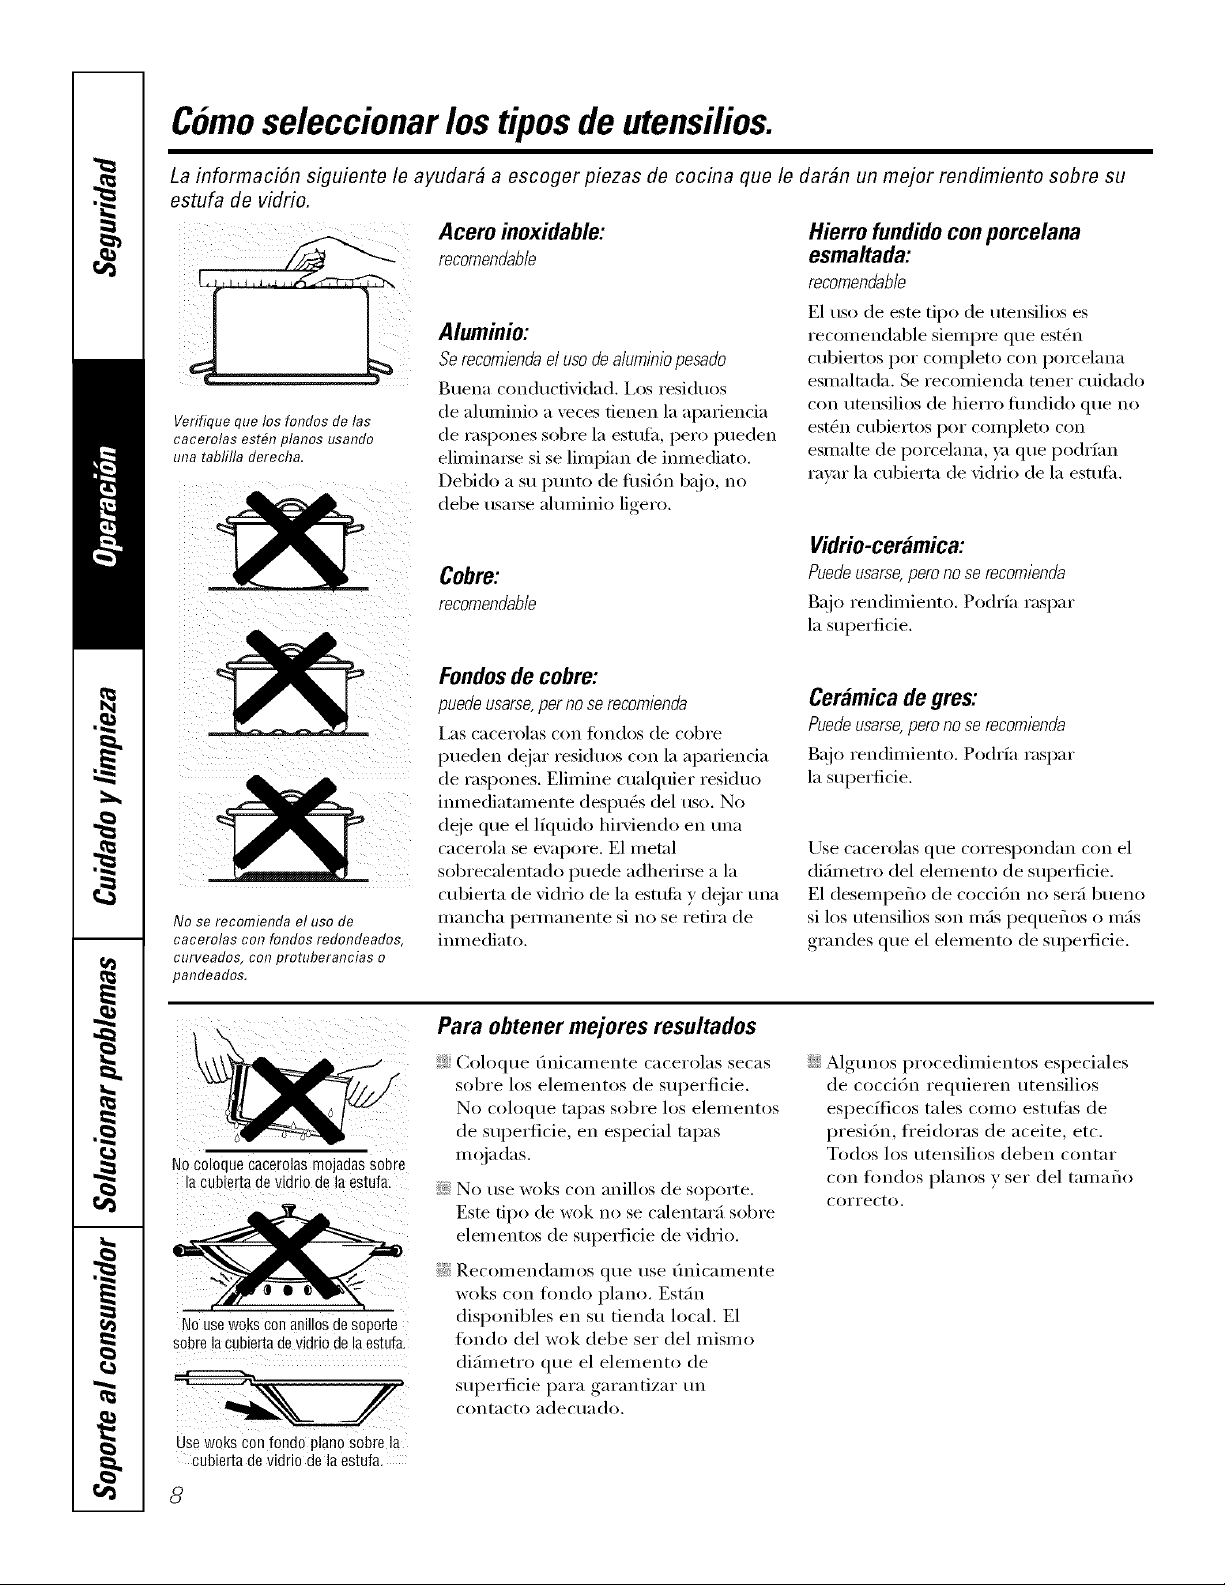
Comoseleccionar los tiposde utensilios.
La informaciSn siguiente le ayudar# a escoger piezas de cocina que le dar#n un mejor rendimiento sobre su
estufa de vidrio.
iii i i
Verifique que los fondos de las
cacerolas estfin pianos usando
una tabfifla derecha.
Acero inoxidable:
recomendab/e
Aluminio:
Se recomienda el uso de aluminio pesado
Buena conducdvidad, i,os residuos
de almninio a veces tienen la apariencia
de raspones sobre la esmfh, pero pueden
elimina_se si se limpian de imnediato.
Debido a su ptmto de fllsi6n bajo, no
debe usa_5e almninio ligero.
Hierro fundido con porcelana
esmaltada:
recomendable
E1 uso de este tipo de utensilios es
recomendable siempre que esttXn
cubiertos pot completo con porcelana
esmaltada. Se recomienda tenet cuidado
con utensilios de hierro fimdido que no
est(_n cubiertos pot completo con
esmalte de porcelana, ya que podrfan
rm_r la cubierta de vidrio de la estufi_.
Vidrio-cerglmica:
Puede usarse, pero no so recomienda
Bajo rendimiento. Podrfa raspar
la superficie.
No so recomienda el uso de
cacerolas con fondos rodondeados,
curveados, col?protuberancias o
pandeados.
Fondosde cobre:
puede usarse, per no se recomienda
i,as ca{'erolas {on fimdos de {'obre
pueden dejar resi{hu}s con la aparien{'ia
de raspones. Elimine cualquier residuo
imnediatamente despu(_s del uso. No
deje que el lfquido hirviendo en tma
cacerola se evapore. E1 metal
sobrecalentado puede aclhed_e a la
cubierta de vichio de la esttdi_ y dejar tma
mancha pemmnente si no se retira de
imnediato.
Cerglmicade gres:
Puede usarse, pero no so recomienda
Bajo rendimiento. Podrfa raspar
la superficie.
Use cacerolas que correspondan con el
difimetro del elemento de supe_ticie.
E1 desempeflo de cocci6n no set5 bueno
si los umnsilios son mils pequeflos o mils
grandes que el elemento de supe_ticie.
z
NOColoque cacerolas mo adas Sobre
la cubierta de vidrio de la estufa.
No use woks con anillosde soporte
sobre la cubierta de vidrio de laestufa.
iii!! i_iii_ ii
Usewoks con fondo piano sobre la
cubierta de vidrio de la estufa.
Para obtener mejores resultados
:_ Coh}que finicamente cacerolas secas
sol)re los elementos de sui)erfi{ie.
No coloque tapas sol)re los elementos
de superficie, en especial tapas
m oja das.
S::tNo use woes con anillos de sopo_te.
Este tipo de wok no se calentarfi sobre
elem entos de supet_icie de vidrio.
tgi!:Recomendamos que use Onicamente
woks con fondo piano. Estfin
disponibles en su tienda local. E1
fimdo del wok debe set del mismo
difimetro que el elemento de
superficie para garantizar tm
COlltacto adectlado.
::Ji::Algtmos procedimientos especiales
de cocci6n requieren utensilios
especfficos tales como estuths de
presi6n, ti'eidoras de aceite, etc.
To(los los utensilios deben contar
con fimdos pianos y set del tamafio
corFecto.
8

_e.com
iCorrecto!
ilncorrecto!
Nora: Las enlatadoras con rondo piano
son necesarias para las estufas con
cubierta de vidrio,
Siga los siguientes puntos para la preparacion de enlatados
i_s cacerolas que tengan una sui:)e*_ide
mayor a 1" del cfrculo del elemento
de supelfide no se recomiendan para
la mayor pai_e de la cocd6n sobre la
superfide. No obsmnte, cuando enlate
l:)or medio de bafio Maria o t***
elemento de presi6n, pueden usal_e
cacerolas de mayor difimetro. Esto es
debido a que las temperlmn'iis del agua
hirviendo (incluso bajo presi6n) no
dafian las supei{ides de la estufii
alrededor de los elementos de superfide.
NO OBSTANTE, NO USE
ENIATADOfg_,S DE GIg_,NDES
DL_.IETROS U OTIg_,S CACEROIAS
GIg_,NDES }'AIg _, FREiR O HERVIR
AI,IMENTOS QUE NO SEAN AGUA.
Ia mavorfa de las mezclas dejarabe o
salsa (y todos los tipos de fl_turi0 se
c5/ecen a tel//pes"attlI'as II/;_s ele\;_das
que la del agua hil_'iendo. Titles
temperaturas l.:O(]_fan eventualmente
dafiar la superfide de la cubiella
de vi(hJo de la estulit.
[]
_segfirese de que la enlamdora
se ajuste al centro del elemento
de superficie. Si su estuiil o su
ubicaci6n no penniten centrar la
enlata(lora sobre el elemento de
stlpeKJ]cie, rise caces"olas de illenoF
diSmetro para obtener mejores
resultados de enlatado.
[]
Deben emplem_e enlatadoras
de tbndo piano. No use enlatadoras
con [()n(lt)s rebordeados 51
ondulados (con fl'ecuencia en
utensilios esmalmdos), debido a
qtle no tieslen el contacto suficiente
COn lOS elemesltos de superfide y
requiere mils tiempo hesMr el agua.
[] Recuerde que el enlatado es un
proceso que genera grim cantidad
de "4q)o1: Para evitar qtlelnadt/rlis
debidas al _;ipor o calos; tenga
cuidado al enlaml:
NOTA: Si su casa cuenta con un voltaje
bajo, el en/atado puede tomar m#s tiempo
de/esperado, inc/uso si se ban seguido /as
instrucciones cuidadosamente. El tiempo
de/proceso disminuir# si:
(1) usa una en/atadora a presidn, y
(2) si comienzacon agua del grifo
CALIENTEpara un calentado m#sr#pido
de cantidadesmayores de agua.
PRECAUCION:
_: Elenlatadoseguro requiere la
destrucci6nde microorganismosdafiinos
y que los frascos est#n comp/etamente
sellados.Cuandoenlate alimentoscon
una enlatadorade bafio Maria, debe
mantenerseunhervor /igero pero
constantedurante el tiempo requerido.
Cuandoen/atea/imentoscon una
enlatadoraa presidn,debe mantenerse
lapresi6n durante el tiemporequerido.
_: Una vezque haya ajustado los controles,
es muy importante que so asegure que
los nivelesde hervor o presidn prescritos
se mantengandurante el tiempo
requerido.
_: Oebidoa que debeasegurarsede
en/atardurante el tiempoprescrito, sin
interrupci6na/gunadurante el perfodo
de/proceso, no en/atesobrening(/n
elementode superficie de la estufa
si su enlatadora no esplana.
[]
(_um5(lo enlate, use recetas }
procedilnientos (155el)5"°vellgall,
de flmntes (onfiables. Ixis recetas
y procedimientos de tuentes
confiables estSn disponibles a troy&
del fi_bficante de su enlamdom;
ti_b_icantes de fl'ascos de vidrio pare
enlatac tales como la marca Ball
and/;.er_; y el Se_Mdo de Extensi6n
del Departamento de Agriculture
de EE.UU.
9
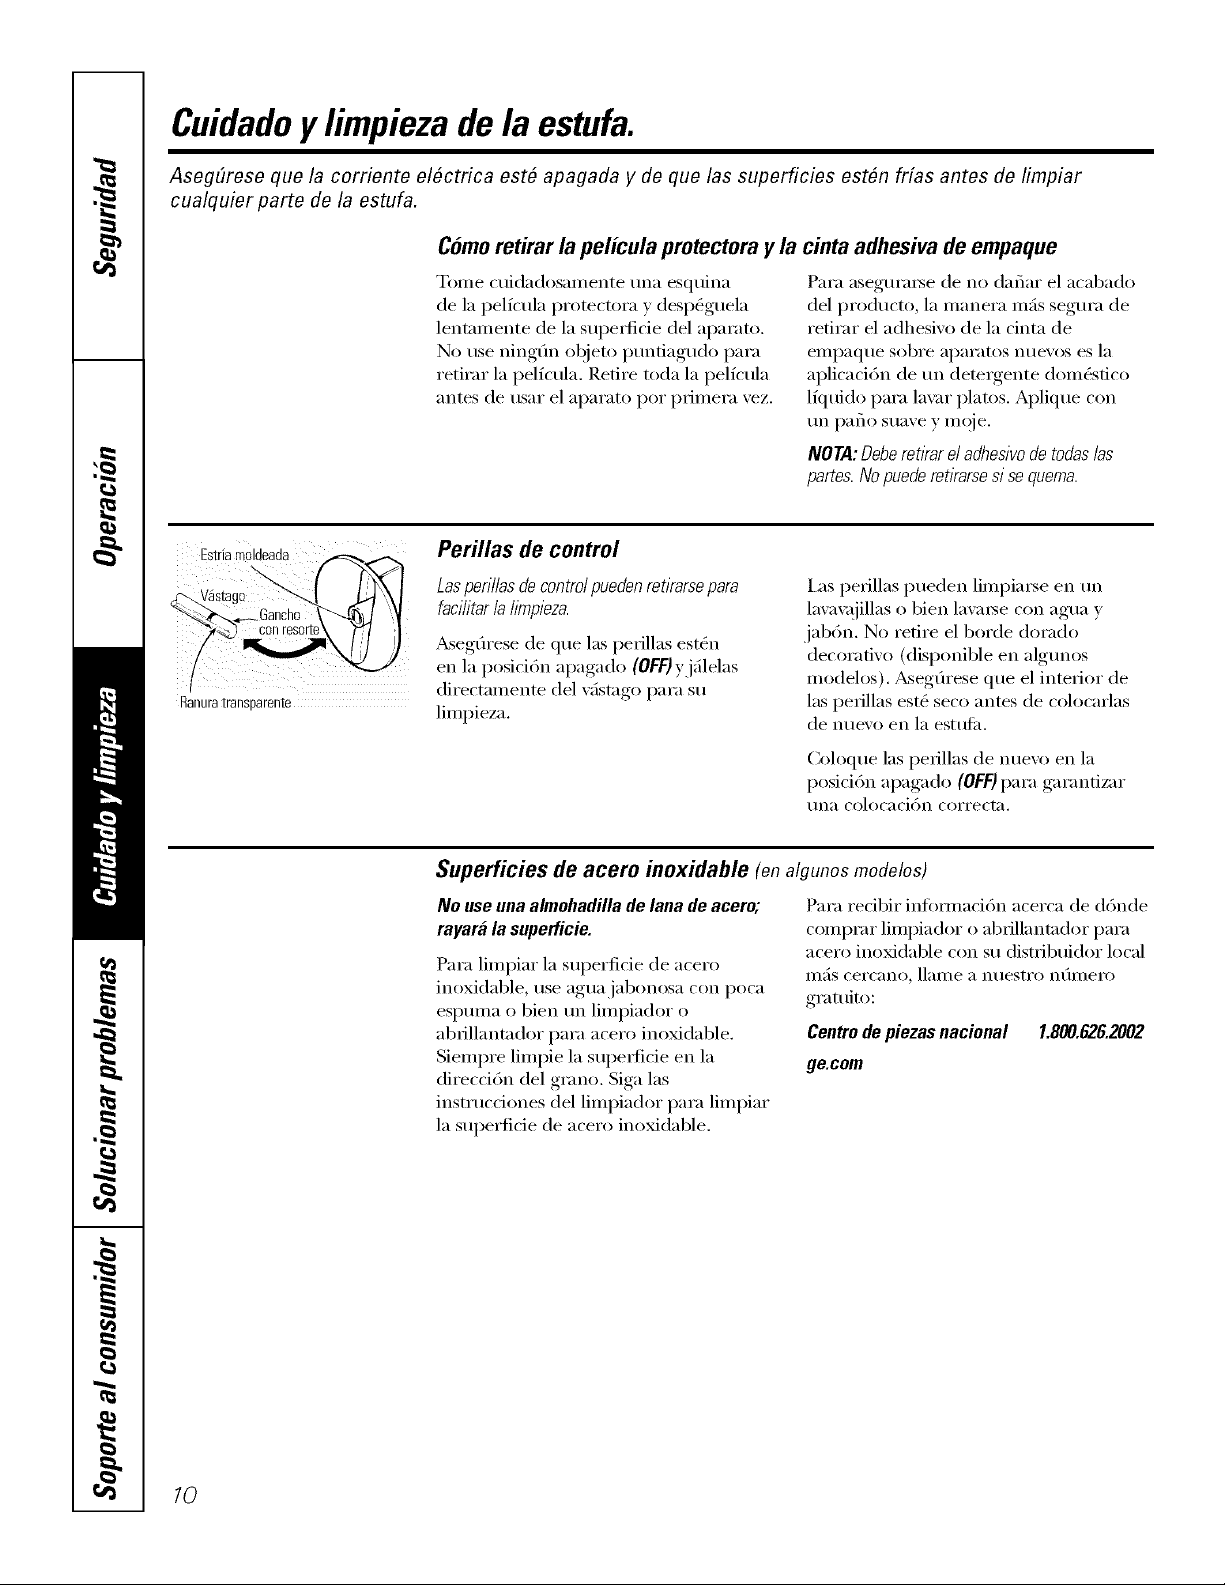
Cuidadoy limpieza de la estufa.
Aseg6rese que la corriente el#ctrica est# apagada y de que las superficies est#n frias antes de limpiar
cualquier parte de la estufa.
Comoretirar la pelicula protectora y la
Toille ctlidadosail/ente tlna esqtlina
de la pelfcula protectora y despOguela
lentmnente de la supe_ficie del aparato.
No use ningfin objeto puntiagudo para
retirar la pelfcula. Retire toda la pelfcula
antes de usar el aparato pot primera vez.
cinta adhesiva de empaque
Para asegm'a_e de no daflar el acabado
del producto, la manera mils segura de
retirar el adhesivo de la cinta de
eillpaqtle sobi'e apai';itos ntleVOS es la
aplicaci6n de tm dem_gente dom_sfico
lfquido para la\m" platos. Aplique con
un patio suave x' inoie.
NORA:Oeberetkar el adhesivo de todas los
partes. No puederetirarse si se quema.
Estfiarnddeada ("_'_
astag0
_ 3 conresorte\ 7°'/ '1
Ranura"Lransparente
Perillas de control
Lasperillas de control pueden retirarsepara
facllltar la hrnpieza.
_seg(u'ese de que las perillas estg_n
en la posici6n apagado (OFF)yjfilelas
directamente del xfistago para su
limpieza.
ias perillas pueden limpia_se entm
lava\_ljillas o bien la\'a_se con agua y
jab6n. No retire el horde dorado
decorativo (disponible en algmlos
modelos), _segfirese que el interior de
las perillas est(_ seco antes de colocarlas
de nuevo en la esttdi_.
Coloque las pefillas de nuevo en la
posici6n apagado (OFF)para garantizar
tlll_l colocacidn cori'ecta.
Superficies de acero inoxidable (onalgunosmodolos)
No use una almohadilla de lana de acero;
myara la supefficie.
Para limpiar la superficie de acero
inoxidable, use agua jabonosa con poca
espmna o bien tm limpiador o
abfillantador pare acero inoMdable.
Siempre limpie la supedide en la
direccidn del grano. Siga las
instrucdones del limpiador para limpiar
la superficie de acero inoxidable.
Para redbir inflmnacidn acerca de d6nde
comprar limpiador o abrillantador para
acero inoMdable con su distribuidor local
Ill;iS cei'cano, llame a ntlestro n(/i//ei'o
gramito:
Centro de piezas nacional 1.800.626.2002
ge.com
10
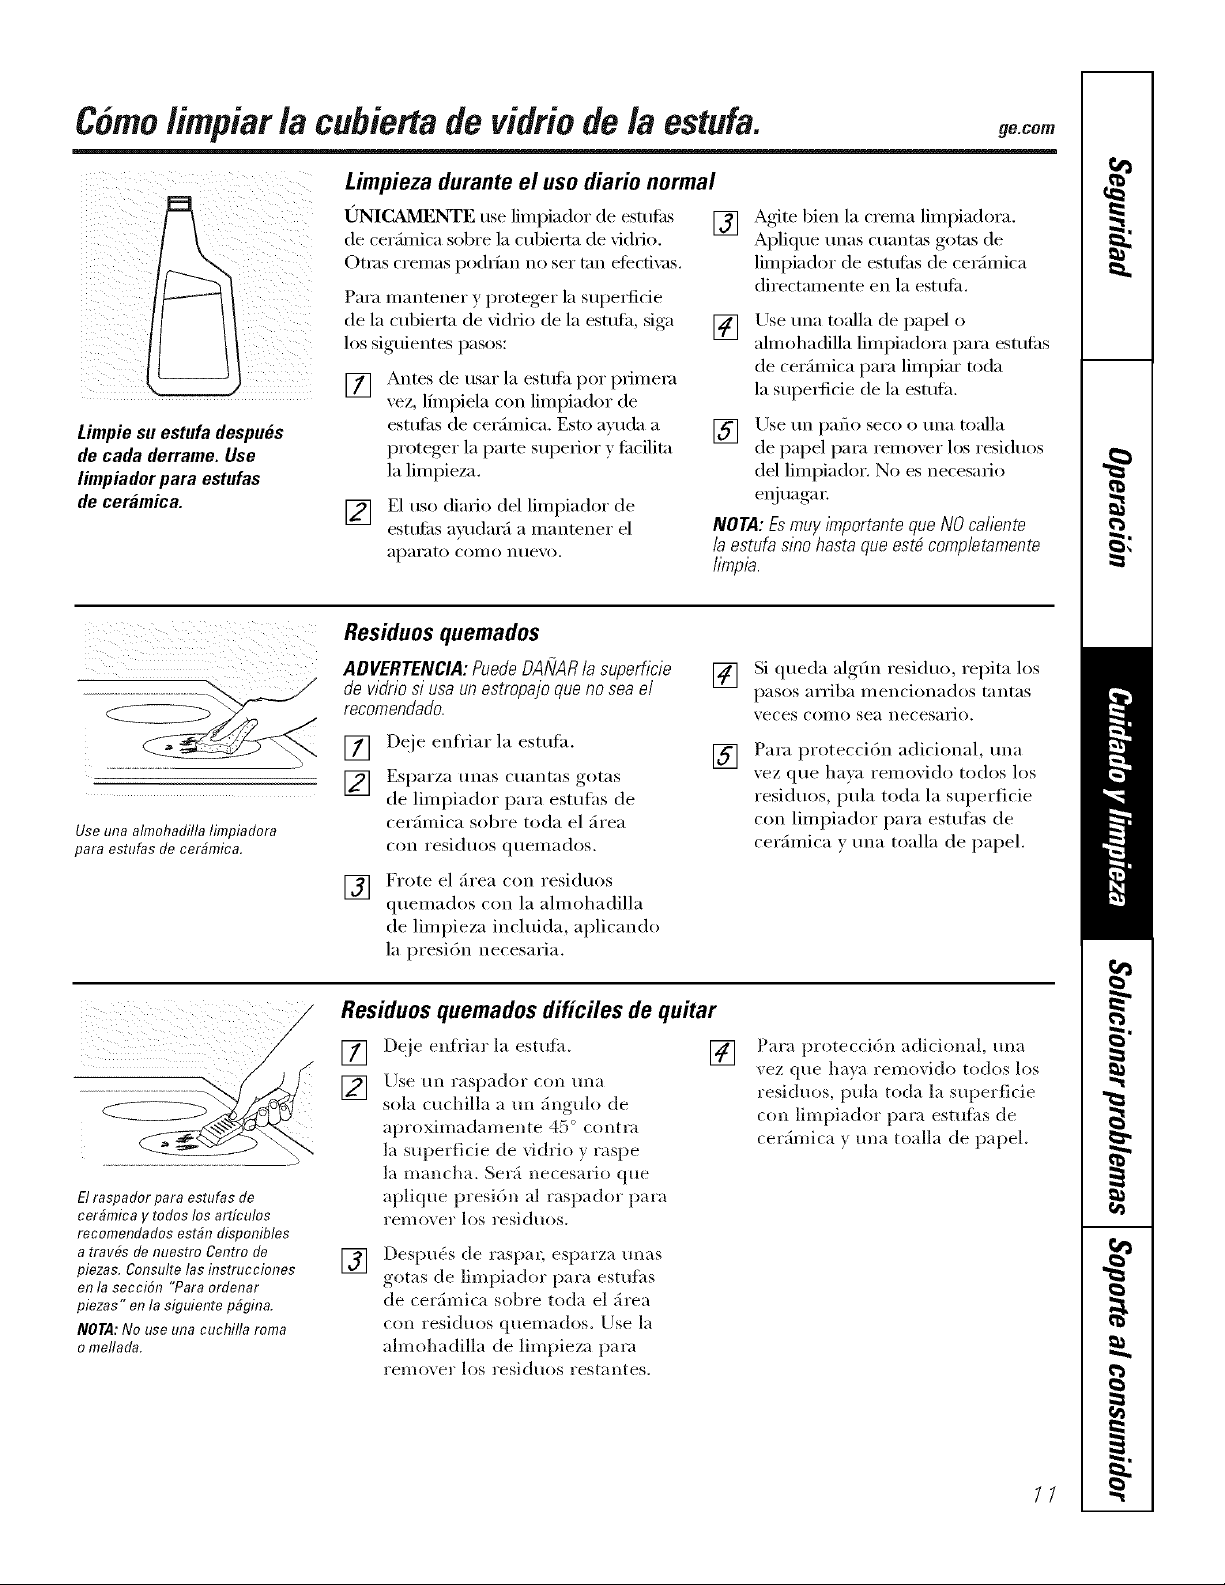
Comolimpiar/a cubiertade vidriode/a estufa. 9e.oo,,
Limpie su estufa despu_s
de cada derrame. Use
limpiader para estufas
de ceMmica.
Limpieza durante el uso diario normal
I.)NICAMENTE use limpiador de estufils []
de cerfimica sol)re la cubiert;_ de vidrio.
Otms ci'emas pod6an no set tin eiectix _s.
Para nmntener y proteger la superlicie
de la cubiertn de vidfio de la estufi_, siga []
los siguientes pasos:
[] Antes de usar la esttflh pot primem
xez, lfmpiela con limpiador de
estufi_s de cerfimica. Esto ayuda a []
proteger la parte superior y fi_cilitn
la limpieza,
[] E1 uso diario del limpiador de
esttdi_s avudarfi a mantener el
}lp}lI'_lto COlllO ntle_,o.
Agite bien la crema limpiadora.
Aplique tmas cuantas gotns de
limpiador de estufi_s de cerfimica
directamente en la estufi_.
Use tma toalla de papel o
almohadilla limpiadora para estufi_s
de cerfimica para limpiar toda
la supe_ide de la estttfil.
Use tm patio seco o tma toalla
de papel para remoxer los residuos
del limpiador. No es necesario
eqiuagm;
NOTA: Esmay/Ynportante qua NO ca/iente
/a estufa sino hasta que est_ comp/etamente
limpia.
Use una almohadilla limpiadora
para estufas de cerbmica.
Residuos quemados
ADVERTENCIA:PuedeDAA!ARia superficie
de vidrio si usa un estropajo que no sea el
recomendado.
[] Deje enfl'iar la estufi_.
] Esparza tlll}lS ell}lilt}IS got}is
de limpiador para esttflhs de
cerfimica sobre toda el firea
con residtloS qtlelllados.
[] Frote el firea con residuos
quemados con la almohadilla
de limpieza inchfida, aplicando
la presi6n necesaria.
[]
[]
Si queda algfin residuo, repita los
pasos alTiba i/lencionados t_llltas
xeces COlllO sea necesaFio.
Para protecci6n adicional, tma
vez que hax_ relnovido todos los
residuos, pula toda la superficie
con limpiador para esmths de
cerfimica v tma toalla de papel.
El raspador para estufas de
cerbmica y todos los artfculos
recomendados estbn disponibles
a travfis de nuestro Centro de
piezas. Consulte las flTstrucciones
en la secciSn "Para ordenar
piezas" en la siguiente pbgina.
NOTA:No use una cuchilla roma
o meflada.
Residuos quemados dificiles de quitar
[] Deje enfl'iar la estufi_.
] Use [Ill l[tsp[tdof coil [lll_l
sola cuchilla a ml :h_gulo de
aproximadamente 47) ° contra
la superficie de vidrio y raspe
la mancha. Ser:_ necesario clue
aplique presi6n al raspador para
I'el//OVel" los I'esidtloS.
[]
[]
Despu_:s de raspal; esparza rams
gotas de limpiador para estufhs
de cer;imica sobre toda el 5tea
con residuos quemados. Use la
ahnohadilla de limpieza para
I'el//OVel" los residuos restantes.
Para protecci6n adicional, mm
vez que haya removido todos los
residuos, pula toda la snperficie
con limpiador pare estufhs de
cer:hnica y una toalla de papeL
//

Comolimpiar/a cubiertade vidriode/a estufa.
Marcas metalicas y raspones
[] Tenga cuidado de no deslizar
cacerolas _ sai'tenes sobre S/l estufiL
Dejarfi marcas de metal sobre la
supe_l'icie de la misma.
Estas III}IIT'}IS son reln(Mbles con
limpiador para esmfi_s de cerfimica y
tma ahnohadilla para limpiar estufils
de cerfimica.
[] Si deja secar el lkluido hirxiendo en
cacerolas con una capa delgada de
ahmfinio o col)re, dicha capa podrfa
dejar una decoloracidn negra sobre
la estufiL
Debe eliminar dicha coloracidn
de imnediato antes de calentar otra
vez; de lo contrario la decoloracidn
podrfa set pemmnente.
ADVERTE/VCIA:Verl_?luecuidadosamentee/
rondo de/as cacero/aspara comprobarsi podrfan
ragarla estufa.
Superficiede vidrio--potencialpara da o permanente.
Nuestras pruebas demuestran
que si esta cocinando mezclas
con un alto contenido de azucar
tales como gelatina o caramelo
fundido y estas se derraman
sobre la estufa, podrian causar
da_os permanentes a la
superficie de vidrio a menos
que el derrame se limpie de
inmediato.
Da#os causados por derrames con azucar y plastico fundido
[] Apague todos los elementos de [] Cualquier derrame restante debe
superficie. Retire las cacerolas dejm_e ahf hasta que la superficie
calientes, de la estufi_ se haxa enliJado.
[]
Con tm guante para homo:
a. Use tm raspador de tma sola
cuchilla (raspador para estufi_s de
ceI'_illlica) paI'a I/lover el deiTai/le
a tm firea fl'fa sobre la estufi_.
b. Retire el derrame c<>ntoallas
de papel.
[] N<> use los element<>s de superficie
otto vez sino hasta que haya
limpiado todos h>s residuos.
NOTA:S/ /a superfl?iega presentahendiduras
o agujeros, deberfireemplazarel vidrio de la
estufa. En este cast),ser_ necesarioun serv/cio
de reparac/6n.
Para ordenar piezas
Para ordenar limpiador para esttdas de
cerfimica y el raspador para esmfhs, llame
a ntlesti'o n(/illei'o sin costo:
Centrode piezasnational 800.626.2002
Limpiadorparaestufas
de ceramica ............... # WXTOX300
Raspadorparaestufas
de ceramica ............... # WX70)(0302
Equipo .................... # WB64XS027
(Elequlpoincluyela cremagel raspadorpara
estufas)
Almohadillaslimpiadoras
para estufasdeceramica ,, ,# WX10X350
/2

Antesde//amar paraso/icitar servicio... 9e.co,,
Ideassobre la identificaci6ny soluciSnde problemas
iAhorre fiempoy dinero! Reviseesta tablaprimero yes posible
que nonecesiteIlamarnosen busca deservicio.
Que hacer
• Use cacerolas que sean absohltamente planas ) que
correspondan al difimetro del elemento de superficie
seleccionado.
Causas posibles
LoselementosdeSupedicie Esta empleando
nosemantieeenhirviendo los utensilios
o la cocci6nes lenta inadecuados.
Los Mementos de Un fusible en su casa podrla • Reemplace el fllsible o reajuste el interruptor de circuitos.
superficieno funcionan haberse volado o el hlterruptor
aprepiadamente de circuitose aterriz6.
Los controles de la • ]nspeccione que el control correcto hava sido
estufa estfin colocados seleccionado para el elen_ento de superficie que usted
inapropiadamente, seleccion6,
Rasgufiosdiminutos M_todos de lhnpieza • Use los procedimientos de limpieza recomendados.
o marcas de metal incorrectos siendo usados.
o abrasionessobre
la superficiede vidrio
de la estufaradiante
Utensilios con rondos
rugosos es_6x_ sJendo usadas
o hubo paxtlculas gruesas
(sal o arena) entre los
utel_silios y la superficie
de la estufa.
• Cerci6rese de que los tondos de los utensilios y que los
utensilios mismos est(_n limpios antes de usarlos. Use
utensilios con timdos lisos. No pueden eliminaise los
raspones pequeflos, pero ser;in menos visibles coil el tiempo
como resulmdo de la limpieza.
Se han deslizado utensilios
sobre la superficie de la estufa.
Areasde decoloraci6n Estfi empleando • Pueden eliminarse las marcas de cacerolas de almninio
o rayas oscuras en la los utensilios v col)re, asf como los depdsitos minerales de agua, con
estufa inadecuados, la crema limpiadora.
Superficie caliente en • Esto es normal. La superficie podrfa parecer decolorada
un modelo con cubierta ctmndo est_i caliente. Esto es temporal y desal)arecer_hl
de vidrio de color claro, conli)rnle el vidrio se enfrfa.
No se lhnpiaron los • (;onsulte la secci()n C6mo/impiar/a cubierta de vidrio
derrames de alhnentos de la estufa.
antes del siguiente uso.
Se estfia_ emplem_do los • Use h)s l_roce(limientos de limpieza recomendados.
m6todos de limpieza
incorrectos,
Plastico fundido La estufa caliente entro • Consulte la seccidn Superficie de vidrio--potencial de dafio
sobre la superficie en contacto con plfistico permanente en la secci()n Cdmo limpiar la cubierta de vidrio
colocado sobre 6sta. de la estufa.
Agnjeros (o hendidnras) Derrame de tma mezcla • lJame a un t6cnico calilicado para que realice
en la superficie de azucarada caliente sobre un reemplazo.
la estufa la estufa.
Ciclosfrecuentesde Estfi empleando • Para mininfizar los ciclos, use (ulicanmnte utensilios
encendidoy apagado los utensilios pianos. Consulte la seccidn Cic[os de encendido y apagado
de los Mementos de inadecuados, de Ins elementos de superficie.
Laperilla de control Los controles de • Cuando la perilla se encuentre ell la posicidn apagaclo
]a estufa estfin ma] (OFF),deber;i presionar antes de poder girarla. Cuando
ajustados, la perilla est_ en otra posicidn, puede girarse sin
necesidad de presionarla.
13

NOta$,
.m
r_
@
m
N
q_
m
m
€_
m
m
m
r_
Q_
w
NOta$_
15
€_
€_
R
m
mlml
€_
N
_L
m_
Iqmb
B_
€_
m

NOta$,
.m
r_
m
N
q_
m
m
€_
m
m
m
r_
Q_
w
Garantiade GEpara su estufa electrica.
Todos los servicios de garantfa los proporcionan nuestros Centros
de ReparaciSn de F#brica o nuestros t#cnicos Customer Care®
autorizados. Para concertar una cita de reparaciSn, en Ifnea,
24 horas al dfa, visftenos en ge.com, o flame a1800.GE.CARES
(800.432.2737). Cuando Ilame para soficitar servicio, pot favor
tenga a mano el n#mero de serie y el n#mero de modelo.
Pegue aqui su recibo.
Se requiem facilitar prueba
de la fecha de compra original
para obtener un servicio
bajo la garantfa.
Una#o
A part#de la fecha
de compraoriginal
GE reemplazara:
Cualquierparte de la estufi_ que riffle debido a un (lele('to en los matefiales o mano de ol)ra.
Durante estagarantialimitadadeun a#o,(;E tambi_n ofl'ecer;i, sin costoalguno,toda la mano
de obra v servicio interno i)ara reemplazar las partes (lelectuosas.
::Ji::Viajes de servicio a su hogax paJca ensefiaxle como usaJc
el producto.
::Ji::InstaJaci6n, entrega o mmltenhniento h_correctos.
::Ji::FaJlas del producto si hay abuso, maJ uso, o uso para
otros propositos que los propuestos, o uso paJca fines
comerciaJes.
::Ji::Dm-lo a la estufa de vidxio causado pot el uso de
limpiadores dJferentes alas cremas y almohadillas
recomendadas.
_:: Dm-lo a la estufa de vidxio causado por derrmnes
endttrecidos de materiaJes azucaxados o pot plfistico
derretido que no sem_ lhnpiados confonne alas
dJrecciones en el Mmmal del propietaxio.
::Ji::Reemplazo de fusibles de su hogax o reajuste de
hlterruptores de circttito.
::Ji::Da6o a] producto causado por accidente, fuego,
hltmdaciones o actos de Dios.
_: Da6o hlcidentaJ o consecuenciaJ causado por posibles
defectos con el apaJcato.
_: Dafos causados despu6s de la entrega.
::Ji::Producto no accesible paJca facilitaJc el servicio
requerido.
EXCLUSIt_NDE GARANTIASIMPLJCITAS--Su #nice y exclusive derecho es la reparacion del produeto, tal y come se
indica en esta Garantia limitada. Cualquier garantia implicita, incluyendo las garantias implicitas de comerciabilidad o
adecuacion para un fin determinado, est#n limitadas a un afio o el periodo de tiempo masbreve permitido por la ley.
Esta garantfa se extiende al comprador original y cualquier comprador posterior de pmductos comprados para uso
residencial dentro des Estados Unidos. Si el producto est# situado en un #tea que no dispone de servicio pot parte
de un proveedor de servicio autorizado de GE,podrfa tenet que hacerse cargo de los costes de env[o o bien podrfa
solicit#rsele que Ileve el producto a una centro de servicio de GE autorizado para realizar la reparaciSn. En Alaska,
la garantfa excluye el costo de env[o o las visitas de servicio a su casa.
Algunos estados no permiten la exclusiSn o las limitaciones de dafios incidentales o consecuenciales. Esta garantfa
da derechos legales especfficos, y usted podrfa tener otros derechos que variar#n de estado a estado. Para saber
cu#les son sus derechos legales, consulte a la oficina de asuntos del consumidor local o la oficina del Prucurador
(Attorney General) en su Iocalidad.
Garante: General Electric Company. Louisville, KY 40225
17
Soportea/consumidor.
PdginaWebde gEAppliances ge.com
_Tiene_ algtlIla_ })1e_q/lltam sobre su electi odomt4stico? iPl t/ebe ]a p;_gilla _'_b de GE Appliances 24 horas al
dfa, cualquier dfa del aflo! Para ma}or corn eniencia _ servicio m_s r:_pido, }a puede descargar los Manuales
de los Propietafios, }_dir piea_s o incluso hacer una cita en lfnea pare que vengan a realizer una reparaci6n.
Soliciteunareparacibn
E1 servido de expe*qtos GE est;_a tan s61o m_ paso de su pue*q:a, iEntre en lfnea _ solidte su reparaci6n
cuando le _enga bien 24 horas al dfa cualquier dfa del aflo! 0 llame al 800.(;E.CARES (800.432.2737)
(hll'allte hoFas llOF///ales de o_]cllla.
go. com
RealLifeDesignStudio(Estudiodedisefioparalavidareal) Do.oDin
GE apoya el concepto de Diseflo l_)niversal--productos, servicios y ambientes que pueden usar gente de
todas las edades, mFnaflos y capaddades. Recol_oCelnos la necesidad de diseflar pant tma gr;m gama de
habilidades v dificultades flsicas v mentales. Para mrs detalles cobre las aplicadones de GE Diseflo Univemal,
incluvendo ideas de diseflo para ]a codna para pe>onas con discapacidades, mire nuesm_ pfgina Web boy
mismo. Para personas con dificultades auditi_;is, fi_vor de llamar al 800.TDD.GEAC (800.833.4322).
garantfasampliadas ge.com
Compre tma garantfa ampliada > obtenga detalles sol)re descuentos especiales disponibles mientras su garantfa
00 "_ ....
est_i afin activa. Puede comprafla en ]inea en cualquier momento, o llamar al (8 .626.2224) din'ante h(was
nonnales de oficina. (;E (:onsmner Home Set'rices estar;_ afin ahf cuando su garant/a tem]ine.
[ I
J
Piezasy accesorios
Aquellos individuos con la calificad6n neces;uia para reparar sus propios electrodom_sticos pueden
pedir que se les manden las piezas o acceso*ios directamente a sus hogm'es (aceptamos las tmjetas
VISA, Master(]ard y Disco\ er). Haga su pedido en lfnea boy, 24 horas cada dfa o llamm" p(w tel_fbno
al 800.626.2002 din'ante horas nom_ales de oiicina.
go. tom
Lasinstruccionesdescr#asenestemanual cubrenlospmcedhnientos a seguir per cualquierusuado. Cualquier
otra reparaci6ndebe#a,per reglageneral,referirsea personal calificadoautorizado.DebeejercerseprecauciOn
ya quelas reparacienesincorrectas pueden causar condiciones de funcionamientoinseguras.
Pbngaseen contacto con
nosotros
Si no est:_ satistbcho con el servido que redbe de GE, p6ngase en contncto con nosotros en nuestra
}x_gina Web indicando todos los demlles asf cored su nfiFnero de tel_tkmo o escrfl)anos a:
General Managel; Customer Relations
GE Appliances, Appliance Park
Louisville, KY 40225
go. com
q Registresu electrodom6stico go.corn
iRegistve su nnevo electmdomC_stico en llnea--cuaaado usted prefiera! El registrar su producto a dempo le
proporcionar_, si sm'giera la necesidad, una Fneior coi-nmlicaci(_i* x tm servicio m_s r_pido baj() los t_m_inos de
su garant/a. _mH)i6n puede enxiar su taljeta de registro pre-impresa que se inclu}e en el material de embalaje.
__ Impreso on los E-U

