Read these instructions carefully. Failure to follow them could damage the product or cause a hazardous condition.
Check the ratings given in the instructions and on the product to make sure the product is suitable for your application.
Installer must be a trained, experienced service technician
CAUTION Personal Injury Hazard. Power supply can cause electrical shock. Disconnect power supply before beginning installation.
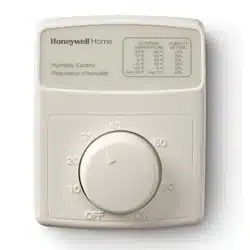
NOTE: The H8908 electrical connections are not shared with the thermostat.
DUCT INSTALLATION
1. Choose a location on the duct.
2. Apply sticker template to duct and drill holes for mounting screws. Cut along the dotted line of the template with metal shears or tin snips.
3. Run two-fan, low-voltage wire to the mounting location on the duct. See Fig. 5
IMPORTANT: Use rated 18-22 gauge wire. Leave approximately 6 in. of wire to properly connect the humidistat.
REMOTE MOUNT INSTALLATION
1. Choose a location in the living area.
NOTE: Select a location clear of drafts or excessive humidity. Avoid mounting near doors or windows, or in bathrooms or kitchens. See Fig. 6.
2. Cut 1 in. diameter wire hole in wall.
3. Run two-fan, low-voltage wire to the mounting location in the living area.
IMPORTANT: Use rated 18-22 gauge wire. Leave approximately 6 in. of wire to properly connect the humidistat.
4. Remove the base bracket from the humidistat. For duct mount, slide the black gasket onto the base bracket. See Fig. 8.
NOTE: Use gasket only when mounting the control to ductwork. Leave off when mounting to a wall.
5. Secure the base bracket to the duct or remote location. Secure to the duct with four 1-in. (25 mm) screws (provided) or to the wall with two 1-in. (25 mm) screws (provided).
WIRING
CAUTION Personal Injury Hazard. Can cause electrical shock and injury. Disconnect power before installation or servicing.
All wiring must comply with applicable local codes, ordinances and regulations. Make wiring connections according to humidifier (or dehumidifier/ventilator) instructions, if available; otherwise, see typical wiring diagrams in Fig. 12–19.
IMPORTANT
Select models of fan centers include humidifier taps so the current sensing relay, sail switch or air pressure switch is not needed. If not using a current sensing relay, sail switch, or air pressure switch, the humidifier must be energized during blower motor cycles for proper operation.
On multispeed blower applications, do not wire the high voltage side of the transformer to the same power source that services the furnace blower. Premature transformer burnout can occur. On HE365 fan powered humidifier models, only the two yellow wires are connected to the control. The remaining two red wires are only used with electronic humidity controls.
6. Using wire nuts, connect the low-voltage wire to the leads on the H8908 humidistat. See Fig. 6–19 for different wiring configurations
7. Mount the humidistat by hooking the two hinges at the top of the back cover to the raised edge at the top of the base bracket. Press the bottom of the humidistat in to engage the base hinge. You will hear a “click” when the humidistat is secured.
CHECKOUT
Turn the H8908 dial to “ON” to test proper installation. See Fig. 20.
You will hear an audible click if installed correctly, and water will begin flowing to the humidifier.
OPERATION
Humidity Control Adjustment
To maintain optimal humidity levels without causing condensation on cold surfaces such as windows, the homeowner must adjust the setpoint as the outdoor temperature changes.
To reduce the relative humidity, lower the setpoint approximately three percent relative humidity every 24 hours. To increase the relative humidity, increase the setpoint approximately three percent relative humidity every 24 hours.
Setpoint Adjustment
Set the humidity setpoint according to the prevailing outdoor temperature. Recommended settings are available on the control and in the table below.
Have new H8908B with humidifier. Unit has lugs for Com and N.O. ( LUG for N.C. removed at factory ). Does this package have both lugs ?
Normally closed would make unit run all the time
2. Is there a smart version of this product that automatically adjusts the humidity level based on temperature?
Yes, we have a wide selection of humidistats and smart thermostats with humidistat control to choose from and would be happy to go over the different features and what may work for your system. At your convenience, please contact us at 1-855-733-5465, or through live chat at resideo.com/us/en/support/. You can also reach us through Facebook or Twitter under Honeywell Home.
3. I want device to activate an exhaust fan when humidity is too high. This device seems opposite -activates when humidity too low. Any solution/product?
A humidifier is activated when humidity is low, so you need a de-humidifier.
This will be activated if the humidity gets higher than your setting.
If you set it at 45%, then your fan will come on when the humidity get to 46%.
4. Does the circuit open on humidity rise?
Hi there, thanks for your question. The humidistat uses a SPST switch which closes the circuit to reach the humidity setpoint, then open once it is satisfied.
5. Does this work with a Fantech VHR unit ?
No only two pole.
6. Can this be used with my central A/C unit, with My thermostat?.
This is a mechanical humidistat switch. If you are asking can it kick on your A/C unit the same way your thermostat can...yes. It has hysteresis "live" band just like the thermostat where it will be on for a certain range of humidity around the setpoint. I recommend wiring it with a relay because it will turn on when the humidity is low. Using it with an A/C unit, you want it to turn on when the humidity is high. Using it with a relay, you can reverse the logic and make the relay close when the humidistat turns off. If you wire in series with your thermostat, then the A/C will only kick on when the temp and humidity are high. If you wire in parallel with the thermostat, then the A/C will kick on when the temp or humidity is high, which might be closer to what you want, although the humidity could be high when the temp is low...so not sure about that.