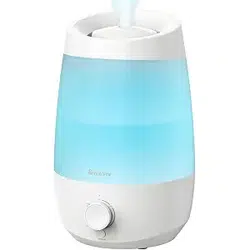

HUMIDIFIER
Model:MG15JS
Light Auto
Timer
Sleep
Mist Power

1
IMPORTANT SAFETY INSTRUCTIONS US
Installation Warning
To reduce the risk of fire, electric shock, and personal injury, please adhere to the following
guidelines:
● Any part of this product (electrical components, power cord, plug, packaging, etc.)
should not be placed near stoves, fireplaces, ovens, or other high-temperature heat
sources. It should not be used near windows, on uneven or unstable surfaces, or near
water.
● Electrical appliances, power sources, power cords, and plugs must not come into
contact with water. Do not use this product on damp surfaces. Do not use this product
in the bathtub, shower, or place it where it might fall into the bathtub, laundry,
swimming pool, or other water containers. Do not use this product outdoors or expose
it to weather or harsh environments.
● Do not run cords under carpets. Do not cover cords with rugs, runners, or similar
coverings, and do not run cords under furniture or appliances. Arrange cords away from
traffic areas where they won't be tripped over. Cords should not hang over the edge of
counters or be placed where they can be pinched or closed. Place appliances near
convenient outlets to allow for quick unplugging in case of an emergency.
Safety Use Warning
To reduce the risk of fire, electric shock, and personal injury, please follow these
instructions:
●
Warning: To reduce the possibility of circuit overload, fire, and electric shock, do not
operate using solid-state speed devices such as dimmer control switches.
● If the unit has been dropped or damaged, do not operate the unit. Do not use this
product if the power cord or plug is damaged. To avoid the risk of electric shock, do not
attempt to repair or replace parts yourself. Only use original replacement parts. If the
power cord is damaged, it must be replaced by the manufacturer, its service agent, or
similarly qualified personnel to avoid danger. For further instructions on replacement
and repair, please contact the consumer service department at support@bree
zome.com.
● Your device may be equipped with a detachable power supply or power cord or plug
with a fuse or other safety features. Only use the provided power cord and plug.
● Before plugging the power cord into a power outlet, ensure that all the electrical outlet
rating labels, including voltage, are compatible with your power supply.
● Never use the power cord as a handle or otherwise bend, stretch, or pull the power
cord.
● When inserting the product, do not insert or allow foreign objects to enter any input or
output openings, as this may cause electric shock or fire risk, or damage the product.
● Loose connections between the wall outlet (receptacle) and the plug may cause
overheating and plug deformation. Stop using the product in this outlet. Contact a
qualified electrician to replace loose or worn outlets.

2
IMPORTANT SAFETY INSTRUCTIONS
● Before filling with water, moving, repositioning, servicing, cleaning, and when not in use,
turn off the power using the product controls, then unplug the power cord. To
disconnect the power cord, hold and pull the plug, not the cord. Turn off and unplug the
power if the product is left unattended for an extended period or during a power storm.
● Electric shock occurs when liquid comes into contact with electricity. Be careful when
removing and reinstalling the water tank to avoid electric shock. Do not pour water
through the top outlet air grille of the power head.
● Be aware that high humidity levels can promote the growth of biological organisms in
the environment.
● Unplug the device during filling and cleaning.
● Never leave water in the reservoir when the device is not in use.
● Empty and clean the humidifier before storing it. The humidifier should be cleaned
before the next use.
● When the ambient humidity is ≥75%RH, it is recommended to select the automatic
mode or turn off the humidifier to prevent furniture from being affected by moisture.
Maintenance Warning
To reduce the risk of fire, electric shock, and personal injury, please follow these
guidelines:
●
Warning: After handling the wick (filter), wash your hands to avoid contact with your
eyes.
● Regularly clean the product according to the instructions in this manual. Before
cleaning, turn off the product and unplug it. Do not use gasoline, thinners, solvents, or
other chemicals for cleaning. Please refer to the provided cleaning and maintenance
instructions.
● Do not open the appliance casing when the product is plugged in. To avoid the risk of
shock, all service and/or repairs must be performed by an authorized service center.
● Empty the water tank immediately after use to prevent the growth of mold, mildew,
and other microorganisms. If water remains in the tank for more than 8 hours,
thoroughly clean and disinfect the device as described in the “CLEANING AND
MAINTENANCE” section.
Disposal Warning
To reduce waste and environmental impact, follow these guidelines:
● The packaging protects the equipment from cross-port damage. The chosen packaging
materials are environmentally friendly and can be recycled. Dispose of all packaging
materials in an environmentally responsible manner.
POLARIZED PLUG
The appliance has a polarized plug(one blade is wider than the other).To
reduce the risk of electric shock, this plug is intended to fit into a
polarized outlet only one way. If the plug does not fit fully into the outlet,
reverse the plug. If it still does not fit, contact a qualified electrician.
US

3
IMPORTANT SAFETY INSTRUCTIONS
Before Using the Humidifier
Before use, check the device for visible damage. If damaged, do not use it. A visual
inspection may not reveal subtle cracks. Fill the water tank and check for leaks.
● Please install the product correctly according to the manual; otherwise, it may cause
electric shock, fire, and personal injury.
● If the power cord is damaged, it must be replaced by the manufacturer, a service
agent, or similarly qualified personnel to avoid danger.
● If the product does not match, stop using the unit and contact the dealer. Do not plug
in the humidifier if the installation is not complete.
● After receiving the humidifier, let it sit for 30 minutes before use to prevent water tank
damage caused by sudden changes.
● Insert the parts into the appropriate sockets.Do not put metal products,chemicals,or
detergents into the washing tank.
● Do not add water to the mist outlet or air outlet.
Using the Humidifier
● Turn off, unplug, and empty water when moving the machine.
● Make sure to place the machine at least 2 meters away from wooden furniture or other
appliances.
● Do not allow water to flow into the bottom through the exhaust port to avoid damage.
● When in use, place the device on a smooth and flat surface. Do not tilt the humidifier.
● Keep hair, fabric, etc., away from the machine to avoid blocking the air inlet and outlet.
When using with household gas appliances (gas stoves, gas water heaters, etc.), ensure
ventilation.
● Do not exceed the maximum water level when adding water.
● Use within a room temperature range of 5°C-40°C.
● Leakage may occur during cleaning,moving,or filling the water tank.Be careful to avoid
leakage when performing these activities.
● Place the humidifier so that it does not blow directly onto objects or plants.
● Plug the power cord into a standard grounded wall outlet.
● Do not pull on the power cord.
● Do not clean the device or add water when it is connected to the power supply.
● Do not disassemble the device yourself.
● Keep the machine away from high temperatures and direct sunlight.
● If the room temperature is below 0°C, please empty the water tank and water tray.
● Keep the bottom dry during cleaning.
US
4
SPECIFICATIONS
KNOWING YOUR HUMIDIFIER
Product Diagram
Rated Voltage:120V~
Rated Frequency:60Hz
Model:MG15JS
Rated Power:25W
1
2
3
4
9
12
8
7
6
5
10
11
US
US
5
KNOWING YOUR HUMIDIFIER
Installation
1.Before Use
Upon first use, remove the foam wrapped around the float in the water tank of the
machine.
2.Mist outlet component
● The mist outlet assembly is pre-installed on the water tank cover. To install or remove,
pull to loosen, press to tighten. Please ensure the mist outlet assembly is installed
before use.
● The mist outlet assembly is one of the important components and should be installed
correctly as shown in the diagram.
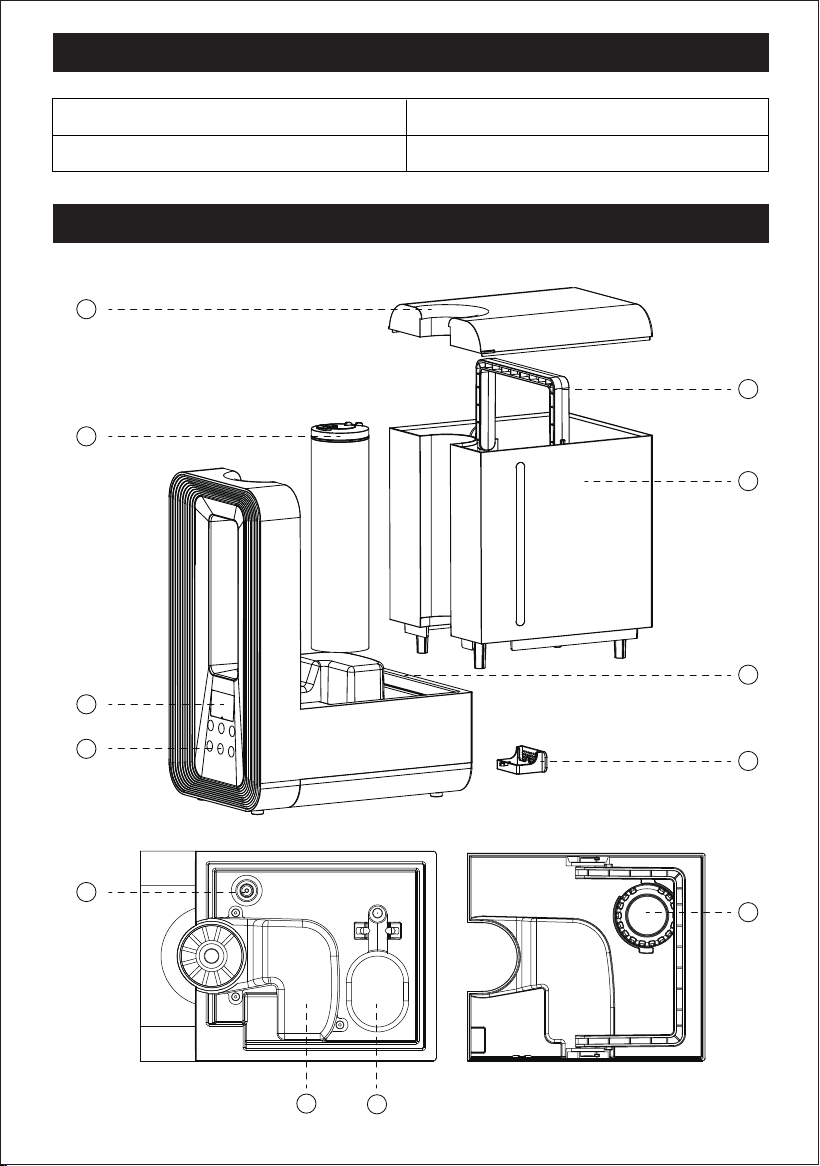
Water Tank Lid1 Mist Tube Assembly2 Display Screen3
Control Panel4 Handle5 Water Tank Assembly6
Base7 Essential Oil Tray8 Magnetic Ring9
Air Duct Assembly
10 Float11 Filter12
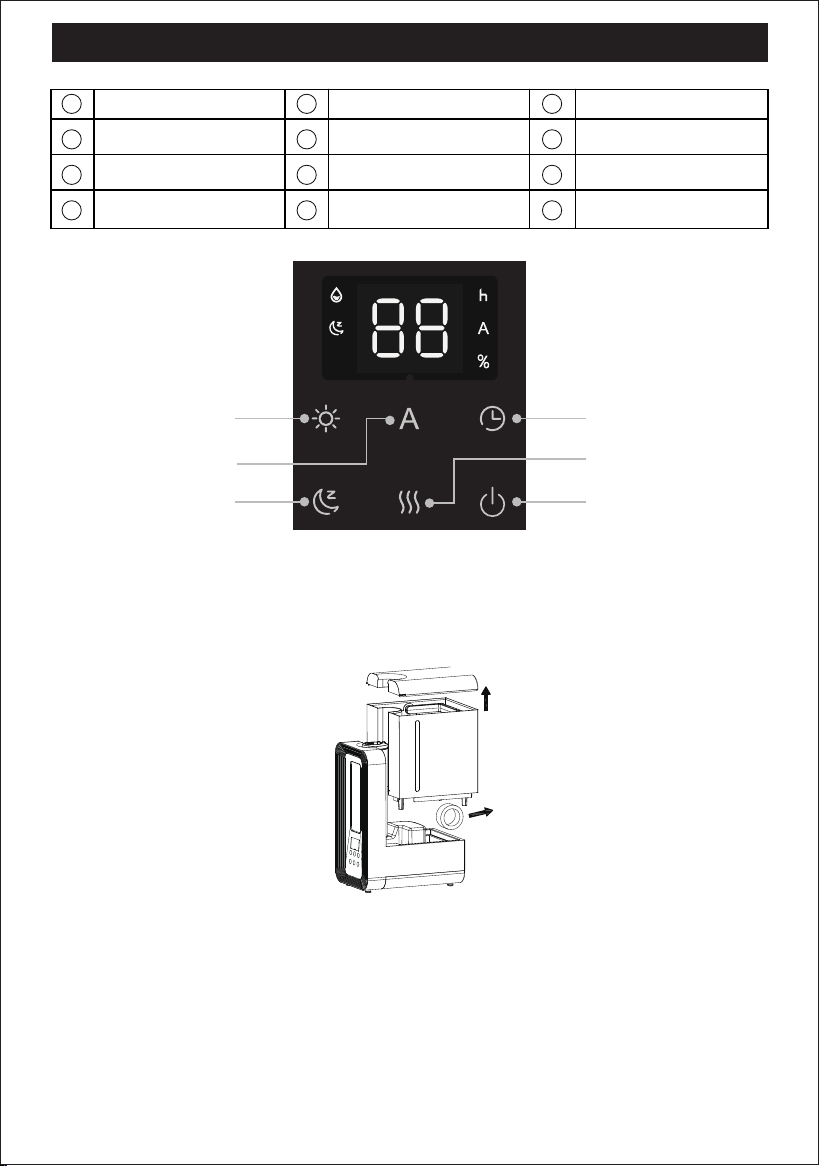
Light Mode
Time button
Sleep Mode
Automatic Mode
Mist Mode
Power On/Off
US
KNOWING YOUR HUMIDIFIER
● The mist outlet assembly needs to be cleaned every two weeks. After removing it,
clean the mist tube with water, then reinstall according to the instructions.
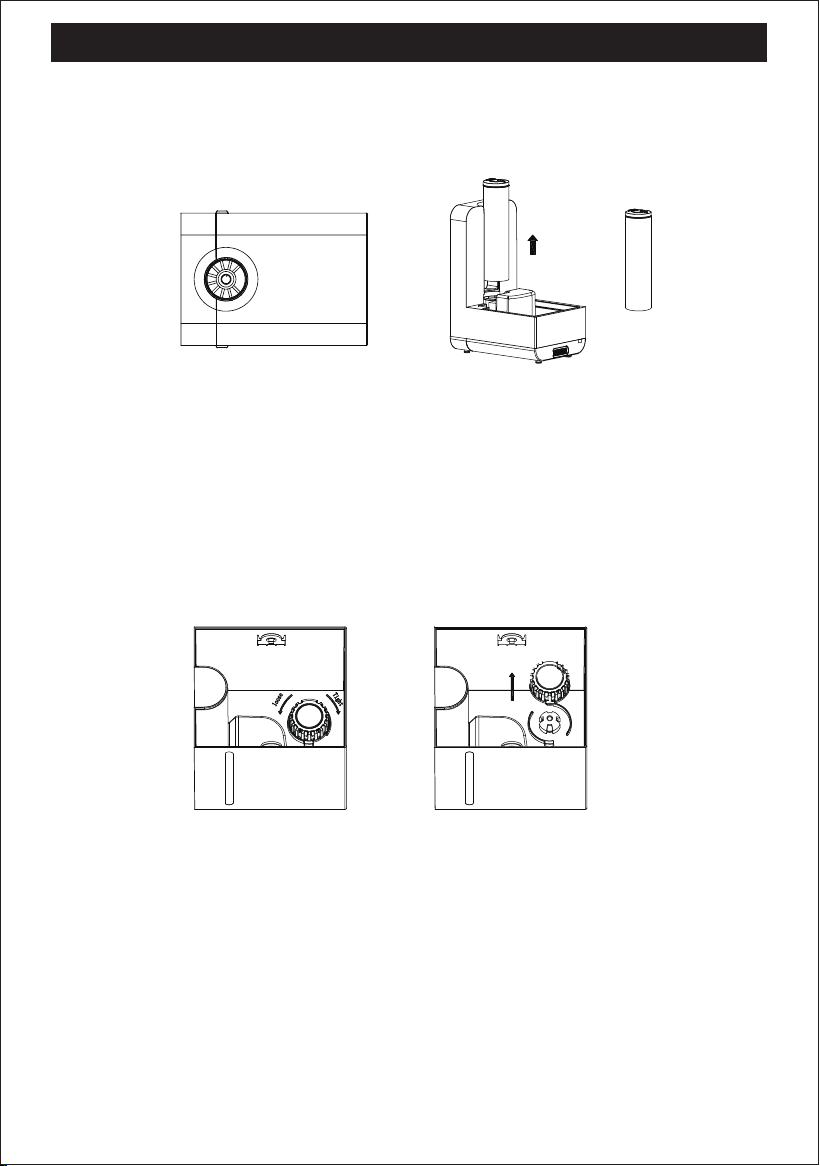
3.Filter component
● The filter assembly is pre-installed inside the water tank. To install or remove it, turn left
to loosen and right to tighten. Please ensure the filter assembly is installed before
adding water.
● The filter assembly is one of the important components. Please install it correctly as
shown in the figure below.
● The filter assembly needs to be cleaned once a week. Please disassemble it, clean it
with water, and then reinstall it according to the instructions.
4.Drain valve component
● The drain valve assembly is preinstalled at the bottom of the water tank. To install or
remove, turn left to loosen and right to tighten. Please ensure the drain valve assembly
is properly installed before adding water.
● The drain valve assembly is one of the important components.Please install it correctly
as shown in the figure below.
● The drain valve assembly needs to be cleaned every two weeks. After disassembling,
clean the sealing ring and stainless steel ball with water, then reinstall according to the
instructions.
6
US

KNOWING YOUR HUMIDIFIER
5.Air duct component
● The air duct assembly is preinstalled on the main unit. To install or remove it, pull it out
gently and press it back in firmly. Please ensure the air duct assembly is installed before
use.
● The air duct assembly is one of the important components. Please install it correctly as
shown in the diagram below.
● The air duct assembly needs to be cleaned every two weeks. After disassembly, wash
the air duct and the water baffle with water, then reinstall them according to the
instructions
7.Aroma box component
● Press the essential oil cover plate.
● Add essential oil to the indicated position.
● Only use the droppers come with the essential oils, do not pour in directly.
● Add 2-3 drops of essential oils each time, being careful not to overflow.
● Avoid adding essential oil directly to the water, otherwise it may damage the product
and caused water leakage.
7
NOTES:
US
KNOWING YOUR HUMIDIFIER
8
● Do not add water to the nozzle. Turn off the power and unplug before adding water!
● Do not exceed the maximum water level mark on the water tank.
●
Tip: To reduce white mineral dust (calcium and magnesium ions in water), it is
recommended to use filtered or pure water and to clean the humidifier regularly.
●
Tip: It is not recommended to use bleach for cleaning. Soak in vinegar for cleaning.
Note:
Using your smart Humidifier
US
1.Power On/Off
● Connect the power, the buzzer will sound once, and the LED screen will flash once, then
screen turn off, entering standby mode.
● Touch the " " key; the buzzer beeps once. The default L1 level (low) mist is set, and the
ambient light turn on. Touch the button again to turn it off.
2.Mist Adjustment
● Press the " " key to switch the mist level from L1 (low) to L3 (high). Default at L1(low),
press once to switch to L2 (medium), press again to L3 (high). The display screen will
show the mist mode synchronously.
3.Light Adjustment
● The ambient light defaults to a seven-color gradient.
● Press the " " key to lock the current light color, press again to turn off the ambient light.
● Click on to adjust the time in 1-hour increments, cycling through 1 to 24 hours.3
seconds of inactivity, humidity setting successful. remains illuminated
continuously.After successful setup, the display screen shows the remaining time.
● Press and hold to continuously adjust the timer.
● In standby mode, selecting the timer allows you to set the power-on time; in power-on
mode, selecting the timer allows you to set the power-off time.
● You can set the target ambient humidity. Once the specified humidity is reached, the
humidification will stop.
● Press to adjust humidity in increments of 5%. Current humidity is 40%, with a
maximum adjustable humidity of 80%. After reaching the maximum value of 80%,
pressing again will cycle back, starting from 40%. After selecting the desired humidity
level, it will be successfully set after 3 seconds of inactivity. remains illuminated
continuously.After successful setting, the machine will operate at the current setting
level. It will stop humidifying when reaching the specified humidity, and the screen will
continuously display the current environmental humidity.
● Long press the" "key to turn off the display and ambient light, entering no-light mode.
Press any key except the power key to restore the previous lighting state.

KNOWING YOUR HUMIDIFIER
9
US
CLEANING AND MAINTENANCE
● To ensure air quality and humidification performance, proper cleaning and maintenance
of your ultrasonic humidifier are essential. The frequency of cleaning the humidifier
varies depending on usage, water hardness, and environmental factors.
● Generally, it is recommended to thoroughly clean the humidifier a few times
throughout the season or whenever algae, mineral deposits, or other particles begin to
form. It is recommended to clean the water tank and body reservoir every 3 days.
★Before cleaning, turn off the humidifier and unplug it. Remove the water tank, empty
any remaining water from the tank and body reservoir, and wipe with a soft cloth. The
surface of the humidifier and water tank can be wiped with a clean, soft, damp cloth
(use the provided brush to clean hard-to-reach areas). Keep the device dry. Reassemble
the humidifier:
US
Note: Selecting the mist level will disable the constant humidity function, and selecting
the constant humidity will disable the mist level function. Press and hold " " to disable
the constant humidity function.
● Sleep mode sets the humidifier's mist level to low and turns off the display light. The sleep
icon will turn off after 5 seconds, making it ideal for sleeping.
● Press any key except the main key to wake up the display screen. Click again to use the
machine normally. If there is no operation for 3 seconds, it will enter sleep mode again,
with the sleep icon half-lit. After 5 seconds, the sleep icon will turn off.
● In sleep mode, the ambient light is off by default. You can choose to turn on the ambient
light. Upon the first press of the ambient light button, the display screen wakes up and
lights up. Press the ambient light button again within 5 seconds to turn on the ambient
light normally, and the '88' display screen turns off, returning to sleep mode. Repeat this
operation to turn off.
● After plugging in, the screen is turn off in standby mode.
● Timer function enabled. Press the timer button to set the time, and after 3 seconds, the
setting will be successful. 'h' will light on. The machine will start at the scheduled time.
(Note: Before the set time, pressing the power button directly activates the machine.)
6.Sleep Mode
9.In standby mode
7.Water Shortage Reminder
● When the product is in a water shortage state, the buzzer beeps three times, and the
red indicator light flashes. After flashing three times, the indicator light turns off, and
the " " light turns on. The product enters standby mode.
8.Memory Function
● If the power remains connected, the humidifier will remember the last settings for
humidity and mode. The next time it is turned on, it will run with the recorded settings.
● Note: Disconnecting the power will reset the memory settings to default.
US
CLEANING AND MAINTENANCE
10
● It is recommended to clean before storage.
● Unplug the power cord and tie up loose power cords.
● Allow the humidifier to be completely dry before storage, and do not store standing
water in the water container.
● Cover with a lid, or place back in the retail box, to prevent the humidifier from
accumulating dust over time.Store the humidifier in a cool, dry place.
★Note: When your humidifier is in operation, pay attention to the following:
● If you run the humidifier continuously, it may need to be replenished with water daily.
Check if the water tank has enough supply for the system to operate.
● Ensure optimal airflow by keeping the air outlet clear. Make sure curtains and other
items are kept sufficiently away from the humidifier to avoid blocking the air intake or
disrupting airflow.
● Do not use any additives, such as fragrances or water conditioners. These additives can
cause cracks in the silicone sealing ring and may affect its performance.
Cleaning the Ultrasonic Nebulizer
● To reduce the risks of fire, electric shock, or injury to persons that could exist
due to use of the product, the source of electrical supply shall be disconnect
ed prior to beginning any such service or cleaning operation.
place the product and its connected cord in a way that reduces
the likelihood of tipping over.
● To reduce the risk of electric shock, avoid overfilling or cleaning the product,
and do not remove the heating element without disconnecting the
power-supply cord.
● Before cleaning the product, users must be described as follows including any
need for disassembly (and reassembly) and any need for the use of additives.
● Warning:
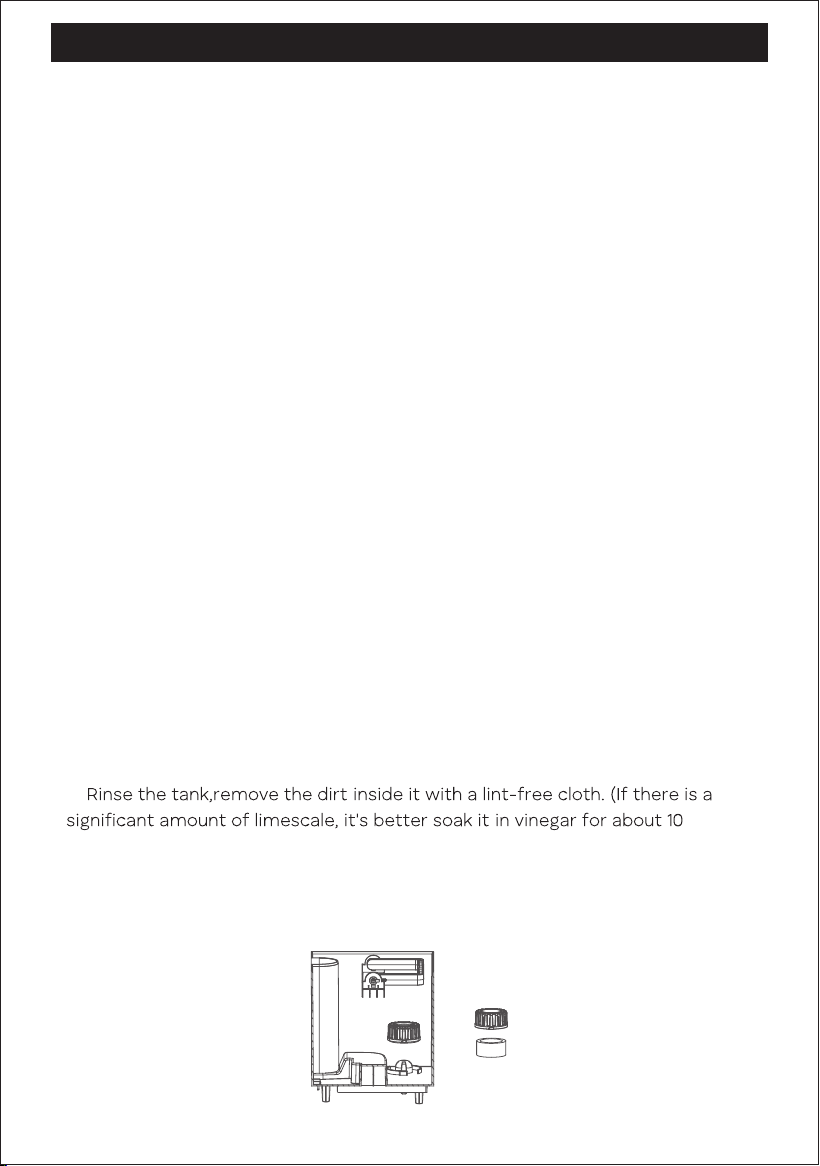
● a.
mins).
b. To prevent malfunctions caused by clogging of the water tank, rotate
counter clockwise to remove the filter cover(at the bottom of the water
tank), take out the filter sponge, rinse them both thoroughly and remove any
scale.
US
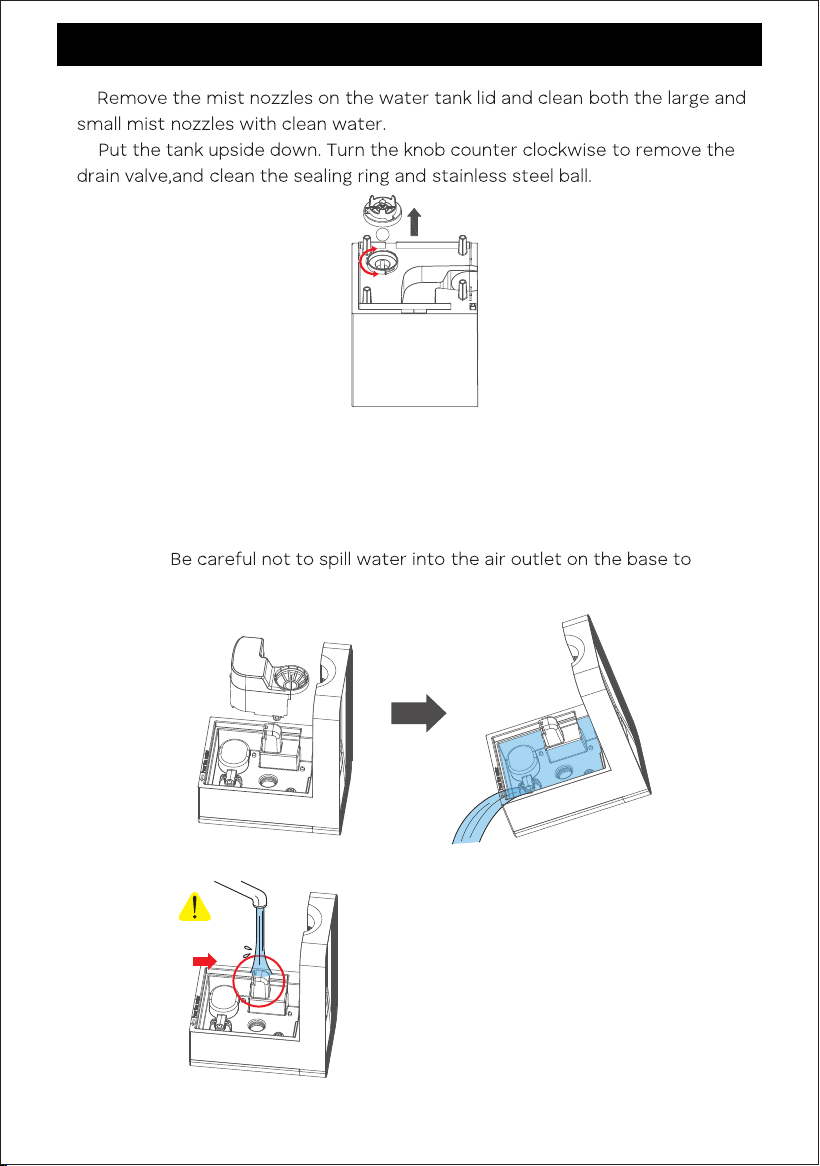
c.
d.
e. Remove the noise silencer, then add a small amount of vinegar to the base,
soak for 10 minutes, then wipe out the limescale/dirt with a soft cloth, then
fill the base with water, follow the instructions at the bottom to pour out the
water, and repeat 2 to 3 times. Do not rinse it directly under faucet.
Not to do:
prevent any damage to the machine.
11
CLEANING AND MAINTENANCE
Not to do
US
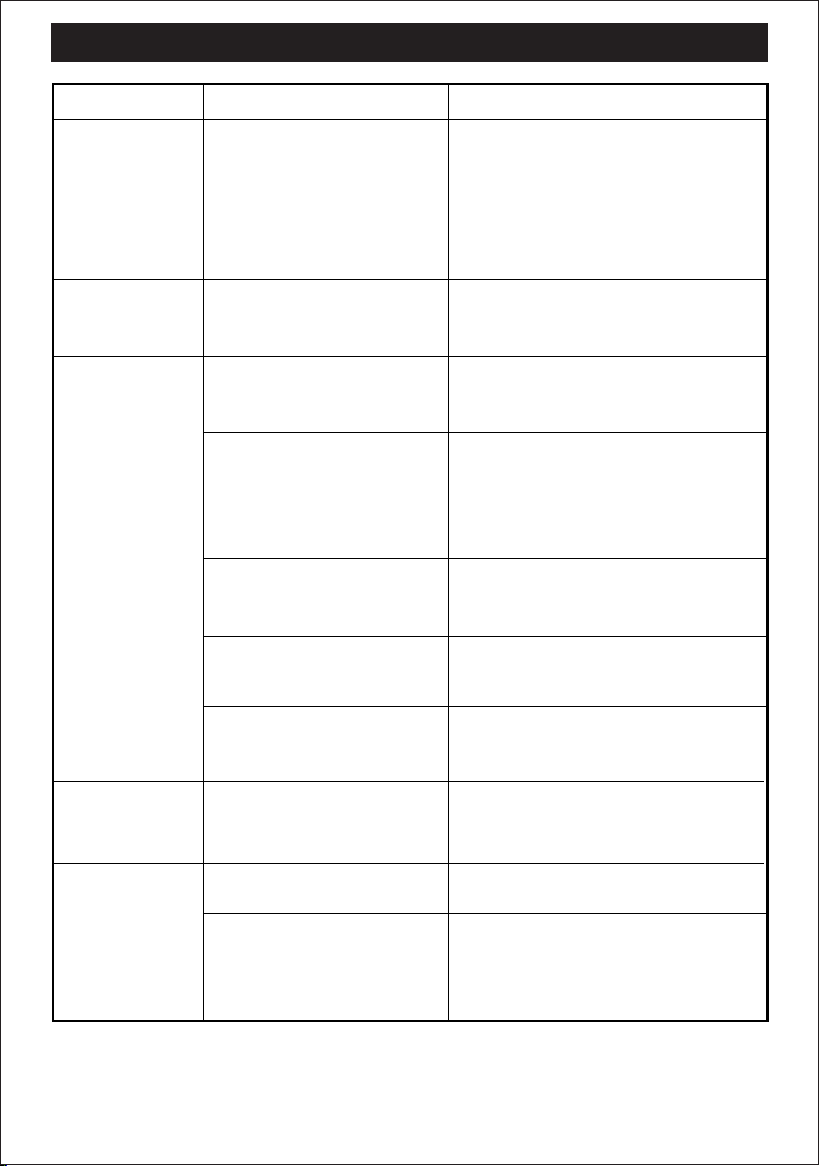
TROUBLESHOOTING
12
Stop working
after a period
of use and the
red light
flashes.
The filter(located at the
bottom of the water
tank)hasn't been cleaned for
a long time, causing
limescale to clog the filter.
Take out the filter lid and try to turn
on the machine again.
Tips:
Please clean the filter at least
once a week. Rinse it under faucet or
soak it in vinegar, try to wipe away
the limescale on it.
No mist come
out from the
top.
Water is
leaking from
the machine.
Leaves white
residue or
white dust.
Unit fails to
power on.
The water tank and the base
are not aligned.
Ensure the water tank and the base
are properly aligned.
Adding essential oils directly
to water leads to product
damage and water leakage.
The foam wrapped around
the float hasn't been
removed, or something is
stuck in the float inside the
base.
Please add essential oil to the
essential oil tray. Contact us if
leakage is severe.
Remove the foam or something
else that stuck in the float.
Dirt is stuck in the drain
valve of the water tank.
Clean the dirt around the drain valve
to ensure the valve can close proper-
ly.
Accidentally pour water into
the mist outlet when adding
water.
Avoid adding water into the mist
outlet.
Tried above ways and
leakage problem still cannot
solve.
Contact us for a resend or refund.
The white residue comes
from minerals in the water.
Use distilled water or purchase
additional demilitarization cartridge
for humidifier.
Unit is not plugged in.
Plug power cord into electrical outlet.
Household circuit
breaker/ground fault circuit
interrupter has tripped or
blown fuse.
Reset circuit breaker/ground fault
circuit interrupter or replace fuse.
Problem
Possible Cause Solution
US
TROUBLESHOOTING
13
Unit fails to
power on.
Unit makes
bubbling or
gurgling sound.
There is no air
humidification.
Unit is damaged or in need
of repair.
Contact our customer service for
replacement.
Cease usage and unplug.
This is normal , water is being dispensed into base.
Ensure power head is securely in
place for proper power connection.
Contact Customer Service for
assistance.
Water level in tank is empty
or too low.
Refill with clean, cool water.
See instructions.
Air flow is blocked.
Remove obstruction.
The water tank and the base
are not aligned.
Ensure the water tank and the base
are properly aligned.
Unit has reached its set
point.
When set humidity level is
reached, the Fan will turn off until
humidity level in room drops below
humidity set point.
The water tank
has some
white
sediment.
The dirt generated from
improper water usage or the
sediment formed after
water has been left standing
for a long time.
Pour out the water when not in use
for extended periods, and use
distilled water correctly to minimize
the build up of impurities.
Unit is not
Producing
desired
amount of
humidity.
The fog
produces an
unpleasant
smell.
Unit settings are too low.
Set to High Fan Speed and
Continuous Humidity for maximum
humidity out.
Long time without
changing water.
Clean this device, then place it in a
cool, shaded area to air dry for 12
hours with the lid removed.
The device has not been
cleaned for a long time.
Contact our excellent support:
Problem
Possible Cause Solution
US

BREEZOME CUSTOMER CARE
14
Thanks for choosing Breezome HUMIDIFIER.
This product is covered with Breezome product and labor warranty for 12 months from the
date of its original purchase.
The warranty will not apply in cases of:
- Accident, misuse, or repairs performed by unauthorized personnel,
- Any unit that has been tampered with or used for commercial purpose.
- Normal wear and tear of wearable parts,
- Use enforce, damage caused by external influences,
- Damage caused by non-observance of the User Manual, e.g. connection to an unsuitable
mains supply or non-compliance with the instructions,
- Partially or completely demanded appliances,
- Defects caused by or resulting from damages from shipping or from repairs, service, or
alteration to the product or any of its parts that have been performed by a repair person
not authorized by Breezome.
We can only provide after sales service for products that are sold by Breezome or
Breezome authorized retailers and distributors. lf you have purchased your unit from a
different place, please contact your seller for return and warranty issues.
US