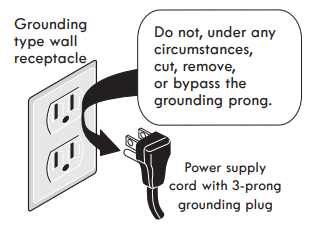
For personal safety, the cooktop must be properly grounded. For maximum safety, the power cord must be plugged into an electrical outlet that is correctly polarized and properly grounded.
DO NOT Operate the cooktop using a 2-prong adapter or an extension cord. If a 2-prong wall receptacle is the only available outlet, it is the personal responsibility of the consumer to have it replaced with a properly grounded 3-prong wall receptacle installed by a qualified electrician.
See the INSTALLATION INSTRUCTIONS packaged with this cooktop for complete installation and grounding instructions.
WARNING: This appliance is equipped with a 3-prong grounding plug for your protection against shock hazard and should be plugged directly into a properly grounded receptacle. DO NOT cut or remove the grounding prong from this plug.
WARNING: Avoid fire hazard or electrical shock. DO NOT use an adapter plug, an extension cord, or remove grounding prong from electrical power cord. Failure to follow this warning can cause serious injury, fire or death.
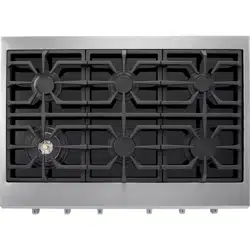
Features at a Glance
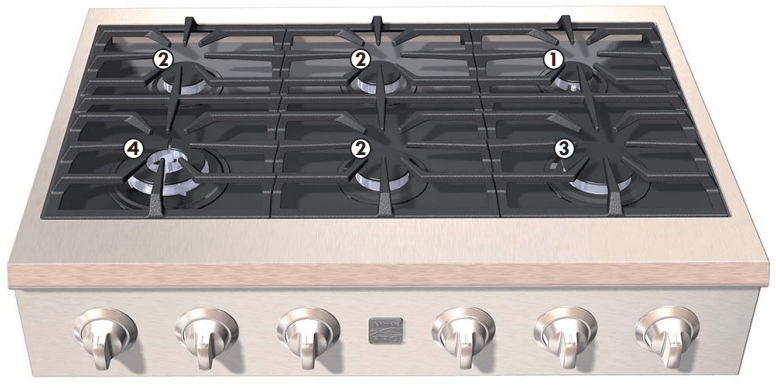
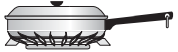
Location of the Gas Surface Burners
Your cooktop is equipped with gas surface burners with different BTU ratings. The ability to heat food quicker and in larger volumes increases as the burner size increases.
The small SIMMER burner is best used for simmering delicate sauces, etc.
The REGULAR burners can be used for most surface cooking needs.
The TURBO BOIL burner is best used when bringing larger quantities of liquid to a rolling boil. You'll spend less time preparing dinner and more time enjoying it with 18,200 BTUs of power.
The TURBO BOIL FLEX burner combines a single high and low power burner to deliver rapid heat and slow warming so you can warm, boil and simmer without moving the pot.
Regardless of size, always select cookware that is suitable for the amount and type of food being prepared. Select a burner and flame size appropriate to the pan. Never allow flames to extend beyond the outer edge of the pan.
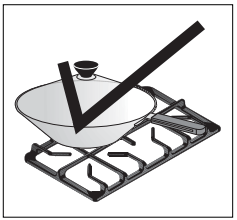
Surface Cookware Recommendations
Use Proper Cookware
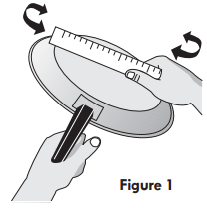
Cookware should have flat bottoms that make good contact with the cooktop grate. Check for flatness by rotating a ruler across the bottom of the cookware.
Be sure to follow the recommendations for using cookware as shown below
CORRECT
Flat bottom and straight sides.
Tight fitting lids.
Weight of handle does not tilt pan. Pan is well balanced.
Pan sizes match the amount of food to be prepared.
Made of material that conducts heat well.
Easy to clean.
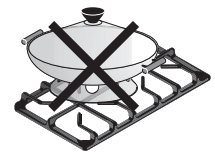
INCORRECT
Curved and warped pan bottoms
Pan overhangs unit by more than 2.5 cm (1”).
Heavy handle tilts pan.
Flame extends beyond unit.
Note: The size and type of cookware used will influence the setting needed for best cooking results.
Note: Always use a utensil for its intended purpose. Follow manufacturer's instructions. Some utensils were not made to be used in the oven or on the cooktop
* Specialty pans such as lobster pots, griddles and pressure cookers may be used but must conform to the above recommended cookware requirements.
Cookware Material types
The cookware material determines how evenly and quickly heat is transferred from the surface unit to the pan bottom. The most popular materials available are:
ALUMINUM - Excellent heat conductor. Some types of food will cause it to darken (Anodized aluminum cookware resists staining & pitting).
COPPER - Excellent heat conductor but discolors easily.
STAINLESS STEEL - Slow heat conductor with uneven cooking results. Is durable, easy to clean and resists staining.
CAST IRON - A poor heat conductor however will retain heat very well. Cooks evenly once cooking temperature is reached.
PORCELAIN-ENAMEL on METAL - Heating characteristics will vary depending on base material.
GLASS - Slow heat conductor.
Using a Wok (not supplied)
Woks with flat bottoms suitable for use on your cooktop are available in most cookshop or hardware stores. Roundbottomed woks (with a support ring that does not extend beyond the burner unit) may also be used. The metal ring was designed to support the wok safely when it is filled with large amounts of liquids (soup making) or fat (frying).
Wire trivets: Do not use wire trivets. Cookware bottoms must be in direct contact with the grates.
DO NOT use a wok if it is equipped with a metal ring that extends beyond the burner unit. Because this ring traps heat, the surface unit and cooktop surface could be damaged.
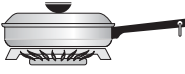
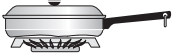
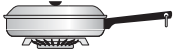
Using the Griddle
Before first use:
Wash Griddle in hot soapy water. Rinse and then dry completely.
Apply a thin coat of vegetable oil to the entire surface (front and back of griddle).
Preheat your oven to 350°F. Place the griddle on the upper rack in your oven.
Bake griddle for 1 hour at 350°F, then turn oven OFF and let cool before removing.
The surface may appear to have a tacky feel to it from this seasoning process. If desired, wash the griddle in hot soapy water, rinse well, and dry completely.
After each use:
To prevent rusting, store in a dry place and keep uncovered
After each use, clean with a stiff brush and hot water only.
DO NOT CLEAN GRIDDLE IN DISHWASHER.
Dry immediately and apply a light coating of vegetable oil to griddle before storing.
Using the Griddle:
Place either side of the griddle centered over the left side gas burners.
Preheat the griddle for 5 minutes on medium to medium low setting. Slow preheat ensures even heat distribution during the cooking process.
DO NOT preheat the griddle on HI setting. Preheating on HI may warp the griddle and prevent even heat distribution.
CAUTION:
Always place the griddle on the grate before turning on the burner.
Always use potholders to remove the griddle from the grate. Allow the griddle to cool before removing. Do not set hot griddle on surfaces that cannot withstand high heat such as countertops.
Be sure the griddle is positioned correctly and is stable before use to prevent hot spills and possible burns.
Before Setting Surface Controls
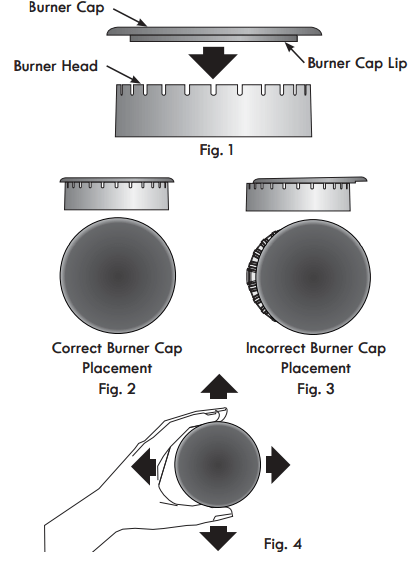
Check Burner Cap Placement Before Operating the Surface Burners
To prevent fl are-ups and avoid creation of harmful byproducts, do not use the cooktop without all burner caps properly installed to insure proper ignition and gas flame size.
It is very important to be sure that all surface burner caps and burner grates are properly installed and in the correct locations BEFORE operating the cooktop burners.
Remember:
Always keep surface burner caps in place whenever using a surface burner.
When placing the burner caps, be sure that all burner caps are seated firmly and rest level on top of burner heads.
For proper flow of gas and ignition of burners DO NOT allow spills, food, cleaning agents or any other material to enter the gas orifice port opening.
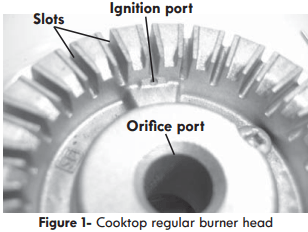
Round Style Burners
The burner cap lip (See Fig. 1) should fit snug into the center of burner head and rest level. Refer to Figs. 2 & 3 for correct and incorrect burner cap placement. Once in place, you may check the fit by gently sliding the burner cap from side to side (Fig. 4) to be sure it is centered and firmly seated. When the burner cap lip makes contact inside the center of the burner head you will be able to feel it. Please note that the burner cap should NOT move off the center of the burner head when sliding from side to side.
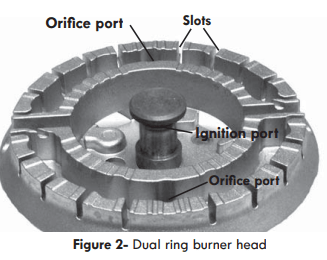
Double Ring Style Burners
The Double Ring burner only operates properly with two burner caps in place. Be sure the burner cap lips are positioned facing down towards the burner head (Fig. 5) and into the recessed areas (Fig. 6) on each side of the burner head. Be sure both burner caps are seated firmly and rest level on the burner head before operating.
Check the fit for each cap using the same method for the round burner caps by gently sliding each cap from side to side. Please note that the burner cap lips should NOT move out of recessed areas of the burner head.
Setting Surface Controls
Setting Proper Surface Burner Flame Size
For most cooking, start on the highest control setting and then turn to a lower one to complete the process. Use the recommendations below as a guide for determining proper flame size for various types of cooking. The size and type of utensil used and the amount of food being cooked will influence the setting needed for cooking.
*Flame Size
Type of Cooking
High Flame
Start most foods; bring water to a boil; pan broiling.
Medium Flame
Maintain a slow boil; thicken sauces, gravies; steaming
Low Flame
Keep foods cooking; poach; stewing.
*These settings are based on using medium-weight metal or aluminum pans with lids. Settings may vary when using other types of pans. The color of the flame is the key to proper burner adjustment. A good flame is clear, blue and hardly visible in a well-lighted room. Each cone of flame should be steady and sharp. Clean burner if flame is yelloworange.
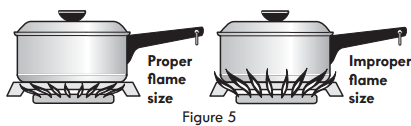
Regardless of size, always select cookware that is suitable for the amount and type of food being prepared. Select a burner and flame size appropriate to the pan. Never allow flames to extend beyond the outer edge of the pan
Never extend the flame beyond the outer edge of the utensil. A higher flame wastes heat and energy and increases your risk of being burned by the flame (Figure 5).
For deep fat frying, use a thermometer and adjust the surface control knob accordingly. If the fat is too cool, the food will absorb the fat and be greasy. If the fat is too hot, the food will brown so quickly that the center will be undercooked. Do not attempt to deep fat fry too much food at once as the food will neither brown nor cook properly
CAUTION: Do not place items such as aluminum foil, salt and pepper shakers, spoon holders or plastic wrappings on top of the range when it is in use. These items could melt or ignite. Potholders, towels or wood spoons could catch fire if placed too close to a flame.
Manual Lighting
In the event of an electrical power outage, the surface burners can be lit manually. To light a surface burner, hold a lit match to the burner head, then slowly turn the surface control knob to LITE. After burner lights push in and turn knob to desired setting. Use caution when lighting surface burners manually.
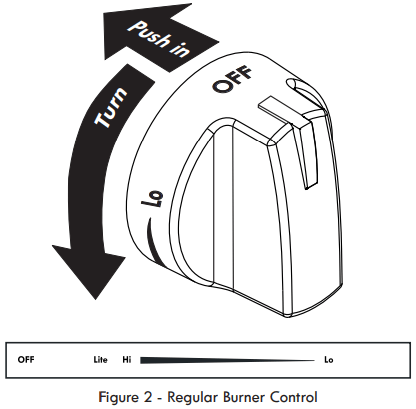
Setting the Regular, Simmer or Turbo Boil Burners
Place cooking utensil on surface burner.
Push the surface control knob down and turn counterclockwise out of the OFF position (See Figure 2).
Release the knob and rotate to the LITE position.
Visually check that the burner has a flame.
Once the burner is lit, continue to turn counterclockwise to the desired flame size. The control knobs do not have to be set at a particular setting. Use the knob indicator settings to adjust the flame as needed.
Important notes:
DO NOT cook with the surface control knob left in the LITE position. (The electronic ignitor will continue to spark if the control knob setting remains in the LITE position).
When setting any surface control knob to the LITE position, all electronic surface ignitors will spark at the same time. However, only the surface burner you are setting will ignite.
NEVER place or straddle a cooking utensil over two diff erent surface cooking areas at the same time. This can cause uneven heating results.
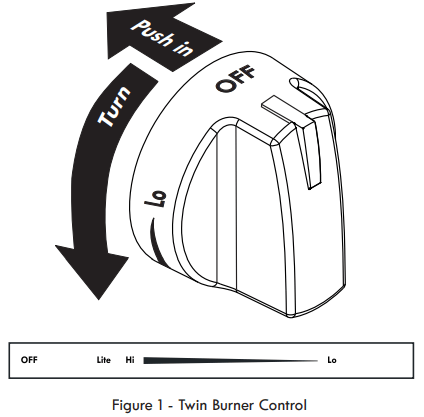
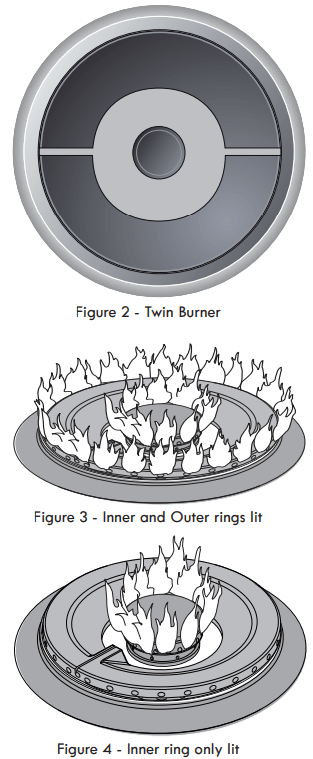
Setting the Turbo Boil Flex Twin Burner
The versatile Turbo Boil Flex Twin burner offers a complete range of gas surface settings from the same burner position.
At the lowest setting, only the burner’s inner ring is active, providing a smaller flame that is perfect for simmering. If needed, the burner’s outer ring may be added and when set for HI will provide a gas flame that may be used to bring a large pan of liquid to boil quickly
Operating the Turbo Boil Flex Twin Burner
Place cooking utensil on surface burner.
Push the surface control knob down and turn counterclockwise out of the OFF position (See Figure 1).
Release the knob and rotate to the Lite position.
Visually check that both the inner and outer rings for the Twin burner are lit (See Figure 3). Once lit, turn the control knob and continue to turn counterclockwise out of the Lite position and adjust to the desired flame size.
When adjusting for a low or simmer type flame setting, continue to rotate the control knob counterclockwise from middle setting towards Lo (See Figure 1). Between the middle and Lo settings, the flame for the outer ring portion of the burner will turn off leaving only the inner burner with a flame for simmering (See Figure 4). Make any further flame adjustments as needed.
Important notes:
DO NOT cook with the surface control knob left in the LITE position. (The electronic ignitor will continue to spark if the control knob setting remains in the LITE position).
When setting any surface control knob to the LITE position, all electronic surface ignitors will spark at the same time. However, only the surface burner you are setting will ignite.
NEVER place or straddle a cooking utensil over two different surface cooking areas at the same time. This can cause uneven heating results.
General Care and Cleaning
Cleaning Various Parts of Your Cooktop
Before cleaning any part of the cooktop, be sure all controls are turned OFF and the cooktop is COOL. REMOVE SPILLOVERS AND HEAVY SOILING AS SOON AS POSSIBLE. REGULAR CLEANINGS NOW WILL REDUCE THE DIFFICULTY AND EXTENT OF A MAJOR CLEANING LATER.
Surfaces
How to Clean
Painted Control Knobs
For general cleaning, use hot soapy water and a cloth. For more difficult soils and built-up grease, apply a liquid detergent directly onto the soil. Leave on soil for 30 to 60 minutes. Rinse with a damp cloth and dry. DO NOT use abrasive cleaners on any of these materials; they can scratch or dull the finish.
Control Panel
Wipe the control panel clean after each use. Before cleaning the control panel, turn all controls to OFF and remove the control knobs. To remove, pull each knob straight off the shaft. Clean using hot, soapy water and a cloth. Be sure to squeeze excess water from the cloth before wiping the panel; especially when wiping around the controls. Excess water in or around the controls may cause damage to the appliance. To replace knobs after cleaning, line up the flat sides of both the knob and the shaft; then push the knob into place.
Stainless Steel
Clean with hot, soapy water and a dishcloth. Rinse with clean water and cloth. Do not use cleaners with high concentrations of chlorides or chlorines. Do not use harsh scrubbing cleaners. Only use kitchen cleaners that are especially made for cleaning stainless steel. Always be sure to rinse the cleaners off from the surface as bluish stains may occur during heating that cannot be removed.
Porcelain Enamel Burner Grates, Cooktop Surface
Gentle scouring with a soapy scouring pad will remove most spots. Rinse with a 1:1 solution of clear water and ammonia. If necessary, cover difficult spots with an ammonia-soaked paper towel for 30 to 40 minutes. Rinse with clean water and a damp cloth, and then scrub with a soap-filled scouring pad. Rinse and wipe dry with a clean cloth or paper towel. Remove all cleaners or the porcelain may become damaged during future heating. DO NOT use spray oven cleaners on the cooktop.
Cleaning the Cooktop and Surface Burners
CAUTION: To avoid possible burns DO NOT attempt any of the cooktop cleaning instructions provided before turning OFF all of the surface burners and allow them to completely cool.
CAUTION: Any additions, changes or conversions required in order for this appliance to satisfactorily meet the application needs must be made by an authorized qualified agency.
Routinely clean the cooktop. Wipe with a clean, damp cloth and wipe dry to avoid scratches.
Keeping the surface burner head ports and slots clean will prevent improper ignition and an uneven flame. See the following sections for more instructions.
Cleaning recessed and contoured areas of cooktop
If a spill occurs on or in the recessed or contoured areas, blot up spill with an absorbent cloth. Rinse with a clean, damp cloth and wipe dry.
Cleaning surface burner grates
Clean only after the grates are completely cool.
Use nonabrasive plastic scrubbing pad and mild abrasive cleanser or clean in the dishwasher.
Food soils containing acids may affect the finish. Clean immediately after the grates are cool.
Thoroughly dry grates immediately following cleaning.
Cleaning burner caps
Remove caps from burner heads after they have cooled.
Clean heavy soils with a plastic scrubbing pad and absorbent cloth.
Thoroughly dry burner caps immediately following cleaning including the bottom and inside of cap.
Do not use abrasive cleaners. They can scratch porcelain.
Do not clean burner caps in the dishwasher.
Do not operate surface burners without burner caps properly in place. Read important notes.
Cleaning surface burner heads
For proper gas flow it may be necessary to clean the burner head and slots. To clean, first use a clean DAMP cloth to soak up any spills. Remove any food from between the burner slots using a small nonabrasive brush like a toothbrush and afterwards wipe up using a damp cloth. For stubborn soils located in the slots, use a small-gauge wire or needle to clean.
Any spill on or around the electrode must be carefully cleaned. Take care not to hit the electrode with any thing hard or it could be damaged.
To clean the burner head ignition ports
Each burner head has a small ignition port located as shown. Should you experience ignition problems it may be that this port hole is partially blocked with soil. With the burner head in place, use a small wire gauge needle or the end of a paper clip to clear the ignition port (See to Fig. 1 and 2).
Important notes:
The surface burner heads are secured to the cooktop and must be cleaned in place on the cooktop.
Always keep the surface burner caps in place whenever a surface burner is in use.
When replacing the burner caps, be sure the burner caps are seated firmly on top of the burner heads.
For proper flow of gas and ignition of burners DO NOT allow spills, food, cleaning agents or any other material to enter the gas orifice port opening.
Before You Call
Solutions to Common Problems
Before you call for service, review this list. It may save you time and expense. The list includes common occurrences that are not the result of defective workmanship or materials in this appliance.
OCCURRENCE
POSSIBLE CAUSE/SOLUTION
Surface burners do not light
Surface Control knob has not been completely turned to LITE. Push in and turn the Surface Control knob to LITE until burner ignites and then turn control to desired flame size
Be sure gas supply valve is open.
Gas-air mixture needs a straight line to travel. Be sure burner is properly seated in its support (models with open burners only).
Burner ports or slots are clogged. With the burner off , use a small-gauge wire or needle to clean ports or slots.
Power cord is disconnected from outlet (electric ignition models). Be sure cord is plugged securely into outlet.
Electrical power outage (electric ignition models). Burners can be lit manually. See Setting Surface Controls in this Use & Care Guide.
Surface burner flame burns half way around.
Burner ports or slots are clogged. With the burner off , clean ports with a smallgauge wire or needle to clean ports or slots.
Moisture is present after cleaning. Lightly fan the flame and allow burner to operate until flame is full. To avoid this occurrence dry the burners thoroughly following instructions under General Care & Cleaning.
Surface burner flame is orange.
Dust particles in main line. Allow the burner to operate a few minutes until flame turns blue.
In coastal areas, a slightly orange flame is unavoidable due to salt air