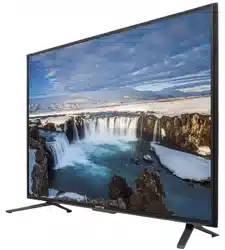
Documents: Go to download!
- User Manual - (English)
- SCEPTRE Remote Control
- Connection Suggestions
- Switching Sources
- Ready to Watch Some TV?*
- OSD (On Screen Display) Controls
- OSD (On Screen Display) Options
- Detailed Explanations
- Troubleshooting
Table of contents
USER MANUAL
SCEPTRE Remote Control
This remote control follows SONY’s universal remote code. To find the actual code
you need to consult your cable or satellite tech support.

For universal remotes, this display follows SONY’s universal remote code. You need to find the actual code from your cable or satellite or universal remote provider. The button order is from left to right.
1.POWER – Turns the display on or off.
2.SOURCE – Press this button to cycle through INPUT source.
3.CC – Cycles between different closed captioning modes.
4.MTS – Selects stereo, mono, or second audio programming.
5.MUTE – Turns the sound off from the display. To un-mute either press VOL(+) or press the MUTE button again.
6.NUMBER BUTTONS (0-9) – Press 0-9 to select a display channel directly when you are watching display. The channel will change after 2 seconds.
7. (-) - Inserts the dash for selecting digital channels directly.
8. R – Returns to the previous channel.
9. GUIDE – Opens the current digital channel information guide (antenna only).
10.INFO – Shows the display info.
11.  ENTER – These directional buttons allow you to move around in the display’s menu. Press the ENTER button when you want to select a particular option. Under ROKUTM these buttons have the same functionality.
12.MENU – Brings up the main display menu on the screen.
13.EXIT – Exit the main display menu on the screen. Under ROKUTM this button functions as the return button, returning to the previous screen.
14.VOL(+)/VOL(-) – Press the VOL buttons to increase or decrease the sound level.
15.ASPECT – This button changes the picture’s cropping method.
16.FREEZE – Press this button to freeze current picture.
17.SLEEP – Turns the display off in a specific set of time dependent on your selection.
18.CH(+)/CH(-) – Press the CH buttons to switch to the next or switch to the previous channel.
19.FAVORITE – Gives you your list of favorite channels.
20.ADD/DEL – Adds or Deletes current channel from favorite list.
21. FAV(-) – This button changes to the previous favorite channel.
22.FAV(+) – Press this button to change to the next favorite channel.
23.PICTURE – Selects various preset picture settings.
24.SOUND - Selects various preset sound settings.
25.USB – Launches the USB reader function for images and music.
26.HOME / MHL – This button selects the source HDMI 1 for MHL connection or regular HDMI connection. The button while using a ROKUTM product will return any current running program back to the ROKUTM home screen.
27.REWIND – Under ROKUTM this button rewinds the current video being played.
28.PLAY / PAUSE – Under ROKUTM this button plays or pauses the current video being played.
29.FAST FORWARD – Under ROKUTM this button plays the current video at a faster pace.
30.STAR (*) – Under ROKUTM this button gives the info on the ROKUTM MHL Streaming stick.
31.A – C – Not used.
The following buttons are functions designed to work with the optional accessory, Sceptre Sound Bar.
32.SOURCE – This button selects the sound bar’s source.
33.MODE – This button selects the sound bar’s sound modes.
34.VOL(-) – This button decreases the volume of the sound bar.
35.VOL(+) – This button increases the volume of the sound bar.
36.POWER – This button turns on the sound bar.
Installing Batteries to the Remote Control
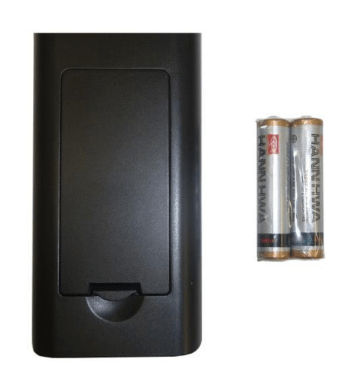
Please insert two AAA batteries into the remote control. Make sure that you match the (+) and (-) symbols on the batteries with the (+) and (-) symbols inside the battery compartment. Afterwards, re-attach the battery cover.
Please note:
- Only use AAA batteries.
- Do not mix new and old batteries. This may result in cracking or leakage that may pose a fire risk or lead to personal injury.
- Inserting the batteries incorrectly may also result in cracking or leakage that may pose a fire risk or lead to personal injury.
- Dispose the batteries in accordance with local laws and regulations.
- Keep the batteries away from children and pets.
- If the remote control is not used for a long time, remove the batteries.
- Keep the remote control away from moisture, sunlight, and high temperatures.
Connection Suggestions
If You Have Digital Cable without Cable Box or Antenna...
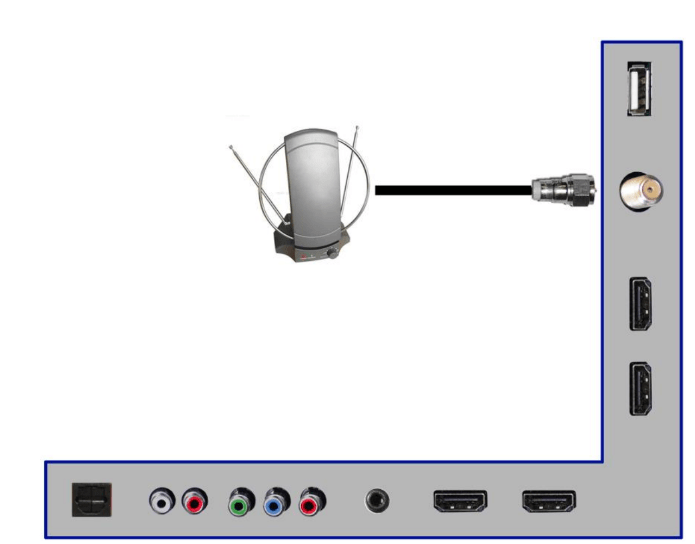
- Make sure the power of UHD display is turned off.
- Connect the Coaxial RF cable from your antenna or digital cable to the display port on the back of your UHD display.
- Turn on the UHD display.
- Follow the first time on screen instructions.
Please Note:
- Not all broadcasts are in High Definition (HD). Please refer to your local broadcasting stations for more information.
- TV tuner is an optional item in this display.
- The UHD TV’s tuner is designed for UHD display therefore requires a stronger signal than normal displays. If you cannot achieve that signal level with your antenna or cable, your UHD display might lose picture or sound.
Connecting DVD Player with Component YPbPr...
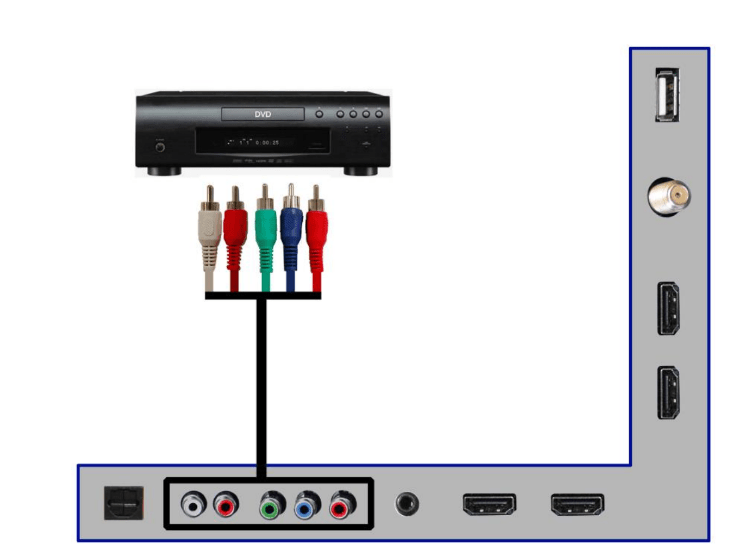
- Make sure the power of UHD display and your DVD player is turned off.
- Obtain a Component Cable. Connect the green color connector to both your DVD player and YPbPr’s green connector port on the back of your UHD display.
- Connect the blue color connector to both your DVD player and YPbPr’s blue connector port on the back of your UHD display.
- Connect the red color connector to both your DVD player and YPbPr’s red connector port on the back of your UHD display.
- Obtain a RCA Audio Cable. Connect the white color connector to both your DVD player and YPbPr’s white connector port on the back of your UHD display.
- Connect the red color connector to both your DVD player and YPbPr’s red connector port on the back of your UHD display.
- Turn on the UHD display and your DVD player.
- Use the remote control’s source button or the source button on the display to switch to YPbPr.
Please Note:
- Sometimes DVD players will not automatically output to YPbPr. You will need to configure your DVD player with AV connection first then switch to YPbPr. Please reference the DVD player’s manual, to make sure the DVD player is configured to output correctly to the display.
- This source shares audio jacks with composite video
Connecting WiiTM with Composite...
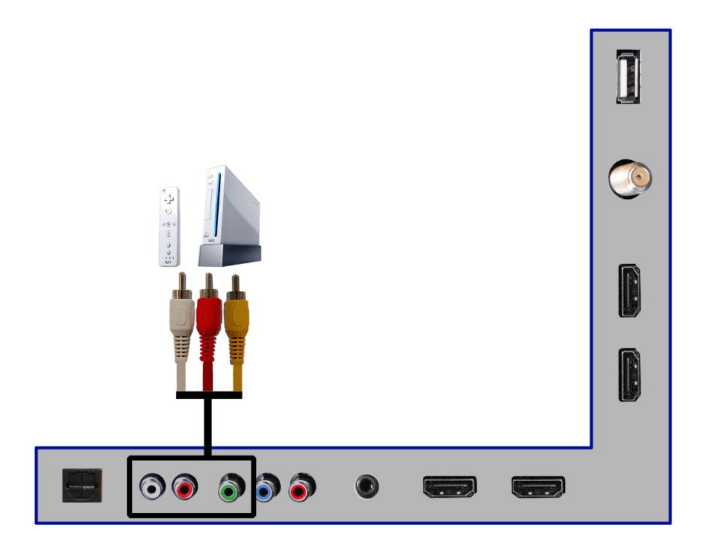
- Make sure the power of UHD display and your WiiTM is turned off.
- Obtain a Yellow Video Cable. Connect the Yellow Video connector to both your WiiTM and AV’s GREEN Video connector port on the back side of your UHD display.
- Obtain a RCA Audio Cable. Connect the white color connector to both your WiiTM and AV’s white connector port on the back side of your UHD display.
- Connect the red color connector to both your WiiTM and AV’s red connector port on the back side of your UHD display.
- Turn on the UHD display and your WiiTM.
- Use the remote control’s source button or the source button on the display to switch to AV.
Please Note:
- Make sure to read your WiiTM installation guide for further information.
Connecting Cable or Satellite boxes with HDMI...
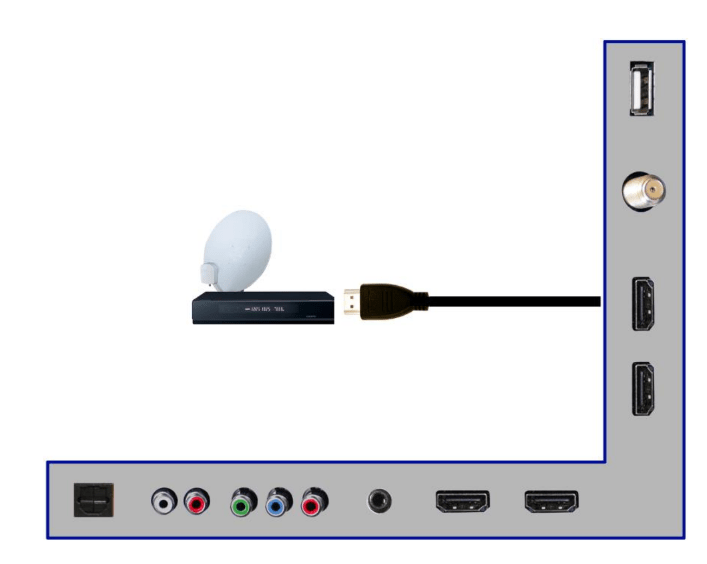
- Make sure the power of UHD display and your set-top box is turned off.
- Connect a HDMI cable to the HDMI output of your set-top box and the other end to the HDMI port on the back of your UHD display.
- Turn on the UHD display and your set-top box.
- Use the remote control’s source button or the source button on the display to switch to HDMI.
Please Note:
- Please reference the set-top box’ manual, to make sure the set-top box is configured to output correctly to the display.
- Sceptre’s UHD display supports SONY’s universal remote code. Please look up SONY’s codes in your universal remote’s hand book.
Connecting to a PC with HDMI...
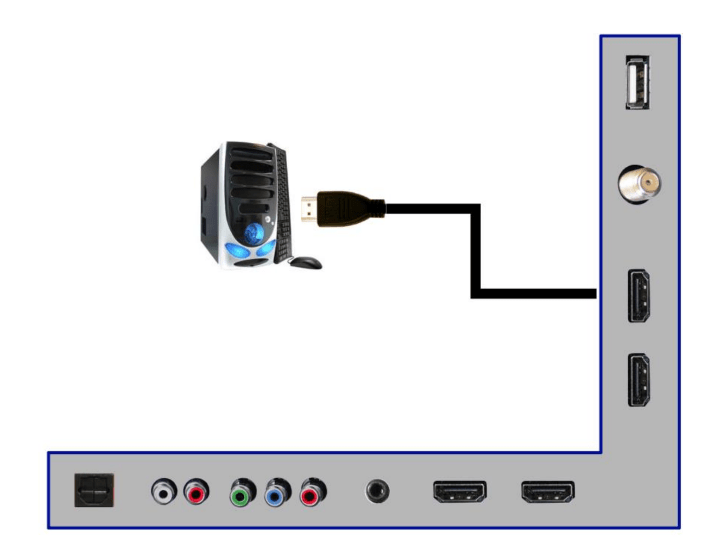
- Make sure the power of UHD display and your PC is turned off.
- Obtain a HDMI 2.0 cable; connect to the HDMI output of your PC and the other end to the HDMI 1 port on the back of your UHD display.
- Turn on the power of the UHD display and your PC.
- Use the remote control’s source button or the source button on the display to switch to HDMI1.
- Change your PC resolution to 3840 x 2160.
Please Note:
- For the best results, please set your PC resolution to x 2160. Please refer to the PC or graphic card’s manual for further instructions on how to set your resolution and refresh rate.
- Please refer to your PC manual for video output requirements of the video card.
Connecting a Digital Audio Receiver with Optical SPDIF...
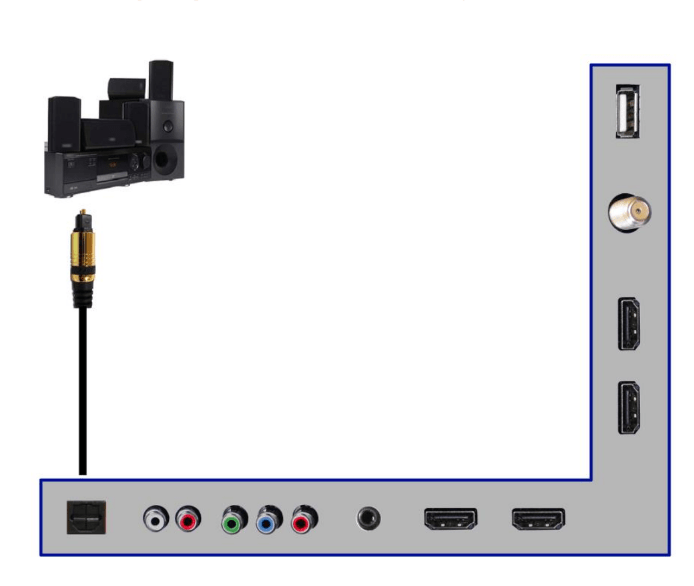
- Make sure the power of UHD display and your receiver is turned off.
- Obtain an optical SPDIF cable; connect it to your receiver’s optical SPDIF digital input and the optical SPDIF connection on the SPDIF port on the back of the UHD display.
- Turn on the UHD display and your receiver.
Please Note:
- If you want pure digital stream for your receiver to decode, you must also configure the display’s OSD Sound->Digital Audio Out function. Make sure the option is on 5.1CH.
- If your receiver is making static noises when receiving 5.1CH, you must use the PCM option instead.
- Please reference the receiver’s manual as well, to make sure the receiver is configured to receive signals correctly from the display.
- The display’s SPDIF out for 5.1CH is ONLY used for antenna/cable connection. Any other incoming audio signal will be passed out of SPDIF in PCM format.
Switching Sources
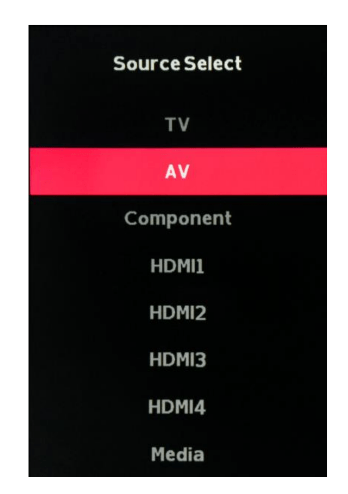
- Press the
 button on the side of the HD Display or the SOURCE button on the remote control and you will see the picture above.
 - Use ▲▼ buttons to select the source you want to switch to and press the ENTER button in the middle of the ▲▼ buttons.
- If you have connected coax cable (the cable with a needle in the middle and a ring to tighten the connection) from the box to the display, you’ll need to change to the correct channel. Make sure your source is TV and press 3 and ENTER on the display remote. If that does not work you’ll need to connect your Satellite or Cable Company for support.
Ready to Watch Some TV?*
Starting up the UHD Display
- Make sure your power cable is connected and the standby red light in the front of the display is lit up.
- Check all your connection cables off the side or the back of your display and also your AV devices. Make sure they are all connected securely.
- Turn on your display and other AV devices if necessary.
- Select the correct source according to the Connecting pages.
If You’ve Connected Antenna to the TV*...
If an antenna or cable (without a cable box) is connected to your display’s TV tuner* , you will need to go through an INITIAL SETUP process in order to watch the display.
1. Press MENU to open the menu

2. Use the ◄ or ► button to select the CHANNEL icon and press ENTER.
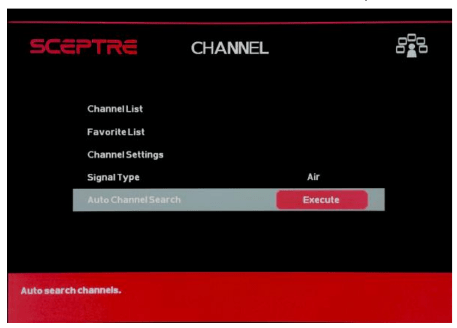
3. Use the ▲ or ▼ buttons to highlight the signal type and press ◄ or ► to select your connection either AIR or CABLE.
4. Use the ▲ or ▼ buttons to select AUTO CHANNEL SEARCH and press ENTER to scan for channels.
5. Once the scanning finishes, you can begin to watch display.
OSD (On Screen Display) Controls
Via Remote Control
In order to adjust most of the options inside the On Screen Display (OSD), the picture below shows all the buttons used on the remote control.
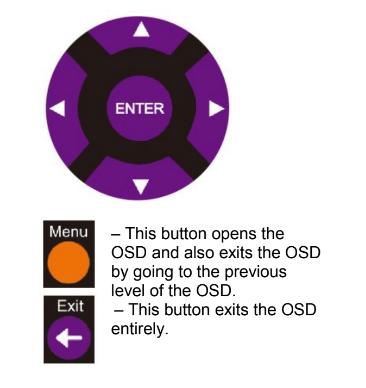
 This button changes functions as up direction in the OSD.
 This button functions as down direction in the OSD.
 This button functions as left direction in the OSD.
 This button functions as right direction in the OSD.
ENTER – This button changes the channel in conjunction with the number pad and also functions as ENTER for selecting options in the OSD.
Via Display Side Panel Buttons
In order to provide more than one type of OSD control buttons, the side panel’s buttons have also been made functional for adjusting the OSD.

- VOL(+/-) – These buttons functions as left/right direction in the OSD or increases/decreases the value of an option.
- CH(▲/▼) – These buttons functions as up/down direction in the OSD.
 This button opens the OSD menu and also exits out of menus.
 This button acts as the enter button to enter each function or option.
OSD (On Screen Display) Options

PICTURE – This main option has functions for changing the picture settings for all ports, such as tint, contrast, sharpness.
SOUND – This main option has functions for changing sound settings for all ports, such as SPDIF Type, treble, bass, and AVL....etc.
CHANNEL – This main option has functions for the tuner port, such as scanning channels, editing channels, audio language, and tuner mode....etc.
SETUP – This main option has functions for all ports, OSD language, caption styles, time setup, and channel setup, sleep, reset display functions.
PICTURE
This option allows users to adjust the display’s picture sharpness, color, tint, and other various functions.
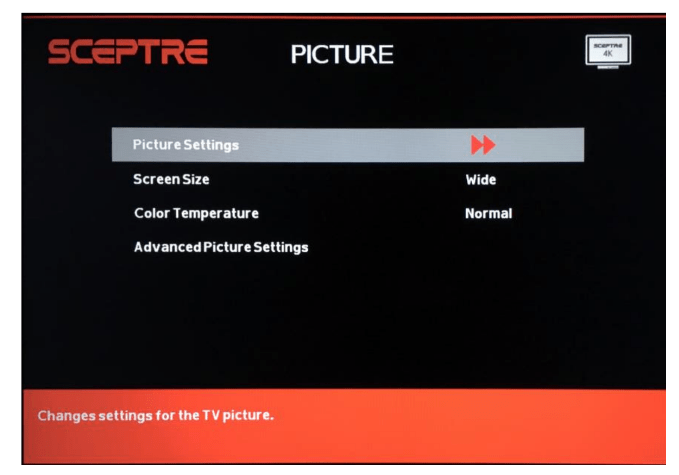
- Press MENU to open the OSD.
- Press ◄ or ► to select PICTURE and press ENTER.
- Use ▲ or ▼ to select the one you want to adjust and ◄ or ► or ENTER to adjust them.
I. PICTURE SETTINGS
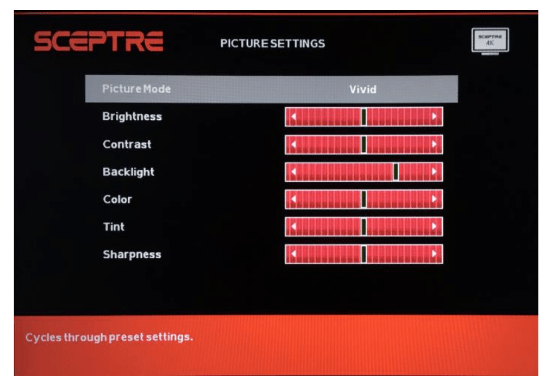
i. PICTURE MODE – This feature changes various color and power saving modes for the display.
ii. BRIGHTNESS – This feature changes the picture’s detail in dark colors.
iii. CONTRAST – This feature changes the difference between dark and bright objects.
iv. BACKLIGHT – This feature changes the intensity of the backlight.
v. COLOR – This feature changes the amount of color in the picture.
vi. TINT – This feature changes the white balance of the color.
vii. SHARPNESS – This feature changes the picture quality.
II. SCREEN SIZE – This feature changes the various aspects of the display’s video. (Normal, Wide, Cinema, Zoom, FULL 100%).
III. COLOR TEMPERATURE – This feature adjusts the color temperature of the display, giving warm, normal, and cool, (warm being redder, cool being bluer and normal being neutral color).
IV. ADVANCE PICTURE SETTINGS
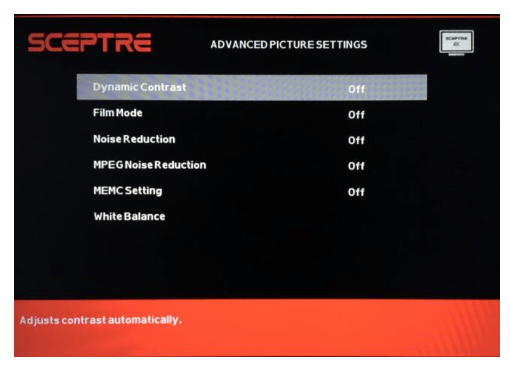
i. DYNAMIC CONTRAST – This feature allows the display to automatically adjust the contrast of the display depending on the picture you are viewing.
ii. FILM MODE – This feature is 24p that syncs with DVD movies, and should be enabled when viewing DVD video to allow smoother frame rate.
iii. NOISE REDUCTION – This feature reduces general pixilation by blurring them.
iv. MPEG NOISE REDUCTION – This feature reduces DVD video pixilation by blurring them.
v. MEMC SETTING – This function smooths the video frames thereby making a moving picture clearer for viewers.
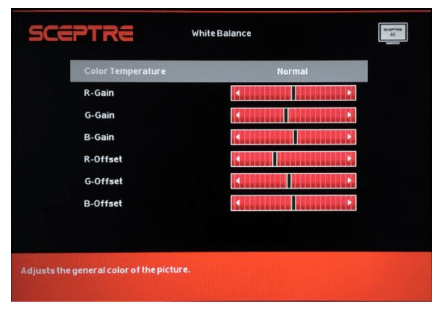
vi. WHITE BALANCE – This feature adjusts various red, green, blue color values in order to provide a balanced neutral color.
SOUND
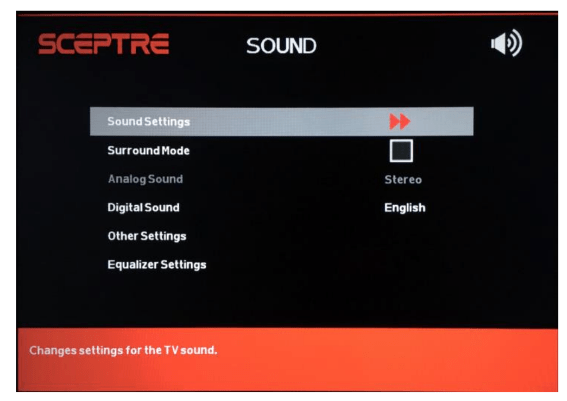
This option allows users to adjust the display’s sound functions.
- Press MENU to open the OSD.
- Press ◄ or ► to select SOUND and press ENTER.
- Use ▲ or ▼ to select the one you want to adjust and ◄ or ► or ENTER to adjust them.
I. SOUND SETTINGS

i. SOUND MODE – This feature switches between preset settings (presets include standard, soft, and dynamic).
ii. BASS – This feature adjusts the audio bass level of the display.
iii. TREBLE – This feature adjusts the audio treble level of the display.
iv. BALANCE – This feature adjusts the balance between the two speakers moving sound from left to right.
II. SURROUND MODE – This feature enables the display two speakers to provide a wider sound effect.
III. ANALOG SOUND – This feature adjusts the second audio programming in analog channels.
IV. DIGITAL SOUND – This feature adjusts the digital second audio programming in digital channels.
V. OTHER SETTINGS
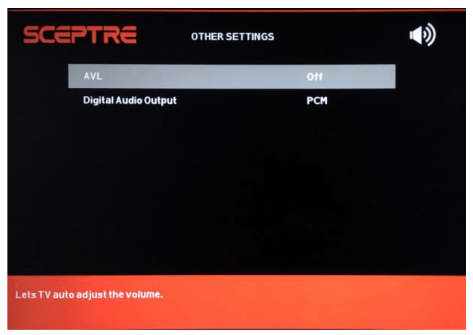
i. AVL – This feature adjusts the auto volume leveler enabling volume protection from overly loud commercials.
ii. DIGITAL AUDIO OUTPUT – This feature adjusts the digital audio output.
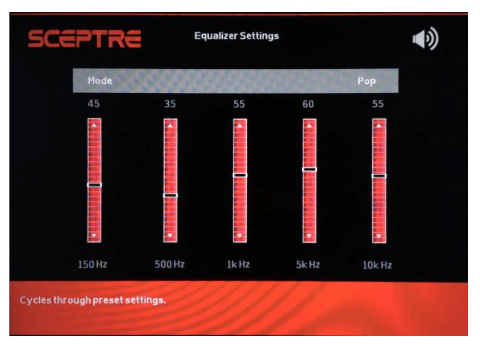
VI. EQUALIZER SETTINGS – This feature enables the internal equalizer of the speakers. You can adjust the settings individually or use the presets (rock, pop, jazz).
Please Note:
- Second audio programming is dependent on the support of the TV station you are watching. If they do not have a second audio programming (SAP), this function will not work.
CHANNEL
This option allows user to adjust the display’s tuner functions.
- Press MENU to open the OSD.
- Press ◄ or ► to select CHANNEL and press ENTER.
- Use ▲ or ▼ to select the one you want to adjust and ◄ or ► or ENTER to adjust them.
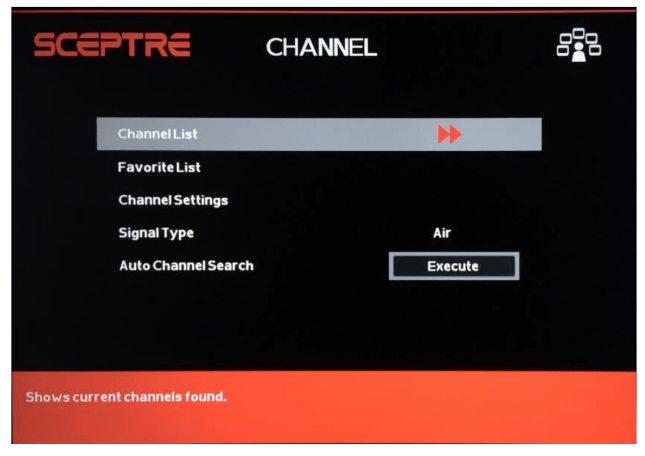
I. CHANNEL LIST – This feature gives you the list of channels currently found by the display.
II. FAVORITE LIST – This feature gives the favorite list of channels added.
III. CHANNEL SETTING – This feature allows you to skip channels, add favorite channels and also edit channel labeling.
IV. SIGNAL TYPE – This feature allows you to switch between air such as using antenna) and cable.
V. AUTO CHANNEL SEARCH – This feature searches channels automatically for you.
Please Note:
- The TV tuner in this display does not support QAM.
SETUP
This option allows user to adjust the display’s miscellaneous options.
- Press MENU to open the OSD.
- Press ◄ or ► to select SETUP and press ENTER.
- Use ▲ or ▼ to select the one you want to adjust and ◄ or ► or ENTER to adjust them.
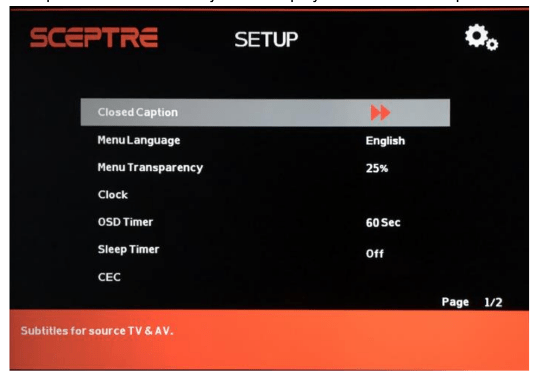
I. CLOSED CAPTION – This provides your display tuner, AV ports with subtitles.
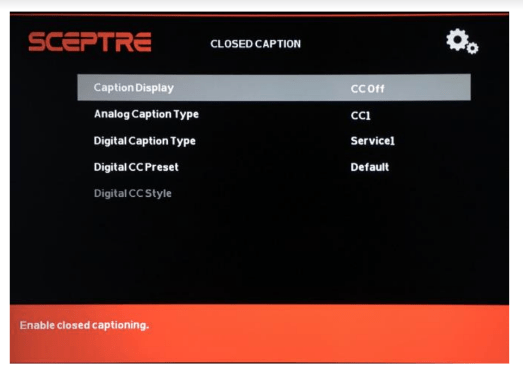
i. CAPTION DISPLAY – This turns on or off the closed captioning.
ii. ANALOG CAPTION TYPE – This chooses the subchannel that supplies the closed captioning. For United States, usually the setting is CC1. TEXT1-4 displays advertisements of the channel.
iii. DIGITAL CAPTION TYPE – This chooses the subchannel for digital channel closed captioning. iv. DIGITAL CC PRESET – This unlocks users ability to change caption styles.
v. DIGITAL CC STYLE – This feature changes caption options of digital closed captioning.
a) CC SIZE – This changes the size of the text.
b) CC FONT – This changes the text font style.
c) CC OPACITY – This changes the transparency of the captioning.
d) TEXT COLOR – This changes the color of the text.
e) CC BACKGROUND OPACITY – This changes the transparency of background of the text.
f) CC BACKGROUND COLOR – This changes the color of the background.
II. MENU LANGUAGE – This function adjusts the language of the menu (English, French, and Spanish).
III. MENU TRANSPARENCY – This function adjusts the opacity of the OSD menu.
IV. CLOCK
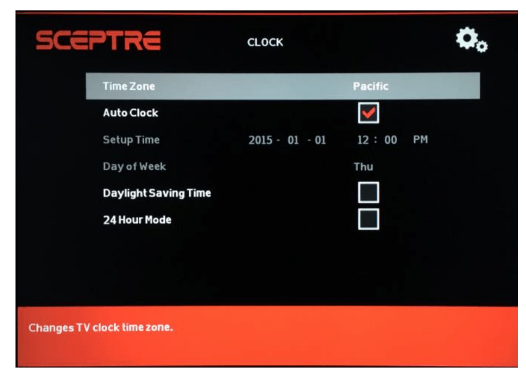
i. TIME ZONE – This adjusts the time zone for the display’s clock.
ii. AUTO CLOCK – This feature sets the display clock to the TV channel’s clock. (You must have antenna to use this feature.)
iii. SETUP TIME – This feature manually lets you adjust the time and date.
iv. DAY OF THE WEEK – This feature tells you the day of the week.
v. Daylight Savings Time – This feature toggles the daylight savings time options.
vi. 24 Hour Mode – This feature tells time in a 24 hour fashion instead of showing AM and PM.
V. OSD TIMER – This function adjusts the idle duration the MENU stays on the screen.
VI. SLEEP TIMER – This function adjusts the time duration for the display to turn off automatically.
VII. CEC – This function adjusts consumer electronics control options.
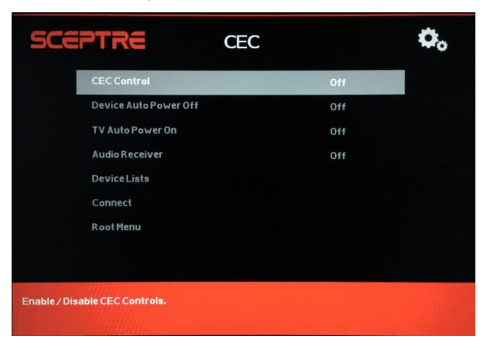
i. CEC CONTROL – This turns on or off the CEC controls.
ii. DEVICE AUTO POWER OFF – This enables the display remote to turn off CEC compatible devices (ie DVD player that supports CEC).
iii. TV AUTO POWER ON – This enables the display to turn on if you press the CEC compatible device’s remote to power on.
iv. AUDIO RECEIVER – This enables the display to use audio return channel function via source HDMI 1.
v. DEVICE LISTS – This shows the current CEC compatible devices connected. vi. CONNECT – This turns on CEC devices through this menu.
vii. ROOT MENU – This shows CEC compatible device’s own menu.
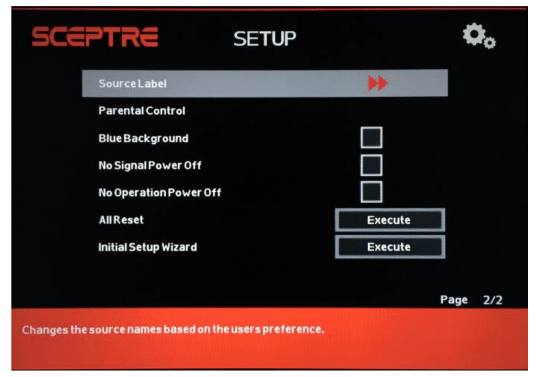
VIII. SOURCE LABEL – This feature edits the name of each source.
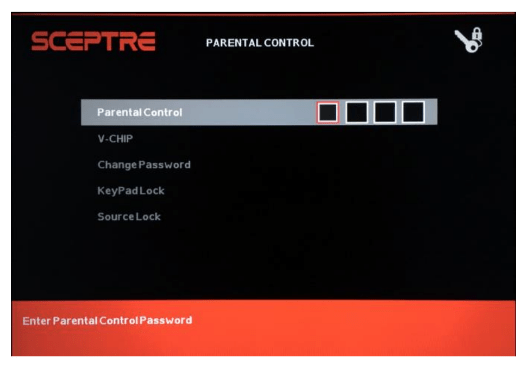
IX. PARENTAL CONTROL – This feature allows you to input a password in order to access the other features. (The default password is “0000”)
X. V-CHIP – This feature blocks shows under the TV tuner.
i. US V-CHIP
a) MOVIE RATING – This feature blocks movies.
b) TV RATING – This blocks shows based on TV ratings.
ii. CANADA V-CHIP
a) ENGLISH RATING – This blocks English TV shows in Canada.
b) FRENCH RATING – This blocks French TV shows in Canada.
iii. BLOCK UNRATED SHOW – This blocks TV shows with no ratings supplied. iv. DOWNLOADABLE RATING – This is a feature under the new V-chip where ratings can be downloaded from the channel.
v. CLEAR DOWNLOADABLE DATA – This feature clears the downloaded ratings data.
XI. CHANGE PASSWORD – This feature changes the password of the parental control function.
XII. KEYPAD LOCK – This feature locks the buttons on the display from functioning, except for the POWER button.
XIII. SOURCE LOCK – This feature locks different sources from working.
XIV. BLUE BACKGROUND – This feature gives the display a blue default background when there is no signal.
XV. NO SIGNAL POWER OFF – This feature turns the display off if there is no signal given to the display after a certain (10 minutes) time.
XVI. NO OPERATIONS POWER OFF – This feature turns the display off if there are no commands given to the display after a certain hour) time.
XVII. ALL RESET – This reset all the options in the MENU back to its default values.
XVIII. INITIAL SETUP WIZARD – This function sends you back to the initial setup when you first turn on the display.
Please Note:
- Please refer to RATINGS EXPLAINED for more information on ratings definitions.
- Downloadable rating and clear downloadable data might be grayed out depending on the TV stations support.
- Closed captioning is only available under AV, and display ports.
- Closed captioning depends on your TV program’s support. Sometimes due to the TV channel or the signal, closed captioning will not be available.
- In United States, closed captioning under analog signals is CC1.
- In United States, closed captioning under digital signal is Service1.
- TEXT1-TEXT4 offers you local information; however it might not be support by your local broadcasting station. When no information is offered, you will see a large black box in the middle of the screen.
Detailed Explanations
USB Connection Explained
The display is a widescreen display with an USB port. With the USB port the display can access USB flash drives (up to 2GB) and display pictures or play MP3 files. To use this feature connect a USB flash drive to the USB port of the display and press the USB button to start browsing for music and pictures.
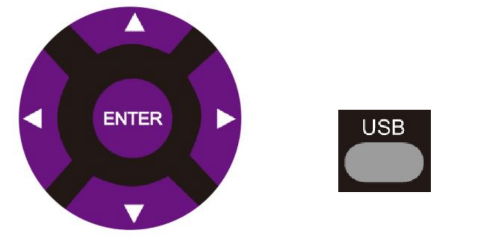
Once you press the USB button the USB menu will come up. Select either the music or picture you want to browse using the arrow buttons. Press the ENTER button to select the file you want.
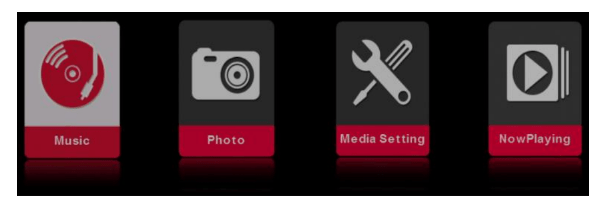
Browsing Music and Photo
In the USB function, select Music or Photo.
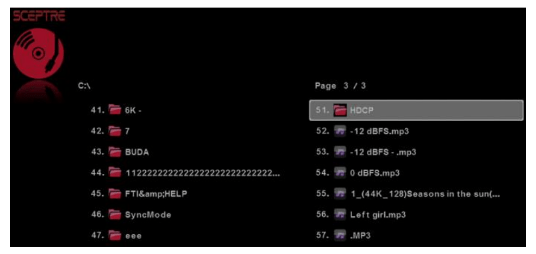
Use the ▲ or ▼ button to select the file you want and use the ENTER to play the file. Use the EXIT button to exit a folder.
Media Setting
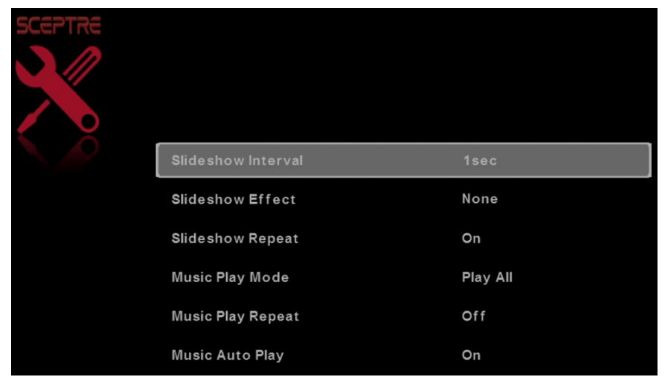
- SLIDESHOW INTERVAL – This option adjusts the time interval of a displayed picture.
- SLIDESHOW EFFECT – This option adjusts the video effects when pictures interchange.
- SLIDESHOW REPEAT – This option toggles the repeat function for displaying pictures.
- MUSIC PLAY MODE – This option adjusts the music playing option.
- MUSIC PLAY REPEAT – This option toggles the repeat function for playing music.
- MUSIC AUTO PLAY – This function toggles the auto play feature which will play any music found in the USB flash drive once you insert the flash drive.
Technical Limitation
- The USB port does not support USB hubs.
- The USB flash drive supports FAT32 and FAT16 file system only.
- The biggest file size is 2 gigabyte (FAT32).
- The picture function only supports JPEG file (baseline only, progressive is not supported).
- The music function only supports MP3 that is from 32-48k Hz using a data rate of kbps.
- All USB functions are operated by the remote control. None of the buttons physically located on the display will respond to USB functions.
Closed Captioning (digital and analog) Explained
Your display is equipped with an internal Closed Caption decoder. It allows you to view conservations, narration and sound effects as subtitles on your display. Closed Captions are available on most TV program, and on some VHS home video tapes, at the election of the program provider.
CC – Press this button to enable the CC function. You can then use the ▲▼ buttons to select if you want CC off or CC on. You can use the ◄► buttons to select between different CC channels.
Please Note:
- Digital Closed Caption service is a new caption service available on digital TV programs also at the election of the service provider). It is a more flexible system than the original Closed Caption system, because it allows a variety of caption sizes and font styles.
- Not all programs and VHS video tapes offer closed caption. Please look for the CC symbol to ensure that captions will be shown.
- In the Closed Caption system, there can be more than one caption service provided. Each is identified by its own number. The CC1 and CC2 services display subtitles of TV programs superimposed over the program’s picture.
- In the Closed Caption system, the TEXT1 or TEXT2 services display text that is unrelated to the program being viewed (e.g., weather or news). These services are also superimposed over the program currently being viewed.
- Closed Captioning for this display only works under sources TV, and AV.
MHL Explained
MHL® stands for mobile high definition link. It is a protocol and cable that enables mobile devices tablets, cell phones...etc) to be displayed and charging at the same time on a display. This Sceptre display supports MHL on HDMI1. If you see your mobile device supporting MHL then you can purchase a MHL cable and connect one end (usually micro USB) to your mobile device and the other end to HDMI 1. Turn on both the mobile device and the Sceptre display and press the MHL button and things displayed on the mobile device will be displayed on the display.
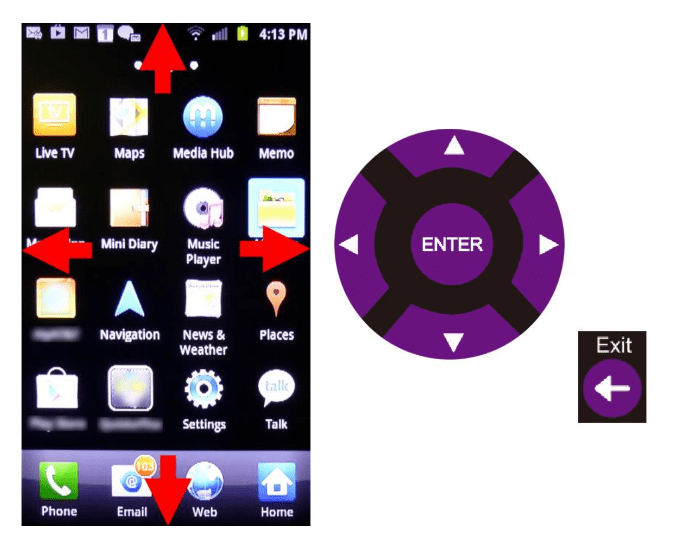
Once you see the cell phone screen on the display you can either use the cell phone itself to control the screen or use the display remote’s buttons shown above to control the cell phone screen.
Please Note:
- Not every cell phone supports MHL. Please contact your cell phone company for support information or search MHL on the web for more information.
- Not every MHL cable supports your cell phone. There are different versions of MHL cables for different cell phones. The wrong type of cable will not produce an image on the display. Please contact your cell phone company to ensure you have the correct MHL cable.
- The directional button and ENTER buttons on the display’s remote have limited control over the cell phone’s OS and the programs within. Some programs will respond to the control, some will not. For maximum control please use the cell phone’s touch screen instead of the display’s remote.
Direct Function Buttons
Direct function buttons allow the user to control certain special functions of the display or the Sceptre Sound Bar.

Color Buttons A-C
The color buttons are direct function buttons that lets the user switch between their 3D and 2D modes.
- RED A – This button changes the picture from 2D to 3D.
- GREEN B – This button changes the picture from 3D to 2D if you are playing a 3D signaled video.
- YELLOW C – This button changes the 3D effect on pivoting the picture to the left or right.
Please Note:
- Sceptre Sound Bar Buttons and 3D buttons are only functional if you have the product. Without the Sceptre Sound Bar or a Sceptre 3D display, those buttons will be non-functional.
Sceptre Sound Bar
The Sceptre Sound Bar is an add-on speakers designed to connect to any flat panel display or UHD display including Sceptre’s own. These direct function buttons above help eliminate the use of the Sound Bar remote.
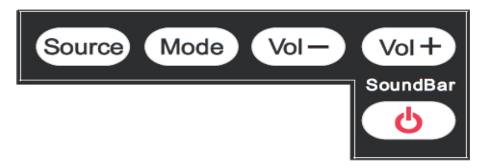
- Power –This button turns the Sound Bar on or off.
- Source – This button changes the audio signal of the Sound Bar.
- Mode – This button changes the sound mode of the Sound Bar.
- Vol(-) – This button decreases the volume of the Sound Bar.
- Vol(+) – This button increases the volume of the Sound Bar.
Please Note:
- If you own a Sceptre Sound Bar with the Sceptre display, the display remote’s power button will turn on both the Sound Bar and the display.
ROKU Function Buttons
Sceptre ROKU Ready displays support the ROKU streaming stick. You can control the ROKU stick with the PURPLE colored buttons.
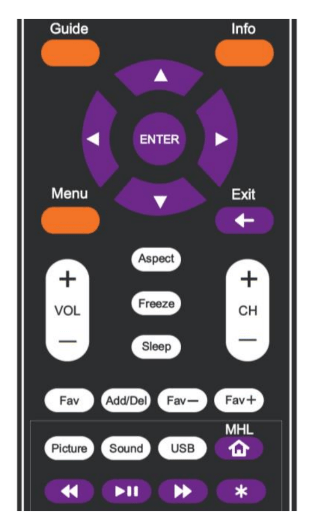
 ENTER – Under ROKUTM these buttons move your selection up, down, left, right. ENTER selects the function you want to use.
- EXIT / RETURN – Under ROKUTM this button functions as the return button, returning to the previous screen.
- HOME / MHL – The button while using a ROKUTM product will return any current running program back to the ROKUTM home screen.
- REWIND – Under ROKUTM this button rewinds the current video being played.
- PLAY / PAUSE – Under ROKUTM this button plays or pauses the current video being played.
- FAST FORWARD – Under ROKUTM this button plays the current video at a faster pace.
- STAR (*) – Under ROKUTM this button gives the info on the ROKUTM MHL Streaming stick.
HDMI ARC (Audio Return Channel) Explained
This Sceptre display has the feature ARC (Audio Return Channel) on HDMI 4. ARC is a feature that enables a display, via a single HDMI cable, to send audio data to an AV receiver or surround sound DVD / Blu-ray player. This feature eliminates the necessity of having a separate S/PDIF audio connection for sending display audio to the receiver.
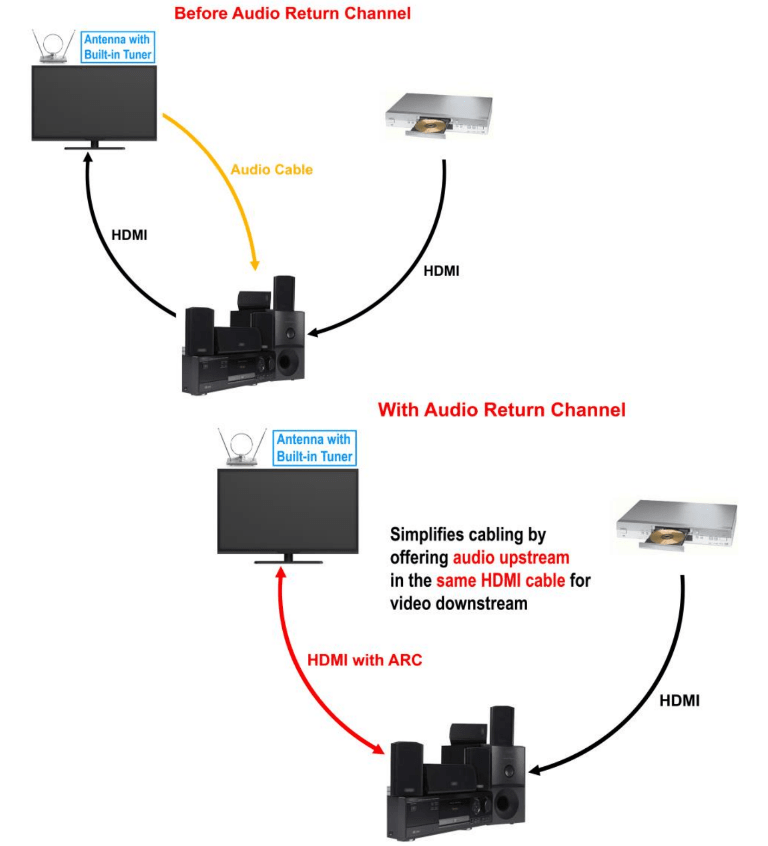
For ARC to work properly the following needs to be met:
- Make sure the display, the audio receiver both have the ARC function.
- Make sure the HDMI cable is ARC capable (HDMI ver 1.4 or higher).
- Make sure you are using ARC on the correct HDMI port. This display’s ARC feature is on HDMI 4 only.
Ratings Explained
General Operation
To block channels you don’t want your children to watch, you can filter them with the ratings function.
MPAA lets you control ratings for movies. For regular TV programs you can use USTV settings.
USTV settings lets you filter what content you want at each age level, TV-Y, to TV-MA (refer to definitions below). Below are definitions for each setting.
USTV Rating
TV-Y (USTV) – For All Children
This program is designed to be appropriate for all children. Whether animated or live-action, the themes and elements in this program are specifically designed for a very young audience, including children from ages 2-6. This program is not expected to frighten younger children.
TV-Y7 (USTV) – Directed to Older Children
This program is designed for children age 7 and above. It may be more appropriate for children who have acquired the developmental skills needed to distinguish between make-believe and reality.
Themes and elements in this program may include mild fantasy violence or comedic violence, or may frighten children under the age of 7. Therefore, parents may want to consider the suitability of this program for their very young children. Note: For those programs where fantasy violence may be more intense or more combative than other programs in this category, such programs will be designated TV-Y7-FV.
TV-G (USTV) – General Audience
Most parents would find this program suitable for all ages. Although this rating does not signify a program designed specifically for children, most parents may let younger children watch this program unattended. It contains little or no violence, no strong language and little or no sexual dialogue or situations.
TV-PG (USTV) – Parental Guidance Suggested
This program contains material that parents may find unsuitable for younger children. Many parents may want to watch it with their younger children. The theme itself may call for parental guidance and/or the program contains one or more of the following: moderate violence (V), some sexual situations (S), infrequent coarse language (L), or some suggestive dialogue (D).
TV-14 (USTV) – Parents Strongly Cautioned
This program contains some material that many parents would find unsuitable for children less than years of age. Parents are strongly urged to exercise greater care in monitoring this program and are cautioned against letting children under the age of 14 watches unattended. This program contains one or more of the following: intense violence (V), intense sexual situations (S), strong coarse language (L), or intensely suggestive dialogue (D).
TV-MA (USTV) – Mature Audience Only
This program is specifically designed to be viewed by adults and therefore may be unsuitable for children under 17. This program contains one or more of the following: graphic violence (V), explicit sexual activity (S), or crude indecent language (L).
TV program description
FV - Fantasy Violence
V - Violence
S - Sexual Situations
L - Adult Language
D - Sexually Suggestive Dialog
MPAA Rating
G (MPAA)
General audiences. All ages admitted.
PG (MPAA)
Parental guidance suggested. Some material may not be suitable for children.
PG-13 (MPAA)
Parents strongly cautioned. Some material may be inappropriate for children under 13.
R (MPAA)
Restricted. Under 17 requires accompanying parent or adult guardian (age varies in some jurisdictions).
NC-17 (MPAA)
No one 17 and under admitted.
X (MPAA)
X is an older rating that is unified with NC-17 but may be encoded in the data of older movies.
Aspect Ratio Explained
The display is in widescreen aspect, but most TV programs are still broadcasting in a square format, therefore the display is offering multiple ways of viewing videos. There are mainly two types of signal format, Full (16:9 format), Normal (4:3 format), while others offer a novelty ways to view the display. Simply use the ASPECT button on the display’s remote control to cycle between the multiple modes.
1. NORMAL
Most analog TV channels have 4:3 signal formats. If the original 4:3 aspect ratio (1.33:1 source) is preserved, black bars are added to the left and right of the display image. This aspect keeps that aspect ratio and shows you the black bars on the side.
2. WIDE
This mode will stretch the picture to a widescreen ratio. If you have a perfect 16:9 ratio picture you will not see any black bars. If you are watching a widescreen movie in 1.85:1 or 2.35:1 ratio, you will still get black bars on the top and bottom of the screen. If you use this mode on pictures they will be stretched and distorted horizontally.
3. CINEMA
This mode cuts off all 4 sides to try to make a widescreen movie fit better on the display screen.
4. ZOOM
When watching a 4:3 aspect ratio TV or movie, this mode zooms in to cut off most of the black bars on the side while preserving the 16:9 ratio. Because of the zoom, the top and bottom are cut off as well.
5. DOT BY DOT
This mode is only available under PC. It will map dot by dot to the screen. Any resolution will be proportionate.
Shortcuts to Browsing Channels
Browsing through the entire channel list on the display can be tedious. This display features a favorite channel list, where you can add in channels that you always want to watch

TO ADD TO THE FAVORITE LIST
- Go to any channel you would like to include in your favorites list.
- Press the ADD/DEL button on the remote control. You will see a (FAV) on the INFO banner denoting that this channel is in the favorites list.
TO DELETE FROM THE FAVORITE LIST
- Go to any channel you would like to remove from your favorites list.
- Press the ADD/DEL button on the remote control. You will then see the (FAV) disappear on the INFO banner denoting that this channel is no longer in the favorites list.
BROWSING CHANNELS WITH THE FAVORITE LIST
- Press the FAVORITE button, and the list of channels you have added will be in a window.
- Use the ▲ or ▼ buttons to select the channel you want to jump to and press ENTER to confirm.
- You can also use the FAV+/- keys to switch up and down the favorites list automatically.
How do I clean the display ?
IMPORTANT
- The power cable has to be removed from the socket before cleaning the display.
- Do not use volatile solvent (alcohol, rosin, and toluene) to clean the display. These types of chemicals might damage the housing and the LCD glass.
Cleaning the bezel and remote control
- Use a 100% cotton cloth or micro-fiber cloth for cleaning.
- If the remote control or bezel is dirty to the point where you cannot simply dry wipe it, please lightly dampen the wiping material (the wiping material cannot be dripping wet, because if water drips into the panel it will cause malfunction and possible permanent damage to the panel which will not be covered under the warranty) with clean water and wipe again. Wipe the display with a dry micro-fiber cloth or cotton cloth afterwards.
Please Note:
- Make sure you wring the water out of the cloth before cleaning the bezel or remote in order to prevent water from penetrating into the electronics.
Cleaning the Screen
- Use a 100% cotton cloth or micro-fiber cloth for cleaning.
- The LCD screen glass is extremely fragile. Do not scrape it with any material. Do not press or tap the screen to avoid cracking. When the screen is dirty to the point where you cannot simply dry wipe it, please lightly dampen the wiping material with clean water and wipe again. Wipe the display with a dry micro-fiber cloth or 100% cotton cloth afterwards.
Troubleshooting
The following table contains the common problems and the solutions to these problems. Please check this list before you contact the technicians.
| NO PICTURE | Connect power cord correctly. |
| Turn on power. | |
| Connect video cable correctly. | |
| Select the input signal source with proper cable connection with the source button. | |
| ABNORMAL COLORS | Match the colors on the cables to the ports off the back of the television. I.E. red cable to red colored port. |
| PICTURE IS TOO DARK | Adjust your contrast, brightness and lamp settings from the OSD Menu. For adjust controls, refer to page 28. |
| AUDIO ONLY NO PICTURE | Make sure you have connected both your video and audio cables. |
| The display’s tuner signal must not be lower than 65 %. | |
| PICTURE ONLY NO AUDIO | Make sure the audio cable is connected. |
| Readjust your volume via the remote control. | |
| The display’s tuner signal must not be lower than 65 %. | |
| REMOTE CONTROL DOES NOT WORK | Turn off the display, unplug it from the socket. Remove the batteries out of the remote for 30 seconds. Press the remote buttons and the power button randomly for a good 2 seconds, and then reinstall the batteries. Try the remote to see if it works. For battery removal instructions, refer to page 17. |
| The display’s remote sensor is also housed in the same place as the power indicator light. Please make sure there is line of sight from the remote control’s front sensor to the remote sensor of the display. | |
| CANNOT RECEIVE SUFFICIENT CHANNELS THROUGH THE ATSC/NTSC TUNER | The display’s tuner signal must not be lower than 65 %. Change the direction of your antenna and rescan your channels. If you have cable call up your cable company and ask about signal strength of your local cable. |
| NO COLOR | Please adjust your picture setup and make sure the saturation and the RGB are not turned all the way down. For adjustment controls refer to page 28. |
| The display’s tuner signal must not be lower than 65 %. Check your signal. | |
| WEAK SIGNAL OR NO PROGRAM SYMBOL ON SCREEN | The display’s tuner signal must not be lower than 65 %. Change the direction of your antenna and rescan your channels. If you have cable call up your cable company and ask about signal strength of your local cable. |
| DISPLAY’S UNIVERSAL REMOTE CODE | This television follows SONY’s universal remote code. To find the actual code you must read through your own universal remote’s guide book. |
| TV CHANNELS ARE BLOCKED | Check your auto lock function’s settings inside the OSD. You may have locked up some channels but forgot about them. Refer to page 36 for more instructions. |
| UNIVERSAL REMOTE CODE | This display follows SONY’s universal remote code. Please check your hand book for SONY’s codes then apply them. |
| THE DISPLAY TURNS ON OR OFF SLOWLY AND THE SCREEN SHOWS UP SLOWLY | This display is an Ultra High Definition liquid crystal display panel. It requires a few more seconds than normal TVs to power up and show the picture. |
| HDCP VIDEO SAYS NO HDCP SUPPORT | Reboot your HDCP video device but turning them off and unplugging the power cord. Wait up to 8 minutes to plug the power back in to see if it works or not. |
| PICTURE IS DISTORTED OR HAS ABNORMAL SOUND | This might be from interference from large electrical appliances, cars, motorcycles, or fluorescent lights. If the display is close to the wall, try moving the display to another room in your house to see if the problem still occurs. |
| PICTURE DOES NOT COVER THE ENTIRE SCREEN | If you’re using HDMI or a TV digital channel make sure you use the ASPECT button to switch to 16:9 format. If you are using VGA, use the AUTO ADJUST function to adjust to the screen. Please Note: If you are using regular analog TV, AV, or component in 480i resolution, use the ASPECT button to switch to 16:9 in order to fill up the screen. Please Note: This note this feature will distort the picture. |
| PICTURE QUALITY IS HORRIBLE!! | For best image quality, view HD widescreen programs where possible. If HD content is not available view “Standard Definition” from a digital source. Standard, analog TV will always be noticeable inferior to HD because your display has video that is many times better than old TV’s and so you can see interference and deficiencies you did not KNOW you had. |
| PICTURE HAS PIXELS THAT ARE ALWAYS DISPLAYING THE SAME COLOR | Your display is manufactured using an extremely high level of precision technology, however, sometimes some pixels of your display may not display. Pixels defects within industry specifications are inherent to this type of product and do not constitute a defective product. |
| I CANNOT CHANGE THE TIME MANUALLY | Your display syncs time automatically according to your local TV channel. This function only works while the display’s tuner is connected to an ANTENNA. |
| BIG BLACK BOX IN THE MIDDLE OF SCREEN | You have turned on closed captioning and are using TEXT1 – TEXT4. Change the setting to CC1 or turn off closed captioning and the box will disappear. Refer to page 37 for more information. |
| SWITCHING A CHANNEL OR SOURCE CHANGES THE VOLUME | Different channels and inputs will sometimes have this effect because the channel signal’s own volume is already loud. There is no way remove this completely. The display has an AUTO VOLUME LEVEL function that can combat this type of effect. Please make sure that function is turned on. |
| THERE IS NOISE OR TRASH PIXELS ON THE SCREEN | When your display’s resolution is higher than the digital channel’s broadcast resolution, the signal is up-converted to match your display’s resolution. Up-converting can cause this type of effect. |
| TIPS FOR HIGH DEFINITION USERS | The display is an ideal platform for viewing High Definition Content. The best image quality can be achieved by HDMI, YPbPr (Component), then VGA. However, due to variances in broadcast practices, it is possible some image distortions can occur. |
| TIPS FOR LETTERBOX CONTENT USERS | Letterboxed (Widescreen) versions of DVD movies are most commonly formatted for standard 4:3 TVs. The display has the capability of expanding this content so the entire screen is filled at the expense of the image proportion. To use this function press the aspect button on the remote control and cycle among the available options. |
| I CANNOT FIND THE VOLUME AND CHANNEL CHANGING BUTTONS | The buttons are represented by the ▲▼◄► buttons located on the remote control. ▲▼ changes the channels and ◄► changes the volume. |
| DISPLAY TURNS OFF AUTOMATICALLY AFTER 10 MINUTES | The display features a power saving mode which will automatically turn off the display, if there’s no signal provided for more than 10 minutes. |
| MY DISPLAY PICTURE IS VERY DIM | Check to see if you are under POWER SAVING mode for your picture mode. Keep pressing the PICTURE button on the remote control to cycle out of POWER SAVING. |
| MY CELL PHONE DOES NOT WORK WHEN I CONNECT MHL CABLE TO MY CELL PHONE | Check if you connected to HDMI2 or another HDMI since ONLY HDMI1 works with MHL. If it still doesn’t work make sure you have the correct MHL cable (some have more pins than others). Ultimately, please consult your cell phone manufacturer for compatibility issues. |
| UNDER MHL THE DISPLAY’S REMOTE WON’T CONTROL THE CELL PHONE | For total control you will need to use the cell phone’s touch screen. The display’s remote have limited functions and its controls are dependent on the program you are using. |
| I HAVE DIGITAL CABLE AND AFTER SCANNING FOR CHANNELS I GOT NOTHING! | This display does not support QAM. You’ll need a cable box in order for the display to work correctly. Make sure you have a HDMI cable connected to the cable box and to the display. Afterwards turn on the display and cable box and make sure your display’s source is HDMI. |
| MY VIDEO IS BLACK AND WHITE UNDER YPBPR | AND WHITE UNDER YPBPR Make sure you are not using yellow video cable connecting to the YPbPr’s green port. If you are you’ll need to use AV as your source instead of YPbPr. |
| I DON’T SEE AN OPTION FOR THE RESOLUTION 3840 x 2160 WHILE CONNECTED TO HDMI | Check and make sure your video card supports that resolution and the cable you are using is HDMI 1.4 or higher. Make sure the drivers are upgraded to the newest version possible. |
See other models: E246BV-SR X328BV-SR
