Push in and turn the control knob to turn on the warming drawer. The power indicator light will turn on and remain on while the warming drawer is in operation.
When finished, turn the control knob to OFF to turn off the warming drawer. When the warming drawer is turned off, the power indicator light will go out and the drawer will begin to cool.
The temperature is controlled by rotating the control knob to the desired setting. The temperature setting ranges from Lo to Hi on the warming drawer control to keep heated foods warm at the selected temperatures.
Moist-Dry Slide Control
The Moist-Dry slide control allows you to open or close the vent slots in the door. The MOIST setting holds moisture in, while the DRY setting allows steam and moisture to escape from the drawer
NOTE: Condensation may form on inner surfaces. This is normal.
To keep foods moist, slide control to MOIST, closing the vents. Closing the vents will seal the drawer and keep hot foods soft and moist.
To keep foods crisp, slide control to DRY, opening the vents. Opening the vents releases moisture from the drawer and keeps hot foods crisp and dry. See the Warming Drawer Temperature Chart in the “Setting the Controls” section.
Setting the Controls
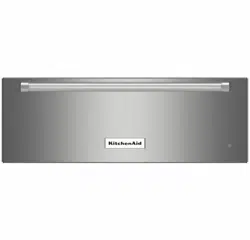
The Indoor/Outdoor Warming Drawer is ideal for keeping hot cooked foods at serving temperature. It is designed to operate properly either indoors or outdoors at temperatures down to 32°F (0°C). If the drawer is operated at temperatures colder than 32°F (0°C), performance may be affected.
Different types of food may be placed in the warming drawer at the same time.
When keeping several types of food hot, use the setting for the highest temperature food in the warming drawer. Place foods requiring the highest temperature on the bottom of the drawer and those foods requiring the lowest temperature on the elevated rack.
For best results, do not hold foods in the warming drawer longer than 1 hour. For smaller quantities or heat-sensitive foods, such as eggs, do not hold longer than 30 minutes.
Food must be cooked and at serving temperature before being placed in the warming drawer. Cover foods with a lid.
Breads, pastries, and fruit pies may be heated from room temperature on the HI setting. Remove food from plastic bags and place in oven-safe container.
Oven-safe serving dishes and dinner plates can be heated while the warming drawer is preheating.
NOTE: To conserve heat, place cookware and positioning rack in the warming drawer before preheating.
To Use:
1. Push in and turn the control knob to the desired food warming setting: Lo (low), between Lo and Med (medium low), Med (medium), between Med and Hi (medium high), or Hi (high).
NOTE: For best results, meats, seafood, poultry and any foods containing meat, seafood or poultry should be set to medium or higher.
2. Select MOIST or DRY setting.
3. Allow warming drawer to preheat. Recommended minimum preheating times are 5 minutes for Lo, 10 minutes for Med, and 20 minutes for Hi.
4. Push in and turn the control knob to OFF when finished.
WARMING DRAWER TEMPERATURE CHART
Different foods require different settings in order to maintain the ideal serving temperature. Use the following chart as a guide.
You can set the drawer temperature anywhere between Lo and Hi. For best results, meats, seafood and poultry should be set to medium or higher. Cover food, if desired, to maintain heat and moisture
When keeping several different types of food hot, set the drawer to the food requiring the highest temperature setting. Place item(s) requiring the highest temperature on the bottom of the drawer and those items requiring the lowest temperature on the rack
Warming Cookware
Use only cookware approved for oven use. Follow the cookware manufacturer’s instructions.
Positioning Racks and Pans
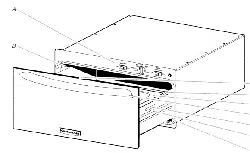
Positioning Rack
The 2 racks accompanying your warming drawer will fit from front to back or side to side.
NOTE: The warming drawer must be fully opened when placing or removing racks.
Each rack raises an oven-safe container 1¹⁄₈" (2.86 cm) from the bottom of the drawer.
Keep the number of times the drawer is opened to a minimum in order to maintain set temperature in the warming drawer
Optional Pans (accessory)
The warming drawer includes 2 pan support rails designed to hold a variety of serving pan sizes. Pan sizes that can be used are 1/6, 1/9, 1/3, 1/2, and 2/3. A full size serving pan can be placed across the width of the 27" (68.6 cm) and 30" (76.2 cm) warming drawer.
1/2 and 1/3 size pans may be purchased from the KitchenAid® Customer eXperience Center. See the “Assistance or Service” section to order.
Other size serving pans can be purchased at various retailers and restaurant supply stores.
Please refer to the following chart to determine the correct positioning of the pan support rails for each of the pan sizes.
*Full size pans cannot be used with the 24" (61 cm) warming drawer.
When using serving pans, make sure the pan support rails are properly installed in the locator notch before inserting pans.
A. Position 1 pan support rail locator notch
B. Position 2 pan support rail locator notch
C. Position 3 pan support rail locator notch
Proofing Bread
Proofing bread prepares dough for baking by activating the yeast. Check dough periodically for progress.
To Proof:
1. Cover dough with lightly oiled waxed paper and place temperature safe bowl(s) on rack.
2. Set control knob to PROOF setting.
3. Place vent on MOIST setting.
4. Verify doneness by pressing 2 fingers ¹⁄₂" (1.3 cm) into dough. If indentation remains, the dough is ready
For second proofing of dough, repeat steps 1-4.
Slow Cook Function
The SLOW COOK function in the warming drawer cooks food slowly at a low temperature over a long period of time, similar to a countertop slow cooker.
When the warming drawer is installed outdoors, the SLOW COOK function should not be used when the temperature is below 32°F (0°C).
There are 2 settings: Hi and Lo. Guidelines for cooking times are 4 to 5 hours for Hi and 8 to 10 hours for Lo. Smaller quantities of food may require less time, while larger quantities may require more time.
When slow cooking, use serving pans (available for purchase) or oven-safe cookware. To order serving pans, see the “Assistance or Service” section.
Before slow cooking, thaw frozen foods completely.
IMPORTANT: Brown roasts thoroughly before starting to slow cook.
To Use:
1. Push in and turn control knob to the SLOW COOK zone and set the desired temperature: Lo or Hi. Preheating is not necessary.
2. Place food into warming drawer. Food should be placed directly on the bottom of the warming drawer. Do not use the rack.
3. Close the warming drawer. Be sure that the warming drawer is completely closed during operation.
4. Turn control knob to OFF when finished.
Panel Kits (Accessory)
Panel kits are available for customizing the front of the warming drawer to match other KitchenAid® home appliances. See the “Assistance or Service” section to order.
WARMING DRAWER CARE
Drawer Slides
The drawer slides allow you to fully extend the drawer for easier cleaning. If necessary, the drawer can be removed.
NOTE: Load capacity for the drawer is 100 lbs (45 kg).
Warming Drawer
Remove all items from inside the warming drawer, and allow the warming drawer to cool completely before attempting to remove the drawer.
To Remove:
1. Open drawer to its fully open position.
2. Locate the black tabs on both sides of the drawer
3. Press the tab down on the right side of the drawer and lift tab up on the left side of the drawer at the same time. Then pull drawer out another inch to disengage latch.
4. Hold the drawer by the sides (not by the front). Pull it slowly all the way out.
To Replace:
1. Align the drawer rails with the receiving slides.
2. Push drawer in all the way.
3. Gently open and close the drawer to ensure it is seated properly on the slices.
General Cleaning
IMPORTANT: Before cleaning, make sure all controls are off and the warming drawer and the drawer accessories are cool. Always follow label instructions on cleaning products.
Soap, water and a soft cloth or sponge are suggested first unless otherwise noted.
STAINLESS STEEL SURFACES
To avoid damage to stainless steel surfaces, do not use soapfilled scouring pads, abrasive cleaners, Cooktop Polishing Creme, steel-wool pads, gritty washcloths or some paper towels.
Rub in direction of grain to avoid damaging.
Cleaning Method:
■ affresh® Stainless Steel Cleaner Part Number W10355016 (not included): See “Assistance or Service” section to order.
■ Liquid detergent or all-purpose cleaner: Rinse with clean water and dry with soft, lint-free cloth.
■ Vinegar for hard water spots
CONTROL KNOB
Do not use steel wool, abrasive cleansers or oven cleaner.
Do not soak knob.
When replacing knob, make sure knob is in the Off position.
Cleaning Method:
■ Soap and water:
Pull knob straight away from control panel to remove. Wash, rinse and dry with a soft cloth.
WARMING DRAWER
Cleaning Method:
Routine cleaning
■ Paper towel and spray glass cleaner: Make sure drawer is cool. Follow manufacturer’s instructions.
■ Warm, soapy water or all-purpose cleaner and a nonabrasive, plastic scrubbing pad: Wash, wipe with clean water and dry thoroughly.
■ affresh® Kitchen and Appliance Cleaner W10355010 (not included): See “Assistance or Service” section to order.
Stubborn stains and baked-on residue
Rub in direction of grain to avoid damaging.
■ Mildly abrasive cleanser or stainless-steel cleaners and a damp cloth or sponge. Wash, wipe with clean water and dry thoroughly. Repeat if necessary.
RACKS
Cleaning Method:
■ Steel-wool pad and warm, soapy water: Wash, rinse and dry thoroughly.
TROUBLESHOOTING
Try the solutions suggested here first in order to avoid the cost of an unnecessary service call.
Warming drawer will not operate
■ Has a household fuse blown, or has a circuit breaker tripped?
Replace the fuse or reset the circuit breaker. If the problem continues, call an electrician.
■ Is the power supply cord unplugged?
Plug into a grounded 3 prong outlet.
Warming drawer does not slide properly
■ Has the drawer been mounted properly on the slides?
See “Warming Drawer Care” section.
■ Has the drawer been overloaded?
The weight inside the drawer should not exceed 100 lbs (45 kg).
■ Is the drawer load uneven?
Redistribute the food to evenly balance the weight.
Excessive moisture on the warming drawer
■ Did you preheat the drawer?
Preheat the drawer before each use. See “Warming Drawer Use” section.
■ Is the MOIST-DRY setting correct?
Set the MOIST-DRY slide to DRY to vent the moisture.
Cooking results not what expected
■ The exterior of beef and pork may become very dark, but not burnt. This is normal. The interior will remain tender and juicy. Poultry will also darken, especially in areas not covered by skin.