
Model Number: RHCHS1001-C
Turbo Lite
Corded Handheld Stick Vacuum
For Customer Services & Spare Parts please call 0345 209 7461
Opening times: Monday - Friday 8am – 8pm & Saturday 9am – 1pm
Or visit us at www.productcare.co.uk
PLEASE RETAIN
FOR FUTURE REFERENCE

Contents
Page
Safety
instructions
…………………………….………..
3
Energy
Performance Label
………………………………....…..
6
Feature diagram
………………………………....…..
7
Unpacking your
vacuum cleaner
……………………………….……..
8
Assembling your vacuum cleaner
………………………………………
9
How to empty the dust
container
………………………………………
11
How to clean the filter
………………………………………
12
How to change the fuse
………………………………………
13
Troubleshooting
………………………………………
14
Connection to the mains supply
………………………………………
15
Notes
………………………………………
16
Guarantee & Customer Services
………………………………………
18
Spare Parts
………………………………………
19
2
For Customer Services & Spare Parts please call 0345 209 7461
Opening times: Monday - Friday 8am – 8pm & Saturday 9am – 1pm
Or visit us at www.productcare.co.uk
Thank you for purchasing your Turbo Lite Corded Handheld Stick Vacuum.
To get the best from your new cleaner, take a few moments to read these
instructions and keep them in a safe place for future reference.
Should you require any further assistance, our friendly Product Care team will
be happy to help.

Safety instructions
WARNING:
• It is hazardous for anyone other than a competent person
to carry out any service or repair operation that involves
the removal of a cover which gives protection against
exposure to electrical parts.
• If the supply cord is damaged, it must be replaced by the
manufacturer, its service agent or similarly qualified
persons in order to avoid a hazard.
• This product is intended for household use only.
Do not use outdoors.
• This appliance can be used by children aged from 8 years
and above and persons with reduced physical, sensory or
mental capabilities or lack of experience and knowledge if
they have been given supervision or instruction concerning
use of the appliance in a safe way and understand the
hazards involved. Children should not play with the
appliance. Cleaning and user maintenance should not be
made by children unless they are older than 8 and
supervised. Keep the appliance and its cord out of reach of
children less than 8 years.
• Do not operate this appliance for anything other than its
intended use.
• Do not immerse in water or other liquids for cleaning.
IMPORTANT SAFETY INSTRUCTIONS
READ CAREFULLY AND KEEP FOR FUTURE REFERENCE
3

Safety instructions
• DO NOT direct at people, animals, electrical outlets, or
equipment containing electrical components.
• Unplug from outlet when not in use. Do not leave the
cleaner unattended while plugged in.
• DO NOT use with damaged cord or plug.
• DO NOT use vacuum cleaner if it has been dropped,
damaged, left outdoors or dropped into water.
• Keep the vacuum cleaner away from water; do not allow it
to get wet. If unit is wet, do not plug unit into wall socket
or turn unit on.
• DO NOT pull or carry by cord, use cord as a handle, close
door on cord, pull cord around sharp corners or edges, or
expose cord to heated surfaces.
• DO NOT unplug by pulling on cord.
• To protect against electrical shock do not immerse cord,
plug, or appliance in water or other liquid.
• Unplug from the mains outlet when not in use, before
putting on and taking off parts, and before cleaning.
• The use of accessory attachments not recommended by
the appliance manufacturer may cause fire, electric shock
or injury. Only use the accessories supplied by the
manufacturer.
• DO NOT let the cord hang over the edge of the worktop, or
touch hot surfaces.
4

Safety instructions
• This cleaner is intended for internal household use only, do
not use outside or for anything other than its’ intended
purpose.
• DO NOT use this vacuum to pick up water or any other
liquids, combustible substances or hot/burning objects.
• Only use the unit when fully assembled.
• NEVER place your fingers or other objects into any part of
the cleaner. Be aware that loose clothing or hair may
become trapped in the cleaner if improperly used.
• Before use, ensure that all of the air vents of the cleaner
are clear and there is no restriction of air flow.
• Caution: Exhaust air discharged from the sides of the
cleaner may extinguish a gas fire, pilot light, or disturb
ashes in an open fire. Always avoid directing the cleaner
toward naked flames.
• Important: This cleaner has a thermal safety device which
automatically cuts off the power supply in case of over
heating. If the safety device has switched the cleaner off,
unplug from the mains and allow the cleaner to cool
down. Once the cleaner has cooled it can be plugged back
in to the mains and used as normal. This takes
approximately 15 minutes to reset.
• NEVER wrap the power cord around the appliance. This
can cause the cord to become damaged leading to
electrical failure.
5
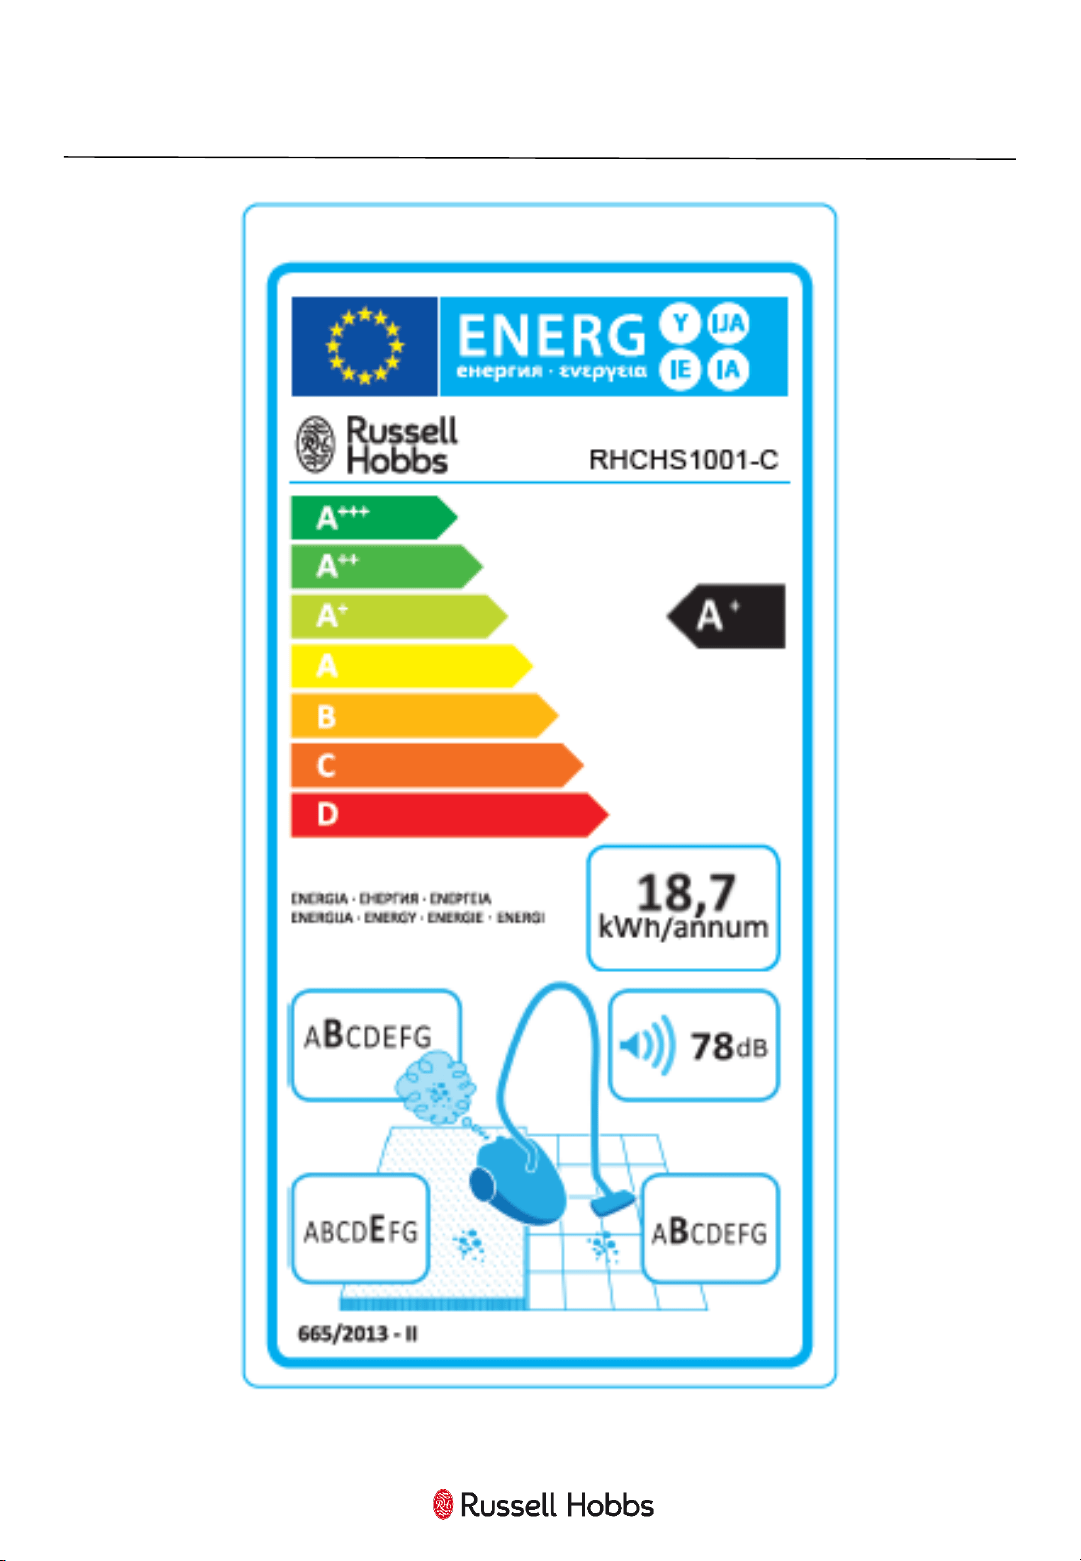
Energy Performance Label
6
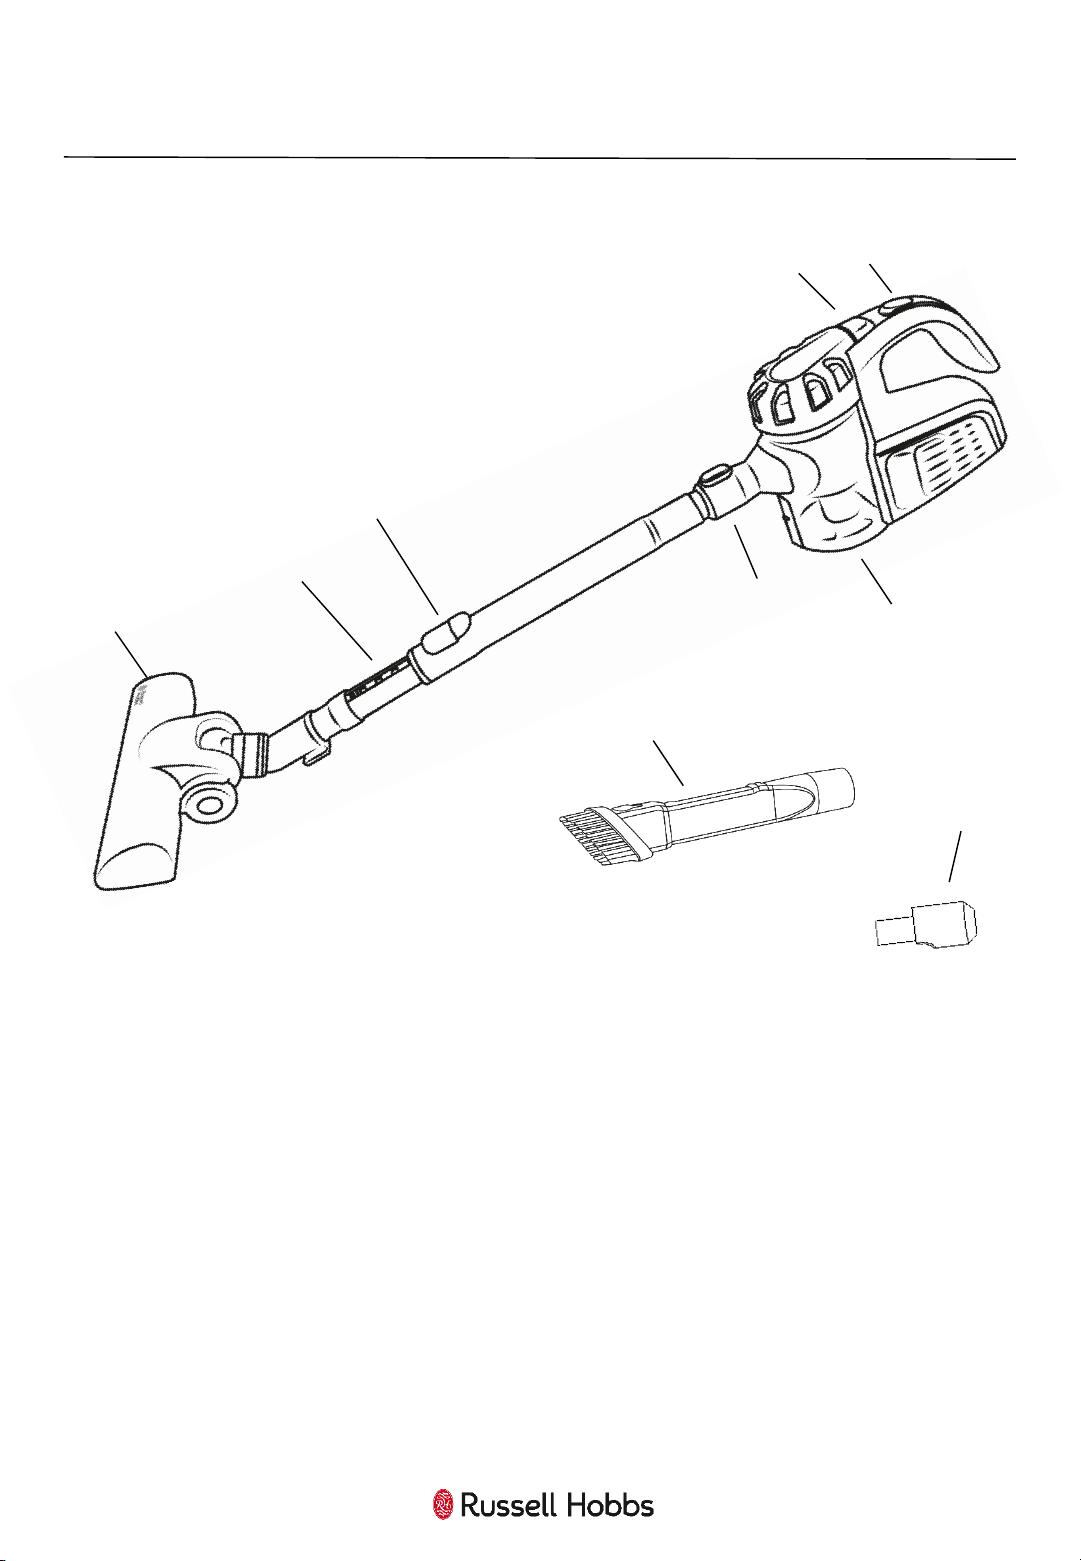
Feature diagram
7
1. Floor head
2. Extension tube
3. Extension tube release
button
4. Dust container release
button
5. Power switch
6. Dust tank
7. Nozzle
8. 2 in 1 crevice and brush tool
9. Connecting joint tool
1
2
3
5
6
7
8
4
9
Unpacking your vacuum cleaner
8
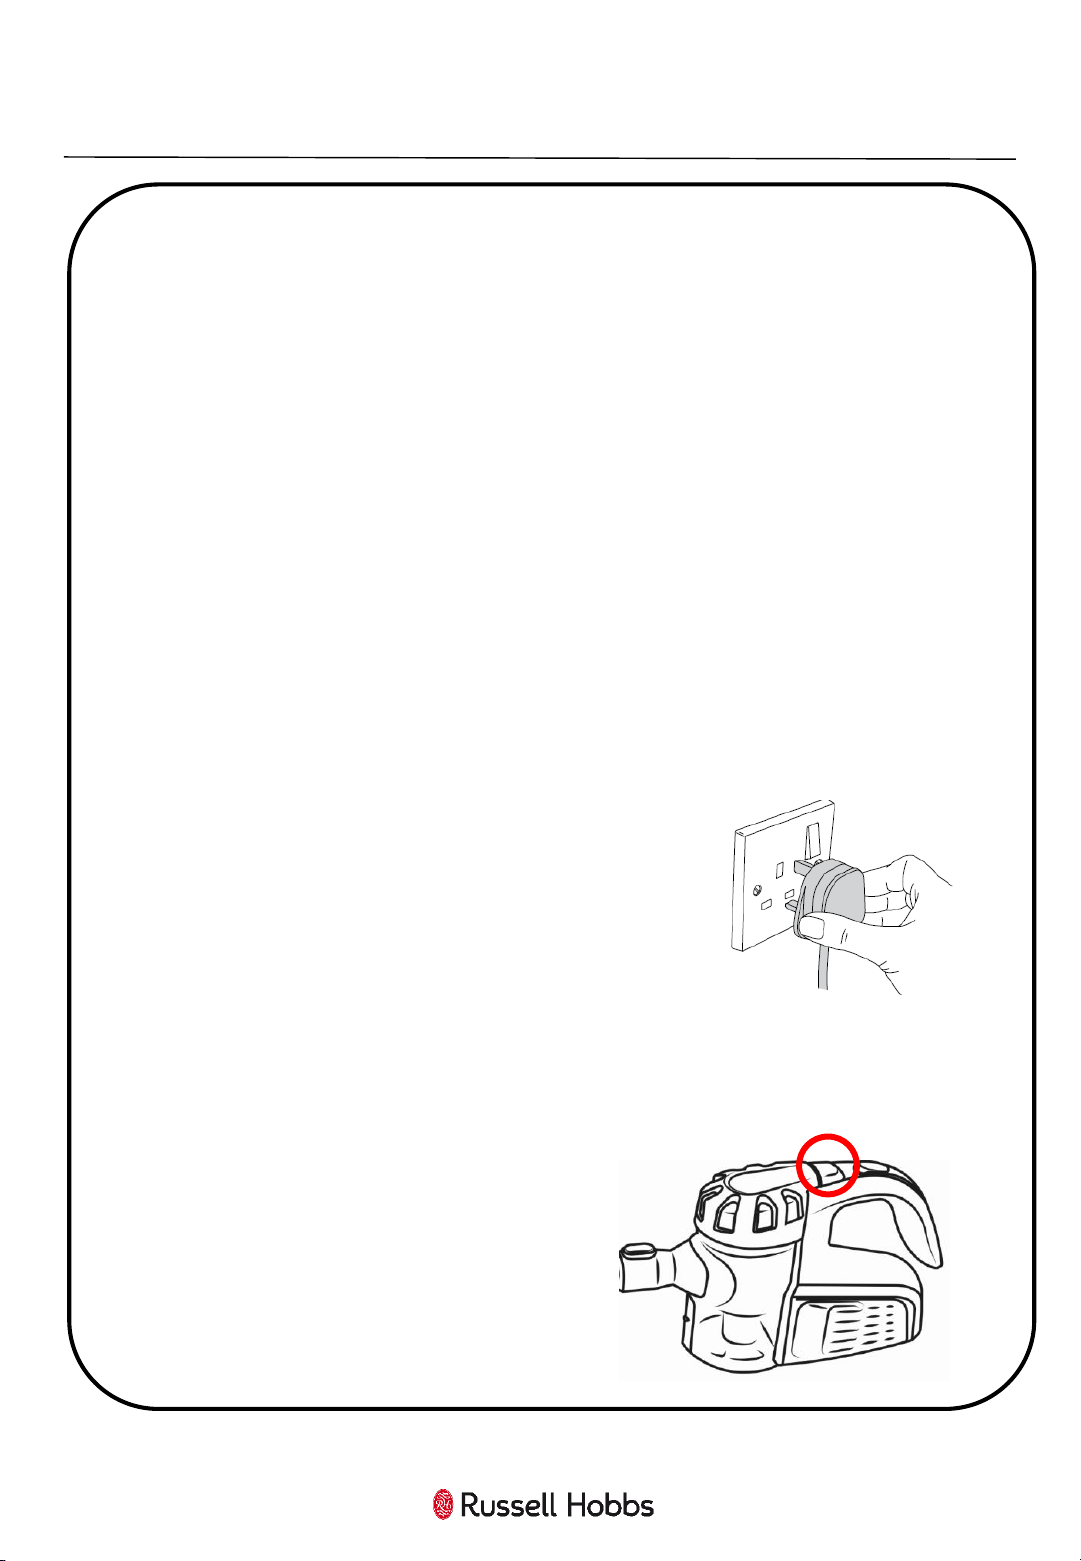
Powering the cleaner
Plug the power cord into a wall socket.
Push the power switch on the top of the machine, shown
in the circle below, to switch the cleaner on and off.
Before using your vacuum cleaner
Remove all packaging and lay out the separate components.
Check the unit after unpacking for any visual damage such as:
• Misaligned or damaged parts
• Damage to the main body and separate components
• Damage to the plug or cable.
If you can see any damage do not use the vacuum cleaner
and contact customer services
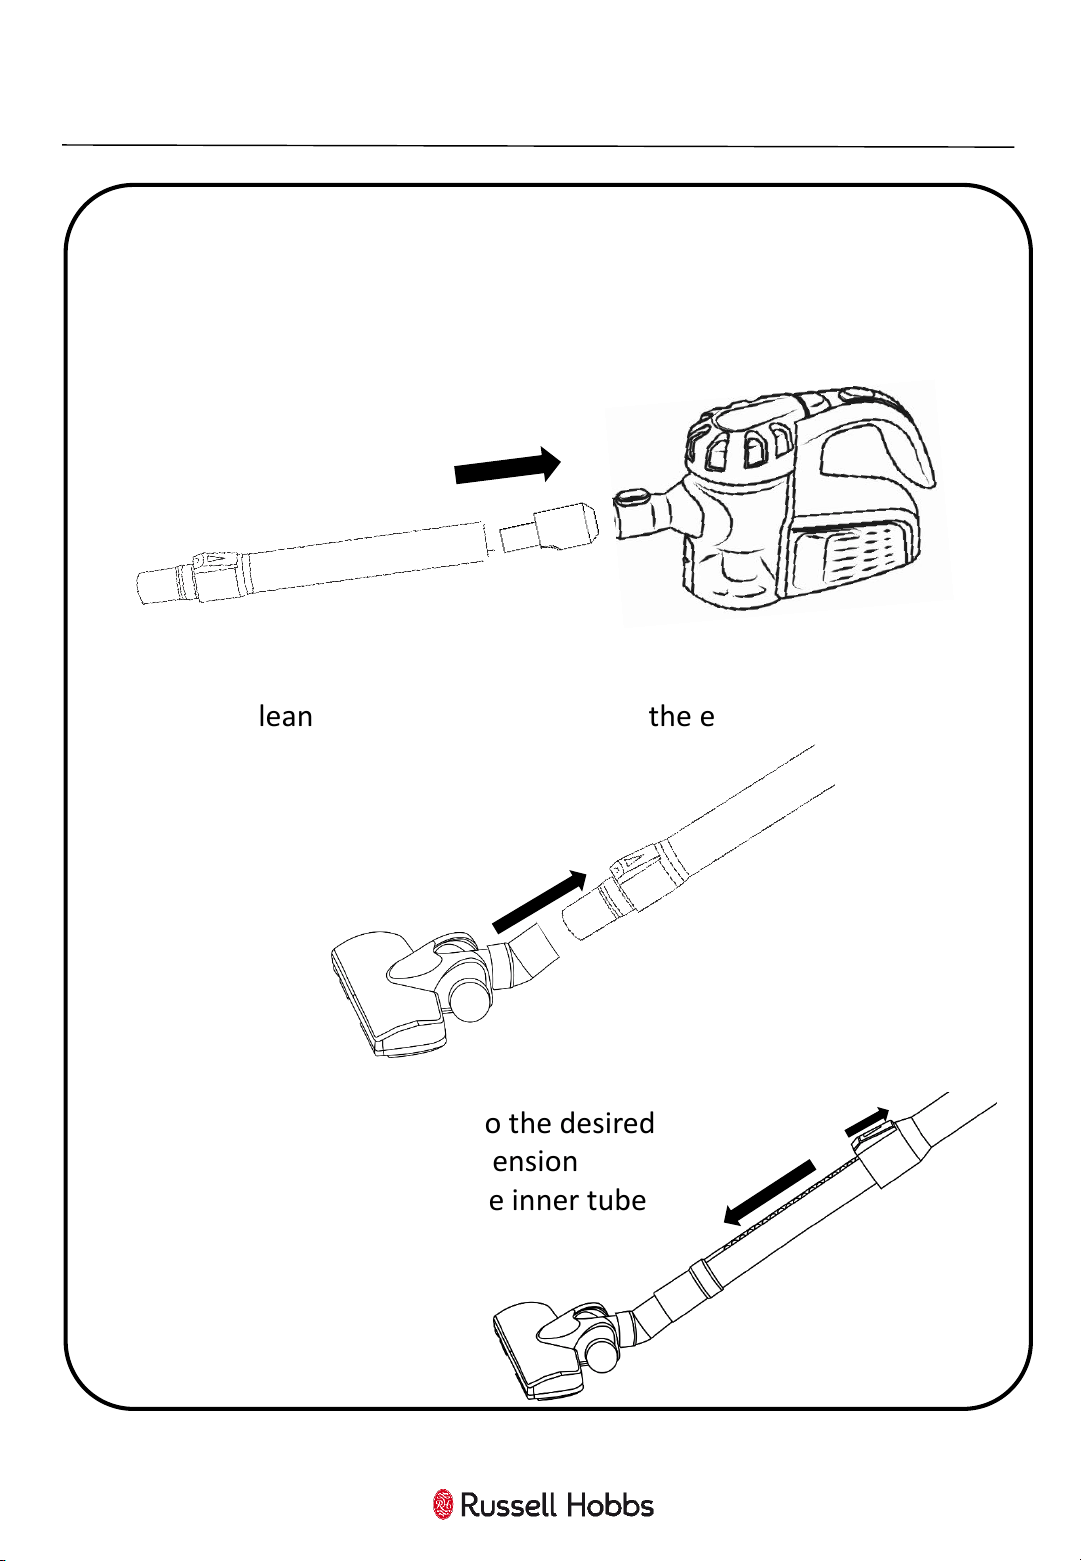
1. To attached the extension tube, insert the connecting joint tool
into the nozzle of the main vacuum cleaner. Then push the end of the
extension tube into the connecting joint until securely in place.
Assembling your vacuum cleaner
2. Slot the cleaning head on to the end of the extension tube.
9
3. Adjust the telescopic tube to the desired
height by pushing the tube extension
button upwards and pulling the inner tube
downwards.
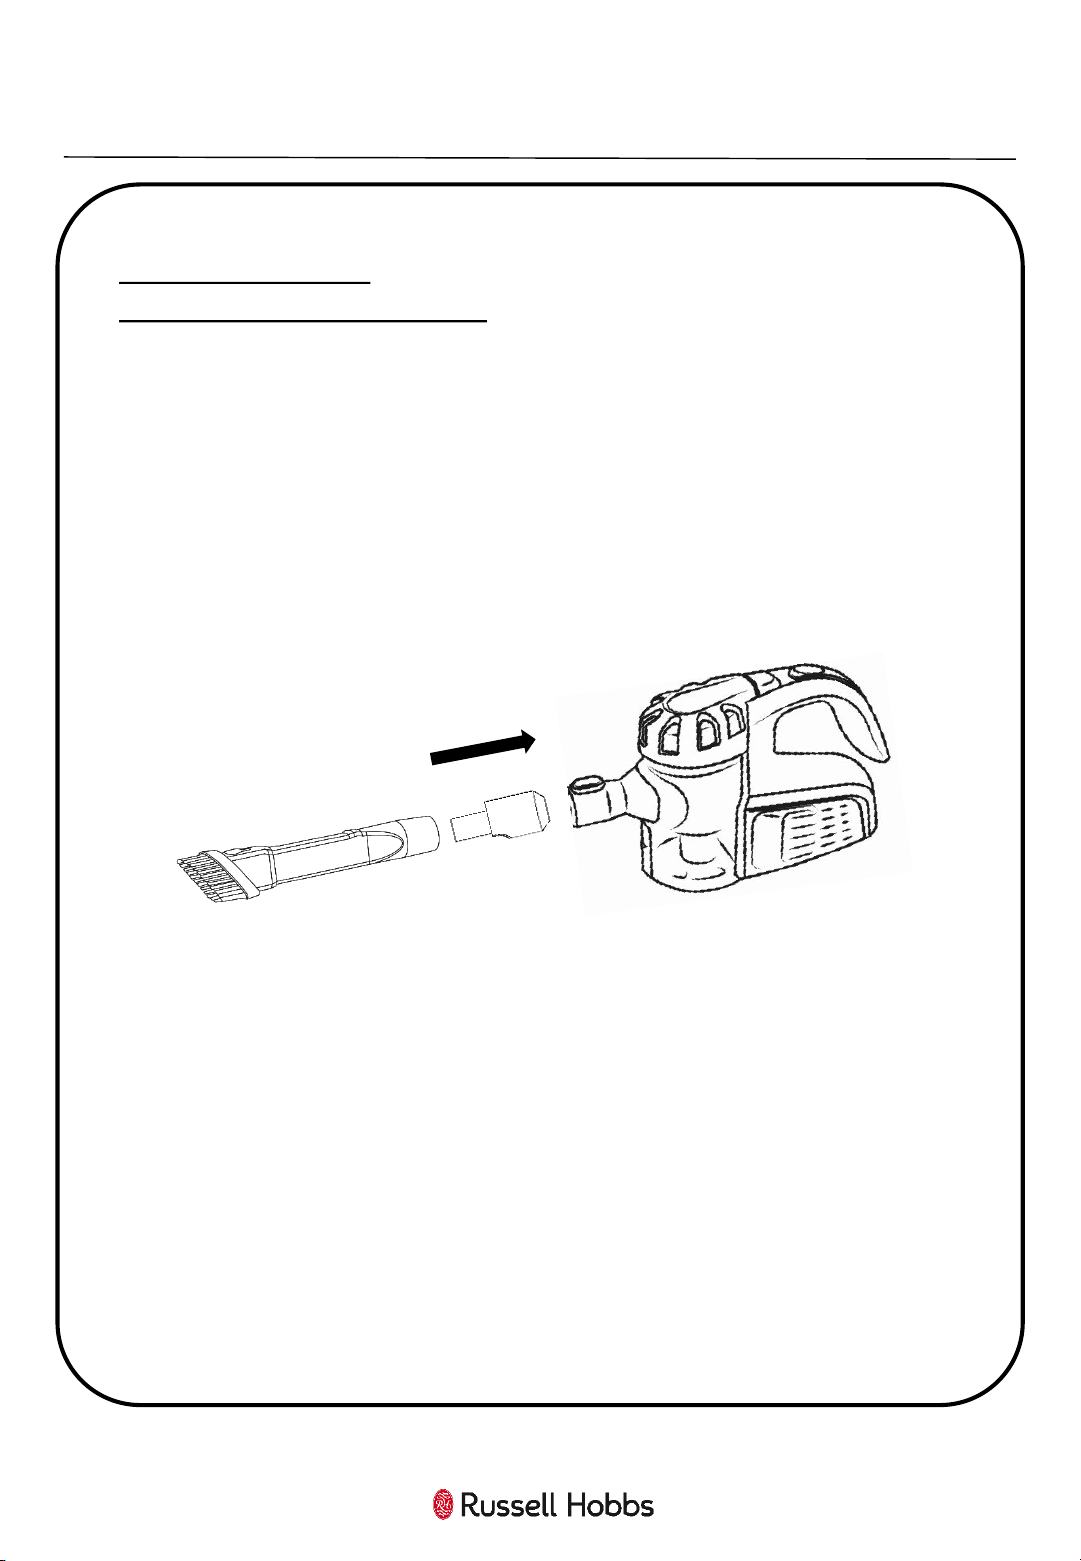
Attaching the tools
2 in 1 crevice and brush Tool
The 2 in 1 crevice and brush tool can be used for cleaning hard
to reach areas, dusting and cleaning delicate surfaces.
To use the 2 in 1 crevice and brush tool, first attach the
connecting joint tool into the nozzle of the vacuum. Once
secure, push the 2 in 1 crevice tool into the connecting joint.
Slide the brush to the end of the tool until securely in place.
To use the brush tool, slide the brush to the end of the tool until it
clicks into place. To use the crevice tool, slide the brush back to
expose the crevice tool.
10
Assembling your vacuum cleaner
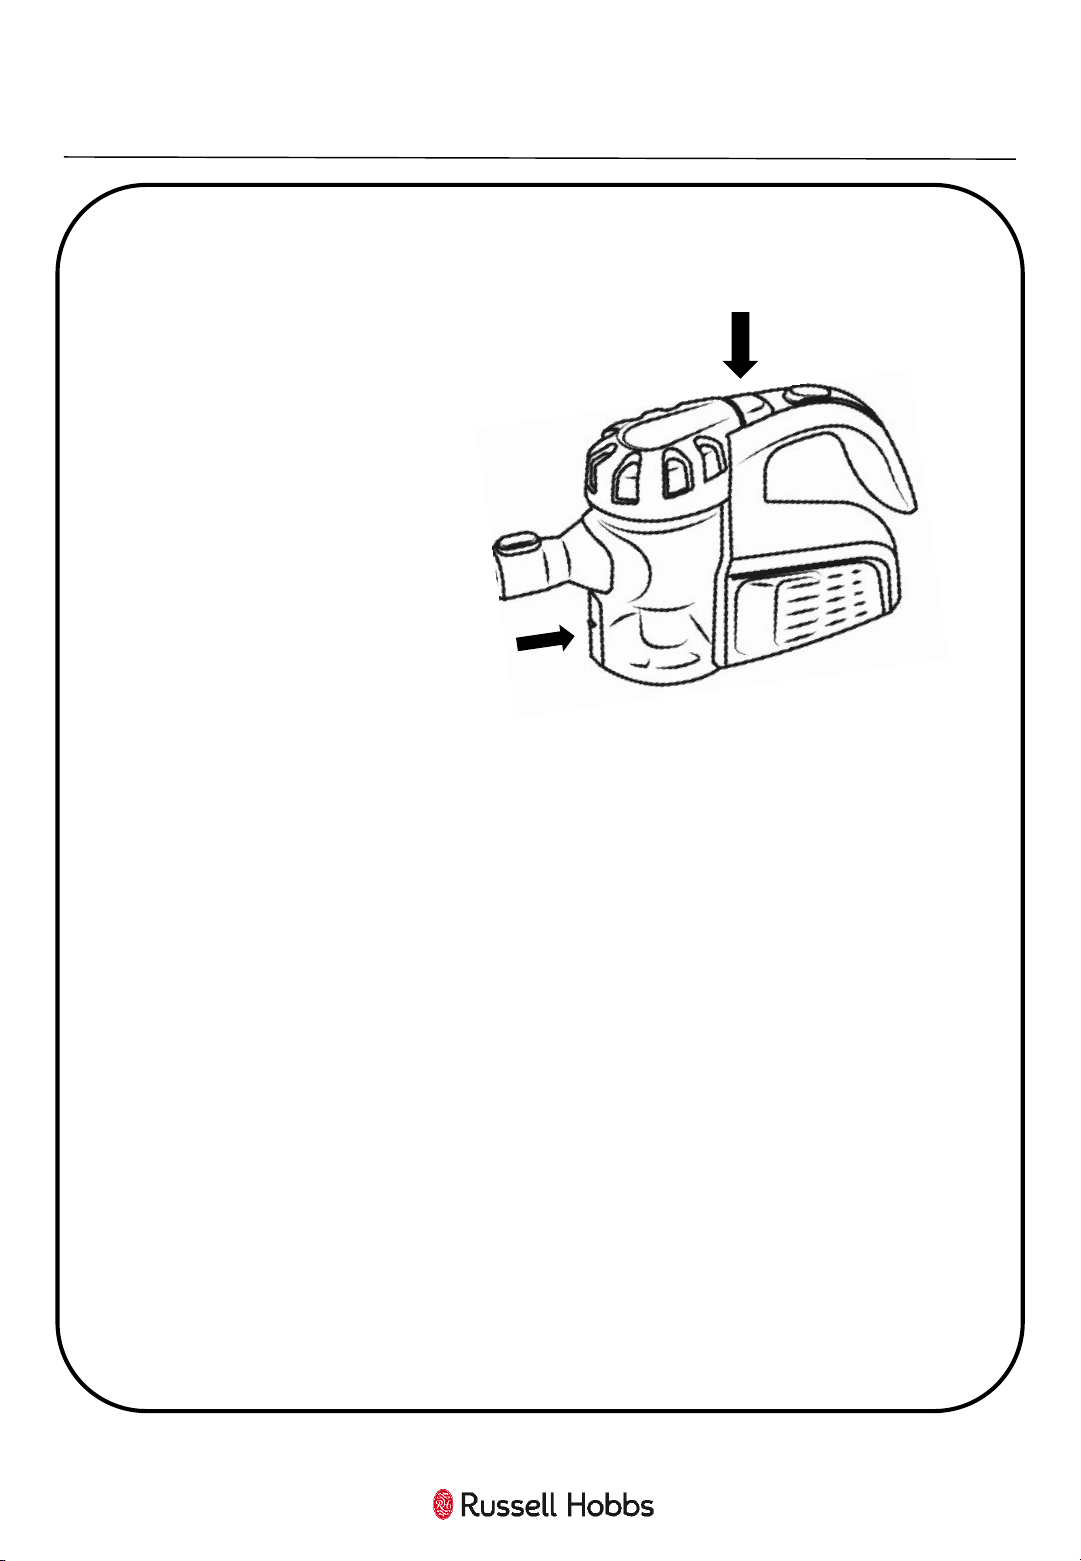
How to empty the dust container
Whilst holding over a bin or inside a bin bag, press down the
button on the side of the dust container below the nozzle to
open the bottom and release the dust (2).
Important: You may wish to empty the dust container outdoors
as emptying may create a dust cloud.
Make sure to empty the
dust container before
the ‘MAX’ fill line is
reached. Press the
release button on the
top of the vacuum
cleaner (1), and lift the
dust container clear of
the base.
Once empty, close the bottom of the dust container then clip the
dust container back into the vacuum cleaner unit, ensuring the
bottom of the dust container is correctly located before the release
button clicks back into place.
11
(1)
(2)
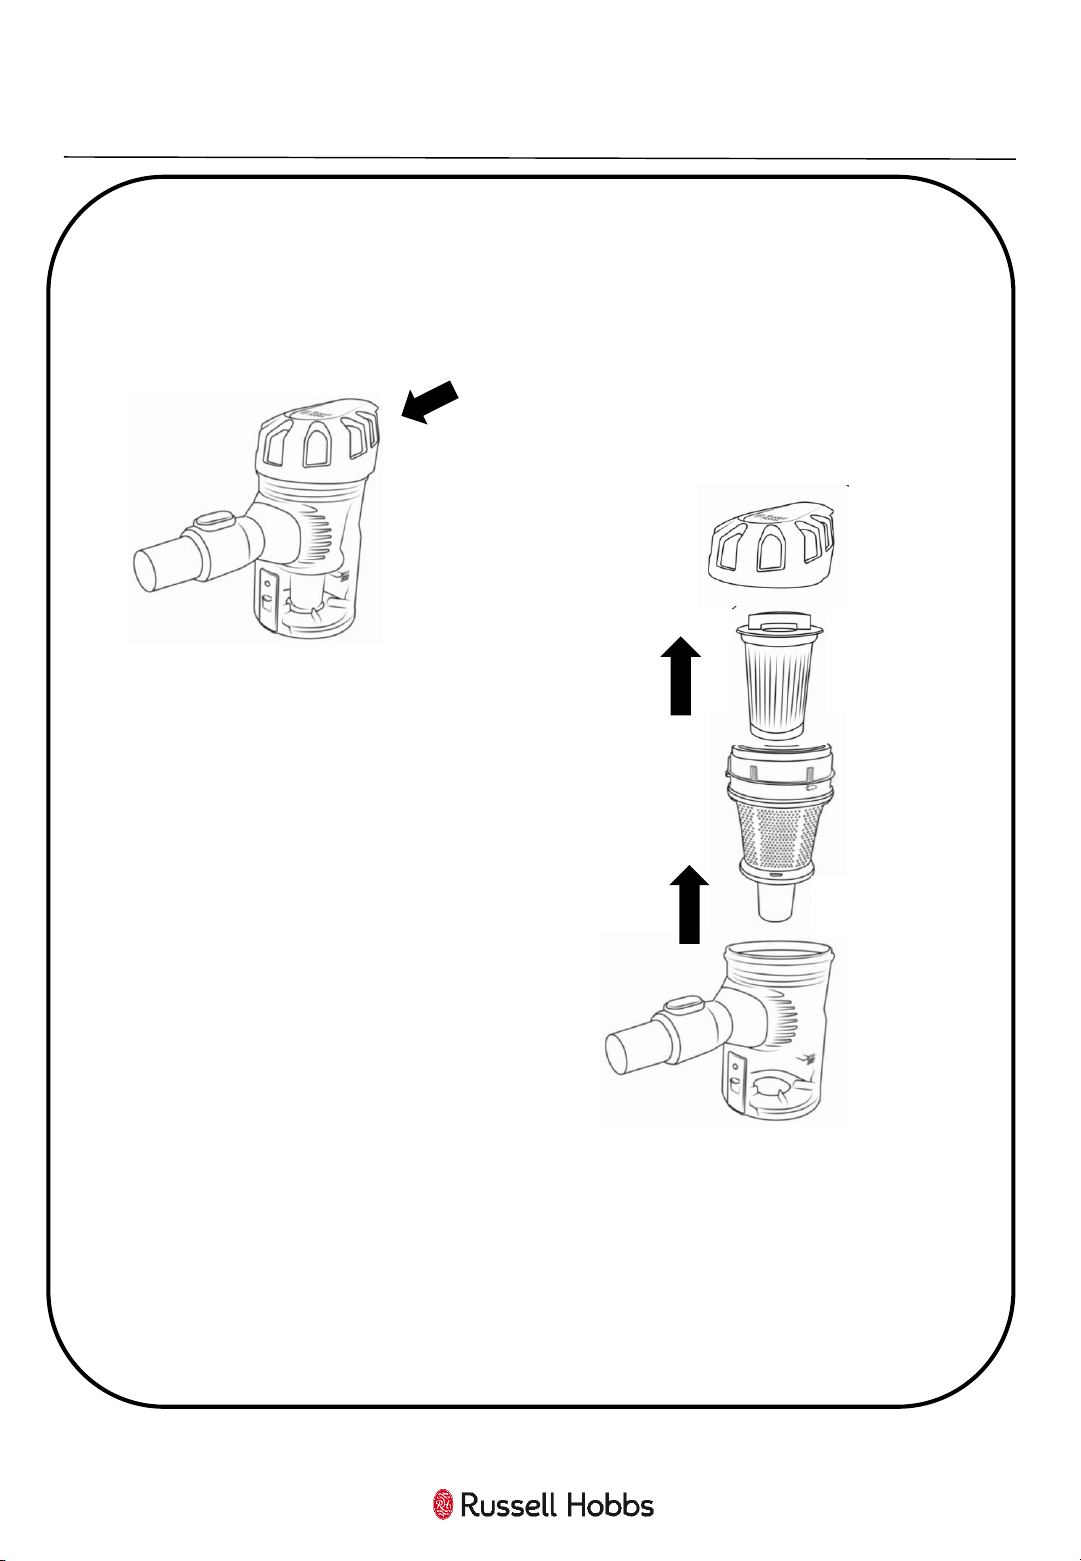
How to remove and clean the filter
Turn off and unplug the cleaner. Remove the dust container as per
instructions on page 11.
Remove the filter assembly by unclipping the dust container lid
which is located at the back of the container.
12
Lift the lid off and twist the
cyclonic filter anti clockwise to
remove from the dust
container. Remove HEPA filter
from the cyclonic filter by
twisting anti clock wise. To
clean, remove excess dust
from the filter using a soft
brush. Wash in warm water
and allow to dry for 24 hours.
Replace the HEPA filter into the cyclonic filter by turning clockwise to
the lock position. Then place the cyclonic filter back into the dust
container and clock wise to the lock position. Refit the dust
container as per the instructions on page 11.
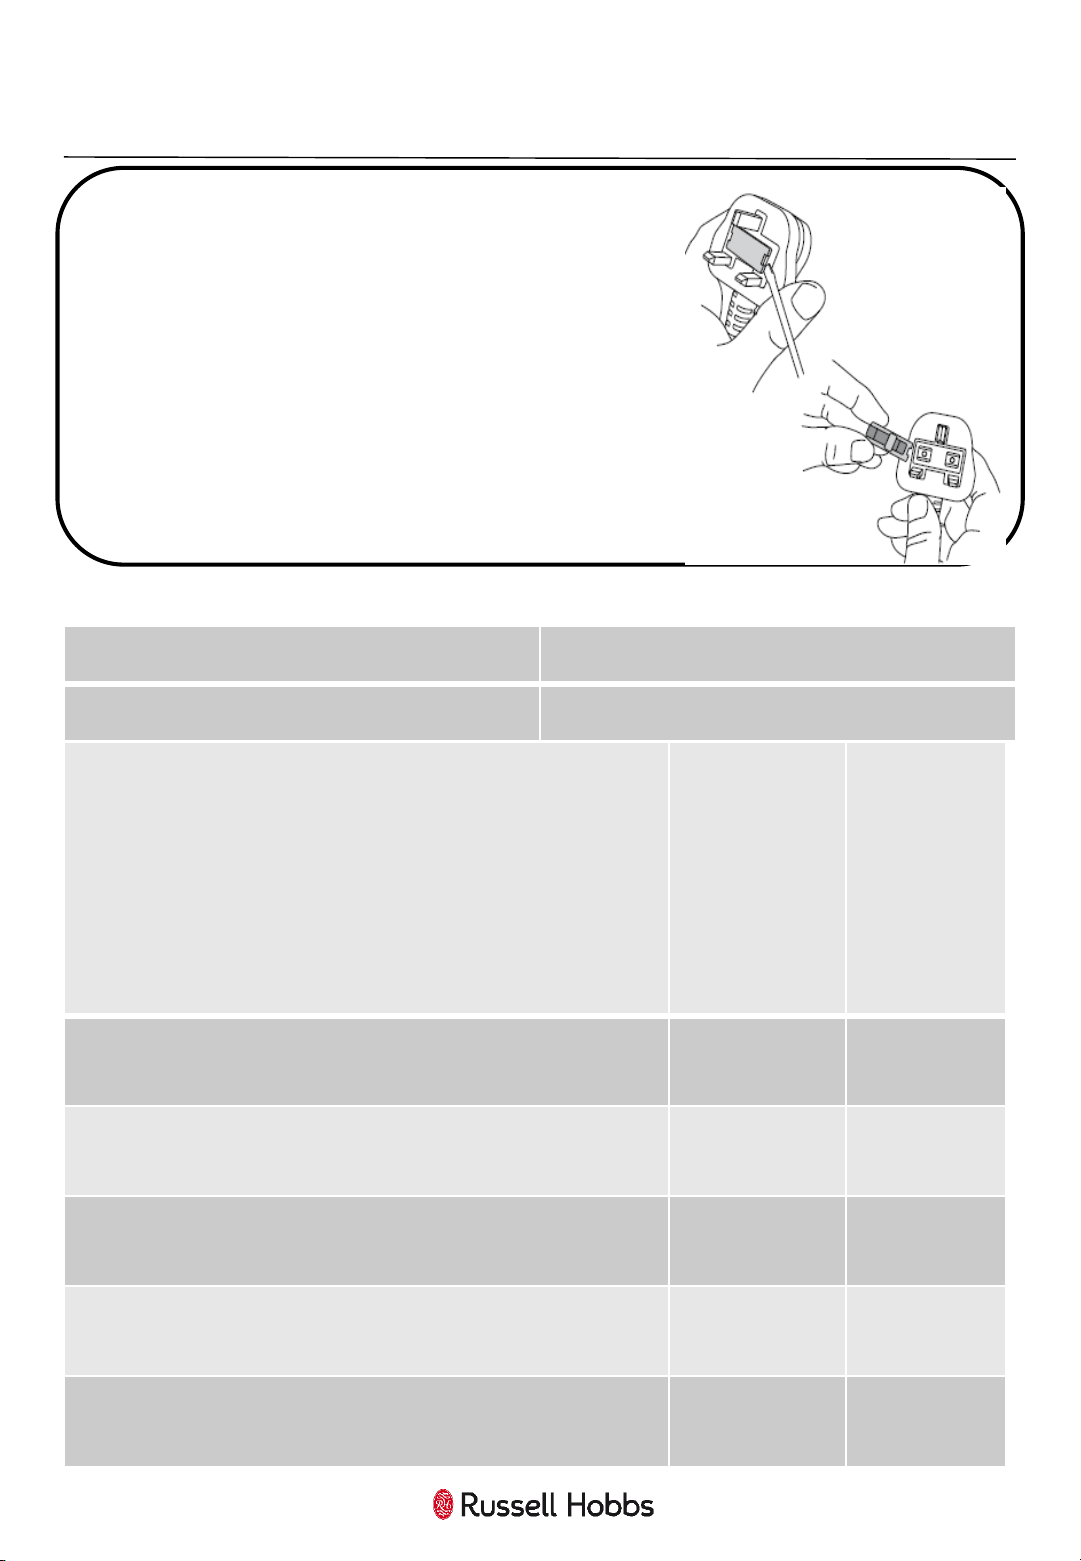
How to change the fuse
1. Slot the end of a screwdriver into the
recess in the fuse holder of the plug.
2. Pull the fuse holder upwards until free of
the plug and slide the fuse out.
3. Replace the fuse and replace fuse holder,
pushing down until locked into place.
Important: Only ever use 13 amp fuses.
Supplier Trade
Mark
Russell
Hobbs
Model Number
RHCHS1001
-C
Indicative annual energy
consumption (kWh per year)
,
based on 50 cleaning tasks. Actual
annual energy consumption will
depend on how the appliance is
used.
18.7 A+
Rate Input
Power (W)
600W -
Dust Pick
Up on Carpet (dpu)
0.75 E
Dust Pick Up on hard floor
(dpu)
1.092 B
Dust Re
-emission(%)
0.039% B
Sound Power Level (dB(A))
78 -
Product Fiche
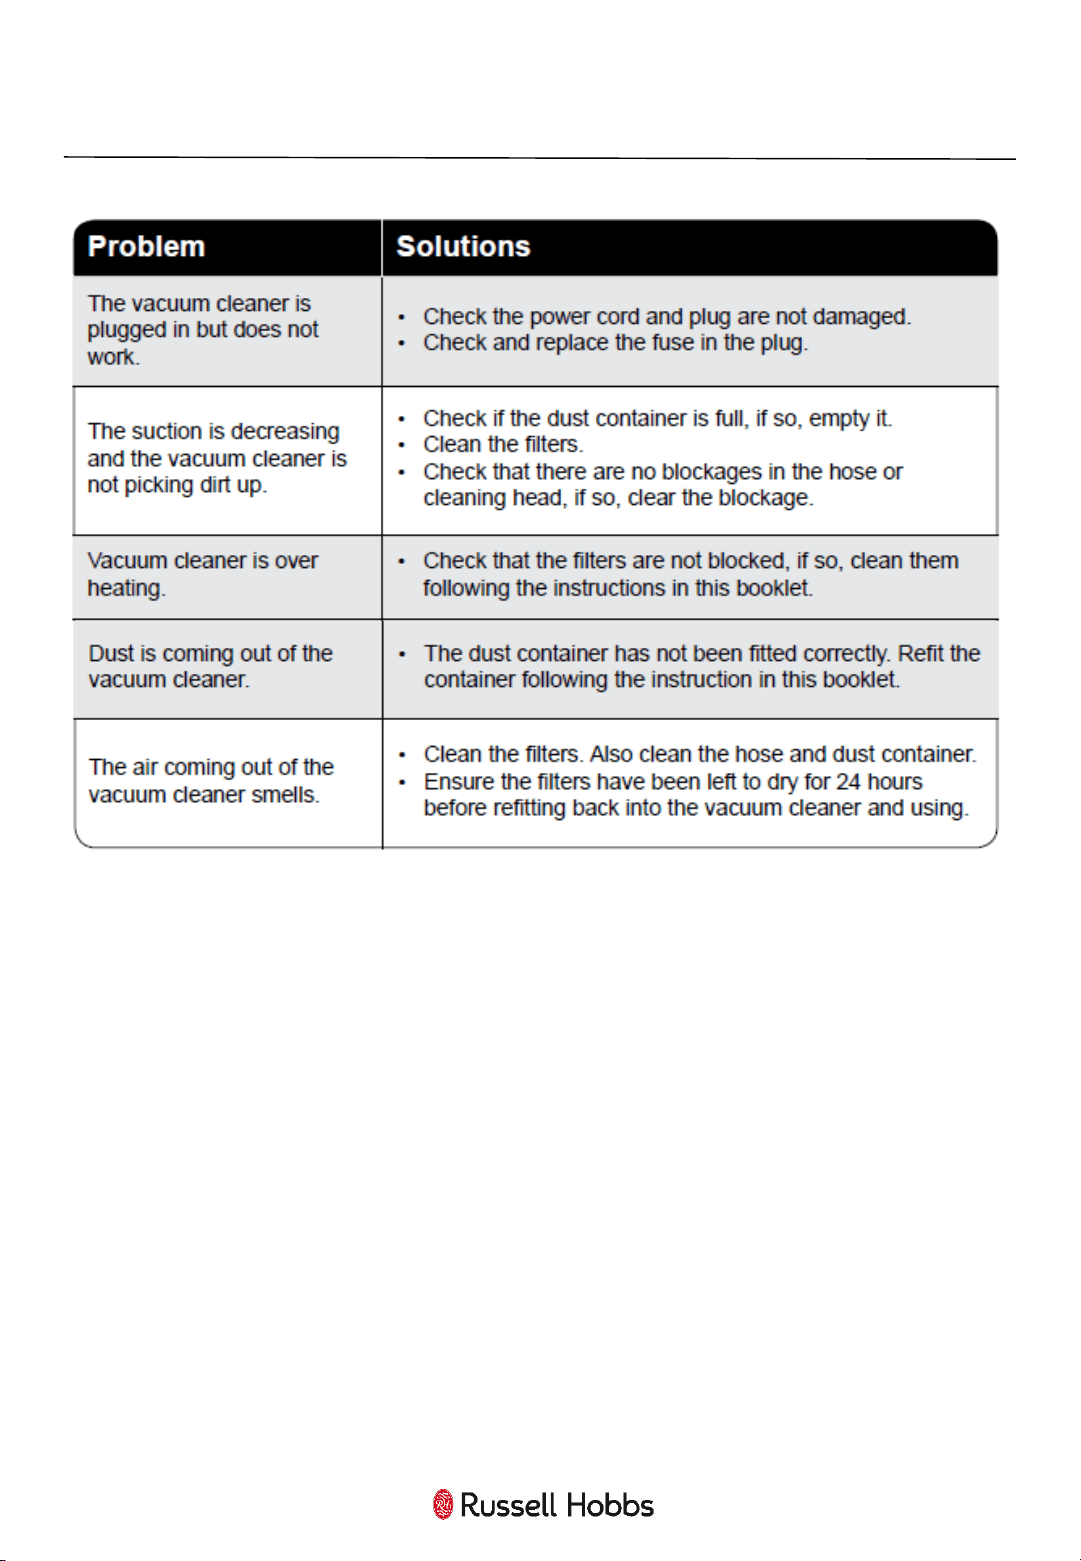
Troubleshooting
14
Connection to the mains supply
WARNING:
This appliance is designed to operate from a mains supply of AC230V -
240V ~ 50/60HZ.
Check that the voltage marked on the product corresponds with your
supply voltage.
This product is fitted with a 13A plug complying with BS1363.
If this plug is unsuitable or needs to be replaced, please note the following:
Important: The wires in the mains lead are coloured in accordance with
the following code:
BLUE-NEUTRAL
BROWN-LIVE
15

Notes
16

Notes
17
18
GUARANTEE AND CUSTOMER SERVICES
At Russell Hobbs, we take all our customer feedback seriously.
Feel free to contact our Product Care Team, on 0345 209 7461
Monday – Friday: 8am-8pm & Saturday: 9am – 1pm,
who will be more than happy to assist you.
This product is guaranteed for 12 months from the date of the
original purchase. If any defect arises due to faulty materials or
workmanship, the faulty product must be returned to the place of
purchase.
Refund or replacement is at the discretion of the retailer.
The following conditions apply:
• The product must be returned to the retailer with the original
proof of purchase.
• The product must be installed and used in accordance with the
instructions contained in this instruction guide and any other
instructions for use which are supplied.
• It must be used for domestic purposes only and for its intended
use.
• This warranty does not cover wear and tear, damage, misuse
or consumable parts.
This does not affect your statutory rights.
For Customer Services & Spare Parts please call 0345 209 7461
Opening times: Monday - Friday 8am – 8pm & Saturday 9am – 1pm
Or visit us at www.productcare.co.uk

19
SPARE PARTS
For Customer Services & Spare Parts please call 0345 209 7461
Opening times: Monday - Friday 8am – 8pm & Saturday 9am – 1pm
Or visit us at www.productcare.co.uk
To check the availability of the following spare parts, simply contact
our friendly Customer Services team using the details provided at the
bottom of this page.
HEPA Filter
2 in 1 Crevice / Brush Tool
Extension Tube
Floor Head
Connecting Joint Tool
20
Revision 3.1
Model: RHCHS1001-C
This symbol is known as the 'Crossed-out wheelie bin Symbol'.
When this symbol is marked on a product/batteries, it means that
the product/batteries should not be disposed of with your general
household waste. Only discard electrical/electronic/battery items
in separate collection schemes, which cater for the recovery and
recycling of materials contained within. Your co-operation is vital
to ensure the success of these schemes and for the protection of
the environment. For your nearest disposal facility, visit
www.recycle-more.co.uk or ask in store for details.
We reserve the right, due to possible changes to design, to alter
the instruction manual without prior notice.
For Customer Services & Spare
Parts please call
0345 209 7461
Opening times: Monday - Friday
8am – 8pm & Saturday 9am –1pm
Or visit us at
www.productcare.co.uk
Made by G2S Ltd under license.
G2S Limited, Wigan, WN2 4AY
Produced for Amazon EU SARL, UK Branch, London, EC1A 2FD
Russell Hobbs is the registered trademark of
Spectrum Brands (UK) Ltd.
