User Manual
OPERATION
Control Panel Overview
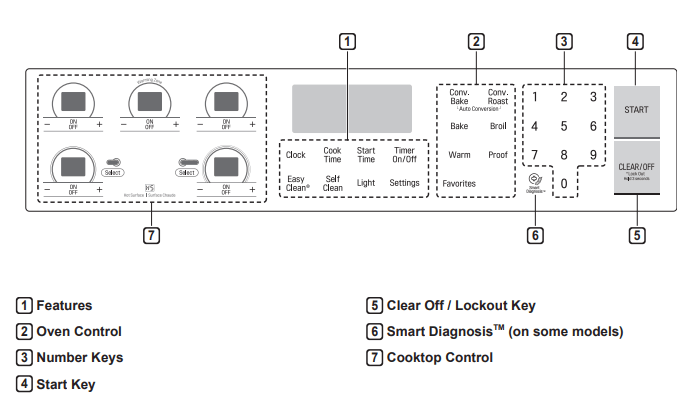
Hot Surface Indicator
The HS(hot surface) indicator appears in the display as long as any surface cooking area is too hot to touch. It remains on after the element is turned off and until the surface has cooled to approximately 150 ˚F. Also, The HS indicator appears during the self clean cycle.
Flashing Time
If your oven displays a flashing clock, press Clock and reset the time, or press any key to stop the flashing.
Changing Oven Settings
Clock
The clock must be set to the correct time of day in order for the automatic oven timing functions to work properly.
- Press Clock
- Press the numbers to enter the time. For example, to set the clock for 10:30, press the numbers: 1, 0, 3 and 0.
- Press START.
NOTE
- The time of day cannot be changed during a timed baking or self-clean cycle.
- To check the time of day when the display is showing other information, press Clock.
- If no other keys are pressed within 25 seconds of pressing Clock, the display reverts to the original setting.
- If the display time is blinking, there may have been a power failure. Reset the time.
Setting the Hour Mode
The control is set to use a 12-hour clock. To reset the clock to 24-hour mode, follow the steps below.
1 Press and hold Clock for three seconds.
2 Press 1 for 12-hour or press 2 for 24-hour.
3 Press Start to accept the change.
Oven Light
The interior oven light automatically turns on when the door is opened.
- Press Light to manually turn the oven light on.
NOTE
- The oven light cannot be turned on if the Self Clean function is active.
- The oven light turns off automatically after 90 seconds.
Timer On/Off
The Timer On/Off serves as an extra timer in the kitchen that beeps when the set time has run out. It does not start or stop cooking.
The Timer On/Off feature can be used during any of the other oven control functions.
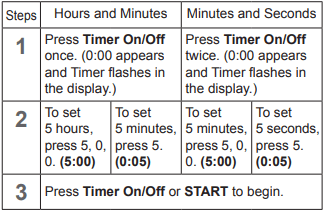
Setting the Timer
Canceling the Timer
- Press Timer On/Off once. The display returns to the time of day.
Settings
Press the Settings key repeatedly to toggle through and change oven settings.
The Settings key allows you to:
- set the language
- enable/disable convection auto conversion
- adjust the oven temperature
- activate/deactivate the preheating alarm light
- set the beeper volume
- switch the temperature scale between Fahrenheit and Celsius
Adjusting the Oven Thermostat
Your new oven may cook differently from the one it replaced. Use your new oven for a few weeks to become more familiar with it before changing the temperature settings. If after familiarizing yourself with the new oven, you still think that it is too hot or too cold, you can adjust the oven thermostat yourself.
- To begin, either raise or lower the thermostat 15 °F (8 °C). Try the oven with the new setting. If the oven still needs adjustment, raise or lower the thermostat again, using the first adjustment as a gauge. For example, if the adjustment was too much, raise or lower the thermostat 10 °F (5 °C). If the adjustment was not enough, raise or lower the thermostat 20 °F (12 °C). Proceed in this way until the oven is adjusted to your satisfaction.
- Press Settings repeatedly until AdJU appears in the display.
- Use the number keys to enter the number of degrees you want to adjust the oven temperature.
- Adjust the temperature either up or down by pressing Settings repeatedly to toggle between plus (+) or minus (-).
- Press START to accept the change.
To increase the temperature
- Press Settings repeatedly until AdJU appears in the display.
- Use the number keys to enter the number of degrees you want to adjust the oven temperature.
- Press START.
To decrease the temperature
- Press Settings repeatedly until AdJU appears in the display.
- Use the number keys to enter the number of degrees you want to adjust the oven temperature.
- Press Settings once to add a minus sign (-) in front of the temperature in the display.
- Press START
Language
The default language of the display is English. It can be changed to Spanish or French.
- Press Settings repeatedly until Lng appears in the display.
- Press 1 for English or Press 2 for Spanish or Press 3 for French.
- Press START to accept the change.
Turning the Preheat Alarm Light On/Off
When the oven reaches its set-temperature, the preheating alarm light flashes 5 times or until the oven door is opened.
You can activate or deactivate the preheating alarm light.
- Press Settings repeatedly until PrE appears in the display.
- Press 1 to turn the light on/off.
- Press START to accept the change.
Adjusting the Beeper Volume
- Press Settings repeatedly until Beep appears in the display.
- Press 1 to select Hi, Lo or Off.
- Press START to accept the change.
Selecting Fahrenheit or Celsius
Set the oven temperature display to show either Fahrenheit (°F) or Celsius (°C) units. The oven defaults to Fahrenheit unless changed by the user.
- Press Settings repeatedly until Unit appears in the display.
- Press 1 to select F (Fahrenheit) or C (Celsius).
- Press START to accept the change.
Lockout
The Lockout feature automatically locks the oven door and prevents most oven controls from being turned on. It does not disable the timer and the interior oven light.
1 Press and hold Clear/Off for three seconds.
2 The lock melody sounds, OVEN LOCKOUT appears in the display and the lock  blinks in the display.
3 Once the oven door is locked, the lock  indicator stops blinking and remains on.
4 To deactivate the Lockout feature, press and hold Clear/Off for three seconds. The unlock melody sounds and the door and the controls unlock.
Start Time (Delayed Timed Cook)
The automatic timer of the Delayed Timed Cook function turns the oven on and off at the time you select. This feature can be used with the Bake, Conv. Bake and Conv. Roast modes.
Setting a Delayed Timed Cook
1 Press Bake. 350 °F appears in the display.
2 Set the temperature: Press 3, 0 and 0.
3 Press Cook Time and set the baking time.
4 Press Start Time.
5 Set the start time: Press 4, 3 and 0 for 4:30.
6 Press START. A short beep sounds and Timed Delay and the start time appear in the display. The oven begins baking at the set start time.
NOTE
- To cancel the Delayed Timed Cook function, turn the oven mode knob to the OFF position at any time.
- To change the cooking time, repeat step 3 and press START.
- If the oven clock is set as a 12-hour clock, you can delay the cook time for 12 hours. If the oven clock is set as a 24-hour clock, you can delay the cook time for 24 hours.
The oven will continue to cook for the set amount of time and then turn off automatically. When the cooking time has elapsed:
- End and the time of day show in the display.
- The cook end indicator tone sounds every 60 seconds until Clear/Off is pressed.
- When Warm is set, the warming function is activated after the cooking time ends.
Cook Time (Timed Cook)
Set the oven to cook for a specific length of time using the Timed Cook feature. This feature can only be used with the Bake, Conv. Bake, Conv. Roast, Air Sous-Vide, Air Fry, Slow Cook, FrozenMeal and Proof modes.
Setting a Timed Cook
For example, to bake at 300 °F for 30 minutes, first set the clock to the correct time of day.
- Press Bake. 350 °F appears in the display.
- Set the temperature. Press 3, 0 and 0.
- Press Cook Time. Timed flashes in the display. Bake, 0:00 and 300 °F appear in the display.
- Set the baking time: press 3 and 0 (for 30 minutes). The baking time can be set for any amount of time between 1 minute and 11 hours and 59 minutes
- Press START.
The oven will continue to cook for the set amount of time and then turn off automatically. When the cooking time has elapsed:
- End and the time of day show in the display.
- The cook end indicator tone sounds every 60 seconds until Clear/Off is pressed.
- When Warm is set, the warming function is activated after the cooking time ends.
Changing the Cook Time during Cooking
For example, to change the cook time to 1 hour and 30 minutes during cooking:
- Press Cook Time.
- Change the baking time: press 1, 3, 0.
- Press START to accept the change.
Using the Cooktop
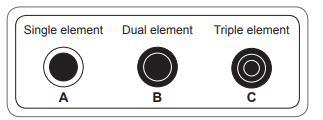
Cooking Areas
The cooking areas on your range are identified by permanent circles on the glass cooktop surface. For the most efficient cooking, fit the pan size to the element size.
Pans should not extend more than 1/2 to 1-inch beyond the cooking area.
When a control is turned on, a glow can be seen through the glass cooktop surface.

Using the Cooktop Elements
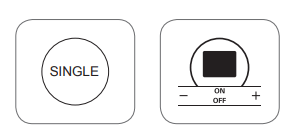
Turning on a Single Element
1 Press the ON/OFF button that controls the desired surface element.
2 Press the + button once to adjust the element temperature to Hi, or the – button once to adjust the element temperature to Lo.
3 Use the – / + buttons to adjust the element temperature settings. The element temperature settings are adjustable at all times.
4 To turn off the element after cooking, press the ON/OFF button once.
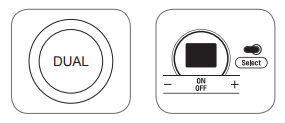
Turning on a Dual Element
Adjust the dual element according to the pot/pan size being used.
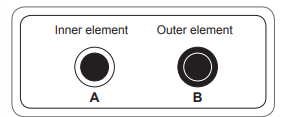
1 Press the ON/OFF button that controls the desired surface element.
2 Press the SELECT button to select either the inner (smaller) or outer (larger) element function. The dual elements default to the inner element function. The light bars above the SELECT button indicate whether the element is adjusted for the inner or outer element function. One bar will display for the inner element and two bars will display for outer element.
3 Press the + button once to adjust the element temperature to Hi, or the – button once to adjust the element temperature to Lo.
4 Use the – / + buttons to adjust the element temperature settings. The element temperature settings are adjustable at all times.
5 To turn off the element after cooking, press the ON/OFF button once.
Turning on a Triple Element
Adjust the triple element according to the pot/pan size being used.
1 Press the ON/OFF button that controls the desired surface element.
2 Press the SELECT button repeatedly to change the size of the triple element to small, medium, or large. By default, the element is set to function as a small element. The LED bars above the SELECT button indicate the current setting. The display shows 1 bar for small element function, 2 bars for medium, and 3 bars for large.
3 Press the + button once to adjust the element temperature to Hi, or the – button once to adjust the element temperature to Lo.
4 Use the – / + buttons to adjust the element temperature settings. The element temperature settings are adjustable at all times. 5 To turn off the element after cooking, press the ON/OFF button once.

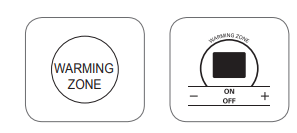
Turning on the Warm Zone
The Warm Zone, located in the back center of the glass surface, will keep hot, cooked food at serving temperature. Use the Warm Zone to keep food warm after it has already been cooked. Attempting to cook uncooked or cold food on the Warming Zone could result in a food-borne illness.
1 Press the warming zone ON/OFF button. The warming zone indicator light flashes.
2 Press the + button once to adjust the temperature to Hi, or the – button once to adjust the temperature to Lo. Power level sequence is from – Lo, 2, 3, 4, Hi or from + Hi, 4, 3, 2, Lo.
3 Use the – / + buttons to adjust the temperature settings. The temperature settings are adjustable at all times.
4 To turn off the warming zone, press the ON/OFF button once.
Using the Proper Cookware
The size and type of cookware will influence the settings needed for the best cooking results. Be sure to follow the recommendations for using proper cookware.
Cookware should have flat bottoms that make good contact with the entire surface heating element. Check for flatness by placing a ruler across the bottom of the cookware. The ruler should touch the cookware across the entire bottom, with no gaps.

Cookware Recommendations
- Flat bottom and straight sides
- Heavy-gauge pans
- Pan sizes that match the amount of food to be prepared and the size of the surface element
- Weight of handle does not tilt pan. Pan is well balanced
- Tight-fitting lids
- Flat bottom woks
Cookware should not

NOTE
Do not use pans less than 7 inches in diameter on the front elements.
Do not use foil or foil-type containers. Foil may melt onto the glass. Do not use the cooktop if metal has melted on it. Call an authorized LG Service Center.
Choosing Cookware
The cookware material determines how evenly and quickly heat is transferred from the surface element to the pan bottom. The most popular materials available are:
- Aluminum - Excellent heat conductor. Some types of food will cause it to darken (anodized aluminum cookware resists staining and pitting). If aluminum pans slide across the ceramic cooktop, they may leave metal marks which will resemble scratches. Remove these marks immediately.
- Copper - Excellent heat conductor but discolors easily. May leave metal marks on glass-ceramic (see Aluminum above).
- Stainless steel - Slow heat conductor with uneven cooking results. Is durable, easy to clean and resists staining.
- Cast iron - A poor heat conductor but retains heat very well. Cooks evenly once cooking temperature is reached. Not recommended for use on ceramic cooktops.
- Porcelain-enamel on metal - Heating characteristics will vary depending on base material. Porcelain-enamel coating must be smooth to avoid scratching ceramic cooktops.
- Glass - Slow heat conductor. Not recommended for ceramic cooktop surfaces because it may scratch the glass.
Home Canning Tips
- Be sure that the canner is centered over the surface element and is flat on the bottom.
- The base must not be more than 1 inch larger than the element. Use of water bath canners with rippled bottoms may extend the time required to bring the water to a boil and may damage the cooktop.
- Some canners are designed with smaller bases for use on smooth surfaces.
- Use the high heat setting only until the water comes to a boil or pressure is reached in the canner.
- Reduce to the lowest heat setting that maintains the boil, or pressure. If the heat is not turned down, the cooktop may be damaged.
Using the Oven
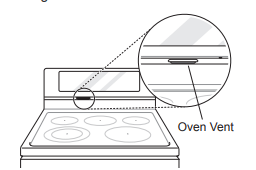
Oven Vent
Areas near the vent may become hot during operation and may cause burns. Do not block the vent opening. Avoid placing plastics near the vent as heat may distort or melt the plastic.
It is normal for steam to be visible when cooking foods with high moisture content.
Using Oven Racks
The racks have a turned-up back edge that prevents them from being pulled out of the oven cavity.
Removing Racks
- Pull the rack straight out until it stops.
- Lift up the front of the rack and pull it out.
Replacing Racks
- Place the end of the rack on the support.
- Tilt the front end up and push the rack in.
Bake
Bake is used to prepare foods such as pastries, breads and casseroles. The oven can be programmed to bake at any temperature from 170 °F (80 °C) to 550 °F (285 °C). The default temperature is 350 °F (175 °C).
Setting the Bake Function (example, 375 °F)
- Press Bake.
- Set the oven temperature: press 3, 7 and 5.
- Press START. The oven starts to preheat. As the oven preheats, the temperature is displayed and rises in 5-degree increments. Once the oven reaches the set temperature, a tone sounds and the oven light blinks on and off.
- When cooking is complete, turn the oven mode knob to the OFF position.
- Remove food from the oven.
NOTE
- It is normal for the convection fan to operate periodically throughout a normal bake cycle in the oven. This is to ensure even baking results.
Baking Tips
- Baking time and temperature will vary depending on the characteristics, size, and shape of the baking pan used.
- Check for food doneness at the minimum recipe time.
- Use metal bakeware (with or without a nonstick finish), heatproof glass-ceramic, ceramic or other bakeware recommended for oven use.
- Dark metal pans or nonstick coatings will cook food faster with more browning. Insulated bakeware will slightly lengthen the cooking time for most foods.
- The oven bottom has a porcelain-enamel finish.
- To make cleaning easier, protect the oven bottom from excessive spillovers by placing a cookie sheet on the rack below the rack you are cooking on. This is particularly important when baking a fruit pie or other foods with a high acid content. Hot fruit fillings or other foods that are highly acidic may cause pitting and damage to the porcelain-enamel surface and should be wiped up immediately.
Convection Mode
The convection system uses a fan to circulate the heat evenly within the oven. Improved heat distribution allows for even cooking and excellent results while cooking with single or multiple racks.
Setting the Convection Function (example, 375 °F)
- Press Conv. Bake or Conv. Roast. The display flashes 350 °F.
- Set the oven temperature: press 3, 7 and 5.
- Press START. The display shows Conv. Bake or Conv. Roast and the oven temperature starting at 100 °F. As the oven preheats, the display shows increasing temperatures in 5-degree increments. Once the oven reaches the set adjusted temperature, a tone sounds and the oven light flashes on and off. The display shows the auto converted oven temperature, 350 °F and the fan icon.
- When cooking has finished or to cancel, turn the oven mode knob to the OFF position
Broil
The Broil function uses intense heat from the upper heating element to cook food. Broiling works best for tender cuts of meat, fish, and thinly cut vegetables.
Some models may feature a hybrid broiler consisting of an inner broiler that utilizes a carbon heating element which provides instantaneous heat, and a traditional outer broiling element. During normal broiler operation, it is normal for either element to cycle off intermittently.
Setting the Oven to Broil
1 Oven door must always be closed during Broil mode.
2 Press Broil once for Hi or twice for Lo.
3 Press START. The oven begins to heat.
4 Let the oven preheat for approximately five minutes before cooking the food if using broil.
5 Press Clear/Off to cancel at any time or when cooking is complete
Warm
This function will maintain an oven temperature of 170 °F. The Warm function will keep cooked food warm for serving up to three hours after cooking has finished. The Warm function may be used without any other cooking operations or can be used after cooking has finished using a Timed Cook or a Delayed Timed Cook.
Setting the Warm Function
1 Press Warm.
2 Press Start.
3 Press Clear/Off at any time to cancel.
Setting the Warm Function after a Timed Cook
1 Select the cooking function.
2 Enter the oven temperature using the number keys.
3 Press Cook Time and enter the cook time using the number keys.
4 Press Warm.
5 Press Start.
6 When cooking is finished, press Clear/Off to cancel the Warm function.
Proof
This feature maintains a warm oven for rising yeast leavened products before baking. (Set temperature: 92 °F)
Setting the Proof Function
- Use rack position 2 or 3 for proofing.
- Press Proof until PrF appears in the display.
- Press Start.
- Press Clear/Off when proofing is finished.
NOTE
- To avoid lowering the oven temperature and lengthening proofing time, do not open the oven door unnecessarily. Check bread products early to avoid over proofing.
- Do not use the proofing mode for warming food or keeping food hot. The proofing oven temperature is not hot enough to keep foods at safe temperatures. Use the Warm feature to keep food warm. Proofing does not operate when the oven is above 125 . Hot shows in the display.
- It is normal for the fan to operate during the Proof function.
Sabbath Mode
Sabbath mode is typically used on the Jewish Sabbath and Holidays. When the SABBATH mode is activated, the oven does not turn off until the SABBATH mode is deactivated. In SABBATH mode, all function buttons, except for the CLEAR/OFF is inactive. Sb will appear in both the cooktop and oven displays
Setting the SABBATH mode
- Press the Bake button.
- Press the number buttons to enter the bake temperature.
- Press the START button.
- Press and hold the Settings button for three seconds. SB and
 will appear in the display when the Sabbath mode is activated.
- To cancel the Sabbath mode, press and hold the Settings button for three seconds. To cancel the Bake function, press the CLEAR/OFF button at any time.
Changing the temperature while in SABBATH mode
- Press the Bake button. (No tones will sound and the display will not change.)
- Set the temperature using the number buttons.
- Press the START button.
MAINTENANCE
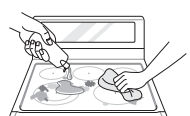
Cleaning the Glass-Ceramic Cooktop
Use ceramic cooktop cleaner on the glass cooktop.
Other creams may not be as effective or may scratch, damage or stain the cooktop surface.
To maintain and protect the surface of the glass cooktop, follow these steps:
- Before using the cooktop for the first time, clean it with a ceramic cooktop cleaner. This helps protect the top and makes cleanup easier.
- Use ceramic cooktop cleaner daily to help keep the cooktop looking new.
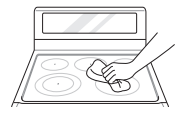
- Shake the cleaning cream well. Apply a few drops of cleaner directly to the cooktop.
- Use a paper towel to clean the entire cooktop surface.
- Rinse with clear water and use a dry cloth or paper towel to remove all cleaning residue.
Burned-On Residue
1 While the cooktop is still hot, remove any burnt on deposits or spilled food from the glass-ceramic cooking surface with a suitable metal razor scraper. (Similar to scraping paint off of a windowpane, it will not damage the decorated cooking surface.) Hold the scraper at an approximate 30° angle to the cooktop.

2 When the cooking surface has cooled down, apply a few dabs (about the size of a dime) of an approved cleaner in each burner area and work the cleaning cream over the cooktop surface with a damp paper towel.
3 Rinse with clean water and wipe the cooktop surface with a clean, dry paper towel.
EasyClean®
LG’s EasyClean® enamel technology provides two cleaning options for the inside of the lower oven. The EasyClean® feature takes advantage of LG’s new enamel to help lift soils without harsh chemicals, and it runs using ONLY WATER for just 10 minutes in low temperatures to help loosen LIGHT soils before hand cleaning.
While EasyClean® is quick and effective for small and LIGHT soils, the Self Clean feature can be used to remove HEAVY, built up soils. The intensity and high heat of the Self Clean cycle may result in smoke which will require the opening up of windows to provide ventilation. Compared to the more intense Self Clean process, your LG oven gives you the option of cleaning with LESS HEAT, LESS TIME, and virtually NO SMOKE OR FUMES.
When needed, the oven still provides the Self Clean option for longer, more thorough oven cleaning for heavier, built up soils.
Benefits of EasyClean®
- Helps loosen light soils before hand-cleaning
- EasyClean® only uses water; no chemical cleaners
- Makes for a better self-clean experience
- Delays the need for a self-clean cycle
- Minimizes smoke and odors
- Can allow shorter self-clean tim

Cleaning Tips
- Allow the oven to cool to room temperature before using the EasyClean® cycle. If your oven cavity is above 150 °F (65 °C), OVEN IS HOT will appear in the display, and the EasyClean® cycle will not be activated until the oven cavity cools down.
- A plastic spatula can be used as a scraper to scrape off any chunks or debris before and during oven cleaning.
- Using the rough side of a non-scratch scouring pad may help to take off burnt-on stains better than a soft sponge or towel.
- Certain non-scratch scrubbing sponges, such as those made of melamine foam, available at your local stores, can also help improve cleaning.
- The Oven must be level to ensure that the lower surface of the oven cavity is completely covered with water at the beginning of the EasyClean® cycle.
- For best results, use distilled or filtered water. Tap water may leave mineral deposits on the oven bottom.
- Soil baked on through several cooking cycles will be more difficult to remove with the EasyClean® cycle.
- Do not open the oven door during the EasyClean® cycle. Water will not get hot enough if the door is opened during the cycle.
- For hard to reach areas such as the back surface of the oven, it is better to use the Self Clean cycle.
Self Clean
The Self Clean cycle uses extremely hot temperatures to clean the oven cavity. While running the Self Clean cycle, you may notice smoking or an odor. This is normal; especially if the oven is heavily soiled.
During Self Clean, the kitchen should be well ventilated to minimize the odors from cleaning.
Setting Self Clean
The Self Clean function has cycle times of 3, 4, or 5 hours.
Self Clean Soil Guide
- Lightly Soiled Oven Cavity 3-Hour Self Clean
- Moderately Soiled Oven Cavity 4-Hour Self Clean
- Heavily Soiled Oven Cavity 5-Hour Self Clean
- Remove all racks and accessories from the oven.
- Touch Self Clean. The oven defaults to the recommended four-hour self clean for a moderately soiled oven. Touch twice for a five hour self clean or three times for a three-hour self clean.
- Touch Start.
- Once the self-clean cycle is set, the oven door locks automatically and the lock icon displays. You will not be able to open the oven door until the oven has cooled. The lock releases automatically when the oven has cooled.
CAUTION
Do not force the oven door open when the lock icon is displayed. The oven door remains locked until the oven temperature has cooled. Forcing the door open will damage the door.
Setting Self Clean with a Delayed Start
- Remove all racks and accessories from the oven.
- Touch Self Clean. The oven defaults to the recommended four-hour self clean for a moderately soiled oven. Touch twice for a five-hour self clean or three times for a three-hour self clean.
- Touch Start Time.
- Use the number keys to enter the time of day you would like the Self Clean to start.
- Touch Start.
During Self Clean
- The Self Clean cycle uses extremely hot temperatures to clean the oven cavity. While running the Self Clean cycle, you may notice smoking or an odor. This is normal, especially if the oven is heavily soiled.
- As the oven heats, you may hear sounds of metal parts expanding and contracting. This is normal and will not damage the oven.
- Do not force the oven door open when the lock is displayed. The oven door remains locked until the oven temperature has cooled. Forcing the door open will damage the door.
- Do not remove the steam feeder tank from the oven during the self-clean cycle. Doing so, could result in product damage.
After the Self Clean Cycle
- The oven door remains locked until the oven temperature has cooled.
- You may notice some white ash in the oven. Wipe it off with a damp cloth or a soap-filled pad after the oven cools. If the oven is not clean after one self�clean cycle, repeat the cycle.
- If oven racks were left in the oven and do not slide smoothly after a self-clean cycle, wipe racks and rack supports with a small amount of vegetable oil to make them glide more easily.
- Fine lines may appear in the porcelain because it went through heating and cooling. This is normal and will not affect performance
Changing the Oven Light
The oven light is a standard 40-watt appliance bulb. It turns on when the oven door is open. When the oven door is closed, press Light to turn it on or off.
- Unplug the range or disconnect power.
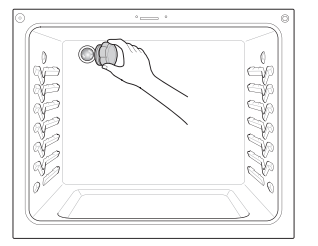
- Turn the glass bulb cover in the back of the oven counterclockwise to remove.
- Turn the bulb counterclockwise to remove it from the socket.
- Insert the new bulb and turn it clockwise.
- Insert the glass bulb cover and turn it clockwise.
- Plug in the range or reconnect the power.
Cleaning the Exterior
Painted and Decorative Trim
For general cleaning, use a cloth with hot soapy water. For more difficult soils and built-up grease, apply a liquid detergent directly onto the soil. Leave it on for 30 to 60 minutes. Rinse with a damp cloth and dry. Do not use abrasive cleaners.
Stainless Steel Surfaces
To avoid scratches, do not use steel wool pads.
- Place a small amount of stainless steel appliance cleaner or polish on a damp cloth or paper towel.
- Clean a small area, rubbing with the grain of the stainless steel if applicable.
- Dry and buff with a clean, dry paper towel or soft cloth.
- Repeat as necessary
Oven Door
- Use soapy water to thoroughly clean the oven door. Rinse well. Do not immerse the door in water.
- You may use a glass cleaner on the outside glass of the oven door. Do not spray water or glass cleaner on the door vents.
- Do not use oven cleaners, cleaning powders, or harsh abrasive cleaning materials on the outside of the oven door.
- Do not clean the oven door gasket. The oven door gasket is made of a woven material that is essential for a good seal. Care should be taken not to rub, damage, or remove this gasket.

Broiler Pan and Grid

- Do not store a soiled broiler pan or grid anywhere in the oven.
- Do not clean the broiler pan or grid in a self cleaning mode.
- Remove the grid from the pan. Carefully pour out the grease from the pan into a proper container
- Wash and rinse the broiler pan and grid in hot water with a soap-filled or plastic scouring pad.
- If food has burned on, sprinkle the grid with cleaner while hot and cover with wet paper towels or a dishcloth. Soaking the pan will remove burned-on foods.
- Both the broiler pan and grid may be cleaned with a commercial oven cleaner or in the dishwasher.
Oven Racks
Remove the oven racks before operating the self clean cycle.
1 Food spilled into the tracks could cause the racks to become stuck. Clean racks with a mild, abrasive cleaner.
2 Rinse with clean water and dry
Removing and Replacing the Lift-Off Oven Doors and Drawer
Removing the Door
1 Open the door fully.
2 Pull the hinge locks down toward the door frame to the unlocked position.

3 Firmly grasp both sides of the door at the top.
4 Close door to the door removal position, which is approximately 5 degrees.

5 Lift door up and out until the hinge arm is clear of the slot.
Replacing the Door
1 Firmly grasp both sides of the door at the top.
2 With the door at the same angle as the removal position, seat the indentation of the hinge arm into the bottom edge of the hinge slot. The notch in the hinge arm must be fully seated into the bottom of the slot.

3 Open the door fully. If the door will not open fully, the indentation is not seated correctly in the bottom edge of the slot.
4 Push the hinge locks up against the front frame of the oven cavity to the locked position.

5 Close the oven door.
TROUBLESHOOTING
FAQs
Can I use a rack in my upper oven to reheat or cook on two levels at once?
Only use the rack that is supplied with your upper oven. Use of any other rack can result in poor cooking performance and/or arcing and may damage your oven.
Will the upper oven be damaged if it operates empty?
Yes. Never operate the oven empty or without the glass tray.
Does microwave energy pass through the viewing screen in the door?
No. The metal screen bounces the energy back to the oven cavity. The holes (or ports) allow only light to pass through. They do not let microwave energy pass through.
Why do I see light reflection around the outer case?
This light is from the upper oven light which is located between the oven cavity and the outer wall of the oven.
What are the various sounds I hear when the upper oven is operating?
The clicking sound is caused by a mechanical switch turning the microwave oven's magnetron ON and OFF.
The heavy hum and clunk is from the change in power the magnetron draws as it is turned ON and OFF by a mechanical switch. The change in blower speed is from the change in line voltage caused by the magnetron being turned ON and OFF.
Can my upper oven be damaged if food is cooked for too long?
Like any other cooking appliance, it is possible to overcook food to the point that the food creates smoke and even possibly fire, and damage to the inside of the oven. It is always best to be near the oven while you are cooking.
Why is a standing time recommended after microwave cooking time is over?
Standing time allows foods to continue cooking evenly for a few minutes after the actual microwave oven cooking cycle. The amount of standing time depends upon the density of the foods.
Why is additional time required for cooking food stored in the refrigerator?
As in conventional cooking, the initial temperature of food affects total cooking time. You need more time to cook food taken out of a refrigerator than for food at room temperature.
Can I use either metal or aluminum pans in my upper oven?
Usable metal includes aluminum foil for shielding (use small, flat pieces), and shallow foil trays (if tray is ¾ inch deep and filled with food to absorb microwave energy). Never allow metal to touch walls or door.
Sometimes the door of my upper oven appears wavy. Is this normal?
This appearance is normal and does not affect the operation of your oven.
The glass tray does not move.
The glass tray is not correctly in place. It should be correct-side up and sitting firmly on the center hub. The support is not operating correctly. Remove the glass tray and restart the oven. Cooking without the glass tray can give you poor results.
Why does the dish become hot when I microwave food in it? I thought that this should not happen.
As the food becomes hot it will conduct the heat to the dish. Use hot pads to remove food after cooking.
What does standing time mean?
Standing time means that food should be taken out of the oven and covered for additional time after cooking. This process allows the cooking to finish, saves energy, and frees the oven for other purposes.
Can I pop popcorn in my upper oven? How do I get the best results?
Yes. Pop packaged microwave popcorn following manufacturer’s guidelines or use the preprogrammed Popcorn key.
Do not use regular paper bags. Use the listening test by stopping the oven as soon as the popping slows to a pop every one or two seconds. Do not try to repop unpopped kernels. You can also use special microwave poppers. When using a popper, be sure to follow manufacturer’s directions. Do not pop popcorn in glass utensils.
Why does steam come out of the air exhaust vent?
Steam is normally produced during cooking. The upper oven has been designed to vent steam out of the top vent.
The Lower oven doesn’t cook like my old one. Is there something wrong with the temperature settings?
No, your oven has been factory tested and calibrated. For the first few uses, follow your recipe times and temperatures carefully. If you still think your new oven is too hot or too cold, you can adjust the oven temperature yourself to meet your specific cooking needs. Refer to the Oven Temperature Adjustment section in this manual for easy instructions on how to adjust your thermostat.
Is it normal to hear a clicking noise coming from the back of the lower oven when I am using it?
Your new oven is designed to maintain a tighter control over your oven’s temperature. You may hear your oven’s heating elements click on and off more frequently on your new oven. This is NORMAL.
Why is the time flashing?
This means that the product has just been plugged in, or that it has experienced a power interruption. To clear the flashing time, touch any button and reset the clock if needed.
During convection cooking the fan stops when I open the door. Is that normal?
Yes, this is normal. When the door is opened, the convection fan will stop until the door is closed.
Can I use aluminum foil to catch drippings in the lower oven cavity?
Never use aluminum foil to line the bottom or sides of the oven. The foil will melt and stick to the bottom surface of the oven and will not be removable. Use a sheet pan placed on a lower oven rack to catch drippings instead. (If foil has already melted onto the bottom of the oven, it will not interfere with the oven's performance.)
Can I use aluminum foil on the racks?
Do not cover racks with aluminum foil. Covering entire racks with foil restricts air flow, leading to poor cooking results. Use a sheet pan lined with foil under fruit pies or other acidic or sugary foods to prevent spillovers from damaging the oven finish.
Can I leave my racks in the oven when running a Self Clean cycle?
No. Although it will not damage the racks, it will discolor them and may make them hard to slide in and out during use. Remove all items from the oven before starting a Self Clean cycle.
What should I do if my racks are sticky and have become hard to slide in and out?
Over time, the racks may become hard to slide in and out. Apply a small amount of olive oil to the ends of the racks. This will work as a lubricant for easier gliding.
Why aren't the function buttons working?
Make sure that the oven is not in Lockout mode. The lock will show in the display if Lockout is activated. To deactivate Lockout, touch and hold Lower Clear/Off for three seconds. The unlock melody sounds and Loc appears in the display until the controls are unlocked.
My oven is still dirty after running the EasyClean® cycle. What else should I do?
The EasyClean® cycle only helps to loosen light soils in your oven to assist in hand-cleaning of your oven. It does not automatically remove all soils after the cycle. Some scrubbing of your oven is required after running the EasyClean® cycle.
I tried scrubbing my oven after running EasyClean®, but some soils still remain. What can I do?
The EasyClean® feature works best when the soils are fully soaked and submerged in water before running the cycle and during hand-cleaning. If soils are not sufficiently soaked in water, it can negatively affect the cleaning performance. Repeat the EasyClean® process using sufficient water. Sugar-based and certain greasy soils are especially hard to clean. If some stubborn soils remain, use the Self Clean feature to thoroughly clean your oven.
Soil on the oven walls is not coming off. How can I clean the oven walls?
Soils on the side and rear walls of your oven may be more difficult to fully soak with water. Try repeating the EasyClean® process with more than the ¼ cup (2 oz or 60 ml).
Will EasyClean® get all of the soils and stains out completely?
It depends on the soil type. Sugar-based and certain grease stains are especially hard to clean. Also, if stains are not sufficiently soaked in water, this can negatively affect cleaning performance. If stubborn or built-up stains remain, use the Self Clean feature. Refer to the Self Clean section of your owner's manual.
Are there any tricks to getting some of the stubborn soils out?
Scraping the soils with a plastic scraper before and during hand-cleaning is recommended. Fully saturating soils with water is also recommended. However, certain types of soils are harder to clean than others. For these stubborn soils, the Self Clean cycle is recommended. Consult the Self Clean section of your owner's manual for details.
Is it safe for my convection fan, broil burner or heater element to get wet during EasyClean®?
Yes. The convection fan, broiler burner or heater element may get a little wet during cleaning. However, direct spray onto the broil burner and heater elements is not necessary because these are self-cleaning during regular use.
I see smoke coming out of my oven's vents during EasyClean®. Is this normal?
This is normal. This is not smoke. It is actually water vapor (steam) from the water in the oven cavity. As the oven heats briefly during EasyClean®, the water in the cavity evaporates and escapes through the oven vents.
How often should I use EasyClean®?
EasyClean® can be performed as often as you wish. EasyClean® works best when your oven is LIGHTLY soiled from such things as LIGHT grease splatter and small drops of cheese. Please refer to the EasyClean® section in your owner's manual for more information.
What is required for EasyClean®?
A plastic scraper, a non-scratch scrubbing pad and a towel. You should not use abrasive scrubbers such as heavy-duty scouring pads or steel wool. Except for a towel, all of the materials you need are included in a special cleaning kit with your new oven.
Before Calling for Service
Before you call for service, review this list. It may save you time and expense. The list includes common occurrences that are not the result of defective workmanship or materials in this appliance.
Oven control beeps and displays any F code error
- Electronic control has detected a fault condition. Touch Clear/Off to clear the display and stop beeping. Reprogram oven. If fault recurs, record fault number. Touch Clear/Off and contact a Service agent.
- Code F-3 Touch key error
- Code F-9 Oven not heating
Oven will not work
- Plug on range is not completely inserted in the electrical outlet.
- Make sure electrical plug is plugged into a live, properly grounded outlet.
- A fuse in your home may be blown or the circuit breaker tripped.
- Replace the fuse or reset the circuit breaker.
- Oven controls improperly set.
- See the Using the Oven section.
- Oven too hot.
- Allow the oven to cool to below locking temperature.
Arcing or Sparking (Upper Oven)
- Cookware is not microwave safe. When in doubt, test cookware before use.
- Do not operate oven while empty.
Unevenly Cooked Foods (Upper Oven)
- Test cookware to make sure it is microwave safe.
- Do not cook without the glass tray.
- Turn or stir food while cooking.
- Defrost food completely before cooking.
- Use correct cook time and power level.
Overcooked Foods (Upper Oven)
- Change cook time or power level.
Undercooked Foods (Upper Oven)
- Test that cookware is microwave safe.
- Defrost food completely before cooking.
- Change cook time or power level.
- Make sure ventilation ports are not blocked.
Improper Defrosting (Upper Oven)
- Test that cookware is microwave safe.
- Change defrost time or weight.
- Turn or stir food during defrost cycle.
If the display shows a time counting down but the oven is not cooking
- Check that door is firmly closed.
- Check that timer wasn't started instead of a cooking function.
Steam is exhausted through the oven vent
- Cooking foods with high moisture produces steam. This is normal.
Appliance does not operate
- Make sure cord is plugged correctly into outlet. Check circuit breakers.
- Service wiring is not complete. Contact your electrician for assistance.
- Power outage. Check house lights to be sure. Call your local electric company for service.
Oven light does not work
- Replace or tighten bulb. See Changing the Oven Light section in this Owner’s Manual.
Oven smokes excessively during broiling
- Control not set properly. Follow instructions under Setting Oven Controls.
- Meat too close to the element. Reposition the rack to provide proper clearance between the meat and the element. Preheat broil element for searing.
- Meat not properly prepared. Remove excess fat from meat. Cut remaining fatty edges to prevent curling.
- Insert on broiler pan wrong side up and grease not draining. Always place grid on the broiler pan with ribs up and slots down to allow grease to drip into pan.
- Grease has built up on oven surfaces. Regular cleaning is necessary when broiling frequently.
- Old grease or food spatters cause excessive smoking.
Food does not bake or roast properly
- Oven controls improperly set.
- See the Using the Oven section.
- Rack position is incorrect or the rack is not level.
- See the Using the Oven section.
- Incorrect cookware or cookware of improper size being used.
- See the Using the Oven section.
- Oven sensor needs to be adjusted.
- See Oven Temperature Adjustment in the Features section.
Food does not broil properly
- Oven controls improperly set.
- Make sure you touch Broil.
- Improper rack position being used.
- Cookware not suited for broiling.
- Use broiling pan and grid.
- Aluminum foil used on the broiling pan and grid has not been fitted properly and slit as recommended.
- See the Using the Oven section.
- In some areas the power voltage may be low.
- Preheat the broil element for 5-7 minutes.
- See the Broiling Guide.
Oven temperature too hot or too cold
- Oven sensor needs to be adjusted.
- See Oven Temperature Adjustment in the Features section.
Oven will not Self Clean
- The oven temperature is too high to set a Self Clean operation.
- Allow the oven to cool and reset the controls.
- Oven controls improperly set.
- See the Self Clean section.
- A Self Clean cycle cannot be started if the oven lockout feature is active.
- Make sure to slide the tank into the slot until it clicks into place.
”Crackling” or “popping” sound
- This is the sound of the metal heating and cooling during both the cooking and Self Clean functions.
Fan noise
- A convection fan may automatically turn on and off.
Convection Fan stops
- Convection fan stops during a convection bake cycle.
- This is normal and is done to allow for more even heating during the cycle. This is not a failure of the oven and should be considered normal operation.
Displayed Time is flashing
- This is normal. This means that the product has just been plugged in, or that it has experienced a power interruption. Touch the Clock key and reset the time, or touch any key to stop the flashing.
Excessive smoking during a Self Clean cycle
- Excessive soil.
- Touch the Clear/Off button. Open the windows to rid the room of smoke. Wait until the Self Clean mode is cancelled. Wipe up the excess soil and reset the clean.
Oven door does not open after a Self Clean cycle
- Oven is too hot.
- Allow the oven to cool below locking temperature.
- Allow about one hour for the oven to cool after the completion of a Self Clean cycle. The door can be opened when the lock is no longer displayed.
- The control and door may be locked.
The oven does not clean after a Self Clean cycle
- Oven controls not properly set.
- See the Self Clean section.
- Oven was heavily soiled.
- Clean up heavy spillovers before starting the clean cycle. Heavily soiled ovens may need to Self Clean again or for a longer period of time.
CLEAN and door flash in the display
- The Self Clean cycle has been selected, but the door is not closed.
LOCKED is on in the display when you want to cook
- The oven door is locked because the temperature inside the oven has not dropped below the locking temperature.
- Touch the Clear/Off button. Allow the oven to cool.
Burning or oily odor emitting from the vent
- This is normal in a new oven and will disappear in time.
- To speed the process, set a Self Clean cycle for a minimum of 3 hours. See the Self Clean section.
Oven racks are difficult to slide
- The shiny, silver-colored racks were cleaned in a Self Clean cycle.
- Apply a small amount of vegetable oil to a paper towel and wipe the edges of the oven racks with the paper towel
Moisture collects on oven window or steam comes from oven vent
- This is normal when cooking foods high in moisture.
- Excessive moisture was used when cleaning the window.
Oven will not Steam cook
- Make sure to slide the tank into the slot until it clicks into place.
- The drain in the steam feeder tank may be clogged with hard water scale. If this happens, the descaling function must be run before the steam function can be used.
Water pools in the bottom of the oven during or after steam cooking
- During steam cooking, the water in the steam feeder is transferred to the bottom of the oven. It is normal for water to fill the bottom of the oven during or after the Steam mode.
- If the water leaves mineral deposits on the oven bottom, remove the deposits with a cloth or sponge soaked in vinegar.
White residue appears on the oven bottom after steam cooking
- Using hard water in the steam feeder can result in hard water scale on the oven bottom.
- To remove mineral deposits that remain on the oven bottom, use a cloth or sponge soaked in vinegar or a weak citric acid solution.
Trouble connecting appliance and smartphone to Wi-Fi network
- The password for the Wi-Fi network was entered incorrectly.
- Delete your home Wi-Fi network and begin the registration process again.
- Mobile data for your smartphone is turned on.
- Turn off the Mobile data on your smartphone before registering the appliance.
- The wireless network name (SSID) is set incorrectly.
- The wireless network name (SSID) should be a combination of English letters and numbers. (Do not use special characters.)
- The router frequency is not 2.4 GHz.
- Only a 2.4 GHz router frequency is supported. Set the wireless router to 2.4 GHz and connect the appliance to the wireless router. To check the router frequency, check with your Internet service provider or the router manufacturer.
- The distance between the appliance and the router is too far.
- If the appliance is too far from the router, the signal may be weak and the connection may not be configured correctly. Move the router closer to the appliance or purchase and install a Wi-Fi repeater.