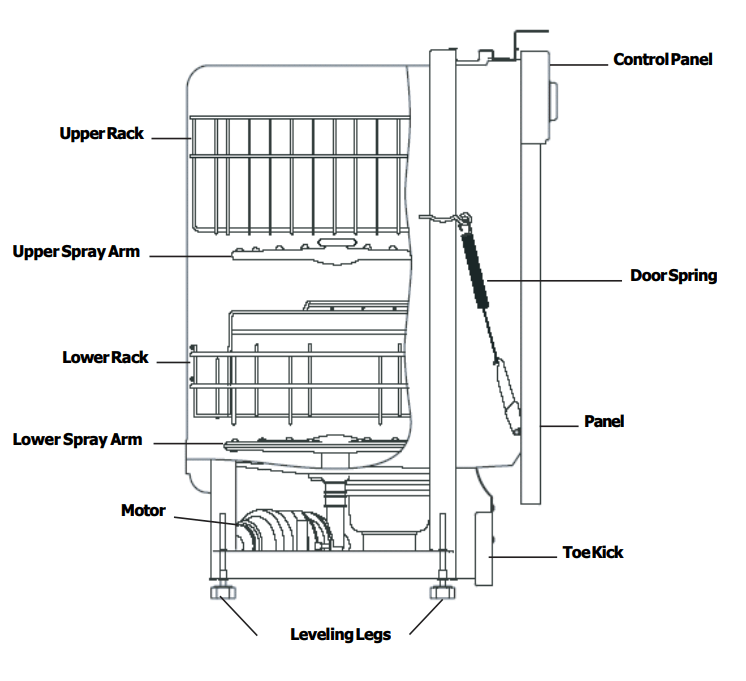
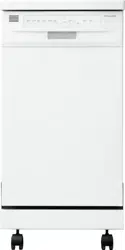
Your dishwasher, illustrated below, cleans by spraying a mixture of hot, clean water, and detergent against the soiled surfaces of your dishes and tableware. Each cycle starts with a pre-drain. Next, the dishwasher fills with water to a level even with the heating element. This water is constantly pumped through the rotating spray arm and sprayed onto the dishes. Soiled water is pumped out and replaced iwth clean water during a cylce. The number of water fills depends upon the cycle being used.
OPERATING INSTRUCTIONS
Getting Started
Check Filter (See Cleaning Filter)
Load dishwasher (See Preparing and Loading Dishes).
Add detergent (See Dishwasher Dispenser &Detergents).
Add rinse aid, if needed (See Rinse Aid).
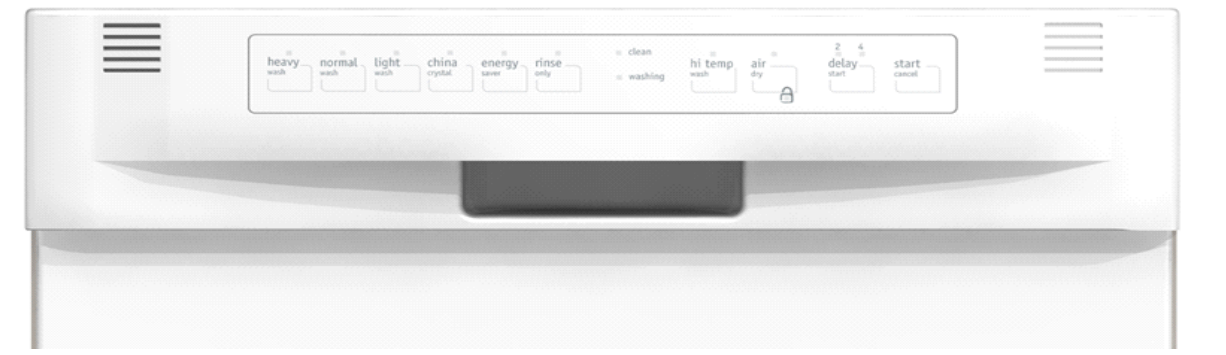
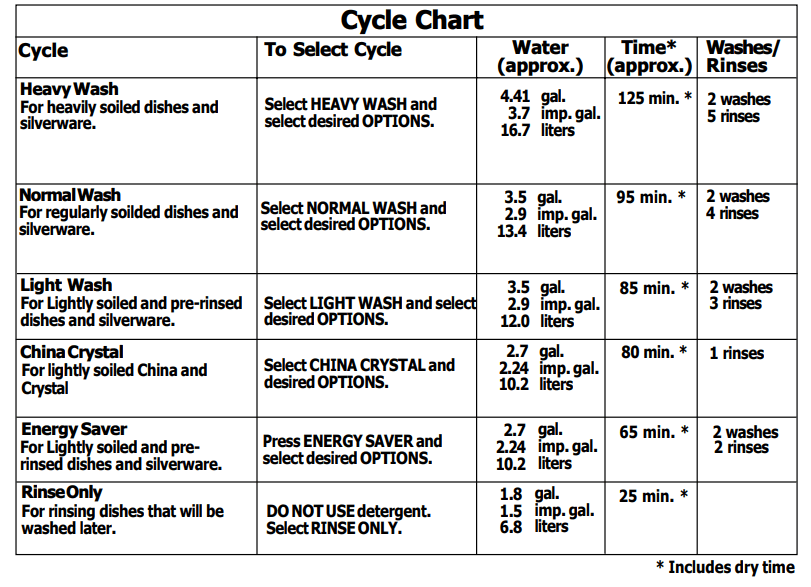
Select wash cycle (See Cycle Chart).
Select desired OPTIONS.
See page 11 for instructions on connecting the portable dishwasher.
Run hot water faucet nearest dishwasher until water is hot. Turn water off.
To start, close door to latch.
Dish Preparation
It is not necessary to rinse dishes before putting them into the dishwasher. Just remove large pieces and quantities of food, bones, pits, etc. Empty glasses and cups. It may be necessary to presoak or lightly scour firmly cooked-on or baked-on foods. Foods such as mustard, mayonnaise, vinegar, lemon juice and tomato-based products may cause discoloration of stainless steel and plastics if allowed to sit for a long period of time. Unless the dishwasher is to be operated at once, it is best to rinse off these food soils.
Load dishes facing the center of the rack so that thewater spray from the rotating spray arm can reach soiled surfaces.
Be sure large items do not block the detergentdispenser, preventing it from opening during the wash cycle.
To be sure an item is dishwasher safe, read themanufacturer’s care instructions.
If the dishwasher drains into a food disposer, be sure disposer is completely empty before dishwasher is started.
To save energy, wash full loads.
For best washing results, load correctly and avoidoverloading.
Energy Options
Hi-Temp Wash Option
When HI-TEMP WASH ON option is selected, the dishwasher heats the water in the main wash to approximately 140°F (60°C).
This increase in water temperature helps dishwasher detergent remove food grease and soil from dishes more effectively and aids in drying. HI-TEMP WASH option can be used with all cycles except CHINA CRYSTAL and RINSE ONLY. HI-TEMP WASH is automatically provided when HEAVY WASH cycle is selected.
To turn off the HI-TEMP WASH option, press the pad a second time.
Air Dry Option
The unit defaults to heated dry when it is started with any cycle selected. This drying uses a combination of the heated dry with rinse aid that achieves enhanced drying performance. If you prefer to only have AIR DRY for dishes, you will select AIR DRY and the uit will not energize the heating element. This will reduce energy consumption, but reduce drying performance.
Delay Start
The DELAY START option allows you to automatically delay starting your dishwasher from 2 - 4 hours.
Make cycle selections, press the DELAY START key until the desired delay LED is it, then close the door and the delay time will start.
To cancel the delay and start the cycle before the delay period is over, open the door and press the START/CANCEL key. Close the door and the cycle will start.
PREPARING AND LOADING DISHES
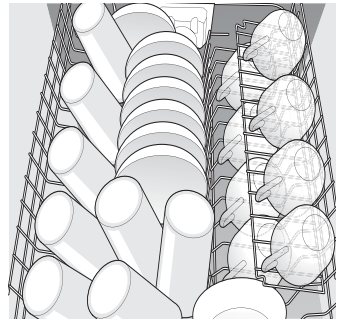
Loading the Top Rack
Glasses and cups—Place glasses and cups against outside pins at an angle. Cups with a concave bottom will collect water.
Small plates and saucers—Place dishes between middle two rows of pins.
Plasticware—Load plasticware in the top rack to avoid melting. Bowls—Place bowls between the middle 2 rows of pins facing down.
Miscellaneous items—Place long handled knives and utensils in top rack.
Cup Shelf—The cup shelf can be folded down over short items (juice glasses, cups, etc.) for more loading space. When using cup shelf, alternate items with layer below so that water can reach all inside surfaces.
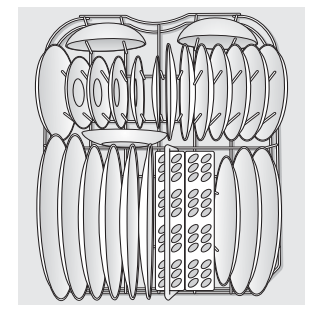
Loading the Bottom Rack
Large plates and platters—Place between the support pins with soiled sides facing inward.
Bowls, casseroles and sauce pans— Load upside down or at an angle facing inward. Slightly tilting items will provide better drainage.
Pots and pans—Place upside down and at an angle. Do not allow handles to protrude through bottom of rack, blocking wash arm rotation. Load large items at the sides and not across the front so they do not block the detergent dispenser preventing it from opening.
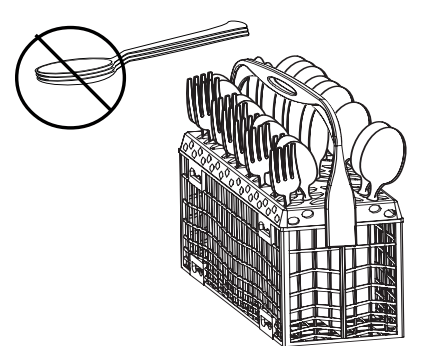
Loading the Silverware Basket
Load sharp items with handles up. Be sure items do not protrude through the holes in the basket and stop the rotation of the spray arm.
Load silverware so items are mixed in each section to prevent nesting. Water spray cannot effectively reach nested items.
Adding a Dish
Make sure there is a full wash cycle yet to be completedso that any added items are thoroughly washed and rinsed.
Unlatch door and wait for water action to stop.
Open door and add dish.
Firmly close door to latch and resume cycle.
DISHWASHER DISPENSER & DETERGENTS
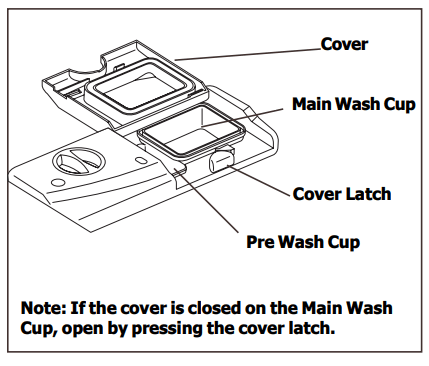
Filling the Detergent Dispenser
The detergent dispenser has one covered and one uncovered cup. Detergent in the uncovered cup falls into the dishwasher when the door is closed. The covered cup opens automatically to release detergent.
How much Detergent to use
The amount of detergent to use depends on the water hardness. Water hardness is measured in grains per gallon. Using too little detergent can result in poor cleaning and hard water filming or spotting. Using too much detergent in soft water can cause a permanent film called etching. Your local water company, water softener company or county extension agent can tell you the water hardness in your area.
Use only fresh automatic dishwashing detergent. Other detergents will cause oversudsing.
Add detergent just before starting cycle.
Store detergent in a cool, dry location. Moist or caked detergent will not dissolve properly.
Do not fill both washcups, unless you have very hard water, see chart below*.
FACTORS AFFECTING PERFORMANCE
Rinse Aid
Rinse aid greatly improves drying and reduces water spots and filming. Water “sheets” off dishes rather than forming water droplets that cling and leave spots.
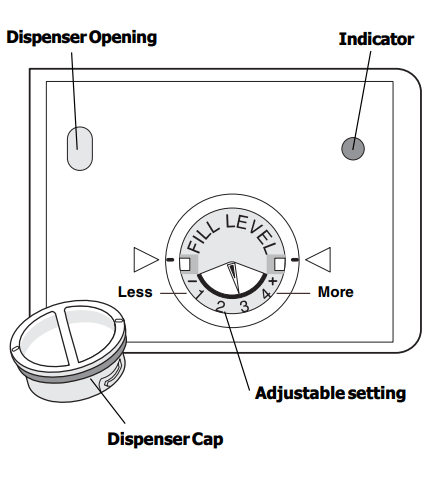
A dispenser, located next to the detergent cup, automatically releases a measured amount of rinse aid during the last rinse. If spotting and poor drying are problems, increase the amount of rinse aid dispensed by rotating the dial to a higher number. The dial is located under the dispenser cap. The indicator will be dark when full and will show clear when it is time to refill.
To add liquid rinse aid, turn dispenser cap 1/4 turn counterclockwise and lift out. Pour in rinse aid until liquid touches the indicated fill level. Replace cap.
Do not overfill since this can cause oversudsing. Wipe up any spills with a damp cloth.
The dispenser holds enough for 35 to 140 washes, depending on setting.
Water Pressure
Water pressure should be between 20 and 120 pounds per square inch. Low water pressure occurs most often during periods of high water consumption, such as when laundry or showers are being done. To determine if you have enough water pressure, put a 2 quart container under fully opened hot water faucet nearest the dishwasher. It should fill in less than 14 seconds. Be sure all other faucets are turned off during test.
Water Temperature
Hot water is needed for best dishwashing and drying results. Water entering dishwasher should be at least 120°F (49°C) to give satisfactory results.
To check water temperature entering dishwasher:
Turn on hot water faucet nearest dishwasher forseveral minutes to clear cool water from pipes.
Hold a candy or meat thermometer in stream ofwater to check the temperature.
If temperature is below 120°F (49°C), have aqualified person raise the hot water heater thermostat setting
Important: Before starting a cycle, run hot water to clear cool water from pipe.
Not selecting the AIR DRY option in combination with rinse aid will enhance drying performance. The energy required to use the AIR DRY option costs pennies per cycle. You may choose to select the AIR DRY option; however you will have items in your dish load that will not be completely dry at the end of the cycle.
CARE AND CLEANING
Outside—Occasionally wash with a mild nonabrasive detergent and water. Rinse and dry.
Inside—The inside of the dishwasher is self-cleaning with normal use.
To clean stainless steel wipe with the grains.
Use a Dishwasher Safe Detergent to help with the stains or discolorations.
NEVER use products that contain Chlorine Bleach or Citric Acid.
Important: The dishwasher motor is permanently lubricated at the factory and does not need to be oiled.
Care of Drain Air Gap
If a drain air gap was installed for your built-in dishwasher, check to make sure it is clean so the dishwasher will drain properly. Drain air gaps are usually mounted on countertop and can be inspected by removing the cover. A drain air gap is not part of your dishwasher and is not covered by this warranty.
Winterizing
A dishwasher left in an unheated place should be protected from freezing. Have a qualified person do the following:
To Disconnect Service:
Turn off electrical power to the dishwasher at the supplysource by removing fuses or tripping circuit breaker.
Shut off water supply.
Place a pan under the inlet valve. Disconnect water linefrom inlet valve and drain into pan.
Disconnect drain line from pump and drain water intopan.
To Restore Service:
Reconnect the water, drain, and electrical power supply.
Turn on water and electrical power supply.
Fill both detergent cups and run dishwasher through aNORMAL WASH Cycle.
Check connections to make sure they do not leak.
Cleaning the Filter
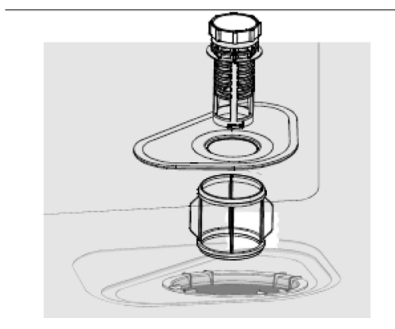
For optimum performance, your dishwasher is equipped with a filter assembly featuring a main filter, cup and fine filter as shown in the drawing above. All food fragments are removed from the dishwasher as water passes through the filter assembly.
Each part of the assembly should be cleaned often to ensure that all food fragments are removed from the dishes. To remove food fragments from the filter assembly, the filters must be removed from the dishwasher. To remove the filters, pull up on the edge of the main filter. Next, rinse the main filter and fine filter under running water. Cleaning with a brush may also be necessary to remove any fragments trapped in the filters. Once cleaning has been completed, simply reassemble the filter as shown in the drawing above. To ensure that the filter is fully seated, please press down on the top of the main filter. Using the dishwasher without a properly installed filter is not recommended as it will reduce the cleaning efficiency and may damage dishware.
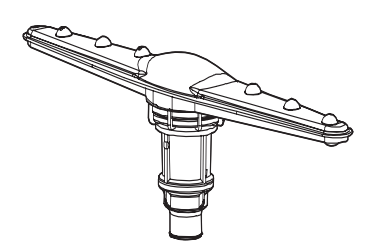
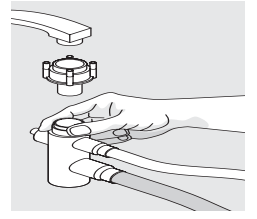
Cleaning the Spray Arm
The spray arm may need to be cleaned to insure that there are no clogs to the spray arm jets and bearings due to hard water chemicals.
To remove spray arm simply hold the spray arm in place and turn the retaining nut clockwise and pull up on the spray arm lifting off the shaft.
To clean the spray arm use warm soapy water using a soft brush to clean the jets and bearings.
To replace the spray arm simply set the spray arm on the shaft, take the retaining nut and turn it counter clockwise till it has locked into place.
CONNECTING AND DISCONNECTING THE PORTABLE DISHWASHER
The portable dishwasher must be connected to a faucet and electrical outlet each time it is used. Follow directions on this page to properly connect dishwasher.
Faucet Adapter Assembly (Figure A)
IMPORTANT: Make sure door is latched before moving dishwasher.
The power cord and faucet coupler with hoses are located in a compartment in back of dishwasher. A special adapter must be installed on faucet before you can connect dishwasher (Figure A).
Remove faucet adapter assembly from literature package.
Unscrew existing sink faucet aerator.
Check faucet spout to see if threads are inside or outside.
If threads are on inside of faucet spout, use both rubber washers.
If threads are on outside of faucet spout, use one rubber washer only.
If faucet has no threads, an adapter kit with instructions for attachment toa non-threaded spout is available at most hardware stores.
Assemble faucet spout as shown in Figure A.
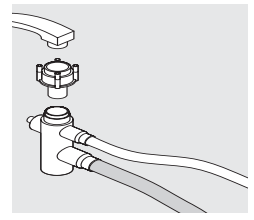
Connecting the Portable Faucet Adapter Assembly (Figure B)
Connecting the Portable Dishwasher
1.Run water at faucet until it is hot. Turn off faucet.
2.Pull hoses out of compartment.
3.Push collar down and slip faucet connector onto faucet adapter (Figure B).
4.When connector snaps into place, release collar.
5.Slowly turn on hot water all the way.
6.Plug power cord into grounded outlet.
Disconnecting the Portable Dishwasher
1.When cycle has finished, unplug power cord and return it to compartment.
2.Turn off hot water.
3.Press red button on coupler to release water pressure.
4.Press down on collar to release coupler.
5.Empty remaining water from coupler and return it to compartment.
IMPORTANT: A sink spray hose can burst due to constant water pressure while in use. If your spray hose is installed on same water line as the dishwasher, it is your responsibility to disconnect sink's spray hose and to plug hole.
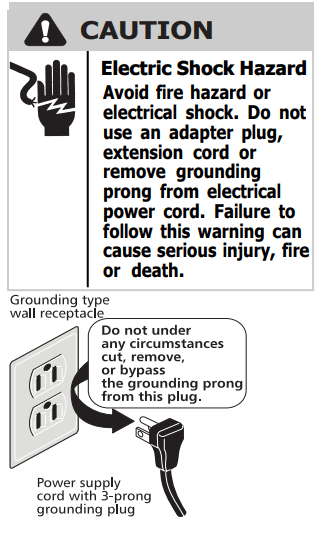
Electrical Connection for a Portable Dishwasher
An electrical supply of 120 volts, 60 Hz, AC only, 15 amps is required. For your safety, the dishwasher must be grounded. If there is a malfunction or breakdown, grounding will reduce risk of electrical shock. This dishwasher has a power cord with a 3-prong grounding plug. It must be plugged into a mating 3-prong grounding type receptacle, installed and grounded in accordance with the National Electrical Code and any local codes and ordinances.
COMMON DISHWASHING PROBLEMS AND SOLUTIONS
Dishes not clean—Check pages 4 to 8 for information on correct wash cycle, proper loading, water temperature, water pressure, hard water, amount of detergent, old and ineffective detergent, and dish placement. To maximize wash performance clean the filter of all large food particles after each wash. To ensure that you clean the filter correctly refer to page 12.
Dishes not drying can be greatly improved by using a rinse aid and hot water. Hot water raises temperature of dishes to speed up drying. When loading, invert cups and bowls so that water can run off. Avoid nesting of articles. If dishes are not completely dry at end of cycle (which may occur when COOL DRY setting is used), open door, roll out racks, and allow dishes to air dry.
Spotting—Spots form when hard water droplets evaporate leaving a deposit. Low phosphate detergents increase the problem in hard water. To prevent, use hot water and a detergent with a higher level of phosphates (preferably 8.7% or higher), or use more of a low phosphate detergent. Be sure to use a rinse aid. If water is very hard, it may be necessary to install a water softener. Load glasses and plates so they have minimum contact with racks and pins. Avoid overloading. Spotting will occur where dishes and glasses touch.
Cloudy films and streaking are usually caused by a combination of hard water and an insufficient amount of detergent. Low phosphate detergents are also a factor. To correct, increase amount of detergent, check water temperature and always use a rinse aid. If water is very hard, it may be necessary to install a water softener.
Etched film on glassware is caused by using too much detergent in soft or softened water. This film cannot be removed. It is more likely to occur on soft leaded glass or expensive crystal. An early warning of this condition is a cloudy iridescent appearance on glasses. To prevent, be sure dishwasher is getting a full fill of water. Water should reach base of heating element. If water level is low, have water pressure checked by a plumber. Use less detergent and make sure water temperature is not higher than 150°F (66°C). Underload to assure thorough rinsing. Use the COOL DRY Option.
Chipped dishes and glasses can result from rough handling and improper loading. Do not put glasses in direct contact with other items. Place glasses securely against pins.
Crazing of older china and pottery happens when items are subjected to very hot water. Once crazing (fine cracks in the glaze) appears, it cannot be removed. Do not machine wash again or condition may worsen.
Coffee and tea stains can occur when water contains traces of iron. To avoid stains, rinse cups out immediately after use. Increase amount of detergent and use a rinse aid. Water temperature should be approximately 140°F (60°C). If problem persists, install a water softener with an iron removal unit. To remove stains, hand wash cups in solution of 1/2 cup (120 ml) bleach and a quart (1 L) of warm water. Rinse thoroughly.
Gray-black stains on dishes are caused by manganese in water supply. To correct, install a manganese filtering system into house water supply.
Reddish-brown stains on dishes, glasses and interior are caused by iron in water. To avoid iron stain, increase detergent, use water heated to approximately 140°F (60°C) and a rinse aid. It may be necessary to install a water softener with an iron removal unit. To improve appearance, use a commercial rust and lime scale remover.
Plastic items can lose their shape due to high temperatures of automatic dishwashing. Read labels before washing. Place washable items in top rack away from heating element.
Discoloration of plasticware by some foods, such as tomato sauce, can stain plasticware. If stained, soak item in solution of 1 tablespoon dishwasher detergent and a quart of hot water or in a solution of 1/2 cup (120 ml) bleach and a quart (1 L) of hot water.
Fading of patterns and metallic trim is due to many washings, detergent and hot water. Most of today’s china is dishwasher safe. Antique, handpainted china, and handpainted pottery should be washed by hand.
Do not place silver next to or touching stainless steel utensils in dishwasher silverware basket. This can cause pitting of stainless steel blades. (Most silver knives have stainless steel blades. Do not let blades touch other stainless steel utensils during wash cycle.)
Tarnish on silver plate occurs when worn down to the base metal and turns a bronze color when exposed to hot water and detergent. Remove bronzing by soaking item in vinegar for 10 minutes or use a silver polish. For permanent protection, have silver replated.
Silver tarnish can be caused by prolonged contact with air or with foods containing sulphur like eggs, mayonnaise, or seafood. Contact with undissolved detergent can also cause tarnish. To prevent this, rinse silver soon after use. Use care not to pour detergent directly onto silver. Remove tarnish with a silver polish.
Discoloration of stainless steel— Food soil can create a film or discoloration. To avoid, rinse stainless items promptly. Food soil films can be removed with a stainless steel cleanser or mild cleanser. Rinse thoroughly.
Pitting of stainless steel is caused by prolonged contact with detergent granules and foods like salt, mayonnaise, fruits, butter or milk. To prevent, rinse soon after use. Do not allow detergent to fall directly onto stainless steel items.
Discoloration of aluminum—Anodized (colored) aluminum cannot withstand machine washing. Resulting loss of color is permanent. Other aluminum may darken when machine washed. To decrease chance of discoloration, do not place aluminum directly beneath detergent dispenser. To brighten darkened items, scour with soap filled steel wool pads. For severely darkened pans, simmer an acidic food or a solution of 2 teaspoons (10 ml) cream of tartar per quart (1 L) of water for 1/2 hour. Scour with soap filled steel wool pad, rinse and dry.
Knife handles become loose when the cement is exposed to very hot water. Test wash a single knife for several weeks. Damaged knives should be professionally re-cemented.
Troubleshooting
Before calling for service, review this list. It may save you both time and expense. This list includes common experiences that are not the result of defective workmanship or material.
Noise problems?
It is normal to hear swishing and pulsating sounds. These sounds mean that water is circulating through the dishwasher.
It is normal to hear motor sounds before water enters tub.
Loud ticking usually means something is hitting wash arm. See Preparing and Loading Dishes.
Vibrating or rattling sounds can mean dishes are touching each other. See Preparing and Loading Dishes.
Operating problems?
Be sure door is firmly closed. It is normal for dishwasher to pause between cycles.
Leaking?
Check for items sticking out of dishwasher that could prevent door from closing and sealing properly. Use only fresh dishwashing detergent to avoid oversudsing.
Water coming through door vents? When a dish is added after starting dishwasher, wait a few seconds before latching door. This permits entering cold air to expand slowly inside dishwasher.
Dishes not dry?
Check to see if rinse aid dispenser needs refilling.
Hot water temperature may be too low (min. 120°F 49°C). If COOL DRY option is being used, additional drying time may be required with door open.
Water in tub?
A small amount of water in bottom of tub is normal. It keeps water seal lubricated.
Detergent left in cup?
Detergent may be too old. Discard old detergent.Use fresh detergent. Dishes may not be loaded properly. Be sure items do not protrude from front of bottom rack preventing detergent cup from opening.