User Manual Irons
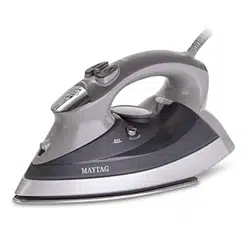
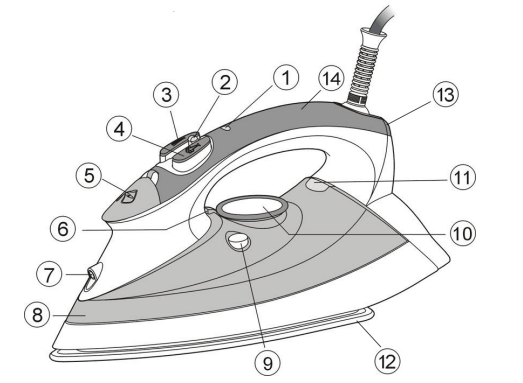
MEET YOUR IRON
1. Auto Shut-Off Indicator Light
2. Steam Control
3. Spray Button
4. Steam Burst Button
5. Water Fill Cover/Inlet
6. Temperature Marker
7. Spray Nozzle
8. Water Tank
9. Self-Clean Button
10. Temperature Control Setting
11. Temperature Ready Light
12. Soleplate
13. Heel Rest
14. Soft Grip Handle
OPERATING YOUR IRON
1 Before First Use
- Remove any protective packaging. films. or stickers from the soleplate and the iron
- Read all “Safety Guidelines.” See section 1
- Fill Water Tank as instructed in “Filling Water Tank.” See page section 3
- Plug the iron into a grounded electrical outlet.
You will hear a beep when plugged in. but the iron is NOT heating up yet
- To heat up. turn the Temperature Control Setting to LINEN. This is the highest setting
- When Temperature Ready light will turn off when the iron is ready.
- It is normal for a small amount of smoke and a light odor to be produced the first time the iron is used; this won’t last long
- Particles may emit from the iron the first time it is used. They are not harmful and should dissipate once used
- Move the Steam Control/Self-Clean to maximum. This is the continuous steam setting
- Iron for the first time on an old towel or a heavy material until the Water Tank is empty and no more steam is produced. This will help to eliminate any particles in the iron.
2 Control Features
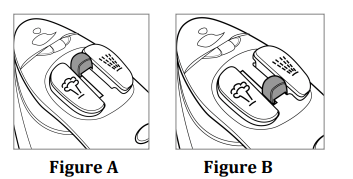
STEAM CONTROL
- Slide the steam switch towards the front of the iron to increase the amount of the steam.
- See Figure A.
- Slide the switch towards the back of the iron to decrease or turn the steam off. See Figure B.
SPRAY BUTTON
Water spray can help to eliminate wrinkles.
- For water spray. push the Water Spray Button. See Figure C. left Button.
STEAM BURST BUTTON
This function is good for those extra stubborn wrinkles.
- Follow instructions in “Steam Ironing.” See section 6.
- While Steam Ironing, press the Steam Burst button. See Figure C, right button.
- It takes a few seconds on steam reboot for rapid steaming.

3 Filling Water Tank
1. Ensure the iron is unplugged when filling the Water Tank.
Do not use any soap or chemical mixed with the water or any other liquid in the iron.
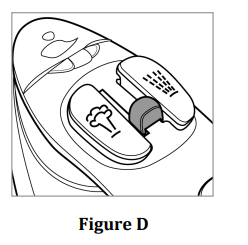
2. Set Steam Control to Off. See Figure D.
3. Open the Water Fill Cover/Inlet.
4. Using the included cup. fill the Water Tank to the max level mark on the outside of the Water Tank.
Be careful not to overfill. this could cause leakage. See Figure E.
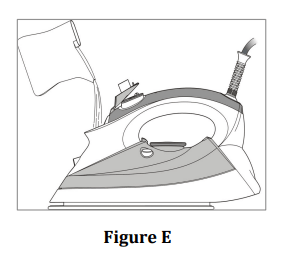
5. Close the Water Fill Cover/Inlet
When refilling the Water Tank, ensure the iron is unplugged.
4 Setting Temperatures and Turning on Your Iro
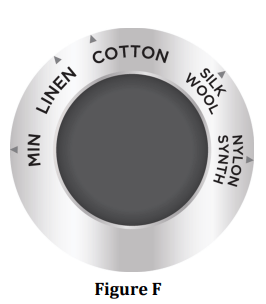
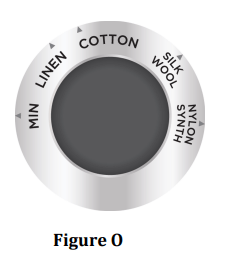
TEMPERATURE SETTINGS (SEE FIGURE F)
NYLON/SYNTH Nylon/Synthetics
SILK/WOOL Silk/Wool
COTTON Cotton
LINEN Linen
MIN is the lowest temperature setting. If you are not sure of the material this is the safest setting.
TURNING ON YOUR IRON
1. Rest unplugged iron on its heel.
2. Plug the iron into a grounded electrical outlet.
You will hear a beep when plugged in. but the iron is NOT heating up yet.
3. To heat up. turn the Temperature Control Dial time to NYLON/SYNTH for (Nylon/Synthetics). This is the lowest setting.
4. The Temperature Ready Light will turn off when the set temperature is reached.
5. Iron away.
For Silk/Wool setting turn the Temperature Control Dial to SILK/WOOL
For Cotton setting turn the Temperature Control Dial to COTTON
For Linen setting turn the Temperature Control Dial to LINEN
5 Turning Off Your Iron
1. Turn the Temperature Control Dial to MIN.
2. Unplug the iron.
3. The iron is now turned off.
4. Stand iron upright on its heel to cool down.
Note: The iron will remain hot after turning off. Allow ample time to cool down prior to handling and storing.
6 Steam Ironing
1. Fill the Water Tank following “Filling Water Tank.” See section 3.
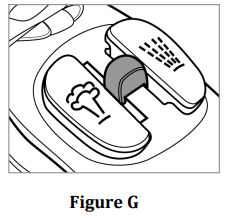
2. Move the Steam Control to the desired steam level. See Figure G.
3. Plugin the iron to a grounded outlet while on its heel.
4. Turn on the iron and set the Temperature Setting to the appropriate setting for your fabric. See “Setting Temperature and Turning on Your Iron.” See section 4.
5. Temperatures preheat takes about 60 seconds or less depending on your Temperature Control Setting.
6. Begin to steam iron.
7. When finished ironing. ensure to turn off the iron by following the section “Turning Off Your Iron”. See section 5.
7 Dry Ironing
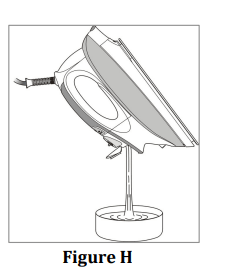
1. Make sure the Steam Control/Self-Clean is set to the offsetting.
We recommend using with an empty Water Tank for Dry Ironing. See Figure H.
2. Plugin the iron to a grounded outlet while on its heel.
Turn on the iron and set the Temperature Setting to the appropriate setting for your fabric. See “Setting Temperature and Turning on Your Iron.” See section 4.
3. Temperatures preheat takes about 60 seconds or less depending on your Temperature Setting.
4. Begin to dry iron.
5. When finished ironing. ensure to turn off the iron by following the section “Turning Off Your Iron”. See section 5.
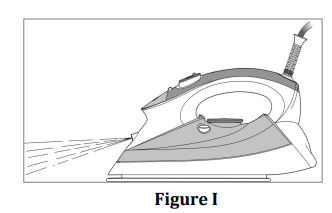
8 Spray (see Figure I)
Water can be sprayed at any setting as long as the Water Tank is filled with water.
1. Fill the Water Tank following “Filling Water Tank’ section. See section 3.
2. Aim the spray nozzle at your desired area.
3. Press the Spray Button control.
4. If the spray is weak. try pushing the button a few times to pump water.
5. Iron away.
6. When finished ironing. ensure to turn off the iron by following the section “Turning Off Your Iron”. See section 5.
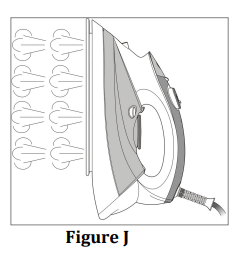
9 Vertical Steam Burst (See Figure J)
This allows you to remove wrinkles from hanging cloths. curtains and other hanging fabrics.
1. Follow instructions in “Steam Ironing.” See section 6.
2. Hang the garment up to be steamed.
3. Turn the Steam Control to high.
4. Plug in the iron to a grounded outlet while on its heel.
5. Turn on the iron and set the Temperature Control
Setting to the appropriate setting for your fabric. See “Setting Temperature and Turning on Your Iron.” See section 4.
6. Temperatures preheat takes about 60 seconds or less depending on your Temperature Control Setting.
7. Hold the iron upright and close to, but never touching the fabric (about 6 inches away).
8. Push Steam Burst Button at the directed area of the fabric. Steam will remove wrinkles. Repeat Steam Burst for stingy wrinkles.
9. When finished ironing. ensure to turn off the iron by following the section “Turning Off Your Iron.” See section 5.
IMPORTANT NOTE: Do not iron or steam articles when being worn by you or others. Never aim steam at living beings.
IT IS RECOMMENDED TO EMPTY THE WATER TANK AFTER EVERY USE.
CLEANING YOUR IRON
We recommend cleaning your iron once per month to remove impurities that may build up inside the soleplate over the use of your iron. The self-cleaning function does produce hot steam and water during the process; hold iron away from your body as water/steam exit the soleplate during cleaning.
1. Ensure iron is unplugged.
2. Fill the Water Tank halfway with water following “Filling Water Tank” and close Water Fill Cover. See section 1.
3. Place iron in an upright position.
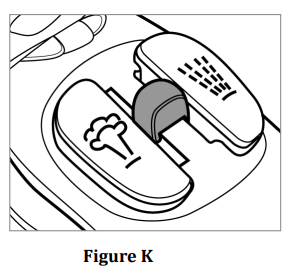
4. Place Steam Control in off position. See Figure K
5. Turn on iron and set temperature to max setting. See “Setting Digital Temperature and Turning on Your Iron.” See section 4.
6. Once LINEN temperature is met. turn off iron. See “Turning Off Your Iron.” See section 5.
7. Ensure iron is unplugged.
8. Hold the iron over the sink with the soleplate facing down. Keep away from body.
9. Hold the Self-Clean Button. Hot water and steam will come out of the soleplate.
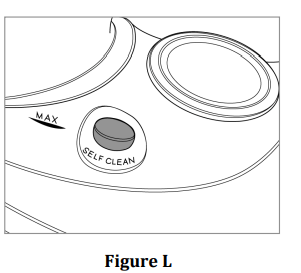
10. Continue to hold the Self-Clean Button until all the water has emptied from the Water Tank. You may have to move the iron back and forth to remove most of the water from the Water Tank. See Figure L.
11. When water/steam stops flowing. release the Self-Clean Button and stand the iron up on its heel to cool down.
12. Once the iron is cool. wipe down the soleplate with a cold damp cloth. When ready to use again. plug the iron in and let heat for about 2 minutes to dry out any remaining water.
DRAINING THE WATER
1. Turn the Steam Control to off position. See Figure M.

2. Make sure the iron is off and unplug the iron from the wall.
3. Place iron on its heel and to allow the iron to cool.
4. Open the water fill cover.
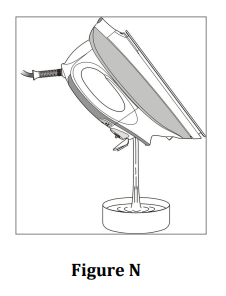
5. Hold the iron upside down over a sink to remove any excess water. See Figure N.
AUTO SHUT OFF
The Auto Shut-Off feature will operate automatically when the iron is unattended and it is connected to a main supply outlet.
Horizontal Auto Shut Off
- The iron will shut off automatically after 30 seconds of sitting in the ironing position (horizontal).
- Auto shut-off indicator light blinks RED, indicating the iron is in Auto Shut Off mode
- Moving the iron will turn it back on.
Vertical Auto Shut Off
- The iron will switch off automatically between 7 to 10 minutes if the iron is left on its heel rest position (vertical).
- Auto shut-off indicator light blinks RED, indicating the iron is in Auto Shut Off mode
- Moving the iron will turn it back on.
NOTE: After Auto Shut-Off. the iron will take about 60 seconds to reach its previous soleplate temperature.
TROUBLESHOOTING
IF YOU COME ACROSS ANY OF THESE PROBLEMS HERE ARE SOME POSSIBLE SOLUTIONS.
IF PROBLEM IS NOT LISTED OR SOLUTION FAILS TO SOLVE PROBLEM. CONTACT
The iron is lugged in, but the soleplate of the n iron isn’t heating up.
- Check that the power plug is properly inserted or try plugging the iron into a different outlet.
- Temperature is set too low. Set the temperature control toa higher temperature. See Figure O.
- Automatic shut-off is active. Try moving your iron.
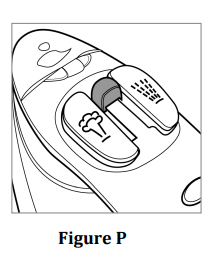
None or too little steam is being emitted.
- Check to see if the steam switch isn’t on the dry setting. Adjust setting on switch. See Figure P.
- There might not be enough water in the Water Tank. Try filling the Water Tank.
- There is an anti-drip feature that could be enacted. Make sure that the iron has reached the correct temperature.
Brown streaks come through the holes in the soleplate and stain the fabric.
- Residue could have built up in the steam chamber or on the soleplate. Try using the Self-Cleaning feature to remove the residue in the iron. See Figure Q.
- Using an Iron Descaling agent can sometimes cause this. There is no need to use one; the self-cleaning feature will rescale the iron without it.
- Fabric fibers can often build up in the holes of the soleplate. Try cleaning the soleplate with a
- non-metallic sponge or vacuuming out the holes. Figure Q
- Make sure you have washed any new items before ironing them. This can help prevent streaks or stains.
- Make sure you didn’t spray starch on the side of the clothing you are ironing. If you are going to use starch. spray it on the other side of the fabric.
- Make sure to use regular tap water. Do not use distilled water. dematerialized water. or softened water.

Iron is leaking.
- Overuse of the steam burst can cause drips. make sure to allow more time between each burst.
- The soleplate temperature could be too low. Check to make sure the soleplate is heated up.
- Water Tank is over filled. Do not fill past Max line on Water Tank.