
Please read these instructions carefully
and retain for future reference.
Pro Glide
®
8300
Steam Generator
Instruction Booklet
SR8300

Contents
Sunbeam’s Safety Precautions 3
Features of your Pro Glide
®
8300 Steam Generator 4
Using your Pro Glide
®
8300
Steam Generator 7
Care and Cleaning of your Pro Glide
®
8300 Steam Generator 11
Ironing Tips & Tricks 13
Ironing Chart 14
Important instructions – retain for
future use.

3
Sunbeam’s Safety Precautions
Sunbeam is very safety conscious when designing
and manufacturing consumer products, but it is
essential that the product user also exercise care
when using an electrical appliance. Listed below
are precautions which are essential for the safe use
of an electrical appliance:
• Readcarefullyandsavealltheinstructions
providedwithanappliance.
• Alwaysturnthepoweroffatthepoweroutlet
beforeyouinsertorremoveaplug.Removeby
graspingtheplug-donotpullonthecord.
• Turnthepoweroffandremovetheplugwhenthe
applianceisnotinuseandbeforecleaning.
• Donotuseyourappliancewithanextensioncord
unlessthiscordhasbeencheckedandtestedby
aqualifiedtechnicianorserviceperson.
• Alwaysuseyourappliancefromapoweroutletof
thevoltage(A.C.only)markedontheappliance.
• Thisapplianceisnotintendedforusebypersons
(includingchildren)withreducedphysical,
sensoryormentalcapabilities,orlackof
experienceandknowledge,unlesstheyhavebeen
givensupervisionorinstructionconcerninguse
oftheappliancebyapersonresponsiblefortheir
safety.
• Childrenshouldbesupervisedtoensurethatthey
donotplaywiththeappliance.
• Thetemperatureofaccessiblesurfacesmaybe
highwhentheapplianceisoperating.
• Neverleaveanapplianceunattendedwhilein
use.
• Donotuseanapplianceforanypurpose
otherthanitsintendeduse.
• Donotplaceanapplianceonornearahotgas
flame,electricelementoronaheatedoven.
• Donotplaceontopofanyotherappliance.
• Donotletthepowercordofanappliancehang
overtheedgeofatableorbenchtoportouch
anyhotsurface.
• Donotoperateanyelectricalappliancewitha
damagedcordoraftertheappliancehasbeen
damagedinanymanner.Ifdamageissuspected,
returntheappliancetothenearestSunbeam
AppointedServiceCentreforexamination,repair
oradjustment.
• Foradditionalprotection,Sunbeamrecommend
theuseofaresidualcurrentdevice(RCD)
withatrippingcurrentnotexceeding30mAin
theelectricalcircuitsupplyingpowertoyour
appliances.
• Donotimmersetheapplianceinwaterorany
otherliquidunlessrecommended.
• Appliancesarenotintendedtobeoperatedby
meansofanexternaltimerorseparateremote
controlsystem.
• Thisapplianceisintendedtobeusedin
householdandsimilarapplicationssuchas:staff
kitchenareasinshops,officesandotherworking
environments;farmhouses;byclientsinhotels,
motelsandotherresidentialtypeenvironments;
bedandbreakfasttypeenvironments.
SAFETYPRECAUTIONSFORYOURIRON
• Donotleaveahotironwithinreachof
children.Iftheycomeintocontactwithahot
ironitcouldleadtoseriousburns.
• Irononlyonanironingboard.Donotplacethe
steamgeneratoroncarpetduringuse.
• Theironmustnotbestoredwhilstitis
connectedtothesupply.Theelectronicswitch
providedisforfunctionaluseonlyduring
operation,andisnotintendedtoprovide
disconnectionfromthesupply.Beforestoring
theironafteruse,itmustbeunpluggedfrom
thesupply.
• ASteamGeneratortakesapproximately2hours
tocompletelycooldown.Allowtheirontocool
completelybeforestoring.
• Donotwindthecordaroundthesoleplate
whiletheironisstillhot.
• Donotleavetheironunattendedwhileitis
pluggedintothepoweroutlet.
• Alwaysunplugtheironfromthepoweroutlet
beforefillingoremptyingthewatertank.
• Theironmustbeusedandrestedonastable
surface.Whenplacingtheirononastand,
ensurethatthesurfaceonwhichthestandis
placedisstable.
• Theironisnottobeusedifithasbeen
dropped,iftherearevisiblesignsof
damageorifitisleaking.
• Thisironfeaturesan“auto-off”function,which
isanadditionalsafetyfeaturedesignedto
disconnectpowertotheheatingelementifthe
ironhasnotbeenusedforacertainperiodof
time.
Ifyouhaveanyconcernsregardingtheperformanceanduseofyourappliance,
pleasevisitwww.sunbeam.com.auorcontacttheSunbeamConsumerServiceLine.
Ensure the above safety precautions are understood.
4
Features of your Pro Glide
®
8300 Steam Generator
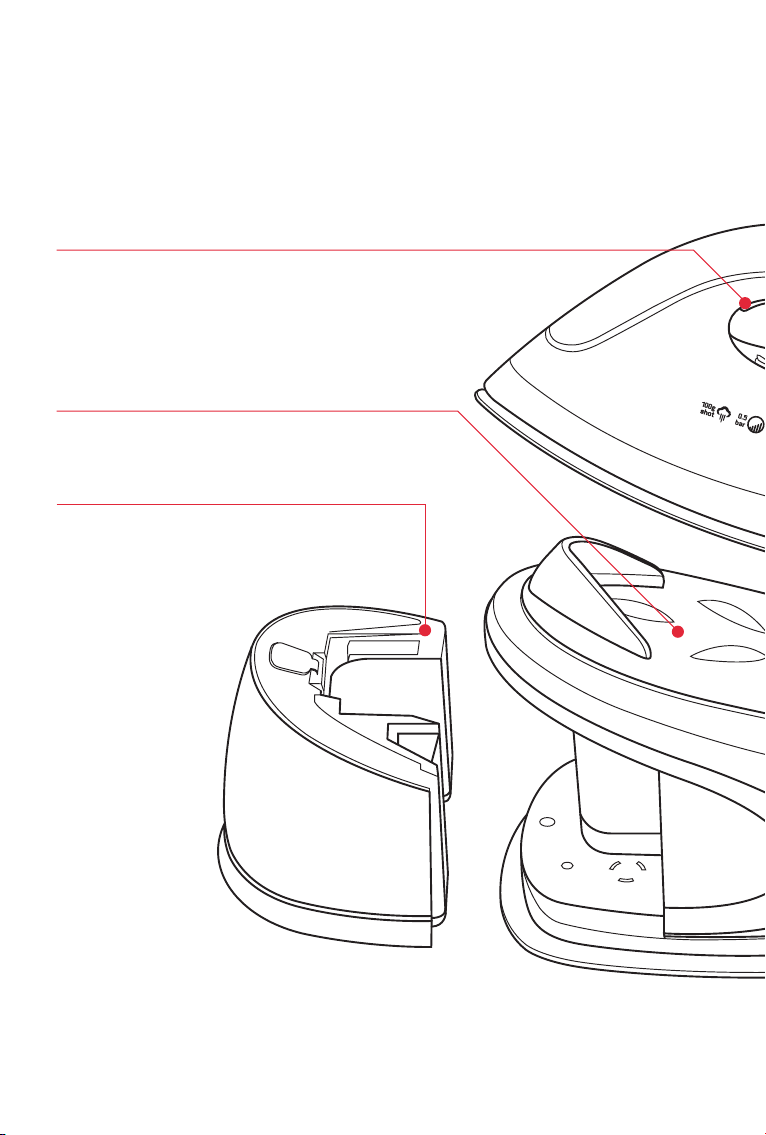
Steam release button
Pressandholdthesteamreleasebuttonto
produceaconstantstreamofhigh-powered
steamtoreduceyourironingtimeandeffort.
Steamwillnotbeemittedfromtheironwhen
thesteamreleasebuttonisnotdepressed.
Iron rest
Placetheironontheheatresistantironrest
betweengarments.
Refillable water tank cover
Theremovable1400mlcapacitytankhas
alargefillingholdtomakeiteasytorefill.
Thetankcanberemovedandrefilledduring
ironing.
5
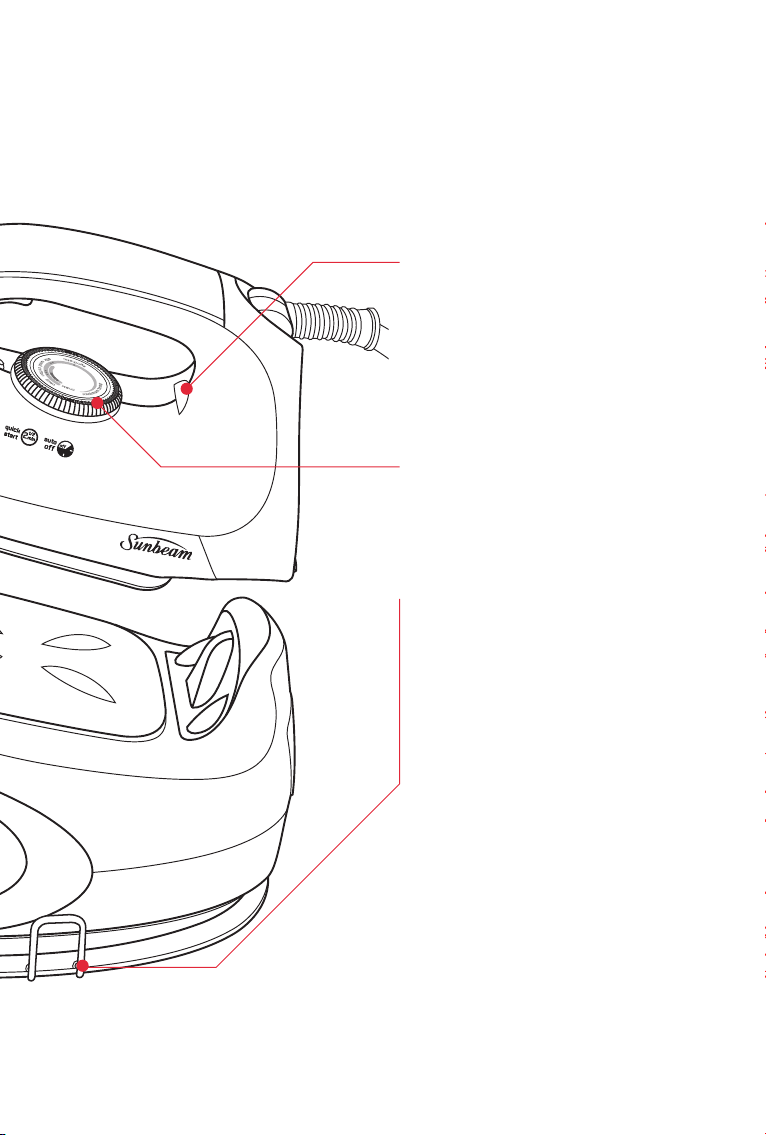
Thermostat light
Thethermostatlightilluminatesto
indicatethattheironsoleplateisheating,
andgoesoutwhenithasreachedthe
temperatureselectedonthetemperature
dial.Thethermostatlightcyclesonand
offduringironingastheironsoleplate
maintainstheselectedtemperature.
Variable temperature dial
Thevariabletemperaturedialadjusts
thetemperatureoftheironsoleplate,
allowingyoutoselectthedesired
temperatureforeachgarment.
Cord Clamp
Whennotinuse,thehoseandpower
cordcanbewrappedaroundtheunitand
securedinplaceusingthecordclamp.
6
Features of your Pro Glide
®
8300 Steam Generator continued
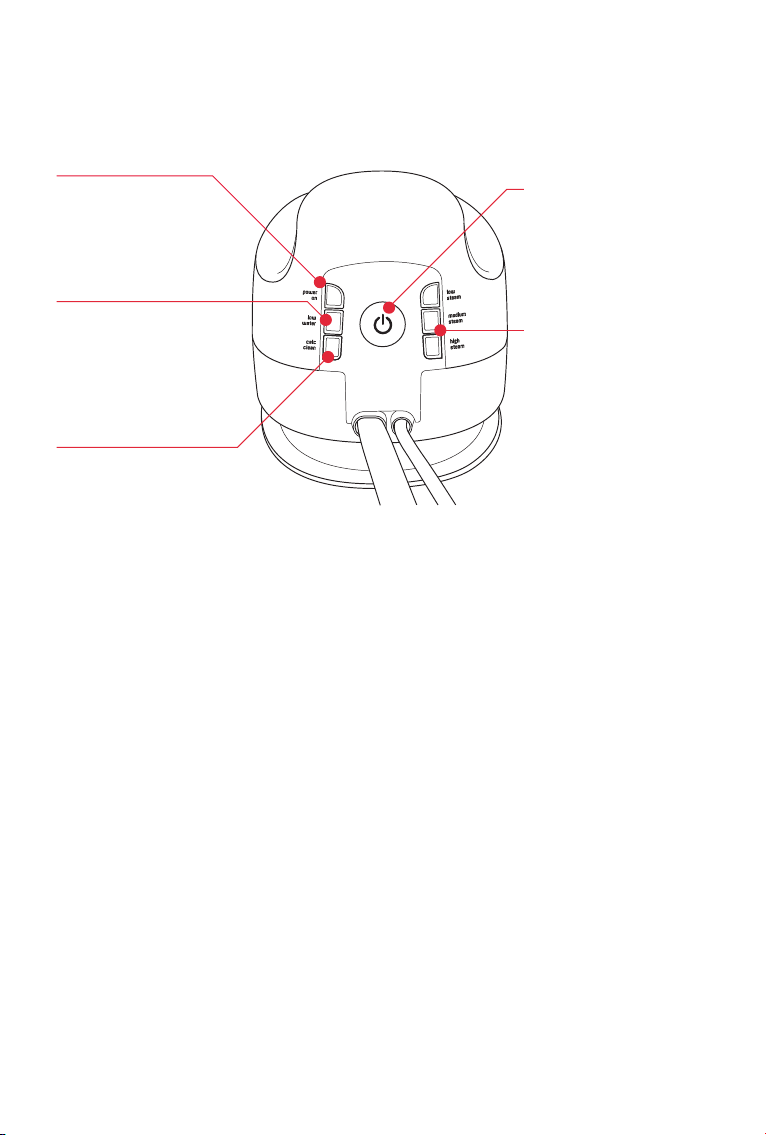
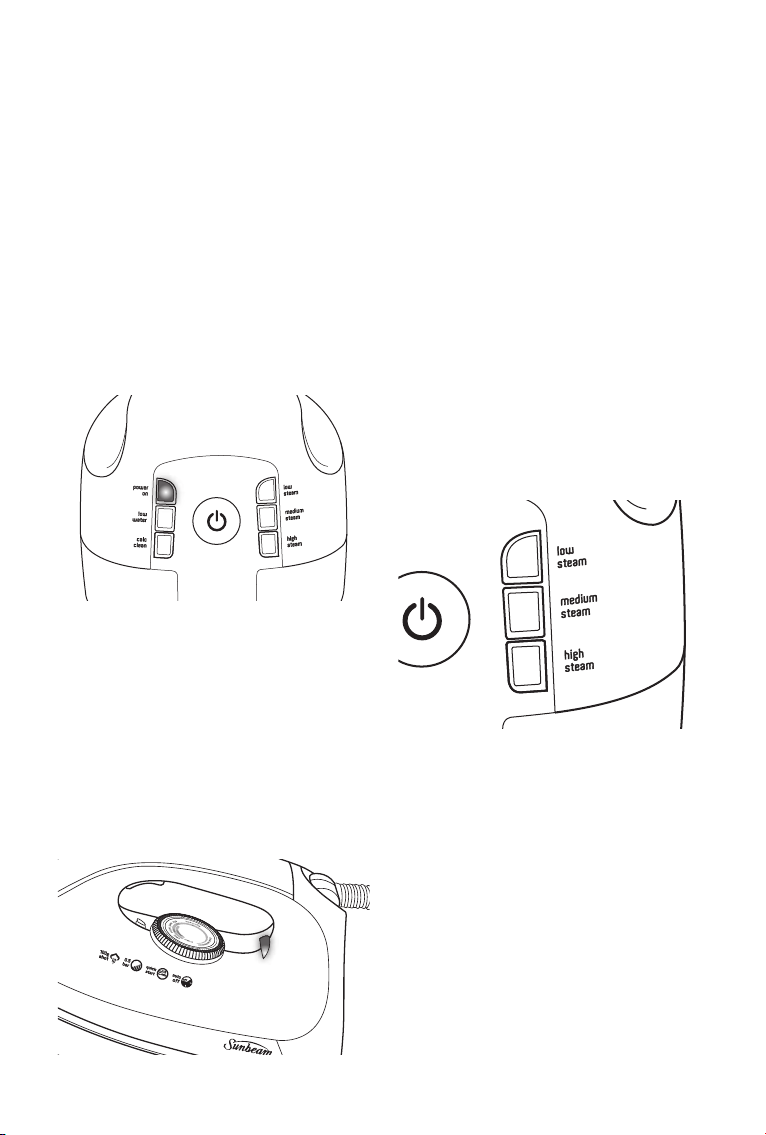
Power On Button
Thepoweronbuttonwill
beilluminatedREDwhen
theunitisturnedon.
Low water indicator
Thelowwaterindicator
illuminatestoalertyou
whenitistimetorefill
thewatertank.
Calc Clean Indicator
TheCalcCleanindicator
illuminatestoalertyou
whenitsistimetoflush
theboiler.
On/Off Switch
Thisswitchcontrols
theinternalboilerand
theelementintheiron
soleplate.
Steam rate Buttons
Thesteamratecanbe
selectedbypressing
thelow,mediumor
highsteambuttons.
Whentheyhavebeen
selected,theywillflash
untilthesteamratehas
beenreachedatwhich
pointtheywillremain
illuminated

Before first use
Removeanyadhesivestickers,plastic
coversorcardboardsleevesfromthe
soleplate.Ensurethatalladhesiveis
removedbyrubbingthesoleplatewitha
clothdampenedwithmethylatedspirits.
Fillthewatertankandemptythewater.
Thiswillrinseoutanyforeignparticles
remaininginthewatertankfromthe
manufacturingprocess.
NOTE:Whenturnedonforthefirsttime,
yournewironmaygiveoffvapours
forupto10minutes.Thisisdueto
theinitialheatingofthematerials
used.Itissafe,notdetrimentaltothe
performanceoftheiron,andwillnot
reoccur.
NOTE:Ensurethesteamgeneratoris
alwaysusedandrestedonastable
surface.
Filling the steam generator tank with water
Slidethewatertankoutandliftthe
cover.Usingajugslowlypourwater
intothewaterinletuntilthemaximum
waterlevelisreached.Donotexceed
themaximumwaterlevelindicator.Push
thewaterinletcoverfirmlytocloseand
slidethetankbackintoposition.
NOTE:Thenon-corrosivestainlesssteel
boilerhasbeendesignedtoallowyou
tousetapwaterinyourprofessional
ironingsystem.Howeverinveryhard
waterareas,Sunbeamrecommendsthe
useofdistilledwater,orwaterwhich
hasbeendemineralised.
Forbestperformance,werecommend
theuseofSunbeamWater
Demineraliser,availablefromselected
retailers.
Donotfilltheironwithfabric
conditioner,starchesoranyother
solutionasthesewilldamagethesteam
mechanism.Donotusecontaminated
water.
Using your Pro Glide
®
8300
Steam Generator
7
8
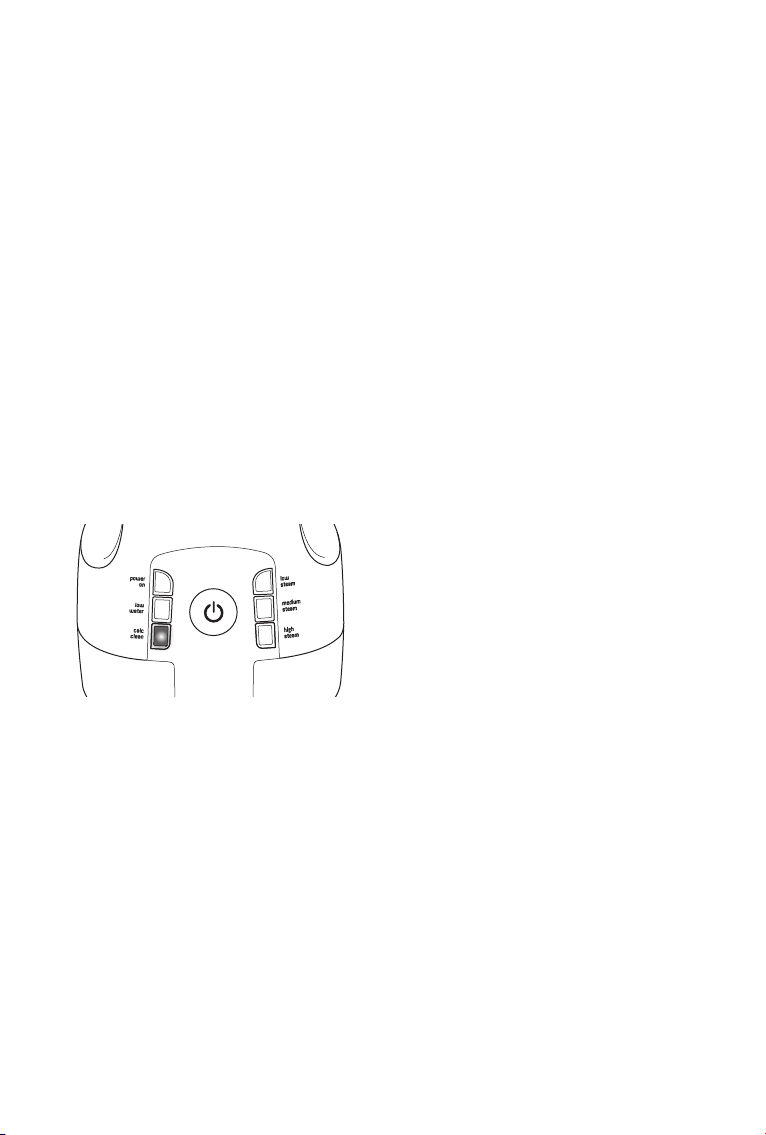
Using your iron
1.Inserttheplugintoa230/240volt
poweroutletandturnthepoweron.
2.Selectthepowerbuttontoturn
theuniton.ThePowerOnlight
illuminatesREDasshowninFig1.
Theboilerandsoleplatewillbegin
heatingandthelowsteamselection
lightflashesBLUE.
NOTE:Thedefaultsteamratesettingis
LowSteamwhichwillflashBLUEwhen
theunitisfirstturnedon.
3.Turnthetemperaturedialonthe
irontothedesiredsetting.The
thermostatlight(asshowninFig2)
willilluminateREDtoindicatethat
theironisheating.Itwillgooutonce
theironhasreachedtheselected
temperature.
NOTE:Whenchangingthetemperature
ofthesoleplatefromahighertolower
setting,ensuretheirontemperatureis
stableatthenewsettingbyallowingthe
thermostattocycleonce(thethermostat
lightwillturnon/offonce).
4.Selectthedesiredsteamlevelby
pressingthelow,mediumorhigh
steamratebutton(asshownin
Fig3).Thesteamselectionindicator
willflashBLUEwhilsttheboileris
heating.Whenthesteamselection
remainsilluminatedBLUEanddoes
notflash,theunitisreadytouse.
Beforeusingthesteamgeneratoron
agarment,directashotofsteam
intotheairtoreleaseanyremaining
condensation.
5.Pressandholdthesteamrelease
triggertoironwithsteam.Todryiron,
donotpressthesteamreleasetrigger.
NOTE:Boththesteamselectionindicator
andthethermostatlightwillcycleon
andoffduringironingastheironing
systemmaintainstheselectedsteam
pressureandtemperaturelevels.
Using your Pro Glide
®
8300 Steam Generator (continued)
Figure1
Figure2
Figure3

NOTE: Topreventwaterdrippingfromthe
soleplate,onlyusethesteamfunction
onhighertemperaturesettings(••/silk
settingandabove).
Onceyouhavefinishedironing,switch
theironandboileroffbypressingthe
powerbutton.Switchthepoweroffat
thepoweroutletandremovetheplug.
Waitfortheirontocoolcompletelyand
emptywatertankbeforestoring.
Warning:Nevertouchthesoleplateat
anytimewhenitishot.
NOTE:Ensurethesteamgeneratoris
usedandrestedonastablesurface.Do
notplacethesteamgeneratoroncarpet
duringuse.
Refilling the tank during ironing
Whenthewaterinthetankfallsbelow
theminimumlevel,thelowwater
indicatorwillilluminateRED,asshown
infig4,thesteamgeneratorbeepsonce
andtheironwillstopgeneratingsteam.
Thewatertankcanberefilledatany
timeduringironingbuttheboilermay
takeafewminutestoreturntothe
correcttemperature.
1.Slidethewatertankoutandliftthe
cover.
2.Usingajugslowlypourwaterintothe
waterinletuntilthemaximumwater
levelisreached.Donotexceedthe
maximumwaterlevelindicator.
3.Pushthewaterinletcoverfirmlyto
closeandslidethetankbackinto
position
4.Thesteamselectionlightwillflash
BLUE
5.Recommenceironingwhenthesteam
selectionlightilluminatesBLUE
withoutflashing
Safety Auto-Off
Thesafetyauto-offmechanism
automaticallyturnstheironingsystem
offifyouforget.Theironandboiler
willautomaticallyshutoffifthesteam
releasetriggerisnotusedfor10
minutesormore.
Shouldyouleavetheironingsystem
unattendedawarningbeepwillsoundto
letyouknowthattheauto-offfunction
hasbeenactivated.Powertotheiron's
heatingelementandboilerwillbecut
andtheironwillstarttocoolandthe
powerlightwillgooff.Inordertostart
usingtheironagain,thepowerbutton
needstobepressedtopowerbackup
theboilerandtheiron.Allowtheiron
toheatupuntilthethermostatlight
ontheirongoesoutandthesteam
selectionlightisilluminatedBLUEand
nolongerflashing
Using your Pro Glide
®
8300 Steam Generator (continued)
9
Figure4
Using your Pro Glide
®
8300 Steam Generator (continued)
Calc Clean Reminder
TheCalcCleanlightilluminatesBLUE
toremindyouwhenitistimeto
flushtheboiler.TheCalcCleanlight
illuminatesafterapproximately8hours
ofuse.
Mineraldepositsintapwatersolidify
whenthewaterisheatedandcanbuild
upinthesteamholesandboilersystem
whichcanaffectsteamperformance.It
isimportanttoregularlyflushoutthe
boilertomaintaintheperformanceof
theironingsystem.
SEECARE&CLEANINGSECTIONON
PAGE1.
Figure5
10

After each use
1.Turnthepoweroffandremovetheplug
fromthepoweroutlet.
2.Allowtheirontocoolbeforewinding
thecordaroundthebuilt-incordwrap.
Storage
Emptythetankbeforestorage.
Alwaysstoretheirononthebaseofthe
steamgenerator.
Cleaning
Tocleantheexteriorofyouriron,wipe
overwithadampsoftclothandwipedry.
Caution:Donotuseharshabrasives,
chemicalcleanersorsolventstocleanthe
exteriorofyourironasthesewilldamage
thesurface.
Cleaning the steam holes
Toremovebuildupfromthesteamholes
whichmayaffectsteamperformance,
useacottonwooltipmoistenedin
methylatedspirits.
Cleaning the soleplate
Wipewithasoftdampclothandwipedry.
Caution:Donotusescouringpads,
abrasivesorharshcleanerstoclean
yoursoleplate,asthesewillscratchand
damagethesurface.
Calc Clean Reminder
Mineraldepositsintapwatersolidify
whenthewaterisheatedandcanbuild
upinthesteamholesandboilersystem
whichcanaffectsteamperformance.Itis
importanttoregularlyflushouttheboiler
tomaintaintheperformanceoftheironing
system.
TheCalcCleanlightilluminatesBLUEto
remindyouwhenitistimetoflushthe
boiler.TheCalcCleanlightilluminates
afterapproximately8hoursofuse.
Calc Clean instructions – using Sunbeam
Ironing System Descaling Tablets
1.Toflushtheboiler,turntheunitoffand
waitforittocoolcompletely(approx2
hours).
2.Placetheunitonawaterproofsurface,
orontheedgeofthesink.
3.Tiltthesteamgeneratorontoitssideso
thatthebottomsurfaceisvisible.
Caution:iftheunithasbeenusedpriorto
cleaningtheboilercapwillbeveryhot.
Ensurethattheunithascooledcompletely
beforecommencingtheCalccleaning
process.
4. Usethescrewdriverprovidedtoslowly
releasetheboilercap.Seefig6.
Note:Theboilercapneedstobeturned
slowlytoreleaseanyremainingsteam.
Care and Cleaning
11
Figure6
Screwdriver Boilercap

12
5. Removetheboilercapcompletely.
Seefig7
6. Placetheunitonitssideandcarefully
pourthedescalingsolutionintothe
boiler.Replacethecap.
7. Returntheunittotheuprightposition
andleavefor2minutes.
8. Shaketheunitbackandforthto
dislodgeanyscalebuilduponthebase
oftheboiler.Leavefor10minutes.
9. Shaketheunitagaintoswirlthe
solutionaroundinsidetheboiler.
10.Placetheunitonasinkorvesselso
thatwatercanbeexpelledfromthe
boilerflushcap.
11.Carefullyremovetheboilercapand
allowthedescalingsolutiontoempty.
12.Rinsewith1cup(250ml)cleanwater,
shakeandempty.Repeat.
13.Onceyouhavecompletedthedescaling
process,andrefilledthetank,the
CalcCleanreminderwillnolonger
beilluminated.Thepowerlightwill
illuminateandtheunitwillbegin
heatingasnormal.
Note:SunbeamSteamIroningSystem
descalingtabletsareavailablefrom
selecteddepartmentstoresandelectrical
retailers.
Calc Clean instructions – using lemon juice
Alternatively,ifyoudonothaveSunbeam
IroningSystemDescalingTablets,youcan
uselemonjuicetoremovethescalebuild
upfrominsidetheunit’sboiler.
1. Toflushtheboiler,turntheunitoff
andwaitforittocoolcompletely
(approx2hours).
2. Placetheunitonawaterproofsurface,
orontheedgeofthesink.
3. Slowlyreleasetheboilercaptorelease
anyremainingsteam.Removethe
boilercapcompletely
CAUTION:iftheunithasbeenusedprior
tocleaningtheboilercapwillbeveryhot.
Ensurethattheunithascooledcompletely
beforecommencingtheCalccleaning
process.
4. Emptyanyremainingwaterfromthe
boiler.
5. Inasmalljug,add1tbslemonjuiceto
1cup(250ml)ofwaterandstirtomix.
6. Placetheunitonitssideandcarefully
pourthelemonsolutionintotheboiler.
Replacethecap.
7. Returntheunittotheuprightposition
andleavefor2minutes.
8. Shaketheunitbackandforthto
dislodgeanyscalebuilduponthebase
oftheboiler.Leavefor10minutes.
9. Shaketheunitagaintoswirlthe
solutionaroundinsidetheboiler.
10.Placetheunitonasinkorvesselso
thatsolutioncanbeexpelledfromthe
boilerflushcap.
11.Carefullyremovetheboilercapand
allowthesolutiontoempty.
12.Rinsewith1cup(250ml)cleanwater,
shakeandempty.Repeat.
13.Onceyouhavecompletedthedescaling
process,andrefilledthetank,the
CalcCleanreminderwillnolonger
beilluminated.Thepowerlightwill
illuminateandtheunitwillbegin
heatingasnormal.
Care and Cleaning (continued)
Figure7

13
Tip # 1 - Iron shirts like a pro
Startwiththecollar,workingfromtheouter
edgesintothemiddle.Irontheshoulder
next,followedbythecuffsandsleeves.
Placethecollaratthenarrowendofthe
boardsothatonefrontpaneloftheshirt
isextendedflat.Ironthefrontpanelfrom
shouldertoshirttail.Rotatetoironthe
backoftheshirt.Rotateandcompletethe
remainingfrontpanel.
Tip # 2 - Tips for T-shirts
Straightenseamsont-shirtsbeforehanging
outtodry.Toavoiddamagetoprinted
graphicsandlogosturnthet-shirtinsideout
andironthereversesideoftheprint.Never
ironareasofyourt-shirtwhereperspiration
marksarevisibleastheheatoftheironwill
permanentlyfixthestain.
Tip # 3 - Hung out to dry
Whenwashingiscomplete,removeshirts
fromthemachineimmediately,shakethem
outandhangthemoncoathangerstoairdry
–thiswillkeepwrinklestoaminimum.
Tip # 4 - Selecting the right temperature
Ifyouareunsureofthecorrectsettingfora
particulargarment,testasmallareasuchas
aseamorinsidehembeforeironingavisible
area.Startwithalowtemperatureandslowly
increasetheheattofindthebestsetting.
Tip # 5 - Don’t be afraid to iron silk
Don’tbeafraidtoironsilk.Althoughdelicate
inappearance,silkisthestrongestandmost
resilientofallnaturalfibres.Toachievethe
bestresults,settoalowcottonsettingand
useregularshotsofsteam.Alwaysusea
pressingclothtoavoidshinemarks.
Tip # 6 - Ironing the seam
Alwayspressseamsinthesamedirection
theyweremade.Whenagarmentis
produced,thefibreswillnaturallysettle
inthedirectiontheywereinitiallypressed,
soit’sbestnottoironagainstthegrain.
Tip # 7 - Sort types of fabric
Sortarticlestobeironedaccordingtothe
typeoffabric.Thiswillreducetheneedto
adjustthetemperatureconstantly.Startwith
articlesrequiringlowertemperaturesand
workyourwaythroughtoitemsrequiring
highersettings.
Tip # 8 - Summer frocks and frills
Steamisthekeywhenironingdelicate
summerfabricssuchasmuslin,cottonand
linen.Don’tpressdownwiththeiron,simply
hoverabovethegarmentandsteamitusing
averticalshotofsteam.Ruffling,netting,
tulleorintricatehanddetailingisalsobest
ironedusingthismethod.
Tip # 9 - Pressing your winter woollies
Steamiscrucialwhenpressingyourwinter
woollies.Woollengarmentscanbehungand
steamedusingtheverticalshotofsteam
feature.Aftersteaming,brushthegarment
withyourhandtoplumpupwoollenfibres.
Ifironingthegarmentflatitisbesttouse
apressingcloth.Don’tbeafraidtoapply
pressure–steamandhold.
Tip # 10 - Table settings to impress
Toavoidunwantedcreasesalwaysiron
yourtableclothaftertakingitoutofthe
cupboard.Adinnerpartyisaspecial
occasion,sotreatthetableclothasyou
wouldyourownoutfit.Forbestresults,lay
towelsacrossyourtableandironthetable
clothoverthetowels.Thiswillsaveyoutime
andensureabeautifullypresentedtable
setting.
Ironing Tips and Tricks

Ironing Chart
Fabric Temperature Setting Ironing recommendation
Acrylic • Dryirononwrongside
Acetate •
Dryirononwrongsidewhilestilldamporuse
spraytodampen
Silk ••
Irononwrongside.Useanironingclothto
preventshinemarks
Nylon ••
Irononwrongsidewhilestilldamporuse
spraytodampen
Polyester ••
Irononwrongsidewhilestilldamporuse
spraytodampen
Rayon •• Irononwrongsideoffabric
Viscose ••
Mainlydryiron.Steamcanbeusedunder
manufacturer’sinstructions
Wool ••
Steamirononwrongsideoruseanironing
cloth
WoolBlends ••
Steamirononwrongsideoruseanironing
cloth
CottonBlends ••
Checklabelandfollowmanufacturer’s
instructions.Usesettingforthefibrerequiring
thelowestsetting
Corduroy •••
Steamirononwrongsideoruseanironing
clothandbrushtoraisethepile
Cotton •••
Dryironwhilestilldamporusesprayto
dampen.Usesteammediumtohigh
Linen •••toMax
Irononwrongsideoruseanironingcloth
topreventshinemarks,especiallywithdark
colours.Dryironwhilestilldamporusespray
todampen.Usesteammediumtohigh
Denim •••toMax Usemaximumsteam
14

Shouldyouexperienceanydifficultieswith
yourappliance,pleasephoneourcustomer
servicelineforadviceon1300881861in
Australia,or0800786232inNewZealand.
Alternatively,youcansendawrittenclaim
toSunbeamattheaddresslistedbelow.
Onreceiptofyourclaim,Sunbeamwill
seektoresolveyourdifficultiesor,ifthe
applianceisdefective,adviseyouonhow
toobtainareplacementorrefund.
YourSunbeam2YearReplacement
Guaranteenaturallydoesnotcovermisuse
ornegligenthandlingandnormalwearand
tear.
Similarlyyour2YearReplacementGuarantee
doesnotcoverfreightoranyothercosts
incurredinmakingaclaim.Pleaseretain
yourreceiptasproofofpurchase.
Thebenefitsgiventoyoubythisguarantee
areinadditiontoyourotherrightsand
remediesunderanylawswhichrelatetothe
appliance.
Ourgoodscomewithguaranteesthatcannot
beexcludedundertheAustralianConsumer
LawandundertheNewZealandConsumer
GuaranteesAct.
InAustraliayouareentitledtoa
replacementorrefundforamajorfailureand
forcompensationforanyotherreasonably
foreseeablelossordamage.Youarealso
entitledtohavethegoodsrepairedor
replacedifthegoodsfailtobeofacceptable
qualityandthefailuredoesnotamountto
amajorfailure.
Shouldyourappliancerequirerepairor
serviceaftertheguaranteeperiod,contact
yournearestSunbeamservicecentre.
ForacompletelistofSunbeam’sauthorised
servicecentresvisitourwebsiteorcall:
Australia
www.sunbeam.com.au
1300881861
Units5&6,13LordStreet
BotanyNSW2019Australia
New Zealand
www.sunbeam.co.nz
0800786232
26VesteyDrive,MtWellington
Auckland,NewZealand
In the unlikely event that this appliance develops any malfunction
within 2 years of purchase (3 months commercial use) due to
faulty materials or manufacture, we will replace it for you
free of charge.
2 Year Replacement Guarantee

is a registered trademark.
Need help with your appliance?
Contactourcustomerserviceteamorvisit
ourwebsiteforinformationandtipson
gettingthemostfromyourappliance.
In Australia
Visit www.sunbeam.com.au
Or call 1300 881 861
In New Zealand
Visit www.sunbeam.co.nz
Or call 0800 786 232
‘Solus’ and ‘Resilium’ are registered trademarks of
Sunbeam Corporation.
Made in China.
Due to minor changes in design or otherwise,
the product may differ from the one shown in this leaflet.
© Copyright.
Sunbeam Corporation Limited 2006.
ABN 45 000 006 771
Units 5 & 6, 13 Lord Street
Botany NSW 2019 Australia
Unit 3, Building D
26 Vestey Drive
Mt Wellington Auckland
New Zealand
Sunbeam Corporation is a division of GUD Holdings Ltd.
8/11