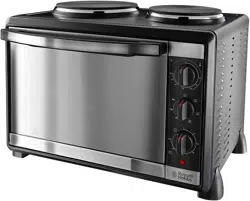
User manual Multi-Cooker
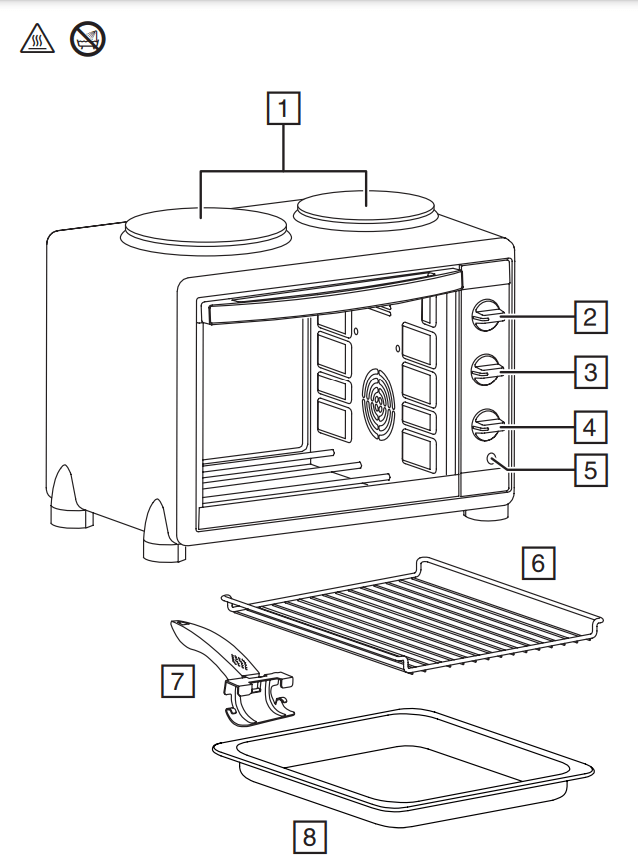
PARTS
1. Hotplates
2. Temperature control
3. Selector switch
4. Timer control
5. Power light
6. Rack
7. Handle
8. Tray
BEFORE USING FOR THE FIRST TIME
- Before using your mini kitchen to cook anything, you need to ‘cure’ the elements. This involves burning off any coatings that have been used on the elements during manufacture.
- This may smell and smoke a little but it’s nothing to worry about. Ensure the room is well ventilated.
- Turn the timer control anticlockwise to the
 position, turn the selector switch to
  and allow the hotplates to heat up for about 5 minutes.
- After 5 minutes, turn the selector switch to the
 setting and the temperature control to 230ºC. Turn the timer control to 20 minutes.
- After the timer bell sounds, the elements of your mini kitchen have been cured. You will not have to do this again.
USING THE HOTPLATES
- ke good contact with the hotplate.
- The base of the pan should be the same size as the hotplate or slightly wider.
- The temperature control does not control the temperature of the hotplates.
1. Select which hotplate you want to use with the selector switch:
- Select
 for the left hotplate.
- Select
 for the right hotplate.
- Select for both hotplates.
GRILLING
- The rack and tray slide on the shelf supports at the sides of the oven. Use the lower supports for baking and roasting. Use the upper supports for grilling, toasting, and browning toppings.
- If you’re not cooking on the tray, slide it between the bottom shelf supports to catch drips.
- If you are using the tray, you can clip the handle to it.
1. Select the upper element  using the selector switch.
2. Set the temperature control to 230ºC. (you can select a lower temperature if desired).
3. Place the food to be grilled onto the rack or tray.
- Watch out for fat or juices spitting, and food coming into contact with the upper element.
- If this happens, move the food down to a lower support position.
- Spitting will make cleaning difficult.
- Residues burned on to the top element may shorten its life.
USING THE OVEN
- The rack and tray can be used during oven cooking.
- Select which element you want to use with the selector switch:
- Select for the top element.
- Select for the bottom element.
- Select for both elements.
- Set the required temperature using the temperature control.
- Set the timer by turning it clockwise to the desired time. If you aren’t using the timer, leave it set to the position.
- Allow 12-15 minutes for your oven to preheat to the selected temperature before opening the door and placing the food inside.
COOKING TEMPERATURES
- As the oven is small, cooking times will generally be slightly shorter than with a large conventional oven.
- The following temperatures are for guidance only. They’re for fresh or fully defrosted food, using both elements, with the door closed.
- Check food is cooked through before serving. If in doubt, cook it a bit more.
- Cook meat, poultry, and any derivatives (mince, burgers, etc.) till the juices run clear.
- Cook fish till the flesh is opaque throughout.
- When cooking pre-packed foods, follow any guidelines on the package or label.
| Food |
Temperature |
Food |
Temperature |
| Beef |
190-210ºC |
Pastry |
190-210ºC |
| Casseroles |
140-160ºC |
Pork |
190-210ºC |
| Chicken |
190-210ºC |
Quiche/flan |
160-180ºC |
| Fish |
170-190ºC |
Scones |
190-220ºC |
| Lamb |
190-210ºC |
Sponge cake |
160-180ºC |
| Meringue |
90-110ºC |
Rich fruit cake |
140-160ºC |
| Milk pudding |
140-160ºC |
Yorkshire pudding |
200-220ºC |
TEMPERATURE CONVERSION CHART
| Celcius ºC |
Fahrenheit ºF |
Gas Mark |
| 50 |
122 |
- |
| 100 |
212 |
¼ |
| 130 |
250 |
1/2 |
| 140 |
275 |
1 |
| 150 |
300 |
2 |
| 160-170 |
325 |
3 |
| 180 |
350 |
4 |
| 190 |
375 |
5 |
| 200 |
400 |
6 |
| 210-220 |
425 |
7 |
| 230 |
450 |
8 |
CARE AND MAINTENANCE
Unplug your mini kitchen and let it cool before cleaning and storing away.
Wipe up all spillages, to avoid discolouring the surfaces and corroding the hotplates.
- Hand wash the tray, rack, and handle in warm soapy water.
- Clean the glass with a proprietary glass cleaner.
- Wipe the outside surfaces with a damp cloth (you may use a non-abrasive cleaner).
- Use a non-abrasive proprietary oven cleaner on the internal surfaces of the oven. Leave the oven door open afterwards, to dry the oven thoroughly.
- Never immerse your mini kitchen in water or any other liquid.
- Don’t use scourers, wire wool, or soap pads.
IMPORTANT SAFEGUARDS
Follow basic safety precautions, including:
- This appliance can be used by children aged from 8 years and above and persons with reduced physical, sensory or mental capabilities or lack of experience and knowledge if they have been supervised/instructed and understand the hazards involved.
- Children shall not play with the appliance
- Cleaning and user maintenance shall not be done by children unless they are older than 8 and supervised.
- Keep the appliance and cable out of reach of children under 8.
- Don’t connect the appliance via a timer or remote control system.
- Don’t use the appliance near or below combustible materials (e.g. curtains).
- The surfaces of the appliance will get hot.
- If the cable is damaged, return the appliance, to avoid hazard
Do not use this appliance near bathtubs, showers, basins or other vessels containing water
- Sit the appliance on a stable, level, heat-resistant surface, at least 75cm above floor level.
- Leave a space of at least 50mm all round the appliance.
- Unplug the appliance when not in use, before moving and before cleaning.
- Don’t use the appliance for any purpose other than those described in these instructions.
- Don’t operate the appliance if it’s damaged or malfunctions.
- Always use oven gloves when opening and closing the door, and when placing or removing food inside the oven.
- Over time, heat will cause discolouration of the surfaces of your mini kitchen. This is unavoidable but it wont affect the functionality of the appliance.
Q&A
1. Can the oven and both hotplates be used at the same time
- No, you can't draw that much power from a normal plug socket with a 13 A fuse.
- Real ovens: are wired directly without a 13 A plug, use an electrical cable that can handle more amps, are not on the same ring main at the fuse box
2. Is this 1920w as Russell Hobbs website says it's only 1600w?
- The sticker on the back reads, “1580W-1920W”.
3. Can you place the oven on top of the counter like a micromave? As Ive read from below that the oven can get really hot?
- Yes you definitely can place it on the counter top without any worries. And - yes! It does get hot - but it IS an oven. I found everything cooked much much quicker than any other oven - so it's cheaper to run.
4. How does the door open which diection please. For elderly mum in bedsit with limited mobiity.
- The door is hinged at the bottom so opens from top to bottom.
5. What are the internal dimensions of the oven please?
- Did not no that I had given any sizes but they are 18" x 11" depth 12"
6. What wattage is the oven alone?
- The rating plate on the back of my Russell Hobbs mini oven states that the appliance is rated for 1580-1920 Watts. This wattage is delivered at the standard UK voltage of 220 - 240 Volts and 50-60 Hz. There is no indication on the plate of how this wattage is split between each section of the mini oven. If I had to guess I would say that the lower figure of 1580 might represent the oven's usage and the upper figure of 1920 watts must cover the total usage of both rings and oven combined. You could try contacting Russell Hobbs themselves. They would surely know the answer to that
7. Can you use the oven and the hob at the same time?
- No it is not possible to use them at the same time. Also each hob cannot be used independent.
8. Is there anyway of heating up the oven without having the timer on as it doesn't seem to heat up unless i put the timer on?
- If you turn the timer to the left, instead of the right, the cooker stays on. You will need to turn it back to the centre till you hear a ping/ding, to turn it off.
9. How many litres is it?
- It is about the size of a normal microwave
10. Anyone else having issues with frying pan not gaining heat? use a granite frying pan but it doesn't seem to get anywhere near hot enough to cook food
- It sounds like you might need a more powerful ring to get your granite frying pan up to temperature. I mainly use my main ring to boil potatoes or make porridge on, but I use a stainless steel pan. This works fine for me, but I don't use my ring to fry stuff.