Documents: Go to download!
- Owner's manual - (English)
- VS4500 FoodSaver® Lock & Seal
- Using your FoodSaver® Lock & Seal
- Vacuum Sealing Accessories
- Food Preparation & Safety Tips
- Guidelines for Vacuum Packaging
- Care and Cleaning Instructions
- Troubleshooting
Table of contents
User Manual
VS4500 FoodSaver® Lock & Seal
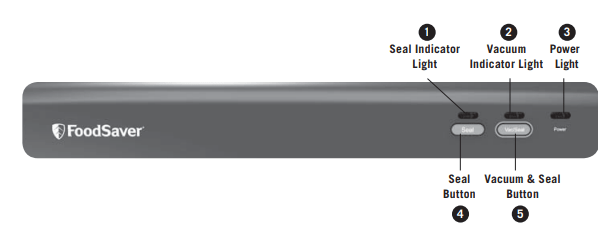
1 Seal Indicator Light
This light has two uses:
1. Constant light indicates Sealing process is engaged.
2. Flashes to indicate error.
2 Vacuum Indicator Light
Shows Vacuum and Seal process is engaged. Shuts off when the full process is finished.
3 Power Light
Illuminates when the unit is in the OPERATE position. Shuts off automatically when latch is not in OPERATE position.
4 Seal Button
This button has three uses:
1. Press to create a seal when making bags from a FoodSaver® Roll.
2. Press to immediately stop the vacuum process and begin sealing the bag. This prevents crushing delicate items such as bread, cookies and pastries.
3. Press to create a seal on multilayer film bags (such as a potato chip bag) to keep food sealed airtight.
5 Vacuum & Seal Button
This button has two uses:
1. Press to vacuum seal and seal food airtight. Appliance shuts off automatically.
2. Press to pause vacuum process at any point
Using your FoodSaver® Lock & Seal
How to make a Bag from a FoodSaver® Roll
- Using scissors, cut enough bag material from roll to hold item, plus 7.5cm. Be sure to cut straight.
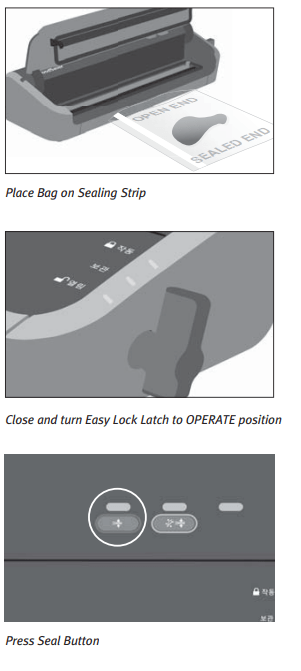
- Move Easy Lock Latch to the open position. Open appliance lid. Insert one end of bag material across Sealing Strip.
- Close lid and turn Easy Lock Latch to OPERATE position.
- Press Seal button.
- When Seal Indicator Light turns off, sealing is complete. Turn latch to OPEN position, lift lid and remove bag.
Now you are ready to vacuum seal with your new bag
How to Vacuum Seal FoodSaver® Bags
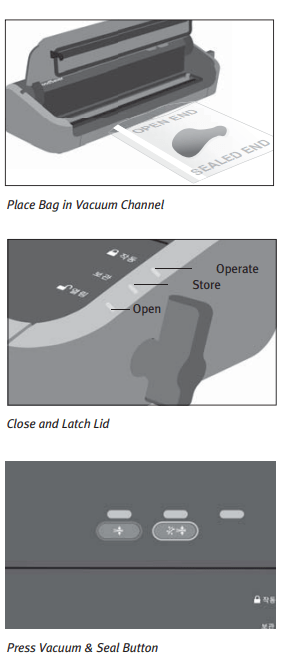
- Place item(s) in bag, allowing at least 7.5cm of space between bag contents and top of bag.
- Open appliance lid and place open end of bag into Vacuum Channel.
- Close lid and turn Easy Lock Latch to OPERATE position.
- Press Vacuum & Seal Button to begin vacuum and sealing process. Motor will continue to run until bag is fully vacuumed, then will automatically seal.
- When Seal Indicator Light turns off, turn Latch to OPEN position, lift lid and remove bag. Refrigerate or freeze if needed. (See FoodSaver® Storage Guide, page 14, for safe food storage tips.)
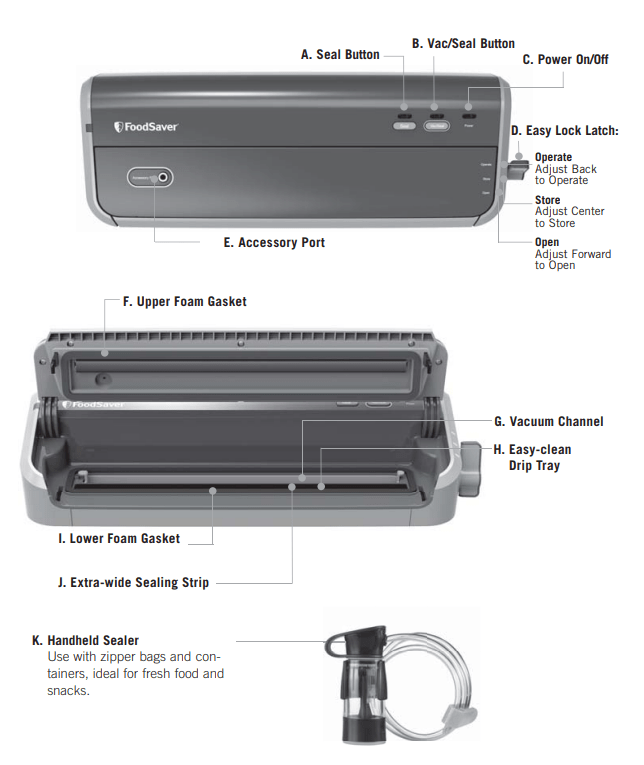
NOTE: Let appliance cool down for 20 seconds after each use. Always store appliance with the Easy Lock Latch in the center STORE position.
Tips on sealing & vacuuming a bag
Make sure you've securely locked the FoodSaver® appliance lid. When making a bag from a roll, place bag material on the sealing strip, close and lock the lid.
Prevent moisture or liquid from being pulled into the Vacuum Channel or trapped in the seal. For very moist or wet foods either use Seal only, or pre-freeze for 1-2 hours before vacuum packaging. Alternatively place a folded paper towel between food and end of bag to absorb excess liquids. Just be sure to leave at least 7.5cm between food and end of bag so that bag seals properly with paper towel inside.
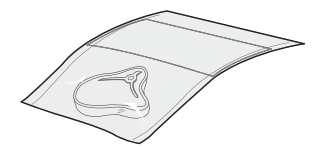
Make sure you give FoodSaver® appliance time to cool down. Under heavy usage, appliance will not operate to prevent overheating. If it does, wait 10 - 20 minutes to allow appliance to cool off.
Vacuum packaging in bulk
To package a large number of bags at one time, it is recommended to:
- create bag
- place foods in bag
- vacuum & seal
- repeat
Following this process will prevent the appliance from overheating.
Make sure you've securely locked the FoodSaver® appliance lid. 'When vacuuming and sealing a bag or container ensure the lid has been fully closed and lid has locked into place.
Check for wrinkles in the bag along the Sealing Strip. Wrinkles in seal may cause leakage and allow air to come back into bag. Check for wrinkles in bag along Sealing Strip before closing lid and vacuum packaging. If you find wrinkles after sealing bag, simply cut bag open and vacuum seal again.
If the motor runs for more than 2 minutes without stopping, consider the following:
- adjust the bag and try again.
- if you are making an initial seal on a piece of bag material with two open ends, make sure the bag is placed on the sealing strip.
- if you are vacuum packaging with a bag, make sure the open end is placed down inside the vacuum channel.
- ensure the accessory hose is not attached.
Vacuum Sealing Accessories
For Containers
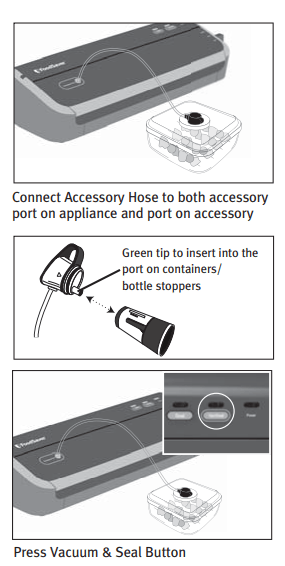
1. Prepare container according to FoodSaver® Accessory Guidelines (see manual that comes with your Accessory Kit).
2. Insert one end of Accessory Hose into Accessory Port on appliance. Press the Handheld Sealer over the accessory.
NOTE: For Containers and Bottle stoppers without green oval buttons on lid, remove the clear bottom portion of Handheld Sealer from top handle. Insert the green tip into the hole on top of the container lid or into the bottle stopper. Twist the green tip of the hose while inserting to ensure a tight fit.
3. Close lid, rotate Latch to OPERATE position, press Vacuum & Seal Button.
4. When motor and Indicator Light turn off, vacuum process is complete. Note that the appliance will still go through sealing cycle even when vacuuming an accessory. You will hear Motor shut off and then the sealing cycle will begin.
5. Gently twist and remove Handheld Sealer from accessory and appliance.
6. To test vacuum, simply tug on accessory lid. It should not move.
NOTE: For important tips on using accessories with different foods, please refer to the FoodSaver® Storage Guide
For Zipper bags
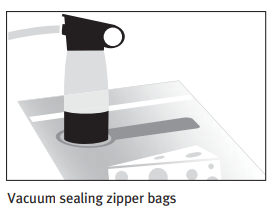
- To use Handheld sealer with Vacuum Zipper Bags, lay bag flat with grey circle facing upwards. Squeeze air out of the bag and seal closed completely.
- Place Handheld Sealer over grey circle on bag and press Vacuum & Seal button.
Food Preparation & Safety Tips
Guidelines for Vacuum Packaging Food
Vacuum packaging is not a substitute for canning nor can it reverse deteriorating quality; it can only slow down changes in quality. It is impossible to predict how long a specific food will have top-quality flavour, appearance and texture, because it depends on the age and condition of the food on the day it was vacuum packaged. Foods that are extremely fresh will last longer than foods that are already deteriorating.
Vacuum packaging extends the life of foods by removing nearly all the air in a sealed container, thereby reducing oxidation which affects nutritional value, flavour and overall quality. However, most foods contain enough water to support micro-organisms which can grow with or without air. While micro-organisms are present everywhere, only certain ones cause problems, and only under certain conditions:
- Mould: Easy to identify because of its characteristic fuzz. Moulds are virtually eliminated by vacuum packaging because they cannot grow in a low oxygen environment.
- Yeast: Results in fermentation, which can frequently be identified by smell or taste. Yeast requires water, sugar and a moderate temperature to grow, and can grow with or without air. Refrigeration slows the growth of yeast, and freezing stops it completely.
- Bacteria: Frequently results in discolouration, soft or slimy texture, and/or an unpleasant odour. 'Clostridium botulinum' (the organism that causes Botulism) can grow without air under the right conditions, cannot be detected by smell or taste, and although extremely rare, can be very dangerous.
Thawing and Heating Vacuum Packaged Foods
Always thaw foods in either the refrigerator or microwave – do not leave “perishable” foods at room temperature to thaw.
To microwave in a FoodSaver® Bag, cut a corner of the bag and place on a microwave-safe dish.
The combination of vacuum packaging and freezing will extend food freshness and reduce the growth of bacteria in perishable foods.
Maintaining low temperatures is a critical factor in preserving foods safely. Growth of micro-organisms is significantly reduced at temperatures of 4°C or below. Freezing at -17°C does not kill micro-organisms, but it stops them from growing. For long term storage, always freeze “perishable” foods that have been vacuum packaged.
NOTE: Vacuum packaging is NOT a substitute for refrigeration or freezing. Any “perishable” foods that require refrigeration prior to vacuum packaging still must be refrigerated or frozen after vacuum packaging.
Guidelines for Vacuum Packaging
Vacuum Packaging and Food Safety
The vacuum packaging process extends the life of foods by removing most of the air from the sealed container. This reduces oxidation, which affects nutritional value, flavour and overall quality.
Removing air can also inhibit growth of micro organisms, which can cause problems under certain conditions such as mould, yeast and bacteria.
IMPORTANT: Vacuum packaging is NOT a substitute for refrigeration or freezing
Any perishable foods that require refrigeration must still be refrigerated or frozen after vacuum packaging.
Thawing and Reheating Vacuum Packaged Foods
Always thaw foods in either refrigerator or microwave — do not thaw perishable foods at room temperature.

Reheating in a microwave
To reheat foods in a microwave in a FoodSaver® Bag, always cut corner of the bag before placing it on a microwave-safe dish.
However, to avoid hot spots, do not reheat bone-in meat or greasy foods in microwave within a FoodSaver® Bag.
Reheating in water
You can also reheat foods in FoodSaver® Bags by placing them in water at a low simmer below 75°C.

Vacuum Packaging Meat and Fish:
For best results, use a FoodSaver® bag to vacuum seal before freezing.
For very moist meat or fish, place a folded paper towel in the bag, between meat/fish and top of bag, below seal area. Leave paper towel in bag to absorb excess moisture and juices during vacuum packaging process.
Note: Beef may appear darker after vacuum packaging due to the removal of oxygen.This is not an indication of spoilage.

Vacuum Packaging Hard Cheeses:
To keep cheese fresh, vacuum package it after each use. To continue using the same bag, when initially vacuum packaging the cheese, ensure the FoodSaver® Bag is extra long. Allow one inch of bag material for each time you plan to open and reseal the bag in addition to the 7.5cm space you normally leave between contents and seal. Simply cut sealed edge and remove cheese prior to use.When you’re ready to repackage the cheese, just drop it in bag and reseal.
IMPORTANT: Due to the risk of anaerobic bacteria, Soft cheeses should never be vacuum packaged.

Vacuum Packaging Vegetables:
It is recommended that vegetables are blanched before vacuum packaging.
This process stops the enzyme action that could lead to loss of flavour, colour and texture.
To blanch vegetables, place them in boiling water or in the microwave until they are cooked, but still crisp.
Approximate blanching times:
- 1 to 2 minutes for leafy greens and peas
- 3 to 4 minutes for snap peas, sliced zucchini or broccoli
- 5 minutes for carrots
- 7 to 11 minutes for corn on the cob.
After blanching, immerse vegetables in cold water to stop the cooking process.
Dry vegetables on a towel before vacuum packaging.
Note: All vegetables (including broccoli, Brussels sprouts, cabbage, cauliflower, kale, turnips) naturally emit gases during storage. Therefore, after blanching, they must be stored in freezer only.
IMPORTANT: Due to the risk of anaerobic bacteria, Fresh mushrooms, onions, & garlic should never be vacuum packaged.

Vacuum Packaging Leafy Vegetables:
For best results, use a container to store leafy vegetables. First wash the vegetables, and then dry with a towel or salad spinner.
After they are dried, put them in a container and vacuum package. Store in refrigerator.

Vacuum Packaging Fruits:
For best results, vacuum seal fruit in a FoodSaver® Container to protects the shape of berries and soft fruits. Alternatively pre-freeze fruit for 1-2 hours before vacuum sealing to help maintain the shape and flavour of the food. If storing in the refrigerator, we recommend using a FoodSaver® Container.

Vacuum Packaging Baked Goods:
To vacuum package soft or airy baked goods, we recommend using a FoodSaver® Container so they will hold their shape. If using a bag, pre-freeze for 1-2 hours or until solidly frozen. To save time, make cookie dough, pie shells, whole pies, or mix dry ingredients in advance and vacuum package for later use.

Vacuum Packaging Coffee and Powdery Foods:
To prevent food particles from being drawn into vacuum pump, place a coffee filter or paper towel inside the bag, above the coffee and below the top of the bag, before vacuum packaging.
You can also place the food in its original bag inside a FoodSaver® Bag.

Vacuum Packaging Liquids:
Using a FoodSaver® Container is the easiest way to vacuum seal liquids. Pouring liquids into a FoodSaver® bag then using Seal only is a quick way to prepare liquids for storage. Alternatively pre-freeze liquids until solid, remove from freezer and vacuum package in a FoodSaver® bag. Then return to the freezer. When you’re ready to use, just cut corner of bag and place in a dish in microwave or drop into water at a low simmer, below 75°C.

Vacuum Packaging Snack Foods:
Your snack foods will maintain their freshness longer when you vacuum package them.
For best results, use a FoodSaver® Container for crushable items like crackers.
Vacuum Packaging Non-Food Items
The FoodSaver® vacuum packaging system also protects non-food items from oxidation, corrosion and moisture. Simply follow the directions to vacuum package items using FoodSaver® Bags & Containers.
 To vacuum package silver, wrap forks in soft cushioning material, such as a paper towel, to avoid puncturing bag.
 Your FoodSaver® Bags are ideal for outdoor excursions. For camping and hiking, keep your matches, maps and food dry and compact.
 To have fresh water for drinking, simply fill a FoodSaver® Bag with ice, seal it and when needed, let the ice pack melt.
 If you’re going sailing or boating, vacuum package your food, film and a dry change of clothes. Just remember to bring scissors or a knife to open the bag.
 To keep emergency kits safe and dry, vacuum package flares, batteries, flashlights, matches, candles and other necessities. Your emergency items will stay dry and organized in your home, car or boat.
Natural Gases in Foods
The release of natural gases or fermentation from foods, (such as fresh fruits and vegetables) can add air back into a vacuum packaged bag. To prevent this occurring, vegetables can be blanched prior to vacuum packing. See page 13 for more details.
Pre-freezing meats prior to vacuum packaging can prevent natural gases being released.
Care and Cleaning Instructions
The FoodSaver® Appliance
- Always unplug the appliance before cleaning.
- Clean using a mild dishwashing soap and a warm, damp cloth. Do not immerse the appliance in water. Dry thoroughly before using.
- Do not use abrasive products or materials to clean any of the appliance components.
Drip Tray
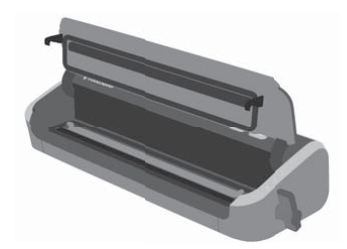
Remove from appliance for easy clean.Clean drip tray in warm soapy water.
FoodSaver® Bags
IMPORTANT: Do not reuse bags after storing meats, fish or greasy foods.
- Wash bags in warm water using a mild dishwashing soap.
- Bags can be washed in the dishwasher by carefully turning the bags inside out and spreading them over the top rack of the dishwasher so that all surfaces are exposed to the washing water.
- Allow bags to dry thoroughly before reusing. To avoid possible illness, do not reuse bags after storing raw meats, fish or greasy foods. Do not reuse bags that have been microwaved or simmered.
FoodSaver® Accessories
- All FoodSaver® accessories should be washed in warm water using a mild dishwashing soap. Dry thoroughly before using.
- The FoodSaver® Fresh Containers can be cleaned in the dishwasher but only in the top shelf. Items washed in bottom shelves can distort due to the heat from the dishwasher element. FoodSaver® Quick Marinator lids are NOT dishwasher safe
IMPORTANT: All plastic components deteriorate through the prolonged use of a dishwasher for cleaning. Hand washing of plastic components in warm soapy water is always recommended.
To Store Appliance
Clean unit thoroughly.
After the unit has been cleaned and allowed to fully dry, close lid and push the Easy Lock Latch into the STORE (middle) position. This setting will keep the lid closed but avoid and pressure being applied to the gaskets.
Always leave lid latch in STORE position when not in use. Never store lid in OPERATE position as gaskets may become compressed. If gaskets become compressed the unit may not function properly.
Troubleshooting
| Problem | Solution |
|---|---|
| Red Seal LED flashing |
|
| Pump is running for more than 2 minutes without bag vacuuming (no visible air coming out of bag) |
|
| Bag is not sealing properly |
|
| There are no lights on the control panel |
|
| Nothing happens when latch is closed and Vac/Seal or Seal button is pressed |
|
| Air was removed from the bag, but has come back into the bag |
|
| The Bag Melts: |
|
| The FoodSaver® Container will not vacuum |
NOTE: For all accessories, make sure the Accessory Hose is completely inserted into appliance and lid of accessory. Twist grey tab on Accessory Hose while inserting to ensure a tight fit. |
| Gasket is loose or has a tear |
|
See other models: FA8900 FP5910 KE2210G VS6100 HP5520
