User Manual for Refrigerator
Familiarizing yourself with your appliance
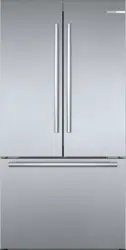
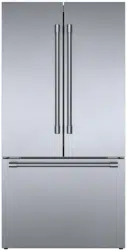
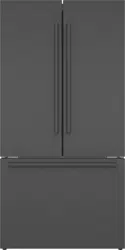
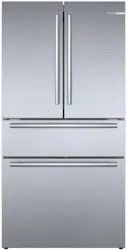
Appliance
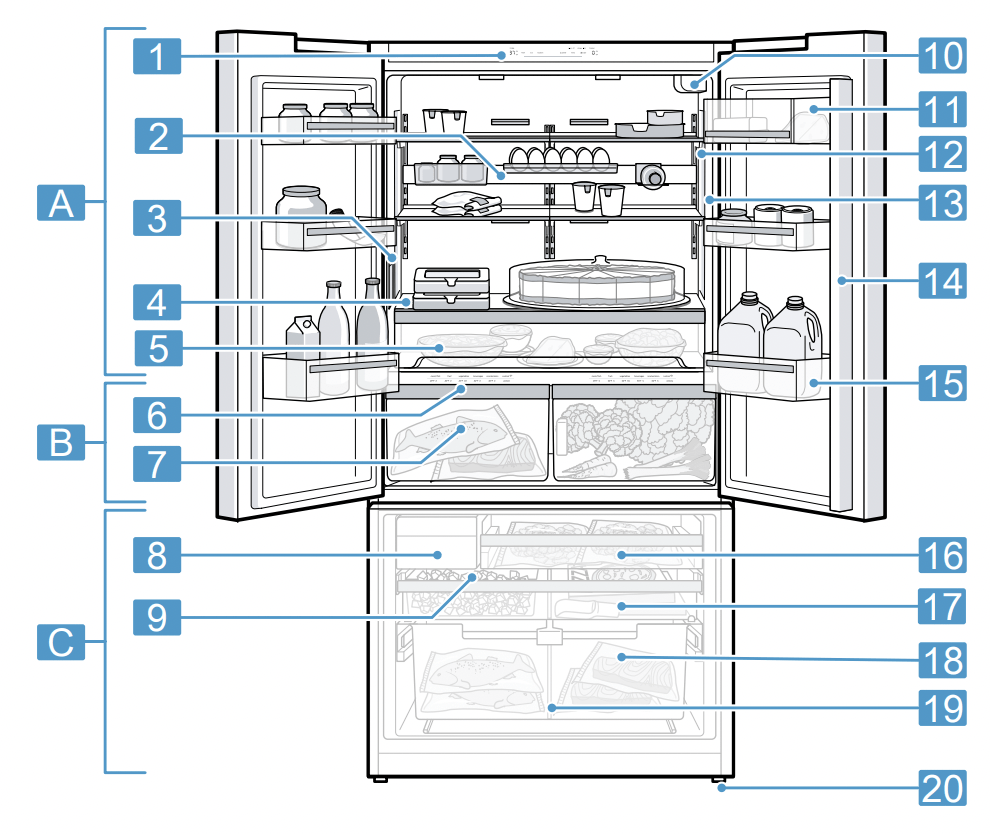
Here you can find an overview of the parts of your appliance.
|
A Refrigerator compartment → Page 18
B Cool-fresh compartment → Page 18
C Freezer compartment → Page 18
1 Control panel → Page 9
2 Equipment bar → Page 11
3 Water dispenser → Page 20
4 Fixed shelf → Page 12
5 Pull-out container → Page 12
6 Control panel (cool-fresh compartment) → Page 11
7 Cool-fresh container
8 Ice maker
9 Ice storage container → Page 13
10 Water filter → Page 19
|
|
11 Butter and cheese compartment → Page 13
12 Interior lighting
13 Rating label → Page 29
14 Hinged condensation protection bar → Page 6
15 Door rack for large bottles → Page 13
16 Frozen food pull-out container → Page 13
17 Flat frozen food container → Page 13
18 Frozen-food carrying container → Page 13
19 Container divider → Page 12
20 Screw foot
Note: Your appliance may differ from the diagrams with regard to features and dimensions.
|
Control panel
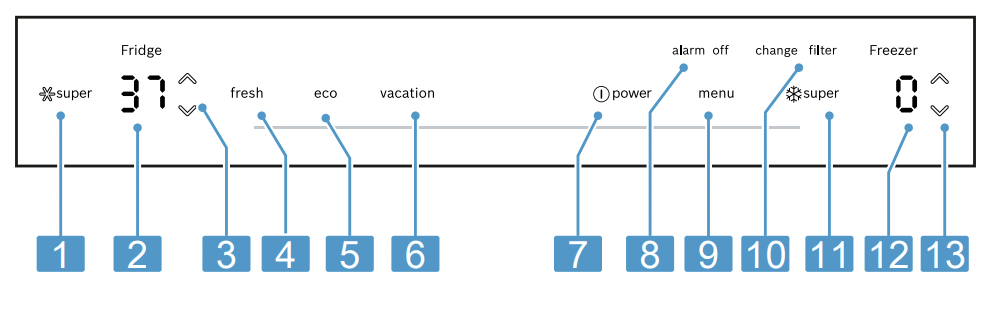
You can use the control panel to configure all functions of your appliance and to obtain information about the operating status.
|
1  switches Super cooling on or off. switches Super cooling on or off.
2 Displays the set temperature for the refrigerator compartment in °F or °C.
3  (Refrigerator compartment) sets the temperature of the refrigerator compartment. (Refrigerator compartment) sets the temperature of the refrigerator compartment.
4  switches freshness mode on or off. switches freshness mode on or off.
5  switches energy-saving mode on or off. switches energy-saving mode on or off.
6  switches vacation mode on or off. switches vacation mode on or off.
7  switches the appliance on or off. switches the appliance on or off.
|
|
8  switches off the alarm. switches off the alarm.
9  opens and closes the menu. opens and closes the menu.
10  lights up when the filter needs to be replaced. lights up when the filter needs to be replaced.
11  switches Super freezing on or off. switches Super freezing on or off.
12 Displays the set temperature for the freezer compartment in °F or °C.
13 (Freezer compartment) sets the temperature of the freezer compartment.
|
Control panel (submenu)
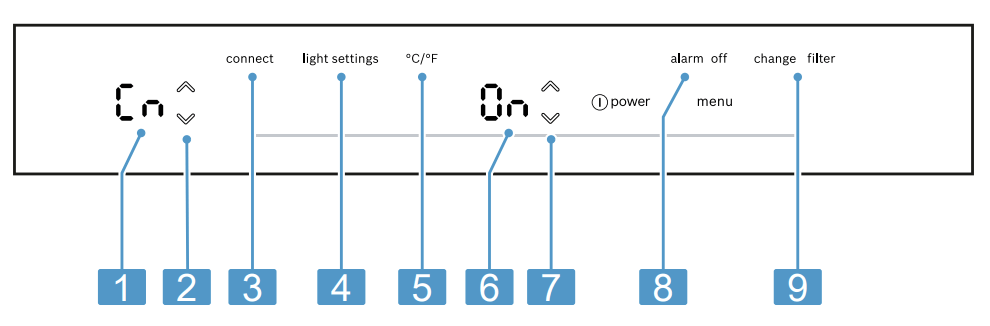
You can configure further settings in the submenu.
|
1 Displays the selected submenu.
2 (Submenu) is used to navigate through the submenu.
3 opens the menu for setting Home Connect.
4  opens the menu for setting the lighting. opens the menu for setting the lighting.
5  opens the menu for changing the temperature unit. opens the menu for changing the temperature unit.
|
|
6 Displays the settings of the submenu.
7 (Submenu setting) changes the submenu setting.
8  opens the menu for setting the door alarm. opens the menu for setting the door alarm.
9 opens the menu for setting the filter.
|
Control panel (cool-fresh compartment)
Using the control panel for the cool-fresh compartment, you can set the temperature and humidity in the cool-fresh compartment.
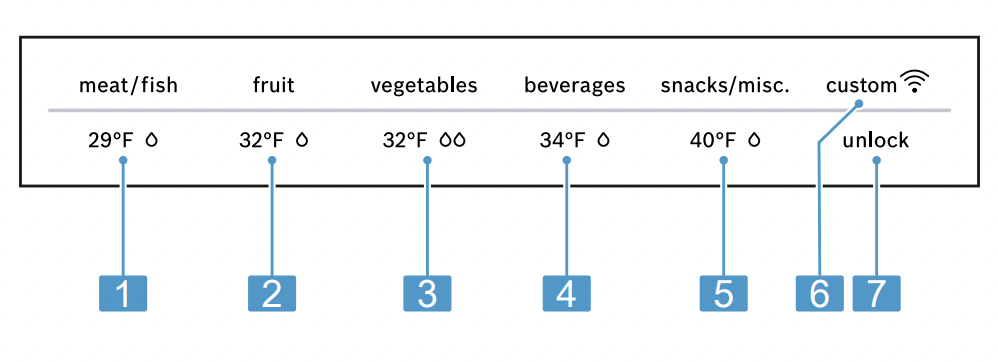
1  sets the cool-fresh compartment storage setting for meat and fish.
2  sets the cool-fresh compartment storage setting for fruit.
3  sets the cool-fresh compartment storage setting for vegetables.
4  sets the cool-fresh compartment storage setting for beverages.
5  sets the cool-fresh compartment storage setting for snacks.
6  lights up if user-defined settings have been set via the Home Connect™ app. You can find more information in the Home Connect™ app.
7  switches the button lock for the control panel (cool-fresh compartment) off.
Features
The features of your appliance depend on the model.
Shelf
NOTICE: If fitted at an angle, the hooks on the shelf can scratch the rear panel of the refrigerator compartment.
▶ Ensure that the shelf is horizontal and that the hooks are properly fitted in place.
To vary the shelf as required, you can remove the shelf and re-insert it elsewhere. → "Removing the shelf", Page 21
Note Do not cover the interior ventilation openings.

Equipment bar
The fittings on the equipment bar provide additional storage space in the refrigerator compartment:
- Store a bottle securely on the bottle shelf.
- Store preserving jars in the container.
- Store an egg carton on the shelf.
You can position the fittings anywhere along the equipment bar.

NOTICE: If fitted at an angle, the hooks on the equipment bar can scratch the rear panel of the refrigerator compartment.
▶ Ensure that the equipment bar is horizontal and that the hooks are properly fitted in place.
You can remove the equipment bar and re-insert it at a different location. → "Removing the equipment bar", Page 21
Tip: Position the equipment bar in the centre of the refrigerator compartment.
Fixed shelf
Always put the fixed shelf in the specified position.
Pull-out container
Store large plates or containers with processed food which has been covered in the pull-out container.
Cool-fresh container
To automatically set the cool-fresh container to the right humidity and temperature for your food, use the different cool-fresh container storage settings. Store fresh fruit and vegetables loose in the cool-fresh container.
Cover any chopped fruit and vegetables, or store in airtight packaging.
For hygiene reasons, do not store fruit and vegetables in a cool-fresh container with meat and fish. Store food no higher than the container rim to prevent detaching the lid of the cool-fresh container. Condensation may form in the cool-fresh container depending on the type and quantity of food stored. Remove the condensation with a dry cloth.
To ensure that the quality and aroma are retained, store fruit and vegetables that are sensitive to cold outside of the appliance at temperatures of approximately 46 °F (8 °C) to 54 °F (12 °C), e.g. pineapple, bananas, citrus fruits, cucumbers, zucchinis, bell peppers, tomatoes and potatoes.
Container divider
WARNING Children may climb into the appliance and suffocate.
▶ Never remove the carrying container dividers of the frozen food container.
NOTICE: The carrying container divider of the frozen food container will be damaged if removed.
▶ Never remove the carrying container dividers of the frozen food container.
To vary the division of the frozen food container, you can move the container divider.
Flat frozen food container
Store flat frozen items, the ice storage container and the ice scoop in the flat frozen food container.
Frozen food pull-out container
In order to achieve an improved overview and to remove frozen food more quickly, remove the frozen food pull-out container.
Frozen food carrying container
Store large frozen items in the frozen food carrying container.
Butter and cheese compartment
Store butter and hard cheese in the butter and cheese compartment.
Door rack
To adjust the door rack as required, you can remove the door rack, and re-insert it elsewhere.
→"Removing the door rack", Page 22
Ice storage container
If ice cube production is switched on, the ice cubes are automatically stored in the ice storage container.
NOTICE:
The ice maker may become blocked or damaged by food or objects stored in the ice storage container.
▶ Never store food or objects in the ice storage container.
Accessories
Only use original accessories. These are designed especially for your appliance. The accessories for your appliance depend on the model.
Ethylene absorber
For important safety instructions and information about installation and use, see the enclosed installation and operating instructions for the ethylene absorber. The ethylene absorber slows down the ripening of ethylene-sensitive fruit and vegetables to keep them fresher for longer.
Attaching the ethylene absorber
▶ Attach the ethylene absorber in accordance with the instructions for installation and use for the ethylene absorber.
Using the refill set
- Install the components of the refill set in accordance with the instructions for installation and use for the ethylene absorber.
- Replace the bags and the timer every 6 months following activation.
Note: Refill sets consisting of bags and timer are available from our customer service, your dealer or on our website.
Ice scoop
You can use the ice scoop to remove a portion of ice cubes.
Basic Operation
Switching on the appliance
1. Connect the appliance to the electricity supply. → Page 7
Note: If the appliance has been previously switched off using the control panel, press .
√ The appliance begins to cool.
2. Switch off the warning signal using .
√ goes out as soon as the set temperature has been reached.
3. Set the required temperature. → Page 13
Operating tips
- Once you have switched on the appliance, the set temperature is only reached after several hours. Do not put any food in the appliance until the set temperature has been reached.
- The front and side panels of the housing heat up occasionally. This prevents condensation from forming.
- When you close the door, a vacuum may be created. The door is then difficult to open again. Wait a moment until the vacuum is offset.
Switching off the appliance
▶ Press
Setting the temperature unit
You can choose between the temperature setting °F and °C.
1. Press .
2. Press .
3. Press (Submenu setting) until the setting display submenu shows or
or
4. Press .
Setting the temperature
Setting the refrigerator compartment temperature
▶ Press (Refrigerator compartment) repeatedly until the temperature display (refrigerator compartment) shows the required temperature. The recommended temperature in the refrigerator compartment is 37 °F (3 °C).
Setting the freezer compartment temperature
▶ Press (Freezer compartment) repeatedly until the temperature display (freezer compartment) shows the required temperature. The recommended temperature in the freezer compartment is 0 °F (−18 °C).
Cool-fresh compartment storage setting
You can set the temperature and humidity of the coolfresh container using predefined storage settings.
Tip: Further settings are available in the Home Connect™ app.
Setting the cool-fresh compartment storage setting
- Press any touch field on the control panel (cool-fresh compartment).
- Press and hold until the light bar lights up fully.
- Press the storage setting that you require.
Additional functions
Super cooling
With Super cooling, the refrigerator compartment cools as cold as possible. Switch on Super cooling before placing large quantities of food.
Note: When Super cooling is switched on, increased noise may occur.
Switching on Super cooling
▶ Press .
√ lights up.
Note: After approximately 6 hours, the appliance switches to normal operation.
Switching off Super cooling
▶ Press .
√ The previously set temperature is displayed.
Super freezing
With Super freezing, the freezer compartment cools as cold as possible. Switch on Super freezing 1 to 2 hours before placing food weighing 4.4 lbs (2 kg) or more into the freezer compartment. Use Super freezing to accelerate ice cube production.
Note: When Super freezing is switched on, increased noise may occur.
Switching on Super freezing
▶ Press .
√ lights up.
Note: After approximately 8 hours, the appliance switches to normal operation.
Switching off Super freezing
▶ Press .
√ The previously set temperature is displayed.
Vacation mode
If you are going to be away for a long time, you can switch on energy-saving vacation mode on the appliance.
CAUTION The refrigerator compartment heats up while the vacation mode is switched on. The increased temperature may cause bacteria to increase and spoil the food.
▶ When the vacation mode is switched on, do not store any food in the refrigerator compartment.
The appliance automatically sets the temperatures.
| Refrigerator compartment |
|
43 °F (6 °C) |
| Cool-fresh compartment |
|
40 °F (4 °C) |
| Freezer compartment |
|
Temperature remains unchanged |
Note: While the vacation mode is activated, the ice cube production and the water dispenser are switched off.
Switching on vacation mode
▶ Press .
√ lights up.
Switching off vacation mode
▶ Press .
√ The previously set temperature is displayed.
Energy-saving mode
You can set the appliance to save energy with the energysaving mode.
The appliance automatically sets the temperatures.
Refrigerator compartment 43 °F (6 °C)
Cool-fresh compartment 32 °F (0 °C)
Freezer compartment 6 °F (−14 °C)
Switching on energy-saving mode
▶ Press .
√ lights up.
Switching off energy-saving mode
▶ Press .
√ The previously set temperature is displayed.
Freshness mode
In order to keep the food fresh longer, you can switch on the freshness mode on the appliance.
The appliance automatically sets the temperatures
Refrigerator compartment 36 °F (2 °C)
Cool-fresh compartment 32 °F (0 °C)
Freezer compartment Temperature remains unchanged
Switching on freshness mode
▶ Press .
√lights up
Switching off freshness mode
▶ Press .
√ The previously set temperature is displayed.
Interior lighting
You can switch the interior lighting off or set the brightness.
 The interior lighting is switched off
 Minimum brightness
 Maximum brightness
Setting the interior lighting
1. Press .
2. Press .
3. Press (Submenu setting) until the setting display submenu shows the required setting.
4. Press .
Sabbath mode
To ensure that you can also use the appliance on the Sabbath, the Sabbath mode switches off all non-essential functions.
During Sabbath mode, the following functions are switched off:
- Super cooling
- Super freezing
- Alarm
- Water dispensing
- Ice cube production
- Interior lighting
- Audible signals
- Messages on the control panel
Note: The brightness of the control panel lighting is reduced during the Sabbath mode.
Switching on Sabbath mode
▶ Press and hold for 10 seconds until an audible signal sounds.
√ lights up.
Note: After approximately 80 hours, the appliance switches to normal operation.
Switching off Sabbath mode
▶ Press and hold for 5 seconds until an audible signal sounds.
Filter change notification
Every 6 months, the filter change notification will come on. lights up.
Note: Increased water consumption switches the filter change notification on sooner.
Switching off the filter change notification
1. Replace the water filter. The bypass cap does not need to be replaced.
2. Press and hold for 3 seconds.
√goes out.
√ The filter change status is reset.
Filter change status
If you replace the filter before the filter change notification, reset the filter change status.
The measurement of the filter change status is running
Resetting the filter change status
Resetting the filter change status
1. Press .
2. Press .
√ The submenu setting display shows .
3. Press (Submenu setting).
√ The submenu setting display shows .
4. Press .
Water system
Your appliance is equipped with water-carrying components. The water system only works if a water filter or a bypass cap is installed.
Water filter
The water filter filters particles and the taste of chlorine out of the water. The water filter reduces further contamination, e. g. from chloramines, lead and pharmaceutical products.
Note: The water filter does not filter bacteria or microbes out of the water.
Change the water filter:
- every 6 months.
- if lights up.
- if the water output has visibly reduced.
Tips
- A new water filter can be purchased from customer service, your dealer or our website.
- If you do not want to use a water filter in your appliance or an external water filter system is installed, you can permanently replace the water filter with a bypass cap. The bypass cap filters only large particles out of the water and can be cleaned as required. A bypass cap can be purchased from customer service or our website.
Changing the water filter or replacing it with a bypass cap
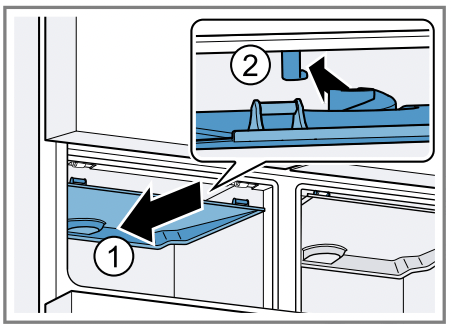
1. Reach into the recess below the filter cover, pull it forward slightly 1 and move it to the bottom left 2.
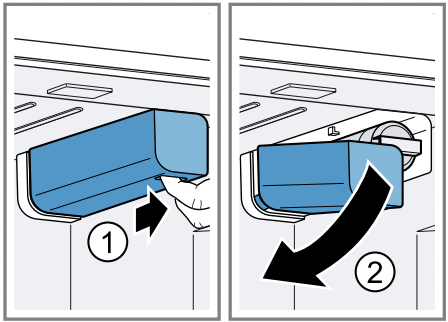
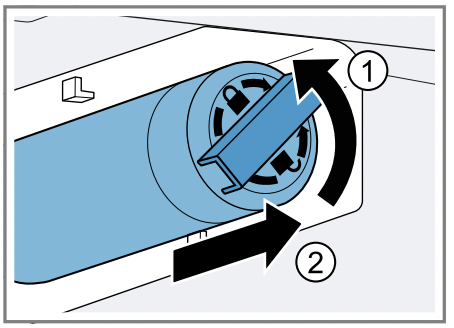
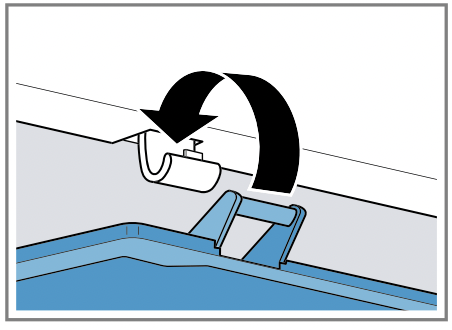
2. Turn the water filter counterclockwise by 90° 1 and remove it 2 .
‒ Remove the water filter with care as it is under pressure.
Note: When removing it, a small amount of water may drip out of the water filter. Remove the drips of water with a dry cloth.
Tip: You can dispose of the old water filter with your household garbage.
3. Insert the new water filter or the bypass cap all the way into the filter opening and turn it 90° clockwise until it stops.
4. Move the filter cover up to the right and slide back all the way.
5. Discard the ice cubes produced during the first 24 hours, and dispense water for 5 minutes and discard.
Water dispenser
Dispense cold water via the water dispenser.
Putting the water dispenser into operation
Note: Once the appliance has been connected or a new water filter has been installed, there will be air in the water system.
1. Keep dispensing water until it contains no more air bubbles. Remove any splashes of water with a dry cloth.
2. For hygiene reasons, dispense water for 5 minutes and discard.
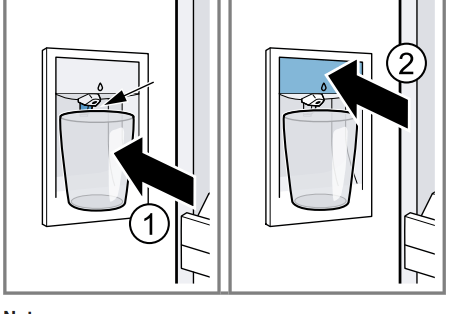
Dispensing water
▶ Press and hold the glass against the dispensing button 1 or hold the glass under the water dispenser and press  2.
2.
Notes
- After a while of continuous dispensing, the water stops being dispensed. Wait a few seconds before dispensing water again.
- After water has been dispensed several times consecutively, water stops being dispensed. Wait a few minutes before dispensing water again.
Ice maker
Use the ice maker to produce ice cubes.
WARNING Rotating parts may cause injury.
▶ Never reach into or underneath the ice maker.
Note: The ice maker automatically detects that the ice storage container is full. It could take up to 48 hours until the ice storage container is full.
Tips
- You can accelerate ice cube production by setting a colder freezer compartment temperature or by switching on Super freezing. This will slightly increase energy consumption.
- If the ice cubes taste stale, discard them and the cubes produced over the next 24 hours. If the ice cubes still taste stale, change the water filter.
Putting the ice maker into operation
Notes
- Ice cube production starts as soon as the appliance is switched on and the freezer compartment has reached the set temperature.
- As soon as the freezer compartment reaches the set temperature, the first batch of ice cubes will be ready in approximately 4 hours.
▶ For hygiene reasons, discard the ice cubes produced within the first 24 hours.
Switching on ice cube production
▶ Lift the ice maker cover upwards 1 and press the ice maker button 2.
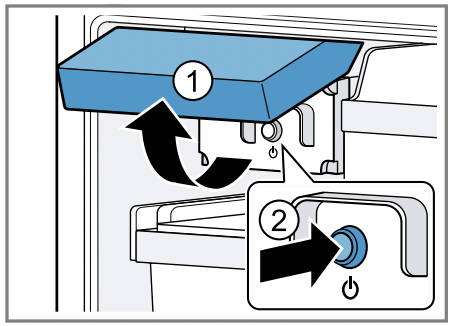
√ The ice maker button lights up.
Note: If you press and hold the ice maker button for 3 seconds, the filter change status is reset.
Switching off ice cube production
▶ Lift the ice maker cover upwards 1 and press the ice maker button 2.
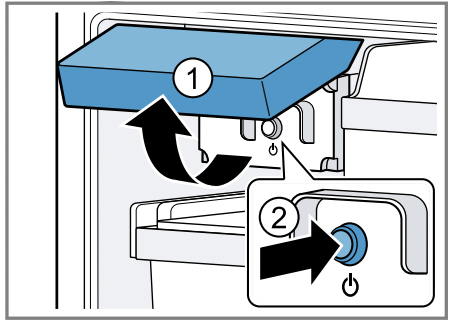
√ The ice maker button goes out.
Note: If you press and hold the ice maker button for 3 seconds, the filter change status is reset.
Defrosting
Defrosting in the refrigerator compartment
The refrigerator compartment in your appliance defrosts automatically.
Defrosting in the cool-fresh compartment
The cool-fresh compartment in your appliance defrosts automatically.
Defrosting in the freezer compartment
The fully automatic NoFrost system ensures that the freezer compartment remains frost-free. Defrosting is not required.
Cleaning and maintenance
To keep your appliance working efficiently for a long time, it is important to clean and maintain it carefully. Customer Service must clean inaccessible points. Cleaning by Customer Service can give rise to costs.
Preparing the appliance for cleaning
1. Switch off the appliance. → Page 13
2. Disconnect the appliance from the power supply. Unplug the appliance from the power source or switch off the circuit breaker in the fuse box.
3. Take out all of the food and store it in a cool place. Place ice packs (if available) onto the food.
4. Remove all fittings and accessories from the appliance. → Page 21
5. Remove the telescopic rails. → Page 23
6. Remove the refrigerator compartment glass plate. → Page 24
7. Remove the cool-fresh container cover. → Page 25
Cleaning the appliance
WARNING Moisture intrusion may cause an electric shock.
▶ Do not use any steam cleaners or high-pressure cleaners to clean the appliance.
NOTICE: Unsuitable cleaning agents may damage the surfaces of the appliance.
▶ Do not use hard scouring pads or cleaning sponges.
▶ Do not use strong or abrasive cleaning agents.
▶ Do not use cleaning agents with a high alcohol content.
▶ Do not use stainless-steel cleaning agents on the outside of the appliance.
If you clean fittings and accessories in the dishwasher, this may cause them to become deformed or discolor.
▶ Never clean fittings and accessories in the dishwasher.
1. Prepare the appliance for cleaning. → Page 21
2. Clean the appliance, the fittings, the accessories and the door seals with a dish cloth, lukewarm water and a little pH-neutral dishwashing liquid.
3. Dry thoroughly with a soft, dry cloth.
4. Insert the fittings and install the appliance components.
5. Connect the appliance to the electricity supply.
6. Switch on the appliance. → Page 13
7. Put the food into the appliance.
Removing the fittings
If you want to clean the fittings thoroughly, remove these from your appliance.
Removing the shelf
▶ Lift the shelf 1 and remove it 2.
Removing the equipment bar
▶ Lift the equipment bar and remove it.
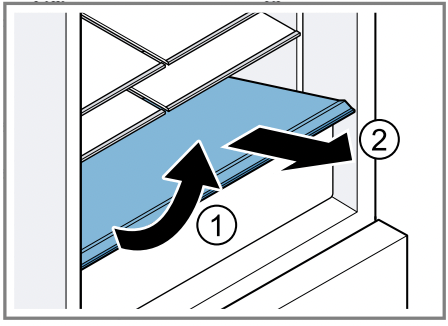
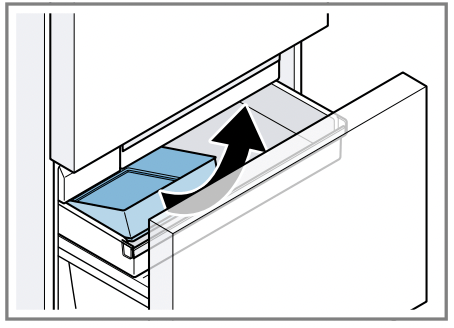
Removing the fixed shelf
1. Pull out the pull-out container.
2. Lift the fixed shelf at the front 1 and remove it 2 .
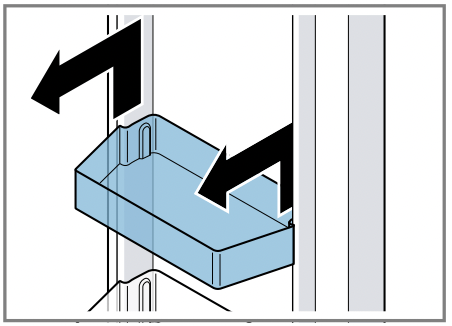
Removing the door rack
▶ Lift the door rack and remove it.
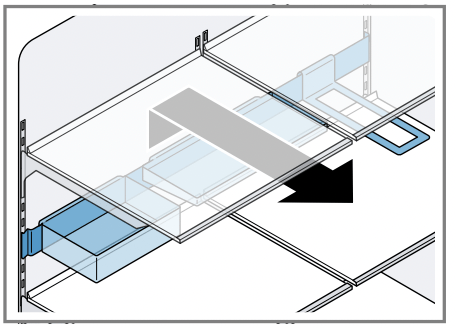
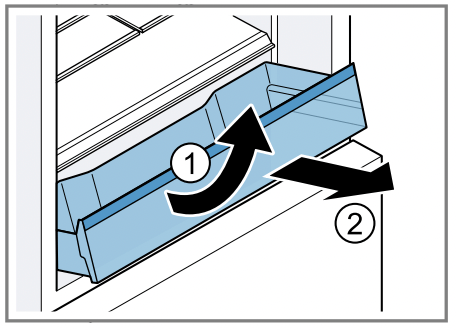
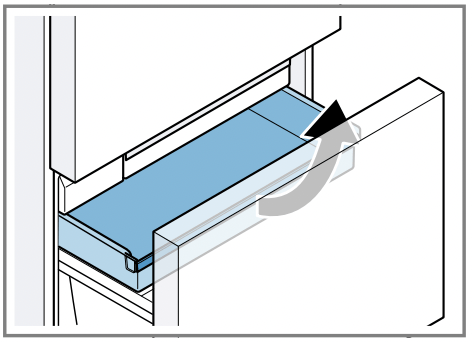
Removing the pull-out containers
1. Pull out the pull-out container as far as it will go.
2. Lift the pull-out container at the front 1 and remove it 2.
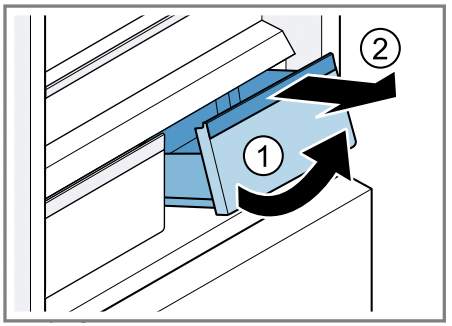
Removing the cool-fresh container
1. Pull the cool-fresh container out all the way.
2. Lift the cool-fresh container at the front 1 and remove it 2.
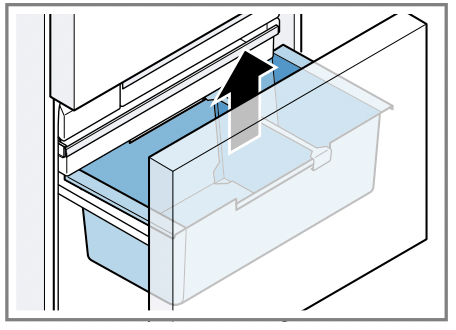
Removing the frozen food pull-out container
1. Pull out the frozen food pull-out container as far as it will go.
2. Lift the frozen food pull-out container at the front and remove it.

Removing the flat frozen food container
1. Pull out the flat frozen food container as far as it will go.
2. Lift the flat frozen food container at the front and remove it.
Removing the ice cube container
1. Pull out the flat frozen food container as far as it will go.
2. Lift the ice cube container at the front and remove it.
Removing the frozen-food carrying container
▶ Remove the frozen-food carrying container upwards.
Removing the appliance components
If you want to clean your appliance thoroughly, you can remove certain components from your appliance.
Telescopic rails
You can remove the telescopic rails in order to clean them thoroughly.
Removing the telescopic rails
1. Pull out the telescopic rail.
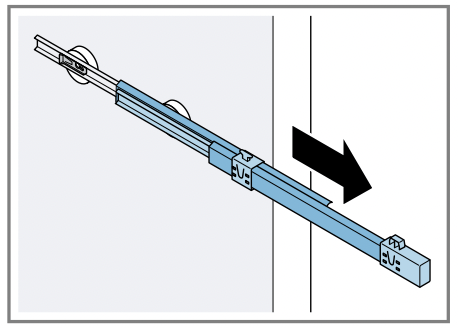
2. Move the lock in the direction of the arrow 1 and loosen the pin from the rear 2
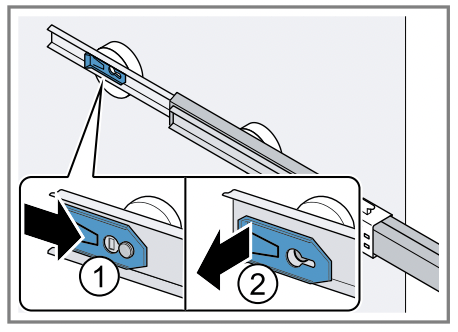
3. Push in the telescopic rail.
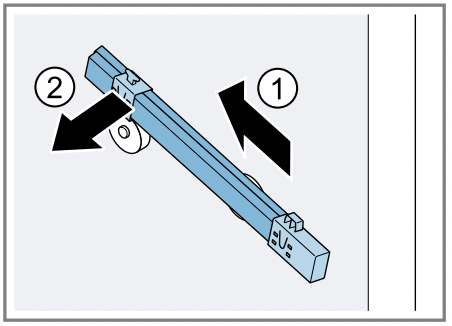
4. Push the telescopic rail backwards above the rear pin 1 and disengage 2.
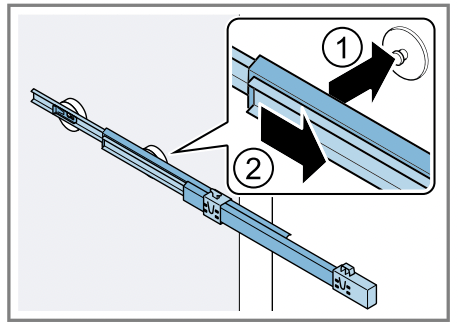
Installing the telescopic rails
1. Place the extended telescopic rail on the front pin 1 and pull it forwards slightly to lock in place 2
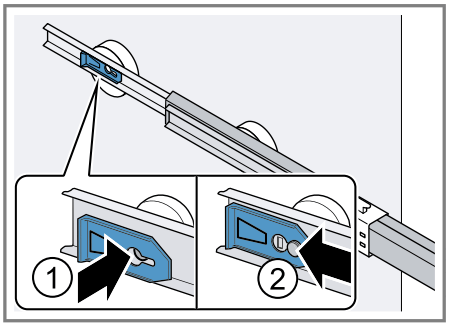
2. Place the telescopic rail on the rear pin 1 and push the locking mechanism back 2 .
Refrigerator compartment glass plate
To clean the refrigerator compartment glass plate thoroughly, you can remove it.
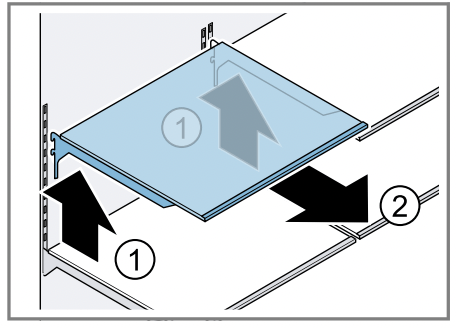
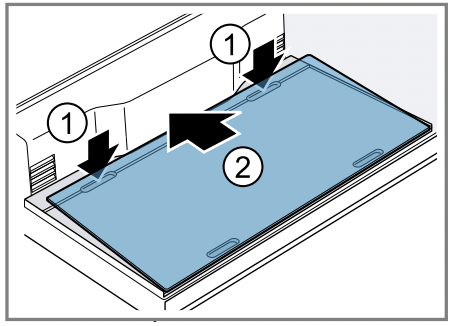
Removing the refrigerator compartment glass plate
1. Grip both the rear recesses at the base of the refrigerator compartment and lift the refrigerator compartment glass plate 1 . Slide the refrigerator compartment glass plate towards the rear 2.
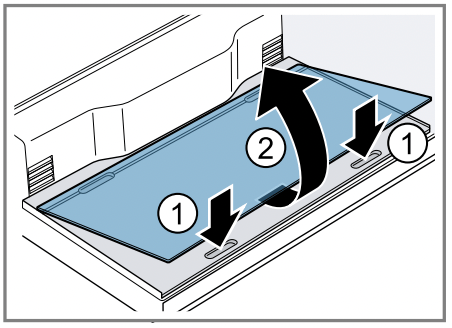
2. Grip both the front recesses at the base of the refrigerator compartment 1 , lift the refrigerator compartment glass plate and remove it 2.
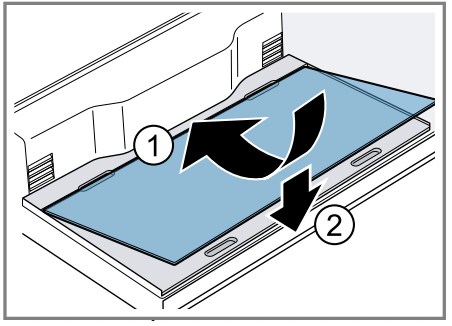
Install the refrigerator compartment glass plate
▶ Place the refrigerator compartment glass plate at the rear of the base of the refrigerator compartment 1 and lower it 2 .
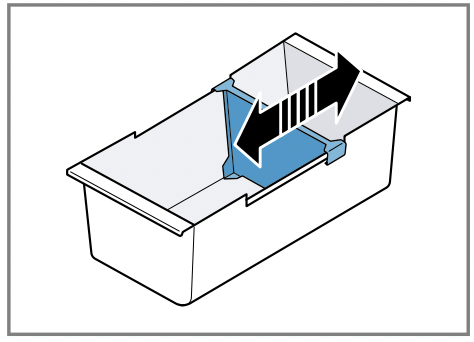
Cool-fresh container cover
To clean the cool-fresh container cover thoroughly, you can remove it.
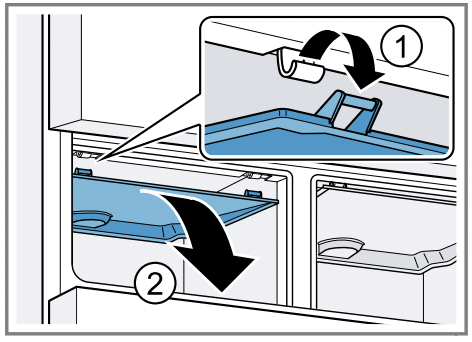
Removing the cool-fresh container cover
1. Remove the cool-fresh container.
2. Unclip the cool-fresh container cover 1 and remove it 2.
Fitting the cool-fresh container cover
1. Slide the lid of the cool-fresh container symmetrically towards the rear 1 and hook it into place 2 .
2. Click the cool-fresh container lid into place.
3. Install the cool-fresh container.
Troubleshooting
You can eliminate minor issues on your appliance yourself. Please read the information on eliminating issues before contacting Customer Service. This may avoid unnecessary repair costs.
▶ If the power cord of this appliance becomes damaged, it must be replaced with a specific connection cord, which is available from the manufacturer or the manufacturer's Customer Service.
WARNING Improper repairs are dangerous.
▶ Only original spare parts may be used to repair the appliance.
| Issue |
Cause and troubleshooting |
| The appliance is not cooling, the displays and lighting light up. |
Showroom mode is switched on.
1. Press and hold for 15 seconds until three audible signals sound.
√ The lighting on the control panels and the interior lighting switch themselves off briefly.
√ flashes and a warning signal sounds.
2. Press .
3. After a short time, check whether your appliance is cooling.
|
| The LED lighting does not work. |
Various causes are possible.
▶ Call customer service. → "Customer service", Page 29
|
| Home Connect is not working properly. |
Various causes are possible.
▶ Go to home-connect
|
| E or d appears in the temperature display. |
The electronics have detected a fault.
1. Switch off the appliance. → Page 13
2. Disconnect the appliance from the power supply. Unplug the power plug or switch off the circuit breaker in the fuse box.
3. Reconnect the appliance after 5 minutes.
4. Switch on the appliance. → Page 13
5. If the message still appears on the display, call customer service. → "Customer service", Page 29
|
|
The temperature display (freezer compartment) flashes, a warning signal sounds and flashes.
The temperature alarm is switched on.
|
Various causes are possible.
1. Press .
√ The alarm is switched off.
2. After several hours, check whether the set freezer compartment temperature has been reached again.
|
|
The exterior ventilation grilles are blocked.
▶ Remove any obstructions from in front of the exterior ventilation grilles.
|
|
Large quantities of fresh food have been placed inside.
▶ Switch on Super freezing before placing a larger amount of food in the appliance. → "Switching on Super freezing", Page 14
|
|
A warning signal sounds andflashes.
The door alarm is switched on.
|
The appliance door is open.
▶ Close the appliance door.
|
| The temperature differs greatly from the setting. |
Various causes are possible.
1. Switch off the appliance. → Page 13
2. Switch the appliance back on after approximately 5 minutes. → Page 13
‒ If the temperature is too warm, check the temperature again after a couple of hours.
‒ If the temperature is too cold, check the temperature again on the following day.
|
| Water is leaking out of the appliance. |
The water connection or water hose is not leak-tight.
▶ Check if the water connections are fastened firmly and the water hose is undamaged. If necessary, replace the water hose.
|
| Water output is reduced. |
Low water pressure.
▶ Check the pressure of the water supply system or the external water filter system, e.g. reverse osmosis system.
Connect the appliance only to a water connection with sufficient water pressure. → Page 6
|
|
The water filter is blocked.
▶ Change the water filter. → Page 19
|
| Water is dripping from the water dispenser. |
Air is in the water system.
▶ Keep dispensing water until it contains no more air.
|
| The water dispenser is not functioning. |
There is no water supply.
▶ Ensure that there is a water supply and that the shut-off valve on the water connection is open.
Contact an installer if necessary.
|
|
Kink in the water hose.
▶ Turn off the water supply and straighten the kink in water hose.
If necessary, replace the water hose
|
Ice cube production is low.
|
The appliance has only recently been connected.
▶ Wait approximately 4 hours until the first batch of ice cubes is ready.
|
|
The freezer compartment has been opened frequently or for an extended period of time.
▶ Check ice cube production after a few hours.
|
|
Low water pressure.
▶ Check the pressure of the water supply system or the external water filter system, e.g. reverse osmosis system.
Connect the appliance only to a water connection with sufficient water pressure. → Page 6
|
|
The water filter is blocked.
▶ Change the water filter. → Page 19
|
|
Food or objects are blocking the fill level sensor for the ice maker.
▶ Remove all food and objects from the ice storage container.
|
|
Fault in the ice maker.
1. Switch off the appliance. → Page 13
2. Disconnect the appliance from the power supply. Unplug the power plug or switch off the circuit breaker in the fuse box.
3. Reconnect the appliance after 5 minutes.
4. Switch on the appliance. → Page 13
5. If the fault persists, call customer service. → Page 29
|
The ice maker is not functioning.
|
Ice cube production is switched off.
▶ Switch on ice cube production. → Page 20
|
|
There is no water supply.
▶ Ensure that there is a water supply and that the shut-off valve on the water connection is open. Contact an installer if necessary.
|
|
Kink in the water hose.
▶ Turn off the water supply and straighten the kink in water hose. If necessary, replace the water hose.
|
|
Fault in the ice maker.
1. Switch off the appliance. → Page 13
2. Disconnect the appliance from the power supply. Unplug the power plug or switch off the circuit breaker in the fuse box.
3. Reconnect the appliance after 5 minutes.
4. Switch on the appliance. → Page 13
5. If the fault persists, call customer service. → Page 29
|
| The appliance hums, bubbles, buzzes, gargles, clicks, crackles or rumbles. |
Not a fault. A motor is running, e.g. refrigerating unit, fan. Refrigerant is flowing through the pipes. The motor, switches, solenoid valves or water valves are switching on or off. Automatic defrosting is running. Ice cubes fall into the ice storage container. No action required |
The appliance makes noises.
|
The appliance is not level.
▶ Align the appliance using a bubble level and the screw feet.
|
|
The appliance is not free-standing.
▶ Observe the minimum clearances for the appliance.
|
|
Fittings wobble or stick.
▶ Check the removable fittings and, if required, replace these.
|
|
Bottles or containers are touching.
▶ Move the bottles or containers away from each other.
|
| Super freezing is switched on. No action required. |
Power failure
During a power failure, the temperature in the appliance rises; this reduces the storage time and the quality of the frozen food.
Notes
- Open the appliance as little as possible during a power failure and do not place any other food in the appliance.
Conducting an appliance self-test
1. Switch off the appliance. → Page 13
2. Disconnect the appliance from the power supply. Unplug the appliance from the power source or switch off the circuit breaker in the fuse box.
3. Connect the appliance to the electricity supply after 5 minutes.
4. Switch on the appliance. → Page 13
5. Within the first 2 minutes after switching on, press and hold for 10 seconds until an audible signal sounds.
 The appliance self-test starts.
While the appliance self-test is running, a long audible signal sounds.
If, at the end of the appliance self-test, two audible signals sound and the temperature display indicates the set temperature, your appliance is OK. The appliance switches to normal operation.
If, at the end of the appliance self-test, five audible signals sound and the submenu setting display shows Er , inform Customer Service.
Storage and disposal
Storage and disposal Here you can find out how to prepare your appliance for storage. You can also find out how to dispose of used appliances.
Taking the appliance out of operation
1. Switch off the appliance. → Page 13
2. Disconnect the appliance from the power supply. Unplug the appliance from the power source or switch off the circuit breaker in the fuse box.
- Check the quality of the food immediately after a power failure.
– Dispose of any frozen food that has defrosted and is hotter than 41 °F (5 °C).
– Cook or fry slightly thawed frozen food, and then either consume it or freeze it again.
3. Disconnect the appliance from the drinking water connection.
4. Remove all of the food.
5. Remove the water filter. → Page 19
6. Clean the appliance. → Page 21
7. To ensure the ventilation inside the appliance, leave the appliance open.
Disposal of your old appliance
Environmentally compatible disposal allows valuable raw materials to be recycled.
WARNING Children can lock themselves in the appliance, thereby putting their lives at risk.
▶ Remove the appliance doors and the appliance drawer.
▶ To prevent children from climbing in, leave shelves and containers in the appliance.
▶ Keep children away from the discarded appliance.
WARNING If the tubes are damaged, flammable refrigerant and harmful gases may escape and ignite.
▶ Do not damage the tubes of the refrigerant circuit or the insulation.
1. Unplug the appliance from the power supply.
2. Cut through the power cord.
3. Dispose of the appliance in an environmentally responsible manner. Information about current disposal methods can be obtained from your specialist dealer or local authority