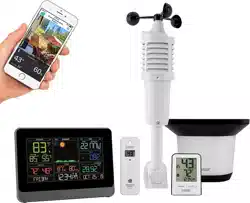
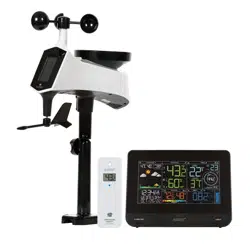
1. Insert 2 - C batteries into your LTV-W1 Wind Sensor.
2. Insert 2 - AA batteries into your LTV-R2 Rain Sensor.
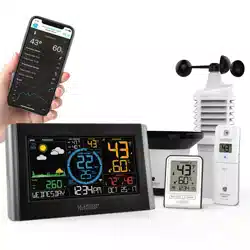
3. Insert 2 - AA batteries into your LTV-TH2 Thermo-Hygro Sensor.
4. Insert the power cord into your C83100 station. Remove the red insulation tab from the CR2032 battery compartment found on the bottom of your station.
5. Insert batteries into your Bonus Station.
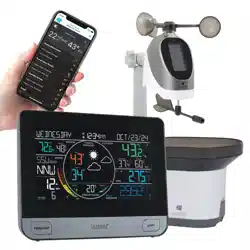
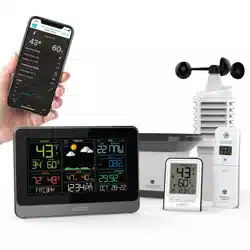
6. Download the La Crosse View™ App (App Store or Google Play)
7. Follow along with our instructional videos to connect your station to the app
8. Mount your sensors in appropriate locations.
BUTTON FUNCTIONS
Buttons located on top of Profesional Weather Station
Buttons located on the right side of Professional Weather Station
SET
Hold for basic setting. Press to view Wi-Fi status.
TEMP, WIND, RAIN
Press to view history.
LIGHT
Press to adjust brightness. Hold to set Auto Dim.
+ or –
Use + or – to adjust values in settings.
+ & –
Hold both buttons to search for Wi-Fi.
SENSOR
Press to view sensor ID numbers, then hold PLUS (+) to search, or hold MINUS (–) to remove.
DAILY, HOURLY
Press to see forecast. Must be connected to Wi-Fi.
RAIN & LIGHT
Hold both buttons together to reset all sensor ID’s and Wi-Fi settings.
EXTRA SENSOR
Press to toggle through “extra sensor” & Barometric Pressure. Hold to add Sensors.
WEATHER STATION ICONS
EXTRA SENSOR AREA ICONS:
• The Extra Sensor area of your station will default to Pressure when you first power up.
• When you choose to add additional sensors, the Sensor Reception Indicator will show in the upper left corner whether Press ure or Sensor reading is displayed.
• Press and release the EXTRA SENSOR button to view all additional sensors.
Press the DAILY button on the side of your station to scroll through 7 days of future forecasts. You’ll see changing forecast icons, HI/LO Temperature readings.
IMPORTANT: After viewing your Daily Forecast, the display will automatically revert back to the default 12 hour forecast after 10 seconds
ACCUWEATHER HOURLY FORECAST
Press the HOURLY button on the side of your station to scroll through 12 hours of future forecasts. You’ll see hourly changes in:
• Weather Icons
• Chance of Precipitation
• Temperature
• Wind Direction
IMPORTANT: After viewing your Hourly Forecast, the display will automatically revert back to the default 12 hour forecast after 10 seconds.
Note: If you press the HOURLY or DAILY button when not connected, station will say CONNECT TO WIFI. If your station is connected, but happens to lose connection with the weather service, it will say WAIT FOR WEATHER when your HOURLY or DAILY button is pushed.
ACCUWEATHER HI/LO TEMPERATURES
• When connected, your daily AccuWeather HI/LO Temperature predictions will display in this section.
• If unconnected, this section will display your Outdoor Temperature Records registered daily by your Thermo-Hygro Sensor. These will automatically reset at Midnight everyday
ACCUWEATHER WIND DIRECTION
CUSTOM DATA STREAMS
Use the Data Stream Menu in the La Crosse View™ app to select up to 3 items to stream on your station.
1. Open the La Crosse View™ app and swipe until you find your station’s device page.
2. Scroll down to the Data Stream section and press the blue stream icon in the upper right.
3. Follow the app’s instructions to customize your “Data Stream” to display on your station
Note: Allow up to 10 minutes for new Data Stream selections to appear on your station.
ADDITIONAL SENSORS CAN READ TO YOUR APP
How to add Sensors to your La Crosse View App only:
1. Install batteries in the sensor, and if the sensor has a TX button, press the TX button to force a signal.
2.Scan sensor bar code ID so it will read in the La Crosse View app.
Details: Open your La Crosse View app to add sensors. Watch the video for adding devices to the La Crosse View app
1. From Main Menu - select “Devices” under “Add/Edit”
2. On Edit Devices page - select “ADD DEVICE”
3. Scan Device ID - Scan the bar code on your sensor or choose “ADD MANUALLY” to type in the number on the bar code. Select “CONTINUE”.
4. On Confirm Device page - Confirm the sensor image and select “YES”
5. On Enter Device and Location Name page - enter Device Name and select a location or enter a Location Name for your sensor. Select “DONE”.
Repeat steps 1-5 for any additional sensors you wish to add.
STATUS MESSAGES WHEN CONNECTED
Status Messages on you station will let you know if there are issues.
Press and release the SET button to view the status of your station.
ALL OK CONNECTED
• Station is connected all the way through to the La Crosse View app.
CHECK APP
• The Wi-Fi router connection is working.
• Check your connection to the La Crosse View app.
• Check Notifications in the La Crosse View app
• Is there an update to install?
LOST WIFI
• Check your power cord connection (power cord required to connect)
• When trying to reestablish your station’s Wi-Fi connection, be sure your mobile device is on the same 2.4GHz network you want your station to use.
• Check your network connection.
• Hold the + and – buttons together for 3 seconds to search for Wi-Fi.
NO WEATHER SERVICE
• Wi-Fi, and App are fine.
• Weather/Time service not connecting. This will be resolved at the Weather Server. Please be patient.
• Weather Forecast, Precipitation and Weather HI/LO temperature will not be displayed.
FEATURES OF YOUR WEATHER STATION
Your station provides most functionality when connected to the La Crosse View app. However it is fully functional as a standalone station.
Here we have included the details for various functions of your station:
• Adjustable Backlight
• Auto Dim Backlight
• Settings Menu
• Extra Sensor Area
• Wind Speed Readings and History
• Rainfall Readings and History
• Temperature/Humidity Readings and HI/LO Records
• Feels Like Temperature
• Temperature Trend Arrows
• Relative Barometric Pressure
• Low Battery Indicators
• Sensor Reception Indicator
• Sensor ID’s and Sensor Search
• Delete Sensor
• Factory Restart Station
• Bonus Station
ADJUSTABLE BACKLIGHT
Your station has 5 levels of brightness for the backlight:
• Press and release the LIGHT button to adjust the backlight at 5 levels of intensity.