minutes.
4 Clean inside of appliance with hot water and non-abrasive
sponge.
5 If necessary, clean heater with a cleaning brush to remove
any food residue.
This appliance has no other user-serviceable parts. For
assistance in the U.S. or Canada only call 1-866-309-8817.
Storage
1 Unplug appliance and let it cool down.
2 Be sure all parts are clean and dry.
3 Push power cord into cord storage compartment.
Disposal
- Your product is designed and manufactured with high quality
materials and components, which can be recycled and
reused. For recycling information, please contact your local
waste management facilities or visit www.recycle.philips.com.
Warranty and service
If you need information, support, or if you have a problem, please
visit www.philips.com/support or in the U.S. or Canada only, call
1-866-309-8817 for assistance.
Troubleshooting
This chapter summarizes the most common problems
you could encounter with the appliance. If you are unable
to solve the problem with the information below, visit
www.philips.com/support or in the U.S. or Canada only, call
1-866-309-8817 for assistance.
Problem Possible cause Solution
The appliance
does not
work.
The appliance
is not plugged
in.
Put the plug in a grounded wall
outlet.
You have not
pressed the
on/o button.
Press the on/o button to
switch on the appliance.
The
ingredients
fried with the
airfryer are not
done.
The amount of
ingredients in
the basket is
too big.
Put smaller batches of
ingredients in the basket.
Smaller batches are fried more
evenly. Do not exceed MAX
indication.
The set
temperature is
too low.
Set the temperature to the
required temperature setting.
The cooking
time is too
short.
Set the timer to the required
cooking time.
The
ingredients
are fried
unevenly in
the airfryer.
Certain types
of ingredients
need to be
shaken halfway
through the
cooking time.
Ingredients that lie on top of
or across each other (e.g. fries)
need to be shaken halfway
through the cooking time.
Fried foods
are not crispy
when they
come out of
the airfryer.
You used a
type of food to
be prepared
in a traditional
deep fryer.
Use food intended to be cooked
in an oven or lightly brush some
oil onto the food for a crispier
result.
I cannot slide
the pan into
the appliance
properly.
There are
too many
ingredients in
the basket.
Do not ll the basket beyond
the MAX indication.
The basket
is not placed
in the pan
correctly.
Make sure the pan and basket
are placed correctly.
White smoke
comes out of
the appliance.
You are
preparing fatty
ingredients.
When you fry greasy ingredients,
a large amount of oil or
rendered fat leaks into the
pan. The oil or fat causes white
smoke and the pan may heat
up more than usual. This does
not aect the appliance or the
end result. Midway through
the cooking process you can
carefully pour o any excess oil
or rendered fat from the pan
wearing oven-safe gloves then
continue cooking.
The pan still
contains greasy
residue from
previous use.
White smoke is caused by
greasy residue heating up in the
pan. Make sure you clean the
pan properly after each use.
Marinade,
liquid or meat
juices are
splattering in
the rendered
fat or grease.
Pat food dry before placing it in
the basket. Occasionally pour o
rendered fat or grease from the
pan during cooking.
Breading or
coating did
not adhere
properly to the
food.
White smoke can be caused by
tiny pieces of airborne breading.
Press breading or coating to
food to ensure it sticks.
Home-made
fries are fried
unevenly in
the airfryer.
You did not
soak the
potato sticks
properly before
you fried them.
Soak the potato sticks in a bowl
for at least 30 minutes, take
them out and dry them with
paper towel.
You did not
use the right
potato type.
Use fresh potatoes and be sure
they stay rm during frying.
Home-made
fries are not
crispy when
they come out
of the airfryer.
The crispiness
of the fries
depends on
the amount of
oil and water in
the fries.
Be sure you dry the potato
sticks properly before you add
the oil. Cut the potato sticks
smaller for a crispier result. Add
slightly more oil for a crispier
result.
The message
‘Er’ appears
on the display.
An error has
occurred.
In the U.S. or Canada only, call
1-866-309-8817 for assistance.
The time and
temperature
indications
change au-
tomatically,
even though
I do not press
any buttons.
There is
moisture on
the control
panel.
Make sure you dry the control
panel with a cloth after you have
cleaned it.
One Year Limited Warranty
Philips warrants that this product shall be free from defects
in material, workmanship and assembly, under normal use, in
accordance with the specications and warnings, for a period of
one year from the date of purchase. This warranty extends only
to the original purchaser of the product, and is not transferable.
To exercise your rights under this warranty, you must provide
proof of purchase in the form of an original sales receipt that
shows the product name and the date of purchase. For customer
support or to obtain warranty service, please visit our website
www.philips.com/support. THERE ARE NO OTHER EXPRESS OR
IMPLIED WARRANTIES. Philips’ liability is limited to repair or, at
its sole option, replacement of the product. Incidental, special
and consequential damages are disclaimed where permitted
by law. This warranty gives you specic legal rights. You may
also have other rights that vary from state to state, province to
province or country to country.
In U.S. only
Manufactured for:
Philips Personal Health
A division of Philips North America LLC
P.O. Box 10313, Stamford, CT 06904, United States of America
Canada only
Manufactured for:
Philips Electronics Ltd.
281 Hillmount Road
Markham, ON L6C 2S3
ENGLISH
IMPORTANT SAFEGUARDS
When using electrical appliances, basic safety precautions
should always be followed including the following:
1. Read all instructions.
2. Do not touch hot surfaces. Use handles or knobs (Fig. 2).
3. To protect against electrical shock do not immerse cord,
plugs or appliance in water or other liquid.
4. Close supervision is necessary when any appliance is
used by or near children or invalids. Children should be
supervised by a responsible person to ensure they do not
play with the appliance.
5. Unplug from outlet when not in use and before cleaning.
Allow to cool before putting on or taking o parts.
6. Do not operate any appliance with a damaged cord or plug
or after the appliance malfunctions or has been damaged
in any manner. For assistance in the U.S. and Canada only,
call 1-866-309-8817.
7. The use of accessory attachments not recommended by
the appliance manufacturer may cause injuries.
8. Do not block any ventilation openings. Install in accordance
with the manufacturer’s instructions.
9. Do not use outdoors.
10. Do not let cord hang over edge of table or counter, or touch
hot surfaces.
11. Do not place on or near a hot gas or electric burner, or in a
heated oven.
12. Extreme caution must be used when moving an appliance
containing hot oil or other hot liquids.
13. Plug the cord into the wall outlet. To disconnect, turn any
control to “o”, then remove plug from wall outlet.
14. Do not use appliance for other than intended use.
15. Use extreme caution when removing the pan, basket and
disposing hot grease.
16. Do not clean with metal scouring pads. Pieces can break o
the pad and touch electrical parts, creating a risk of electric
shock.
17. Use only on properly grounded outlet.
18. A short power-supply (or detachable power-supply cord)
should be used to reduce the risk resulting from becoming
entangled in or tripping over a longer cord.
19. Extension cords may be used if care is exercised in their
use. If an extension cord is used:
The marked electrical rating of the cord must be as great as
the rating of the appliance.
The cord should be arranged so that it will not drape over
the edge of the counter or table top where it could be
pulled by children or tripped over unintentionally.
If the appliance is of grounded type, the extension cord
should be a grounded-type 3-wire cord.
20. This appliance has a polarized plug (one blade is wider
than the other). To reduce the risk of electric shock, this
plug is intended to t into a polarized outlet only one way.
If the plug does not t fully into the outlet, reverse the plug.
If it still does not t, contact a qualied electrician. Do not
attempt to modify the plug in any way.
21. Oversize foods or metal utensils must not be inserted in the
appliance as they may create a risk of re or electric shock.
22. A re may occur if the appliance is covered or touching
ammable material, including curtains, draperies, walls, and
the like, when in operation. Do not store any item on top of
the appliance when in operation.
23. Do not place any of the following materials in the
appliance: paper, cardboard, plastic and the like.
24. Immediately unplug appliance if you see dark smoke
coming out of appliance. Wait for smoke emission to stop
before pulling pan out of appliance.
25. Use on a at, stable, heat-resistant surface away from water
or any heat source.
26. Do not leave appliance unattended while operating.
27. This appliance operates at high temperatures which may
cause burns. Do not touch hot surfaces, parts or inside of
appliance while operating (Fig. 2). Allow appliance to cool
down completely before handling or cleaning.
28. During hot air frying, hot steam is released through the hot
air outlet openings. Keep hands and face away from steam
and air outlet openings.
29. Avoid contacting moving parts.
30. This appliance works with hot air only; food is not fried in oil
or fat! Never ll fat or oil into the pan.
31. This product is for household use only.
32. Never use the airfryer without the pan and basket in place.
33. Make sure before each use of the device that the heater
and heater surrounding are clean and clear from any food
remainders in order to ensure a awless function.
34. Never use light ingredients or baking paper in the
appliance.
35. Never touch the inside of the appliance while it is operating.
36. Do not place the appliance on or near combustible
materials such as a tablecloth or curtain.
37. Do not let the appliance operate unattended.
38. Immediately unplug the appliance if you see dark smoke
coming out of the appliance. Wait for the smoke emission
to stop before you pull the pan out of the appliance.
SAVE THESE INSTRUCTIONS
Consuming raw or undercooked meats, poultry, seafood, shellsh
or egg may increase your risk of foodborne illness.
Make sure ingredients prepared in this appliance come out
golden-yellow instead of dark brown. Remove burnt remnants.
For best results, do not fry fresh potatoes at a temperature
above 360°F/180°C or beyond golden-yellow.
Introduction
Congratulations on your purchase and welcome to Philips! To
fully benet from the support that Philips oers, register your
product at www.philips.com/welcome.
Your new airfryer allows you to prepare your favorite ingredients
and snacks in a healthier way.
The airfryer uses hot air in combination with high-speed air
circulation (Rapid Air) and a top grill to prepare a variety of
tasty dishes in a healthy, fast and easy way. Your ingredients
are heated from all sides at once and there is no need to add
oil to most of the ingredients. For more inspiration, recipes and
information about the airfryer, visit www.philips.com/kitchen.
General description (Fig. 1)
1 Basket
2 MAX indication
3 Basket handle
4 Pan
5 Control panel
A - Power on/o button
B - START/PAUSE button
C – Preset button
D – Temperature increase and decrease buttons
E – Time/temperature indication
F – Timer increase and decrease buttons
6 Drawer
7 Hot air outlet openings
8 Air inlet
Automatic shut-off
This appliance is equipped with an automatic shut-o. If you do
not press a button within 30 minutes, the appliance switches o
automatically. To switch o the appliance manually, press the
power on/o button.
Before first use
1 Remove all packing material.
2 Open the drawer by pulling the handle (Fig. 3).
3 Remove the basket by lifting the handle (1). To remove the
pan, tilt it backward and lift it o the tracks (2) (Fig. 4).
4 Thoroughly clean the basket and pan with hot soapy water
and a non-abrasive sponge.
Note: You can also clean these parts in the dishwasher.
5 Wipe the inside and outside of the appliance with a moist
cloth.
6 Place the pan in the drawer (1) and put the basket in the pan
(2) (Fig. 5).
7 Slide the drawer back into the airfryer by the handle.
Note: The appliance may produce some smoke when you use
it for the rst time. This is normal.
Preparing for use
1 Place the appliance on a stable, horizontal and level surface.
Make sure the drawer can be opened completely.
Do not place the appliance on non-heat-resistant surface.
2 Pull the power cord out of the cord storage compartment at
the back of the appliance.
This airfryer works on hot air. Do not ll the pan with oil, frying
fat or any other liquid.
Do not put anything on top of the appliance or block air vents.
This disrupts the airow and aects the hot air frying result.
Using the appliance
Refer to Recipe Book for recipes, cooking temperatures and
times and tips.
Do not touch hot surfaces. Use handles or knobs. This
product is for household use only.
Preheating
1 Put the plug in a grounded wall outlet.
2 Press the power on/o button to switch on the
appliance (Fig. 6).
, The display shows the last selected temperature.
3 Set the preheating temperature by pressing the increase or
decrease buttons (Fig. 7).
Tip: Press and hold the increase or decrease button longer to
move the temperature forward or backward faster.
4 Press the START/PAUSE button (Fig. 8).
, The appliance starts preheating to the set temperature.
Note: If you do not want to preheat, but want to start frying
immediately, skip steps 3, 4 and 5 and follow the instructions in
section ‘Hot air frying’ in this chapter.
5 The set temperature ashes until the set temperature
has been reached. Then the appliance beeps and the set
temperature is displayed continuously. The appliance stops
beeping if you set the required cooking time (see step 6 in
section ‘Hot air frying’).
Note: You can also start the preheating process manually by
setting the temperature and then pressing the timer decrease
button until ‘- -‘ appears (Fig. 9).
Hot air frying
1 Put the power plug in a grounded wall outlet.
2 Open the drawer by pulling the handle (Fig. 3).
3 Put the ingredients in the basket (Fig. 10).
Note: Never ll the basket beyond the MAX indication. This
has a negative eect on the end result.
4 Slide the drawer back into the airfryer by the handle (Fig. 11).
Never use pan without basket in place. If by accident you heat
up the appliance without basket, use oven-safe gloves to open
the drawer. The edges and inside of the drawer become very
hot.
Caution: Do not touch pan or basket during and directly after
use as they get very hot! Only hold pan by basket handle.
5 Press the temperature increase or decrease button to set
the required cooking temperature.
6 Set the required cooking time by pressing the increase or
decrease buttons (Fig. 12).
Note: You can change the time or the temperature anytime
during the process.
Note: If you have not preheated the appliance, add 3 minutes
to the cooking time.
Note: If you do not set the required cooking time within 5
minutes, the appliance automatically shuts o for safety
reasons.
7 Press the START/PAUSE button to start the cooking process
(Fig. 13).
, The display starts counting down the set cooking time.
, Excess oil or rendered fat from the ingredients is collected
on the bottom of the pan.
8 Some ingredients require shaking midway through the
cooking process. To shake ingredients, open the drawer by
pulling the handle (Fig. 3). Remove the basket by lifting the
handle (1) (Fig. 4), then shake it. Replace the basket into the
pan and slide drawer back into airfryer.
Note: Depending on type of ingredients cooking, you may
want to carefully pour o any excess oil or rendered fat from
pan before replacing basket into pan. Place basket on a heat-
resistant surface. To remove the pan, use oven-safe gloves
to hold the pan or touch the drawer as they are very hot. Tilt
pan backward and lift it o the tracks (2) (Fig. 4).
9 When the appliance starts beeping, the set cooking time has
elapsed.
Note: You can also stop the cooking process manually. To do
this, press the START/PAUSE button (Fig.8).
10 Open the drawer by pulling the handle and check if the
ingredients are ready (Fig. 14).
If the ingredients are not ready yet, simply slide the drawer back
into the airfryer by the handle and add a few extra minutes to
the set time.
11 To remove small ingredients (e.g. fries), lift the basket out of
the pan by the handle (Fig. 15).
After the cooking process the pan, basket, and ingredients are
hot. Depending on the type of ingredients in the airfryer, steam
may escape from the pan.
Always remove basket with ingredients from pan to serve, as
hot oil or rendered fat may be in bottom of pan. Be careful,
steam may escape from pan.
12 Empty the basket into a bowl or onto a plate (Fig. 16).
Tip: To remove large or fragile ingredients, use a pair of tongs
to lift the ingredients out of the basket (Fig. 17).
13 When a batch of ingredients is ready, the airfryer is instantly
ready for preparing another batch.
Note: Repeat steps 1 to 9 if you want to prepare another
batch.
Note: If you prepare another batch within 30 minutes, it is not
necessary to preheat the appliance again.
14 Press the power on/o button to switch o the airfryer.
Preset button
You can program the appliance to prepare your favorite
ingredients at a specic temperature for a specic length of
time.
Note: the appliance can only retain one temperature and one
cooking time.
To set your favorite settings:
1 Press the power on/o button to switch on the appliance
(Fig. 6).
2 Press the preset button (star symbol) (Fig.18). The display
shows the current saved settings.
3 Press the temperature increase or decrease button to set
the desired temperature (Fig. 7).
4 Press the timer increase or decrease button to set the
desired time (Fig. 12).
5 Press the preset button (star symbol) (Fig. 18).
You hear a beep and the star symbol lights up continuously to
indicate that the settings have been saved.
From now on, the appliance retains your favorite settings. Just
press the preset button to recall the saved settings. Press the
START/PAUSE button to start the program.
Note: If you want to change the saved settings, simply perform
steps 1 to 5 again.
Cleaning
Clean appliance after every use. Remove oil from bottom of pan
after every use to prevent smoke.
Let basket, pan, and inside of appliance cool completely before
you start cleaning.
Pan and basket have a non-stick coating. Do not use metal
kitchen utensils or abrasive cleaning materials as this may
damage non-stick coating.
Be careful when cleaning the upper area of the cooking
chamber: Hot heating element, edge of Metal parts.
1 Unplug the appliance and let it cool down.
Note: Open the drawer to let the appliance cool down more
quickly.
2 Wipe the outside of the appliance with a moist cloth.
Note: Make sure no moisture remains behind on the control
panel. Dry the control panel with a cloth after you have
cleaned it.
3 Thoroughly clean basket and pan with hot, soapy water and
non-abrasive sponge or in dishwasher.
Tip: If residue sticks to basket or bottom of pan, ll pan with
hot soapy water. Put basket in pan and let soak for at least 10
ESPAÑOL
PRECAUCIONES
IMPORTANTES
Si utiliza un aparato eléctrico siempre debe tomar medidas de
seguridad básicas, tales como:
1. Lea todas las instrucciones.
2. No toque las supercies calientes. Utilice las asas o los
pomos (g. 2).
3. No sumerja el cable de alimentación, los conectores ni
el aparato en agua u otros líquidos para evitar descargas
eléctricas.
4. Se requiere una estricta supervisión cuando algún niño
o persona discapacitada utilice los aparatos, o cuando
se utilicen cerca de ellos. Una persona responsable debe
supervisar a niños para evitar que jueguen con este
aparato.
5. Desconecte el aparato del tomacorriente cuando no lo
utilice y antes de limpiarlo. Deje que se enfríe antes de
añadir o retirar piezas.
6. Nunca use ningún aparato si el cable de alimentación o el
conector están dañados, si funciona mal o si sufrió algún
tipo de daño.
7. Evite el uso de accesorios no recomendados por el
fabricante del aparato para prevenir lesiones.
8. No obstruya ningún oricio de ventilación. Para instalar,
siga las instrucciones de fábrica.
9. No utilice el dispositivo al aire libre.
10. No deje que el cable cuelgue del borde de la supercie
sobre la que se encuentra apoyado ni permita que toque
supercies calientes.
11. No coloque este tipo de aparatos sobre quemadores
eléctricos o que funcionen cerca de gas caliente. Tampoco
lo coloque dentro de hornos calientes.
12. Tome las medidas de precaución necesarias cuando mueva
un artefacto que contenga aceite caliente u otros líquidos
calientes.
13. Enchufe el conector al tomacorriente de pared. Para
desconectarlo, lleve los controles a la posición de apagado
y desconéctelo del tomacorriente.
14. Utilice el aparato solo para el uso previsto.
15. Tenga mucho cuidado al retirar la sartén, la cesta y al
eliminar la grasa caliente.
16. No limpie con esponjas metálicas. Pueden saltar pedazos
de la esponja y tocar partes eléctricas, lo que genera un
riesgo de electrocución.
17. Solo utilice este artefacto en un tomacorriente con una
apropiada conexión a tierra.
18. Se debe usar un cable de alimentación corto (o un cable
de alimentación desmontable) para reducir el riesgo de
enredarse o tropezarse con un cable largo.
19. Se pueden utilizar cables de extensión si se toman las
precauciones debidas. Si se utiliza un cable de extensión:
La clasicación eléctrica del cable debe ser igual a la
clasicación del artefacto.
El cable debe instalarse de tal manera que no cuelgue
del borde de la supercie de apyo, para así evitar caídas y
enredos.
Si el aparato posee toma de tierra, el cable de alimentación
deberá constar de 3 cables de los cuales uno debe ser de
tierra.
20. Este aparato cuenta con un conector polarizado (una
hoja es más ancha que la otra). Para reducir el riesgo de
descarga eléctrica, este conector está diseñado para
ajustarse a una salida polarizada de un solo modo. Si el
conector no se ajusta por completo a la salida, invierta el
conector. Si sigue sin encajar, póngase en contacto con un
electricista calicado. No intente modicar el conector de
ningún mod.
21. No deben colocarse alimentos de gran tamaño ni utensilios
de cocina metálicos en el aparato, ya que pueden generar
un incendio o una descarga eléctrica.
22. Puede ocurrir un incendio si el artefacto está cubierto o
en contacto con material inamable, esto incluye cortinas,
tapicería, paredes o similares, durante su funcionamiento.
No almacene objetos sobre el aparato durante su
funcionamiento.
23. No introduzca ninguno de los siguientes materiales en el
aparato: papel, cartón, plástico o similares.
24. Desenchufe el aparato inmediatamente si observa que
sale humo oscuro del aparato. Espere que se detenga la
emisión de humo antes de retirar la sartén del aparato.
25. Utilice el aparato sobre una supercie horizontal, plana y
estable lejos de cualquier fuente de agua o calor.
26. No deje el aparato sin supervisión mientras está en
funcionamiento.
27. Este aparato funciona a altas temperaturas que pueden
provocar quemaduras. No toque las supercies y las
piezas calientes, ni el interior del aparato mientras está en
funcionamiento (Fig. 2). Deje que el aparato se enfríe antes
de manipularlo o limpiarlo.
28. Mientras el aparato fríe con aire caliente, sale vapor
caliente por las aberturas de salida de aire. Mantenga las
manos y la cara a una distancia segura del vapor y de las
aberturas de salida de aire.
29. Evite el contacto entre partes movibles.
30. Este aparato solo funciona con aire caliente; la comida no
se fríe en aceite o grasa. Nunca llene la sartén con aceite o
grasa.
31. Este producto es solo para uso doméstico.
32. Nunca utilice la airfryer sin la sartén ni la cesta en su lugar.
33. Antes de cada uso del dispositivo, asegúrese de que el
calentador y los alrededores del mismo estén limpios y sin
restos de alimentos para garantizar una función impecable.
34. Nunca utilice ingredientes ligeros ni papel para hornear en
el artefacto.
35. Nunca toque el interior del aparato mientras está en
funcionamiento.
36. No coloque el aparato sobre materiales inamables ni
cerca de ellos (p. ej. manteles o cortinas).
37. Nunca deje el artefacto en funcionamiento sin vigilancia.
38. Desconecte inmediatamente el artefacto si ve que se
desprende humo negro de él. Espere a que se detenga la
emisión de humo antes de retirar el sartén del artefacto.
CONSERVE ESTAS
INSTRUCCIONES
El consumo de carnes, aves, pescados y mariscos o huevos
crudos o sin cocinar puede incrementar el riesgo de contraer
enfermedades transmitidas por los alimentos.
Asegúrese de que los ingredientes preparados en este aparato
tienen un color dorado o amarillo en lugar de color marrón
oscuro. Retire los restos quemados. Para obtener los mejores
resultados, no freír las patatas frescas una temperatura por
encima de 360°F/ 180°C o más allá de color amarillo dorado.
Introducción
Felicitaciones por su compra y bienvenido a Philips. Para
disfrutar de todos los benecios que le ofrece la asistencia de
Philips registre su producto en www.philips.com/welcome.
La nueva airfryer le permite preparar sus ingredientes y aperitivos
favoritos de una manera más sana.
La airfryer utiliza aire caliente combinado con circulación de aire
a alta velocidad (Rapid Air) y una parrilla superior para preparar
una variedad de platos sabrosos de una manera rápida, sana
y fácil. Los ingredientes se calientan por todos los lados de
una sola vez y no hay necesidad de añadir aceite a la mayoría
de los ingredientes. Para inspirarse más, consultar recetas e
información sobre la airfryer, visite www.philips.com/kitchen.
Información general (Fig. 1)
1 Cesta
2 Indicación de MÁX.
3 Asa de la cesta
4 Sartén
5 Panel de control
A - Botón de encendido/apagado
B - Botón INICIO/PAUSA
C – Botón de preselección
D – Botones de aumento y reducción de temperatura
E – Indicación de tiempo/temperatura
F – Botones de aumento y reducción del temporizador
6 Gaveta
7 Aberturas de salida de aire caliente
8 Entrada de aire
Apagado automático
Este aparato cuenta con un sistema de apagado automático.
Si no presiona unbotón en el transcurso de 30 minutos, el
aparato se apaga automáticamente. Para apagar el aparato
manualmente, presione el botón de encendido/apagado.
Antes del primer uso
1 Quite todo el material de embalaje.
2 Para abrir la gaveta tire del asa (Fig. 3).
3 Para retirar la cesta levante el asa (1). Para retirar la sartén,
inclínela hacia atrás y levántela de los carriles (2) (Fig. 4).
4 Limpie a fondo la cesta y la sartén con agua caliente con
detergente y una esponja no abrasiva.
Nota: También puede lavar estas piezas en el lavavajillas.
5 Limpie el interior y exterior del aparato con un paño
húmedo.
6 Coloque la sartén en la gaveta (1) y coloque la cesta en la
sartén (2) (Fig. 5).
7 Vuelva a colocar la gaveta en la airfryer tomándola por el
asa.
Nota: El aparato puede generar un poco de humo cuando se
usa por primera vez. Es normal.
Preparación inicial
1 Coloque el aparato sobre una supercie estable, horizontal
y plana. Asegúrese de que la gaveta pueda abrirse por
completo.
No coloque el aparato sobre supercies no resistentes al calor.
2 Saque el cable de alimentación del compartimento para
guardar el cable situado en la parte trasera del aparato.
Esta airfryer funciona con aire caliente. No llene la sartén con
aceite, grasa para freír ni ningún otro tipo de líquido.
No coloque nada encima del aparato ni bloquee las rejillas de
ventilación. Esto interrumpe el ujo de aire y afecta al resultado
de los alimentos fritos con aire caliente.
Uso del aparato
Revise el libro de recetas para consultar recetas, consejos, las
temperaturas y los tiempos de cocción.
No toque las supercies calientes. Utilice las asas o los
pomos (g. 2).
Precalentamiento
1 Enchufe el conector en un tomacorriente de pared con
conexión a tierra.
2 Pulse el botón de encendido/apagado para encender el
aparato (Fig. 6).
, En este visor se muestra la última temperatura seleccionada.
3 Ajuste la temperatura de precalentamiento con los botones
de echa arriba/abajo (Fig. 7).
Sugerencia: Mantenga presionado el botón de aumento y
reducción de la temperatura durante más tiempo para subir o
bajar la temperatura más rápidamente.
4 Presionar el botón INICIO/PAUSA (Fig. 8).
, El artefacto comenzará a precalentarse hasta alcanzar la
temperatura seleccionada.
Nota: Si desea comenzar a freír directamente sin precalentar
el aparato, omita los pasos 3, 4 y 5 y siga las instrucciones
descritas en la sección “Cómo freír con aire caliente” de este
capítulo.
5 Luego, el aparato emitirá un pitido y la temperatura
establecida se mostrará continuamente. El aparato deja
de emitir pitidos cuando congura el tiempo de cocción
requerido (consultar el paso 6 de la sección “Freír con aire
caliente”).
Nota: También puede comenzar el proceso de precalentado
manualmente al congurar la temperatura y luego presionar
el botón de reducción del temporizador hasta que se muestre
“- -” (Fig. 9).
Cómo freír con aire caliente
1 Conecte el artefacto a un enchufe de pared con conexión a
tierra.
2 Para abrir la gaveta tire del asa (Fig. 3).
3 Ponga los ingredientes en la cesta (Fig. 10).
Nota: Nunca llene la cesta por encima de la indicación MAX.
Esto tiene un impacto negativo en la calidad del resultado
nal.
4 Vuelva a colocar la gaveta en la airfryer tomándola por el
asa. (Fig. 11).
Nunca utilice la sartén si no está la cesta en su interior. Si por
accidente, calienta el aparato sin la cesta, utilice guantes para
horno para abrir la gaveta. Los bordes y el interior de la gaveta
alcanzan altas temperaturas.
Precaución: No toque la sartén ni la cesta durante su uso ni
inmediatamente después de haberlas utilizado porque se
calientan mucho. Sujete la cesta únicamente por el asa.
5 Presione el botón de aumento o reducción de la
temperatura para elegir la temperatura de cocción
requerida.
6 Seleccione el tiempo de cocción deseado con los botones
de echa arriba/abajo (Fig. 12).
Nota: Puede cambiar el tiempo o la temperatura en cualquier
momento durante el proceso.
Nota: Si no ha precalentado el aparato, agréguele 3 minutos
al tiempo de cocción.
Nota: si no establece el tiempo de cocción en el transcurso
de 5 minutos, el aparato se apaga automáticamente por
seguridad.
7 Presione el botón de INICIO/PAUSA para comenzar con el
proceso de cocción (Fig. 13).
, En la pantalla comenzará la cuenta regresiva a partir del
tiempo de cocción establecido.
, El exceso de aceite o la grasa derretida procedente de los
ingredientes se recoge en el fondo de la sartén.
8 Algunos ingredientes se tienen que sacudir a mitad del
proceso de cocción. Para sacudir los ingredientes, abra la
gaveta tirando del asa (Fig. 3). Retire la cesta levantándola
del asa (1) y luego sacúdala. Reemplace la cesta de la sartén
y deslice la gaveta hacia el interior de la airfryer.
Nota: Según el tipo de ingredientes que cocine, le
recomendamos que escurra con cuidado el aceite sobrante o
la grasa derretida de la sartén antes de reemplazar la cesta
de la sartén. Coloque la cesta en una supercie resistente
al calor. Para retirar la sartén, use guantes para horno
para tomar la sartén o tocar la gaveta, ya que estarán muy
calientes. Incline la sartén hacia atrás y levántela de los
carriles (2) (Fig. 4).
9 Cuando el aparato comience a emitir un pitido, signica que
ya ha transcurrido el tiempo de cocción.
Nota: También puede detener el proceso de cocción de forma
manual. Para ello, pulse el botón INICIO/PAUSA (Fig. 8).
10 Abra la gaveta tirando del asa y controle que los
ingredientes estén listos (Fig. 14).
Si los ingredientes aún no están listos, solo tiene que volver a
colocar la gaveta en la airfryer tomándola por el asa y agregar
unos minutos más al tiempo seleccionado.
11 Para retirar ingredientes pequeños (p. ej. papas fritas), retire
la cesta de la sartén tomándola por el asa (Fig. 15).
Después del proceso de cocción, la sartén, la cesta y los
ingredientes están calientes. Según el tipo de ingredientes que
haya en la airfryer, puede salir vapor de la sartén.
Siempre retire la cesta con los ingredientes de la sartén a la
hora de servirlos, ya que puede quedar aceite caliente o grasa
derretida en la sartén. Tenga cuidado de que no salga vapor de
la sartén.
12 Vacíe la cesta en un recipiente o en un plato (Fig. 16).
Sugerencia: En el caso de ingredientes grandes o delicados,
utilice unas pinzas para sacar los ingredientes de la cesta
(Fig. 17).
13 Cuando un lote de ingredientes está listo, la airfryer está
instantáneamente preparada para cocinar otro lote.
Nota: Repita los pasos 1 a 9 para preparar otra tanda.
Nota: Si prepara otro lote en los próximos 30 minutos, no es
necesario volver a precalentar el artefacto.
14 Pulse el botón de encendido/apagado para apagar la
airfryer (Fig. 2).
Botón de preselección
Puede programar el aparato para preparar sus alimentos
favoritos con temperaturas y tiempos especícos.
Nota: El aparato solo puede guardar una temperatura y un
tiempo de cocción.
Cómo seleccionar su conguración favorita:
1 Pulse el botón de encendido/apagado para encender el
aparato (Fig. 6).
2 Presione el botón de preselección (símbolo de estrella)
(Fig.18). El visor muestra la conguración guardada
actualmente.
3 Presione el botón de aumento o reducción de la
temperatura para elegir la temperatura deseada (Fig. 7).
4 Presione el botón de aumento o reducción del temporizador
para elegir el tiempo deseado (Fig. 12).
5 Presione el botón de preselección (símbolo de estrella)
(Fig. 18).
Se oirá un pitido y el símbolo de estrella se iluminará
continuamente para indicar que se ha guardado la
conguración.
A partir de ahora, el aparato guardará su conguración favorita.
Solo presione el botón de preselección para recuperar la
conguración guardada. Presione el botón INICIO/PAUSA para
iniciar el programa.
Nota: Si desea cambiar la conguración guardada,
simplemente repita los pasos 1 a 5.
Limpieza
Limpie el aparato después de cada uso. Elimine el aceite del
fondo del sartén después de cada uso para evitar la producción
de humo.
Permita que se enfríe por completo la canasta, la rejilla, la
sartén y el interior del aparato antes de que inicie la limpieza.
La sartén y la canasta tienen un recubrimiento antiadherente.
No use utensilios de cocina metálicos o materiales de limpieza
abrasivos para limpiarlos, pues puede dañar el recubrimiento
antiadherente.
Tenga cuidado cuando limpie el área superior de la cámara de
cocción: puede que el elemento térmico y los bordes de las
partes metálicas estén a una alta temperatura.
1 Desenchufe el artefacto y déjelo enfriar.
Nota: Abre el gaveta para que el aparato se enfríe más
rápido.
2 Limpie la parte exterior del aparato con un paño húmedo.
Nota: Asegúrese de que no quede humedad detrás del panel
de control. Seque el panel de control con un paño después de
limpiarlo.
3 Limpie a fondo la cesta, la bandeja y la sartén con agua
caliente con detergente y una esponja no abrasiva, o en un
lavavajillas.
Sugerencia: Si quedan residuos pegados en la cesta o el
fondo de la sartén, llénela con agua caliente con detergente.
Coloque la cesta en la sartén y déjela en remojo por lo menos
durante 10 minutos.
4 Limpie el interior del aparato con agua caliente y una
esponja no abrasiva.
5 De ser necesario, limpie el calentador con un cepillo de
limpieza para eliminar cualquier residuo de comidas.
Este aparato no contiene otras piezas que pueda reparar
el usuario. Si se encuentra en Canadá o en Estados Unidos,
comuníquese al 1-866-309-8817 para obtener asistencia.
Almacenamiento
1 Desenchufe el artefacto y déjelo enfriar.
2 Asegúrese de que todas las piezas están limpias y secas.
3 Introduzca el cable en el compartimento para guardar el
cable. Fije el cable insertándolo en la ranura de jación.
Eliminación
- Este producto ha sido diseñado y fabricado con materiales
y componentes de alta calidad que pueden reciclarse
y reutilizarse. Para obtener más información visite
www.recycle.philips.com.
Garantía y servicio
Si necesita información, asistencia o tiene un problema, visite el
sitio web de Philips en www.philips.com/support o llame al
- Colombia: 01-800-700-7445
- Costa Rica: 0800-507-7445
- República Dominicana: 1-800-751-2673
- Ecuador: 1-800-10-1045
- El Salvador: 800-6024
- Guatemala: 1-800-299-0007
- Honduras: 8002-791-9273
- Mexico: 01800504 6200
- Nicaragua: 1-800-507-0018
- Panama: 800-8300
para obtener ayuda.
PHILIPS y el Sello Philips son Trademarks registradas por
Koninklijke Philips N.V. © 2018 Philips Electronics North America
Corporation. Todos los derechos reservados.
Solución de problemas
Este capítulo resume los problemas más comunes que puede
afrontar con este aparato. Si aún con la información descrita no
puede resolver el problema, visite: www.philips.com/support
Problema Posible causa Solución
La airfryer no
funciona.
El aparato
no está
enchufado.
Conecte el artefacto a un
enchufe de pared con conexión
a tierra.
No se ha
pulsado el
botón de
encendido/
apagado.
Pulse el botón de encendido/
apagado para encender el
aparato.
Los
ingredientes
fritos con la
airfryer no
están hechos
del todo.
La cantidad de
ingredientes
que hay en
la cesta es
demasiado
grande.
Coloque lotes de ingredientes
más pequeños en la cesta. Los
lotes más pequeños se fríen de
forma más uniforme. No supere
la indicación de MÁX.
La temperatura
seleccionada
es demasiado
baja.
Ajuste la temperatura de
la posición de temperatura
deseada.
El tiempo de
cocción es muy
corto.
Congure el temporizador
según el tiempo de cocción
requerido.
Los
ingredientes
se fríen de
forma desigual
en la airfryer.
Ciertos tipos
de ingredientes
se deben
sacudir a mitad
del tiempo de
cocción.
Los ingredientes que están
mezclados o unos sobre otros
(por ejemplo, las patatas fritas)
se tienen que sacudir a mitad
del tiempo de preparación.
Los alimentos
fritos no están
crujientes
cuando salen
de la Airfryer.
Utilizó un tipo
de alimento
para preparar
en una freidora
tradicional.
Use alimentos que se cocinen
en un horno o aplíqueles un
poco de aceite con un pincel
para obtener un resultado más
crujiente.
No puedo
introducir la
sartén en el
aparato cor-
rectamente.
Hay
demasiados
ingredientes en
la cesta.
No llene la cesta por encima de
la indicación MAX.
La cesta no
está colocada
en la sartén
correctamente.
Asegúrese de que el pan y la
cesta se colocan correctamente.
Presione la cesta en la sartén
hasta que oiga un clic.
CONFORMS ANSI/UL STD 1026
CERTIFIED TO CAN/CSA C22.2 NO.60335-1
PHILIPS and Philips Shield are Registered Trademarks of
Koninklijke Philips N.V.
©2018 Philips North America LLC. All Rights Reserved.

10. Ne laissez pas le cordon d’alimentation dépasser du bord
de la table ou du comptoir sur lequel l’appareil est posé, ni
entrer en contact avec des surfaces chaudes.
11. Ne placez pas l’appareil sur ou à proximité d’un brûleur à
gaz ou électrique, ni sur un four chaud.
12. Faites preuve d’extrême prudence lorsque vous déplacez
un appareil contenant de l’huile chaude ou d’autres liquides
chauds.
13. Branchez le cordon d’alimentation sur une prise murale.
Pour le débrancher, réglez tous les boutons sur la position
d’arrêt, puis retirez la che de la prise.
14. Utilisez l’appareil uniquement aux ns auxquelles elle est
destinée.
15. Faites extrêmement attention quand vous sortez la cuve et
le panier et jetez la graisse chaude.
16. Ne vous servez pas de tampons à récurer métalliques pour
le nettoyage, car vous risqueriez de briser des pièces et de
créer des risques de choc électrique si vous endommagez
les composants.
17. Branchez cet appareil uniquement sur une prise
correctement mise à la terre.
18. Le cordon d’alimentation à utiliser doit être court (ou
amovible) pour éviter qu’il ne s’emmêle ou qu’il ne puisse
être accroché involontairement.
19. Vous pouvez toutefois utilisez des rallonges en redoublant
de vigilance. Si vous souhaitez utiliser une rallonge vériez
les points suivants :
Les caractéristiques électriques du cordon d’alimentation
doivent être aussi élevées que celles de l’appareil.
La rallonge doit être disposée de façon à ne pas reposer au
bord d’une table ou d’un comptoir car un enfant pourrait
alors facilement l’attraper ou quelqu’un pourrait se prendre
les pieds dedans.
Si l’appareil est un modèle avec une prise de terre, la
rallonge doit être à trois conducteurs avec neutre.
20. Cet appareil possède une che polarisée (une lame
est plus grosse que l’autre). An de réduire les risques
d’électrocution, cette che ne peut être insérée que
d’une seule façon dans une prise polarisée. Si la che ne
s’adapte pas parfaitement à la prise, essayez dans l’autre
sens. S’il est impossible d’insérer la che correctement,
communiquez avec un électricien. Ne tentez en aucun cas
de la modier par vous-même.
21. Ne mettez pas d’aliments trop gros ni d’ustensiles en métal
dans l’appareil; ils pourraient causer un incendie ou un choc
électrique.
22. Un incendie pourrait se déclarer si l’appareil est en contact
avec des matériaux inammables tels que des rideaux,
des tentures ou un mur pendant qu’il fonctionne. Ne posez
aucun objet sur l’appareil en cours d’utilisation.
23. Ne mettez aucun objet en papier, en carton, en plastique
ou matière similaire dans l’appareil.
24. Débranchez immédiatement l’appareil si vous voyez de
la fumée foncée s’en échapper. Attendez que la fumée se
dissipe avant de sortir la cuve de l’appareil.
25. Utilisez l’appareil sur une surface plane, stable et résistante
à la chaleur, loin de toute source d’eau ou de chaleur.
26. Ne laissez pas l’appareil sans surveillance pendant qu’il
fonctionne.
27. Cet appareil fonctionne à des températures élevées
qui pourraient causer des brûlures. Ne touchez pas à
des surfaces ou à des pièces chaudes ni à l’intérieur de
l’appareil pendant qu’il fonctionne (Fig. 2). Laissez l’appareil
refroidir complètement avant de le manipuler ou de le
nettoyer.
28. Durant le processus de friture à air chaud, de la vapeur
chaude s’échappera des sorties d’air chaud. Tenez les mains
et le visage loin de la vapeur et des sorties d’air chaud.
29. Évitez tout contact avec les pièces mobiles.
30. Cet appareil fonctionne seulement à l’air chaud; la
nourriture n’est pas frite dans l’huile ou la graisse! Ne versez
jamais de graisse ni d’huile dans la cuve.
31. Ce produit est réservé à un usage domestique seulement.
32. N’utilisez jamais la friteuse sans la cuve ni le panier.
33. Avant chaque utilisation de l’appareil, assurez-vous que
l’élément chauant et son environnement sont propres
et exempts de tout résidu de nourriture an d’assurer un
fonctionnement parfait.
34. Ne jamais mettre d’ingrédients légers ou de papier
parchemin dans l’appareil.
35. Ne touchez jamais l’intérieur de l’appareil pendant qu’il
fonctionne.
36. Ne placez jamais l’appareil sur ou à proximité de matériaux
combustibles, comme une nappe ou des rideaux.
37. Ne laissez jamais l’appareil fonctionner sans surveillance.
38. Débranchez immédiatement l’appareil si vous apercevez de
la fumée foncée en sortir. Attendez que l’émission de fumée
cesse avant de retirer la cuve de l’appareil.
CONSERVEZ CES
CONSIGNES
La consommation de viande, de volaille, de poissons, de fruits
de mer, de crustacés ou d’œufs crus ou pas assez cuits peut
augmenter le risque de maladies d’origine alimentaire.
Assurez-vous que les ingrédients préparés dans l’appareil soient
jaune doré au lieu de brun foncé. Déposer restes brûlés. Pour de
meilleurs résultats, ne pas faire frire les pommes de terre à une
température au-dessus 360 °F/ 180 °C ou au-delà jaune doré.
Introduction
Félicitations pour votre achat et bienvenue dans l’univers Philips!
Pour proter pleinement du soutien de Philips, enregistrez votre
produit sur le site : www.philips.com/welcome.
Votre nouvelle friteuse Airfryer vous permet de préparer vos plats
et encas préférés de façon plus saine.
La friteuse Airfryer utilise de l’air chaud qui circule rapidement
grâce à la technologie Rapid Air et est équipée d’une grille
supérieure pour préparer une foule de plats savoureux
d’une manière saine, rapide et facile. Les aliments sont cuits
uniformément en une seule fois et il n’est pas nécessaire
d’ajouter de l’huile pour cuire la plupart d’entre eux.
Pour obtenir de l’inspiration, d’autres recettes et de
l’information sur la friteuse à air chaud, visitez le site
www.philips.com/kitchen.
Description générale (Fig. 1)
1 Panier
2 Ligne de remplissage (MAX)
3 Poignée du panier
4 Cuve
5 Panneau de commande
A – Interrupteur d’alimentation
B – Bouton START/PAUSE
C – Bouton de préréglage
D – Boutons de réglage de la température
E – Achage du temps et de la température
F – Boutons de réglage de la minuterie
6 Tiroir
7 Sorties d’air chaud
8 Entrée d’air
Arrêt automatique
Cet appareil est équipé d’une fonction d’arrêt automatique.
Si vous n’appuyez sur aucun bouton pendant 30 minutes,
l’appareil s’éteindra automatiquement. Pour éteindre l’appareil
manuellement, appuyez sur l’interrupteur d’alimentation.
Avant la première utilisation
1 Retirez l’appareil de l’emballage.
2 Pour ouvrir le tiroir, tirez sur la poignée (g. 3).
4 Pour sortir le panier, levez la poignée (1). Pour sortir la cuve,
faites-la basculer vers l’arrière, puis soulevez-la pour la
dégager des rails (2) (g. 4).
5 Nettoyez à fond le panier et la cuve avec de l’eau chaude et
une éponge non abrasive.
Remarque : Vous pouvez également nettoyer ces pièces au
lave-vaisselle.
6 Essuyez l’extérieur et l’intérieur de l’appareil à l’aide d’un
chion humide.
7 Placez la cuve dans le tiroir (1) et mettez le panier dans la
cuve (2) (g. 5).
8 En tenant la poignée, faites glisser le tiroir à l’intérieur de la
friteuse à air chaud.
Remarque : Il est possible que l’appareil dégage de la fumée
la première fois que vous l’utiliserez. C’est normal.
Problema Posible causa Solución
Sale humo
blanco del
aparato.
Está
preparando
ingredientes
grasientos.
Cuando fríe ingredientes
grasientos en la Airfryer, se
gotea al sartén una gran
cantidad de aceite o grasa
derretida. El aceite o grasa
producen humo blanco y
es posible que la sartén se
caliente más de lo normal.
Esto no afecta al aparato o
el resultado nal. A mitad del
proceso de cocción puede
escurrir con cuidado el aceite
sobrante o la grasa derretida
de la sartén con guantes
para horno, y continuar con la
cocción.
La sartén
todavía
contiene restos
de grasa del
uso anterior.
El humo blanco lo provoca
la grasa que se calienta en la
sartén. Asegúrese de limpiar la
sartén correctamente después
de cada uso.
Los jugos,
líquidos o
adobo de la
carne salpican
en la grasa
derretida.
Seque los alimentos con
cuidado antes de colocarlos
en la cesta. Cada tanto escurra
la grasa derretida de la sartén
durante el proceso de cocción.
El rebozado o
recubrimiento
no se
adhirieron
correctamente
a los alimentos.
El humo blanco lo provocan
las pequeñas partículas de
rebozado que vuelan. Apriete el
rebozado o recubrimiento para
asegurarse de que se adhiera a
los alimentos.
Las patatas
fritas hechas
en casa se
fríen de forma
desigual en la
Airfryer.
No ha dejado
en remojo las
tiras de patata
correctamente
antes de
freírlas.
Deje las tiras de patata en
remojo en un recipiente
durante al menos 30 minutos y
después séquelas con papel de
cocina.
No ha utilizado
el tipo correcto
de patata.
Utilice patatas frescas y
asegúrese de que no se
rompen mientras se fríen.
Las papas
fritas caseras
no están
crujientes
cuando salen
de la Airfryer.
La textura
crujiente de las
patatas fritas
depende de
la cantidad de
aceite y agua
de las patatas.
Asegúrese de secar las tiras de
patata correctamente antes
que añadir el aceite.
Haga las tiras de patata más
pequeñas para obtener un
resultado más crujiente.
Añada un poco más aceite
para obtener un resultado más
crujiente.
Aparece en
la pantalla el
mensaje “Er”.
Se ha
producido un
error.
Si se encuentra en Canadá o los
Estados Unidos, comuníquese
al 1-866-309-8817 para obtener
asistencia.
Las
indicaciones
del tiempo y la
temperatura
cambian
de forma
automática,
aunque yo no
toque ningún
botón.
Hay humedad
en el panel de
control.
Seque el panel de control con
un paño después de limpiarlo.
Garantía limitada a un año
Philips garantiza que este producto esté libre de defectos en el
material, fabricación y ensamblado, en condiciones normales
de uso, de acuerdo con las especif caciones y las advertencias,
por un periodo de un año a partir de la fecha de compra.
Esta garantía solo se extiende para el comprador original del
producto y no es transferible. Para ejercer sus derechos en esta
garantía, debe proporcionar el comprobante que corresponda
al recibo original de la compra, el cual muestra el nombre del
producto y la fecha de la compra. Para servicio al cliente u
obtener un servicio de garantía, visite nuestro sitio web www.
philips.com/support . NO HAY OTRAS GARANTÍAS EXPRESAS
O IMPLÍCITAS. La responsabilidad de Philips se limita a reparar
o, a su entero criterio, remplazar el producto. Se deslinda de los
daños accidentales, especiales o resultantes, donde la ley lo
permita. Esta garantía le otorga derechos legales específ cos.
También tiene otros derechos que varían según el estado, la
provincia o el país.
Sólo en los Estados Unidos
fabricado por:
Philips Personal Health
Una división de Philips North America LLC
P.O. Casilla 10313, Stamford, CT 06904
Sólo en Canadá
fabricado para:
Philips Electronics Ltd
281 Hillmount Road
Markham, ON L6C2S3
Fabricado por:
- Colombia: 01-800-700-7445
- Costa Rica: 0800-507-7445
- República Dominicana: 1-800-751-2673
- Ecuador: 1-800-10-1045
- El Salvador: 800-6024
- Guatemala: 1-800-299-0007
- Honduras: 8002-791-9273
- Mexico: 01800504 6200
- Nicaragua: 1-800-507-0018
- Panama: 800-8300
CONFORMS ANSI/UL STD 1026
CERTIFIED TO CAN/CSA C22.2 NO.60335-1
PHILIPS y el Sello Philips son Trademarks registradas por
Koninklijke Philips N.V.
© 2018 Philips North America LLC. Todos los Derechos
Reservados.
FRANÇAIS (CANADA)
MISES EN GARDE
IMPORTANTES
Quand vous utilisez un produit électrique, suivez toujours les
mesures de sécurité fondamentales, notamment ce qui suit :
1. Lisez toutes les instructions.
2. Ne touchez pas aux surfaces chaudes. Utilisez les poignées
ou les boutons (g. 2).
3. Pour prévenir les risques de chocs électriques, ne plongez
pas le cordon, les prises, ni l’appareil dans l’eau, ni dans
aucun autre liquide.
4. Une surveillance attentive est nécessaire lorsque l’appareil
est utilisé par des enfants ou des personnes handicapées,
ou à proximité. Une personne responsable devrait surveiller
les enfants pour s’assurer qu’ils ne jouent pas avec
l’appareil.
5. Assurez-vous de toujours débrancher l’appareil lorsque
vous ne l’utilisez pas et avant de le nettoyer. Laissez-le
refroidir avant d’y mettre des objets ou d’en retirer.
6. Cessez d’utiliser l’appareil si son cordon d’alimentation
ou toute autre partie venait à être endommagé ou si vous
veniez à constater un dysfonctionnement quel qu’il soit.
Pour obtenir de l’aide, rendez-vous sur le site www.philips.
com/support ou aux États-Unis et au Canada seulement,
composez le 1-866-309-8817.
7. N’utilisez aucun accessoire non recommandé par le
fabricant de l’appareil sous peine de risquer des blessures.
8. N’obstruez aucune prise de ventilation. Installez l’appareil
en conformité avec les instructions du fabricant.
9. N’utilisez pas cet appareil à l’extérieur.
Avant l’utilisation
1 Posez l’appareil sur une surface horizontale, plane et stable.
Assurez-vous de pouvoir ouvrir le tiroir au complet.
Ne posez pas l’appareil sur une surface qui ne résiste pas à la
chaleur.
2 Tirez sur le cordon pour le sortir de son compartiment à
l’arrière de l’appareil.
Cette friteuse fonctionne avec de l’air chaud. Ne remplissez pas
la cuve d’huile, de graisse à friture ou de tout autre liquide.
Ne posez aucun objet sur le dessus de l’appareil an de ne pas
bloquer les prises et les sorties d’air. Cela dérange la circulation
d’air et aecte les résultats de friture à air chaud.
Utilisation de l’appareil
Consultez le livret de recettes pour découvrir diérentes recettes,
les températures et les temps de cuisson et des conseils.
Ne touchez pas aux surfaces chaudes. Utilisez les
poignées ou les boutons (g. 2).
Préchauage
1 Branchez la che sur une prise murale mise à la terre.
2 Appuyez sur l’interrupteur marche/arrêt de l’appareil (Fig. 6).
, L’écran ache la dernière température sélectionnée.
3 Réglez la température de préchauage en appuyant sur les
èches du haut ou du bas (Fig. 7).
Conseil : Maintenez le bouton de réglage de la température
enfoncé plus longtemps pour augmenter ou diminuer la
température plus rapidement.
4 Appuyez sur le bouton START/PAUSE (g. 8).
, L’appareil commence à se réchauer à la température
voulue.
Remarque : lorsque vous ne désirez pas préchauer l’appareil
et commencer à frire immédiatement, sautez les étapes 3,
4 et 5 et suivez les instructions «Friture à air chaud» de ce
chapitre.
5 L’appareil émettra un bip et la température réglée sera
achée en continu. L’appareil arrêtera d’émettre des bips
quand vous réglerez la minuterie (voir l’étape 6 de la section
« Friture à air chaud »).
Remarque : Vous pouvez également préchauer
manuellement l’appareil en réglant la température, puis
en appuyant sur le bouton de soustraction de temps de la
minuterie jusqu’à ce que « - - » s’ache (g. 9).
Friture à l’air chaud
1 Branchez la che d’alimentation sur une prise murale mise à
la terre.
2 Pour ouvrir le tiroir, tirez sur la poignée (g. 3).
3 Mettez les aliments dans le panier (Fig. 10).
Remarque : ne jamais remplir au-delà de l’indication MAX.
Cela peut avoir des eets négatifs sur les résultats.
4 En tenant la poignée, faites glisser le tiroir à l’intérieur de la
friteuse à air chaud (g. 11).
N’utilisez jamais la cuve sans le panier. Si, par mégarde,
vous préchauez l’appareil sans le panier, utilisez des gants
résistants à la chaleur pour ouvrir le tiroir. Les bords et l’intérieur
du tiroir seront très chauds.
Avertissement : Ne touchez pas à la cuve ni au panier durant
ou directement après l’utilisation, car ils seront très chauds!
N’utilisez que la poignée du panier pour tenir la cuve.
5 Appuyez sur les boutons de réglage de la température pour
déterminer la température de cuisson voulue.
6 Réglez le temps de cuisson requis en appuyant sur les
èches du haut ou du bas (Fig. 12).
Remarque : vous pouvez changer le temps ou la température
n’importe quand durant le processus.
Remarque : si vous n’avez pas réchaué l’appareil, ajoutez 3
minutes au temps de cuisson.
Remarque : Si vous ne réglez pas la minuterie en moins de 5
minutes, l’appareil s’éteindra automatiquement par mesure
de sécurité.
7 Appuyez sur le bouton de démarrage/pause pour
commencer le processus de cuisson (Fig. 13).
, La minuterie s’ache à l’écran et démarre.
, L’huile en trop ou la graisse des ingrédients sont recueillies
au fond de la cuve.
8 Certains aliments doivent être secoués au milieu de la
cuisson. Pour secouer les aliments, ouvrez le tiroir en tirant
sur la poignée (g. 3). Sortez le panier en levant la poignée
(1), puis secouez-le. Remettez le panier dans la cuve, puis
faites glisser le tiroir dans la friteuse à air chaud.
Remarque : Selon le type d’aliments en cuisson, il pourrait
être nécessaire de vider soigneusement toute huile ou graisse
écoulée en trop dans la cuve avant d’y replacer le panier.
Placez le panier sur une surface résistante à la chaleur. Au
moment de sortir la cuve, utilisez des gants résistants à
la chaleur pour tenir la cuve ou toucher le tiroir, puisqu’ils
seront très chauds. Faites basculer la cuve vers l’arrière, puis
soulevez-la pour la dégager des rails (2) (g. 4).
9 Quand l’appareil émet un bip, le temps de cuisson est
écoulé.
Remarque : Vous pouvez également mettre n à la cuisson
manuellement. Pour ce faire, appuyez sur le bouton START/
PAUSE (g. 8).
10 Tirez sur la poignée pour ouvrir le tiroir et vérier si les
aliments sont prêts (g. 14).
Si les aliments ne sont pas encore prêts, retournez simplement
le tiroir dans la friteuse à air chaud en poussant sur la poignée et
ajoutez quelques minutes de cuisson.
11 Pour sortir de petits aliments (p. ex. des frites), sortez le
panier de la cuve en levant la poignée (g. 15).
Après la cuisson, la cuve, le panier, et les aliments sont chauds.
Selon le type d’aliments dans la friteuse à air, de la vapeur peut
s’échapper de la cuve.
Toujours retirer le panier avec les aliments de la cuve pour le
servir, car de l’huile chaude ou de la graisse de cuisson des
aliments peut se ramasser dans le fond. Faites attention, de la
vapeur peut s’échapper de la cuve.
12 Videz le panier dans un bol ou sur une assiette (Fig. 16).
Conseil : pour retirer des aliments de bonne taille ou fragiles,
utilisez des pinces pour les sortir du panier (Fig. 17).
13 Quand une quantité d’aliments est prête, la friteuse à air
chaud est prête instantanément pour préparer une autre
quantité.
Remarque : Pour préparer une autre quantité d’aliments,
répétez les étapes 1 à 9.
Remarque : Si vous préparez une autre quantité d’aliments à
l’intérieur de 30 minutes, il n’est pas nécessaire de préchauer
l’appareil à nouveau.
14 Appuyez sur le bouton d’alimentation pour éteindre
l’appareil (Fig. 2).
Bouton de préréglage
Vous pouvez programmer l’appareil pour qu’il prépare vos
aliments préférés à une température précise pour une durée
déterminée.
Remarque : L’appareil ne peut garder en mémoire qu’une seule
température et un seul temps de cuisson.
Pour congurer votre réglage préféré :
1 Appuyez sur l’interrupteur d’alimentation de l’appareil
(g. 6).
2 Appuyez sur le bouton de préréglage (étoile) (g. 18). L’écran
achera les réglages mis en mémoire.
3 Appuyez sur les boutons de réglage de la température pour
déterminer la température voulue (g. 7).
4 Appuyez sur les boutons de réglage de la minuterie pour
régler la durée de cuisson voulue (g. 12).
5 Appuyez sur le bouton de préréglage (étoile) (g. 18).
Vous entendrez un bip et l’étoile sera allumée en continu pour
indiquer que les réglages ont été mis en mémoire. À partir
de maintenant, l’appareil gardera vos réglages préférés en
mémoire.
Appuyez simplement sur le bouton de préréglage pour
utiliser les réglages mis en mémoire. Appuyez sur le bouton
START/PAUSE pour commencer la cuisson.
Remarque : Si vous voulez changer les réglages mis en
mémoire, refaites simplement les étapes 1 à 5.
Nettoyage
Nettoyez l’appareil après chaque utilisation. Retirez l’huile du
fond de la cuve après chaque utilisation pour éviter la formation
de fumée.
Laissez le panier, la cuve, et l’intérieur de l’appareil refroidir
complètement avant de les nettoyer.
La cuve et le panier ont un revêtement antiadhésif. N’utilisez
pas d’ustensiles métalliques ou de produits abrasifs pour les
nettoyer an d’éviter d’endommager ce revêtement.
Soyez prudent(e) lorsque vous nettoyez la zone supérieure de la
chambre de cuisson, l’élément chauant ou le bord des pièces
métalliques.
1 Débranchez l’appareil et laissez-le refroidir.
Remarque : ouvrez le tiroir pour laisser l’appareil se refroidir
plus rapidement.
2 Essuyez l’extérieur de la machine avec un chion humide.
Remarque : assurez-vous de ne laisser aucune humidité
derrière le panneau de commande. Séchez le panneau de
commande avec un autre chion sec après l’avoir nettoyé.
3 Nettoyez soigneusement le panier, le support et la cuve avec
de l’eau savonneuse et une éponge non abrasive ou dans le
lave-vaisselle.
Conseil : si des résidus restent collés au panier ou dans le
fond de la cuve, remplissez cette dernière d’eau chaude
savonneuse. Placez le panier dans la cuve et laissez-le
tremper pendant au moins 10 minutes.
4 Nettoyez l’intérieur de l’appareil avec de l’eau chaude et une
éponge non abrasive.
5 Au besoin, nettoyez le dispositif de chauage avec une
brosse pour retirer les résidus de nourriture.
Cet appareil ne contient aucune pièce pouvant être réparée par
l’utilisateur. Pour obtenir de l’aide aux États-Unis ou au Canada,
téléphonez au 1 866 309-8817.
Entreposage
1 Débranchez l’appareil et laissez-le refroidir.
2 Assurez-vous que toutes les parties sont propres et sèches.
3 Rangez le cordon d’alimentation dans son compartiment et
insérez-le dans la fente.
Mise au rebut
- Votre produit a été conçu et fabriqué avec des matériaux et
des composants de grande qualité qui peuvent être recyclés
et réutilisés. Pour en savoir plus sur le recyclage, veuillez
communiquer avec les centres de gestion des déchets locaux
ou visiter le site www.recycle.philips.com.
Garantie et service
Si vous souhaitez obtenir des informations supplémentaires ou
faire réparer l’appareil, ou si vous rencontrez un problème, visitez
le site Web de Philips à l’adresse www.philips.com/support ou
aux États-Unis et au Canada seulement composez le 1-866-
309-8817 pour obtenir de l’aide
Dépannage
Ce chapitre présente les problèmes les plus courants pouvant
survenir avec votre appareil. Si vous ne parvenez pas à résoudre
le problème à l’aide des renseignements ci-dessous, visitez notre
site Web www.philips.com/support ou aux États-Unis et au
Canada seulement composez le 1-866-309-8817 pour obtenir
de l’aide.
Problème Cause possible Solution
La friteuse
Airfryer ne
fonctionne
pas.
L’appareil n’est
pas branché.
Branchez la che
d’alimentation sur une prise
murale mise à la terre.
Vous n’avez
pas appuyé
sur le bouton
marche/arrêt.
Appuyez sur le bouton
marche/arrêt pour mettre
l’appareil en marche.
Les aliments
frits avec
la friteuse
Airfryer ne
sont pas
assez cuits.
La quantité
d’aliments
dans le panier
est trop
grande.
Mettez moins d’aliments dans
le panier an qu’ils cuisent
de manière plus uniforme.
Ne dépassez pas la ligne de
remplissage (MAX).
La
température
sélectionnée
est trop basse.
Réglez la température à la
température requise.
Le temps de
cuisson est
insusant.
Réglez le temps de cuisson
requis sur la minuterie.
Les aliments
ne sont
pas frits de
manière
uniforme.
Il peut être
nécessaire de
mélanger la
préparation
à mi-cuisson
pour certains
types
d’aliments.
Pour une cuisson optimale de
certains aliments comme les
frites, vous devez les mélanger
à mi-cuisson.
Les aliments
frits ne
sont pas
croustillants
après avoir
été cuits
dans la
friteuse
Airfryer.
Vous avez
utilisé un type
d’ingrédient
devant être
cuit dans
une friteuse
traditionnelle.
Utilisez des aliments
permettant une cuisson au
four ou badigeonnez-les d’un
peu d’huile pour un résultat
plus croustillant.
Je n’arrive
pas à glisser
la cuve dans
l’appareil cor-
rectement.
Vous avez
mis trop
d’aliments
dans le panier.
Ne remplissez pas le panier
au-delà de l’indication MAX.
Le panier n’est
pas placé
correctement
dans la cuve.
Enfoncez le panier dans la
cuve jusqu’à ce que vous
entendiez un clic.
De la fumée
blanche
s’échappe de
l’appareil.
Vous faites
frire des
aliments gras.
Lorsque des aliments gras
sont cuits dans la friteuse
Airfryer, une grande quantité
d’huile (graisse fondue) coule
dans la cuve. L’huile produit
de la fumée blanche et la
cuve peut être plus chaude
que d’habitude. Ceci n’a
aucune conséquence sur le
fonctionnement de l’appareil
ou sur le résultat nal. Vers
le milieu de la cuisson, vous
pouvez vider soigneusement
toute huile ou graisse écoulée
en trop de la cuve en portant
des gants résistants à la
chaleur, puis poursuivre la
cuisson.
La cuve
contient des
résidus de
graisse de
l’utilisation
précédente.
La cuisson d’aliments gras
produit de la fumée blanche.
Assurez-vous de nettoyer
correctement la cuve après
chaque utilisation.
La marinade,
le liquide
ou les jus
dégouttent
dans l’huile
et la graisse
accumulées
au fond.
Sécher les aliments avant de
les placer dans le panier. Vous
pouvez vider la graisse et
l’huile accumulées à l’occasion
pendant la cuisson.
La chapelure
ou un enduit
ne colle pas
correctement
aux aliments.
De la fumée blanche peut
s’échapper à cause de petits
morceaux de chapelure dans
l’air. Appuyez sur la chapelure
ou l’enduit pour qu’ils collent
bien sur les aliments.
Problème Cause possible Solution
Les frites
maison
ne sont
pas cuites
uniformé-
ment dans
la friteuse
Airfryer.
Vous
n’avez pas
correctement
fait tremper
les pommes
de terre
coupées
avant de les
faire frire.
Faites tremper les bâtonnets
de pommes de terre dans
un bol rempli d’eau pendant
au moins 30 minutes, puis
séchez-les avec de l’essuie-
tout.
Vous n’avez
pas utilisé la
bonne variété
de pommes
de terre.
Utilisez des pommes de terre
à chair ferme.
Les frites
maison ne
sont pas
croustillantes
lorsqu’elles
sortent de
la friteuse
Airfryer.
Le croustillant
des frites
dépend de la
qualité d’huile
utilisée et de
l’humidité des
pommes de
terre.
Veillez à sécher correctement
les pommes de terre coupées
avant d’ajouter l’huile.
Coupez les pommes de terre
en plus petits morceaux pour
un résultat plus croustillant.
Ajoutez légèrement plus
d’huile pour un résultat plus
croustillant.
Le message
«Er» apparaît
à l’écran.
Une erreur est
survenue.
Pour les États-Unis et le
Canada uniquement, appelez
au 1-866-309-8817 pour
obtenir de l’aide.
Les
indications
de
température
et la
minuterie
changent
automati-
quement,
même si je
n’ai appuyé
sur aucun
bouton.
Présence
d’humidité sur
le panneau de
commande.
Assurez-vous de bien sécher
le panneau de commande
avec un chion après l’avoir
nettoyé.
Garantie limitée d’un an
Philips garantit que ce produit sera exempt de défauts
de matériaux, de main-d’œuvre et de fabrication, dans
des conditions normales d’utilisation, conformément aux
spécications et aux avertissements, pendant un an à compter
de la date d’achat. La présente garantie s’applique uniquement
à l’acheteur d’origine du produit et n’est pas cessible. Pour
exercer vos droits en vertu de la présente garantie, vous devez
fournir une preuve d’achat sous la forme d’un reçu de caisse
original sur lequel gurent le nom du produit et la date d’achat.
Pour communiquer avec le service à la clientèle ou faire appel
au service de garantie, visitez notre site www.philips.com/
support . IL N’EXISTE AUCUNE AUTRE GARANTIE EXPRESSE OU
IMPLICITE. La responsabilité de Philips se limite à la réparation
ou, à son entière discrétion, au remplacement du produit. Philips
décline toute responsabilité quant aux dommages accidentels,
spéciaux ou induits, lorsque la loi l’autorise. Cette garantie vous
donne des droits précis reconnus par la loi, auxquels peuvent
s’ajouter des droits qui varient selon l’État, la province, ou le
pays.
États-Unis seulement
fabriqué pour:
Philips Personal Health
Une division de Philips North America LLC
P.O. Box 10313, Stamford, CT 06904
Canada seulement
fabriqué pour:
Philips Électronique Ltée
281 Hillmount Road
Markham, ON L6C 2S3
CONFORMS ANSI/UL STD 1026
CERTIFIED TO CAN/CSA C22.2 NO.60335-1
PHILIPS et le blason Philips sont des marques de commerce
désposées de Koninklijke Philips N.V.
© 2018 Philips North America LLC. Tous droits réservés.
2 3
1
2
4
1
2
5
6
7 8 9
10 11 12 13
14 15 16 17
18
4
6
5
8
7
D FE
C AB
1
3
2
1
4203 064 61043 F
Specifications are subject to change without notice
Les caractéristiques sont susceptibles d'être modifiées sans préavis
© 2018 Koninklijke Philips N.V.
All rights reserved.
Tous droits réservés.
User manual
Manual del usuario
Guide d’utilisation
HD9240
HD9241
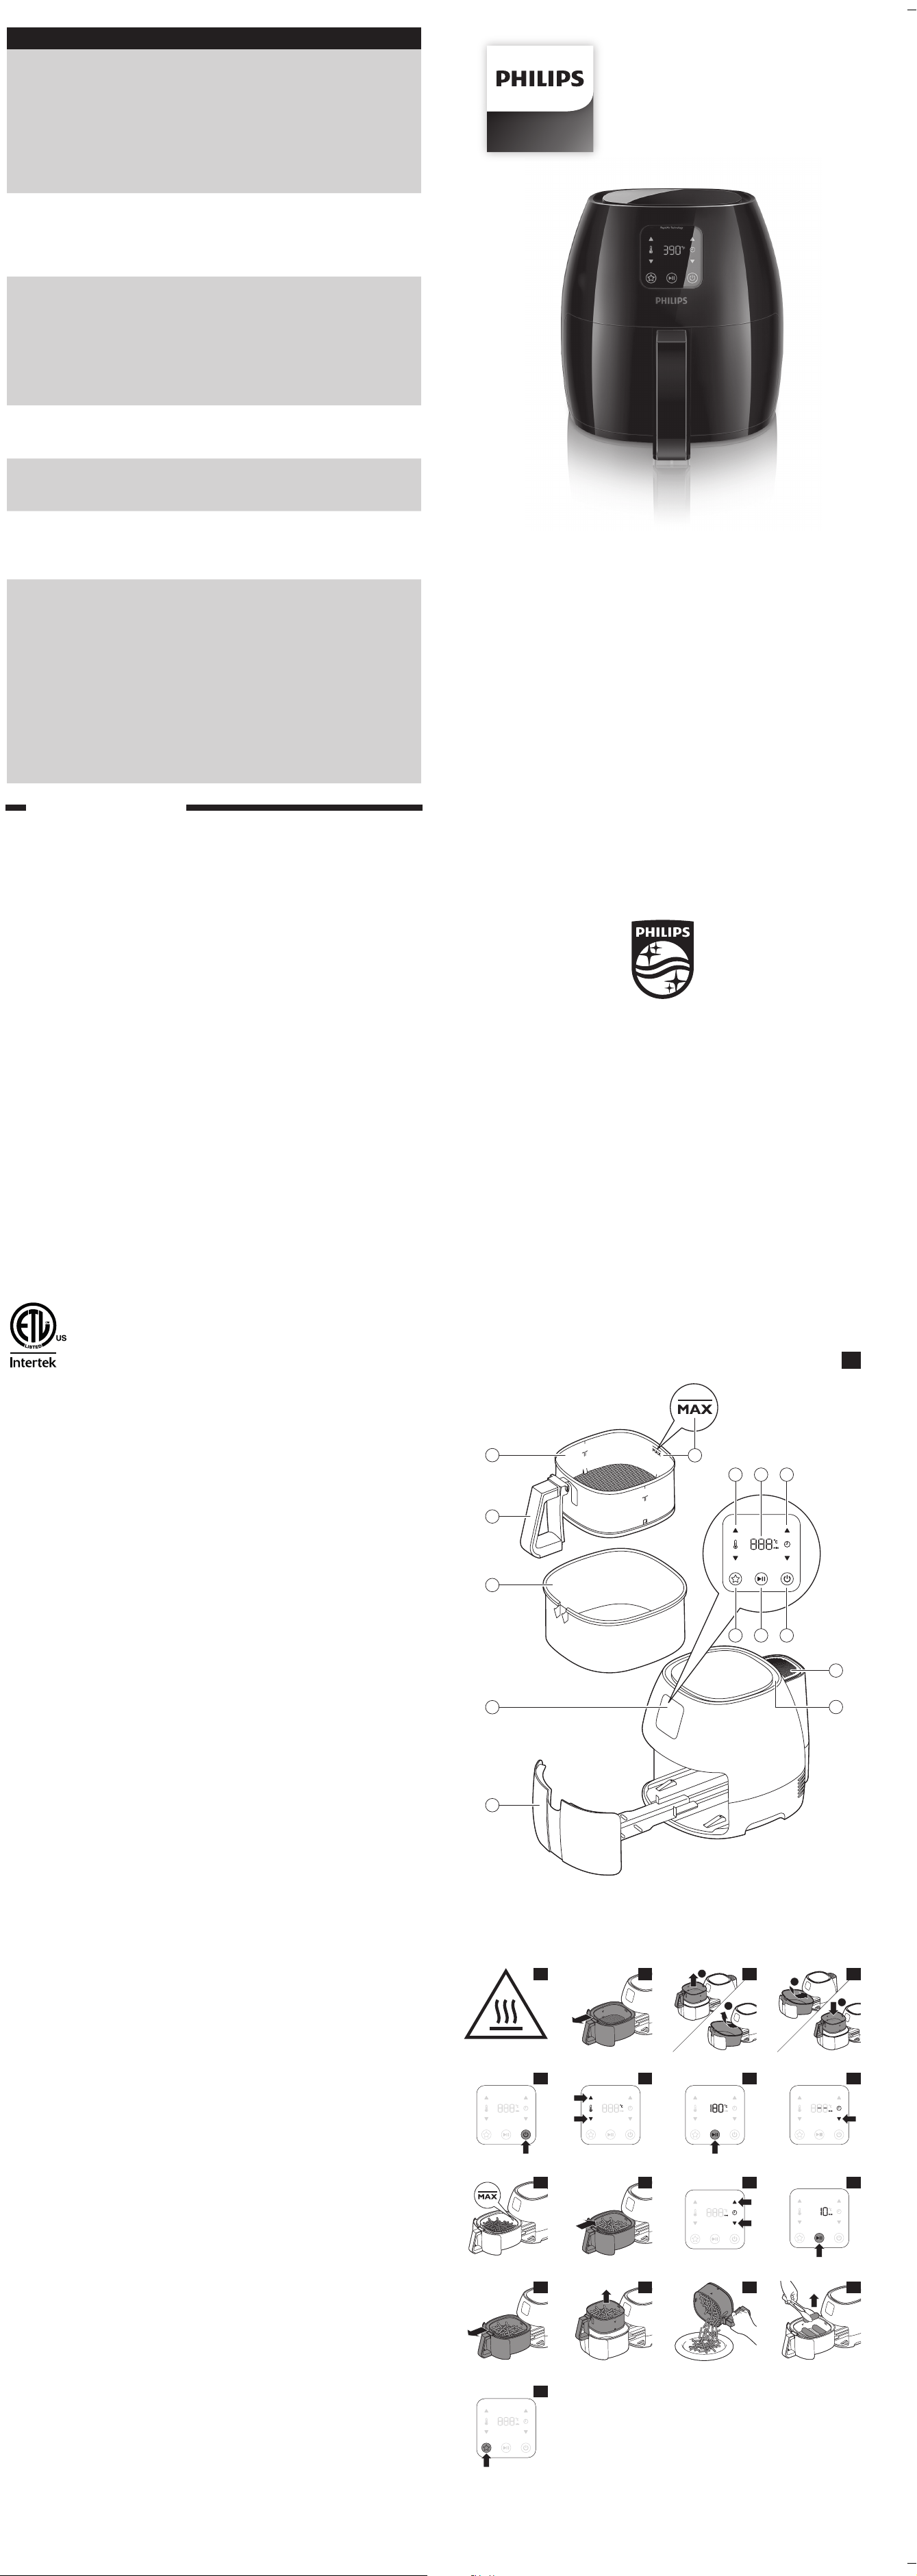