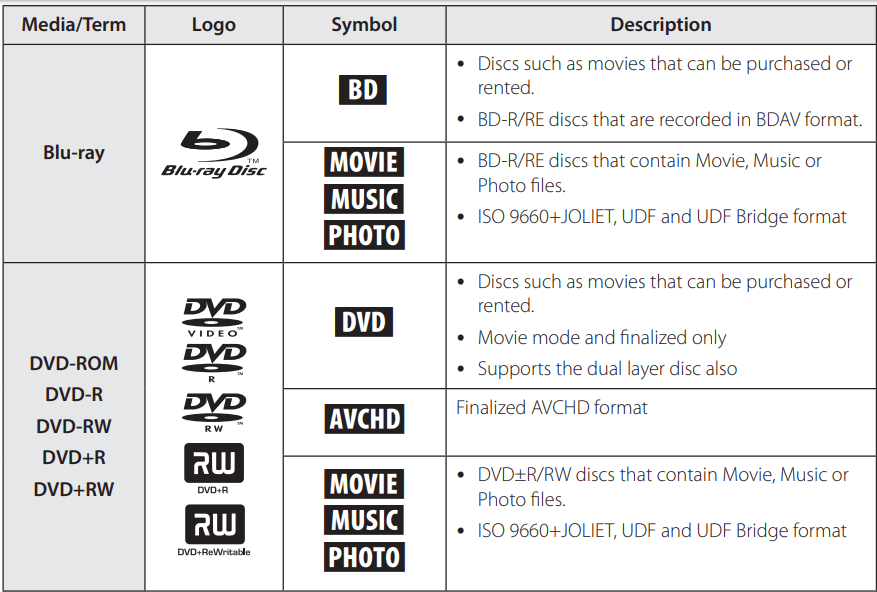
Depending on the conditions of the recording equipment or the CD-R/RW (or DVD±R/RW) disc itself, some CD-R/RW (or DVD±R/RW) discs cannot be played on the unit.
Depending on the recording software & the finalization, some recorded discs (CD-R/RW, DVD±R/RW, BD-R/RE) may not be playable. y BD-R/RE, DVD±R/RW and CD-R/RW discs recorded using a personal computer or a DVD or CD Recorder may not play if the disc is damaged or dirty, or if there is dirt or condensation on the player’s lens.
If you record a disc using a personal computer, even if it is recorded in a compatible format, there are cases in which it may not play because of the settings of the application software used to create the disc. (Check with the software publisher for more detailed information.)
This player requires discs and recordings to meet certain technical standards in order to achieve optimal playback quality. y Pre-recorded DVDs are automatically set to these standards. There are many different types of recordable disc formats (including CD-R containing MP3 or WMA files) and these require certain pre-existing conditions to ensure compatible playback.
Customers should note that permission is required in order to download MP3 / WMA files and music from the Internet. Our company has no right to grant such permission. Permission should always be sought from the copyright owner.
You have to set the disc format option to [Mastered] in order to make the discs compatible with the LG players when formatting rewritable discs. When setting the option to Live System, you cannot use it on LG player. (Mastered/Live File System : Disc format system for windows Vista)
About the “” Symbol Display
"" may appear on your TV display during operation and indicates that the function explained in this owner’s manual is not available on that specific media.
Regional Code
This unit has a regional code printed on the rear of the unit. This unit can play only BD-ROM or DVD discs labelled same as the rear of the unit or “ALL”.
LG AV Remote
You can control this player with your iPhone or Android phone via your home network. This player and your phone must be connected to your wireless network device such as access point. Visit “Apple iTunes” or “Google Android Market (Google Play Store)” for detailed information of “LG AV Remote”.
Remote Control
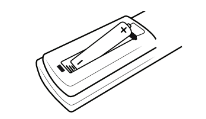
Battery Installation
Remove the battery cover on the rear of the Remote Control, and insert the R03 (size AAA) battery with and matched correctly.
(POWER): Switches the player ON or OFF.
(OPEN/CLOSE): Opens and closes the disc tray.
0 - 9 numerical buttons: Selects numbered options in a menu.
CAPTION: Turns on or off closed caption function.
REPEAT (): Repeats a desired section or sequence.
(SCAN): Searches backward or forward.
(SKIP): Goes to the next or previous chapter / track / file.
INFO/MENU (): Displays or exits On-Screen Display.
Direction buttons(): Selects an option in the menu.
ENTER (): Acknowledges menu selection.
BACK (): Exits the menu or returns to the previous screen.
DISC MENU: Accesses menu on a disc.
Colored (R, G, Y, B) buttons: Use to navigate BD-ROM menus. They are also used as shortcut buttons for specific menus.
TV Control Buttons: See page 48.
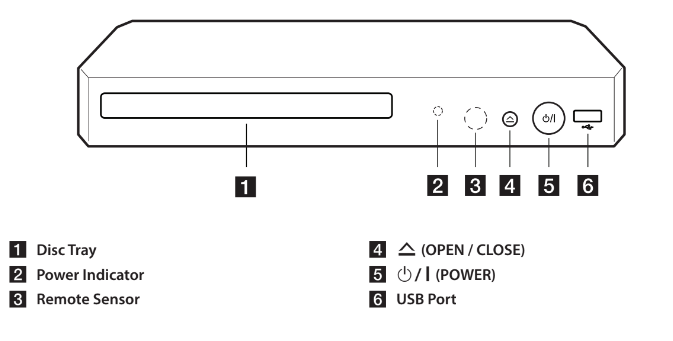
Front Panel
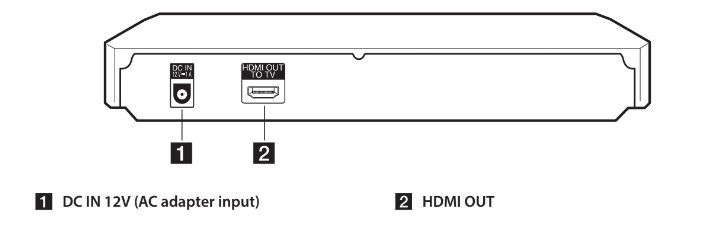
Rear Panel
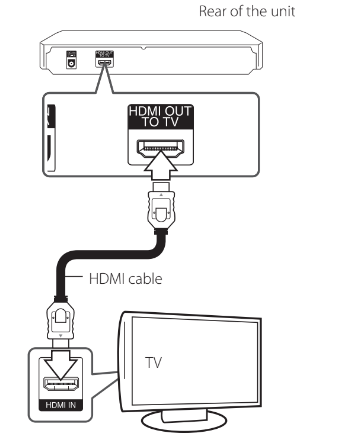
Connecting to Your TV
If you have a HDMI TV or monitor, you can connect it to this player using a HDMI cable (Type A, High Speed HDMITM Cable). Connect the HDMI jack on the player to the HDMI jack on a HDMI compatible TV or monitor.
Set the TV’s source to HDMI (Refer to TV’s Owner’s manual).
Note: Please refer to the manuals of your TV, Stereo System or other devices as necessary to make the best connections.
Additional Information for HDMI
When you connect a HDMI or DVI compatible device make sure of the following:
Try switching off the HDMI/DVI device and this player. Next, switch on the HDMI/DVI device and leave it for around 30 seconds, then switch on this player.
The connected device’s video input is set correctly for this unit.
The connected device is compatible with 720x480p, 1280x720p, 1920x1080i or 1920x1080p video input.
Not all HDCP-compatible HDMI or DVI devices will work with this player.
The picture will not be displayed properly with non-HDCP device.
Note:
If a connected HDMI device does not accept the audio output of the player, the HDMI device’s audio sound may be distorted or may not output.
When you use HDMI connection, you can change the resolution for the HDMI output.
Refer to “Resolution Setting” on page 14) y Select the type of video output from the HDMI OUT jack using [HDMI Color Setting] option on the [Settings] menu (see page
Changing the resolution when the connection has already been established may result in malfunctions. To solve the problem, turn off the player and then turn it on again.
When the HDMI connection with HDCP is not verified, TV screen is changed to black screen. In this case, check the HDMI connection, or disconnect the HDMI cable.
If there are noises or lines on the screen, please check the HDMI cable (length is generally limited to 4.5 m).
Connecting to an Amplifier
Since many factors affect the type of audio output, see “Audio Output Specifications” for details (page
About Digital Multi-channel sound
A digital multi-channel connection provides the best sound quality. For this, you need a multi- channel Audio/Video Receiver that supports one or more of the audio formats supported by your player. Check the logos on the front of the Audio/ Video receiver and the manual. (PCM Stereo, PCM Multi-Ch, Dolby Digital, Dolby Digital Plus, Dolby TrueHD, DTS and/or DTS-HD)
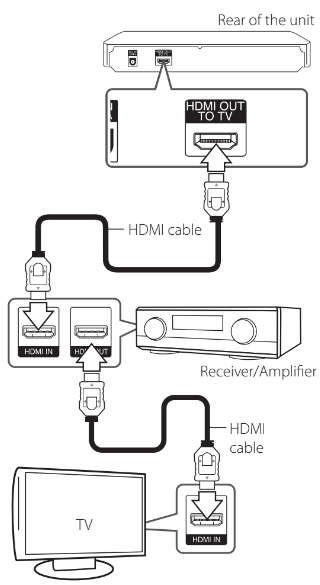
Connecting to an Amplifier via HDMI Output
Connect the player’s HDMI OUT jack to the corresponding in jack on your amplifier using a HDMI cable.
Connect the amplifier’s HDMI output jack to HDMI input jack on your TV using a HDMI cable if your amplifier has HDMI output jack. (Refer to amplifier’s owner’s manual.)
You will need to activate the player’s digital output. (See “[AUDIO] Menu” on page 24)
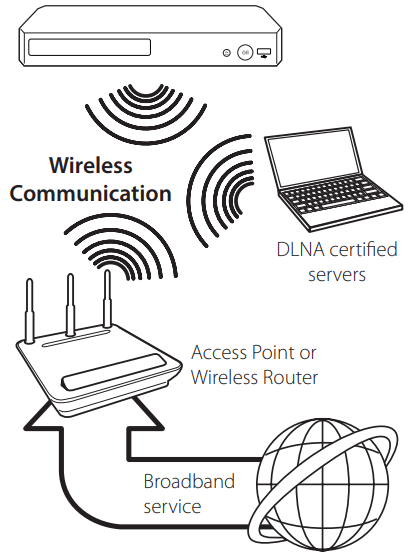
Connecting to your Home Network
This player can be connected to the internal wireless module.
By connecting the unit to a broadband home network, you have access to services such as software updates, BD-Live interactivity and online content services.
Wireless network connection
This connection is to use an Access Point or a wireless router. The network configuration and connection method may vary depending on the equipment in use and the network environment.
Refer to the setup instructions supplied with your access point or wireless router for detailed connection steps and network settings.
Performance can sometimes be affected by other electronic devices in the home.
Notes on Network Connection
Many network connection problems during set up can often be fixed by re-setting the router or modem. After connecting the player to the home network, quickly power off and/ or disconnect the power cable of the home network router or cable modem. Then power on and/or connect the power cable again.
Depending on the internet service provider (ISP), the number of devices that can receive internet service may be limited by the applicable terms of service. For details, contact your ISP.
Our company is not responsible for any malfunction of the player and/or the internet connection feature due to communication errors/malfunctions associated with your broadband internet connection, or other connected equipment.
The features of BD-ROM discs made available through the Internet Connection feature are not created or provided by our company, and our company is not responsible for their functionality or continued availability. Some disc related material available by the Internet Connection may not be compatible with this player. If you have questions about such content, please contact the producer of the disc.
Some internet contents may require a higher bandwidth connection.
Even if the player is properly connected and configured, some internet contents may not operate properly because of internet congestion, the quality or bandwidth of your internet service, or problems at the provider of the content.
Some internet connection operations may not be possible due to certain restrictions set by the Internet service provider (ISP) supplying your broadband Internet connection.
Any fees charged by an ISP including, without limitation, connection charges are your responsibility.
You must use a Router to use xDSL service. y A DSL modem is required to use DSL service and a cable modem is required to use cable modem service. Depending on the access method of and subscriber agreement with your ISP, you may not be able to use the internet connection feature contained in this player or you may be limited to the number of devices you can connect at the same time. (If your ISP limits subscription to one device, this player may not be allowed to connect when a PC is already connected.)
The use of a “Router” may not be allowed or its usage may be limited depending on the policies and restrictions of your ISP. For details, contact your ISP directly.
The wireless network operate at 2.4 GHz radio frequencies that are also used by other household devices such as cordless telephone, Bluetooth® devices, microwave oven, and can be affected by interference from them.
Turn off all unused network equipment in your local home network. Some devices may generate network traffic.
For the purpose of the better transmission, placing the player from the access point as close as possible. y In some instances, placing the access point or wireless router at least 0.45 m above the floor may improve the reception.
Move closer to the access point if possible or re- orient the player so there is nothing between it and the access point.
The reception quality over wireless depends on many factors such as type of the access point, distance between the player and access point, and the location of the player.
Set your access point or wireless router to Infrastructure mode. Ad-hoc mode is not supported.
Initial Setup
When you turn on the unit for the first time, the initial setup wizard appears on the screen. Set the display language and network settings on the initial setup wizard.
1. Press (POWER).
The initial setup wizard appears on the screen.
2. Use / to select a display language and press ENTER ().
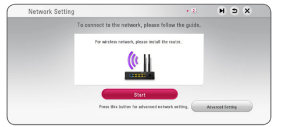
3. After checking the Terms of Sevice, select [Agree] to use the Premium Service and SW Updates.
Read and prepare the preparations for the network settings and then press ENTER () while [Start] is highlighted.
4. All available networks are displayed on the screen. Use to select a desired SSID of wireless network and press ENTER ().
If you have security on your access point, you need to input the security code as necessary.
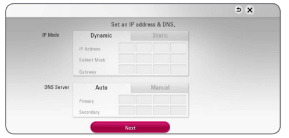
5. Use / to select the IP mode between [Dynamic] and [Static]. Normally, select [Dynamic] to allocate an IP address automatically.
6. Select [Next] and press ENTER () to apply network settings. Network connection status is displayed on the screen. For details on network settings, refer to “Connecting to your Home Network” on page 16.
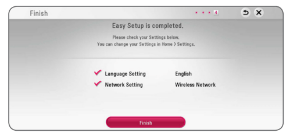
7. Check all the settings that you have set in the previous steps.
Press ENTER () while [Finish] is highlighted to finish the initial setup settings. If there is any settings to be changed, use / to select and press ENTER ().
8. Displays the guide to enjoy online contents using LG AV Remote. Press ENTER ().
Operating
Home Menu Display
Using [HOME] menu
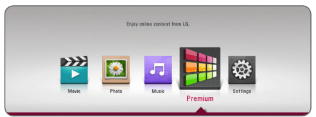
The home menu appears when you press HOME ( ). Use to select a category and press ENTER ().
[Movie] - Plays video content.
[Photo] - Plays photo content.
[Music] - Plays audio content.
[Premium] - Displays the Premium home screen. (page 43)
[Settings] - Adjusts the system settings.
Displays related submenu
Playing the Linked Devices
Playing a disc
Press (OPEN/CLOSE), and place a disc on the disc tray.
Press (OPEN/CLOSE) to close the disc tray. For the most Audio CD, BD-ROM and DVD-ROM discs, playback starts automatically.
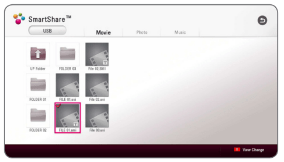
Press HOME ().
Select [Movie] or [Music], and select disc icon.
Note:
Playback functions described in this manual are not always available in every files and media. Some functions can be restricted depending on many factors.
Depending on the BD-ROM titles, a USB device connection may be needed for the proper playback.
Unfinalized DVD-VR format discs may not be played in this player.
Some DVD-VR discs are made with CPRM data by DVD RECORDER. This unit cannot support these kinds of discs.
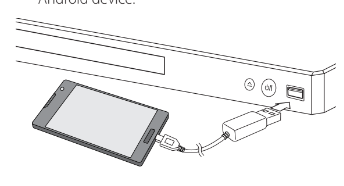
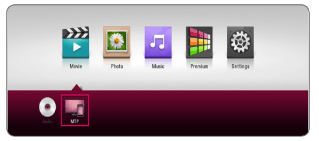
Playing a file on Android device
This player can play video, audio and photo files contained in Android device.
1. Connect Android device to the unit with USB cable. Make sure that MTP is activated on Android device.
2. Press HOME ( ).
3. Select [Movie], [Photo] or [Music] using, and press s.
4. Select [MTP] using and press ENTER ().
File loading may take few minutes depending on the number of content stored in Android device.
5. Select a file using /, and press z (PLAY) or ENTER () to play the file.
Notes on Connecting Android device
This unit can support only MTP (Media Transfer Protocol) Android (4.0 or later is recommended) devices.
Do not extract Android device during operation play, etc.).
Video, audio and photo files can be played. For details of playing each file type, refer to the relevant pages.
Regular back up is recommended to prevent data loss.
If you use a USB extension cable, USB HUB or USB Multi-reader, Android device may not be recognized.
'Some Android devices may not work with this unit.
When you use MTP, playing some music, photo, movie, or subtitle files may not work depending on Android device.
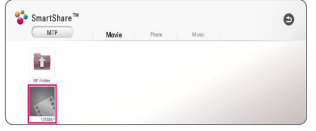
Using Home Network server for PC
Before connecting to PC to play a file, SmartShare PC Software should be installed on your PC.
About SmartShare PC Software
SmartShare PC Software is for sharing video, audio and photo files stored on your computer to this unit as a digital media server.
Downloading SmartShare PC Software
Start up your computer, visit web lg . If necessary, select your region.
Click support tab.
Fill your model name on the cover of owner’s manual in search bar.
Find and download the “SmartShare PC Software” file.
Installing SmartShare PC Software
Before installation, close all running programs including firewall and Anti-Virus programs.
Unzip and double-click “Setup.exe” to install SmartShare PC Software. The installation is prepared and the installation wizard appears.
Follow the directions of the installation wizard displayed on the screen.
Click the [Exit] button to complete the installation.
Note:
SmartShare PC Software is not supported with Mac OS.
The SmartShare PC Software is a customized software edition only for sharing files and folders to this player.
This manual explains operations with the English version of SmartShare PC Software as examples. Follow the explanation referring to the actual operations of your language version.
Sharing files and folders
On your computer, you must share the folder containing video, audio and/or photo content to play them on this player.
This part explains the procedure for selecting the shared folders on your computer.
Double-click the “SmartShare” icon.
Click [Movie], [Photo] or [Music] icon on the center, and then click [Settings] on the top right corner of the SmartShare PC Software. The [Settings] menu appears on the screen.
Click [My Shared Contents] tab, and then click icon. The [Add/Remove Shared Folders] menu appears on the screen.
Click the folder containing the files you want to share and then click the [OK]. The checked folder is added to the [My Shared Contents] and then click the [OK] at the bottom of the [Settings] menu.
Make sure that the SmartShare service turns on at the [Service] tab.
Note:
If the shared folders or files are not displayed on the player, click the [My Shared Contents] on the [Settings] menu, and then click icon.
For more information, click [HELP] on the [Settings] menu.
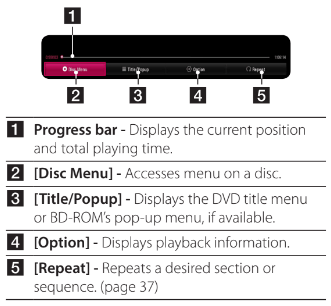
On-Screen Display
You can display and adjust various information and settings about the content.
To control video playback
You can control playback and set options while watching videos.
During playback, press INFO/MENU ().
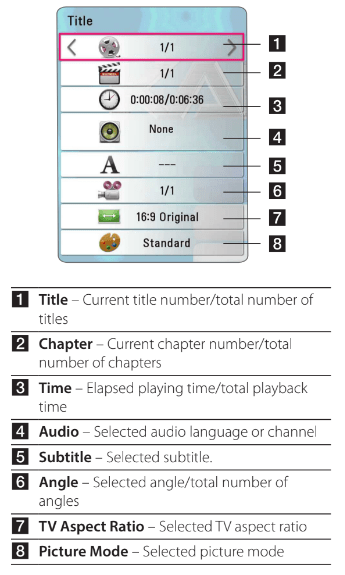
Displaying content information on- screen
1. During playback, press INFO/MENU ().
2. Select an [Option] using , and press ENTER ().
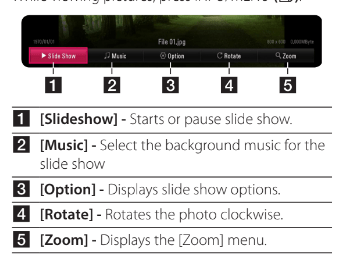
To control photo view
Controls playback and sets options while viewing pictures in full screen.
You can control playback and set options while viewing pictures in full screen.
While viewing pictures, press INFO/MENU ().
Selecting a subtitle file
If the subtitle file name is different from the video file name, you need to select the subtitle file on the
Movie] menu before playing the movie.
1. Use / to select the subtitle file you wish to play in the [Movie] menu.
2. Press ENTER ().
Press ENTER () again to deselect the subtitle file. Selected subtitle file will be displayed when you play the video file.
Note:
If you press (STOP) during playback, the subtitle selection is cancelled.
This function is not available for playing file on a server via home network.
Audio CD recording
You can record one desired track or all of the tracks in Audio CD to an USB storage device.
Insert an USB storage device to the USB port on the front panel.
Insert an Audio CD into the player. The playback starts automatically.
Press red (R) colored button to start [CD Recording].
Note:
For audio CD recording, use the USB flash drive / external HDD formatted in FAT32 only.
Audio track is recorded to an audio file with kbps.
Recording times in the table above are approximate.
Actual recording time for USB storage device varies depending on the USB storage device’s ability.
Make sure that there is minimum of 50 MB free space is needed when recording into the USB storage device.
The length of the audio should be longer than 20 seconds for the proper recording.
Do not turn off this player or extract the connected USB storage device during Audio CD recording.
During Audio CD recording, it is unavailable to use MUSIC flow.
Using the Premium
You can use various content services via Internet with the Premium feature.
1. Check the network connection and settings (page 16).
2. Press HOME ( ).
3. Select the [Premium] using , and press ENTER ().
4. The list of the apps you can use appears. When you use the app for the first time, you should install it before using. To install the app, select the app using /, and ENTER () and follow the directions on the screen.
Note:
For detailed information of each service, contact to the content provider or visit support link of the service.
The content of Premium services and service related information, including user interface, is subject to changes. Please refer to the web site of each service for most up- to-date information.
Using Premium features with wireless network connection may result in improper streaming speed by interference from household devices that are using radio frequencies.
For the first time to access [Premium], current country setting appears.
If you want to change the country setting, go to [Settings] > [NETWORK] > [Smart Service Setting] > [Manual] on [Country Setting] tab and select desired country using / and ENTER ()
Troubleshooting
General
Symptom
Cause & Solution
The unit does not work properly.
Turn off the power of this unit and the connected external device (TV, Woofer, DVD-player, Amplifier, etc.) and turn it on again.
Disconnect the power cord of this unit and the connected external device (TV, Woofer, DVD-player, Amplifier, etc.) and then try connecting again.
The Power does not turned on.
Plug the power cord into the wall outlet securely.
Be sure that the AC adaptor is connected to the unit securely.
The unit does not start playback.
Insert a playable disc. (Check the disc type, color system, and regional code.)
Place the disc with the playback side down.
Place the disc on the disc tray correctly inside the guide.
Clean the disc.
Cancel the Rating function or change the rating level.
The connected USB storage device is not recognized.
Try using different USB cable, some USB cables may not support enough current for normal USB operation.
If you use an USB extension cable or USB HUB, the USB devices may not be recognized.
An USB device which requires additional program installation when you have connected it to a computer is not supported.
This unit supports only USB Flash Drive and USB External HDD with FAT32 or NTFS format.
The angle cannot be changed.
Multi-angles are not recorded on the DVD Video being played.
Cannot play movie, photo or music files.
The files are not recorded in a format that the unit can play.
The unit does not support the codec of the movie file.
The remote control does not work properly.
The remote control is not pointed at the remote sensor of the unit.
The remote control is too far from the unit.
There is an obstacle in the path of the remote control and the unit.
The batteries in the remote control are exhausted.
The unit is plugged in, but the power will not turn on or off.
You can reset the unit as follows.
Unplug the power cord, wait at least five seconds, and then plug it in again. The unit is not operating normally.
Network
Symptom
Cause & Solution
BD-Live feature does not work.
The connected USB storage may not have enough space. Connect the USB storage with at least 1GB free space.
Ensure that the unit is correctly connected to the local area network and can access the internet (page 16).
Your broadband speed may not fast enough to use the BD-Live features. Contact your Internet Service Provider (ISP) and increase the broadband speed is recommended.
The [BD-LIVE connection] option in the [Settings] menu is set to [Prohibited]. Set the option to [Permitted].
Streaming video services (such as YouTubeTM, etc.) are often stopped or “buffer” during playback.
Your broadband service speed may not be fast enough to stream video services. Contact your Internet Service Provider (ISP) and increase the broadband speed is recommended.
Media servers are not displayed on the device list.
The firewall or anti-virus software on your media server is running.
Turn off the firewall or anti-virus software running on your media server. y The player is not connected to the local area network that your media server is connected.
Cannot connect the player to the access point or wireless LAN router.
The wireless communication may be interrupted from household devices that are using radio frequencies. Move the player away from them.
Access point is not displayed on the “Access point name” list.
The access point or wireless LAN router may not broadcast its SSID. Set your access point to broadcast its SSID through your computer.
Your network device such as access point may not set with available frequency range and channel that this player can support. Try setting the frequency range and channel on the network device setting.
Picture
Symptom
Cause & Solution
There is no picture.
Select the appropriate video input mode on the TV so the picture from the unit appears on the TV screen.
Connect the video connection securely.
Check the [HDMI Color Setting] in the [Settings] menu is set to the appropriate item that conforms to your video connection.
Your TV may not support the resolution you have set on the player. Change the resolution that your TV accepts.
The player’s HDMI OUT jack is connected to a DVI device that does not support copyright protection.
Picture noise appears.
You are playing a disc recorded in a color system that is different from your TV.
Set the resolution which your TV accepts
Customer support
You can update the Player using the latest software to enhance the products operation and/or add new features. To obtain the latest software for this player (if updates have been made), please visit web lg or contact LG Electronics customer care center.
Open source software notice
To obtain the source code under GPL, LGPL, MPL and other open source licenses, that is contained in this product, please visit http://opensource.lge.com.
In addition to the source code, all referred license terms, warranty disclaimers and copyright notices are available for download.
LG Electronics will also provide open source code to you on CD-ROM for a charge covering the cost of performing such distribution (such as the cost of media, shipping and handling) upon email request to opensource@lge. This offer is valid for three (3) years from the date on which you purchased the product.
Network Software Update
Network update notification
From time to time, performance improvements and/or additional features or services may be made available to units that are connected to a broadband home network. If there is new software available and the unit is connected to a broadband home network, the player will inform you about the update as follows.
Option 1:
The update menu will appear on the screen when you turn on the player.
Use to select a desired option and then press ENTER ().
Option 2:
If the software update is available from the update server, the “Update” icon appears in the Home menu. Press blue (B) colored button to start the update procedure.
Software update
You can update the player using the latest software to enhance the products operation and/or add new features. You can update the software by connecting the unit directly to the software update server.
Note:
Before updating the software in your player, remove any disc and USB Device from the player.
Before updating the software in your player, turn the player off and then turn it back on.
During the software update procedure, do not turn off the player or disconnect AC power, or do not press any button.
If you cancel the update, turn off the power and turn it on for stable performance.
This unit cannot be updated to previous software version.
1. Check the network connection and settings (page 16).
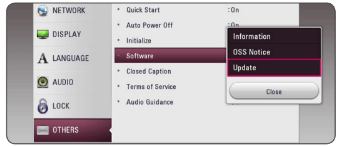
2. Select [Software] option in the [Settings] menu then press ENTER ().
3. Select [Update] option, and press ENTER ().
The player will check for the newest update.
Note
Pressing ENTER () while checking for the update will end the process.
If there is no update available, the Message, “No update is found.” appears. Press ENTER () to return to the [Home Menu].
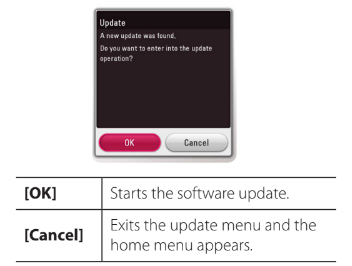
4. If newer version exists, the message “A new update was found. The update takes a few minutes. Do you want to update?” appears.
5. Select [OK] to start update. (Selecting [Cancel] will end the update.)
6. The player starts downloading the newest update from the server. (Downloading will takes several minutes depending on your home network condition.)
7. To update software the next time, the software update procedure has to be started from the beginning again.
8. When update is completed, the power will be turned off automatically in a few seconds.
9. Turn the power back on. The system now operates with the new version.

 ” Symbol Display
 " may appear on your TV display during operation and indicates that the function explained in this owner’s manual is not available on that specific media.
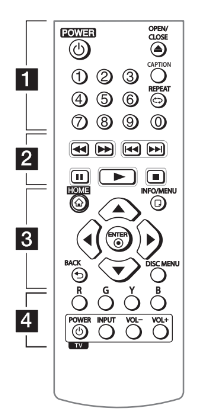
 and
and  matched correctly.
 (POWER): Switches the player ON or OFF.
 (OPEN/CLOSE): Opens and closes the disc tray.
 ): Repeats a desired section or sequence.
 (SCAN): Searches backward or forward.
 (SKIP): Goes to the next or previous chapter / track / file.
 (PAUSE): Pauses playback. z(PLAY): Starts playback.
 (STOP): Stops playback. c• • • • • •
 ): Displays or exits the [Home Menu].
 ): Displays or exits On-Screen Display.
 ): Selects an option in the menu.
 ): Acknowledges menu selection.
 ): Exits the menu or returns to the previous screen.
 (POWER).
 /
/ to select a display language and press ENTER (
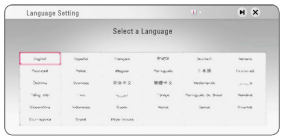
 to select a desired SSID of wireless network and press ENTER (
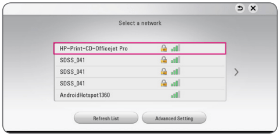
 and press ENTER (
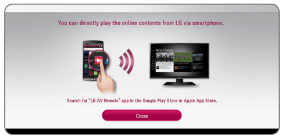
 ). Use
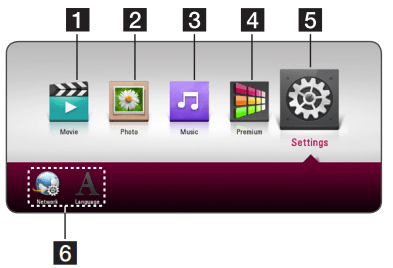

 (OPEN/CLOSE), and place a disc on the disc tray.
 ).
).
 icon. The [Add/Remove Shared Folders] menu appears on the screen.
 icon.
icon. ).
).


 (STOP) during playback, the subtitle selection is cancelled.
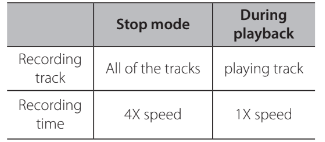
 ).
).
 /
/