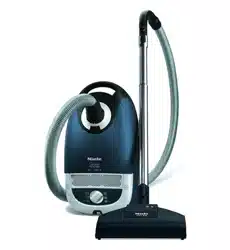
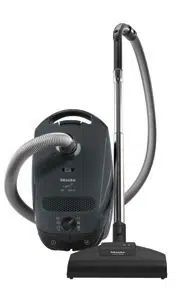
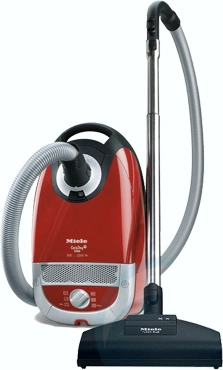
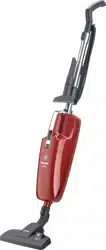
Miele SAAO0 Vacuum Cleaner
Product's Documents
Below are documents related to this product, you can read online or download:
- User Manual - (English, French) Read Online | Download pdf
Vacuum Manual

* Features marked with * do not come standard with all vacuum cleaners and may not be included with your model.
Some models have as standard equipment one of the following accessories that are not shown in this description of the vacuum cleaner. These vacuum cleaners come with a separate operating manual for the corresponding accessory.
The illustrations referred to in the text are shown on the fold-out pages at the end of these operating instructions.
Gently turn the tube until it locks in place.
The handle can also be fitted directly to the vacuum cleaner housing (see fig. 3).
This allows for easier vacuuming of upholstered furniture, mattresses, etc.
You can also attach the suction wand to the nozzle of the vacuum cleaner (see fig. 5).
This makes it easier to clean under furniture that is close to the floor.
When the vacuum cleaner is not in use the power cord can be wound around the two cord hooks.
To prevent the cord from unwinding, press the cord into the cable clip (see detail).
The vacuum cleaner includes the following accessories:
Accessory clip (see fig 8) standard on some models)
The accessory clip stores the supplied crevice nozzle and upholstery nozzle see fig. 9).
The lower cord hook rotates.
One piece of the telescopic wand is stored inside the other and can be adjusted to suit your height for comfortable vacuum cleaning.
The power cord will be guided so that it does not hinder vacuuming. It also prevents it kinking at the connection to the vacuum cleaner.
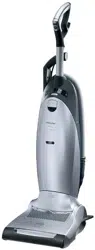
There are two slide switches located on the handle to turn the vacuum cleaner on and off easily whether the vacuum cleaner is used upright or horizontally.
Either of these slide switches can be used to operate the vacuum cleaner.
0 = vacuum cleaner is off
min. = minimum suction
Select min. for vacuuming light weight items such as throw rugs or curtains.
max. = maximum suction
The highest setting should be used if a Turbobrush is connected to the vacuum cleaner.
The rug and floor tool has been designed to give excellent cleaning results on either carpeted or smooth floors. For other floor coverings, we recommend the use of special Miele brushes (see "Optional Accessories").
It is important, however, to observe the cleaning and care instructions of the floor covering manufacturer.
Vacuum carpets and rugs with recessed bristle strip:
 .
.Vacuum smooth floors with exposed bristle strip:
 .
.Always vacuum floors with very deep seams or gaps with the rug and floor tool with exposed bristle strip.
There is a non-skid rubber bumper on the vacuum cleaner handle. This allows the vacuum cleaner to be leaned upright against a wall if desired (see fig. 17).
Before leaving the vacuum cleaner make sure it is turned off and leaning against a wall at a safe angle.
To protect the bristle rings on the rug and floor tool, we suggest hanging the vacuum cleaner up.
For storage you can hang up the vacuum cleaner easily. There is a hole for this located on the handle (see fig. 18).
Always turn off and unplug the vacuum cleaner before performing any maintenance work.
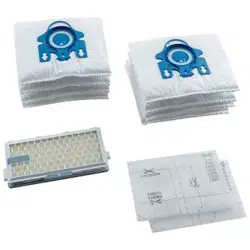
The Miele filter system consists of three components (see fig. 19).
Each of these components must be changed periodically to maintain the vacuum cleaner’s efficiency.
Only use Miele filter bags, filters and accessories with the "Original Miele" logo. Only then can the suction power of the vacuum cleaner reach its optimum potential creating the best possible cleaning results.
WARNING The use of filter bags made of paper or a similar material, or filter bags with a cardboard retaining plate can lead to serious damage to the vacuum cleaner and possibly voiding the warranty, just as with the use of filter bags without the Original Miele" logo.
Original Miele filter bags and filters can be purchased from an authorized Miele vacuum dealer or by visiting the Miele store at http://store.miele.com.
Original Miele filter bags with yellow retaining plate Type K/K and Original
Miele filters, have the "Original Miele" logo on the packaging or directly on the filter bags.

An "AirClean" exhaust filter and a dust compartment filter are supplied with every box of Miele filter bags.
If you would like to purchase additional Miele filters separately, contact your vacuum dealer or Miele, please quote the model number of your Miele vacuum cleaner to ensure correct parts are ordered. These parts are also available to order from the online Miele store.
Change the filter bag when the colored marker in the filter bag change indicator is completely red.
Miele filter bags are disposable.
Dispose of full filter bags. Do not attempt to reuse.
Blocked pores reduce the suction of the vacuum cleaner.
The filter bag change indicator is designed to show when the bag is full of common household dust and measures the amount of air flow through the filter bag. Normal household dust is a mixture of dust, hair, carpet fluff, threads, sand, etc.
However, if fine dust, such as drill dust, sand, plaster or flour is vacuumed, the pores of the filter bag may become blocked. The marker will indicate that the bag is "full" even when it is not. The filter bag should be changed as the suction power is greatly reduced.
If the bag is bulging with pet fur, hair, carpet fluff, etc. the indicator may not register "full". This is because the air flow of the filter bag may still be high enough not to activate the marker to show maximum. The filter bag should still be changed.
The filter bag has a flap which closes automatically to prevent dust from escaping when the filter bag is removed.
WARNING A no-bag demobilizer blocks the dust compartment lid from closing if no filter bag is inserted or if it is not inserted all the way. Do not force it closed.
Whenever you open a new box of Miele filter bags, a dust compartment filter is included in every box of genuine Miele filter bags.
Depending on the model, one of the following standard exhaust filters is installed (see fig. 25).
a AirClean
Replace this exhaust filter whenever you open a new box of Miele filter bags.
An AirClean exhaust filter is included in every box of genuine Miele filter bags.
b Active AirClean
c HEPA
Replace these exhaust filters about once a year. You can note the date on the exhaust filter.
Make sure that only one exhaust filter is installed.
Make sure that only one exhaust filter is installed.
If you would like to use an AirClean filter, see "Exchanging exhaust filters".
Depending on the model, one of the following standard exhaust filters is installed (see fig. 25).
a AirClean
b Active AirClean (SF-AAC 10)
c HEPA (SF-H 10)
All of the above filters are interchangeable and the exhaust filter supplied with the vacuum cleaner can be exchanged with another type.
Make sure that only one exhaust filter is installed.
The exhaust filters have different features (see "Optional accessories").
* Filter frame - see "Optional accessories"
The thread catcher pads on the bottom of the rug and floor tool should be replaced as soon as they appear worn.
Press the new thread catcher into the slots.
Remove all threads, hair etc. and reinstall the roller and lock the roller pin.
Turn off the vacuum and unplug it from the outlet before performing any maintenance work.
The vacuum cleaner and other plastic accessories can be cleaned with a damp cloth or a cleaner suitable for plastics.
WARNING Do not use abrasive, oil-based, glass or all purpose cleaners!
The dust compartment can, if necessary, be cleaned using a dry cloth, dusting brush or a second vacuum to remove any dust.
Do not submerge the vacuum in water. If moisture gets into the appliance there is the risk of an electric shock.
If the vacuum cleaner has overheated the temperature limiter will automatically turn off the vacuum cleaner.
This can occur if, for example, large articles block the suction tube or when the filter bag is full or contains particles of fine dust. A heavily soiled exhaust or dust compartment filter can also be the cause of overheating. In this case, turn off the vacuum cleaner and unplug it from the outlet.
Once the cause has been addressed, allow the vacuum cleaner to cool for approx. 20 - 30 minutes before resuming vacuuming.
The cardboard box and packaging protect the vacuum cleaner during shipping. These materials are recyclable. Please recycle.
Ensure that any plastic wrappings, bags etc. are disposed of safely and kept out of the reach of children.
Danger of suffocation!
Old vacuum cleaners may contain materials that can be recycled. Please contact your local recycling authority about the possibility of recycling these materials.